

Page 1

HomePlug Wireless Adapter
Page 2

Easy Start Guide
© Copyright 2007
All rights reserved. No part of this document may be reproduced, republished, or retransmitted in any form
or by any means whatsoever, whether electronically or mechanically, including, but not limited to, by way
of photocopying, recording, information recording, or through retrieval systems without the express written
permission of the owner. The owner reserves the right to revise this document at any time without the
obligation to notify any person and/or entity of such revisions and/or changes. All other company or
product names mentioned are used for identification purposes only and may be trademarks of their
respective owners.
Page 2 of 14
Page 3

Easy Start Guide
Contents
About the Product ......................................................................................................4
System Requirements .................................................................................4
Device Design.............................................................................................. 5
HomePlug Turbo (Starter Kit Bundle).......................................................... 6
Getting Started........................................................................................................... 7
Hardware Installation..................................................................................8
Hardware Installation (Starter Kit).............................................................. 9
Using the CD Setup Utility.......................................................................... 10
Accessing the Web User Interface ............................................................. 11
Configuring TCP/IP..................................................................................................12
Connecting Wireless Devices .....................................................................13
Page 3 of 14
Page 4

Easy Start Guide
About the Product
HomePlug Wireless Adapter is a networking device that allows secure transmission of
data through existing power circuits and radio frequencies. It features an Ethernet port
for wired connection and an Access Point for connecting with wireless-enabled devices.
HomePlug Wireless Adapter is a device that utilizes the existing electrical wiring in the
house as a path to create a secured network of computers and Ethernet devices.
HomePlug Wireless Adapter does not require a device driver to work. With a maximum
data rate of 85 Mbps, HomePlug Wireless Adapter can reliably provide Internet
connection among linked devices.
System Requirements
HomePlug Wireless Adapter can be used out of the box regardless of operating system.
However, you need a computer using Windows 98 SE, Me, 2000, XP, or Vista with a CD-
ROM drive to use the CD Setup Utility.
Page 4 of 14
Page 5
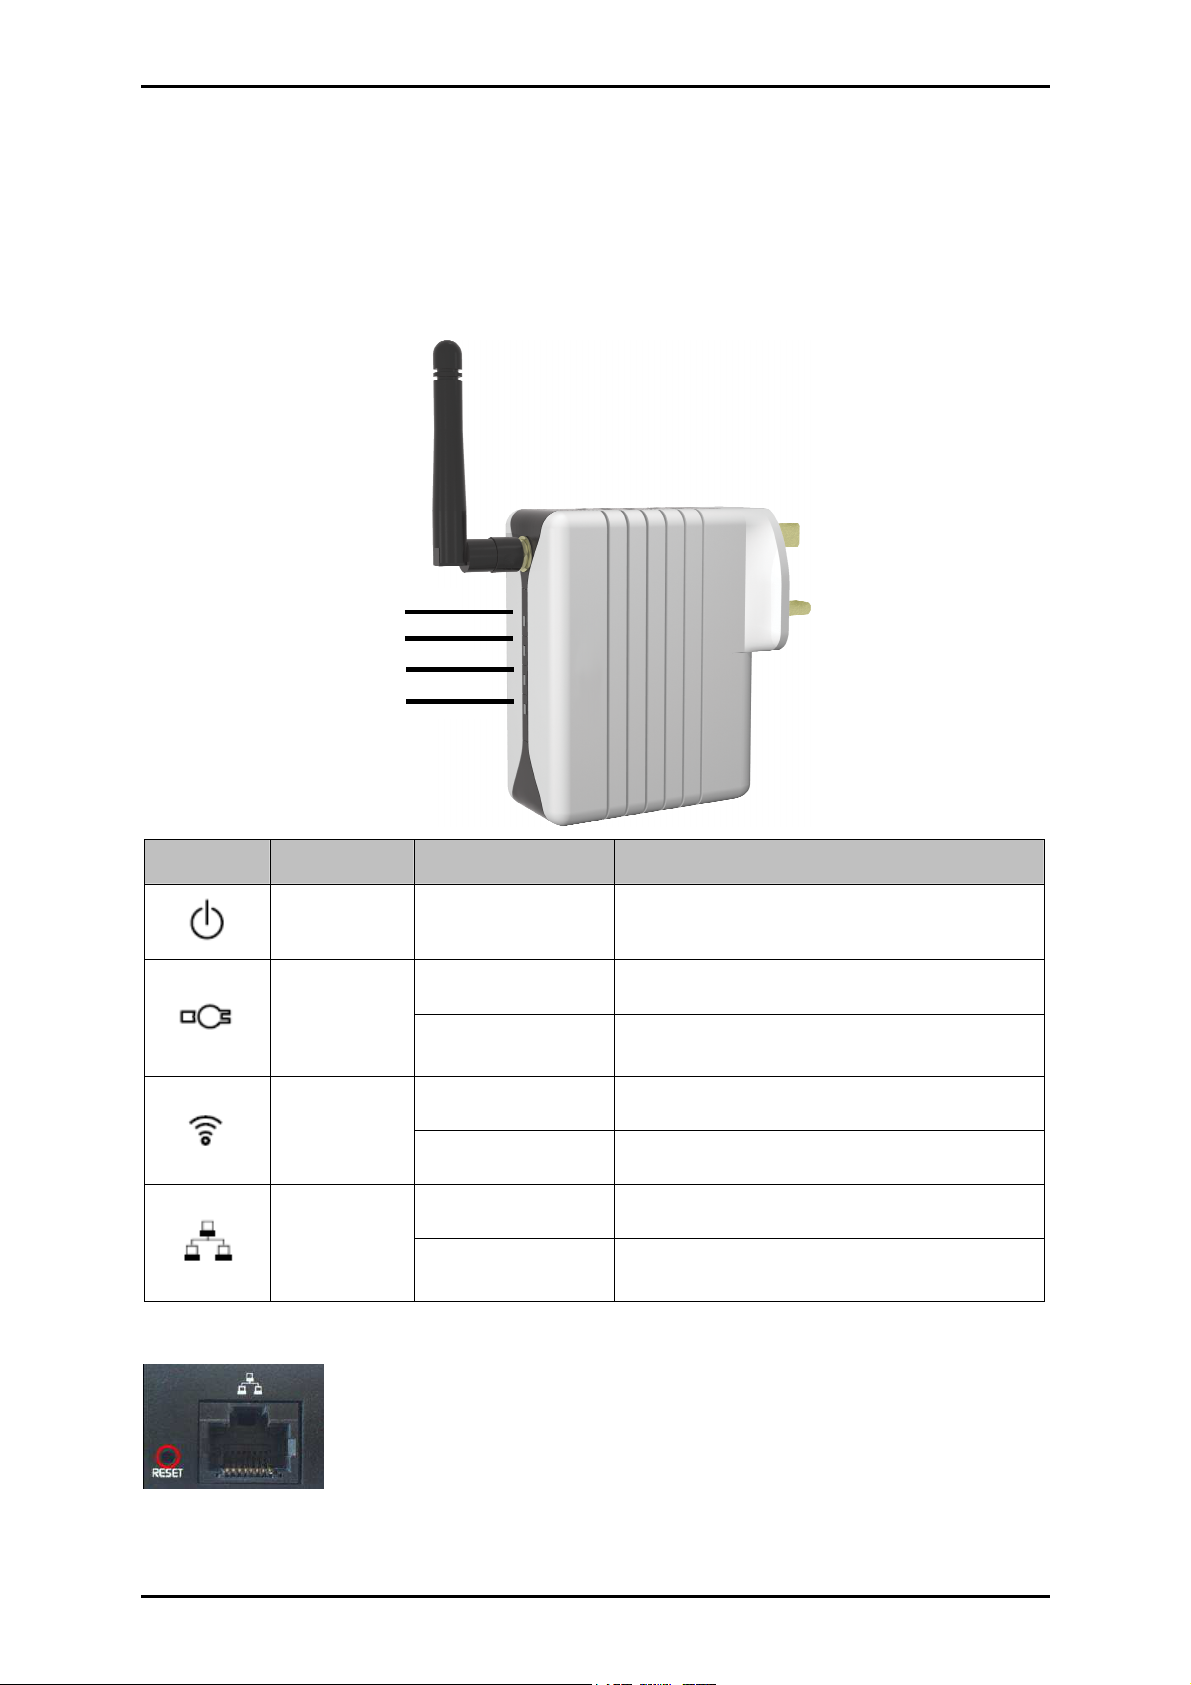
Device Design
The HomePlug Wireless Adaptor has four LEDs and an Ethernet port.
Power
HomePlug
Wireless
Ethernet
Easy Start Guide
Icon
Icon Name
IconIcon
Name LED Status
NameName
Power
HomePlug
Wireless
Ethernet
LED Status Description
LED StatusLED Status
On/Off Power is on/off
On/Off Another HomePlug is detected/not detected
Flicker Sending/receiving data with another HomePlug
On/Off Access point is enabled/disabled
Flash Sending/receiving data wirelessly
On/Off Ethernet is connected/not connected
Flicker Sending/receiving data through Ethernet
Description
DescriptionDescription
To reset the HomePlug Wireless Adapter to default settings, press
RESET
RESET for 10 seconds. The Ethernet Port
RESETRESET
Ethernet Port accepts either cross or
Ethernet PortEthernet Port
straight Ethernet cable to connect with another Ethernet device.
Page 5 of 14
Page 6
Easy Start Guide
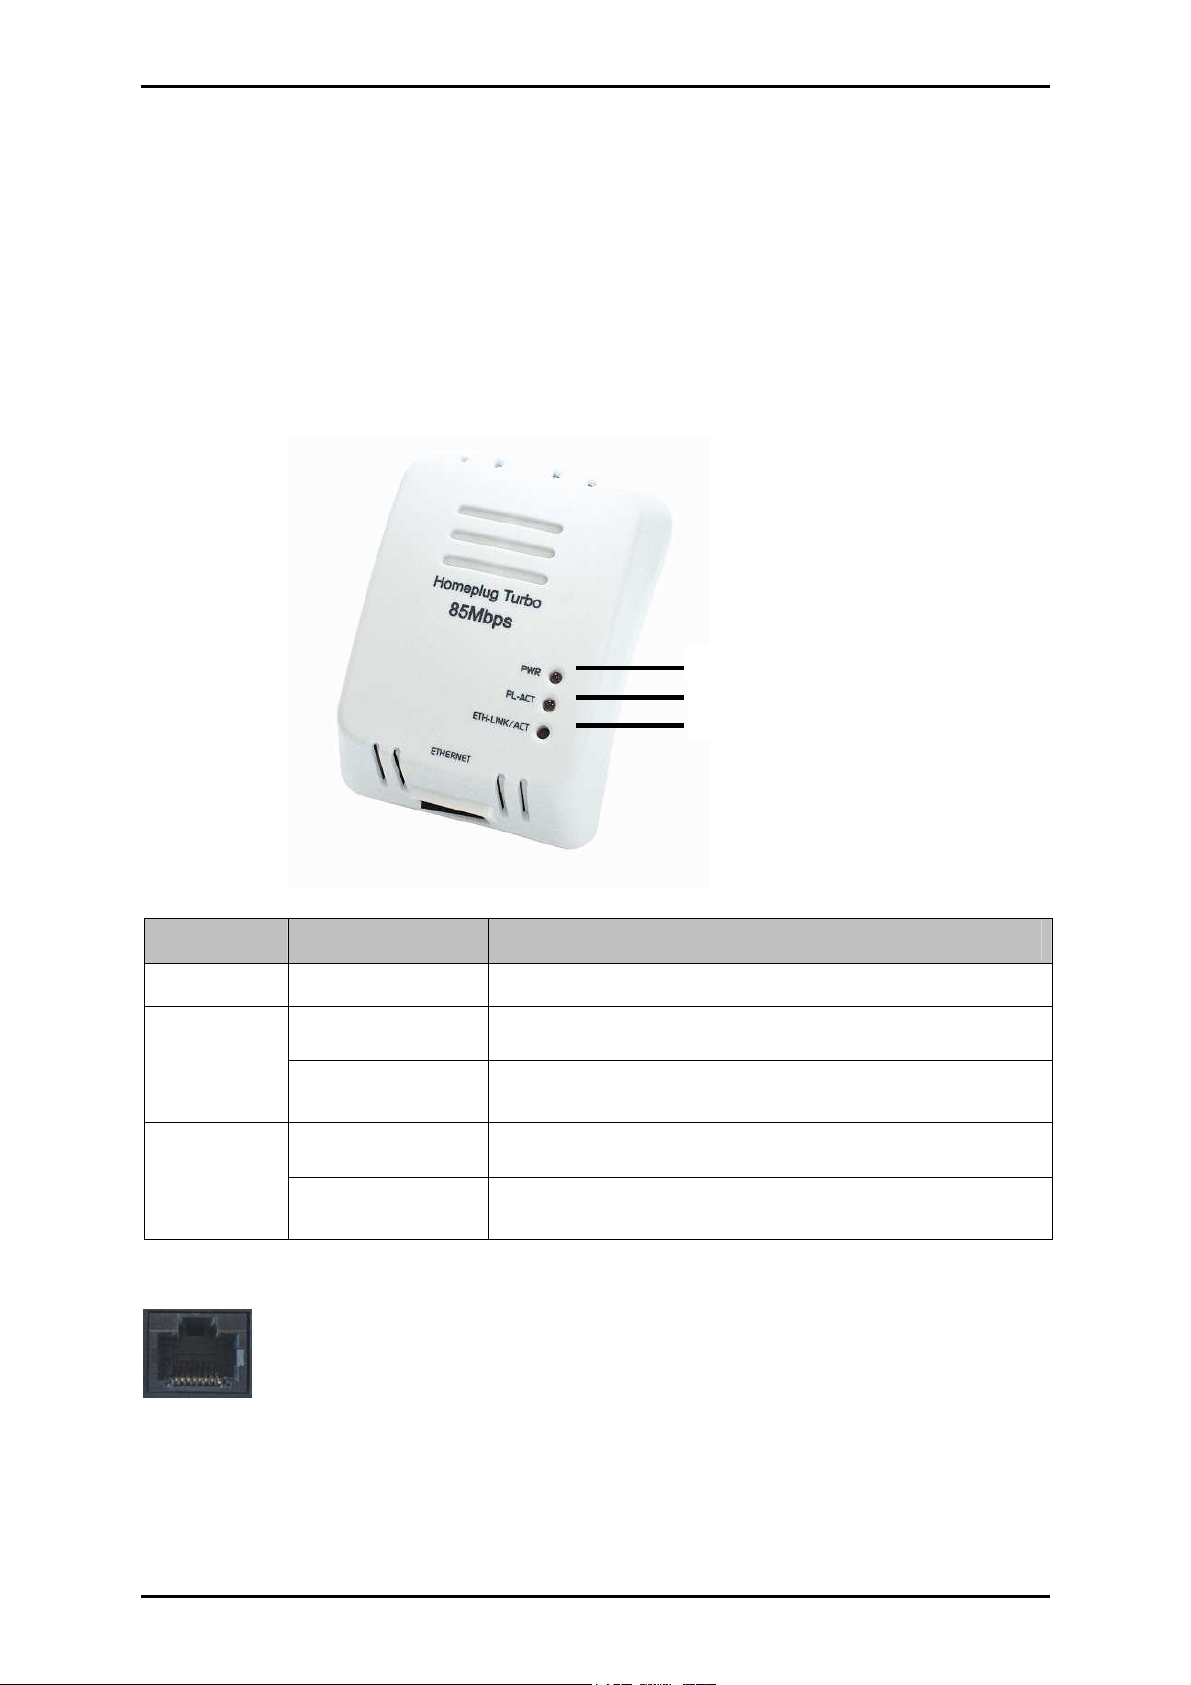
HomePlug Turbo (Starter Kit Bundle)
HomePlug Turbo is a networking device that allows secure transmission of data through
existing power circuits. It can be connected to a computer or an existing network (router)
through an Ethernet port.
Name
Name LED Status
NameName
PWR On/Off Power is on/off
PL-ACT
ETH-LINK/ACT
LED Status Description
LED StatusLED Status
On/Off Another HomePlug is detected/not detected
Flicker Sending/receiving data with another HomePlug
On/Off Ethernet is connected/not connected
Flicker Sending/receiving data through Ethernet
Description
DescriptionDescription
PWR
PL-ACT
ETH-LINK/ACT
Page 6 of 14
The Ethernet Port
Ethernet Port accepts either cross or straight Ethernet cable to connect
Ethernet PortEthernet Port
with another Ethernet device.
Page 7
Easy Start Guide
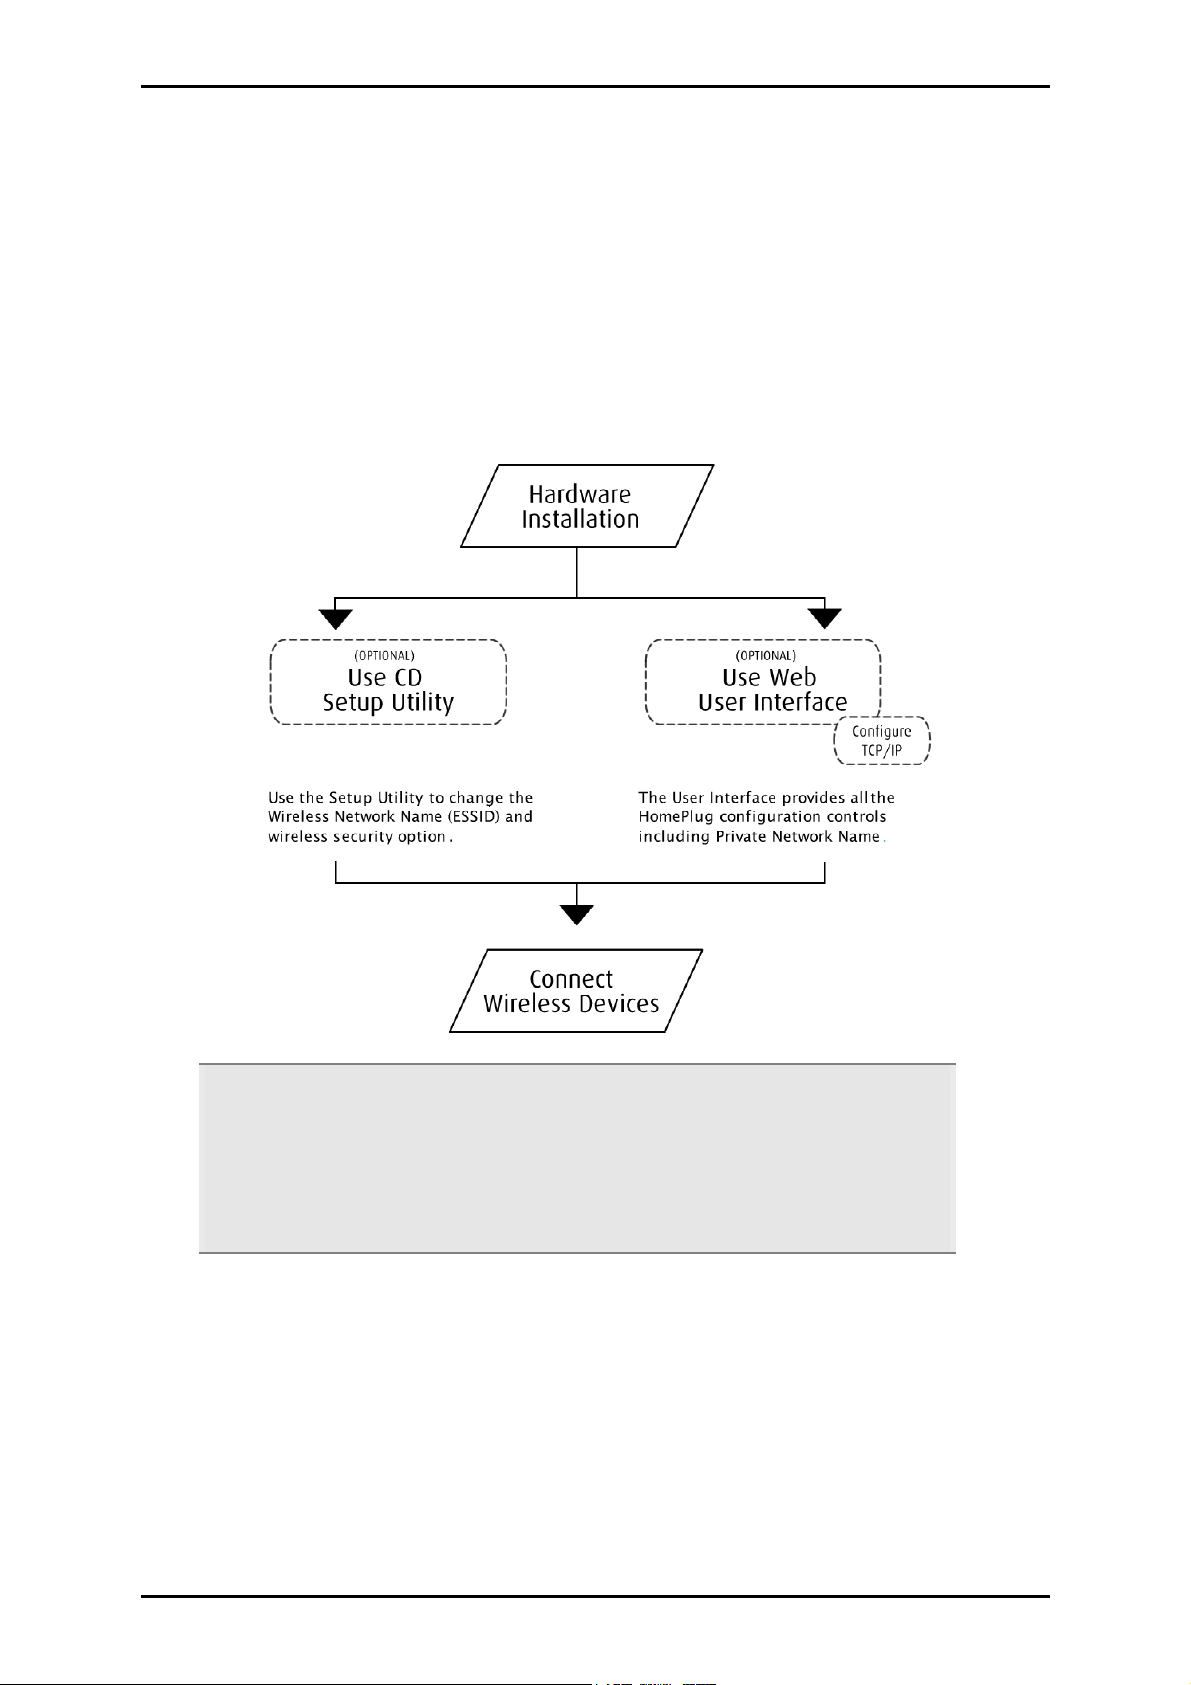
Getting Started
You can use your HomePlug Wireless Adapter immediately out of the box. However, if
you want to configure the device, you can use the CD Setup Utility or the Web User
Interface. Here are the installation steps you will go through:
Tip:
Tip: As shown in the flowchart, there are several ways to configure the HomePlug
Tip: Tip:
settings. We recommend you to use the CD Setup Utility to help you change the
Wireless Network Name (ESSID/SSID) and wireless security option. It helps you to
easily secure your wireless network from eavesdroppers and enjoy using your
HomePlug device immediately.
Page 7 of 14
Page 8

Easy Start Guide
Hardware Installation
You can install the HomePlug Wireless Adapter in several ways:
To connect the HomePlug Wireless Adapter with a computer:
1. Insert one end of an Ethernet cable from the computer’s Ethernet port and then
insert the other end into the HomePlug Wireless Adapter’s Ethernet port ( ).
Note:
Note: When you connect the HomePlug Wireless Adapter with a computer, you have
Note: Note:
to set the static IP Address in the computer’s network card. For instructions, please
refer to Configuring TCP/IP.
2. Plug the HomePlug Wireless Adapter into the electrical outlet.
To connect the HomePlug Wireless Adapter with an existing network/router:
1. Insert one end of an Ethernet cable from the router’s Ethernet port and then insert
the other end into the HomePlug’s Ethernet port ( ).
2. Plug the HomePlug Wireless Adapter into the electrical outlet.
Page 8 of 14
Page 9

Easy Start Guide
Hardware Installation (Starter Kit)
A Starter Kit package includes a HomePlug Turbo and a HomePlug Wireless Adapter.
To install the Starter Kit:
1. Insert one end of an Ethernet cable from the router’s Ethernet port and then insert
the other end into the HomePlug Turbo’s Ethernet port.
2. Plug the HomePlug into the electrical outlet.
3. Plug the HomePlug Wireless Adapter into the electrical outlet.
If you need to connect through wires with the HomePlug Wireless Adapter, insert
one end of an Ethernet cable into the computer’s Ethernet port and then insert
the other end into the HomePlug Wireless Adapter’s Ethernet port ( ).
If you need to connect wirelessly with the HomePlug Wireless Adapter, check if
the wireless LED is on and then log into the wireless network.
Page 9 of 14
Page 10

Easy Start Guide
Using the CD Setup Utility
The CD Setup Utility provides easy to follow step-by-step instructions to help you change
the wireless network name and wireless security settings. It opens on Windows
operating systems.
Note:
Note: Using the CD Setup Utility is optional. Right out of the box, you can already use
Note: Note:
your HomePlug Wireless Adapter.
To use the CD Setup Utility:
1. Insert the Resource CD
Resource CD into your CD drive.
Resource CDResource CD
2. If the utility does not open automatically, select Start
(where D:
D: is your CD-ROM drive), and then click OK
D:D:
3. Follow the instructions from the CD Setup Utility.
Page 10 of 14
Start > Run
StartStart
OK.
OKOK
Run, enter D:
RunRun
D:\\\\Setup.exe
D:D:
Setup.exe
Setup.exe Setup.exe
Page 11

Easy Start Guide
Accessing the Web User Interface
The User Interface can be accessed through a browser running on any operating system.
It provides access to all basic and advanced configuration settings for your device. You
enter the HomePlug’s IP Address in the browser to access its Web User Interface. By
default, the IP Address is 192.168.1.254
192.168.1.254. If the HomePlug is connected to a
192.168.1.254192.168.1.254
network/router, the device will receive its own unique IP Address from the
network/router.
To access the Web User Interface:
1. Open a browser.
2. If you are connected to the computer, you have to set a static IP address first. For
help on how to manually set your IP address, please refer to Configuring TCP/IP.
3. Enter the IP Address of the HomePlug and then press Enter
If the HomePlug is connected with the computer, use 192.168.1.254
Enter.
EnterEnter
192.168.1.254 (default).
192.168.1.254 192.168.1.254
Enter the IP Address you used if you changed the default.
If you are connected to a network/router, you must enter the IP Address
provided by the DHCP Server. To do this, you need the CD Setup Utili
CD Setup Utility
CD Setup UtiliCD Setup Utili
ty. Insert
tyty
the Resource CD into the CD drive and allow it to scan your network. After the
scan, it will show the IP Addresses and MAC Addresses of HomePlugs in your
network. Use the IP Address of the HomePlug you want to configure. You can
identify each HomePlug by the MAC Address printed on the device itself.
Tip:
Tip: Aside from using the CD Setup Utility, you can also use your router’s Web User
Tip:Tip:
Interface to get your HomePlug’s IP address. Essentially, your router acts as the DHCP
Server and your HomePlug is a DHCP Client. Please refer to your router’s
documentation for instructions on how to view the DHCP Clients in the network. This
is usually discussed in the topic called DHCP Client.
4. Enter the Administrator password. The default Administrator password is ad
admin
adad
min.
minmin
Page 11 of 14
Page 12

Easy Start Guide
Configuring TCP/IP
Here are instructions on how to manually configure TCP/IP on a Windows operating
system. You need to set the TCP/IP settings manually to access the Web User Interface
and to allow your computer and HomePlug Wireless Adapter to communicate with each
other.
Notes:
Notes: If you are using a non-Windows operating system, please refer to the
Notes: Notes:
operating system’s documentation about how to change the TCP/IP settings.
To set the TCP/IP properties:
1. Select Start
2. Enter control
3. Right-click LAN
Properties
Properties dialog box.
Properties Properties
4. Select Internet Protocol (TCP/IP)
Protocol (TCP/IP)
Protocol (TCP/IP) dialog box.
Protocol (TCP/IP)Protocol (TCP/IP)
5. Select Use the following IP address
6. Enter the IP Address
Start > Run
Start Start
control ncpa.cpl
controlcontrol
Internet Protocol (TCP/IP) and then click Properties
Internet Protocol (TCP/IP)Internet Protocol (TCP/IP)
Use the following IP address.
Use the following IP addressUse the following IP address
Run. This opens the Run
RunRun
ncpa.cpl and then click OK
ncpa.cpl ncpa.cpl
LAN and then select Properties
LAN LAN
IP Address to be used. You can enter any IP address between 192.168.2
IP AddressIP Address
Properties. This opens the Local Area Connection
PropertiesProperties
to 192.168.253.
7. Click Subnet mask
Subnet mask. When you click the field for Subnet mask, 255.255.255.0
Subnet maskSubnet mask
automatically appears
Run dialog box.
Run Run
OK. This opens Network Connections
OKOK
Network Connections.
Network ConnectionsNetwork Connections
Local Area Connection
Local Area Connection Local Area Connection
Properties. This opens the IIIInternet
PropertiesProperties
nternet
nternet nternet
8. Click OK
9. Click OK
Page 12 of 14
OK to close the Internet Protocol (TCP/IP)
OKOK
OK to close the Local Area Connection Properties
OK OK
Internet Protocol (TCP/IP) dialog box.
Internet Protocol (TCP/IP) Internet Protocol (TCP/IP)
Local Area Connection Properties dialog box.
Local Area Connection Properties Local Area Connection Properties
Page 13

Easy Start Guide
Connecting Wireless Devices
HomePlug Wireless Adapter gives you the capability to connect wireless-enabled devices
into your computer network.
HomePlug Wireless Adapter allows you to connect with several wireless devices
HomePlug Wireless Adapter allows you to connect with several wireless devices
HomePlug Wireless Adapter allows you to connect with several wireless devicesHomePlug Wireless Adapter allows you to connect with several wireless devices
To connect with wireless devices:
1. Turn on your wireless device.
2. Open the software you use to detect a wireless connection. This opens a window
to ask for the connection settings. By default, the wireless network name is
yournetworkname
yournetworkname with no wireless security. If you changed the wireless network
yournetworknameyournetworkname
name and applied password encryption during setup, enter the new settings.
Page 13 of 14
Page 14

Easy Start Guide
Safety Precautions
Do not open, service, or change any component.
Only qualified technical specialists are allowed to service the equipment.
Observe safety precautions to avoid electric shock.
Check voltage before connecting to the power supply. Connecting to the wrong
voltage will damage the equipment.
Page 14 of 14
 Loading...