

Page 1

85Mbps HomePlug
Page 2

Easy Start Guide
© Copyright 2007 All rights reserved.
No part of this document may be reproduced, republished, or retransmitted in any form or by any means
whatsoever, whether electronically or mechanically, including, but not limited to, by way of photocopying,
recording, information recording, or through retrieval systems without the express written permission. We
reserve the right to revise this document at any time without the obligation to notify any person and/or
entity. All other company or product names mentioned are used for identification purposes only and may
be trademarks of their respective owners.
Page 2 of 19
Page 3

Easy Start Guide
Contents
About the Product ...................................................................................................... 4
Package Contents........................................................................................4
Device Design ..............................................................................................5
Getting Started........................................................................................................... 6
Planning your Network ............................................................................... 7
Local Network ...........................................................................................................7
Gaming Network.......................................................................................................7
Entertainment Network............................................................................................8
Media Network .........................................................................................................8
Remove/Disable Conflicts ........................................................................... 9
TCP/IP........................................................................................................................9
Internet Properties..................................................................................................10
Connecting the Device............................................................................... 10
About PowerPacket Utility ....................................................................................... 11
Main .......................................................................................................... 12
Privacy....................................................................................................... 14
Quality of Service ...................................................................................... 16
Diagnostics ................................................................................................ 17
About......................................................................................................... 18
Page 3 of 19
Page 4

Easy Start Guide
About the Product
HomePlug Turbo is a device that utilizes the existing electrical wiring in the house as a
path to create a secured network of computers and Ethernet devices. HomePlug Turbo
does not require a device driver to work. With a maximum data rate of 85 Mbps,
HomePlug Turbo can reliably provide Internet connection among linked devices.
HomePlug Turbo is operating system independent. This means it can be used in
Windows, Macintosh, or Linux operating systems immediately out of the box. However,
to manage and monitor the device, you will need PowerPacket Utility, a Windows-based
software application. The primary use of PowerPacket Utility is for changing the Private
Network Name. Private Network Name serves as a key that allows HomePlug Turbo to
communicate with other HomePlug 1.0 and HomePlug Turbo devices using the same
Private Network Name.
PowerPacket Utility to change the Private Network Name of your HomePlug devices.
HomePlug
is the default Private Network Name. You can use
Package Contents
The package contains the following items:
• 1 HomePlug Turbo for Single Pack or 2 HomePlug Turbo’s for Twin Pack
• 1 Network cable for Single Pack or 2 network cables for Twin Pack
• Resource CD
• Easy Start Guide
Page 4 of 19
Page 5

Device Design
HomePlug Turbo has three LED indicators and an Ethernet port.
Easy Start Guide
Label Status Description/ Function
PWR On/Off Power is on/off.
On/Off Another HomePlug is detected/not detected
PL-ACT
Flashes Data is being transmitted.
On/Off Ethernet is connected/not connected.
ETH-LINK/ACT OFF
Flashes Sending/receiving data.
Ethernet Port Accepts either cross or straight cable.
Page 5 of 19
Page 6
Easy Start Guide
Getting Started
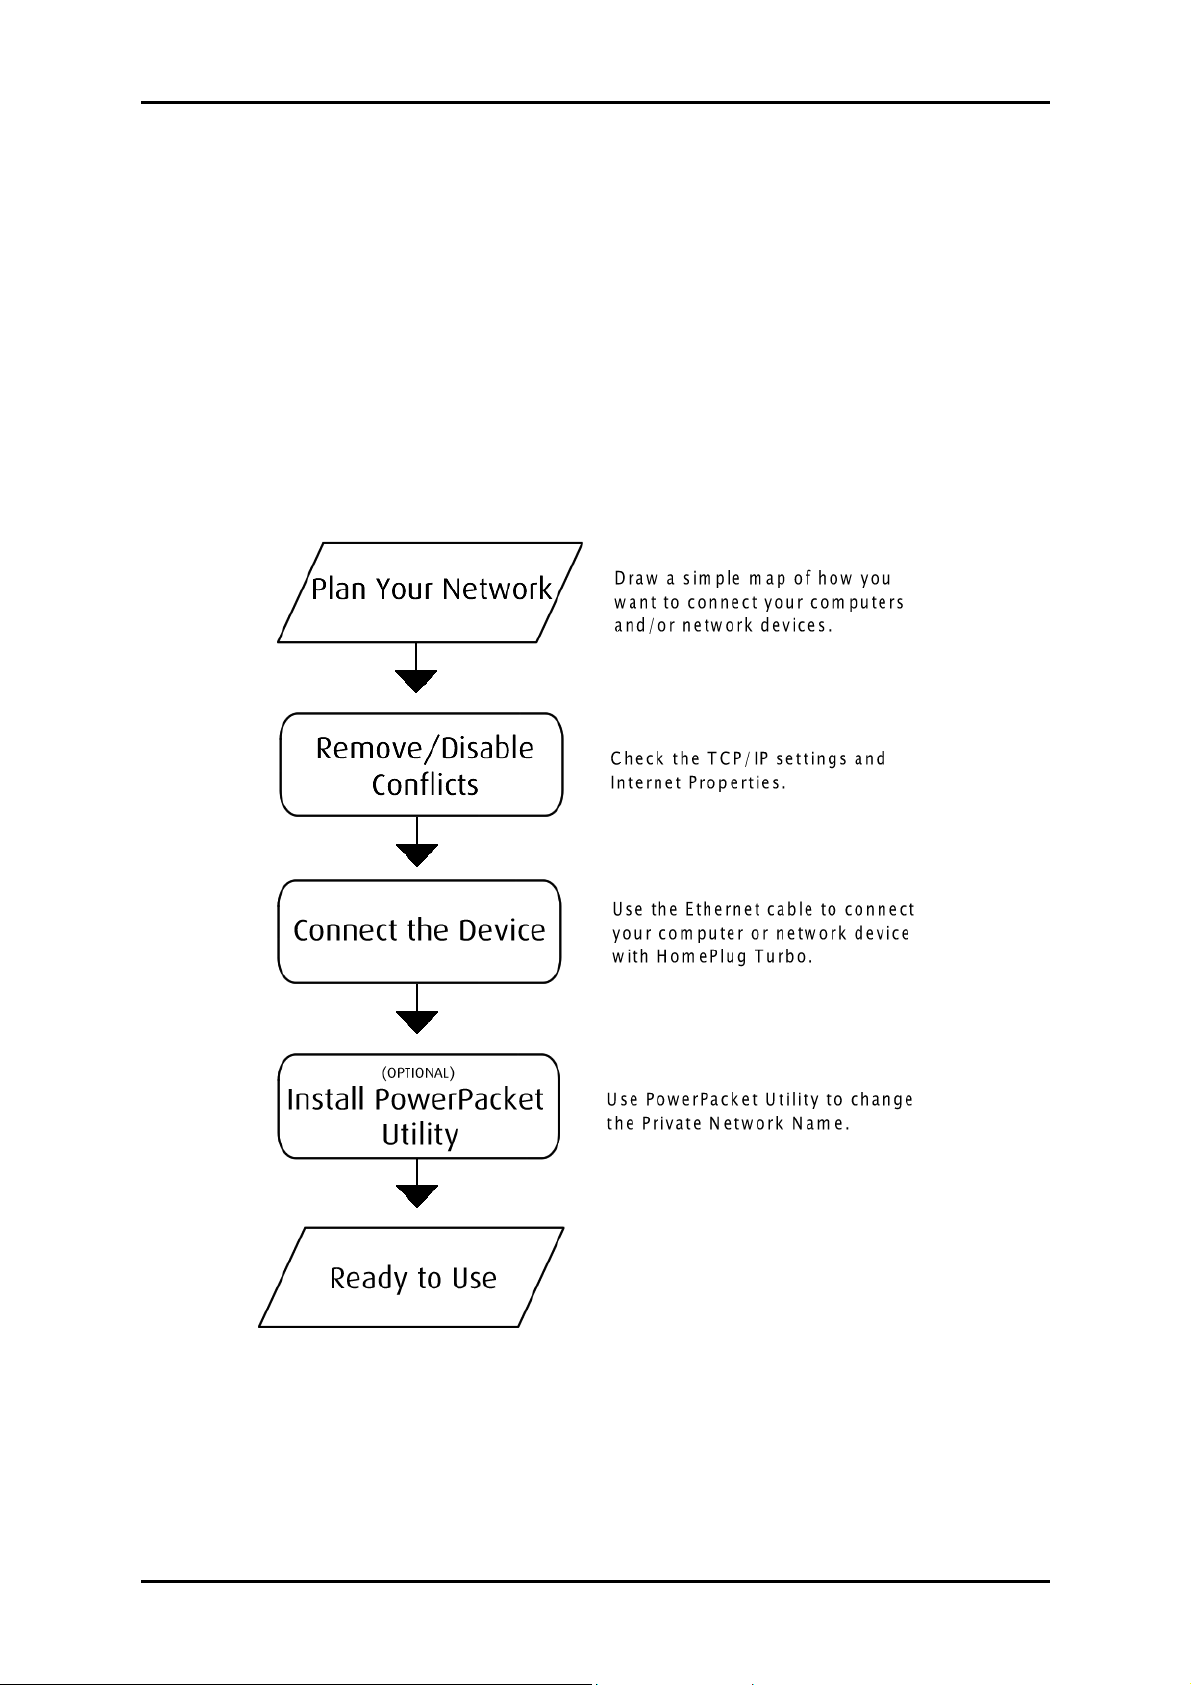
Setting up the device is easy. The flowchart below provides an outline of the steps you
need to go through. Some steps are required while some are optional. There are brief
descriptions beside each step to help you along. Detailed instructions are provided in the
subsequent pages.
Page 6 of 19
Page 7

Planning your Network
Here are ideas on how you can use HomePlug Turbo.
Local Network
Share Internet connection with any computer wherever it is in the house.
Easy Start Guide
Gaming Network
Connect your gaming console into the Internet and compete with other online players.
Page 7 of 19
Page 8

Easy Start Guide
Entertainment Network
Watch and listen to your media files using your entertainment system.
Media Network
Realize your high-tech lifestyle by converging your IP devices into a single network.
Page 8 of 19
Page 9

Easy Start Guide
Remove/Disable Conflicts
You may need to check the TCP/IP and Internet properties to make sure there are no
conflicts with the way devices in the network are identified.
TCP/IP
HomePlug Turbo’s IP Address should be obtained automatically.
To set the TCP/IP properties:
1. Select Start > Run. This opens the Run dialog box.
2. Enter control ncpa.cpl and then click OK. This opens the Network Connections in
your computer.
3. Right-click LAN and then select Properties. This opens the Local Area Connection
Properties dialog box.
4. Select Internet Protocol (TCP/IP) and then click Properties. This opens the Internet
Protocol (TCP/IP) dialog box.
5. Select Obtain an IP address automatically.
6. Click OK to close the Internet Protocol (TCP/IP) dialog box.
7. Click OK to close the Local Area Connection Properties dialog box.
Page 9 of 19
Page 10

Easy Start Guide
Internet Properties
To set the Internet Properties:
1. Select Start > Run. This opens the Run dialog box.
2. Enter control inetcpl.cpl and then click OK. This opens the Internet Properties
dialog box.
3. Click Connections tab.
4. In the Dial-up and Virtual Private Network settings pane, select Never dial a
connection.
5. Click OK to close the Internet Properties dialog box.
Connecting the Device
HomePlug Turbo does not require the installation of a device driver. It is a plug-and-play
device that can be used right after connecting the network cables and plugging it into a
power outlet.
To connect HomePlug Turbo with your computer:
1. Insert one end of the network cable into your computer’s Ethernet port.
2. Insert the other end of the network cable into HomePlug Turbo.
3. Plug HomePlug Turbo into a power outlet.
Page 10 of 19
Page 11

Easy Start Guide
About PowerPacket Utility
PowerPacket Utility is a Windows-based software application used to manage and
monitor the activity of HomePlug devices.
System Requirements
Your computer must meet the following requirements:
• Windows Operating System: Windows 98SE, Windows Me, Windows 2000
Windows XP, or Windows Vista
• Pentium III 300 MHz MMX-Compatible PC or greater
• 128MB hard disk space and memory
• CD-ROM drive
Installation
To install:
1. Insert the Resource CD that comes with HomePlug Turbo into the CD-ROM drive.
2. If the installer does not launch automatically, select Start > Run, enter
D:\Setup.exe (where D: is your CD-ROM drive), and then click OK.
3. Follow the instructions on the Utility.
Opening PowerPacket Utility
Two ways to open PowerPacket Utility:
• Select Start > All Programs > PowerPacket > PowerPacket Ethernet Adapter >
PowerPacket Utility.
• Right-click the PowerPacket Utility desktop icon and then select Open.
Page 11 of 19
Page 12

Easy Start Guide
Main
The Main tab displays local and remote HomePlug devices that are active in the network.
The top portion displays the local device which pertains to the HomePlug that is directly
connected to the computer. The bottom portion displays a table of all remote HomePlugs
with their Device Name, Password, Quality, Rate, and MAC Address.
Main Screen
Note…
The Main tab displays remote HomePlug devices using the same Private Network
Name as the local HomePlug.
An icon represents each remote HomePlug. These icons include:
• - Refers to low speed HomePlug 1.0 devices
• - Refers to high speed HomePlug Turbo devices
Page 12 of 19
Page 13

Easy Start Guide
To connect to a local HomePlug:
1. Select a HomePlug listed in Local Devices on your computer.
2. Click Connect. After connection, a message showing the HomePlug MAC Address is
displayed on top of the Connect button.
To change the device name:
1. Select a remote HomePlug.
2. Click Rename.
3. Enter the new name.
To enter the device password:
1. Select a remote HomePlug.
2. Click Enter Password.
3. Enter the Device Password. The Device Password is printed on the sticker label on
the HomePlug itself.
To add devices in the list:
1. Click Add. This opens Add Device to Network.
Add Device To Network
2. Enter the Device Name.
Page 13 of 19
Page 14

Easy Start Guide
3. Enter the Password. The Device Password is printed on the sticker label on the
HomePlug itself.
4. Click OK.
To scan for HomePlugs:
• Click Scan. By default, PowerPacket Utility scans devices from time to time.
Privacy
The Privacy tab provides a means for changing the Private Network Name of local or all
HomePlug devices within the network. A Private Network Name is composed of four to
24 alphanumeric case-sensitive characters.
Name.
HomePlug
is the default Private Network
Privacy
Page 14 of 19
Page 15

Easy Start Guide
To change the Private Network Name of a local HomePlug:
Note…
You will not be able to change the Private Network Name of a local HomePlug if it is
not in a connected status in the Main tab.
1. Enter the new Private Network Name in the Privacy tab. A Private Network Name
is composed of four to 24 alphanumeric case-sensitive characters.
2. Click Set Local Device Only.
To change the Private Network Name of all HomePlugs in the network:
Note…
You will not be able to change the Private Network Name of local and remote
HomePlug devices if the local HomePlug is not in a connected status and if the
remote HomePlugs do not have their Device Passwords entered in the Main tab.
1. Enter the new Private Network Name in the Privacy tab. A Private Network Name
is composed of four to 24 alphanumeric case-sensitive characters.
2. Click Set All Devices.
Page 15 of 19
Page 16

Easy Start Guide
Quality of Service
Quality of Service (QoS) is a feature that allows you to determine which application will
be given a guaranteed priority over other applications. QoS is not enabled by default.
QoS
To enable QoS:
1. Select an application in the QoS tab
• Online Game/Internet Select this option if the device will be connected to
a computer or a game console
• Audio or Video Select this option if the device will be used for audio/video
steaming
• Voice over IP Select this option for if the device will be used with your IP
phone
2. Click Update QoS.
Page 16 of 19
Page 17

Easy Start Guide
Diagnostics
Diagnostics displays details about the system as well as the other HomePlug devices
within the network. It is divided into two sections – System Information and Remote
Device History.
System Information displays software applications and hardware devices connected with
the local computer. Remote Device History displays a record of all remote HomePlug
devices that has been connected with the network.
Diagnostics
Page 17 of 19
Page 18

Easy Start Guide
About
About displays the software version and preferences. The Autoscan preference is enabled
by default.
About
Page 18 of 19
Page 19

Easy Start Guide
Safety Instructions
For your safety, be sure to read and follow all warning notices and instructions.
Do not open the device. Opening or removing the device cover can expose you to
dangerous high voltage points or other risks. Only qualified service personnel can
service the device. Please contact your vendor for further information.
Do not use your device during a thunderstorm. There may be a risk of electric
shock brought about by lightning.
Do not expose your device to dust or corrosive liquids.
Do not use this product near water sources.
Make sure to connect the cables to the correct ports.
Do not obstruct the ventilation slots on the device.
Page 19 of 19
 Loading...