

Page 1
Aztech E310-Single/Twin BlackDect Phone
Page 2

Page 2 of
Legal Notice
2009 ©
No part of this
whatsoever, whether
recording,
reserve
entity.
be
LIMITATION OF LIABILITY AND DAMAGES
THE PRODUCT AND THE SOFTWARES WITHIN ARE PROVIDED
MANUFACTURER’S RESELLERS (COLLECTIVELY
EXPRESS
INFRINGEMENT, MERCHANTABILITY
FROM COURSE OF DEALING, COURSE OF PERFORMANCE, OR
BE LIABLE FOR DAMAGES
PUNITIVE
PROFITS,
USE
RESULTING FROM DEFECTS IN THE PRODUCT
DATA OF ANY KIND,
HAVE BEEN ADVISED OF THE POSSIBILITY OF SUCH
PERFORMANCE OF THE PRODUCT OR ITS SOFTWARE IS ASSUMED BY CUSTOMER. BE CAUSE SOME STATES DO NO
ALLOW THE EXCLUSION
TO THE PARTIES. IN
RELATION TO THE PRODUCT OR ITS SOFTWARE EXCEED THE AMOUNT PAID BY CUSTOMER FOR THE PR
All
rights reserved
document
information
the right to revise this
All
other company or product
trademarks
OR
of their respective owners.
,
IMPLIED
, INCIDENTAL
OR DAMAGES FOR LOSS OF BUSINESS OF ANY CUSTOMER OR ANY THIRD PARTY ARISING OUT OF TH
THE INABILITY TO USE THE PRODUCT
.
may be
electronically or
recording, or through retrieval
OR STATUTORY,
OR LOSS,
,
EXEMPLARY
WHETHER BASED
OR
LIMITATION OF LIABILITY FOR DAMAGES, THE ABOVE LIMITATION MAY NOT APPL
NO
EVENT WILL THE SELLERS’ TOTAL CUMULATIVE LIABILITY OF EACH AND EVERY KIND I
reproduced, republished,
mechanically,
document
OR
at any time without the obligation to notify any person and/or
names mentioned
REFERRED TO AS “THE SELLE
INCLUDING WITHOUT LIMITATION THE IMPLIE
FITNESS FOR A PARTICULAR
INCLUDING BUT NOT LIMITED TO DIRECT, INDIRECT,
,
OR CONSEQUENTIAL, DAMAGES,
OR
ON CONTRACT,
including, but not limited to, by way of photocopyin
OR
THE SOFTWARES,
SOFTWARE OR DOCUMENTATION,
TORT OR ANY OTHER LEGAL THEORY,
DAMAGES.
or retransmitted in any form or by any mean
systems
without the express written
are used for
"AS IS," BASIS. THE MANUFACTURER AND
USAGE OF TRADE.
identification purposes
RS”)
PURPOSE,
INCLUDING BUT NOT LIMITED TO THOS
THE ENTIRE RISK AS TO THE RESULTS AN
OR
IN
DAMAGES FOR LOSS OF BUSINE
permission.
DISCLAIM ALL WARRANTIES,
D
WARRANTIES OF
ANY WARRANTIES ARISING
NO
EVENT WILL THE SELLE
SPECIAL WILLFUL,
OR
LOSS
OR
INACCURACY OF
EVEN IF THE PARTIE
only and ma
ODUCT.
s
g,
We
y
NON-
RS
SS
E
E
S
D
T
Y
N
Page 3

Page 3 of
Contents
Handset Key Layout ................................................................................................................................ 5
LCD Display and Icons ............................................................................................................................. 6
Battery Indicator ..................................................................................................................................... 6
Navigating the Menu ............................................................................................................................. 7
Menu Option List .................................................................................................................................... 7
Setting the language .............................................................................................................................. 8
Outgoing calls ......................................................................................................................................... 8
Making a phone call ........................................................................................................................... 8
Pre dial Method .................................................................................................................................. 8
Dialing from recent call list ................................................................................................................ 8
Answering an Incoming calls ................................................................................................................. 9
Setting the volume ................................................................................................................................. 9
Handset Setting ...................................................................................................................................... 9
Setting the ring volume and melody ................................................................................................ 9
Handset melody ................................................................................................................................. 9
Handset ring volume .......................................................................................................................... 9
Handset name .................................................................................................................................. 10
Turning key beep on/off ................................................................................................................. 10
Manual selection (Only applicable to User using two bases unit) ................................................ 10
Auto Pickup ....................................................................................................................................... 10
Phonebook ........................................................................................................................................ 10
Adding phonebook entries .............................................................................................................. 10
Dialing a Phonebook entry .............................................................................................................. 11
Editing name or number .................................................................................................................. 11
Deleting an entry ............................................................................................................................. 11
Deleting All entry ............................................................................................................................. 11
Caller-ID functions (CLIP) .................................................................................................................. 11
Page 4

Page 4 of
New calls .......................................................................................................................................... 11
Call Log .............................................................................................................................................. 11
Calling from the Call log ................................................................................................................... 12
Erasing a number from the Call list ................................................................................................. 12
Erasing all numbers from the Call list ............................................................................................. 12
Store a number from the call log into the phonebook .................................................................. 12
Date Time setting ............................................................................................................................. 12
Register/de-register a handset ........................................................................................................... 12
Register to a DECT base .................................................................................................................... 12
To register a handset ....................................................................................................................... 13
Removing a handset ........................................................................................................................ 13
Call transfer and Intercom between two handsets ............................................................................ 13
Call transfer and conference call during an external call ................................................................... 13
To transfer the outside call to another handset ............................................................................. 13
Internal call (intercom) .................................................................................................................... 14
To end an intercom call.................................................................................................................... 14
Reset of the handset ............................................................................................................................ 14
Base Setting .......................................................................................................................................... 15
Changing the PIN code (system PIN code) ......................................................................................... 15
Page 5
Page 5 of
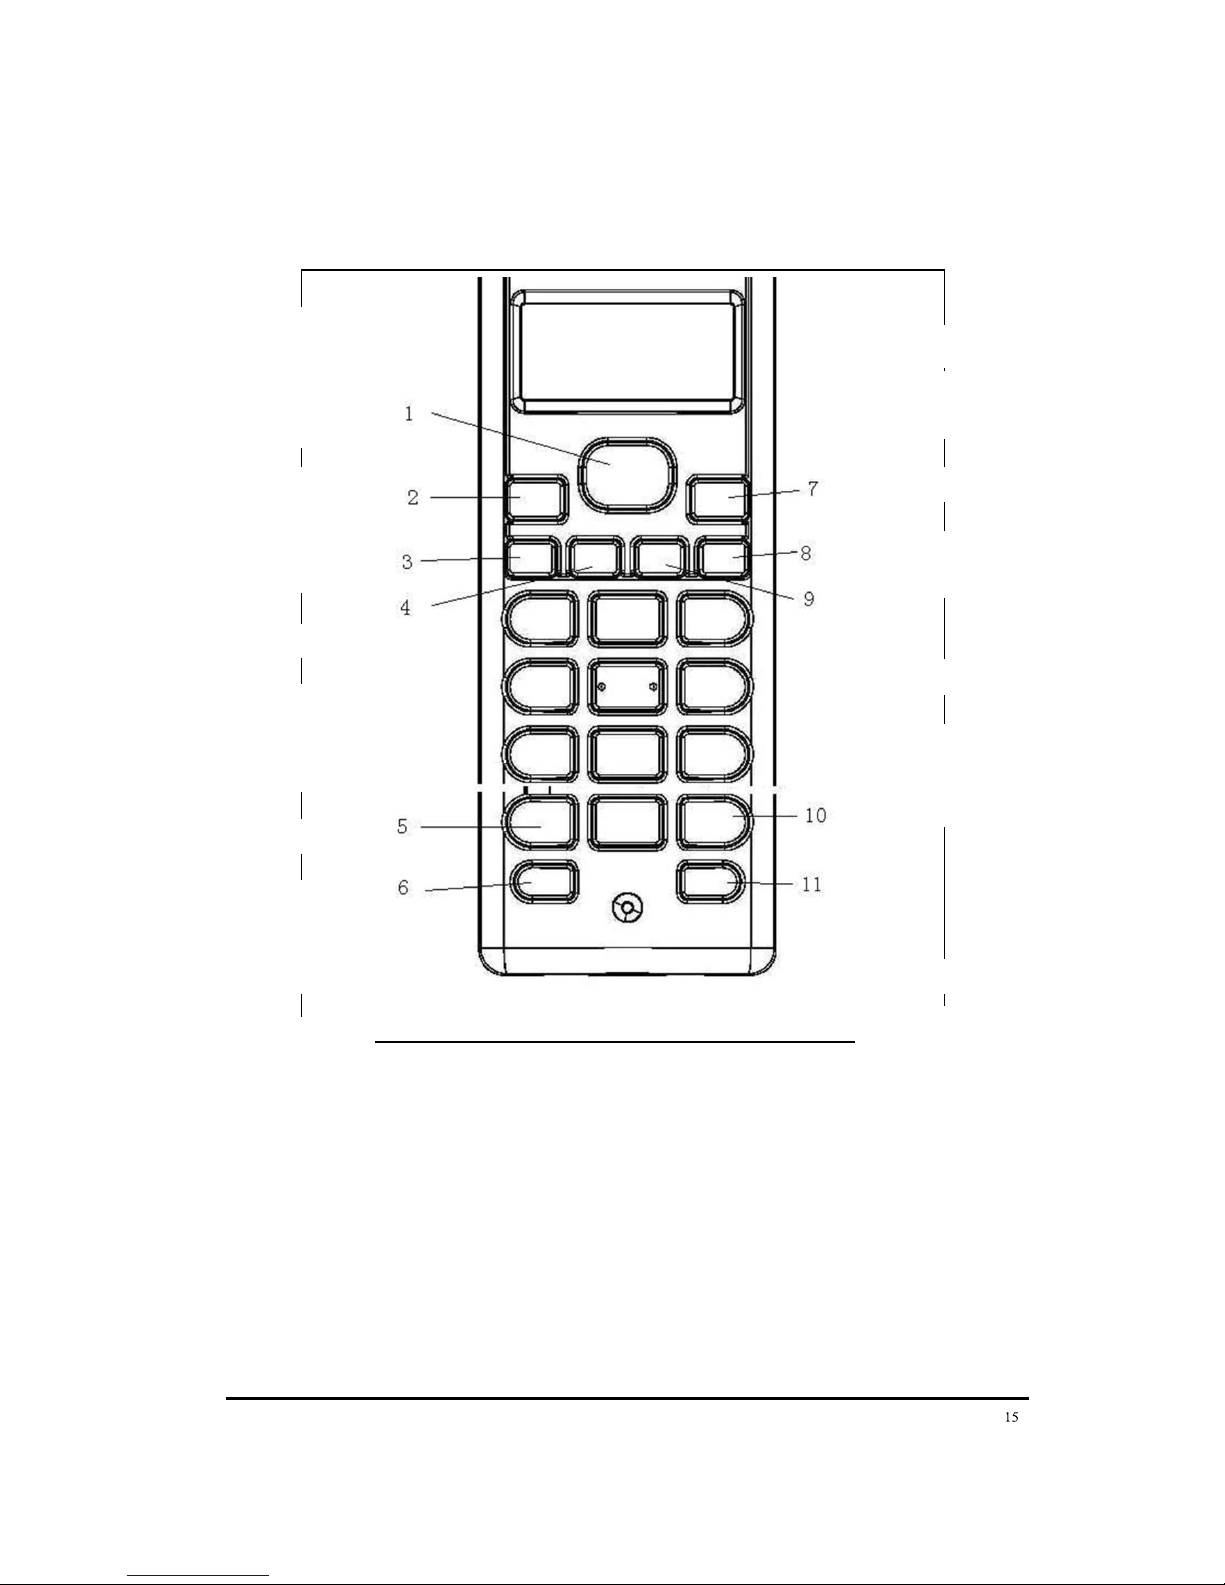
Handset Key Layout
Press to enter menu
mode and enter submenu or to confirm the
selection.
Press to begin and answer
the call
2 – Recall/ Phone
You can activate Recall
function if your phone is
connected toa PABX,or if
you use Select Services.
In standby mode, press to
enter phonebook mode.
Press to confirm selection
Press when the phone is in
standby to mute the ringer.
Allow you to adjust the
handset volume
7– Speaker Phone
Press to turn on/off the
speaker phone.
Press during a call to
mutethe microphone
Press to make an intercom call
(if you have more thanone
handset)
Press and hold to lock /
unlock the keypad on the
handset
Press to select long / short
flash.
Page 6

Page 6 of
LCD Display and Icons
Battery Indicator
When the battery is flat or low power, you will see an empty battery symbol in the display
screen. The handset will no longer able to perform normal operation if the battery is flat or low
power. You are recommended to place the handset back onto the base unit for recharging the
battery. It is recommended that the handset is to be charged at least 8 hours to ensure maximize
the battery life span.
• Full battery
• Empty battery
When you are in the midst of a conversation and the handset will emit a warning beep sound if
the battery is low in power. The call will be disconnect once the battery is flat, you are advised to
place the handset on the base unit to charge.
Page 7

Page 7 of
Navigating the Menu
The Aztech E310 has a menu page. In the menu there are a list of options which enable you to
customize your phone settings.
To enter the menu, press the Menu button (4). Use the Right (7) or Left (2) key tonavigate to the
option you want to customize. Press OK (4) to show more options or to confirm thesetting
changed. To go back in the previous menu or exit the menu, press the ESC/INT (9) key.
Menu Option List
Phonebook
Handset
Base
New Entry
Ring Tone
External
Dial Mode
Tone
Edit Entry
Internal
Pulse
Delete Entry
Volume
Recall
Short
Delete All
Auto Talk
On
Long
Off
System Pin
Handset Name
Keypad Beep
On
Off
Reset
Language
Date Time
Register
De Register
Page 8

Page 8 of
Setting the language
The option enable user to choose the preferred language display on the handset.
You can do so by selecting the Menu button (4) Use the Left (2) or Right (7) button to navigate
to ‘Handset’ option and press Confirm/OK (4) button to open another list of options. Use the
Left (2) or Right (7) keys again to navigate to ‘Language’ option and press OK (4).
You may now select your preferred language by using the Right (7) or Left (2) key. To confirm
your selection by pressing Confirm/OK (4) button.
Outgoing calls
Making a phone call
Press the Call button (1) and you will hear the dial tone. You may enter the telephone
number you wish to dial.
Press the Call button (1) when you want to end the call.
Pre dial Method
Enter the telephone number and press the Call button. Your call will be connected shortly.
To correct the number which you have entered wrongly in the pre-dial, you can do so by using
the Mute button (8) to delete the number entered.
Take note that if you haven’t pressed any button for 20 seconds, the handset will return to
standby mode, and you will have to enter the number again.
Dialing from recent call list
This option allows you to dial from the last three telephone number called from this handset.
Press the Call button (1) when you will hear the dial tone. Press the Redial key (11), the last
telephone number you dialed will appear on the display. Navigate by using the Left (2) or
Right (7) key to select another last two numbers dialed.
Press the Call button (1) to dial number shown on the display.
Page 9

Page 9 of
Answering an Incoming calls
To answer an incoming call, press the Call button (1).
Setting the volume
During a conversation you can set the volume by pressing the Volume button (6). You can set
the volume alternatively in between 1-5. You can also use the left/right button to do so.
Handset Setting
Setting the ring volume and melody
You can customized the ringer melody for an incoming call (external) and Intercom call
(internal)
Handset melody
Press Menu button (4). Use the Left or Right button to scroll to ‘HANDSET’ and press OK (4).
Use the Left or Right button to scroll to ‘RING TONE’ and press OK (4).Use the Left or Right
button to scroll to ‘EXTERNAL’ or ‘INTERNAL’ and press OK (4).Select the melody you want,
and then press OK (4).
Or the external call melody can be set as follows:
Press and hold the melody button (6) until the current melody is heard. Select the desired
melody (1-9) by means of the Left or Right keys. Press melody button (6) again to confirm the
setting.
Handset ring volume
Press Menu button (4) Use the Left or Right button to scroll to ‘HANDSET’ and press OK
(4).Use the Left or Right button to scroll to ‘RING TONE’ and press OK (4).Use the Left or
Right button to scroll to ‘VOLUME’ and press OK (4).Select the volume level you want, and
then press OK (4).
Or
Press the volume button (6) in standby. The handset will ring in the current volume. Use the
Left or Right keys to select the desired volume (0-5). Press the volume button (6) again to
confirm the setting.
Note: When the volume is set to 0, the handset will not ring when there is an incoming call
and the display will show
Page 10

Page 10 of
Handset name
You can change the name that appears on the screen (max. 9 characters). Press Menu key
(4).Use the Left or Right button to scroll to ‘HANDSET’ and press OK Use the Left or Right
button to scroll to ‘HANDSET NAME’ and press OK (4).The current handset name will be shown.
Delete the character by the Mute button (8). Use the keypad to enter the new name. Press the
Menu/OK (4) button to confirm.
Turning key beep on/off
You can turn off or on the handset keypad sound. Press Menu button (4). Use the Left or
Right button to scroll to ‘HANDSET’ and press OK (4).Use the Left or Right button to scroll to
‘KEYPAD BEEP’ and press OK (4).Use the Left or Right button to scroll to ‘ON’ and press OK (4).
Manual selection (Only applicable to User using two bases unit)
If you set the handset to ‘manual selection’, the handset will only detect the base unit you
have selected. Press Menu button (4). Use the Left or Right button to scroll to ‘HANDSET’
and press OK (4).Use the Left or Right button to scroll to ‘SELECT BASE’ and press OK (4).Use the
Left or Right button to select to ‘MANUAL’ or ‘AUTO’. Select “MANUAL’ if you want to set it as
MANUAL mode.
Note: When you have activated Automatic base selection and the handset is out of range on
the current base, the handset will only search for the strongest base in the surrounding.
Caution: Before you can select a base unit, the handset must be registered to the base first.
Auto Pickup
The call will be automatically pickup when the handset is taken out from the base when there
is an incoming call. This feature can be enabled or disabled with the steps below;
Press Menu button (4). Use the Left or Right button to scroll to ‘HANDSET’ and press OK
(4).Use the Left or Right button to scroll to ‘AUTO TALK’ and press OK (4).Use the Left or Right
button to select to ‘ON’.
Phonebook
You can program 20 phonebook entries in the phone’s memory. Display Names can be up to
16 characters and telephone numbers can be up to 24 digits.
Adding phonebook entries
Press the Phonebook button (3) until the icon is on, Press OK key (4) and ‘NEW ENTRY’ will
display. Press OK key (4) and enter the name by using the alphanumerical keypad. Press the
Menu/OK key (4) to confirm the name. Enter the telephone number, and Press the Menu/OK
key (4) to confirm.
Page 11

Page 11 of
Dialing a Phonebook entry
Press the Phonebook button (3) to open the phonebook. Enter the first letter of the
desired name by using the alphanumeric keypad.The first name in the list with this letter
appears on the display.Press the LEFT and RIGHT key to search the name you want to
dial.Press the Call button (1) and the number will be dialed automatically.
Editing name or number
Press the Phonebook button (3) to enter the phonebook. Press the left or right key to search
the name you want to edit. Press the OK key (4) to enter the Phonebook Menu. Press the left
or right key to select ‘EDIT ENTRY. Delete the character by the Mute key (8). Use the keypad to
enter the new name. Press the Menu/OK key (4) to confirm.Enter/delete the telephone
number. Press the Menu/OK key (4) to confirm.
Deleting an entry
Press the Phonebook button (3) to enter the phonebook. Press the left or right key to search
the name you want to delete. Press the OK key (4) to enter the Phonebook Menu. Press the
left or right key to select ‘DELETE ENTRY. Press the Menu/OK key (4) to confirm.
Deleting All entry
Press the Phonebook button (3) to enter the phonebook. Press the OK key (4) to enter the
Phonebook options. Press the left or right key to select ‘DELETE ALL. Press the Menu/OK key (4)
to confirm and the handset will prompt you to reconfirm the delete all function.Press the
Menu/OK key (4) to confirm.
Caller-ID functions (CLIP)
This displays the telephone numbers of incoming calls. This function is available only if you
have subscribed to a telephone operator that provides this service. Contact your telephone
provider for more information. When you receive a call, the numbers are saved in a Call history
list. This list can hold 20 telephone numbers (each of max. 23 digits). If the number is longer
than 14 digits, you can press the Left or Right button to scroll the other digits!
New calls
If a call is not answered, the CLIP symbol will blink and the display will show ‘XX MISSED’. “XX”
means the number of calls missed.
Call Log
Press the Call Log button (7) to view the last received call is shown on the display. If the list is
empty, “EMPTY” will be shown on the display, else you will be able to see the name,
number and date/time.Press the INT key to exit the call log.
Take note that Time and date stamp is taken from the subscribed service provider.
Page 12

Page 12 of
Calling from the Call log
Scroll to the number in the Call Log, and by pressing the Call button (1), the number will be
dialed automatically.
Erasing a number from the Call list
Scroll through the Call list until the desired number is shown on the display.
Press the Menu/OK key (4) and then use the left or right button to select “Delete”,
Then press Menu/OK key (4) to erase the number.
Erasing all numbers from the Call list
Scroll through the Call list until the desired number is shown on the display.Press the Menu/OK
key (4) and then use the left or right button to select “Delete All”, Then press Menu/OK key
(4) to erase all the numbers.
Note: Only those read numbers from the call log will be erased using this function.
Store a number from the call log into the phonebook
Scroll through the Call list until the desired number is shown on the display. Press the
Menu/OK key (4) and then use the left or right button to select “SAVE to PB”, Press Menu/OK
key (4) again.The last character of the current name will be blinking and you can begin edit
the name. Press Menu/OK key (4) to save the name.The last digit of the telephone number
will blink and you can begin edit the telephone number.Press OK (4) again to confirm and you
will be bring back to the call list.
Date Time setting
Press Menu button (4). Use the Left and Right button to scroll to ‘DATE TIME’ and press OK
(4). Enter the Year and press OK (4). Enter the Month and press OK (4). Enter the Date and
press OK (4). Enter the Hours and press OK (4). Enter the Minute and press OK (4)
Register/de-register a handset
Register to a DECT base
Your phone is supplied with the handset already registered to the base unit, and you shouldn't
need to register it. But if you've bought extra handsets separately, you'll need to register each
one to your original base unit. Maximum 5 handsets can be registered to one base.
Page 13

Page 13 of
To register a handset
Press the MENU button, then press LEFT and RIGHT button to the location
REGISTER
Press the OK button, then press LEFT and RIGHT button to the location
BASE 1
Press the OK button again
The display shows Enter Pin? Key in pin by default is “0000” and press OK to confirm.
Once the screen shows “Press Base” together with a blinking wireless icon immediately
power off/on the base station.
You will hear a beep sound from the handset and the screen will show the name “Aztech”
together with a number.
Removing a handset
You can remove a handset from a base to allow another handset to be registered: Press Menu
button (4). Use the Left and Right button to scroll to ‘DE-REGISTER’ and press OK (4). Enter
the pin code (0000) and press OK (4). Enter the handset number (1-5) you want to remove
and press OK (4). If handset deregistered is not successful; it will ask again to enter the
handset number.
Call transfer and Intercom between two handsets
Call transfer and conference call during an external call
To transfer the outside call to another handset
(if you have two or more handsets):
Press the INT button for 2 seconds and key in the number of the other handset.
The outside call is put on hold. When the other handset answers, you can speak to the user. If
the other handset does not answer, you can get back to the outside call by pressing the INT
button again.
Page 14

Page 14 of
Internal call (intercom)
To make an intercom call
Press the INT button
Key in the number of the other handset
On the other handset's display, your number appears, and the INT symbol flashes. Then the
other handset user presses the CALL button to connect the call.
For details of how to change the ringing melody and volume for intercom calls, see "INT
MELODY" and "INT VOLUME" on "HANDSET SETTING" part.
To end an intercom call
Press the CALL button on your handset
The other person will hear Busy tone, and should also press the CALL button to hang up.
Reset of the handset
Warning: If you reset the system, you will lose all stored information (including numbers in
memory) and all features will return to their default settings.
If you reset the system, you will lose all stored information (including numbers in memory)
and all features will return to their default settings. You need to register the handset to the
base unit again.
While you are resetting the system, you should disconnect the telephone line cord from the
back of the base unit, so you won't be interrupted by incoming calls.
Press Menu button (4) Use the Left and Right button to scroll to ‘HANDSET’ and press OK (4)
Use the Left and Right button to scroll to ‘RESET’ and press OK (4)
Enter the pin code (0000) and press OK (4).
Page 15

Page 15 of
Base Setting
For base setting, we have already customized the settings accordingly to the region settings.
We do not recommend user to change any settings which is already preconfigured in the base
set.
Changing the PIN code (system PIN code)
Certain functions required your PIN code in order to make the changes. The default PIN code
setting is ‘0000’. If you would like to change the PIN code and to use your own private PIN,
please follow the below steps to make the changes:
Press Menu button (4)
Use the Left or Right button to scroll to ‘BASE’ and press OK (4).Use the Left or
Right button to scroll to ‘SYSTEM PIN’ and press OK (4).Enter the old pin and press
OK (4).Enter the new pin and press OK (4).Press the new pin again and press OK (4). If it is
successful, it will display “PIN CHANGED”
Note: If the wrong PIN code is entered, ‘Error PIN’ will be shown.
 Loading...