

Page 1

MODEL
DSL5018EN(1T1R)
Connect the power adapter to your modem router then plug it to
a power outlet.
Switch ON your modem router.
Kindly follow the steps provided below in setting up your hardware. A
setup diagram has also been provided for reference.
The following items are included in your DSL5018EN(1T1R)
package.
Step 1 : Check Package Contents
A.
B.
C.
D.
E.
F.
G.
This Easy Start Guide will help you setup your DSL5018EN(1T1R) modem router and connect to the Internet . Before proceeding
with the installation, please prepare your internet account settings given by your Internet Service Provider. You may also download
this Easy Start Guide and the User Manual of this product on our Aztech Support Website (www.aztech.com/support)
Step 1: Step 2: Step 3:
Setting Up Your
Hardware
Setting Up Your
Internet Connection
Check Package
Contents
DSL5018EN(1T1R)
DSL MicrofilterEthernet Cable
Power Adapter
DSL5018EN(1T1R)
Telephone Cable
Easy Start Guide
Step 2 : Setting Up Your Hardware
Power
Adapter
Ethernet
Cable
Telephone Cable
Desktop/PC
Telephone
Outlet
DSL
Microfilter
DSL5018EN(1T1R)
B
Using an Ethernet cable, connect your modem router to the
desktop through both of the devices’ Ethernet ports.
Using a telephone cable, connect your modem router to the DSL
microfilter.
Connect the DSL microfilter to the telephone outlet.
Hardware Setup Diagram
NOTE:
Please check
both wire ends
for each step.
E
A
B
D
C
Warranty Card
Resource CD
Page 2
MODEL
DSL5018EN(1T1R)
Step 3: Setting Up Your Internet Connection
Once the Hardware Setup is completed, proceed to the steps below to establish
the connection with your Internet Service Provider.
Launch an Internet Browser (e.g. Internet Explorer, Google
Chrome), input http://192.168.1.1 on the address bar and press
Enter. You will be redirected to the Web User Interface.
A
Select the Timezone and NTP Server that you would like to set on your
modem router then click Next.
Click the Wizard Tab and follow the step by step guide in setting up
your Internet Connection. Click Next to start.
C
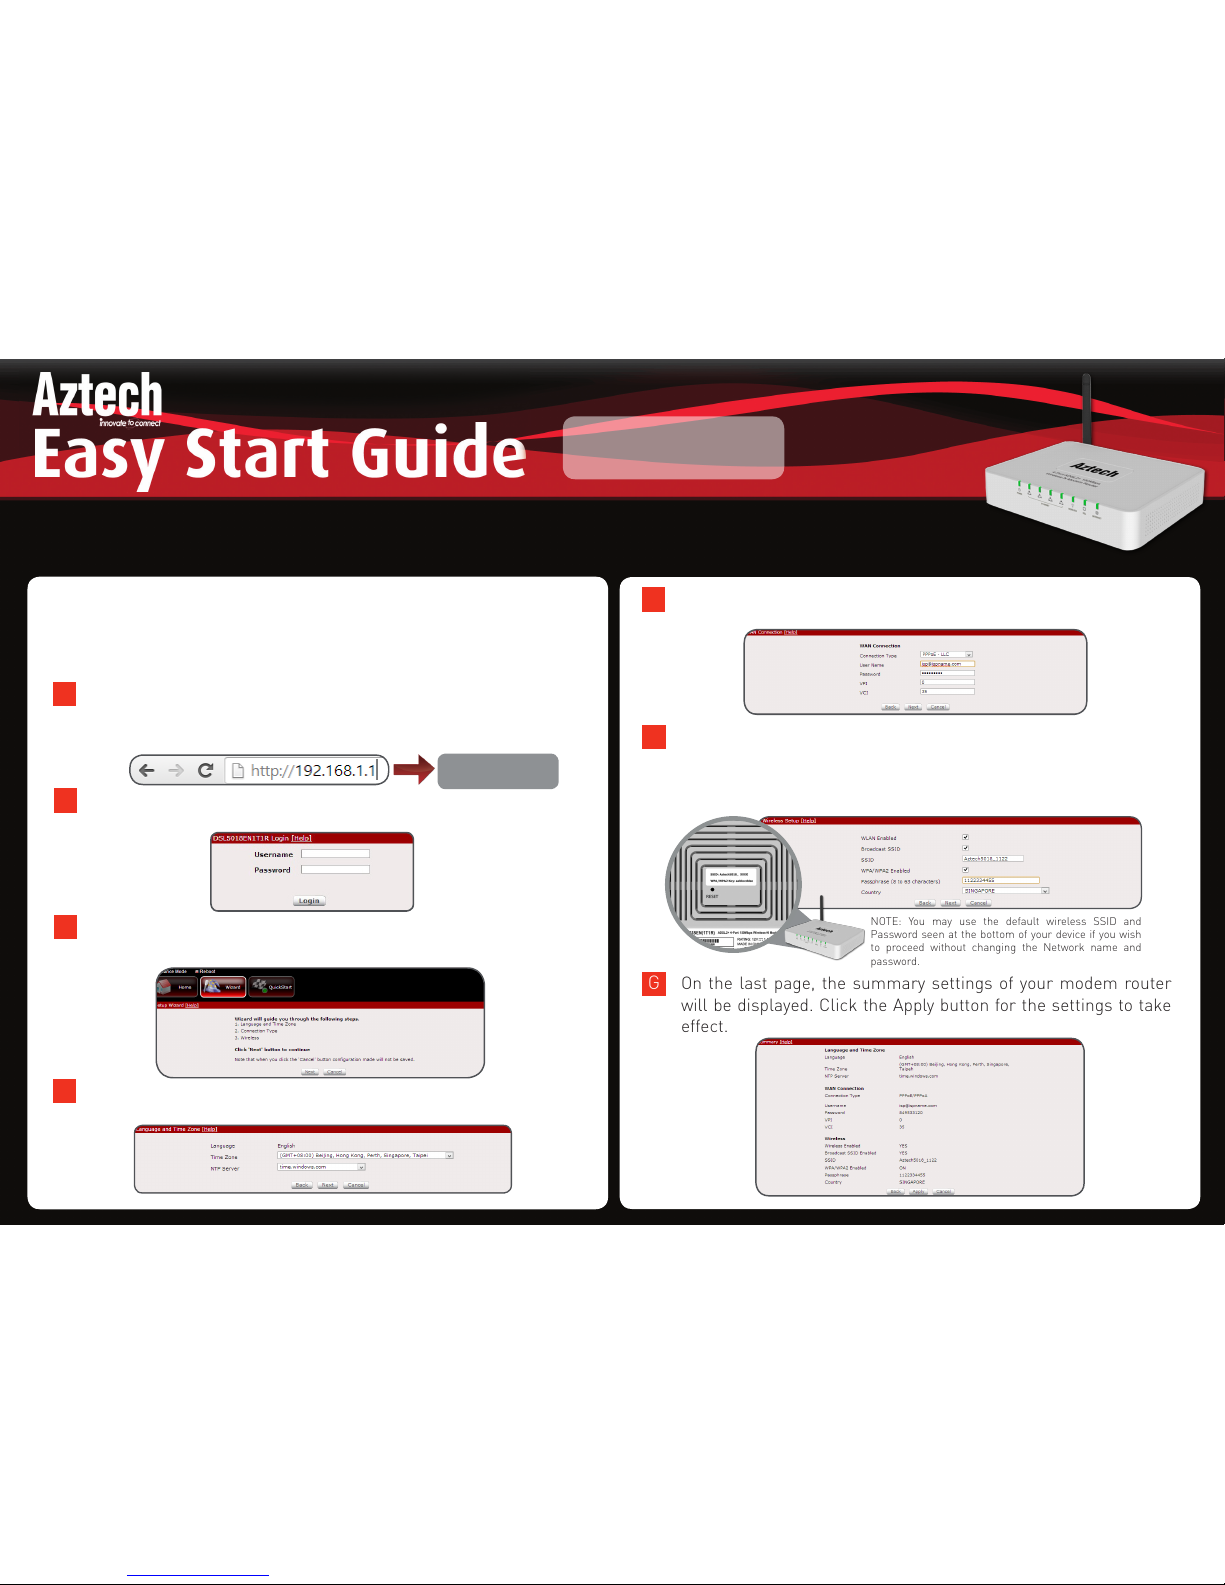
D
Select the WAN Connection type supplied by your Internet Service
Provider then click Next.
E
Your device has been programmed with a default wireless network
name (SSID) and a default wireless password (Passphrase). These
information can also be found underneath your modem router’s
label. Click Next to confirm your settings.
F
On the last page, the summary settings of your modem router
will be displayed. Click the Apply button for the settings to take
effect.
G
NOTE: You may use the default wireless SSID and
Password seen at the bottom of your device if you wish
to proceed without changing the Network name and
password.
Before proceeding to Step 3, please prepare your internet account settings given by your Internet Service Provider. This Easy
Start Guide along with the User Manual which provides a more advanced guide to this product is downloadable on our Aztech
Support Website (www.aztech.com/support).
DSL5018EN(1T1R)
WEB USER INTERFACE
Input admin for the username and admin for the password then
click Login.
B
admin
admin
 Loading...