


AZATOM® SONANCE T1 Digital Radio
DAB+/DAB/FM Radio Alarm Clock
User Manual
This manual is available to download online at www.azatom.com

Thank you for shopping with AZATOM® Please read this manual carefully before using your new device and keep it safe for future reference.
AZATOM® is a British company specialising in advanced audio products. All our products are developed by our In-house Team of British Designers.
We are experts in sound engineering and great care and attention goes into the design and manufacture of every Azatom product to ensure class-leading performance and quality.
Please read the manual thoroughly before operating the device.
Choose a suitable location for the device. Suitable locations are dry, even and anti-slip surfaces on which you may operate the device easily.
Make sure there is proper ventilation for the device. Remove, if necessary, the protection sheet from the display.
This DAB Radio was designed to travel and come with you on your adventures, all while delivering high quality audio.
FREE Earphones with every review left online at amazon.co.uk or ebay.co.uk
Fill in our easy online form to claim yours!

Contents |
|
Section: |
Page: |
Controls & Interface............................................................................................................ |
1 |
What’s In The Box?.............................................................................................................. |
3 |
Using the SONANCE T1 DAB Radio |
|
Power Supply / Battery Use / USB Charge..................................................................... |
4 |
DAB |
|
Operating your radio............................................................................................................ |
5 |
Selecting a station / Finding new radio stations.......................................................... |
6 |
Auto Scan............................................................................................................................... |
7 |
Manual Tuning...................................................................................................................... |
8 |
Dynamic Range Control Settings..................................................................................... |
9 |
FM |
|
Auto Search Tuning / Manual Tuning.............................................................................. |
10 |
Pre-set Stations – FM & DAB / Recalling Pre-sets....................................................... |
11 |
Brightness Setting / Sleep Function............................................................................... |
12 |
Time/Date Setting / Alarm Setting.................................................................................. |
13 |
Snooze - Stop Alarm - Disable Alarms............................................................................ |
15 |
Factory Reset / Earphones (Not Included)..................................................................... |
16 |
Technical Specifications.................................................................................................... |
17 |
Important Safety Information........................................................................................... |
18 |
Grab your free extended warranty & keep up to date with AZATOM® online at www.azatom.com
1
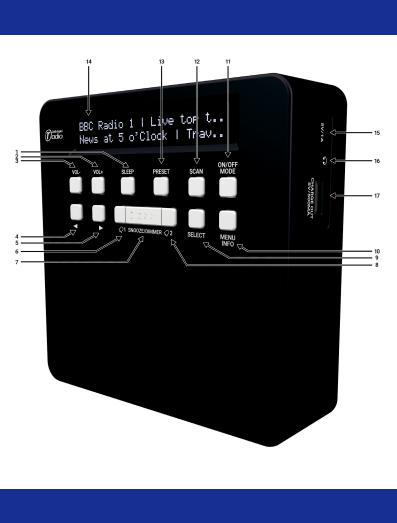
Controls & Interface
For technical support call: 01740 629901 or email: info@azatom.com

2
1.SLEEP
2.VOLUME+
3.VOLUME- 4.◄ / TUN- 5.► / TUN+
6.ALARM 1
7.Snooze/Dimmer (Dimmer for brightness setting)
8.ALARM 2
9.SELECT
10.MENU/INFO
11.POWER/MODE
12.SCAN
13.PRE-SET
14.LCD Display
15.DC-IN socket (5V, 500MA)
16.Headphone socket (3.5mm) / Reset
17. USB charge port (5v, 500MA for mobile phone)
FREE Earphones with every review left online at amazon.co.uk or ebay.co.uk
Fill in our easy online form to claim yours!
3
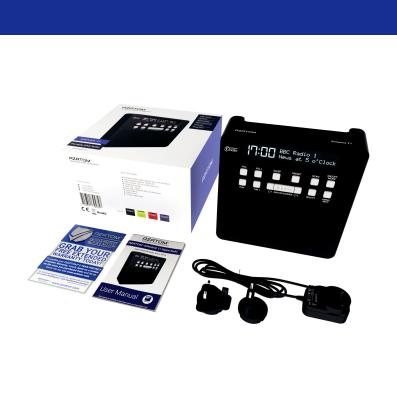
What’s in the box?
 AZATOM® SONANCE T1 Digital Radio
 User Manual
 Power Adapter
 AZATOM® Warranty Card
4
Using the SONANCE T1
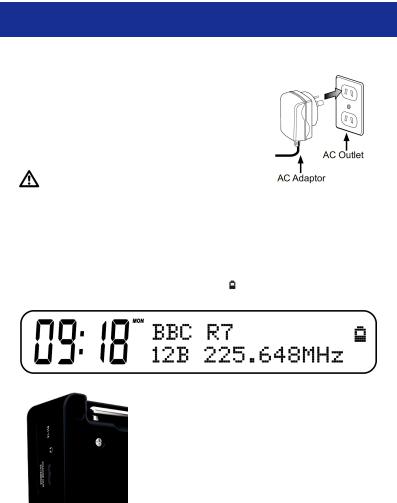
Power supply (Adapter):
Insert the mains adapter into a properly installed power socket. Connect the device with the plug connector by inserting its plug into the 5V DC charging port of the device.
Make sure the grid voltage corresponds to the figures on the rating plate.
CAUTION:
Only use the supplied power adapter for this device.
Do not use the included power adapter for other devices.
This adapter has been specially designed with an anti-magnetic module in the power cord to prevent interference.
NOTE: Disconnect from mains power supply during longer periods of non-use.
Battery use:
Please note when using battery mode the battery symbol “ ” will appear on the display screen showing the remaining battery charge.
USB Charge:
The USB charge port is 5V 500mah output for charging additional devices such as mobile phones.
 Loading...