


AZATOM® Multiplex D1 Digital Radio
DAB+/DAB/FM Radio with Bluetooth
User Manual
This manual is available to download online at www.azatom.com

Thank you for shopping with AZATOM® Please read this manual carefully before using your new device and keep it safe for future reference.
AZATOM® is a British company specialising in advanced audio products. All our products are developed by our In-house Team of British Designers.
We are experts in sound engineering and great care and attention goes into the design and manufacture of every Azatom product to ensure class-leading performance and quality.
Please read the manual thoroughly before operating the device.
Choose a suitable location for the device. Suitable locations are dry, even and anti-slip surfaces on which you may operate the device easily.
Make sure there is proper ventilation for the device. Remove, if necessary, the protection sheet from the display.
This DAB Radio was designed to travel and come with you on your adventures, all while delivering high quality audio.
FREE Earphones with every review left online at amazon.co.uk or ebay.co.uk
Fill in our easy online form to claim yours!

Contents |
|
Section: |
Page: |
Controls & Interface............................................................................................................ |
1 |
What’s in the box?.............................................................................................................. |
3 |
Using the Multiplex D1 DAB Radio |
|
Power Supply / Battery Use / USB Charge..................................................................... |
4 |
DAB |
|
Operating your radio............................................................................................................ |
5 |
Selecting a station / Finding new radio stations.......................................................... |
6 |
Auto Scan............................................................................................................................... |
7 |
Manual Tuning...................................................................................................................... |
8 |
Dynamic Range Control Settings..................................................................................... |
9 |
FM |
|
Auto Search Tuning / Manual Tuning.............................................................................. |
10 |
Prune (To remove stations which are listed but unavailable) / |
|
Equalizer Setting, Bass/Treble......................................................................................... |
11 |
Pre-set Stations – FM & DAB / Recalling Pre-sets....................................................... |
12 |
Brightness Setting / Back-light settings / Sleep function......................................... |
13 |
Time/Date Setting / Alarm Setting / AUX-IN ................................................................ |
14 |
Snooze - Stop Alarm - Disable Alarms............................................................................ |
17 |
Bluetooth / Earphones......................................................................................................... |
18 |
Factory Reset / Earphones (Not Included)..................................................................... |
19 |
Technical Specifications.................................................................................................... |
20 |
Important Safety Information........................................................................................... |
21 |
Grab your free extended warranty & keep up to date with AZATOM® online at www.azatom.com

1
Controls & Interface
1LCD Display
2ON/OFF and Standby
3VOLUME / SCROLL / ENTER / SNOOZE / DIMMER
4Alarm 1
5Tuning - / Backwards
6Alarm 2
7Tuning + / Forwards
8Preset
9Play/Pause / Scan (Play/Pause for Bluetooth Mode)
10Equaliser
11Menu / Info
12Sleep
13MODE / Exit
14Telescopic Antenna
15Battery Charging Indicator
16DC 9V Port (9V, 1.5A)
17Micro USB Port (For Firmware Updates ONLY)
183.5mm AUX-IN Port / Reset Button
(Use a long thin non metal object to press into the port and hit the reset button to the rear of the hole)
19USB Charging Out Port (5V/500mA For Mobile Phones)
20Headphone Port
For technical support call: 01740 629901 or email: info@azatom.com

2
3
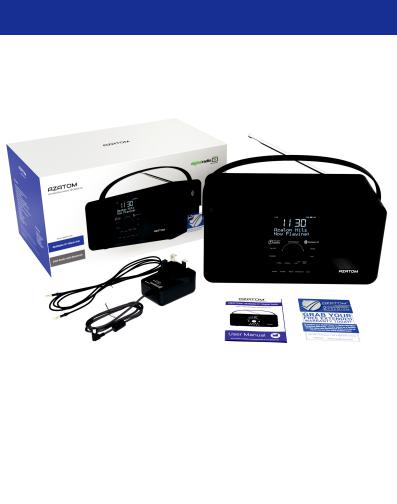
What’s in the box?
 AZATOM® Multiplex D1 Digital Radio
 Power Adapter
 Audio Cable
 User Manual
 AZATOM® Warranty Card

4
Using the Multiplex D1
Power supply (Adapter):
Insert the grid plug into a properly installed AC socket. Connect the device with the plug connector by inserting its plug into the DC 9V jack of the device. 
Make sure the grid voltage corresponds to the figures on the rating plate.
CAUTION:
Only use the supplied power adapter for this device.
Do not use the included power adapter for other devices.
This adapter has been specially designed with an anti-magnetic module in the power cord to prevent interference.
NOTE: Disconnect from mains power supply during longer periods of non-use.
Charging the battery:
Before you can operate the device with the battery, you need to charge it first.
Connect the device to a wall socket with the power adaptor.
The battery charging, the “GREEN” indicator lights up.
Once the battery has been charged completely, the charging indicator lights up “RED”.
CAUTION: Never leave the device unattended during the charging process.
NOTE: The duration of the charging process depends on the state of charge of the battery.
FREE Earphones with every review left online at amazon.co.uk or ebay.co.uk
Fill in our easy online form to claim yours!

5
Operating your radio - DAB:
1.Carefully extend the telescopic aerial.
2.Press the ON/OFF button to switch on your radio. The display will show
“Welcome to digital radio.”
3.If this is the first time the unit goes into DAB Mode, it will automatically start an ‘Auto Scan’ to search for available stations.
(Once DAB Mode has been used before, the Multiplex D1 will automatically select the previously played station)
4. Pressing and holding “SCAN” at any time will automatically start an auto scan.
During the scanning process, the lower line of the display shows a bar-graph indicating progress of the scan.
5.When the scanning is completed the first station (in alphanumeric order) will be selected.
The clock will automatically set to the current time.
6.If the station list is still empty after the scan, your radio will display “Service not available”.
7.If no stations are found, please ensure the aerial is extended and test the reception by doing another auto scan in a different location.
 Loading...