


AZATOM® Home Hub B1
Radio Alarm Docking Station with Bluetooth™
User Manual
This manual is available to download online at www.azatom.com

Thank you for shopping with AZATOM® Please read this manual carefully before using your new device and keep it safe for future reference.
The Home Hub is one of our best selling Bluetooth™ enabled Lightning connection docking stations with premium speaker drivers for rich sounding music.
The Home Hub is small enough to put anywhere around your home with a room filling 30W of power.
Bluetooth™ allows you to stream your content wirelessly from any Bluetooth-enabled device including phones, tablets and laptops.
A custom amplifier combined with High Fidelity
Drivers ensure that whether you are docked or streaming, playing music, a podcast or the soundtrack to a film, the Home Hub delivers superb quality.
FREE Earphones with every review left online at amazon.co.uk or ebay.co.uk
Fill in our easy online form to claim yours!

Contents |
|
Section: |
Page: |
Controls & Interface................................................................. |
1 |
Power.......................................................................................... |
3 |
|
4 |
What’s In The Box?................................................................... |
|
Using the Home Hub: |
|
Power / Setting The Alarm........................................................................ |
5 |
Activate / Deactivate Alarm / Display Brightness................................................ |
6 |
Play From Device.................................................................................. |
7 |
Play via Bluetooth................................................................................. |
8 |
Control via Bluetooth.............................................................................. |
9 |
Listening to / Tuning FM Radio.................................................................... |
10 |
Technical Specifications........................................................ |
11 |
Troubleshooting Guide............................................................ |
12 |
Important Safety Information...............................................13 |
|
Grab your free extended |
|
warranty & keep up to date |
|
with AZATOM® online at |
|
www.azatom.com |
|
1
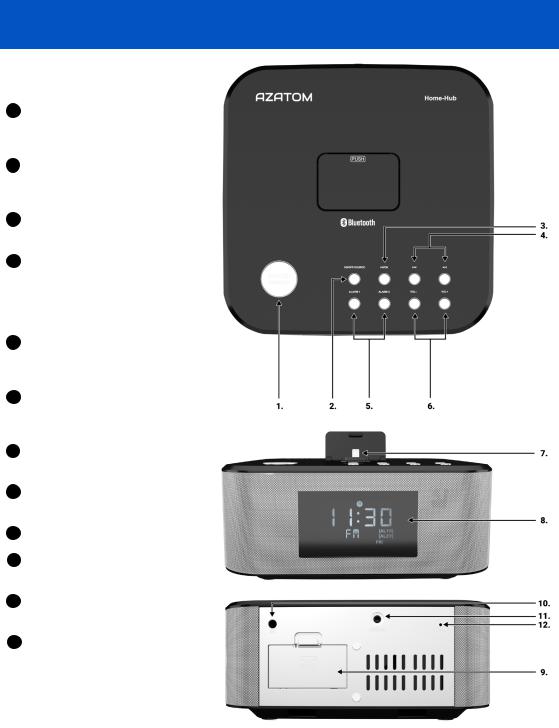
Controls & Interface
1SNOOZE/DIMMER
-Repeat the alarm
-Adjust the display brightness
2ON/OFF/SOURCE
-Turn on or turn off the unit
-Select the play function
3►|| / OK
-Start or pause play
4FORWARDS ► ►/|BACKWARDS |◄ ◄
-Skip to previous/next audio file
-Search radio stations manually
-Press and hold this button to search radio stations automatically
5ALARM 1/ALARM 2
-Set the alarm timer
-View alarm settings
6VOLUME +/-
-Decrease or increase the volume level
7DOCK for iPod/iPhone/iPad
-Load an iPod/iPhone/iPad
8Display Panel
-Show the current status
9Battery Compartment
10AC
-Connect to power
11LINE IN
-Connect to an external audio device
12FM ANT
-Radio Antenna wire
Top
Front
Back
2
Remote
1 |
ON/OFF |
11 |
ALARM 1 |
|
- Turn on or turn off unit |
|
- Set the alarm 1 timer |
||
2 |
DIMMER |
|
- View alarm 1 settings |
|
12 |
SLEEP |
|||
- Adjust display brightness |
||||
3 |
DOCK |
|
- Set the sleep timer |
|
13 |
EQ |
|||
- Select iPod/iPhone/iPad function |
||||
4 |
FM/BT |
|
- Select a preset sound effect: Classic, Rock, Jazz, etc. |
|
14 |
MUTE |
|||
- Select between FM and Bluetooth functions |
||||
5 |
SNOOZE |
|
- Mute or resume the sound |
|
15 |
LINE IN |
|||
- Snoozes the Home Hub Alarm |
||||
|
|
|
- Select LINE IN function |
|
6 |
UP ▲ |
16 |
CLOCK |
|
- Navigate through iPod/iPhone menu |
|
- Press and hold this button in the standby mode to set |
||
- Select a next preset station |
|
the clock |
||
- Adjust time |
17 |
SKIP FORWARDS ► ► | |
||
7 |
SKIP BACKWARDS |◄ ◄ |
|||
|
- Skip to next audio file |
|||
- Skip to previous audio file. |
|
- Search radio stations manually |
||
- Search radio stations manually |
|
- Press and hold this button to search radio stations |
||
- Press and hold this button to search radio stations |
|
automatically |
||
|
automatically. |
18 |
PROG |
|
8 |
►||/ PAIR |
|||
|
- Preset stations for tuner |
|||
- Start or pause play |
19 |
ALARM 2 |
||
9 |
REPEAT |
|||
|
- Set the alarm 2 timer |
|||
- Select repeat play modes |
|
- View alarm 2 settings |
||
10 |
DOWN ▼ |
20 |
VOL+ /VOL- |
|
-Navigate through iPod/iPhone menu - Increase/Decrease the volume level
-SelectFora previoustechnicalpreset stationsupport call: 01740 629901 or email: info@azatom.com
-Adjust time
3
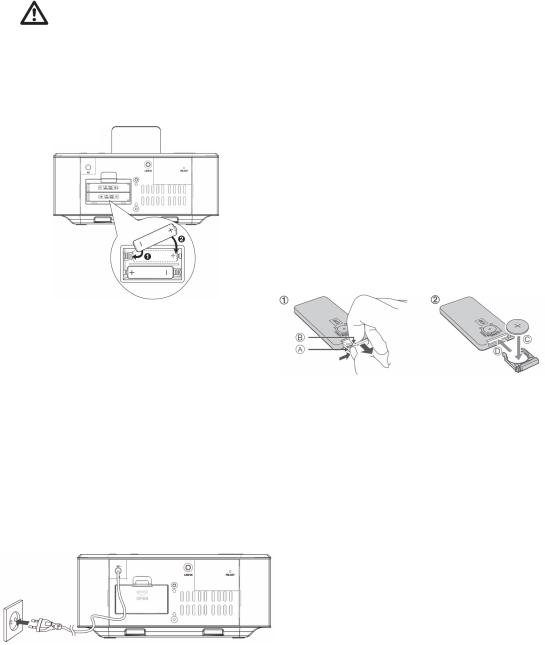
Install Batteries
Note:
•You can only use AC power as power supply. Batteries (not supplied) are for powering the clock and alarm only
•If the system is unplugged or if a power failure occurs, all setups of the unit will be erased unless there are batteries in the unit
1.Open the batteries compartment
2.Install two AAA batteries (not supplied) with above
3.Close the battery compartment
Connect Power
Caution:
-Risk of product damage! Ensure that the power supply voltage corresponds to the voltage printed on the back or the underside of the unit
-Before connecting the AC power cord, ensure you have completed all other connections. Connect the AC power cord to the wall socket
Connect the AC Power cord to the wall socket
Prepare the Remote Control:
The provided Remote Control allows the unit to be operated from a distance.
• Even if the Remote Control is operated within the effective range (6m), remote control operation may be impossible if there are any obstacles between the unit and the remote control
• If the Remote Control is operated near other products which generate infrared rays, or if other remote control devices using infrared rays are used near the unit, it may operate incorrectly. Conversely, the other products may operate incorrectly
For First-time use:
The unit has a pre-installed lithium CR2025 battery.
Remove the protective tab to activate the remote control battery.
To Replace the Remote Control Battery:
1. Pull out the battery tray and remove the old battery
2.Place a new CR2025 battery into the battery tray with correct polarity (+/-) as indicated
3.Insert the battery tray back into the slot
Precautions Concerning Batteries
• When the Remote Control is not going to be used for a long time (more than a month), remove the battery from the Remote Control to prevent it from leaking.
• If the batteries leak, wipe away the leakage inside the battery compartment and replace the batteries with new ones.
• Do not use any batteries other than those specified.
• Do not heat or disassemble batteries.
Never throw them in fire or water.
• Do not carry or store batteries with other metallic objects. Doing so could cause batteries to short circuit, leak or explode.
• Never recharge a battery unless it is confirmed to be rechargeable.
 Loading...