

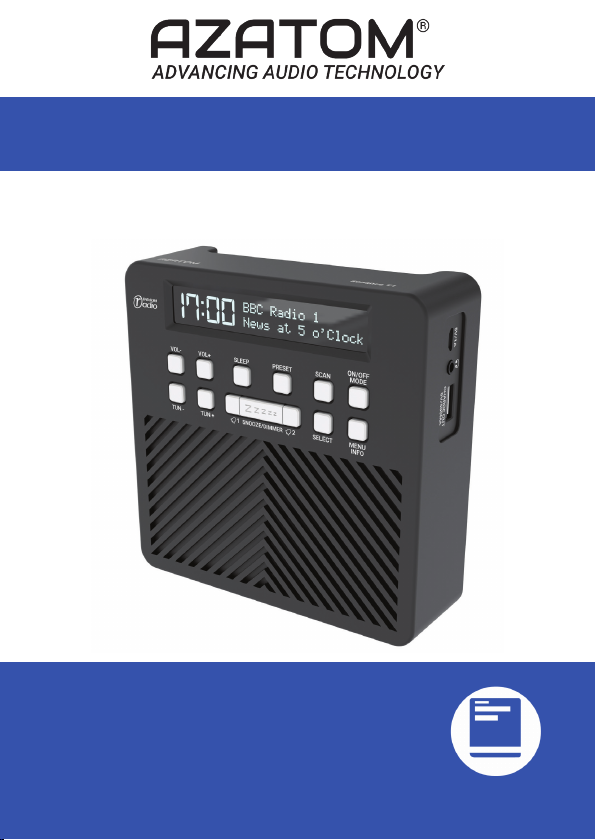
AZATOM® SONANCE T1 Digital Radio
DAB+/DAB/FM Radio Alarm Clock
User Manual
This manual is available to download online at www.azatom.com

Thank you for shopping with AZATOM® Please read
this manual carefully before using your new device
and keep it safe for future reference.
AZATOM
audio products. All our products are developed by our
In-house Team of British Designers.
We are experts in sound engineering and great care and
attention goes into the design and manufacture of every
Azatom product to ensure class-leading performance and
quality.
Please read the manual thoroughly before operating the device.
Choose a suitable location for the device. Suitable locations are
dry, even and anti-slip surfaces on which you may operate the
device easily.
Make sure there is proper ventilation for the device.
Remove, if necessary, the protection sheet from the display.
This DAB Radio was designed to travel and come with you on your
adventures, all while delivering high quality audio.
®
is a British company specialising in advanced
FREE Earphones with every review left
online at amazon.co.uk or ebay.co.uk
Fill in our easy online form to claim yours!

Contents
Contents
Section: Page:
Controls & Interface............................................................................................................
What’s In The Box?..............................................................................................................
Using the SONANCE T1 DAB Radio
Power Supply / Battery Use / USB Charge.....................................................................
DAB
Operating your radio............................................................................................................
Selecting a station / Finding new radio stations..........................................................
Auto Scan...............................................................................................................................
Manual Tuning......................................................................................................................
Dynamic Range Control Settings.....................................................................................
FM
Auto Search Tuning / Manual Tuning..............................................................................
Pre-set Stations – FM & DAB / Recalling Pre-sets.......................................................
Brightness Setting / Sleep Function...............................................................................
Time/Date Setting / Alarm Setting..................................................................................
Snooze - Stop Alarm - Disable Alarms............................................................................
Factory Reset / Earphones (Not Included).....................................................................
Technical Specications....................................................................................................
Important Safety Information...........................................................................................
Grab your free extended
warranty & keep up to date
with AZATOM® online at
www.azatom.com
1
3
4
5
6
7
8
9
10
11
12
13
15
16
17
18
1
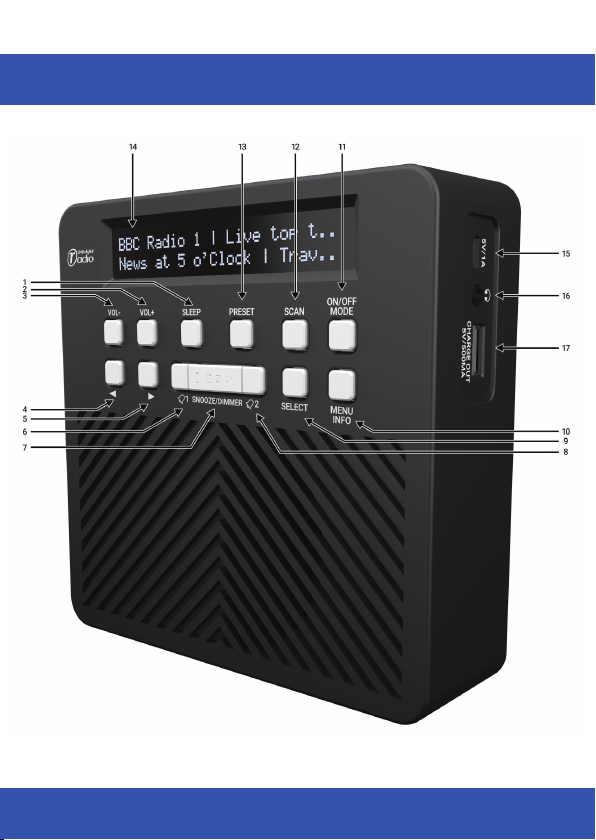
Controls & Interface
For technical support call: 01740 629901 or email: info@azatom.com

2
1. SLEEP
2. VOLUME+
3. VOLUME-
4.◄ / TUN-
5.► / TUN+
6. ALARM 1
7. Snooze/Dimmer (Dimmer for brightness setting)
8. ALARM 2
9. SELECT
10. MENU/INFO
11. POWER/MODE
12. SCAN
13. PRE-SET
14. LCD Display
15. DC-IN socket (5V, 500MA)
16. Headphone socket (3.5mm) / Reset
17. USB charge port (5v, 500MA for mobile phone)
FREE Earphones with every review left
online at amazon.co.uk or ebay.co.uk
Fill in our easy online form to claim yours!
3
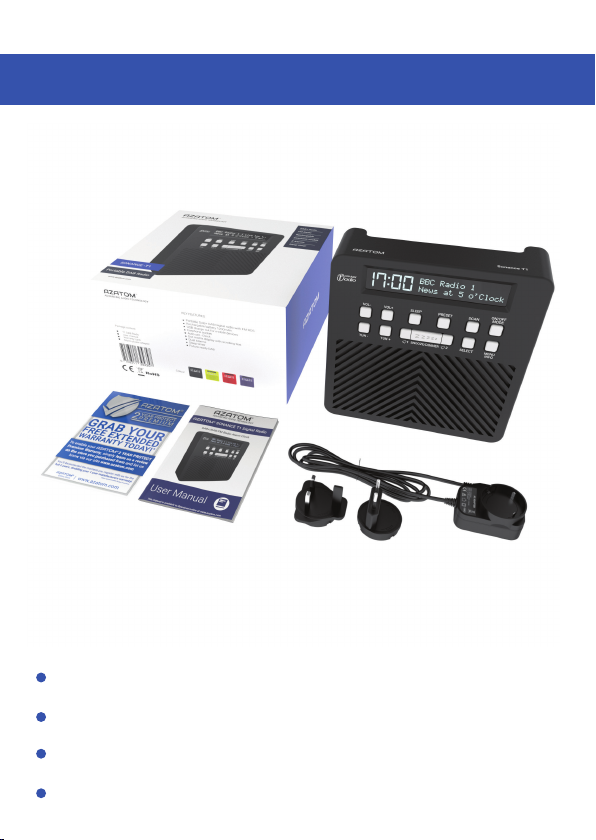
What’s in the box?
AZATOM® SONANCE T1 Digital Radio
User Manual
Power Adapter
AZATOM® Warranty Card
4
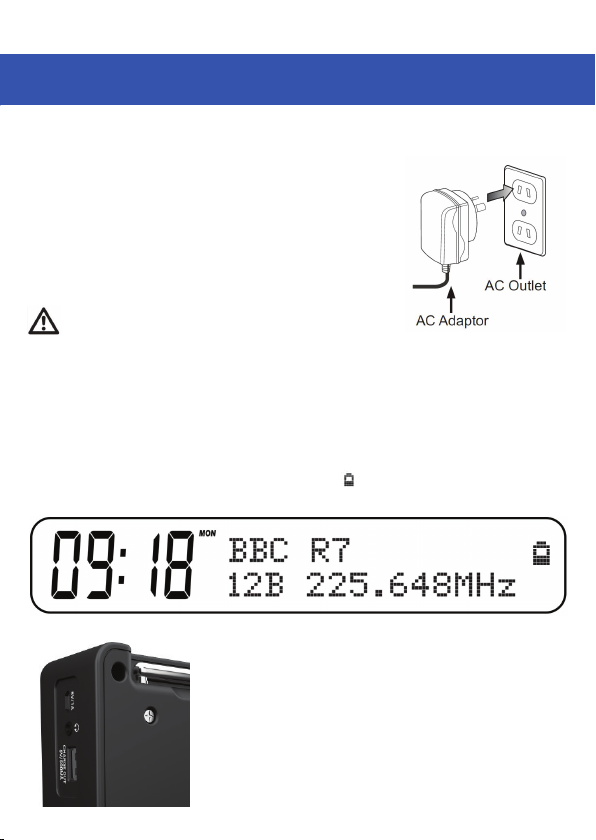
Using the SONANCE T1
Power supply (Adapter):
Insert the mains adapter into a properly installed power socket.
Connect the device with the plug connector by inserting its plug into
the 5V DC charging port of the device.
Make sure the grid voltage corresponds to the gures on the rating
plate.
CAUTION:
Only use the supplied power adapter for this device.
Do not use the included power adapter for other devices.
This adapter has been specially designed with an anti-magnetic module in the power cord to
prevent interference.
NOTE: Disconnect from mains power supply during longer periods of non-use.
Battery use:
Please note when using battery mode the battery symbol “ ” will appear on the display screen
showing the remaining battery charge.
USB Charge:
The USB charge port is 5V 500mah output for charging additional
devices such as mobile phones.

5
Operating your radio - DAB:
1. Carefully extend the telescopic aerial.
2. Press the ON/OFF button to switch on your radio. The display will show
“Welcome to digital radio.”
3. If this is the rst time the unit goes into DAB Mode, it will automatically start an ‘Auto Scan’ to
search for available stations.
(Once DAB Mode has been used before, the SONANCE T1 DAB will automatically select the previously
played station)
4. Pressing and holding “SCAN” at any time will automatically start an auto scan.
During the scanning process, the lower line of the display shows a bar-graph indicating progress
of the scan.
5. When the scanning is completed the rst station (in alphanumeric order) will be selected.
The clock will automatically set to the current time.
6. If the station list is still empty after the scan your radio will display “Service not available”.
7. If no stations are found, please ensure the aerial is extended and test the reception by doing
another auto scan in a different location.

6
Selecting a station – DAB:
1. The top line of the display shows the name of the station currently selected.
2. Push the ◄ or ► buttons to select the list of available stations on the lower line of the display,
and push the SELECT button to conrm the desired station.
Finding new radio stations - DAB:
Over time new stations may become available. To nd new stations you can auto scan as follows
1. Press the◄ or ► the display will show “Auto Scan Now”.
2. Press “SCAN” for auto scan. The display will show “Scanning...” and your radio will perform a
scan of the Band III DAB channels. As new radio stations are found the station counter on the
right-hand side of the display will increase and the radio stations will be added to the list stored
in the radio.
Secondary services – DAB
1. Some radio stations have additional secondary services associated with them. If a radio station
has a secondary service associated with it the display will show “>>” next to the station name on
the station list. The secondary service will then appear immediately after the primary services
as you push the ◄ or ►.
2. Press SELECT to select the station
3. When the secondary service shuts down, your radio will automatically switch back to the main
radio station if it is available.

7
Auto Scan – DAB:
As an alternative to clicking the menu to select a station your radio can be set to automatically
select a station.
1. Press the MENU button and ◄ or ► until you nd “Settings”.
2. Press ◄ or ► until “Auto Scan On “ shows on the display.
3. Press ◄ or ► until “YES” is highlighted. Press SELECT to conrm the selection. When
tuning your radio will now automatically select a station from the station list.
4. If you do not wish to use the Auto Scan On function press ◄ or ► until “NO” is highlighted.
The radio will require a click to choose a station from the station list.
FREE Earphones with every review left
online at amazon.co.uk or ebay.co.uk
Fill in our easy online form to claim yours!

8
Manual Tuning – DAB:
Manual tuning allows you to tune display to the various DAB Band III channels.
1. Press MENU and ◄ or ► until the display show “Manual Scan”, press SELECT to enter the
Services Menu.
2. Press ◄ or ► to highlight the desired channel.
3. Press MENU, the graph will indicate the signal strength, and the upper line will show the name
of the DAB multiplex (group of radio stations). Any stations found will be added to the stored list
in the radio.
4. Press MENU to return to the normal tuning mode.
For technical support call: 01740 629901 or email: info@azatom.com

9
Dynamic Range Control Settings – DAB:
Dynamic Range Control (also known as DRC) is a technology used to help make quieter sounds
easier to hear in a noisy environment.
1. Press the ON/OFF button to switch on your radio.
2. Press MENU and ◄ or ► until the display shows “DRC”. Press SELECT to enter the settings
menu.
3. Press ◄ or ► until “DRC” is highlighted.
4. Press SELECT to enter the adjustment mode.
5. Press ◄ or ► to select the required DRC setting (the default is 0).
DRC OFF - DRC is switched off, Broadcast DRC will be ignored.
DRC LOW - DRC level is set to 1/2 that sent by broadcaster.
DRC HIGH - DRC level is used as sent by broadcaster.
6. Press MENU to conrm the setting. The display will return back to normal.
Note: Not all DAB broadcasts are able to use the DRC function. If the broadcast does not
support DRC, then the DRC setting in the radio will have no effect.

10
Auto Search Tuning – FM:
1. Carefully extend the telescopic aerial fully and press the ON/OFF button to switch on your radio.
2. Press MODE to enter FM mode.
3. Press ◄ button and hold for 2 seconds, your radio will scan and stop automatically when it
nds a station of sufcient strength.
4. After a few seconds the display will update. The display will show the station frequency. If the
signal is strong enough and the station has RDS data present then the radio will display the
station name.
5. To nd other stations, press and hold the ◄ button as before.
6. To scan the FM band in the opposite direction (high frequency to low frequency) press the ►
button and hold for 2 seconds.
7. When the scan has reached the end of the frequency range your radio will commence tuning
from the beginning of the frequency range until scan is complete.
Manual Tuning – FM:
1. Carefully extend the telescopic aerial fully and press the ON/OFF button to switch on your radio.
2. Select FM mode as previously described if required.
3. Press ◄ or ► to tune to a station. With each press of tuning the frequency will change up or
down by 50 kHz.
4. When the scan has reached the end of the frequency range your radio will commence tuning
from the beginning of the frequency range until scan is complete.

11
Preset Stations – FM and DAB:
You may store your preferred DAB and FM radio stations to the pre-set station memories. There
are 60 memory pre-sets in your radio, 30 for DAB and 30 for FM. Pre-sets are stored by your radio
in the event of a power failure.
The procedure for setting pre-sets and using them to tune stations is the same for FM and DAB
modes:
1. Press ON/OFF button to switch on the radio.
2. Select the desired waveband.
3. Tune to the required station as previously described.
4. Press PRE-SET button and hold to enter pre-set store, and then press to SELECT the desired
pre-set number which you wish to store the station. Press SELECT to conrm.
5. Press SELECT to conrm, for example, “Pre-set 01 stored”. The station will be stored under the
chosen pre-set. Repeat this procedure as needed.
6. Stations which have been stored in pre-set memories may be overwritten by following the above
procedure.
Recalling Pre-sets:
1. Press the ON/OFF button to switch on the radio.
2. Press PRE-SET shortly, then the display shows “Pre-set Recall” then press SELECT to tune to
the station stored in pre-set memory.
Note: If you have not previously stored a pre-set station and the pre-set button is pressed
“Empty pre-set” will be displayed.

12
Brightness settings:
Press the Dimmer/Snooze button for four levels of brightness: High, Medium, Low and Sleep low.
Sleep function:
Your radio can be set to turn off after a pre-set time has elapsed.
The sleep setting can be adjusted between 15 and 90 minutes. Ensure your radio is switched on.
1. Press SLEEP until “Set Sleep time” is highlighted on the display.
2. Press SLEEP continuously to set 15, 30, 45, 60, 75 and 90 minutes or Sleep Off which will
cancel the sleep function.
3. The sleep timer indicator “ “ will show on the display. Your radio will switch off after the pre-set
sleep time has elapsed.
Grab your free extended
warranty & keep up to date
with AZATOM® online at
www.azatom.com

13
Time/Date Setting:
When no DAB/FM signal, you need to set the TIME and DATE manually.
1. Press MENU to enter the settings menu.
2. Press ◄ or ► until “Settings”, press SELECT to conrm.
3. Press ◄ or ► until “Set Time/Date”, press SELECT to conrm.
Or ◄ or ► to set the time AUTO UPDATE 12/24 hours, and date format as well.
4. Press ◄ or ► and SELECT to set the correct time and date.
Alarm Setting:
NOTE: PLEASE SELECT A RADIO STATION BEFORE SETTING THE ALARM.
You will be given the option to choose from last station used or one of your favourite pre-set
channels.
1. Press “ ” or “ ” to entry the setting menu.
2. Press ◄ or ► to set the alarm time and press SELECT to conrm.
3. Press ◄ or ► to set the duration 15, 30, 45, 60, 90 minutes and press SELECT to conrm.

14
4. Press ◄ or ► to set the alarm source and press SELECT to conrm.
5. If you choose DAB radio or FM radio as your alarm you can choose from last station listened or
choose from your favourite pre-set channels 01 to 30
Press ◄ or ► to scroll between last listened and pre-set channels.
6. Press ◄ or ► to set the Once / Daily / Weekdays / Weekends, choose the days on which
the alarm is active.
Alarm will only sound for 1 day only.
Alarm will sound for 7 days of the week.
Alarm will sound Monday to Friday.
Alarm will sound Saturday and Sunday.
7. Press ◄ or ► to set the alarm volume and press SELECT to conrm.
8. Press ◄ or ► and SELECT to save the alarm setting.
For technical support call: 01740 629901 or email: info@azatom.com

15
Snooze - Stop Alarm - Disable Alarms:
1. When the alarm sounds, pressing the ZZZZZ button will temporarily silence (SNOOZE) the alarm,
you can choose the time from 5, 10, 15, 20, 25, 30 minutes and snooze off.
2. The snooze function also has a countdown allowing you to see how long before the alarm
re-sounds.
3. When you choose SNOOZE OFF, the radio returns to standby mode, showing the time and date.
Press POWER to turn it on.
Stop Alarm
When the alarm is sounding you can press any buttons except the Snooze button one time to stop
the alarm sound. The SONANACE T1 will then return to Standby mode.
Enable and Disable Alarms
How to Enable or Disable your Alarms 1 or 2 once you have set them:
- Long press for 2 seconds “ ” once for Alarm 1 on
- Repeat long press “ ” for 2 seconds for Alarm 1 off
- Long press “ ” for 2 seconds for Alarm 2 on
- Repeat long press “ ” for 2 seconds for Alarm 2 off
You will see the symbol on display screen when Alarm 1 is active
You will see the symbol on display screen when Alarm 2 is active
You will see the / symbol on display screen when Alarm 1 and 2 are active

16
Factory reset:
If your radio fails to operate correctly, or some digits on the display are missing or incomplete, it
may be possible to restore normal operation by carrying out a system reset on your radio. This will
restore the radio’s settings to the factory default. No pre-sets will be stored, and the list of DAB
radio stations will be empty.
If you have moved to a different part of the country and you wish to erase local DAB radio stations
that are no longer available from the stored list, then you may choose to carry out this procedure.
Your radio will automatically re-scan for the DAB stations available at your current location when it
restarts.
1. Press MENU to enter the menu.
2. Press ◄ or ► until the display shows “Settings”, then press SELECT to enter the settings
menu.
3. Press ◄ or ► until the display shows “Factory Reset”. Press SELECT.
4. If you wish to perform the reset operation, push the ◄ or ► until “YES” is highlighted on the
display and press. A full reset of your radio will be performed. All pre-sets and station lists will be
erased.
If you do not wish to reset your radio press ◄ or ► until “NO” is highlighted. Your radio will
return to the previous menu.
5. After a system reset a scan of the DAB band will be performed.
In case of malfunction due to electrostatic discharge, reset the product (temporary disconnection
of the power adaptor may be required) to resume normal operation.
Earphones (NOT INCLUDED):
The lead connecting the earphones to your radio acts as an aerial when plugged into the Earphone
socket.
1. Plug the earphones into the Earphone socket on the back of your radio.
2. Check that the Volume level is not too loud before listening through the earphones.
IMPORTANT: Do not switch on the radio with the earphones connected and inserted in your
ears. Excessive sound pressure from earphones can cause hearing loss.

17
Technical Specications
Power requirement mains (via adaptor): AC 100-240V, 50/60Hz
DC 5V 1A
3.7V /1200mAh battery.
Battery:
Frequency Coverage:
FM: 87.5-108MHz
174.928 - 239.200MHz
DAB:
Circuit Features:
Loudspeaker: 3.0 inch
Output power: 3W RMS (speaker)
Earphone socket: 3.5mm dia. stereo
Aerial system: FM: Telescopic Aerial
DAB: Telescopic Aerial
Grab your free extended
warranty & keep up to date
with AZATOM® online at
www.azatom.com
FREE Earphones with every review left
online at amazon.co.uk or ebay.co.uk
Fill in our easy online form to claim yours!

18
IMPORTANT SAFETY INFORMATION
1. Read these instructions.
2. Keep these instructions. Instructions are also
available for download at www.azatom.com
3. Heed all Warnings.
4. Follow all instructions.
5. Do not clean the apparatus near or with water.
6. Clean only with a dry cloth.
7. Do not block any ventilation openings.
Install in accordance with the manufacturer’s
instructions.
8. Do not install near any heat sources such as
radiators, heat registers, stoves, or other
apparatus (including ampliers) that produce heat.
9. Protect the power cord from being walked on
or pinched particularly at plugs, convenience
receptacles, and the point where they exit from
the apparatus.
10. Only use attachments/accessories specied by
the manufacturer.
11. Unplug this apparatus during light storms or
when unused for long periods of time.
12. Refer all servicing to qualied service personnel.
Servicing is required when the apparatus has been
damaged in any way, such as powersupply cord or
plug is damaged, liquid has been spilled or objects
have fallen into the apparatus, the apparatus has
been exposed to rain or moisture, does not operate
normally or has been dropped.
13. No naked flame sources, such as lit candles,
should be placed on the apparatus.
14. Dispose of used electrical products and
batteries safely according to your local authority
and regulations.
ADDITIONAL WARNINGS
The apparatus shall not be exposed to dripping
or splashing and no objects lled with liquid,
such as vases, shall be placed on apparatus.
Main plug is used to disconnect device and it
should remain readily operable during intended
use. In order to disconnect the apparatus from
the main mains completely, the mains plug
should be disconnected from the main socket
outlet completely.
Battery shall not be exposed to excessive heat
such as sunshine, re or the like.
RECYCLING ELECTRICAL PRODUCTS
You should now recycle your waste electrical goods
and in doing so help the environment.
This symbol means an electrical
product should not be disposed
of with normal household waste.
Please ensure it is taken to a
suitable facility for disposal when
nished with.
IMPORTANT: Please read all
instructions carefully before use
and keep for future reference
• Risk of electric shock.
Do not open
• Read all instructions carefully
before use and keep for future
reference.
• When servicing, use only
identical replacement parts.

www.azatom.com
@Azatom @Azatom_UK @azatom.online
Grab your free extended
warranty & keep up to date
with AZATOM® online at
www.azatom.com
FREE Earphones with every review left
online at amazon.co.uk or ebay.co.uk
Fill in our easy online form to claim yours!
 Loading...