

Page 1
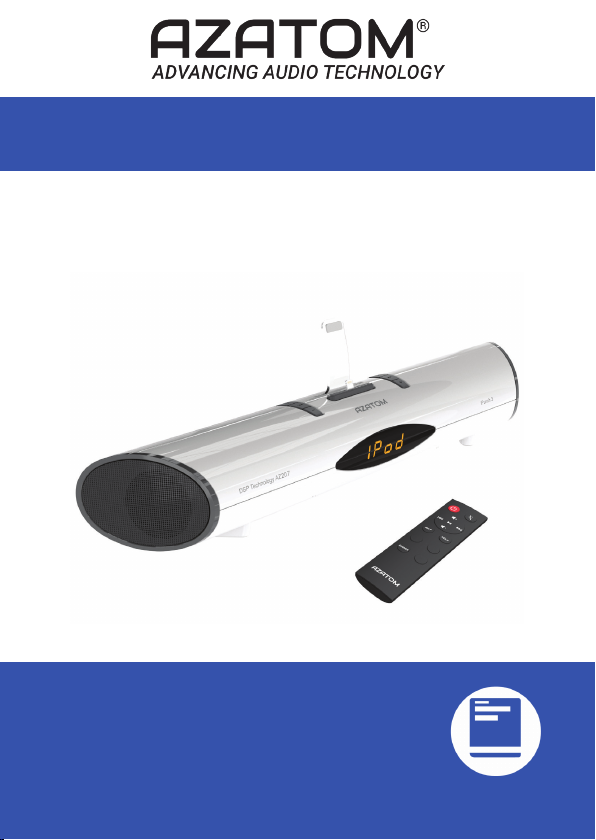
AZATOM® iPunch 3
Lightning Docking Station with FM Radio and Bluetooth™
User Manual
This manual is available to download online at www.azatom.com
Page 2

Thank you for shopping with AZATOM® Please read this
manual carefully before using your new device and keep it
safe for future reference.
The iPunch 3 is one of our most advanced docking
stations with premium speaker drivers and sound
processing technology for rich, crisp full sounding music.
With an Apple® certied Lightning connection for your
iPhone / iPod, you’ll be able to charge and listen to music
simultaneously. The iPunch 3 also come with a remote
control as standard.
Using the latest in Bluetooth™ technology you can connect
any Bluetooth™ enabled device and stream music to the
iPunch 3 Docking Station wirelessly.
Utilising a compact, sleek and portable design it makes it
easy to move the iPunch 3 Docking Station to anywhere
around your home.
FREE Earphones with every review left
online at amazon.co.uk or ebay.co.uk
Fill in our easy online form to claim yours!
Page 3

Contents
Contents
Section: Page:
Controls & Interface ............................................................. 1
What’s In The Box? ................................................................ 3
Using the iPunch 3 ................................................................ 4
Using the iPunch 3 Remote ................................................ 6
Charging Devices .................................................................. 7
Technical Specications ..................................................... 8
Troubleshooting Guide ........................................................ 9
Important Safety Information ........................................... 10
Grab your free extended
warranty & keep up to date
with AZATOM® online at
www.azatom.com
Page 4
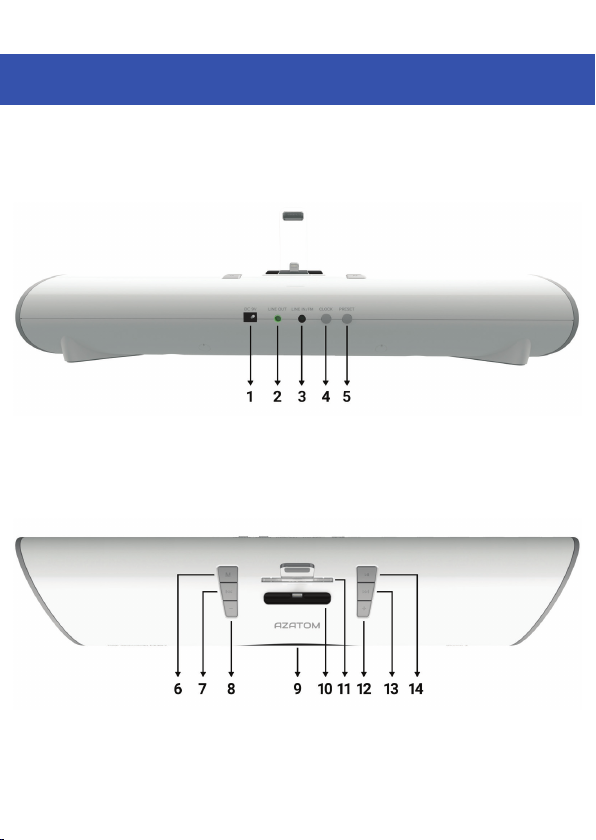
1.
Controls & Interface
Back View
Top View
Page 5

2.
(1) DC IN jack: DC input 9V (use provided ofcial adapter).
(2) Line out jack: Output the audio of iPhone / iPod / Bluetooth / FM radio via 3.5mm Cable.
(3) Line in jack: Connect the speaker and other audio player via Aux Cable.
The Aux cable also acts as the antenna for the FM radio when connected to the
Line In / FM port.
(4) Clock:
a. Working mode: short press to preset standby time from 15 to 120 minutes & off to cancel
preset.
b. Standby mode: long press to adjust the clock, setting rst the hour, then minute and once
you’ve set the time again to press exit.
(5) Preset: Select FM station presented.
(6) Audio source select:
Select iPhone / Bluetooth / FM / LINE IN, short press the button, the screen will display the
now playing audio source, press the button within 3 seconds will change the audio source
in turn.
(7) Previous:
a. Short press is previous track, long press is seek backwards.
b. FM mode: short press is previous 0.1MHz, long press is searching station automatically.
c. Clock mode: change hour and minutes.
(8) Volume – (Reduces volume)
(9) LED display screen.
(10) Lightning connection.
(11) iPhone support shelf insert hole: Must insert the support shelf (included with package) into
the hole before using.
(12) Volume + (Increases volume)
(13) Next:
a. Short press is next track, long press is seek forward.
b. FM mode: short press is next 0.1MHz, long press is searching station automatically.
c. Clock mode: change hour and minutes
(14) Play/Pause:
a. Standby mode: press to power on iPod.
b. Bluetooth mode: play and pause.
c. FM mode: short press to search and store stations automatically.
d. Line in mode: short press to mute and cancel mute.
e. Any working mode: long press to enter standby (clock mode).
For technical support call: 01740 629901 or email: info@azatom.com
Page 6

3.
What’s in the box?
iPunch 3 Docking Station with FM Radio and Bluetooth™
Remote Control
User Manual
Power Adapter
Aux Cable
AZATOM® Warranty Card
Phone Back Rest
Page 7

4.
Using the iPunch 3
Connect the power plug to a power outlet, then connect the DC
adapter to the DC input jack on the back of the iPunch 3.
The LED screen will power on and the iPunch 3 will enter standby
mode (also referred to as “Clock mode”).
Short press the play/pause button to fully power the iPunch 3 on,
to return back to Standby / Clock Mode, long press the play/pause
button.
(1) When using for the rst time, please set the clock time (or insert an iPhone while the
iPunch 3 is powered on, the clock will synchronize with iPhone clock automatically).
a. Long press the clock button and the clocks hour number
will start flashing, change the hour number using the Next
and Previous buttons.
b. Short press the clock button again, then change the
minute number.
c. Short press the clock button to exit the clock setting
mode and conrm the clock time.
Caution: A time maintain battery is built in the speaker, it can
maintain the clock time without power supply of the DC adapter.
(2) The speaker will revert to the last input source that was used e.g. if AUX In was used
last when the iPunch 3 was powered off, it’ll power on into that mode.
(3) In iPod mode, the symbol “iPod” will be on and flashing, insert an iPhone or iPod lightly
according the direction of the lightning jack. The symbol “iPod” will stop flashing and
play the iPhone music automatically.
a. Press the next / previous / play buttons to control the iPhone play. Press the
volume +/- buttons adjust the volume of the speaker.
Important: If the iPhone has a protective case on, we suggest you remove the case for
guaranteed compatibility.
Page 8

5.
(4) To enter Bluetooth mode – press the source button while the iPunch 3 is powered on
until “blue” is displayed on screen. Once “blue” starts flashing the iPunch 3 is in pairing
mode - activate the Bluetooth on you mobile phone and search for nearby devices until
you see the iPunch 3 speaker and connect to it (speaker name: AZATOM iPunch 3,
the speaker will be in standby if no connection is made after 5 minutes), after a
successful connection, “BLUE” will be solid and not flashing. If you want to connect a
new Bluetooth device, disconnect the connected phone or long press (for 3 seconds)
the source button, then “BLUE “will begin flashing again for a new connection.
(5) Insert a 3.5mm audio cable and press the Source button until “LINE” is displayed on the
screen – this is the Line in mode. Connect the device via earphone jack (or Line out)
with the speaker’s Line in jack through the audio cable (included w/ package). The
speaker will play the music from the connecting player. For better sound quality make
sure the volume on the device connected (playing the music) to the iPunch 3 has its
volume set to around 75%.
(6) Press the Source button until “FM” is displayed on screen – This is the FM Radio mode.
IMPORTANT: Please make sure an AUX cable is plugged into the LINE IN / FM Port at the
a. Short press the Next and Previous button to change the frequency (0.1MHz every
time). Long press to start searching automatically for the next station.
b. Short press the play/pause button to search and store stations automatically.
The screen will display the Station plus the Station number, the iPunch 3 can store
20 FM stations maximum.
You can select the stored station by the “PRESET” button on the speaker or the
button “M” of the remote control.
Caution: 1. For better reception, please straighten antenna to maximize signal.
2. If you live in an area with poor signal strength, you will not pick up as many
radio stations – This is normal and subject to the area you are searching for
stations in.
3. The stored stations will no longer be kept in the memory if you have left the
iPunch 3 powered off for a long period of time.
(7) Adjust the volume of the iPunch 3 to a comfortable level by using the two volume
buttons on either side of the Lightning connector of the speaker or on the remote
control (the monitor will display the volume status)
(8) Put the iPunch 3 into standby mode when it is not playing music to help lower
energy usage.
rear of the iPunch 3 as this acts as the antenna.
For technical support call: 01740 629901 or email: info@azatom.com
Page 9

6.
Using the iPunch 3 Remote
(1) Standby
(2) Select Source
(3) Volume + (Increases volume)
(4) Skip Backward / Seek Backward
(5) Skip Forward / Seek Forward
(6) Play/Pause
(7) Volume – (Reduces volume)
(8) Previous Playlist
(9) Next Playlist
(10) Mute
(11) Clock
(12) Dimmer
(13) Menu / Source
(14) Battery stock
(CR2025 li-ion battery)
*
*
*
*
*
*This functionallity is dependant upon the device connected and type of connection to the iPunch 3.
An audio device connected via AUX cable for example will not utilise the remote controls full functionallity.
Page 10

7.
Charging Devices
The iPunch 3 can safely recharge an iPhone and iPod, simply plug
the power adapter into iPunch 3 and then insert the iPhone / iPod
into the Lightning connector.
The iPunch 3 will charge a Lightning device even in standby
mode. The charging icon will display on the iPhone / iPod, generally it will take 2-3 hours to complete charging (if the iPunch 3 is
playing music, the time of charging will be longer).
Note: While charging your device, if it gets warm to the touch this is
normal and just the battery within the device receiving charge.
For technical support call: 01740 629901 or email: info@azatom.com
FREE Earphones with every review left
online at amazon.co.uk or ebay.co.uk
Fill in our easy online form to claim yours!
Page 11

8.
Technical Specications
Unit Specications:
Maximum output power: 24W (12W+12W)
Audio sources: Lightning
3.5mm stereo
Bluetooth
FM radio
AC power adapter: 9V/2000mA
Frequency response: 120-18000Hz
S/N: ≥ 60dB
Channel separation: ≥ 40dB
Remote control battery: CR2025
Remote control distance: ≥ 5 m
Remote control angle: ≥ 45 °
Bluetooth Specications:
Bluetooth version: Bluetooth 4.0
Transfer power: 25mW
Receive sensitivity: -82dBm
Transfer distance: ≥10
Transfer sensitivity: 4dBm
Support standard: A2DP1.2
Grab your free extended
warranty & keep up to date
with AZATOM® online at
www.azatom.com
Page 12

9.
Trouble Shooting Guide
Page 13

10.
IMPORTANT SAFETY INFORMATION
1. Read these instructions.
2. Keep these instructions. Instructions are also
available for download at www.azatom.com
3. Heed all Warnings.
4. Follow all instructions.
5. Do not clean the apparatus near or with water.
6. Clean only with a dry cloth.
7. Do not block any ventilation openings.
Install in accordance with the manufacturer’s
instructions.
8. Do not install near any heat sources such as
radiators, heat registers, stoves, or other
apparatus (including ampliers) that produce heat.
9. Protect the power cord from being walked on
or pinched particularly at plugs, convenience
receptacles, and the point where they exit from
the apparatus.
10. Only use attachments/accessories specied by
the manufacturer.
11. Unplug this apparatus during light storms or
when unused for long periods of time.
12. Refer all servicing to qualied service personnel.
Servicing is required when the apparatus has been
damaged in any way, such as powersupply cord or
plug is damaged, liquid has been spilled or objects
have fallen into the apparatus, the apparatus has
been exposed to rain or moisture, does not operate
normally or has been dropped.
13. No naked flame sources, such as lit candles,
should be placed on the apparatus.
14. Dispose of used electrical products and
batteries safely according to your local authority
and regulations.
ADDITIONAL WARNINGS
The apparatus shall not be exposed to dripping
or splashing and no objects lled with liquid,
such as vases, shall be placed on apparatus.
Main plug is used to disconnect device and it
should remain readily operable during intended
use. In order to disconnect the apparatus from
the main mains completely, the mains plug
should be disconnected from the main socket
outlet completely.
Battery shall not be exposed to excessive heat
such as sunshine, re or the like.
RECYCLING ELECTRICAL PRODUCTS
You should now recycle your waste electrical goods
and in doing so help the environment.
This symbol means an electrical
product should not be disposed
of with normal household waste.
Please ensure it is taken to a
suitable facility for disposal when
nished with.
IMPORTANT: Please read all
instructions carefully before use
and keep for future reference
• Risk of electric shock.
Do not open
• Read all instructions carefully
before use and keep for future
reference.
• When servicing, use only
identical replacement parts.
Page 14

www.azatom.com
@Azatom @Azatom_UK @uk.Azatom
Grab your free extended
warranty & keep up to date
with AZATOM® online at
www.azatom.com
FREE Earphones with every review left
online at amazon.co.uk or ebay.co.uk
Fill in our easy online form to claim yours!
 Loading...