

Page 1
AZATOM® Home Hub Q
Bluetooth™ Radio Alarm with Wireless Qi Charging
User Manual
This manual is available to download online at www.azatom.com
Page 2

Page 3

Thank you for shopping with AZATOM® Please read this manual
carefully before using your new device and keep it safe for future
reference.
The Home Hub Q is one of our best selling Bluetooth™ Radio Alarms
with Wireless Qi Charging with premium speaker drivers for rich
sounding music.
The Home Hub Q is small enough to put anywhere around your home
with a room lling 30W of power.
Bluetooth™ allows you to stream your content wirelessly from any
Bluetooth-enabled device including phones, tablets and laptops.
A custom amplier combined with High Fidelity Drivers ensure that
whether you are docked or streaming, playing music, a podcast or
the soundtrack to a lm, the Home Hub Q delivers superb quality.
Qi charging allows you to wirelessly charge your compatible device
by simply placing it where the Qi charging logo appears on the
Home Hub Q.
FREE Earphones with every review left
online at amazon.co.uk or ebay.co.uk
Fill in our easy online form to claim yours!
Page 4

Contents
Contents
Section: Page:
Controls & Interface.................................................................
Installing the batteries............................................................
What’s In The Box?...................................................................
Using the Home Hub Q:
General Operation / Setting the time / Setting an alarm.........................................
Using Qi Charging & Using the USB Port.........................................................
Activate & Deactivate Alarm / Display Brightness................................................
Play via Bluetooth.................................................................................
Control via Bluetooth..............................................................................
Listening to / Tuning FM Radio....................................................................
Technical Specications........................................................
Troubleshooting Guide............................................................
Important Safety Information...............................................
1
3
4
5
6
7
8
9
10
11
12
13
Grab your free extended
warranty & keep up to date
with AZATOM
www.azatom.com
®
online at
Page 5
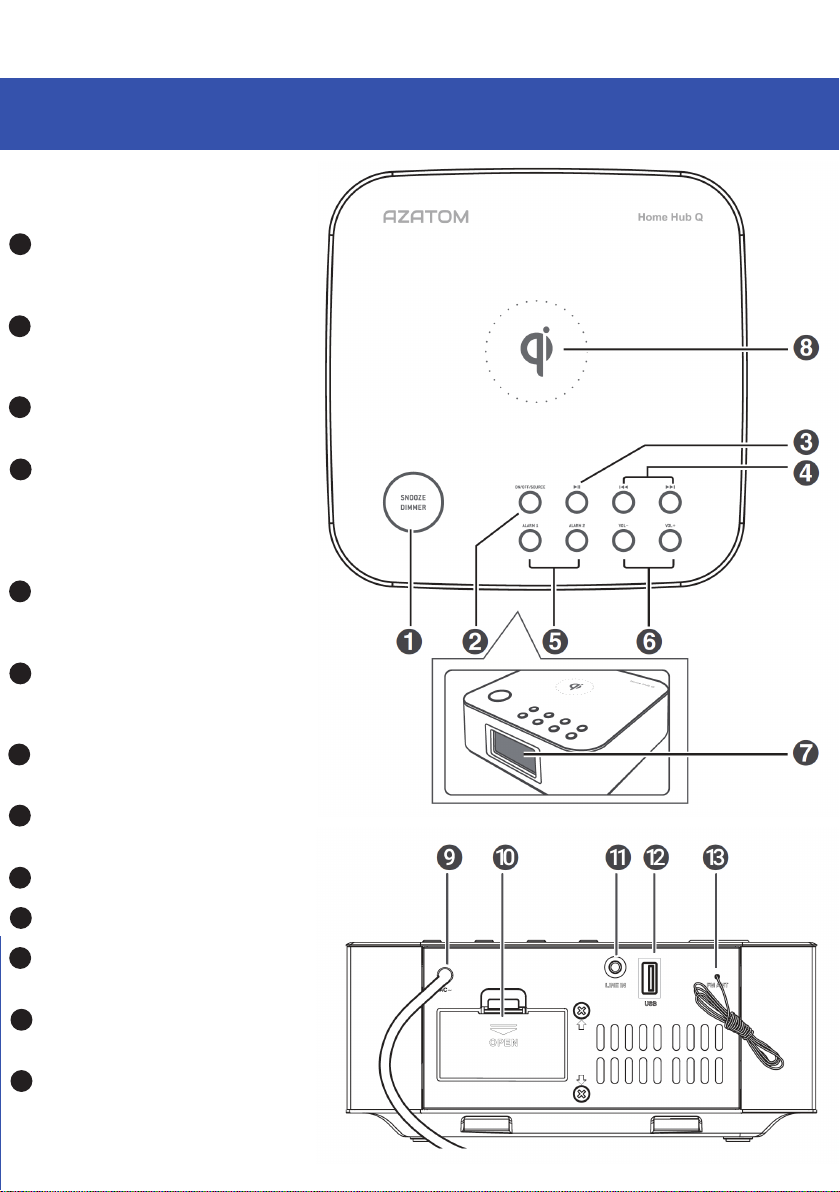
Controls & Interface
1 SNOOZE/DIMMER
- Repeat the alarm
- Adjust the display brightness
2 ON/OFF/SOURCE
- Turn on or turn off the unit
- Select the play function
3 ►| |
- Start or pause play
4 FORWARDS ► ► | / BACKWARDS | ◄ ◄
- Skip to previous/next audio le
- Search radio stations manually
- Press and hold this button to
search radio stations automatically
5 ALARM 1/ALARM 2
- Set the alarm timer
- View alarm settings
1
Top
6 VOLUME +/-
- Decrease or increase the
volume level
7 Display Panel
- Show the current status
8 Qi Charging
- Wirelessly Charge
9 AC Wire
10 Battery Compartment
11 LINE IN
- Connect to an external audio device
12 USB socket
- Use this to charge your device
13 FM Antenna
Page 6
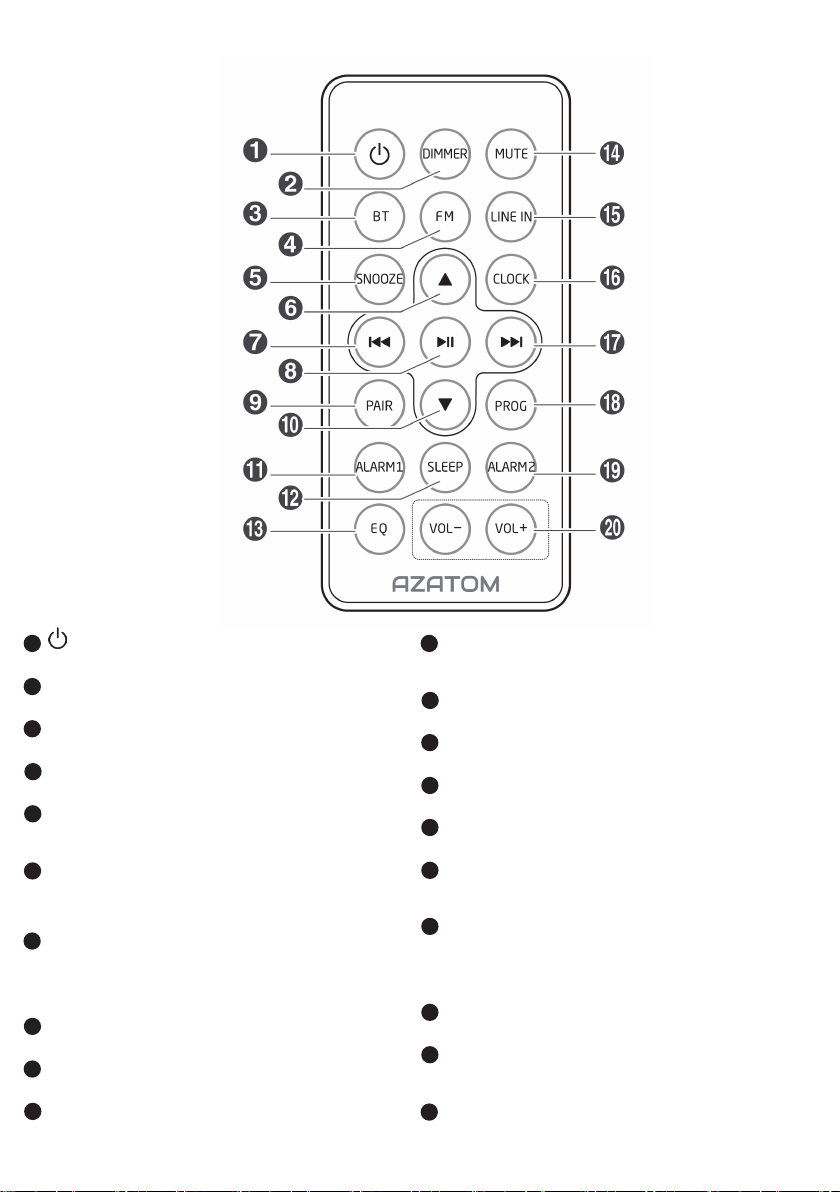
Remote
2
1
- Turn on or turn off unit
2 DIMMER
- Adjust display brightness
3 BT
- Select Bluetooth Functions
4 FM
- Select FM functions
5 SNOOZE
- Snoozes the Home Hub Alarm
6 UP ▲
- Navigate through the menu
- Select a next preset station
- Adjust time
7 SKIP BACKWARDS
- Skip to previous audio le.
- Search radio stations manually
- Press and hold this button to search radio stations
automatically.
8
►| |
- Start or pause play
9 PAIR
- Selects the PAIR function
10 DOWN ▼
- Navigate through the menu
For technical support call: 01740 629901 or email: info@azatom.com
- Select a previous preset station
- Adjust time
| ◄ ◄
11 ALARM 1
- Set the alarm 1 timer
- View alarm 1 settings
12 SLEEP
- Set the sleep timer
13 EQ
- Select a preset sound effect: Classic, Rock, Jazz, etc.
14 MUTE
- Mute or resume the sound
15 LINE IN
- Select LINE IN function
16 CLOCK
- Press and hold this button in the standby mode to set
the clock
17 SKIP FORWARDS
- Skip to next audio le
- Search radio stations manually
- Press and hold this button to search radio stations
automatically
18 PROG
- Preset stations for tuner
19 ALARM 2
- Set the alarm 2 timer
- View alarm 2 settings
20 VOL+ /VOL-
- Increase/Decrease the volume level
► ► |
Page 7

3
Install Batteries
Note:
• You can only use AC power as power supply.
Batteries (not supplied) are for powering the
clock and alarm only
• If the system is unplugged or if a power failure
occurs, all setups of the unit will be erased unless
there are batteries in the unit
1. Open the batteries compartment
2. Install two AAA batteries (not supplied)
with above
3. Close the battery compartment
Prepare the Remote Control:
The provided Remote Control allows the unit to be operated
from a distance.
• Even if the Remote Control is operated within the effective
range (6m), remote control operation may be impossible
if there are any obstacles between the unit and the remote
control
• If the Remote Control is operated near other products which
generate infrared rays, or if other remote control devices
using infrared rays are used near the unit, it may operate
incorrectly. Conversely, the other products may operate
incorrectly
For First-time use:
The unit has a pre-installed lithium CR2025 battery.
Remove the protective tab to activate the remote control
battery.
To Replace the Remote Control Battery:
1. Pull out the battery tray and remove the old battery
2. Place a new CR2025 battery into the battery tray with correct
polarity (+/-) as indicated
3. Insert the battery tray back into the slot
Precautions Concerning Batteries
• When the Remote Control is not going to be used for a long
time (more than a month), remove the battery from the
Remote Control to prevent it from leaking.
• If the batteries leak, wipe away the leakage inside the battery
compartment and replace the batteries with new ones.
• Do not use any batteries other than those specied.
• Do not heat or disassemble batteries.
Never throw them in re or water.
• Do not carry or store batteries with other metallic objects.
Doing so could cause batteries to short circuit, leak or
explode.
• Never recharge a battery unless it is conrmed to be
rechargeable.
Page 8
4
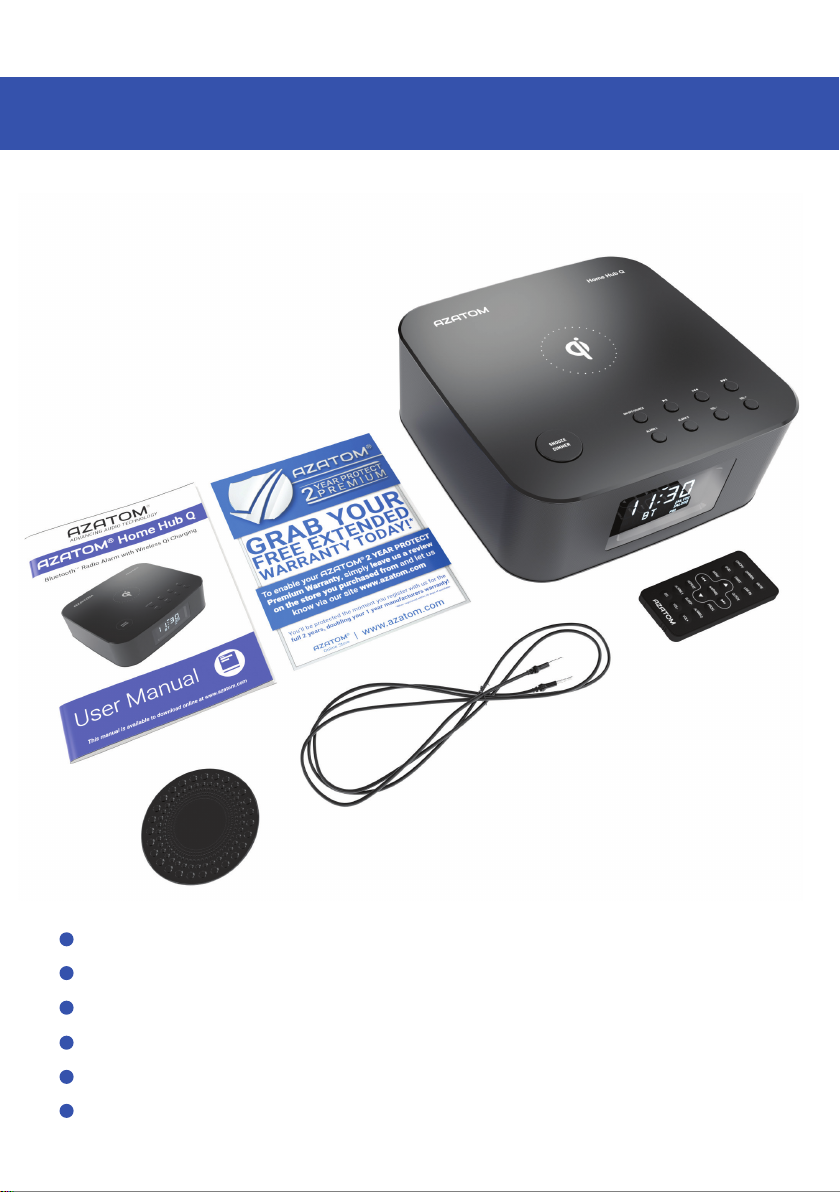
What’s in the box?
AZATOM
User Manual
Aux Cable
Remote Control
AZATOM
Anti Slip Pad
®
®
Warranty Card
Bluetooth™ Radio Alarm with Wireless Qi Charging
Page 9

5
Using the Home Hub Q
General Operation
Power:
You can use all the functions on the top of the unit or the remote control after connecting to power
supply (called Standby Mode).
Turn On:
Press ON/OFF button to turn the system on from standby mode.
Press ON/OFF/SOURCE to select different functions.
When turning the system on, the unit will start in the same mode as it was in when it was
switched off.
Turn Off:
Press and hold ON/OFF button on the unit or press the button on the remote control again to turn the
system off and go to standby mode.
The unit will automatically revert to Standby Mode when not in use for 15 minutes unless in FM mode.
Be sure to unplug the power cord from the outlet when the system is not in use for an
extended period of time.
Set Time:
The built-in clock shows the correct time in the display.
1 In standby mode, press and hold the CLOCK button for some seconds, hour indicator will blink.
2 Set the hour with the ▲ button or ▼ button.
3 Press the CLOCK button to conrm, minute indicator will blink.
4 Repeat steps 2-3 to set the minutes, day, month and year.
In standby mode, press and hold the CLOCK button for 3 seconds, then press the ►|| button
to select 12 / 24 hour format.
Set the Alarm Timer:
You can set two alarms which go off at different times.
1. Ensure that you have set the clock correctly.
2. Press
3. Press ALARM 1 or ALARM 2. The hour digits will begin to blink.
4. Press
5. Press ALARM 1 or ALARM 2. The minute digits begin to blink.
6. Repeat steps 5-6 to set the minute.
7. Repeat steps 5-6 to select whether the alarm will ring for the whole week, on weekdays,
or at the weekend.
8. Repeat steps 5-6 to set the alarm volume.
▲/▼ on the remote control to select an alarm sound source: FM tuneror buzzer.
▲/▼ repeatly to set the hour.
Page 10
6
Clock Synchronization
1. In the STANDBY mode, press and hold the SNOOZE button on the remote control for few seconds,
then the unit will enter the CLOCK SYNC mode.
2. Press
modes:
- RDS Only synchronize with the RDS radio station.
- OFF Turn off the clock synchronization function, only adjust the clock manually.
3. Then press on remote control or on main unit to conrm.
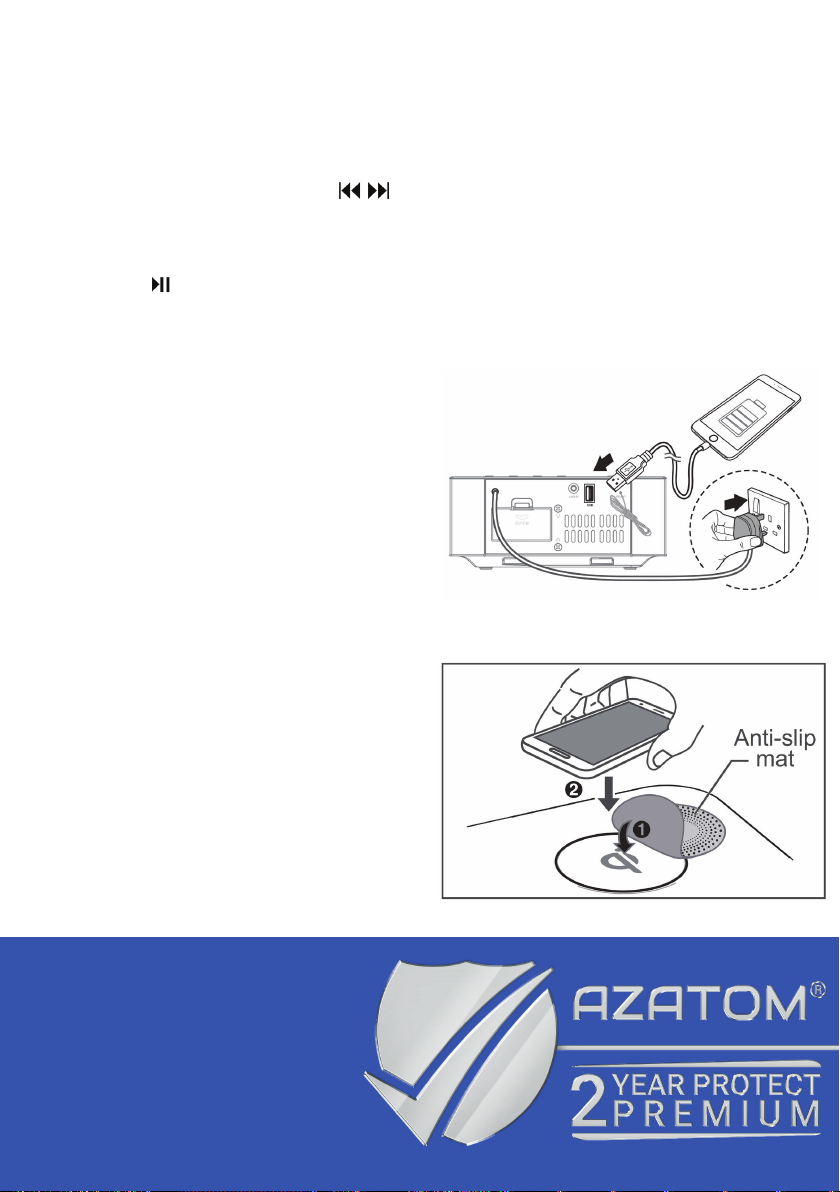
Connect the Power
Caution:
Risk of product damage! Ensure that the power supply voltage corresponds to the voltage printed on
the rating label on the back or the underside of the
unit. Before connecting the AC power cord, ensure
you have completed all other connections.
• Connect the AC power cord to the wall socket.
Use USB Charge socket:
Connect a USB cable (not supplied) to the USB
socket to charge your smartphone or tablet PC.
▲/▼ on the remote control or on the unit to switch the clock synchronization
Uses of Qi (wireless charging):
This function only works with mobile devices
that support Qi technology.
1. To prevent the displacement of mobile
devices, please put anti-slip mat rst.
2. Make sure your mobile devices are aligned to the
Home Hub Q’s charging area.
• When mobile devices play music while
wirelessly charging, mobile devices may rattle
against the Home Hub Q, please reduce the
volume.
• When mobile devices are not charging, please
check whether the mobile device is resting within
the charge area.
Grab your free extended
warranty & keep up to date
with AZATOM® online at
www.azatom.com
Page 11

7
Activate and Deactivate the Alarm Timer:
Press ALARM 1 or ALARM 2 to activate or deactivate the timer.
• If the timer is activated, [AL1 ] or [AL2 ] is displayed.
• If the timer is deactivated, [AL1 ] or [AL2 ] disappears.
Repeat Alarm:
You can press to adjust the interval to repeat alarm. When the alarm rings, press SNOOZE/ DIMMER.
The alarm repeats ringing 9 minutes later.
Stop Alarm Ring:
When the alarm rings, press the corresponding ALARM 1 or ALARM 2. The alarm stops but the alarm
settings remain.
View the Alarm Settings:
Press ALARM 1 or ALARM 2 to view the alarm settings.
Set the sleep timer:
This unit can switch to standby automatically after a set period of time.
1. Press SLEEP repeatedly to select a set period of time (in minutes).
• When the sleep timer is activated, the display will show, the volume will gradually decrease before
the unit powers off.
2. Press SLEEP repeatedly until [OFF] is displayed.
• When the sleep timer is deactivated, disappears on the display.
Adjust Display Brightness:
Press DIMMER repeatedly to select different levels of display brightness.
Adjust Volume Level:
During play, press the VOL+/- buttons to increase/decrease the volume level.
Select a Preset Sound Effect
During play, press the EQ button repeatedly to select: [FLAT], [Pop], [Classic], [Rock], [Jazz]
Mute Sound:
During play press the MUTE button to mute or restore sound. Press this button again to
cancel the effect.
Grab your free extended
warranty & keep up to date
with AZATOM
®
online at
www.azatom.com
Page 12

8
Play with Bluetooth Device:
You can listen to music from a bluetooth-enabled device via this player.
Pair Bluetooth-enabled Devices Manually
The rst time you connect your Bluetooth device to this player, you need to pair your device to this
player.
Note:
• The operational range between this player and a Bluetooth device is approximately 8 metres.
• Before you connect a Bluetooth device to this unit, familiarise yourself with the Bluetooth capabilities of the device.
• Compatibility with all Bluetooth devices is not guaranteed.
• Any obstacle between this unit and a Bluetooth device can reduce the operational range.
• Keep this player away from any other electronic device that may cause interference.
1. Turn on the Bluetooth function on your device.
2. Switch player’s source to Bluetooth, Display panel shows “BT”, then shows “NO BT”
(if no Bluetooth device is connected).
3. Press or PAIR on remote control or on the Home Hub Q for a few seconds to activate Blue
tooth pairing mode, display panel shows “PAIR”.
4. Search for Bluetooth device with your device.
5. Select “Home Hub Q” in the pairing list.
6. If prompted, enter default password “0000”, when the pairing succeeds the display panel shows
“BT” again.
7. To disconnect connection, turn off the Bluetooth function on your device or switch the player to
another source.
Tip:
- If a connection exist, hold and press or PAIR remote control or on the Home Hub Qfor a few seconds to
re-activate the pairing mode, the connection will be interrupted.
- If no other Bluetooth device pairs with this player within two minutes, the player will your device is moved beyond the
operational range.
- If you want to reconnect your device to this player, place it within the operational range.
- If the device is moved beyond the operational range, when it is brought back, please check if the device is still
connected to the player.
- If they are connected, display panel shows “BT”.
- If the connection is lost, display panel shows “NO BT”. Follow the instruction above to pair your device to
the player again.
For technical support call: 01740 629901 or email: info@azatom.com
Page 13

9
Controlling Music from your Bluetooth Device:
• If the connected Bluetooth device supports Advanced Audio Distribution Prole (A2DP), you can
listen to the music stored on the device through the player.
• If the device also supports Audio Video Remote Control Prole (AVRCP), you can use the player’s
remote control to play music stored on the device.
1. Pair your device with the player.
2. Start to play music via your device (if it supports A2DP)
3. Use supplied remote control to control play (if it supports AVRCP)
- To pause/resume play, press the ►| | button.
- To skip to a track, press the | ◄ ◄ / ► ► | buttons.
Play from an External Audio Device:
You can listen to an external audio device through this unit.
1 Ensure that the unit is connected to the TV or audio device.
- Connect the 3.5mm audio cable to the LINE IN socket on the rear of unit and to the headphone
socket on the audio player.
2 Press the ON/OFF/SOURCE button on the main unit repeatedly or the LINE IN button on the remote
control to select the LINE source.
3 Start to play on the audio player.
4 Press the VOL +/– buttons on remote control or on the main unit to adjust the volume to your
desired level.
For technical support call: 01740 629901 or email: info@azatom.com
Page 14

10
Listening to FM Radio
Tuning in a Station:
1. Press the FM button to select the FM source.
2. Press and hold the buttons, the frequency changes down or up automatically until a
station is found.
3. Press buttons repeatedly until you nd the station you want.
Presetting Stations, You can preset up to 20 FM stations.
Program radio stations automatically:
Press and hold the PROG button for 2 seconds to activate automatic programming. All available sta-
tions are programmed in the order of waveband
reception strength.
- The rst programed radio station is played automatically.
Program radio stations manually:
1. Tune in the desired station, then press the PROG button.
2. Press the ▲/▼ buttons on the remote control to select a preset number.
3. Press the PROG button to store the station.
4. Repeat above steps 1 to 3 for each station you want to store in memory with a preset number.
If the system is unplugged or if a power failure occurs, the preset stations will be lost unless
there are batteries in the unit.
Tune to a Preset Radio Station:
Press the ▲ or ▼ buttons to select a preset number that you want.
FREE Earphones with every review left
online at amazon.co.uk or ebay.co.uk
Fill in our easy online form to claim yours!
Page 15

11
Technical Specications
General
Power Requirements.................................................................................AC220-240V~ 50/60Hz
Power Consumption..................................................................................25W
USB 2.0 socket for charging....................................................................5V 1A
Output Power..............................................................................................5W x 2
Total Harmonic Distortion........................................................................1%(1kHz, 1W)
Audio Input Sensitivity.............................................................................. 500mV
Frequency Response.................................................................................40Hz - 20kHz
Tuning Range..............................................................................................87.5 - 108MHz
Unit Dimension (W x H x D)......................................................................198 x 89 x 198mm
Speaker Impedance...................................................................................2Ω
Remote Control
Distance......................................................................................................6m
Angle........................................................................................................... 30°
Battery type................................................................................................CR 2025
Standard Accessories
Remote Control ........................................................................................ x 1
Instruction Manual................................................................................... x 1
3.5mm to 3.5mm audio cable................................................................ x 1
Anti Slip Pad............................................................................................... x 1
FREE Earphones with every review left
online at amazon.co.uk or ebay.co.uk
Fill in our easy online form to claim yours!
Page 16

12
Troubleshooting Guide
To keep the warranty valid, never try to repair the system yourself. If you encounter problems when
using this unit, check the following points before requesting service.
No power:
- Ensure that the AC cord of the apparatus is connected properly.
- Ensure that there is power at the AC outlet.
- Press ON/OFF button to turn the unit on.
Remote control does not work:
- Before you press any function button, rst select the correct source.
- Reduce the distance between the remote control and the unit.
- Insert the battery with its polarities (+/-) aligned as indicated.
- Replace the battery.
- Aim the remote control directly at the sensor on the front of the unit.
No Response From the Unit:
- Disconnect and reconnect the AC power plug, then turn on the unit again.
Poor radio reception:
- Increase the distance between the unit and your TV or VCR.
- Fully extend the FM antenna.
- Connect an outdoor FM antenna instead.
Timer does not work:
- Set the clock correctly.
- Switch on the timer.
Clock/timer setting erased:
- Power has been interrupted or the power cord has been disconnected.
- Reset the clock/timer.
I can’t nd the Bluetooth name of this unit on my Bluetooth device for
Bluetooth pairing:
- Ensure that the unit is switch on.
- Ensure that the Bluetooth function is activated on your Bluetooth device.
Grab your free extended
warranty & keep up to date
with AZATOM
®
online at
www.azatom.com
Page 17

13
IMPORTANT SAFETY INFORMATION
1. Read these instructions.
2. Keep these instructions. Instructions are also
available for download at www.azatom.com
3. Heed all Warnings.
4. Follow all instructions.
5. Do not clean the apparatus near or with water.
6. Clean only with a dry cloth.
7. Do not block any ventilation openings.
Install in accordance with the manufacturer’s
instructions.
8. Do not install near any heat sources such as
radiators, heat registers, stoves, or other
apparatus (including ampliers) that produce heat.
9. Protect the power cord from being walked on
or pinched particularly at plugs, convenience
receptacles, and the point where they exit from
the apparatus.
10. Only use attachments/accessories specied by
the manufacturer.
11. Unplug this apparatus during light storms or
when unused for long periods of time.
12. Refer all servicing to qualied service personnel.
ADDITIONAL WARNINGS
The apparatus shall not be exposed to dripping
or splashing and no objects lled with liquid,
such as vases, shall be placed on apparatus.
Main plug is used to disconnect device and it
should remain readily operable during intended
use. In order to disconnect the apparatus from
the main mains completely, the mains plug
should be disconnected from the main socket
outlet completely.
Battery shall not be exposed to excessive heat
such as sunshine, re or the like.
RECYCLING ELECTRICAL PRODUCTS
You should now recycle your waste electrical goods
and in doing so help the environment.
This symbol means an electrical
product should not be disposed
of with normal household waste.
Please ensure it is taken to a
suitable facility for disposal when
nished with.
IMPORTANT: Please read all in
structions carefully before use and
keep for future reference
-
Servicing is required when the apparatus has been
damaged in any way, such as powersupply cord or
plug is damaged, liquid has been spilled or objects
have fallen into the apparatus, the apparatus has been
exposed to rain or moisture, does not operate normally or has been dropped.
13. No naked flame sources, such as lit candles,
should be placed on the apparatus.
14. Dispose of used electrical products and
batteries safely according to your local authority
and regulations.
• Risk of electric shock.
Do not open
• Read all instructions carefully
before use and keep for future
reference.
• When servicing, use only
identical replacement parts.
Page 18

Get to know us
Azatom brand is a UK-based high-tech company owned by
4Cool Technology Ltd which specialises in creating
innovative speaker systems and high-end partner products
for iPads, iPhones, iPods and other Tablets and
Smartphones. We have a clear focus on improving sound
performance for digital products. Azatom has unique,
proprietary technology in the areas of DSP (Digital Sound
Processing), Airflow and Shape design which we combine
to make some of the most exciting systems on the market.
We are constantly evolving our designs and incorporating
the very latest innovations in technology to stay at the
forefront of digital sound. As phones and tablets have
become the media hubs for people’s lives - Azatom
products deliver the technology and sound quality to give
people greater freedom and enjoyment from their devices.
We are a fast-growing technology rm with a clear focus
on developing new sound technologies and innovative, high
quality products. Our R&D is based at our Headquarters
in Netpark, a Technology cluster here in the UK. Here we
develop new technology, develop patents, carry out studio
sound testing and undertake all aspects of the design of
new products. We have the expertise to take new
technologies and innovations from ideas through to
class-leading products.
Page 19

Technology put through its paces
We use the latest software and equipment to tune our
speakers and use studio space to create the best sounding
systems at their respective prices: Our compact speaker
systems produce the sound of larger, more expensive units.
Whilst our larger speaker systems are competitive with
units costing many times their price.
Unlike many other companies, we are able to produce
superior sound quality through using our own DSP
(Digital Sound Processing) microchips, which we have
evolved and ‘tuned’ with extensive studio testing.
The Azatom DSP chipset lies at the heart of many Azatom
products. Our DSP chips are constantly being developed
and tested to ensure the highest sound performance and
reliability for extended use. The Azatom DSP chip is also
tuned to ensure increased Bass performance without the
articial ‘added bass’ which is common with other systems.
We match our DSP chip with the very best drivers, cones
and tweeters to ensure a smooth, rich sound for the
complete system. Our Airflow technology works in
partnership with the DSP chip and speakers to create
the high quality and expansive sounds of larger systems
within smaller, portable speaker cabinets; whilst our larger
systems are some of the most powerful in the market. Our
focus is always to produce the best sounding speakers for
playing music from digital devices.
We are passionate about the advances in sound
technology and it is our aim to be recognized as one of
the leading companies in our eld by developing the most
advanced technology and exceeding expectations with our
products.
Page 20

www.azatom.com
@AZATOM @AZATOM_UK @AZATOM.ONLINE
Grab your free extended
warranty & keep up to date
with AZATOM® online at
www.azatom.com
FREE Earphones with every review left
online at amazon.co.uk or ebay.co.uk
Fill in our easy online form to claim yours!
 Loading...