

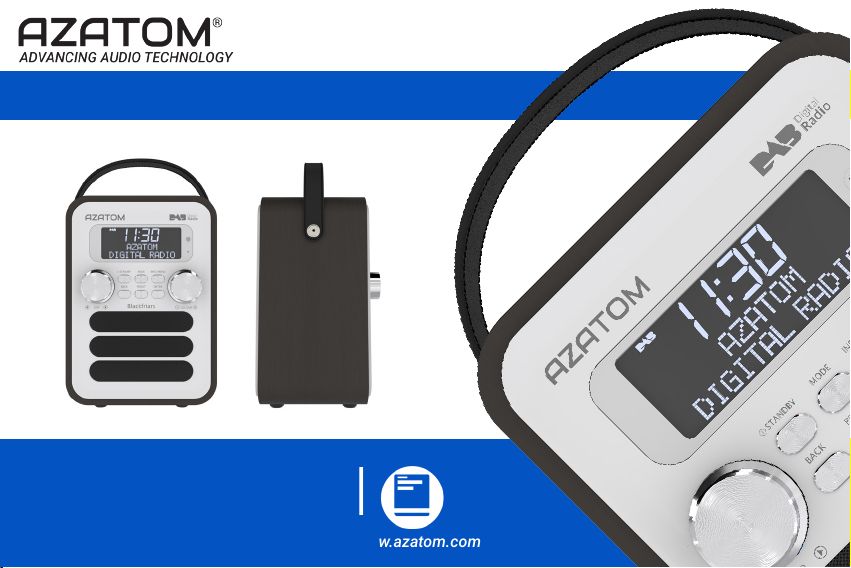
AZATOM® Blackfriars DAB Speaker
DAB+ / Calender / Clock / Alarm Clock / FM Radio / AUX-In
User Manual
This manual is available to download online at www.azatom.com

Thank you for shopping with AZATOM® Please read this manual carefully before
using your new device and keep it safe for future reference.
AZATOM
are developed by our In-house Team of British Designers.
We are experts in sound engineering and great care and attention goes into the design and
manufacture of every Azatom product to ensure class-leading performance and quality.
Please read the manual thoroughly before operating the device.
Choose a suitable location for the device. Suitable locations are dry, even and anti-slip surfaces on
which you may operate the device easily.
Make sure there is proper ventilation for the device. Remove, if necessary, the protection sheet from the
display.
This DAB Radio was designed to travel and come with you on your adventures, all while delivering high
quality audio.
®
is a British company specialising in advanced audio products. All our products
FREE Earphones with every review left online
at amazon.co.uk or ebay.co.uk
Fill in our easy online form to claim yours!

ContentsContents
Section: Page:
Controls & Interface..............................................................................................................................................................
Control Button Functions.....................................................................................................................................................
Remote Control Button Functions......................................................................................................................................
Specication............................................................................................................................................................................
Display.......................................................................................................................................................................................
Menu Map Tree.......................................................................................................................................................................
System Settings......................................................................................................................................................................
Time...........................................................................................................................................................................................
Alarm & Sleep..........................................................................................................................................................................
Operation:
DAB Mode................................................................................................................................................................................
FM Mode...................................................................................................................................................................................
AUX-In Mode............................................................................................................................................................................
Important Saftey Information..............................................................................................................................................
Grab your free extended warranty & keep up to date
with AZATOM® online at www.azatom.com
1
3
4
5
6
7
8
9
10
15
19
21
22

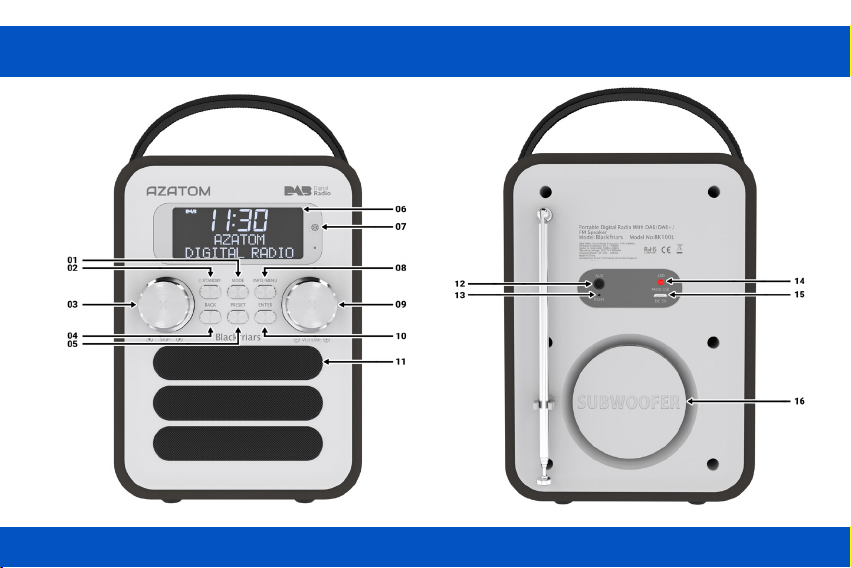
ContentsControls & Interface
1
MODE
2
STANDBY
3
SKIP- / SKIP+
4
BACK
5
PRESET
6
LCD DISPLAY
7
INFRARED REMOTE CONTROL RECEIVER WINDOW
8
INFO / MENU
9
VOLUME - / VOLUME +
10
ENTER
11
SPEAKER
12
AUX PORT
13
RESET BUTTON
14
CHARGE INDICATOR
15
DC 5V CHARGE IN
16
SUB-WOOFER
For technical support call: 01740 629901 or email: info@azatom.com For technical support call: 01740 629901 or email: info@azatom.com
1
2
For technical support call: 01740 629901 or email: info@azatom.com
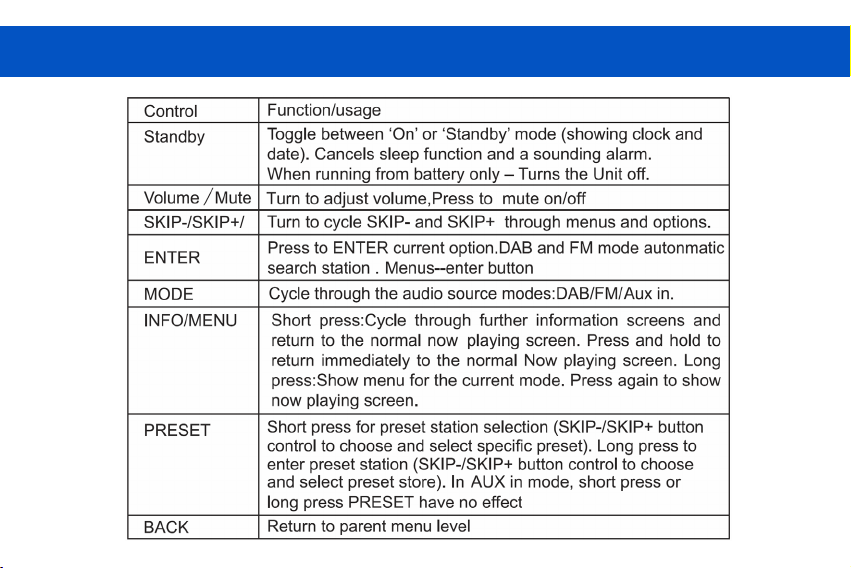
Control Button Functions
3

4
Remote Control Button Functions
1
STANDBY
2
MENU
3
INFO
4
ENTER - Use this to switch FM & DAB modes
5
Volume +
6
PLAY / PAUSE
7
VOLUME -
8
MODE: Cycle audio sources
9
BACK
10
SKIP -
11
SKIP +
12
0 - 9: These are used for preset stations.
A short press selects the preset, a Long press
sets the current station to that preset number

5
Specication
01. DAB/DAB+ Digital radio frequency: 17 4.928-239.200MHz
02. FM radio Frequency: 87.5-108MHz
03. Large signal handling capacity: 0dBm
04. Sensitivity: -98dBm
05. Adjacent channel Rejection: 40dB
06. Total power output:RMS3W (THD+N=10%.f0=1 KHz)
07. Distortion: <7%
08. Signal to noise ratio: >70dBA
09. Frequency response:100Hz-18KHz
10. Work Voltage: DC 3.7V 1800mAh
11. Charge power: DC 5V 600mA
12. Working time: 4-6 hours
13. Charging time: 6-8 hours

6
Display
The screen is a graphic matrix display capable of emulating either a 2 line 16 text
character layout or an 8 character Starburst display layout. In addition various icons are
displayed, when appropriate, along the top of the screen. These represent the following
attributes: DAB, Signal Strength, Time, Clock, Battery, FM, AUX and Alarms.

Menu Map Tree
7

8
System Settings
The system settings allow you to tailor the radio with a variety of options to suit you. To access the
system settings from any mode, Select MENU -> System -> Then select from the multiple options.
The system setting menu options are:
• Sleep
• Alarm
• Equaliser
• Time
• Backlight Language
• Factory Reset
• Software Upgrade
• Software Version
Turn the SKIP- / SKIP+ button to cycle through the menu / sub-menu pressing ENTER to select the
highlighted option. Use the BACK button to return to the previous menu.

9
Time
The time and date can be updated manually or automatically. With auto-update, the time and date are
automatically synchronised with national time signals broadcast over DAB and FM (when available).
You can also select the display format for the time and date.
The Time menu contains the following options:
• Set Time/Date: (see below)
• Auto update: Update from Any | Update from DAB | Update from FM | No Update
• Set 12/24 hour: 12 | 24
• Set date format: dd-mm-yyyy | mm-dd-yyyy.
Set time/date:
This option is for manually setting the time and date displayed. The time displays as hh:mm AM/PM, with the
rst value, hh, active (flashing). Adjust each value using the SKIP- / SKIP+ button control and press ENTER to
conrm. The next value then becomes active and flashes. The date values follow and are set in the same way.
Note: The date displays as dd-mm-yyyy or mm-dd-yyyy depending on your choice of date format

10
Alarm & Sleep
As well as a clock/calendar, there are four versatile wake-up alarms with snooze facility, and a sleep function to
turn the system off after a set period of time. The alarm sound for each alarm can use a buzzer or a selection
from the audio sources .
1. Alarms
Note: Alarms will only function when the unit is On (mains or battery power) or in Standby mode (Mains power only). Attempting to enter Standby mode
when powered only by battery will turn the unit Off.
An active alarm is indicated by its icon in the top line of the display.
Note: Alarms can be switched on or off in standby mode (see below), however, the alarm parameters can only be set when the radio is on.
To set or change alarm 1, press SKIP+ once, then press ENTER. To set or change alarm 2, press SKIP+ twice, then
press ENTER. To set or change alarm 3, press SKIP+ three times, then press ENTER. To set or change alarm 4,
press SKIP+ four times, then press ENTER.
To exit alarm setting mode, press BACK again.
The alarm setup prompts you for the following parameters. Select a value for each parameter in press the SKIP-/
SKIP+ button control and press ENTER to conrm and move on to the next parameter.

11
Parameters:
• On time: hours and minutes
• Duration: 15 | 30 | 45 | 60 | 90 minutes If the alarm is not cancelled returns to standby after this time period.
• Source: DAB | FM | Buzzer If DAB or FM is chosen as the audio source you will also be prompted to select the
Last played station or one of the preset stations (if set).
• Daily | Once | Weekends | Weekdays Choose the days on which the alarm is active. Note: if you
choose ‘Once’, you are prompted to enter the required date.
• Volume: (increase using the right button or decrease using the left button) This is the volume the alarm will
build up to. (Initially the alarm sounds at a low volume and gradually gets louder to the set volume).
• Alarm: Off | On
In all listening modes active alarms are indicated by displaying the relevant Alarm 1 and / or Alarm 2 / Alarm 3
Alarm 4 icons.
At the set time, the alarm will sound, quietly at rst, then gradually building up to the set volume. When an
alarm sounds, the bell icon in the display flashes.
To cancel a sounding alarm and switch the radio to standby by pressing standby

12
2. Sleep
Choosing Sleep: You can choose the sleep delay time in minutes from:
Sleep Off | 15 | 30 | 45 | 60 | 90
Use SKIP-/SKIP+ button control to cycle through the options then press ENTER to choose the displayed option.
Once you select a sleep delay period, the display returns to the Now playing screen with a sleep icon showing.
After the sleep delay period the radio switches to standby mode.
3. Equaliser
This presents a number of preset settings plus a My Equaliser option to allow you to create your own equaliser
settings.
My EQ… | Normal | Classic | Jazz | Pop | Rock | Speech
This option allows you to set a bias in the treble and bass audio frequencies. Values can be set between -7
(Minus 7) and +7 (plus 7).
My EQ…
Treble: (Use the SKIP- / SKIP+ button control to choose a bias value between -7 and +7) Bass – (Use the SKIP- /
SKIP+ button control to choose a bias value between -7 and +7)

13
4. Backlight
The display has a backlight with three brightness settings, and adjustable timeout (this is the time delay, in
seconds, after which the display switches to the Dim level).
There are three settings:
• Timeout - Light On | 10 | 20 | 30 | 45 | 60 | 90 | 120 | 180
• On level - Low | Mid | High
• Dim level - Low | Mid | High
Note: as you cycle through the possible values, an asterisk appearing to the right-hand side of the display
indicates the currently selected value for each setting.
5. Language
The language used for display messages can be selected from:
English German French
Italiano Espanol Dansk
Svenska Norsk Nederlands

14
6. Factory Reset
A factory reset clears all user dened settings, replacing them with the original default values, so time/date,
preferences/settings, DAB station list and preset stations are all lost. If you select Factory reset, you are
asked to conrm by selecting Yes.

15
Operation
DAB Radio Mode
DAB radio mode receives DAB/DAB+ digital radio and displays information about the station and programme /
track as broadcast. To enter DAB MODE Press MODE until the display shows DAB
1. Scanning for stations
The rst time you use the radio, or if the station list is empty, the radio automatically performs a full scan to
see what stations are available. You may also need to start a scan manually to update the list of stations for
one of the following reasons:
• New stations may become available from time to time.
• Stations close or can no longer be received (In the station list, invalid stations are indicated with a question
mark in front of their name).
• If reception was not good for the original scan (for example the antenna was not up), this may result in an
empty or incomplete list of available stations.
• If you have poor reception of some stations causing the audio to break up, you may wish to list only stations
with good signal strength. To do a full scan Select MENU > FULL SCAN.
Once a scan is complete, the radio returns to playing the previously-selected station or rst station on the
station list.

16
2. Selecting Stations
To change station Use the SKIP - / SKIP+ button to scroll through the list of stations and press to enter button
to the displayed station. The Now playing screen is displayed with the new station details.
Some stations are secondary services associated with a Primary channel and only available at certain times.
Any station that has associated secondary services is indicated with a double chevron pointing to the right.
The Secondary service station is indicated with a double chevron pointing left. In the Station List Secondary
stations are always listed next to their Primary station rather than the normal.
3. Presets
The radio has 20 preset memories for DAB.
To store a station in a preset memory Press and hold Preset until the display shows Preset Store. Presets (1-
20) are displayed as either Empty or with the currently stored station name. Use the SKIP- / SKIP+ button to
choose a preset memory then press enter button to store the currently playing station.
After conrming the preset station is stored the display reverts to the Now playing screen.
To recall a preset station Press Preset briefly (the display will show Preset Recall). Select one of the listed
preset stations using the SKIP- / SKIP+ button and press enter button to choose the displayed preset station.

17
4. Manual Tune
As well as the normal method of scanning, you can also manually tune to a particular channel/frequency. This
can be useful for adjusting your antenna to achieve the best possible reception and scanning a particular
channel to update the station list.
To Manually Tune:
Press and hold INFO / MENU > Manual tune then use SKIP- / SKIP+ button control to display a particular
channel / frequency, press ENTER to tune to that channel / frequency. The display shows a live indication of
the received signal strength on the selected frequency. Adjustments to your antenna will be manifested in the
received signal strength displayed.
Note: The slightly larger rectangle indicates the audio quality threshold – if the signal strength, as indicated by
the solid rectangles, falls below this threshold the audio quality will deteriorate.
At the same time The radio scans for any DAB stations on the selected frequency and updates the station list
with any new stations found. To listen to any stations found, return to the Now playing screen and select the
required station from the station list as normal.

18
5. Now Playing Information
While a station is playing, the screen shows its name and DLS (Dynamic Label Segment) information
broadcast by the station such as programme name, track title and contact details. Long DLS info, over 16
characters scrolls across the display.
Press INFO / MENU Each time you press Info, the next set of information is displayed, cycling through: DLS
text, DL Plus information (this is only displayed if broadcast by the station), signal strength, programme type,
ensemble name, channel number / frequency, signal error rate, bit rate, codec/DAB variant, power status
(Mains/Battery), time and date.
Note: DL Plus presents additional information that can be broadcast by stations and stored temporarily on your
radio.
To return to the default Now playing screen at any time, Press and hold INFO / MENU.
6. Other Settings
Dynamic range compression (DRC)
This function reduces the difference between the loudest and quietest audio being broadcast. Effectively, this
makes quiet sounds comparatively louder, and loud sounds comparatively quieter.
Note: DRC only works if it is enabled by the broadcaster for a specic station.
To change the DRC setting Select MENU > DRC > The options available are: DRC off | low | high.

19
FM Radio Mode
FM radio mode receives analogue radio from the FM band and displays RDS (Radio Data System) information
about the station and show (where broadcast).
To enter FM MODE:
Press MODE until the display shows FM Mode
1. Selecting stations
The rst time you select FM radio is set to the lowest frequency in the FM band.
To scan for a station in FM MODE Press ENTER. It scans up through the FM band frequencies, showing the
current frequency on the screen display.
A scan stops when a signal is found. The radio can be set to stop at each station or only at stations with a
strong signal.
Alternatively, you can tune, using the SKIP- / SKIP+ button control on the front panel or the left and right
buttons on the IR remote control, in 50 kHz steps.
2. Presets
The Radio has 20 preset memories for FM, which work in the same way as DAB mode presets.

20
3. Now Playing Information
While FM radio is playing, the screen shows its frequency, or if RDS information is available, station name
and any further ‘Radio Text’ information. If no information is available, just the frequency and a No Radio Text
message is shown.
To view further information about the broadcast:
Press INFO Each time you press Short press INFO / MENU , the next set of information is displayed, cycling
through: RDS Radio Text, programme type, frequency, mono / stereo, power status (Mains / Battery), time and
date.
To return to the default Now playing screen:
Long press INFO / MENU.
4. Settings
Scan settings By default, FM scans stop at any available station (All stations). This may result in poor quality
audio from weak stations.
Options: All stations | Strong stations only
To change the scan settings, to stop only at stations with good signal strength Select Menu > Scan setting
then Strong stations only. Audio settings By default, all stereo stations are reproduced in stereo. For weak
stations, this may result in poor quality audio. The audio quality can be improved using mono.
Options: Stereo allowed | Forced mono
To play weak stations in mono Select Menu > Audio setting > Forced mono.

21
Aux-In Mode
Aux In mode plays audio from an external source such as an MP3 player.
To play audio with Aux In mode:
1. Turn the volume low on both the radio and, if adjustable, the audio source device.
2. Connect the external audio source to the Aux In 3.5 mm stereo socket.
3. Press Mode until the display shows Auxiliary Input.
4. Adjust the volume of the radio (and, if necessary, the audio source device) as required.
Now playing information:
When in Aux In mode, the screen shows Auxiliary Input and the battery power indicator. Press Info to toggle
between time, date and battery power indicator information.

IMPORTANT SAFETY INFORMATION
1. Read these instructions.
2. Keep these instructions. Instructions are also
available for download at www.azatom.com
3. Heed all Warnings.
4. Follow all instructions.
5. Do not clean the apparatus near or with water.
6. Clean only with a dry cloth.
7. Do not block any ventilation openings.
Install in accordance with the manufacturer’s
instructions.
8. Do not install near any heat sources such as
radiators, heat registers, stoves, or other
apparatus (including ampliers) that produce heat.
9. Protect the power cord from being walked on
or pinched particularly at plugs, convenience
receptacles, and the point where they exit from
the apparatus.
This symbol means an electrical
product should not be disposed
of with normal household waste.
Please ensure it is taken to a
suitable facility for disposal when
nished with.
IMPORTANT: Please read all
instructions carefully before use
and keep for future reference
22
10. Only use attachments/accessories specied by
the manufacturer.
11. Unplug this apparatus during light storms or
when unused for long periods of time.
12. Refer all servicing to qualied service personnel.
Servicing is required when the apparatus has been
damaged in any way, such as power-supply cord or
plug is damaged, liquid has been spilled or objects
have fallen into the apparatus, the apparatus has
been exposed to rain or moisture, does not operate
normally or has been dropped.
13. No naked flame sources, such as lit candles,
should be placed on the apparatus.
14. Dispose of used electrical products and
batteries safely according to your local authority
and regulations.
• Risk of electric shock.
Do not open
• When servicing, use only
identical replacement parts.
ADDITIONAL WARNINGS
The apparatus shall not be exposed to dripping
or splashing and no objects lled with liquid,
such as vases, shall be placed on apparatus.
Main plug is used to disconnect device and it
should remain readily operable during intended
use. In order to disconnect the apparatus from
the main mains completely, the mains plug
should be disconnected from the main socket
outlet completely.
Battery shall not be exposed to excessive heat
such as sunshine, re or the like.
RECYCLING ELECTRICAL PRODUCTS
You should now recycle your waste electrical goods
and in doing so help the environment.
• Read all instructions carefully
before use and keep for future
reference.

www.azatom.com
@AZATOM @AZATOM_UK @AZATOM.ONLINE
FREE Earphones with every review left
online at amazon.co.uk or ebay.co.uk
Fill in our easy online form to claim yours!
Grab your free extended
warranty & keep up to date
with AZATOM® online at
www.azatom.com
 Loading...