

Page 1

AXISQ6054MkIIIPTZNetworkCamera
UserManual
Page 2

AXISQ6054MkIIIPTZNetworkCamera
TableofContents
Productoverview...........................................3
Howtoaccesstheproduct....................................4
Howtoaccesstheproductfromabrowser...........................4
Aboutsecurepasswords..........................................4
Setup.....................................................6
Productwebpageoverview........................................6
Imagequality...................................................8
Overlays.......................................................10
PTZ(PanTiltZoom)..............................................11
Streamingandstorage...........................................1 1
Events........................................................13
Applications....................................................16
Troubleshooting............................................17
Howtoresettofactorydefaultsettings.............................17
Howtocheckthecurrentrmware.................................17
Howtoupgradethermware.....................................17
Technicalissues,cluesandsolutions................................18
Performanceconsiderations.......................................19
Specications..............................................21
LEDindicators..................................................
21
SDcardslot....................................................
21
Buttons.......................................................
21
Connectors....................................................
21
2
Page 3

AXISQ6054MkIIIPTZNetworkCamera
Productoverview
Productoverview
NO NO
NO
TICE TICE
TICE
Makesurethedomeisattachedinoperationmode,otherwisefocusmaybeaffected.
1
Partnumber(P/N)&Serialnumber(S/N)
2
Networkconnector(PoE+)
3
Multi-connector
4
Dome
5
SDcardslot
6
StatusLEDindicator
7
Controlbutton
8
Powerbutton
3
Page 4

AXISQ6054MkIIIPTZNetworkCamera
Howtoaccesstheproduct
Howtoaccesstheproduct
AXISIPUtilityandAXISDeviceManagerarerecommendedmethodsforndingAxisproductsonthenetworkandassigningthemIP
addressesinWindows®.Bothapplicationsarefreeandcanbedownloadedfromaxis.com/support
Theproductcanbeusedwiththefollowingbrowsers:
•Windows
®
:Chrome
TM
(recommended),Firefox
®
,Edge
®
,orOpera
®
•OSX®:Chrome
TM
(recommended)orSafari
®
•Otheroperatingsystems:Chrome
TM
orFirefox
®
.
Ifyouneedmoreinformationaboutrecommendedbrowsers,gotoaxis.com/browser-support
Howtoaccesstheproductfromabrowser
1.Startawebbrowser.
2.EntertheIPaddressorhostnameoftheAxisproductinthebrowser’saddresseld.
ToaccesstheproductfromaMaccomputer(OSX),gotoSafari,clickonBonjourandselecttheproductfromthe
drop-downlist.ToaddBonjourasabrowserbookmark,gotoSafari>Preferences.
IfyoudonotknowtheIPaddress,useAXISIPUtilitytolocatetheproductonthenetwork.Forinformationabout
howtodiscoverandassignanIPaddress,seethedocumentHowtoassignanIPaddressandaccessyourdeviceonthe
productpageataxis.com.
3.Enteryourusernameandpassword.Ifthisisthersttimetheproductisaccessed,therootpasswordmustrstbe
congured.
4.Theproduct’sliveviewpageopensinyourbrowser.
Aboutsecurepasswords
Important
Axisdevicessendtheinitiallysetpasswordincleartextoverthenetwork.Toprotectyourdeviceaftertherstlogin,set
upasecureandencryptedHTTPSconnectionandthenchangethepassword.
Thedevicepasswordistheprimaryprotectionforthedataandservices.Axisdevicesdonotimposeapasswordpolicyastheymaybe
usedinvarioustypesofinstallations.Toprotectyourdatawerecommendthatyou:
•Changethedefaultpasswordthatcomeswiththedevices.
•Useapasswordwithatleast8characters,preferablycreatedbyapasswordgenerator .
•Don’texposethepassword.
•Changepasswordatarecurringinterval,atleastonceayear.
Setasecurepasswordfortherootaccount
Important
Thedefaultadministratorusernameisroot.Ifthepasswordforrootislost,resetthedevicetofactorydefaultsettings.
1.Typeapassword.Followtheinstructionsaboutsecurepasswords.SeeAboutsecurepasswordsonpage4.
2.Retypethepasswordtoconrmthespelling.
4
Page 5

AXISQ6054MkIIIPTZNetworkCamera
Howtoaccesstheproduct
3.ClickCreatelogin.Thepasswordhasnowbeencongured.
5
Page 6

AXISQ6054MkIIIPTZNetworkCamera
Setup
Setup
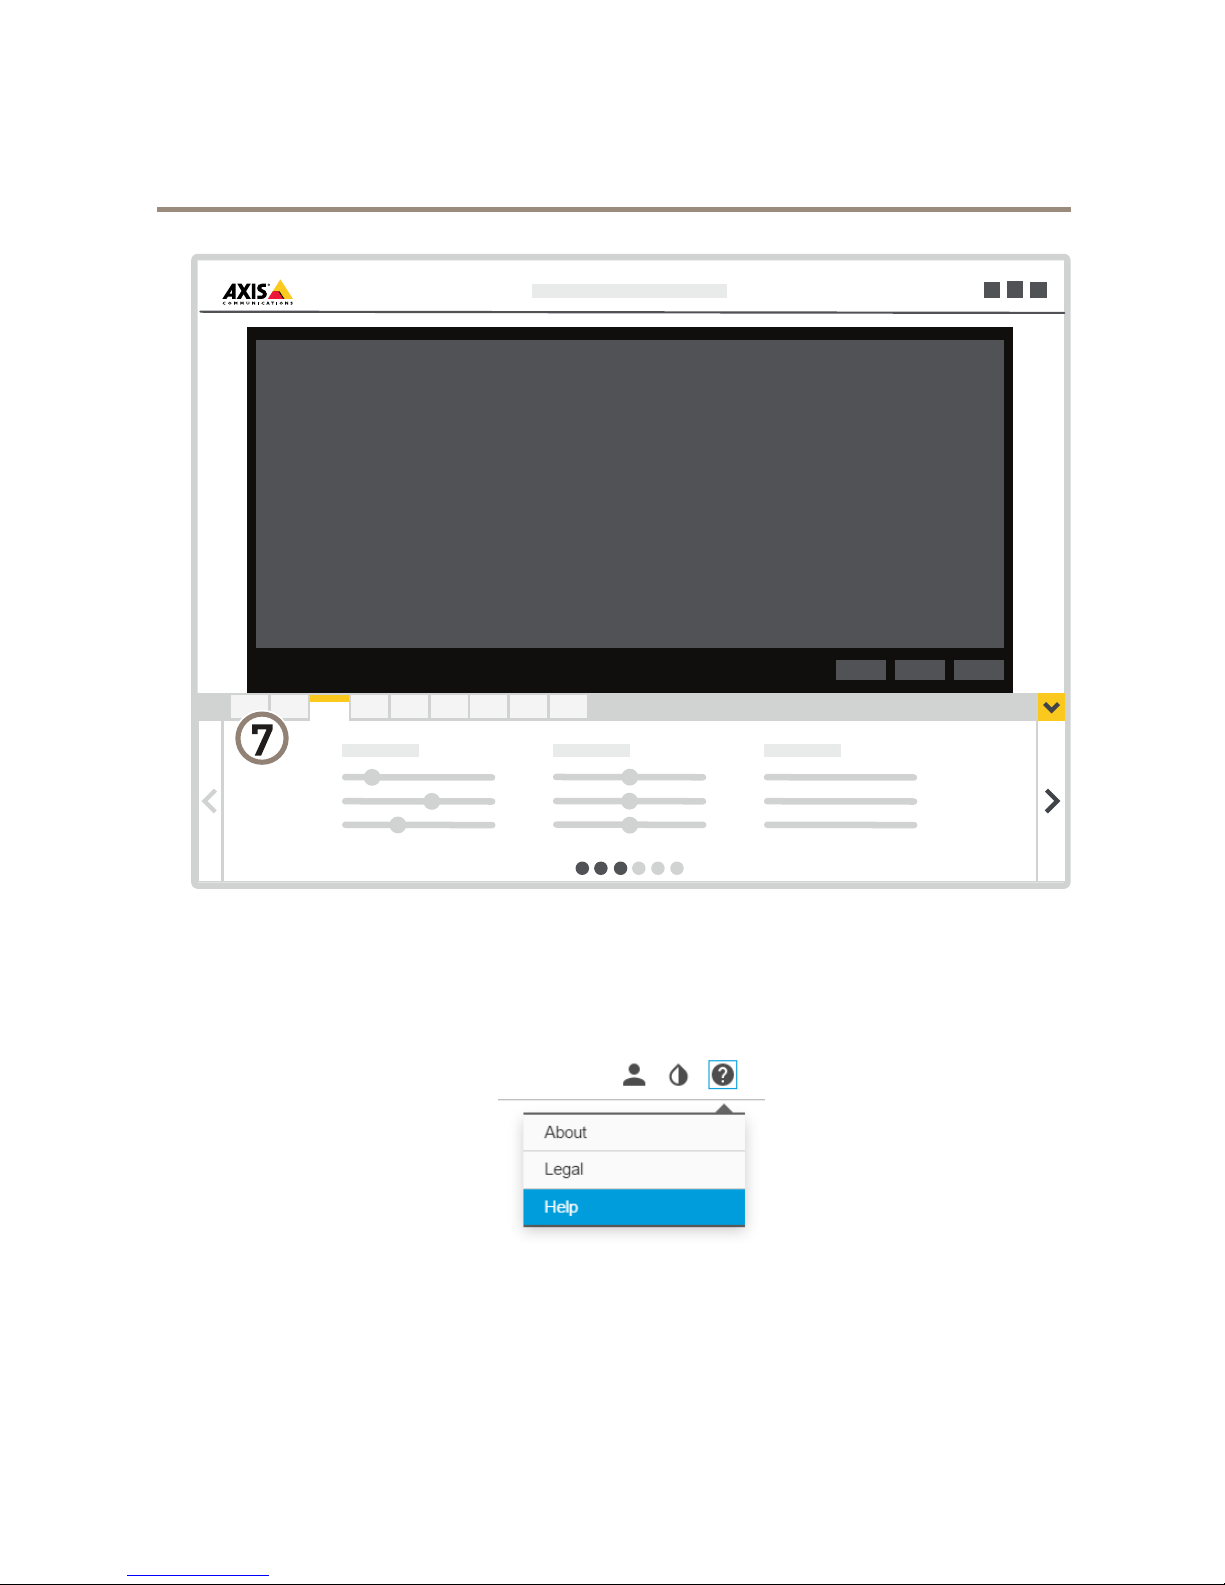
Productwebpageoverview
1
Liveviewcontrolbar
2
Liveview
3
Productname
4
Controls
5
Videocontrolbar
6
Settingstoggle
6
Page 7
AXISQ6054MkIIIPTZNetworkCamera
Setup
7
Settingstabs
Abouttheproduct'sbuilt-inhelp
Youcanaccessthebuilt-inhelpfromtheproduct’swebpage.Thehelpprovidesmoredetailedinformationontheproduct’s
featuresandtheirsettings.
7
Page 8

AXISQ6054MkIIIPTZNetworkCamera
Setup
Imagequality
Howtofocusfasterusingfocusrecallareas
Tosavethefocussettingsataspecicpan/tiltrange,addafocusrecallarea.Eachtimethecameramovesintothatareaitrecallsthe
previouslysavedfocus.It’senoughtocoverhalfofthefocusrecallareaintheliveview.
Werecommendthefocusrecallfeatureinthefollowingscenarios:
•Whenthereisalotofmanualoperationinliveview,forexamplewithajoystick.
•WherePTZpresetpositionswithmanualfocusarenotefcient,forexamplemovementswherethefocussettingchanges
continuously.
•Inlow-lightscenarios,wheretheautofocusischallengedbythelightingconditions.
Important
•Thefocusrecalloverridesthecamera’sautofocusatthespecicpan/tiltrange.
•Apresetpositionoverridesthefocussettingsavedinthefocusrecallarea.
•Themaximumamountoffocusrecallareasis20.
Howtoaddafocusrecallarea
1.Pan,tiltandzoomintotheareawhereyouwouldliketohavefocus.
2.Setthefocus,eitherusetheautofocusoradjustmanually.Aslongasthefocusrecallbuttonshowsaplus,youcanadda
focusrecallareainthatposition.
3.Clickonthefocusrecallbutton.
Howtoremoveafocusrecallarea
1.Pan,tiltandzoomintothefocusrecallareayouwanttoremove.Thefocusrecallbuttontogglestominuswhenthe
cameradetectsafocusrecallarea.
2.Clickonthefocusrecallbutton.
Howtoselectexposuremode
Therearedifferentexposuremodeoptionsinthecamerathatadjustsaperture,shutterspeed,andgaintoimproveimagequalityfor
specicsurveillancescenes.GotoSettings>Image>Exposureandselectbetweenthefollowingexposuremodes:
•Formostusecases,selectAutomaticexposure.
•Ifyouneedfullcontrolofallparameters,mostlyusefulforsceneswithlittlechangeinlighting,selectManual.
HowtobenetfromIRlightinlow-lightconditionsusingnightmode
Yourcamerausesvisiblelighttodelivercolorimagesduringtheday.Aslightdiminishes,youcansetthecameratoautomatically
shifttonightmode.Innightmodethecamerausesbothvisiblelightandnear-infraredlighttodeliverblack-and-whiteimages.
Sincethecamerausesmoreoftheavailablelightitcandeliverbrighter,moredetailed,images.
1.GotoSettings>Image>Dayandnight,andmakesurethattheIRcutlterissettoAuto.
2.Todetermineatwhatlightlevelyouwantthecameratoshifttonightmode,settheDay-nightshiftprioritytoDay,
NightorNone.
8
Page 9

AXISQ6054MkIIIPTZNetworkCamera
Setup
Howtoreducenoiseinlow-lightconditions
Toreducenoiseinlow-lightconditions,youcanadjustoneormoreofthefollowingsettings:
•Makesurethattheexposuremodeisautomatic.
Note
Increasingthemaxshuttervaluecanresultinmotionblur.
•Theshutterspeedshouldbeasslowaspossible,whichmeansyoushouldsetmaxshuttertothehighestpossiblevalue.
•Reducesharpnessintheimage.
•Tryloweringthemaxgainvalue.
Howtomaximizedetailsinanimage
Important
Ifyoumaximizedetailsinanimage,bitrateincreasesandmightleadtoreducedframerate.
•Makesuretoselectcapturemodethathasthehighestresolution.
•Setcompressionaslowaspossible.
•SelectMJPEGstreaming.
•TurnofftheZipstreamfunctionality.
Howtohandlesceneswithstrongbacklight
Dynamicrangeisthedifferenceinlightlevelsinanimage.Insomecasesthedifferencebetweenthedarkestandthebrightest
areascanbesignicant.Theresultisoftenanimagewhereeitherthedarkorthebrightareasarevisible.Widedynamicrange
(WDR)makesbothdarkandbrightareasoftheimagevisible.
1.GotoSettings>Image.
2.TurnonWDRunderWidedynamicrange.
ImagewithoutWDR.
9
Page 10

AXISQ6054MkIIIPTZNetworkCamera
Setup
ImagewithWDR.
Note
WDRmaycauseartifactsintheimage.
FindoutmoreaboutWDRandhowtouseitataxis.com/web-articles/wdr
HowtostabilizeashakyimagewithElectronicImageStabilization(EIS)
EIScanbeusedinenvironmentswheretheproductismountedinanexposedlocationandsubjecttovibrations,forexample,wind
orpassingtrafc.TurnonEIStogetasmootherandsteadierimagewithoutblur.
EISalsoreducesthelesizeofthecompressedimageandlowersthebitrateofthevideostream.
Note
WhenEISisturnedontheimageiscroppedslightly,loweringthemaximumresolution.
1.GotoSettings>Image.
2.TurnonEIS.
Overlays
Aboutoverlays
Overlaysaresuperimposedoverthevideostream.Theyareusedtoprovideextrainformationduringrecordings,suchasatimestamp,
orduringproductinstallationandconguration.
Howtoshowatextoverlaywhenthecameradetectsmotion
Thisexampleexplainshowtodisplaythetext“Motiondetected”whenthecameradetectsmotion:
MakesuretheAXISVideoMotionDetectionapplicationisrunning:
1.GotoSettings>Apps>AXISVideoMotionDetection.
2.Starttheapplicationifitisnotalreadyrunning.
3.Makesureyouhavesetuptheapplicationaccordingtoyourneeds.
Addtheoverlaytext:
4.GotoSettings>Overlay.
5.SelectCreateoverlayandconrmTextoverlay.
6.Enter#Dinthetexteld.
10
Page 11

AXISQ6054MkIIIPTZNetworkCamera
Setup
7.Choosealignment,textsizeandappearance.
8.Includethetextoverlay.
Createanactionrule:
9.GotoSystem>Events>Actionrules.
10.CreateanactionrulewithAXISVideoMotionDetectionastrigger.
11.Fromthelistofactions,selectOverlaytext.
12.Type“Motiondetected”.
13.Settheduration.
Note
Ifyouupdatetheoverlaytextitwillbeautomaticallyupdatedonallvideostreamsdynamically.
Howtodisplaythepanortiltpositionasatextoverlay
Itmaybeusefultoretrieve,forinstancefromarecordedvideo,thepanortiltpositionindegreesinwhichaneventhastakenplace.
Thiscanbeobtainedbyincludingthepositionintheimageasatextoverlay,usingaso-calledmodier.
1.GotoSettings>Overlay.
2.Inthetexteld,enter#xtoshowthepanposition.
Enter#ytoshowthetiltposition.
3.Choosealignment,textsizeandappearance.
4.Includethetextoverlay.
5.Thecurrentpanandtiltpositionsshowupintheliveviewimageandintherecording.
PTZ(PanTiltZoom)
Howtolimitpan,tilt,andzoommovements
Inthisexample,thecameraissurveillingaparkinglotwithnearbyapartmentbuildings.Setpan,tiltandzoomlimitstoensure
privacyforresidents.
Tolimitpan,tiltandzoommovements,gotoSettings>PTZ>Limits.
Streamingandstorage
Howtochoosevideocompressionformat
Decidewhichcompressionmethodtousebasedonyourviewingrequirements,andonthepropertiesofyournetwork.The
availableoptionsare:
MotionJPEG
MotionJPEGorMJPEGisadigitalvideosequencethatismadeupofaseriesofindividualJPEGimages.Theseimagesarethen
displayedandupdatedataratesufcienttocreateastreamthatshowsconstantlyupdatedmotion.Fortheviewertoperceivemotion
videotheratemustbeatleast16imageframespersecond.Fullmotionvideoisperceivedat30(NTSC)or25(PAL)framespersecond.
TheMotionJPEGstreamusesconsiderableamountsofbandwidth,butprovidesexcellentimagequalityandaccesstoeveryimage
containedinthestream.
11
Page 12

AXISQ6054MkIIIPTZNetworkCamera
Setup
H.264orMPEG-4Part10/AVC
Note
H.264isalicensedtechnology.TheAxisproductincludesoneH.264viewingclientlicense.Installingadditionalunlicensed
copiesoftheclientisprohibited.Topurchaseadditionallicenses,contactyourAxisreseller.
H.264can,withoutcompromisingimagequality,reducethesizeofadigitalvideolebymorethan80%comparedtotheMotion
JPEGformatandbyasmuchas50%comparedtotheMPEG-4standard.Thismeansthatlessnetworkbandwidthandstoragespace
arerequiredforavideole.Orseenanotherway,highervideoqualitycanbeachievedforagivenbitrate.
Howtoreducebandwidthandstorage
Important
Ifyoureducethebandwidthitcanresultinlossofdetailsinthepicture.
1.GotoliveviewandselectH.264.
2.GotoSettings>Stream.
3.Dooneormoreofthefollowing:
-TurnontheZipstreamfunctionalityandselectthedesiredlevel.
-TurnondynamicGOPandsetahighGOPlengthvalue.
-Increasethecompression.
-TurnondynamicFPS.
Howtosetupnetworkstorage
Tostorerecordingsonthenetwork,youneedtosetupnetworkstorage:
1.GotoSettings>System>Storage.
2.ClickSetupunderNetworkstorage.
3.EntertheIPaddressofthehostserver.
4.Enterthenameofthesharedlocationonthehostserver.
5.Movetheswitchifthesharerequiresalogin,andenterusernameandpassword.
6.ClickConnect.
Howtoaddaudiotoyourrecording
Note
Toconnecttheaudiodevice,thisproductrequiresamulticable.
Editthestreamprolewhichisusedfortherecording:
1.GotoSettings>System>Streamproles.
2.SelectthestreamproleandclickModify.
3.IntheAudiotab,selecttheAudiostreamcheckboxandselectOnfromthedrop-downlist.
4.ClickOk.
12
Page 13

AXISQ6054MkIIIPTZNetworkCamera
Setup
Howtorecordandwatchvideo
Torecordvideoyoumustrstsetupnetworkstorage,seeHowtosetupnetworkstorageonpage12,orhaveanSDcardinstalled.
1.Gotothecamera’sliveview.
2.ClickonRecordoncetostartrecordingandonemoretimetostoprecording.
Towatchyourrecording:
1.ClickonStorage>Gotorecordings.
2.Selectyourrecordinginthelistanditwillplayautomatically.
Events
Aboutevents
Theeventpagesallowyoutocongureyourproducttoperformactionswhendifferenteventsoccur.Forexample,theproduct
canstartarecordingorsendanemailnoticationwhenmotionisdetected.Thesetofconditionsthatdeneshowandwhen
theactionistriggerediscalledanactionrule.
Howtotriggeranaction
1.GotoSettings>System>Eventstosetupanactionrule.Theactionruledeneswhenthecamerawillperformcertain
actions.Actionrulescanbesetupasscheduled,recurring,orforexample,triggeredbymotiondetection.
2.SelectwhatTriggermustbemettotriggertheaction.Ifyouspecifymorethanonetriggerfortheactionrule,all
ofthemmustbemettotriggertheaction.
3.SelectwhichActionthecamerashouldperformwhentheconditionsaremet.
Note
Ifyoumakechangestoanactiveactionrule,theactionruleneedstoberestartedforthechangestotakeeffect.
Howtorecordvideowhenthecameradetectsmotion
ThisexampleexplainshowtosetupthecameratostartrecordingtotheSDcardvesecondsbeforeitdetectsmotionandto
stoponeminuteafter.
MakesuretheAXISVideoMotionDetectionapplicationisrunning:
1.GotoSettings>Apps>AXISVideoMotionDetection.
2.Starttheapplicationifitisnotalreadyrunning.
3.Makesureyouhavesetuptheapplicationaccordingtoyourneeds.
Createanactionrule:
4.GotoSettings>System>Eventsandaddanactionrule.
5.Typeanamefortheactionrule.
6.Fromthelistoftriggers,selectApplicationsandthenselectAXISVideoMotionDetection(VMD).
7.Fromthelistofactions,selectRecordvideo.
8.Selectanexistingstreamproleorcreateanewone.
9.Setthepre-triggertimeto5seconds.
10.Setthepost-triggertimeto60seconds.
13
Page 14

AXISQ6054MkIIIPTZNetworkCamera
Setup
11.SelectSDcardfromthelistofstorageoptions.
12.ClickOk.
Howtodirectthecameratoapresetpositionwhenthecameradetectsmotion
Thisexampleexplainshowtosetupthecameratogotoapresetpositionwhenitdetectsmotionintheimage.
MakesuretheAXISVideoMotionDetectionapplicationisrunning:
1.GotoSettings>Apps>AXISVideoMotionDetection.
2.Starttheapplicationifitisnotalreadyrunning.
3.Makesureyouhavesetuptheapplicationaccordingtoyourneeds.
Addapresetposition:
4.GotoSettings>PTZandsetwhereyouwantthecameratobedirectedbycreatingapresetposition.
Createanactionrule:
5.GotoSettings>System>Events>Actionrulesandaddanactionrule.
6.Typeanamefortheactionrule.
7.Fromthelistoftriggers,selectApplicationsandthenselectAXISVideoMotionDetection(VMD).
8.Fromthelistofactions,selectPTZControlandthenselectPresetPosition.
9.Selectthepresetpositionyouwantthecameratogoto.
10.ClickOk.
Howtorecordvideowhenthecameradetectsloudnoises
ThisexampleexplainshowtosetupthecameratostartrecordingtotheSDcardvesecondsbeforeitdetectsloudnoiseandto
stoponeminuteafter.
Makesureaudioturnedon:
1.Setupthestreamproletoincludeaudio,seeHowtoaddaudiotoyourrecordingonpage12.
Makesuretheaudiodetectionissetup:
2.GotoSettings>System>Detectors>Audiodetection.
3.Adjustthealarmlevelaccordingtoyourneeds.
Createanactionrule:
4.GotoSettings>System>Eventsandaddanactionrule.
5.Typeanamefortheactionrule.
6.Fromthelistoftriggers,selectDetectorsandthenselectAudioDetection.
7.Fromthelistofactions,selectRecordvideoandthenselectPresetPosition.
8.Selectthestreamprolewhereaudiohasbeenturnedonorcreateanewone.
9.Setthepre-triggertimeto5seconds.
10.Setthepost-triggertimeto60seconds.
14
Page 15

AXISQ6054MkIIIPTZNetworkCamera
Setup
11.SelectSDcardfromthelistofstorageoptions.
12.ClickOk.
Howtoautomaticallyzoominonaspecicareawithgatekeeper
Thisexampleexplainshowtousethegatekeeperfunctionalitytomakethecamerazoominautomaticallyonthelicenseplateofa
carthatpassesthroughagate.Whenthecarhaspassed,thecamerazoomsouttothehomeposition.
Createthepresetpositions:
1.GotoSettings>PTZ>Presetpositions.
2.Createthehomepositionthatincludestheentranceofthegate.
3.Createthezoomed-inpresetpositionsothatitcoverstheareaintheimagewhereyouassumethatthelicenseplate
willappear.
Createamotiondetectionprole:
4.GotoSettings>AppsandopenAXISVideoMotionDetection.
5.Createaprolethatcoverstheentranceofthegateandthensavetheprole.
Createanactionrule:
6.GotoSettings>System>Eventsandaddanactionrule.
7.NametheactionruleGatekeeper.
8.Fromthetriggerlist,selectApplicationsandthenselectthepreviouslycreatedmotiondetectionprole.
9.Fromtheactionlist,selectthepreviouslycreatedpresetposition.
10.ClickOK.
Howtorecordvideowhenthecameradetectsimpact
Shockdetectionallowsthecameratodetecttamperingcausedbyvibrationorshock.Vibrationcausedbytheenvironmentoran
objectcantriggeranactiondependingontheshocksensitivityrange,whichcanbesetfrom0to100.Inthisscenario,someoneis
throwingrocksatthecameraduringafterhoursandyouwouldliketoreceiveavideoclipoftheevent.
1.GotoSettings>System>Detectors.
2.Enableshockdetectionandsetshocksensitivityvalue.
3.ClickSave.
Createanactionrule:
4.GotoSettings>System>Eventsandaddanactionrule.
5.Typeanamefortheactionrule.
6.Fromthelistoftriggers,selectDetectorsandthenselectShockdetection.
7.Fromthelistofschedules,selectAfterHours.
8.Fromthelistofactions,selectSendVideoClip.
9.Selectanexistingstreamproleorcreateanewone.
10.Setthepre-triggertimeto5seconds.
11.Setthepost-triggertimeto60seconds.
15
Page 16

AXISQ6054MkIIIPTZNetworkCamera
Setup
12.Selectanexistingrecipientorcreateanewone.
13.ClickOk.
Applications
Aboutapplications
AXISCameraApplicationPlatform(ACAP)isanopenplatformthatenablesthirdpartiestodevelopanalyticsandotherapplications
forAxisproducts.Tondoutmoreaboutavailableapplications,downloads,trialsandlicenses,gotoaxis.com/applications
TondtheusermanualsforAxisapplications,gotoaxis.com
Note
•Severalapplicationscanrunatthesametimebutsomeapplicationsmightnotbecompatiblewitheachother.Certain
combinationsofapplicationsmightrequiretoomuchprocessingpowerormemoryresourceswhenruninparallel.Verify
thattheapplicationsworktogetherbeforedeployment.
16
Page 17

AXISQ6054MkIIIPTZNetworkCamera
Troubleshooting
Troubleshooting
Ifyoucan’tndwhatyou’relookingforhere,trythetroubleshootingsectionataxis.com/support
Howtoresettofactorydefaultsettings
Important
Resettofactorydefaultshouldbeusedwithcaution.Aresettofactorydefaultresetsallsettings,includingtheIPaddress,to
thefactorydefaultvalues.
Toresettheproducttothefactorydefaultsettings:
1.Pressandholdthecontrolbuttonandthepowerbuttonfor15–30secondsuntilthestatusLEDindicatorashesamber.
SeeProductoverviewonpage3.
2.ReleasethecontrolbuttonbutcontinuetoholddownthepowerbuttonuntilthestatusLEDindicatorturnsgreen.
3.Releasethepowerbuttonandassembletheproduct.
4.Theprocessisnowcomplete.Theproducthasbeenresettothefactorydefaultsettings.IfnoDHCPserverisavailableon
thenetwork,thedefaultIPaddressis192.168.0.90
5.UsingtheinstallationandmanagementsoftwaretoolstoassignanIPaddress,setthepasswordandaccessthevideo
stream.
Itisalsopossibletoresetparameterstofactorydefaultthroughthewebinterface.GotoSettings>System>Maintenanceand
clickDefault.
Howtocheckthecurrentrmware
Firmwareisthesoftwarethatdeterminesthefunctionalityofnetworkdevices.Oneofyourrstactionswhentroubleshootinga
problemshouldbetocheckthecurrentrmwareversion.Thelatestversionmaycontainacorrectionthatxesyourparticular
problem.
Tocheckthecurrentrmware:
1.Gototheproduct’swebpage.
2.Clickonthehelpmenu.
3.ClickAbout.
Howtoupgradethermware
Important
Preconguredandcustomizedsettingsaresavedwhenthermwareisupgraded(providedthatthefeaturesareavailablein
thenewrmware)althoughthisisnotguaranteedbyAxisCommunicationsAB.
Important
Makesurethecoverisattachedduringupgradetoavoidinstallationfailure.
Important
Makesuretheproductremainsconnectedtothepowersourcethroughouttheupgradeprocess.
17
Page 18

AXISQ6054MkIIIPTZNetworkCamera
Troubleshooting
Note
Whenyouupgradetheproductwiththelatestrmware,theproductreceivesthelatestfunctionalityavailable.Alwaysread
theupgradeinstructionsandreleasenotesavailablewitheachnewreleasebeforeupgradingthermware.Tondthelatest
rmwareandthereleasenotes,gotoaxis.com/support/rmware
1.Downloadthelatestrmwareletoyourcomputer,availablefreeofchargeataxis.com/support/rmware
2.Logintotheproductasanadministrator.
3.GotoSettings>System>Maintenance.Followtheinstructionsonthepage.Whentheupgradehasnished,the
productrestartsautomatically.
AXISDeviceManagercanbeusedformultipleupgrades.Findoutmoreataxis.com/products/axis-device-manager
Technicalissues,cluesandsolutions
Ifyoucan’tndwhatyou’relookingforhere,trythetroubleshootingsectionataxis.com/support
Problemsupgradingthermware
FirmwareupgradefailureIfthermwareupgradefails,theproductreloadsthepreviousrmware.Themostcommonreason
isthatthewrongrmwarelehasbeenuploaded.Checkthatthenameofthermwarele
correspondstoyourproductandtryagain.
ProblemssettingtheIPaddress
Theproductislocatedona
differentsubnet
IftheIPaddressintendedfortheproductandtheIPaddressofthecomputerusedtoaccessthe
productarelocatedondifferentsubnets,youcannotsettheIPaddress.Contactyournetwork
administratortoobtainanIPaddress.
TheIPaddressisbeingused
byanotherdevice
DisconnecttheAxisproductfromthenetwork.Runthepingcommand(inaCommand/DOS
window,typepingandtheIPaddressoftheproduct):
•Ifyoureceive:Replyfrom<IPaddress>:bytes=32;time=10...
thismeansthattheIPaddressmayalreadybeinusebyanotherdeviceonthenetwork.
ObtainanewIPaddressfromthenetworkadministratorandreinstalltheproduct.
•Ifyoureceive:Requesttimedout,thismeansthattheIPaddressisavailable
forusewiththeAxisproduct.Checkallcablingandreinstalltheproduct.
PossibleIPaddressconict
withanotherdeviceonthe
samesubnet
ThestaticIPaddressintheAxisproductisusedbeforetheDHCPserversetsadynamicaddress.
ThismeansthatifthesamedefaultstaticIPaddressisalsousedbyanotherdevice,theremay
beproblemsaccessingtheproduct.
Theproductcannotbeaccessedfromabrowser
Cannotlogin
WhenHTTPSisenabled,ensurethatthecorrectprotocol(HTTPorHTTPS)isusedwhenattempting
tologin.Youmayneedtomanuallytypehttporhttpsinthebrowser’saddresseld.
Ifthepasswordfortheuserrootislost,theproductmustberesettothefactorydefaultsettings.
SeeHowtoresettofactorydefaultsettingsonpage17.
TheIPaddresshasbeen
changedbyDHCP
IPaddressesobtainedfromaDHCPserveraredynamicandmaychange.IftheIPaddresshasbeen
changed,useAXISIPUtilityorAXISDeviceManagertolocatetheproductonthenetwork.Identify
theproductusingitsmodelorserialnumber,orbytheDNSname(ifthenamehasbeencongured).
Ifrequired,astaticIPaddresscanbeassignedmanually.Forinstructions,gotoaxis.com/support
Certicateerrorwhenusing
IEEE802.1X
Forauthenticationtoworkproperly,thedateandtimesettingsintheAxisproductmustbe
synchronizedwithanNTPserver.GotoSettings>System>Dateandtime
18
Page 19

AXISQ6054MkIIIPTZNetworkCamera
Troubleshooting
Theproductisaccessiblelocallybutnotexternally
Routerconguration
CheckthatyourrouterallowsincomingdatatrafctotheAxisproduct.Theroutermustsupport
UPnP
®
.
Firewallprotection
ChecktheInternetrewallwithyournetworkadministrator.
Problemswithstreaming
MulticastH.264only
accessiblebylocalclients
Checkifyourroutersupportsmulticasting,oriftheroutersettingsbetweentheclientandthe
productneedtobecongured.TheTTL(TimeToLive)valuemayneedtobeincreased.
NomulticastH.264
displayedintheclient
CheckwithyournetworkadministratorthatthemulticastaddressesusedbytheAxisproduct
arevalidforyournetwork.
Checkwithyournetworkadministratortoseeifthereisarewallpreventingviewing.
PoorrenderingofH.264
images
Ensurethatyourgraphicscardisusingthelatestdriver .Thelatestdriverscanusuallybe
downloadedfromthemanufacturer’swebsite.
Colorsaturationisdifferent
inH.264andMotionJPEG
Modifythesettingsforyourgraphicsadapter.Gototheadapter’sdocumentationformore
information.
Lowerframeratethan
expected
•SeePerformanceconsiderationsonpage19.
•Reducethenumberofapplicationsrunningontheclientcomputer.
•Limitthenumberofsimultaneousviewers.
•Checkwiththenetworkadministratorthatthereisenoughbandwidthavailable.
•Lowertheimageresolution.
•Logintotheproduct’swebpageandsetacapturemodethatprioritizesframerate.
Changingthecapturemodetoprioritizeframeratemightlowerthemaximum
resolutiondependingontheproductusedandcapturemodesavailable.
•Themaximumframespersecondisdependentontheutilityfrequency(60/50Hz)of
theAxisproduct.
Performanceconsiderations
Whensettingupyoursystem,itisimportanttoconsiderhowvarioussettingsandsituationsaffecttheperformance.Somefactors
affecttheamountofbandwidth(thebitrate)required,otherscanaffecttheframerate,andsomeaffectboth.Iftheloadonthe
CPUreachesitsmaximum,thisalsoaffectstheframerate.
Thefollowingfactorsarethemostimportanttoconsider:
•Highimageresolutionorlowercompressionlevelsresultinimagescontainingmoredatawhichinturnaffectsthe
bandwidth.
•RotatingthelensmanuallywillresultinbetterperformancecomparedtorotatingtheimagefromtheGUI.
•Removingorattachingthecoverwillrestartthecamera.
•AccessbylargenumbersofMotionJPEGorunicastH.264clientsaffectsthebandwidth.
•Simultaneousviewingofdifferentstreams(resolution,compression)bydifferentclientsaffectsbothframerateand
bandwidth.
Useidenticalstreamswhereverpossibletomaintainahighframerate.Streamprolescanbeusedtoensurethat
streamsareidentical.
•AccessingMotionJPEGandH.264videostreamssimultaneouslyaffectsbothframerateandbandwidth.
•Heavyusageofeventsettingsaffectstheproduct’sCPUloadwhichinturnaffectstheframerate.
•UsingHTTPSmayreduceframerate,inparticularifstreamingMotionJPEG.
•Heavynetworkutilizationduetopoorinfrastructureaffectsthebandwidth.
19
Page 20

AXISQ6054MkIIIPTZNetworkCamera
Troubleshooting
•Viewingonpoorlyperformingclientcomputerslowersperceivedperformanceandaffectsframerate.
•RunningmultipleAXISCameraApplicationPlatform(ACAP)applicationssimultaneouslymayaffecttheframerateand
thegeneralperformance.
20
Page 21

AXISQ6054MkIIIPTZNetworkCamera
Specifications
Specifications
Tondthelatestversionoftheproduct’sdatasheet,gototheproductpageataxis.comandlocateSupport&Documentation.
LEDindicators
StatusLED
Indication
Unlit
Connectionandnormaloperation.
GreenShowssteadygreenfor10secondsfornormaloperationafterstartupcompleted.
Amber
Steadyduringstartup.Flashesduringrmwareupgradeorresettofactorydefault.
Amber/RedFlashesamber/redifnetworkconnectionisunavailableorlost.
SDcardslot
NO NO
NO
TICE TICE
TICE
•RiskofdamagetoSDcard.Donotusesharptools,metalobjects,orexcessiveforcewheninsertingorremovingthe
SDcard.Useyourngerstoinsertandremovethecard.
•Riskofdatalossandcorruptedrecordings.DonotremovetheSDcardwhiletheproductisrunning.UnmounttheSDcard
fromtheproduct’swebpagebeforeremoval.
ThisproductsupportsSD/SDHC/SDXCcards.
ForSDcardrecommendations,seeaxis.com
SD,SDHC,andSDXCLogosaretrademarksofSD-3CLLC.SD,SDHCandSDXCaretrademarksorregistered
trademarksofSD-3C,LLCintheUnitedStates,othercountriesorboth.
Buttons
Controlbutton
Thecontrolbuttonisusedfor:
•Resettingtheproducttofactorydefaultsettings.SeeHowtoresettofactorydefaultsettingsonpage17.
•ConnectingtoanAXISVideoHostingSystemservice.Toconnect,pressandholdthebuttonforabout3secondsuntilthe
statusLEDashesgreen.
Powerbutton
Pressandholdthepowerbuttontotemporarilypowertheproductwhenthedomecoverisremoved.Thepowerbuttonisalsoused
withthecontrolbuttontoresetthecameratofactorydefaultsettings.Seepage17.
Connectors
Networkconnector
RJ45EthernetconnectorwithPoweroverEthernetPlus(PoE+).
NO NO
NO
TICE TICE
TICE
Usethesuppliedmidspan.
21
Page 22

AXISQ6054MkIIIPTZNetworkCamera
Specifications
Multiconnector
Terminalconnectorforconnectingexternalequipment:
•Audioequipment
•Input/Output(I/O)devices
•AC/DCpowersupply
Whenconnectingexternalequipment,aseparatelysoldAxismulticableisrequiredinordertomaintaintheproduct’sIPrating.
Formoreinformation,seeMulticableconnectorsonpage22.
Multicableconnectors
Multicableoverview
1
Cameramulticonnector
2
Audioin(pink)
3
Audioout(green)
4
Powerconnector ,3-pin
5
I/Oterminalblock,6-pin
Themulticableprovidesthefollowingconnectors:
Powerconnector-3-pinterminalblockusedforpowerinput.UseaSafetyExtraLowVoltage(SELV)compliantlimitedpowersource
(LPS)witheitheraratedoutputpowerlimitedto≤100Woraratedoutputcurrentlimitedto≤5A.
22
Page 23

AXISQ6054MkIIIPTZNetworkCamera
Specifications
DCpowerinputACpowerinput
Audioin(pink)-3.5mminputforamonomicrophone,oraline-inmonosignal(leftchannelisusedfromastereosignal).
Audioout(green)-3.5mmoutputforaudio(linelevel)thatcanbeconnectedtoapublicaddress(PA)systemoranactivespeaker
withabuilt-inamplier.Astereoconnectormustbeusedfortheaudioout.
I/Oterminalconnector-Usewithexternaldevicesincombinationwith,forexample,tamperingalarms,motiondetection,event
triggering,andalarmnotications.Inadditiontothe0VDCreferencepointandpower(DCoutput),theI/Oconnectorprovidesthe
interfaceto:
•Digitaloutput—ForconnectingexternaldevicessuchasrelaysandLEDs.Connecteddevicescanbeactivatedby
theVAPIX®ApplicationProgrammingInterfaceorfromtheproduct’swebpage.
•Digitalinput—Forconnectingexternaldevicesthatcantogglebetweenanopenandclosedcircuit,forexample
PIRdetectors,door/windowcontacts,andglassbreakdetectors.
FunctionPinNotes
Specications
0VDC(-)
1
DCoutput
2
Canbeusedtopowerauxiliaryequipment.
Note:Thispincanonlybeusedaspowerout.
3.3VDC
Maxload=250mA
Digitalinput–Connecttopin1toactivate,orleave
oating(unconnected)todeactivate.
0tomax40VDC
Congurable(Input
orOutput)
3–6
Digitaloutput–Connecttopin1toactivate,orleave
oating(unconnected)todeactivate..Ifusedwithan
inductiveload,e.g.arelay,adiodemustbeconnected
inparallelwiththeload,forprotectionagainstvoltage
transients.
0tomax40VDC,open
drain,100mA
23
Page 24

AXISQ6054MkIIIPTZNetworkCamera
Specifications
1
0VDC(-)
2
DCoutput3.3V,max250mA
A
I/Oconguredasinput
B
I/Oconguredasoutput
24
Page 25

UserManualVer.M1.9
AXISQ6054MkIIIPTZNetworkCamera
Date:June2018
©AxisCommunicationsAB,2018
PartNo.T10128027
 Loading...