

Page 1
AXISQ60Series
AXISQ6052PTZNetworkCamera
AXISQ6054MkIIPTZNetworkCamera
AXISQ6055PTZNetworkCamera
InstallationGuide
Page 2

Legalconsiderations
Videoandaudiosurveillancecanberegulatedbylawsthat
varyfromcountrytocountry.Checkthelawsinyourlocal
regionbeforeusingthisproductforsurveillancepurposes.
Thisproductincludesthefollowinglicences:
•one(1)AACdecoderlicense
•one(1)H.264decoderlicense
Topurchasefurtherlicenses,contactyourreseller.
Liability
Everycarehasbeentakeninthepreparationofthis
document.PleaseinformyourlocalAxisofceofany
inaccuraciesoromissions.AxisCommunicationsABcannot
beheldresponsibleforanytechnicalortypographicalerrors
andreservestherighttomakechangestotheproductand
manualswithoutpriornotice.AxisCommunicationsAB
makesnowarrantyofanykindwithregardtothematerial
containedwithinthisdocument,including,butnotlimited
to,theimpliedwarrantiesofmerchantabilityandtnessfor
aparticularpurpose.AxisCommunicationsABshallnot
beliablenorresponsibleforincidentalorconsequential
damagesinconnectionwiththefurnishing,performance
oruseofthismaterial.Thisproductisonlytobeusedfor
itsintendedpurpose.
Intellectualpropertyrights
AxisABhasintellectualpropertyrightsrelatingto
technologyembodiedintheproductdescribedinthis
document.Inparticular,andwithoutlimitation,these
intellectualpropertyrightsmayincludeoneormoreof
thepatentslistedatwww.axis.com/patent.htmandoneor
moreadditionalpatentsorpendingpatentapplicationsin
theUSandothercountries.
Thisproductcontainslicensedthird-partysoftware.See
themenuitem“About”intheproduct’suserinterfacefor
moreinformation.
ThisproductcontainssourcecodecopyrightAppleComputer,
Inc.,underthetermsofApplePublicSourceLicense2.0
(seewww.opensource.apple.com/apsl).Thesourcecodeis
availablefromhttps://developer.apple.com/bonjour/
Equipmentmodications
Thisequipmentmustbeinstalledandusedin
strictaccordancewiththeinstructionsgiveninthe
userdocumentation.Thisequipmentcontainsno
user-serviceablecomponents.Unauthorizedequipment
changesormodicationswillinvalidateallapplicable
regulatorycerticationsandapprovals.
Trademarkacknowledgments
AXISCOMMUNICATIONS,AXISandVAPIXareregistered
trademarksortrademarkapplicationsofAxisABinvarious
jurisdictions.Allothercompanynamesandproductsare
trademarksorregisteredtrademarksoftheirrespective
companies.
Apple,Boa,Apache,Bonjour,Ethernet,InternetExplorer,
Linux,Microsoft,Mozilla,Real,SMPTE,QuickTime,UNIX,
Windows,WindowsVistaandWWWareregistered
trademarksoftherespectiveholders.Javaandall
Java-basedtrademarksandlogosaretrademarksor
registeredtrademarksofOracleand/oritsafliates.
TM
UPnP
isacerticationmarkoftheUPnP
Corporation.
SD,SDHCandSDXCaretrademarksorregisteredtrademarks
ofSD-3C,LLCintheUnitedStates,othercountriesorboth.
Also,miniSD,microSD,miniSDHC,microSDHC,microSDXC
arealltrademarksorregisteredtrademarksofSD-3C,LLC
intheUnitedStates,othercountriesorboth.
TM
Implementers
Regulatoryinformation
Europe
ThisproductcomplieswiththeapplicableCEmarking
directivesandharmonizedstandards:
•ElectromagneticCompatibility(EMC)Directive
2014/30/EU.SeeElectromagneticcompatibility(EMC)
2.
•LowVoltage(LVD)Directive2014/35/EU.SeeSafety3.
•RestrictionsofHazardousSubstances(RoHS)Directive
201 1/65/EU.SeeDisposalandrecycling3.
Acopyoftheoriginaldeclarationofconformitymaybe
obtainedfromAxisCommunicationsAB.SeeContact
Information3.
Electromagneticcompatibility(EMC)
Thisequipmenthasbeendesignedandtestedtofulll
applicablestandardsfor:
•Radiofrequencyemissionwheninstalledaccordingto
theinstructionsandusedinitsintendedenvironment.
•Immunitytoelectricalandelectromagneticphenomena
wheninstalledaccordingtotheinstructionsandused
initsintendedenvironment.
USA
Thisequipmenthasbeentestedusingashieldednetwork
cable(STP)andfoundtocomplywiththelimitsfora
ClassAdigitaldevice,pursuanttopart15oftheFCCRules.
Theselimitsaredesignedtoprovidereasonableprotection
againstharmfulinterferencewhentheequipmentis
operatedinacommercialenvironment.Thisequipment
generates,uses,andcanradiateradiofrequencyenergy
and,ifnotinstalledandusedinaccordancewiththe
instructionmanual,maycauseharmfulinterferenceto
radiocommunications.Operationofthisequipmentin
aresidentialareaislikelytocauseharmfulinterference
inwhichcasetheuserwillberequiredtocorrectthe
interferenceathisownexpense.Theproductshallbe
connectedusingashieldednetworkcable(STP)thatis
properlygrounded.
Canada
ThisdigitalapparatuscomplieswithCANICES-3(ClassA).
Theproductshallbeconnectedusingashieldednetwork
cable(STP)thatisproperlygrounded.Cetappareil
numériqueestconformeàlanormeNMBICES-3(classeA).
Leproduitdoitêtreconnectéàl'aided'uncâbleréseau
blindé(STP)quiestcorrectementmisàlaterre.
Europe
ThisdigitalequipmentfulllstherequirementsforRF
emissionaccordingtotheClassAlimitofEN55032.The
productshallbeconnectedusingashieldednetworkcable
(STP)thatisproperlygrounded.Notice!ThisisaClassA
product.Inadomesticenvironmentthisproductmaycause
RFinterference,inwhichcasetheusermayberequired
totakeadequatemeasures.
Thisproductfulllstherequirementsforemissionand
immunityaccordingtoEN50121-4andIEC62236-4railway
applications.
Thisproductfulllstherequirementsforimmunity
accordingtoEN61000-6-1residential,commercialand
light-industrialenvironments.
Thisproductfulllstherequirementsforimmunity
accordingtoEN61000-6-2industrialenvironments.
Thisproductfulllstherequirementsforimmunity
accordingtoEN55024ofceandcommercial
environments.
Australia/NewZealand
Page 3

ThisdigitalequipmentfulllstherequirementsforRF
emissionaccordingtotheClassAlimitofAS/NZSCISPR32.
Theproductshallbeconnectedusingashieldednetwork
cable(STP)thatisproperlygrounded.Notice!Thisisa
ClassAproduct.Inadomesticenvironmentthisproduct
maycauseRFinterference,inwhichcasetheusermaybe
requiredtotakeadequatemeasures.
Japan
この装置は、クラスA情報技術装置です。この装
置を家庭環境で使⽤すると電波妨害を引き起こす
ことがあります。この場合には使⽤者が適切な対
策を講ずるよう要求されることがあります。本
製品は、シールドネットワークケーブル(STP)を
使⽤して接続してください。また適切に接地し
てください。
Korea
이기기는업무용(A급)전자파적합기기로서판매
자또는사용자는이점을주의하시기바라며,가
정외의지역에서사용하는것을목적으로합니다.
적절히접지된STP(shieldedtwistedpair)케이블
을사용하여제품을연결하십시오.
Safety
ThisproductcomplieswithIEC/EN/UL60950-1,Safetyof
InformationTechnologyEquipment.
Ifitsconnectingcablesareroutedoutdoors,theproduct
shallbegroundedeitherthroughashieldednetworkcable
(STP)orotherappropriatemethod.
Thepowersupplyusedwiththisproductshallfulll
therequirementsforSafetyExtraLowVoltage
(SELV)andLimitedPowerSource(LPS)accordingto
IEC/EN/UL60950-1.
Disposalandrecycling
Whenthisproducthasreachedtheendofitsusefullife,
disposeofitaccordingtolocallawsandregulations.For
informationaboutyournearestdesignatedcollectionpoint,
contactyourlocalauthorityresponsibleforwastedisposal.
Inaccordancewithlocallegislation,penaltiesmaybe
applicableforincorrectdisposalofthiswaste.
Europe
Thissymbolmeansthattheproductshallnotbe
disposedoftogetherwithhouseholdorcommercialwaste.
Directive2012/19/EUonwasteelectricalandelectronic
equipment(WEEE)isapplicableintheEuropeanUnion
memberstates.Topreventpotentialharmtohumanhealth
andtheenvironment,theproductmustbedisposedofin
anapprovedandenvironmentallysaferecyclingprocess.
Forinformationaboutyournearestdesignatedcollection
point,contactyourlocalauthorityresponsibleforwaste
disposal.Businessesshouldcontacttheproductsupplierfor
informationabouthowtodisposeofthisproductcorrectly.
Thisproductcomplieswiththerequirementsof
Directive2011/65/EUontherestrictionoftheuseof
certainhazardoussubstancesinelectricalandelectronic
equipment(RoHS).
China
有毒有害物质或元素
部
件
名
称
电
气
实
装
部
分
0:表示该有毒有害物质在该部件所有均质材料中
的含量均在GB/T26572标准规定的限量要求以下。
X:表示该有毒有害物质至少在该部件的某一均质
材料中的含量超出GB/T26572标准规定的限量要
求。
ContactInformation
AxisCommunicationsAB
Emdalavägen14
22369Lund
Sweden
Tel:+46462721800
Fax:+4646136130
www.axis.com
汞
铅
(Pb)
X
镉
(Hg)
(Cd)
00000
六价
多溴
铬
联苯
(Cr-
(PB-
(VI))
B)
Support
Shouldyourequireanytechnicalassistance,pleasecontact
yourAxisreseller.Ifyourquestionscannotbeanswered
immediately,yourresellerwillforwardyourqueriesthrough
theappropriatechannelstoensurearapidresponse.Ifyou
areconnectedtotheInternet,youcan:
•downloaduserdocumentationandsoftwareupdates
•ndanswerstoresolvedproblemsintheFAQdatabase.
Searchbyproduct,category,orphrase
•reportproblemstoAxissupportstaffbylogginginto
yourprivatesupportarea
•chatwithAxissupportstaff
•visitAxisSupportatwww.axis.com/support
Learnmore!
VisitAxislearningcenterwww.axis.com/academy/for
usefultrainings,webinars,tutorialsandguides.
多溴
二苯
醚
(PBDE)
Thisproductcomplieswiththerequirementsof
SJ/T11364-2014,Markingfortherestrictionofhazardous
substancesinelectricalandelectronicproducts.
Page 4

Page 5

AXISQ60Series
Safetyinformation
ReadthroughthisInstallationGuidecarefullybeforeinstallingtheproduct.KeeptheInstallation
Guideforfuturereference.
Hazardlevels
DANGER
Indicatesahazardoussituationwhich,ifnotavoided,willresultindeathorseriousinjury.
WARNING
Indicatesahazardoussituationwhich,ifnotavoided,couldresultindeathorseriousinjury.
CAUTION
Indicatesahazardoussituationwhich,ifnotavoided,couldresultinminorormoderate
injury.
NO
TICE
NO NO
TICE TICE
Indicatesasituationwhich,ifnotavoided,couldresultindamagetoproperty.
Othermessagelevels
Important
Indicatessignicantinformationwhichisessentialfortheproducttofunctioncorrectly.
Note
Indicatesusefulinformationwhichhelpsingettingthemostoutoftheproduct.
Safetyinstructions
WARNING
TheAxisproductshallbeinstalledbyatrainedprofessional,andincompliancewithlocal
lawsandregulations.
NO
TICE
NO NO
TICE TICE
•TheAxisproductshallbeusedincompliancewithlocallawsandregulations.
•Axisrecommendsusingashieldednetworkcable(STP)CAT5orhigher.
•TousetheAxisproductoutdoors,orinsimilarenvironments,itshallbeinstalledinan
approvedoutdoorhousing.
•StoretheAxisproductinadryandventilatedenvironment.
•AvoidexposingtheAxisproducttoshocksorheavypressure.
•Donotinstalltheproductonunstablepoles,brackets,surfacesorwalls.
•UseonlyapplicabletoolswheninstallingtheAxisproduct.Usingexcessiveforcewith
powertoolscouldcausedamagetotheproduct.
•Donotusechemicals,causticagents,oraerosolcleaners.
5
Page 6

AXISQ60Series
•Useacleanclothdampenedwithpurewaterforcleaning.
•Useonlyaccessoriesthatcomplywiththetechnicalspecicationofyourproduct.These
canbeprovidedbyAxisorathirdparty.AxisrecommendsusingAxispowersource
equipmentcompatiblewithyourproduct.
•UseonlysparepartsprovidedbyorrecommendedbyAxis.
•Donotattempttorepairtheproductyourself.ContactAxissupportoryourAxisreseller
forservicematters.
•Donotpointthecameralenstowardthesunorotherhigh-intensityradiationsources
becausethiscouldcausedamagetothecamera.
Transportation
NO
TICE
NO NO
TICE TICE
•WhentransportingtheAxisproduct,usetheoriginalpackagingorequivalenttoprevent
damagetotheproduct.
Battery
TheAxisproductusesa3.0VCR2032lithiumbatteryasthepowersupplyforitsinternalreal-time
clock(RTC).Undernormalconditionsthisbatterywilllastforaminimumofveyears.
LowbatterypoweraffectstheoperationoftheRTC,causingittoresetateverypower-up.When
thebatteryneedsreplacing,alogmessagewillappearintheproduct’sserverreport.Formore
informationabouttheserverreport,seetheproduct´ssetuppagesorcontactAxissupport.
Thebatteryshouldnotbereplacedunlessrequired,butifthebatterydoesneedreplacing,contact
Axissupportatwww.axis.com/techsupforassistance.
Lithiumcoincell3.0Vbatteriescontain1,2-dimethoxyethane;ethyleneglycoldimethylether
(EGDME),CASno.1 10-71-4.
WARNING
•Riskofexplosionifthebatteryisincorrectlyreplaced.
•ReplaceonlywithanidenticalbatteryorabatterywhichisrecommendedbyAxis.
•Disposeofusedbatteriesaccordingtolocalregulationsorthebatterymanufacturer's
instructions.
Domecover
NO
TICE
NO NO
TICE TICE
•Becarefulnottoscratch,damageorleavengerprintsonthedomecoverbecausethis
coulddecreaseimagequality.Ifpossible,keeptheprotectiveplasticonthedomecover
untiltheinstallationiscomplete.
•Donotcleanadomecoverthatlookscleantotheeyeandneverpolishthesurface.
Excessivecleaningcoulddamagethesurface.
6
Page 7

AXISQ60Series
•Forgeneralcleaningofthedomecoveritisrecommendedtouseanon-abrasive,
solvent-freeneutralsoapordetergentmixedwithpurewaterandasoft,cleancloth.Rinse
wellwithpurelukewarmwater.Drywithasoft,cleanclothtopreventwaterspotting.
•Neveruseharshdetergents,gasoline,benzeneoracetoneetc.andavoidcleaningthe
domecoverindirectsunlightoratelevatedtemperatures.
•Makesurethedomeisattachedinoperationmode,otherwisefocusmaybeaffected.
7
Page 8

8
Page 9

Packagecontents
•AXISQ6052/Q6054MkII/Q6055PTZDomeNetworkCamera
•Cleardomecover(premounted)
•Smokedtransparentdomecover
•AxisPoE+midspan1-port(LPS)
•Mountingkitfordropceilingmount
•Printedmaterials
-InstallationGuide(thisdocument)
-Drilltemplatefordropceilingmount
-Extraserialnumberlabel(2x)
-AVHSAuthenticationkey
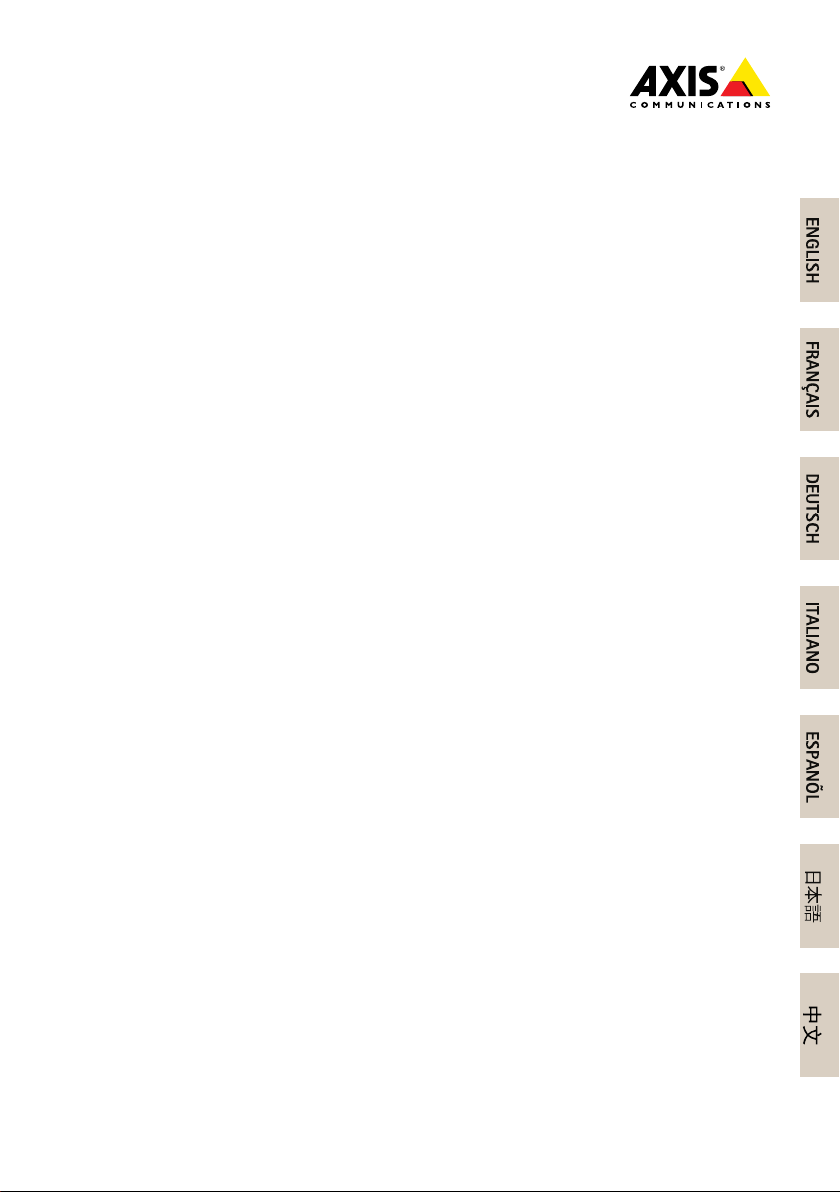
HardwareOverview
NO
TICE
NO NO
TICE TICE
Makesurethedomeisattachedinoperationmode,otherwisefocusmaybeaffected.
AXISQ60Series
9
Page 10
AXISQ60Series
1
Unitholder(3x)
2
Camerabaselid
3
CamerabaselidscrewT20(3x)
4
Hookforsafetywire
5
Partnumber(P/N)&Serialnumber(S/N)
6
Cabletrack(2x)
7
Foamgasket
8
Networkconnector(PoE+)
9
Multi-connector
10
Topcover
11
Dome
10
Page 11
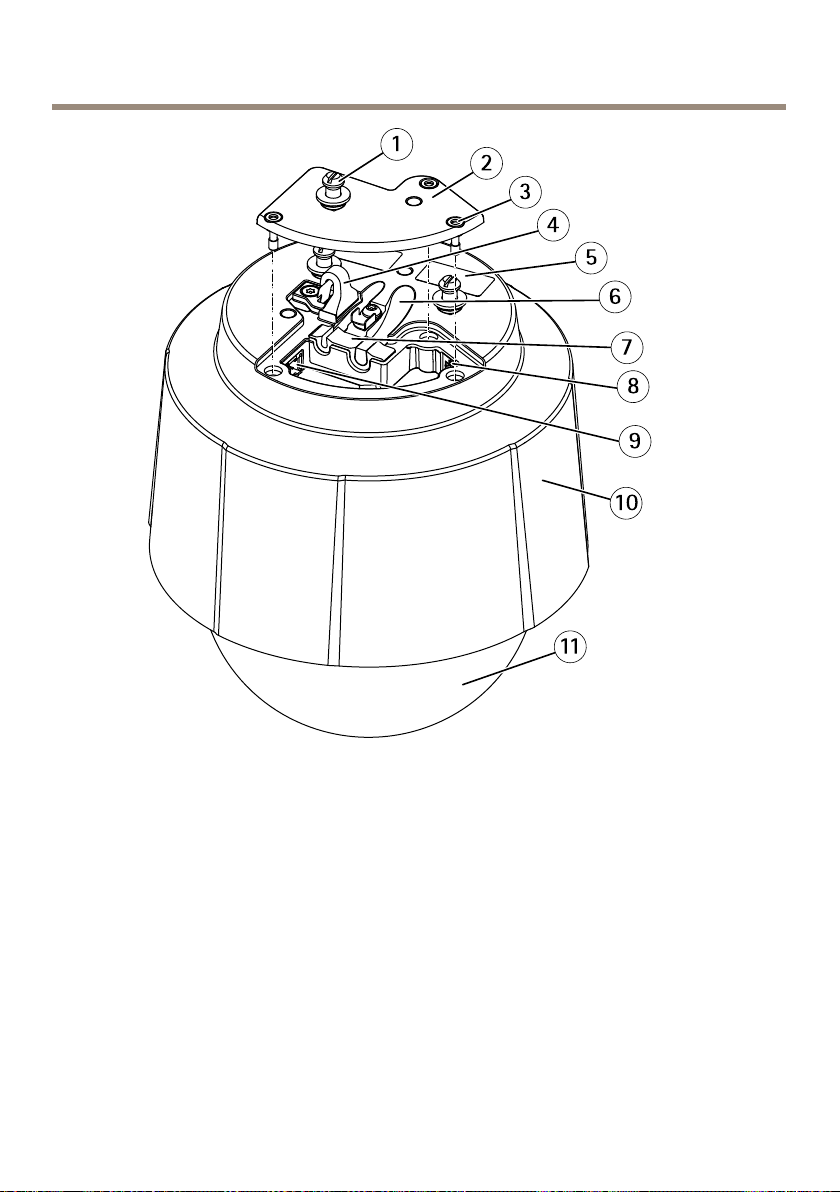
CameraUnit
DomeCover
AXISQ60Series
1
SDcardslot
2
StatusLEDindicator
3
Controlbutton
4
Powerbutton
1
DomebracketscrewT20(4x)
2
Domebracket
3
Domecover
4
DomeringscrewT20(4x)
5
Domering
11
Page 12
AXISQ60Series
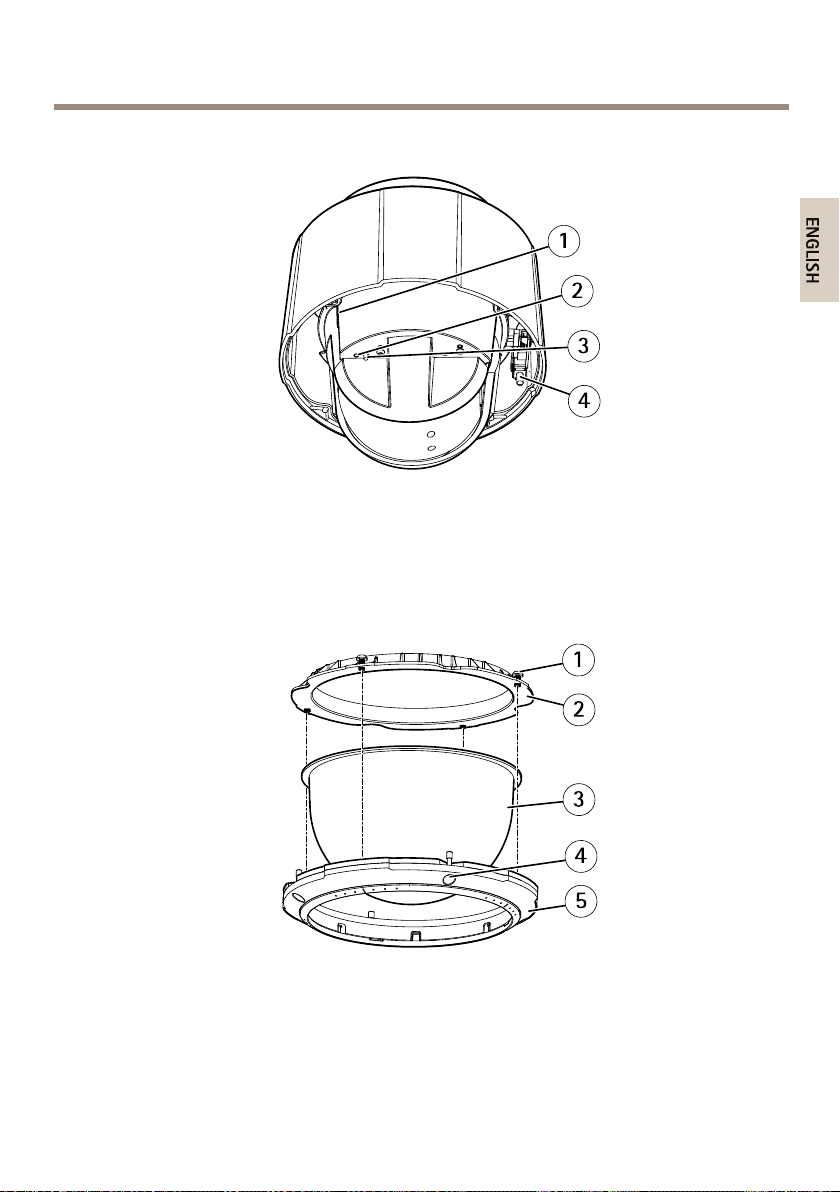
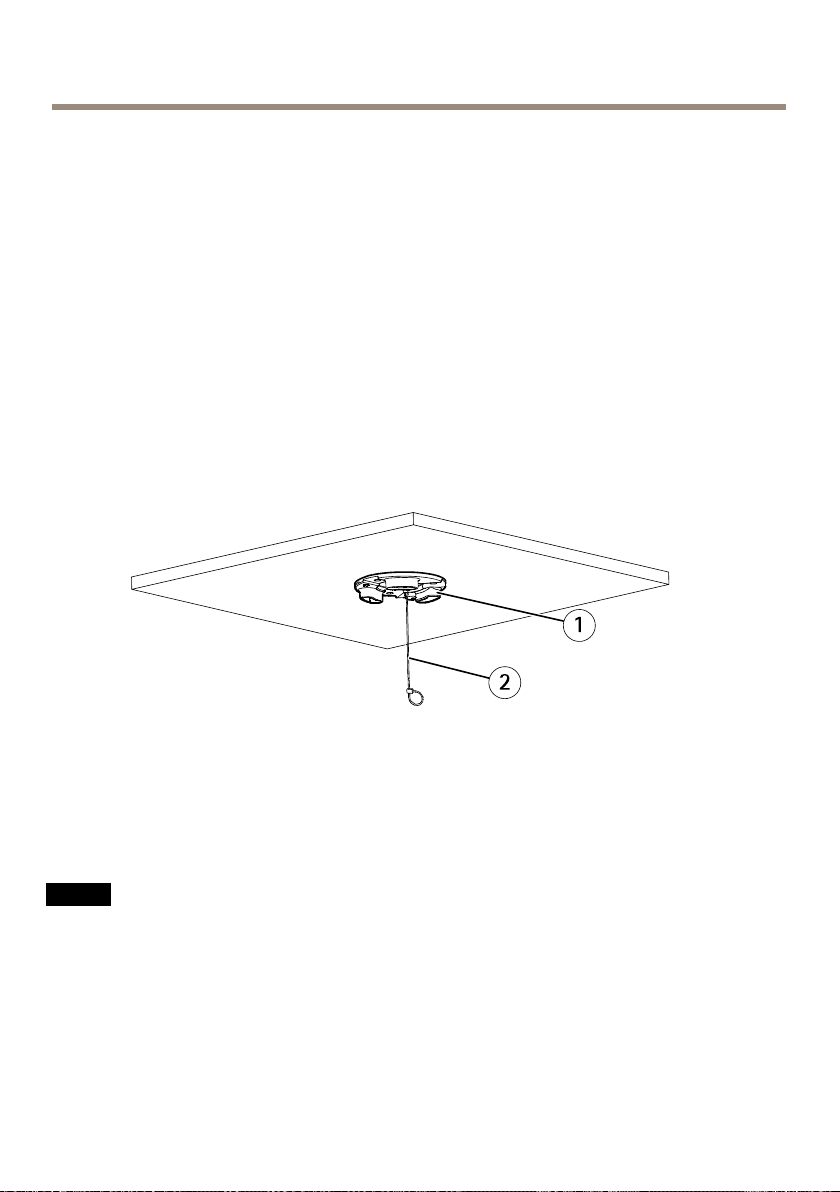
HardCeilingMount
DropCeilingMount
1
Mountingplate
2
Safetywire
1
Mountingplate
2
MountingplatescrewT20(3x)
3
Bracketarm
4
BracketarmscrewT20(3x)andwasher(3x)
5
Bracketring
6
Trimring
7
Safetywire
12
Page 13

AXISQ60Series
Howtoinstalltheproduct
Readalltheinstructionsbeforeinstallingtheproduct.Someinstallationstepswouldbenetfrom
beingcompletedtogetherbecausetheyrequireremovalofthedomecover.
NO
TICE
NO NO
TICE TICE
•Duetolocalregulationsortheenvironmentalandelectricalconditionsinwhichthe
productistobeused,ashieldednetworkcable(STP)maybeappropriateorrequired.
Allcablesconnectingtheproducttothenetworkandthatareroutedoutdoorsorin
demandingelectricalenvironmentsshallbeintendedfortheirspecicuse.Makesurethat
thenetworkdevicesareinstalledinaccordancewiththemanufacturer’sinstructions.For
informationaboutregulatoryrequirements,seeRegulatoryinformation2.
•Mounttheproductwiththedomecoverfacingdownward.
•Becarefulnottoscratch,damageorleavengerprintsonthedomecoverbecausethis
coulddecreaseimagequality.Ifpossible,keeptheprotectiveplasticonthedomecover
untiltheinstallationiscomplete.
Changethedomecover(optional)
Thepremountedcleardomecovercanbereplacedifyouwanttousethesmokeddomecoveror
ifthedomecoverisscratchedordamaged.SparedomecoverscanbepurchasedfromyourAxis
reseller
Forlocationofthecomponents,seeHardwareOverviewonpage9.
1.Loosenthedomeringscrewsandremovethedomecover.
2.Removethedomebracketscrews,thedomebracket,andthedomecoverfromthedome
ring.
3.Attachthedomebracketandthedomecovertothedomeringandtightenthescrews
(torque1.2Nm).
4.ToinstallanSDcard,seeHowtoinstallanSDcard(optional)onpage13.
5.Attachthedomecovertothetopcoverandtightenthescrews(torque1.5Nm).
HowtoinstallanSDcard(optional)
InstallinganSDcardisoptional.AstandardorhighcapacitySDcard(notincluded)canbeusedto
storerecordingslocallyintheproduct.
1.Loosenthedomeringscrewsandremovethedomecover.
2.InsertanSDcardintotheSDcardslot.
3.Attachthedomecovertothetopcoverandtightenthescrews(torque1.5Nm).
13
Page 14
AXISQ60Series
Howtoinstallthecamera
TheAxisproductcanbemountedwiththecablesroutedthroughoralongthewallorceiling.
Chooseoneofthefollowingwaystoinstallyourcamera:
•Installthecamerawithahardceilingmountonpage14.
•Installthecamerawithadropceilingmountonpage15.
•Installthecamerawithabracketmountonpage18.
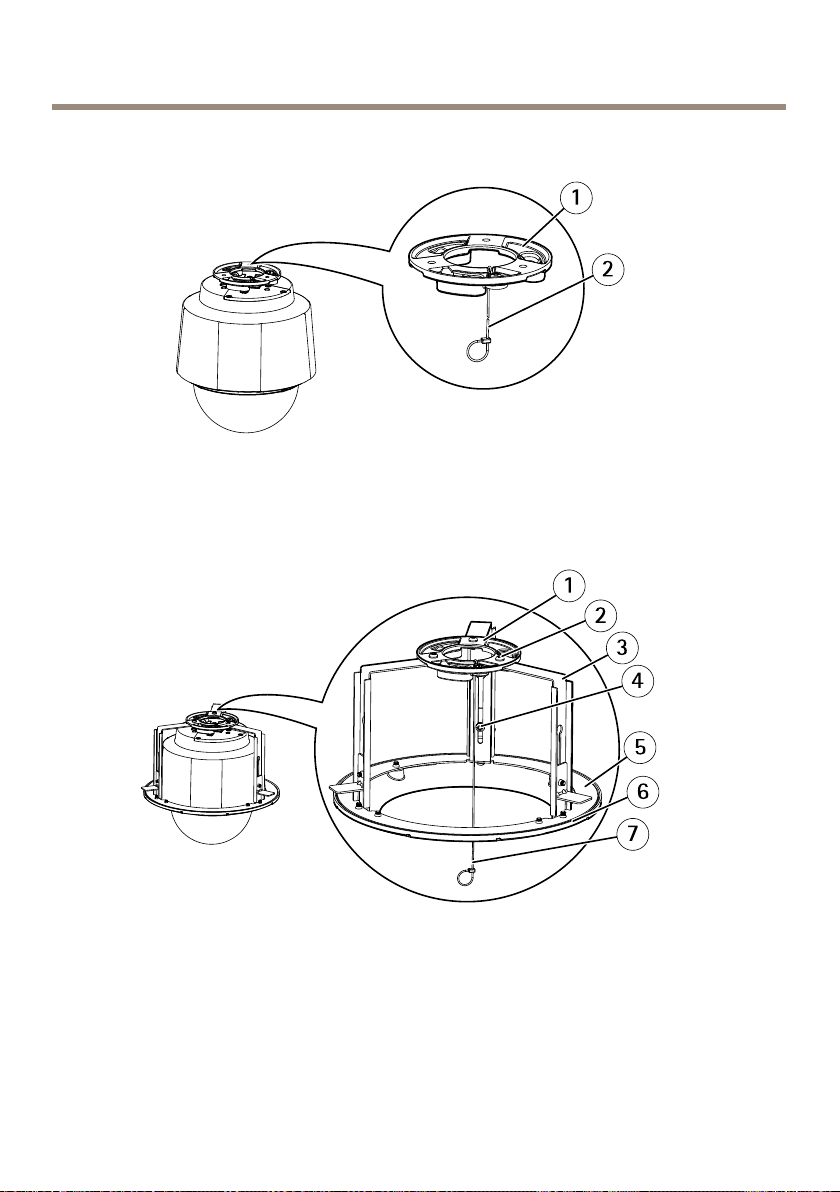
Installthecamerawithahardceilingmount
1.Preparetheceilingforinstallationofthemountingplate.Usethemountingplateas
atemplatetopositiontheholes.Makesuretousedrillbits,screwsandplugsthat
areappropriateforthematerial.
2.Installthemountingplate.Thearrowonthemountingplatewillalignwiththelogotype
onthecamera.
1
Mountingplate
2
Safetywire
3.Loosenthecamerabaselidscrewsandremovethecamerabaselid.
4.Securethecamerausingthesuppliedsafetywire.
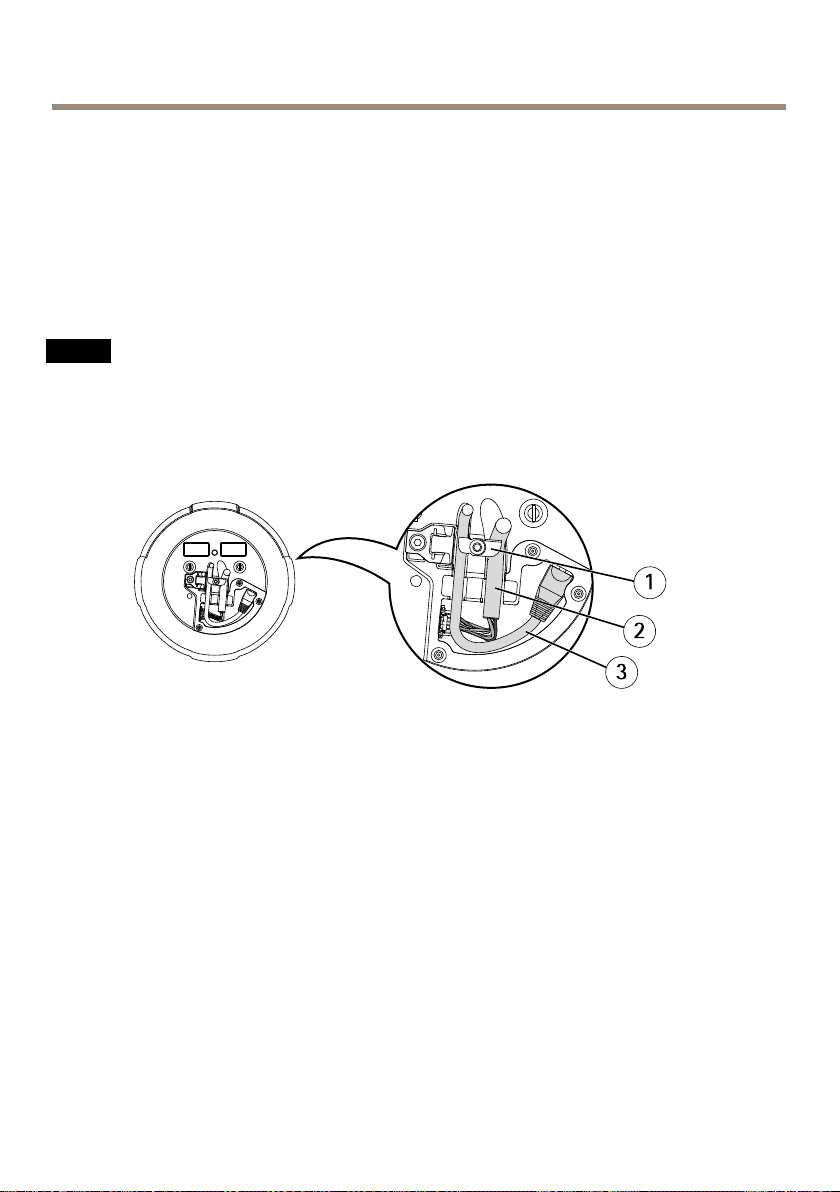
5.Routeandconnectthenetworkcableand,ifused,themulti-connectorcabletothe
camera.
NO
TICE
NO NO
TICE TICE
•Becarefulnottodamagethecableswhenconnectingthem.
•Makesurethatthefoamgasketholesarealignedwiththecabletracks.Ifusinga
multi-connectorcable,removethecut-outpieceforthemulti-connectorcablefrom
thefoamgasket.
14
Page 15

AXISQ60Series
1
Cableholders
2
Multi-connectorcable
3
Networkcable
6.Turnthecableholderstokeepthecablesinplace.
7.Putthecamerabaselidbackinitsoriginalpositionandtightenthescrews(torque
1.5Nm).
8.Slidetheunitholdersonthenetworkcameraintotheslotsinthemountingplateand
rotatethecameraunit.
9.Installthesuppliedmidspan,seetheInstallationGuidedeliveredwiththemidspanor
nditonwww.axis.com
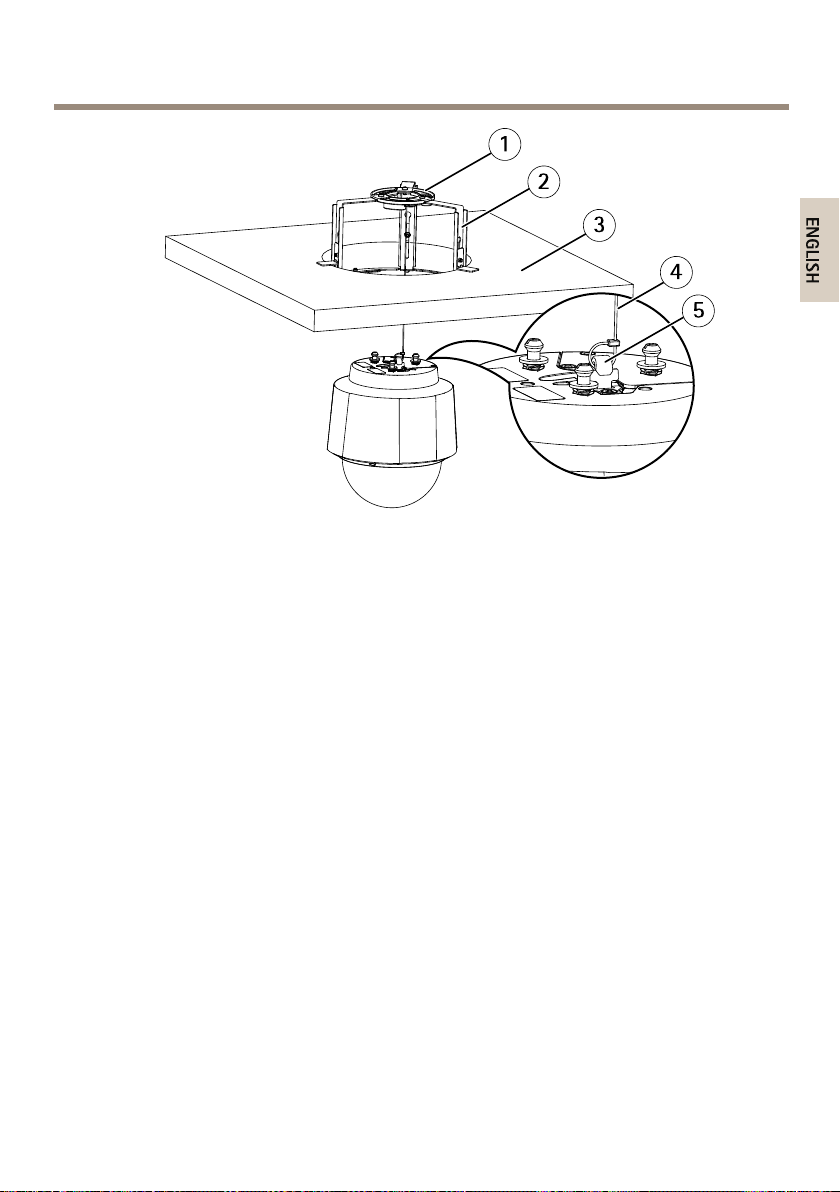
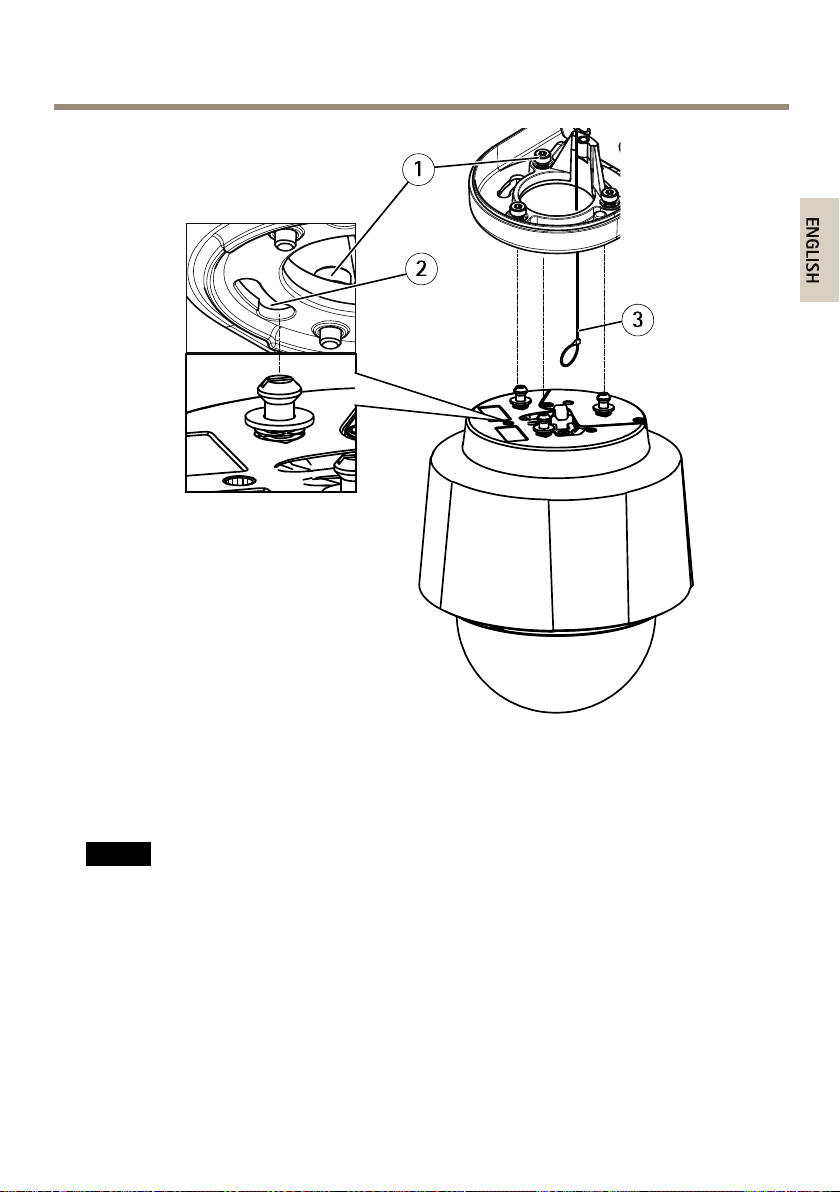
Installthecamerawithadropceilingmount
WARNING
Thecombinedweightofthecameraandceilingmountisapproximately3200g(7.1lb).
Makesurethattheceilingmaterialisstrongenoughtosupportthisweight.
NO
TICE
NO NO
TICE TICE
Theceilingtileshouldbe5–60mm(3/16–23/8in)thick.
1.Removetheceilingtileinwhichthedropceilingmountistobetted.
2.Cutaholeintheceilingtileforthedropceilingmount.Usethesuppliedtemplateto
markthepositionandcutaroundthetemplate.
1
Ceilingtile
15
Page 16
AXISQ60Series
2
Holediameter225mm(87/8in)
3.Assembletheceilingbracketandattachittotheceilingtile.Makesurethearrowson
themountingplateandtheceilingbracketarepointinginthesamedirectionforthe
logotypesonthecameraandthetrimringtoalign.
4.Tightenthebracketarmscrews.
5.Loosenthecamerabaselidscrewsandremovethecamerabaselid.
6.Routeandconnectthenetworkcableand,ifused,themulti-connectorcabletothe
camera.
NO
TICE
NO NO
TICE TICE
•Becarefulnottodamagethecableswhenconnectingthem.
•Makesurethatthefoamgasketholesarealignedwiththecabletracks.Ifusinga
multi-connectorcable,removethecut-outpieceforthemulti-connectorcablefrom
thefoamgasket.
1
Cableholders
2
Multi-connectorcable
3
Networkcable
7.Turnthecableholderstokeepthecablesinplace.
8.Putthecamerabaselidbackinitsoriginalpositionandtightenthescrews(torque
1.5Nm).
9.Securethecamerausingthesuppliedsafetywire.
16
Page 17
1
2
3
4
5
AXISQ60Series
Mountingplate
Ceilingbracket
Ceilingtile
Safetywire
Hookforsafetywire
10.Slidetheunitholdersonthenetworkcameraintotheslotsinthemountingplateand
rotatethecameraunit.
11.Installthesuppliedmidspan,seetheInstallationGuidedeliveredwiththemidspanor
nditonwww.axis.com
12.Installtheceilingtilewiththecameramountedonit.
13.Putthetrimringontheceilingbracketandtightenthescrews.
17
Page 18
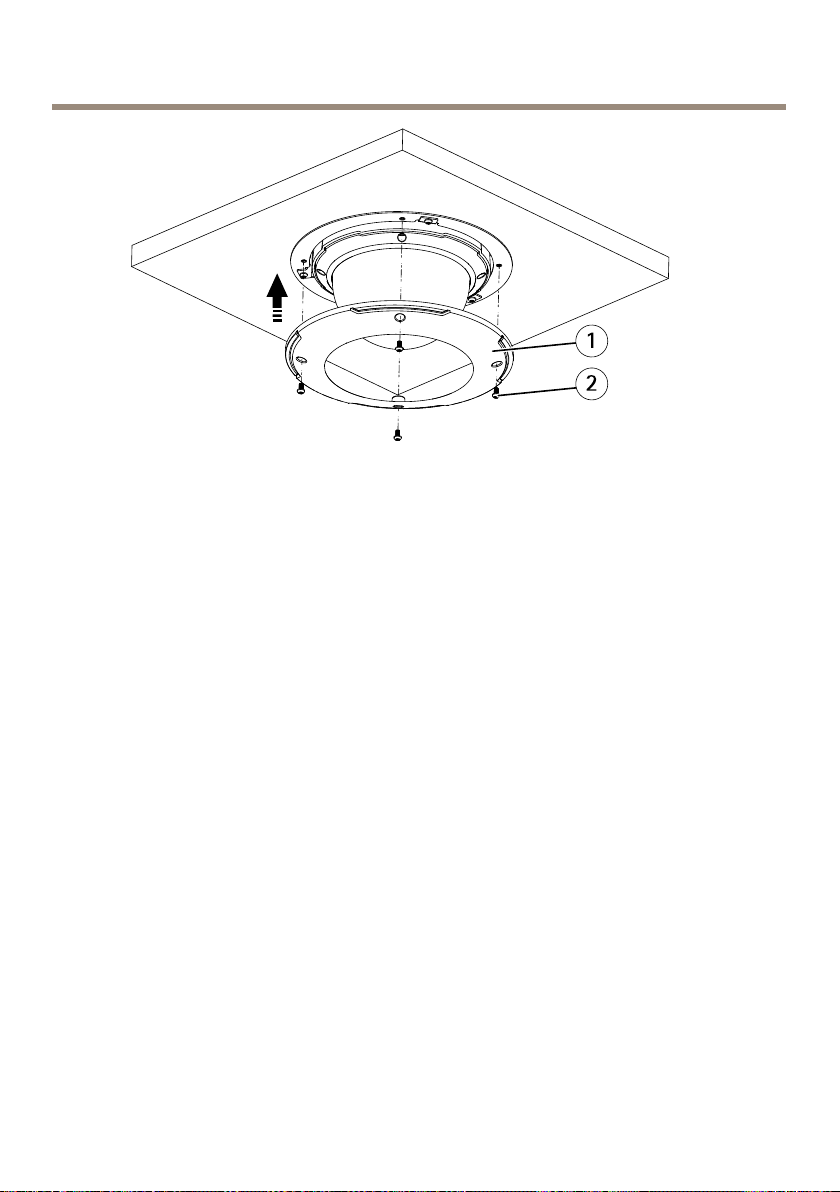
AXISQ60Series
1
Trimring
2
TrimringscrewT20(4x)
Installthecamerawithabracketmount
1.Installtheselectedbracketaccordingtotheinstructionssuppliedwiththebracket.If
drillingisrequired,makesuretousedrillbits,screwsandplugsthatareappropriatefor
thematerial.
2.Loosenthecamerabaselidscrewsandremovethecamerabaselid.
3.Routethenetworkcableand,ifused,themulti-connectorcablethroughtheholes
inthemountingbracket.
4.Securethecamerausingthesuppliedsafetywire.
18
Page 19
AXISQ60Series
1
ScrewT30(3x)
2
Slotforunitholder(3x)
3
Safetywire
5.Connectthenetworkcableand,ifused,themulti-connectorcabletothecamera.
NO
TICE
NO NO
TICE TICE
•Becarefulnottodamagethecableswhenconnectingthem.
•Makesurethatthefoamgasketholesarealignedwiththecabletracks.Ifusinga
multi-connectorcable,removethecut-outpieceforthemulti-connectorcablefrom
thefoamgasket.
19
Page 20
AXISQ60Series
1
Cableholders
2
Multi-connectorcable
3
Networkcable
6.Turnthecableholderstokeepthecablesinplace.
7.Putthecamerabaselidbackinitsoriginalpositionandtightenthescrews(torque
1.5Nm).
8.Slidetheunitholdersonthenetworkcameraintotheslotsinthemountingbracketand
rotatethecameraunit.
9.Securethenetworkcameratothemountingbracketbytighteningthescrews.
10.Installthesuppliedmidspan,seetheInstallationGuidedeliveredwiththemidspanor
nditonwww.axis.com
Howtoaccesstheproduct
AXISIPUtilityandAXISCameraManagementarerecommendedmethodsforndingAxisproducts
onthenetworkandassigningthemIPaddressesinWindows®.Bothapplicationsarefreeandcan
bedownloadedfromwww.axis.com/techsup
Theproductcanbeusedwithmostoperatingsystemsandbrowsers.Werecommendthefollowing
browsers:
•InternetExplorer
•Safari
•Chrome
Formoreinformationaboutusingtheproduct,seetheUserManualavailableatwww.axis.com
®
withOSX
TM
®
withWindows
®
orFirefox
®
withotheroperatingsystems.
®
Howtoresettofactorydefaultsettings
Important
Resettofactorydefaultshouldbeusedwithcaution.Aresettofactorydefaultwillreset
allsettings,includingtheIPaddress,tothefactorydefaultvalues.
20
Page 21

AXISQ60Series
Note
Theinstallationandmanagementsoftwaretoolsareavailablefromthesupportpages
onwww.axis.com/techsup
Toresettheproducttothefactorydefaultsettings:
1.Pressandholdthecontrolbuttonandthepowerbuttonfor15–30secondsuntilthe
statusLEDindicatorashesamber.SeeHardwareOverviewonpage9.
2.Releasethecontrolbuttonbutcontinuetoholddownthepowerbuttonuntilthestatus
LEDindicatorturnsgreen.
3.Releasethepowerbuttonandassembletheproduct.
4.Theprocessisnowcomplete.Theproducthasbeenresettothefactorydefaultsettings.
IfnoDHCPserverisavailableonthenetwork,thedefaultIPaddressis192.168.0.90
5.Usingtheinstallationandmanagementsoftwaretools,assignanIPaddress,setthe
passwordandaccessthevideostream.
Itisalsopossibletoresetparameterstofactorydefaultviathewebinterface.GotoSetup>
SystemOptions>MaintenanceandclickDefault.
21
Page 22

AXISQ60Series
Furtherinformation
•Forthelatestversionofthisdocument,seewww.axis.com
•Theusermanualisavailableatwww.axis.com
•Tocheckifthereisupdatedrmwareavailableforyourproduct,see
www.axis.com/support
•Forusefulonlinetrainingsandwebinars,seewww.axis.com/academy
Optionalaccessories
Foracompletelistofavailableaccessoriesforthisproduct,gotowww.axis.com
Warrantyinformation
ForinformationaboutAxis’productwarrantyandtheretorelatedinformation,goto
www.axis.com/warranty/
22
Page 23

AXISQ60Series
Specifications
LEDIndicators
StatusLED
Unlit
GreenShowssteadygreenfor10secondsfornormaloperationafter
Amber
Amber/RedFlashesamber/redifnetworkconnectionisunavailableorlost.
RedFirmwareupgradefailure.
Indication
Connectionandnormaloperation.
startupcompleted.
Steadyduringstartup.Flashesduringrmwareupgradeorreset
tofactorydefault.
Buttons
ControlButton
Forlocationofthecontrolbutton,seeHardwareOverviewonpage9.
Thecontrolbuttonisusedfor:
•Resettingtheproducttofactorydefaultsettings.Seepage20.
•ConnectingtoanAXISVideoHostingSystemserviceorAXISInternetDynamicDNS
Service.Formoreinformationabouttheseservices,seetheUserManual.
Powerbutton
Pressandholdthepowerbuttontotemporarilypowertheproductwhenthedomecoveris
removed.Thepowerbuttonisalsousedwiththecontrolbuttontoresetthecameratofactory
defaultsettings.Seepage20.
Connectors
Networkconnector
RJ45EthernetconnectorwithPoweroverEthernetPlus(PoE+).
NO
TICE
NO NO
TICE TICE
Usethesuppliedmidspan.
23
Page 24

AXISQ60Series
NO
TICE
NO NO
TICE TICE
Theproductshallbeconnectedusingashieldednetworkcable(STP).Allcablesconnecting
theproducttothenetworkshallbeintendedfortheirspecicuse.Makesurethatthe
networkdevicesareinstalledinaccordancewiththemanufacturer’sinstructions.For
informationaboutregulatoryrequirements,seeElectromagneticcompatibility(EMC)2.
SDcardslot
NO
TICE
NO NO
TICE TICE
•RiskofdamagetoSDcard.Donotusesharptools,metalobjectsorexcessiveforcewhen
insertingorremovingtheSDcard.Useyourngerstoinsertandremovethecard.
•Riskofdatalossandcorruptedrecordings.DonotremovetheSDcardwhiletheproduct
isrunning.DisconnectpowerorunmounttheSDcardfromtheAxisproduct’swebpages
beforeremoval.
ThisproductsupportsSD/SDHC/SDXCcards(notincluded).
ForSDcardrecommendations,seewww.axis.com
I/Oandaudioconnector
Terminalconnectorforconnectingexternalequipment:
•Audioequipment
•Input/Output(I/O)devices
Whenconnectingexternalequipment,anAxismulticableisrequiredinordertomaintainthe
product’sIPrating.Formoreinformation,seeMulticableconnectorsonpage24.
Multicableconnectors
WhenconnectingexternalequipmenttotheAxisproduct,anAxismulticableisrequiredinorderto
maintaintheproduct’sIPrating.TheAxismulticablecanbepurchasedfromyourAxisreseller.To
locatethemulti-connector,seeHardwareOverviewonpage9.
Themulticableprovidesthefollowingconnectors:
Powerconnector-3-pinterminalblockusedforpowerinput.UseaSafetyExtraLowVoltage
(SELV)compliantlimitedpowersource(LPS)witheitheraratedoutputpowerlimitedto≤100Wor
aratedoutputcurrentlimitedto≤5A.
Audioin(pink)-3.5mminputforamonomicrophone,oraline-inmonosignal(leftchannelis
usedfromastereosignal).
Audioout(green)-3.5mmoutputforaudio(linelevel)thatcanbeconnectedtoapublicaddress
(PA)systemoranactivespeakerwithabuilt-inamplier.Astereoconnectormustbeusedforthe
audioout.
24
Page 25
AXISQ60Series
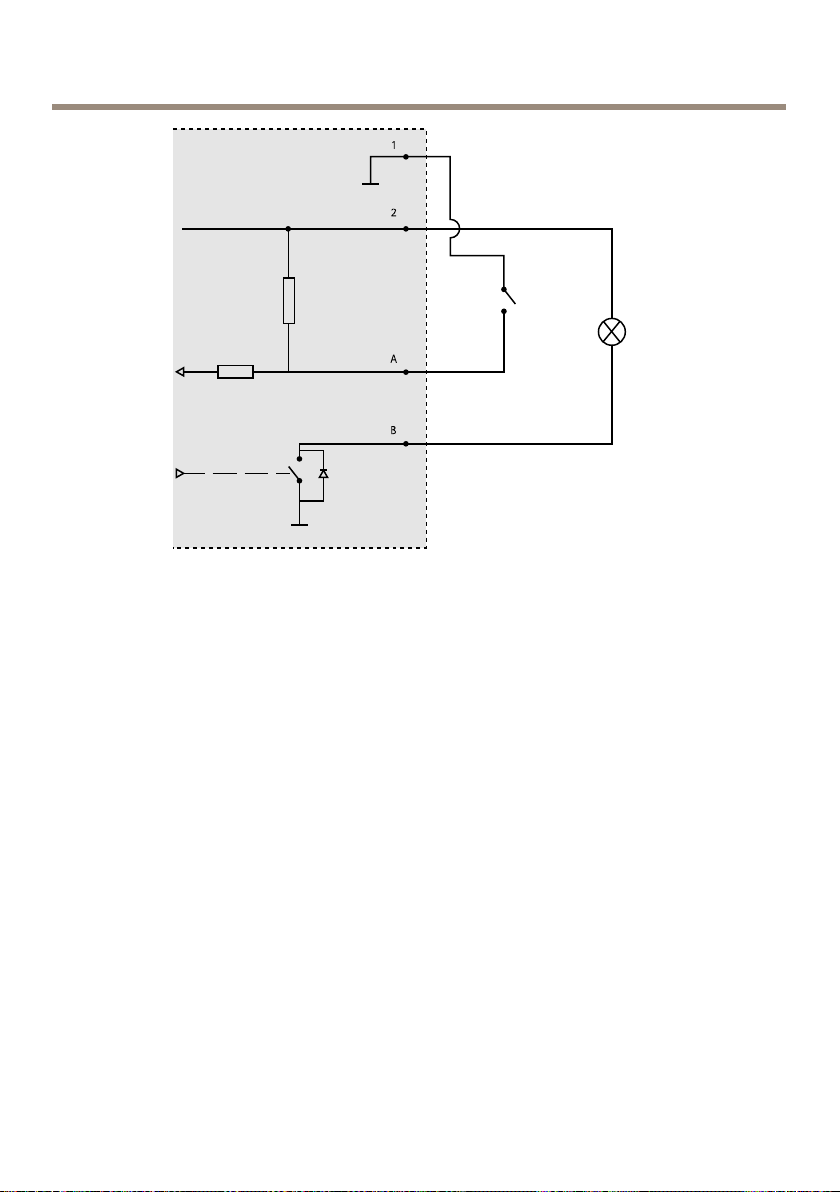
I/Oterminalconnector-Usewithexternaldevicesincombinationwith,forexample,tampering
alarms,motiondetection,eventtriggering,timelapserecordingandalarmnotications.Inaddition
tothe0VDCreferencepointandpower(DCoutput),theI/Oconnectorprovidestheinterfaceto:
•Digitaloutput—ForconnectingexternaldevicessuchasrelaysandLEDs.
ConnecteddevicescanbeactivatedbytheVAPIX®ApplicationProgramming
Interface,outputbuttonsontheLiveViewpageorbyanActionRule.Theoutput
willshowasactive(shownunderSystemOptions>Port&Devices>Port
Status)ifthealarmdeviceisactivated.
•Digitalinput—Analarminputforconnectingdevicesthatcantogglebetween
anopenandclosedcircuit,forexample:PIRs,door/windowcontacts,glass
breakdetectors,etc.Whenasignalisreceivedthestatechangesandtheinput
becomesactive(shownunderSystemOptions>Port&Devices>PortStatus).
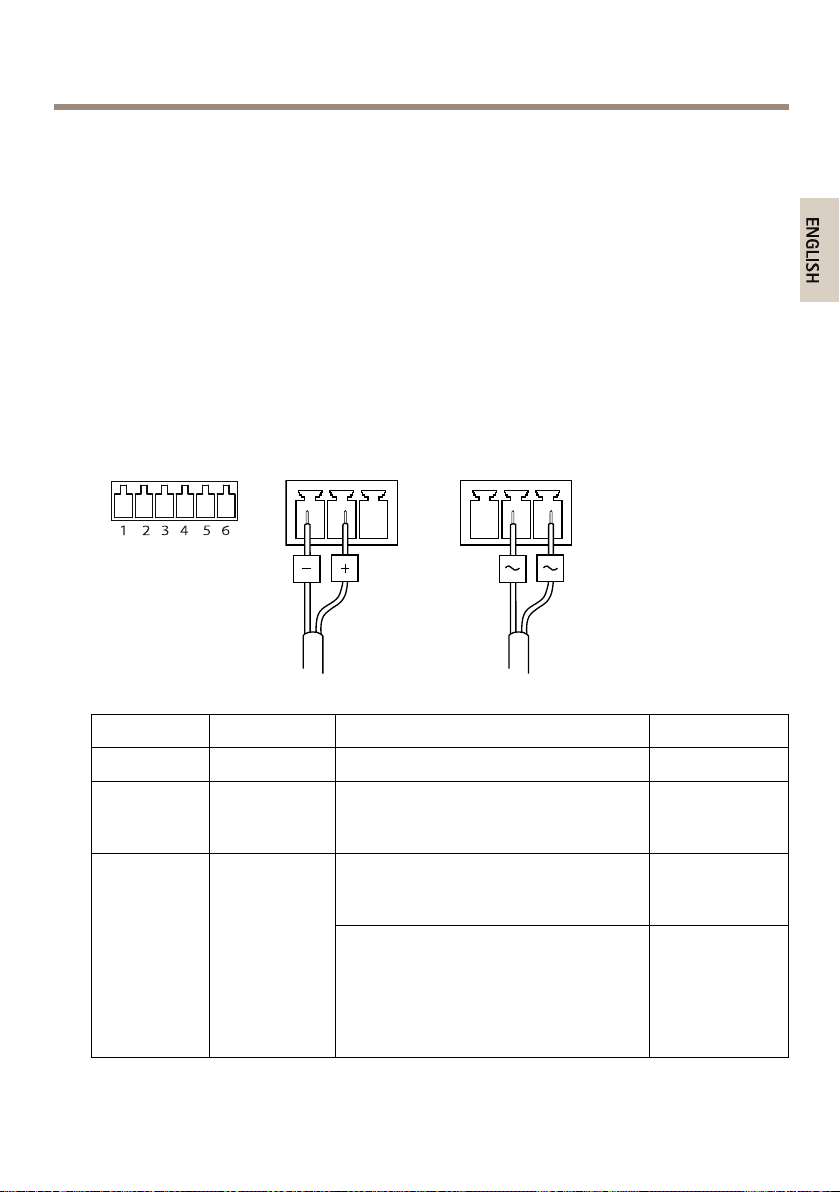
I/Oconnector
FunctionPinNotes
0VDC(-)
DCoutput
Congurable
(Inputor
Output)
1
2
3–6
DCpowerinputACpowerinput
Canbeusedtopowerauxiliaryequipment.
Note:Thispincanonlybeusedaspower
out.
Digitalinput–Connecttopin1to
activate,orleaveoating(unconnected)
todeactivate.
Digitaloutput–Connectedtopin1when
activated,oating(unconnected)when
deactivated.Ifusedwithaninductive
load,e.g.arelay,adiodemustbe
connectedinparallelwiththeload,for
protectionagainstvoltagetransients.
Specications
3.3VDC
Maxload=
250mA
0tomax40VDC
0tomax40VDC,
opendrain,
100mA
25
Page 26
AXISQ60Series
1
0VDC(-)
2
DCoutput3.3V,max250mA
A
I/Oconguredasinput
B
I/Oconguredasoutput
26
Page 27
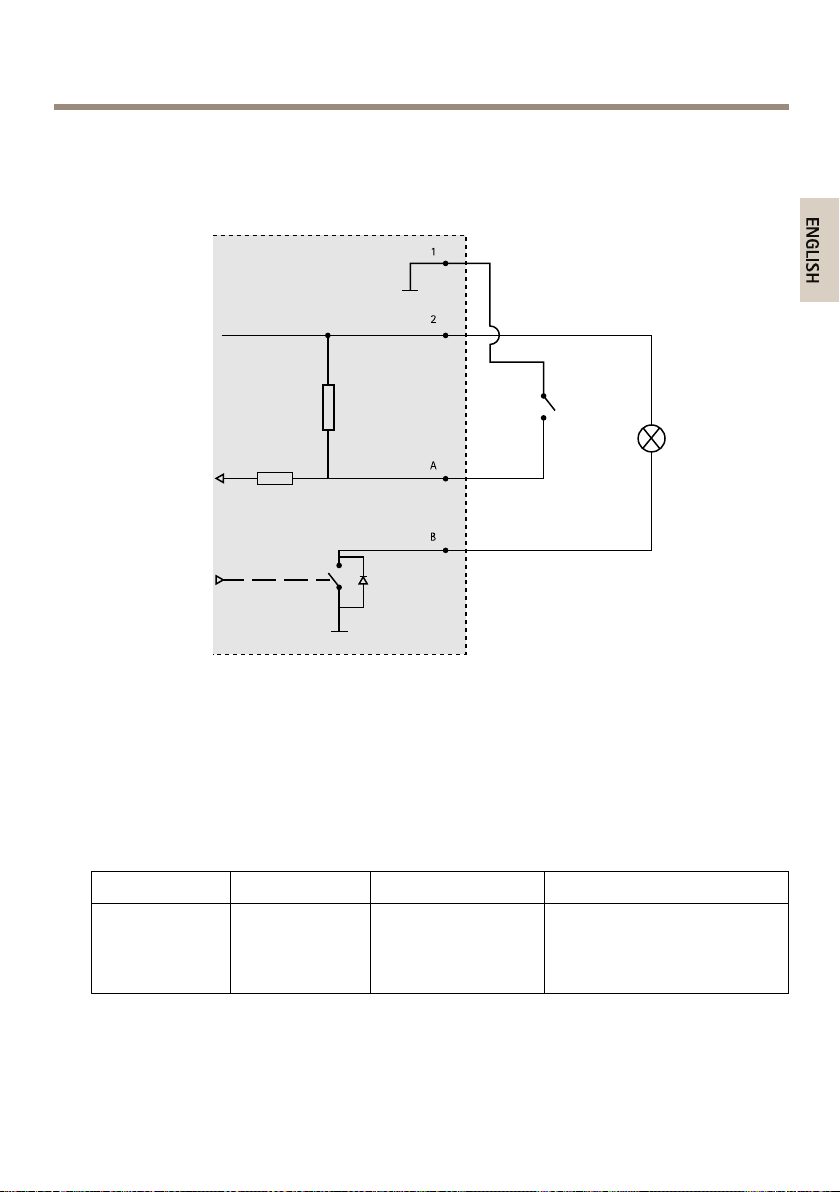
ConnectionDiagrams
I/OConnector
AXISQ60Series
1
0VDC(-)
2
DCoutput3.3V,max250mA
A
I/Oconguredasinput
B
I/Oconguredasoutput
Operatingconditions
TheAxisproductisintendedforindooruse.
Product
AXISQ6052
AXISQ6054MkII
AXISQ6055
Classication
IEC60721-4-3
Class3K3,3M3
IEC60529IP52
TemperatureHumidity
0°Cto50°C
(32°Fto122°F)
27
10–85%RH(non-condensing)
Page 28
AXISQ60Series
StorageConditions
Temperature
-50ºCto60ºC(-58ºFto140ºF)
Powerconsumption
NO
TICE
NO NO
TICE TICE
UseaSafetyExtraLowVoltage(SELV)compliantlimitedpowersource(LPS)witheither
aratedoutputpowerlimitedto≤100Woraratedoutputcurrentlimitedto≤5A.Axis
recommendsusingthesuppliedmidspan.
ProductAxisPoE+midspan
AXISQ605224–34VDC,
AXISQ6054MkII24–34VDC,
AXISQ6055
1–port(included)
IEEE802.3at,Type2
Class4
Multi-connectorcable
max19W
max19W
24–34VDC,
max19W
20–24VAC,
max27VA
20–24VAC,
max25.9VA
20–24VAC,
max27VA
28
Page 29

AXISQ60Series
Informationssurlasécurité
Lisezattentivementceguided'installationavantd'installerl'appareil.Conservezleguide
d'installationpourtouteréférenceultérieure.
Niveauxderisques
DANGER
Indiqueunesituationdangereusequi,siellen'estpasévitée,entraîneraledécèsoudes
blessuresgraves.
AVERTISSEMENT
Indiqueunesituationdangereusequi,siellen'estpasévitée,pourraitentraînerledécès
oudesblessuresgraves.
ATTENTION
Indiqueunesituationdangereusequi,siellen'estpasévitée,pourraitentraînerdes
blessureslégèresoumodérées.
VIS
A AAVIS VIS
Indiqueunesituationqui,siellen'estpasévitée,pourraitendommagerl'appareil.
Autresniveauxdemessage
Important
Indiquelesinformationsimportantes,nécessairespourassurerlebonfonctionnementde
l’appareil.
Note
Indiquelesinformationsutilesquipermettrontd’obtenirlefonctionnementoptimalde
l’appareil.
Consignesdesécurité
AVERTISSEMENT
LeproduitAxisdoitêtreinstalléparunprofessionnelqualiéetconformémentauxloiset
règlementationslocalesenvigueur.
VIS
A AAVIS VIS
•LeproduitAxisdoitêtreutiliséconformémentauxloisetrèglementationslocalesen
vigueur.
•Axisrecommanded'utiliseruncâbleréseaublindé(STP)CAT5ousupérieur.
•PourpouvoirutiliserleproduitAxisàl'extérieur,oudansdesenvironnementssimilaires,il
doitêtreinstallédansunboîtierd'extérieurhomologué.
•ConserverceproduitAxisdansunenvironnementsecetventilé.
•NepasexposerceproduitAxisauxchocsouauxfortespressions.
•Nepasinstallerceproduitsurdespoteaux,supports,surfacesoumursinstables.
29
Page 30

AXISQ60Series
•Utiliseruniquementdesoutilsrecommandéspourl'installationdel'appareilAxis.
L'applicationd'uneforceexcessivesurl'appareilavecdesoutilspuissantspourrait
l'endommager.
•Nepasutiliserdeproduitschimiques,desubstancescaustiquesoudenettoyants
pressurisés.
•Utiliserunchiffonpropreimbibéd'eaupurepourlenettoyage.
•Utiliseruniquementdesaccessoiresconformesauxcaractéristiquestechniquesdevotre
produit.IlspeuventêtrefournisparAxisouuntiers.Axisrecommanded'utiliserun
équipementd'alimentationAxiscompatibleavecvotreproduit.
•UtiliseruniquementlespiècesderechangefourniesourecommandéesparAxis.
•Nepasessayerderéparervous-mêmeceproduit.Contacterl'assistancetechniqued'Axis
ouvotrerevendeurAxispourdesproblèmesliésàl'entretien.
•Évitezdepointerl’objectifdelacaméraverslesoleiloutouteautresourcederadiation
dehauteintensité.Celarisqued’endommagerlacaméra.
Transport
VIS
A AAVIS VIS
•LorsdutransportduproduitAxis,utilisezl'emballaged'origineouunéquivalentpour
éviterd'endommagerleproduit.
Batterie
LeproduitAxisutiliseunebatterieaulithiumCR20323,0Vcommealimentationdesonhorloge
entempsréelinterne(RTC).Dansdesconditionsnormales,cettebatterieauneduréedevie
minimaledecinqans.
Silabatterieestfaible,lefonctionnementdel'horlogeentempsréelpeutêtreaffectéetentraîner
saréinitialisationàchaquemisesoustension.Unmessageenregistréapparaîtdanslerapportde
serveurduproduitlorsquelabatteriedoitêtreremplacée.Pourtoutcomplémentd'information
concernantlerapportdeserveur,reportez-vousauxpagesdeCongurationduproduitoucontactez
l'assistancetechniqued'Axis.
Labatteriedoitêtreremplacéeuniquementencasdebesoin,etpourcefaire,contactezl'assistance
techniqued'Axisàl'adressewww.axis.com/techsupetobtenirdel'aide.
Lespilesboutons3,0Vaulithiumcontiennentdu1,2-diméthoxyéthane,éthylèneglycoldiméthyl
éther(EGDME),CASN°1 10-71-4.
AVERTISSEMENT
•Risqued'explosionsilabatterieestremplacéedefaçonincorrecte.
•Remplacez-launiquementparunebatterieidentiqueouunebatterierecommandéepar
Axis.
30
Page 31

AXISQ60Series
•Mettezaurebutlesbatteriesusagéesconformémentauxréglementationslocalesou
auxinstructionsdufabricantdelabatterie.
Couverclededôme
VIS
A AAVIS VIS
•Veillezànepasrayer,endommageroulaisserd'empreintessurlecouvercledudômecar
celapourraitaltérerlaqualitéd'image.Laissez,sipossible,laprotectionenplastiquesur
lecouvercledudômejusqu’àlandel’installation.
•Nenettoyezpaslecouvercledudômes'ilsemblepropreàl'œilnuetnefrottezjamaissa
surface.Unnettoyageexcessifpourraitendommagerlasurface.
•Pourlenettoyagegénéralducouvercledudôme,ilestrecommandéd'utiliserunproduit
nonabrasif,unsavonneutresanssolvantouundétergentmélangéavecdel'eaupureet
unchiffondouxpropre.Rincezbienàl'eautièdepure.Séchezavecunchiffondouxet
proprepouréviterlestâchesd'eau.
•N'utilisezjamaisdedétergentsagressifs,d'essence,debenzèneoud'acétone,etc.et
éviteztouteexpositiondirecteauxrayonsdusoleilouàdestempératuresélevéeslors
dunettoyage.
•Vériezqueledômeestxéenmodedefonctionnement,sinonlamiseaupointpeuten
êtreaffectée.
31
Page 32

32
Page 33

AXISQ60Series
Contenudel’emballage
•CaméradômeréseauAXISQ6052/Q6054MkII/Q6055
•Couverclededômenonfumé(prémonté)
•Couverclededômetransparentfumé
•InjecteurdepuissanceHighPoE+Axis1port(LPS)
•Kitdexationpourxationfauxplafonds
•Documentsimprimés
-Guided’installation(cedocument)
-Gabaritdeperçagepourxationenfaux-plafond
-Étiquettesupplémentairedenumérodesérie(x2)
-Cléd'authenticationAVHS
Aperçudumatériel
VIS
A AAVIS VIS
Vériezqueledômeestxéenmodedefonctionnement,sinonlamiseaupointpeuten
êtreaffectée.
33
Page 34

AXISQ60Series
1
Supportdel'appareil(x3)
2
Couverclesurlabasedelacaméra
3
VisducouverclesurlabasedelacaméraT20(3x)
4
Crochetpourcâbledesécurité
5
Référence(P/N)etnumérodesérie(S/N).
6
Porte-câble(2x)
7
Jointenmousse
8
Connecteurréseau(PoE+)
9
Multiconnecteurs
10
Couverclesupérieur
11
Dôme
34
Page 35

Caméra
Couverclededôme
1
EmplacementpourcarteSD
2
Voyantd’état
3
Boutondecommande
4
Boutond’alimentation
AXISQ60Series
1
VisdusupportpourcaméradômeT20(x4)
2
Supportpourcaméradôme
3
Couverclededôme
4
VisdelagarniturepourcaméradômeT20(x4)
5
Garniturepourcaméradôme
35
Page 36

AXISQ60Series
Fixationauplafonddelacaméra
1
Plaquedemontage
2
Câbledesécurité
Fixationaufaux-plafond
1
Plaquedemontage
2
VisdelaplaquedemontageT20(3x)
3
Brasdusupport
4
VisT20(3x)etrondelle(3x)dubrasdusupport
5
Garnituredusupport
6
Garniture
7
Câbledesécurité
36
Page 37

AXISQ60Series
Commentinstallerleproduit
Liseztouteslesinstructionsavantl'installationdel'appareil.Ilseraitpréférablederéalisercertaines
étapesenmêmetempsparcequ'ellesexigentleretraitducouvercledudôme.
VIS
A AAVIS VIS
•lesréglementationslocalesoulesconditionsenvironnementalesetélectriquesdans
lesquellesleproduitestutilisépeuventnécessiterl’utilisationd’uncâbleréseaublindé
(STP).Touslescâblesréseauquisontacheminésàl'extérieuroudansdesenvironnements
électriquesexigeantsdoiventêtredestinésàleurusagespécique.Assurez-vousqueles
périphériquesréseausontinstallésconformémentauxinstructionsdufabricant.Pourplus
d’informationssurlesexigencesréglementaires,consultezRegulatoryinformation2.
•Fixezleproduitenorientantlecouvercledudômeverslebas.
•Veillezànepasrayer,endommageroulaisserd'empreintessurlecouvercledudômecar
celapourraitaltérerlaqualitéd'image.Laissez,sipossible,laprotectionenplastiquesur
lecouvercledudômejusqu’àlandel’installation.
Remplacementducouverclededôme(enoption)
Lecouvercledudômeprémontépeutêtreremplacésivoussouhaitezutiliserlecouverclededôme
fuméousilecouvercledudômeestrayéouendommagé.Vouspouvezacheterdescouverclesde
dômefumésderechangeauprèsdevotrerevendeurAxis.
Pourconnaîtrel'emplacementdescomposants,consultezAperçudumatérielpage33.
1.Desserrezlesvisdelagarniturepourcaméradômeetretirezlecouvercledudôme.
2.Dévissezlesupportdudôme,puisretirezlesupportetlecouvercledudômedela
garniture.
3.Fixezlesupportetlecouvercledudômeàlagarniturepuisserrezlesvis(couple1,2Nm).
4.PourinstallerunecarteSD,consultezInstallationd’unecarteSD(facultatif)page37.
5.Fixezlecouvercledudômesurlecouverclesupérieuretserrezlesvis(couple1,5Nm).
Installationd’unecarteSD(facultatif)
L'installationd’unecarteSDestfacultative.UnecarteSDstandardouàhautecapacité(non
fournie)peutêtreutiliséepoursauvegarderdesenregistrementsdansl'appareil.
1.Desserrezlesvisdelagarniturepourcaméradômeetretirezlecouvercledudôme.
2.InsérezunecarteSDdansl'emplacementpourcarteSD.
3.Fixezlecouvercledudômesurlecouverclesupérieuretserrezlesvis(couple1,5Nm).
37
Page 38

AXISQ60Series
Commentinstallerlacaméra
LeproduitAxispeutêtremontéavecdescâblesacheminésàtraversoulelongdumuroudu
plafond.
Choisissezl'unedesméthodessuivantespourinstallervotrecaméra:
•Installationdelacaméraavecunexationauplafondpage38.
•Installationdelacaméraavecunexationaufaux-plafondpage39.
•Installationdelacaméraavecunsupportdexationpage42.
Installationdelacaméraavecunexationauplafond
1.Préparezleplafondpourl'installationdelaplaquedemontage.Utilisezlaplaquede
xationcommegabaritdeperçagedestrous.Assurez-vousd'utiliserlesforets,lesviset
leschevillesquisoientappropriéspourlematériau.
2.Installationdelaplaquedemontage.Laèchesituéesurlaplaquedexations’aligne
aveclelogodelacaméra.
1
Plaquedemontage
2
Câbledesécurité
3.Dévissezlesvisxantlecouverclesurlabasedelacaméraetretirezlecouvercledela
base.
4.Sécurisezlacaméraàl'aideducâbledesécuritéfourni.
5.Acheminezetconnectezlecâbleréseauet,encasd'utilisation,lecâblemulticonnecteurs
àlacaméra.
VIS
A AAVIS VIS
•Veillezànepasendommagerlescâbleslorsquevouslesconnectez.
•Assurez-vousquelestrousdujointenmoussesontalignésaveclesporte-câbles.
Encasd'utilisationd'uncâblemulticonnecteurs,retirezlapiècedécoupéeducâble
multiconnecteurssurlejointenmousse.
38
Page 39

AXISQ60Series
1
Supportsdescâbles
2
Câblemulticonnecteurs
3
Câbleréseau
6.Retournezlessupportsdescâblespourmaintenirlescâblesenplace.
7.Remettezlecouverclesurlabasedelacaméradanssapositiond'origineetserrezles
vis(couple1,5Nm).
8.Glissezlessupportsdel'appareilsurlacaméraréseaudanslesfentesdelaplaquede
montageetfaitestournerlacaméra.
9.Installezl'injecteurfourni.Reportez-vousauGuided’installationfourniavecl'injecteur
outéléchargez-ledepuiswww.axis.com
Installationdelacaméraavecunexationaufaux-plafond
AVERTISSEMENT
Lepoidscumulédelacaméraetdukitdemontageestd'environ3200g(7,1lb).
Assurez-vousquelematériauduplafondestassezsolidepoursupportercepoids.
VIS
A AAVIS VIS
Ladalledeplafonddoitavoiruneépaisseurcompriseentre5et60mm(0,2et2,43/16–2
3/8po).
1.Retirezladalledeplafondsurlaquellelaxationpourfaux-plafonddoitêtremontée.
2.Formezuntroudansladalledeplafondpourlaxationpourfaux-plafond.Utilisezle
modèlefournipourmarquerlapositionetdécouperautourdumodèle.
39
Page 40

AXISQ60Series
1
Dalledeplafond
2
Diamètredutrou225mm(87/8po)
3.Assemblezlesupportplafonnieretxez-leàladalledeplafond.Assurez-vousqueles
èchesdelaplaquedexationetdusupportplafonniersontorientéesdanslamême
directionpouralignerleslogosdelacamérasurlagarniture.
4.Serrezlesvisdubrasdusupport.
5.Dévissezlesvisxantlecouverclesurlabasedelacaméraetretirezlecouvercledela
base.
6.Acheminezetconnectezlecâbleréseauet,encasd'utilisation,lecâblemulticonnecteurs
àlacaméra.
VIS
A AAVIS VIS
•Veillezànepasendommagerlescâbleslorsquevouslesconnectez.
•Assurez-vousquelestrousdujointenmoussesontalignésaveclesporte-câbles.
Encasd'utilisationd'uncâblemulticonnecteurs,retirezlapiècedécoupéeducâble
multiconnecteurssurlejointenmousse.
1
Supportsdescâbles
2
Câblemulticonnecteurs
3
Câbleréseau
7.Retournezlessupportsdescâblespourmaintenirlescâblesenplace.
8.Remettezlecouverclesurlabasedelacaméradanssapositiond'origineetserrezles
vis(couple1,5Nm).
40
Page 41

9.Sécurisezlacaméraàl'aideducâbledesécuritéfourni.
1
Plaquedemontage
2
Supportplafonnier
3
Dalledeplafond
4
Câbledesécurité
5
Crochetpourcâbledesécurité
AXISQ60Series
10.Glissezlessupportsdel'appareilsurlacaméraréseaudanslesfentesdelaplaquede
montageetfaitestournerlacaméra.
11.Installezl'injecteurfourni.Reportez-vousauGuided’installationfourniavecl'injecteur
outéléchargez-ledepuiswww.axis.com
12.Installezladalledeplafondaveclacaméraxéedessus.
13.Placezlagarnituresurlesupportplafonnieretserrezlesvis.
41
Page 42

AXISQ60Series
1
Garniture
2
VisdelagarnitureT20(4x)
Installationdelacaméraavecunsupportdexation
1.Installezlesupportchoisiconformémentauxinstructionsfourniesaveclesupport.
S’ils’avèrenécessairedepercer,vériezquelesforets,visetchevillesàutilisersont
appropriéspourlematériau.
2.Dévissezlesvisxantlecouverclesurlabasedelacaméraetretirezlecouvercledela
base.
3.Acheminezlecâbleréseauet,encasd'utilisation,lecâblemulticonnecteursàtraversles
oricesdusupportdemontage.
4.Sécurisezlacaméraàl'aideducâbledesécuritéfourni.
42
Page 43

AXISQ60Series
1
VisT30(x3)
2
Troupoursupportdelacaméra(x3)
3
Câbledesécurité
5.Connectezlecâbleréseauet,encasd'utilisation,lecâblemulticonnecteursàlacaméra.
VIS
A AAVIS VIS
•Veillezànepasendommagerlescâbleslorsquevouslesconnectez.
•Assurez-vousquelestrousdujointenmoussesontalignésaveclesporte-câbles.
Encasd'utilisationd'uncâblemulticonnecteurs,retirezlapiècedécoupéeducâble
multiconnecteurssurlejointenmousse.
43
Page 44

AXISQ60Series
1
Supportsdescâbles
2
Câblemulticonnecteurs
3
Câbleréseau
6.Retournezlessupportsdescâblespourmaintenirlescâblesenplace.
7.Remettezlecouverclesurlabasedelacaméradanssapositiond'origineetserrezles
vis(couple1,5Nm).
8.Glissezlessupportsdel'appareilsurlacaméraréseaudanslesfentesdusupportde
montageetfaitestournerlacaméra.
9.Sécurisezlacaméraréseausurlesupportdemontageenserrantlesvis.
10.Installezl'injecteurfourni.Reportez-vousauGuided’installationfourniavecl'injecteur
outéléchargez-ledepuiswww.axis.com
Commentaccéderauproduit
SivoussouhaitezrechercherdesproduitsAxissurleréseauouleuraffecterdesadresses
IPsousWindows®,nousrecommandonsl’utilisationdesapplicationsAXISIPUtilityet
AXISCameraManagement.Cesdeuxapplicationssontgratuitesetpeuventêtretéléchargées
depuiswww.axis.com/techsup
Leproduitpeutêtreutiliséaveclaplupartdessystèmesd’exploitationetdesnavigateurs.Nous
recommandonslesnavigateurssuivants:
•InternetExplorer
•Safari
•Chrome
®
avecOSX
TM
®
avecWindows
®
ouFirefox
®
aveclesautressystèmesd’exploitation.
Pourplusd’informationsconcernantl’utilisationduproduit,consultezlemanueldel’utilisateur
disponiblesurlesitewww.axis.com
®
,
44
Page 45

AXISQ60Series
Commentréinitialiserlesparamètrespardéfaut
Important
Laréinitialisationauxparamètrespardéfautdoitêtreutiliséeavecprudence.Cette
opérationreconguretouslesparamètres,ycomprisl’adresseIP,auxvaleursd’usinepar
défaut.
Note
Leslogicielsd’installationetdegestionsontdisponiblessurlespagesd’assistancedu
sitewww.axis.com/techsup
Pourréinitialiserl’appareilauxparamètresd’usinepardéfaut:
1.Maintenezleboutondecommandeetleboutond'alimentationenfoncéspendant15
à30secondes,jusqu’àcequelevoyantd'étatpasseàl’orangeetclignote.Consultez
Aperçudumatérielpage33.
2.Relâchezleboutondecommandemaiscontinuezàmaintenirleboutond’alimentation
jusqu’àcequelevoyantclignoteenvert.
3.Relâchezleboutond’alimentationetassemblezl’appareil.
4.Leprocessusestmaintenantterminé.Lesparamètresd’usinepardéfautdel’appareil
ontétérétablis.Enl’absenced’unserveurDHCPsurleréseau,l’adresseIPpardéfautest
192.168.0.90.
5.Utilisezlesoutilsd'installationetdegestionpourattribueruneadresseIP,congurerle
motdepasseetaccéderauuxdedonnéesvidéo.
Ilestégalementpossiblederétablirlesparamètresd’usineàpartirdel’interfaceWeb.Accédezà
Setup>SystemOptions>Maintenance(Conguration>Optionsdusystème>Maintenance)
etcliquezsurDefault(Défaut).
45
Page 46

AXISQ60Series
Informationscomplémentaires
•Pourladernièreversiondecedocument,consultezlesitewww.axis.com
•LeManueldel’utilisateurestdisponibleàl’adressesuivante:www.axis.com
•Pourvériersidesmisesàjourdeslogicielssontdisponiblespourvotreappareilréseau,
consultezlesitewww.axis.com/techsup.
•Pourensavoirplussurlesformations,leswebinaires,lestutorielsetlesguides,visitez
lesitewww.axis.com/academy.
Accessoiresenoption
Pourobtenirlalistecomplètedesaccessoiresdisponiblespourceproduit,consultezwww.axis.com
Informationssurlagarantie
PourobtenirdeplusamplesinformationssurlagarantieduproduitAXISetdesrenseignements
connexes,visitezlesitewww.axis.com/warranty/
46
Page 47

Caractéristiquestechniques
Voyants
AXISQ60Series
Voyantd’état
Éteint
VertVertxependant10secondespourindiquerunfonctionnement
OrangeFixependantledémarrage.Clignotependantlesmisesàniveau
Orange/RougeClignoteenorange/rougeencasd'indisponibilitéoudeperte
Rouge
Indication
Branchementetfonctionnementnormal.
normalaprèsledémarrage.
dumicroprogrammeoulerétablissementdesvaleurspardéfaut
conguréesenusine.
delaconnexionréseau.
Échecdelamiseàniveaudumicroprogramme.
Boutons
Boutondecommande
Pourconnaîtrel'emplacementduboutondecommande,consultezAperçudumatérielpage33.
Leboutondecommandepermetderéaliserlesopérationssuivantes:
•Réinitialisationduproduitauxparamètresd’usinepardéfaut.Cf.page45.
•ConnexionauserviceduSystèmed'hébergementvidéoAXISouauserviceAXISInternet
DynamicDNS.Pourplusd'informationssurcesservices,reportez-vousauManuelde
l'utilisateur.
Boutond’alimentation
Appuyezsurleboutond'alimentationetmaintenez-leenfoncépouralimentertemporairementle
produitlorsduretraitducouverclededôme.Leboutond'alimentationestégalementutiliséavecle
boutondecommandepourréinitialiserlacaméraauxparamètresd'usinepardéfaut.Cf.page45.
Connecteurs
Connecteurréseau
ConnecteurEthernetRJ45avecl'alimentationparEthernetPlus(PoE+).
47
Page 48

AXISQ60Series
VIS
A AAVIS VIS
Utilisezl'injecteurfourni.
VIS
A AAVIS VIS
Leproduitdoitêtreconnectéàl'aided'uncâbleréseaublindé(STP).Touslescâbles
reliantleproduitaucommutateurréseaudoiventêtredestinésàleurusagespécique.
Assurez-vousquelespériphériquesréseausontinstallésconformémentauxinstructions
dufabricant.Pourplusd’informationssurlesexigencesréglementaires,consultez
Electromagneticcompatibility(EMC)2.
EmplacementpourcarteSD
VIS
A AAVIS VIS
•LacarteSDrisqued'êtreendommagée.Nepasutiliserd'outilstranchantsoud'objets
métalliquesetnepasforcerlorsdel'insertionouduretraitdelacarteSD.Utilisezvos
doigtspourinséreretretirerlacarte.
•Risquedepertededonnéesetd'enregistrementscorrompus.NeretirezpaslacarteSD
tantqueleproduitestenfonctionnement.DébranchezoudéposezlacarteSDdespages
WebduproduitAXISavantdelaretirer.
CetappareilestcompatibleavecunecarteSD/SDHC/SDXC(nonincluse).
PourobtenirdesconseilssurlacarteSD,rendez-voussurwww.axis.com
ConnecteurE/Setaudio
Connecteurpourterminalpouruneconnexionàl’équipementexterne:
•Matérielaudio
•Périphériquesd’entréeoudesortie(E/S)
Lorsquevousconnectezunéquipementexterne,uncâblemultipleAxisestnécessairepour
conserverlaclassicationIPdel'appareil.Pourensavoirplus,consultezCâblemultipleAxispage48.
CâblemultipleAxis
LorsquevousconnectezunéquipementexterneauproduitAxis,uncâblemultipleAxisest
nécessairepourconserverlaclassicationIPdel'appareil.LecâblemultipleAxispeutêtreacheté
auprèsd'unrevendeurAxis.Pourlocaliserlemulticonnecteur,reportez-vousàAperçudumatériel
page33.
Lecâblemultiplefournitlesconnecteurssuivants:
Connecteurd'alimentation-Blocterminalà3brochesutilisépourl'alimentationàl'arrivée.
Utilisezunesourced'alimentationlimitée(LPS)conformeauxexigencesdeTrèsbassetensionde
sécurité(TBTS)dontlapuissancedesortienominaleestlimitéeà≤100Woudontlecourant
desortienominalestlimitéà≤5A.
48
Page 49

AXISQ60Series
Entréeaudio(rose)-Entréede3,5mmpourmicrophonemonoousignalmonoavecentréede
ligne(lecanalgauched'unsignalstéréoestutilisé).
Sortieaudio(verte)-Sortieaudiode3,5mm(niveaudeligne)quipeutêtreconnectéeàun
systèmedesonorisation(PA)ouàunhaut-parleuractifavecamplicateurintégré.Unconnecteur
stéréodoitêtreutilisépourlasortieaudio.
ConnecteurpourterminalE/S-Utilisezavecdespériphériquesexternesassociésauxapplications
tellesquelesalarmesdedétérioration,ladétectiondemouvement,ledéclenchementd'événements,
l'enregistrementàintervallesetlesnoticationsd'alarme.Enplusdupointderéférence0VCCet
del'alimentation(sortieCC),leconnecteurd'E/Sfournituneinterfaceauxélémentssuivants:
•Sortienumérique–Permetdeconnecterdesdispositifsexternes,commedes
relaisoudesvoyants.Lesappareilsconnectéspeuventêtreactivésparl'interface
deprogrammationVAPIX®,lesboutonsdesortiesurlapageLiveView(Vidéoen
direct)ouparunerègled'action.Lasortieestconsidéréecommeétantactive
(afchéedansSystemOptions>Port&Devices>PortStatus(Optionssystème
>Portetpériphériques>Étatduport))siledispositifdel'alarmeestactivé.
•Entréenumérique–Entréed'alarmeutiliséepourconnecterdesdispositifs
pouvantpasserd'uncircuitouvertàuncircuitfermé,parexemple:détecteurs
infrarougepassifs,contactsdeporte/fenêtre,détecteursdebrisdeverre,etc.À
laréceptiond'unsignal,l'étatchangeetl'entrées'active(sousSystemOptions
>Port&Devices>PortStatus(Optionsdusystème>Portetdispositifs
>Étatduport)).
FonctionBrocheNotes
0VCC(-)
SortieCC
Congurable
(entréeou
sortie)
1
2
3–6
Peutserviràalimenterlematériel
auxiliaire.
Remarque:cettebrochenepeutêtre
utiliséequecommesortied’alimentation.
Entréenumérique–Connectez-laàla
broche1pourl’activeroulaissez-laotter
(déconnectée)pourladésactiver.
Sortienumérique-Connectéeàla
broche1lorsqu'elleestactivée,otte
(déconnectée)lorsqu'elleestdésactivée.
Sivousl’utilisezavecunecharge
inductive,parexempleunrelais,une
diodedoitêtreconnectéeenparallèle
aveclacharge,enguisedeprotection
contrelestensionstransitoires.
49
Caractéristiques
3.3VCC
Charge
maximale=
250mA
0à40VCC
0à40VCCmax.,
drainouvert,
100mA
Page 50

AXISQ60Series
Pourunexempledeschéma,consultezSchémasdeconnexionpage50.
Connecteurd'E/S
Schémasdeconnexion
Connecteurd’E/S
Entrée
d'alimentationCC
Entrée
d’alimentationCA
1
0VCC(-)
50
Page 51

2
SortieCC3,3V,maxi.250mA
A
Entrée/sortieconguréecommeentrée
B
Entrée/sortieconguréecommesortie
Conditionsd'utilisation
LeproduitAxisestuniquementdestinéàuneutilisationenintérieur.
AXISQ60Series
Produit
AXISQ6052
AXISQ6054MkII
AXISQ6055
Classication
IEC60721-4-3
Classe3K3,3M3
IEC60529IP52
TempératureHumidité
0°Cà50°C
(32°Fà122°F)
Humiditérelativede10à
85%(sanscondensation)
Conditionsdestockage
+Température
De-50ºCà60ºC(-58ºFà140ºF)
Consommationélectrique
VIS
A AAVIS VIS
Utilisezunesourced'alimentationlimitée(LPS)conformeauxexigencesdeTrèsbasse
tensiondesécurité(TBTS)dontlapuissancedesortienominaleestlimitéeà≤100Woudont
lecourantdesortienominalestlimitéà≤5A.Axisrecommanded'utiliserl'injecteurfourni.
ProduitInjecteurde
AXISQ605224–34VCC,
AXISQ6054MkII24–34VCC,
AXISQ6055
puissancePoE+Axis
1port(inclus)
IEEE802.3at,Type2
Classe4
Câblemulticonnecteurs
max19W
max19W
24–34VCC,
max19W
20–24VCA,
max27VA
20–24VCA,
max25,9VA
20–24VCA,
max27VA
51
Page 52

52
Page 53

AXISQ60Series
Sicherheitsinformation
LesenSievorderInstallationdesProduktssorgfältigdieInstallationsanleitung.BewahrenSiedas
InstallationshandbuchfürzukünftigeZweckeauf.
Gefährdungsstufen
GEFAHR
WeistaufeinegefährlicheSituationhin,welchezumTododerzuschwerenVerletzungen
führt.
WARNUNG
WeistaufeinegefährlicheSituationhin,welche,fallsnichtverhindert,zuTododer
schwerenVerletzungenführenkann.
VORSICHT
WeistaufeinegefährlicheSituationhin,welche,fallsnichtverhindert,zugeringfügiger
odermäßigerVerletzungführenkann.
HINWEIS
HINWEIS HINWEIS
WeistaufeinegefährlicheSituationhin,welche,fallsnichtverhindert,zuSachschäden
führenkann.
WeitereNachrichtenstufen
Wichtig
WeistaufwichtigeInformationenhin,diedenrichtigenBetriebdesProduktsgewährleisten.
Beachten
WeistaufnützlicheInformationenhin,diedieoptimaleVerwendungdesProdukts
unterstützen.
Sicherheitsanweisungen
WARNUNG
DasAxisProduktmussvonfachmännischemPersonalundunterEinhaltungderörtlich
geltendenBestimmungeninstalliertwerden.
HINWEIS
HINWEIS HINWEIS
•DasAxisProduktmussunterBeachtungderörtlichgeltendenGesetzteundBestimmungen
benutztwerden.
•AxisempehltdieVerwendungeinesabgeschirmtenNetzwerkkabels(STP)derKategorie
5oderhöher.
•FürdenEinsatzvonAxis-ProduktenimAußenbereichoderähnlichenUmgebungenmüssen
dieseinfürdenAußenbereichzugelassenenGehäuseninstalliertwerden.
•LagernSiedasAxisProduktineinertrockenenundbelüftetenUmgebung.
•AchtenSiedarauf,dassdasAxisProduktwederStößennochstarkemDruckausgesetztist.
53
Page 54

AXISQ60Series
•InstallierenSiedasProduktnichtaninstabilenMasten,Halterungen,Oberächenoder
Wänden.
•VerwendenSiebeiderInstallationdesAxisProduktsausschließlichpassendeWerkzeuge.
EinzugroßerKraftaufwandmitelektrischenWerkzeugenkanndasProduktbeschädigen.
•VerwendenSiekeinechemischen,ätzendenoderaerosolhaltigenReinigungsmittel.
•VerwendenSiezumReinigeneinsauberes,mitdestilliertemWasserangefeuchtetesTuch.
•VerwendenSienurZubehör,dasdentechnischenVorgabenIhresProduktsentspricht.
DiesesistvonAxisoderDrittanbieternerhältlich.AxisempehltdiemitIhremProdukt
kompatibleStromversorgungvonAxis.
•VerwendenSieausschließlichErsatzteiledievonAxisangebotenoderempfohlenwerden.
•VersuchenSienicht,diesesProduktselbsttätigzureparieren.WendenSiesichbezüglich
ReparaturundWartungandenAxisSupportoderIhrenAxisHändler.
•RichtenSiedasKameraobjektivnichtdirektaufdieSonneoderanderestarkeLichtquellen,
umeineBeschädigungderKamerazuvermeiden.
Transport
HINWEIS
HINWEIS HINWEIS
•BeiBedarftransportierenSiedasAxisProduktinderOriginalverpackungodereiner
entsprechendenVerpackung,sodassSchädenvermiedenwerden.
Batterie
DasAxis-Produktistmiteiner3,0V-CR2032-Lithium-Batterieausgestattet,mitderdieinterne
Echtzeituhr(RTC)versorgtwird.UnternormalenBedingungenhatdieBatterieeineLebensdauer
vonmindestensfünfJahren.
BeientladenerBatterieistderBetriebderEchtzeituhrnichtmehrgewährleistet,sodassdieUhrbei
jedemSystemstartzurückgesetztwird.SieerhalteneineProtokollnachrichtimServerberichtdes
Produkts,wenneinBatteriewechselerforderlichist.WeitereInformationenüberdenServerbericht
ndenSieaufdenSetup-SeitendesProdukts,oderwendenSiesichandenAxisSupport.
DieBatteriesolltenurbeiBedarfersetztwerden.WendenSiesichindiesemFallandenAxis
Supportunterwww.axis.com/techsup.
Lithium-Knopfzellen(3,0V)enthalten1,2-Dimethoxyethan;Ethylenglycoldimethylether(EGDME),
CAS-Nr.110-71-4.
WARNUNG
•ExplosionsgefahrbeifehlerhaftemBatteriewechsel.
•DieBatteriedarfnurdurcheineidentischeBatterieodereinevonAxisempfohlene
Batterieersetztwerden.
•VerbrauchteBatteriensindgemäßdenörtlichenVorschriftenoderdenAnweisungendes
Herstellerszuentsorgen.
54
Page 55

AXISQ60Series
Kuppelabdeckung
HINWEIS
HINWEIS HINWEIS
•AchtenSiedaraufdieKuppelabdeckungwederzuzerkratzen,zubeschädigenoderdarauf
Fingerabdrückezuhinterlassen,dadiesdieBildqualitätbeeinträchtigenkann.Falls
möglich,entfernenSiedieSchutzfolieerstnachAbschlussderInstallation.
•SäubernSieniemalseineKuppelabdeckung,wenndiesesaubererscheint,undpolierenSie
keinesfallsdieOberäche.ZuhäugesSäubernkanndieOberächebeschädigen.
•FürdienormaleReinigungderKuppelabdeckungwerdeneinenicht-scheuernde,
lösungsmittelfreieneutraleSeifeodereinentsprechendesReinigungsmittelmit
destilliertemWasserundeinsauberer,weicherLappenempfohlen.SpülenSiedie
KuppelabdeckunggründlichmitlauwarmemdestilliertemWasserab.TrocknenSiedie
Kuppelabdeckungmiteinemweichen,sauberenLappen,umWassereckenzuvermeiden.
•VerwendenSieniemalsaggressiveReinigungsmittel,Benzin,BenzoloderAcetonusw.
ReinigenSiedieKuppelabdeckungnichtbeidirekterSonneneinstrahlungoderhöheren
Temperaturen.
•DieKameradarfnurmitangebrachterKuppelbetriebenwerden,damitderFokusnicht
beeinträchtigtwird.
55
Page 56

56
Page 57

Lieferumfang
•AXISQ6052/Q6054MkII/Q6055-PTZ-Dome-Netzwerk-Kamera
•KlareKuppelabdeckung(vormontiert)
•Getönte,transparenteKuppelabdeckung
•AxisPoE+Midspan1-Port(LPS)
•MontagesatzfürdieBefestigungabgehängtenDecken
•GedruckteDokumente
-Installationsanleitung(diesesDokument)
-BohrschablonefürabgehängteDecken
-ZusätzlicheEtikettenmitderSeriennummer(2x)
-AVHS-Authentizierungsschlüssel
ÜbersichtüberdieHardware
HINWEIS
HINWEIS HINWEIS
DieKameradarfnurmitangebrachterKuppelbetriebenwerden,damitderFokusnicht
beeinträchtigtwird.
AXISQ60Series
57
Page 58

AXISQ60Series
1
Gerätehalter(3x)
2
Kamera-Grundplatte
3
SchraubefürdieKamera-GrundplatteT20(3x)
4
HakenfürSicherheitsdraht
5
Bestellnummer(P/N)undSeriennummer(S/N)
6
Kabelbahn(2x)
7
Schaumstoffdichtung
8
Netzwerkanschluss(PoE+)
9
Mehrfachanschluss
10
ObereAbdeckung
11
Kuppel
58
Page 59

AXISQ60Series
Kameraeinheit
1
SD-Kartensteckplatz
2
LED-Statusanzeige
3
Steuertaste
4
Netzschalter
Kuppelabdeckung
1
KuppelhalterungsschraubeT20(4x)
2
Kuppelhalterung
3
Kuppelabdeckung
4
KuppelringschraubeT20(4x)
5
Kuppelring
59
Page 60

AXISQ60Series
HalterungfürMassivdecken
1
Montageplatte
2
Sicherheitsdraht
HalterungfürabgehängteDecken
1
Montageplatte
2
MontagenplatteschraubeT20(3x)
3
Halterungsarm
4
HalterungsarmschraubeT20(3x)undUnterlegscheibe(3x)
5
Halterungsring
6
Klemmansch
7
Sicherheitsdraht
60
Page 61

AXISQ60Series
InstallierendesProdukts
LesenSiedieAnweisungen,bevorSiedasProduktinstallieren.MancheInstallationsschrittesollten
besserzusammenausgeführtwerden,dennsieerforderndieEntfernungderKuppelabdeckung.
HINWEIS
HINWEIS HINWEIS
•AufgrundörtlicherVorschriftenoderjenachUmgebungoderelektrischerAnlage,in/mitder
dasProduktverwendetwird,kanneinabgeschirmtesNetzwerkkabel(STP)empfehlenswert
odernotwendigsein.AlleNetzwerkkabeldesProdukts,dieimAußenbereichoderin
anspruchsvollenelektrischenUmgebungenverlegtwerden,müssenhierfürausgelegt
sein.StellenSiesicher,dassdieNetzwerkgerätegemäßdenAnweisungendesHerstellers
installiertwurden.InformationenzugesetzlichenBestimmungenndenSieunter
Regulatoryinformation2.
•BefestigenSiedasProduktmitderKuppelabdeckungnachuntenzeigend.
•AchtenSiedaraufdieKuppelabdeckungwederzuzerkratzen,zubeschädigenoderdarauf
Fingerabdrückezuhinterlassen,dadiesdieBildqualitätbeeinträchtigenkann.Falls
möglich,entfernenSiedieSchutzfolieerstnachAbschlussderInstallation.
AustauschderKuppelabdeckung(optional)
DievormontierteklareKuppelabdeckungkannausgetauschtwerden,wennSiediegetönte
KuppelabdeckungverwendenmöchtenoderwenndieKuppelabdeckungzerkratztoderbeschädigt
ist.Ersatz-KuppelabdeckungenerhaltenSievonIhremAxisHändler.
DiePositionenderKomponentenndenSieunterÜbersichtüberdieHardwareaufSeite57.
1.LösenSiedieKuppelringschraubenundentfernenSiedieKuppelabdeckung.
2.EntfernenSiedieKuppelhalterungsschraubenundentfernenSiedieKuppelhalterung
ausdemKuppelring.
3.BringenSiedieKuppelhalterungunddieKuppelabdeckungamKuppelringanundziehen
SiedieSchraubenfest(Anzugsmoment1,2Nm).
4.WeitereInformationenzurInstallationeinerSD-SpeicherkartendenSieunter
InstallationeinerSD-Speicherkarte(optional)aufSeite61.
5.BefestigenSieKuppelabdeckunganderoberenAbdeckungundziehendieSchraubenan
(Anzugsmoment1,5Nm).
InstallationeinerSD-Speicherkarte(optional)
DieInstallationeinerSD-Speicherkarteistoptional.MiteinerStandard-SD-Speicherkarteoder
SD-SpeicherkartemithoherKapazität(nichtenthalten)könnenAufzeichnungendirekt/lokalauf
demProduktgespeichertwerden.
1.LösenSiedieKuppelringschraubenundentfernensiedieKuppelabdeckung.
2.SchiebenSiedieSD-KarteindenSD-Karteneinschub.
61
Page 62

AXISQ60Series
3.BefestigenSieKuppelabdeckunganderoberenAbdeckungundziehendieSchraubenan
(Anzugsmoment1,5Nm).
InstallierenderKamera
BeiderMontagediesesAxisProduktskönnendieKabeldurchdieWandoderentlangderWand
bzw.Deckeverlegtwerden.
FolgendeMöglichkeitenzurInstallationderKamerastehenzurAuswahl:
•AnbringenderKameramiteinerHalterungfürMassivdeckenaufSeite62.
•AnbringenderKameramiteinerHalterungfürabgehängteDeckenaufSeite63.
•AnbringenderKameramiteinerHalterungaufSeite66.
AnbringenderKameramiteinerHalterungfürMassivdecken
1.BereitenSiedieDeckefürdieInstallationderMontageplattevor.MarkierenSie
diePositionderBohrlöchermithilfederMontageplatte.StellenSiesicher,dassdie
Bohrerspitzen,SchraubenundDübelfürdenBaustoffgeeignetsind.
2.InstallierenSiedieMontageplatte.DieMontageplattewirdmitdemPfeilzumSchriftzug
aufderKameraausgerichtet.
1
Montageplatte
2
Sicherheitsdraht
3.LösenSiedieSchraubenderKamera-GrundplatteundentfernenSiedieGrundplatte.
4.SichernSiedieKameramitdemmitgeliefertenSicherheitsdraht.
5.VerlegenSiedasNetzwerkkabelundggf.dasMehrfachanschlusskabelfürdieKamera.
HINWEIS
HINWEIS HINWEIS
•AchtenSiebeimVerbindenderKabeldarauf,diesenichtzubeschädigen.
•VergewissernSiesich,dassdieSchaumstoffdichtungslöcherandenKabelbahnen
ausgerichtetsind.EntfernenSieggf.dieAusschnittefürdasMehrfachanschlusskabelaus
derSchaumstoffdichtung.
62
Page 63

AXISQ60Series
1
Kabelhalter
2
Mehrfachanschlusskabel
3
Netzwerkkabel
6.DrehenSiedieKabelhalter,umdieKabelinPositionzuhalten.
7.BringenSiedieGrundplattederKamerawiederinihrePositionundziehenSiedie
Schraubenan(Anzugsmoment1,5Nm).
8.SchiebenSiedieGerätehalterungderNetzwerk-KameraindieÖffnungender
MontageplatteunddrehenSiedieKameraeinheit.
9.AnweisungenzurInstallationdesmitgeliefertenMidspanndenSieinderbeiliegenden
Installationsanleitungoderunterwww.axis.com.
AnbringenderKameramiteinerHalterungfürabgehängteDecken
WARNUNG
DasGesamtgewichtvonKameraundDeckenhalterungbeträgtetwa3200g.StellenSie
sicher,dassdasDeckenmaterialstabilgenugist,umdiesesGewichtzutragen.
HINWEIS
HINWEIS HINWEIS
DieStärkederDeckenplattesollte5bis60mmbetragen.
1.EntfernenSiedieDeckenplatte,indiedieHalterungfürabgehängteDeckeneingelassen
werdensoll.
2.SchneidenSiefürdieHängedeckenmontageeinLochindieDeckenplatte.VerwendenSie
diemitgelieferteVorlagezumMarkierenderPositionundzumAusschneidenderÖffnung.
63
Page 64

AXISQ60Series
1
Deckenplatte
2
Lochdurchmesser225mm
3.MontierenSieDeckenhalterungundbringenSiedieDeckenplattean.StellenSiesicher,
dassdiePfeileaufderMontageplatteundderDeckenhalterungindiegleicheRichtung
zeigen,damitdieLogosaufderKameraundderKlemmanschaufeinanderpassen.
4.ZiehenSiedieHalterungsarmschraubenfest.
5.LösenSiedieSchraubenderKamera-GrundplatteundentfernenSiedieGrundplatte.
6.VerlegenSiedasNetzwerkkabelundggf.dasMehrfachanschlusskabelfürdieKamera.
HINWEIS
HINWEIS HINWEIS
•AchtenSiebeimVerbindenderKabeldarauf,diesenichtzubeschädigen.
•VergewissernSiesich,dassdieSchaumstoffdichtungslöcherandenKabelbahnen
ausgerichtetsind.EntfernenSieggf.dieAusschnittefürdasMehrfachanschlusskabelaus
derSchaumstoffdichtung.
1
Kabelhalter
2
Mehrfachanschlusskabel
3
Netzwerkkabel
7.DrehenSiedieKabelhalter,umdieKabelinPositionzuhalten.
8.BringenSiedieGrundplattederKamerawiederinihrePositionundziehenSiedie
Schraubenan(Anzugsmoment1,5Nm).
9.SichernSiedieKameramitdemmitgeliefertenSicherheitsdraht.
64
Page 65

AXISQ60Series
1
Montageplatte
2
Deckenhalterung
3
Deckenplatte
4
Sicherheitsdraht
5
HakenfürSicherheitsdraht
10.SchiebenSiedieGerätehalterungderNetzwerk-KameraindieÖffnungender
MontageplatteunddrehenSiedieKameraeinheit.
11.AnweisungenzurInstallationdesmitgeliefertenMidspanndenSieinderbeiliegenden
Installationsanleitungoderunterwww.axis.com.
12.BefestigenSiedieDeckenplattemitdermontiertenKamera.
13.SetzenSiedenKlemmanschaufdieDeckenhalterungundziehenSiedieSchraubenfest.
65
Page 66

AXISQ60Series
1
Klemmansch
2
KlemmanschschraubeT20(4x)
AnbringenderKameramiteinerHalterung
1.InstallierenSiedieausgewählteHalterungentsprechenddenmitgelieferten
Anweisungen.FallsdasBohrenvonLöchernerforderlichist,stellenSiesicher,dassdie
Bohrer,SchraubenundDübelfürdenBaustoffderWand/Deckegeeignetsind.
2.LösenSiedieSchraubenderKamera-GrundplatteundentfernenSiedieGrundplatte.
3.FührenSiedasNetzwerkkabelundggf.dasMehrfachanschlusskabeldurchdieÖffnungen
inderMontagehalterung.
4.SichernSiedieKameramitdemmitgeliefertenSicherheitsdraht.
66
Page 67

AXISQ60Series
1
SchraubeT30(3x)
2
SteckplatzfürGerätehalterung(3x)
3
Sicherheitsdraht
5.SchließenSiedasNetzwerkkabelundggf.dasMehrfachanschlusskabelandieKameraan.
HINWEIS
HINWEIS HINWEIS
•AchtenSiebeimVerbindenderKabeldarauf,diesenichtzubeschädigen.
•VergewissernSiesich,dassdieSchaumstoffdichtungslöcherandenKabelbahnen
ausgerichtetsind.EntfernenSieggf.dieAusschnittefürdasMehrfachanschlusskabelaus
derSchaumstoffdichtung.
67
Page 68

AXISQ60Series
1
Kabelhalter
2
Mehrfachanschlusskabel
3
Netzwerkkabel
6.DrehenSiedieKabelhalter,umdieKabelinPositionzuhalten.
7.BringenSiedieGrundplattederKamerawiederinihrePositionundziehenSiedie
Schraubenan(Anzugsmoment1,5Nm).
8.SchiebenSiedieGerätehalterungderNetzwerk-KameraindieÖffnungender
MontagehalterungunddrehenSiedieKameraeinheit.
9.BefestigenSiedieNetzwerk-KameraanderWandhalterung,indemSiedieSchrauben
festziehen.
10.AnweisungenzurInstallationdesmitgeliefertenMidspanndenSieinderbeiliegenden
Installationsanleitungoderunterwww.axis.com.
ZugriffaufdasProdukt
FürdieSuchenachAxisProduktenimNetzwerkundzurZuweisungeinerIP-Adresseunter
Windows®werdenAXISIPUtilityundAXISCameraManagementempfohlen.BeideAnwendungen
sindkostenlosundkönnenvonunsererWebsiteunterwww.axis.com/techsupheruntergeladen
werden.
DasProduktistmitdenmeistenBetriebssystemenundBrowsernkompatibel.Empfohlenwerden
folgendeBrowser:
•InternetExplorer
•Safari
•Chrome
®
unterOSX
TM
®
unterWindows
®
oderFirefox
®
unteranderenBetriebssystemen
WeitereInformationenzurNutzungdiesesProduktsndenSieimBenutzerhandbuchunter
www.axis.com.
®
68
Page 69

AXISQ60Series
SosetzenSieaufdiewerksseitigenStandardeinstellungenzurück
Wichtig
DieFunktionzumZurücksetzenaufdiewerksseitigenStandardeinstellungensolltemit
Vorsichtverwendetwerden.BeimZurücksetzenaufdieWerkseinstellungenwerdenalle
EinstellungeneinschließlichderIP-AdresseaufdieWerkseinstellungenzurückgesetzt.
Beachten
DieSoftware-ToolsfürInstallationundVerwaltungsindüberdieSupportseitenunter
www.axis.com/techsupverfügbar.
SowirddasProduktaufdiewerksseitigenStandardeinstellungenzurückgesetzt:
1.HaltenSiedieSteuer-unddieNetztastefür15bis30Sekundengedrückt,bisdie
LED-Statusanzeigegelbblinkt.SieheÜbersichtüberdieHardwareaufSeite57.
2.LassenSiedieSteuertastelos,haltenSiedieNetztasteallerdingsgedrückt,bisdie
LED-Statusanzeigegrünleuchtet.
3.LassenSiedieNetztastelosundmontierenSiedasGerät.
4.DerVorgangistdamitabgeschlossen.DasProduktwurdeaufdieWerkseinstellungen
zurückgesetzt.WennkeinDHCP-ServerimNetzwerkverfügbarist,lautetdie
Standard-IP-Adresse192.168.0.90.
5.VerwendenSiedieSoftware-ToolsfürInstallationundVerwaltung,umeineIP-Adresse
zuzuweisen,einKennworteinzurichtenundaufdenVideostromzuzugreifen.
DieParameterkönnenauchüberdieWeboberächeaufdieWerkseinstellungenzurückgesetzt
werden.RufenSieSetup>SystemOptions>Maintenance(Setup>Systemoptionen>Wartung)
aufundklickenSieaufDefault(Standard).
69
Page 70

AXISQ60Series
WeitereInformationen
•Unterwww.axis.comndenSiedieaktuelleVersiondiesesDokuments.
•DasBenutzerhandbuchstehtunterwww.axis.comzurVerfügung.
•Unterwww.axis.com/supportndenSieFirmware-AktualisierungenfürIhreProdukte.
•NützlicheOnlineschulungenundWebinarendenSieunterwww.axis.com/academy.
OptionalesZubehör
EinevollständigeListemitZubehörfürdiesesProduktndenSieunterwww.axis.com.
Gewährleistungsinformationen
InformationenzurGewährleistungderAxisProdukteundandere,hierzurelevanteInformationen
ndenSieunterwww.axis.com/warranty/
70
Page 71

TechnischeDaten
LEDs
AXISQ60Series
Status-LED
LeuchtetnichtAnschlussundNormalbetrieb
GrünLeuchtetbeiNormalbetriebnachAbschlussdesStartvorgangs
GelbLeuchtetbeimStart.BlinktwährendFirmware-Aktualisierung
Gelb/rotBlinktgelb/rot,wenndieNetzwerkverbindungnichtverfügbar
RotFehlerwährendderFirmware-Aktualisierung.
Bedeutung
10Sekundenlanggrün.
undWiederherstellungderWerkseinstellungen.
istoderunterbrochenwurde.
Tasten
Steuertaste
DieLagederSteuertastewirdhierbeschrieben:ÜbersichtüberdieHardwareaufSeite57.
DieSteuertastehatfolgendeFunktionen:
•ZurücksetzendesProduktsaufdieWerkseinstellungen.SieheSeite69.
•VerbindenmiteinemAXISVideoHostingSystem-ServiceodereinemAXISInternet
DynamicDNS-Service.WeitereInformationenzudiesenDienstenndenSieinder
Bedienungsanleitung.
Netzschalter
DrückenSiedenNetzschalterundhaltenSiediesengedrückt,umdasProduktbeientfernter
Kuppelabdeckungkurzzeitiganzuschalten.DerNetzschalterwirdauchzusammenmitder
Steuertasteverwendet,umdieKameraaufdiewerksseitigenStandardeinstellungenzurückzusetzen.
SieheSeite69.
Anschlüsse
Netzwerkanschluss
RJ45-EthernetanschlussmitPoweroverEthernetPlus(PoE+).
71
Page 72

AXISQ60Series
HINWEIS
HINWEIS HINWEIS
VerwendenSiedenmitgeliefertenMidspan.
HINWEIS
HINWEIS HINWEIS
DasProduktmussmiteinemabgeschirmtenNetzwerkkabel(STP)angeschlossenwerden.
AlleKabel,diedasProduktmitdemNetzwerkswitchverbinden,müssenhierfürausgelegt
sein.StellenSiesicher,dassdieNetzwerkgerätegemäßdenAnweisungendesHerstellers
installiertwurden.InformationenzugesetzlichenBestimmungenndenSieunter
Electromagneticcompatibility(EMC)2.
SD-Karteneinschub
HINWEIS
HINWEIS HINWEIS
•GefahrvonSchädenanderSD-Karte.VerwendenSiebeimEinlegenoderEntfernender
SD-Kartekeinescharfen/spitzenWerkzeugeoderGegenständeausMetallundwendenSie
nichtzuvielKraftan.SetzenSiedieKarteperHandein.DasGleichegiltfürdasEntfernen.
•GefahrvonDatenverlustundBeschädigungderAufnahmen.DieSD-Kartedarfnicht
entferntwerden,währenddasProduktinBetriebist.TrennenSiedieStromversorgungoder
deaktivierenSiedieSD-KartevordemEntfernenüberdieWebseitendesAxisProdukts.
DiesesProduktunterstütztSD-/SDHC-/SDXC-Karten(separaterhältlich).
EmpfehlungenzuSD-KartenndenSieunterwww.axis.com.
E/A-undAudio-Anschluss
AnschlussleistefürexterneGeräte:
•Audio-Geräte
•Eingabe-/Ausgabegeräte(E/A)
ZumAnschließenexternerGeräteisteinAxisMehrfachkabelerforderlich,umdieIP-Schutzklasse
desProduktszugewährleisten.WeitereInformationenndenSieunterAxisMehrfachkabelauf
Seite72.
AxisMehrfachkabel
ZumAnschließenexternerGeräteamAxisProduktisteinAxisMehrfachkabelerforderlich,umdie
IP-SchutzklassedesProduktszugewährleisten.EinAxisMehrfachkabelkönnenSiebeiIhrem
AxisHändlererwerben.DiePositiondesMehrfachanschlussesndenSieunterÜbersichtüber
dieHardwareaufSeite57.
DasMehrfachkabelweistfolgendeAnschlüsseauf:
Netzanschluss-3-poligerAnschlussblockfürdieStromversorgung.VerwendenSieeinemit
denAnforderungenfürSchutzkleinspannung(SELV)kompatibleStromquellemitbegrenzter
Leistung(LPS),entwedermiteinerNennausgangsleistungvon≤100Wodereinemdauerhaftauf
≤5AbegrenztenNennausgangsstrom.
72
Page 73

AXISQ60Series
Audio-Eingang(rosa)-3,5-mm-AnschlussfüreinMonomikrofonodereinMonosignal(linker
KanalwirdvoneinemStereosignalbenutzt).
Audio-Ausgang(grün)-3,5-mm-Audio-Ausgang(Leistungsstufe)zumAnschließeneiner
Rundrufanlage(PA)odereinesAktivlautsprechersmitintegriertemVerstärker.Fürden
Audio-AusgangmusseinStereo-Steckerbenutztwerden.
E/A-Anschluss-ZurVerwendungmitexternenGeräteninVerbindungmitManipulationsalarmen,
Bewegungserkennung,Ereignisauslösung,Zeitrafferaufnahmen,Alarmbenachrichtigungen
usw.Abgesehenvom0VDC-BezugspunktundStrom(Gleichstromausgang)verfügtdie
E/A-KlemmenleisteübereineSchnittstellezu:
•Digitalausgang–zumAnschlussexternerGerätewieRelaisundLEDs.
AngeschlosseneGerätekönnenüberdieVAPIX®ApplicationProgramming
Interface(Programmierschnittstelle)überdieSchaltächenfürdenAusgang
aufderSeite„LiveView”oderdurcheineAktionsregelaktiviertwerden.Der
Ausgangwirdalsaktiviert(sieheSystemOptions>Ports&Devices>Port
Status(Systemoptionen>Ports&Geräte>PortStatus))angezeigt,wenn
dasAlarmmeldegeräteingeschaltetist.
•Digitaleingang–AlarmeingangfürdenAnschlussvonGeräten,diezwischen
geöffnetemundgeschlossenemSchaltkreiswechselnkönnen,z.B.:PIR-Kameras,
Tür-/Fensterkontakte,Glasbruchmelderusw.BeiEmpfangeinesSignalsändert
sichderStatusundderEingangwirdaktiviert(sieheSystemOptions>Ports&
Devices>PortStatus(Systemoptionen>Ports&Geräte>PortStatus)).
FunktionKontaktHinweiseTechnische
0VDC(-)
Gleichstro-
mausgang
Kongurierbar(Ein-oder
Ausgang)
1
2
3–6
KannfürdieStromversorgungvon
Zusatzgerätenverwendetwerden.
Hinweis:DieserKontaktkannnurfürden
Stromausgangverwendetwerden.
Digitaleingang–zumAktivierenmit
Pin1verbinden;zumDeaktivierennicht
anschließen.
Digitalausgang–beiAktivierungmit
Pin1verbunden;wenndeaktiviert:frei
(nichtverbunden).BeiVerwendung
miteinerinduktivenLast,z.B.einem
Relais,mussparallelzurLastzum
SchutzvorSpannungsspitzeneineDiode
zwischengeschaltetwerden.
73
Daten
3,3VDC
Max.
Stromstärke=
250mA
0bismax.40VDC
0bismax.40VDC,
OpenDrain,
100mA
Page 74

AXISQ60Series
EinBeispielschaltbildndenSieunterAnschlussschaltbilderaufSeite74.
E/A-Anschluss
Gleichstromanschluss
Wechselstromanschluss
Anschlussschaltbilder
E/A-Anschluss
1
0V(-)DC
74
Page 75

2
DC-Ausgang3,3V,max.250mA
A
E/AalsEingangkonguriert
B
E/AalsAusgangkonguriert
Betriebsbedingungen
DasAxisProduktistfürdieVerwendungimInnenbereichkonzipiert.
AXISQ60Series
Produkt
AXISQ6052
AXISQ6054MkII
AXISQ6055
Klassikation
IEC60721-4-3
Klasse3K3,3M3
IEC60529IP52
Temperatur
0°Cbis50°C
Luftfeuchtigkeit
10bis85%rF(nicht
kondensierend)
Lagerbedingungen
Temperatur
-50bis+60ºC
Stromverbrauch
HINWEIS
HINWEIS HINWEIS
VerwendenSieeinemitdenAnforderungenfürSchutzkleinspannung(SELV)kompatible
StromquellemitbegrenzterLeistung(LPS),entwedermiteinerNennausgangsleistungvon
≤100Wodereinemdauerhaftauf≤5AbegrenztenNennausgangsstrom.Axisempehltdie
VerwendungdesmitgeliefertenMidspans.
ProduktAxisPoE+Midspan
AXISQ605224bis34VDC,
AXISQ6054MkII24bis34VDC,
AXISQ6055
1-Port(enthalten)
IEEE802.3at,Typ2
Klasse4
Mehrfachanschlusskabel
max.19W
max.19W
24bis34VDC,
max.19W
20bis24VAC,
max.27VA
20bis24VAC,
max.25,9VA
20bis24VAC,
max.27VA
75
Page 76

76
Page 77

AXISQ60Series
Informazionidisicurezza
Leggereconattenzionelaguidaall'installazioneprimadiinstallareildispositivo.Conservarequesto
documentoperusifuturi.
Livellidipericolo
PERICOLO
Indicaunasituazionepericolosache,senonevitata,provocamorteolesionigravi.
AVVERTENZA
Indicaunasituazionepericolosache,senonevitata,potrebbeprovocarelamorteolesioni
gravi.
ATTENZIONE
Indicaunasituazionepericolosache,senonevitata,potrebbeprovocarelesionimedie
ominori.
VVISO
A AAVVISO VVISO
Indicaunasituazioneche,senonevitata,potrebbedanneggiarelaproprietà.
Altrilivellidimessaggio
Importante
Indicainformazioniimportanti,essenzialiperilcorrettofunzionamentodeldispositivo.
Nota
Indicainformazioniutilicheaiutanoaottenereilmassimodaldispositivo.
Informazionidisicurezza
AVVERTENZA
IldispositivoAxisdeveessereinstallatodaunprofessionistaqualicato,inconformità
alleleggiealledisposizionilocali.
VVISO
A AAVVISO VVISO
•IldispositivoAxisdeveessereutilizzatoinconformitàalleleggiealledisposizionilocali.
•Axisconsiglial'usodiuncavodireteschermato(STP)CAT5osuperiore.
•PerutilizzareildispositivoAxisinambientiesternioinambientisimili,deveessere
installatoinunacustodiaperesterniapprovata.
•ConservareildispositivoAxisinunambienteasciuttoeventilato.
•EvitarediesporreildispositivoAxisaurtiopressionieccessive.
•Noninstallareildispositivosusupporti,superci,paretiopaliinstabili.
•UtilizzaresolostrumentiapplicabiliquandosiinstallaildispositivoAxis.Sesiutilizzauna
forzaeccessivaconstrumentinonadattièpossibilecausaredannialdispositivo.
•Nonutilizzaresostanzechimiche,agenticausticiodetergentiaerosol.
77
Page 78

AXISQ60Series
•Utilizzareunpannopulitoinumiditoinacquapuraperlapulizia.
•Utilizzaresoloaccessoricompatibiliconlespecichetecnichedeldispositivo.Questi
possonoesserefornitidaAxisodaterzeparti.Axisconsiglial'usodell'apparecchiaturadi
alimentazioneAxiscompatibileconildispositivo.
•UtilizzaresolopartidiricambioforniteoconsigliatedaAxis.
•Nontentarediriparareildispositivodasoli.Contattarel'assistenzaoilrivenditoreAxis
perquestionirelativeallamanutenzione.
•Nonrivolgerel'obiettivodellatelecameraversoilsoleoaltresorgentidiradiazionimolto
intensepoichésipotrebbedanneggiarelatelecamera.
Trasporto
VVISO
A AAVVISO VVISO
•DuranteiltrasportodeldispositivoAxis,utilizzarel'imballaggiooriginaleoequivalente
perevitaredannialdispositivo.
Batteria
IldispositivoAxisutilizzaunabatteriaallitioda3,0VCR2032comealimentazioneperilsuo
real-timeclock(RTC)interno.Incondizioninormaliquestabatteriaavràunadurataminima
dicinqueanni.
UnabassacaricadellabatteriainuiscesulfunzionamentodelRTC,facendoloresettareaogni
accensione.Quandolabatteriadeveesseresostituita,unmessaggiodiregistrovienevisualizzato
nelreportserverdeldispositivo.Perulterioriinformazionisulreportserver,vederelepaginedi
congurazionedeldispositivoocontattarel'assistenzaAxis.
Labatterianondeveesseresostituitasenonrichiesto,manelcasoincuiquestofossenecessario,
contattareilsupportoAxisall'indirizzowww.axis.com/techsupperassistenza.
Batteriaabottoneallitio3,0Vcontengono1,2-dimetossietano;eteredimetilicodiglicoleetilenico
(EGDME),CASn.110-71-4.
AVVERTENZA
•Rischiodiesplosioneselabatteriavienesostituitainmodoerrato.
•SostituiresoloconunabatteriaidenticaounabatteriaconsigliatadaAxis.
•Smaltirelebatterieusateinbaseallenormativelocalioalleistruzionidelproduttore
dellabatteria.
Cupoladiprotezione
VVISO
A AAVVISO VVISO
•Fareattenzioneanongrafare,danneggiareolasciareimprontesullacupoladiprotezione,
perchépotrebbediminuirelaqualitàdell'immagine.Sepossibile,tenerelaprotezionein
plasticasullacupolanoaquandol'installazionenonsaràcompletata.
78
Page 79

AXISQ60Series
•Nonpulirelacupoladiprotezionequandoallosguardorisultapulitaenonlucidarela
supercie.Unapuliziaeccessivapotrebbedanneggiarelasupercie.
•Perlapuliziageneraledellacupoladiprotezione,siconsigliadiutilizzareunsapone
neutroodetergentenonabrasivoconacquapuraeunpannomorbidoepulito.Sciacquare
beneconacquapuratiepida.Asciugareconunpannomorbidoepulitoperevitare
macchied'acqua.
•Nonusaremaidetergentiaggressivi,benzina,benzeneoacetoneeccedevitaredipulirela
cupolaallalucedirettadelsoleoatemperatureelevate.
•Assicurarsichelacupolavengainstallataquandoildispositivoèoperativoinmododanon
alterarelamessaafuoco.
79
Page 80

80
Page 81

AXISQ60Series
Contenutodellaconfezione
•TelecameradireteacupolaPTZAXISQ6052/Q6054MkII/Q6055
•Coperturaacupolatrasparente(premontata)
•Coperturacupolatrasparenteoscurata
•MidspanAxisPoE+con1porta(LPS)
•Kitdimontaggiopercontrosoftti
•Materialecartaceo
-Guidaall'installazione(questodocumento)
-Sagomaperlaforaturaperilmontaggioacontrosoftto
-Etichettaaggiuntivaconnumerodiserie(2)
-ChiavediautenticazioneAVHS
Panoramicadell'hardware
VVISO
A AAVVISO VVISO
Assicurarsichelacupolavengacollegatainmodalitàoperativainmododanonalterarela
messaafuoco.
81
Page 82

AXISQ60Series
1
Supportounità(3x)
2
Coperchiodellabasedellatelecamera
3
ViteT20delcoperchiodellabasedellatelecamera(3x)
4
Ganciopercavodisicurezza
5
Codicedispositivo(N/P)enumerodiserie(N/S)
6
Binariocavo(2x)
7
Guarnizioneinschiuma
8
Connettoredirete(PoE+)
9
Multiconnettore
10
Protezionesuperiore
11
Cupola
82
Page 83

AXISQ60Series
Unitàtelecamera
1
SlotperschedaSD
2
IndicatoreLEDdistato
3
Pulsantedicomando
4
Tastodiaccensione
Cupoladiprotezione
1
VitestaffacupolaT20(4x)
2
Staffacupola
3
Custodiadellacupola
4
VitianellocupolaT20(4x)
5
Anellocupola
83
Page 84

AXISQ60Series
Montaggioasoftto
Montaggioacontrosoftto
1
Piastradimontaggio
2
Cavodisicurezza
1
Piastradimontaggio
2
VitipiastradimontaggioT20(3x)
3
Bracciostaffa
4
VitebracciostaffaT20(3x)erondella(3x)
5
Anellostaffa
6
Anelloguarnizione
7
Cavodisicurezza
84
Page 85

AXISQ60Series
Comeinstallareildispositivo
Leggereattentamentetutteleistruzioniprimadiinstallareildispositivo.Alcunefasid'installazione
dovrebberoessereeseguiteinparalleloperchérichiedonolarimozionedellacupoladiprotezione.
VVISO
A AAVVISO VVISO
•Acausadinormativelocaliocondizioniambientaliedelettricheincuiildispositivodeve
essereutilizzato,puòessereopportunoonecessariol'utilizzodiuncavodireteschermato
(STP).Tuttiicavidiretedeldispositivoposizionatiall'apertooinambientielettriciin
condizionidifcilisonodestinatiallorousospecico.Accertarsicheidispositividirete
sianoinstallatisecondoleistruzionidelproduttore.Permaggioriinformazionisuirequisiti
normativi,consultareRegulatoryinformation2.
•Montareildispositivoconlacupolarivoltoversoilbasso.
•Fareattenzioneanongrafare,danneggiareolasciareimprontesullacupola,perché
potrebbediminuirelaqualitàdell'immagine.Sepossibile,tenerelaprotezioneinplastica
sullacupolanoaquandol'installazionenonsaràcompletata.
Sostituzionedellacupola(facoltativo)
Lacupolatrasparentepremontatapuòesseresostituitasesidesiderautilizzarelacupolaoscuratao
selacupolaègrafataodanneggiata.Èpossibileacquistarecupolediricambiopressoilproprio
rivenditoreAxis
Perl'ubicazionedeicomponenti,vederePanoramicadell'hardwareallapagina81.
1.Allentarelevitidell'anellodellacupolaerimuoverelacoperturadellacupola.
2.Rimuoverelevitidellastaffadellacupola,lastaffacupolaeilcoperchiodall'anello
dellacupola.
3.Fissarelastaffaeilcoperchiodellacupolaall'anellodellacupolaeserrareleviti(coppia
1,2Nm).
4.PerinstallareunaschedaSD,consultareComeinstallareunaschedaSD(facoltativa)
allapagina85.
5.Fissarelacupolaallacoperturasuperioreeserrareleviti(serraggio1,5Nm).
ComeinstallareunaschedaSD(facoltativa)
L'installazionediunaschedaSDèfacoltativa.UnaschedaSDstandardoadaltacapacità(non
inclusa)puòessereutilizzatapermemorizzareleregistrazionilocalmenteneldispositivo.
1.Allentarelevitidell'anellodellacupolaerimuoverelacupoladiprotezione.
2.InserireunaschedaSDnelloslotperschedeSD.
3.Fissarelacupoladiprotezioneallacoperturasuperioreeserrareleviti(serraggio1,5Nm).
85
Page 86

AXISQ60Series
Comeinstallarelatelecamera
IldispositivoAxispuòessereinstallatoconicavichepassanoattraversoolungolapareteo
ilsoftto.
Scegliereunodeiseguentimodidiinstallazionedellatelecamera:
•Installazionedellatelecameraconmontaggioasofttoallapagina86.
•Installazionedellatelecameraconmontaggioacontrosofttoallapagina87.
•Installazionedellatelecameraconmontaggioastaffaallapagina90.
Installazionedellatelecameraconmontaggioasoftto
1.Preparareilsofttoperl'installazionedellapiastradimontaggio.Usarelapiastradi
montaggiofornitaperposizionareifori.Assicurarsidiutilizzarepunte,vitietasselliche
sianoappropriatiperilmateriale.
2.Installarelapiastradimontaggio.Lafrecciasullapiastradimontaggiosiallineeràcon
illogosullatelecamera.
1
Piastradimontaggio
2
Cavodisicurezza
3.Allentarelevitidellabasedelcoperchiodellatelecameraerimuoverlo.
4.Fissarelatelecamerautilizzandoilcavodisicurezzaindotazione.
5.Posizionareecollegareilcavodiretee,seutilizzato,ilcavomulticonnettorealla
telecamera.
VVISO
A AAVVISO VVISO
•Fareattenzioneanondanneggiareicaviquandolisicollega.
•Assicurarsicheiforidellaguarnizioneinschiumasianoallineaticonletraccedeicaviese
siutilizzauncavomulticonnettore,rimuoverelaprefratturaperilcavomulticonnettore
dallaguarnizioneinschiuma.
86
Page 87

AXISQ60Series
1
Portacavi
2
Cavomulticonnettore
3
Cavodirete
6.Ruotareiportacavipermantenereicaviinposizione.
7.Posizionareilcoperchioposterioredellatelecameranellasuaposizioneoriginariae
serrareleviti(serraggio1,5Nm).
8.Farscorrereisupportidell'unitàsullatelecameradiretenellefessuredellapiastradi
montaggioeruotarelatelecamera.
9.Perinstallareilmidspanfornito,consultarelaguidaall'installazionefornitaconil
midspanodisponibileall'indirizzowww.axis.com
Installazionedellatelecameraconmontaggioacontrosoftto
AVVERTENZA
Ilpesototaledellatelecameraedegliaccessoriperilmontaggioasofttoèdicirca3200g
(7,1lb).Assicurarsicheilmaterialedelsofttosiaabbastanzasolidopersostenerequesto
peso.
VVISO
A AAVVISO VVISO
Ilpannellodelsofttodovrebbeesserespessoda5a60mm.
1.Rimuovereilpannellodelsofttoincuideveesseremontatoilcontrosoftto.
2.Praticareunforonelpannelloperilmontaggioacontrosoftto.Utilizzareladimafornita
percontrassegnarelaposizioneetagliareintornoadessa.
87
Page 88

AXISQ60Series
1
Pannellodelsoftto
2
Diametrodelforo225mm
3.Montarelastaffaasofttoessarlaalpannellodelcontrosoftto.Assicurarsichele
freccesullapiastradimontaggioelastaffaasofttosianorivoltenellastessadirezione
perallineareiloghisullatelecamerael'anellodinitura.
4.Stringerelevitidelbracciodellastaffa.
5.Allentarelevitidellabasedellacupoladellatelecameraerimuoverlo.
6.Posizionareecollegareilcavodiretee,seutilizzato,ilcavomulticonnettorealla
telecamera.
VVISO
A AAVVISO VVISO
•Fareattenzioneanondanneggiareicaviquandolisicollega.
•Assicurarsicheiforidellaguarnizioneinschiumasianoallineaticonletraccedeicaviese
siutilizzauncavomulticonnettore,rimuoverelaprefratturaperilcavomulticonnettore
dallaguarnizioneinschiuma.
1
Portacavi
2
Cavomulticonnettore
3
Cavodirete
7.Ruotareiportacavipermantenereicaviinposizione.
8.Posizionarelaprotezioneposterioredellatelecameranellasuaposizioneoriginariae
serrareleviti(serraggio1,5Nm).
9.Fissarelatelecamerautilizzandoilcavodisicurezzaindotazione.
88
Page 89

1
Piastradimontaggio
2
Staffaperilmontaggioasoftto
3
Pannellosoftto
4
Cavodisicurezza
5
Ganciopercavodisicurezza
AXISQ60Series
10.Farscorrereisupportidell'unitàsullatelecameradiretenellefessuredellapiastradi
montaggioeruotarelatelecamera.
11.Perinstallareilmidspanfornito,consultarequestaguidafornitaconilmidspano
disponibileall'indirizzowww.axis.com
12.Installareilpannellodelsofttoconlatelecameramontatasudiesso.
13.Metterel'anellodiniturasullastaffaeserrareleviti.
89
Page 90

AXISQ60Series
1
Anelloguarnizione
2
VitianellodinituraT20(4x)
Installazionedellatelecameraconmontaggioastaffa
1.Installarelastaffaselezionatainbasealleistruzionifornite.Seènecessarioforare,
assicurarsidiutilizzarepunte,vitietasselliadattialmateriale.
2.Allentarelevitidellabasedelcoperchiodellatelecameraerimuoverlo.
3.Farpassareilcavodireteeilcavomulticonnettore,seutilizzato,attraversoiforidella
staffadimontaggio.
4.Fissarelatelecamerautilizzandoilcavodisicurezzaindotazione.
90
Page 91

AXISQ60Series
1
ViteT30(3x)
2
Slotpersupportiunità(3x)
3
Cavodisicurezza
5.Collegareilcavodiretee,seutilizzato,ilcavomulticonnettoreallatelecamera.
VVISO
A AAVVISO VVISO
•Fareattenzioneanondanneggiareicaviquandolisicollega.
•Assicurarsicheiforidellaguarnizioneinschiumasianoallineaticonletraccedeicaviese
siutilizzauncavomulticonnettore,rimuoverelaprefratturaperilcavomulticonnettore
dallaguarnizioneinschiuma.
91
Page 92

AXISQ60Series
1
Portacavi
2
Cavomulticonnettore
3
Cavodirete
6.Ruotareiportacavipermantenereicaviinposizione.
7.Posizionareilcoperchioposterioredellatelecameranellasuaposizioneoriginariae
serrareleviti(serraggio1,5Nm).
8.Farscorrereisupportidell'unitàsullatelecameradiretenellefessuredellastaffadi
montaggioeruotarelatelecamera.
9.Fissarelatelecameradireteallastaffadimontaggioserrandoleviti.
10.Perinstallareilmidspanfornito,consultarelaguidaall'installazionefornitaconil
midspanodisponibileall'indirizzowww.axis.com
Comeaccederealdispositivo
AXISIPUtilityeAXISCameraManagementsonoimetodiconsigliatipertrovareidispositiviAxisin
reteeassegnarelorounindirizzoIPinWindows®.Questeapplicazionisonoentrambegratuitee
possonoesserescaricatedawww.axis.com/techsup
Ildispositivopuòessereutilizzatoconlamaggiorpartedeisistemioperativiedeibrowser.I
browserconsigliatisonoiseguenti:
•InternetExplorer
•Safari
•Chrome
®
conOSX
TM
®
conWindows
®
oFirefox
®
conaltrisistemioperativi.
Perulterioriinformazionisull'utilizzodeldispositivo,consultarelaguidaperl'utentedisponibile
sulsitoWebwww.axis.com
®
92
Page 93

AXISQ60Series
Comeripristinareivaloripredenitidifabbrica
Importante
Ilripristinodeivaloripredenitidifabbricadeveessereutilizzatoconcautela.Unripristino
delleimpostazionidifabbricaconsentiràdiripristinareleimpostazionidifabbricapertutti
iparametri,inclusol'indirizzoIP.
Nota
Glistrumentiperl'installazioneelagestionedelsoftwaresonodisponibilinellepagine
dedicateall'assistenzasulsitoWebwww.axis.com/techsup.
Perripristinareildispositivoalleimpostazionipredenitedifabbrica:
1.Tenerepremutiilpulsantedicontrolloeilpulsantediaccensioneper15-30secondi
noaquandoilLEDdistatolampeggeràingiallo.VederePanoramicadell'hardware
allapagina81.
2.Rilasciareilpulsantedicontrollo,macontinuareatenerepremutoilpulsantedi
accensionenoaquandoilLEDdistatodiventaverde.
3.Rilasciareilpulsantediaccensioneemontareildispositivo.
4.Aquestopuntoilprocessoècompletato.Ildispositivoèstatoreimpostatoalle
impostazionidifabbricapredenite.SenessunserverDHCPèdisponibileinrete,
l'indirizzoIPpredenitoè192.168.0.90.
5.Medianteglistrumentiperl'installazioneelagestionedelsoftware,assegnareun
indirizzoIP,impostarelapasswordeaccederealussovideo.
Èanchepossibilereimpostareiparametrialleimpostazionipredenitedifabbricamediante
l'interfacciaWeb.AndareaSetup>SystemOptions>Maintenance(Congurazione>Opzionidi
sistema>Manutenzione)efareclicsuDefault(Predenito).
93
Page 94

AXISQ60Series
UlterioriInformazioni
•Perlaversionepiùrecentediquestodocumento,visitareilsitoall'indirizzowww.axis.com
•Ilmanualeperl'utenteèdisponibileall'indirizzowww.axis.com
•Pervericaresesonostatipubblicatiaggiornamentidelrmwareperilproprio
dispositivo,vederewww.axis.com/support
•Perservizidiformazioneutiliewebinar,visitailsitowww.axis.com/academy
Accessoriopzionali
Perunelencocompletodegliaccessoridisponibiliperquestodispositivo,andarealsito
www.axis.com
Informazionisullagaranzia
PerinformazionisullagaranziadeldispositivoAxiseinformazioniadessorelative,consultare
lapaginawww.axis.com/warranty/
94
Page 95

AXISQ60Series
Datitecnici
IndicatoriLED
LEDdistatoIndicazione
SpentoConnessioneefunzionamentonormale.
VerdeUnaluceverdessaper10secondiindicailnormale
Giallo
Giallo/rossoLampeggiaingiallo/rossoseilcollegamentodiretenonè
RossoErroredurantel'aggiornamentodelrmware.
funzionamentounavoltacompletatol'avvio.
Lucessadurantel'avvio.Lampeggiadurantel’aggiornamento
delrmwareoilripristinodelleimpostazionipredenite.
disponibileoèstatoperso.
Pulsanti
Pulsantedicomando
Perl'ubicazionedelpulsantedicomando,vederePanoramicadell'hardwareallapagina81.
Ilpulsantedicomandovieneutilizzatoper:
•Ripristinodeldispositivoalleimpostazionipredenitedifabbrica.Consultarepagina93.
•CollegamentoaunservizioAXISVideoHostingSystemoAXISInternetDynamicDNS
Service.Perulterioriinformazionisuquestiservizi,consultareilManualeUtente.
Tastodiaccensione
Tenerepremutoiltastodiaccensioneperalimentareilprodottotemporaneamentequandoèstata
rimossalacupoladiprotezione.Ilpulsantediaccensioneèutilizzatoancheconiltastodicontrollo
perripristinarelafotocameraalleimpostazionipredenitedifabbrica.Consultarepagina93.
Connettori
Connettoredirete
ConnettoreEthernetRJ45conPoweroverEthernetPlus(PoE+).
VVISO
A AAVVISO VVISO
Utilizzareilmidspanfornito.
95
Page 96

AXISQ60Series
VVISO
A AAVVISO VVISO
Collegareildispositivoconuncavodireteschermato(STP).Tuttiicavichecolleganoil
dispositivoallaretesonodestinatiallorousospecico.Accertarsicheidispositividirete
sianoinstallatisecondoleistruzionidelproduttore.Permaggioriinformazionisuirequisiti
normativi,consultareElectromagneticcompatibility(EMC)2.
SlotperschedaSD
VVISO
A AAVVISO VVISO
•RischiodidanniallaschedaSD.Nonutilizzarestrumentiappuntitiooggettimetallici
enonesercitareeccessivaforzadurantel'inserimentoolarimozionedellaschedaSD.
Utilizzareleditaperinserireerimuoverelascheda.
•Rischiodiperditadidatiedanneggiamentodelleregistrazioni.Nonrimuoverelascheda
SDmentreildispositivoèinfunzione.Scollegarel'alimentazioneedeffettuarel'unmount
dellaschedaSDdallepagineWebdeldispositivoAxisprimadirimuoverla.
QuestodispositivosupportaschededimemoriaSD/SDHC/SDXC(schedadimemorianoninclusa).
PericonsiglisullaschedaSD,visitareilsitoWebwww.axis.com.
ConnettoreaudioeI/O
Connettoreterminaleperilcollegamentodiapparecchiatureesterne:
•Dispositiviaudio
•Dispositividiinput/output(I/O)
Quandosicollegaunapparecchioesterno,ènecessariounmulticavoAxispermantenerela
classicazioneIPdelprodotto.Perulterioriinformazioni,consultareMulticavoAxisallapagina96.
MulticavoAxis
QuandosicollegaunapparecchioesternoaldispositivoAxis,ènecessariounmulticavoAxisper
mantenerelaclassicazioneIPdelprodotto.ÈpossibileacquistareilmulticavoAxispressoil
propriorivenditoreAxis.Perindividuareilmulticonnettore,consultarePanoramicadell'hardware
allapagina81.
Ilmulticavofornisceleseguenticonnessioni:
Morsettieradialimentazione-Morsettieraa3pinusataperl'ingressodell'alimentazione.
Utilizzareunasorgentedialimentazionelimitata(LPS)compatibileconunabassissimatensionedi
sicurezza(SELV)conunapotenzadiuscitanominalelimitataa≤100Wounacorrentenominaledi
uscitalimitataa≤5A.
Ingressoaudio(rosa)-3,5mmpermicrofonoinmonoosegnalemonoline-in(ilcanalesinistroè
usatodaunsegnaleinstereo).
96
Page 97

AXISQ60Series
Uscitaaudio(verde)-Uscitaaudioda3,5mm(livellodilinea)chepuòessereconnessaaun
sistemadiindirizzopubblico(PA),oppureaunaltoparlanteconamplicatoreintegrato.Perl'uscita
audioènecessariousareunconnettorestereo.
ConnettoredelmorsettoI/O-Utilizzarecondispositiviesterniincombinazionecon,ad
esempio,allarmiantimanomissione,rilevazionedelmovimento,attivazionedieventi,registrazione
temporizzataenotichediallarme.Oltrealpuntodiriferimento0VCCeall'alimentazione(uscita
CC),ilconnettoreI/Oforniscel'interfacciaper:
•Uscitadigitale–PercollegaredispositiviesternicomerelèoLED.Leperiferiche
collegatepossonoessereattivatetramiteVAPIX®API(interfacciaperla
programmazionediapplicazioni),tramiteipulsantidicomandodellapaginaLive
View(Immaginidalvivo)oppuretramitel'opzioneActionRule(regoladiazione).
L’uscitaverràvisualizzatacomeattiva(visualizzatainSystemOptions>Port
&Devices>PortStatus(OpzionidiSistema>Porta&Dispositivi>Stato
porta))seildispositivodiallarmeèattivato.
•Ingressodigitale–Ingressoallarmeutilizzabilepercollegareleperiferiche,
chepuòpassaredalcircuitochiusoalcircuitoaperto,adesempio:Sensori
dimovimento(PIR),contattiporta/nestra,rilevatoridirotturavetriecosì
via.Dopolaricezionedelsegnalelostatocambiael’ingressodiventaattivo
(visualizzatoinSystemOptions>Port&Devices>PortStatus(Opzionidi
Sistema>PorteeDispositivi>Statoporta))).
FunzionePinNote
0VCC(-)
UscitaCC
Congurabile
(ingressoo
uscita)
Perunesempiodischema,consultareSchemadelleconnessioniallapagina98.
1
2
3–6
Ilpinpuòessereutilizzatoancheper
alimentareunaperifericaausiliaria.
Nota:questopinpuòessereusatosolo
comeuscitaalimentazione.
Ingressodigitale-collegarealpin1
perattivarlooppurelasciarloisolato
(scollegato)perdisattivarlo.
Uscitadigitale–Collegarealpin1
quandoattiva,isolata(scollegata)quando
inattiva.Seutilizzataconuncarico
induttivo,adesempiounrelèesterno,è
necessariocollegareundiodoinparallelo
alcaricoperproteggereildispositivoda
sovratensioni.
97
Speciche
3,3VCC
Caricomassimo
=250mA
da0amax40VCC
Da0amax40VCC,
open-drain,
100mA
Page 98

AXISQ60Series
ConnettoreI/O
Schemadelleconnessioni
ConnettoreI/O
Ingresso
alimentazioneCC
Ingresso
alimentazioneCA
1
0VCC(-)
2
UscitaCC3,3V,max250mA
A
I/Oconguratocomeingresso
98
Page 99

B
I/Oconguratocomeuscita
Condizionidifunzionamento
IldispositivoAxisèdestinatoall'usointerno.
AXISQ60Series
Dispositivo
AXISQ6052
AXISQ6054MkII
AXISQ6055
Classicazione
IEC60721-4-3
Classe3K3,3M3
IEC60529IP52
Temperatura
Da0°Ca50°C
Umidità
10-85%(umiditàrelativasenza
condensa)
Condizionidistoccaggio
Temperatura
Da-50ºCa60ºC
Consumoenergetico
VVISO
A AAVVISO VVISO
Utilizzareunasorgentedialimentazionelimitata(LPS)compatibileconunabassissima
tensionedisicurezza(SELV)conunapotenzadiuscitanominalelimitataa≤100Wouna
correntenominalediuscitalimitataa≤5A.Axisconsigliadiutilizzareilmidspanfornito.
DispositivoMidspanAxisHigh
AXISQ605224-34VCC,max19W20-24VCA,
AXISQ6054MkII24-34VCC,max19W20-24VCA,
AXISQ6055
PoE+con1porta
(incluso)
IEEE802.3at,Tipo2
Classe4
Cavomulticonnettore
max27VA
max25,9VA
24-34VCC,max19W20-24VCA,
max27VA
99
Page 100

100
 Loading...