

Page 1
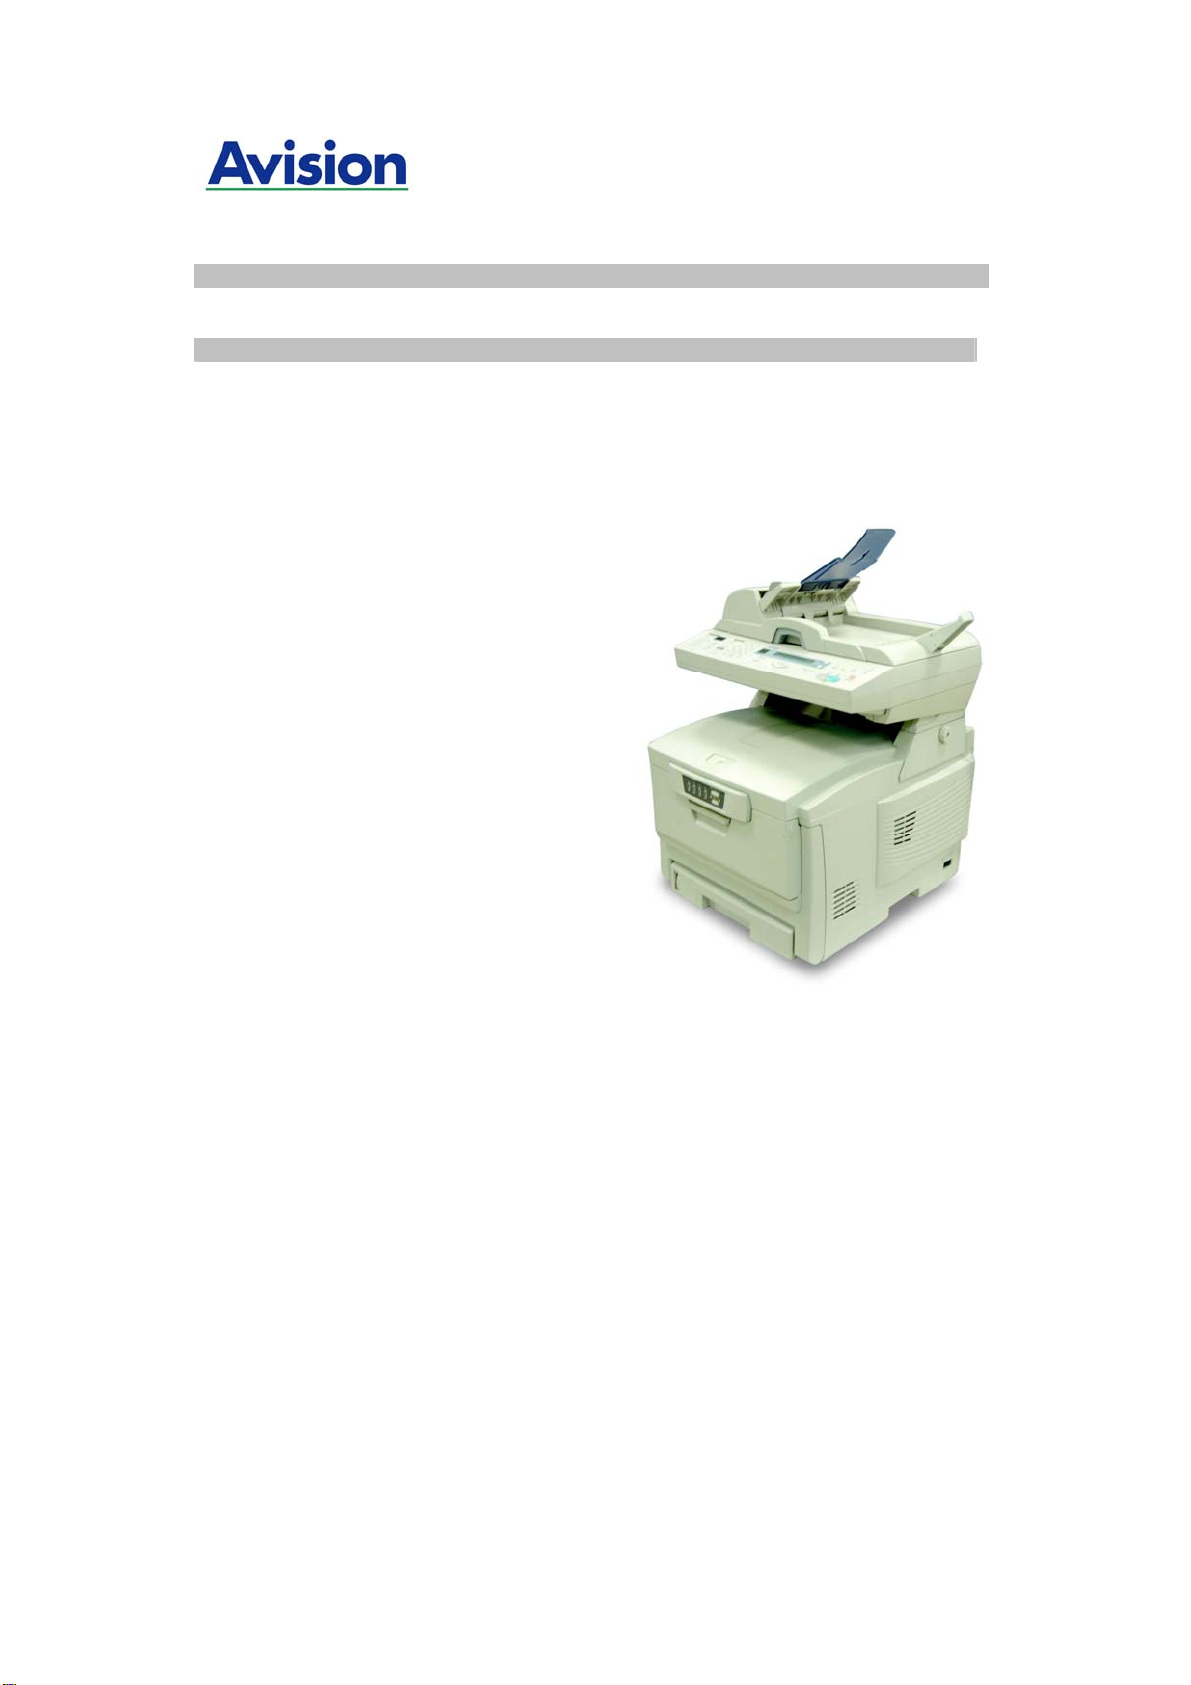
AM6120 Color MFP
Page 2

Copyrights and Trademarks
Ethernet is a registered trademark of Xerox Corporation.
Microsoft, Windows and Windows NT are registered trademarks of Microsoft
Corporation in the United States and/or other countries.
Other product names used herein are for identification purposes only and may
be trademarks of their respective companies. We disclaim any and all rights to
those marks.
Warranty
The information contained in this document(s) is subject to change without
notice.
The manufacturer makes no warranty of any kind with regard to this material,
including, but not limited to, the implied warranties of fitness for a particular
purpose.
The manufacturer shall not be liable for errors contained herein or for
incidental or consequential damages in connection with the furnishing,
performance, or use of this material.
i
Page 3

i
Notes, Cautions and Warning
Notes: A note indicates further explanation or clarification. Reading this is
highly recommended.
Caution!
A caution provides additional information which, if ignored, may result in
equipment malfunction or damage.
Warning!
A warning provides additional information which, if ignored, may result in a
risk of personal injury.
To avoid hazardous electric shock or fire, do not remove any covers or screws
other than those specified in this manual.
i
Page 4

i
Warning!
Only use the AC adapter (Model: ADP-50ZB, Manufacturer: Delta Electronics
Inc.) included with the equipment. Using other AC adapters may cause an
electric shock or fire.
Caution!
Disconnect the power plug by pulling the plug, not the cable.
Do not touch the metal fingers of the ADF pad module. The edges are
sharp and touching them may result in injury.
Precautions
• Do not install the equipment near heating or air conditioning units.
• Do not install the equipment in a humid or dusty place.
• Be sure to use the proper AC power source.
• Place the equipment securely on an even, flat surface. Tilted or uneven
surfaces may cause mechanical or paper-feeding problems.
• Retain the box and packing materials for shipping purposes.
Notice
Important
Do not make copies of any item for which copying is prohibited by law.
Copying the following items are normally prohibited by the local law:
Bank bills, revenue stamps, bonds, stock certificates, bank drafts, checks,
pass-ports, driver's licenses.
This machine is equipped with a function that prevents making counterfeit
bank bills. Due to this, images similar to bank bills may not be copied
properly.
ii
Page 5

v
Contents
1 GETTING STARTED..................................................................1-2
INTRODUCTION.................................................................................................. 1-2
FEATURES............................................................................................................ 1-2
EXTERNAL VIEW ................................................................................................ 1-4
THE FRONT VIEW .................................................................................... 1-4
THE REAR VIEW....................................................................................... 1-5
THE CONTROL PANEL ............................................................................. 1-6
PRINTER STATUS PANEL...................................................................... 1-10
SWITCHES ............................................................................................... 1-11
LED DISPLAY ........................................................................................... 1-13
PREINSTALLATION INFORMATION............................................................... 1-16
INTERNET COMMUNICATION FEATURES.................................................... 1-19
SCAN TO E-MAIL.................................................................................... 1-19
SCAN TO FTP .......................................................................................... 1-19
SCAN TO FTP .......................................................................................... 1-20
2 INSTALLING YOUR MACHINE .............................................2-1
MINIMUM CONFIGURATION REQUIREMENTS.............................................. 2-1
CHECKING PACKAGE CONTENTS ................................................................... 2-2
INSTALLING THE AM6120 PRINTER .............................................................. 2-3
MOVING YOUR PRINTER ...................................................................... 2-21
INSTALLING THE AM6120.............................................................................. 2-23
INSTALLING THE PAPER FEED TRAY AND PAPER SUPPORT ........ 2-23
INSTALLING THE PAPER STOPPER .................................................... 2-24
INSTALLING THE AM6120.............................................................................. 2-25
INSTALLING THE CABLES AND PRINTER DRIVER.................................... 2-28
CONNECTING THE ADF CABLE ........................................................... 2-28
CONNECTING THE NETWORK CABLE................................................ 2-28
i
Page 6

v
CONNECT THE PRINTER CABLE.......................................................... 2-29
CONNECTING TO POWER .................................................................... 2-30
INSTALLING THE PRINTER DRIVER................................................... 2-33
INSTALLING THE NETWORK PRINTER DRIVER................................. 2-33
INSTALLING TWAIN DRIVER (SCANNER DRIVER) AND LOCAL
PRINTER DRIVER ....................................................................................2-37
INSTALLING NETWORK SETUP TOOL................................................ 2-42
3 CONFIGURING YOUR MACHINE.........................................3-1
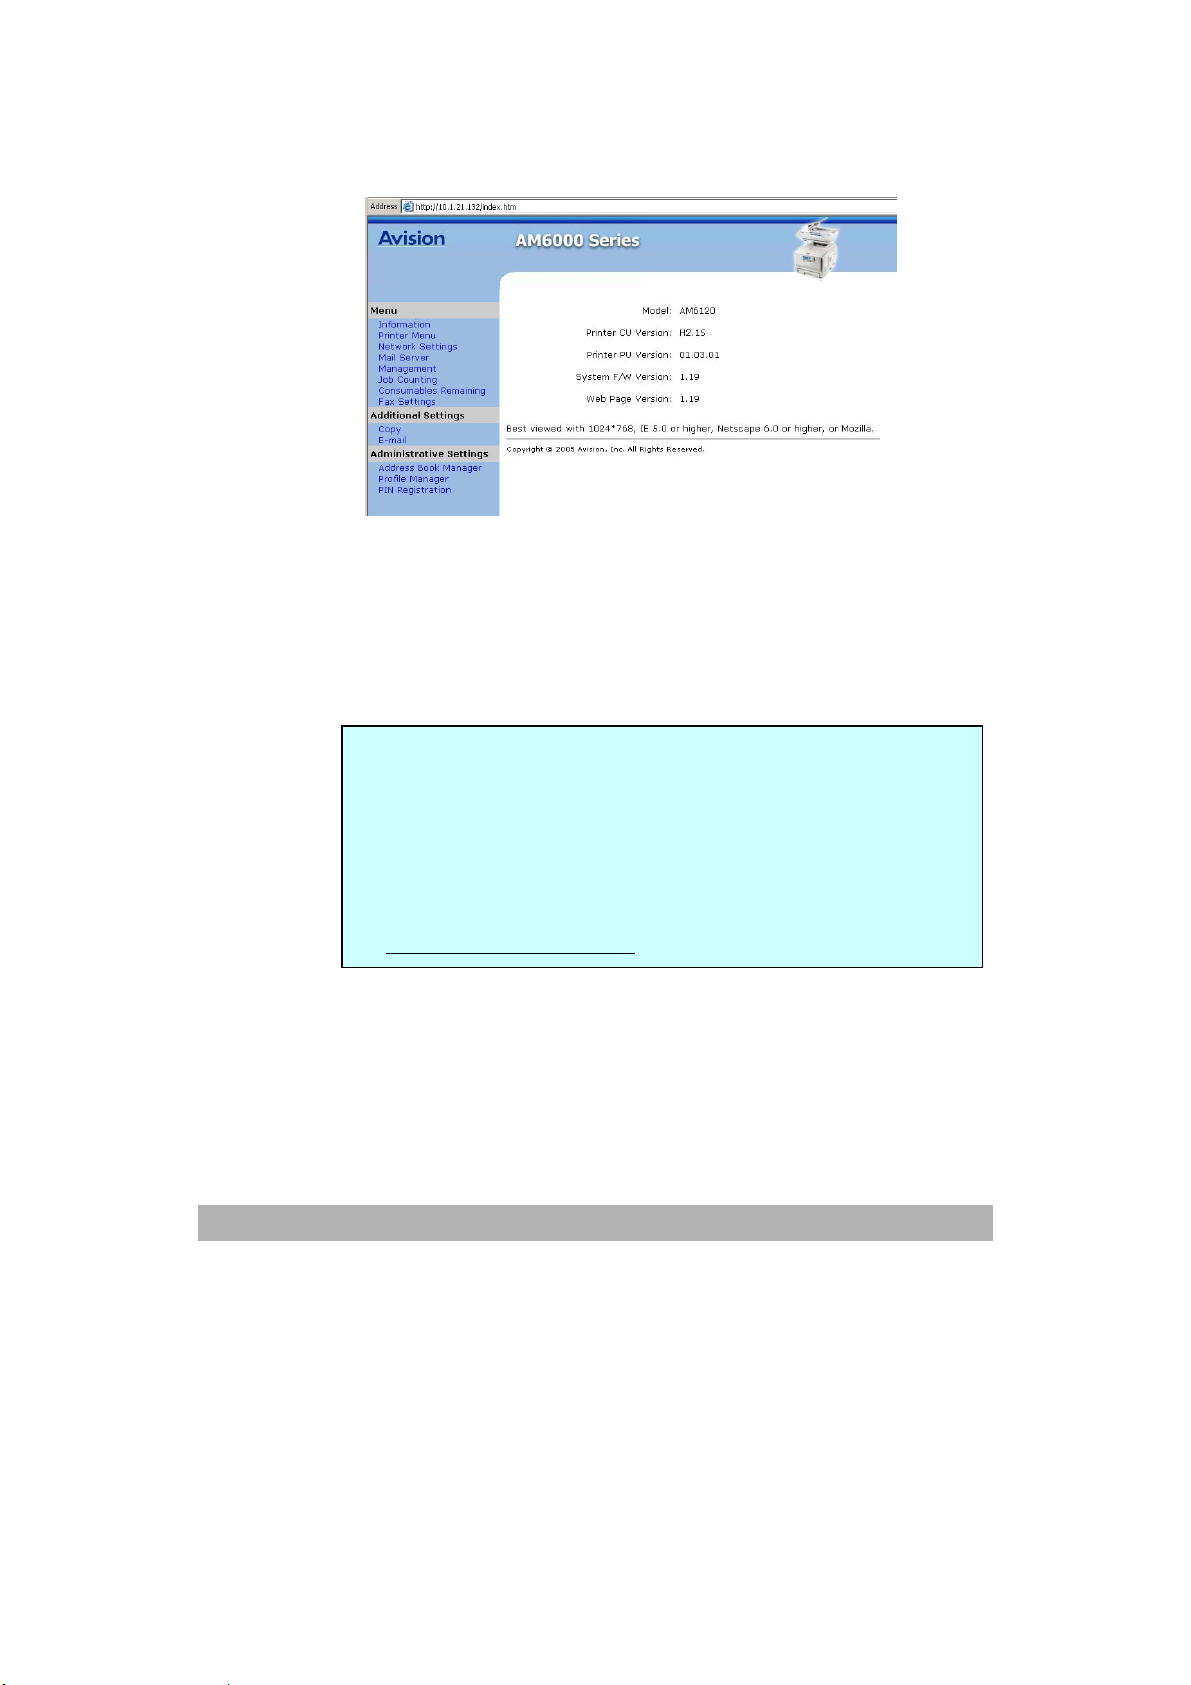
CONFIGURING THE MACHINE FROM THE CONTROL PANEL..................... 3-2
CONFIGURING THE MACHINE FROM THE WEB PAGE................................ 3-2
CONFIGURATION ITEMS .................................................................................. 3-4
CONFIGURING MANAGEMENT ITEMS ................................................. 3-8
CREATING YOUR E-MAIL ADDRESS BOOK................................................. 3-10
CREATING YOUR ADDRESS BOOK BY THE HOMEPAGE OF AM6120
.................................................................................................................. 3-10
CREATING YOUR ADDRESS BOOK BY NETWORK SETUP TOOL .. 3-13
CREATING YOUR FILING PROFILE(DESTINATION) .................................. 3-16
CREATING YOUR FILING PROFILE (DESTINATION)BY THE
HOMEPAGE OF THE AM6120............................................................... 3-16
CREATING YOUR FILING PROFILE (DESTINATION) BY THE
NETWORK SETUP TOOL ....................................................................... 3-20
EXPLANATION OF FILING PROTOCOL............................................... 3-23
PRINTER SETTINGS IN WINDOWS .............................................................. 3-30
PRINTER DRIVER SETTINGS ............................................................... 3-30
PRINTING PREFERENCES IN WINDOWS APPLICATIONS.............. 3-31
“SETUP”TAB ............................................................................................. 3-32
“COLOR” TAB........................................................................................... 3-34
SETTING FROM WINDOWS CONTROL PANEL.................................. 3-35
“GENERAL” TAB....................................................................................... 3-35
“ADVANCED” TAB ................................................................................... 3-36
Page 7

i
COLOR PRINTING ............................................................................................ 3-38
FACTORS THAT AFFECT THE APPEARANCE OF PRINTS ................ 3-38
DIFFERENCES BETWEEN THE RANGE OF COLOURS A MONITOR OR
PRINTER CAN REPRODUCE................................................................... 3-38
VIEWING CONDITIONS ......................................................................... 3-39
PRINTER DRIVER COLOUR SETTINGS ................................................ 3-39
MONITOR SETTINGS.............................................................................. 3-39
HOW YOUR SOFTWARE APPLICATIO DISPLAYS COLOUR............... 3-40
PAPER TYPE .............................................................................................3-40
TIPS FOR PRINTING IN COLOUR........................................................ 3-40
PRINTING PHOTOGRAPHIC IMAGES ................................................... 3-40
PRINTING FROM MICROSOFT OFFICE APPLICATION ...................... 3-40
PRINTING SPECIFIC COLOURS(E.G. A COMOPANY LOGO) ........ 3-41
ACCESSING THE COLOURS MATCHING OPTIONS ......................... 3-41
SETTING THE COLOURS MATCHING OPTIONS................................. 3-42
USING THE COLOUR SWATCH FEATURE............................................ 3-43
USING THE COLOUR CORRECT UTILITY ............................................ 3-45
4 OPERATING YOUR MACHINE...............................................4-1
LOADING PAPER................................................................................................. 4-2
NOTICE ON USING THE ADF................................................................. 4-2
PLACING DOCUMENT IN THE ADF ....................................................... 4-3
PLACING DOCUMENT(S) ON THE GLASS ...........................................4-4
SENDING YOUR DOCUMENT TO E-MAILS .................................................... 4-5
BASIC OPERATION .................................................................................. 4-5
ADVANCED OPERATION......................................................................... 4-7
SENDING YOUR DOCUMENT TO FILING SERVERS..................................... 4-9
BASIC OPERATION .................................................................................. 4-9
ADVANCED OPERATION....................................................................... 4-11
v
Page 8

i
MAKING COPIES .............................................................................................. 4-13
PAPER RECOMMENDAIONS ................................................................. 4-13
CASSETTE TRAY...................................................................................... 4-14
MULTIPURPOSE TRAY .............................................................................. 4-1
FACE DOWN STACKER............................................................................. 4-1
FACE UP STACKER.................................................................................... 4-1
LOADING PAPER ...................................................................................... 4-2
CASSETTE TRAY........................................................................................ 4-2
MULTIPURPOSE TRAY .............................................................................. 4-5
BASIC OPERATION .................................................................................. 4-6
ADVANCED OPERATION......................................................................... 4-7
CHANGING SCALING ............................................................................... 4-9
CHANGING COPY QUALITY ...................................................................4-10
ADJUSTING DENSITY............................................................................. 4-11
INCREASING COPY COUNT................................................................... 4-12
TO USE AM6120 MFP AS A SCANNER ......................................................... 4-13
A GLANCE OF THE USER INTERFACE ................................................ 4-15
5 TROUBLESHOOTING...............................................................5-1
INFORMATION CODE AND MESSAGE............................................................ 5-1
THE MESSAGE DURING INITIALIZATION........................................... 5-1
THE MESSAGE DURING COPYING........................................................ 5-2
THE MESSAGE DURING NETWORKING............................................... 5-7
THE MESSAGE DURING SENDING E-MAILS ...................................... 5-9
THE MESSAGE DURING FILING.......................................................... 5-13
CLEARING A PAPER JAM................................................................................. 5-17
CLEARING PAPER JAMS.................................................................................. 5-18
REMOVING THE ABNORMAL LINE IMAGE................................................... 5-27
CLEANING THE ADF UNIT.............................................................................. 5-28
REPLACING THE ADF PAD.............................................................................. 5-29
CLEANING THE GLASS.................................................................................... 5-31
vi
Page 9

i
REPLACING CONSUMABLE ITEMS................................................................ 5-32
TONER CARTRIDGE REPLACEMENT ................................................... 5-33
IMAGE DRUM REPLACEMENT .............................................................. 5-40
REPLACING THE BELT UNIT ................................................................ 5-45
FUSER REPLACEMENT .......................................................................... 5-48
INSTALLING ADDITIONAL MEMORY.................................................. 5-51
MEMORY UPGRADE................................................................................. 5-51
TECHNICAL SUPPORT ..................................................................................... 5-55
APPENDIX..............................................................................................a
QUICK GUIDE .........................................................................................................a
SPECIFICATIONS ...................................................................................................c
INDEX.......................................................................................................................h
vii
Page 10

2
1 Getting Started
Introduction
Thank you for purchasing our AM6120, an internet appliance. The
AM6120 offers an unprecedented document delivery technology,
transmitting paper documents electronically over the internet.
With the AM6120, you can instantly scan paper-based document
and deliver the electronic image to various destinations including
e-mail addresses, printers, ftp servers or someone else’s computer
on the network. The new way to distribute documents is faster,
more cost effective, and safer than any traditional methods such as
fax, mail, or courier.
Features
Scan to E-mail:
Connected to an Ethernet network and a SMTP server, the AM6120
allows you to transmit document(s) over the internet via e-mail.
With a touch of the e-mail key and the selection of your recipients'
e-mail addresses, the document(s) is/are first scanned and
converted into an image file, and then transmitted to remote
recipients within minutes.
Scan to FTP:
The AM6120 allows you to send scanned documents to a server or a
personal computer’s file folder over intranet with FTP(File Transfer
Protocol), HTTP(Hypertext Transfer Protocol), CIFS(Common
Internet File System) protocol. The scan to filing feature off-loads
the mail server from handling large attachments.
Getting Started
1-
Page 11

Digital Copying:
With an intuitive control panel, making digital copy becomes fast
and easy.
Network/PC Printing
The AM6120 is able to perform network or PC printing since it is
installed in a network environment.
Scanning
After installing the scanner driver and connecting the USB cable to
your computer, the AM6120 can be used as a scanner. You can
used various scanning feature to modify your scanned image.
Multiple Pages Sending:
With the Auto Document Feeder, AM6120 allows a stack of 50-page
document(s) to be continuously scanned at one time in reliable
quality to increase your efficiency.
Address Book/Profiles Managing:
The AM6120 provides a convenient way to manage all the e-mail
addresses and profiles (filing destinations). Simply typing the
machine's IP address in the URL field of your browser, AM6120 web
page will be prompted. This web page allows you to create up to
100 e-mail addresses and several filing destinations to manage
your document.
1-3
Page 12
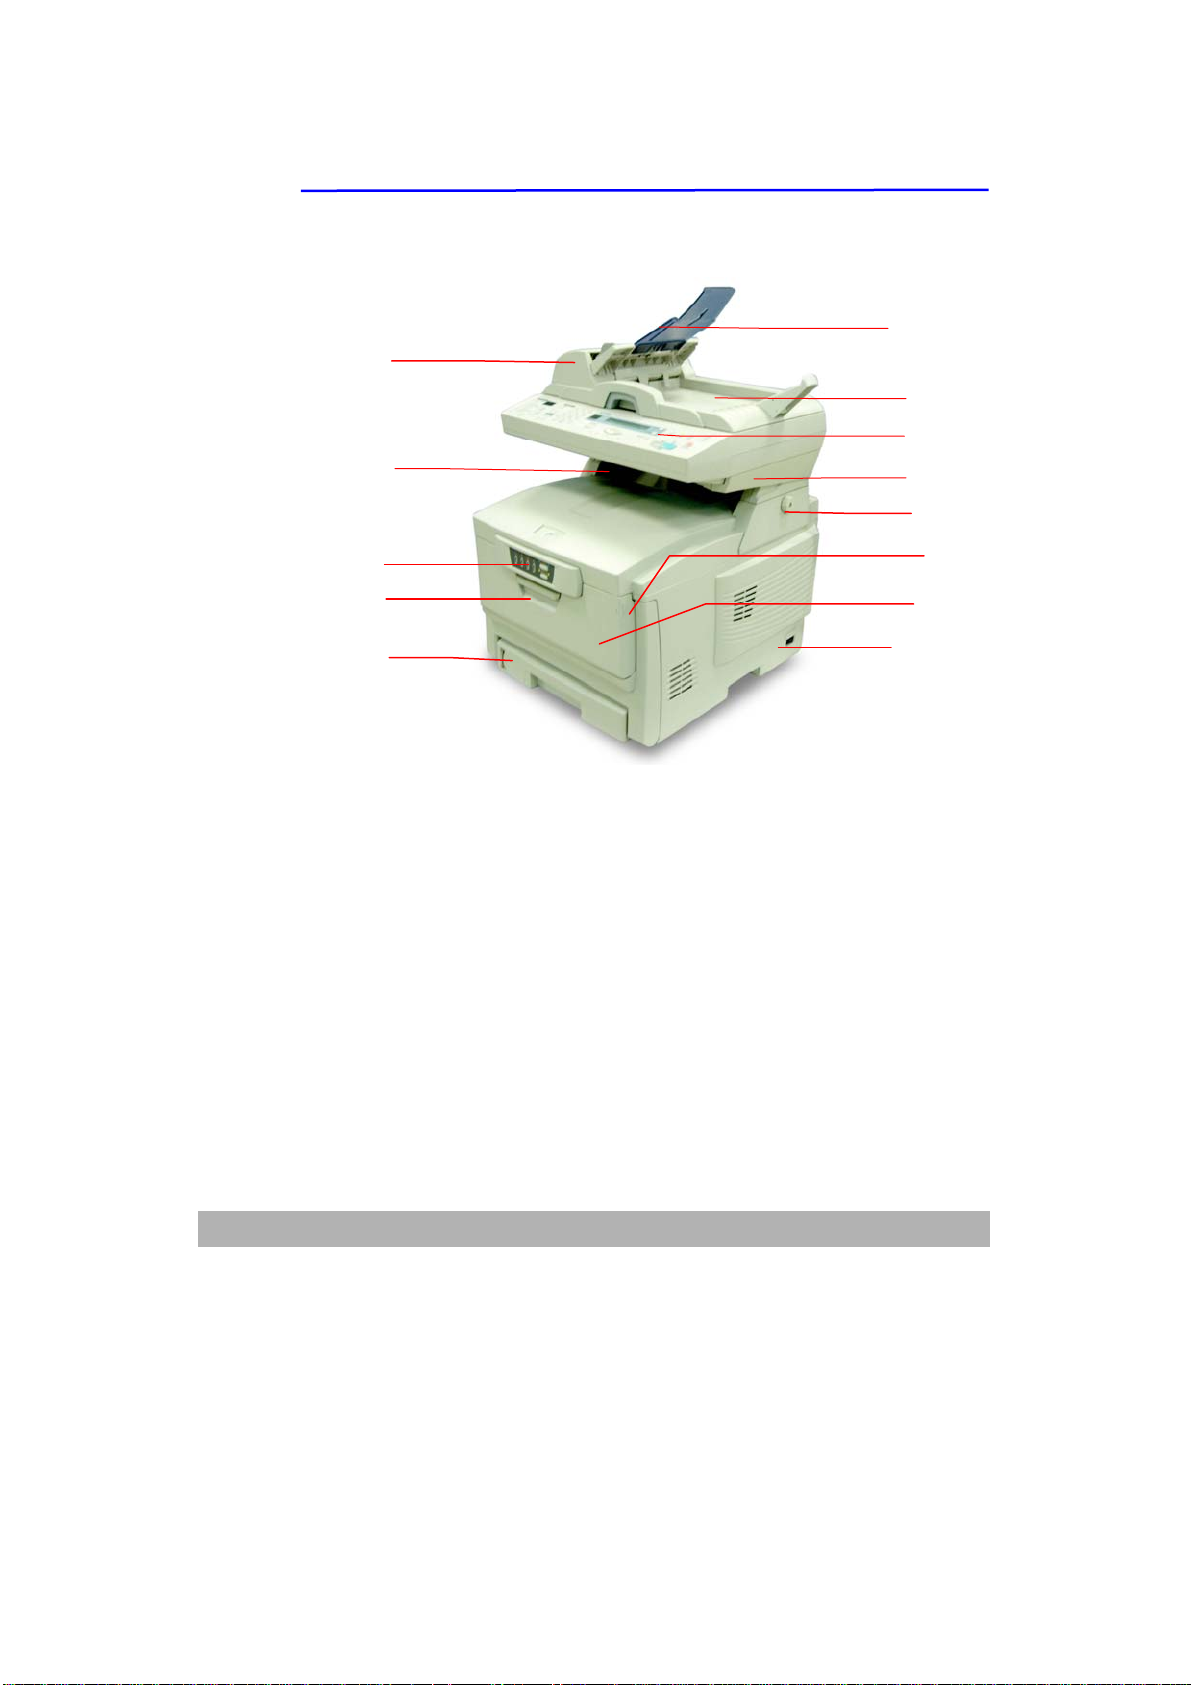
External View
The Front View
1
2
6
7
8
9
10
3
4
5
11
12
13
1. Auto document feeder (ADF) unit.
2. Lower support.
3. Status panel: Show status.
4. Front cover release (lift).
5. Paper tray:Standard blank paper tray. Hold up to 300 sheets of
6. ADF paper tray and ADF paper support:Lload multi-page document up
7. Document cover。
8. AM6120 control panel: Display AM6120 status and operation button.
9. Upper support。
10. Lock switch:To lock or release the AM6120.
11. Manual tray release button (2)(Press down).
12. Multipurpose feed tray:To load heavy paper, envelope, and other type
13. “ON/OFF”power swtich.
2
80g/m
to 50 sheets of plain paper.
of print media.
paper.
Getting Started
1-4
Page 13
5
The Rear View
7
8
9
1
2
3
4
5
6
1. RJ-45 network port: To connect an ethernet cable.
2. Cable socket: To fix the cables.
3. Power adapter: To connect power.
4. Copy port: To connect printer.
5. Printer USB port: To connect the AM6120。 (max. length: 2 meters)
6. Printer power socket: To connect printer power cable.
7. ADF cable: To connect the ADF unit.
8. USB port: To connect the computer.
9. ADF port: To connect ADF cable.
10. Power switch: To open or close power of the AM6120.
11. Rear paper stacker: Hold 100 sheets of plain paper. (face up)
10
11
11
1-
Page 14
6
When the rear paper stacker is folded down, paper exists through
the rear of the printer and is stacked here face up. This is mainly
used for heavy print media. When used in conjunction with the
multipurpose feed tray, the paper path through the printer is
essentially straight. This avoids bending the paper around curves
in the paper path and enalbes feeding of up to 203g/m
2
meida.
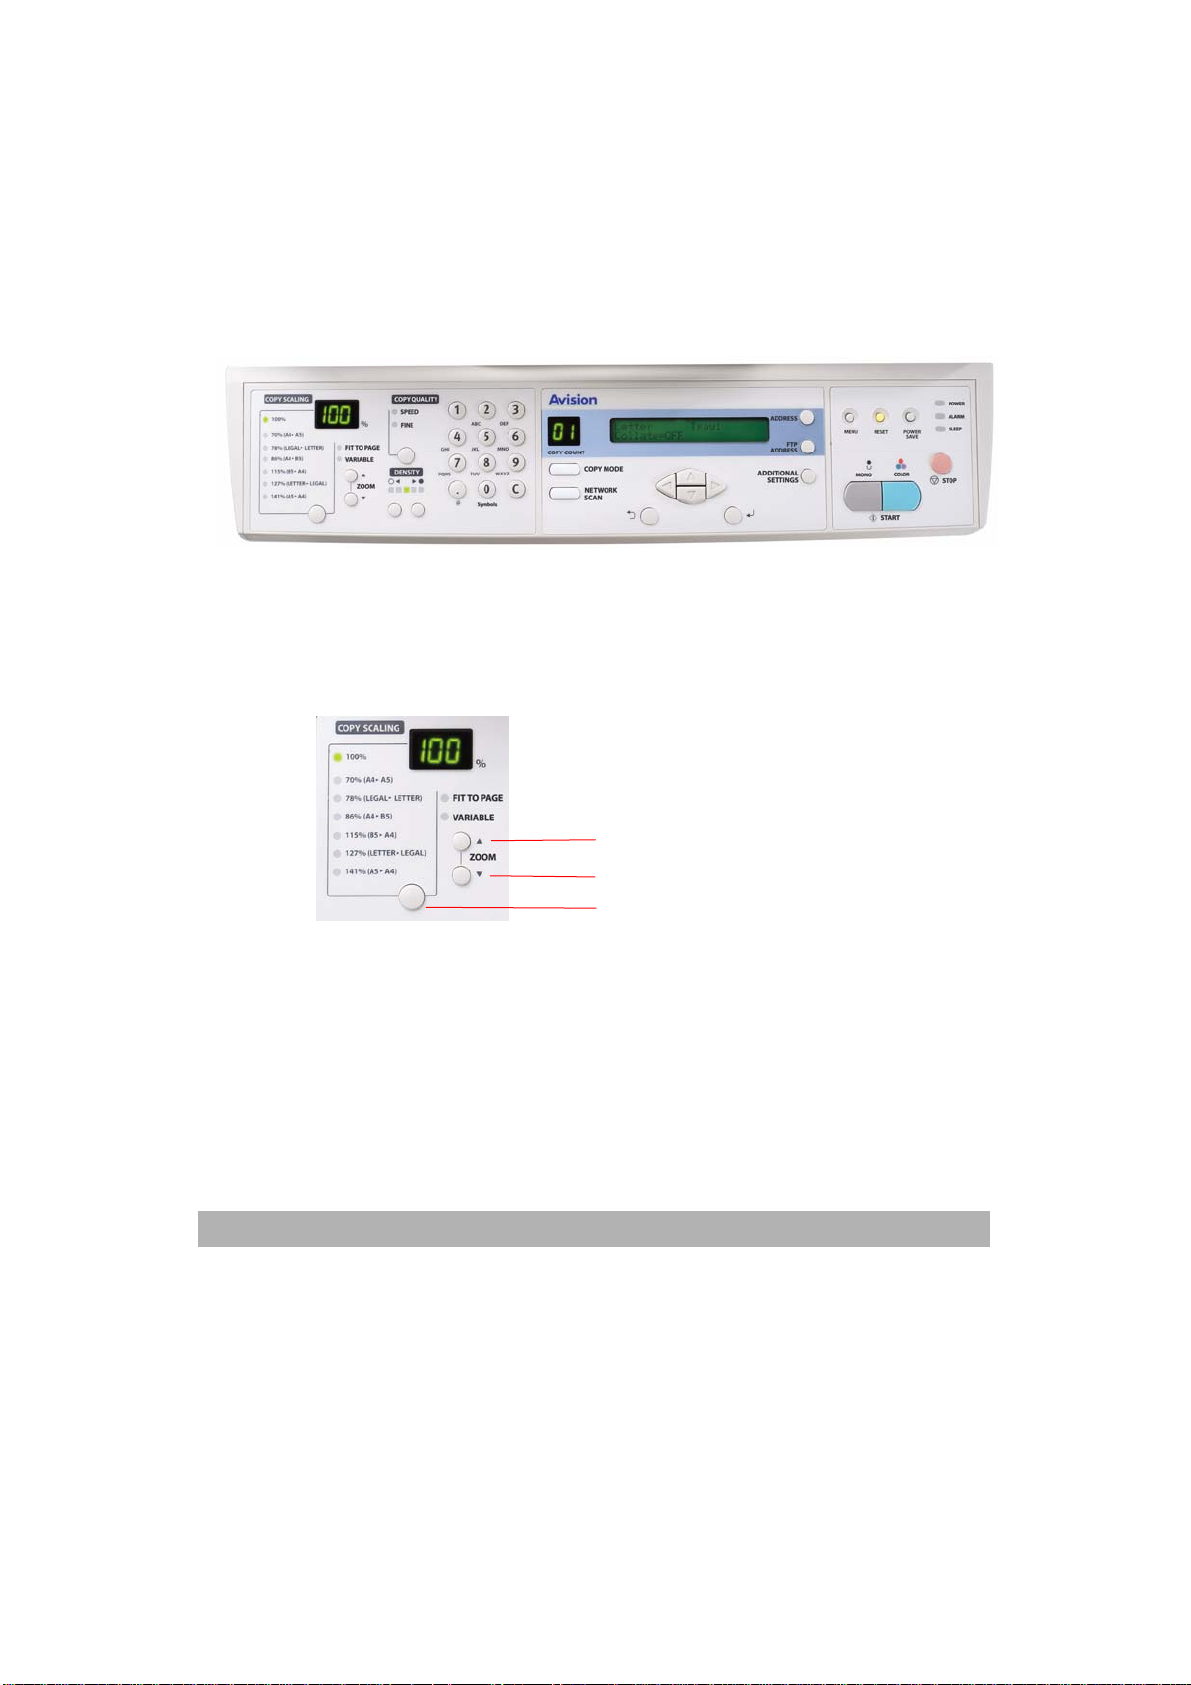
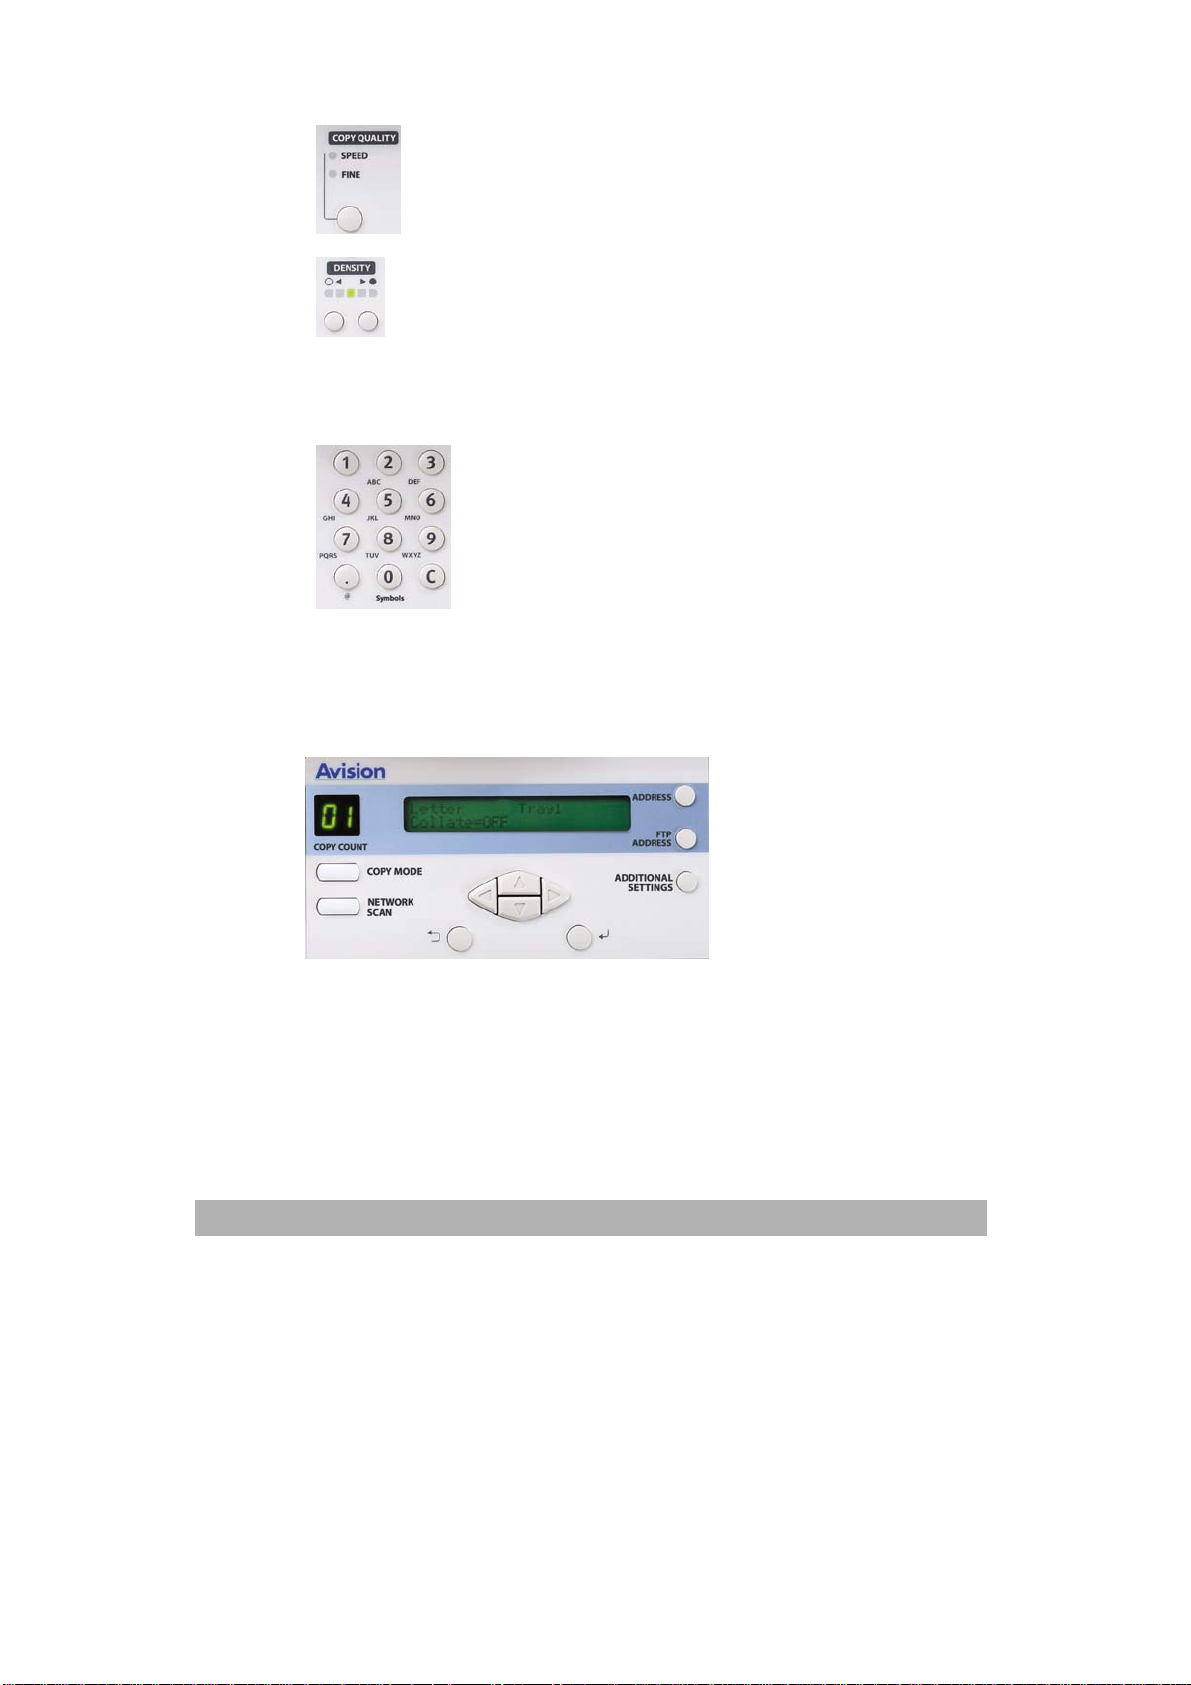
The Control Panel
The Scaling Area:
Used to reduce document down to 25% or enlarge it up to 400%.
1. Increase scaling in 1% increment up to 400%
2. Decrease scaling in 1% Decrement down to 25%
3. Select scaling from the preset percentages (70%,78%,
86%,93%,100%,115%,127%,141%)
Getting Started
1-
(93%)
1
2
3
Page 15
7
Used to select copy quality.
Used to select density level.
Numeric Keypad:
Used to enter network parameter or copy
count.
LCD-display and Function Keys:
Used to display current operation and select a working mode.
1-
Page 16
8
Function Keys and Others:
Used to indicate the number of copies.
Used to choose the copy mode. (also the
default working mode)
Used to choose the Scan to e-mail, or Scan to
Server mode.
Used to execute the additional settings of
“copy” and “network scan” mode. (The settings
are available only for three minutes. After
three minutes, the settings will return to
default value.)
Used to move the cursor up/down/left/right in
the LCD. The up/down keys can be used to
switch the indication of the function. The left
key can be used to return to the upper level of
the setting. The right key can be used to go
to the lower level of the setting.
Getting Started
1-
Used to select and confirm current selections
for the settings.
Used to cancel selections and go back to upper
level of the setting. The key is also used to
cancel previous input.
Used to indicate the existing FTP address for
“network scan” function. This key is only
available in “network scan” mode.
Used to indicate the existing E-mail address for
“network scan” function. This key is only
available in “network scan” mode.
Page 17
9
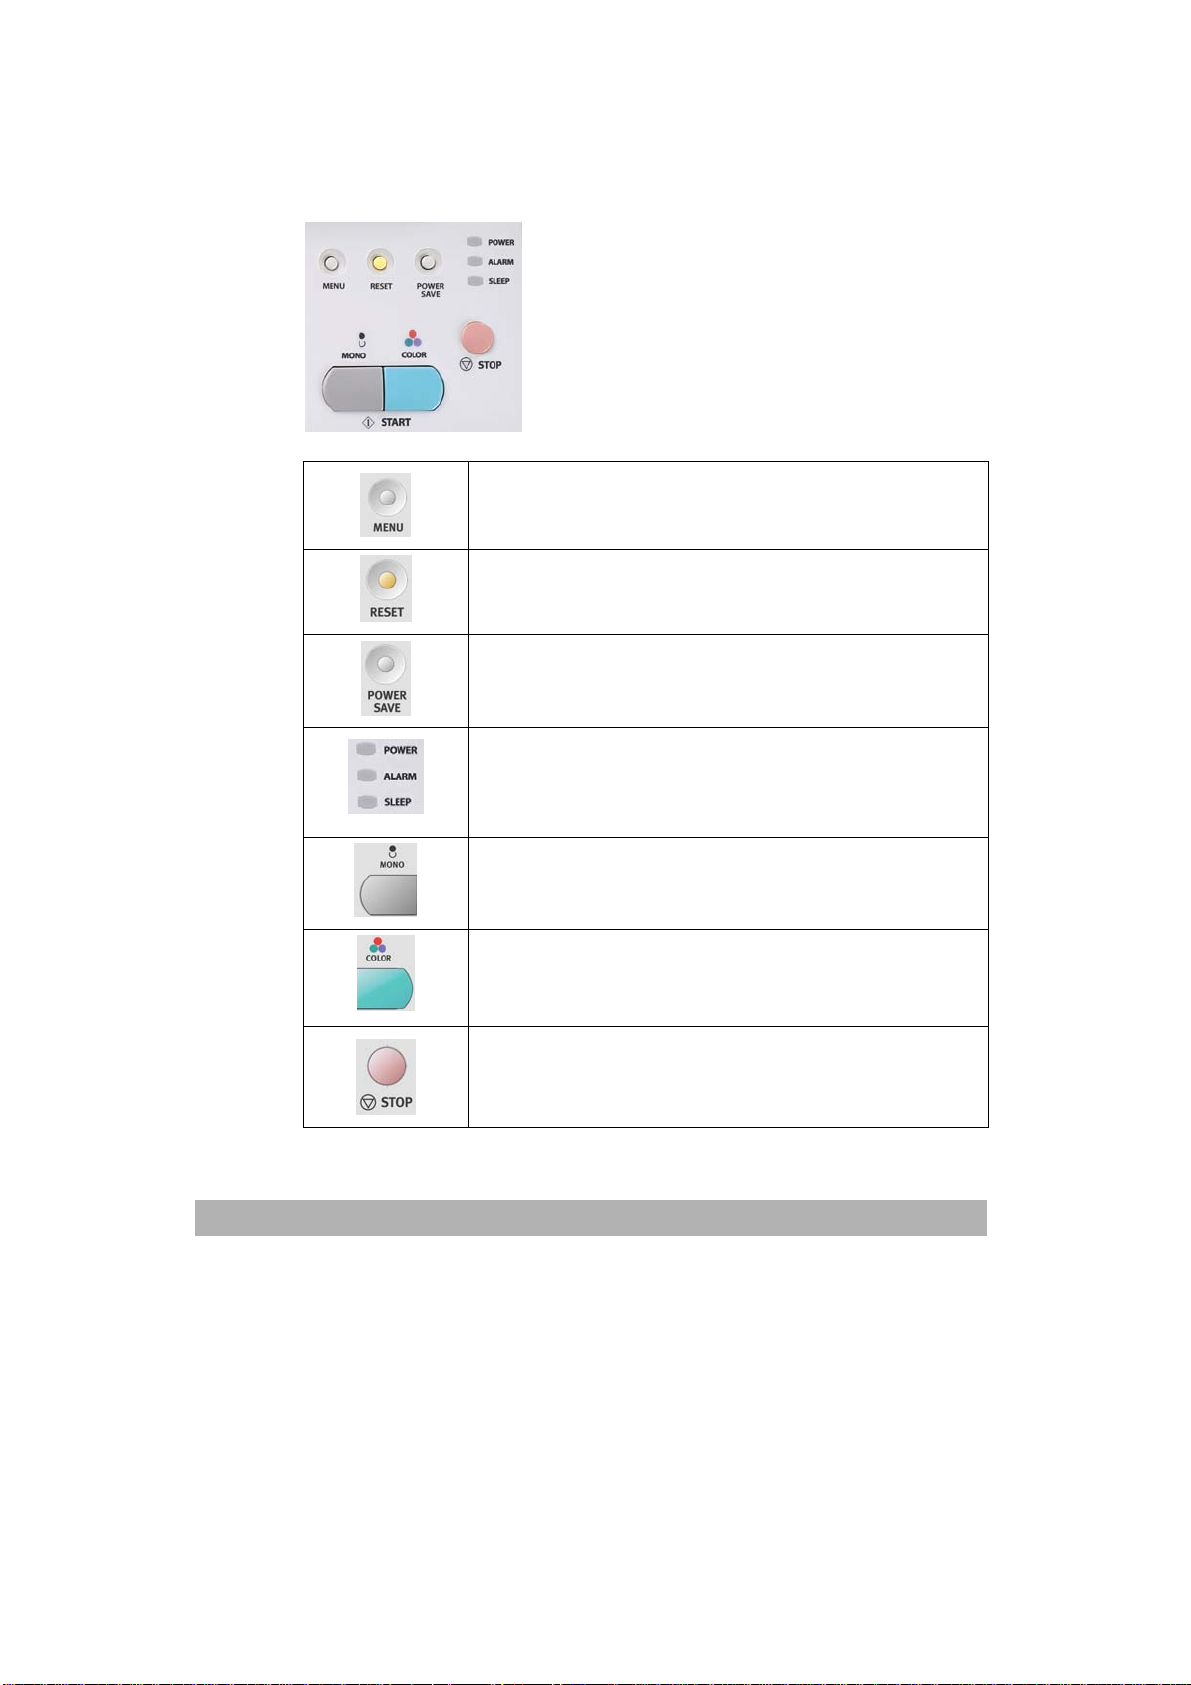
Start & Other Keys:
Used to select special requirement or the start key to send or copy
your document(s).
Used to set up the printer and the scanner.
Used to change scanner setting to factory default
value.
Used to go to sleep mode immediately.
( A continuous press is invalid )
Power LED indicates power on and ready status.
Alarm LED indicates error status.
Sleep LED indicates power saving status.
Used to send or copy the document(s) in black
and white.
Used to send or copy the document(s) in colors.
Used to stop every operation (LCD indication shifts
to stand-by screen of each function) but not effect
all settings.
1-
Page 18
0
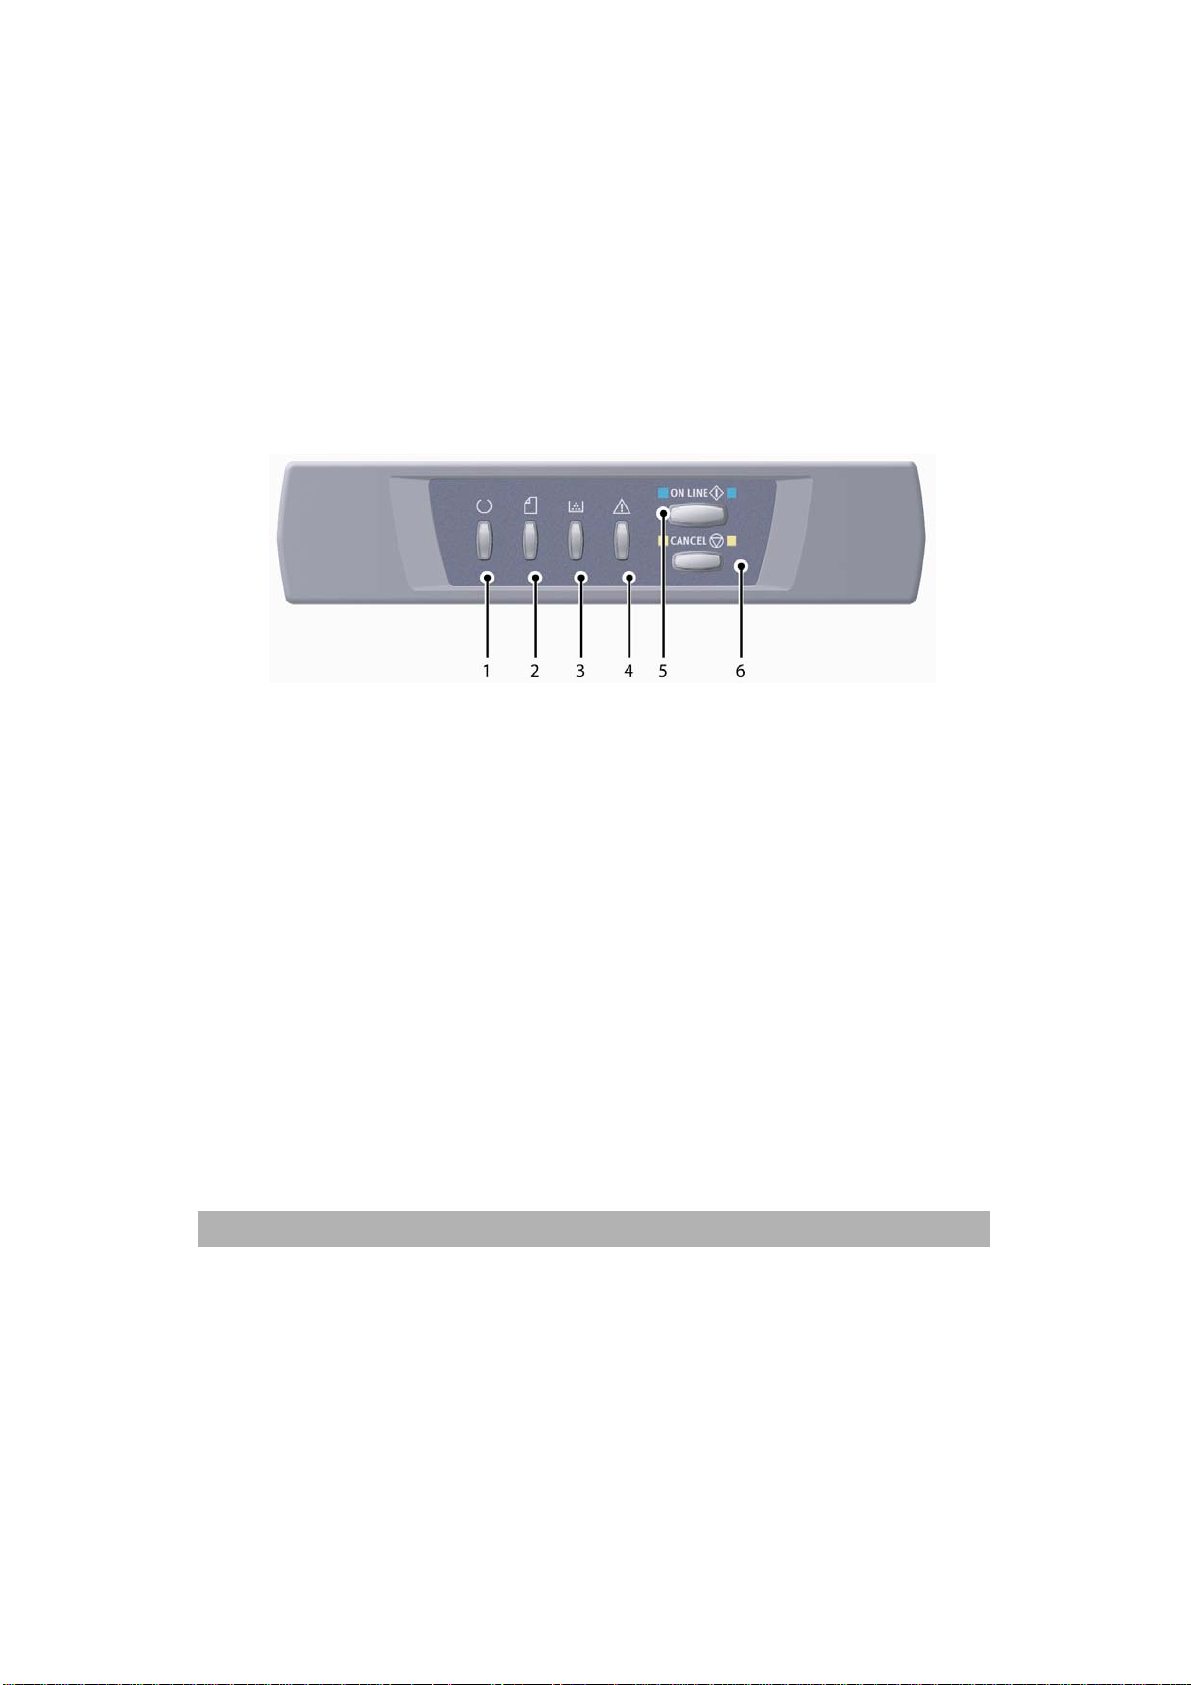
Printer Status Panel
The Status Panel allows operator intervention and indicates both
when the printer is operating normally and when it requires
attention. Detailed printer status is provided by the Status
Monitor.
The Status Panel incorporates 4 LEDs and 2 push-button switches
as follows:
1. Power (Ready) LED (green)
2. Paper LED (amber)
3. Consumable LED (amber)
4. Alarm LED (amber)
5. ON LINE switch
6. CANCEL switch
The switches enable printer operation while the LEDs display the
status of the printer operation.
Getting Started
1-1
Page 19
SWITCHES
Operation
The switches are labelled ON LINE and CANCEL and each has
three modes of operation as follows:
Operation Description
Momentary
press
(Press 1)
2-second
press
(Press 2)
5-second
press
(Press 5)
Function
The results of operating the switches in different contexts are
summarised below.
pressing
ON LINE (idling
mode)
OFF LINE
(idling mode)
ON LINE (data
being received,
processing or
printing)
Press the switch and release it within 2 seconds of
pressing it.
Press the switch and release it between2 and 5 seconds
after pressing it. The operation starts immediately the
switch is released (except at job cancellation).
Press the switch and hold it for 5 seconds or more. The
operation starts 5 seconds after pressing the switch,
even if you hold it pressed for more than 5 seconds.
ONLINE switch CANCEL switch Status before
Press 1 Press 2 Press 3 Press 4 Press 5
Shifts to
OFF
Shifts to
ON
Shifts to
OFF
PRINT
Menu Map
(*1)
PRINT
Menu Map
(*2)
- - - Cancel
Demo
Prints
Demo
Prints
(*2)
- - -
- - -
Job
(*3)
Press 6
-
1-11
Page 20

2
pressing
Requesting
manual feed, no
paper in MP Tray
or wrong paper
size
No paper in Tray
1 or Tray 1 open
Memory
overflow or
invalid data
Paper Jam
After the waste
toner has
become full,
cover open/close
ONLINE switch CANCEL switch Status before
Press 1 Press 2 Press 3 Press 4 Press 5 Press 6
Starts
paper
supply
- -
Recover
from the
error and
shifts to
ON LINE
- -
Recognises
the toner
has been
replaced
- - - Cancel
Jobs (*3)
- Cancel
Jobs (*3)
- - - -
- - - -
Recognises
the toner
has not
been
replaced
-
-
*1: The Menu Map (or Status Page) provides details of printer settings and status
information.
*2: Shifts to ON LINE after printing has started.
*3: Executes job cancellation 2 seconds after start of switch operation (even if the
switch is held down longer).
Getting Started
1-1
Page 21

LED Display
General
Printer status (as indicated by the LEDs) can be broadly
categorised as follows:
1. Normal status: the printer is operating normally e.g. it is
ON LINE or processing.
2. Warning status: you can continue to use the printer
without intervention but an error may result.
3. Error status: you cannot continue to use the printer.
Intervention is required to recover from the error. Fatal
errors are irrecoverable and require a service call.
When several different status situations occur concurrently, only
the status with the highest priority is displayed on the LEDs.
Warning status combined with the highest-priority normal status
is displayed on the LEDs.
Function
A summary of the functions of each LED is given below:
LED Function
Power
(Ready)
Indicates POWER ON, ON LINE, OFF LINE, power saving, data
receiving, printing, job cancelling, warming up, density
adjustment/temperature adjustment in progress
Paper Indicates paper out warning/alarm, manual feed request
Consumable
Alarm Indicates paper jam, cover open error
Indicates consumables life warning/alarm, consumables
installation error
1-13
Page 22
Illumination and meaning
To be able to indicate a large number of status situations both
individually and in combination, the LEDs are illuminated as
follows: The Status Monitor provides a readable description of
the printer status corresponding to the indications of the LEDs.
If you have the Status Monitor Preferences set to Pop up on
alerts, this readable message will be presented on screen
whenever an abnormal condition occurs.
LED Illumination Status
Power (Ready) Green
OFF Power OFF
ON ONE LINE (idle)
Blinking 1(2S cycle) OFF LINE (this blinking
Blinking 2(500mS cycle) Data being received,
Blinking 3(120 mS cycle) Job cancelling in progress
Blinking 4(4.5S ON and
500mS OFF)
OFF ON LINE
ON A warning is indicated
Blinking 1(2S cycle) An error has occurred but
pattern always takes place
while an error is
occurring)
printing, warming up,
density
adjustmnet/temperature
adjustmnet in progress
Power saving mode
(printing possible)
printing can continue if
you press the ON LINE or
CANCEl switch.
Getting Started
1-14
Page 23

5
Paper,
Consumable,
Alarm (Amber)
Blinking 3(120 mS cycle) A serious error has
Blinking 2(500 mS cycle) An error has occurred.
You need to replace
consumables or remove
jammed paper, for
example. The printer
then recovers from the
error and printing
becomes possible again.
occurred. Rebooting or a
service call is required.
1-1
Page 24

6
Preinstallation Information
The AM6120 has to be setup properly on your network to perform
scan to e-mail and scan to FTP functions. In order for other
network devices to find the AM6120 on the network, the following
network parameters have to be set.
• DHCP Enable:
• IP Address:
• Subnet Mask:
• Gateway IP:
• DNS Server:
• SMTP Server:
• SMTP Port:
• POP3 Port:
• POP3 Port:
Explanation of contents:
1. DHCP Enable: Obtain IP/subnet/gateway addresses
automatically from DHCP server.
2. IP Address: The Internet Protocol (IP) address
assigned to your machine by your network
administrator.
3. Subnet Mask:
4. Gateway IP: The gateway IP address assigned by your
5. SMTP Server:
The net mask address assigned by your
network administrator.
network administrator.
The IP address of your SMTP Mail Server
assigned by your network administrator.
Getting Started
1-1
Page 25

7
6. SMTP Port: The port number of your SMTP Mail
Server.
7. DNS server: The IP address of DNS Server assigned by
your network administrator.
8. POP3 Server: The IP address of your POP3 server.
9. POP3 Port The port number of your POP3 Server.
Please enter the DNS name or IP and port
number of your POP3 server if your mail
server requires POP3 authentication before
sending e-mails from the machine.
1-1
Page 26

Note:
1. DHCP server: With DHCP (Dynamic Host Configuration
Protocol), a host can automatically be given a unique IP
address each time it connects to a network--making IP
address management an easier task for network
administrators. If the DHCP server is available from your
network, you do not need to enter TCP/IP, subnet mask,
gateway, and DNS information. Instead, this information will
be automatically given for the AM6120.
2. IP Address: An IP (Internet Protocol) address uniquely
identifies a host connection to an IP network. System
administrator or network designer assigns the IP address.
The IP address consists of two parts, one identifying the
network and the one identifying your node.
The IP address is usually written as four numbers separated
by periods. Each number can be zero to 255. For example,
10.1.30.186 could be an IP address.
3. SMTP: Stands for Simple Mail Transfer Protocol. It is the
main communication protocol used to send and receive e-mail
on the Internet.
4. DNS: Stands for Domain Name System. The DNS server
identifies hosts via names instead of IP addresses. If the
DNS server is available on your network, you can enter the
domain name instead of digits for your SMTP or POP3 servers,
such as Pegasus.com.tw instead of 120.3.2.23.
5. POP3: POP3 is the latest Post Office Protocol 3, this is a
service that stores and serves e-mails for various client
machines that are not connected to the Internet 24 hours a
day. E-mails are held in POP3 until you log on.
Getting Started
1-18
Page 27
AM6120
Internet Communication Features
Scan to E-mail
The AM6120 allows you to deliver your scanned document to e-mail
addresses on the network. The document is first scanned and
converted to a standard PDF, JPEG, TIFF, or MTIF (Multi-page TIFF)
file format and then transmitted to remote recipients
simultaneously as an e-mail attachment.
When you send an e-mail to someone via the AM6120, it uses
Simple Mail Transfer Protocol (SMTP) to transfer your outgoing
e-mails to your SMTP mail server, and then send these e-mails to
your recipients through internet.
Intranet
Internet
AM6120
PC
PC
≈
E-mail server
PC
1-19
Page 28
0
Scan to FTP
A
Through the intranet with FTP (File Transfer Protocol), HTTP
(Hypertext Transfer Protocol), or CIFS (Common Internet File
System), the AM6120 allows you to save scanned document
directly to a designated server or a personal computer on the
network in a standard PDF, JPEG, TIFF, or MTIFF file format.
CIFS is the sharing system of Microsoft Windows. What’s unique
about this filing function is to let entire corporate users share
one machine to send documents to each desired file folder on a
designated server or individual computer.
M6120
PC
CIFS servers
(Windows)
Getting Started
1-2
Page 29

2 Installing Your Machine
This chapter is specifically targeted to the persons who are
responsible for the administration of the AM6120. It is
recommended that the administrator read this chapter before
installing the machine.
Minimum Configuration Requirements
To make the best of the AM6120, the following configuration is
required:
To send e-mails from the AM6120:
y TCP/IP network
y A SMTP and a optional POP3 server
To file document(s) via intranet
y FTP, HTTP, or CIFS Protocol environment
y Windows 98, Windows NT, Windows 2000, Windows Me,
Windows XP, HTTP or FTP server
2-1
Page 30
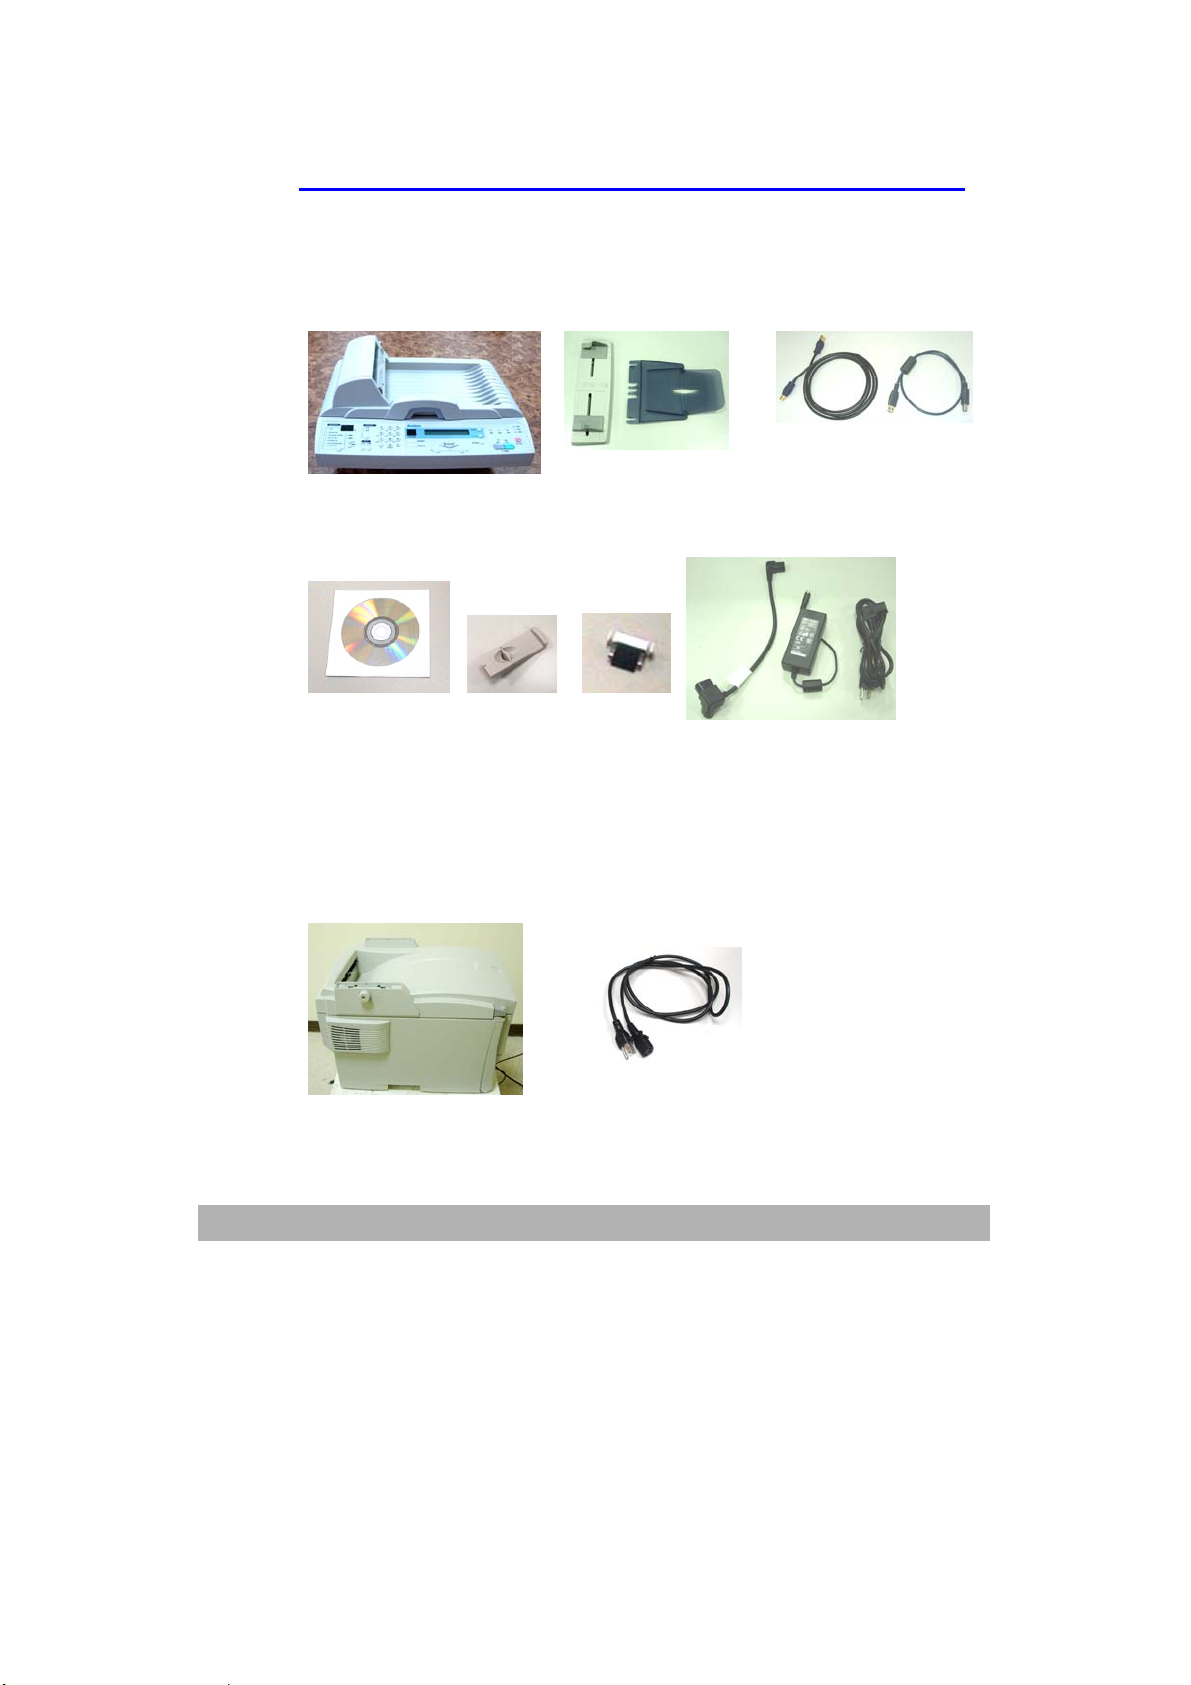
Checking Package Contents
Open two boxes and check the package contents.
Box 1:
AM6120 scanner
Input Paper Tray and
Paper Support
USB cable (one for 60cm,
the other 180 cm)
CD/Quick Guide Paper Stopper ADF Pad
* Be sure to use the supplied power adapter(model 077-242090-I3
made by YHI);Using other power adapter may cause malfunction
or damage to the machine which is void in the warranty.
Box 2:
AM6120 Printer
2-2
Installing Your Machine
Y-type cable (adapter)
Adapter/Power Cord
Printer Power Cable
Page 31

3
INSTALLING THE AM6120 PRINTER
1. Remove the handler to lift the box.
2. Remove the protective material.
2-
Page 32

3. Open the protective plastic bag.
4. Choose a proper location for the machine.
800mm
500mm
2-4
Installing Your Machine
200mm
200mm
Page 33

5
5. Place the installation base on the location.
500mm
200mm
200mm
6. Lift the printer to place it in a selected place.
26
2-
Page 34

7. Place the printer upon the installation base.
26
2-6
Installing Your Machine
Page 35

7
8. Turn the lock switch to Unlocked position.
2-
Page 36

9. Remove the protective tape/paper/cushion.
10. Open multi-purpose tray.
2-8
Installing Your Machine
Page 37

9
11. Remove the tape and paper.
12. Close the multi-purpose tray.
2-
Page 38

13. Open the protective plastic bag.
2-10
Installing Your Machine
Page 39

14. Place the AM6120 scanner to the support of the printer and
move it backward.
2-11
Page 40

15. Move the lock switch to Locked position.
2-12
Installing Your Machine
Page 41

3
16. Turn the lock switch on the scanner to the “Unlcoked
position”.
2-1
Page 42
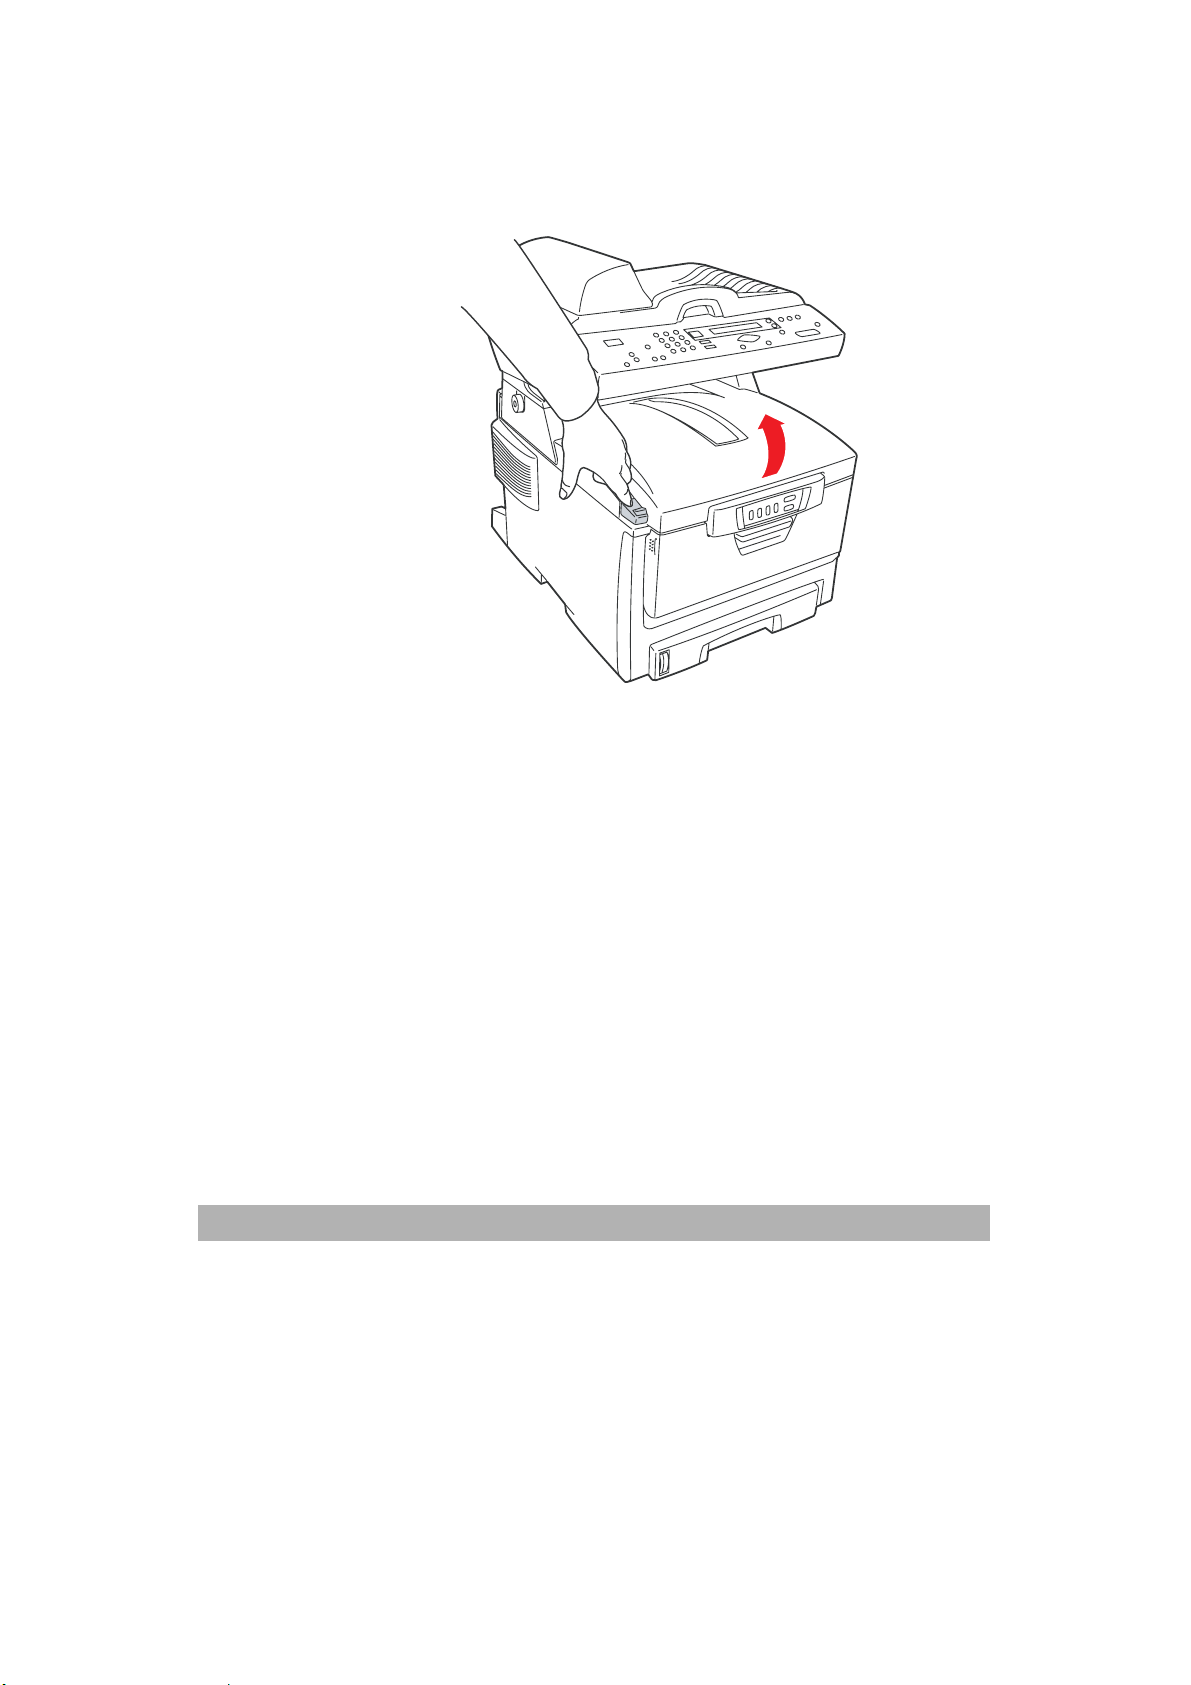
17. Press the release button to open the cover.
2-14
Installing Your Machine
Page 43

5
18. Pull the release lever to raise the image drum.
5
2-1
Page 44

19. Open the image drum.
20. Remove paper and protective film.
2-16
Installing Your Machine
Page 45
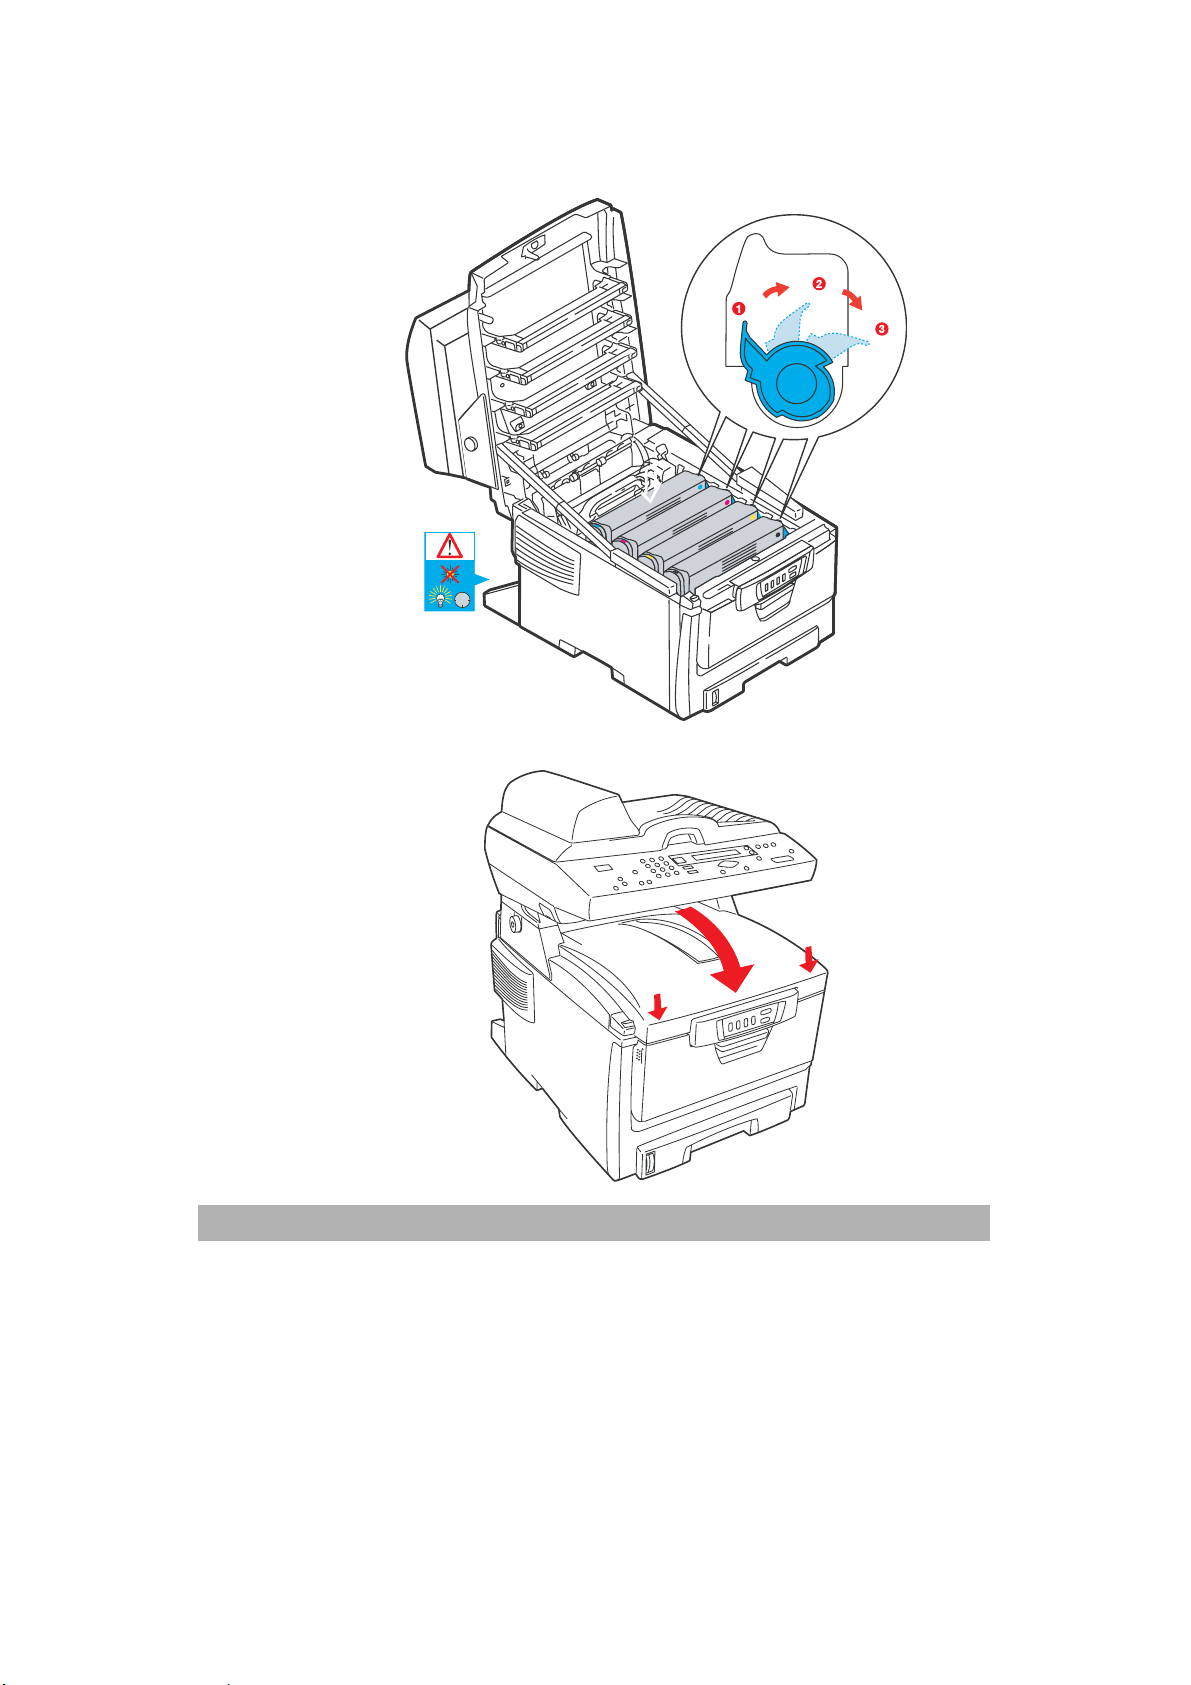
7
21. Close the drum and move 4 levers to the p position.
5
22. Close the printer top cover.
2-1
Page 46

23. Pull out the output tray.
24. Adjust the paper size in the paper tray.
2-18
Installing Your Machine
Page 47

9
25. Insert the printing paper.
26. Make sure the paper size properly fit in the tray.
2-1
Page 48

27. Gently pull back the paper tray.
2-20
Installing Your Machine
Page 49

Moving Your Printer
If you need to move your printer due to relocation or maintenance
purpose, please follow these steps to remove the accessories, or
consumables first.
1. Please remove the accessories according to the reversed order of
installing these accessories and consumables (toner cartridge,
paper tray, paper, and power cable).
Make sure the printer is switched off before removing any
accessories.
2.Please refer to the manual to install the accessories.
3.Use protective material to pack the printer and then pack into
box.
If you have no protective material or box, please use other
packingmaterial to protect the printer from the damage during
transportation.
Caution!
The printer weights about 26 kgs excluding the printer cartridges.
Please hold the handles as illustrated. It is strongly
recommended that two persons are required to carry the printer.
(It may cause damage if only one person carry the printer.)
2-21
Page 50

26
2-22
Installing Your Machine
Page 51

3
Installing the AM6120
Installing the Paper Feed Tray and Paper Support
1). Attach the Paper Support to the Paper Feed Tray.
Paper Feed
Tray
Paper
Support
2).
Attach the Paper Feed Tray to the machine.
2-2
Page 52

Installing the Paper Stopper
Attach the paper stopper to the end of the document cover as
shown below. If you are copying or sending a batch of document in
A4 or Letter size, please pull the lever up to stop paper from falling
apart. If your paper is larger than A4 or Letter, please hold the
lever and press down to return to original position.
Paper
Stopper
Lever
2-24
Installing Your Machine
Paper
Page 53

Installing the AM6120
1. Have two persons carry the AM6120 printer and place it on the
installation base on a selected location.
2. Move the lock switches at the right and left sides of the printer
to the “unlocked position”.
Lock switch
3. Lift the AM6120 with both hands and gently place it on the
support of the printer.
AM6120
Support of
the printer
Printer
2-25
Page 54

3. Move the AM6120 MFP backward as illustrated.
4. Move the lock switch at both sides to the “locked position” as
illystrated.
2-26
Installing Your Machine
Page 55

7
5. Unlcok the lock switch on the scanner
1). Locate the lock switch of the scanner at the bottom left corner
as illustrated.
2). Move the lock switch to the “unlocked position”.
Note:
If you need to move the AM6120, please make sure the scan
unit at the home position as illustrated below and then move the
lock switch to the “locked position”. If the scan unit is not at
the home position, please turn on the scanner to let the scan
unit return to the home position.
“unlocked
position”
“locked
position”
Make sure the
scan unit at this
position before
locking.
Note:
Before moving the AM6120 scanner, please also make sure the
lock switch of the printer support is in the “locked position” and
then gently slide the scanner forwardly to detach the scanner from
the printer.
2-2
Page 56

Installing the Cables and Printer Driver
Connecting the ADF Cable
Connect the ADF (Auto Document Feeder) cable (attached to the
document(s) cover) to the ADF port at the back of the AM6120.
Connecting the Network Cable
1. Connect one end of your Ethernet LAN cable to an available
port of your Ethernet Hub.
2. Connect the other end to the network port at the back of your
AM6120.
2-28
Installing Your Machine
Page 57

9
Connect the Printer Cable
1. Turn off your printer first. Then, connect squre end of the USB
cable to USB port of the the printer.
2. Connect the retangle end to the “Copy” port of the AM6120
scanner.
3. Turn on your printer.
Caution!
To make copies through your printer, please FIRST turn on
your printer and then turn on the AM6120. Otherwise, you
may encounter problem in making copies through the printer.
2-2
Page 58

Connecting to Power
1. Turn off the power switch of the AM6120 scanner.
2. Insert the adapter fixer to the socket as illustrated.
Power Adapter
Socket
Adapter fixer
3. Insert the power adapter to the fixer. Insert the small
end of the power cord to the power jack of the AM6120.
Power
Cable
2-30
Installing Your Machine
Page 59

4. Connect one end of the Y-type cable to the power
adapter.
5. Connect one end of the printer cable to the power socket
of the Y-type cable. Connect the other end of the printer
cable to an available power outlet.
6. Turn on the power switch of the AM6120 scanner. After
warming up, the LCD-display will show a ready mode.
Caution!
The AM6120 scanner is designed with a power saving mode.
If you have not used the machine for four hours, the AM6120
scanner will shut off the lamp. To use the machine, please
press any key on the control panel.
2-31
Page 60
6. The connection is completed as illustrated.
8
9
1
10
2
3
11
4
5
6
7
1. Network Port: Used to connect the Ethernet cable.
2. Cable Fixer: Used to fix the cables.
3. Power Adapter: Used to connect power.
4. Copy Port: Used to connect printer and scanner with an USB
cable (60cm).
5. Printer USB Port: Used to connect printer and scanner with an USB
cable (60cm).
6. Y-type Power Cable: Used to connect the power adapter and the power
cable of the printer.
7. Printer Power Jack: Used to connect the power of the AM6120 printer.
8. USB Port (AM6120
Scanner):
9. ADF Port: Used to connect the ADF cable.
10. Power Jack: Used to connect the power cable.
11. Power Switch: Used to turn on or off the AM6120 scanner.
Used to connect the AM6120 scanner to your
computer with the USB cable (180cm) to use the PC
scan and PC print feature.
2-32
Installing Your Machine
Page 61

3
Installing the Printer Driver
Installing the Network Printer Driver
1. Insert the supplied CD into the CD-Rom drive.
2. The following installation graphic appears. Choose “Install
Network Printer”. If the installation graphic does not appear,
please double click the “setup.exe”.
3. Choose “Network printer” and then click “Next”.
2-3
Page 62

4. Choose “Directly to the network using TCP/IP” and click
“Next”.
5. Type IP address of your printer and then click “Next”.
2-34
Installing Your Machine
Page 63

5
6. Choose AM6120P and then click “Next”.
7. Choose AM6120P as your printer name and then click “Next”.
2-3
Page 64

8. Choose if your printer need to be shared and then click “Next”.
9. The system then is copying the files.
10. Click “Finish” to complete the installation.
2-36
Installing Your Machine
Page 65

7
Installing Scanner Driver and Local Printer Driver
Caution!
You must install the scanner driver (TWAIN driver) FIRST before
connecting the USB cable to your computer. Otherwise, the
scanner driver may not work properly.
1. In the Installation grahic, choose “Install TWAIN Driver”.
2. Choose your language and an installation shield wizard will
guide you through the rest of the installation.
2-3
Page 66

3. Turn on the AM6120 scanner. Connect one end of the USB
cable (180cm) to the USB port of your computer. Then,
connect the other end to the USB port marked “Scan” at the
back of the AM6120 scanner.
AM6120
scanner
4. A “Found New Hardware Wizard” appears. Click “Next” to
continue.
2-38
Installing Your Machine
Page 67

9
5. The system is installin the software. Click “Next” to continue.
6. Click “Finish” to complete the installtion.
2-3
Page 68

7. After “Found New Hardware Wizard” has completed the
installation of the scanner driver, the “Found New Hardware
Wizard” for the local printer driver will prompt.
8. Select language and proper operation system.
2-40
Installing Your Machine
Page 69

9. The system is now installing the software.
10. Click “Finish” to complete the installation of a local printer
driver.
2-41
Page 70

Installing Network Setup Tool
With Network Setup Tool, you can create an address book including
100 e-mail addresses and 20 e-mail group (each group contains up
to 50 e-mail addresses). In addition, you can setup 20 profiles
(filing destination) and manage several AM6120 in the network.
The installation steps,
1. Choose install “Network Setup Tool” in the Installation
graphic, and then choose the language you prefer.
2. In the Welcome dialog box, choose “Next” to continue.
2-42
Installing Your Machine
Page 71

3
3. Read the license and then choose “Yes” to continue.
4. Choose your destination and then click “Next”.
2-4
Page 72

5. Choose your program folder and then click “Next”.
6. The system is then installing the driver.
2-44
Installing Your Machine
Page 73

5
7. Click “Finish” to complete the installation of the Network
Setup Tool.
Note:
For further information on how to use the Network Setpup Tool,
please refer to the online help of the software application.
.
2-4
Page 74

3 Configuring Your Machine
This chapter is specifically targeted to the persons who are
responsible for the administration of the AM6120. There are three
methods to configure your machine. The first one is to configure
the machine from the control panel; the second one is from the
AM6120’s web page; the third one is from the AM6120
Management Utilities. On how to configure the machine from the
Management Utilities, please refer to the user’s manual of the
Network Setup Tool in the supplied CD-ROM.
The following settings or destinations must be defined by the
system administrator before the AM6120 can be used to distribute
the scanned document on the network.
• Network and E-mail parameters: Defines the parameters for
TCP/IP, SMTP, and POP3 protocols to send your scanned
document to e-mail addresses.
• Filing destinations: Defines the protocols and destinations to
send your scanned document to FTP servers, web, or any
personal computers on the network.
Note:
If the system administrator has chosen DHCP, then the IP
address of TCP/IP, gateway, subnet mask, and DNS server will
be automatically given.
When installing the AM6120 for the first time, it is recommended
that the Administrator retain the default system settings. The
settings can be customized at a later date once you are familiar
with the operation and functionality.
3-1
Page 75

2
Configuring the Machine from the Control
Panel
1. Press
on the LCD-display.
2. Use the Down key to scroll to each item and then use the
Select key to select your desired item.
on the control panel. This prompts the Menu items
Information
Printer Menu
Network Settings
Mail Server
Report Print
Management
Configuring the Machine from the
Homepage
1 Turn on your computer.
2 Start yoru browser. Netscape 6.0 or higher, Microsoft I.E.
5.0 or higher, or Mozilla.
3 Type the IP address of the AM6120 in the URL field of your
browser and then press Enter. The AM6120 web page
appears. For example:
http://10.1.21.132
3-
Operation
Page 76
3
AM6120 homepage
4. Click each item on the menu and enter your setting
respectively.
Note:
1. The Administrative Settings are blocked by password. It
is recommended that the system administrator creates a
new password since the machine is shipped without
specific password.
2. To execute the homepage of the AM6120, you need to
install the Sun Java Runtime Environment program.
You can download the program from
HTTP://WWW.JAVA.COM
.
3-
Page 77

Configuration Items
Click the Menu button prompts the following Menu item.
Printer Menu
Network Settings
Mail Server
Report
Management
Contents of each menu
Information
3-4
Items Description or Choice
Model Display the model name.
Serial number Display serial number.
F/W version Display firmware version.
Operation
Page 78

5
Printer Menu
* The items indicated in bold letters are default values.
Items Description or Choice
Tray 1 Paper Size
Letter, A4, A5, A6, B5, Legal,
Legal135, Legal13, Executive,
Custom.
MP Paper Size
Tray 1 Media Weight
Tray 1 Media Type
MP Media Weight
MP Media Type
Auto Density Adjust
Density Adjustment
Auto Color
Registration
A4, A5, A6, B5, Legal, Legal135,
Legal13, Letter, Executive, Custom,
COM9, COM10, Monarch, DL, C5,
Envelope1.
Light, Medium, Heavy.
Plain, Letterhead, Bond, Recycled,
Rough
Medium, Heavy, Ultra Heavy.
Plain, Letterhead, Transparency,
Labels, Bond, Recycled, CardStock,
Rough.
ON/OFF. Select to perform Auto
Density Adjustment.
Select to perform Density Adjustment.
Select to perform Auto Color
Registration.
3-
Page 79
6
Network Settings
Item Description
IP Address The IP address of this machine.
Subnet Mask The IP address of your subnet mask.
Gateway IP The IP address of your gateway.
DNS Server IP address of your DNS server.
DHCP Enable Select Yes if you wish to enable DHCP.
Device Name The device name of this machine.
Mail Server
Item Description
SMTP Server The IP address of your SMTP server.
SMTP Port The port number of your SMPT server.
Default: 25
3-
POP3 Server The IP address of your POP3 server.
POP3 Port The port number of your POP3 server.
Authentication
Method
Operation
Default: 110
Choose authentication method to send
email.
Option: No, SMTP, POP3
(Choosing SMTP or POP3 means you need
to login first to send e-mail from the
AM6120.)
Page 80

7
User Name Type your login name to send emails.
Password Type your password to send emails.
Def. Subject Default text for the Subject field in
e-mail messages from the AM6120. Up to
64 characters are allowed. The default
subject is used only when users did not
enter anything in the Subject field in
e-mail message from the AM6120.
Def. From Default From for the From field in e-mail
message from the AM6120. Up to 64
characters are allowed.
Scan Size Limit The limitation for the attachment to be
sent from the AM6120.
Choice: 1MB, 3MB, 5MB, 10MB, 30MB,
No limit.
Report Print
Item Description
Menu Map Select to print Menu Map.
Demo Page Select to print sample page.
Job Counting Select to print job counting.
Consumable
Select to print consumable remaining.
Remaining
Scan to Log
Select to print all the “scan to” jobs.
Report
3-
Page 81

Configuring Management Items
Note the Management selection is blocked by password. Since the
machine is shipped without a specific password, it is recommended
that the administrator create a new password to ensure the security
of using the AM6120.
1. Press the Menu button on the control panel. This prompts the
following items.
Printer Menu
Network Settings
Mail Server
Report
Management
3-8
2. Choose “Management”, the login screen appears. Enter your
password to prompt the following items.
Item Description
Password Enter new password if administrator wish to
change his or her password. (Up to 8
alphabets or digits are allowed to enter in
this filed. To enter alphabets, note they
are case-sensitive.)
Operation
Page 82

9
Add “To”
Address On
If “Yes” is selected, when finishing sending
E-mail, there will be a dialog box inquiring
whether user wishes to add the new e-mail
address to the AM6120’s address book.
Choice: Yes, No
Pin Setting Choice: On, Off
Note:
1. The PIN ID input screen is indicated at the
time of “PIN Setting=Enable” and “Scan to
Restriction≠OFF”.
2. Please enter four to six characters for your
pin ID. PIN ID under four characters will
be denied.
Pow Save
Mode
Time to Power
Save
Choose to use the power saving mode.
Choice: On, Off
Select to enter power saving mode after the
machine has stopped using for a specific period.
Choice: Off, 5, 15, 30, 60, 240 minutes.
Standby Timer Choose the amount of time to return to ready
mode from power saving mode.
Choice: 20, 40, 60, 120, 180 seconds.
Language Choose the language you prefer to show in the
LCD-display.
Choice:
Eng/Fra/Ita/Spa/Ger/Por/Dut/Dan/Swe/Nor/Gre
Scan To Log
Print the network scan log report.
Report
Printing
3-
Page 83

0
Creating Your E-mail Address Book
You can use the homepage of the AM6120 or the bundled software
application, Network Setup Tool to create your address book.
For more information on how to use the Network Setup Tool, please
refer to the online help of the Network Setup Tool software
application.
Creating Your Address Book By the homepage of
AM6120
1. Start your browser such as Netscape Communicator 6.0 or higher,
or Microsoft I.E. 5.0 or higher.
2. Enter IP address of the AM6120 in the URL address, the following
homepage appears. (For example, http://10.1.21.132)
3-1
Note:
It is recommended to use 1024 x 768 dpi to view the homepage.
Operation
Page 84

3. Click Adminstrative Settings to prompt the login dialog. For
security, please enter your password. (Up to 8 digits or
characters are allowed and the password is case sensitive.)
4. The Address Book Manager dialog box appears. Click New to
prompt an “Add a new e-mail” dialog box.
3-11
Page 85

2
5. Enter name and e-mail address and click OK to complete.
Note:
You can choose “Group” and then “Add a New Group Set”, to create
a group which contains up to 50 e-mail addresses. Refer to the
following “Add a New Group Set” dialog box to enter group name.
To insert members, please choose the e-mail address list from the
right side and then click
address from the right and click Æ to delete.
Å. To delete members, please choose the
3-1
Operation
Page 86

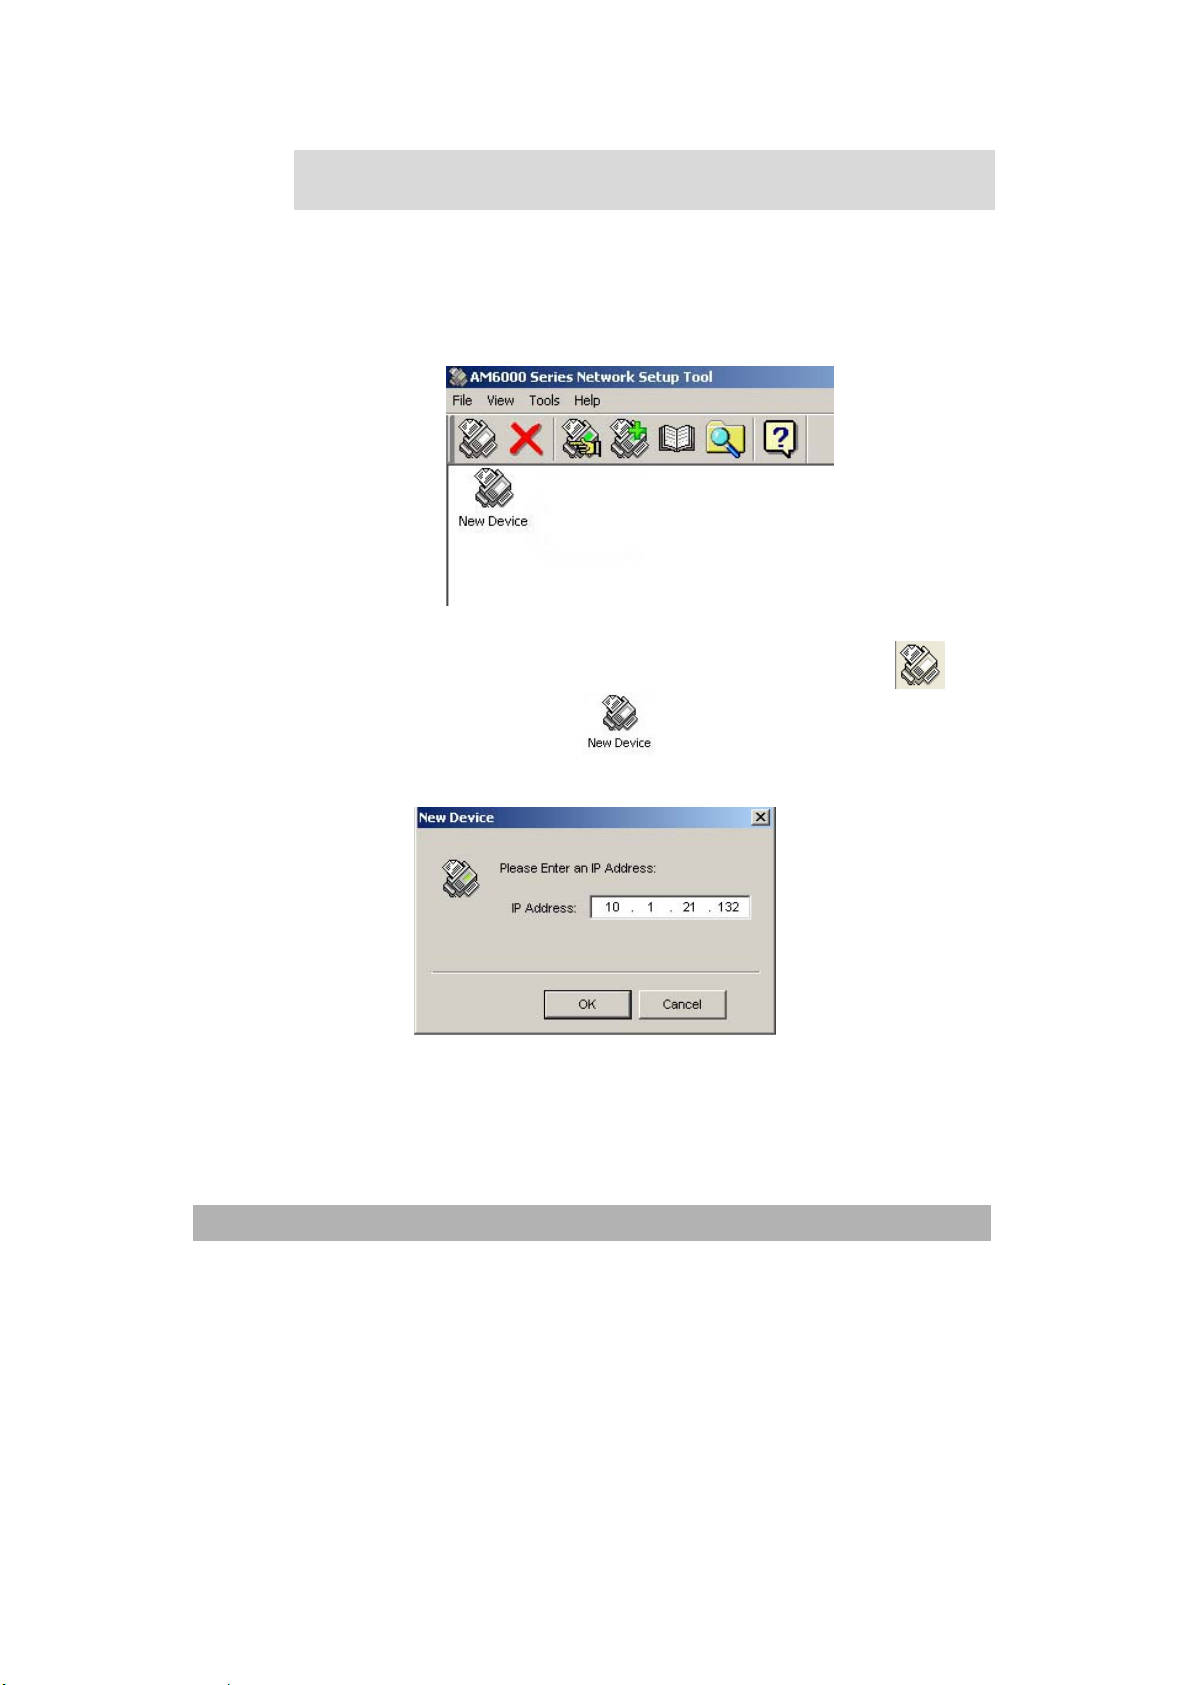
Creating Your Address Book By Network Setup
Tool
1. Start Network Setup Tool from your program folder.,The main
window appears as below. (If you have not installed the
software yet, please install from the supplied CD-ROM.)
2. Choose New Device from the File menu or click
Tool bar or click
window. The following dialog will appear.
3. Type the IP address of the AM6120 and click OK. The new
device will be shown in the main window.
from the icon in the empty area of the
from the
3-13
Page 87

4. You may enter the Address Book Manager from the following
ways:
a. Choose Address Book from the Tools menu.
b. Click
c. Right click and choose Address Book Manager.
5. Click
add a new email address. The New email dialog box appears.
or “Add a new email” from the Address Book menu to
from the tool bar.
3-14
Operation
Page 88

5
6. Enter a new email address and name and then click OK to
complete.
Note:
For effective, you can create a new group to send your email
simultaneously to multiple receipients (up to 50 individual email
addresses can be set up in one group). You can choose Add a new
group from the Address Book or click
from the tool bar to
prompt the New group dialog box as illustrated. You can choose one
address from the left side and click “Add” to insert the address in the
group.
3-1
Page 89

6
Creating Your Filing Profile (Destination)
To send the scanned image to a filing destination, it is necessary to
set up a few frequently used filing destinations. You can use the
homepage of the AM6120 or the supplied Network Setup Tool to set
your filing profiles (destination). The filing profiles include your
filing protocol, directory, file name, and other scanning settings for
your scanned image.
Note that you can use only the home page of this machine or the
Network Setup Tool to create your filing profiles. It is not allowed
to use the control panel to create your filing profiles. About how to
use the Network Setup Tool, please refer to the online help of the
Network Setup Tool.
Creating Your Filing Profile (Destination)By the
Homepage of the AM6120
1. Start your browser such as Netscape Communicator 6.0 or above
or Microsoft I.E. 5.0 or above.
3-1
2. Type the IP address of the AM6120 in the URL address. The
following homepage appears.
(For example, http://10.1.21.132)
Note:
It is best viewed the homepage with resolution of 1024 x 768 dpi.
Operation
Page 90

7
3. Choose “Profiile Manager” from the Administrative Setting. A
login dialog box appears. Type your password up to 8 digits or
characters. Note that the password is case sensitive.
4. The following Profiel manager dialog box appears. Click “New” to
add a new profile.
5. The following New Profile dialog appears. Enter your filing
protocol, file name, and other scan settings and click OK to save
the settings. (Refer to the following page on how to set these
settings.)
3-1
Page 91

Items Description
Profile
name
The name of your profile. The name will show in
the LCD display after pressing the “FTP address”
key.
Protocol Choose the protocol you desire to store your
scanned image. Choice: *FTP, *HTTP, *CIFS,
*AVPP
Target URL Enter the directory for the scanned document. Note
that the directory is different due to the protocol.
The route starts from the root directory in FTP,
HTTP, and CIFS. Choice: ftp://, http://. File:\\,
AVPP://
Port If your port number for the protocol is different from
the default, please enter your port number in this
field. Default settings: FTP:25, HTTP:80,
CIFS:139, AVPP:80
User name The login name of your filing protocol.
Password The password for your filing protocol.
File name Enter file name for the scanned image.
Or you may enter #n to let system name your file.
( n represents 5 seriel numbers.)
Color
output
format
File format for documents to be sent in colors via
filing from @V5100. Default setting: PDF(file
format), Low (compression rate)
Choice:
1. File format: PDF, JPG, TIF, MTIF (Multi-page
TIF)
Note: Choose MTIF or PDF when you need to
scan multi-page document and convert it to a
single image file.
2. Compression rate: Low, Medium, High
3-18
Operation
Page 92

B&W
Output
Format
File format for documents to be sent in black and
white via filing from @V5100. Default setting:
Multi-level B&W: No, File format: PDF,
Compression rate: Low, Background remove:
No, Document type: Text
Choice:
1. Multi-level B&W(Gray): Yes, No
2. File format: PDF, PCX, MTIF, TIFF
3. Compression rate: Low, Medium, High
4. Background remove: Yes, No
5. Document type: Text, Photo, Mixed
Resolution Choose the scanning resolution for the scanned
document from a selection of 75, 100, 150, 200,
300, 400, 600 dpi. A higher resolution reproduces
your image with greater details yet it requires more
disk space.
Density Choose the density level. Choic e: 1,2,3, 4,5,6 ,7.
/ Default setting: Density: 4
Subfolder Choose Yes if you wish to establish a subfolder.
Choice: Yes, No / Default setting: No
Report to
e-mail
Enter your e-mail address here if you wish to send
the filing report to your e-mail. In this e-mail, you
will receive a URL link to the server where your
scanned document resides.
Document
Default: A4 Choice: A4, Letter, Legal
size
3-19
Page 93
0
Creating Your Filing Profile (Destination) By the
Network Setup Tool
1. Start Network Setup Tool from your programs. The following
main window appears. (If you have not installed the software
yet, please install from the supplied CD-ROM.)
3-2
2. Choose Add a new device from the File menu. Or click
from the tool bar or click
of the window. The following New Device dialog box appears.
Operation
from the icon in the empty area
Page 94

3. Enter the IP address of your AM6120 and click OK. The new
device will appear in the window as below.
4. You may access the following Profile Manager in one of these:
a. MenuÆ ToolsÆProfile Manager.
b. Tool barÆ
c. Right click your mouseÆProfile Manager.
。
3-21
Page 95

2
5. To add a new profile, choose Add a new profile from the
Profile menu or click
from the tool bar.
6. Enter your filing destination, file name, and other scan
settings and click OK to complete. (You may refer to the
preceeding section about how to set these settings.)
3-2
Operation
Page 96

Explanation of Filing Protocol
FTP
FTP stands for "File Transfer Protocol." It is a common method
of transferring files via the Internet from one computer to
another. FTP use RFC 959[FTP] as their protocol. Therefore,
please make sure you have legal FTP account with the privilege
of writing under the directory to save the files and the password
before using FTP to save the files. To add a sub-directory from
the AM6120, you need to have the privilege of adding a new
directory.
HTTP
HTTP use RFC 2616[HTTP 1.1] as their protocol, and the default
Port is usually 80. If you are not using the HTTP port to save
the files, you must change the HTTP Port AM6120 to the port
for the Web Server.
Generally speaking, Web Server, such as IIS or the other HTTP
server, will use anonymous account for authentication, so that
the user can link directly to the web page without entering the
user name and password first. Hence, if the HTTP Server allows
anonymous account for authentication when you use the
AM6120 to keep the files, there is no need for setting any text
in the field of Login name and Password of the AM6120.
On the other hand, if IIS or HTTP server does not allow
anonymous account for authentication connecting to the web
page, the user will be prompted to enter the user name and
password first while connecting to the web site. In this mode,
3-23
Page 97

the file saving feature is available only when entering the user
name and password permitted by the server in the field of Login
name and Password for the AM6120 respectively.
Therefore, please make sure the mode that your Web Server
allows before using HTTP for files saving. If anonymous access
mode is not allowed, you must have legal HTTP account and
password.
Since the AM6120 will check whether the directory for file
saving really exists before proceeding file saving and then
writing the file after scanning to the specified directory, you
have to set the directory for files saving as "browse" and allow
for writing in Web Server; otherwise, the AM6120 will not be
able to write the file into the directory.
If you wish to use the AM6120 to save files, in addition to
3-24
making some settings in Web Server, you will have to confirm
the account with the privilege of writing for connecting Web
Server; otherwise, the AM6120 will not be able to "write" the
scanned file in the file system.
The setting for IIS anonymous access is as below:
1. Start "Internet service manager" in "Control Panel", select
"Default Web site" and right click C:\Inetpub\wwwroot\X
cabinet, and select "Properties ".
Operation
Page 98

5
2. In the X cabinet dialog box, select "Directory security" tab,
and click "Edit" for " Anonymous Access and Authentication
Control". Please make sure " Anonymous Access" is selected
in "Authentication Methods" dialog box.
3. Click on "Edit" to open "Account for anonymous access".
3-2
Page 99

6
Please make sure that the account, stored in your computer
system, in the "username" filed is with sufficient privilege to
access the file system.
The setting for IIS privilege is as below:
Like the setting in anonymous access, start "Internet service
manager" and select "Default Web site", and right click
C:\Inetpub\wwwroot\X cabinet, and select "Properties ".
Select "Directory" tab in the Properties page. Please ensure the
privileges for "Read", "Write" and "Directory Browsing" are
selected.
3-2
Operation
Page 100

7
If the file management system in your server is NTFS, in order
to allow IIS to use an anonymous account to access the files in
the directory of C:\Inetpub\wwwroot\X cabinet\Files, you have
to make sure the anonymous account is with sufficient privilege.
You may make the following settings:
Select C:\Inetpub\wwwroot\X cabinet\Files directory in Windows
Explorer, and right click to select "Properties".
Select "Security" tab in the File dialog box, and select
"Everyone". Select the privileges for "Read and Execute",
"Folder Properties List", “Read" and "Write".
After that "every user" has the privilege to manage all files in
the directory of files saving.
Note: For the actual security concern of the scanned files, we
should not allow the group of “Everyone” to have full privileges
of the file directory. Therefore, when setting the access privilege
for your file system, it is recommended to set the privilege of
the directory for file saving to IIS anonymous account or the
other users and groups that can use the directory only.
3-2
 Loading...