

AVer FD2020-1 User Manual
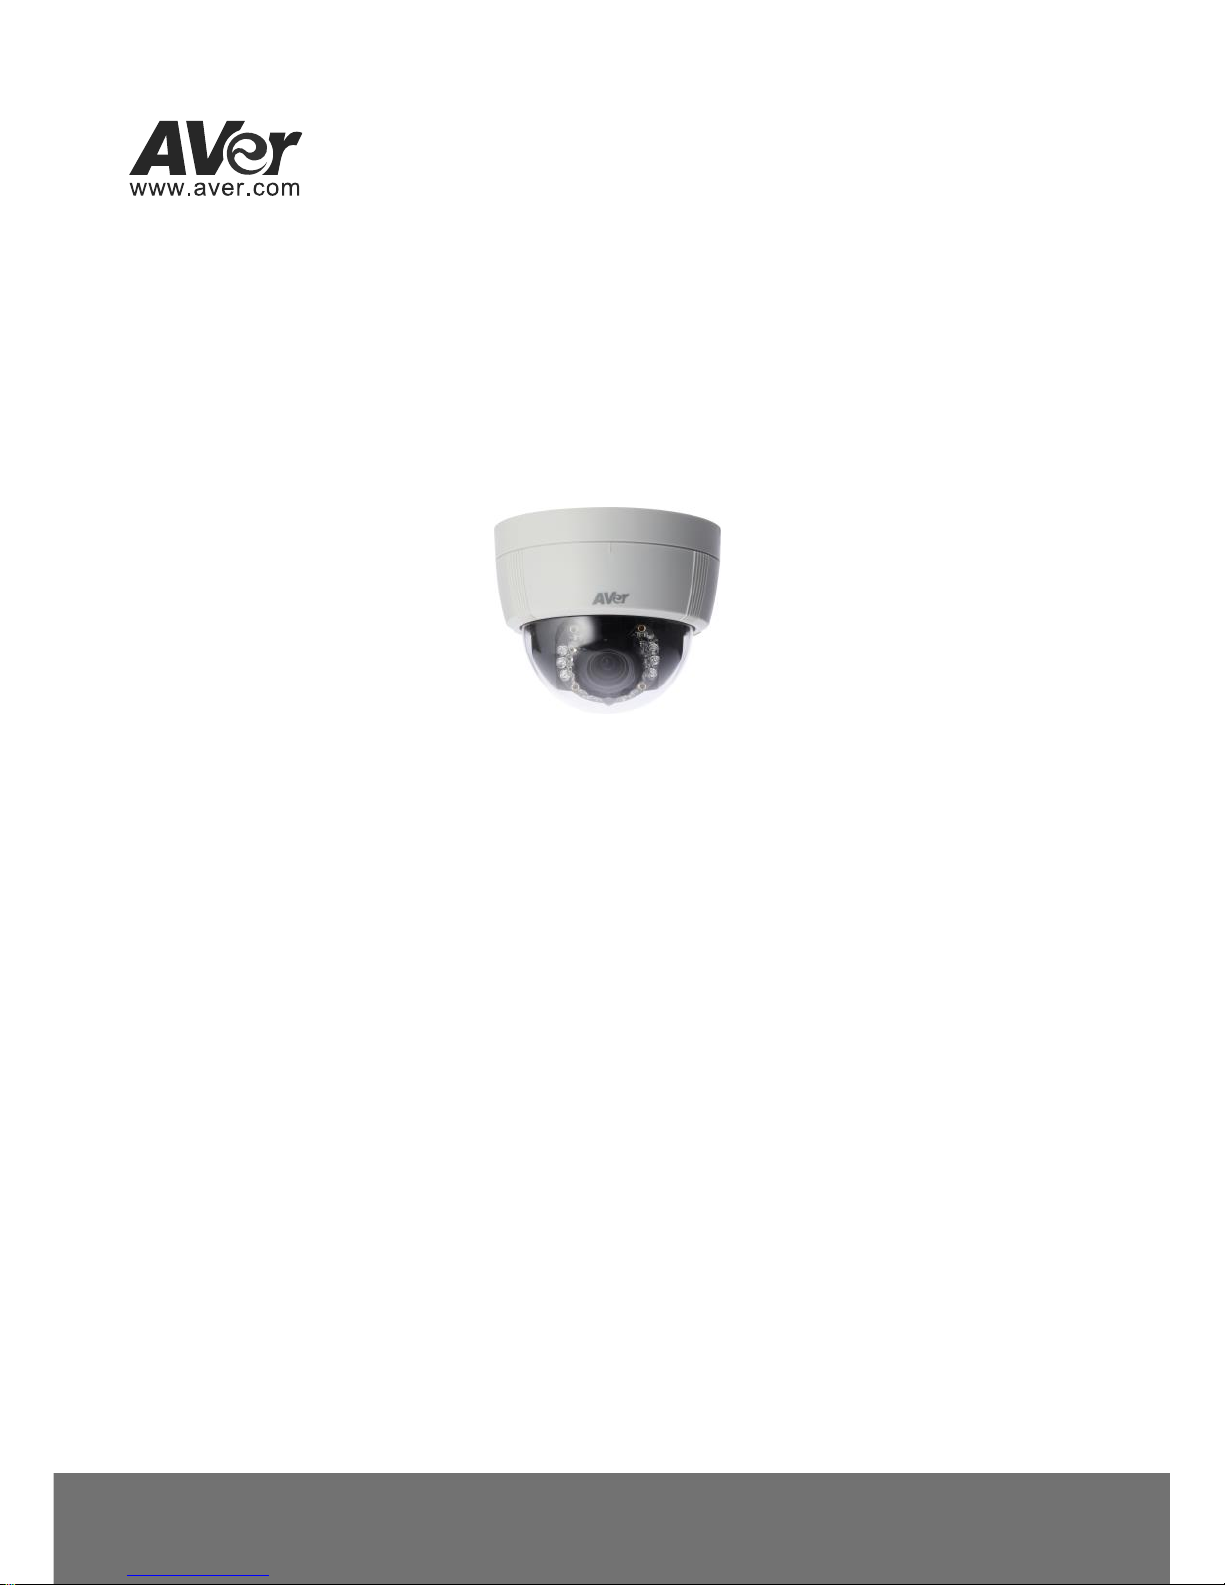
AVer FD2020-1
User Manual

Table of Contents
PRODUCT SPECIFICATIONS ............................................................................................. 1
PACKAGE CONTENTS ....................................................................................................... 5
PRODUCT INSTALLATION ................................................................................................. 6
MONITOR SETTING ............................................................................................................. 6
HARDWARE INSTALLATION.................................................................................................... 7
POWER OVER ETHERNET (POE) ........................................................................................ 10
IP ASSIGNMENT ................................................................................................................ 11
FINDING IP CAMERA BY USING “NXU LITE RECORDING SOFTWARE”........................................ 11
FINDING IP CAMERA BY USING “AVER IPCAM UTILITY” ......................................................... 14
USING NON-DHCP SERVER/ROUTER NETWORK ................................................................ 16
INSTALL ACTIVEX CONTROL ............................................................................................... 18
USING THE IP CAMERA BROWSER INTERFACE .......................................................... 20
PREVIEW ......................................................................................................................... 20
SYSTEM > GENERAL ......................................................................................................... 23
SYSTEM > GENERAL > MAINTENANCE ................................................................................. 23
To Upgrade the IP Camera Firmware ....................................................................... 24
SYSTEM > GENERAL > DATE & TIME ................................................................................... 25
SYSTEM > USER MANAGEMENT ......................................................................................... 26
SYSTEM > USER MANAGEMENT ......................................................................................... 26
SYSTEM > NETWORK SETTING > SETTING ........................................................................... 28
SYSTEM > NETWORK SETTING > SEVER ............................................................................. 29
SYSTEM > NETWORK SETTING > DDNS ............................................................................. 30

SYSTEM > NETWORK SETTING > OTHER 1 .......................................................................... 32
SYSTEM > NETWORK SETTING > OTHER 2 .......................................................................... 34
SYSTEM > NETWORK SETTING > IPV6 ................................................................................ 38
SYSTEM > ADVANCE > HTTPS .......................................................................................... 39
SYSTEM > ADVANCE > SNMP ........................................................................................... 41
SYSTEM > ADVANCE > ACCESS LIST ................................................................................... 43
SYSTEM > ADVANCE > QOS/DSCP ................................................................................... 44
SYSTEM > IMAGE ................................ ................................ .............................................. 45
SYSTEM > IMAGE> OSD ................................................................................................... 45
SYSTEM > IMAGE > PREFERENCE ....................................................................................... 46
SYSTEM > IMAGE> ADVANCED ........................................................................................... 47
SYSTEM > IMAGE> PRIVACY MASK ..................................................................................... 49
SYSTEM > VIDEO STREAM > GENERAL ............................................................................... 50
SYSTEM > VIDEO STREAM > STREAM1 ............................................................................... 53
SYSTEM > VIDEO STREAM > STREAM2 ............................................................................... 55
SYSTEM > VIDEO STREAM > STREAM3 ............................................................................... 57
SYSTEM > AUDIO .............................................................................................................. 58
SYSTEM > SD CARD ................................................................ ......................................... 59
EVENT > ARRANGEMENT > MOTION .................................................................................... 60
EVENT > ARRANGEMENT > PREFERENCE ............................................................................ 61
EVENT > SCHEDULE ......................................................................................................... 64
STATUS INFORMATION ....................................................................................................... 66
NETWORK CONFIGURATION .......................................................................................... 67

FACTORY DEFAULT ......................................................................................................... 69
TROUBLESHOOTING ....................................................................................................... 70
APPENDIX ......................................................................................................................... 71
FCC NOTICE (CLASS A)................................................................................................... 72
COPYRIGHT ...................................................................................................................... 72
NOTICE .............................................................................................................................. 72
WARNING .......................................................................................................................... 72
LIMITED WARRANTY ....................................................................................................... 73
LIMITATIONS OF WARRANTY ......................................................................................... 73
DISCLAIMER OF WARRANTY ......................................................................................... 73
LIMITATION OF LIABILITY ............................................................................................... 74
GOVERNING LAW AND YOUR RIGHTS .......................................................................... 74

1
Product Specifications
Full HD 1080P Real Time
3D+2D Digital Noise Reduction
Power over Ethernet (PoE)
H.264/MJPEG Compression
SD card backup (SD card is not included)
2-way audio
Digital Wide Dynamic Range
Power over Ethernet Available
SDK for software integration
IR LED Built-in 15M Available
Free bundled 32-CH AVer NXU Lite recording software

2
Specifications
Hardware
CPU
Multimedia SoC
RAM
256MB
Flash
16M
Image sensor
1/2.7” Megapixel CMOS Sersor
Mini. illumination
Color : 0.06 Lux @ F1.4
B / W: 0 Lux @ F1.4(IR LED on)
Lens type
Vari-focal Lens 2.8~12mm @F1.4
View Angle
99°(W)~37.1°(T) Horizontal
53°(W)~20.9°(T) Vertical
I/O
1 DI / 1 DO
Audio
G.711(64K) and G.726(32K,24K) audio compression
Input : External Audio in
Output: External Line Out
Power Over Ethernet
Yes
Power Consumption
DC 12V Max: 3.96W(IR ON), 2.52W(IR OFF)
PoE Max: 5.28W(IR ON), 3.36W(IR OFF)
Operation Temperature
0°C ~ 45°C
Dimensions
132mm ()x 108mm (H)
Weight
680g
Network
Ethernet
10/ 100 Base-T
Network Protocol
IPv6, IPv4, HTTP, HTTPS, SNMP, QoS/DSCP, Access list,
RTSP, TCP/ IP, UDP, SMTP, FTP, PPPoE, DHCP, DDNS,
NTP, UPnP, 3GPP, SAMBA, Bonjour

3
System
Video Resolution
1920x1080@30fps,1280x960@30fps,
1280x720@30fps,800x600@30fps 640x480@30fps,
320x240@30fps, 176x144@30fps
Video Adjust
Brightness, Contrast, Hue, Saturation, Sharpness, AGC,
Shutter Time, Sense-Up, D-WDR, Lens Distortion
Correction, Flip, Mirror, Red Gain and Blue Gain, De-noise,
Anti-fog
Triple Streaming
Yes
Image snapshot
Yes
Full screen monitoring
Yes
Privacy Mask
Yes, 5 different areas
Compression format
H.264/ M-JPEG
Video bitrate adjust
CBR, VBR
Motion Detection
Yes, 3 Different Areas
Triggered action
Mail, FTP, Save to SD card, Samba
Security
Password protection, IP address filtering, HTTPS encrypted
data transmission, QoS/DSCP
Firmware upgrade
HTTP mode, can be upgraded remotely
Simultaneous connection
Up to 10
Micro SD card management
Recording trigger
Motion Detection, IP check, Network break down (wire
only),Schedule
Video format
AVI, JPEG
Video playback
Yes
Delete files
Yes

4
Web browsing requirement
OS
Windows 7, XP
Microsoft® IE 8.0 or above
[Note] Please enable “Compatibility View” while using
IE 10 or above.
Hardware Suggested
Intel Dual Core 2.53G, RAM: 1024MB, Graphic card:
128MB
Mobil support
iOS 4.3 or above, Android 1.6 or above.
*SPECIFICATIONS ARE SUBJECT TO CHANGE WITHOUT NOTICE.
5
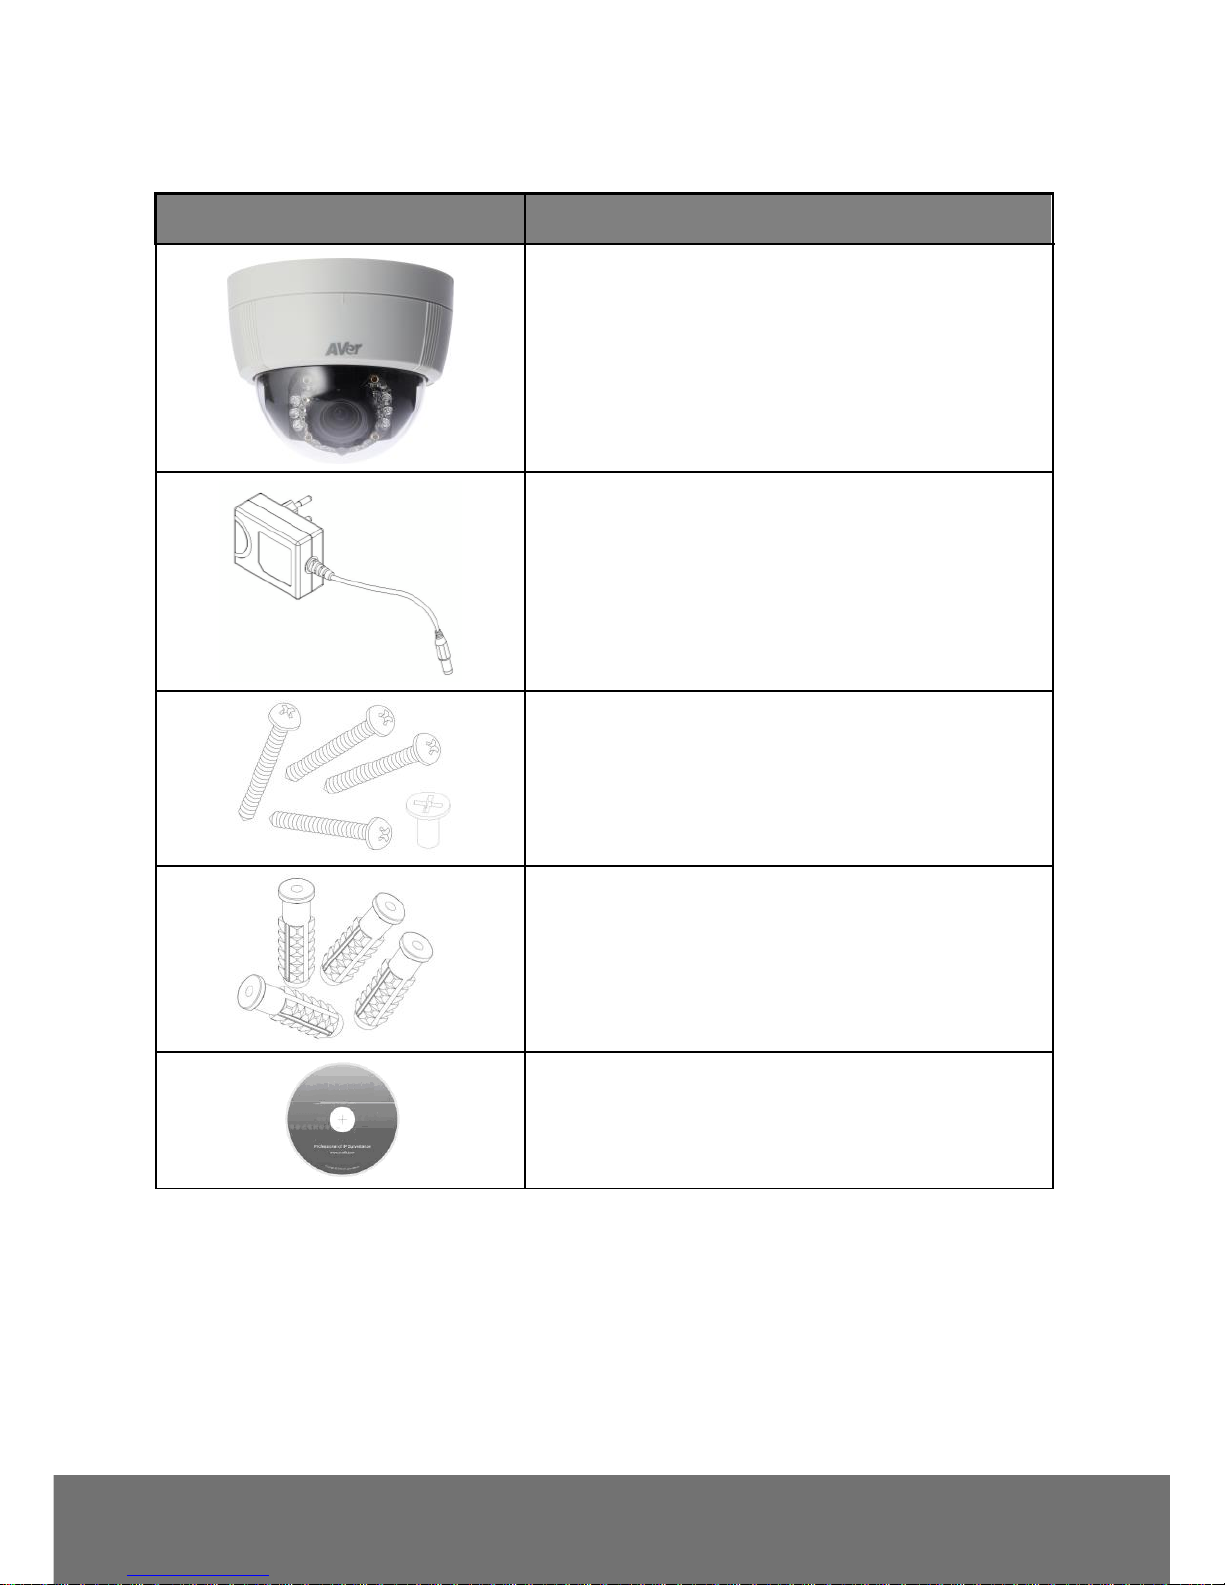
Package contents
Item
Descriptions
1. FD2020-1
2. Power adapter(option)
3. Screws
4. Wall plugs
5. CD (User’s Manual and Quick Guide, NVR
software included)
**If any of the above items are missing, please contact your dealer immediately.
6
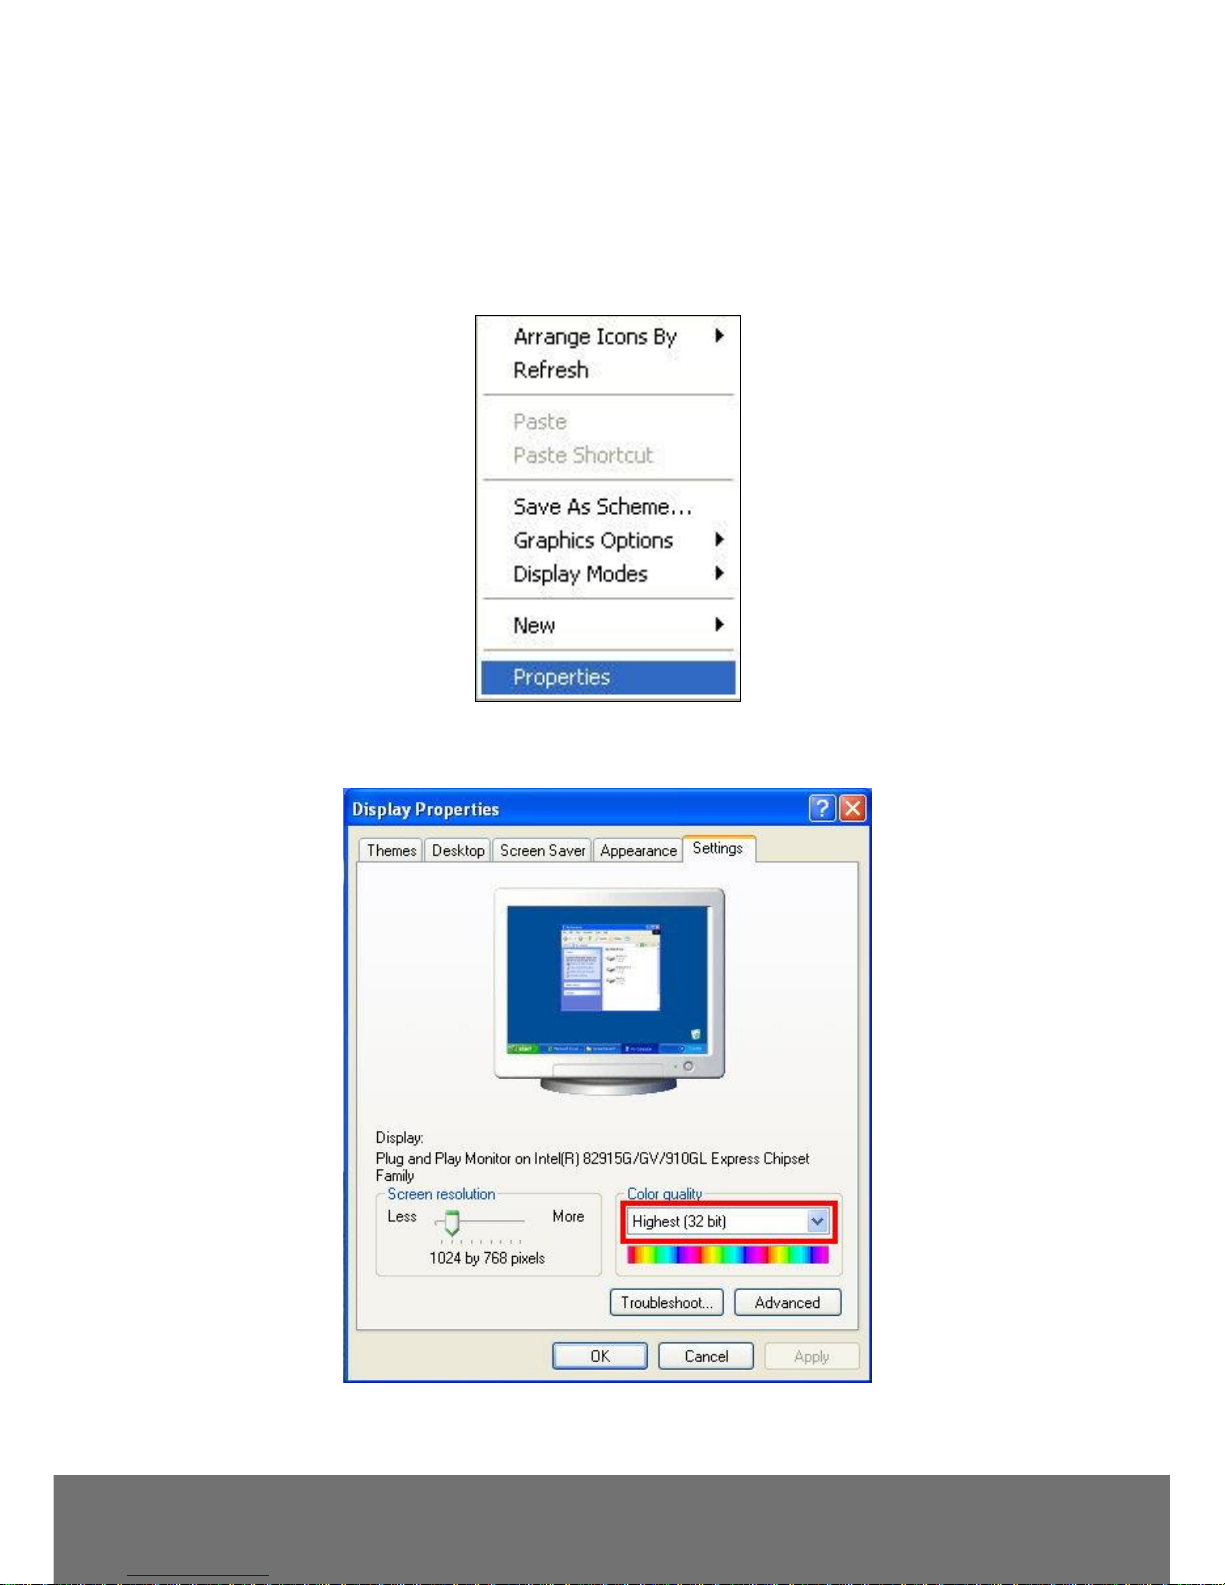
Product Installation
Monitor Setting
1. Right-click on the desktop. Select “ Properties”
2. Change “Color quality” to “Highest (32-bit)”.
7
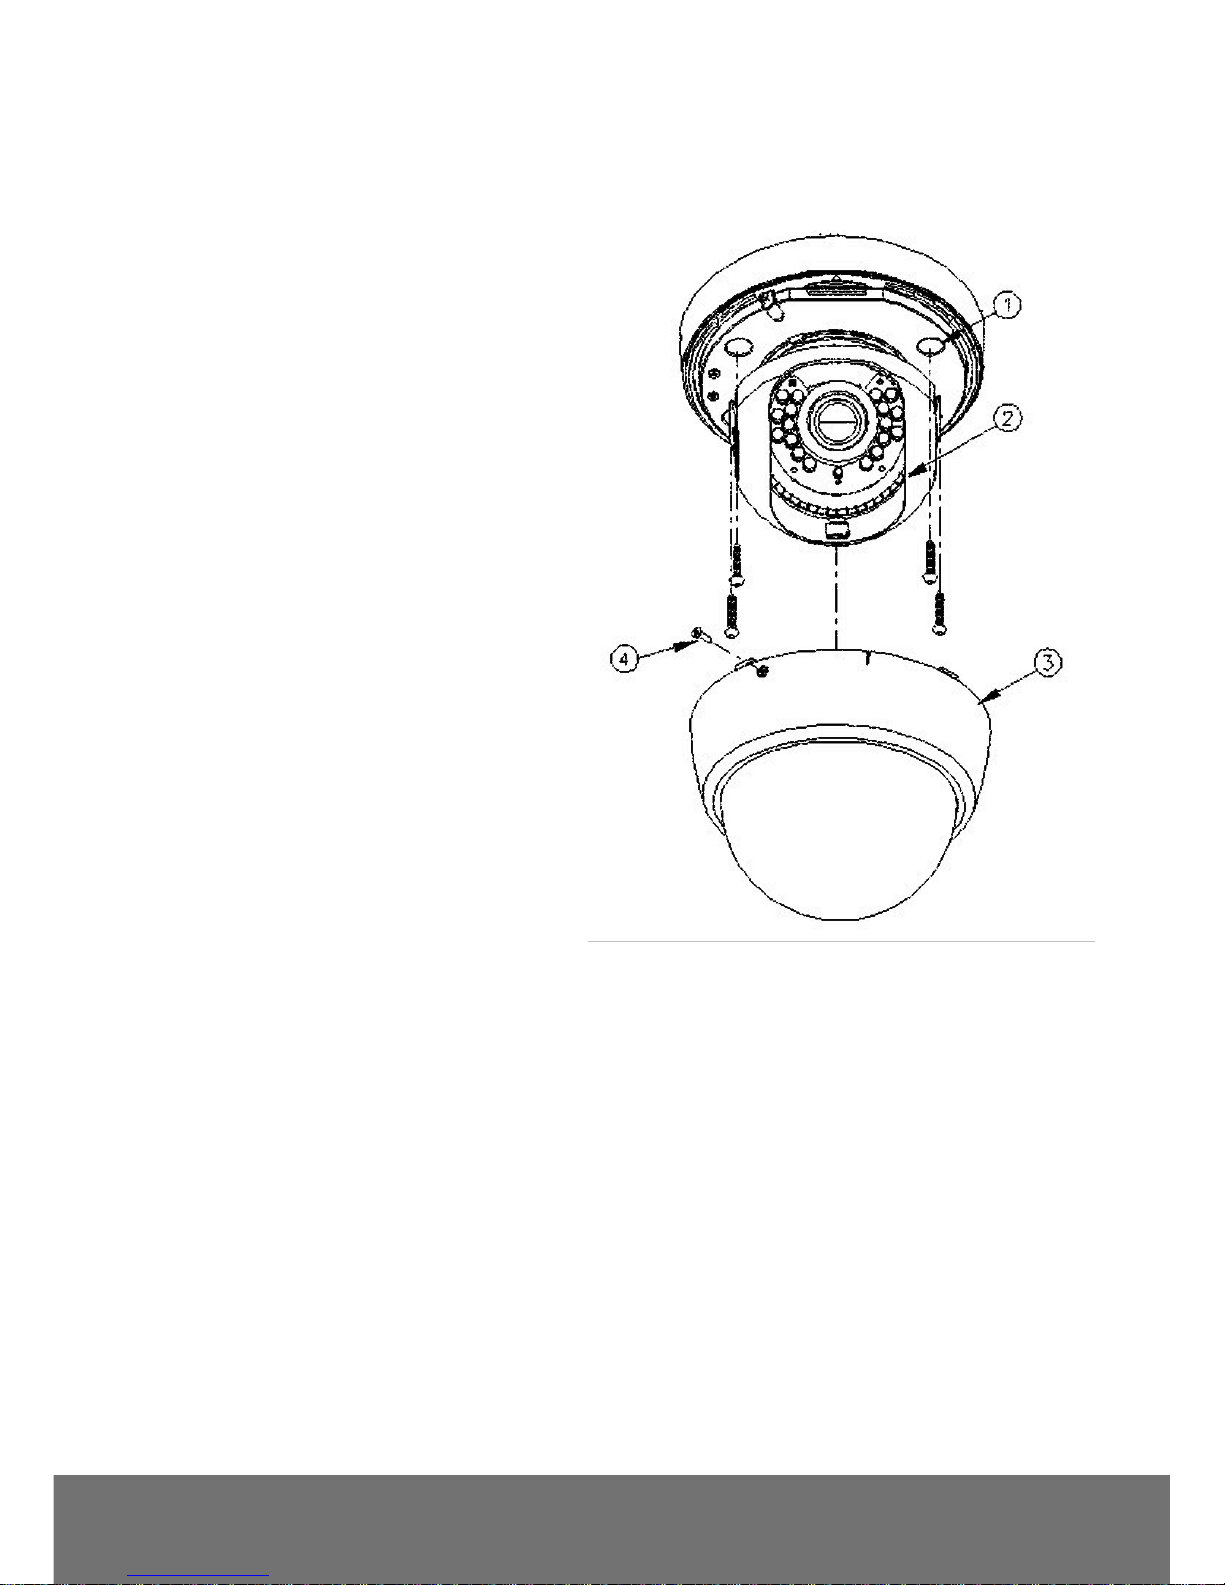
Hardware Installation
1. Dome Installation
a. Use screws to lock the bottom of camera
to the ceiling or the wall.
b. Use 3-Axis to adjust the lens angle
.
c. Close the dome cover.
d. Tighten the screw on the cover to fix it.
8
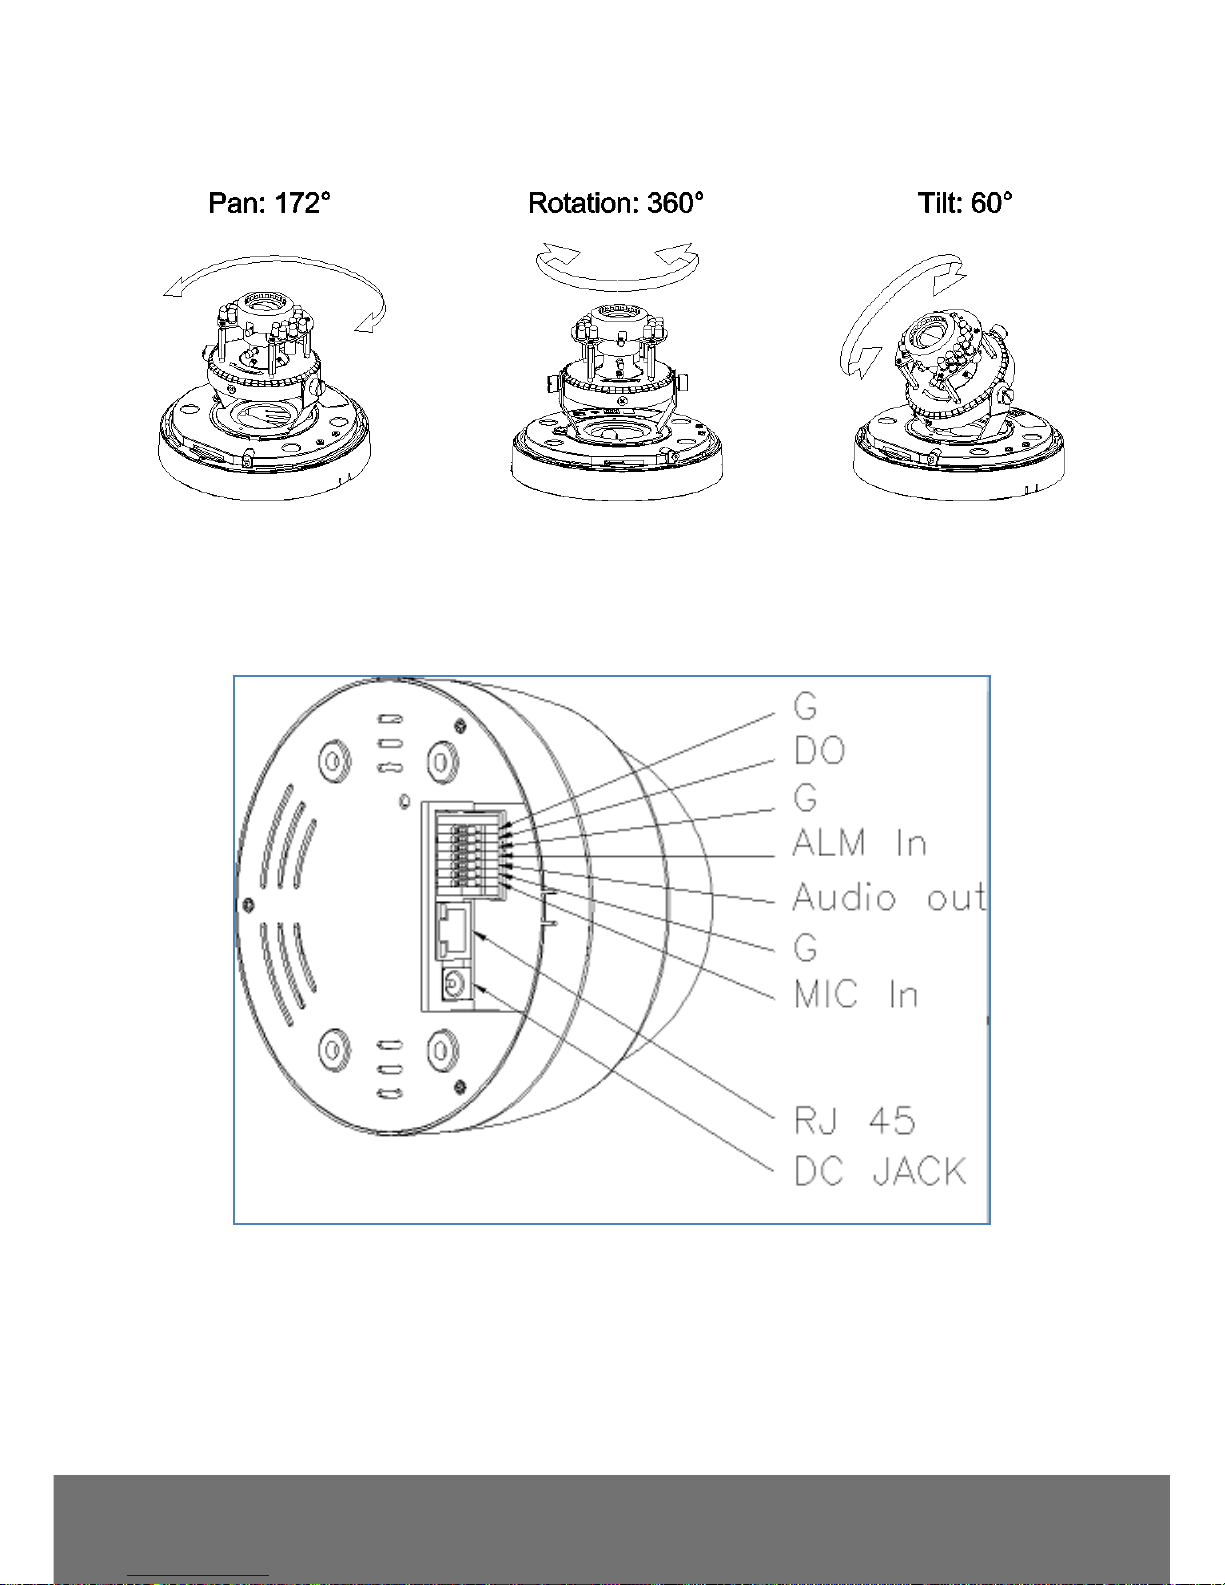
2. 3-Axis Diagram
Use the 3-Axis bracket to adjust the camera to appropriate angle.
3. Connector Instruction
The camera connectors are as below. Connect the power and the Ethernet cable with the camera, and
set it according to your network environment.
9
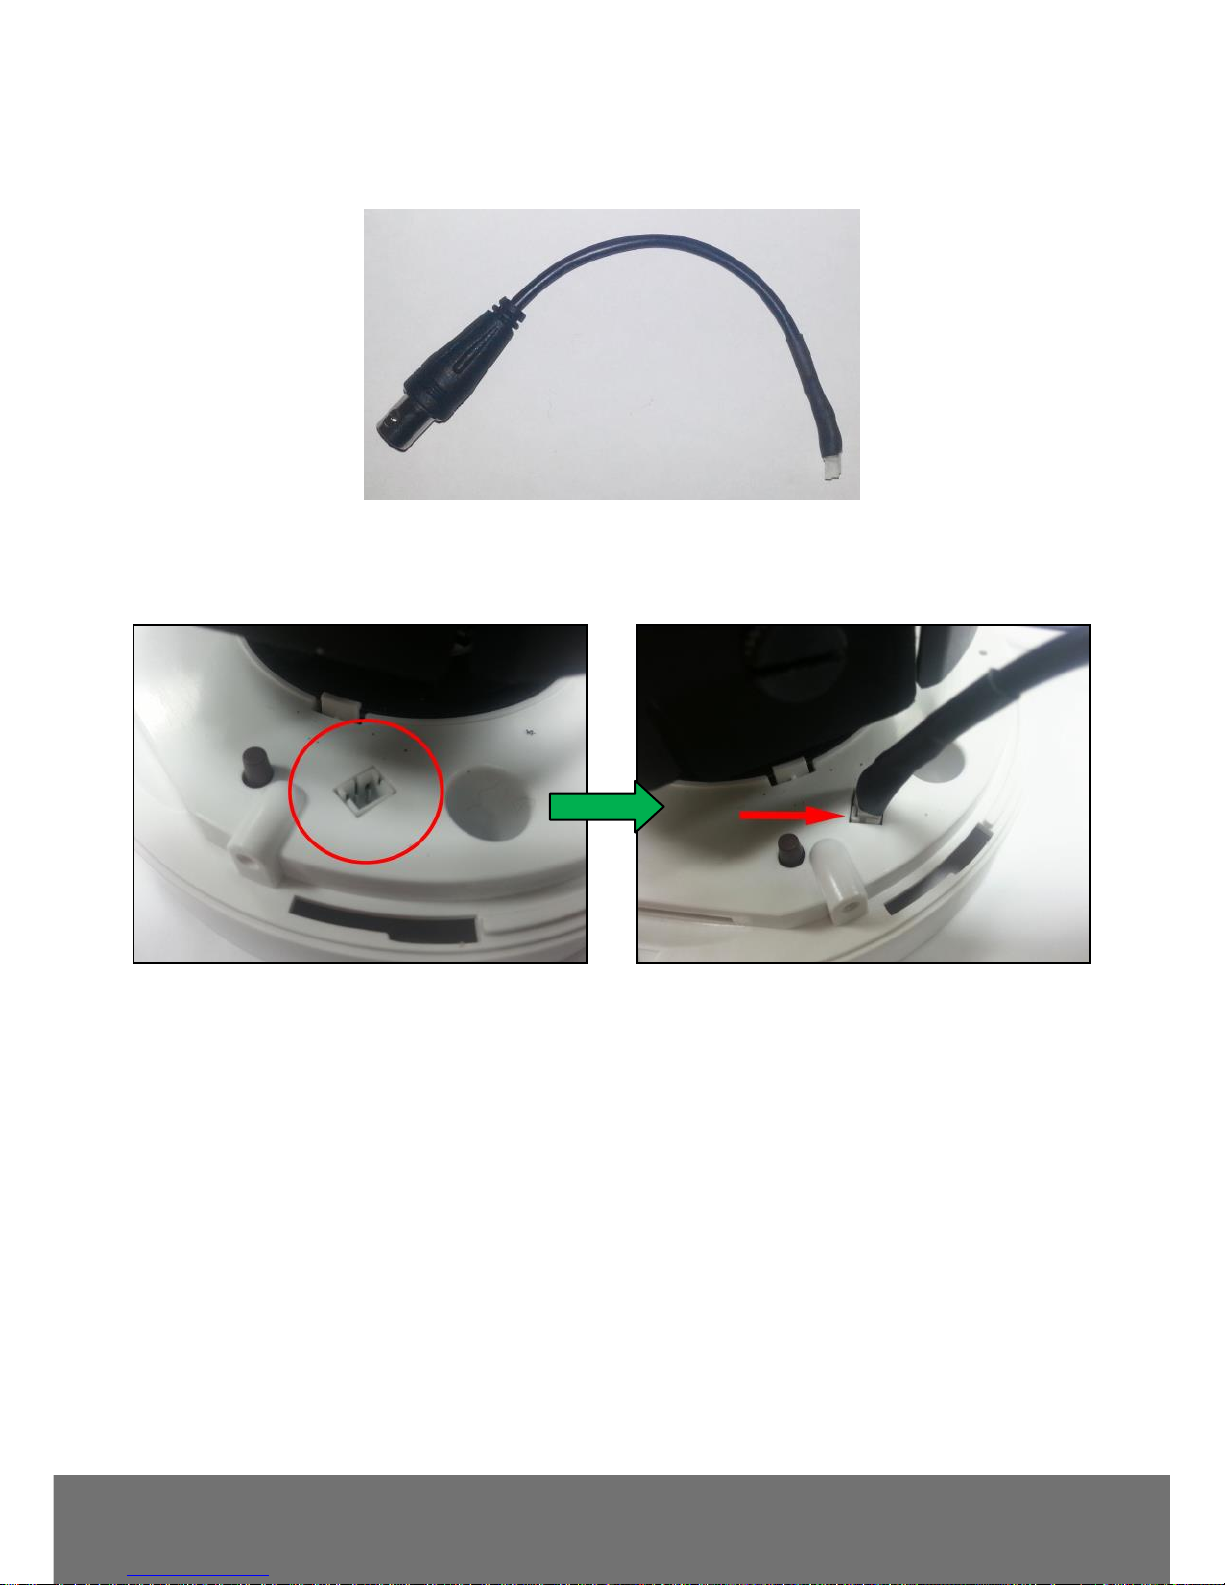
4. Video Out Connector
A Video Out connector is included in the accessories package.
Please connect the connector into the Dome base as shown in the pictures below:
[Note] TV’s resistance is 75ohm(±10%)
10
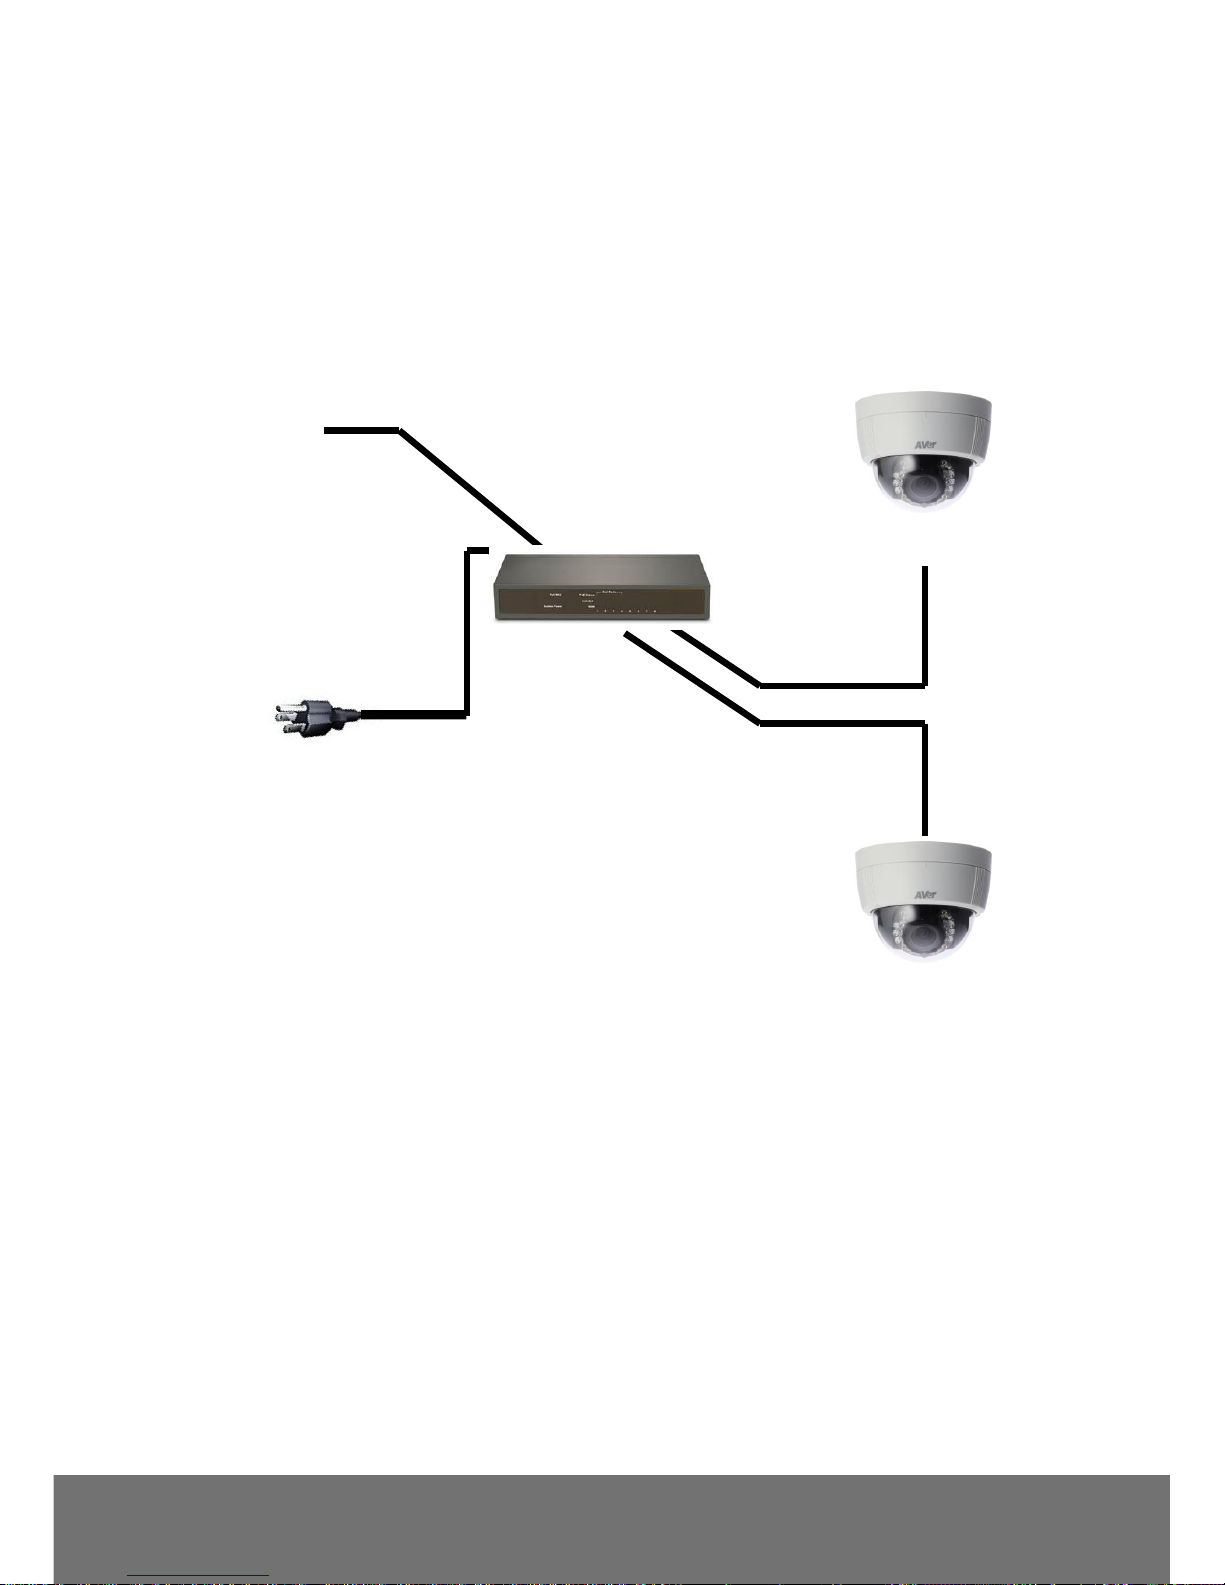
Power Over Ethernet (PoE)
Set up the IP camera through Power over Ethernet (PoE). PoE is a technology that integrates power
into a standard LAN infrastructure. It enables power to be provided to the network device, such as an
IP camera, using the same cable as that used for network connections. It eliminates the need for
power outlets at the camera locations.
[Note] 802.3af, 15.4W PoE switch is recommended.
Ethernet
PoE Switch
PoE IP Camera
PoE IP Camera
Ethernet Cable
Ethernet Cable
11
IP Assignment
There are two ways to find IP Cameras:
Finding IP Camera by using the “NXU Lite recording software”
Finding IP Camera by using the “AVer IPCam Utility”
Finding IP Camera by using “NXU Lite recording software”
1. The NXU Lite software is in the attached software CD. Before launching it, please install the
software first. During the installation process, users will be required to input a User name and
Password for login NXU Lite system. Users can define the User name and Password as desired.
Please refer to the NXU Lite user manual for detailed installation instructions.
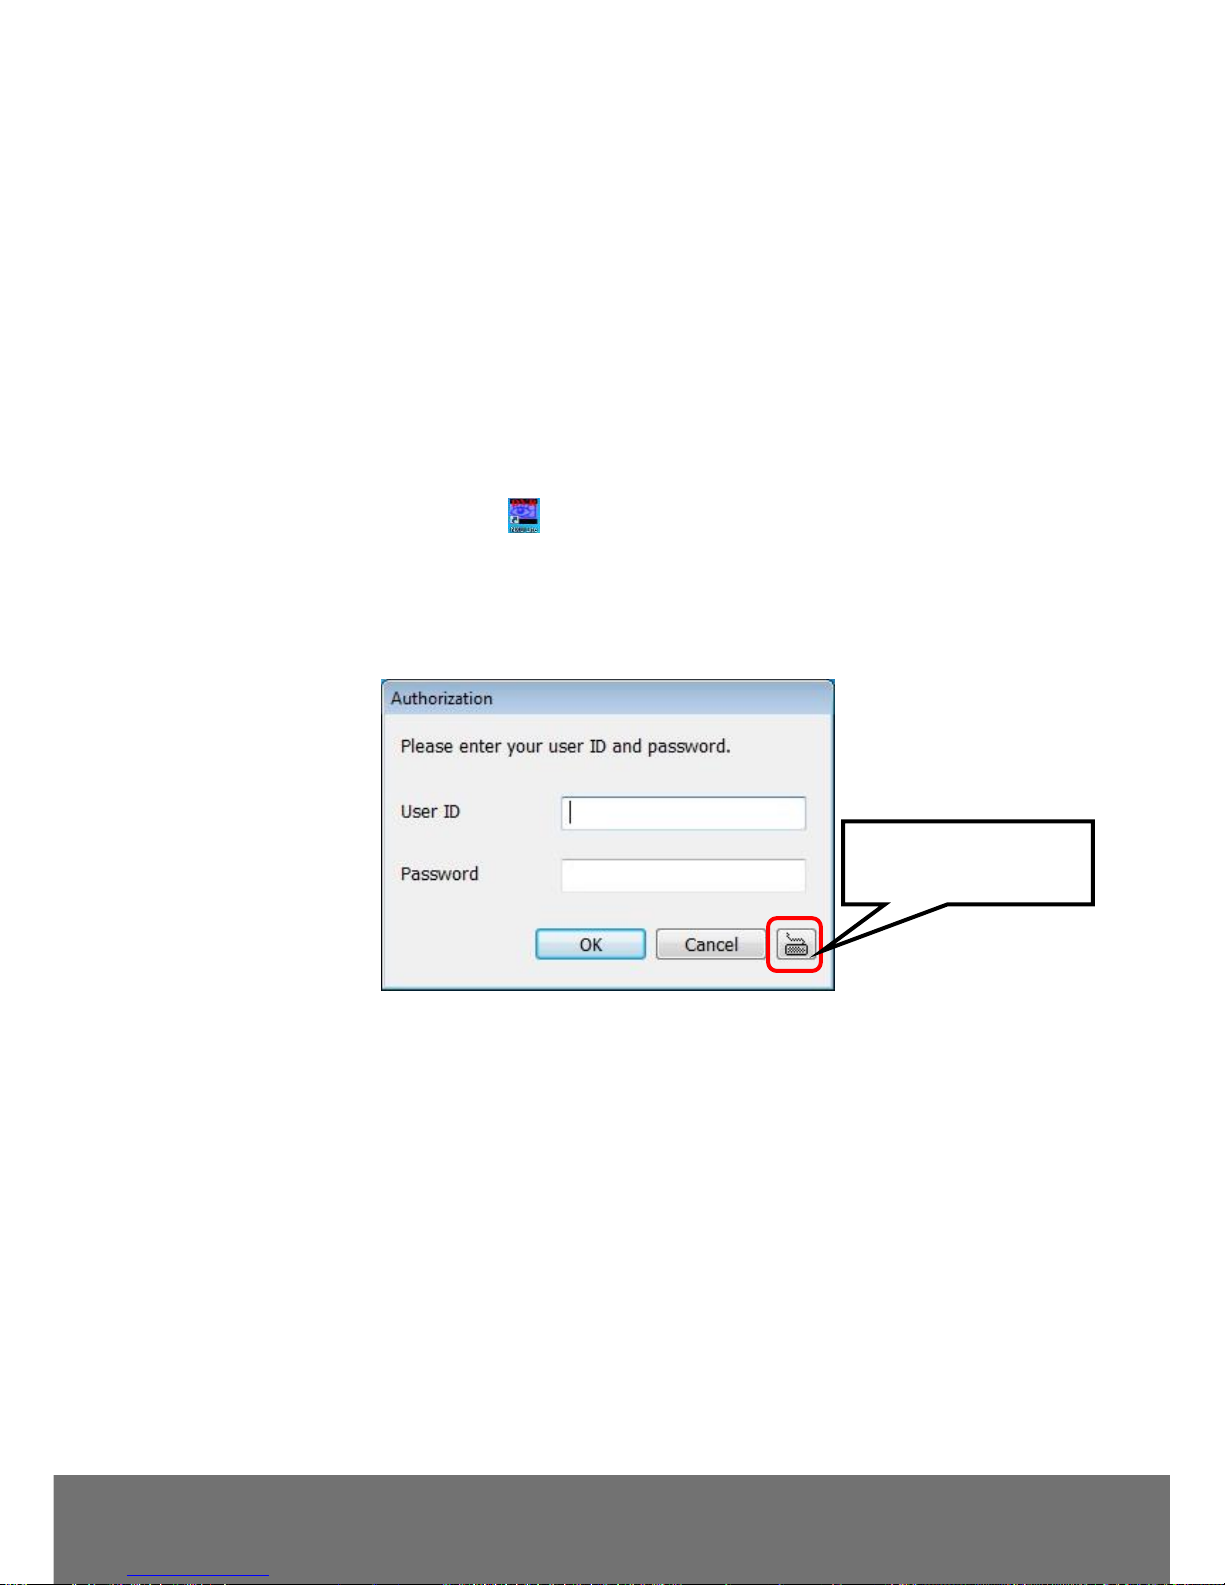
2. To run the application, double-click on your PC desktop or click Start > Programs > DVR >
NXU Lite. For security purposes, some of the features require you to enter the User name and
Password before it can be accessed. When the Authorization dialog box appears, key in your User
ID and Password. (If this is the first time, enter the one you have registered when installing the
software.
Click it to call out the
virtual keyboard.
12
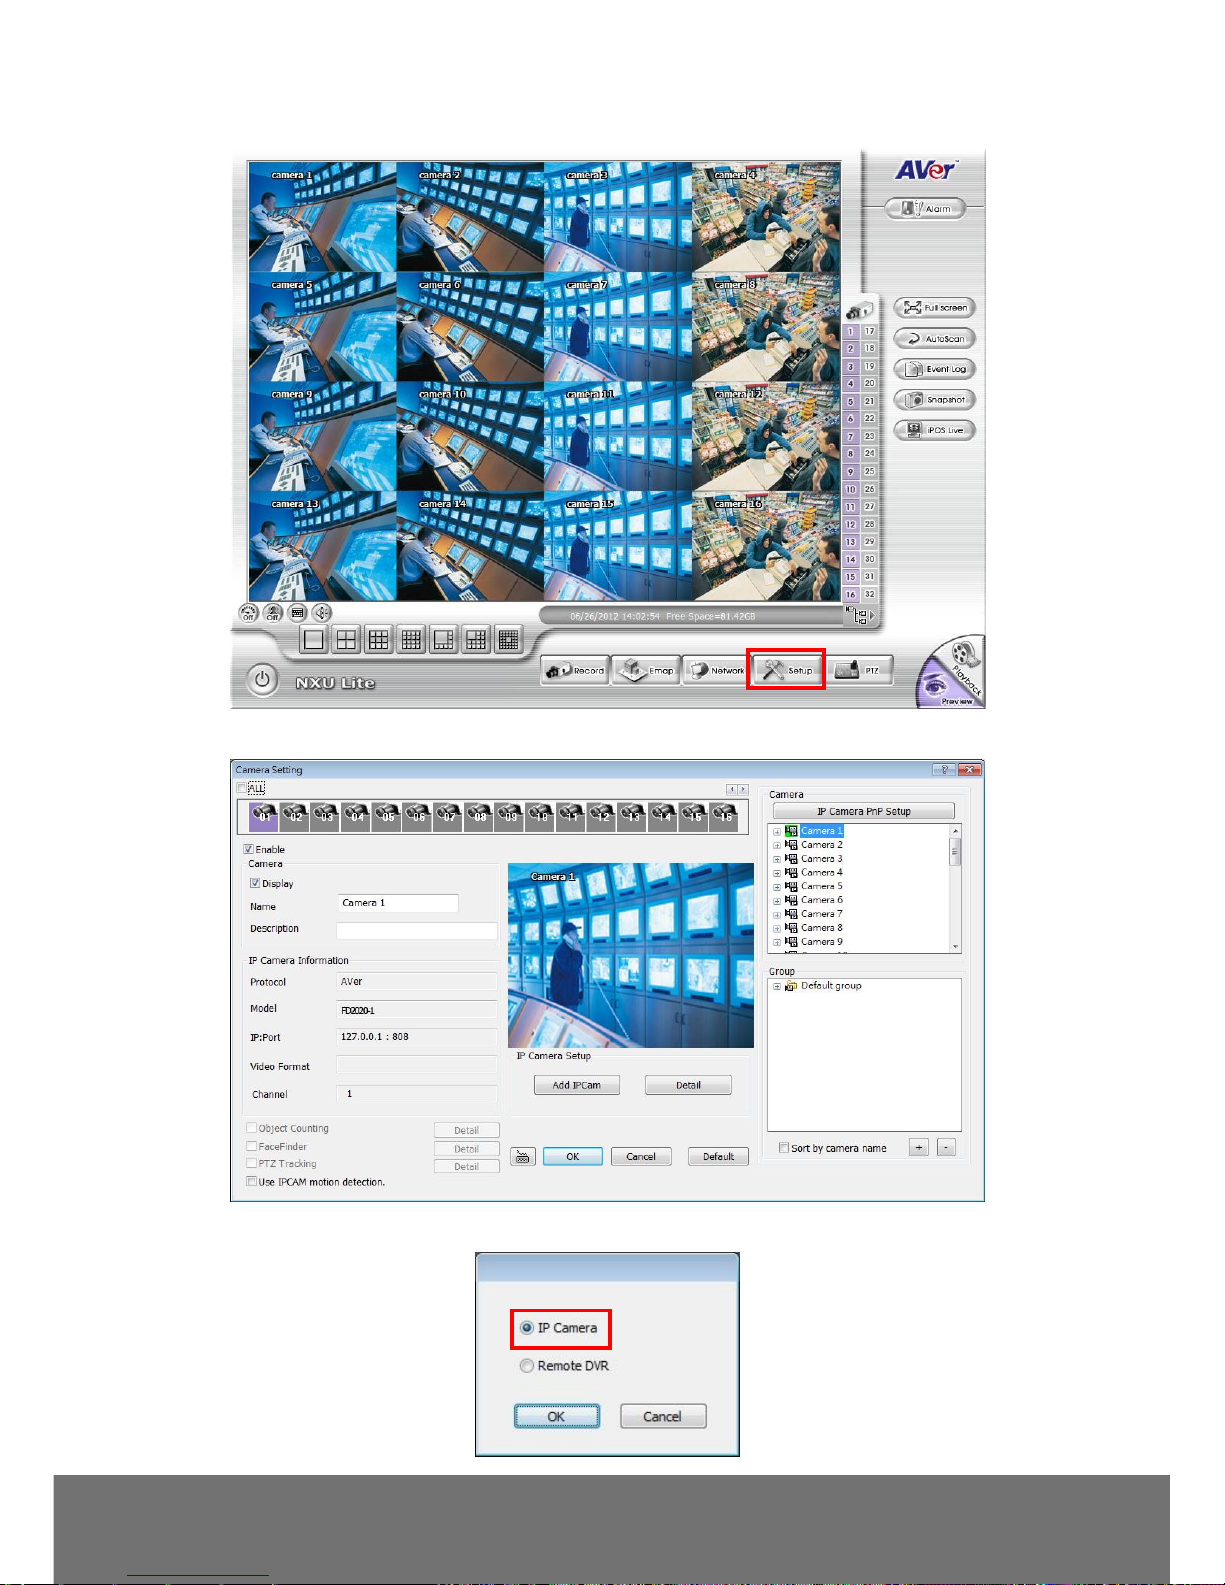
3. Click the “Setup” button.
4. Click the “Add IPCam” button.
5. Select “IP Camera” item.
13
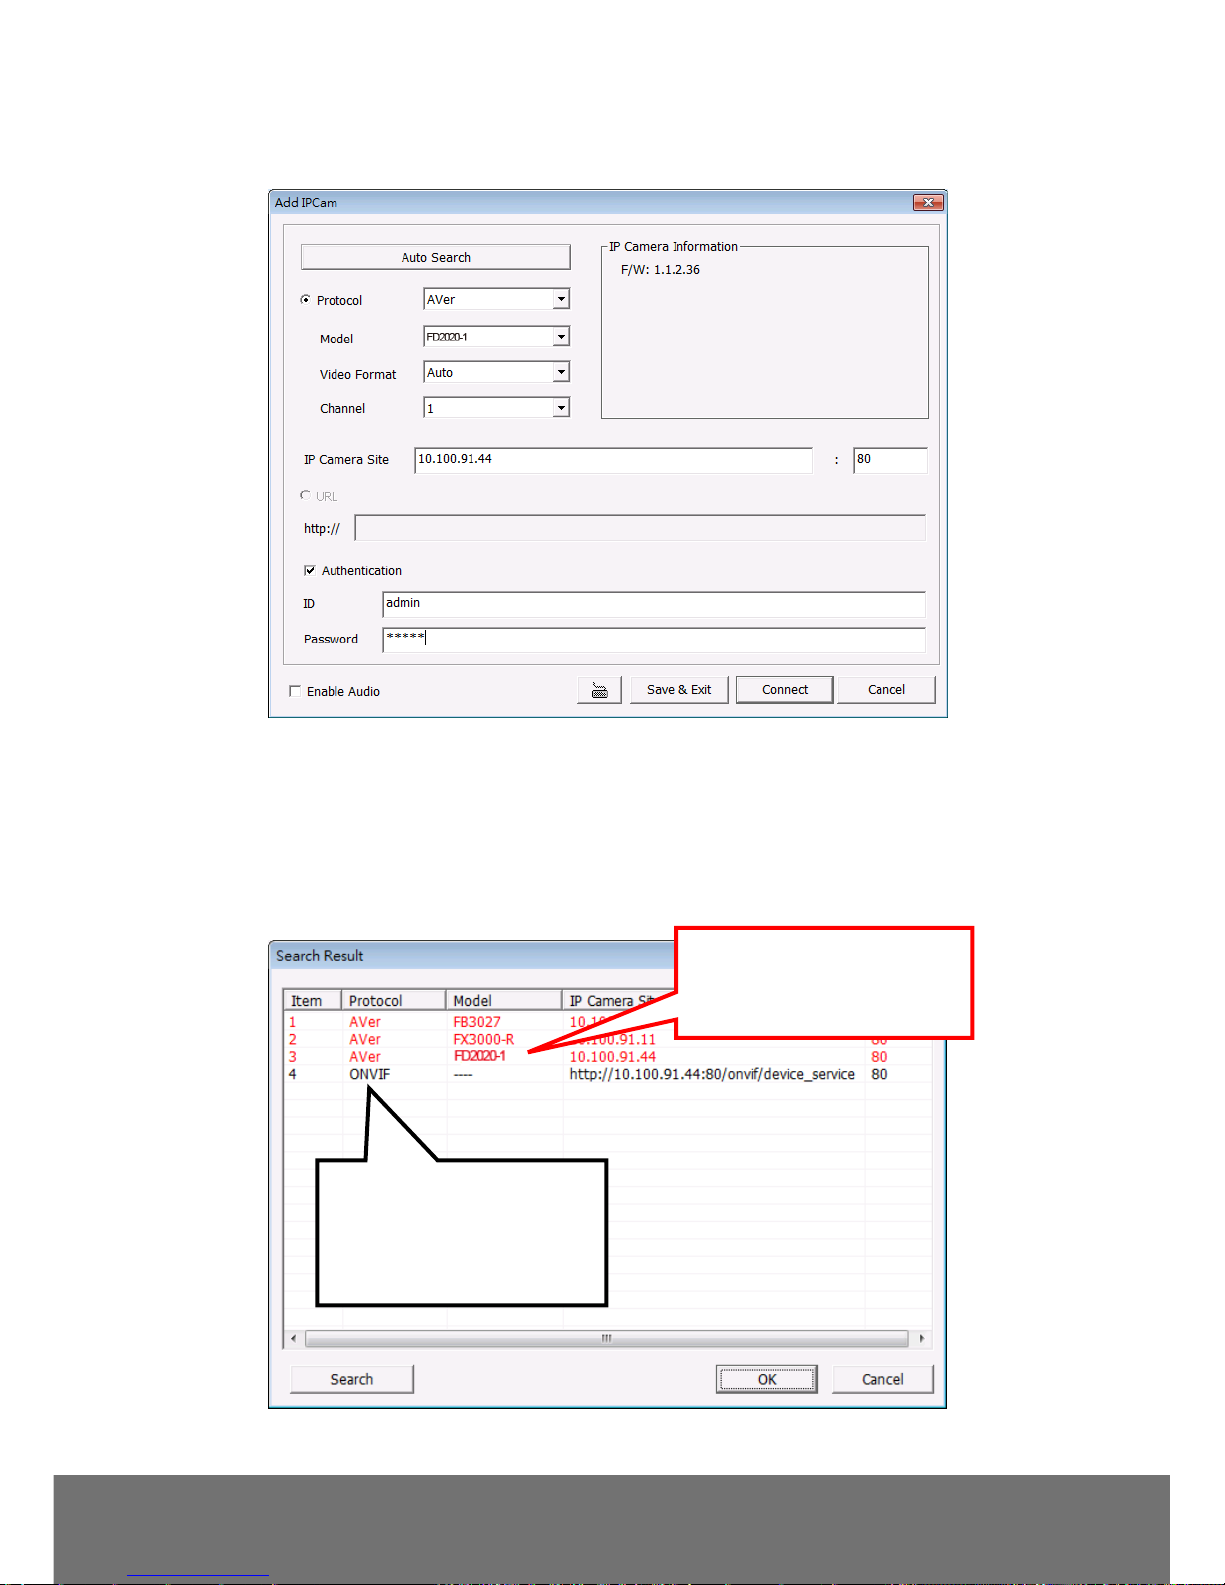
6. Enter IP Camera’s ID and Password (default is admin/admin) and click “Auto Search” to find
camera.
7. In the Search Result window, click the IP camera model that the user has purchased (Please
ignore ONVIF connection item); the camera is in red text that is configurable. Users can click on
the camera in the red text and configure the IP camera’s settings; even if the IP camera is not in
the same IP segment. Press “OK” to go back to the previous screen and press ”Connect” to start
live view.
Click the IP camera model that
user has purchased (ex:
FD2020-1).
Please ignore ONVIF
protocol selection; NXU Lite
doesn’t support ONVIF
connection.
14
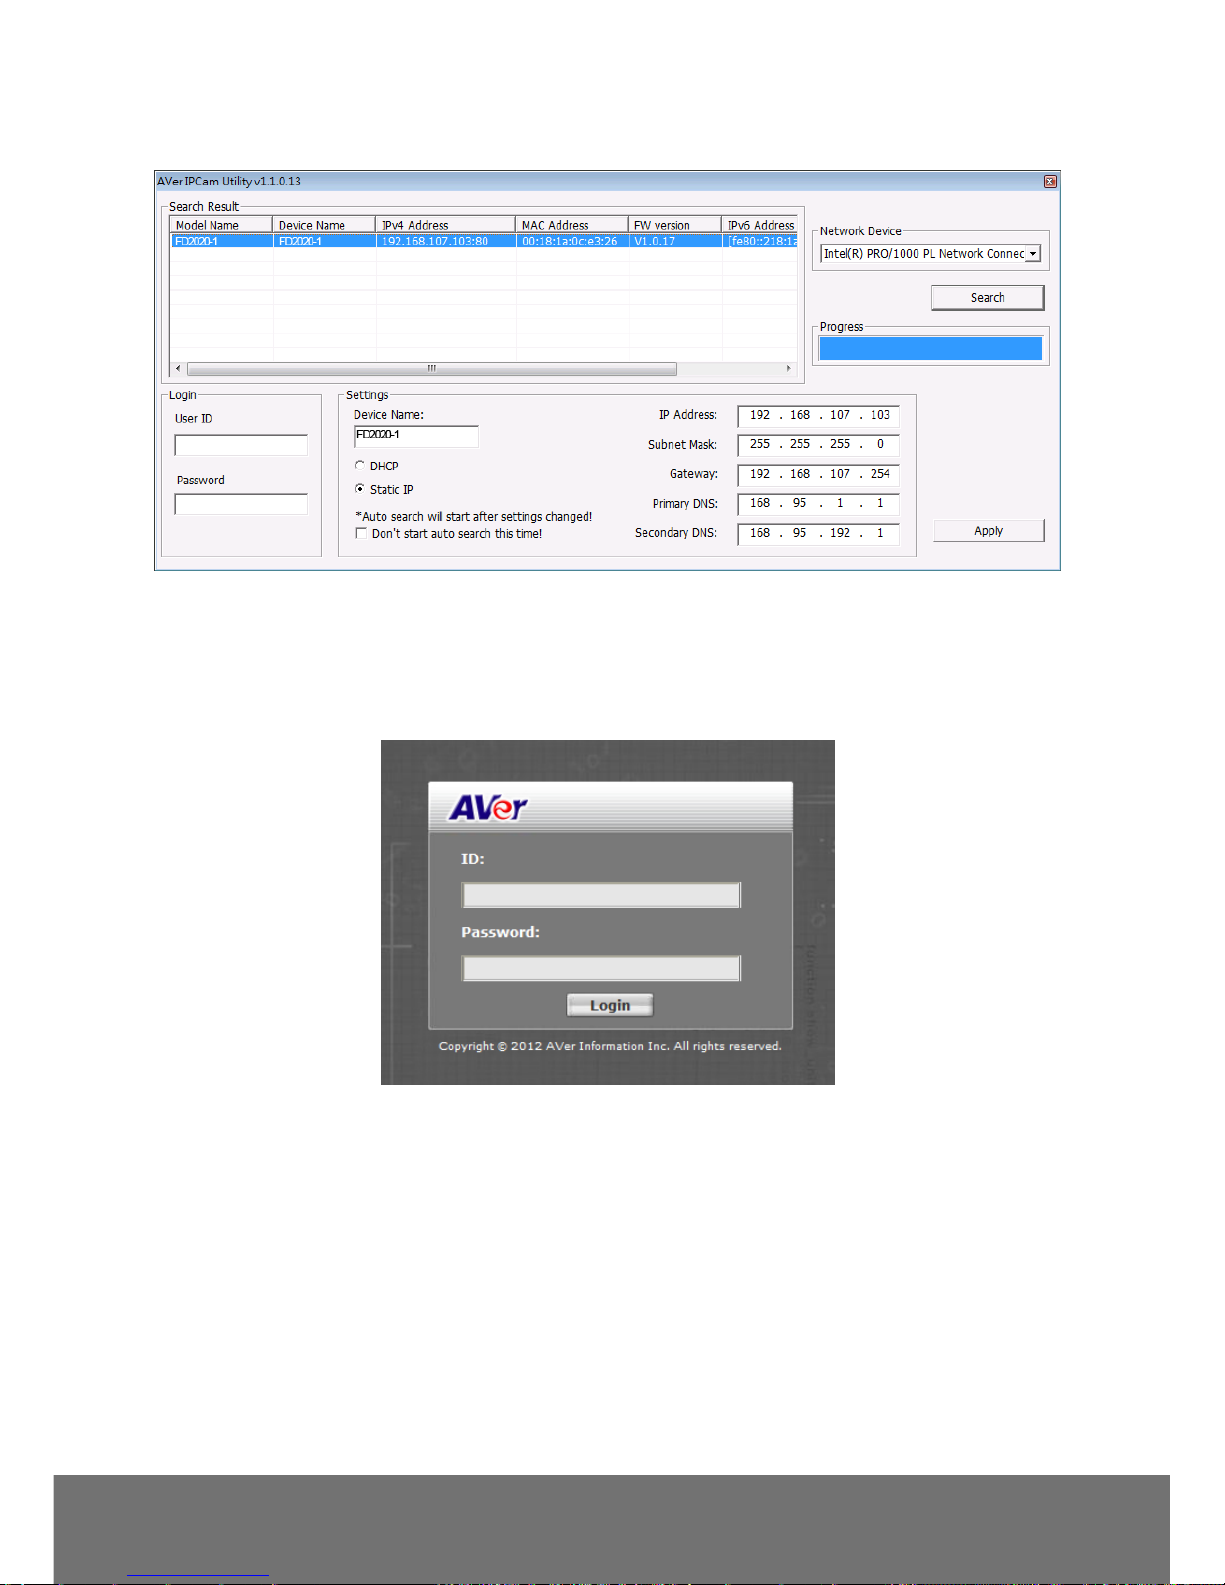
Finding IP Camera by using “AVer IPCam Utility”
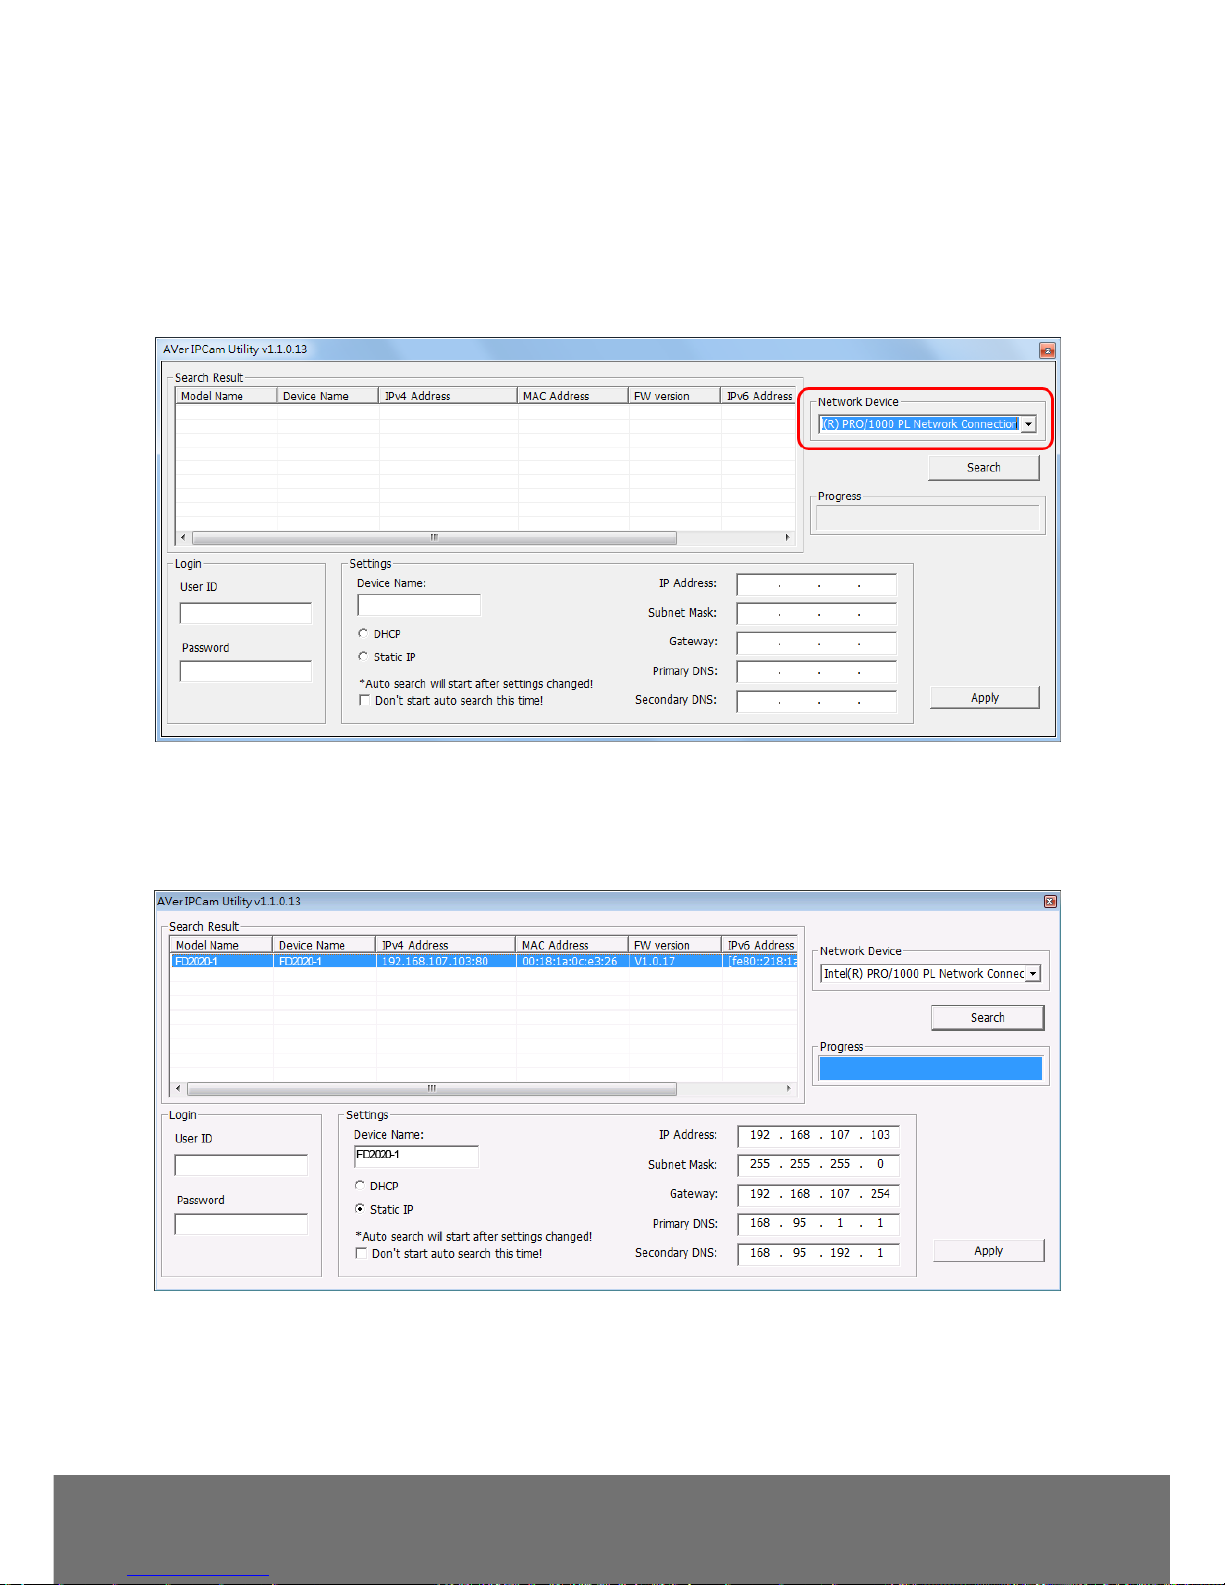
1. Use the software, “AVer IPCam Utility” to assign the IP address of the IP camera. The software is
in the attached software CD.
2. Run the IPCam Utility
3. Select the proper network adapter and click [Search] to begin searching.
4. Select and double click the IP camera you want to access. If you want to change the settings of the
selected IP camera, enter the user ID, correct password, and change the settings and then click
Apply button. This will change the setting and rescan the network again.
15
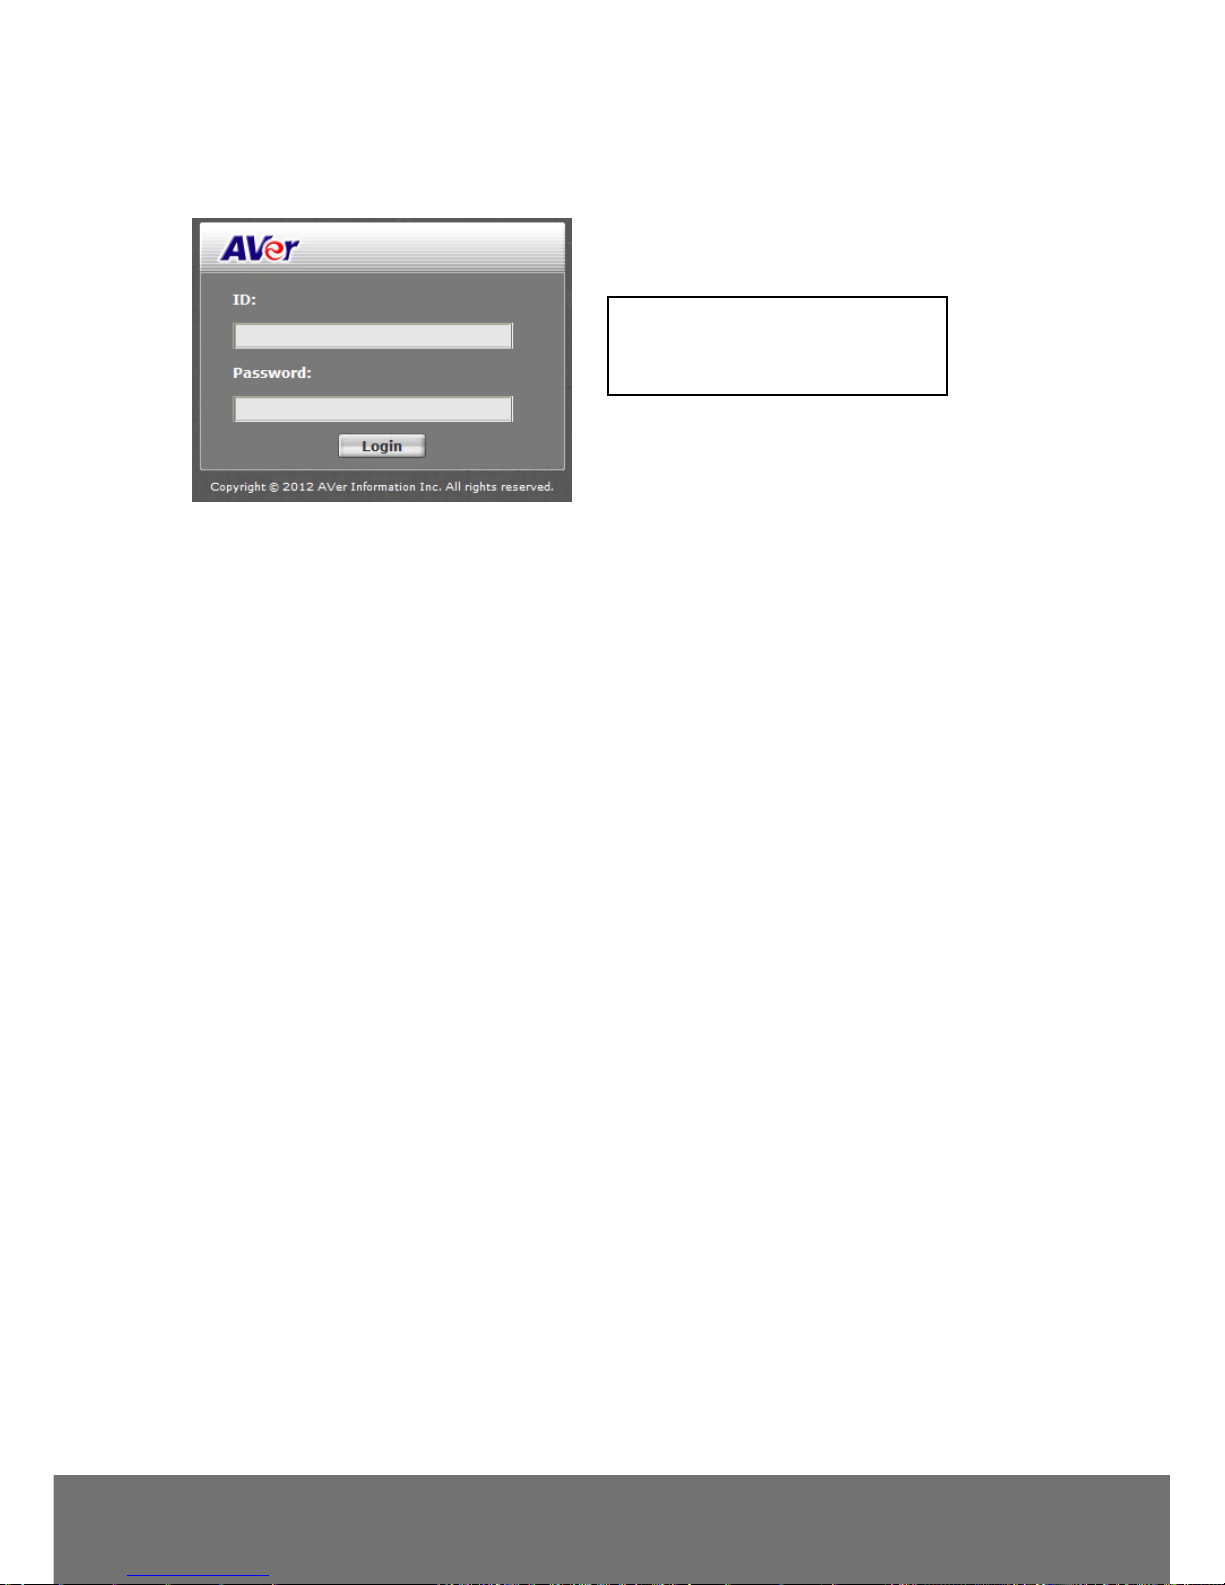
5. The IE browser will open and direct you to the IP camera login page. This requires IPViewer.ocx to
run. If the IE ActiveX warning message appears, click to allow running the add-on.
[Note]
The default IP address is: 192.168.1.168
The default ID and Password are both ”admin”.
You can’t enter a device name in Chinese or any other special characters (' " \ & ^).
Gateway number can’t be “0”.
IP camera device name should be less than 30 digits
Default ID: admin
Default Password: admin
16
Using NON-DHCP Server/Router Network
In Non-DHCP server/router network, the static IP address must be assigned to the device each time
when adding another IP camera to the network; the default IP address of the current one must be
changed to avoid conflict.
Please make sure the Subnet of the PC’s IP address and the IP camera’s IP address are the same.
[Example]
The same Subnet:
IP camera IP address: 192.168.1.168
PC IP address: 192.168.1.100
Different Subnets:
IP camera IP address: 192.168.1.168
PC IP address: 192.168.2.100
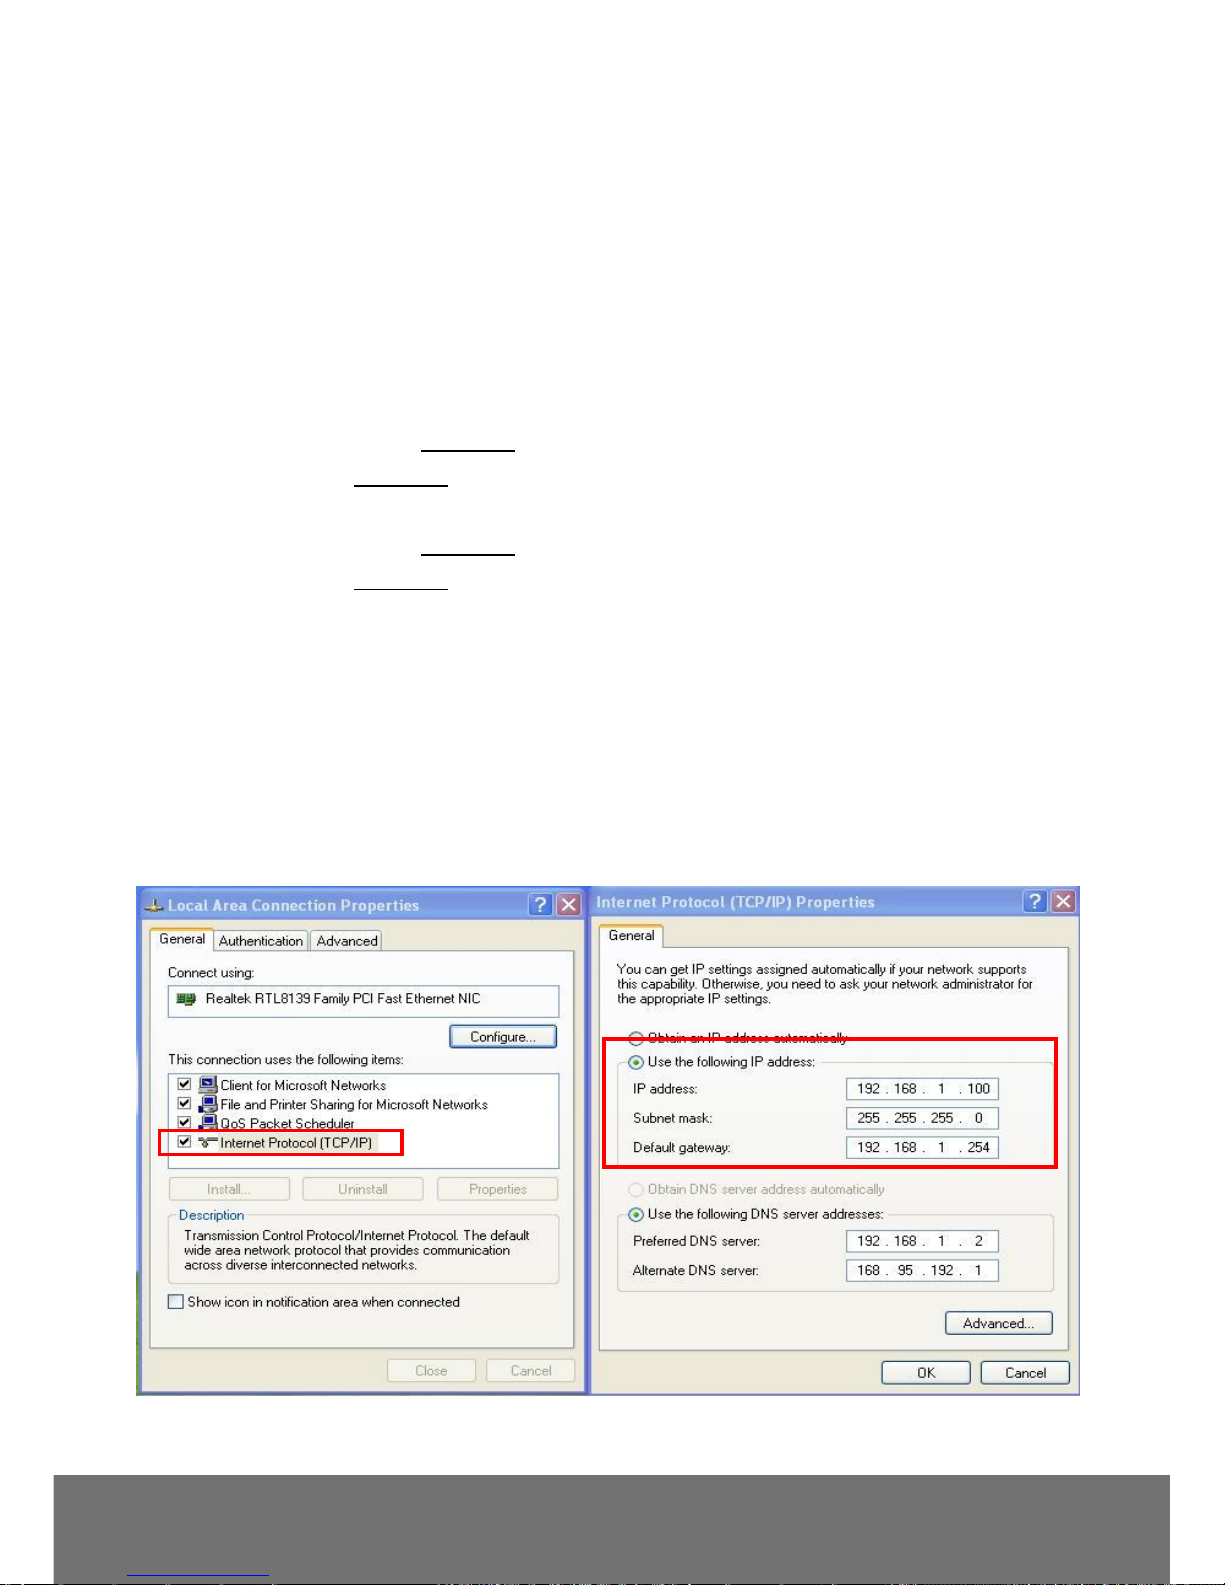
To Change PC IP Address:
Control PanelNetwork Connections Local Area Connection Properties Internet
Protocol (TCP/IP) Properties
Please make sure your IP camera and PC have the same Subnet. If not, please change IP
camera subnet or PC IP subnet accordingly.
PC’s IP address:
17
IP camera IP addresses:
A quick way to access remote monitoring is to double-click on a selected IP camera in “Camera Name
list” in AVer IPCam Utility. Then, the IE browser will open and connect to the IP camera.
Then, please key in the default “ID” and “Password”, both of which are “admin”.
18
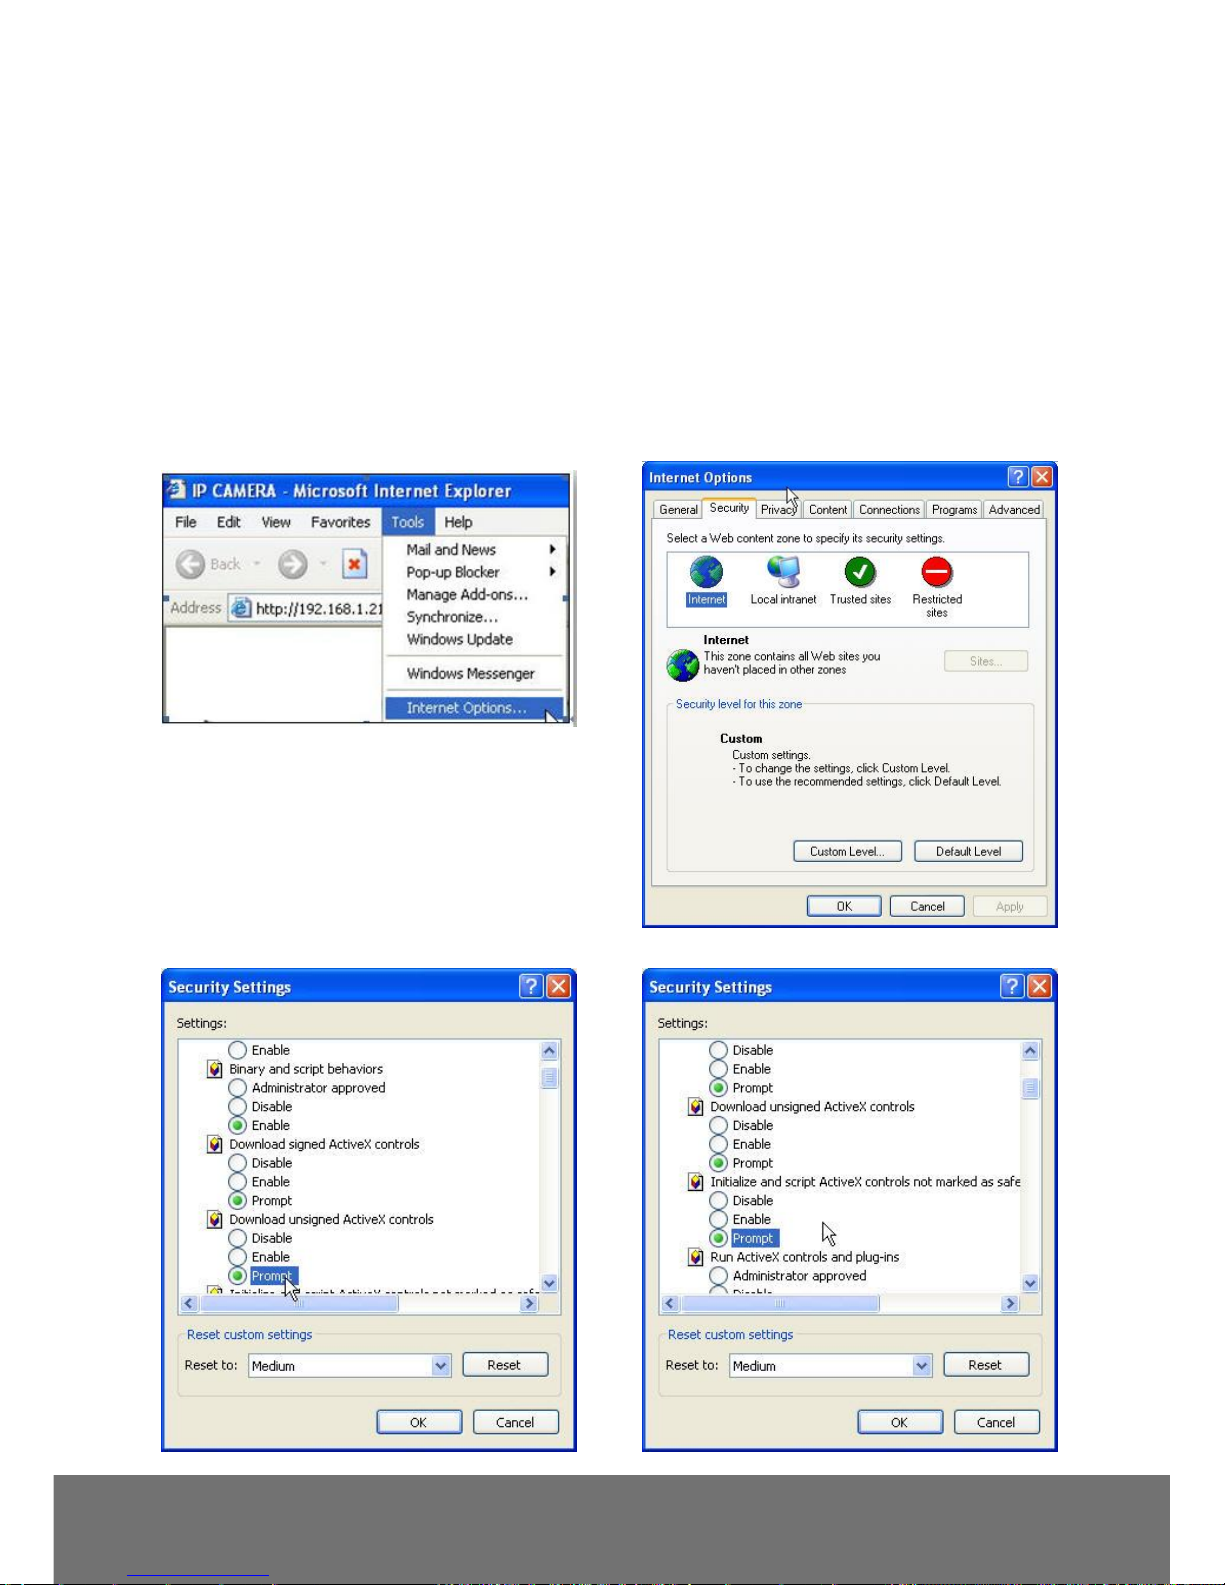
Install ActiveX Control
The first time you attempt to view the camera video via Internet Explorer, it will ask you to install the
ActiveX component.
If the installation fails, please check the security settings for the Internet Explorer browser.
1. IE Tools Internet Options… Security Tab Custom Level… Security Settings
Download unsigned ActiveX controls Select “Enable” or Prompt.
2. IE Tools Internet Options… Security Tab Custom Level… Initialize and script ActiveX
controls not marked as safe Select “Enable” or Prompt.
1
2
3
4

19
5
When the following dialogue box appears, click “Yes”.
20
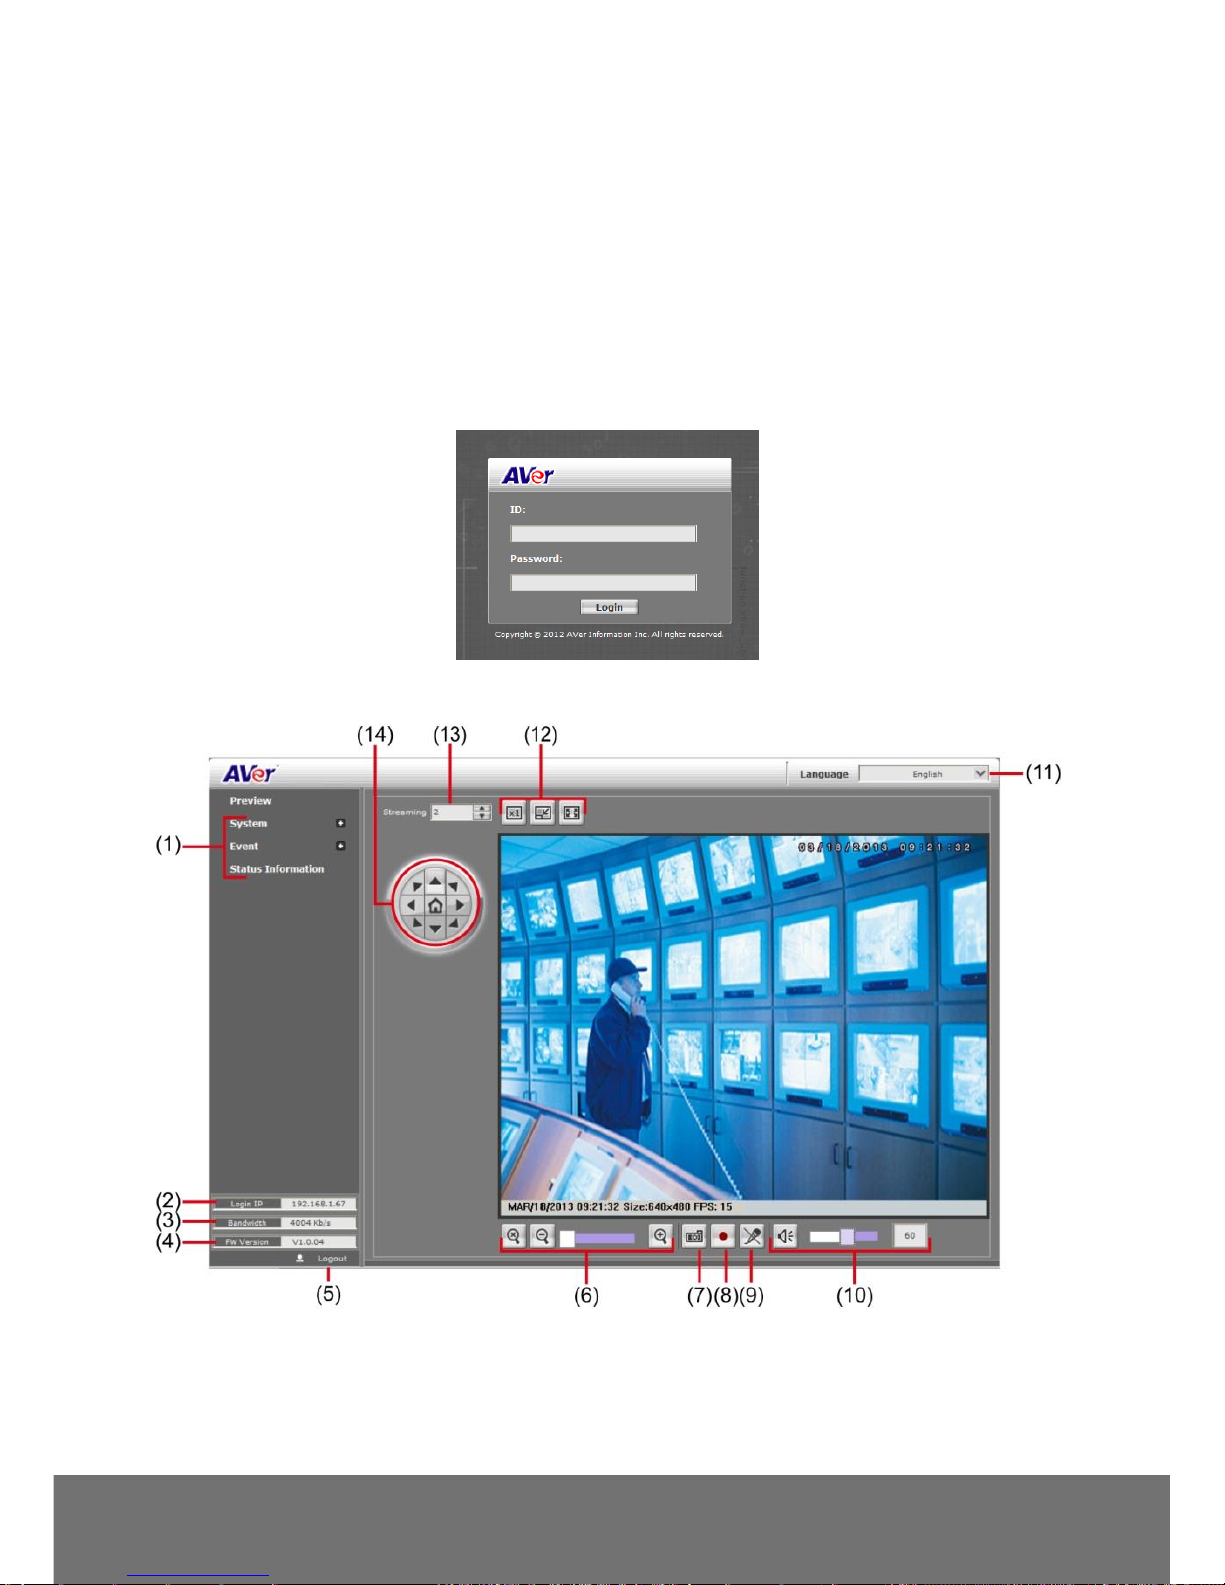
Using the IP Camera Browser Interface
The admin have the full access to the IP camera browser interface. The menu on the left, you can
expand and navigate to access all the features.
Preview
Launch the Internet Explorer browser, type the IP address of the IP camera in the address field. It will
show the following dialogue box. Key-in the ”ID” and “Password”. The default ”ID” and “Password”
are both “admin”.
Once connected to the IP camera, the following program interface will appear.
 Loading...