

Page 1
A
V
®
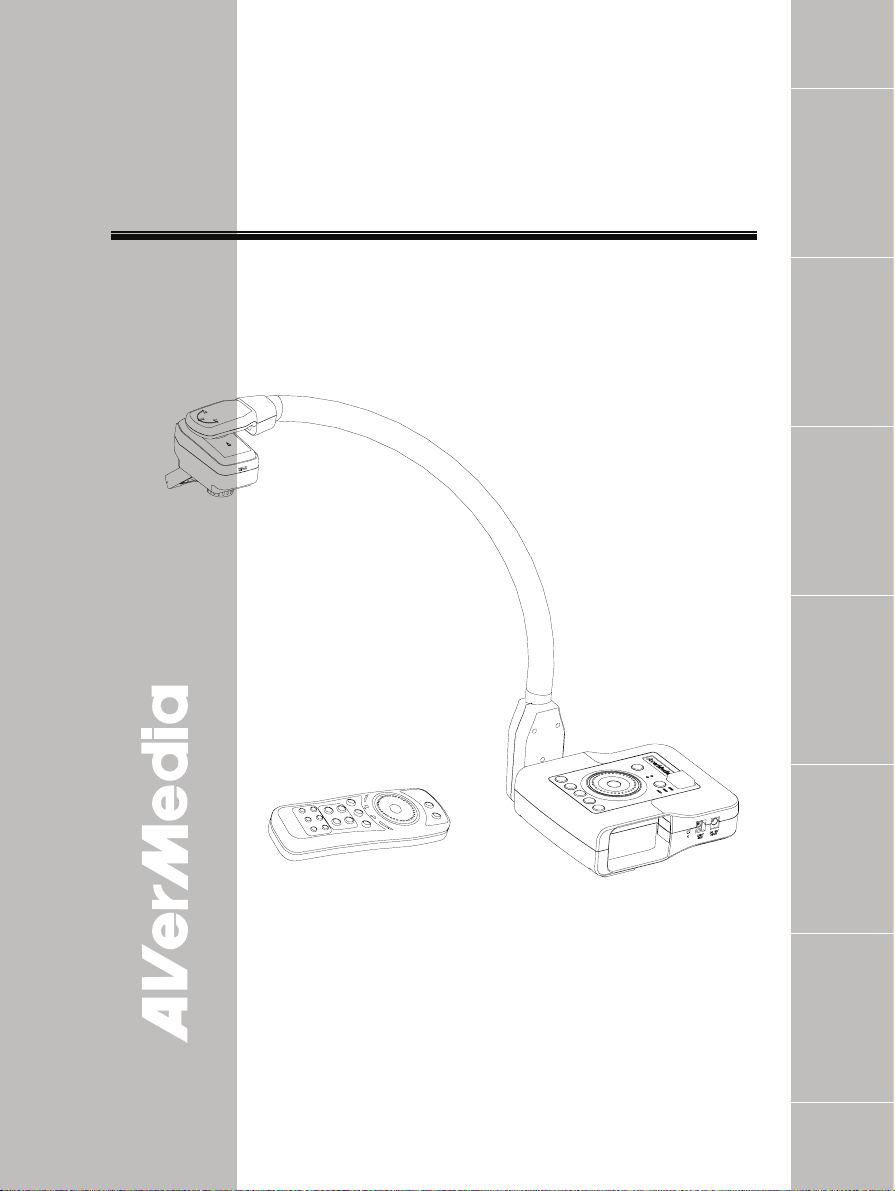
AVerMedia® AVerVision CP300
User Manual
English Deutsch Français
Italiano Español Česky
erMedia
Digital Document Camera
Page 2

P/N 300AP0A7-CP9
Made in Taiwan
Page 3

FCC NOTICE (Class A)
NOTE- This equipment has been tested and found to comply with the limits for a Class A digital device,
pursuant to Part 15 of the FCC Rules. These limits are designed to provide reasonable protection against
harmful interference in a residential installation. This equipment generates uses and can radiate radio
frequency energy and, if not installed and used in accordance with the instructions, may cause harmful
interference to radio communications. However, there is no guarantee that interference will not occur in a
particular installation. If this equipment does cause harmful interference to radio or television reception,
which can be determined by tuning the equipment off and on, the user is encouraged to try to correct the
interference by one or more of the following measures:
• Reorient or relocate the receiving antenna.
• Increase the separation between the equipment and receiver.
• Connect the equipment into an outlet on a circuit different from that to which the receiver is connected.
• Consult the dealer or an experienced radio/television technician for help.
Class A ITE:
Class A ITE is a category of all other ITE which satisfies the class A ITE limits but not the class B ITE
limits. Such equipment should not be restricted in its sale but the following warning shall be included in the
instructions for use:
Warning - This is a class A product. In a domestic environment this product may cause radio interference
in which case the user may be required to take adequate measures.
CE Class A (EMC)
radio interference in which case the user may be required to take adequate measures to correct this
interference.
DISCLAIMER
No warranty or representation, either expressed or implied, is made with respect to the contents of this
documentation, its quality, performance, merchantability, or fitness for a particular purpose. Information
presented in this documentation has been carefully checked for reliability; however, no responsibility is
assumed for inaccuracies. The information contained in this documentation is subject to change without
notice.
In no event will AVerMedia be liable for direct, indirect, special, incidental, or consequential damages
arising out of the use or inability to use this product or documentation, even if advised of the possibility of
such damages.
TRADEMARKS
AVerVision is registered trademarks of AVerMedia Information, Inc. IBM PC is a registered trademark of
International Business Machines Corporation. Macintosh is a registered trademark of Apple Computer, Inc.
Microsoft is a registered trademark and Windows is a trademark of Microsoft Corporation. All other
products or corporate names mentioned in this documentation are for identification and explanation
purposes only, and may be trademarks or registered trademarks of their respective owners.
COPYRIGHT
© 2008 by AVerMedia Information, Inc. All rights reserved. No part of this publication may be
reproduced, transmitted, transcribed, stored in a retrieval system, or translated into any
language in any form by any means without the written permission of AVerMedia
INFORMATION, Inc.
This device complies with Part 15 of the FCC Rules. Operation is subject to the following two
conditions: (1) this device may not cause harmful interference, and (2) this device must accept
any interference received, including interference that may cause undesired operation.
Federal Communications Commission Statement
This product is herewith confirmed to comply with the requirements set out in the Council
Directives on the Approximation of the laws of the Member States relating to
Electromagnetic Compatibility Directive 2004/108/EEC.
Warning - This is a Class A product. In a domestic environment this product may cause
THE MARK OF CROSSED-OUT WHEELED BIN INDICATES THAT THIS PRODUCT MUST
NOT BE DISPOSED OF WITH YOUR OTHER HOUSEHOLD WASTE. INSTEAD, YOU NEED
TO DISPOSE OF THE WASTE EQUIPMENT BY HANDING IT OVER TO A DESIGNATED
COLLECTION POINT FOR THE RECYCLING OF WASTE ELECTRICAL AND ELECTRONIC
EQUIPMENT. FOR MORE INFORMATION ABOUT WHERE TO DROP OFF YOUR WASTE
EQUIPMENT FOR RECYCLING, PLEASE CONTACT YOUR HOUSEHOLD WASTE
DISPOSAL SERVICE OR THE SHOP WHERE YOU PURCHASED THE PRODUCT.
English Deutsch Français
Italiano Español Česky
Page 4

Page 5

TTaabbllee ooff CCoonntteennttss
Introduction ......................................................E-1
Package Contents ............................................ E-1
Optional Accessories....................................... E-2
AVerVision CP300 Parts................................... E-3
Technical Specifications.................................. E-4
Making the Connections.................................. E-5
Connecting the Power Adapter ............................... E-6
Connecting a TV ..................................................... E-6
Connecting a VGA, Mac Display Monitor or
LCD/DLP Projector ................................................. E-
Connecting an IBM Compatible PC or
Macintosh Computer............................................... E-
Installing the Optional Light Box.............................. E-9
Connecting to a Microscope ................................... E-9
Setting Up AVerVision CP300........................ E-10
Camera Head ....................................................... E-10
LED & Laser Positioning Guide ............................ E-10
Flexible Gooseneck and Arm.................................E-11
Infrared Sensor ......................................................E-11
Anti-glare Sheet .....................................................E-11
Using the Infrared Remote Control ..............E-12
Touch Button Control Panel..........................E-15
OSD Navigation Tree......................................E-17
Menu Functions.............................................. E-18
RS-232C Diagram Connection ...................... E-22
RS-232C Cable Spec ...................................... E-23
RS-232C Transmission Spec.........................E-23
RS-232C Communication Format................. E-23
RS-232C Command Table..............................E-23
Transferring the Captured Image to PC.............. E-24
Troubleshooting............................................. E-24
Limited Warranty............................................ E-25
English Deutsch Français
7
8
Italiano Español Česky
Page 6

Page 7
A
V
®
IInnttrroodduuccttiioonn
Thank you for purchasing
the AVerMedia®
AVerVision CP300. This
document camera displays
documents, negatives,
transparencies and 3D
objects onto a TV, LCD or
DLP projector making
presentations a snap.
AVerVision CP300 is an
ideal presentation tool for
business, academic,
medical and the scientific
community.
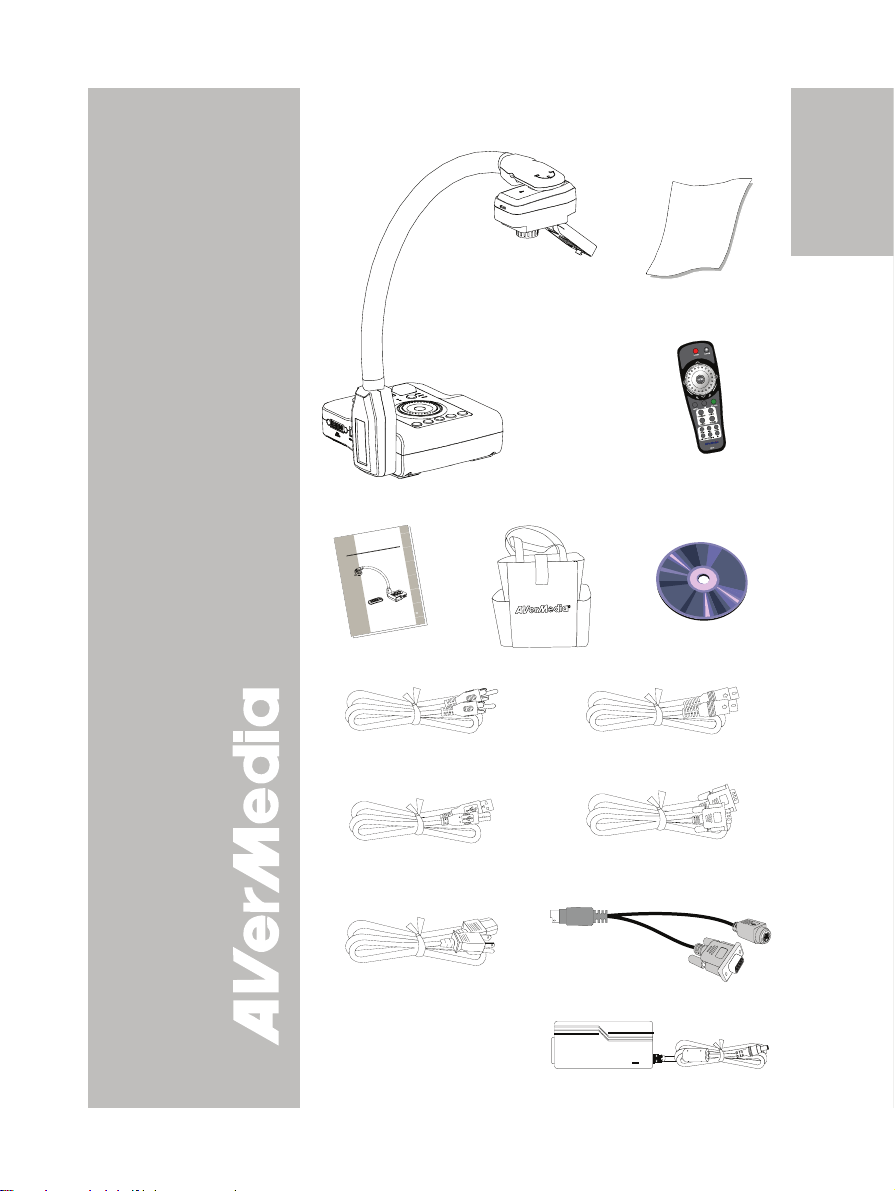
PPaacckkaaggee CCoonntteenntts
AVerMedia® AVerVision CP300
h
s
i
l
g
n
E
00
3
P
C
on
i
s
i
V
r
e
®
V
A
a
h
di
e
M
c
r
e
V
A
s
l
t
ua
an
u
M
r
e
s
e
U
D
s
i
a
ç
n
a
r
F
o
n
a
i
l
a
t
I
l
o
ñ
a
p
s
E
y
k
s
e
Č
a
i
d
e
M
r
e
a
r
e
m
a
C
t
n
e
m
u
c
o
D
l
a
t
i
i
g
D
User Manual
Bag
s
English Deutsch Français
Anti-glare Sheet
Remote Control
(batteries included)
Driver CD
RCA Cable
USB Cable
Power Cord
* The power cord will vary
S-Video Cable
Computer Extension cable
(VGA Cable)
S-Video/RS-232 Cable
Italiano Español Česky
depending on the standard
power outlet of the country
where it is sold.
Power Adapter
E-1
Page 8

OOppttiioonnaall AAcccceessssoorriieess
34mm Microscopic Adapter
Light Box
28mm Microscopic Adapter
E-2
Page 9
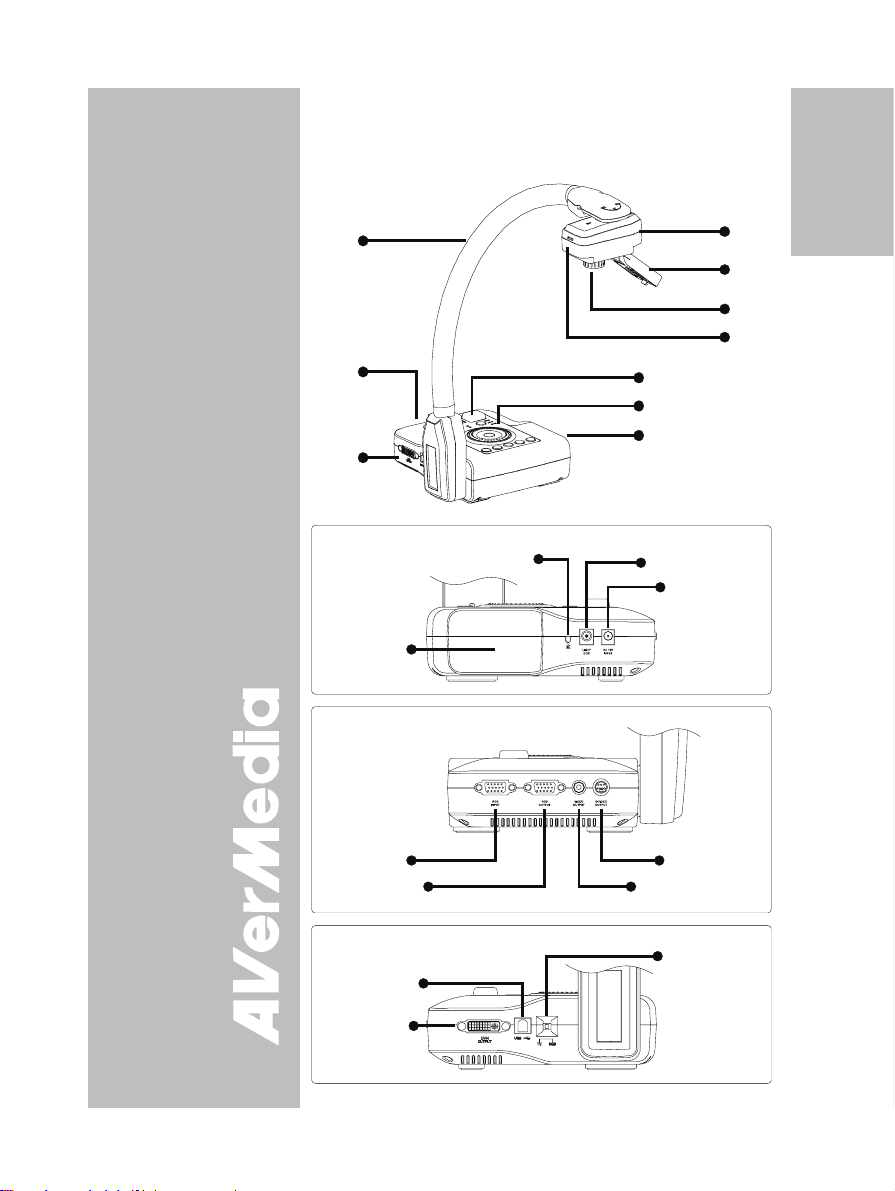
(
(1) Camera head
(2) LED light with Laser
Positioning Guide
(3) Camera lens
(4) LED & Laser
Positioning Guide
switch
(5) IR sensor
(6) Control panel
(7) Right panel
(8) Gooseneck
(9) Rear panel
(10) Left panel
(11) Light box power port
(12) DC 12V port
(13) Antitheft slot
(14) Camera head holder
(15) S-Video output port
(16) Composite video
output port
(17) RGB input port
(18) RGB output port
(19) TV-RGB switch
(20) USB port
(21) DVI-I output port
AAVVeerrVViissiioonn CCPP330000 PPaarrttss
The illustrations below identify the parts of AVerVision CP300.
(8)
(9)
(5)
(6)
(7)
10)
Right Panel
(13)
(11)
(12)
(14)
Rear Panel
(17)
(15)
(16)(18)
(1)
(2)
(3)
(4)
English Deutsch Français
Italiano Español Česky
Left Panel
(19)
(20)
(21)
E-3
Page 10

TTeecchhnniiccaall SSppeecciiffiiccaattiioonnss
Image
Sensor 1/2” Progressive Scan CMOS
Pixel Count 3.2 mega pixels
Frame Rate 24 fps (max.)
White Balance Auto / Manual
Exposure Auto / Manual
Image mode Text / Graphics / High Frame
Effect Color / B/W / Negative
Analog RGB output
Image Capture Up to 80 Frames
WXGA 60Hz (1280 x 720); XGA 60 Hz; SVGA 60
Hz; VGA 60 Hz
Optics
Lens F3.0; fl=9.6mm
Focusing Auto/Manual
Shooting Area 300mm x 225mm (max.)
Zooming 2X AVERZOOM, 8X Digital Zoom
Power
Power Source 100-240V ~ 4.0-4.2A, 50-60Hz
Consumption 18 Watts (lamp off); 20 Watts (lamp on)
Lighting
Lamp Type LED light with laser pointer
Input/Output
RGB Input 15-Pins D-sub (VGA)
RGB Output 15-Pins D-sub (VGA)
DVI-I Output DVI-I Type
S-Video Mini-DIN Jack
Composite Video RCA Jack
USB USB2.0
DC 12V Input Power Jack
Light Box Power Jack (DC 6V Output)
Dimension
Operating 160mm x 170mm x 450mm
Folded 287.4mm x 232.5mm x 61mm
Weight 2.4 kg (about 5.3 lb)
E-4
Page 11
MMaakkiinngg tthhee CCoonnnneeccttiioonnss
The ports on the rear, left and right panel of CP300 enable you to
connect the unit to a computer, graphics display monitor or LCD/DLP
projector, TV or other device. Illustrated below are the ports that are
located at the rear, left and right panel of CP300 with their corresponding
labels.
Right Panel
Rear & Left Panel
(1)
(2)(3)
(4)
(5)
(6)
(7)
(8)
(9)
(10)
Port Description
(1) Antitheft Slot Attach a Kensington compatible security lock or
(2) Light Box Plug the optional light box into this port.
(3) DC 12V Input Connect the power adapter into this port.
(4) RGB INPUT Input the signal from a computer or other sources
(5) RGB OUTPUT Output the signal from the camera, RGB input port,
(6) VIDEO OUTPUT
(RCA/Composite)
(7) S-VIDEO
OUTPUT
(8) DVI-I OUTPUT Output the signal from the camera, RGB input port,
antitheft device.
and pass it through to the RGB Output port only.
Connect this port to the VGA output port of the
computer.
or the captured images from the memory on a
VGA/Mac monitor or LCD/DLP projector.
Output the signal from the camera or the captured
images from the memory on TV or Video
equipment.
Output the signal from the camera or the captured
images from the memory on TV or Video
equipment.
or the captured images from the memory on a
VGA/Mac monitor or LCD/DLP projector with DVI-I
interface.
If the display device does not support DVI-I, it can
only display the signal from the camera and the
captured images.
English Deutsch Français
Italiano Español Česky
E-5
Page 12
Port Description
(9) USB Use CP300 as a USB Camera or transfer the
(10) TV-RGB switch Switch to output display video either from Video and
captured images from CP300 memory to PC.
S-VIDEO, or RGB and DVI-I output port.
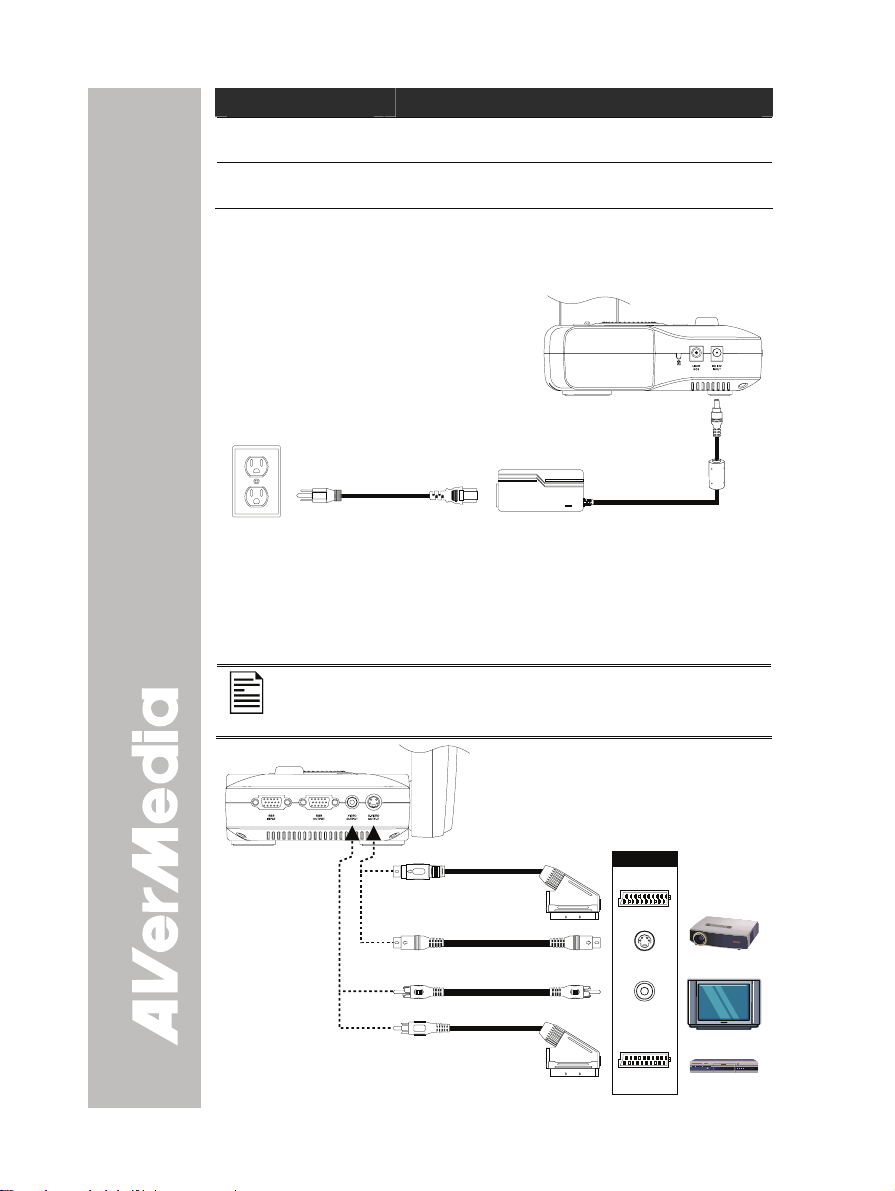
CCoonnnneeccttiinngg tthhee PPoowweerr AAddaapptteerr
Connect the power adapter to a standard 100V~240V AC power source.
Wall outlet
Power cord
Power adapter
CCoonnnneeccttiinngg aa TTVV
Locate the VIDEO, S-VIDEO or SCART RGB input port of the TV or
Video equipment (i.e., VCR) to record your presentation on a videotape
and connect it to S-VIDEO or VIDEO OUTPUT port of CP300. If you are
not sure, please refer to the user manual of the TV or Video equipment.
For better video quality, we strongly suggest using S-VIDEO
connection.
Make sure the TV/RGB switch is set to TV.
INPUT
S-Video to SCART cable
(not supplied)
S-Video cable
RCA cable
RCA to SCART cable
(not supplied)
SCART
S-VIDEO
VIDEO
SCART
Projector
Television
VCR
E-6
Page 13
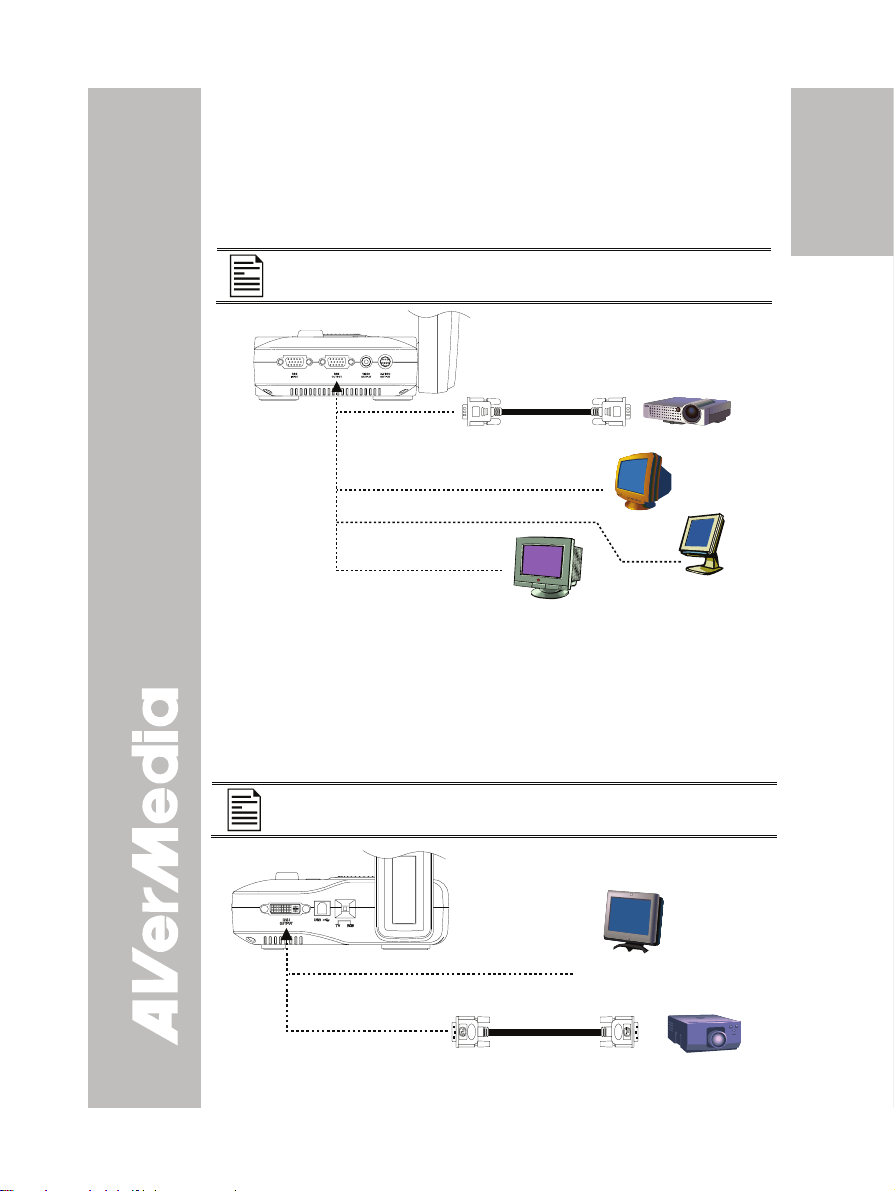
CCoonnnneeccttiinngg aa VVGGAA,, MMaacc DDiissppllaayy
MMoonniittoorr oorr LLCCDD//DDLLPP PPrroojjeeccttoorr
Locate the RGB (VGA) input port of the display device and connect it to
RGB OUTPUT port of CP300. If you are not sure, please refer to the
user manual of the device.
Make sure the TV/RGB switch is set to RGB.
RGB (VGA) cable
(not supplied)
CRT monitor
MAC monitor
LCD/DLP projector
LCD monitor
CCoonnnneeccttiinngg aa VVGGAA MMoonniittoorr oorr LLCCDD//DDLLPP
PPrroojjeeccttoorr wwiitthh DDVVII iinntteerrffaaccee
Locate the DVI input port of the display device and connect it to DVI-I
OUTPUT port of CP300. If you are not sure, please refer to the user
manual of the device.
English Deutsch Français
Italiano Español Česky
Make sure the TV/RGB switch is set to RGB.
LCD Monitor
with DVI interface
DVI cable
(not supplied)
LCD/DLP projector
with DVI interface
E-7
Page 14
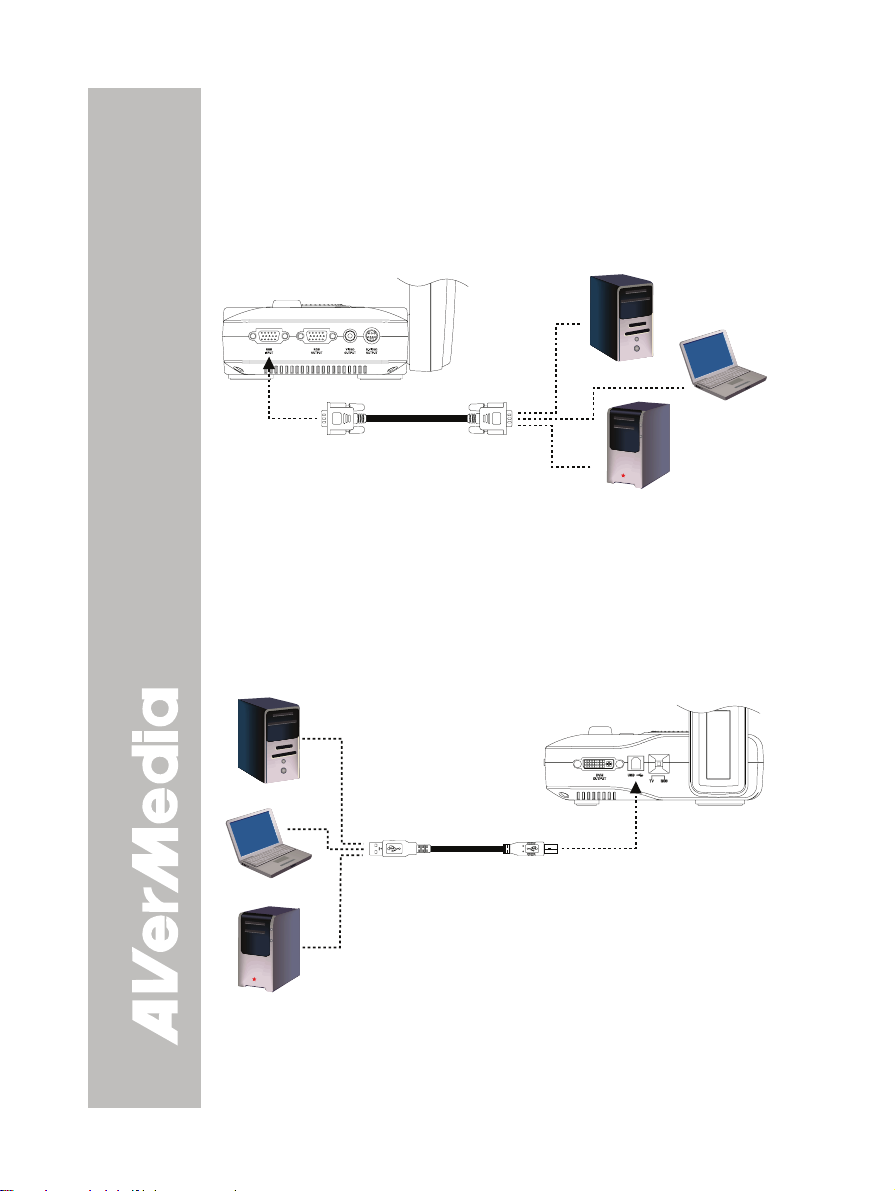
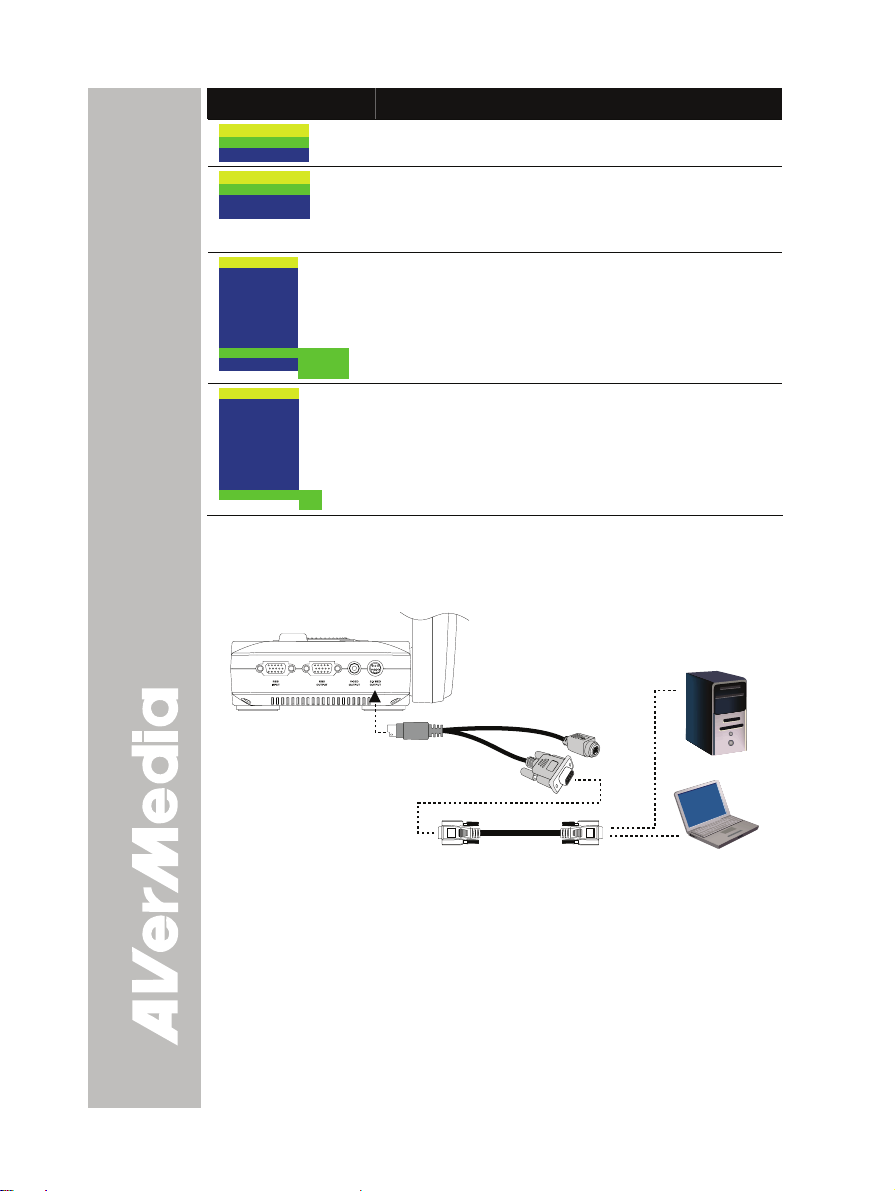
CCoonnnneeccttiinngg aann IIBBMM CCoommppaattiibbllee PPCC oorr
MMaacciinnttoosshh CCoommppuutteerr
Locate the RGB (VGA) output port of the computer or laptop to display
your PC presentation on screen and connect it to RGB INPUT port of
CP300. The video signal from the RGB INPUT port is streamed to RGB
and DVI-I OUTPUT port, and displayed on the screen.
Computer extension cable
(VGA cable)
CCoonnnneeccttiinngg aa CCoommppuutteerr vviiaa UUSSBB
CCoonnnneeccttiioon
Locate the USB port of the computer or laptop and connect it to USB port
of CP300. This enables you to use CP300 as a USB Camera and to
transfer the captured images from the memory and to computer. Also
see “Transfer Image from AVerVision CP300 to PC”.
n
Computer
MAC
Laptop
Computer
USB cable
Laptop
MAC
E-8
Page 15

IInnssttaalllliinngg tthhee OOppttiioonnaall LLiigghhtt BBooxx
Connecting an optional light box enables you to view x-rays,
transparencies and negative slides.
Light Box
(optional)
TURN ON
PLUG
IT HERE
CCoonnnneeccttiinngg ttoo aa MMiiccrroossccooppee
Connecting the CP300 to a microscope enables you to examine
microscopic objects on a big screen without straining your eyes.
Microscopic
Adapter
English Deutsch Français
Italiano Español Česky
Microscope
E-9
Page 16
SSeettttiinngg UUpp AAVVeerrVViissiioonn CCPP330000
This section provides useful tips on how to adjust the CP300 to meet
your needs.
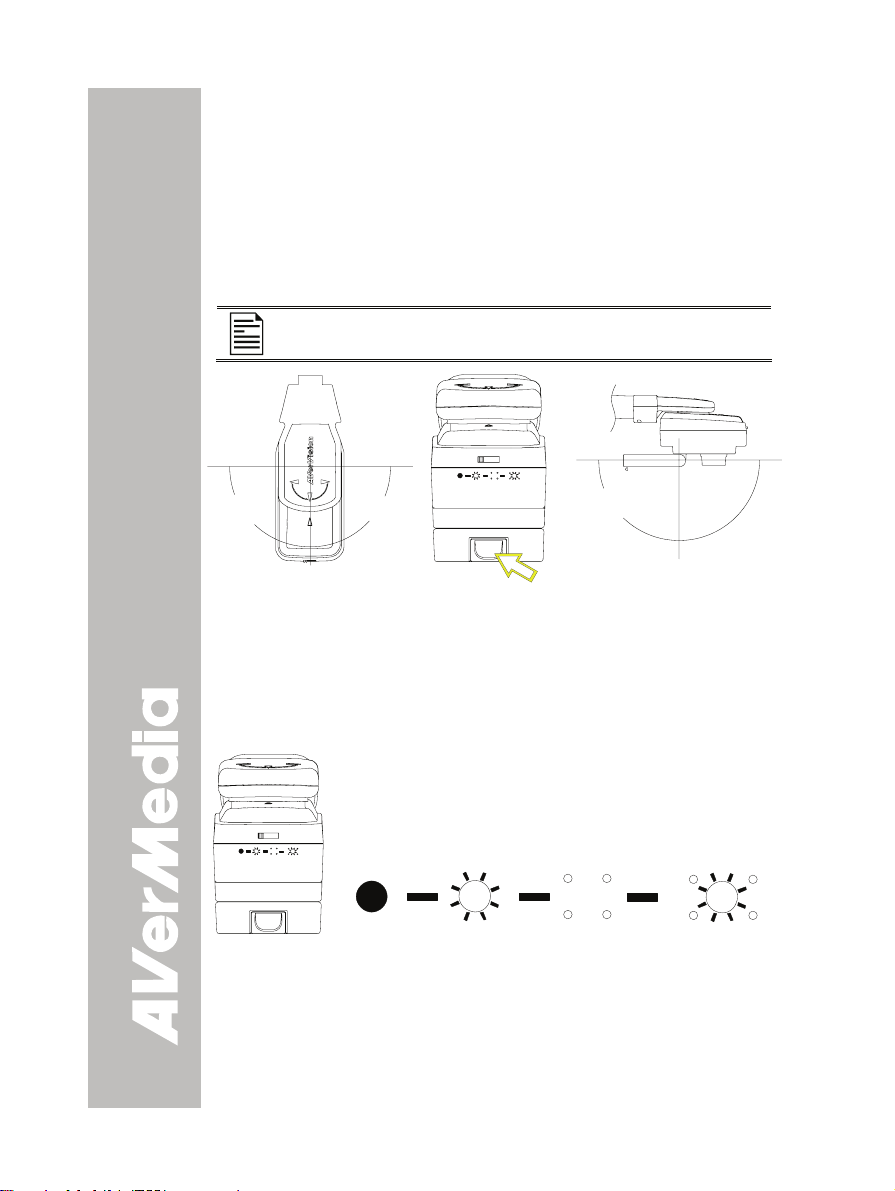
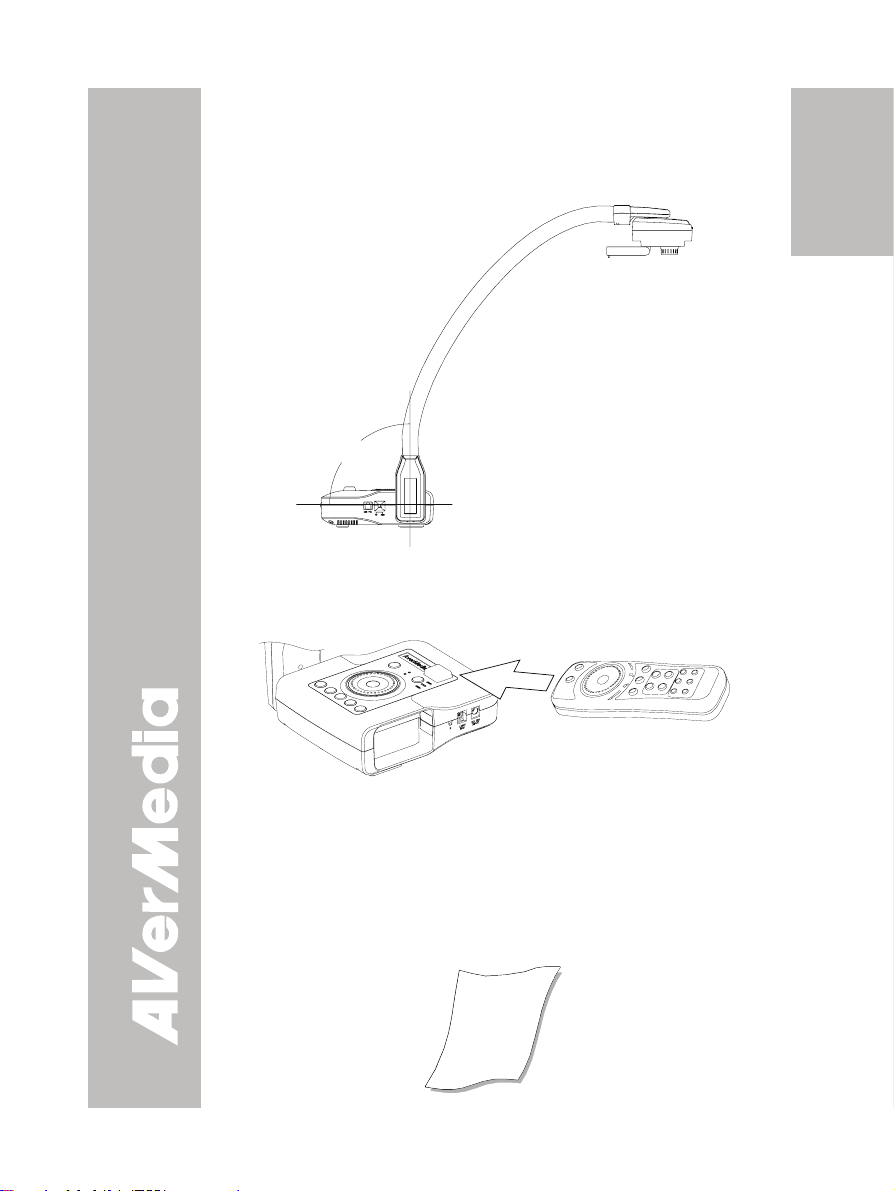
CCaammeerraa HHeeaadd
The camera head can be turned 90 ° to the left and right. The latch must
be pressed to open and unfold the LED light.
Make sure to unfold the LED light fully.
90° 90°
Latch
LLEEDD && LLaasseerr PPoossiittiioonniinngg GGuuiiddee
A unique feature of the CP300 is the four (4) laser positioning pointers
that define the viewing area. This enables the user to quickly center
the object underneath the camera. The three (3) various light and laser
positioning pointers settings are provided as follows:
180°
White LED and
Document
Positioning
Pointers
OffOff
White LED
Only
Document
Positioning
Pointers
E-10
Page 17
FFlleexxiibbllee GGoooosseenneecckk aanndd AArrmm
The flexible gooseneck and arm design allows you to position the
camera head from any angle.
90°
IInnffrraarreedd SSeennssoorr
Aim the remote control at the infrared sensor to operate the unit.
English Deutsch Français
AAnnttii--ggllaarree SShheeeett
The anti-glare sheet is a special coated film that helps eliminate any
glare that maybe encountered while displaying very shiny objects or
glossy surfaces such as magazines and pictures. To use, simply place
the anti-glare sheet on top of the shiny document to reduce reflected
light.
E-11
Italiano Español Česky
Page 18
6
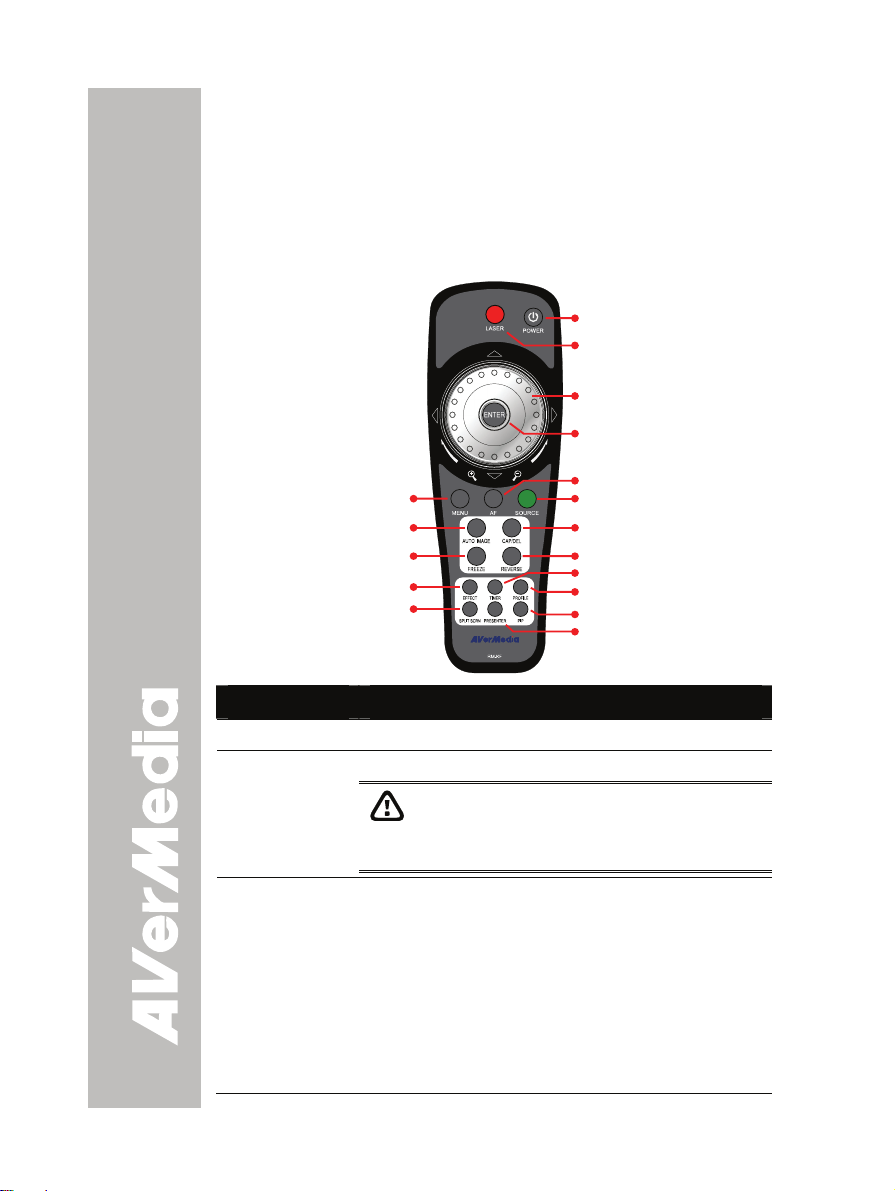
UUssiinngg tthhee IInnffrraarreedd RReemmoottee CCoonnttrrooll
Use the CP300 Remote Control to enhance your presentation by having
the ability to switch between three (3) presentation modes and access
various features. To use the remote control, first insert the batteries (2
“AAA” size batteries are provided) into the battery compartment at the
back of the remote. Use the figure and descriptions below as a reference
for remote control functions.
(1)
(2)
(3)
(4)
(13)
(14)
(15)
(1
(17)
)
(5)
(6)
(7)
(8)
(9)
(10)
(11)
(12)
Name Function
(1) POWER Turn the unit on/off.
(2) LASER
(3) Shuttle Wheel - Turn the shuttle wheel clockwise to zoom in and
Turn on the laser pointer.
DO NOT look directly at the laser pointer and
avoid aiming the laser at any surface that may
reflect the beam (i.e., a mirror or mirrored
surface).
counter-clockwise to zoom out the image in Camera
and Playback mode only.
When it reaches the maximum AVERZOOM level of
about 200%, you can still continue to digitally zoom
in the image up to 1600%. Press ENTER to return to
normal view (100%).
- Press the shuttle wheel ▲,▼,◄, & ► to pan the
image while in zoom in mode, to make a selection on
16-thumbnail images or move to the next or previous
single full screen preview in Playback mode, or to
E-12
Page 19

Name Function
(Shuttle Wheel) make a selection or adjustment on the OSD main-menu
(4) ENTER Make a selection in Playback mode and OSD menu.
(5) AF
(Auto Focus)
(6) Source Switch between Camera, Playback and PC mode.
(7) CAP/DEL - Capture a still image in Camera mode. The captured
(8) REVERSE Rotate the image by 180°in Camera mode only.
and sub-menu (See Menu Functions for more details).
Adjust the focus automatically.
- Camera mode displays the video signal from the
built-in camera.
- Playback mode displays the captured image from
the built-in memory in 16-thumbnail images. Use
▲,▼,◄, & ► buttons to make a selection and
ENTER to display the selected image in full screen.
To start slide show, press MENU, select START and
press ENTER to begin and end. Select INTERVAL
to set the display time interval between frames in
second.
- PC mode displays the video signal from the RGB
INPUT port of CP300.
image is saved in the built-in memory at 1024 x 768
resolution and can store up to 80 images.
- Remove the selected picture from the built-in
memory permanently in Playback mode.
English Deutsch Français
(9) TIMER
(10) PROFILE Recall and switch from the 3 saved user setting profile
(11) PIP Display/hide a thumbnail of the captured image from
(12) PRESENTER Select to turn on/off AVerBox or AVerVisor. Only one
Display the OSD timer menu and
select SET TIME to set the time value, START to begin
the countdown timer, PAUSE/RESUME to temporarily
halt or continue, and STOP to end.
selections (See MENU Functions – SAVE for more
details).
the memory source at the corner of the screen while in
Camera mode.
Use ◄ or ► buttons to move to the previous or next
image and ENTER to display the image in full screen.
To move the mini playback screen to different corners,
press MENU, go to PIP and select the position of the
mini playback screen.
feature can be used at a time.
AVerBox overlays a frame on the presentation screen.
Selecting SHADE changes the opacity of the area
outside the box from 0%, 50% and 100%, COLOR to
use ▲or▼ buttons to
E-13
Italiano Español Česky
Page 20
Name Function
(PRESENTER) change the frame color from red, green and blue, and
(13) MENU Pull up and exit the OSD main-menu and sub-menu.
(14) AUTO
IMAGE
(15) FREEZE Toggle to pause or resume the camera.
(16) EFFECT Convert and display the image in BW, Negative or
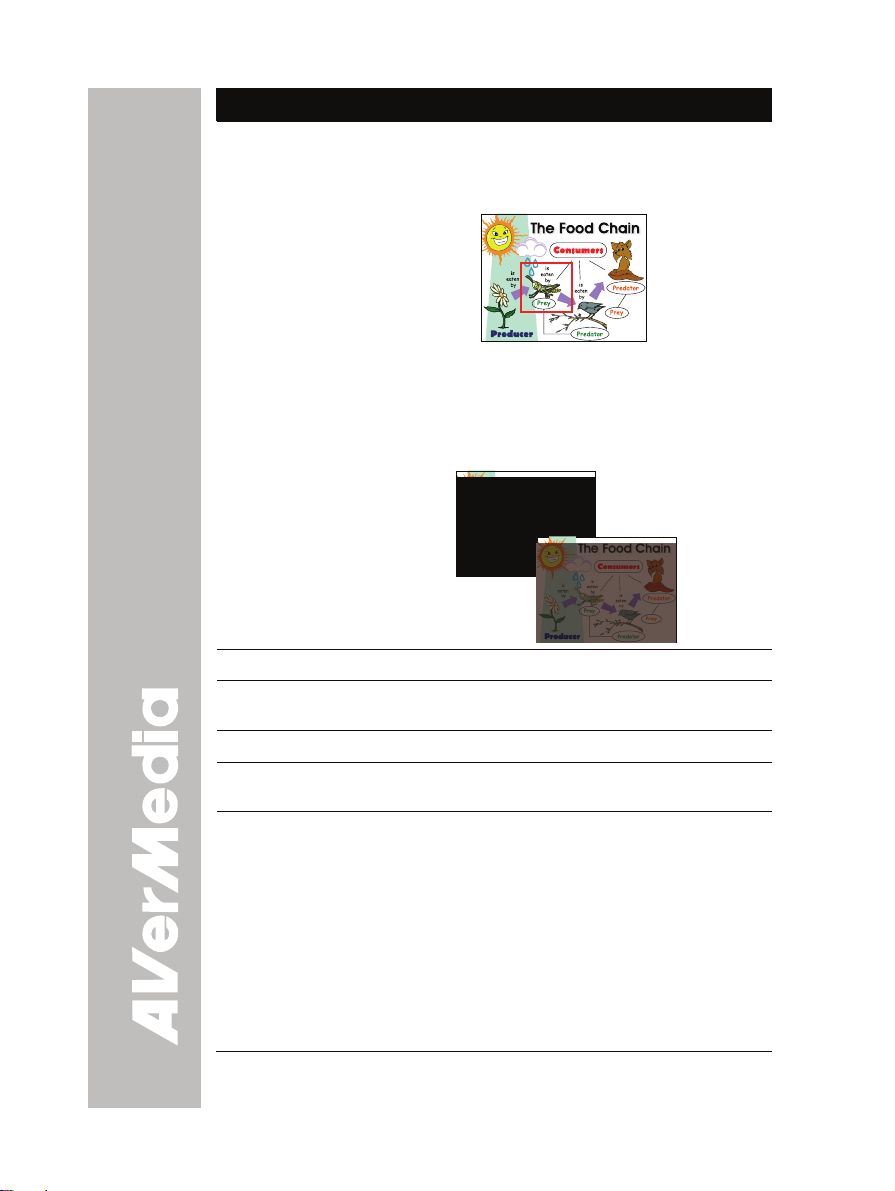
(17) SPLIT SCRN Turn on/off split screen mode. Split Screen divides the
RESIZE to change the size of the frame. To resize or
move the frame around the presentation screen, press
the shuttle wheel ▲,▼,◄, & ►.
AVerVisor covers part of the presentation screen. The
upper part of the presentation screen is slightly
exposed when it is being called each time. To expose
part of the covered area, press the shuttle wheel
▲,▼,◄, &►. Select SHADE to change the darkness of
the shaded area between 50% or 100%.
Automatically adjust and set the white balance and
exposure setting.
Color in Camera and Playback mode only.
screen into two parts. One side displays the live image
from the CP300 camera and the other side displays the
captured images from the memory source in
8-thumbnail preview.
Use the ▲,▼,◄, &► buttons to make a selection and
ENTER to enlarge the selected image in split screen
mode. To horizontally or vertically pan the enlarged
image, use the ◄ & ► or ▲&▼ buttons. To switch to
different split screen type, press MENU, go to SPLIT
SCREEN and select between vertical or horizontal
splitting type.
E-14
Page 21
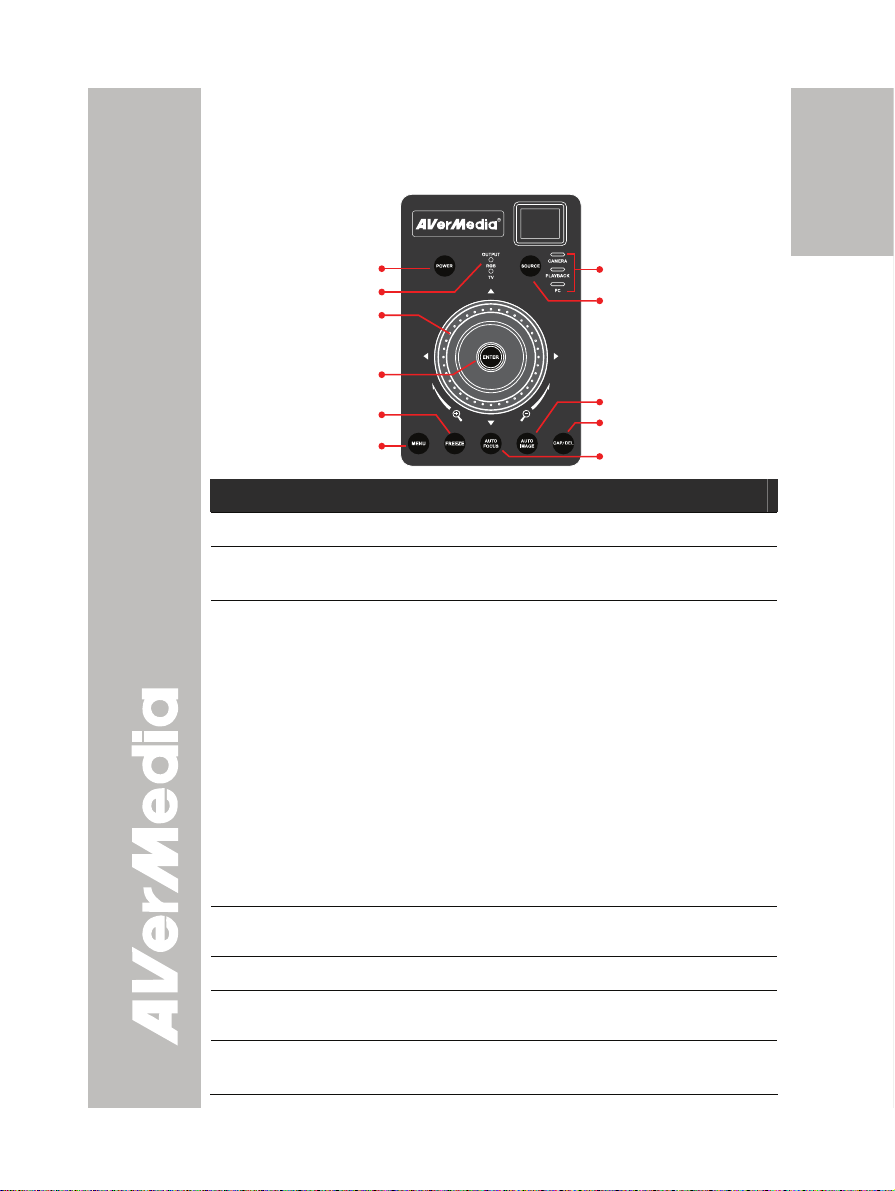
TToouucchh BBuuttttoonn CCoonnttrrooll PPaanneell
The touch button control panel located on the top side of the CP300
provides quick access to commonly used functions.
(1)
(2)
(3)
(4)
(5)
(6)
(7)
(8)
(9)
(10)
(11)
Function Description
(1) POWER
(2) Output LED
Indicator
(3) Shuttle Wheel
(4) ENTER
(5) FREEZE
(6) MENU
(7) Source LED
Indicator
Turn the unit on/off.
Indicate the setting of the TV to RGB dip switch to
which the video signal is being sent out.
- Turn the shuttle wheel clockwise to zoom in and
counter-clockwise to zoom out the image in
Camera and Playback mode only.
When it reaches the maximum AVERZOOM level
of about 200%, you can still continue to digitally
zoom in the image up to 1600%. Press ENTER
to return to normal view (100%).
- Press the shuttle wheel ▲,▼,◄, &► to pan the
image while in zoom in mode, to make a
selection on 16-thumbnail images or move to the
next or previous single full screen preview in
Playback mode, or to make a selection and
adjustment on the OSD main-menu and
sub-menu (See Menu Functions for more
details).
Make a selection in Playback mode and OSD
menu.
Toggle to pause or resume the camera.
Pull up and exit the OSD main-menu and
sub-menu.
Indicate the source of the video signal or image.
English Deutsch Français
Italiano Español Česky
E-15
Page 22
Function Description
(8) Source
SLIDE SHOW
START
INTERVAL
(9) AUTO IMAGE
(10) CAP/DEL
(11) AUTO FOCUS
Switch between Camera, Playback and PC mode.
- Camera mode displays the video signal from the
built-in camera.
- Playback mode displays the captured image
from the built-in memory in 16-thumbnail images.
Use ▲,▼,◄, & ► buttons to make a selection
and ENTER to display the selected image in full
screen. To start slide show, press MENU, select
START and press ENTER to begin and end.
Select INTERVAL to set the display time interval
between frames in second.
- PC mode displays the video signal from the RGB
INPUT port of CP300.
Automatically adjust and set the white balance and
exposure setting.
- Capture a still image in Camera mode. The
captured image is saved in the built-in memory at
1024 x 768 resolution and can store up to 80
images.
- Remove the selected picture from the built-in
memory permanently in Playback mode.
Adjust the focus automatically.
E-16
Page 23
OOSSDD NNaavviiggaattiioonn TTrreeee
54210
RED
ON
OFF
AUTO
63160
DEUTSCH
FRANÇAIS
ITALIANA
ESPAÑOL
RED
2551400
Русский
FLICKER
MANUAL
AUTO
MANUAL
FLICKER
NIGHT VIEW
MODE
5 SECS
INTERVAL
TEXT
GRAPHICS
HIGH FRAME
IMAGE
MANUAL FOCUS
NEAR FAR
EXPOSURE
WHITE BALANCE
BRIGHTNESS
50 HZ
60 HZ
AUTO
RED
BLUE
LANGUAGE
CONTRAST
RESOLUTION
NIGHT VIEW
ENGLISH
255650
255650
1024 x 768
POLSKI
Čeština
FORMAT MEMORY
800 x 600
RED
BLUE
640 x 480
1280 x 720
NO
YES
255650
255650
USB CONNECTION
SAVE
USB CAMERA
IMG DOWNLOAD
PROFILE 1
PROFILE 2
English Deutsch Français
PROFILE 3
VERTICAL
COLOR
B / W
MENU
EFFECT
NEGATIVE
MIRROR OFF
REVERSE/MIRROR
PRESENTER
REVERSE OFF
AVERBOX OFF
PIP
TIMER
SPLIT SCREEN
AVERVISOR OFF
CAPTURE
SHADE
COLOR
SETTINGS
RESIZE
RECALL
DEFAULT
HORIZONTAL
LOWER LEFT
START
UPPER LEFT
UPPER RIGHT
LOWER RIGHT
PAUSE
STOP
SET TIME
SINGLE
CONTINUOUS
MODE
MANUAL FOCUS
IMAGE
LANGUAGE
FORMAT MEMORY
USB CONNECTION
SAVE
PROFILE 1
PROFILE 2
PROFILE 3
NO
YES
Italiano Español Česky
E-17
Page 24

MMeennuu FFuunnccttiioonnss
The MENU functions of CP300 enhance fine-tuning your screen display,
set the timer, select OSD language and more. Press the MENU button
to call up and exit from the main menu or sub-menu display. Then use
▲or▼ buttons to select the items in the menu list. Use ►/ENTER
button to enter sub-menu and ◄/ ENTER to return to main menu. To
adjust the setting, press ◄or► buttons. To make a selection, press
ENTER.
OSD Menu Description
MENU
EFFECT
REVERSE/MIRROR
PRESENTER
SPLIT SCREEN
PIP
TIMER
CAPTURE
SETTINGS
RECALL
DEFAULT
MENU
EFFECT
REVERSE/MIRROR
PRESENTER
SPLIT SCREEN
PIP
TIMER
CAPTURE
SETTINGS
RECALL
DEFAULT
MENU
EFFECT
REVERSE/MIRROR
PRESENTER
SPLIT SCREEN
PIP
TIMER
CAPTURE
SETTINGS
RECALL
DEFAULT
COLOR
B / W
NEGATIVE
MIRROR OFF
REVERSE OFF
AVERBOX OFF
AVERVISOR OFF
SHADE
COLOR
RESIZE
EFFECT
Press ► and use ▲or▼ buttons to select and display
the image in Camera mode into positive (true color),
monochrome (black and white) or negative. Then
/ENTER to make a selection.
press ►
REVERSE / MIRROR
Press ► and use ▲or▼ buttons to select and turn on
MIRROR to flip the image and REVERSE to rotate
the image by 180° in Camera mode. Then press
/ENTER to make a selection.
►
PRESENTER
Press ► and use ▲or▼ buttons to select and turn on
either AV ERB OX or AVERVISOR. Then press
/ENTER to make a selection. Only one feature can
►
be used at a time.
AVerBox overlays a frame on the presentation screen.
Selecting SHADE changes the opacity of the area
outside the box from 0%, 50% and 100%, COLOR to
change the frame color from red, green and blue, and
RESIZE to change the size of the frame. To resize or
move the frame around the presentation screen,
press the shuttle wheel ▲,▼,◄, & ►.
AVerVisor covers part of the presentation screen. The
upper part of the presentation screen is slightly
exposed when it is being called each time. To expose
E-18
Page 25

OSD Menu Description
MENU
EFFECT
REVERSE/MIRROR
PRESENTER
SPLIT SCREEN
PIP
TIMER
CAPTURE
SETTINGS
RECALL
DEFAULT
AVERBOX OFF
AVERVISOR OFF
SHADE
COLOR
RESIZE
part of the covered area, press the shuttle wheel
▲,▼,◄, & ►. Select SHADE to change the darkness
of the shaded area between 50% or 100%.
English Deutsch Français
MENU
EFFECT
REVERSE/MIRROR
PRESENTER
SPLIT SCREEN
PIP
TIMER
CAPTURE
SETTINGS
RECALL
DEFAULT
MENU
EFFECT
REVERSE/MIRROR
PRESENTER
SPLIT SCREEN
PIP
TIMER
CAPTURE
SETTINGS
RECALL
DEFAULT
MENU
EFFECT
REVERSE/MIRROR
PRESENTER
SPLIT SCREEN
PIP
TIMER
CAPTURE
SETTINGS
RECALL
DEFAULT
MENU
EFFECT
REVERSE/MIRROR
PRESENTER
SPLIT SCREEN
PIP
TIMER
CAPTURE
SETTINGS
RECALL
DEFAULT
VERTICAL
HORIZONTAL
LOWER LEFT
UPPER LEFT
UPPER RIGHT
LOWER RIGHT
START
PAUSE
STOP
SET TIME
SINGLE
CONTINUOUS
SPLIT SCREEN
Press ► and use ▲or▼ buttons to select dividing the
screen either vertically or horizontally. Then press
/ENTER to make a selection.
►
This function divides the screen into two parts. One
side displays the live image from the CP300 camera
and the other side displays the captured images from
the memory source in 8-thumbnail preview.
Use the ▲,▼,◄, &► buttons to make a selection and
ENTER to enlarge the selected image in split screen
mode. To horizontally or vertically pan the enlarged
image, use the ◄ & ► or ▲or▼ buttons.
PIP
Press ► and use ▲or▼ buttons to select the location
of the mini playback screen. Then press ►
make a selection.
Display a thumbnail of the captured image from the
memory source at the corner of the screen while in
Camera mode.
Use ◄ or ► buttons to move to the previous or next
image and ENTER to display the image in full screen.
TIMER
Press ► and use ▲or▼ buttons to select SET TIME
to set the time value, START to begin the countdown
timer, PAUSE/RESUME to temporarily halt or
continue, and STOP to end.
CAPTURE
Press ► and use ▲or▼ buttons to select SINGLE or
CONTINUOUS capture mode. Then press ►
to make a selection.
Setting SINGLE saves one still image only and
CONTINUOUS saves successive still images until the
built-in memory is full or when the CAP/DEL button is
being press again to stop.
/ENTER to
Italiano Español Česky
/ENTER
E-19
Page 26
OSD Menu Description
INTERVAL
5 SECS
MENU
EFFECT
REVERSE/MIRROR
PRESENTER
SPLIT SCREEN
PIP
TIMER
CAPTURE
SETTINGS
RECALL
DEFAULT
EXPOSURE
WHITE BALANCE
BRIGHTNESS
CONTRAST
RESOLUTION
IMAGE
MODE
MANUAL FOCUS
IMAGE
LANGUAGE
FORMAT MEMORY
USB CONNECTION
SAVE
MODE
TEXT
GRAPHICS
HIGH FRAME
MANUAL FOCUS
AUTO
MANUAL
FLICKER
NIGHT VIEW
MANUAL
0 5421
FLICKER
50 HZ
60 HZ
NIGHT VIEW
ON
OFF
AUTO
In Continuous mode, use ►or◄ buttons to increase
or decrease the capture time interval between frames
and then press ENTER to save the setting and exit.
The time interval can be set from 5 to 600 sec.
SETTINGS
Press ►, then use ▲or▼ buttons to select the items
in SETTINGS list and press ►/ENTER.
SETTINGS > MODE
Use ▲or▼ buttons to select between Text, Graphics
and High Frame enhancement mode and then
ENTER to make a selection.
• Text - corrects the intensity of the adjacent pixel
making it more uniform producing sharper and
clearer images.
• Graphics - adjusts the gradient of the adjacent
pixel making it appears to have a smooth image.
• High Frame - increases the frame rate capture and
can visually tracks the motion and react quickly.
Sufficient lighting is required when using this
mode.
SETTINGS > MANUAL FOCUS
Use ◄or► buttons to manually adjust the focus and
FARNEAR
then press ENTER to save the setting and exit.
SETTINGS > IMAGE > EXPOSURE
Press ► and use ▲or▼ buttons to select between
Auto, Manual, Flicker and Night View. Then press
►
/ENTER to make a selection.
Select AUTO to automatically adjust the camera
exposure to determine how much light is required.
SETTINGS > IMAGE > EXPOSURE > MANUAL
Use ►or◄ buttons to manually adjust the exposure
level then press ENTER to save the setting and exit.
SETTINGS > IMAGE > EXPOSURE > FLICKER
Use ▲or▼ buttons to select between 50Hz or 60Hz.
Some display devices cannot handle high refresh
rates. The image will flicker a couple of times as the
output is switched to another refresh rate.
SETTINGS > IMAGE > EXPOSURE > NIGHT VIEW
Use ▲or▼ buttons to turn Night View OFF or AUTO.
If you are presenting in a low-light condition, Night
View enables the image of the object to appear as
though under normal lighting conditions. CP300 can
E-20
Page 27
OSD Menu Description
NIGHT VIEW
ON
OFF
AUTO
IMAGE
EXPOSURE
WHITE BALANCE
BRIGHTNESS
CONTRAST
RESOLUTION
IMAGE
EXPOSURE
WHITE BALANCE
BRIGHTNESS
CONTRAST
RESOLUTION
IMAGE
EXPOSURE
WHITE BALANCE
BRIGHTNESS
CONTRAST
RESOLUTION
IMAGE
EXPOSURE
WHITE BALANCE
BRIGHTNESS
CONTRAST
RESOLUTION
LANGUAGE
ENGLISH
DEUTSCH
FRANÇAIS
ITALIANA
ESPAÑOL
Русский
POLSKI
Čeština
FORMAT MEMORY
NO
YES
USB CONNECTION
USB CAMERA
IMG DOWNLOAD
AUTO
RED
BLUE
RED
BLUE
1024 x 768
800 x 600
640 x 480
1280 x 720
automatically adjust the exposure to compensate for
the adverse condition, but the captured image will
appear to be in slow motion.
SETTINGS > IMAGE > WHITE BALANCE
Press ► and use ▲or▼ buttons to select between
auto or manually adjust the red and blue color to suit
the lighting condition or color temperature. Then
press ►/ENTER to make a selection.
SETTINGS > IMAGE > WHITE BALANCE > RED
Use ►or◄ buttons to manually adjust the red color
2550 65
level then press ENTER to save the setting and exit.
SETTINGS > IMAGE > WHITE BALANCE > BLUE
Use ►or◄ buttons to manually adjust the blue color
2550 65
level then press ENTER to save the setting and exit.
SETTINGS > IMAGE > BRIGHTNESS
Use ►or◄ buttons to increase or decrease the
63160
brightness level and improve the visibility of the
image. The brightness level can be set up to 63.
SETTINGS > IMAGE >
Use ►or◄ buttons to emphasize or reduce the
difference between light and dark conditions. The
2551400
contrast level can be adjustable up to 255.
SETTINGS > IMAGE >
Press ► and use ▲or▼ buttons to choose from
different display resolutions then press ►/ENTER to
make the selection.
This selection will not be available in TV output
(Composite/S-Video)
SETTINGS > LANGUAGE
Use ▲or▼ buttons to select from different languages
then press ►/ENTER to make the selection.
SETTINGS > FORMAT MEMORY
Use ▲or▼ buttons to select NO to exit or YES to
format and delete all the images saved in the built-in
memory then press ►/ENTER.
Please wait till the message “FORMAT” disappear to
finish the process.
SETTINGS > USB SELECT
Use ▲or▼ buttons to select the USB function
between USB Camera and Img Download.
• USB Camera - can be used as a computer
webcam or with our bundled software as video
recorder and capture still image.
English Deutsch Français
CONTRAST
RESOLUTION
Italiano Español Česky
E-21
Page 28
OSD Menu Description
USB CONNECTION
USB CAMERA
IMG DOWNLOAD
SAVE
PROFILE 1
PROFILE 2
PROFILE 3
MENU
EFFECT
REVERSE/MIRROR
PRESENTER
SPLIT SCREEN
PIP
TIMER
CAPTURE
SETTINGS
RECALL
DEFAULT
MENU
EFFECT
REVERSE/MIRROR
PRESENTER
SPLIT SCREEN
PIP
TIMER
CAPTURE
SETTINGS
RECALL
DEFAULT
PROFILE 1
PROFILE 2
PROFILE 3
NO
YES
• Img Download - transfer the captured images from
the built-in memory to computer hard disk.
SETTINGS > SAVE
Use ▲or▼ buttons to select which user setting profile
number to save your preferred setting. Only effect,
mode, brightness and contrast settings can be saved.
RECALL
Press ►and use ▲or▼ buttons to select from the list
to change to the preferred saved user setting profile
number then press ►/ENTER to make the selection.
DEFAULT
Press ► and use ▲or▼ buttons to select YES to
restore to original factory default setting or NO to exit
then press ►/ENTER to make the selection.
RRSS--223322CC DDiiaaggrraamm CCoonnnneeccttiioonn
CP300 can be controlled using a PC through RS-232 connection.
S-Video/RS-232 cable
RS-232 cable
(not supplied)
E-22
Computer
Laptop
Page 29
RRSS--223322CC CCaabbllee SSppeecc
Make sure the RS-232 cable matches the cable spec design.
1
PC COM Port
DSUB-9P (Female)
12345
6789
CD
RXD
TXD
DTR
DSR
RTS
CTS
RI (CI)
2
3
4
5
SG
6
7
8
9
RRSS--223322CC TTrraannssmmiissssiioonn SSppeecc
Star bit
Data bit
Stop bit
Parity bit
X parameter
Baud rate(Communication speed)
1
AVerVision RS-232 Port
2
TXD
3
RXD
4
5
SG
6
7
8
9
:1 bit
:8 bit
:1 bit
:None
:None
:9600bps
DSUB-9P (Female)
12345
6789
RRSS--223322CC CCoommmmuunniiccaattiioonn FFoorrmmaatt
Start Code(1 Byte) : 0xFF
Type Code(1 Byte) : 0x70
DataLength Code(1 Byte) : 0x01
Data Code(1 Byte) : See the Command Table for reference.
CheckSum Code(1 Byte) : See the Command Table for reference.
Format : Start + Type + DataLength + Data + CheckSum
Example : 0xFF + 0x70 + 0x01+ 0x1 + 0x70 (Command Power)
English Deutsch Français
Italiano Español Česky
RRSS--223322CC CCoommmmaanndd TTaabbllee
FUNCTION DATA CODE
POWER 0x1 0x70
ENTER 0x2 0x73
UP 0x3 0x72
DOWN 0x4 0x75
LEFT 0x5 0x74
RIGHT 0x6 0x77
MENU 0x7 0x76
AUTOFOCUS 0x8 0x79
SOURCE 0x9 0x78
AUTO IMAGE 0xA 0x7B
CAPTURE 0xB 0x7A
FREEZE 0xC 0x7D
E-23
CHECKSUM
CODE
Page 30
FUNCTION DATA CODE
REVERSE 0xD 0x7C
EFFECT 0xE 0x7F
TIMER 0xF 0x7E
RECALL 0x10 0x61
SPLIT SCRN 0x11 0x60
PRESENTER 0x12 0x63
PIP 0x13 0x62
CHECKSUM
CODE
TTrraannssffeerrrriinngg tthhee CCaappttuurreedd IImmaaggee ttoo PPCC
This enables you to transfer the captured image from the built-in memory
to PC.
The instruction below MUST be read and followed BEFORE
connecting the USB cable.
1. MUST set the USB CONNECTION as IMG DOWNLOAD before
connecting the USB cable.
To set the USB CONNECTION as IMG DOWNLOAD, press MENU
> select SETTING and press ►, select USB CONNECTION and
press ►, select IMG DOWNLOAD and press ►/ENTER, and
MENU to close the OSD menu.
2. When “IMG DOWNLOAD” appears at the lower right corner of the
presentation screen, you may now connect the USB cable.
3. Upon connecting the USB cable, the system automatically detects
the new removable disk. You may now transfer the captured image(s)
from the CP300 built-in memory to PC hard disk.
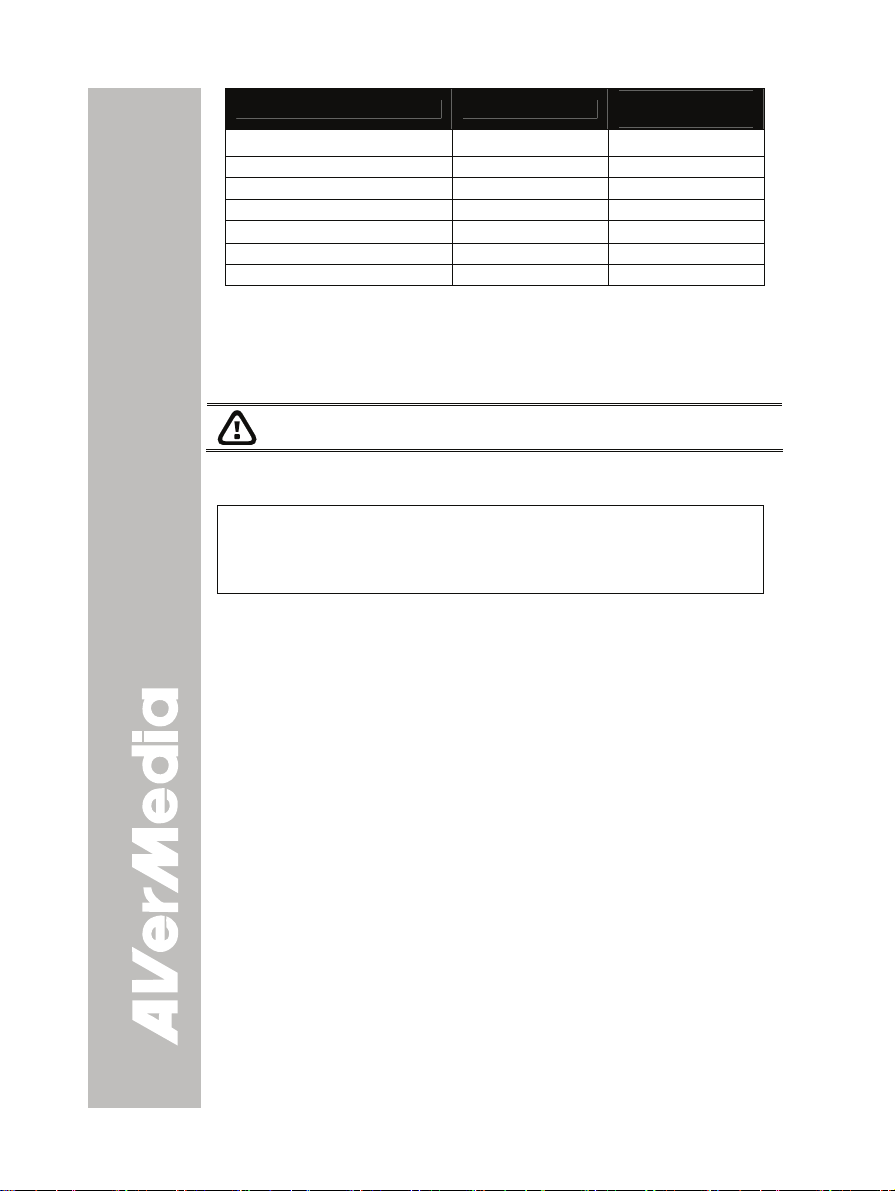
TTrroouubblleesshhoooottiinngg
This section provides many useful tips on how to solve common
problems while using the CP300.
There is no picture on the presentation screen.
1. Check all the connectors again as shown in this manual.
2. Check the on/off switch of the display output device.
3. Verify the setting of the display output device.
4. If you are presenting from a notebook or computer through the display output
device, please check the connection and switch the document camera source
to PC Mode.
I have set up the CP300 and checked all the connections as
specified in the manual but I cannot get a picture on the preferred
presentation screen.
1. The unit POWER button turns orange in standby mode. Press the POWER
button again to turn on and the LED light will turn blue.
2. The default camera display resolution setting is on 1024x768. If your output
device does not support this resolution; no image can be projected. Simply
press hold the MENU and
► button to the change the resolution setting.
E-24
Page 31

3. If your display output device is on TV or any analog device, please switch the
TV-RGB dip switch to TV.
The picture on the presentation screen is distorted or the image is
blurry.
1. Reset all changed settings, if any, to the original manufacturer default setting
(Refer to the Menu Functions for more details and steps).
2. Use the Brightness and Contrast menu functions to reduce the distortion if
applicable.
3. If you discover that the image is blurry or out of focus, press the Auto Focus
button on the control panel or remote control.
There is no computer signal on presentation screen.
1. Check all the cable connections among the display device, CP300 and your
PC.
2. Connect your PC to the CP300 first before you power on your computer.
3. Make sure to switch your laptop to output display on external display device.
The presentation screen does not show the exact desktop image on
my PC or Notebook after I toggle from Camera to PC mode.
1. Return to your PC or Notebook, place the mouse on the desktop and right
click, choose “Properties”, choose “Setting” tab, click on “2” monitor and
check the box “Extend my Windows desktop onto this monitor”.
2. Then go back one more time to your PC or Notebook and place the mouse on
the desktop and right click again.
3. This time choose “Graphics Options”, then “Output To”, then “Intel® Dual
Display Clone”, and then choose “Monitor + Notebook”.
4. After you follow these steps, you should be able to see the same desktop
image on your PC or Notebook as well as on the presentation screen.
How do I download images from CP300 to a computer ? Is it
normal that CP300 will reset to camera mode after I download
images and disconnect the USB cable?
Choose "IMG Download" from the Menu, and then connect the USB cable to
transfer the captured images from the CP300 to the computer. When finished,
unplug the USB cable. The CP300 will automatically reset and switch to camera
mode.
English Deutsch Français
Italiano Español Česky
LLiimmiitteedd WWaarrrraannttyy
For a period of time beginning on the date of purchase of the applicable product
and extending as set forth in the “Warranty Period of AVerMedia Product
Purchased” section of the warranty card, AVerMedia Information, Inc.
(“AVerMedia”) warrants that the applicable product (“Product”) substantially
conforms to AVerMedia’s documentation for the product and that its manufacture
and components are free of defects in material and workmanship under normal
use. “You” as used in this agreement means you individually or the business entity
on whose behalf you use or install the product, as applicable. This limited
warranty extends only to You as the original purchaser. Except for the foregoing,
the Product is provided “AS IS.” In no event does AVerMedia warrant that You
will be able to operate the Product without problems or interruptions, or that the
Product is suitable for your purposes. Your exclusive remedy and the entire
liability of AVerMedia under this paragraph shall be, at AVerMedia’s option, the
repair or replacement of the Product with the same or a comparable product. This
warranty does not apply to (a) any Product on which the serial number has been
defaced, modified, or removed, or (b) cartons, cases, batteries, cabinets, tapes, or
accessories used with this product. This warranty does not apply to any Product
E-25
Page 32

that has suffered damage, deterioration or malfunction due to (a) accident, abuse,
misuse, neglect, fire, water, lightning, or other acts of nature, commercial or
industrial use, unauthorized product modification or failure to follow instructions
included with the Product, (b) misapplication of service by someone other than the
manufacturer’s representative, (c) any shipment damages (such claims must be
made with the carrier), or (d) any other causes that do not relate to a Product
defect. The Warranty Period of any repaired or replaced Product shall be the
longer of (a) the original Warranty Period or (b) thirty (30) days from the date of
delivery of the repaired or replaced product.
Limitations of Warranty
AVerMedia makes no warranties to any third party. You are responsible for all
claims, damages, settlements, expenses, and attorneys’ fees with respect to
claims made against You as a result of Your use or misuse of the Product. This
warranty applies only if the Product is installed, operated, maintained, and used in
accordance with AVerMedia specifications. Specifically, the warranties do not
extend to any failure caused by (i) accident, unusual physical, electrical, or
electromagnetic stress, neglect or misuse, (ii) fluctuations in electrical power
beyond AVerMedia specifications, (iii) use of the Product with any accessories or
options not furnished by AVerMedia or its authorized agents, or (iv) installation,
alteration, or repair of the Product by anyone other than AVerMedia or its
authorized agents.
Disclaimer of Warranty
EXCEPT AS EXPRESSLY PROVIDED OTHERWISE HEREIN AND TO THE
MAXIMUM EXTENT PERMITTED BY APPLICABLE LAW, AVERMEDIA
DISCLAIMS ALL OTHER WARRANTIES WITH RESPECT TO THE PRODUCT,
WHETHER EXPRESS, IMPLIED, STATUTORY OR OTHERWISE, INCLUDING
WITHOUT LIMITATION, SATISFACTORY QUALITY, COURSE OF DEALING,
TRADE USAGE OR PRACTICE OR THE IMPLIED WARRANTIES OF
MERCHANTABILITY, FITNESS FOR A PARTICULAR PURPOSE OR
NONINFRINGEMENT OF THIRD PARTY RIGHTS.
Limitation of Liability
IN NO EVENT SHALL AVERMEDIA BE LIABLE FOR INDIRECT, INCIDENTAL,
SPECIAL, EXEMPLARY, PUNITIVE, OR CONSEQUENTIAL DAMAGES OF ANY
NATURE INCLUDING, BUT NOT LIMITED TO, LOSS OF PROFITS, DATA,
REVENUE, PRODUCTION, OR USE, BUSINESS INTERRUPTION, OR
PROCUREMENT OF SUBSTITUTE GOODS OR SERVICES ARISING OUT OF
OR IN CONNECTION WITH THIS LIMITED WARRANTY, OR THE USE OR
PERFORMANCE OF ANY PRODUCT, WHETHER BASED ON CONTRACT OR
TORT, INCLUDING NEGLIGENCE, OR ANY OTHER LEGAL THEORY, EVEN IF
AVERMEDIA HAS ADVISED OF THE POSSIBILITY OF SUCH DAMAGES.
AVERMEDIA’S TOTAL, AGGREGATE LIABILITY FOR DAMAGES OF ANY
NATURE, REGARDLESS OF FORM OF ACTION, SHALL IN NO EVENT
EXCEED THE AMOUNT PAID BY YOU TO AVERMEDIA FOR THE SPECIFIC
PRODUCT UPON WHICH LIABILITY IS BASED.
Governing Law and Your Rights
This warranty gives You specific legal rights; You may also have other rights
granted under state law. These rights vary from state to state.
For warranty period, please refer to the warranty card.
E-26
Page 33

FCC-HINWEIS (KLASSE A)
Dieses Gerät erfüllt Teil 15 der FCC-Regularien. Der Betrieb unterliegt den folgenden
zwei Voraussetzungen: (1) Dieses Gerät darf keine Störungen verursachen, und 2)
dieses Gerät muss jegliche empfangenen Störungen hinnehmen, einschließlich
Störungen, die zu unbeabsichtigtem Betrieb führen können.
Erklärung der Federal Communications Commission
HINWEIS – Diese Ausrüstung wurde getestet und als mit den Grenzwerten für Digitalgeräte der
Klasse A gemäß Teil 15 der FCC-Regularien übereinstimmend befunden. Diese Grenzwerte wurden
geschaffen, um angemessenen Schutz gegen Störungen beim Betrieb in Wohngebieten zu
gewährleisten. Diese Ausrüstung erzeugt, verwendet und kann Hochfrequenzenergie abstrahlen
und kann - falls nicht in Übereinstimmung mit den Bedienungsanweisungen installiert und verwendet
- Störungen der Funkkommunikation verursachen. Allerdings ist nicht gewährleistet, dass es in
bestimmten Installationen nicht zu Störungen kommt. Falls diese Ausrüstung Störungen des Radiooder Fernsehempfangs verursachen sollte, was leicht durch Aus- und Einschalten der Ausrüstung
herausgefunden werden kann, wird dem Anwender empfohlen, die Störung durch eine oder mehrere
der folgenden Maßnahmen zu beseitigen:
• Neuausrichtung oder Neuplatzierung der Empfangsantenne(n).
• Vergrößern des Abstands zwischen Ausrüstung und Empfänger.
• Anschluss der Ausrüstung an einen vom Stromkreis des Empfängers getrennten Stromkreis.
• Hinzuziehen des Händlers oder eines erfahrenen Radio-/Fernsehtechnikers.
Class A ITE:
Class A ITE ist eine ITE-Kategorie, bei der A ITE-Grenzwerte, nicht jedoch B ITE-Grenzwerte erfüllt
werden. Der Verkauf solcher Geräte sollte nicht eingeschränkt werden, allerdings muss die folgende
Warnung in der Bedienungsanleitung enthalten sein:
Warnung – Dies ist ein Produkt der Klasse A. In Wohnumgebungen kann dieses Produkt
Funkstörungen verursachen. In diesem Fall obliegt es dem Anwender, angemessene Maßnahmen
zu ergreifen.
CE-Klasse A (EMV)
Produkt Funkstörungen verursachen. In diesem Fall obliegt es dem Anwender, angemessene
Maßnahmen zur Beseitigung der Störung zu ergreifen.
HAFTUNGSAUSSCHLUSS
Hinsichtlich der Inhalte dieser Dokumentation, ihrer Qualität, Güte, Handelstauglichkeit oder
Eignung für einen bestimmten Zweck werden keinerlei Gewährleistungen oder Zusicherungen
übernommen, weder ausdrücklich noch implizit. Die in dieser Dokumentation präsentierten
Informationen wurden sorgfältig auf ihre Richtigkeit überprüft, allerdings wird keine Haftung für
Ungenauigkeiten übernommen. Die Angaben in dieser Dokumentation können sich ohne
Vorankündigung ändern.
In keinem Fall haftet AVerMedia für direkte, indirekte, spezielle, beiläufige oder Folgeschäden, die
durch den Einsatz oder das Unvermögen zum Einsatz des Produktes oder der Dokumentation
entstehen, selbst wenn AVerMedia auf die Möglichkeit solcher Schäden hingewiesen wurde.
MARKEN
AVerVision ist eine eingetragene Marke der AVerMedia Information, Inc. IBM PC ist eine
eingetragene Marke der International Business Machines Corporation. Macintosh ist eine
eingetragene Marke der Apple Computer, Inc. Microsoft ist eine eingetragene Marke, Windows ist
eine Marke der Microsoft Corporation. Sämtliche anderen in dieser Dokumentation erwähnten
Produkte oder Firmennamen dienen lediglich Identifizierungs- und Anschauungszwecken und
können Marken oder eingetragene Marken ihrer jeweiligen Besitzer sein.
Hiermit wird bestätigt, dass dieses Produkt die Anforderungen der Ratsdirektive zur
Annäherung von Rechtsvorschriften der Mitgliedsstaaten hinsichtlich der Direktive
zur elektromagnetischen Verträglichkeit 2004/108/EEC erfüllt.
Warnung – Dies ist ein Produkt der Klasse A. In Wohnumgebungen kann dieses
English Deutsch Français
Italiano Español Česky
Page 34

URHEBERRECHT
© 2008 by AVerMedia INFORMATION, Inc. Alle Rechte vorbehalten. Kein Teil dieser Publikation
darf in jedweder Form und durch jedwede Mittel ohne schriftliche Genehmigung von AVerMedia
Information, Inc. reproduziert, übertragen, umgesetzt, in Abrufsystemen gespeichert oder in jegliche
Sprachen übersetzt werden.
DAS SYMBOL MIT DER DURCHGESTRICHENEN ABFALLTONNE BEDEUTET, DASS
DIESES PRODUKT NICHT MIT DEM HAUSMÜLL ENTSORGT WERDEN DARF.
STATTDESSEN MÜSSEN ALTGERÄTE ZUM RECYCLING VON ELEKTRISCHEN UND
ELEKTRONISCHEN ALTGERÄTEN ZU SPEZIELLEN SAMMELSTELLEN GEBRACHT
WERDEN. WEITERE INFORMATIONEN ÜBER ANNAHMESTELLEN ZUR
ENTSORGUNG VON ALTGERÄTEN ZU RECYCLINGZWECKEN ERHALTEN SIE VON
IHREM ENTSORGUNGSDIENSTLEISTER ODER IN DEM GESCHÄFT, IN DEM SIE
DAS GERÄT ERWORBEN HABEN.
Page 35

IInnhhaallttssvveerrzzeeiicchhnniiss
Einleitung..........................................................D-1
Lieferumfang.....................................................D-1
Optionales Zubehör .........................................D-2
AVerVision CP300 - Komponenten.................D-3
Technische Daten.............................................D-4
Anschlüsse ....................................................... D-5
Netzteilanschluss.................................................... D-6
Anschluss eines Fernsehgerätes............................ D-6
Anschluss von VGA-, Mac-Monitor oder
LCD-/DLP-Projektor................................................ D-
Anschluss an IBM-kompatiblen PC oder
Macintosh-Computer............................................... D-
Installation des optionalen Leuchtkastens .............. D-9
Anschluss an ein Mikroskop ................................... D-9
AVerVision CP300 einrichten ........................D-10
Kamerakopf .......................................................... D-10
LED- und Laser-Positionierungshilfe..................... D-10
Flexibler Schwanenhals und Arm.......................... D-11
Infrarotsensor........................................................ D-11
Antireflexbogen..................................................... D-11
Infrarotfernbedienung verwenden................ D-12
Tipptasten-Bedienfeld....................................D-16
OSD-Navigationsbaum .................................. D-18
Menüfunktionen..............................................D-19
RS232-Anschlussdiagramm..........................D-23
RS232C-Pinbelegung.....................................D-23
RS232C-Übertragungsdaten .........................D-24
RS-232C-Übertragungsformat ......................D-24
RS-232C-Befehlstabelle.................................D-24
Aufgenommene Bilder zum PC
übertragen.......................................................D-
Problemlösung ............................................... D-25
Garantie...........................................................D-26
25
English Deutsch Français
7
8
Italiano Español Česky
Page 36

Page 37

A
V
®
EEiinnlleeiittuunngg
Danke für den Kauf von
AVerMedia® AVerVision
CP300. Diese
Dokumentenkamera zeigt
im Nu Präsentationen von
Dokumenten, Negativen,
Transparentem und
3D-Objekten auf einem
TV, LCD- oder
DLP-Projektor.
Die AVerVision CP300 ist
das ideale
Präsentationswerkzeug für
geschäftliche,
akademische,
medizinische und
wissenschaftliche
Anwendungen.
LLiieeffeerruummffaanng
g
AVerMedia® AVerVision CP300
h
s
i
l
g
n
E
0
0
3
P
C
on
i
s
i
V
r
®
e
V
A
a
h
di
e
M
r
c
e
V
A
s
l
t
ua
an
u
M
r
e
s
e
U
D
s
i
a
ç
n
a
r
F
o
n
a
i
l
a
t
I
l
o
ñ
a
p
s
E
y
k
s
e
Č
a
i
d
e
M
r
e
a
r
e
m
a
C
t
n
e
m
u
c
o
D
l
a
t
i
g
i
D
Bedienungsanleitung
Tasche
Antireflexbogen
Fernbedienung
(Batterien
mitgeliefert)
Treiber-CD
English Deutsch Français
Italiano Español Česky
Cinch-Kabel
USB-Kabel
S-Video-Kabel
Computer-Verlängerungskabel
(VGA-Kabel)
Netzkabel
* Das Netzkabel kann je nach
S-Video-/RS-232-Kabel
Steckdosenausführung des
Landes, in dem das Produkt
verkauft wird, unterschiedlich
aussehen.
Netzteil
D-1
Page 38

OOppttiioonnaalleess ZZuubbeehhöörr
34 mm-Mikroskopadapter
Leuchtkasten
28 mm-Mikroskopadapter
D-2
Page 39

(
(1) Kamerakopf
(2) LED-Beleuchtung
mit Laser-
Positionierungshilfe
(3) Kameraobjektiv
(4) Schalter für LED-
und Laser-
Positionierungshilfe
(5) Infrarotsensor
(6) Bedienfeld
(7) Rechte Seitenwand
(8) Schwanenhals
(9) Rückwand
(10) Linke Seitenwand
(11) Leuchtkasten-
Stromanschluss
(12) Netzteilanschluss,
12 V
Gleichspannung
(13) Diebstahlsicher-
ungsschlitz
(14) Kamerakopfhalter
(15) S-Video-Ausgang
(16) Composite-
Videoausgang
(17) RGB-Eingang
(18) RGB-Ausgang
(19) TV-RGB-Schalter
(20) USB-Anschluss
(21) DVI-I-Ausgang
AAVVeerrVViissiioonn CCPP330000 -- KKoommppoonneenntteenn
Die nachstehenden Abbildungen zeigen die Komponenten der
AVerVision CP300.
(8)
(9)
10)
Rechte Seite
(14)
Rückseite
(17)
Linke Seite
(20)
(5)
(6)
(7)
(13)
(11)
(12)
(15)
(16)(18)
(19)
English Deutsch Français
(1)
(2)
(3)
(4)
Italiano Español Česky
(21)
D-3
Page 40

TTeecchhnniisscchhee DDaatteenn
Bilderfassung
Sensor ½ Zoll, Progressive Scan-CMOS
Anzahl Pixel 3,2 Megapixel
Bildrate 24 Einzelbilder/Sekunde (maximal)
Weißabgleich Auto / Manuell
Belichtung Auto / Manuell / Frequenz / Nachtmodus
Bildmodus Text / Grafik / Hohe Bildrate
Effekte Farbe / Schwarzweiß / Negativ
RGB-
Analogausgang
Bilderfassung Bis zu 80 Einzelbilder
WXGA, 60 Hz (1280 x 720); XGA 60 Hz; SVGA 60
Hz; VGA 60 Hz
Optik
Objektiv F3,0; Brennweite 9,6 mm
Fokussierung Automatisch / Manuell
Aufnahmebereich 300 mm x 225 mm (max.)
Vergrößerung Zweifacher AVERZOOM, achtfacher Digitalzoom
Stromversorgung
Stromquelle 100 bis 240 V~; 4,0 bis 4,2 A; 50 bis 60 Hz
Stromverbrauch 18 Watt (Leuchte aus); 20 Watt (Leuchte an)
Beleuchtung
Leuchtmitteltyp LED-Leuchte mit Laserpointer
Eingang / Ausgang
RGB-Eingang D-Sub, 15-polig (VGA)
RGB-Ausgang D-Sub, 15-polig (VGA)
DVI-I-Ausgang DVI-I-Typ
S-Video Mini-DIN-Anschluss
Composite-Video Cinch-Anschluss
USB USB 2.0
DC 12V (Eingang) Netzteilanschluss
Leuchtkasten Netzteilanschluss (6 V Gleichspannung)
Abmessungen
Im Betrieb 160 mm x 170 mm x 450 mm
Zusammengelegt 287,4 mm x 232,5 mm x 61 mm
Gewicht 2,4 kg
D-4
Page 41

AAnnsscchhllüüssssee
Über die Anschlüsse an der Rückseite und an den Seiten der CP300
können Sie das Gerät an Computer, Monitore, LCD-/DLP-Projektoren,
Fernseh- und andere Geräte anschließen. Die nachstehende Abbildung
zeigt die Anschlüsse an der Rückseite und den Seiten der CP300. In der
folgenden Tabelle finden Sie eine kurze Beschreibung der jeweiligen
Funktionen.
Rechte Seite
Rückseite und linke Seite
(1)
(2)(3)
(4)
(5)
(6)
(7)
(8)
(9)
(10)
Anschluss Beschreibung
(1) Diebstahlsicher-
ungsschlitz
(2) Leuchtkasten
(3) 12 V Gleichspannung Hier schließen Sie das Netzteil an.
(4) RGB-EINGANG
(5) RGB-AUSGANG
(6) VIDEOAUSGANG
(RCA/Composite)
(7) S-VIDEOAUSGANG
(8) DVI-I-AUSGANG
Hier können Sie ein Kensington-kompatibles
Sicherheitsschloss oder eine andere
Diebstahlsicherung anbringen.
An diesen Ausgang schließen Sie den optionalen
Leuchtkasten an.
Empfängt das Signal von einem Computer oder
anderen Quellen und leitet es nur weiter durch den
RGB-Ausgang.
Verbinden Sie diesen Anschluss mit dem
VGA-Ausgang des Computers.
Gibt das Signal von der Kamera, dem RGB-Eingang
oder den Bildaufzeichnungen im Speicher auf einem
VGA/Mac-Monitor oder LCD/DLP-Projektor aus.
Gibt das Signal von der Kamera oder den
Bildaufzeichnungen im Speicher auf einem
Fernseher oder Videogerät aus.
Gibt das Signal von der Kamera oder den
Bildaufzeichnungen im Speicher auf einem
Fernseher oder Videogerät aus.
An diesem Ausgang liegt das RGB-Signal der
Kamera, des RGB-Eingangs und gespeicherter
Bilder an. Hier können Sie einen VGA-/Mac-Monitor
oder einen LCD/DLP-Projektor mit DVI-I-Schnittstelle
anschließen.
Falls DVI-I nicht von Ihrem Anzeigegerät unterstützt
wird, können Sie nur Signale der Kamera und
gespeicherte Bilder anzeigen lassen.
English Deutsch Français
Italiano Español Česky
D-5
Page 42

Anschluss Beschreibung
(9) USB
(10) TV-RGB-Dip-
Schalter
Verwendet den CP300 als USB-Kamera oder
überträgt die Bildaufzeichnungen im
CP300-Speicher zum PC.
Stellen Sie den Ausgang entweder auf Video und
S-Video oder auf RGB und DVI-I ein.
NNeettzztteeiillaannsscchhlluussss
Das Netzteil schließen Sie an eine normale Steckdose mit 100 bis 240 V
Wechselstrom an.
Steckdose
Netzkabel
AAnnsscchhlluussss eeiinneess FFeerrnnsseehhggeerräätteess
Ermitteln Sie den Video, S-Video- oder SCART RGB-Eingang des
Fernsehers oder Videogeräts (d.h. VCR), um Ihre Präsentation auf einem
Videotape aufzuzeichnen, und verbinden Sie ihn mit dem S-VIDEO- oder
VIDEOAUSGANG der CP300. Befolgen Sie im Zweifelsfall die Anweisungen
in der Bedienungsanleitung des Fernsehers oder Videogeräts.
Netzteil
Um eine bessere Videoqualität zu erreichen, sollten Sie
unbedingt den S-Video-Anschluss benutzen.
Achten Sie darauf, dass der TV/RGB-Umschalter auf TV
eingestellt ist.
Projektor
S-Video-zu-SCART-Kabel
(nicht mitgeliefert)
S-Video-Kabel
Cinch-Kabel
Cinch-zu-SCART-Kabel
(nicht mitgeliefert)
SCART
S-VIDEO
VIDEO
SCART
Projektor
Fernsehgerät
VCR
D-6
Page 43

AAnnsscchhlluussss vvoonn VVGGAA--,, MMaacc--MMoonniittoorr ooddeerr
LLCCDD--//DDLLPP--PPrroojjeekkttoorr
Ermitteln Sie den RGB-Eingang (VGA) des Anzeigegeräts und verbinden Sie ihn
mit dem RGB-AUSGANG der CP300. Befolgen Sie im Zweifelsfall die
Anweisungen in der Bedienungsanleitung des Geräts.
Sorgen Sie dafür, dass der TV/RGB-Umschalter auf RGB
eingestellt ist.
AAnnsscchhlluussss vvoonn VVGGAA--MMoonniittoorr ooddeerr
LLCCDD//DDLLPP--PPrroojjeekkttoorr m
Schließen Sie den DVI-I-Ausgang (DVI-I OUTPUT) der CP300 an den
DVI-Eingang des Anzeigegerätes an. Falls Sie nicht sicher sind, welcher
Anschluss der richtige ist, schauen Sie bitte in die Anleitung zum entsprechenden
Gerät.
RGB- (VGA-) Kabel
(nicht mitgeliefert)
Mac-Monitor
LCD/DLP-Projektor
Röhrenmonitor
m
iitt DDVVII--SScchhnniittttsstteellllee
LCD-Monitor
English Deutsch Français
Italiano Español Česky
Sorgen Sie dafür, dass der TV/RGB-Umschalter auf RGB eingestellt
ist.
LCD-Monitor mit
DVI-Schnittstelle
DVI-Kabel
(nicht mitgeliefert)
LCD/DLP-Projektor
mit DVI-Schnittstelle
D-7
Page 44

AAnnsscchhlluussss aann IIBBMM--kkoommppaattiibblleenn PPCC
ooddeerr MMaacciinnttoosshh--CCoommppuutteerr
Schließen Sie den RGB-Videoausgang (VGA) Ihres Computers oder Notebooks
an den RGB-Eingang (RGB INPUT) der CP300 an. Das Videosignal des
RGB-Eingangs wird an die RGB- und DVI-I-Ausgänge geleitet und auf dem
Bildschirm angezeigt.
Computer-Verlängerungskabel
(VGA-Kabel)
Computer
MAC
CCoommppuutteerraannsscchhlluussss ppeerr UUSSBB--VVeerrbbiinndduunngg
Ermitteln Sie den USB-Anschluss des Computers oder Laptops und verbinden
Sie ihn mit dem USB-Anschluss der CP300. Auf diese Weise wird die CP300 zur
USB-Kamera und überträgt Bildaufzeichnungen im Speicher und zum Computer.
Siehe auch “Übertragen von Bildern von der AVerVision CP300 zum PC”.
Notebook
Computer
USB-Kabel
Notebook
MAC
D-8
Page 45

IInnssttaallllaattiioonn ddeess ooppttiioonnaalleenn LLeeuucchhttkkaasstteennss
Mit dem optionalen Leuchtkasten können Sie Röntgenbilder, Transparenzfolien
und Negative betrachten.
Leuchtkasten
(optional)
EINSCHALTEN
AAnnsscchhlluussss aann eeiinn MMiikkrroosskkoopp
Wenn Sie die CP300 an ein Mikroskop anschließen, können Sie mikroskopisch
kleine Objekte auf einem großen Bildschirm untersuchen, ohne Ihre Augen zu
überlasten.
Hier anschließen
Mikroskop
adapter
English Deutsch Français
Italiano Español Česky
Mikroskop
D-9
Page 46

AAVVeerrVViissiioonn CCPP330000 eeiinnrriicchhtteenn
In diesem Abschnitt finden Sie nützliche Tipps zum Anpassen der CP300 an Ihren
persönlichen Bedarf.
KKaammeerraakkooppff
Der Kamerakopf kann um 90° nach links und rechts gedreht werden. Der Riegel
muss gedrückt werden, um das LED-Licht zu öffnen und auszufahren.
Sorgen Sie dafür, dass der TV/RGB-Umschalter auf RGB
eingestellt ist.
90° 90°
Entriegelung
LLEEDD-- uunndd LLaasseerr--PPoossiittiioonniieerruunnggsshhiillffee
Zu den einmaligen Ausstattungsmerkmalen der CP300 zählen vier
Positionierung-Laserpointer zur Definition des Anzeigebereiches. Dadurch
können Sie das Objekt schnell und einfach unterhalb der Kamera zentrieren.
Dazu stehen Ihnen drei unterschiedliche Einstellungen für Licht- und
Laser-Positionierungspointer zur Verfügung:
180°
AusAus
Nur weiße
LED
Dokumentpositionierungspointer
Weiße LED u nd
Dokumentpositionierungspointer
D-10
Page 47

FFlleexxiibblleerr SScchhwwaanneennhhaallss uunndd AArrmm
Der flexible Schwanenhals und Arm ermöglichen Ihnen die Positionierung des
Kamerakopfes in einen beliebigen Winkel.
90°
IInnffrraarroottsseennssoorr
Richten Sie die Fernbedienung auf den Fernbedienungssensor, wenn
Sie das Gerät mit der Fernbedienung steuern.
English Deutsch Français
AAnnttiirreefflleexxbbooggeenn
Der Blendschutz ist ein besonders beschichteter Film, der hilft, grelles
Licht zu eliminieren, das bei der Anzeige stark leuchtender Objekte oder
Hochglanzoberflächen wie von Illustrierten oder Fotos auftreten könnte.
Legen Sie den Blendschutz einfach oben auf das glänzende Dokument,
um Lichtreflektionen zu reduzieren.
D-11
Italiano Español Česky
Page 48

IInnffrraarroottffeerrnnbbeeddiieennuunngg vveerrwweennddeenn
Die Fernbedienung Ihrer CP300 ist eine große Hilfe bei Präsentationen.
Mit der Fernbedienung können Sie zwischen drei Präsentationsmodi
umschalten und auf verschiedene Funktionen zugreifen. Bevor Sie die
Fernbedienung benutzen können, müssen Sie zunächst zwei Batterien
(Größe „AAA“, mitgeliefert) in das Batteriefach an der Rückseite der
Fernbedienung einlegen. Zum Einsatz der Fernbedienung schauen Sie
sich bitte die nachstehende Abbildung und die folgenden
Beschreibungen an.
(1)
(2)
(3)
(4)
(13)
(14)
(15)
(16)
(17)
(5)
(6)
(7)
(8)
(9)
(10)
(11)
(12)
Name Funktion
(1) POWER Schaltet das Gerät ein und aus.
(2) LASER
(3) Wechselrad
Schaltet den Laserpointer ein.
Schauen Sie NIEMALS direkt in den
Laserstrahl, richten Sie den Strahl nicht auf
reflektierende Dinge (z. B. Spiegel oder
spiegelnde Oberflächen).
- Durch Drehen des Wechselrads können Sie
Bilder nur im Kamera- und Wiedergabemodus
einzoomen (im Uhrzeigersinn) und auszoomen
(gegen den Uhrzeigersinn).
Wenn die maximale AVERZOOM-Stufe von etwa
200 % erreicht ist, können Sie das Bild digital
noch weiter auf bis zu 1600 % vergrößern. Mit
ENTER (EINGABE) kehren Sie wieder zur
Normalansicht (100 %) zurück.
D-12
Page 49

Name Funktion
(Wechselrad)
(4) EINGABE Wählt eine Option im Wiedergabemodus und
(5) AF (Autofokus) Stellt das Bild automatisch scharf..
(6) Quelle
(7) AUFN/ENTF
(8) UMDREHEN Dreht das Bild (nur im Kameramodus) um 180 °.
(9) TIMER Zeigt das OSD-Timermenü an. Hier können Sie
(10) PROFIL Zur Auswahl von drei benutzerdefinierten Profilen
(11) PIP
- Drücken Sie ▲,▼,◄, & ► am Wechselrad, um
ein gezoomtes Bild zu schwenken, ein Bild aus
16 Miniaturen auszuwählen, zur nächsten oder
vorherigen Vollbildvorschau im
Wiedergabemodus zu wechseln oder um im
OSD-Hauptmenü und Untermenü eine Option zu
wählen oder einzustellen (weitere Details siehe
Menüfunktionen).
OSD-Menü aus.
Schaltet zwischen Kamera-, Wiedergabe- und
PC-Modus hin und her.
- Der Kameramodus zeigt das Videosignal von der
eingebauten Kamera an.
- Der Wiedergabemodus zeigt Bildaufzeichnungen
im eingebauten Speicher in Form von 16
Miniaturen an. Treffen Sie eine Auswahl mit den
Tasten ▲,▼,◄, & ► und drücken Sie ENTER
(EINGABE), um das ausgewählte Bild als
Vollbild anzuzeigen. Für den Start einer Diashow
drücken Sie MENÜ, wählen Sie START und
drücken Sie ENTER (EINGABE), um diese zu
beginnen und zu stoppen. Wählen Sie
INTERVALL, um das Zeitintervall zwischen den
angezeigten Einzelbildern in Sekunden
festzulegen.
- Der PC-Modus zeigt das Videosignal vom
RGB-EINGANG der CP300 an.
- Nimmt ein Foto im Kameramodus auf. Bis zu 80
Bildaufzeichnungen können im eingebauten
Speicher mit einer Auflösung von 1024 x 768
gespeichert werden.
- Entfernt das ausgewählte Bild permanent aus
dem eingebauten Speicher im
Wiedergabemodus.
nach der Auswahl von ZEIT EINSTELLEN die
gewünschte Zeit mit den Tasten ▲ und ▼ festlegen,
den Countdown mit START starten, mit
PAUSE/FORTSETZEN anhalten und fortsetzen
oder mit STOPP komplett abbrechen.
(weitere Hinweise finden Sie bei den
Menüfunktionen unter SPEICHERN).
Zeigt im Kameramodus eine Miniaturdarstellung
eines gespeicherten Bildes in der Ecke des
Bildschirms an.
English Deutsch Français
Italiano Español Česky
D-13
Page 50

Name Funktion
(PIP)
(12) PRÄSENTATOR
Mit den Tasten ◄ und ► springen Sie zum
vorherigen oder nächsten Bild, mit ENTER
(EINGABE) zeigen Sie das gewünschte Bild in
voller Größe an. Wenn Sie den
Mini-Wiedergabebildschirm in eine andere Ecke
verschieben möchten, drücken Sie MENU, wählen
BIB und anschließend die gewünschte Position.
Zum Ein- und Ausschalten von AVe rB o x oder
AVerVisor. Es ist nur jeweils eine Auswahl möglich.
AVerBox überlagert das Bild auf dem
Präsentationsbildschirm. Mit SCHATTIEREN
ändern Sie den äußeren Transparenzgrad (0 %, 50
% und 100 %), mit FARBE können Sie als
Rahmenfarbe Rot, Grün und Blau auswählen, mit
GRÖSSENÄNDERUNG können Sie die Größe des
Rahmens anpassen. Zur Größenänderung des
Rahmens und zum Verschieben auf dem
Präsentationsbildschirm drücken Sie das Drehrad
ein und nutzen die Tasten ▲,▼, ◄ und ►.
AVerVisor überdeckt einen Teil des
Präsentationsbildschirms. Der obere Teil des
Präsentationsbildschirms wird beim Aufrufen leicht
verdeckt. Um einen Teil des abgedeckten Bereiches
hervorzuheben, drücken Sie das Drehrad und
nutzen die Tasten ▲, ►, ▼ und ◄. Mit
SCHATTIEREN können Sie die Transparenz des
abgedeckten Bereiches auf 50 % oder 100 %
einstellen.
(13) MENÜ Blendet OSD-Hauptmenü und -Untermenü ein und
(14) AUTO-
BILDEINSTELLUNG
aus.
Stellt die Einstellung für den Weißabgleich und die
Belichtung automatisch ein.
D-14
Page 51

Name Funktion
(15) STANDBILD Friert das Kamerabild ein (Standbild) und setzt die
(16) EFFEKT Wandelt das Bild zu SW, Negativ oder Farbe nur im
(17) GET.
BILDSCHIRM
Darstellung wieder fort.
Kamera- und Wiedergabemodus um und zeigt es
an.
Schaltet die geteilte Bilddarstellung ein und aus.
Diese Funktion teilt den Bildschirm in zwei Teile. Die
rechte Seite zeigt das Live-Bild der CP300-Kamera,
auf der linken Seite werden aufgenommene Bilder
im Speicher in einer Übersicht von jeweils 8
Miniaturbildern angezeigt.
Mit den Tasten ▲,▼,◄, ► treffen Sie Ihre Auswahl,
mit ENTER (EINGABE) lassen Sie das gewählte
Bild bei geteilter Bildschirmdarstellung vergrößern.
Zum horizontalen Verschieben des vergrößerten
Bildes benutzen Sie die Tasten ▲,▼,◄ und ►.
Wenn Sie das Layout bei geteilter Darstellung
ändern möchten, drücken Sie MENU, wählen GET.
BILDSCHIRM aus und entscheiden sich für
vertikale oder horizontale Teilung.
English Deutsch Français
Italiano Español Česky
D-15
Page 52

TTiippppttaasstteenn--BBeeddiieennffeelldd
Das Tipptasten-Bedienfeld an der Oberseite der CP300 ermöglicht Ihnen
schnellen Zugriff auf häufig verwendete Funktionen.
(1)
(2)
(3)
(4)
(5)
(6)
(7)
(8)
(9)
(10)
(11)
Funktion Beschreibung
(1) POWER
(2) LED-
Ausgangsanzeige
(3) Wechselrad
(4) EINGABE
(5) STANDBILD
Schaltet das Gerät ein und aus.
Zeigt die Einstellung des TV-RGB-Umschalters
und somit den aktiven Videosignalausgang an.
- Durch Drehen des Wechselrads können Sie
Bilder nur im Kamera- und Wiedergabemodus
einzoomen (im Uhrzeigersinn) und auszoomen
(gegen den Uhrzeigersinn).
Wenn die maximale AVERZOOM-Stufe von
etwa 200 % erreicht ist, können Sie das Bild
digital noch weiter auf bis zu 1600 %
vergrößern. Mit ENTER (EINGABE) kehren
Sie wieder zur Normalansicht (100 %) zurück.
- Drücken Sie ▲,▼,◄, & ► am Wechselrad, um
ein gezoomtes Bild zu schwenken, ein Bild aus
16 Miniaturen auszuwählen, zur nächsten oder
vorherigen Vollbildvorschau im
Wiedergabemodus zu wechseln oder um im
OSD-Hauptmenü und Untermenü eine Option
zu wählen oder einzustellen (weitere Details
siehe Menüfunktionen).
Wählt eine Option im Wiedergabemodus und
OSD-Menü aus.
Friert das Kamerabild ein (Standbild) und setzt die
Darstellung wieder fort.
D-16
Page 53

Funktion Beschreibung
(6) MENÜ
(7) LED-
Eingangsanzeige
(8) Quelle
DIASHOW
START
INTERVALL
(9) AUTO-
BILDEINSTELLUNG
(10) AUFN/ENTF
(11) AUTOFOKUS
Blendet OSD-Hauptmenü und -Untermenü ein
und aus.
Zeigt die Eingangsquelle des Videosignals oder
Bildes an.
Schaltet zwischen Kamera-, Wiedergabe- und
PC-Modus hin und her.
- Der Kameramodus zeigt das Videosignal von
der eingebauten Kamera an.
- Der Wiedergabemodus zeigt
Bildaufzeichnungen im eingebauten Speicher
in Form von 16 Miniaturen an. Treffen Sie eine
Auswahl mit den Tasten ▲,▼,◄, & ► und
drücken Sie ENTER (EINGABE), um das
ausgewählte Bild als Vollbild anzuzeigen. Für
den Start einer Diashow drücken Sie MENÜ,
wählen Sie START und drücken Sie ENTER
(EINGABE), um diese zu beginnen und zu
stoppen. Wählen Sie INTERVALL, um das
Zeitintervall zwischen den angezeigten
Einzelbildern in Sekunden festzulegen.
- Der PC-Modus zeigt das Videosignal vom
RGB-EINGANG der CP300 an.
Stellt die Einstellung für den Weißabgleich und
die Belichtung automatisch ein.
- Nimmt ein Foto im Kameramodus auf. Bis zu
80 Bildaufzeichnungen können im eingebauten
Speicher mit einer Auflösung von 1024 x 768
gespeichert werden.
- Entfernt das ausgewählte Bild permanent aus
dem eingebauten Speicher im
Wiedergabemodus.
Stellt das Bild automatisch scharf.
English Deutsch Français
Italiano Español Česky
D-17
Page 54

OOSSDD--NNaavviiggaattiioonnssbbaauumm
D-18
Page 55

MMeennüüffuunnkkttiioonneenn
Mit den MENÜ-Funktionen der CP300 verbessern Sie die Feineinstellung Ihres
Bildschirms, stellen den Timer ein, wählen die OSD-Sprache und mehr. Drücken
Sie die MENU (MENÜ)-Taste, um das Hauptmenü oder Untermenü aufzurufen
und zu beenden. Mit den Tasten ▲ oder▼ wählen Sie dann die Optionen in
der Menüliste. Mit ►/ENTER (EINGABE) rufen Sie das Untermenü auf und
mit ◄/ENTER (EINGABE) kehren Sie zum Hauptmenü zurück. Mit den
Tasten ◄ oder ► nehmen Sie Einstellungen vor. Drücken Sie ENTER
(EINGABE), um etwas auszuwählen.
OSD-Menü Beschreibung
MENUE
EFFEKT
UMKEHREN/SPIEGELN
PRÄSENTIERENDER
GETEILTES BILD
PIP
ZEITMESSER
AUFNEHMEN
EINSTELLUNG
AUFRUFEN
STANDARD
MENUE
EFFEKT
UMKEHREN/SPIEGELN
PRÄSENTIERENDER
GETEILTES BILD
PIP
ZEITMESSER
AUFNEHMEN
EINSTELLUNG
AUFRUFEN
STANDARD
MENUE
EFFEKT
UMKEHREN/SPIEGELN
PRÄSENTIERENDER
GETEILTES BILD
PIP
ZEITMESSER
AUFNEHMEN
EINSTELLUNG
AUFRUFEN
STANDARD
FARBE
S / W
NEGATIV
SPIEGEL AUS
UMKEHREN AUS
AVERBOX AUS
AVERVISOR AUS
FARBTON
FARBE
GRÖSSE ANPASSEN
EFFEKT
Mit den Tasten ► und ▲ oder ▼ wählen und zeigen Sie
das Bild im Kameramodus als positives (Echtfarbe),
monochromes (schwarzweiß) oder negatives Bild an.
Drücken Sie ►/ENTER (EINGABE), um auszuwählen.
UMKEHREN/SPIEGELN
Mit den Tasten ► und ▲ oder ▼ wählen und aktivieren
Sie MIRROR (SPIEGELN), um das Bild zu spiegeln, und
REVERSE (UMKEHREN), um das Bild um 180° im
Kameramodus zu drehen. Drücken Sie ►/ENTER
(EINGABE), um auszuwählen.
PRÄSENTIERENDER
Drücken Sie ► und schalten Sie AVERBOX oder
AVERVISOR mit den Tasten ▲ oder ▼ ein. Drücken Sie
►/ENTER (EINGABE), um auszuwählen. Es ist nur
jeweils eine Auswahl möglich.
AVerBox überlagert das Bild auf dem
Präsentationsbildschirm. Mit SCHATTIEREN ändern Sie
den äußeren Transparenzgrad (0 %, 50 % und 100 %),
mit FARBE können Sie als Rahmenfarbe Rot, Grün und
Blau auswählen, mit GRÖSSENÄNDERUNG können Sie
die Größe des Rahmens anpassen. Zur Größenänderung
des Rahmens und zum Verschieben auf dem
Präsentationsbildschirm drücken Sie das Drehrad ein und
nutzen die Tasten ▲,▼, ◄ und ►.
English Deutsch Français
Italiano Español Česky
D-19
Page 56

OSD-Menü Beschreibung
MENUE
EFFEKT
UMKEHREN/SPIEGELN
PRÄSENTIERENDER
GETEILTES BILD
PIP
ZEITMESSER
AUFNEHMEN
EINSTELLUNG
AUFRUFEN
STANDARD
AVERBOX AUS
AVERVISOR AUS
FARBTON
FARBE
GRÖSSE ANPASSEN
AVerVisor überdeckt einen Teil des
Präsentationsbildschirms. Der obere Teil des
Präsentationsbildschirms wird beim Aufrufen leicht
verdeckt. Um einen Teil des abgedeckten Bereiches
hervorzuheben, drücken Sie das Drehrad und nutzen die
Ta st e n ▲, ►, ▼ und ◄. Mit SCHATTIEREN können Sie
die Transparenz des abgedeckten Bereiches auf 50 %
oder 100 % einstellen.
MENUE
EFFEKT
UMKEHREN/SPIEGELN
PRÄSENTIERENDER
GETEILTES BILD
PIP
ZEITMESSER
AUFNEHMEN
EINSTELLUNG
AUFRUFEN
STANDARD
MENUE
EFFEKT
UMKEHREN/SPIEGELN
PRÄSENTIERENDER
GETEILTES BILD
PIP
ZEITMESSER
AUFNEHMEN
EINSTELLUNG
AUFRUFEN
STANDARD
MENUE
EFFEKT
UMKEHREN/SPIEGELN
PRÄSENTIERENDER
GETEILTES BILD
PIP
ZEITMESSER
AUFNEHMEN
EINSTELLUNG
AUFRUFEN
STANDARD
MENUE
EFFEKT
UMKEHREN/SPIEGELN
PRÄSENTIERENDER
GETEILTES BILD
PIP
ZEITMESSER
AUFNEHMEN
EINSTELLUNG
AUFRUFEN
STANDARD
VERTIKAL
HORIZONTAL
UNTEN LINKS
OBEN LINKS
OBEN RECHTS
UNTEN RECHTS
START
PAUSE
STOPP
ZEITEINSTELLUNG
EINZELBILD
DAUERLAUF
GET. BILDSCHIRM
Drücken Sie ►, wählen Sie die gewünschte Teilung
(vertikal oder horizontal) mit den Tasten ▲ und ▼ aus.
Anschließend bestätigen Sie Ihre Auswahl mit ►/ENTER
(EINGABE).
Diese Funktion teilt den Bildschirm in zwei Teile. Die
rechte Seite zeigt das Live-Bild der CP300-Kamera, auf
der linken Seite werden aufgenommene Bilder im
Speicher in einer Übersicht von jeweils 8 Miniaturbildern
angezeigt.
Mit den Tasten ▲,▼,◄, ► treffen Sie Ihre Auswahl, mit
ENTER (EINGABE) lassen Sie das gewählte Bild bei
geteilter Bildschirmdarstellung vergrößern. Zum
horizontalen Verschieben des vergrößerten Bildes
benutzen Sie die Tasten ▲,▼,◄ und ►.
PIP
Drücken Sie ►, wählen Sie die Position des
Mini-Wiedergabebildschirms mit den Tasten ▲ und ▼.
Anschließend bestätigen Sie Ihre Auswahl mit ►/ENTER
(EINGABE).
Zeigt im Kameramodus eine Miniaturdarstellung eines in
der Speicherquelle gespeicherten Bildes in der Ecke des
Bildschirms an.
Mit den Tasten ◄ und ► springen Sie zum vorherigen
oder nächsten Bild, mit ENTER (EINGABE) zeigen Sie
das gewünschte Bild in voller Größe an.
ZEITMESSER
Drücken Sie ►, wählen Sie anschließend ZEIT
EINSTELLEN mit den Tasten ▲ und ▼ und stellen Sie
die gewünschte Zeit ein. Nun können Sie den Countdown
mit START starten, mit PAUSE/FORTSETZEN anhalten
und fortsetzen oder mit STOPP komplett abbrechen.
AUFNEHMEN
Mit den Tasten ► und ▲ oder ▼ wählen Sie den
Aufnahmemodus SINGLE (EINZELN) oder
CONTINUOUS (KONTINUIERLICH). Drücken Sie
►/ENTER (EINGABE), um auszuwählen.
Die Einstellung SINGLE (EINZELN) speichert nur ein
Foto und CONTINUOUS (KONTINUIERLICH) speichert
fortlaufende Fotos bis der eingebaute Speicher voll ist
oder bis erneut die CAP/DEL (AUFN/ENTF)-Taste
gedrückt wird, um den Vorgang zu stoppen.
D-20
Page 57

OSD-Menü Beschreibung
Im Kontinuierlich-Modus erhöhen oder verringern Sie das
Zeitintervall zwischen den Einzelaufnahmen mit den
Ta st e n ► oder ◄ und drücken ENTER (EINGABE), um
die Einstellung zu speichern und den Vorgang zu
beenden. Das Zeitintervall kann von 5 bis 600 Sek.
eingestellt werden.
EINSTELLUNG
Mit den Tasten ► und ▲ oder ▼ wählen Sie die
Elemente in der Liste SETTINGS (EINSTELLUNG) und
drücken ►/ENTER (EINGABE).
EINSTELLUNG > MODUS
Mit den Tasten ▲ und ▼ schalten Sie zwischen den
Grafikverbesserungsmodi Text, Grafik und Hohe Bildrate
um, mit ENTER (EINGABE) bestätigen Sie Ihre Auswahl.
• Text – korrigiert die Intensität des benachbarten Pixels
und macht sie gleichmäßiger, wodurch schärfere und
klarere Bilder entstehen.
• Grafik – stellt den Gradienten des benachbarten
Pixels ein, so dass ein weicheres Bild entsteht.
• Hohe Bildrate - Beschleunigt die Einzelbilderfassung,
ermöglicht Verfolgung von Bewegungen und schnelle
Reaktion. In diesem Modus ist eine gute Beleuchtung
erforderlich.
EINSTELLUNG > FOCUS MANUELL
Stellen Sie den Fokus mit den Tasten ◄ und ► manuell
WEITNAHE
ein. Mit ENTER (EINGABE) speichern und verlassen Sie
die Einstellung.
EINSTELLUNG > BILD > BELICHTUNG
Mit den Tasten ► und ▲ oder ▼ wählen Sie aus Auto,
Manuell, Flimmern und Nachtsicht aus. Drücken Sie
►/ENTER (EINGABE), um auszuwählen.
Wählen Sie AUTO, damit die Kamera automatisch
festlegt, wie viel Belichtung benötigt wird.
EINSTELLUNG > BILD > BELICHTUNG > MANUELL
Stellen Sie die Belichtung mit den Tasten ◄ und ►
manuell ein. Mit ENTER (EINGABE) speichern und
verlassen Sie die Einstellung.
EINSTELLUNG > BILD > BELICHTUNG > FLICKER
Mit den Tasten ▲ oder ▼ wählen Sie 50Hz oder 60Hz.
Einige Anzeigegeräte können hohe Bildwiederholraten
nicht bewältigen. Das Bild flimmert mehrmals, wenn die
Ausgabe zu einer Bildwiederholrate geschaltet wird.
EINSTELLUNG > BILD > BELICHTUNG >
NACHTSICHT
Mit den Tasten ▲ oder ▼ schalten Sie Nachsicht OFF
(AUS) oder zu AUTO.
Zeigen Sie eine Präsentation bei geringer Beleuchtung,
kann das Bild des Objekts mit Nachtsicht so wie bei einer
normalen Beleuchtung angezeigt werden. Die CP300
kann die Belichtung automatisch einstellen, um die
schlechte Beleuchtung auszugleichen, wobei das
aufgezeichnete Bild jedoch in Zeitlupe angezeigt wird.
MENUE
EFFEKT
UMKEHREN/SPIEGELN
PRÄSENTIERENDER
GETEILTES BILD
PIP
ZEITMESSER
AUFNEHMEN
EINSTELLUNG
AUFRUFEN
STANDARD
BILD
BELICHTUNG
WEISSABGLEICH
HELLIGKEIT
KONTRAST
AUFLÖSUNG
INTERVALL
5 SEC (S)
MODUS
FOCUS MANUELL
BILD
SPRACHE
SPEICHERFORMATIERUNG
USB-ANSCHLUSS
SPEICHERN
MODUS
TEXT
GRAFIK
HIGH FRAME
FOCUS MANUELL
MANUELL
0 5421
FLICKER
50 HZ
60 HZ
NACHTSICHT
EIN
AUS
AUTO
AUTO
MANUELL
FLICKER
NACHTSICHT
English Deutsch Français
Italiano Español Česky
D-21
Page 58

OSD-Menü Beschreibung
BELICHTUNG
WEISSABGLEICH
HELLIGKEIT
KONTRAST
AUFLÖSUNG
BELICHTUNG
WEISSABGLEICH
HELLIGKEIT
KONTRAST
AUFLÖSUNG
BELICHTUNG
WEISSABGLEICH
HELLIGKEIT
KONTRAST
AUFLÖSUNG
BELICHTUNG
WEISSABGLEICH
HELLIGKEIT
KONTRAST
AUFLÖSUNG
ENGLISH
DEUTSCH
FRANÇAIS
ITALIANA
ESPAÑOL
Русский
POLSKI
Čeština
SPEICHERFORMATIERUNG
NEIN
JA
USB-KAMERA
BILD DOWNLOAD
PROFIL 1
PROFIL 2
PROFIL 3
BILD
BILD
BILD
BILD
SPRACHE
USB-ANSCHLUSS
SPEICHERN
AUTO
ROT
BLAU
ROT
BLAU
1024 x 768
800 x 600
640 x 480
1280 x 720
EINSTELLUNG > BILD > WEISSABGLEICH
Mit den Tasten ► und ▲ oder ▼ wählen Sie eine
automatische oder manuelle Einstellung der Farben Rot
und Blau, passend zur Beleuchtung oder Farbtemperatur.
Drücken Sie ►/ENTER (EINGABE), um auszuwählen.
EINSTELLUNG > BILD > WEISSABGLEICH > ROT
Mit den Tasten ► oder ◄ stellen Sie den Rotwert
2550 65
manuell ein und drücken ENTER (EINGABE), um die
Einstellung zu speichern und den Vorgang zu beenden.
EINSTELLUNG > BILD > WEISSABGLEICH > BLAU
Mit den Tasten ► oder ◄ stellen Sie den Blauwert
2550 65
manuell ein und drücken ENTER (EINGABE), um die
Einstellung zu speichern und den Vorgang zu beenden.
EINSTELLUNG > BILD > HELLIGKEIT
Mit den Tasten ► oder ◄ erhöhen oder verringern Sie
die Helligkeit und verbessern die Sichtbarkeit des Bildes.
63160
Die Helligkeit kann bis zu ±63 eingestellt werden.
EINSTELLUNG > BILD > KONTRAST
Mit den Tasten ► oder ◄ betonen oder reduzieren Sie
den Unterschied zwischen hell und dunkel. Der Kontrast
kann bis zu ±255 eingestellt werden.
2551400
EINSTELLUNG > BILD > AUFLÖSUNG
Drücken Sie ►/ENTER (EINGABE), wählen Sie
anschließend mit den Tasten ▲ und ▼ die gewünschte
Anzeigeauflösung, bestätigen Sie Ihre Auswahl mit
►/ENTER (EINGABE).
Diese Auswahl ist für den TV-Ausgang
(Composite/S-Video) nicht verfügbar.
EINSTELLUNG > SPRACHE
Wählen Sie mit den Tasten ▲ und ▼ unter den
verschiedenen Sprachen aus, treffen Sie Ihre Auswahl mit
der Taste ►.
EINSTELLUNG > SPEICHERFORMATIERUNG
Mit den Tasten ▲ oder ▼ wählen Sie NEIN, um den
Vorgang zu beenden, oder JA, um zu formatieren und
alle im eingebauten Speicher befindlichen Bilder zu
löschen, und drücken ►/ENTER (EINGABE).
Warten Sie, bis die Meldung “FORMAT” verschwindet,
um den Vorgang abzuschließen.
EINSTELLUNG > USB-ANSCHLUSS
Mit den Tasten ▲ und ▼ schalten Sie den USB-Modus
zwischen PC Camera und Bildübertragung um.
• USB-Kamera – kann als Computer-Webcam
verwendet werden oder zusammen mit unserer
beigefügten Software als Videorecorder und zur
Bildaufnahme.
• Bild-Download – überträgt die Bildaufzeichnungen
vom eingebauten Speicher zur Festplatte des
Computers.
EINSTELLUNG > SPEICHERN
Mit den Tasten ▲ oder ▼ legen Sie fest, mit welcher
Profilnummer Ihre benutzerdefinierte Einstellung
abgespeichert wird. Es können nur Einstellungen für
Effekt, Modus, Helligkeit und Kontrast gespeichert
werden.
D-22
Page 59

OSD-Menü Beschreibung
MENUE
EFFEKT
UMKEHREN/SPIEGELN
PRÄSENTIERENDER
GETEILTES BILD
PIP
ZEITMESSER
AUFNEHMEN
EINSTELLUNG
AUFRUFEN
STANDARD
MENUE
EFFEKT
UMKEHREN/SPIEGELN
PRÄSENTIERENDER
GETEILTES BILD
PIP
ZEITMESSER
AUFNEHMEN
EINSTELLUNG
AUFRUFEN
STANDARD
PROFIL 1
PROFIL 2
PROFIL 3
NEIN
JA
AUFRUFEN
Drücken Sie ►, wählen Sie anschließend mit den Tasten
▲ und ▼ das Profil aus der Liste, dessen Einstellungen
Sie abrufen möchten; bestätigen Sie Ihre Auswahl mit
►/ENTER (EINGABE).
STANDARD
Mit den Tasten ► und ▲ oder ▼ wählen Sie JA, um die
ursprünglichen Werkseinstellungen wiederherzustellen,
oder NEIN, um den Vorgang zu beenden, und drücken
►/ENTER (EINGABE), um auszuwählen.
English Deutsch Français
RRSS223322--AAnnsscchhlluussssddiiaaggrraammmm
Über den RS232-Anschluss können Sie die CP300 mit einem PC steuern.
S-Video-/RS-232-Kabel
RS-232-Kabel
(nicht mitgeliefert)
RRSS223322CC--PPiinnbbeelleegguunngg
Achten Sie darauf, dass die Pinbelegung Ihres RS232-Kabels der folgenden
Belegung entspricht.
PC COM Port
DSUB-9P (Female)
6789
1
CD
2
RXD
3
TXD
4
DTR
12345
DSR
RTS
CTS
RI (CI)
5
SG
6
7
8
9
1
AVerVision RS-232 Port
2
TXD
3
RXD
4
5
SG
6
7
8
9
DSUB-9P (Female)
Computer
Notebook
12345
6789
Italiano Español Česky
D-23
Page 60

RRSS223322CC--ÜÜbbeerrttrraagguunnggssddaatteenn
Startbit
Datenbit
Stoppbit
Paritätbit
X-Parameter
Baudrate (Übertragungsgeschwindigkeit)
RRSS--223322CC--ÜÜbbeerrttrraagguunnggssffoorrmmaatt
Startcode (1 Byte) : 0xFF
Typcode (1 Byte) : 0x70
Datenlängecode (1 Byte) : 0x01
Datencode (1 Byte) : Siehe Befehlstabelle.
Prüfsummencode (1 Byte) : Siehe Befehlstabelle.
Format : Start + Typ + Datenlänge + Daten + Prüfsumme
Beispiel : 0xFF + 0x70 + 0x01+ 0x1 + 0x70 (Befehl Ein/Aus)
RRSS--223322CC--BBeeffeehhllssttaabbeellllee
FUNKTION DATENCODE PRÜFSUMMENCODE
POWER 0x1 0x70
ENTER (EINGABE) 0x2 0x73
UP (AUFWÄRTS) 0x3 0x72
DOWN (ABWÄRTS) 0x4 0x75
LEFT (LINKS) 0x5 0x74
RIGHT (RECHTS) 0x6 0x77
MENU (MENÜ) 0x7 0x76
AUTOFOCUS (AUTOFOKUS) 0x8 0x79
SOURCE (QUELLE) 0x9 0x78
AUTO IMAGE
(AUTO-BILDEINSTELLUNG)
CAPTURE
(AUFNAHME)
FREEZE (STANDBILD) 0xC 0x7D
REVERSE (UMDREHEN) 0xD 0x7C
EFFECT (EFFEKT) 0xE 0x7F
TIMER 0xF 0x7E
RECALL
(PROFIL ABRUFEN)
SPLIT SCRN
(GET. BILDSCHIRM)
PRESENTER
(PRÄSENTATOR)
PIP 0x13 0x62
0xA 0x7B
0xB 0x7A
0x10 0x61
0x11 0x60
0x12 0x63
:1 bit
:8 bit
:1 bit
:Kein
:Kein
:9600bps
D-24
Page 61

AAuuffggeennoommmmeennee BBiillddeerr zzuumm PPCC
üübbeerrttrraaggeenn
Auf diese Weise können Sie Bilder zwischen internem Speicher und dem PC
austauschen.
Sie MÜSSEN die nachstehenden Anweisungen lesen und
befolgen, BEVOR Sie das USB-Kabel anschließen.
1. Die Option USB-AUSWAHL muss auf BILDÜBERTRAGUNG eingestellt
sein, bevor Sie das USB-Kabel anschließen.
Um die USB-VERBINDUNG als BILD-DOWNLOAD zu wählen, drücken
Sie MENU (MENÜ) > wählen SETTING (EINSTELLUNG) und drücken
►, wählen USB CONNECTION (USB-VERBINDUNG) und drücken ►,
wählen IMG DOWNLOAD (BILD-DOWNLOAD) und drücken
►/ENTER (EINGABE) und dann MENU (MENÜ), um das OSD-Menü
zu schließen.
2. Wird unten rechts im Präsentationsbildschirm “BILD-DOWNLOAD”
angezeigt, können Sie das USB-Kabel anschließen.
3. Nach dem Anschluss des USB-Kabels erkennt das System automatisch
den neuen, wechselbaren Datenträger. Nun können Sie erfasste Bilder
aus dem internen Speicher der AVerVision CP300 zu Ihrem Computer
übertragen.
PPrroobblleemmllöössuunngg
In diesem Abschnitt finden Sie viele nützliche Tipps zur Lösung von
allgemeinen Problemen, auf die Sie bei der Arbeit mit der CP300 eventuell
stoßen können.
Kein Bild auf dem Präsentationsbildschirm.
1. Überprüfen Sie sämtliche Verbindungen, halten Sie sich dabei an die
Hinweise in dieser Anleitung.
2. Schauen Sie nach, ob das Ausgabegerät tatsächlich eingeschaltet ist.
3. Überprüfen Sie die Einstellungen des Ausgabegerätes.
4. Wenn Sie einen (Notebook-) Computer zur Präsentation einsetzen,
überzeugen Sie sich davon, dass die Verbindungen richtig hergestellt wurden
und dass sich die Kamera im PC-Modus befindet.
Ich habe die CP300 richtig eingerichtet und sämtliche
Verbindungen wie im Handbuch angegeben hergestellt und
überprüft. Dennoch wird kein Bild auf dem Präsentationsbildschirm
angezeigt.
1. Die POWER-Taste des Geräts leuchtet orange im Standby-Modus. Drücken
Sie erneut die POWER-Taste, um das Gerät einzuschalten, und die LED
leuchtet blau.
2. Die Kamera-Anzeigeauflösung ist auf 1024 x 768 Bildpunkte voreingestellt.
Falls Ihr Ausgabegerät diese Auflösung nicht unterstützt, kann kein Bild
angezeigt werden. Zum Ändern der Auflösung halten Sie einfach die MENUund die ►-Taste gedrückt.
3. Sollte das Bild verschwommen oder unscharf sein, drücken Sie die
Autofokustaste („Auto Focus“) am Bedienfeld oder an der Fernbedienung.
English Deutsch Français
Italiano Español Česky
D-25
Page 62

Das Bild auf dem Präsentationsbildschirm ist verzerrt oder
verschwommen.
1. Setzen Sie sämtliche geänderten Einstellungen auf die Werksvorgaben
zurück. (Unter Menüfunktionen finden Sie die nötigen Details und Schritte.)
2. Versuchen Sie, die Verzerrungen durch Anpassung von Helligkeit und
Kontrast (Menüfunktionen) zu reduzieren.
3. Bei einem verschwommenen oder unscharfen Bild stellen Sie die Bildschärfe
über den Fokusring am Kamerakopf nach.
Kein Computerbild auf dem Präsentationsbildschirm.
1. Überprüfen Sie sämtliche Kabelverbindungen zwischen Anzeigegerät,
CP300 und Ihrem PC.
2. Schließen Sie die CP300 an Ihren PC an, bevor Sie den Computer
einschalten.
3. Sorgen Sie dafür, dass die Anzeige Ihres Notebooks auf externes
Anzeigegerät eingestellt ist.
Wenn ich vom Kameramodus in den PC-Modus umschalte, wird
nicht das exakte Desktop-Bild meines PCs oder Notebooks auf dem
Präsentationsbildschirm angezeigt.
1. Am PC oder Notebook setzen Sie den Mauszeiger auf eine freie Stelle auf
dem Desktop und klicken mit der rechten Maustaste. Wählen Sie
„Eigenschaften“, danach das Register „Einstellungen“. Klicken Sie den
Monitor Nummer 2 an und setzen Sie ein Häkchen bei „Angefügt“ oder
„Windows-Desktop auf diesen Monitor erweitern“. Klicken Sie auf „OK“.
2. Setzen Sie den Mauszeiger nun noch einmal auf eine freie Stelle auf dem
Desktop und klicken Sie noch einmal mit der rechten Maustaste.
3. Stellen Sie Ihre Grafikkarte nun so ein, dass das Bild sowohl über den
internen Bildschirm (bei Notebooks) als auch über den externen Bildschirm
ausgegeben wird. Die exakte Vorgehensweise erfahren Sie in der
Dokumentation zu Ihrer Grafikkarte.
4. Nachdem Sie diese Schritte ausgeführt haben, sollte dasselbe Desktop-Bild
sowohl auf dem PC oder Notebook als auch auf dem
Präsentationsbildschirm angezeigt werden.
Wie übertrage ich Bilder von der CP300 zum PC? Ist es normal,
dass die CP300 wieder zum Kameramodus wechselt, nachdem ich
Bilder übertragen und das USB-Kabel getrennt habe?
Wählen Sie „Bildtransfer“ aus dem Menü, schließen Sie dann das USB-Kabel an
CP300 und PC an, übertragen Sie nun die in der CP300 gespeicherten Bilder auf
den PC. Wenn Sie damit fertig sind, trennen Sie das USB-Kabel. Die CP300 setzt
sich automatisch zurück und schaltet in den Kameramodus.
GGaarraannttiiee
Für die Zeit ab dem Kauf des zutreffenden Produkts und, wie im Abschnitt
“Warranty Period of AVerMedia Product Purchased (Garantiezeit erworbener
AVerMedia-Produkte)” erweiternd festgelegt ist, garantiert AVerMedia
Information, Inc. (“AVerMedia”), dass das zutreffende Produkt (“Produkt”) im
Wesentlichen mit AVerMedias Dokumentation für das Produkt übereinstimmt und
dass seine Fertigung und seine Komponenten bei normaler Benutzung keine
Fehler in Bezug auf Material und Ausführung aufweisen. In dieser Vereinbarung
steht der Begriff „Sie“ für Sie als Einzelperson oder für das Unternehmen, in
dessen Namen Sie das Produkt benutzen oder installieren. Diese eingeschränkte
Garantie gilt ausschließlich für Sie, den Erstkäufer. Mit Ausnahme der
vorhergehenden Ausführungen wird das Produkt ohne Mängelgewähr geliefert. In
keinem Fall garantiert AVerMedia den problemlosen oder unterbrechungslosen
Betrieb des Produktes sowie die Eignung des Produktes für Ihre Zwecke. Ihre
exklusiven Ansprüche sowie die gesamte Haftung von AVerMedia gemäß dieses
Abschnitts beschränkt sich nach AVerMedias Ermessen auf die Reparatur oder
D-26
Page 63

den Austausch des Produktes gegen ein identisches oder vergleichbares Produkt.
Diese Garantie gilt nicht für a) jedwede Produkte, deren Seriennummer
unkenntlich gemacht, modifiziert oder entfernt wurde und nicht b) für Kartons,
Behälter, Batterien, Gehäuse, Bänder oder Zubehörteile, die mit diesem Produkt
verwendet werden. Diese Garantie umfasst keinerlei Produkte, die Schäden,
Verschleiß oder Fehlfunktionen aufweisen, die durch a) Unfall, Missbrauch,
bestimmungswidrigen Gebrauch, Nachlässigkeit, Feuer, Wasser, Blitzschlag oder
sonstige höhere Gewalt, kommerzielle oder industrielle Nutzung, nicht autorisierte
Modifikationen oder Nichteinhaltung der mit dem Produkt gelieferten Anweisungen,
b) nicht vom Hersteller autorisierte Wartungs- und Reparatureingriffe, c) jegliche
Transportschäden (solche Ansprüche müssen dem ausführenden Unternehmen
gegenüber geltend gemacht werden) oder d) sämtliche weiteren Ursachen
entstehen, die nicht auf Defekte des Produktes selbst zurückzuführen sind. Die
für jegliche reparierte oder ausgetauschte Produkte gültige Garantiezeit entspricht
entweder a) der ursprünglichen Garantiezeit oder b) der Dauer von 30 Tagen ab
Auslieferung des reparierten oder ausgetauschten Produktes; es gilt die jeweils
längere Zeitspanne.
Garantieeinschränkungen
AVerMedia gewährt keinerlei Garantien gegenüber Dritten. Sie sind für sämtliche
Ansprüche, Schadensersatzansprüche, Schlichtungen, Auslagen und
Anwaltsgebühren hinsichtlich Ansprüchen gegenüber Ihnen verantwortlich, die
aus dem Gebrauch oder Missbrauch des Produktes entstehen. Diese Garantie
gilt ausschließlich dann, wenn das Produkt in Übereinstimmung mit den
AVerMedia-Spezifikationen installiert, bedient, gewartet und genutzt wird.
Insbesondere deckt diese Garantie keinerlei Schäden ab, die durch Folgendes
verursacht werden: (1) Unfall, ungewöhnliche physische, elektrische oder
elektromagnetische Belastung, Nachlässigkeit oder Missbrauch, (2)
Stromschwankungen über die von AVerMedia festgelegten Spezifikationen hinaus,
(3) Einsatz des Produktes mit jeglichen Zubehörteilen oder Optionen, die nicht von
AVerMedia oder von ihr autorisierten Vertretern hergerichtet werden, (4)
Installation, Modifikation oder Reparatur des Produktes durch andere Personen
oder Institutionen als durch AVerMedia oder autorisierte Vertreter.
Haftungsausschluss
Wenn nicht ausdrücklich in dieser Vereinbarung erwähnt, lehnt AVerMedia
sämtliche weiteren Garantien in Bezug auf das Produkt unter maximaler
Ausschöpfung rechtlicher Mittel ab; ob ausdrücklich, implizit, statutarisch oder auf
sonstige Weise, einschließlich und ohne Einschränkung hinsichtlich
zufriedenstellender Qualität, Handelssitte, Handelstauglichkeit, Handelsbrauch
sowie hinsichtlich impliziter Zusicherung allgemeiner Gebrauchstauglichkeit,
Eignung für einen bestimmten Zweck oder Nichtverletzung von Rechten Dritter.
Haftungseinschränkungen
In keinem Fall haftet AVerMedia für indirekte, beiläufige, spezielle, exemplarische,
Entschädigungs- oder Folgeschäden jedweder Art, einschließlich, jedoch nicht
beschränkt auf entgangenen Gewinn, Datenverluste, Einkommensverluste,
Produktionsausfälle, Nutzungsausfälle, Geschäftsunterbrechung, Beschaffung
von Ersatzgütern oder Ersatzdiensten in Folge oder in Verbindung mit dieser
eingeschränkten Garantie oder dem Einsatz oder der Leistung jeglicher Produkte,
ob vertraglich oder nach Deliktrecht, einschließlich Nachlässigkeit oder sonstiger
rechtlichen Verbindlichkeit, selbst wenn AVerMedia auf die Möglichkeit solcher
Schäden hingewiesen wurde. AVerMedias Gesamthaftung für Schäden jeglicher
Art übersteigt in keinem Fall und unabhängig von der Art des Vorgangs den Betrag,
den Sie an AVerMedia für das jeweilige Produkt, auf welches sich die Haftung
bezieht, gezahlt haben.
Das Gesetz und Ihre Rechte
Diese Garantie verleiht Ihnen bestimmte gesetzliche Rechte; eventuell werden
Ihnen weitere Rechte eingeräumt. Diese Rechte variieren von Land zu Land.
Die Garantiezeit entnehmen Sie bitte der Garantiekarte.
D-27
English Deutsch Français
Italiano Español Česky
Page 64

DÉCLARATION DE LA FCC (Classe A)
Déclaration de la Commission Fédérale des Télécommunications
(FCC)
Remarque - Cet appareil a été testé et jugé conforme aux limites applicables aux appareils numériques de classe
A, définies dans la partie 15 du règlement de la FCC. Ces limites ont été conçues pour garantir une protection
raisonnable contre les interférences néfastes dans le cadre d'une installation domestique. Cet appareil produit,
utilise et peut émettre des fréquences radioélectriques et, s'il n'est pas installé ou utilisé conformément aux
directives, il est susceptible de causer des interférences radio ou télévision. Cependant, aucune garantie n'est
donnée qu'il ne causera pas d'interférence dans une installation donnée. Si cet appareil cause des interférences
radio ou télévision, ce que vous pouvez facilement observer en éteignant et en rallumant l’appareil, nous vous
encourageons à prendre une ou plusieurs des mesures correctives suivantes :
• Changez la direction ou déplacez l'antenne réceptrice.
• Augmentez la distance entre l’appareil et le récepteur.
• Branchez l’appareil sur une prise relevant d'un circuit différent de celui sur lequel le récepteur est connecté.
• Contactez votre revendeur ou un technicien radio/télévision qualifié pour de l’aide.
Classe A de ITE :
La classe A ITE est une catégorie de tous les autres ITE qui satisfait toutes les limites de la classe A ITE mais pas
les limites de la classe B ITE. Cet appareil peut être vendu tel quel mais l’avertissement suivant doit être inclus
dans les instructions d'utilisation :
Avertissement – Ce produit appartient à la Classe A. Dans un environnement domestique, ce produit est
susceptible de causer des interférences radio, et dans ce cas il est possible que l'utilisateur doive prendre des
mesures adéquates.
Classe A de la CE (EMC)
Aucune garantie ni représentation, qu’elle soit explicite ou implicite, n’est donnée quant au contenu, la qualité et
l’exactitude du présent document ainsi qu’à sa valeur commerciale ou sa convenance à un usage particulier.
L’exactitude des informations contenues dans ce document a été vérifiée minutieusement, cependant nous ne
pouvons pas être tenu responsable d’éventuelles erreurs. Les informations contenues dans le présent document
sont susceptibles à des modifications sans préavis.
En aucun cas AVerMedia ne pourra être tenu responsable d’éventuels dommages que ce soit, directs, indirects,
accidentels, spéciaux ou consécutifs découlant de l’utilisation ou de l’incapacité à utiliser cet appareil ou son
manuel, même si elle a été avertie en avance de la possibilité de tels dommages.
MARQUES DE COMMERCE
AVerVision est une marque déposée de AVerMedia Information, Inc. IBM PC est une marque déposée de
International Business Machines Corporation. Macintosh est une marque déposée de Apple Computer, Inc.
Microsoft est une marque de commerce et Windows est une marque déposée de Microsoft Corporation. Tous les
autres noms commerciaux ou de produits indiqués dans ce document sont à titre d’information uniquement, et
peuvent être des marques enregistrées ou des marques déposées de leurs auteurs respectifs.
COPYRIGHT
© 2008 par AVerMedia INFORMATION, Inc. Tous droits réservés. Aucune portion de ce document ne peut être
reproduite, transmise, enregistrée ou stockée dans un système de restitution, ni traduite en aucune langue que ce
soit, par quelque moyen que ce soit, sans l'autorisation écrite préalable de AVerMedia Information, Inc.
Cet appareil est conforme à la partie 15 du règlement de la FCC. L’utilisation de cet appareil est
soumise aux deux conditions suivantes : (1) Cet appareil ne doit pas causer d’interférences nuisibles
et (2) cet appareil doit être capable d’accepter toutes les interférences éventuelles, y-compris les
interférences pouvant provoquer un fonctionnement inattendu.
Ce produit a été déclaré conforme aux normes du Conseil des Directives pour les lois des Pays
Membres, relatives à la Directive de Compatibilité électromagnétique (2004/108/EEC).
Avertissement – Ce produit appartient à la Classe A. Dans un environnement domestique, ce
produit est susceptible de causer des interférences radio, et dans ce cas il est possible que
l'utilisateur doive prendre des mesures adéquates pour éliminer ces interférences.
DÉCLARATION DE NON-RESPONSABILITÉ
LE SYMBOLE DE POUBELLE AVEC UNE CROIX DESSUS INDIQUE QUE CET APPAREIL
NE DOIT PAS ÊTRE JETÉ DANS UNE POUBELLE ORDINAIRE. VOUS DEVEZ VOUS
DÉBARRASSER DE CET APPAREIL, LORSQUE VOUS N’EN AVEZ PLUS BESOIN, EN
L’EMMENANT DANS UN POINT DE COLLECTION SPÉCIALLEMENT CONÇU POUR LE
RECYCLAGE DES APPAREILS ÉLECTRIQUES ET ÉLECTRONIQUES. POUR PLUS
D’INFORMATIONS SUR LES POINTS DE COLLECTION POUR LE RECYCLAGE SITUÉS
PRÈS DE CHEZ VOUS, CONTACTEZ VOTRE SERVICE DE RECYCLAGE DES APPAREILS
RÉSIDENTIELS OU LE MAGASIN OU VOUS AVEZ ACHETÉ CET APPAREIL.
English Deutsch Français
Italiano Español Česky
Page 65

Page 66

TTaabbllee ddeess mmaattiièèrreess
Introduction ...................................................... F-1
Contenu de la boîte.......................................... F-1
Accessoires optionnels................................... F-2
Parties de l’AVerVision CP300 ........................ F-3
Caractéristiques techniques........................... F-4
Branchements .................................................. F-5
Branchement de l’adaptateur secteur ......................F-6
Connexion à un téléviseur .......................................F-6
Connexion à un moniteur VGA/MAC ou à un
projecteur LCD/DLP.................................................F-
Connexion à un PC compatible IBM ou un ordinateur
Macintosh ................................................................F-
Installation du boîtier d’éclairage optionnel ..............F-9
Connexion à un microscope ....................................F-9
Réglage de l’AVerVision CP300 .................... F-10
Tête de la caméra..................................................F-10
DEL & guide de positionnement laser....................F-10
Bras et col de cygne articulés ................................F-11
Capteur infrarouge.................................................F-11
Feuille antireflet .....................................................F-11
Utilisation de la télécommande infrarouge . F-12
Boutons du panneau de contrôle................. F-16
Structure arborescente des menus OSD..... F-18
Fonctions des menus .................................... F-19
Fonctions des menus .................................... F-19
Schéma de connexion RS-232C ................... F-24
Caractéristiques du câble RS-232C ............. F-24
Caractéristiques de transmission de
RS-232C F- ...................................................... F-
Format de communication RS-232C ............F-25
Tableau de commande RS-232C................... F-25
Transférer les images capturées
sur un PC ........................................................ F-
Guide de dépannage...................................... F-26
Garantie limitée .............................................. F-28
25
26
English Deutsch Français
7
8
Italiano Español Česky
Page 67

Page 68

A
V
®
IInnttrroodduuccttiioonn
Merci d’avoir acheté
l’AVerVision CP300
d’AVerMedia®. Cette
caméra de présentation
permet d’afficher les
documents, les négatifs,
les transparents et les
objets en 3D sur un
téléviseur, un projecteur
LCD ou DLP, pour des
présentations en un tour
de main.
L’AVerVision CP300 est un
outil de présentation idéal
pour les entreprises ainsi
que les environnements
académiques, médicaux et
scientifiques.
CCoonntteennuu ddee llaa bbooîîttee
AVerMedia® AVerVision CP300
h
s
i
l
g
n
E
0
0
3
P
C
on
i
s
i
V
r
®
e
V
A
a
h
di
e
M
r
c
e
V
A
s
l
t
ua
an
u
M
r
e
s
e
U
D
s
i
a
ç
n
a
r
F
o
n
a
i
l
a
t
I
l
o
ñ
a
p
s
E
y
k
s
e
Č
a
i
d
e
M
r
e
a
r
e
m
a
C
t
n
e
m
u
c
o
D
l
a
t
i
g
i
D
Manuel d’utilisation
Sacoche
Feuille antireflet
Télécommande
(avec piles)
CD du pilote
English Deutsch Français
Italiano Español Česky
Câble RCA
Câble USB
Câble S-vidéo
Câble d’extension pour
ordinateur (câble VGA)
Cordon d’alimentation
* Le type du cordon
Câble S-vidéo/RS-232
d’alimentation peut varier en
fonction du type de prise de
courant utilisé dans le pays de
vente.
Adaptateur secteur
F-1
Page 69

AAcccceessssooiirreess ooppttiioonnnneellss
Adaptateur microscopique
34mm
Boîtier d’éclairage
Adaptateur microscopique
28mm
F-2
Page 70

(
(1) Tête de la caméra
(2) Lampe DEL avec
guide de
positionnement laser
(3) Objectif de la caméra
(4) DEL & interrupteur du
guide de
positionnement laser
(5) Capteur IR
(6) Panneau de contrôle
(7) Panneau droit
(8) Bras articulé
(9) Panneau arrière
(10) Panneau gauche
(11) Port d’alimentation du
boîtier d’éclairage
(12) Prise 12V c.c.
(13) Fente antivol
(14) Support de la caméra
(15) Port de sortie S-Vidéo
(16) Port de sortie vidéo
composite
(17) Port d’entrée RVB
(18) Port de sortie RVB
(19) Commutateur TV-RVB
(20) Port USB
(21) Port de sortie DVI
PPaarrttiieess ddee ll’’AAVVeerrVViissiioonn CCPP330000
Le dessin suivant décrit les différentes parties de votre
AVerVision CP300.
(8)
(9)
10)
Panneau droit
(14)
Panneau arrière
(17)
(13)
(5)
(6)
(7)
(11)
(12)
(15)
(16)(18)
(1)
(2)
(3)
(4)
English Deutsch Français
Italiano Español Česky
Panneau gauche
(19)
(20)
(21)
F-3
Page 71

CCaarraaccttéérriissttiiqquueess tteecchhnniiqquueess
Image
Capteur CMOS à balayage progressif 1/2"
Nombre de pixels 3,2 Mega
Vitesse d’image 24 images par seconde (maxi.)
Balance des blancs Auto/Manuel
Exposition Auto / Manuel / Papillotement / Vue de nuit
Mode d’image Texte / Graphiques / Haute résolution
Effet Couleur / N&B / Négatif
Sortie analogique
RVB
Capture d’image Jusqu’à 80 images
WXGA 60Hz (1280 x 720); XGA 60 Hz; SVGA 60
Hz; VGA 60 Hz
Optique
Objectif F3,0 ; f=9,6mm
Mise au point Auto/Manuel
Surface focale 300mm x 225mm (max.)
Zoom Zoom AVERZOOM 2X, Zoom numérique 8X
Alimentation
Source
d'alimentation
Consommation
électrique
100-240V ~ 4,0-4,2A, 50-60Hz
18 Watts (lampe éteinte); 20 Watts (lampe
allumée)
Eclairage
Type de lampe
Lampe DEL avec pointeur laser
Entrée/sortie
Entrée RVB 15 fiches D-Sub (VGA)
Sortie RVB 15 fiches D-Sub (VGA)
Sortie DVI-I Type DVI-I
S-Vidéo Mini prise DIN
Vidéo composite Prise RCA
USB USB2.0
Entrée 12V c.c. Prise d’alimentation
Boîtier d’éclairage Prise d’alimentation (sortie 6V c.c.)
Dimensions
Fonctionnement 160mm x 170mm x 450mm
Plié 287,4mm x 232,5mm x 61mm
Poids 2,4 kg (environ 5,3 livres)
F-4
Page 72

BBrraanncchheemmeennttss
Les ports du panneau arrière, du panneau gauche et du panneau droit
du CP300 permettent de connecter cet appareil à un ordinateur, un
moniteur à affichage graphique, un projecteur LCD/DLP, un téléviseur ou
d'autres appareils similaires. Les ports du panneau arrière, du panneau
gauche et du panneau droit du CP300 sont illustrés ci-dessous avec les
étiquettes correspondantes.
Panneau droit
Panneau arrière & gauche
(1)
(2)(3)
(4)
(5)
(6)
(7)
(8)
(9)
(10)
Port Description
(1) Fente antivol
(2) Boîtier d’éclairage
(3) Entrée 12V c.c. Branchez l’adaptateur d’alimentation sur ce port.
(4) ENTRÉE RVB
(5) SORTIE RVB
(6) SORTIE VIDÉO
(RCA/Composite)
(7) SORTIE S-VIDÉO
(8) SORTIE DVI-I
Permet d’attacher un mécanisme de verrouillage
Kensington ou un dispositif antivol.
Branchez le boîtier d’éclairage, qui est optionnel,
sur ce port.
Entrée du signal d’un ordinateur ou de toute autre
source et transmission de ce signal uniquement
vers le port de sortie RVB.
Connectez ce port au port de sortie VGA de
l’ordinateur.
Sortie du signal de la caméra, port d’entrée RVB,
ou images capturées de la mémoire et
transmission vers un moniteur VGA/Mac ou un
projecteur LCD/DLP.
Sortie du signal de la camera ou des images
capturées de la mémoire et transmission vers un
téléviseur ou un équipement vidéo.
Sortie du signal de la caméra ou des images
capturées de la mémoire et transmission vers un
téléviseur ou un équipement vidéo.
Pour envoyer le signal de la caméra, du port
d’entrée RVB ou des images capturées dans la la
mémoire vers un moniteur VGA/Mac ou un
projecteur LCD/DLP avec une interface DVI-I.
Si l’appareil d’affichage ne supporte pas DVI-I, il
affichera seulement el signal de la caméra et les
images capturées.
English Deutsch Français
Italiano Español Česky
F-5
Page 73

Port Description
(9) USB
(10) Commutateur DIP
TV-RVB
BBrraanncchheemmeenntt ddee ll’’aaddaappttaatteeuurr sseecctteeuurr
Utilisez le CP300 comme caméra USB ou
transférez les images capturées depuis la
mémoire du CP300 vers un PC.
Pour changer à l’affichage vidéo externe à partir
des ports de sortie Vidéo et S-Vidéo, ou RVB et
DVI-I.
Branchez le cordon de l’adaptateur secteur sur une prise de courant
100-240V c.a..
Prise murale
Cordon d’alimentation
Adaptateur d’alimentation
CCoonnnneexxiioonn àà uunn ttéélléévviisseeuurr
Repérez le port d’entrée vidéo, s-vidéo ou SCART RVB du téléviseur ou
de l’équipement vidéo (c’est-à-dire le magnétoscope) pour enregistrer
votre présentation sur une cassette vidéo, puis branchez ce port au port
de SORTIE S-VIDÉO OU VIDÉO du CP300. En cas de doute, veuillez
vous référer au manuel d’utilisation du téléviseur ou de l’équipement
vidéo.
Pour obtenir une meilleure qualité vidéo, nous vous
recommandons d’utiliser une connexion S-VIDÉO.
Assurez-vous que l’interrupteur TV/RVB est réglé sur TV.
ENTRÉE
Câble S-Video/PÉRITEL
(non fourni)
Câble S-Vidéo
Câble RCA
Câble RCA/PÉRITEL
(non fourni)
PÉRITEL
S-VIDÉO
VIDÉO
PÉRITEL
Projecteur
Téléviseur
VCR
F-6
Page 74

CCoonnnneexxiioonn àà uunn mmoonniitteeuurr VVGGAA//MMAACC oouu
àà uunn pprroojjeecctteeuurr LLCCDD//DDLLPP
Repérez le port d’entrée RVB (VGA) de votre périphérique d’affichage et
branchez ce port au port de SORTIE RVB du CP300. En cas de doute,
veuillez vous référer au manuel d’utilisation du périphérique.
Assurez-vous que l’interrupteur TV/RVB est réglé sur RVB.
Câble RVB (VGA)
(non fourni)
MAC
Adaptateur de moniteur
(non fourni)
Moniteur MAC
Projecteur LCD/DLP
Moniteur CRT
Moniteur LCD
CCoonnnneexxiioonn àà uunn mmoonniitteeuurr VVGGAA oouu àà uunn
D
pprroojjeecctteeuurr LLCCD
DDVVII
Trouvez le port d’entrée DVI de l’appareil d’affichage et connectez-le au
port SORTIE DVI-I du CP300. Si vous n’êtes pas sûr, consultez le
manuel d’utilisation de l’appareil.
//DDLLPP aavveecc uunnee iinntteerrffaaccee
English Deutsch Français
Italiano Español Česky
Assurez-vous que l’interrupteur TV/RVB est réglé sur RVB.
Moniteur LCD
avec interface DVI
Câble DVI
(non fourni)
Projecteur LCD/LDP
avec interface DVI
F-7
Page 75

CCoonnnneexxiioonn àà uunn PPCC ccoommppaattiibbllee IIBBMM oouu
uunn oorrddiinnaatteeuurr MMaacciinnttoosshh
Trouvez le port de sortie RVB (VGA) de l’ordinateur de bureau ou
portable pour afficher votre présentation PC sur l’écran et connectez-le
au port ENTRÉE RVB du CP300. Le signal vidéo du port ENTREE RVB
est envoyé sur le port RVB et SORTIE DVI-I et affiché sur l’écran.
Câble d’extension d’ordinateur
(Câble VGA)
Ordinateur
Adaptateur de moniteur
(non fourni)
Ordinateur portable
MAC
CCoonnnneexxiioonn àà uunn oorrddiinnaatteeuurr vviiaa uunnee
ccoonnnneexxiioonn UUSSBB
Repérez le port USB de l’ordinateur ou de l’ordinateur portable, et
branchez ce port au port USB du CP300. Ceci permet d’utiliser le CP300
comme une caméra USB et de transférer les images capturées depuis la
mémoire vers un ordinateur. Veuillez également vous reporter à la
section « Transfert d’image du CP300 AVerVision vers un ordinateur ».
Ordinateur portable
Ordinateur
MAC
Câble USB
F-8
Page 76

IInnssttaallllaattiioonn dduu bbooîîttiieerr dd’’ééccllaaiirraaggee
ooppttiioonnnneell
Vous pouvez utiliser un boîtier d’éclairage optionnel pour regarder des
radiographies, des transparents ou des diapositives.
CCoonnnneexxiioonn àà uunn mmiiccrroossccooppee
Vous pouvez aussi connecter le CP300 à un microscope pour vous
permettre de regarder des objets microscopiques sur un grand écran
sans fatiguer vos yeux.
ALLUMER
Boîtier lumière
(optionnel)
BRANCHER ICI
Adaptateur
microscopique
English Deutsch Français
Italiano Español Česky
Microscope
F-9
Page 77

RRééggllaaggee ddee ll’’AAVVeerrVViissiioonn CCPP330000
Cette section explique comment régler et ajuster le CP300 pour
répondre à vos besoins.
TTêêttee ddee llaa ccaamméérraa
La tête de la caméra peut être tournée de 90° vers la gauche et vers la
droite. Appuyez sur le taquet pour allumer et déployer la lumière DEL.
Assurez-vous de déployer complètement la lumière DEL.
90° 90°
180°
Loquet
DDEELL && gguuiiddee ddee ppoossiittiioonnnneemmeenntt llaasseerr
Une fonctionnalité unique du CP300, les quatre (4) pointeurs de
positionnement laser définissent la zone visible. Ceci permet à
l’utilisateur de placer rapidement l’objet sous la caméra. Les trois (3)
réglages des pointeurs de positionnement laser sont décrits
ci-dessous :
DEL blanc et
pointeurs de
positionnement
de document
EteintEteint
DEL blanc
seulement
Pointeurs de
positionnement
de document
F-10
Page 78

BBrraass eett ccooll ddee ccyyggnnee aarrttiiccuullééss
Le bras et le col de cygne articulés permettent de positionner la tête de
la caméra dans n’importe quel angle.
90°
CCaapptteeuurr iinnffrraarroouuggee
Pointez la télécommande vers le capteur infrarouge pour faire
fonctionner l’appareil.
English Deutsch Français
FFeeuuiillllee aannttiirreefflleett
La feuille antireflet est recouverte d’un film spécial qui permet d’éliminer
les reflets qui peuvent apparaître lors du visionnage d’objets très brillants
ou glacés, comme les magazines ou les photographies. Il suffit de placer
la feuille antireflet sur le document brillant pour réduire la lumière
réfléchie.
F-11
Italiano Español Česky
Page 79

UUttiilliissaattiioonn ddee llaa ttééllééccoommmmaannddee
iinnffrraarroouuggee
Utilisez la télécommande du CP300 pour faciliter les présentations en
vous permettant de changer entre les trois (3) modes de présentation et
pour accéder aux fonctions avancées. Avant d’utiliser la télécommande,
installez en premier les piles (2 piles AAA sont fournies) dans le
compartiment piles au dos de la télécommande. Utilisez l'image suivante
et les descriptions fournies pour apprendre à utiliser la télécommande.
(1)
(2)
(3)
(4)
(13)
(14)
(15)
(16)
(17)
(5)
(6)
(7)
(8)
(9)
(10)
(11)
(12)
Nom Fonction
(1) MARCHE Pour allumer ou éteindre l’appareil.
(2) LASER
(3) Molette - Tournez la molette dans le sens des aiguilles
Pour allumer le pointeur laser.
NE REGARDEZ JAMAIS directement le
pointeur laser et éviter de pointer le laser
sur des surfaces réfléchissantes (par
exemple un miroir ou une surface
réfléchissante).
d’une montre pour effectuer un zoom entrant ;
dans le sens contraire des aiguilles d’une montre
pour effectuer un zoom sortant de l’image.
Uniquement en mode Caméra et Lecture.
Lorsque le niveau de zoom AVERZOOM
maximum est atteint, environ 200%, vous pouvez
continuer avec le zoom numérique jusqu’à un
F-12
Page 80

Nom Fonction
Molette
(4) ENTRÉE Utilisez cette touche pour faire une sélection en
(5) AF (Focale auto) Pour régler automatiquement la focale.
(6) Source
(7) CAP/DEL
(8) INVERSE Pour tourner l’image par 180° en mode Caméra
(9) COMPTEUR Pour afficher le menu de compteur OSD ; utilisez
agrandissement de 1600%. Appuyer sur ENTER
(ENTRÉE) pour retourner à l’affichage normal
(100%).
- Appuyez sur les touches ▲,▼,◄, ou ► de la
molette pour faire un panoramique de l’image, en
mode zoom, pour faire une sélection de 16
images miniatures ou pour passer à l’image plein
écran précédente ou suivante en mode Lecture
ou pour faire une sélection ou des réglages dans
le menu principal et le sous-menu de l’OSD (voir
les fonctions du menu pour plus de détails).
mode Lecture et dans le menu OSD.
Passez d’un mode à un autre : mode Caméra,
mode Lecture et mode PC.
- Le mode Caméra affiche le signal vidéo de la
caméra intégrée.
- Le mode Lecture affiche l’image capturée de la
mémoire intégrée, sous forme de 16 images
miniatures. Utilisez les boutons ▲,▼,◄, et ►
pour faire une sélection, puis la touche ENTER
(ENTRÉE) pour afficher l’image sélectionnée en
plein écran. Pour lancer un diaporama, appuyez
sur la touche MENU, puis sélectionnez START
(DÉMARRER) et appuyez à nouveau sur
ENTER (ENTRÉE) pour lancer et interrompre le
diaporama. Sélectionnez INTERVAL
(INTERVALLE) pour régler la durée en secondes
entre l’affichage des images.
- Le mode PC affiche le signal vidéo du port
ENTRÉE RVB du CP300.
- Permet de capturer une photographie en mode
Caméra. L’image capturée est sauvegardée
dans la mémoire intégrée, en résolution 1 024 x
768. Il est possible de stocker jusqu’à 80 images.
- Permet d’effacer définitivement l’image
sélectionnée de la mémoire intégrée, en mode
Lecture.
seulement.
les boutons ▲ et ▼ pour sélectionner RÉGLER
DURÉE pour régler la durée du compteur,
DÉMARRER pour commencer le compte à rebours,
PAUSE/CONTINUER pour faire une pause ou
continuer et STOP pour arrêter.
English Deutsch Français
Italiano Español Česky
F-13
Page 81

Nom Fonction
(10) PROFIL Pour restaurer et sélectionner l’un des trois profils
(11) PIP Pour afficher/cacher une image miniature de
(12) PRÉSENTATEUR Choisissez entre activer ou désactiver AV er Bo x ou
utilisateurs enregistrés (voir les Fonctions du
menu – ENREGISTRER pour plus de détails).
l’image capturée dans la source de mémoire, dans
le coin de l’écran dans le mode Caméra.
Utilisez les boutons ◄ et ► pour aller à l'image
précédente ou suivante et appuyez sur ENTER
(ENTRÉE) pour afficher l’image en plein écran.
Pour déplacer le mini-écran de lecture dans les
autres coins, appuyez sur MENU, allez sur PIP et
sélectionnez la position du mini-écran de lecture.
AVerVisor. Vous ne pouvez utiliser qu’une fonction
à la fois.
AVerBox permet de superposer un cadre sur l’écran
de présentation. Choisissez OMBRE pour changer
le niveau d’obscurité de la zone hors du cadre,
entre 0%, 50% et 100%, COULEUR pour changer
la couleur du cadre entre rouge, vert et bleu et
REDIMENSIONNER pour changer la taille du
cadre. Pour redimensionner ou déplacer le cadre
autour de l’écran de présentation, appuyez sur la
molette de défilement ▲,▼,◄, & ►.
AVerVisor permet de couvrir une partie de l’écran de
présentation. La partie supérieure de l’écran est
légèrement exposée lorsque vous la rappelez chaque
fois. Pour montrer une partie de la partie cachée,
appuyez sur la molette de défilement ▲,▼,◄, & ►.
Sélectionnez OMBRE pour changer le niveau
d’obscurité de la partie ombrée, entre 50 et 100%
F-14
Page 82

Nom Fonction
(13) MENU Pour ouvrir ou fermer le menu OSD et les
(14) IMAGE AUTO Permet de régler automatiquement l’équilibre des
(15) GELER Appuyez ici pour faire une pause ou continuer avec
(16) EFFET Permet de convertir et d’afficher l’image en noir et
(17) ECRAN
PARTAGÉ
sous-menus.
blancs et l’exposition.
la caméra.
blanc, en négatif ou en couleur. Uniquement en
mode Caméra et Lecture.
Pour activer/désactiver le mode d’écran partagé.
L’écran partagé divise l’écran en deux parties. Une
partie affiche l’image directe de la caméra du
CP300 et l’autre partie affiche les images capturées
de la source de mémoire, dans une vue
8-miniatures.
Utilisez les boutons ▲,▼, ◄ et ► pour faire une
sélection et appuyez sur ENTER (ENTRÉE) pour
agrandir l’image sélectionnée dans le mode écran
partagé. Pour déplacer l'image agrandie
horizontalement ou verticalement, utilisez les
boutons ◄ & ► ou ▲&▼. Pour changer entre les
différents types d’écran partagé, appuyez sur
MENU, allez sur ECRAN PARTAGÉ et choisissez
entre un partage horizontal et vertical.
English Deutsch Français
Italiano Español Česky
F-15
Page 83

BBoouuttoonnss dduu ppaannnneeaauu ddee ccoonnttrrôôllee
Les boutons du panneau de contrôle, qui est situé sur la face supérieure
du CP300, permettent d'accéder rapidement aux fonctions les plus
utilisées.
(1)
(2)
(3)
(4)
(5)
(6)
(7)
(8)
(9)
(10)
(11)
Fonction Description
(1) MARCHE
(2) Voyant DEL
sortie
(3) Molette
(4) ENTRÉE Utilisez cette touche pour faire une sélection en
(5) GELER Appuyez ici pour faire une pause ou continuer avec
(6) MENU Pour ouvrir ou fermer le menu OSD et les
Pour allumer ou éteindre l’appareil.
Indique le réglage de l’interrupteur TV à RVB vers
lequel le signal vidéo est envoyé.
- Tournez la molette dans le sens des aiguilles
d’une montre pour effectuer un zoom entrant ;
dans le sens contraire des aiguilles d’une montre
pour effectuer un zoom sortant de l’image.
Uniquement en mode Caméra et Lecture.
Lorsque le niveau de zoom AVERZOOM
maximum est atteint, environ 200%, vous
pouvez continuer avec le zoom numérique
jusqu’à un agrandissement de 1600%. Appuyer
sur ENTER (ENTRÉE) pour retourner à
l’affichage normal (100%).
- Appuyez sur les touches ▲,▼,◄, ou ► de la
molette pour faire un panoramique de l’image, en
mode zoom, pour faire une sélection de 16
images miniatures ou pour passer à l’image plein
écran précédente ou suivante en mode Lecture
ou pour faire une sélection ou des réglages dans
le menu principal et le sous-menu de l’OSD (voir
les fonctions du menu pour plus de détails).
mode Lecture et dans le menu OSD.
la caméra.
sous-menus.
F-16
Page 84

Fonction Description
(7) Voyant DEL
source
(8) Source
DIAPOSITIVE
DEMARRER
INTERVALLE
(9) IMAGE AUTO
(10) CAP/DEL
(11) FOCALE AUTO
Indique la source du signal vidéo ou de l’image.
Passez d’un mode à un autre : mode Caméra,
mode Lecture et mode PC.
- Le mode Caméra affiche le signal vidéo de la
caméra intégrée.
- Le mode Lecture affiche l’image capturée de la
mémoire intégrée, sous forme de 16 images
miniatures. Utilisez les boutons ▲,▼,◄, et ►
pour faire une sélection, puis la touche ENTER
(ENTRÉE) pour afficher l’image sélectionnée en
plein écran. Pour lancer un diaporama, appuyez
sur la touche MENU, puis sélectionnez START
(DÉMARRER) et appuyez à nouveau sur
ENTER (ENTRÉE) pour lancer et interrompre le
diaporama. Sélectionnez INTERVAL
(INTERVALLE) pour régler la durée en
secondes entre l’affichage des images.
- Le mode PC affiche le signal vidéo du port
ENTRÉE RVB du CP300.
Pour ajuster automatiquement la balance du blanc
et le réglage de l’exposition.
- Permet de capturer une photographie en mode
Caméra. L’image capturée est sauvegardée
dans la mémoire intégrée, en résolution 1 024 x
768. Il est possible de stocker jusqu’à 80 images.
- Permet d’effacer définitivement l’image
sélectionnée de la mémoire intégrée, en mode
Lecture.
Pour régler automatiquement la focale.
English Deutsch Français
Italiano Español Česky
F-17
Page 85

SSttrruuccttuurree aarrbboorreesscceennttee ddeess
mmeennuuss OOSSDD
F-18
Page 86

FFoonnccttiioonnss ddeess mmeennuuss
Les fonctions MENU du CP300 permettent d’optimiser la syntonisation de
l’affichage, de régler la minuterie, de choisir la langue OSD, et bien plus encore.
Appuyez sur le bouton MENU pour faire apparaître ou sortir du menu principale
ou du sous-menu. Utilisez ensuite les boutons ▲ou▼ pour sélectionner les
items dans la liste du menu. Utilisez le bouton ►/ENTER (ENTRÉE) pour
accéder au sous-menu puis ◄/ ENTER (ENTRÉE) pour retourner au menu
principal. Pour ajuster les paramètres, utilisez les boutons ◄ ou ►. Pour
sélectionner, appuyez sur ENTER (ENTRÉE).
OSD Menu Description
MENU
EFFETS
INVERSE/MIROIR
PRESENTATEUR
ECRAN SEPARE
PIP
MINUTEUR
CAPTURE
REGLAGE
RAPPELER
DEFAUT
MENU
EFFETS
INVERSE/MIROIR
PRESENTATEUR
ECRAN SEPARE
PIP
MINUTEUR
CAPTURE
REGLAGE
RAPPELER
DEFAUT
MENU
EFFETS
INVERSE/MIROIR
PRESENTATEUR
ECRAN SEPARE
PIP
MINUTEUR
CAPTURE
REGLAGE
RAPPELER
DEFAUT
COULEUR
N / B
NEGATIF
MIROIR OFF
INVERSE ON
AVERBOX OFF
AVERVISOR OFF
OMBRE
COULEUR
DIMENSIONS
EFFETS
Appuyez sur ► et utilisez les boutons
▲ou▼ pour
sélectionner et afficher l’image en mode Caméra en
positif (couleur réelle), en monochrome (noir et blanc)
ou en négatif. Appuyez ensuite sur ►
(ENTRÉE) pour faire une sélection.
INVERSE / MIROIR
Appuyez sur ► et utilisez les boutons ▲ou▼ pour
sélectionner et activer la fonction MIROIR pour
inverser l’image, et sur INVERSE pour faire tourner
l’image de 180°, en mode Caméra. Appuyez ensuite
/ENTER (ENTRÉE) pour faire une sélection.
sur ►
PRÉSENTATEUR
Appuyez sur ► et utilisez les boutons ▲ et ▼ pour
sélectionner et activer AVERBOX ou AVERVISOR.
Appuyez ensuite sur ►/ENTER (ENTRÉE) pour faire
une sélection. Vous ne pouvez utiliser qu’une fonction
à la fois.
AVerBox permet de superposer un cadre sur l’écran
de présentation. Choisissez OMBRE pour changer le
niveau d’obscurité de la zone hors du cadre, entre
0%, 50% et 100%, COULEUR pour changer la
couleur du cadre entre rouge, vert et bleu et
REDIMENSIONNER pour changer la taille du cadre.
Pour redimensionner ou déplacer le cadre autour de
l’écran de présentation, appuyez sur la molette de
défilement ▲,▼,◄, & ►.
/ENTER
English Deutsch Français
Italiano Español Česky
F-19
Page 87

OSD Menu Description
MENU
EFFETS
INVERSE/MIROIR
PRESENTATEUR
ECRAN SEPARE
PIP
MINUTEUR
CAPTURE
REGLAGE
RAPPELER
DEFAUT
AVERBOX OFF
AVERVISOR OFF
OMBRE
COULEUR
DIMENSIONS
AVerVisor permet de couvrir une partie de l’écran de
présentation. La partie supérieure de l’écran de
présentation est légèrement exposée lorsque vous la
rappelez chaque fois. Pour montrer une partie de la
partie cachée, appuyez sur la molette de défilement
▲,▼,◄, & ►. Sélectionnez OMBRE pour changer le
niveau d’obscurité de la partie ombrée, entre 50% et
100%.
MENU
EFFETS
INVERSE/MIROIR
PRESENTATEUR
ECRAN SEPARE
PIP
MINUTEUR
CAPTURE
REGLAGE
RAPPELER
DEFAUT
MENU
EFFETS
INVERSE/MIROIR
PRESENTATEUR
ECRAN SEPARE
PIP
MINUTEUR
CAPTURE
REGLAGE
RAPPELER
DEFAUT
MENU
EFFETS
INVERSE/MIROIR
PRESENTATEUR
ECRAN SEPARE
PIP
MINUTEUR
CAPTURE
REGLAGE
RAPPELER
DEFAUT
VERTICAL
HORIZONTAL
BAS GAUCHE
HAUT GAUCHE
HAUT DROIT
BAS DROIT
DEMARRER
PAUSE
STOP
TEMPS
ECRAN SEPARE
Appuyez sur ► et utilisez les boutons ▲ et ▼ pour
choisir entre diviser l’écran verticalement ou
horizontalement. Puis appuyez sur ►/ENTER
(ENTRÉE) pour confirmer.
La fonction divise l’écran en deux parties. Une partie
affiche l’image directe de la caméra du CP300 et
l’autre partie affiche les images capturées de la
source de mémoire, dans une vue 8-miniatures.
Utilisez les boutons ▲,▼, ◄ et ► pour faire une
sélection et appuyez sur ENTER (ENTRÉE) pour
agrandir l’image sélectionnée dans le mode écran
partagé. Pour déplacer l'image agrandie
horizontalement ou verticalement, utilisez les boutons
◄ & ► ou ▲&▼.
PIP
Appuyez sur ► et utilisez les boutons ▲ et ▼ pour
choisir l’emplacement du mini-écran de lecture. Puis
appuyez sur ►/ENTER (ENTRÉE) pour confirmer.
Pour afficher une image miniature de l’image
capturée dans la source de mémoire, dans le coin de
l’écran dans le mode Caméra.
Utilisez les boutons ◄ et ► pour aller à l'image
précédente ou suivante et appuyez sur ENTER
(ENTRÉE) pour afficher l’image en plein écran.
MINUTEUR
Appuyez sur ► et utilisez les boutons ▲ et ▼ pour
sélectionner RÉGLER DURÉE pour régler la durée
du compteur, DÉMARRER pour commencer le
compte à rebours, PAUSE/CONTINUER pour faire
une pause ou continuer et STOP pour arrêter.
F-20
Page 88

OSD Menu Description
MENU
EFFETS
INVERSE/MIROIR
PRESENTATEUR
ECRAN SEPARE
PIP
MINUTEUR
CAPTURE
REGLAGE
RAPPELER
DEFAUT
MENU
EFFETS
INVERSE/MIROIR
PRESENTATEUR
ECRAN SEPARE
PIP
MINUTEUR
CAPTURE
REGLAGE
RAPPELER
DEFAUT
IMAGE
EXPOSITION
BAL. DES BLANCS
LUMINOSITE
CONTRASTE
RESOLUTION
UNIQUE
CONTINUE
INTERVALLE
5 SEC (S)
MODE
FOCUS MANUEL
IMAGE
LANGUE
FORMAT MEMOIRE
CONNEXION USB
SAUVEGARDER
MODE
TEXTE
GRAPHIQUES
IMAGES/S.
FOCUS MANUEL
AUTO
MANUEL
PAPILLOTEMENT
VUE NOCTURNE
CAPTURE
Appuyez sur ► et utilisez les boutons ▲ou▼ pour
sélectionner le mode capture UNIQUE ou
CONTINUE. Appuyez ensuite sur ►
(ENTRÉE) pour faire une sélection..
Le paramètre UNIQUE permet de sauvegarder une
seule photographie, le mode CONTINUE permet de
sauvegarder plusieurs photographies consécutives
jusqu’à ce que la mémoire intégrée soit pleine, ou
que le bouton CAP/DEL est à nouveau actionné pour
interrompre la sauvegarde.
En mode Continu, utilisez les boutons ►ou◄ pour
augmenter ou diminuer la durée de capture entre les
cadres, puis appuyez sur ENTER (ENTRÉE) pour
sauvegarder le réglage et quitter le mode. L’intervalle
de temps peut s’échelonner de 5 à 600 secondes.
RÉGLAGES
Appuyez sur ► et utilisez les boutons ▲ou▼ pour
sélectionner les items dans la liste des réglages, puis
appuyez sur ►
RÉGLAGES > MODE
Utilisez les boutons ▲ et ▼ pour choisir entre le
mode d’amélioration Texte, Graphiques et Haut cadre
puis appuyez sur ENTER (ENTRÉE) pour confirmer.
• Texte – corrige l’intensité du pixel adjacent pour
générer des teintes plus uniformes et des images
plus nettes.
• Graphiques – ajuste le dégradé du pixel adjacent
pour une image plus régulière.
• Haut cadre – Pour augmenter le taux de capture
de cadre et suivre visiblement les mouvements et
réagir rapidement. Un éclairage suffisant est
requis lorsque vous utilisez ce mode.
RÉGLAGES > FOCUS MANUEL
Utilisez les boutons ◄ et ► pour ajuster
LOINPRES
manuellement la focale puis appuyez sur ENTER
(ENTRÉE) pour enregistrer et quitter.
RÉGLAGES > IMAGE > EXPOSITION
Appuyez sur ► et utilisez les boutons ◄ou► pour
choisir un affichage Auto, Manuel, Papillotement et
Nuit. Appuyez ensuite sur ►
faire une sélection.
/ENTER
English Deutsch Français
/ENTER (ENTRÉE).
Italiano Español Česky
/ENTER (ENTRÉE) pour
F-21
Page 89

OSD Menu Description
IMAGE
EXPOSITION
BAL. DES BLANCS
LUMINOSITE
CONTRASTE
RESOLUTION
0 5421
IMAGE
EXPOSITION
BAL. DES BLANCS
LUMINOSITE
CONTRASTE
RESOLUTION
AUTO
MANUEL
PAPILLOTEMENT
VUE NOCTURNE
MANUEL
PAPILLOTEMENT
50 HZ
60 HZ
VUE NOCTURNE
ACTIVE
INACTIVE
AUTO
AUTO
ROUGE
BLEU
ROUGE
BLEU
Choisissez OUI pour effectuer un réglage
automatique de l’exposition de la caméra et
déterminer la quantité de lumière requise.
RÉGLAGES > IMAGE > EXPOSITION > MANUEL
Utilisez les boutons ►et◄ pour ajuster manuellement
le niveau d’exposition puis appuyez sur ENTER
(ENTRÉE) pour enregistrer et quitter.
RÉGLAGES > IMAGE > EXPOSITION >
PAPILLOTEMENT
Utilisez les boutons ▲ou▼ pour choisir 50Hz ou
60Hz. Certains périphériques d’affichage ne sont pas
compatibles avec les fréquences de rafraîchissement
élevées. L’image va papillonner un moment, le temps
que la sortie passe à une autre fréquence de
rafraîchissement.
RÉGLAGES > IMAGE > EXPOSITION > VUE
NOCTURNE
Utilisez les boutons ▲ou▼ pour désactiver OFF le
mode Nuit ou passer en mode OUI.
Si les conditions d’éclairage sont faibles, l’affichage
Nuit permet d’obtenir un résultat de l’image de l’objet
semblable à des conditions d’éclairage normales.
Le CP300 peut ajuster automatiquement l’exposition
pour compenser les mauvaises conditions, mais
l’image capturée présentera un mouvement lent.
RÉGLAGES > IMAGE > BALANCE DES BLANCS
Appuyez sur ► et utilisez les boutons ▲ou▼ pour
choisir auto ou manuel, et régler les couleurs rouge et
bleu de façon à compenser les conditions d’éclairage
ou de modifier la température des couleurs. Appuyez
ensuite sur ►/ENTER (ENTRÉE) pour faire une
sélection.
RÉGLAGES > IMAGE > BALANCE DES BLANCS >
ROUGE
2550 65
Utilisez les boutons ►ou◄ pour ajuster
manuellement le niveau de couleur rouge, puis
appuyez sur ENTER (ENTRÉE) pour sauvegarder le
réglage et quitter l’écran.
RÉGLAGES > IMAGE > BALANCE DES BLANCS >
BLEU
2550 65
Utilisez les boutons ►ou◄ pour ajuster
manuellement le niveau de couleur bleu, puis
appuyez sur ENTER (ENTRÉE) pour sauvegarder le
réglage et quitter l’écran.
F-22
Page 90

OSD Menu Description
IMAGE
EXPOSITION
BAL. DES BLANCS
LUMINOSITE
CONTRASTE
RESOLUTION
IMAGE
EXPOSITION
BAL. DES BLANCS
LUMINOSITE
CONTRASTE
RESOLUTION
IMAGE
EXPOSITION
BAL. DES BLANCS
LUMINOSITE
CONTRASTE
RESOLUTION
LANGUE
ENGLISH
DEUTSCH
FRANÇAIS
ITALIANA
ESPAÑOL
Русский
POLSKI
Čeština
FORMAT MEMOIRE
NON
OUI
CONNEXION USB
CAMERA USB
TELECH IMG
SAUVEGARDER
PROFIL 1
PROFIL 2
PROFIL 3
1024 x 768
800 x 600
640 x 480
1280 x 720
RÉGLAGES > IMAGE > LUMINOSITÉ
Utilisez les boutons ►ou◄ pour augmenter ou
63160
diminuer le niveau de luminosité et optimiser la
visibilité de l’image. Le niveau de luminosité peut être
ajusté jusqu’à ±63.
RÉGLAGES > IMAGE > CONTRASTE
Utilisez les boutons ►ou◄ pour augmenter ou
réduire la différence luminosité/obscurité. Le niveau
2551400
de contraste peut être ajusté jusqu’à ±255.
RÉGLAGES > IMAGE > RÉSOLUTION
Appuyez sur ►/ENTER (ENTRÉE) et utilisez les
boutons ▲ et ▼ pour choisir entre les différentes
résolutions offertes puis appuyez sur ►/ENTER
(ENTRÉE) pour confirmer.
Ce choix n’est pas disponible pour la sortie TV
(Composite/S-Vidéo)
RÉGLAGES > LANGUE
Utilisez les boutons ▲ et ▼ pour choisir entre les
différentes langues offertes puis appuyez sur ► pour
confirmer.
RÉGLAGES > FORMAT MEMOIRE
Utilisez les boutons ▲ou▼ pour choisir NON et
quitter l’écran, ou OUI pour formater et supprimer
toutes les images sauvegardées dans la mémoire
intégrée. Appuyez ensuite sur ►/ENTER (ENTRÉE).
Pour terminer le processus, veuillez attendre la
disparition du message « FORMAT ».
RÉGLAGES > CONNEXION USB
Utilisez les boutons ▲ et ▼ pour sélectionner la
fonction USB désirée ; choisissez entre Caméra PC
et Télécharger image.
● Caméra USB – peut être utilisée comme une
webcam sur un ordinateur, ou avec notre logiciel
intégré, comme enregistreur vidéo et appareil de
capture de photographie.
● Chargement d’images – transfert les images
capturées de la mémoire intégrée vers un disque
dur d’ordinateur.
RÉGLAGES > SAUVEGARDER
Utilisez les boutons ▲ et ▼ pour sélectionner le profil
dans lequel vous voulez enregistrer vos réglages.
Vous ne pouvez enregistrer que les réglages de
l’effet, du mode, de la luminosité et du contraste.
English Deutsch Français
Italiano Español Česky
F-23
Page 91

OSD Menu Description
MENU
EFFETS
INVERSE/MIROIR
PRESENTATEUR
ECRAN SEPARE
PIP
MINUTEUR
CAPTURE
REGLAGE
RAPPELER
DEFAUT
MENU
EFFETS
INVERSE/MIROIR
PRESENTATEUR
ECRAN SEPARE
PIP
MINUTEUR
CAPTURE
REGLAGE
RAPPELER
DEFAUT
PROFIL 1
PROFIL 2
PROFIL 3
NON
OUI
RAPPELER
Appuyez sur ► et utilisez les boutons ▲ et ▼ pour
sélectionner le profil de réglage désiré dans la liste
des profils enregistrés et appuyez sur ►/ENTER
(ENTRÉE) pour confirmer.
DÉFAUT
Appuyez sur ► et utilisez les boutons ▲ou▼ pour
sélectionner OUI et restaurer les réglages par défaut,
ou NON pour quitter l’écran. Appuyez ensuite sur
►/ENTER (ENTRÉE) pour faire une sélection.
SScchhéémmaa ddee ccoonnnneexxiioonn RRSS--223322CC
Le CP300 peut être contrôlé avec un PC via une connexion RS-232.
Câble S-vidéo/RS-232
Câble RS-232
(non fourni)
CCaarraaccttéérriissttiiqquueess dduu ccââbbllee
RRSS--223322CC
Vérifiez que les caractéristiques de votre câble RS-232
correspondent aux caractéristiques suivantes.
PC COM Port
DSUB-9P (Female)
1
CD
2
RXD
3
TXD
4
DTR
12345
6789
DSR
RTS
CTS
RI (CI)
5
SG
6
7
8
9
1
2
3
4
5
6
7
8
9
TXD
RXD
SG
Ordinateur
Ordinateur portable
AVerVision RS-232 Port
DSUB-9P (Female)
12345
6789
F-24
Page 92

CCaarraaccttéérriissttiiqquueess ddee ttrraannssmmiissssiioonn
ddee RRSS--223322CC
Bit de départ
Bits de données
Bit d'arrêt
Bit de parité
Paramètre X
Débit en bauds (vitesse de
communication)
FFoorrmmaatt ddee ccoommmmuunniiccaattiioonn
RRSS--223322CC
Code de départ (1 octet) : 0xFF
Code de type (1 octet) : 0x70
Code de longueur de données
(1 octet)
Code de données (1 octet) : Voir le Tableau de commande pour plus
Code de somme de contrôle
(1 octet)
Format : Début + Type + Longueur de données +
Exemple : 0xFF + 0x70 + 0x01+ 0x1 + 0x70 (Command
TTaabblleeaauu ddee ccoommmmaannddee RRSS--223322CC
:1 bit
:8 bit
:1 bit
:Aucun
:Aucun
:9600bps
: 0x01
d'informations.
: Voir le Tableau de commande pour plus
d'informations.
Données + Somme de contrôle
Power)
English Deutsch Français
FONCTION
POWER (MARCHE) 0x1 0x70
ENTER (ENTRÉE) 0x2 0x73
UP (HAUT) 0x3 0x72
DOWN (BAS) 0x4 0x75
LEFT (GAUCHE) 0x5 0x74
RIGHT (DROITE) 0x6 0x77
MENU 0x7 0x76
AUTOFOCUS
(FOCALE AUTO)
SOURCE 0x9 0x78
AUTO IMAGE
IMAGE AUTO)
(
CAPTURE (CAPTURER) 0xB 0x7A
FREEZE (GELER) 0xC 0x7D
REVERSE (INVERSE) 0xD 0x7C
EFFECT (EFFET) 0xE 0x7F
CODE DE
DONNÉES
0x8 0x79
0xA 0x7B
CODE DE
SOMME DE
CONTROLE
Italiano Español Česky
F-25
Page 93

FONCTION
TIMER (MINUTEUR) 0xF 0x7E
RECALL (RAPPEL) 0x10 0x61
SPLIT SCREEN
(ECRAN PARTAGÉ)
PRESENTER
(PRÉSENTATEUR)
PIP 0x13 0x62
CODE DE
DONNÉES
0x11 0x60
0x12 0x63
CODE DE
SOMME DE
CONTROLE
TTrraannssfféérreerr lleess iimmaaggeess ccaappttuurrééeess ssuurr
uunn PPCC
Ceci vous permet de transférer les images capturées entre la mémoire
intégrée et un PC.
1. Vous DEVEZ régler l’option CONNEXION USB sur TÉLÉCHARGER IMG
avant de brancher le câble USB.
Pour paramétrer la CONNEXION USB comme IMG DOWNLOAD , appuyez
sur MENU > sélectionnez SETTING (réglage) puis appuyez sur (►),
sélectionnez USB CONNECTION (CONNEXION USB), appuyez sur (►),
sélectionnez IMG DOWNLOAD (CHARGEMENT IMAGE), puis appuyez sur
(►/ENTER (ENTRÉE)), and MENU pour quitter le menu OSD.
2. Lorsque « IMG DOWNLOAD » (chargement image) apparaît en bas à droite
de l’écran de présentation, vous pouvez brancher le câble USB.
3.
Une fois le câble USB branché, le système détecte automatiquement le
nouveau disque amovible. Vous pouvez maintenant transférer les images
capturées entre la mémoire intégrée du AVerVision CP300 et le disque dur
d'un PC.
GGuuiiddee ddee ddééppaannnnaaggee
Cette section contient des informations importantes qui peuvent vous
aider à résoudre les problèmes les plus courants avec le CP300.
Il n’y a aucune image sur l’écran de présentation.
1. Vérifiez toutes les connexions en suivant les instructions de ce manuel.
2. Vérifiez l’interrupteur de l’appareil d’affichage de sortie.
3. Vérifiez les réglages de l’appareil d’affichage de sortie.
4. Si vous êtes en train de faire une présentation sur un appareil d’affichage de
sortie, à partir d'un ordinateur portable ou de bureau, vérifiez la connexion et
réglez la source de la caméra du document sur le mode PC.
J’ai réglé le CP300 et vérifié toutes les connexions comme indiqué
dans ce manuel mais il n’y a toujours aucune image sur l’écran de
présentation.
1. Le bouton POWER (alimentation) de l’unité est orange en mode Veille.
Appuyez à nouveau sur le bouton d’alimentation pour sortir du mode Veille :
Vous DEVEZ lire attentivement et respecter les instructions
suivantes AVANT de brancher le câble USB.
F-26
Page 94

le voyant DEL devient bleu.
2. Le réglage par défaut de la résolution de la caméra est 1024x768. Si votre
appareil de sortie ne supporte pas cette résolution, aucune image ne sera
projetée. Appuyez sans arrêter sur le bouton MENU et sur ► pour changer le
réglage de la résolution.
3. Si votre périphérique de sortie d’affichage est un téléviseur ou un
périphérique analogique, placez le commutateur DIP TV-RVB sur TV.
L’image sur l’écran de présentation est déformée ou est floue.
1. Réinitialisez tous les réglages sur les réglages du fabricant d’origine (voir les
Fonctions du menu pour plus de détails et d’informations).
2. Utilisez les fonctions de menu Luminosité et Contraste pour réduire la
déformation si possible.
3. Si l’image est floue ou n’est pas au point, appuyez sur le bouton Focale auto
du panneau de commande ou de la télécommande.
Il n’y a aucun signal d’ordinateur sur l’écran de présentation.
1. Vérifiez tous les câbles de connexion entre l’appareil d’affichage, le CP300 et
votre PC.
2. Connectez en premier votre PC au CP300 avant d’allumer votre PC.
3. Assurez-vous que votre ordinateur portable a été correctement configuré
pour l’affichage sur un appareil d’affichage externe.
L’écran de présentation ne montre pas exactement l’image du
bureau sur mon PC ou mon portable après que je change du mode
Caméra au mode PC.
1. Retournez sur votre PC ou portable, mettez la souris sur le bureau et cliquez
sur le bouton droit, puis choisissez « Propriétés » ; choisissez l’onglet
« Réglages », cliquez sur « 2 » moniteurs et cochez la case « Agrandir mon
bureau de Windows sur ce moniteur ».
2. Puis retournez sur votre PC ou portable, remettez la souris sir le bureau et
cliquez de nouveau sur le bouton droit.
3. Cette fois, choisissez « Options graphiques » puis « Envoyer vers », puis
« Intel® double affichage cloné » puis choisissez « Moniteur + portable ».
4. Lorsque vous suivez ces étapes, vous devriez voir la même image du bureay
sur votre PC ou portable ainsi que sur votre écran de présentation.
Comment faire pour télécharger des images du CP300 vers un
ordinateur ? Est-ce que c’est normal que le CP300 retourne au
mode Caméra après que j’ai téléchargé des images et débranché le
câble USB ?
Choisissez « Télécharger IMG » dans le menu puis branchez le câble USB pour
transférer les images capturées du CP300 vers l’ordinateur. Lorsque vous avez
fini, débranchez le câble USB. Le CP300 se réinitialise automatiquement et
retourne au mode Caméra.
English Deutsch Français
Italiano Español Česky
F-27
Page 95

GGaarraannttiiee lliimmiittééee
AVerMedia Information, Inc. (« AVerMedia ») garantit et ce pour la période suivant
la date de l’achat dudit produit et son éventuelle prolongation, telles que définies
dans la section « Warranty Period of AVerMedia Product Purchased (Période
de garantie du produit AVerMedia acheté) », que le produit en question
(« Produit ») est conforme à la documentation d’AVerMedia et que sa fabrication
et ses composants ne présentent pas de défaut matériel ni de défaut de
fabrication, sous réserve d’une utilisation normale. « Vous », dans le cadre de ce
contrat, correspond à vous en tant qu'individu ou qu'entreprise responsable de
l'installation et de l'utilisation du Produit. La présente garantie limitée s’applique
uniquement à Vous, l’acheteur d’origine. Sauf pour ce qui suit, le Produit est
fourni « TEL QUEL ». En aucun cas AVerMedia ne garantie que vous serez
capable d’utiliser le Produit sans problèmes ou interruptions, ou que le Produit
conviendra à vos besoins. Votre seul recours et l’entière responsabilité de
AVerMedia dans ce paragraphe sera, selon AVerMedia, la réparation ou le
remplacement du Produit par un produit similaire ou équivalent. Cette garantie ne
s'applique pas aux (a) Produits dont le numéro de série a été effacé, modifié ou
enlevé et aux (b) cartons, boîtiers, piles, cabinets, cassettes et autres accessoires
utilisés avec ce produit. Cette garantie ne s'applique pas aux Produits qui ont été
endommagés, détériorés ou qui mal fonctionnent suite à (a) un accident, un abus,
la négligence, le feu, l'eau, les éclairs ou tout autre acte naturel, une utilisation
commerciale ou industrielle, une modification interdite ou le non-respect des
instructions fournies avec ledit Produit, (b) un abus de service par une personne
autre que les représentatifs du fabriquant, (c) des dommages pendant le transport
(ces réclamations doivent être faites auprès de la compagnie de transport), ou (d)
toute autre cause qui n'est pas causée par un défaut matériel. La Durée de la
Garantie de tout produit réparé ou remplacé sera la durée la plus longue entre (a)
la Durée de la Garantie d’origine et (b) trente (30) jours à partir de la date de
réception du produit réparé ou de remplacement.
Limitation de la garantie
AVerMedia ne donne aucune garantie à un tiers. Vous êtes responsable pour
tous les dommages, demandes, accords, dépenses et coûts d’avocat associés à
une plainte déposée contre Vous puisque vous êtes le seul responsable de votre
utilisation, correcte ou non, de ce Produit. Cette garantie n’est valide que si ce
Produit a été installé, opéré, utilisé et entretenu en accordance avec les
instructions de AVerMedia. En particulier, cette garantie ne couvre pas les
dommages causés par (i) des accidents, des évènements physiques, électriques
ou électromagnétiques inhabituels, la négligence ou l’utilisation incorrecte, (ii) des
fluctuations dans l’alimentation électrique hors du contrôle de AVerMedia, (iii)
l’utilisation du Produit avec des accessoires ou des attachements non
recommandés par AVerMedia ou ses agents agréés ou (iv) l’installation, la
modification ou la réparation de ce Produit par n’importe qui autre que AVerMedia
ou l’un de ses agents agréés.
Décharge de responsabilité
SAUF DANS LES CAS EXPRESSÉMENT SPÉCIFIÉS DANS LA PRÉSENTE
GARANTIE ET DANS LES LIMITES AUTORISÉES PAR LA LOI, AVERMEDIA
DÉCLINE TOUTE LES AUTRES RESPONSABILITÉS DE GARANTIE POUR CE
PRODUIT, QU’ELLE SOIT EXPLICITE OU IMPLICITE, RÈGLEMENTAIRE OU
AUTRE, INCLUANT SANS RESTRICTIONS LA SATISFACTION DE LA
QUALITÉ, L’APTITUDE À L’UTILISATION, AU FONCTIONNEMENT AINSI QUE
LES GARANTIES IMPLICITES D’APTITUDE À LA COMMERCIALISATION ET
D’ADÉQUATION À UN USAGE PARTICULIER OU LE RESPECT DES DROITS
DE TIERS.
F-28
Page 96

Limitation de responsabilité
EN AUCUN CAS AVERMEDIA NE POURRA ÊTRE TENU RESPONSABLE
D’ÉVENTUELS DOMMAGES QUE CE SOIT, DIRECTS, INDIRECTS,
ACCIDENTELS, SPÉCIAUX, EXEMPLAIRES, PUNITIFS OU CONSÉCUTIFS,
INCLUANT SANS RESTRICTIONS, LA PERTE DE PROFITS, DE DONNÉES,
DE PRODUCTION, DE L’USAGE, LES INTERRUPTIONS DE COMMERCE,
L’OBTENTION DE BIENS OU DE SERVICES DE REMPLACEMENT
DÉCOULANT DE OU ASSOCIÉ À CETTE GARANTIE LIMITÉE, OU DE
L'UTILISATION OU DES PERFORMANCES DE N’IMPORTE QUEL PRODUIT
MÊME SI LA POSSIBILITÉ DE TELS DOMMAGES EST STIPULÉE DANS LE
CONTRAT OU LE DROIT, INCLUANT SANS RESTRICTIONS LA NÉGLIGENCE
OU N’IMPORTE QUELLE AUTRE THÉORIE LÉGALE, MÊME SI AVERMEDIA A
ÉTÉ AVERTI DE LA POSSIBILITÉ DE TELS DOMMAGES. L’UNIQUE ET
ENTIÈRE RESPONSABILITÉ DE AVERMEDIA, DANS LE CAS D’UN
DOMMAGE DE QUELQUE SORTE QUE CE SOIT ET CELA MALGRÉ LA
FORME D’ACTION PRISE, NE DÉPASSERA JAMAIS LE MONTANT PAYÉ PAR
VOUS VERS AVERMEDIA POUR L’ACHAT DU PRODUIT EN QUESTION.
Lois en vigueur et vos droits
Cette garantie vous confère des droits réglementaires spécifiques auxquels
pourront éventuellement s’ajouter d’autres droits en fonction des lois en vigueur.
Ces droits varient d’une région à l’autre.
Pour la période de garantie, reportez-vous à la carte de
garantie.
English Deutsch Français
Italiano Español Česky
F-29
Page 97

AVVISO FCC (Classe A)
Dichiarazione FCC (Federal Communications Commission)
NOTA: Questa attrezzatura è stata controllata ed è stata trovata a norma con i limiti di un apparecchio
digitale di Classe A, in conformità alla parte 15 delle Normative FCC. Questi limiti sono designati a fornire
una protezione ragionevole da interferenze dannose in un’installazione privata. Questa attrezzatura
genera, utilizza e può irradiare energia di frequenza radio e, se non installata ed utilizzata in accordo alle
istruzioni, può provocare interferenze dannose alle comunicazioni radio. Non c'è tuttavia garanzia che non
si verifichino interferenze in installazioni particolari. Se questa attrezzatura provoca interferenze dannose
alla ricezione radiofonica o televisiva, che possono essere determinate accendendo o spegnendo
l'attrezzatura, l'utente è incoraggiato a cercare di correggere l'interferenza prendendo una o più delle
seguenti misure:
• Riorientare o riposizionare l'antenna di ricezione.
• Aumentare la distanza tra l’attrezzatura ed il ricevitore.
• Collegare l'attrezzatura ad una presa di corrente su un circuito diverso da quello al quale è collegato il
ricevitore.
• Consultare il rivenditore o un tecnico specializzato radio / TV per aiuto.
Classe A ITE:
La Classe A ITE è una categoria per tutti gli altri ITE che soddisfa i limiti Classe A ITE ma non i limiti
Classe B ITE. La vendita di tali attrezzature non può essere limitata, ma devono essere allegati i seguenti
avvisi nelle istruzioni per l’uso:
Avviso - Questo è un prodotto di classe A. In un ambiente domestico questo prodotto può provocare
interferenze radio, nel cui caso potrebbe essere richiesto all’utente di prendere misure adeguate per
correggere tale interferenza.
Classe A CE (MEC)
provocare interferenze radio, nel cui caso potrebbe essere richiesto all’utente di prendere misure
adeguate per correggere tale interferenza.
LIMITAZIONE DELLE RESPONSABILITÀ
Non è fatta fa alcuna garanzia o dichiarazione, sia essa espressa o implica, riguardo alla qualità,
l’accuratezza, le prestazioni e l’idoneità a qualsiasi scopo particolare di questo documento. L’esattezza
delle informazioni di questo documento sono state controllate attentamente; tuttavia non è assunta alcuna
responsabilità per qualsiasi inaccuratezza. Le informazioni contenute in questo documento sono soggette
a modifiche senza preavviso.
In nessun caso AVerMedia sarà responsabile per danni diretti, indiretti, speciali, accidentali o conseguenti,
provocati dall’uso o dall’inabilità all’uso di questo prodotto o documentazione, anche se avvisati della
possibilità di tali danni.
MARCHI
AVerVision è un marchio registrato della AVerMedia Information, Inc. IBM è un marchio registrato della
International Business Machines Corporation. Macintosh è un marchio registrato della Apple Computer,
Inc. Microsoft è un marchio registrato e Windows è un marchio della Microsoft Corporation. Tutti gli alti
nomi di prodotti o aziende sono utilizzati in questo documento solo a scopo identificativo o informativo, e
possono essere marchi o marchi registrati dei loro rispettivi proprietari.
DIRITTI D’AUTORE
© 2008 by AVerMedia INFORMATION, Inc. Tutti i diritti riservati. Nessuna parte di questa
pubblicazione può essere riprodotta, trasmessa, trascritta, archiviata in sistemi d’archiviazione, o
tradotta in qualsiasi lingua, usando qualsiasi forma o mezzo, senza previa autorizzazione della
AVerMedia Information, Inc.
Questo prodotto è conforme alla Parte 15 delle Norme FCC. Il funzionamento è soggetto
alle seguenti due condizioni: (1) Questo dispositivo non può provocare interferenze
dannose; (2) questo dispositivo deve accettare tutte le interferenze ricevute, incluse le
interferenze che possono provocare operazioni indesiderate.
Si dichiara la conformità alle richieste dichiarate nel Concilio direttivo (Parlamento
Europeo) sull'Approssimazione delle leggi degli Stati membri in relazione alla Direttiva
2004/108/CEE sulla Compatibilità elettromagnetica dei dispositivi radiofonici e di
telecomunicazione.
Avviso - Questo è un prodotto di classe A. In un ambiente domestico questo prodotto può
QUESTO SIMBOLO SUL PRODOTTO, O SULLA SUA CONFEZIONE, INDICA CHE IL
PRODOTTO NON PUÒ ESSERE SMALTITO INSIEME AI RIFIUTI DOMESTICI. INVECE È
RESPONSABILITÀ DELL’UTENTE DI SMALTIRE L’ATTREZZATURA PRESSO PUNTI
DESIGNATI DI RACCOLTA PER IL RICICLAGGIO DI COMPONENTI ELETTRICI ED
ELETTRONICI. PER ALTRE INFORMAZIONI SUI PUNTI DI RACCOLTA PER IL
RICICLAGGIO DELLE ATTREZZATURE, METTERSI IN CONTATTO CON IL MUNICIPIO, IL
SERVIZIO DI NETTEZZA URBANA OPPURE IL NEGOZIO OVE È STATO FATTO
L’ACQUISTO.
English Deutsch Français
Italiano
Español Česky
Page 98

Page 99

CCoonntteennuuttii
Introduzione....................................................... I-1
Contenuti della confezione .............................. I-1
Optional Accessories........................................ I-2
Parti di AVerVision CP300 ................................ I-3
Specifiche tecniche........................................... I-4
Collegamenti...................................................... I-5
Collegamento dell’adattatore di corrente ..................I-6
Collegamento al televisore........................................I-6
Collegamento a VGA, monitor Mac o proiettore
LCD/DLP...................................................................I-
Collegamento ad un PC compatibile IBM o ad un
computer Macintosh..................................................I-
Installazione del pannello luminoso optional.............I-9
Collegamento al microscopio....................................I-9
Configurazione di AVerVision CP300 ............ I-10
Testa della macchina ..............................................I-10
Interruttore LED e puntatore laser...........................I-10
Supporto a collo d’oca e braccio flessibile .............. I-11
Sensore a raggi infrarossi ....................................... I-11
Foglio antiriflesso....................................................I-11
Utilizzo del telecomando ad infrarossi ......... I-12
Tastiera del pannello di controllo .................. I-15
Struttura del menu OSD.................................. I-17
Funzioni del menu........................................... I-18
Schema di collegamento RS-232C ................ I-23
Specifiche del cavo RS-232C......................... I-23
Specifiche di trasmissione RS-232C............. I-23
Formato comunicazione RS-232C................. I-24
Tabella comandi RS-232C .............................. I-24
Trasferimento delle immagini
acquisite al PC................................................. I-
Risoluzione dei problemi................................ I-25
Garanzia limitata.............................................. I-26
25
English Deutsch Français
7
8
Italiano
Español Česky
Page 100

 Loading...