

Page 1
AVer CP2 series
(CP2-65/CP2-75)
User Manual
Page 2

Federal Communications Commission
This device complies with Part 15 of the FCC Rules. Operation is subject to the
following two conditions: (1) This device may not cause harmful interference, and (2)
this device must accept any interference received, including interference that may
cause undesired operation.
This equipment has been tested and found to comply with the limits for a Class B digital
device, pursuant to Part 15 of the FCC Rules. These limits are designed to provide
reasonable protection against harmful interference in a residential installation. This
equipment generates, uses and can radiate radio frequency energy and, if not installed
and used in accordance with the instructions, may cause harmful interference to radio
communications. However, there is no guarantee that interference will not occur in a
particular installation. If this equipment does cause harmful interference to radio or
television reception, which can be determined by turning the equipment off and on, the
user is encouraged to try to correct the interference by one of the following measures:
- Reorient or relocate the receiving antenna.
- Increase the separation between the equipment and receiver.
- Connect the equipment into an outlet on a circuit different from that to which the
receiver is connected.
- Consult the dealer or an experienced radio/TV technician for help.
FCC Caution: Any changes or modifications not expressly approved by the party
responsible for compliance could void the user's authority to operate this equipment.
DISCLAIMER
No warranty or representation, either expressed or implied, is made with respect to the
contents of this documentation, its quality, performance, merchantability, or fitness for a
particular purpose. Information presented in this documentation has been carefully checked
for reliability; however, no responsibility is assumed for inaccuracies. The information
contained in this documentation is subject to change without notice.
In no event will AVer Information Inc. be liable for direct, indirect, special, incidental, or
consequential damages arising out of the use or inability to use this product or
documentation, even if advised of the possibility of such damages.
TRADEMARKS
“AVer” is a trademark owned by AVer Information Inc. Other trademarks used herein for
description purpose only belong to each of their companies.
COPYRIGHT
© 2019 AVer Information Inc. All rights reserved.
All rights of this object belong to AVer Information Inc. Reproduced or transmitted in any
form or by any means without the prior written permission of AVer Information Inc. is
prohibited. All information or specifications are subject to change without prior notice.
Page 3
The mark of Crossed-out wheeled bin indicates that this product must not be
disposed of with your other household waste. Instead, you need to dispose of
the waste equipment by handing it over to a designated collection point for the
recycling of waste electrical and electronic equipment. For more information
about where to drop off your waste equipment for recycling, please contact
your household waste disposal service or the shop where you purchased the
product.
Notice
The technical specifications provided in this Manual and on the carton are subject to
change without further notice. If there is any difference between this Manual and any
actual operation, such actual operation shall prevail.
Contact Information
Global
AVer Information Inc.
www.aver.com
8F, No.157, Da-An Rd., Tucheng Dist.,
New Taipei City
Taiwan
Tel: +886-2-2269-8535
USA
AVer Information Inc.
668 Mission Ct
Fremont, CA 94539
www.averusa.com
Toll-free: 1(877)528-7824
Local: 1(408)263-3828
Support.usa@aver.com
FCC ID: 2AFG6-SI01
IC: 22166-SI01
CAN ICES-3(B)/NMB-3(B)
AVer Information Europe B.V.
Westblaak 140, 3012KM,
Rotterdam, Netherland
Tel: +31(0)10 7600 550
Technical support:
EU.RMA@aver.com
Page 4

CONTENTS
AAnnnnoottaattiioonn TTooool
l
SSppoottlliigghht
t
CCoouunnttddoowwn
n
SSttooppwwaattcch
h
AAiirrCCllaasss
s
AAllll aapppps
s
SSttaattuuss iiccoon
n
Introduction ........................................................................................................................ 1
Hardware Introduction ....................................................................................................... 2
Package Contents........................................................................................................... 2
Front Side ....................................................................................................................... 3
Terminal Interface Overview ........................................................................................... 4
Ventilation for Installation ................................................................................................ 5
Remote Controller ........................................................................................................... 6
Installation........................................................................................................................... 8
Power connection ........................................................................................................... 9
Connect to Laptop .......................................................................................................... 9
LAN Connection ............................................................................................................ 10
HDMI Output Connection .............................................................................................. 10
Coaxial Output Connection ........................................................................................... 10
Using AVer CP2 System ................................................................................................... 11
Power On ...................................................................................................................... 11
Power Off ...................................................................................................................... 12
Main Screen .................................................................................................................. 12
Toolbar .......................................................................................................................... 13
................................................................................................................... 23
........................................................................................................ 18
.................................................................................................................. 19
................................................................................................ .............. 20
................................................................................................................ 21
................................................................................................................... 22
............................................................................................................... 25
Page 5

Multiple Screen Page .............................................................................................. 26
BBuuiilldd aann AAccccoouunnt
t
OOppeenn aa FFiillee ffrroomm tthhee CClloouudd SSttoorraagge
e
MMeennuu FFuunnccttiioon
n
BBaacckkggrroouunnd
d
IImmppoorrtt PPDDF
F
SSaavvee tthhee PPDDFF ffiillee ttoo GGooooggllee DDrriivve
e
UUssiinngg WWhhiitteebbooaarrd
d
SSeettuupp SSccrreeeennSShhaarree PPrro
o
SShhaarriinngg ccoonntteenntt ffrroomm AAppppllee pprroodduucctt ttoo tthhee AAVVeerr CCPP2
2
ddeesskkttoop
p
SShhaarriinngg ccoonntteenntt ffrroomm CChhrroommee ssoolluuttiioonn ttoo tthhee AAVVeerr CCPP2
2
SShhaarriinngg ccoonntteenntt ffrroomm WWiinnddoowwss ccoommppuutteerr ttoo tthhee AAVVeerr CCPP2
2
SShhaarriinngg ccoonntteenntt ffrroomm AAnnddrrooiidd ddeevviiccee ttoo tthhee AAVVeerr CCPP2
2
EEtthheerrnneett ccoonnnneeccttiioon
n
WWii--FFii CCoonnnneeccttiioon
n
On-Screen Menu ..................................................................................................... 27
Cloud Storage ............................................................................................................... 30
..................................................................................................... 30
........................................................................ 34
Whiteboard ................................................................................................................... 36
........................................................................................................ 36
............................................................................................................. 38
.............................................................................................................. 40
.......................................................................... 41
............................................................................................................... 42
ScreenShare Pro .......................................................................................................... 48
.......................................................................................... 48
.............................................. 52
To share your Mac computer’s
to the AVer CP2 ........................................ 55
.......................................... 57
..................................... 59
............................................ 61
Connect to DocCam...................................................................................................... 64
Internet Connection ...................................................................................................... 65
................................................................................................ 65
..................................................................................................... 66
Adjust Date and Time.................................................................................................... 68
Screen Lock .................................................................................................................. 70
Settings Password ........................................................................................................ 72
Volume Adjustment ....................................................................................................... 74
Wallpaper ...................................................................................................................... 75
Page 6

System Update ............................................................................................................. 76
MMiinniimmuumm SSeerrvveerr SSyysstteemm RReeqquuiirreemmeenntts
s
LLooggiin
n
CChhaannggee PPaasssswwoorrd
d
CChhaannggee EEmmaaiil
l
AAdddd IIFFPP DDeevviicce
e
PPoowweerr OOnn,, OOFFFF,, aanndd RReebboooott IIFFPP DDeevviicce
e
SScchheedduulliinng
g
Display Management .................................................................................................... 77
....................................................................................................................... 78
................................................................................................... 80
.......................................................................................................... 82
....................................................................................................... 83
.............................................................................................................. 91
.................................................................. 77
................................................................. 89
Specification ................................................................ ..................................................... 93
Multimedia Supported Formats ..................................................................................... 97
RS-232 Pin Definition.................................................................................................. 100
RS-232 Send Command Table ................................................................................... 100
Troubleshooting ............................................................................................................. 106
Page 7

Safety Instruction
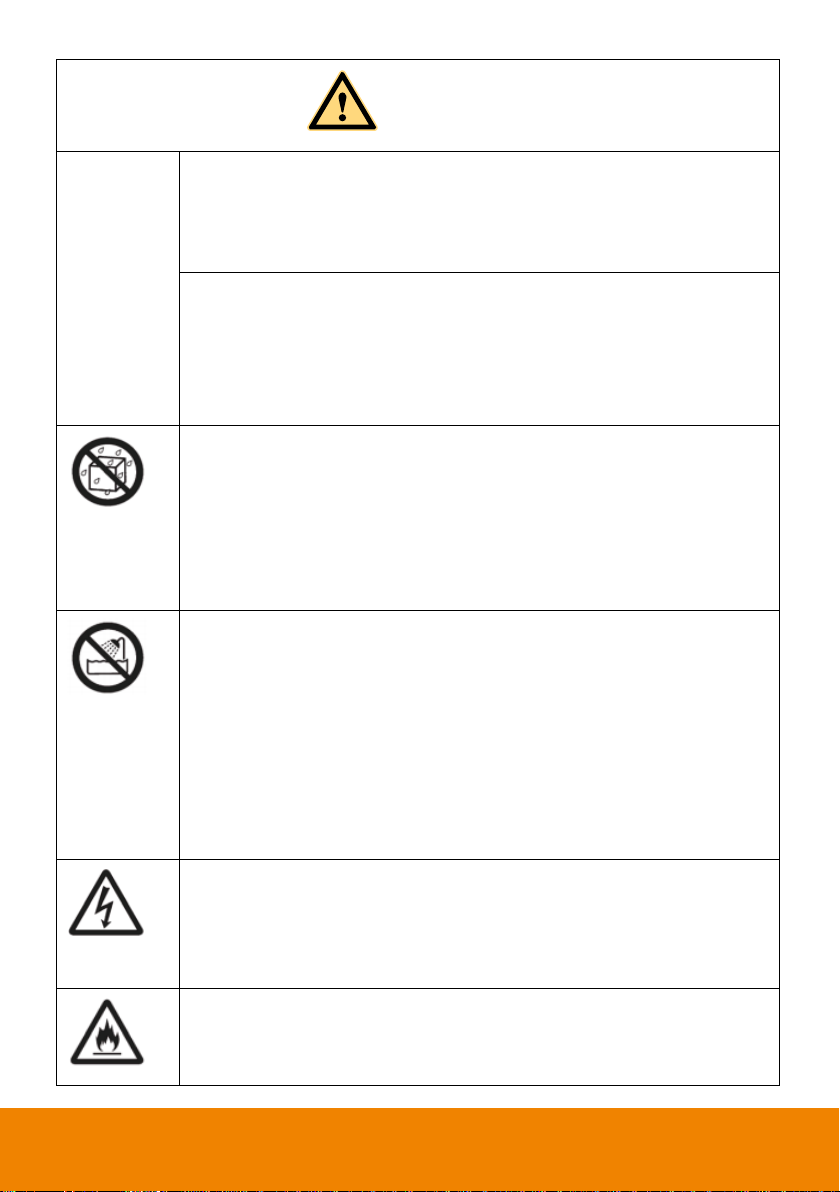
WARNING
Disconnect the product from power supply immediately if major
failures occur.
The major failures include the following:
Smoke, peculiar smell or abnormal sound is discharged from the
product.
No image or sound is displayed, or the image error occurs.
Where the mains plug or an appliance coupler is used as the
disconnect device the disconnect device shall remain readily operable.
In the preceding scenarios, do not continue to use the product,
disconnect power supply immediately and contact professional staff for
troubleshooting.
The socket-outlet shall be installed near the equipment and shall be
easily accessible.
Do not drop liquid, metal or combustible into the product.
If any liquid or metal is dropped into the product, power off the product
and disconnect power supply, then contact professional staff for
solutions.
Pay attention to the children when they are close to the product.
Do not damage the power cable.
Do not damage, change, wind, bend, heat or drag the power cable
forcibly.
As a valuable offering better audio and visual experience, this product has considered the
personal safety factors in design and been tested strictly before delivery. However, improper
installation and use may cause electric shock or fire. To ensure its safe use, maintain its
service life and bring its best performance into full play, please read and understand the
operating instructions and nameplates and observe the following safety precautions
carefully before using the product, and keep this Manual properly for future reference.
For your safety, please read the following instruction before you use the product. Serious
injury or property loss may be caused by improper operations. Do not try to repair the
product by your own.
Page 8

WARNING
Do not put weights (such as the product itself) on the power cable.
Do not drag the cable forcibly when you pull out the power plug. If the
power cable is damaged, please contact the local distributor to repair
or replace it.
The power cable in the accessory box is for this product only. Don't
use it on other devices.
Put the product on a stable surface.
An unstable surface includes and does not limit to an inclined plane, a
shaky stand, desk or platform, which might cause the turnover and
damage.
Use the battery correctly.
Galvanic corrosion, electric leakage and even fire may be caused by
improper battery usage.
It is recommended to use the designated type of battery and install the
battery by correct electrodes (positive and negative electrodes).
Do not install and use new battery together with the used one.
Take out the battery if the remote control is not used for a long period.
Do not expose the battery under overheated environments such as
sunlight and firing.
Dump the used battery based on local regulations.
Do not open the cover or change the product by your own.
High voltage components are installed in the product. When you open
the cover, high voltage, electric shock or other dangerous situations may
occur. If inspection, adjustment or maintenance is required, contact the
local distributor for help.
Use the specified power supply.
Do not use any types of power cables other than the one provided with
the product to prevent the product from being damaged.
Use a three-wire socket and ensure that it is properly grounded.
Pull out the power plug from the socket if the product is not used for a
long period.
Page 9
WARNING
Before you move the product, disconnect all external connections
and separate all toppling preventing devices.
Move the product carefully to prevent it from being hit or squeezed,
especially the screen, which may cause injury if broken.
Clean the dust and metal on the power plug regularly.
When you are cleaning, fire or electric shock may be caused if the
product is powered on.
Keep in mind to pull out the power plug before cleaning it by using a
dried cloth.
Do not put items on the top of the product.
Do not put items, such as a container for liquid (a vase, flowerpot,
cosmetics or liquid medicine), on the top of the product.
If any water or liquid is spilled on the product, short circuit may occur
and cause fire or electric shock.
Do not tread on the product or hang any items on the product.
Do not install the product in an improper place.
Do not install the product in humid places, such as the bathroom, the
shower room, the place near windows or outdoor environments where
experience rain, snow or other harsh weather. The product installation
is also required to avoid a place around by hot spring vapor. The
preceding environments may cause faults or electric shock under
extreme conditions.
Do not put exposed fire source, such as an ignited candle, on the
product.
Pull out the power plug during thunderstorms.
Do not touch the product when lighting to avoid electric shock.
Install or place components which power supply voltage is high
enough to cause personal injury in places out of the reach of children.
Do not cover or block up any vents on the product.
The overheated components may cause fire, damage the product and
shorten the service life.
Page 10
WARNING
Do not put the venting surface of the product facedown.
Do not install the product on a carpet or bed clothes.
Do not use a cloth such as table cloth to cover the product.
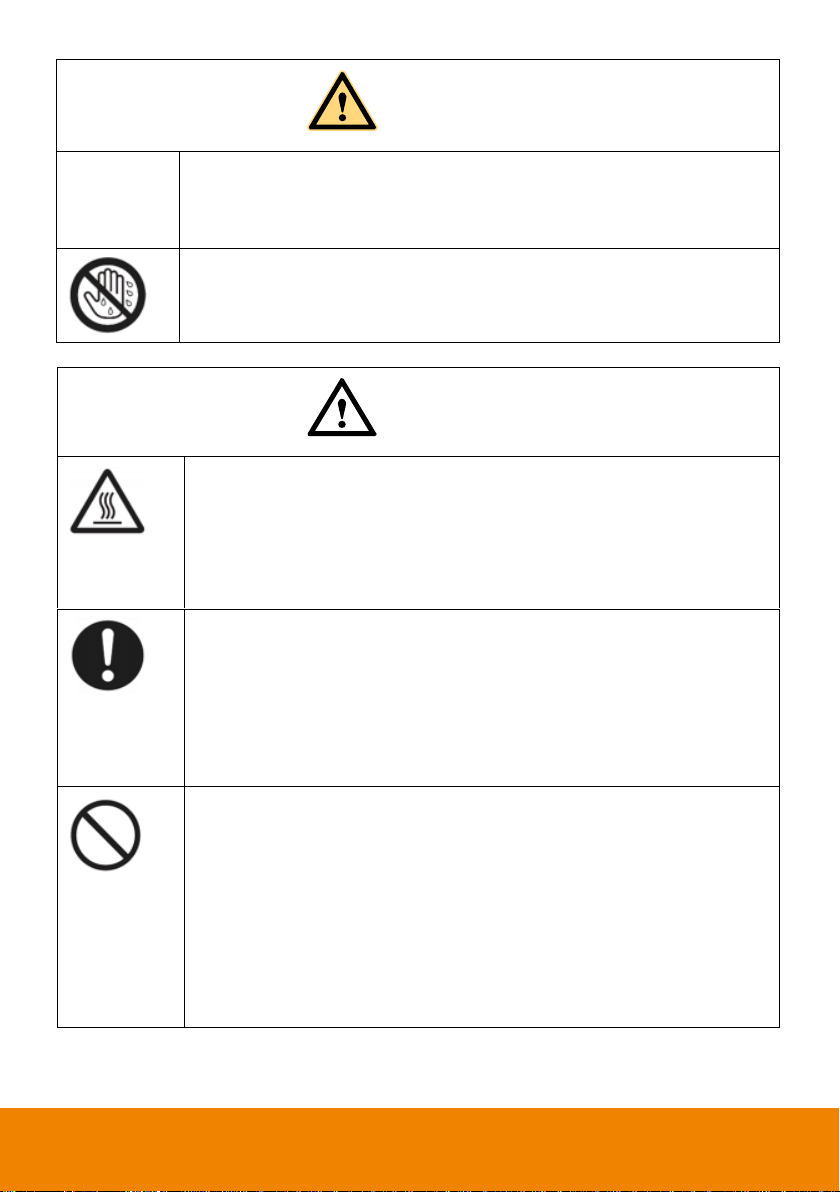
Do not touch the power cable with wet hands to avoid electric shock.
Altitude during operation (m): less than 5000m
CAUTION
Do not install the product in high temperature environments.
Do not install the product near heat source, such as the radiator, the
heat reservoir, the stove or other heating devices.
Do not expose the product under sunlight, which may cause high
temperature and subsequent faults in the product.
For transport:
Pack the product for mobility or maintenance by using the cartons and
cushioning material provided with the product.
Vertically move the product during transport. The screen or other
components are easily broken if the product is moved by an improper
way.
Keep away from the product when you use a radio.
The product design to prevent radio interference complies with the
international EMI standard. However, the interference still exists and
causes noise in the radio.
If noise occurs in the radio, try the following solutions.
Adjust the direction of the radio antenna to avoid the interference from
the product.
Keep the radio away from the product.
Page 11
CAUTION
Advice for watching:
Use the product in an environment with comfortable light. It is
harmful to your eyes to watch in a too bright or too dark environment.
Relax your eyes after a period of time for watching.
When you are watching, the distance which is 3 to 7 times of the
display height should be kept, and it is the best distance to protect
eyes and prevent eyestrain.
Adjust the volume to an appropriate level, especially at night.
Use amplifier equipment as the audio input source with caution. If
you must use amplifier equipment, the input power should not
exceed the maximum of speaker power. Otherwise, problems occur,
such as the speaker is overpowered and damaged.
Sudden temperature or environment humidity changes may cause
moisture condensation. This may cause poor picture quality on
screen. If this occurs, please keep the IFP on to evaporate
moisture.
When the IFP is not in use for several days, please disconnect IFP
from the power socket for environment and safety reasons.
IFP may have features that require it to be left in standby to work
correctly.
For children, please do not allow children to climb on the IFP, keep
small accessories out of reach of children, so that they are not
mistakenly swallowed.
If protective earthing is used as a safeguard, the instructions shall require connection of
the equipment protective earthing conductor to the installation protective earthing
conductor (for example, by means of a power cord connected to a socket-outlet with
earthing connection).
Page 12

Wall Mount Important Safety Instructions
Improper installation may cause property damage or personal injury. If you do not
understand these directions, or have doubts about the safety of the installation, contact
Customer Service or call a qualified contractor. AVer is not responsible for damage or injury
caused by incorrect installation or use.
After reading the manual, please keep it handy for future reference.
Safety information
Warning
1. The product should be installed by a qualified professional specified by the retail store.
Product installation by non-qualified personnel is very dangerous and may cause
personal injury.
2. When moving or replacing the product after installation, contact a qualified installer
specified by the retail store. Installation or movement of the product must be carried out
by a skilled professional. If an unqualified person moves and installs the product, it may
cause safety risks.
3. Be sure not to hang the power cable and signal cable on the back of IFP when installing
the wall-mounted IFP. Damaged cables may result in fire, electric shock, or damage to
the product.
4. The product should be installed where its weight can be fully supported. If the product is
installed on a weak surface, the product may fall, causing injury.
5. Do not hang on this product; protect the product from severe impacts after the
installation. The product may fall and cause injury.
6. This product contains small items that could be a choking hazard if swallowed. Keep
these items away from young children.
Caution
1. Follow the instructions in this manual to product properly. If you do not follow these
instructions, the product may be installed incorrectly and cause serious injury or the
product may become damaged.
2. When installing the product, first check that the wall is flat and strong enough. Use the
anchors and screws provided. If you use anchors and screws that are not specified by
the manufacturer, they may not hold the weight of the product, causing safety issues.
3. Keep this product away from sprinklers, sensors, high-tension wires and power sources.
Do not install it in a location where vibrations or impacts are likely to occur.
4. To install or adjust the height of the product, two or more people are needed. If you try to
install or move the product alone, it may fall and cause injury or the product may
become damaged.
Page 13

5. Do not attempt to install or assemble this product if the product or hardware is damaged
or missing. In the event that replacement parts or hardware are needed, please contact
Customer Service.
6. When drilling holes into the wall, make sure you use a drill and drill bit with the specified
diameter. Ensure that you also follow the instructions regarding the depth of the holes.
Otherwise, the product may be installed incorrectly and cause safety issues.
7. Do not clean the product with a wet towel, and do not place a heater, or humidifier
beneath it. Moisture, steam or heat permeating into this product may result in fire,
electric shock or product damage.
Safety tips for installation
1. At least 2 professional installers should on site when installing the wall mounting bracket
and the IFP. To prevent injury and damage to the wall and device, user should not
perform the installation without professional guidance.
2. The installation position should be on the wall that can bear the weight of the IFP and
bracket, and measures should be taken to calculate the effects of other external forces.
3. To avoid accidental damage to the device and human safety, please install the bracket in
a place which avoids the contact of children.
4. When the installed screws become loose, please turn off the device and unplug the
power cord for further check.
5. The bracket should be installed on a vertical flat surface.
6. For the best working performance, these places should be avoided: strong electric field,
strong magnetic field and potential leakage of inflammable gas.
7. For the best panel viewing, the bracket should be installed in the place where the direct
intense light and reversed light situations should be avoided.
8. In case of fire, please avoid the places as described below: heavy soot, windy and dusty
place, intense humidity and intense heat.
9. During installation, please make sure connection between the screws and bracket are
secured firmly.
This instruction should be strictly followed. The manufacturer isn’t responsible for any
damages and lost caused by inappropriate installation and operation.
Page 14

Introduction
Thank you for choosing our interactive display. As our latest independently developed and
produced human-machine interactive product, the interactive display is a multi-functional
display for interactive teaching, digital demonstration, multi-media presentation, touch
operations and handwriting. They are well designed and produced to meet the needs of
education and corporate applications, and provide a user-friendly experience, digital
intelligent control as an ideal equipment for schools and companies. You can use your
fingers or stylus pen to write, edit and delete any things on the screen.
1
Page 15
Hardware Introduction
1 2
3
4 5 6 7
8
9 10
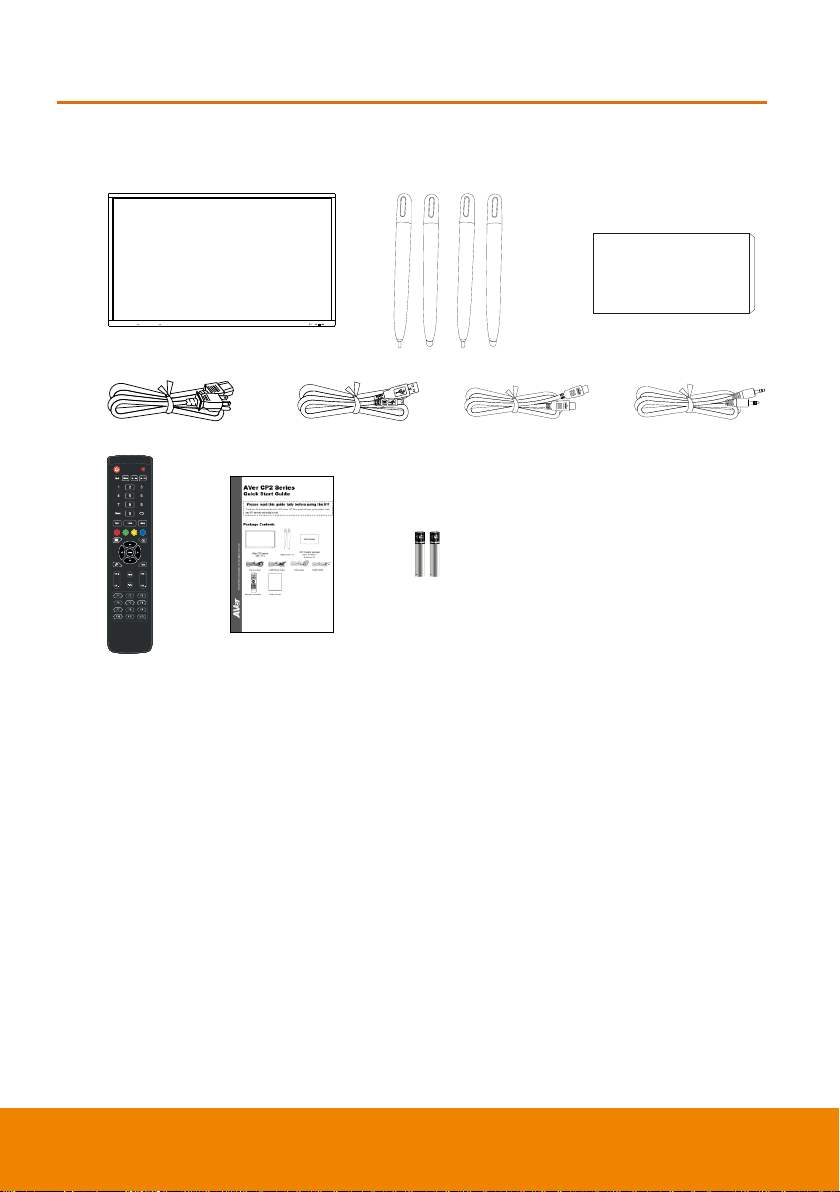
1. AVer CP2 series (65”, 75”)
2. Stylus pens x4 (2 pairs)
3. WiFi module package(WiFi module +
Antenna x2)
4. Power cable
5. USB-Touch cable
6. HDMI cable
7. Audio cable
8. Remote Controller
9. Quick Guide
10. Batteries for remote controller
WiFi Module
package
Package Contents
2
Page 16
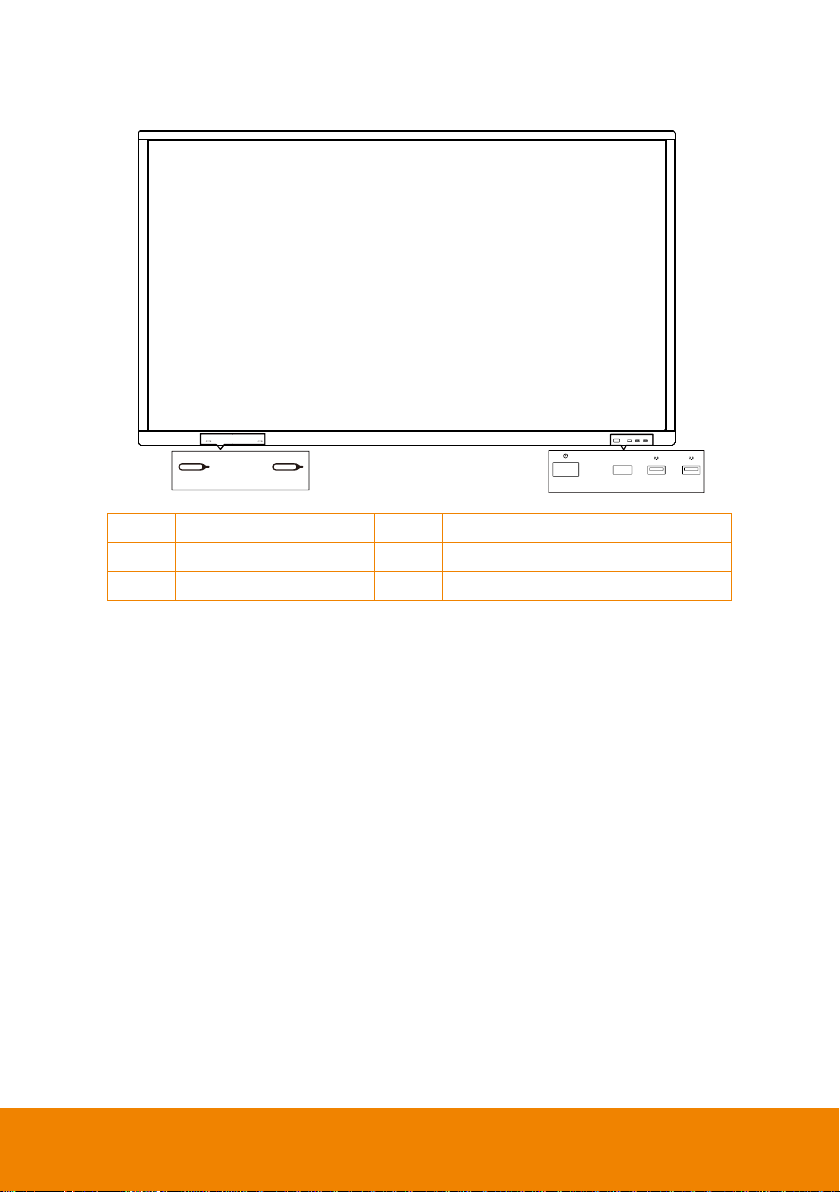
Front Side
1 2 3 4
5 6
1
Power button
4
USB 2.0 port
2
IR receiver
5
Magnetic zone for Stylus pen
3
USB 2.0 port
6
Magnetic zone for Stylus pen
3
Page 17
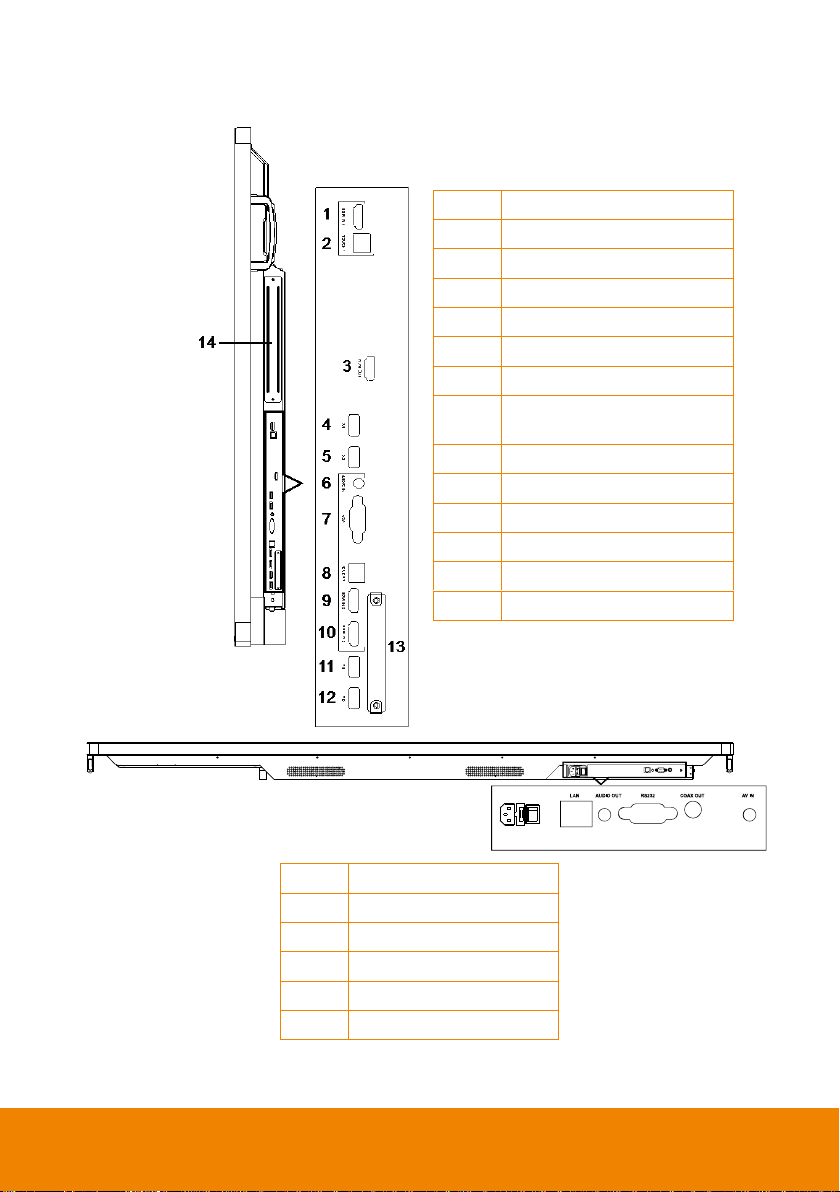
Terminal Interface Overview
1 2 3 4 5 6
1
Power switch
2
Ethernet port
3
Audio output port
4
RS232 port
5
Coaxial output port
6
AV IN port
1
HDMI input 1
2
USB-Touch 1
3
HDMI output
4
USB 3.0 port
5
USB 3.0 port
6
Audio input
7
VGA input
8
USB-Touch 2
(For HDMI 2/3)
9
HDMI input 2
10
HDMI input 3
11
USB 2.0 port
12
USB 2.0 port
13
WiFi module slot
14
PC module slot
4
Page 18
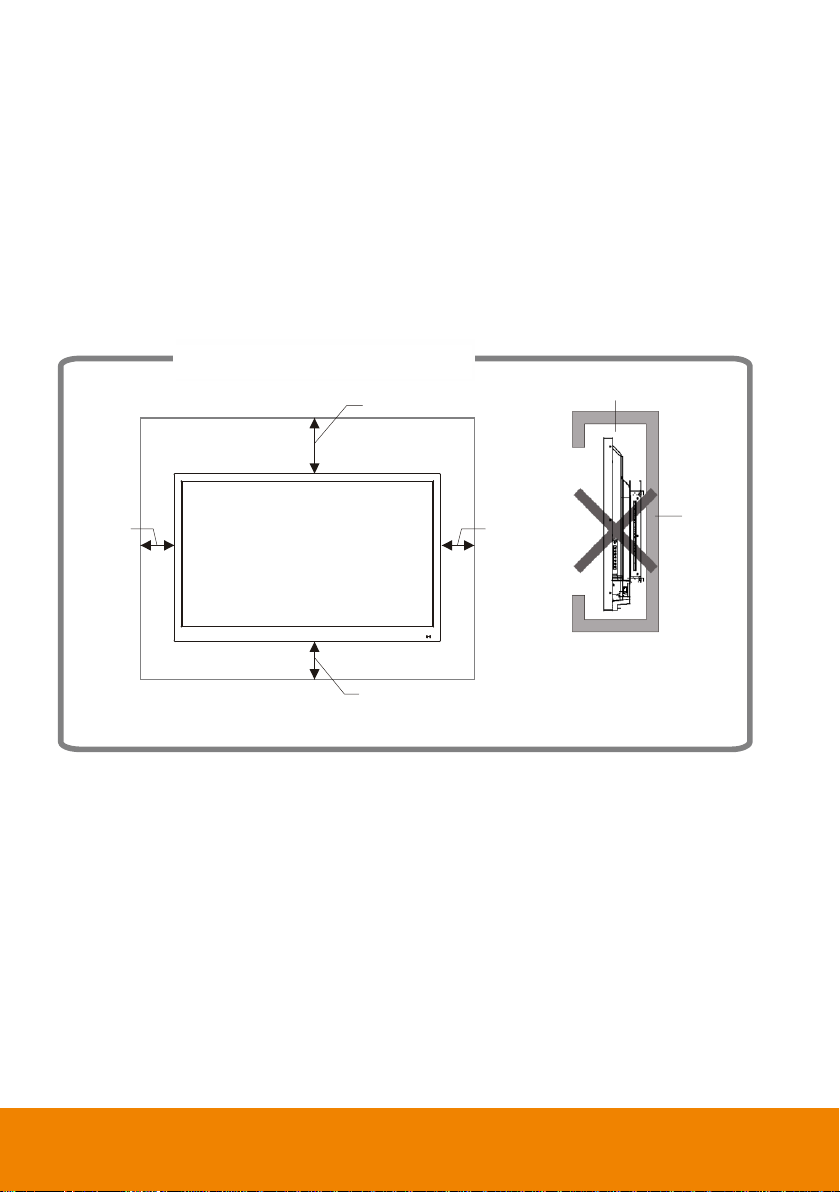
Mounted on the wall
Impede air circulation
30cm
10cm
10cm
10cm
Wall
Ventilation for Installation
Keep clearances around the product according to the minimum dimensions shown in the
picture.
Never cover the ventilation holes or insert any object into the housing.
Do not place the product in a confined space such as bookcase or imbedded closet unless
appropriate ventilation conditions are provided. There should be adequate clearances
around the product to ensure good ventilation.
5
Page 19
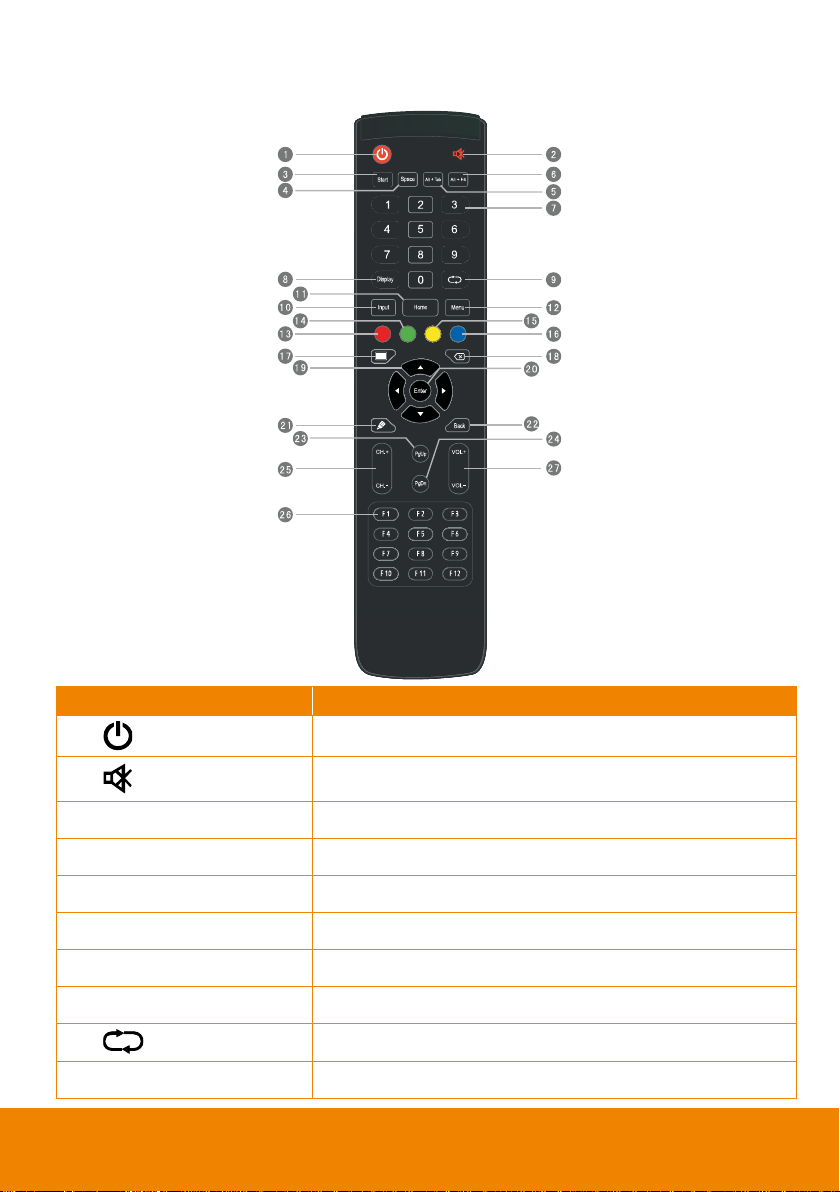
Remote Controller
Name
Function
(1)
Power on/off.
(2)
Volume mute.
(3) Start
Built-in computer Windows key.
(4) Space
Built-in computer Space key.
(5) Alt+Tab
Built-in computer Spacebar Alt + Tab
(6) Alt+F4
Built-in computer program window close button.
(7) Numeric Pad
Use to enter numeric.
(8) Display
Display channel information.
(9)
Not support.
(10) Input
Input signal source selection key,
6
Page 20
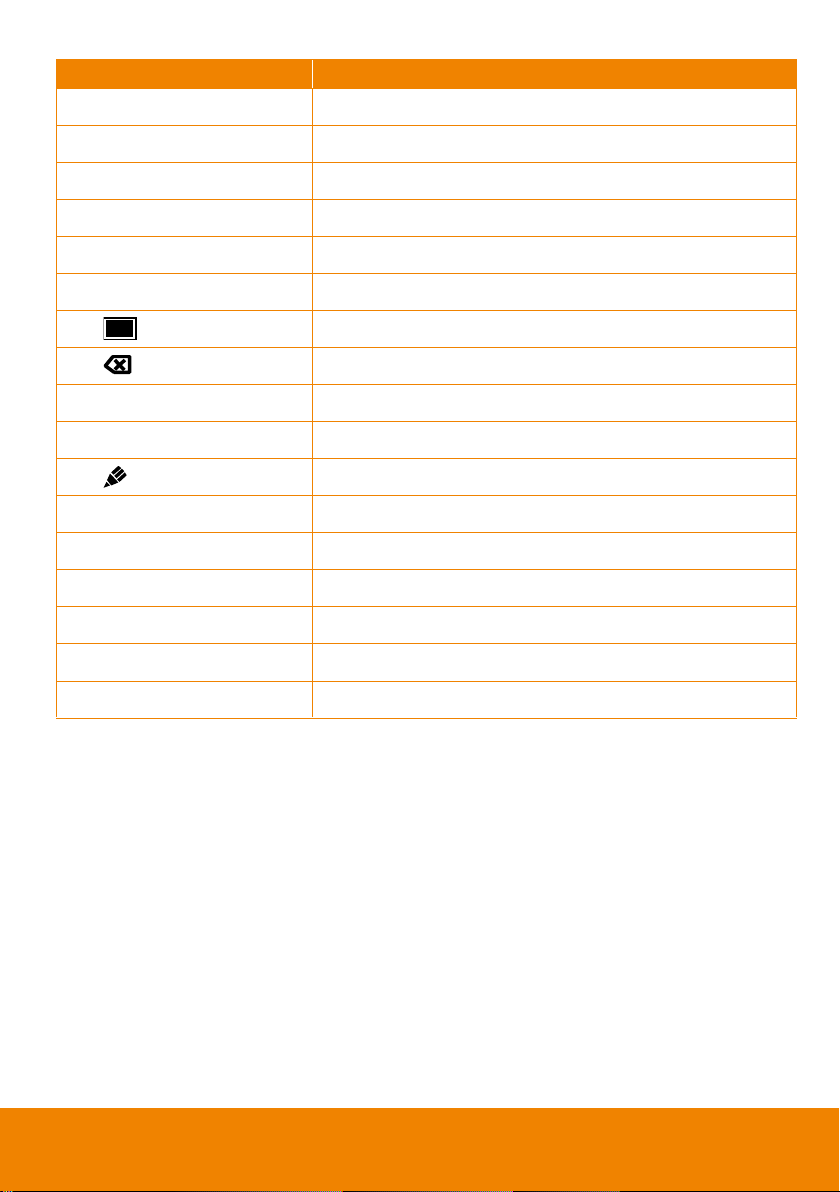
Name
Function
(11) Home
Android system main screen button.
(12) Menu
Press this button to bring out the Setting menu button.
(13) Red button
Lock and unlock Buttons and Touch function.
(14) Green button*
Lock and unlock Buttons function.
(15) Yellow button*
Lock and unlock Touch function.
(16) Blue button
Freeze and call out zoom in/out function
(17)
Switch to backlight off mode.
(18)
Backspace key.
(19) ▲▼
Use these buttons to navigate through the selections.
(20) Enter
To confirm the selection.
(21)
Quickly start writing software.
(22) Back
Return key
(23) PgUp
Built-in computer previous page button.
(24) PgDn
Built-in computer next page button.
(25) CH+/CH-
Not support.
(26) F1~F12
Built-in computer F1 - F12 function keys
(27) VOL+/VOL-
Adjust volume up or down.
*Please use the same key to lock and unlock function.
7
Page 21

Installation
1. Loosen the screws on the metal plate.
2. Remove the metal plate.
3. Slide the WiFi module into the WiFi module
slot and secure the WiFi module with 2
screws.
4. Install the WiFi antennas to the
corresponding position.
Install WiFi Module
Open the “WiFi module package” and follow the below step to install WiFi module and
antenna on the CP2 unit.
Make sure the power cord is unplugged from the wall socket before processing.
8
Page 22
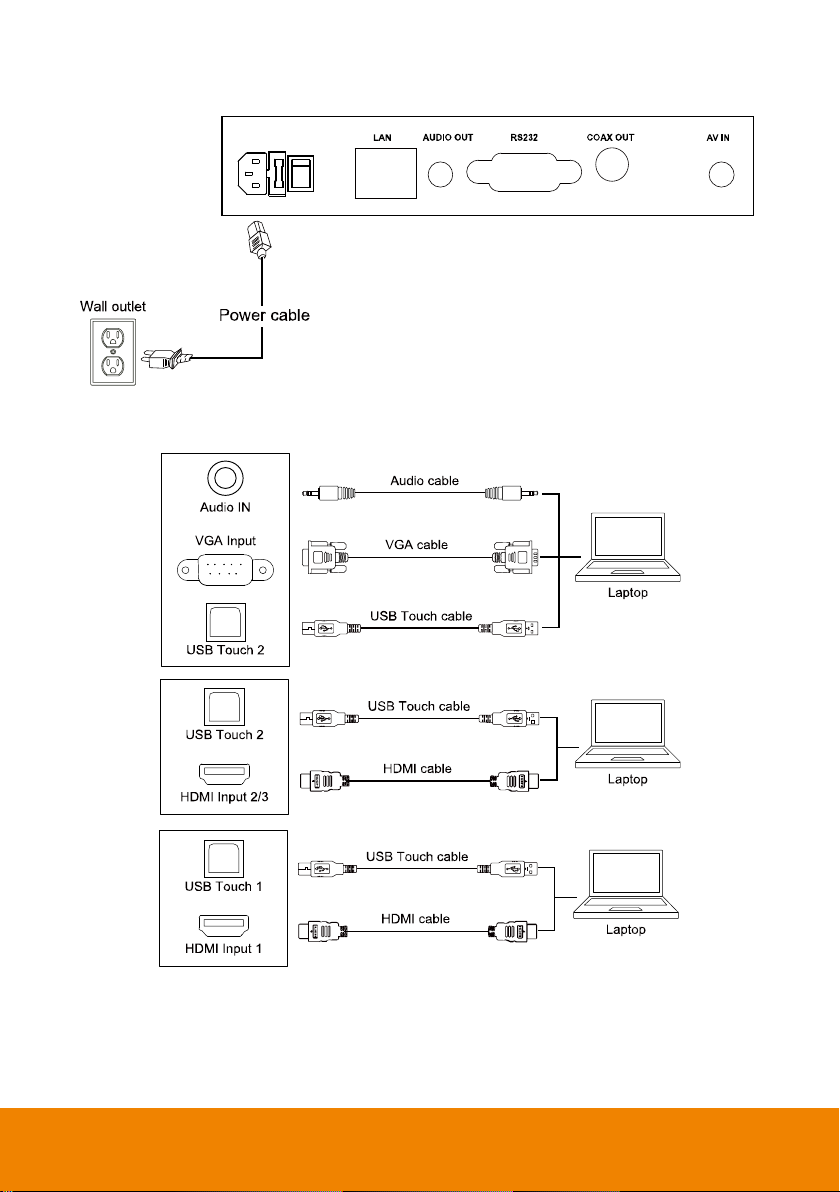
Power connection
Connect to Laptop
9
Page 23
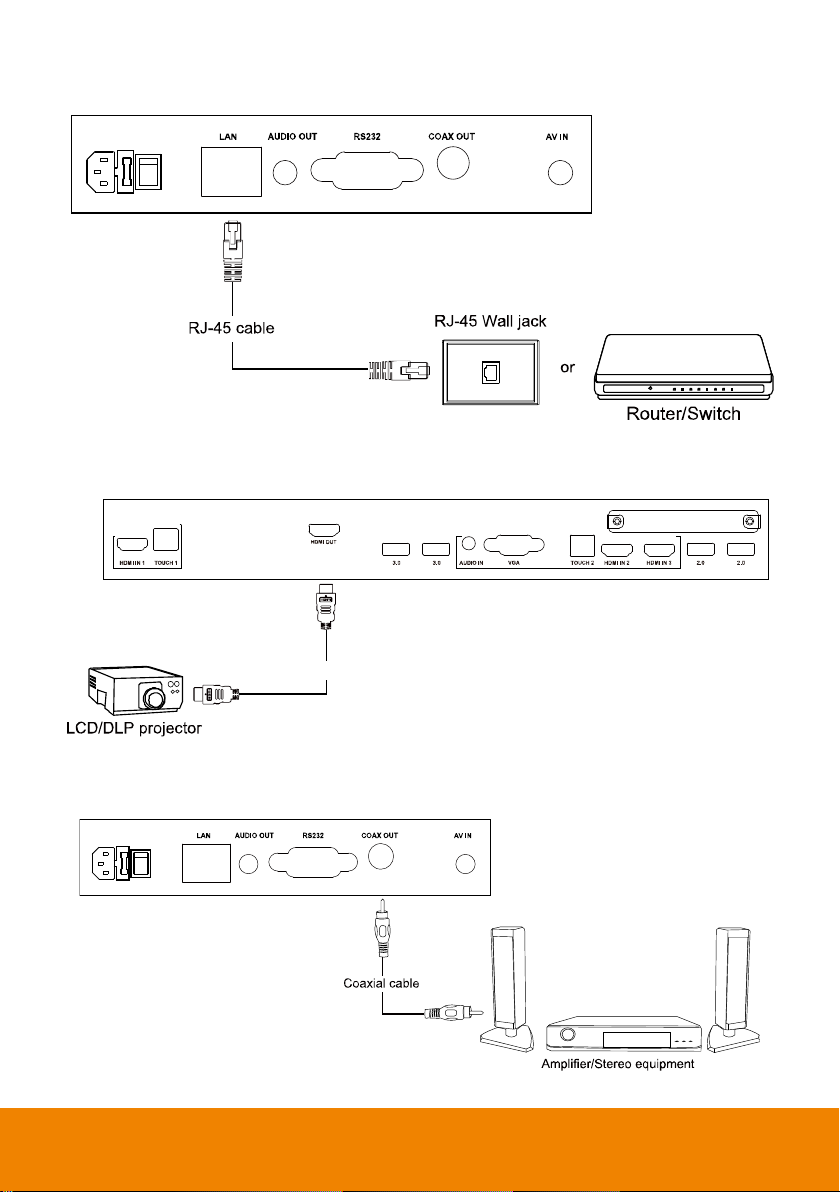
LAN Connection
HDMI cable
HDMI Output Connection
Coaxial Output Connection
10
Page 24
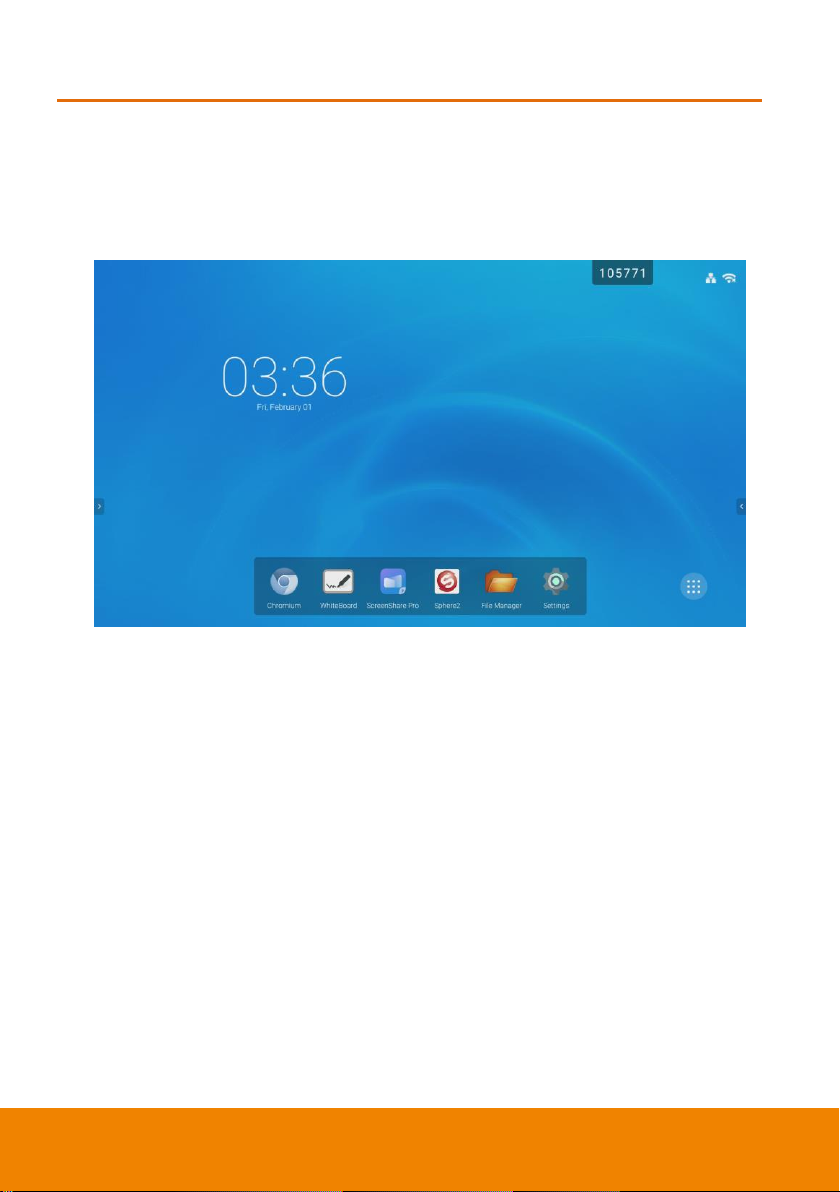
Using AVer CP2 System
Power On
Connect the power plug of AVer CP2 to the power outlet on the wall. Press the power switch
button to on and press the power button locate front panel of AVer CP2. After power on, the
main screen is displayed.
11
Page 25
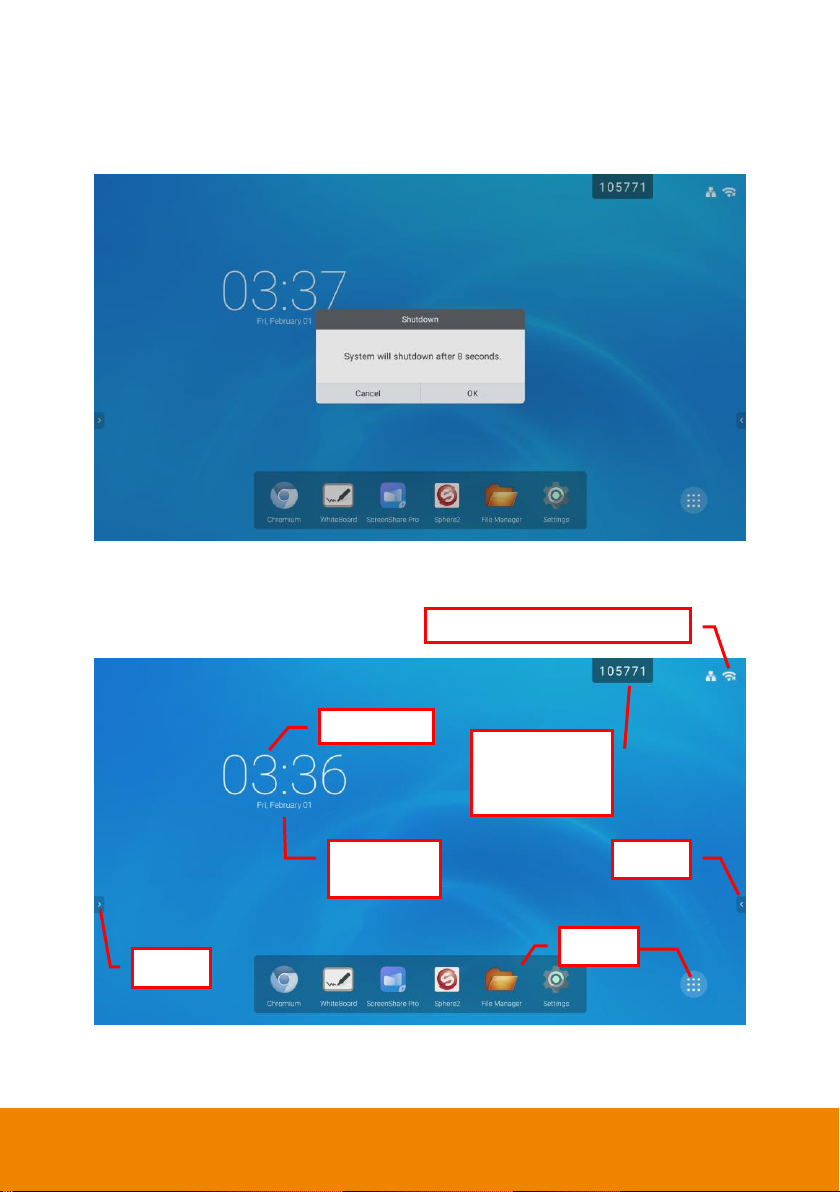
Power Off
Current Date,
Month, Year
All apps
Toolbar
Toolbar
Network status (WiFi, Ethernet)
Current Time
Code for
ScreenShare Pro
connection
While in power on status, press and hold power button (front panel) on the AVer CP2 unit
and a message is displayed on screen; select “Yes” to turn off the AVer CP2 system.
Main Screen
12
Page 26
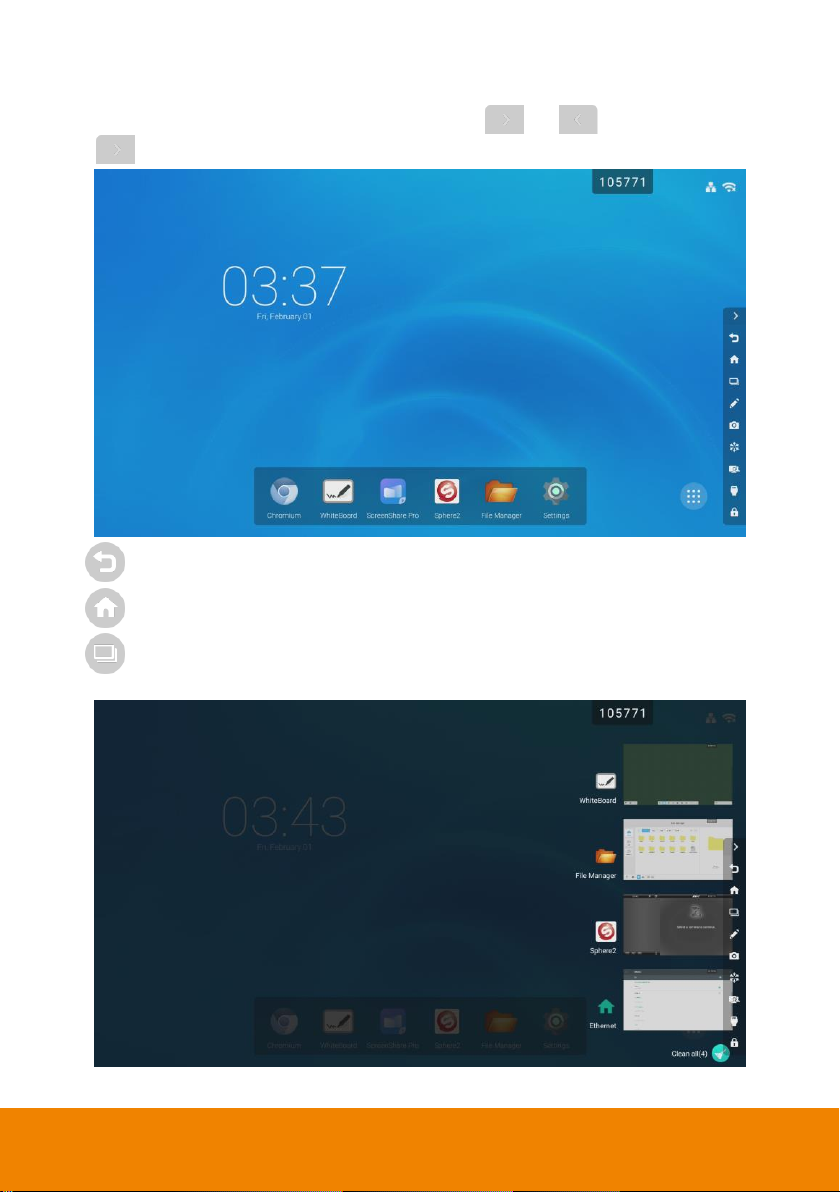
Toolbar
The toolbar is located at both side of the screen, Tap
or to call out the toolbar.
Tap to hide the toolbar. The toolbar position can be move up or down.
(Back): Back to previous screen.
(Home): Return to main screen.
(App Switch): View recent running programs, switch to one of running program,
and close the running programs. Tap “Clear all” can close all programs.
13
Page 27
(Annotate): Call out the annotation tool (Also see Annotation Tool section).
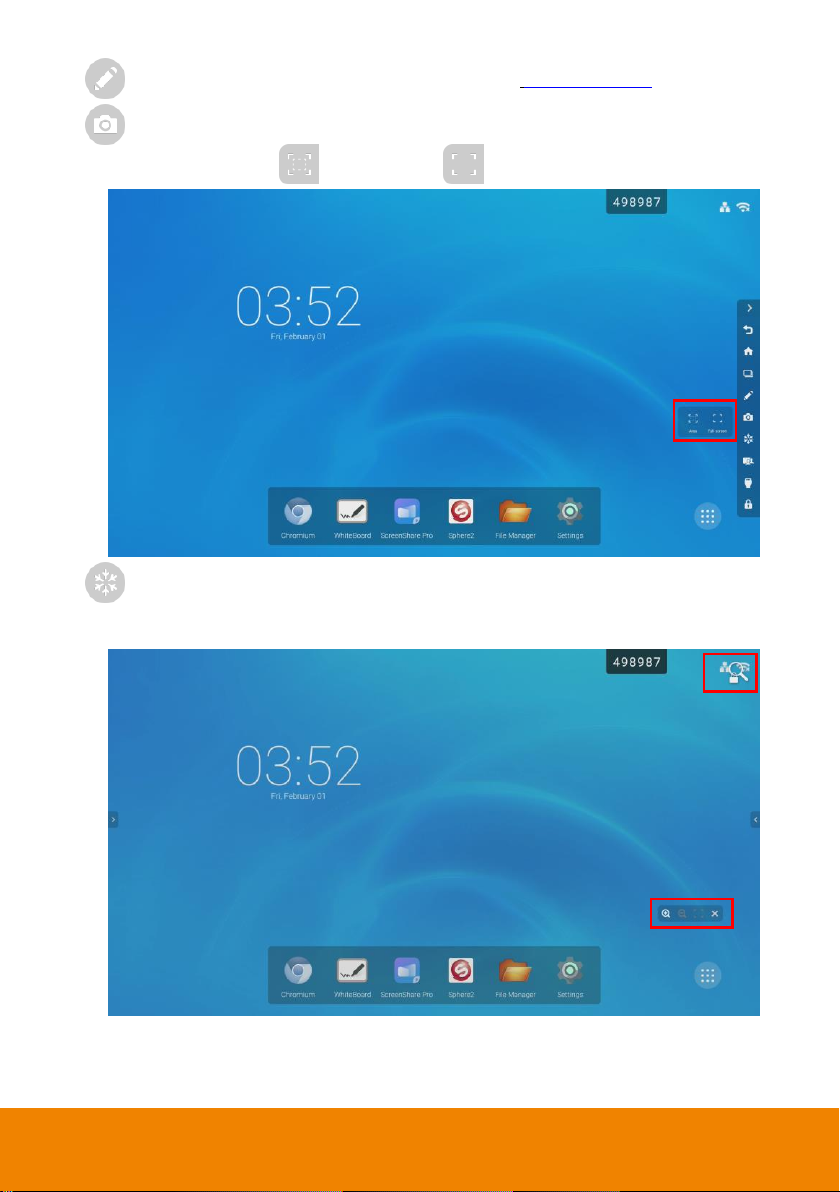
(Snapshot): Capture the current screen image and save to local disk. User can
select the specific area ( ) or full screen ( ) to capture.
(Freeze): To temporarily freeze the screen. A freeze icon will display at upper right
corner. When in freeze status, user can zoom in/out the freeze screen image. Tap the
“Freeze” button to un-freeze.
14
Page 28
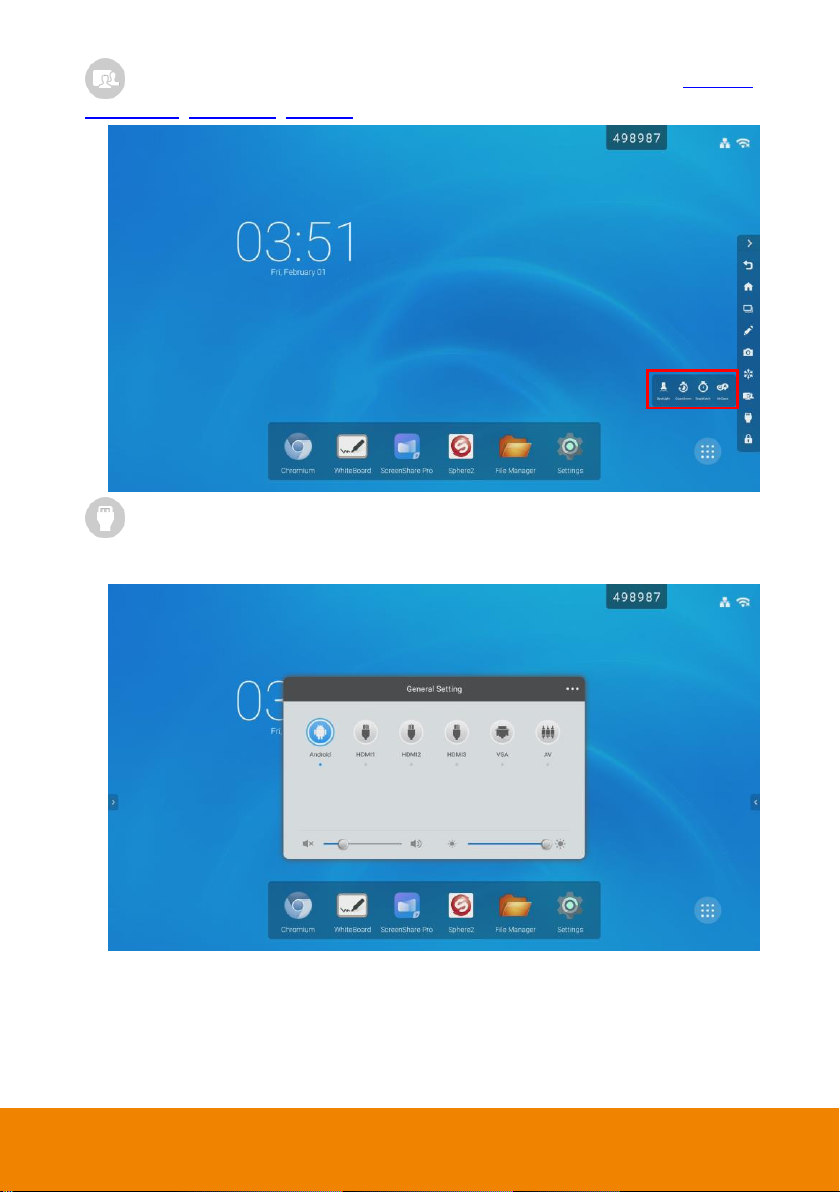
: It includes Spotlight, CountDown, StopWatch, and AirClass(Also see Spotlight,
CountDown, StopWatch, AirClass section).
(Inputs): Select the input source which devices are connected with the AVer CP2
system through HDMI and VGA interface. If the PC module has installed on AVer CP2
unit, a PC input source icon will display.
15
Page 29
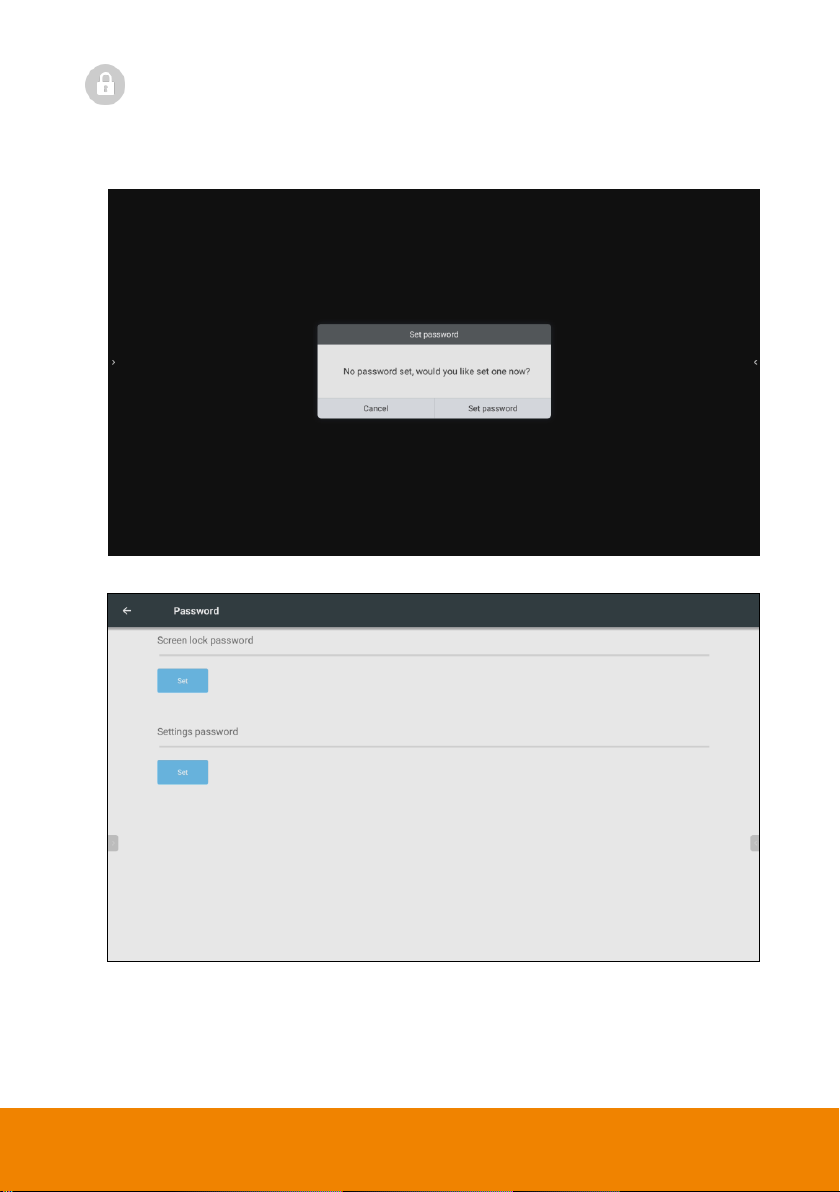
(Screen lock): To lock the screen and turn off the backlight (The screen will be
black).
If the screen lock password is not set, the message will be display and tap “Set
password” to set the password.
Next, tap “Set” to set the password.
16
Page 30
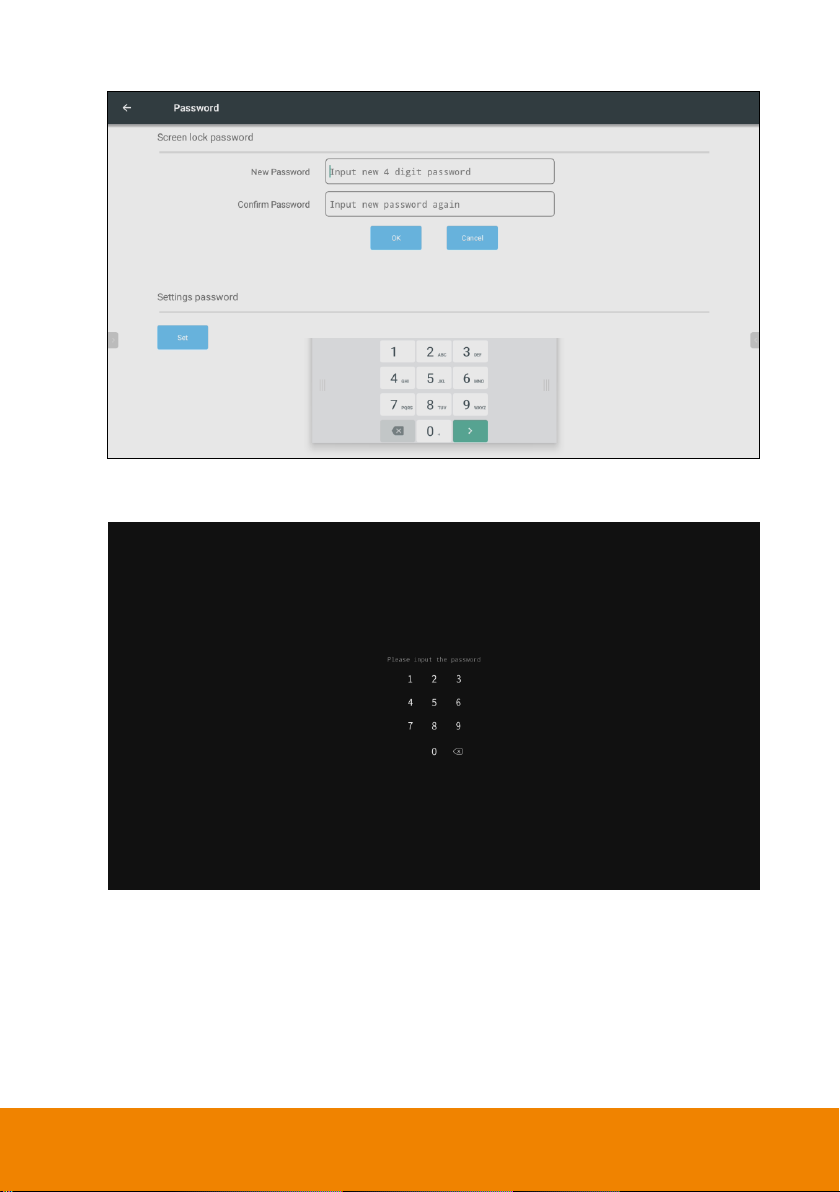
Then, enter the password and tap “OK” to complete setup.
To un-lock the locked screen, press power button of AVer CP2 and enter the password
that user has set.
17
Page 31

AAnnnnoottaattiioonn TTooool
l
The annotation tool can be used in any input source screen.
Tap from toolbar to call out annotation tool.
(Pen color): User can tap icon to switch pen color (black, red, blue, and green)
(Highlighter): User can tap icon to switch highlighter color (yellow, green, blue, and
(Eraser): Clear all annotation on the screen.
[Note] Press with your fist or hand against the screen; a board eraser will show up and user
can use it to clear large area of writing/drawing.
(Save): Save the screen image to local disk or external USB pen drive.
(Exit): Close the annotation tool.
orange).
18
Page 32

SSppoottlliigghhtt
Focus part of screen to display. User can adjust scale and alpha of spotlight.
Tap > from the toolbar.
User can move the spotlight around the screen.
Tap to adjust scale and alpha of spotlight. Tap “X” can exit/close spotlight function.
19
Page 33

CCoouunnttddoowwnn
The Countdown timer function.
Tap > from the toolbar.
Tap “Start” to begin countdown. Mark “Ring when time is up” when the time is up the
system will give a ring sound. Tap “X” to close countdown function.
User can pause, resume and reset the countdown timer. Tap “ ” can switch to full
screen mode. Tap “ ” to close countdown timer.
20
Page 34

SSttooppwwaattcchh
Tap > from the toolbar.
Tap “Start” to begin.
Tap “Lap” to mark the time. Tap “Pause” to stop temperately. Tap “Continue” to start again.
To restart, tap “Reset”.
21
Page 35

AAiirrCCllaassss
Students can scan bar code to join the class for interactive teaching.
Tap > from the toolbar.
22
Page 36

AAllll aapppps
s
All application programs in the system are displayed in here. Select to expand app list.
Tap and hold on the app can move app’s position to the screen.
Click to exit the app list.
23
Page 37

Multiple apps can create a file folder on the screen. First, move the one app to the
screen and move another app overlap on the app. Then, a file folder will be created. The file
folder can be re-named as user wants; just select and enter the name.
24
Page 38

To delete the folder, tap folder until the “remove” option is shown and move the folder to
SSttaattuuss iiccoon
n
remove option.
The Ethernet and WiFi status icon is located at upper right corner. Tap icon will call out the
Ethernet/Wi-Fi setup page.
25
Page 39

Multiple Screen Page
The AVer CP2 supports multiple screen pages.
Tap an app and move to the screen; the screen page becomes multiple pages status.
26
Page 40

On-Screen Menu
Select it to
go to other
function
page.
User can select input source, adjust volume and brightness, setup audio, screen ratio,
display parameters, and adjust screen position and relate parameters.
On the screen, swipe from bottom to top to call out the on-screen menu. Also, tap toolbar >
can call out the on-screen menu.
General Setting
Select the input source. If the PC module is installed, a “PC” input source will be displayed.
Also, user can adjust volume and brightness by moving the bar.
27
Page 41

Audio
User can select the audio value by the scene – Standard, Meeting, Class, and Custom.
The Standard, Meeting, and Class have default value, but user still can adjust the value on
your own. Custom can be set by user own.
To adjust value, tap the function circle (ex: volume, balance) and move (blue circle)
forward or back to adjust.
To mute the sound, select “Mute” to the on status. When mute turn to blue means on.
Screen
Select the screen ratio – 4:3, 16:9, PTP. User also can enable/disable the “Pixel Shift”
function.
This option is available only when the video input source is VGA or HDMI.
28
Page 42
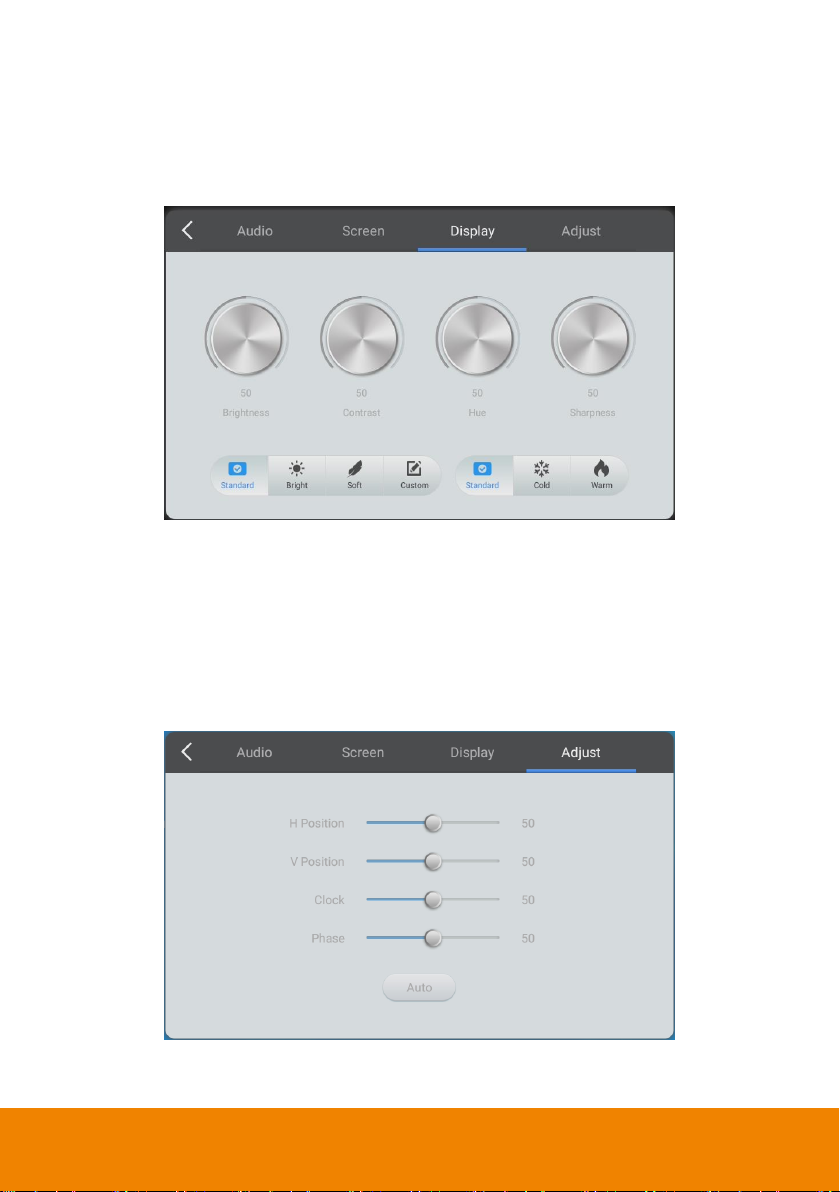
Display
User can select the display value (brightness, contrast, hue, sharpness) in “Standard”,
“Bright” and “Soft” mode. Or select “Custom” to setup your own. The display color can be
select in “Standard”, “Cold”, or “Warm” mode.
This option is available only when the video input source is VGA or HDMI.
Adjust
User can modify this option only if the currently video input source is VGA.
H Position: Sets the horizontal position of the image on the screen.
V Position: Sets the vertical position of the image on the screen.
Clock: Sets the clock phase of the image.
Phase: Sets the image visual noise.
Auto: Automatically sets the H Position, V Position, clock and phase value.
29
Page 43

BBuuiilldd aann AAccccoouunnt
t
Cloud Storage
Create the google drive account on IFP for file accessing and storage.
1.
Open the “File Manager” on the main screen.
2.
In File manager screen, select “Cloud Drive”.
30
Page 44

3.
Select “Add Account”.
4.
Then, select “Google Drive”.
31
Page 45

5.
In Term of Service page, select “Accept and Continue”.
6.
The Google sign in screen is displayed. Enter your google account and select “Next”.
7.
Enter your Google account’s password and select “Next”. And follow the on-screen
instruction to complete.
32
Page 46

8.
The google drive account is created on AVer CP2 system.
33
Page 47

OOppeenn aa FFiillee ffrroomm tthhee CClloouudd SSttoorraagge
e
1. Open the File Manager > Cloud Drive > your Google drive account.
2. Select the file from your google drive.
3. Wait for selected file to download to local disk and open it.
34
Page 48

4. The file is opened by OfficeSuite. Click to play slides.
5. Select “Pen” tool can edit file. Edited file can be saved as PDF file. Select to save
the edited file.
35
Page 49

Whiteboard
Exit
Menu
Enable/disable two
stylus pens function
Functions bar
Add page
Previous page
Current page/page number
Next page
Select on main screen to call out the whiteboard application.
The whiteboard supports two stylus pens function; two stylus pens can write/draw on the
screen at the same. Tap to switch to can enable two stylus pens function.
[Note]The two stylus pens easily has wrong color with thin pens, please use it with.
36
Page 50

MMeennuu FFuunnccttiioon
n
New
To create new file.
Open
To open *.enb format file
from local disk.
Save
To save current screen to
local disk or external USB
drive. The file format is
*.enb.
Import
To import IMG, PDF, SVG
file format.
Export
Click to export current
screen to IMG, PDF, SVG,
or IWB file format.
Cloud Storage
To upload the current
screen image to cloud
storage.
Background
To change background.
Brightness disabled
To enable/disable auto
brightness.
37
Page 51

BBaacckkggrroouunnd
d
The whiteboard can change to different color and format.
1. Select (menu) and select “Background”.
2. Color: The user can select the different background color. Select “Custom” can set
your own color.
38
Page 52

3. Image: The user can select different background form.
39
Page 53

IImmppoorrtt PPDDF
F
User can import the PDF file from local disk or external USB pen drive into whiteboard.
1. Select (menu) and select “Import” > “PDF”.
2. Then, locate the PDF in local disk or external USB drive. Then, the imported PDF file will
display on the screen.
40
Page 54

SSaavvee tthhee PPDDFF ffiillee ttoo GGooooggllee DDrriivvee
[Note] The Google drive must has created on AVer CP2 (See also Cloud Storage section).
1. In whiteboard page, select (menu) and select “Cloud Storage”.
2. Select the Google Drive account. Then, the file will be saving to the Google drive
account.
Use the default account: If user has selected this option, the Google drive account
user has selected this time will be default.
Use the default file name when save: If user has selected this option, the file name
will be default file name when next time save the file to Google drive. If not use
default file name, a file name entering is required.
41
Page 55

UUssiinngg WWhhiitteebbooaarrd
d
The whiteboard function tools are described in following.
Select( )
Allows user to select the object on the screen to edit.
User can change the object’s color and size. Tap the color to change the selected object’s
color. Tap and hold the white dot at corner to adjust the size of the selected object.
42
Page 56

Pen ( )
Pen type. Two stylus pens can select different pen
type.
Adjust the thickness of pen. Move the dot to adjust
the thickness. Two stylus pens can select different
pen thickness.
Pen color. The color within mark icon is selected.
Two stylus pens can select different pen color.
43
Page 57

Eraser(
)
To clear the writing/drawing on the screen as required.
Press with your fist or hand against the screen; a board eraser will show up and user can
use it to clear large area of writing/drawing.
Clear All(
)
Clear all writing/drawing on the screen.
Move/Zooming( )
Move/Zooming the writing/drawing objects on the screen.
44
Page 58

Shape(
)
Draw the shape objects on the screen. Shape objects have 2D and 3D. Tap color to change
color of shape.
Undo ( ): Back to previous step.
Redo ( ): Redo the previous step.
45
Page 59

Watercolor( )
Pen type.
To erase the writing/drawing on the screen. Eraser
can adjust area size by move the adjust bar.
Adjust the thickness of pen. Move the dot to adjust
the thickness.
Select color then press and rotate the circle on
palette to adjust color
Click dipper to dip up color for pen.
Another annotation tool within whiteboard.
46
Page 60

Click to change pen color
Back to Whiteboard screen.
Save the current screen image to local disk or
external USB drive.
Back to previous step.
Add page.
Current page/total page number.
Back to previous page.
47
Page 61

ScreenShare Pro
SSeettuupp SSccrreeeennSShhaarree PPrroo
Devices are able to interact directly with the panel across all platforms (Windows, iOS,
Android, Mac, and Chrome OS) and share content wirelessly without any add-on hardware
installation.
Tap
Start on boot: Enable/disable to display the ScreenShare Pro code when AVer CP2 is
to call out the ScreeShare Pro. Tap “Menu” > “Settings” to Settings page.
start-up.
48
Page 62

Code refresh rate: Set the period time of code change.
Floating window display settings: Select to display code, minimize, or close code
display on the screen.
When code is in minimized status, tap on screen can view the code, change code to
display status and go to main setup page.
49
Page 63

Advanced code mode: Allows multiple devices connect to AVer CP2 through the
ScreenShare Pro at the same time. In advanced mode, the code is with A-F letter (ex:
105759A).
[Note]Only chrome solution doesn't support multiple screen.
Switch Mode: Switch to permission mode. In permission mode, user can accept or
reject the any device wants to mirror to AVer CP2.
Tap “Back” to exit from settings page. Tap “Menu” > “Switch mode” > tap
enable it.
to
50
Page 64

About: Check the update and version.
51
Page 65

SShhaarriinngg ccoonntteenntt ffrroomm AAppppllee pprroodduucctt ttoo tthhee AAVVeerr CCPP2
2
Airplay is a proprietary protocol developed by Apple Inc. that allows wireless display on
Airplay-enabled devices.
1. Enable WiFi connection on AVer CP2 and your device (ex: iPhone, iPad).
[Note] AVer CP2 and your device must at the same LAN network.
2. Download and install ScreenShare Pro on your device.
3. Run the ScreenShare Pro on your device.
52
Page 66

4. Enter the “Code” that is displayed on the screen of AVer CP2.
Tap can view more
information.
Tap can view user guide.
User also can tap to check the code. The code will change depends on the period
time user has set.
53
Page 67

5. After entering the code, the main screen is displayed. Select “Start” can view how to
Allow AVer CP2’s screen
to display on your device
and to operate AVer CP2
system on your device.
To record the video from
your device and display
on the AVer CP2’s
screen.
To show photo from your
device and display on the
AVer CP2’s screen.
Let your device become a
mouse and to operate the
AVer CP2 system.
To play video from your
device and display on the
AVer CP2’s screen.
Tap it to expand and
select “Disconnected” to
disconnect from AVer
CP2 system.
mirror to the AVer CP2’s screen. While in mirroring status, the Media, Photo, Camera,
Remote and Desktop functions are not able to use.
6. To mirroring, select “Screen Mirroring” and select “ScreenShare Pro” on your
iPhone/iPad device.
7. Then, your device screen will be displayed on AVer CP2’s screen.
54
Page 68

To share your Mac computer’s desktop to the AVer CP2
1. Enable WiFi connection on AVer CP2 and your Mac computer.
[Note] AVer CP2 and your Mac computer must at the same LAN network.
2. Run Safari and enter “http://dds.r302.cc” to download ScreenShare Pro. After
downloading, install ScreenShare Pro.
3. Run the ScreenShare Pro on your Mac computer.
4. Enter the “Code” that is displayed on the screen of AVer CP2.
5. After entering the code, your Mac computer is connected with AVer CP2 system. Select
“Start Mirroring”, the Mac computer screen will display on AVer CP2’s screen.
[Note] User can touch on CP2 to use your device.
55
Page 69

6. To stop mirroring, select “Stop Mirroring”. To disconnect from AVer CP2 system, select
“Disconnect”.
56
Page 70

SShhaarriinngg ccoonntteenntt ffrroomm CChhrroommee ssoolluuttiioonn ttoo tthhee AAVVeerr CCPP22
Chromecast is Google cast, it is a proprietary protocol developed by Google that allows
wireless display on Chromecast-enabled devices.
1. Enable WiFi connection on AVer CP2 and your Chromebook.
[Note] AVer CP2 and your Chromebook must at the same LAN network.
2. Open Chrome browser and go to Chrome Online App store (Enter key word
“ScreenShare Pro”) to download and install ScreenShare Pro to your Chromebook.
3. Run the ScreenShare Pro on your Chromebook.
4. Enter the “Code” that is displayed on the screen of AVer CP2.
57
Page 71

5. After entering the code, your Chromebook is connected with AVer CP2 system.
Select “Start Mirroring”, the Chromebook screen will display on AVer CP2’s
screen.
6. To stop mirroring, select “Stop Mirroring”. To disconnect from AVer CP2 system,
select “Disconnect”.
58
Page 72

SShhaarriinngg ccoonntteenntt ffrroomm WWiinnddoowwss ccoommppuutteerr ttoo tthhee AAVVeerr
CCPP2
2
Miracast is a wireless display standard included in Windows 8.1 and windows 10 operating
systems.
1. Enable WiFi connection on AVer CP2 and your computer.
[Note] AVer CP2 and your computer must at the same LAN network.
2. Open browser and enter “http://dss.r302.cc” to download and install ScreenShare Pro
to your computer.
3. Run the ScreenShare Pro on your computer.
4. Enter the “Code” that is displayed on the screen of AVer CP2.
59
Page 73

5. After entering the code, your computer is connected with AVer CP2 system. Select
“Start Mirroring”, the computer screen will display on AVer CP2’s screen.
[Note] User can touch on CP2 to use your device.
6. To stop mirroring, select “Stop Mirroring”. To disconnect from AVer CP2 system, select
“Disconnect”.
60
Page 74

SShhaarriinngg ccoonntteenntt ffrroomm AAnnddrrooiidd ddeevviiccee ttoo tthhee AAVVeerr CCPP2
2
Miracast is a wireless display standard included in Android 4.2 and newer versions perating
systems. It is the Wi-Fi Direct standard, which allows for point-to-point connection between
devices without the use of router.
1. Enable WiFi connection on AVer CP2 and your Chromebook.
[Note] AVer CP2 and your Chromebook must at the same LAN network.
2. Open browser and go to “http://dss.r302.cc” to download and install ScreenShare Pro
to your device.
3. Run the ScreenShare Pro on your device.
4. Enter the “Code” that is displayed on the screen of AVer CP2.
61
Page 75
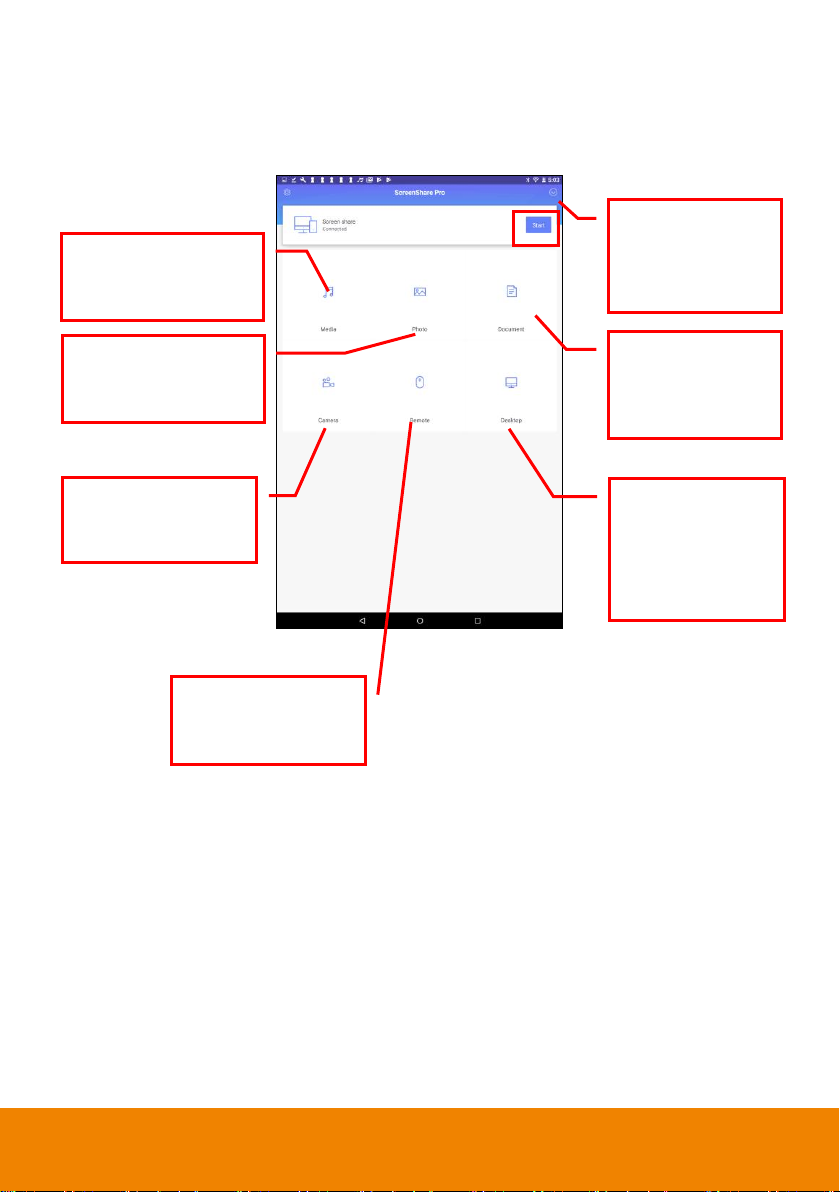
5. After entering the code, your device is connected with AVer CP2 system. Select “Start
Allow AVer CP2’s
screen to display on
your device and to
operate AVer CP2
system on your device.
To record the video from
your device and display
on the AVer CP2’s screen.
To show photo from your
device and display on the
AVer CP2’s screen.
Let your device become a
mouse and to operate the
AVer CP2 system.
To play video from your
device and display on the
AVer CP2’s screen.
Tap it to expand and
select “Disconnected”
to disconnect from
CP2 system.
Share the documents
from your device and
display on AVer CP2’
screen.
Mirroring”, the device screen will display on AVer CP2’s screen. While in mirroring
status, the Media, Photo, Document, Camera, Remote and Desktop functions are not
able to use.
62
Page 76

Using Browser
User can operate the browser same as on PC, beside use the finger instead of the mouse.
Select the “Chromium” to launch the browser app.
63
Page 77

Connect to DocCam
The AVer CP2 system can connect to DocCam device through the Sphere2 to use the class
interactive function in Sphere2.
1. Select Sphere2 from app list at main screen.
2. Please make sure the DocCam and the AVer CP2 system are at same local network.
The Sphere2 will auto search the available DocCam on your local network and list on
screen.
3. Select the DocCam device that wants to connect.
4. Enter the “Password” of DocCam and select OK to confirm.
5. And, select “Start” to connect.
64
Page 78

Internet Connection
EEtthheerrnneett ccoonnnneeccttiioon
n
There are two ways to access the internet – Ethernet and WiFi connection.
Using ethernet cable connects IFP to your local network.
[Note] Turn off the WiFi function if WiFi connection has connected.
Tap Settings > Ethernet. The user can check IP address of AVer CP2.
65
Page 79

WWii--FFii CCoonnnneeccttiioonn
Connect AVer CP2 to internet through the Wi-Fi AP.
1. Tab the “Settings” icon to bring out the Settings page.
2. In Settings page, tap “Wi-Fi”.
66
Page 80

3. Set Wi-Fi to “On”.
4. Select available Wi-Fi networks to connect to it.
5. Tap “ ” can view IP information.
67
Page 81

Adjust Date and Time
1. Select the “Settings” icon to bring out the Settings page.
[Note] The internet connection is required for auto date and time adjustment.
In Settings page, tab “Date & Time”.
2.
68
Page 82

3. You can select “Set date”, “Set time”, “Select time zone” and “Choose time format” to
setup.
4. Also, you can select “Automatic date & time” for adjust date and time through the
network time server.
69
Page 83

Screen Lock
Protect screen by password.
1. Tap Settings > Password > Screen lock password > Set.
70
Page 84

2. Enter the 4 digital numbers for password. Then, re-enter the password again to confirm.
3.
To lock screen by press power button of AVer CP2 unit. Or tap from toolbar.
4. Press power button again and enter the password to un-lock the screen. Or touch the
panel screen and enter the password to un-lock the screen.
5. To disable screen lock, tap Settings > Password > Screen lock password > Clear and
enter the password user has set. Then, select “Clear” to disable the screen lock.
71
Page 85

Settings Password
Protect the settings function with password.
1. Tap Settings > Password > Settings password > Set.
72
Page 86

2. Enter the 4 digital numbers for password. Then, re-enter the password again to confirm.
3. When user tap “Settings”, the password entering is required.
4. To disable Settings password, tap Settings > enter the password user has set >
Password > Setting password > Clear and enter the password user has set. Then,
select “Clear” to disable the Settings password.
73
Page 87

Volume Adjustment
Swipe from bottom to top to call out on-screen menu. Or tap from toolbar.
Move the bar to adjust the volume.
74
Page 88

Wallpaper
Change the wallpaper.
1. Tap and hold on the screen until the “Wallpaper” option is shown.
2. Select the “Wallpaper” and tap “Set wallpaper” to change the wallpaper.
75
Page 89
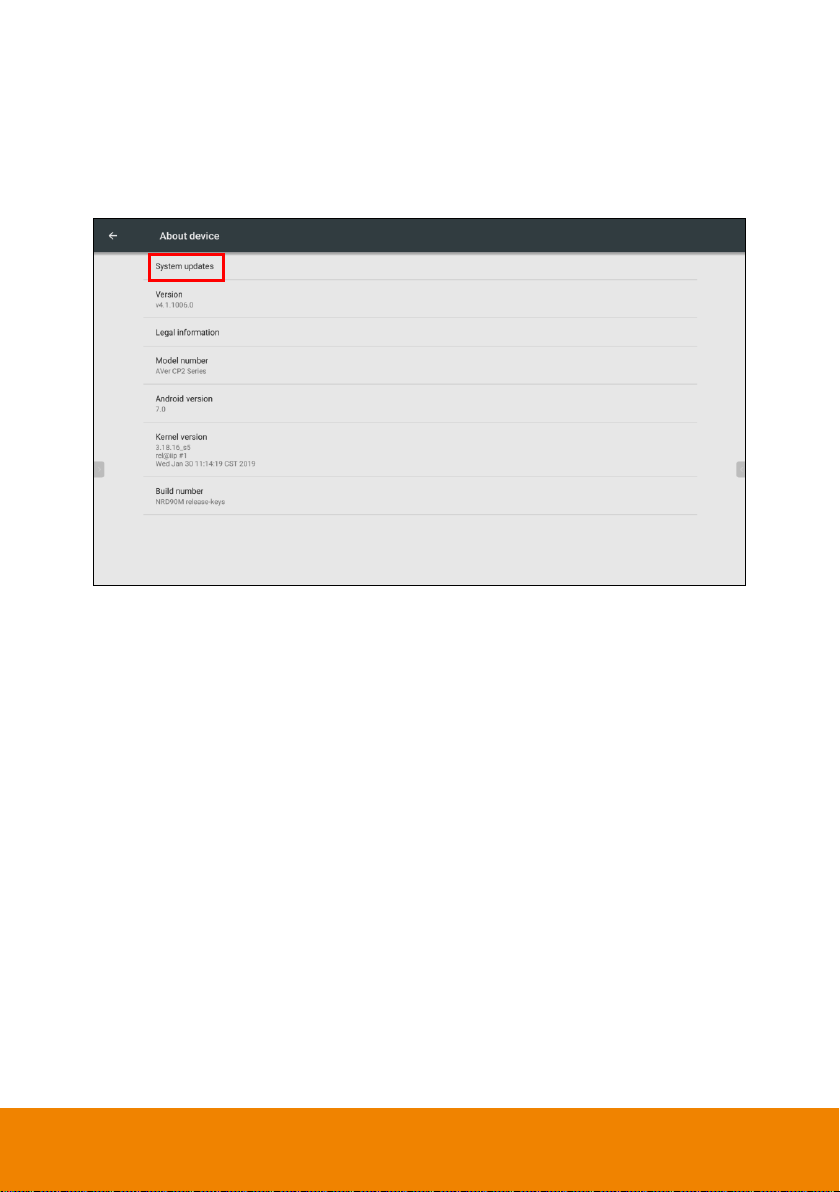
System Update
Tap Settings > About device > System updates and system update will start.
The system update takes time; we recommend doing the system update when the panel is
not in use.
If there is no update, select “Close” to finish.
76
Page 90

Display Management
MMiinniimmuumm SSeerrvveerr SSyysstteemm RReeqquuiirreemmeennttss
Operating System
: Win 7 / Win8 / Win10
CPU
: Intel Core 2 Duo 2.00GHz or later
RAM
: 1 GB of RAM (2 GB recommended)
Resolution
: 1024 x 768 or higher resolution display
Graphic card
: DirectX 9.0c compatible video card
Hard Disk
: 500 MB free hard disk space for basic installation
To manage the IFP devices on your LAN – manual power on/off/reboot IFP and scheduling
IFP for power on/off/reboot.
[Note] An Ethernet cable connection is required for IFP devices.
Please download the Display Management application from
http://www.aver.com/download-center
77
Page 91

LLooggiinn
1. Run the AVer Display Management application.
2. The login dialog is displayed. Enter the password; for the first time login, the default
password is “admin”.
3. After entering the password, select “Login” to go next step.
4. Enter the email for sending password if forgot the password in future. Select “Enter” to
login.
78
Page 92

5. After login, the Display Management UI is displayed.
79
Page 93

CChhaannggee PPaasssswwoorrdd
1. Select “ ” icon.
2. The email and password dialog will show up.
3. Select “Change Password”. Then, enter the new password and re-enter the new password to confirm.
80
Page 94

4. Select “Save” to save the changes.
81
Page 95

CChhaannggee EEmmaaiill
1. Select “ ” icon.
2. The email and password dialog will show up.
3. Enter the new Email address. Then, select “Save” to save the changes.
82
Page 96

AAdddd IIFFPP DDeevviiccee
1. Select “Management”.
2. Click “Add Device”.
3. In Add Device dialog, you can choose “IP Address Search”, “Auto Detection”, or “Mac
Address Search” to find the IFP device on your LAN network.
[Note]
a. An Ethernet cable connection is required for IFP devices.
b. The IFP devices and Display Management must be in the same network.
83
Page 97

4. The search result will be listed. Select the IFP device and enter “Device Name” and
select the “Group” if there are groups for selecting.
5. Select “Save” to add IFP device
.
6. The added IFP device will be listed in management list.
View IFP device’s IP, mask, and gateway information.
:
Edit IFP’s device name.
:
Delete IFP device from management list.
:
84
Page 98

FFiilltteerriinngg IIFFPP DDeevviiccee
To find IFP devices from management list by searching of “Device Name”, “Model Name”,
“Mac Address”, or “FW Version”.
Select the filter condition – Device Name, Model Name, Mac Address or FW Version or
enter the specific words to filter. Then, the filter result will display.
85
Page 99

AAdddd GGrroouupp
Create the group and assign IFP devices to specific group for managing.
1. Select “Add Group” in Management screen.
2. Enter the group name in Group dialog and select “Save”.
86
Page 100

3. The created group will list at left side of Management screen. Select the group to view
the IFP devices in the group. When add IFP device, you can assign IFP device to the
group.
4. Select “ ” can edit and delete group. Edit can change the group name.
87
 Loading...