

Page 1

Central Management System
For E5016
User’s Manual
V1.1.0.0
Page 2

COPYRIGHT
© 2013 AVer Information Inc. All rights reserved.
All rights of this object belong to AVer Information Inc. Reproduced or transmitted in any form or by any
means without the prior written permission of AVer Information Inc. is prohibited. All information or
specifications are subject to change without prior notice.
TRADEMARKS
“AVer” is a t radem a rk owned by AVer Inf orm ati on Inc . Other trade mar ks u sed here in for
description purpose only belong to each of their companies.
DISCLAIMER
No warranty or representation, either expressed or implied, is made with respect to the
contents of this documentation, its quality, performance, merchantability, or fitness for a
particular purpose. Information presented in this documentation has been carefully
checked for reliability; however, no responsibility is assumed for inaccuracies. The
information contained in this documentation is subject to change without notice.
In no event will AVer Information Inc. be liable for direct, indirect, special, incidental, or
consequential damages arising out of the use or inability to use this product or
documentation, even if advised of the possibility of such damages.
Page 3

The caution symbol is intended to alert the user of the importance of the particular
installation and operating instructions. Failure to comply may damage the system.
i
The information symbol is intended to provide additional information for the purpose of
clarification.
Manual Conventions
The following conventions are used throughout this manual.
Page 4

TABLE OF CONTENTS
CHAPTER 1 INTRODUCTION ................................................................................ 1
1.1 Upgrading to CMS GOLD Version ............................................................................ 2
1.2 Dual Monitors setting ............................................................................................... 3
1.2.1 Graphic card with ATi chipset ........................................................................... 3
1.2.2 Graphic card with NVIDIA chipset .................................................................... 6
CHAPTER 2 SOFTWARE INSTALLATION ............................................................. 7
2.1 Minimum System Requirements .............................................................................. 7
2.2 Installing the CM3000 Software in Windows XP/Vista/7 ........................................... 8
CHAPTER 3 USING THE CMS ........................................................................... 9
3.1 Running the CMS Software ...................................................................................... 9
3.1.1 Using the Virtual Keyboard ................................ .............................................. 9
3.2 Using the CMS Application ..................................................................................... 10
3.3 Using the Monitor ................................................................................................... 12
3.3.1 Using the Monitor Controller .......................................................................... 13
CHAPTER 4 CUSTOMIZING THE CMS SYSTEM ................................................ 15
4.1 System Setting ....................................................................................................... 16
4.2 DVR Setup ............................................................................................................. 19
4.2.1 To Add and Remove DVR Server .................................................................. 19
4.3 Camera Setup ........................................................................................................ 20
4.4 Schedule Setup ...................................................................................................... 25
4.4.1 To set schedule at a specific portion of time in that hour: .............................. 26
4.5 Backup Setup ......................................................................................................... 27
4.6 E-MAP Setup ......................................................................................................... 29
4.6.1 To Set Up the E-Map ..................................................................................... 29
4.6.1.1 Add a New Map .................................................................................... 30
4.6.1.2 Add a DVR Server ................................................................................ 31
4.6.2 To Use the E-Map .......................................................................................... 32
4.7 User Setting ........................................................................................................... 34
CHAPTER 5 USING THE PLAYBACK FUNCTION .............................................. 35
5.1 To Playback the video ............................................................................................ 35
5.2 Using the Local Playback Application ..................................................................... 36
5.3 To Cut and Save the Wanted Portion of the Recorded Video ................................. 39
5.4 To Bookmark a Section of the Video ...................................................................... 39
Page 5

5.5 To Search Using the Visual Search ................................................................ ........ 40
5.6 To Search Using the Event Search ........................................................................ 41
5.7 To Search Using the Intelligent Search .................................................................. 42
Page 6
Chapter 1 Introduction
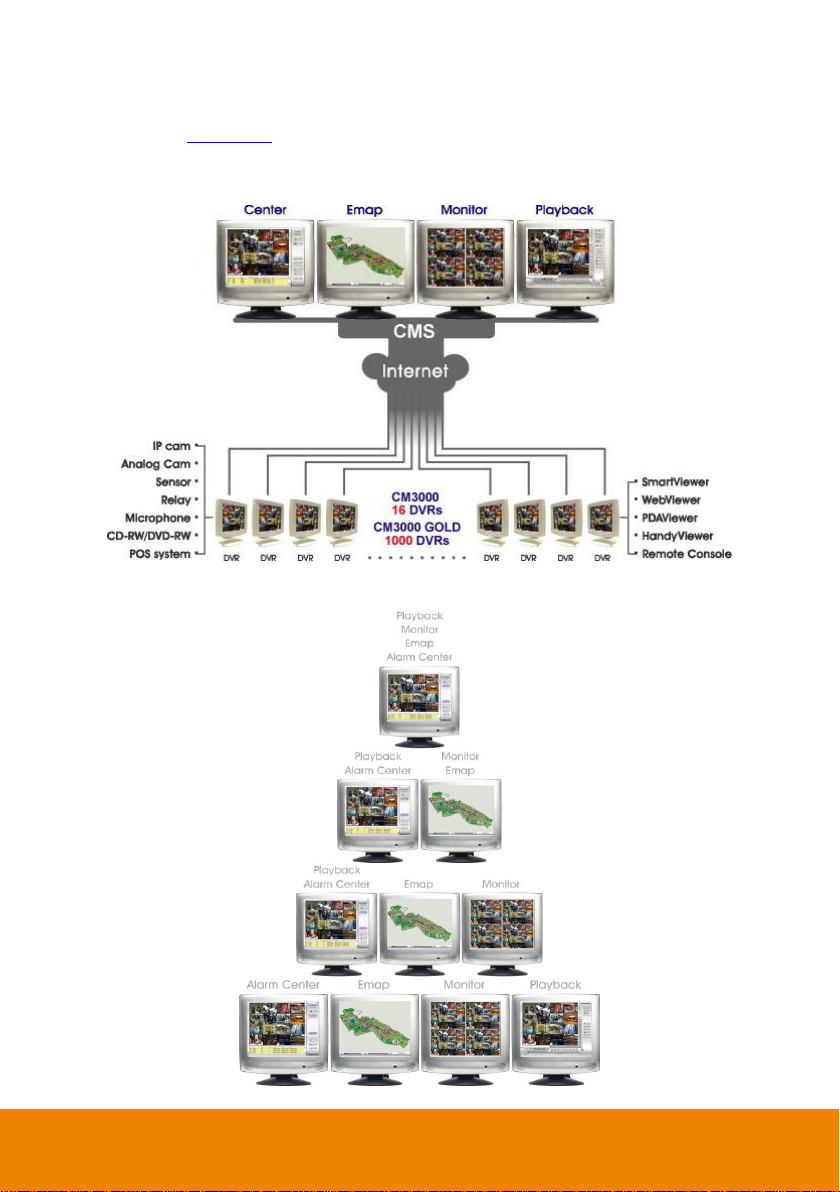
The AVerTM CM3000 is a central monitoring system that enables user to monitor up to 1000 DVR
servers (see also Chapter 1.1 for updating to Gold version) through an internet connection. Like the
DVR program, the CMS system also automatically records and displays video when an event has
occurred on the remote side of the DVR server. You can also playback video files locally or download
from a remote DVR server.
The CMS system Supports Single, Dual, Triple and Four monitor displays. User can operate the CMS
system application on different monitors.
1
Page 7

1 ~ 64 Clients(DVR)
65 ~ 150 Clients(DVR)
151 ~ 1000 Clients(DVR)
i
Without install a USB dongle, CMS only can monitor 16 DVR and some functions are not
available.
1.1 Upgrading to CMS GOLD Version
The CMS can be upgraded by installing a USB software License (USB Dongle). After installed the
USB dongle, CMS can monitor up to 1000 remote DVR servers. The USB dongle provides three type
of license for customer choice:
Please follow the below steps to upgrade the CMS.
1. Run the CMS application.
2. Plug in USB Dongle to your CMS server.
3. The CMS system will detect it automatically and the driver installation dialog will pop up. Click OK
to install the driver.
4. If user chooses to install driver later, then un-plug the USB dongle and plug in again later for
installing.
5. After installation completed, the CMS system will restart automatically.
6. DO NOT un-plug the USB Dongle while the DVR application is operating, it may cause the
application crash abnormally.
2
Page 8
1.2 Dual Monitors setting
Video configuration is different for each different VGA chipsets. Please follow the steps below to setup
the dual monitors display.
The CMS application supports resolution in 1280 x 800、1024 x 768、1280 x 1024、1440 x 900、
1680 x 1050、1920 x 1080 and 1920 x 1200.
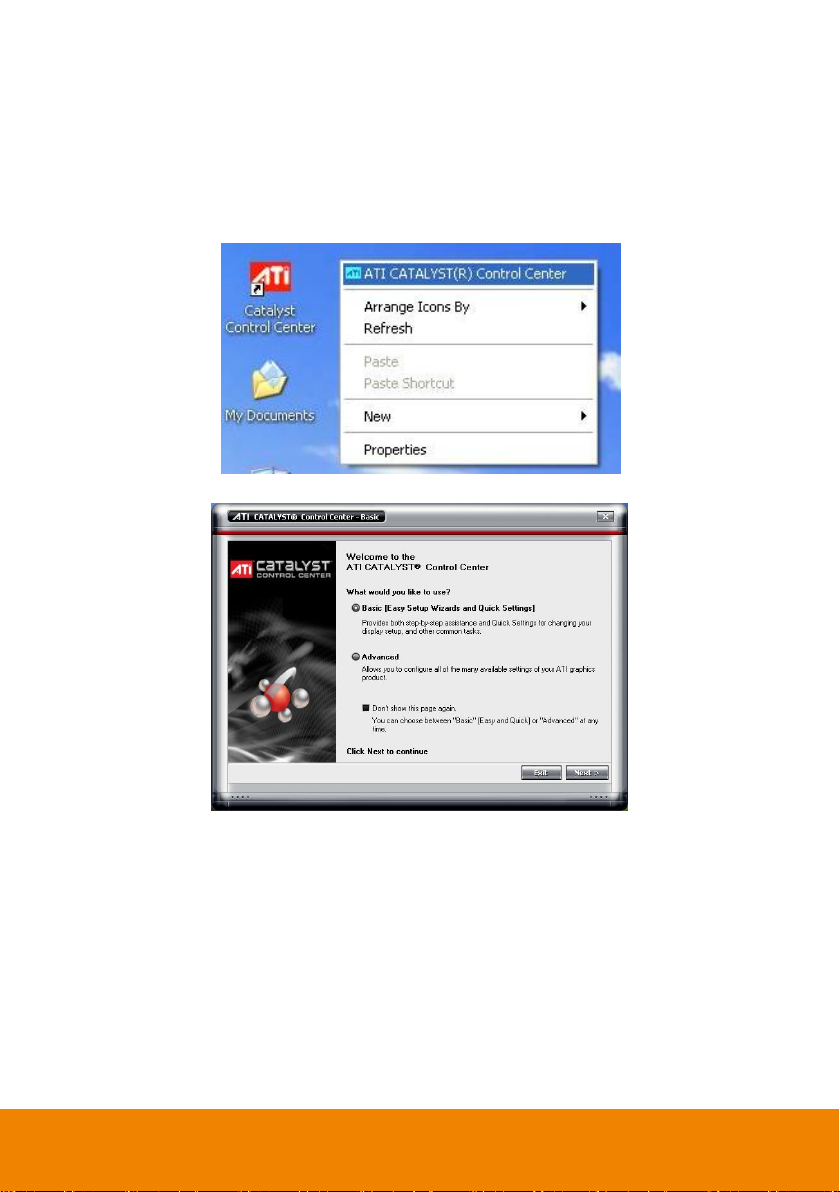
1.2.1 Graphic card with ATi chipset
1. Enter the ATI Catalyst Control Center, user can click the short-cut or right click on the screen.
2. There are two modes to select ─ Basic and Advanced.
3
Page 9
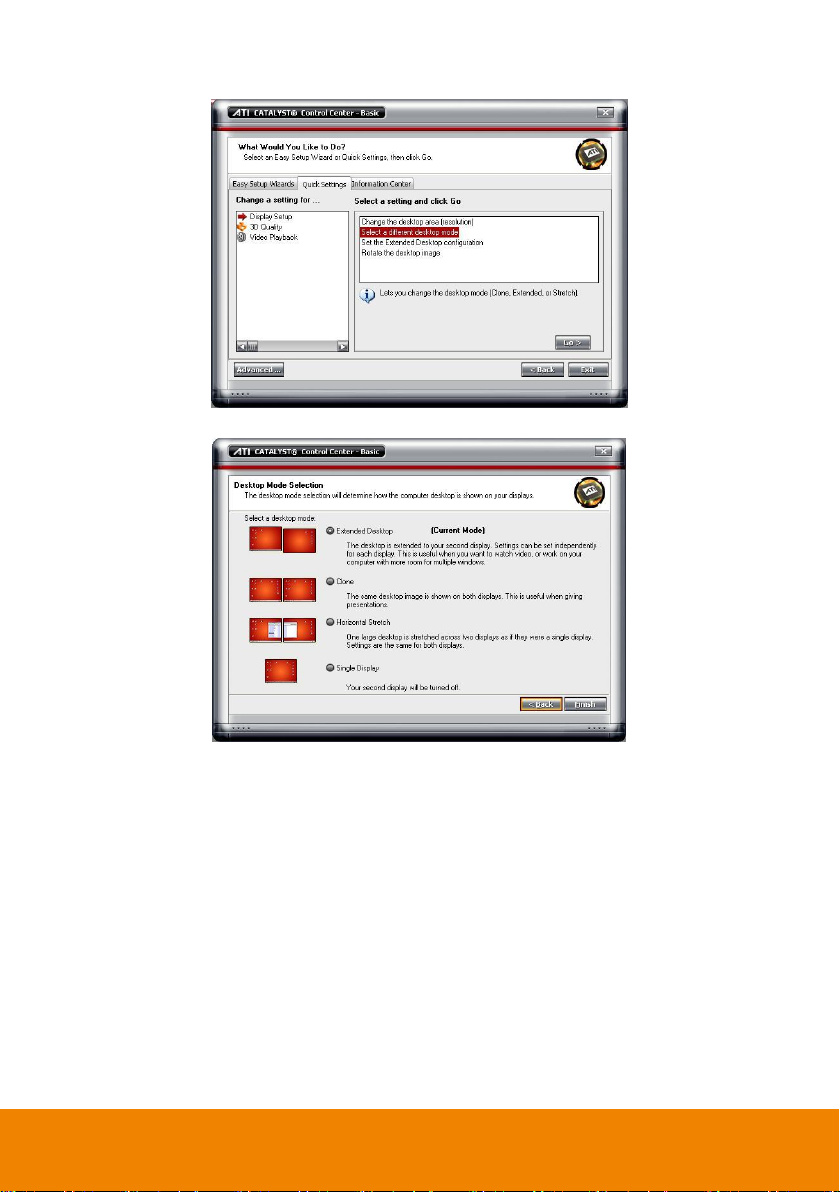
3. If user selected Basic mode, press the Quick Settings tab. Then select the Select a different
desktop mode and click Go.
4. Select the Extended Desktop and then click Finish.
4
Page 10
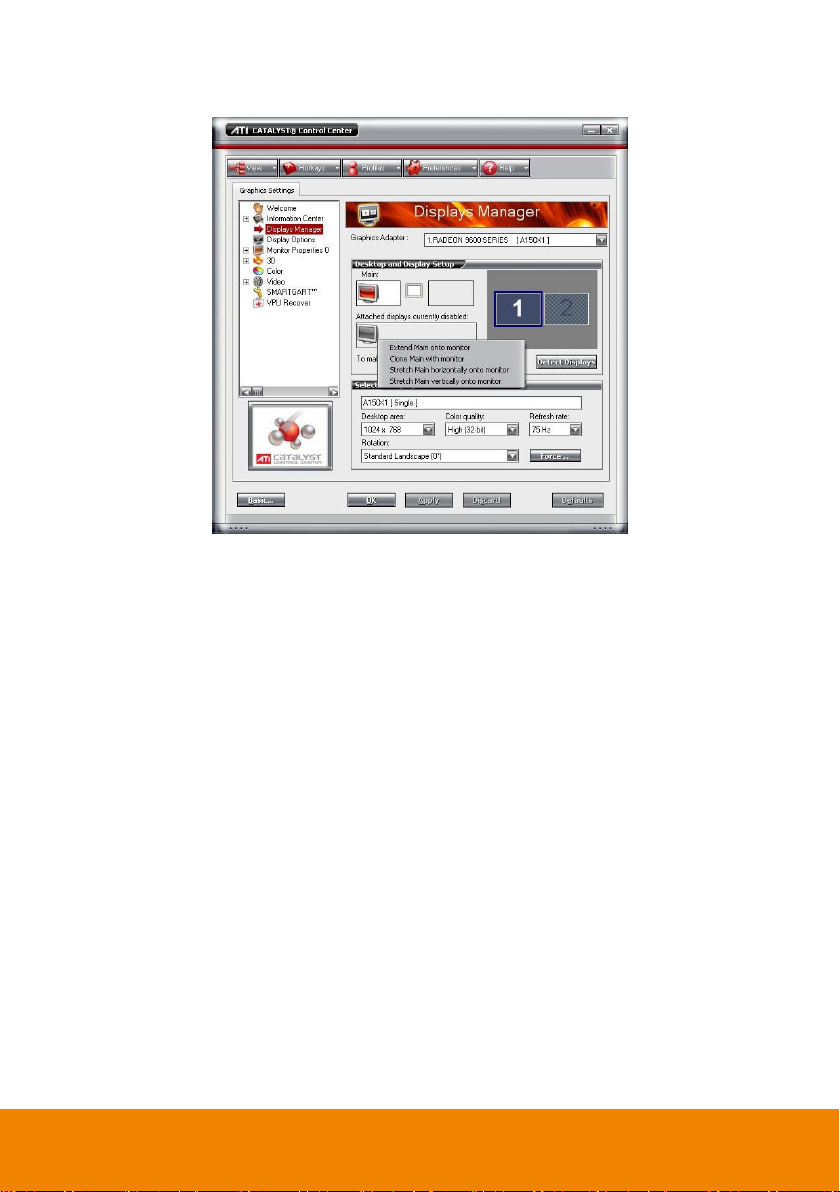
5. If user selected the Advanced mode, click the View button.
6. In Display Manager, right click on the second Display on the right side and select Extend Main
onto monitor.
7. Adjust each monitor resolution to 1280 x 800、1024 x 768、1280 x 1024、1440 x 900、1680 x
1050、1920 x 1080 or 1920 x 1200.
5
Page 11
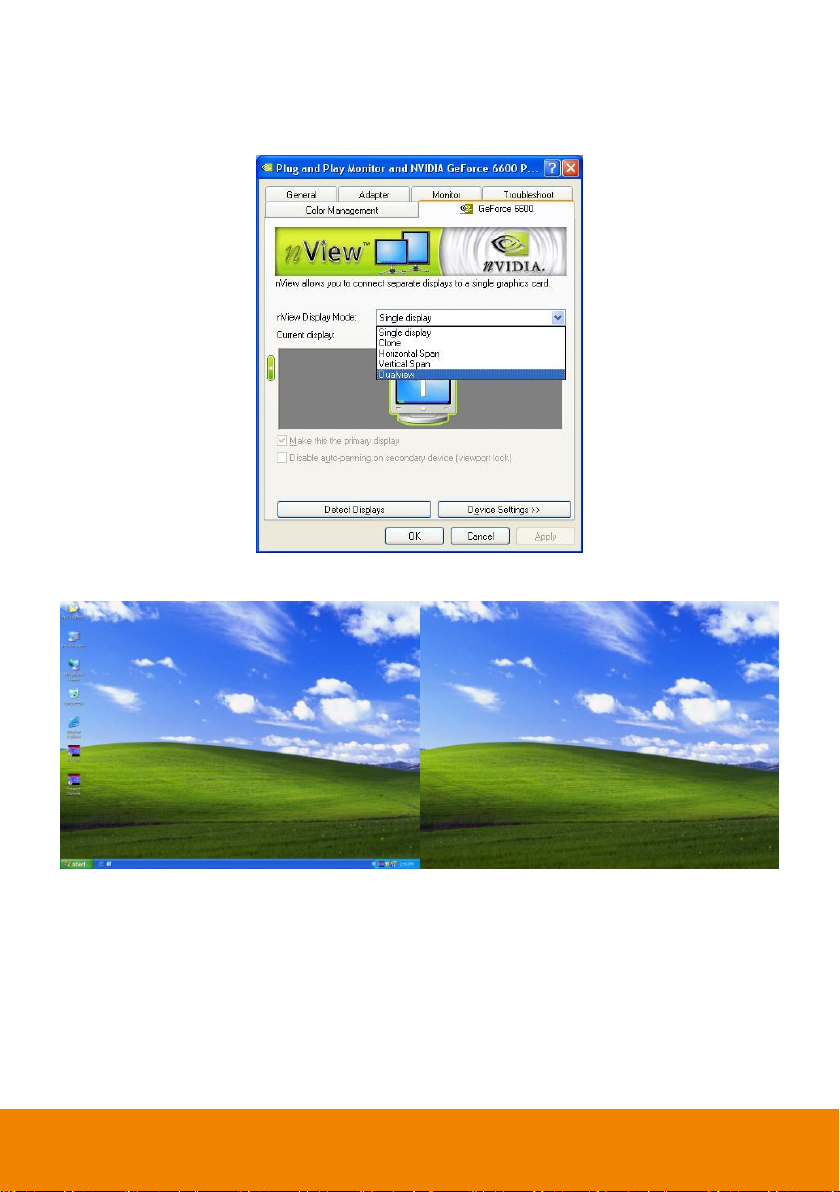
1.2.2 Graphic card with NVIDIA chipset
1. Click the NVIDIA nView, and select the Dualview mode.
2. Adjust each monitor resolution to 1280 x 800、1024 x 768、1280 x 1024、1440 x 900、1680 x
1050、1920 x 1080 or 1920 x 1200.
3. To review if the display mode is correct, you can check the task bar. The task bar will show on the
first monitor only.
Monitor 1 Monitor 2
6
Page 12
- Before installing the software, make sure the Windows OS patches are up to date and
the video graphic card driver is up to date.
- For Windows Vista/7/8, please disable the User Account Control (UAC) function
before install the CMS program. To disable UAC, please go to Control Panel >> User
Account Control. After disable UAC function, please restart system, and then,
install CMS program.
i
To ensure you have the latest copy of the CM3000 software, download the updated version
from the following site:
Worldwide :
http://surveillance.aver.com/download-center >> Software Application >> CM3000 >>
Software; Click Search button
CPU
Pentium 4 3.0GHz or above recommended
OS
Windows XP Professional 32 bit/ 7 32bit & 64bit
RAM
512MB for dual display,1GB for Quad display
Hard disk
120GB or higher
Media
CD-ROM drive
VGA
32-bit high color SVGA graphics card with 256MB video memory and
DirectDraw / YUV Rendering Capability
Audio
Sound card and speakers
Internet capacity
10/100 Base-T Ethernet card or Gigabit Ethernet
Chapter 2 Software Installation
This chapter describes how to install the CM3000 software.
2.1 Minimum System Requirements
First, must verify if the computer meets the minimum system requirements.
7
Page 13
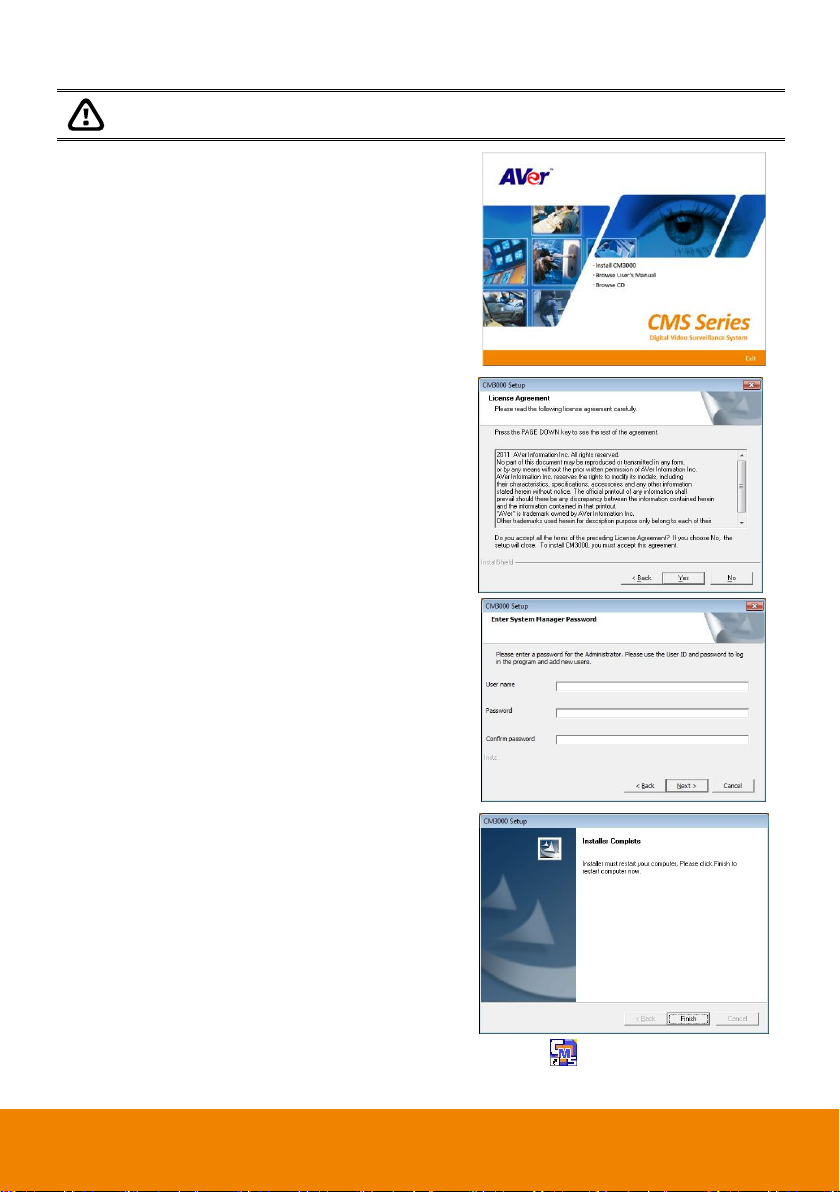
DO NOT install CMS application, DVR application, and MXR Client Software at the same
computer system.
1. Place the installation CD into the CD-ROM drive
then click Install CM3000. And follow the onscreen instructions.
2. Please carefully read the license agreement. Click
Yes to accept the agreement.
3. Enter the administrator ID and password. Then,
follow the on-screen direction to complete the
installation.
4. Click Finish.
5. User may now run the CMS program. To run the application, click on your PC desktop or
click Start> >CMS > CMS >CM3000.
2.2 Installing the CM3000 Software in Windows XP/Vista/7
8
Page 14
Chapter 3 Using the CMS
3.1 Running the CMS Software
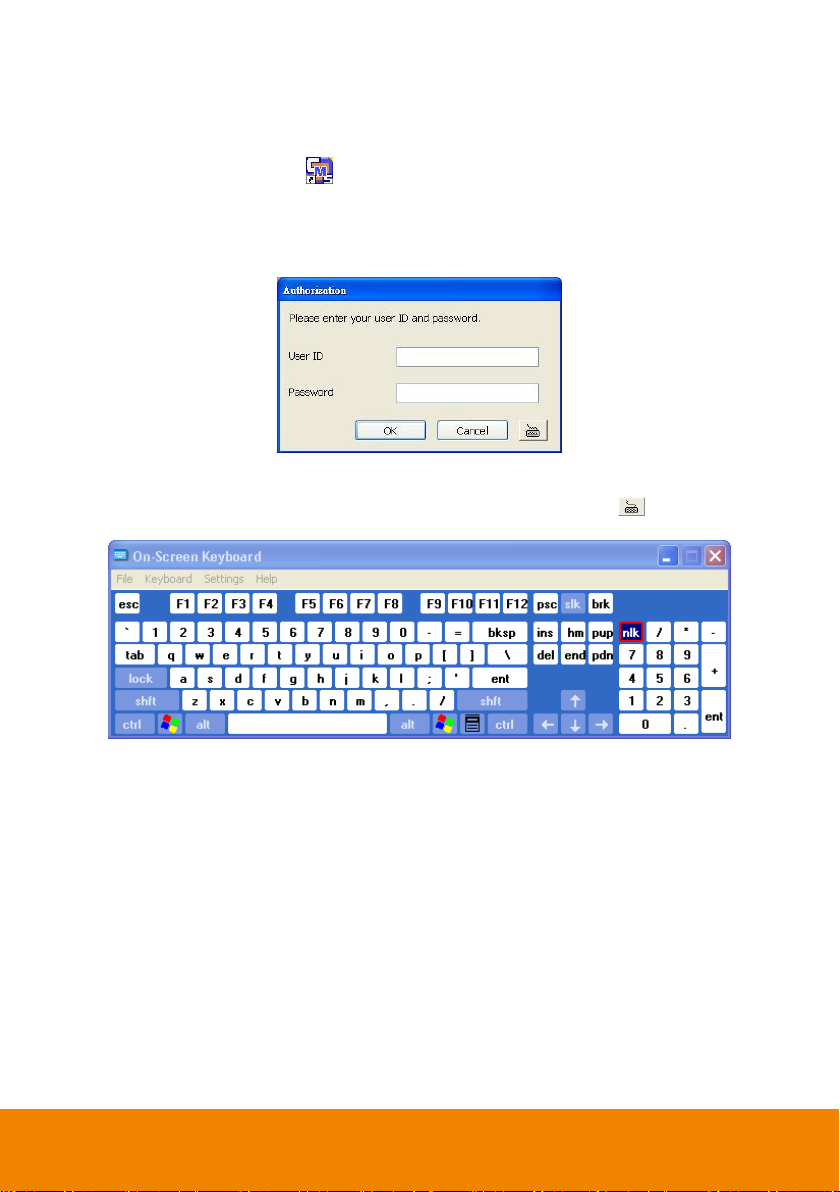
To run the application, double-click on your PC desktop or click Start > CMS > CMS > CM3000.
For security purposes, some of the features would require you to enter a User ID and Password before
they can be accessed. When the Authorization dialog box appears, key in your User ID and Password.
(If this is the first time, enter the one you have registered when installing the software.)
3.1.1 Using the Virtual Keyboard
If the keyboard is not available, you may use the Virtual Keyboard. Just click to show the virtual
keyboard. For uppercase and lowercase, click shift button.
9
Page 15
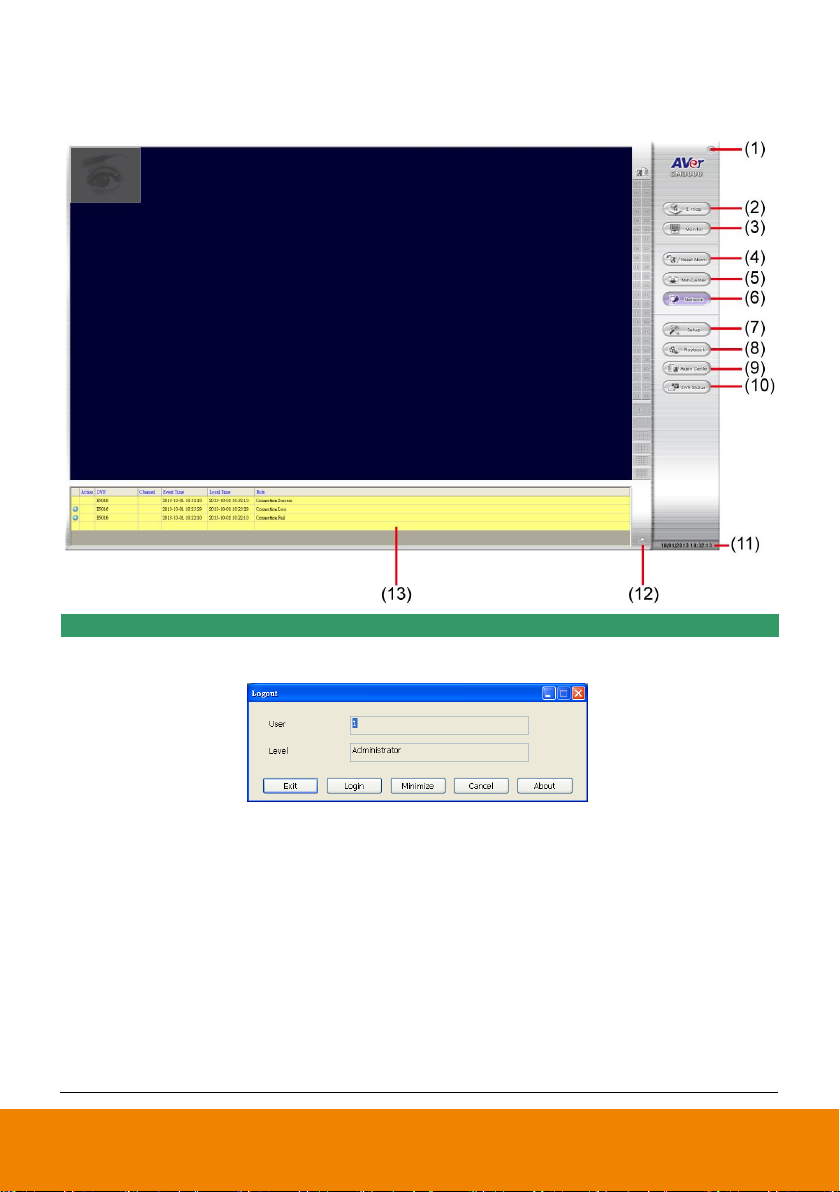
Name
Function
(1) Exit
Call up the Logout dialog box.
In the logout dialog box, you may do the following:
- Click Exit to close the CMS program. Only the administrator is
authorized to access this command.
- Click Login to sign-in as a different user.
- Click Minimize to reduce the CMS to taskbar button. The authorization is
required, please enter the password.
- Click Cancel to close the Logout dialog box.
- Click About to find out more about the software and update CMS
firmware.
Click Update in Product Information window to upgrade the newest CMS
application. In Live Update window, select the Server Site and Address
and click Update.
3.2 Using the CMS Application
The CMS system allows user to monitor the remote DVR and playback the recorded video from
remote DVR and local site of CMS system.
10
Page 16

Name
Function
(2) E-map (F3)
Switch to display the map and show the location of the DVR server on
the map. If you are using a single monitor, press ESC to revert back to
the CMS main application( see also Chapter 4.6.2)
(3) Monitor (F4)
Switch to display live video from the selected DVR servers group. If user
is using a single monitor, press ESC to revert back to the CMS main
application (see also Chapter 3.3).
(4) Reset Alarm
The function doesn’t support for E5016.
(5) MiniCenter Viewer
The function doesn’t support for E5016.
(6) Network
Enable/disable the remote alarm data received. This is activated
automatically when the CMS software starts up.
(7) Setup
Configure the CMS system settings. Only the administrator is authorized
to access this command. (see also Chapter 4)
(8) Playback
Select to playback video from the local hard disk or remote DVR server
(see also Chapter 5).
(9) Alarm Center
The function doesn’t support for E5016.
(10) DVR Status
To view all monitor DVRs’ status – IP, CPU usage, Bandwidth usage,
HDD free space, Connection status, Video Loss status….and so on.
(11) Status
Display the current date, and time
(12) Log extender
Expand and reduce the log viewer
(13) Log viewer
List the entire info in event mode or text mode from all DVR servers.
i
There are a few Hot keys for quick switching between the different applications or display
mode on a single monitor system.
- F1: displays current DVR server information on the CMS Monitor screen.
- F3: Switches to E-Map mode
- F4: Switches to Monitor mode
- Esc: Switches back to the CMS application main screen
11
Page 17

i
Right-click on the channel screen could select to start recording.
Name
Function
(1) Center
Back to CM3000 main UI(center UI)
(2) Monitor
Controller
To call out monitor controller dialog box. User can manage the monitor set
in monitor controller dialog( see also Chapter 3.3.1)
(3) Audio
The function doesn’t support for E5016.
(4) Monitor Name
Display name of current monitor set.
3.3 Using the Monitor
When user has setup the monitor set in Camera Setup (see also Chapter 4.3), then click Monitor to
view all selected cameras live video and playback. The monitor will switch to monitor mode, if user
using more than one monitor, then all enabled monitors will switch to monitor mode.
The following will describe the buttons function on Monitor interface.
12
Page 18

i
User needs to create monitor set in order to using Monitor Controller. To create monitor set,
please go to Setup > Camera (see also Chapter 4.3 Camera setup)
i
- The monitor set is gray that indicates the monitor set is selected and been monitored.
- The monitor 1 ~ 4 are purple that indicate the monitor is monitoring.
- Right-click on monitor and select the Recover to reset the monitor.
3.3.1 Using the Monitor Controller
User can use Monitor Controller to switch different monitor set for monitoring and add/delete the
channel in monitor set.
1. Click
2. The Monitor Controller window will show up as below shown:
3. Drag the monitor set from monitor list to the monitor (1 ~ 4) and click Apply to activate it. To reset
the monitoring group, click Reload.
4. To configure monitor set, click arrow button to expand the sub Monitor Controller window.
5. Select the monitor. The DVR servers are included in the monitor set will list on sub Monitor
Controller window. The lower part of window display all monitored channels in the monitor set.
6. To add new channels, click the DVR server to un-fold the available cameras. Drag the camera to
the blank channel block that has no channel number and name display
7. To change the monitored channels’ position, please delete the monitored channels and drag the
channels to the new position. To delete channels from monitor set, right-click on channel and
select Recover.
13
Page 19

8. Click Apply to refresh the monitor set.
9. Click arrow button to close the sub window.
14
Page 20

Chapter 4 Customizing the CMS System
In the CMS application, click the button to customize the CMS system. In the Authorization
dialog box, enter the administrator User ID and Password.
When the CMS configuration setup selection appears, select and click the buttons you want to change
the setting.
15
Page 21

4.1 System Setting
In the System Setting dialog box, click OK to accept and start to reload the new setting, and Cancel to
exit without saving.
(1) Miscellaneous
Date Format : Select from different date formats
1. Click Setup.
2. In the Authorization dialog box, enter the administrator User ID and Password.
3. Click System.
4. In the Date Format drop down list, click and select the style.
5. In the System Setting dialog box, click OK to accept the new setting and Cancel to exit
without saving the new setting.
16
Page 22

Display position: CMS system supports up to 4 monitors, users are allowed to customize
the display position that to decide the Center, Emap, Monitor, or Playback to be displayed on
which monitor screen. Click Detail to select the display screen setting. The new screen
display setting will be effect at next time login.
Block Windows OS hotkey: Deactivate the [Ctrl-Alt-Del] and [Windows] keyboard key
functions.
Auto Login when OS start: Execute the CMS when the operating system is started.
(2) Attention Please
Check the attentiveness of the person who is monitoring the system. You may set the number of
times the Attention dialog box to appear in a day in Times per day text box. To check the graph
on how fast the person response, click Analysis. When this feature is enabled, the Attention
dialog box would appear. The person who is monitoring the system must enter the same number
that appears from the left box at the right text box and then click OK.
(3) Configuration
Import / Export the CMS system configuration.
(4) Language
Customize the system to display the tool tips and dialogs based on the selected language. By
default the set language is in English.
1. Click Setup.
2. In the Authorization dialog box, enter the administrator User ID and Password.
3. Click System.
4. In the Language drop down list, click and select the language.
17
Page 23

The camera information will be displayed as
user has configured.
User can press F1 to disable/enable camera
information display.
(5) Monitor Text Setting
Enable/disable the camera information display and display position on the monitor screen. To
configure font, click .
18
Page 24

i
To upgrade the CMS to 1000 DVRs, please refer to Chapter 1.1)
4.2 DVR Setup
Display the list of all DVR servers. User may add up to 1000 DVR servers, delete and modify the DVR
setting.
4.2.1 To Add and Remove DVR Server
1. Click Setup.
2. In the Authorization dialog box, enter the administrator User ID and Password.
3. Click DVR.
4. In the DVR Setup section, click Add to insert, Delete to remove and Edit to modify DVR server
setting.
5. To continue adding a DVR, in the text box, enter the name, IP/Domain, Login User, Password,
Confirm Password of the remote DVR server.
6. If necessary, fill up the contact information to let the personnel in the CMS side know whom to
get in touch with when an event has occurred.
7. Select the Video Quality for video display on the CMS system monitor screen. The default value
is Auto.
8. Set the Storage Path for saving the recorded video data of the selected cameras on the Monitor
screen.
9. Set the max video recorded storage capacity of this DVR server on the CMS system server.
Enter the value in Quota.
10. In the DVR Setting dialog box, click OK to accept the new setting and Cancel to exit without
saving the new setting.
11. The CMS system will connect to DVR server. If the connecting time takes too long, user can click
Disconnect button to cancel the connect action.
19
Page 25

i
The maximum number of Monitor is 128.
i
CMS only supports two monitor set for recording.
4.3 Camera Setup
Select the camera from different DVR servers in order to monitor on same screen. The selected
cameras will be played on Monitor screen (see also Chapter 3.3).
1. Click Setup from CMS main interface.
2. In the Authorization dialog box, enter the administrator User ID and Password.
3. Click Camera.
4. Click Add to create a monitor set. Enter a name in Name column (12 characters only).
5. To record the cameras video, mark the Record box. Otherwise, the cameras video will not be
saved on the CMS system hard disk.
6. Mark Show Server Time to display the time on Monitor screen.
7. If user wants to playback the recorded video of monitor set, mark Enable Playback and enter
the time (sec.) in Start Playback Before that is when start playback will start from the present
time backward the time user has setup. User can set the camera transmitting Frame Rate, but
the real transmitting frame rate depends on camera setting.
8. Click OK to save the setting.
20
Page 26

i
User can drag the camera channel to Monitor Layout window without using Add button.
9. After the Monitor set has been created, select the DVR server. And then the cameras of the DVR
server will display on the Camera Select window. User can combines different cameras from
different DVR servers as a monitor set. And all cameras can be selected by different Monitor set
repeat.
10. User can depend on the monitor size to select the screen type – 4:3 (regular screen monitor) or
16:10 (wide screen monitor). The 4:3 and 16:10 screen type support different monitor layout.
11. Select the camera that user wants to add, and then click Add button. The selected camera will
be added to Monitor Layout window. User can add up to 64 cameras in 4:3 screen type and 80
cameras in 16:10 screen type. To remove the camera from the Monitor Layout window, select
the camera and click Delete button. To delete all cameras, click Clear All button. User can enter
a description for a channel.
12. In monitor set, each camera can be configured the name, transmitting type, and frame rate.
Select the camera in monitor layout window and
click Detail button of Camera Setting. And then,
enter the name for the camera and select display
position (Left-bottom or Right-bottom) of the
camera name on monitor screen; click to
change the font.
13. Select the transmitting type by click the radio
button – By Fps, Only Key Frame, or Motion.
And then, set the frame rate of the camera in
Default Frame Rate column. The value of frame
rate will both apply to live video and recording.
21
Page 27

The camera description will
display as user has configured.
Drag to select the multiple
blank channels as a
hotspot channel.
14. Also, user can select the Video Quality – High, Medium, Low, or Auto. Mark the Enable live
displayer for most optimization can improve the live video frame rate of the IP camera (jpeg
megapixel) when viewing the multiple channels.
15. In Monitor Layout window, user also can set the channel for specific type functions instead of
added cameras from DVR servers. In Monitor Layout window, select one of blank channel
(NONE) and click the radio button of type (Hotspot, Sequence, Matrix, Image, or None).
Hotspot: To set the channel for displaying selected camera channel video. Click-and-drag
to select multiple channels as a hotspot channel area.
22
Page 28

i
On the DVR site, user need to enable and configure the matrix to send to CMS
(please refer to Alarm Setting of NV/SA user’s manual).
In the Monitor screen, user can right-click and drag the camera to the hotspot channel for
enlarge viewing.
Sequence: Set the selected channel to automatically switch to display all camera channels
in cycle.
Matrix: set the selected channel to receive and display the alarm event from selected DVR
servers. Click Setup to select the DVR servers. Enable the Retrieve time to set a period
time (0 ~ 255 sec) for alarm event to display. If the retrieve time doesn’t enable, the alarm
event will display on screen until next alarm event come in.
23
Page 29

Image: To insert an image on selected channel. The image supports *.bmp and *.jpg format.
Click Setup and browse where the image located is.
16. Click OK to save the setup. To exit without saving, click Cancel.
17. To delete the monitor set, select the monitor set in Monitor Select window and click Delete
button.
18. To modify the monitor set, select the monitor set in Monitor Select window and click Edit button.
19. To monitor the monitor set, please see Chapter 3.3.
24
Page 30

i
The Monitor set can be scheduled only when the recoding is enabling.
i
Make sure the backup folder and storage folder are not on the same drive.
4.4 Schedule Setup
Schedule to record or backup of all the cameras either weekly or one time.
1. Select the Monitor set for scheduling.
2. Select the date in the calendar. Use and buttons to shift the calendar to the left or right.
3. Select the condition you want to schedule in the drop down list.
- Record
Activate all the cameras to start video recording at the set time based on the Recording setting
- Backup
Save another copy of all the data at the set time and specified backup path. DVR
automatically updates and only backup the data that are not yet included in the archive. To
assign backup path, click .
4. Specify to either schedule it weekly or one time. Click to make a selection.
5. Click on the blocks to set the schedule (see also Chapter 4.4.1). Or click All to select all. To store
the setting, click Save. To remove the settings, click Clear.
6. To end Schedule Setting, click OK to exit and accept the setting and Cancel to exit without
saving the setting.
25
Page 31

4.4.1 To set schedule at a specific portion of time in that hour:
1. Right click the colored blocks.
2. In the Select time dialog box, click to enable or disable
the portion you want to set.
3. Click OK to accept the setting and Cancel to exit
without saving the setting.
26
Page 32

Selected Files
: Show the number of files selected.
Require Space
: Show the total size of the selected file.
4.5 Backup Setup
In the Backup Setting dialog box, the number from 00 to 23 represent the time in 24-hour clock. The
numbers from 01 to 16 represent the camera number.
1. Select the DVR that wants to backup
2. Select the date of the recorded file in the calendar you want to backup. Use and buttons to
shift the calendar to the left or right.
3. In the table below, click on the blue block to select the recorded file or click camera (01~16) or
time (00~23) to select the whole row or column. The blue block turns red when it is selected. The
block that appears in white doesn’t have data. If you want to set the specific time, right-click on the
selected block. Then, set the time to start and end.
4. Check the information beside the calendar.
5. Enable Auto partition and select to divide the file size into DVD-R or CD-R. DVR automatically
backup and divide the file sizes to facilitate burning into DVD or CD disc.
27
Page 33

6. Enable Include player when backup that will included a Qplayer program for playback backup
file in backup folder when backup. Only administrator user has the authority to enable or disable
this function.
7. If you do NOT want to keep the recorded file in the storage folder, enable Delete files after
Backup check box.
8. Click to set the path on where to store the backup file.
9. Click to start archiving the selected file.
10. In the Processing… dialog box, to stop archiving press Abort. When done, in the Backup Path list,
shows the archived item. To burn the file in CD, you need to have NERO 6 or above installed in
your PC then select the item in the list and click Burn. Click Exit to end this procedure and burn it
later.
11. In CD/DVD Backup, enable/disable Delete file after burning check box to remove the archived file
after burning. Click Burn to start and Exit to cancel this process.
28
Page 34

i
Right-click on Emap could call out a short-cut menu.
4.6 E-MAP Setup
Holds up to 64 maps in *.bmp/*.jpg format. The map is hierarchy in structure and users can add a map
on another map. User also may add the DVR icons on the map.
4.6.1 To Set Up the E-Map
1. Click Setup.
2. In the Authorization dialog box, enter the administrator User ID and Password.
3. Click E-Map.
4. The E-Map interface will show up in assigned monitor if user is using multiple monitors for the
CMS system. If user is using single monitor for the CMS application, the E-Map interface will
show up in front of the CMS application interface. Press Esc or click Center button to switch
back to CMS application interface or press F3 to switch to E-Map interface again.
5. On the E-Map interface:
- (1) Map List: list all E-Map and all DVR servers that have been added on the E-Map.
-
(2) Group List: User can create the group to group DVR servers for easy management.
Click to add new group. Drag the DVR server from Map List window into the group. To
delete the group, click . Double-click on the DVR server will call out the DVR Watch
window(see also Chapter 4.6.1.3)
- (3) Cancel: Without saving the setting and exit the E-Map interface.
- (4) OK: To save the setting and exit the E-Map interface.
- (5) Add DVR: Add a DVR server icon on the map. (see also Chapter 4.6.1.2)
- (6) Delete: To remove the DVR server
- (7) Edit: To modify the selected DVR server
- (8) Add E-Map: Add a new map. The new map is added on the current map as a next
level. (see also Chapter 4.6.1.1)
- (9) Load a map to replace the current map
- (10) Show the current name and layer of map
- (11) go back to previous layer of map
29
Page 35

i
- User can add up to a total of 64 maps
- Right-click on the map to call out a short-cut menu.
4.6.1.1 Add a New Map
1. Click button
2. In the Authorization dialog box, enter the administrator User ID and Password
3. Click E-Map button
4. In E-Map interface, click Setup >> Add Map button and the Map setting window will show up.
5. Give a name for the new map.
6. Click to locate the map file. In the open dialog box, locate and select the map and click
Open
7. User may now drag and move the Map icon to its place on the map.
8. User can double click the Map icon to view the map.
9. To edit and delete the map, click the map icon and Edit and Delete button will appear on the
Map interface. Click Edit to modify the map. To delete the map, click the map icon and click
Delete button.
10. Click OK to accept the new setting and Cancel to exit without saving the new setting.
30
Page 36

i
The functions of short-cut menu is listing below:
- Add DVR: To add a DVR server on the E-Map.
- Edit DVR: To modify the DVR server.
- Delete DVR: To delete the selected DVR server from the E-Map.
- Change Bitmap: Replace the E-Map with new map. The map file only support *.jpg and
*.bmp.
- Add New map: Add up a New map on current E-Map level.
- Remote EMAP: To view the selected remote DVR server’s E-map.
- Setup OK: To save the current configuration.
Right-click on the DVR
server icon to call out
the short-curt menu.
4.6.1.2 Add a DVR Server
1. Click button
2. In the Authorization dialog box, enter the administrator User ID and Password
3. Click E-Map button
4. Click Add DVR button and the Add DVR window will show up.
5. Select the DVR server from the Add DVR window and click OK.
6. User may now drag and move the DVR icon to its place on the map.
7. To edit and delete the DVR server on the map, click the DVR server icon and the Edit and
Delete buttons will appear on the Map interface. Click Edit to modify the DVR server (see 4.2.1 #
5~10). To delete the DVR server from the map, click the DVR server icon and click Delete.
8. Click OK to accept the new setting and Cancel to exit without saving the new setting.
31
Page 37

4.6.2 To Use the E-Map
When the alarm has been activated, the DVR icon blinks and turns red.
1. On the CMS main application, click E-map or press F3.
2. Click the DVR server icon and a DVR watch window will show up and connect the DVR server to
play the live video.
3. To switch back to the main application, press ESC.
32
Page 38

i
- If user uses dual monitor, the E-map setup mode is active in E-Map window and the Emap setup mode will not activate in CMS main screen.
- Click OK or Cancel to exit the setup mode in E-Map interface.
4. To setup the E-Map, click button or right click the mouse button and select EMap setup
and the E-Map interface will switch to the E-Map setup mode. (see also Chapter 4.6.1)
5. User can click the Map icon on the map to view the map. And the map can be added level by
level up to 64 maps. (see also Chapter 4.6.1.1).
33
Page 39

Click to select or
un-select.
Click to select or
un-select.
4.7 User Setting
CMS supports 256 user account that includes operator and administrator account.
1. Select the Authorization Level – Operator or Administrator. User can define each
operator/administrator account’s authority of DVR server and Monitor set. Only the
administrator is authorized to close and customize the CMS system.
2. Enter the Name, Description, Password, and Confirm password of the account.
3. Select the DVR servers that allow this account user to preview and playback. The DVR server
with check mark means is selected.
4. Select the Monitor set that allow this account user to view. The Monitor set with check mark
means is selected.
5. User can assign a valid date for Operator user. Select Begin Date and End Date to assign a
valid date for operator account. The account only will be available during the assigned date.
6. Click OK to accept the new settings and Cancel to exit without saving.
34
Page 40

Chapter 5 Using the Playback Function
User can choose to playback video stored on the local hard disk or download the video from the
remote side of the DVR server.
5.1 To Playback the video
1. Click
2. In the DVR Playback select window, select DVR server to play video from the remote DVR server.
3. You can select Local Playback to playback. Click OK to proceed and Cancel to void this operation.
4. User can select to preview 16 channels at a time. Only the cameras previously selected in
Monitor and with the Record enabled can be playback. In the Video Playback Date/Time
Selection, the numbers from 00 to 23 represent the time in 24-hour. The numbers from 01 to 16
represent the camera number. The blue block indicates that there is a recorded video file in that
period of time. While the red bar indicates the selected recorded video for viewing (see also
Chapter 5.2).
35
Page 41

Name
Function
(1) Split Screen
Mode
Select from six (6) different split screen types to playback the recorded video
file of all the cameras, or one camera over the other or alongside on a single
screen.
i
- If there are only 4 cameras, you won’t be able to switch to 9, 16, and 13 split screen
mode.
- To zoom into an area on the screen, Right click and Drag a square on the area you
want to enlarge.
- To view 32 channels, click 16 split screen mode button to view 16 channels each time.
Check the camera ID icon to know which channels are displaying now.
(2) Exit
Close the Player.
(3) Progress bar
Show the progress of the file being played. You may move the bar to seek at
any location of the track.
(4) Hour Buttons
Select and click to playback the recorded video file on the specific time
frame.
(5) Playback
Control Buttons
Begin: Move to the beginning of the recorded video file.
Previous: Go back to the previous frame.
Slower: Play the recorded video file at the speed of 1/2x, 1/4x, or
1/8x.
Rewind: Wind back the recorded video file.
Pause: Briefly stop playing the recorded video file.
Play: Play the recorded video file.
Faster: Play the recorded video file at the speed of 2x, 4x, or 8x, 16x, 32x.
Next: Go to the next frame.
End: Go to the end of the recorded video file.
5.2 Using the Local Playback Application
36
Page 42

Name
Function
(6) Archive
Select the date on the calendar and the time from 00 to 23 to where to start
playing the recorded video file.
– Also, user can open the recorded file from certain location by click OPEN
FILE button
– Click Channel 01~ 16 and Channel 17 ~ 32 button to switch to different
channel group of playback calendar.
– Mark Day Light Saving, the playback calendar will show the available
playback records during day light saving period.
i
The numbers from 00 to 23 represent the time in 24-hour clock. The numbers from 01 to
16 represent the camera ID. The blue colored column indicates that there is a recorded
video file on that period of time. While the red colored column indicates on where to start
playing the recorded video file.
(7) Status bar
Display the recorded date, time and play speed.
(8) Camera ID
Show the number of cameras that are being viewed. When you are in single
screen mode, click the camera ID number to switch and view other camera.
(9) Export
Export includes Snapshot, Print, and Output Video Clip function.
Snapshot: Capture and save the screen shot either in *.jpg or *.bmp
format.
Print: Print the screen shot.
Output Video Clip: Save the segmented file in *.mpg, *.avi, or *.dvr
format (see also Chapter 5.3).
(10) Segment
Keep a portion of the recorded video you want (see also Chapter 5.3).
(11) Full screen
View in Playback-compact mode. To return, Right click the mouse or press
ESC on the keyboard.
When you switch to full screen in multiple-screen mode, Left click to toggle
to only display one of the video in the multiple-screen mode or all.
(12) Bookmark
Mark a reference point when previewing the recorded video file to which you
may return for later reference. You may also set it to protect the file. (See
also Chapter 5.4)
37
Page 43

Name
Function
(13) Visual Search
Search from a specific camera by Date, Hour, Minute, 10 Seconds and
Second (See also Chapter 5.5).
(14) Find Next
Search for the next event or changes in the motion detector frame. You can
use this when you are using Intelligent Search or Event Search only.
(15) Event Search
Search from the recorded activities that take place in the system (i.e.,
Sensor, Motion, Video Loss, POS) (See also Chapter 5.6).
(16) Intelligent
Search
Search the changes in the motion detector frame (See also Chapter 5.7).
(17) Audio
Enable/disable audio and adjust volume
(18) De-interlace
To enhance the video quality. Set the de-interlace mode to #1, if you are
capturing motionless picture and #2, if it captures lots of movement.
38
Page 44

i
- When the bookmark is protected, the file won’t be overwritten.
- The protected bookmark file will be deleted when the Delete the recorded data is
enable in the Backup setting.(also refer to Chapter 4.5 )
5.3 To Cut and Save the Wanted Portion of the Recorded Video
1. Use the Playback Control buttons or drag the bar on the playback progress bar and pause on
where you want to start the cut. Then, click Segment to set the begin mark.
2. Use the Playback Control buttons or drag the bar on the playback progress bar and pause on
where you want to end the cut. Then, click Segment to set the end mark. To cancel segmentation
or set the segment marks from the start, click Segment button again.
3. Click Output button to save the wanted clip.
4. In the Save As dialog box, locate on where you want to save the file, type the filename, and select
the video format.
5.4 To Bookmark a Section of the Video
1. Click Bookmark. The video playback stops when the bookmark button is executed.
2. In the Bookmark dialog box, you may do the following:
- Add to include the new reference mark in the bookmark list. You may select to
enable/disable File Protect to protect the bookmark file for overwritten.
- Edit to change the mark description or enable/disable file protection.
- Delete to remove the selected reference mark in the list.
- Delete All to remove all the reference marks in the list.
- Exit to close Bookmark dialog box.
- Select and click one in the bookmark list to preview the file.
39
Page 45

5.5 To Search Using the Visual Search
1. Click Visual Search.
2. In the Visual Search Setting dialog box, select the Camera number and the date. Then click OK.
3. When a series of frames appear by date, click on the frame to display another series of frames
and search by every Hour of that date, every Minute of that hour, every 10 Seconds of that minute,
every Second of that 10 seconds. To go back, click . To view from the selected frame and
close event search, click .
40
Page 46

5.6 To Search Using the Event Search
1. Click on the video screen on where you want to search.
2. Click Event Search. The Event Search text (red) would appear at the lower left corner of the
screen.
3. In the Event Search Setting dialog box, check the type of condition you want to search. If you
select POS, in the Find Text box, type the word. Then, click OK to start searching. The video
search would stop at the frame that matches the condition. To keep on searching, click .
4. You may also set to search and list all the result. Just check the Output Event List box. In the
Search Duration section, set the Begin Time, End Time and Searching Interval. Then, click OK
to start searching.
5. When the Event list appears, click and select the item you want to view.
41
Page 47

5.7 To Search Using the Intelligent Search
1. Click on the video screen on where you want to search.
2. Click Intelligent Search. The Intelligent Search text (red) would appear at the lower left corner
of the screen.
3. When the Intelligent Search Setting dialog box and motion detector frame appear, you may adjust
the sensitivity bar and the motion detector frame size and location. To set motion detector frame
size and location, left click and drag on the screen. Then, click OK to start searching. The video
search would stop at the frame that matches the condition. To keep on searching, click .
4. You may also set to search and list all the result. Just check the List box. In the Search Duration
section, set the Begin Time, End Time and Searching Interval. Then, click OK to start searching.
Intelligent Search in Local Playback Mode
42
 Loading...