


 Loading...
DISHWASHER / LAVAPLATOS / LAVE-VAISSELLE
INSTRUCTION MANUAL / MANUAL DE INSTRUCCIONES
MANUEL D’INSTRUCTIONS
Model Numbers / Números de Modelos: DW18D0WE / DW18D1BE / DW18D3SE
BEFORE USE, PLEASE READ AND FOLLOW ALL SAFETY RULES AND OPERATING INSTRUCTIONS.
Avanti has a policy of continuous improvement on its products and reserves the right to change materials and specifications without notice.
Avanti Products LLC
P.O. Box 520604 - Miami, Florida 33152
www.avantiproducts.com
TABLE OF CONTENTS |
|
|
Help Us Help You |
3 |
|
Parts and Features |
4 |
|
Important Safety Instructions |
5 |
|
Electrical Connection |
5 |
|
Water Heater Safety |
6 |
|
Before Using Your Dishwasher |
6 |
|
Control Panel |
7 |
|
Wash Cycle Descriptions |
7 |
|
Overflow Protection |
8 |
|
Using the Detergent Dispenser |
8 |
|
Using the Rinse Aid Dispenser |
8 – |
9 |
How to Efficiently Load Your Dishwasher |
9 – 10 |
|
Starting, Modifying and Canceling the Wash Cycle |
10 |
|
Filtering System |
10 – |
11 |
Caring and Maintenance |
11 |
|
Cleaning the Spray Arms |
11 |
|
Cleaning the Filters |
11 |
|
Cleaning the Door |
11 |
|
How to Keep your Dishwasher in Shape |
12 |
|
Problems with your Dishwasher? |
12 |
|
Troubleshooting Guide |
12 – 13 |
|
Service for your Dishwasher |
14 |
|
Wiring Diagram |
14 |
|
Your Avanti Products Warranty |
15 |
|
Instrucciones en Español |
17 – 25 |
|
Instructions en Francais |
17 - 41 |
|
Registration Information / Registration Card |
Back Cover |
|
2

HELP US HELP YOU...
Write down the model and serial numbers.
Read this guide carefully.
It is intended to help you operate and maintain your new dishwasher properly.
Keep it handy to answer your questions.
If you don't understand something or you need more assistance, please call:
Avanti Customer Service 800-220-5570
Keep proof of original purchase date (such as your sales slip) with this guide to establish the warranty period.
You'll find them on a plate located on the rear wall of the dishwasher.
Please write these numbers here:
____________________________________
Date of Purchase
____________________________________
Model Number
____________________________________
Serial Number
Use these numbers in any correspondence or service calls concerning your dishwasher.
If you received a damaged dishwasher, immediately contact the dealer (or builder) that sold you the dishwasher.
Save time and money. Before you call for service, check the Troubleshooting Guide. It lists causes of minor operating problems that you can correct yourself.
IF YOU NEED SERVICE
We're proud of our service and want you to be pleased. If for some reason you are not happy with the service you receive, here are some steps to follow for further help.
FIRST, contact the people who serviced your dishwasher. Explain why you are not pleased. In most cases, this will solve the problem.
NEXT, if you are still not pleased, write all the details, including your telephone number, and send it to:
Customer Service
Avanti Products
10880 NW 30th Street
Miami, FL 33172
3
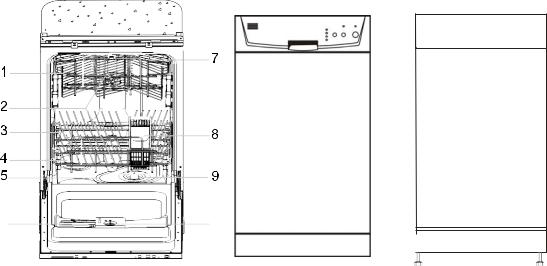
PARTS AND FEATURES
6 |
10 |
11
 12
12
1 |
Upper Rack |
2 |
Spray Arms |
3 |
Lower Rack |
4 |
Stainless Steel Interior |
5 |
Main Filter Assembly |
6 |
Detergent Dispenser |
7 |
Cup Shelf |
8 |
Silverware Basket |
9 |
Coarse Filter |
10 |
Rinse Aid Dispenser |
11 |
Inlet Valve |
12 |
Junction Box |
4

|
Important Safety Instructions |
|
|
|
To reduce the risk of fire, electrical shock, or injury when |
WARNING |
using your dishwasher, follow these basic precautions: |
Read all instructions before using the dishwasher. DANGER or WARNING: Risk of child entrapment.
Child entrapment and suffocation are not problems of the past. Junked or abandoned dishwashers are still dangerous. . . even if they will “just sit in the garage a fewdays.”
Before you throw away your old appliance: Take off the doors. Leave the shelves in place so that children may not easily climb inside.
Never allow children to operate, play with, or crawl inside the dishwasher. Never clean dishwasher parts with flammable fluids.
Do not store or use gasoline or any other flammable vapors and liquids in the vicinity of this or any other dishwasher.
Plug the dishwasher into an exclusive properly installed-grounded wall outlet. Do not under any circumstances cut or remove the third (ground) prong from the power cord. Any questions concerning power and or grounding should be directed toward acertified electrician or an authorized Avanti Products service center
-Save these instructions-
Electrical Connection
Warning
Improper use of the grounded plug can result in the risk of electrical shock. If the power cord is damaged, have it replaced by an authorized Avanti Products servicecenter.
This dishwasher should be properly grounded for your safety. The power cord of this dishwasher is equipped with a three-prong plug which mates with standard three prong wall outlets to minimize the possibility of electrical shock.
Do not under any circumstances cut or remove the third ground prong from the power cord supplied.
Never use an extension cord to connect power to the unit. Never use a two-prong grounding adapter.
Where a two-prong wall receptacle is encountered, contact a qualified electrician to have it replaced with a 3-prong receptacle in accordance with applicable electrical codes.
This dishwasher requires a standard 110/120 volts A.C.~/60hz electrical outlet with three-prong ground.
The cord should be secured behind the dishwasher and not left exposed or dangling to prevent accidental injury.
Connect to a grounded metal, permanent wiring system: or run an equipment grounding terminal or lead of the appliance.
Improper connection of the equipment grounding conductor can result in a risk of electric shock. Check with a qualified electrician or service representative if you are in doubt whether the appliance is properly grounded.
Do not attempt to repair or replace any part of your dishwasher unless it is specifically recommended in this manual. All other servicing should be referred to a qualifiedtechnician.
To minimize the possibility of electric shock, disconnect this appliance form the power supply before attempting any maintenance. Note: Turning the dishwasher off does not disconnect the appliance from the power supply. We recommend having a qualified technician service your appliance.
5

Water Heater Safety
Under certain conditions hydrogen may be produced in a water heater that has not been used for two weeks or more. Hydrogen gas is explosive.
If the hot water has not been use for two weeks or more, prevent the possibility of damage or injury by turning on all hot water faucets and allow them to run for several minutes. Do this before using any electrical appliance which is connected to the hot water system. This simple procedure will allow any built-up hydrogen gas to escape. Since the gas is flammable, do not smoke or use an open flame or appliance during this process.
Use this appliance only for its intended purpose as described in this Owner’s Manual.
WARNING  READ
READ
FOR PROPER USE
Do not abuse, sit on, or stand on the door or dish rack of the dishwasher. Do not touch the heating element during or immediately after use.
Do not wash plastic items unless they are marked dishwasher safe or the equivalent. For plastic items not so marked, check the manufacturer recommendations.
Use only detergent and rinse additives designed for an automatic dishwasher. Using detergent that is not specifically designed for dishwashers will cause the dishwasher to fill with suds.
Keep children away from detergent and rinse aid, keep children away from the open door of the dishwasher, there could still be some detergent left inside.
The door should not be left in the open position since this could present a tripping hazard. During installation, the power supply must not be excessively bent orflattened.
To reduce the risk of injury, do not allow children to play in or on a dishwasher.
Do not operate your dishwasher unless all enclosure panels are properly in place. Open the door very carefully if the dishwasher is operating, there is a risk of water squirtingout.
Do not place any heavy objects or stand on the door when it is open. The appliance could tip
forward.
When loading items to be washed:
1) Locate sharp items so that they are not likely to damage the door seal;
2) Load sharp knives with the handles up to reduce the risk of cut-type injuries.
When using your dishwasher, you should prevent plastic items form contacting with heating element.
If the supply cord is damaged, it must be replaced by the manufacturer or its service agent or
similarly qualified person in order to avoid a hazard. Please dispose of packing materials properly.
Use the dishwasher only for its intended function.
Remove the door when removing an old dishwasher from service or discarding it. Do not tamper with controls.
Do not touch the heating element during or immediately after use.
Before Using Your Dishwasher
Remove the exterior and interior packing.
Check to be sure you have all of the following parts: 2 Wash Racks (1 Upper / 1 Lower)
1 Silverware Basket
1 Measuring Spoon
1 Instruction Manual
1 Measuring Cup
1 Installation Manual
Clean the interior surface with lukewarm water using a soft cloth.
6

CONTROL PANEL
7 |
|
1 |
2 |
|
||||
|
|
|
|
|
|
|
|
|
|
|
|
|
|
|
|
|
|
6 |
5 |
1 |
Program Indicator Lights |
2 |
Rinse Aid Low Indicator Light |
3 |
Power Indicator Light |
4 |
Power ON / OFF Button |
5 |
Start / Reset Button |
6 |
Program Selector Button |
7 |
Air Vent |
Program Indicator light next to the selected program will turn on while the cycle is
1running. During the wash cycle the indicator light for the selected program will blink intermittently.
2Rinse Aid Warning Light will turn on when the dispenser needs to be refilled.
3Power Indicator light will turn on when the Power ON/OFF button ispressed.
4ON/OFF Button: Press to turn the unit ON/OFF
5Start / Pause Button: Press to start the wash cycle, press again while the unit is in operation to pause the wash cycle.
6Program Selector Button: Press the button to select the appropriate wash cycle for your needs.
Once the program has been selected the appropriate indicator light will flash/blink intermittently
Pre-Programmed Wash Cycles
Program |
Cycle Selection |
Description |
Detergent |
Running |
Energy |
Water |
Rinse |
Information |
of Cycle |
pre/main |
time(min) |
(Kwh) |
(gal) |
Aid |
|
|
For the heaviest soiled |
Pre-wash |
|
|
|
|
|
|
loads, such as pots, pans, |
Pre-wash(122°F) |
|
|
|
|
|
|
casserole dishes and dishes |
Wash (127°F) |
|
|
|
|
|
Heavy |
that have been sitting with |
Rinse |
18g |
125 |
0.51 |
4.41 |
|
dried food on them for a |
Rinse (144°F) |
|
|
|
|
|
|
|
while |
Drying |
|
|
|
|
|
|
|
|
|
|
|
|
|
For normally soiled loads , |
Pre-wash |
|
|
|
|
|
|
Wash (122°F) |
|
|
|
|
||
Normal |
such as pots, plates,glasses |
Rinse |
18g |
115 |
0.594 |
3.09 |
|
and lightly soiled pans. |
|||||||
Rinse (131°F) |
|
|
|
|
|||
(AHAM) |
standard daily cycle. |
|
|
|
|
||
Drying |
|
|
|
|
|||
|
|
|
|
|
|
|
|
Pre-wash |
|
|
|
|
|
For lightly soiled loads,such |
Wash (122 °F) |
18g |
85 |
0.291 |
3.54 |
|
Light. |
asplates,glasses,bowls |
and |
Rinse |
||||
lightly soiled pans. |
|
Rinse (131°F) |
|
|
|
|
|
|
|
|
Drying |
|
|
|
|
|
A shorter wash for lightly |
Pre-wash |
|
|
|
|
|
Wash (122°F) |
|
|
|
|
|
|
soiled loads that do not |
15g |
65 |
0.29 |
2.7 |
|
Speed |
need drying. |
Rinse(131°F) |
|
|
|
|
Drying |
|
|
|
|
||
|
|
|
|
|
|
7
OVERFLOW PROTECTIONS
Our Avanti dishwasher has an overfill protection device which could automatically shut off the inlet valve and start the drain pump if the water overflow. If this occurs, turn off the main water supply before calling a servicer. If there is water in the base pan because of an overfill or small leak, the water should be removed before restarting the dishwasher.
DETERGENT DISPENSER
TO PREVENT THE FORMATION OF DETERGENT DEPOSITS DO NOT ADD EXCESS AMOUNT OF DETERGENT AS YOUR DISHWASHER HAS A SPECIALLY DESIGNED WATER SOFTNER.
The dispenser must be refilled before the start of each wash cycle following the instructions provided in the “Wash Cycle Table”. Your dishwasher uses less detergent and rinse aid than conventional dishwashers. Generally, only one teaspoon of detergent is needed for a normal wash load, heavily soiled items may need more detergent. Always add the detergent just before starting the dishwasher, otherwise it could become damp and not dissolve properly.
Amount of Detergent to Use
IF THE WATER IN YOUR AREA IS NOT TOO HARD, YOU MAY ALSO PREVENT THE FORMATION OF DEPOSITS BY DETERGENT
The amount of detergent needed can vary due to differences in the water hardness of your area. To determine the water hardness in your area, contact your local water utility or area water softening company. The harder the water, the more detergent you may need. Remember, you should adjust the amount of detergent you use by small amounts until you find the correctamount.
Removing Hard Water Spots From Dishes
To remove hard water spots, try the following:
Run dishes through a normal wash program.
Remove all metal dishware, such as cutlery, pans, etc., from the dishwasher.
Do not add detergent.
Pour two cups of vinegar into a bowl and set the bowl face up on the lower rack of the dishwasher.
Run the dishes through a normal wash program.
If this doesn’t work, try the same process with ¼ cup of citric acid crystals instead of vinegar.
Proper Use Of Detergent
Use only detergent specifically made for use in dishwasher. Keep your detergent fresh and dry.Don’t put powder detergent into the dispenser until you’re ready to washdishes.
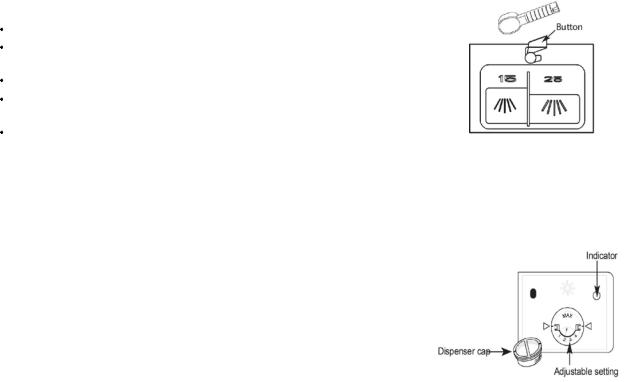
Rinse Aid Dispenser
•Your dishwasher is designed to use liquid rinse aids. The rinse-aid dispenser is located on the door next to the detergent dispenser. Fill the rinse-aid dispenser until the level indicator turns completely black (approximately 100ml of liquid rinse-aid). Be sure not to overfill the dispenser as this will cause over-sudsing. Wipe away any spills with a damp cloth. Keep in mind that if you have soft water, you may not need to use a rinse-aid as it may cause a white film to develop on your dishes.
•To open the dispenser, turn the cap to the “Open” arrow (counter-clockwise) and liftoutward.
• Pour the rinse-aid into the dispenser, being careful not to overfill.
•Replace the cap by inserting it by aligning the arrow to the open position and turning clockwise to close it.
•The rinse-aid is released during the final rinse to prevent water from forming droplets on your dishes that can leave spots and streaks. It also improves drying by allowing the water to “sheet” off the dishes.
8
Adjusting Rinse Aid Dispenser
A measured amount of rinse aid is released during the final rinse. As with detergent, the amount of rinse aid needed for your dishes depends on the hardness of the water in your area. Too much rinse aid can result in lather of foaming and cause cloudiness or streaks on your dishes. If the water in your area is very soft, you may not need rinse aid. If you do, you can dilute the rinse aid with an equal amount of water.
The rinse aid dispenser has 4 settings. Always start with the dispenser set on “2”. If spots and poor drying are problems, increase the amount of rinse aid
dispensed by removing the dispenser lid and rotating the dial to “3”. If the dishes still are not drying properly or are spotted, adjust the dial to “4”. We suggest you to set on”2”.
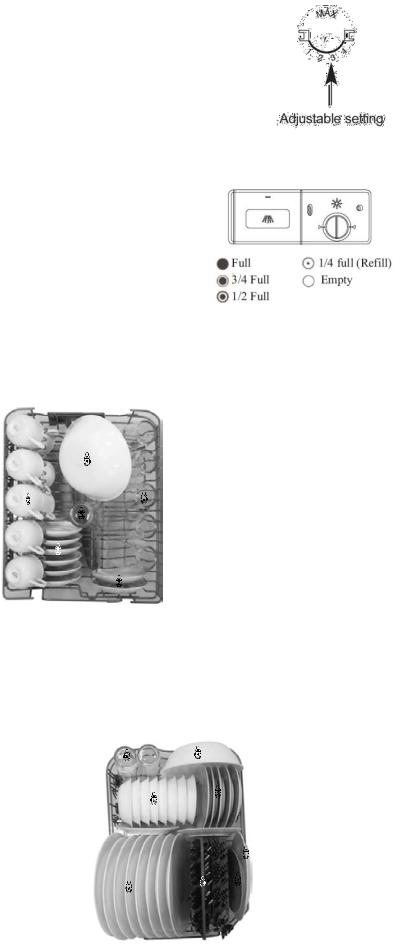
When To Refill The Rinse Aid Dispenser
If there is no rinse aid warning light on the control panel, you can judge the amount of rinse aid by the following means: The black dot on the rinse aid dispenser indicates the amount of rinse aid in the dispenser. As the rinse aid diminishes, the size of the black dot decreases. You should never let the rinse aid get below ¼ full.
How to Use the Upper Rack
The upper rack is designed to hold more delicate and lighter dishware such as glasses, coffee and tea cup and saucers, as well as plates, small bowls and shallow pans ( as long as they are not too dirty). Position the dishes and cookware so that they do not get moved by the spray of water.
The upper rack can be adjusted for height by putting wheels of different height intothe rails.
1. Cups
2. Saucer
3. Glasses
How To Use The Lower Rack
We recommend that you place large items which are most difficult to clean into the lower rack: pots, pans, lids, serving dishes and bowls, as shown in the figure below.
It is preferable to place serving dishes and lids on the side of the racks in order to avoid blocking the rotation of the top spray arm.
Pots, serving bowls, etc, must always be placed top down. Deep pots should be slanted to allow water to flow out.
The bottom rack features fold down tine rows so that larger or more pots and pans can be loaded.
4. Serving Bowl
5.Fruit Bowl
6.Bread and Butter Plates
7.Serving Plates
8.Dinner Plates
9. Silverware Basket
9
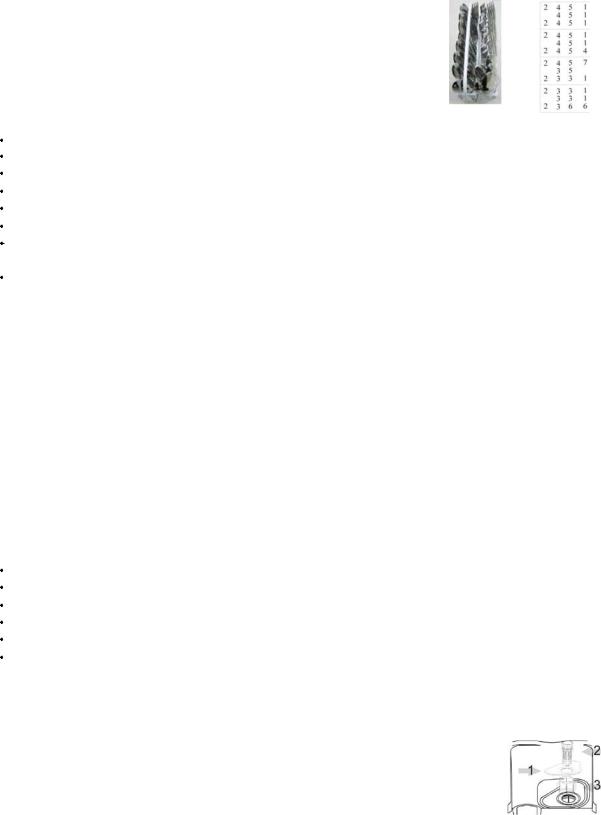
Silverware Basket
Silverware should be placed in the silverware basket with handles at the bottom: if the rack has side baskets, the spoon should be loaded individually into the appropriate slots, especially long utensils should be placed in the horizontal position at the front of the upperrack.
1 |
Salad Forks |
5 |
Knives |
2 |
Teaspoons |
6 |
Serving Spoons |
3 |
Soup Spoons |
7 |
Serving Forks |
4 |
Dinner Forks |
|
|
Starting A Wash Cycle
Make sure that the plug for the appliance is inserted into the wall socket.
Make sure the water supply is turned on to full pressure.
Load the dishwasher.
Pour in the detergent.
Close the door completely.
Press the ON/OFF button.
Select the appropriate wash cycle suitable for your needs the dishwasher will begin theselected wash cycle.
During the wash cycle the START/RESET indicator light will flash intermittently.
Canceling Or Modifying A Wash Cycle Setting
Premise: A cycle that is underway can only be modified if it has only been running for a short time. Otherwise, the detergent may have already been released, and the appliance may have already drained the wash water. If this is the case, the detergent dispenser must be refilled. Press the START/RESET button to hold for more than 3 seconds to cancel the running program. Then you can select appropriate programs.
At The End Of The Wash Cycle
When the cycle has finished; turn off the appliance using the ON/OFF button, shut off the water supply and open the door of the dishwasher. Wait a few minutes before unloading the dishwasher to avoid handling the dishes and utensils while they are still hot and more susceptible to breakage. They will also dry better.
Forgot To Add A Dish?
A forgotten dish can be added any time before the detergent cup opens.
Press the START/RESET button
Pull the door handle.
Do not open the door until the water spray action stops. Steam may rise out of the dishwasher.
Add forgotten dishes.
Push the door to close it. When the door is closed right a click will be heard. Press the START/RESET button again to continue accordingly.
Filtering System
For your convenience, we have placed the drain pump and filtering system within easy reach inside the tub. There are three components of the filtering system: the main filter, the coarse filter and the fine filter.
1. Main Filter
Food and soil particles trapped by this filter are pulverized by a special jet onthe lower spray arm and washed down the drain.
2. Coarse Filter
Larger items, such as pieces of bone or glass, that could clog the drain are trapped in the coarse filter. To remove an item caught in this filer, gently squeeze the tabs on top of this filter and liftout.
3. Fine Filter
10
This filter holds soil and food residue in the sump area and prevents it from being re-deposited on the dishes during a cycle.
Caring And Maintenance
To clean the control panel use a lightly dampened cloth then dry thoroughly. To clean the exterior use a good appliance polish wax.
Never use sharp objects, scouring pads or harsh cleaners on any part of thedishwasher.
Protect against freezing
If you dishwasher is left in an unheated place during the winter, ask a service technicianto:
1.Cut off electrical power to the dishwasher. Remove fuses or tip circuitbreaker.
2.Turn off the water supply and disconnect the water inlet pipe from the water valve.
3.Drain water from the inlet pipe and water valve. (Use a pan to catch the water.)
4.Reconnect the water inlet pipe to the water valve.
5.Remove the plastic sump cover in the tub the bottom and use a sponge to soak up water inrubber boot.
Cleaning The Spray Arms
It is necessary to clean the spray arms regularly or hard water chemicals will clog the spray arm jets and bearings. To remove the spray arm, screw off the nut to take out the washer on top of the spray arm and remove the arm. Wash the arms in soapy and warm water and use a soft brush to clean the jets. Replace them after rinsing them thoroughly.
Cleaning The Filters
Filter assembly
1.Turn the Coarse filter in a counter-clockwise direction and lift outward.
2.Lift out the Main filter
3.Lift out the Fine filter.
To replace the filter follow the same steps in reverse.
For best performance and results, the filter assembly must be cleaned.
The dishwasher must never be used without the filters. Improper replacement of the filter may reduce the performance level of the appliance and damage dishes and utensils.
WARNIING – Never run the dishwasher without the filters in place.
Cleaning The Door
To clean the edge around the door, you should use only a soft warm, damp rag. To prevent penetration of water into the door lock and electrical components, do not use a spray cleaner of any kind.
Also, never use abrasive cleaners or scouring pads on the outer surfaces because they will scratch the finish. Some papers towels can also scratch or leave marks on the surface.
WARNING - Never use a spray cleaner to clean the door panel for it could damage the door lock and electrical components. It is not allowed to use the abrasive agent or some paper towel because of the risk of scratching or leaving spots on the stainless steel surface.
11
How To Keep You Dishwasher In Shape
After every wash
After every wash, turn off the water supply to the appliance and leave the door slightly ajar so that moisture and odors are not trapped inside.
No solvents or abrasive cleaning products
To clean the exterior and rubber parts of the dishwasher, do not use solvents or abrasive cleaning products. Rather, use only a cloth and warm soapy water. To remove spots or stains from the surface of the interior, use a cloth dampened with water and a little white vinegar, or a cleaning product made specifically for dishwashers.
When you go on Holiday
When you go on holiday, it is recommended that you run a wash cycle with the dishwasher empty and them remove the plug from the AC socket, turn off the water supply and leave the door of the appliance slightly ajar. This will help the seals last longer and prevent odors from forming within theappliance.
Seals
One of the factors that cause odors to form in the dishwasher is food that remains trapped in the seals. Periodic cleaning with a damp sponge will prevent this from occurring.
PROBLEMS WITH YOUR DISHWASHER?
You can solve many common dishwasher problems easily, saving you the cost of a possible service call. Try the suggestions below to see if you can solve the problem before calling theservicer.
TROUBLESHOOTING GUIDE
PROBLEM |
POSSIBLE CAUSE |
WHAT TO DO |
Dishwasher does not |
The circuit breaker tripped |
Replace fuse or reset circuit breaker. Remove any |
operate. |
or blown fuse. |
other appliances sharing the same circuit with the |
|
Power supply is not turned |
dishwasher |
|
on. |
Make sure the dishwasher is turned on and the |
|
|
door is closed securely. |
|
Water pressure is low. |
Make sure the power cord is properly connected. |
|
Check that the water supply is connected properly |
|
|
|
|
|
|
and the water is turned on. |
Drain pump doesn’t stop |
Overflow |
The system is designed to detect an overflow. |
|
|
When it doesn’t it shuts off the circulation pump |
|
|
and turns on the drain pump. |
Noise |
Some audible sounds are |
Sound from soft food shredding action and |
|
normal. |
detergent cup opening. |
|
Utensils are not secured in |
Ensure everything is secured in the dishwasher. |
|
Dishwasher has not been used regularly. If you do |
|
|
the baskets or something |
|
|
small has dropped into the |
not use it often, remember to set it to fill and pump |
|
basket. |
out every week, which will help keep the seal |
|
Motor hums. |
moist. |
|
|
|
Suds in the tub |
Improper detergent. |
Use only the special dishwasher detergent to avoid |
|
|
suds. |
|
|
If this occurs, open the dishwasher and let suds |
|
|
evaporate. |
|
|
Add 1 gallon of cold water to the tub. Close and |
|
|
latch the dishwasher, then drain out the water by |
|
|
slowly turning the dial until a drain period is |
|
|
reached. Repeat if necessary. |
|
Spilled rinse agent. |
Always wipe-up rinse agent spills immediately. |
|
|
|
Stained tub interior |
Detergent with colorant was |
Make sure that the detergent is the one without |
12
|
used. |
colorant. |
Dishes are not dried |
Rinse agent dispenser is |
Make sure the rinse agent dispenser is filled. |
|
empty. |
|
Dishes and flatware not |
Improper program. |
Select a stronger program. |
clean. |
Improper rack loading. |
Make sure that the action for the detergent |
|
|
dispenser and spray arms are not blocked by large |
|
|
dishware. |
Cloudiness on glassware. |
Combination of soft water |
Use less detergent if you have soft water and |
|
and too much detergent. |
select a shorter cycle to wash the glassware to get |
|
|
them clean. |
Yellow or brown film on |
Tea or coffee stains. |
Using a solution of ½ cup bleach and 3 cups warm |
inside surfaces. |
|
water to remove the stains by hand. |
|
|
Warning |
|
Iron deposits in water can |
You have to wait for 20 minutes after a cycle to let |
|
the heating elements cool down before cleaning |
|
|
cause an overall film. |
|
|
interior: otherwise, burns will happen. |
|
|
|
|
|
|
You have to call a water softener company for a |
|
|
special filter. |
White film on inside surface. |
Hard water minerals |
To clean the interior, use a damp sponge with |
|
|
dishwasher detergent and wear rubber gloves. |
|
|
Never use any other cleaner than dishwasher |
|
|
detergent for the risk of foaming or suds. |
Detergent left in dispenser |
Dishes block detergent |
Re-load the dishes properly. |
cups. |
cups. |
|
Steam |
Normal phenomenon |
There is some steam coming through the vent by |
|
|
the door latch during drying and water draining. |
Black or gray marks on |
Aluminum utensils have |
Use a mild abrasive cleaner to eliminate those |
dishes. |
rubbed against dishes. |
marks. |
Water standing in the bottom |
This is normal. |
A small amount of clean water around the outlet on |
of the tub. |
|
the tub bottom at the back of the tub keeps the |
|
|
water seal lubricated. |
Water doesn’t pump out of |
Drain is clogged. |
Make sure the kitchen sink is draining well. If the |
the tub. |
|
dishwasher drains into a disposer, run it clear. |
Dishwasher leaks. |
Overfill dispenser or rinse |
Be careful not to overfill the rinse aid dispenser. |
|
aid spills. |
Spilled rinse aid could cause oversudsing and lead |
|
|
to overflowing. Wipe away any spills with a damp |
|
|
cloth. |
|
|
Make sure the dishwasher is level. |
|
Dishwasher isn’t level. |
|
|
|
|
LIGHT and QUICK program |
Water has not reached the |
Malfunction of the temperature sensor and or the |
lights flicker intermittently |
required temperature (HOT) |
heating element |
NORMAL and LIGHT |
Failure of the temperature |
Temperature sensor has failed. |
program lights flicker |
sensor |
Contact an authorized service center |
intermittently |
|
|
NORMAL and QUICK |
Failure of the temperature |
Temperature sensor has failed. |
program lights flicker |
sensor |
Contact an authorized service center |
intermittently |
|
|
13

SERVICE FOR YOUR DISHWASHER
We are proud of our customer service organization and the network of professional service technicians that provide service on your Avanti dishwashers. With the purchase of your Avanti dishwasher, you can have the confidence that if you ever need additional information or assistance, the Avanti Products Customer Service team will be here for you. Just call us toll-free.
|
AVANTI PRODUCTS CUSTOMER SERVICES |
|
Product Information |
|
Whatever your questions are about our products, |
800-323-5029 |
|
help is available. |
Part Orders |
|
You may order parts and accessories that will be |
800-220-5570 |
|
delivered directly to your home, by personal |
|
|
check, money order, Master Card, or Visa. |
In-Home Repair Service |
|
An Avanti Products authorized service center will |
800-220-5570 |
|
provide expert repair service, scheduled at a time |
|
|
that is convenient for you. Our trained servicers |
|
|
know your dishwasher inside and out. |
Wiring Diagram
DW18D0WE / DW18D1BE / DW18D3SE |
14
Loading...