


INSTRUCTION MANUAL
MANUAL DE INSTRUCCIONES
Model Numbers/ No. de Modelos: W797 / W798SS
PORTABLE WASHER
LAVADORA PORTATIL
BEFORE USE, PLEASE READ AND FOLLOW ALL SAFETY RULES AND OPERATING INSTRUCTIONS.
La sección en español empieza en la página 23.
Avanti has a policy of continuous improvement on its products and reserves the right to change materials and specifications without notice.
Avanti Products, A Division of the Mackle Co., Inc.
P.O. Box 520604Miami, Florida 331 52
www.avantiproducts.com
REGISTRATION INFORMATION
Thank you for purchasing this fine Avanti product. Please fill out this card and return it within 100 days of purchase and receive these important benefits to the following address:
Avanti Products, A Division of the Mackle Co., Inc.
P.O. Box 520604 - Miami, Florida 33152 USA
?Protect your product:
We will keep the model number and date of purchase of your new Avanti product on file to help you refer to this information in the event of an insurance claim such as fire or theft.
?Promote better products:
We value your input. Your responses will help us develop products designed to best meet your future needs.
-------------------------------------------------(detach here)----------------------------------------------------------------
Avanti Registration Card
__________________________________
Name
__________________________________
Address
__________________________________
City State Zip
__________________________________
Area Code Phone Number
Did You Purchase An Additional Warranty:
?Extended ?None
Reason For Choosing This Avanti Product:
Please indicate the most important factors that influenced your decision to purchase this product.
?Price
?Product Features
?Avanti Reputation ?Product Quality
?Salesperson Recommendation ?Friend/Relative Recommendation ?Warranty ?Other_______________________
________________________________________
Model # Serial #
________________________________________
Date Purchased Store/Dealer Name
________________________________________
Occupation
As Your Primary Residence, Do You:
?Own |
?Rent |
|
Your Age: |
|
|
?under 18 |
?18-25 ?26-30 |
|
?31-35 |
?36-50 |
?over 50 |
Marital Status: |
|
|
?Married |
?Single |
|
Is This Product Used In The: |
||
?Home |
?Business |
|
How Did You Learn About This Product: |
||
?Advertising |
|
|
?In Store Demo |
?Personal Demo |
|
?Other_________________________________
Comments______________________________
_______________________________________
_______________________________________
2
3

HELP US HELP YOU...
Read this guide carefully.
It is intended to help you operate and maintain your new portable washer properly.
Keep it handy to answer your questions.
If you don't understand something or you need more assistance, please call:
Avanti Customer Service 800-220-5570
Keep proof of original purchase date (such as your sales slip) with this guide to establish the warranty period.
Write down the model and serial numbers.
You'll find them on a plate located on the rear outside wall of the portable washer.
Please write these numbers here:
____________________________________
Date of Purchase
____________________________________
Model Number
____________________________________
Serial Number
Use these numbers in any correspondence or service calls concerning your portable washer.
If you received a damaged portable washer, immediately contact the dealer (or builder) that sold you the portable washer.
Save time and money. Before you call for service, check the Troubleshooting Guide. It lists causes of minor operating problems that you can correct yourself.
IF YOU NEED SERVICE
We're proud of our service and want you to be pleased. If for some reason you are not happy with the service you receive, here are some steps to follow for further assistance.
FIRST, contact the people who serviced your portable washer. Explain why you are not pleased. In most cases, this will solve the problem.
NEXT, if you are still not pleased, write all the details, including your telephone number, and send it to:
Customer Service
Avanti Products
10880 NW 30 Street
Miami, FL 33172 USA
4
TABLE OF CONTENTS
REGISTRATION INFORMATION |
|
|
2 |
||||||||||||||||||||||||||
HELP US HELP YOU… |
|
|
4 |
||||||||||||||||||||||||||
PARTS & FEATURES |
|
6 |
|||||||||||||||||||||||||||
|
|
|
|
|
|
|
|
|
|
|
|
|
|
|
|
|
|
|
|
|
|
|
|
|
|
|
|
|
|
IMPORTANT SAFETY INS TRUCTIONS |
|
|
7 |
||||||||||||||||||||||||||
INSTALLATION INSTRUCTIONS |
|
|
7 |
||||||||||||||||||||||||||
BEFORE USING YOUR PORTABLE WASHER |
|
7 |
|||||||||||||||||||||||||||
SELECTING A LOCATION |
8 |
||||||||||||||||||||||||||||
ADJUST THE ADJUSTABLE FOOT |
|
8 |
|||||||||||||||||||||||||||
|
|
|
|
|
|
|
|
|
|
|
|
|
|
|
|
|
|
|
|
|
|
|
|
|
|
|
|||
INSTALLING THE NOISEPROOF PLATE |
8 |
||||||||||||||||||||||||||||
|
|
|
|
|
|
|
|
|
|
|
|
|
|
|
|
|
|
|
|
|
|
|
|
|
|||||
CONNECTING THE WATER SUPPLY HOSE |
9 |
||||||||||||||||||||||||||||
|
|
|
|
|
|
|
|
|
|
|
|
|
|
|
|
|
|
|
|
|
|
|
|
||||||
WATER CONNECTION |
|
|
|
10 |
|||||||||||||||||||||||||
DISMANTLING THE INLET HOSE |
10 |
||||||||||||||||||||||||||||
|
|
|
|
|
|
|
|
|
|
|
|
|
|
|
|
|
|
|
|
|
|
||||||||
POSITIONING THE DRAIN HOSE |
|
|
|
10 |
|||||||||||||||||||||||||
ELECTRICAL CONNECTION |
11 |
||||||||||||||||||||||||||||
|
|
|
|
|
|
|
|
|
|
|
|
|
|
|
|
|
|
|
|||||||||||
CONTROL PANEL |
|
|
11 |
||||||||||||||||||||||||||
|
|
|
|
|
|
|
|
|
|
|
|
|
|
|
|
|
|
||||||||||||
OPERATING YOUR PORTABLE WASHER |
|
12 |
|||||||||||||||||||||||||||
PREPARATION |
|
|
12 |
||||||||||||||||||||||||||
|
|
|
|
|
|
|
|
|
|
|
|
|
|
|
|||||||||||||||
BEFORE WASHING |
|
|
12 |
||||||||||||||||||||||||||
OPERATION INSTRUCTIONS |
|
|
13 |
||||||||||||||||||||||||||
AUTOMATIC WASH PROGRAMS |
13 |
||||||||||||||||||||||||||||
|
|
|
|
|
|
|
|
|
|
|
|
|
|
||||||||||||||||
MANUAL FUNCTIONS |
|
|
15 |
||||||||||||||||||||||||||
FUNCTIONS |
|
|
|
15 |
|||||||||||||||||||||||||
|
|
|
|
|
|
|
|
|
|
|
|
||||||||||||||||||
DELAY START SETTING |
16 |
||||||||||||||||||||||||||||
|
|
|
|
|
|
|
|
|
|
|
|||||||||||||||||||
CHILDREN-PROOF SETTINGS |
16 |
||||||||||||||||||||||||||||
CARE AND MAINTENANCE |
16 |
||||||||||||||||||||||||||||
|
|
|
|
|
|
|
|
|
|
||||||||||||||||||||
CLEANING YOUR PORTABLE WASHER |
16 |
||||||||||||||||||||||||||||
|
|
|
|
|
|
|
|
|
|||||||||||||||||||||
TROUBLESHOOTING GUIDE |
|
|
18 |
||||||||||||||||||||||||||
|
|
|
|
|
|
|
|
||||||||||||||||||||||
SERVICE FOR YOUR PORTABLE WASHER |
19 |
||||||||||||||||||||||||||||
YOUR AVANTI PRODUCTS WARRANTY |
|
|
20 |
||||||||||||||||||||||||||
|
|
|
|
|
|
|
|||||||||||||||||||||||
WIRING DIAGRAM |
|
|
21 |
||||||||||||||||||||||||||
|
|
|
|
|
|
||||||||||||||||||||||||
INSTRUCCIONES EN ESP AÑOL |
|
|
22~30 |
||||||||||||||||||||||||||
5

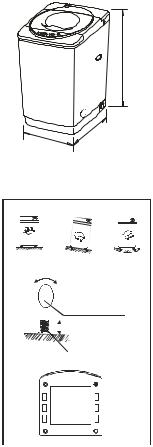
PARTS & FEATURES
|
7 |
1 |
|
2 |
|
|
8 |
3 |
9 |
|
|
4 |
10 |
|
|
|
11 |
5 |
12 |
6 |
13 |
|
1.DETERGENT CASE
2.SOFTENER DISPENSER
3.INNER TUB
4.CONTROL PANEL
5.BASE
6.NOISE PROOF PLATE
7.INLET HOSE (2 PCS)
8.LINT FILTER
9.PULSATOR
10.POWER SUPPLY CORD
11.DRAIN HOSE (1 PC)
12.LEVEL ADJUSTABLE KNOB
13.ADJUSTABLE FOOT
ACCESSORIES
INLET HOSE |
NOISE PROOF PLATE |
|
FAUCET ADAPTER |
CASTER |
2 PIECES |
1 PIECE |
|
2 PIECES |
4 PIECES |
|
|
6 |
|
|

IMPORTANT SAFETY INSTRUCTIONS
?WARNING? |
To reduce the risk of fire, electrical shock, or |
|
injury when using your portable washer, follow |
|
these basic precautions: |
?Read all instructions before using the portable washer.
?Do not wash articles that have been previously cleaned in, washed in, soaked in, or spotted with gasoline, dry-cleaning solvents, or other flammable or explosive subs tances, as they give off vapors that could ignite or explode.
?Do not add gasoline, dry-cleaning solvents, or other flammable or explosive substances to the wash water. These substances give off vapours that could ignite or explode.
?Under certain conditions , hydrogen gas may be produced in a hot-water system that has not been used for 2 weeks or more. HYDROGEN GAS IS EXPLOSIVE. If the hot-water system has not been used for such a period, before using a washing machine, turn on all hot-water faucets and let water flow from each for several minutes. This will release any accumulated hydrogen gas. As the gas is flammable, do not smoke or use an open flame during this time.
?DANGER or WARNING: Risk of child entrapment.
Child entrapment and suffocation are not p roblems of the past. Junked or abandoned appliances are still dangerous . . . even if they will “just sit in the garage a few days.”
?Before you throw away your old portable washer: Take off the lid.
?Never allow children to operate, play with, or crawl i nside the portable washer. Close supervision of children is necessary when the washer is used near children.
?Do not reach into the washer if the agitator or inner tub is moving.
?Do not tamper with controls.
?Do not repair or replace any part of the washer o r attempt any servicing unless specifically recommended in the user -maintenance instructions or in published user -repair instructions.
?Never clean portable washer parts with flammable fluids. The fumes can create a fire hazard or explosion.
?Do not place the washer in steamy rooms or where the washer is directly exposed to rain. Moisture may destroy the electrical insulation causing an electrical shock hazard.
?Do not store, use gasoline, or any other flammable vapors and liquids in the vicinity of this or a ny other portable washer. The fumes can create a fire hazard or explosion.
?If the power cord is damaged, it must be replaced by the manufacturer or its service agent or a similar qualified person in order to avoid a hazard.
-Save these instructions -
|
|
INSTALLATION INSTRUCTIONS |
|
|
|
BEFORE USING YOUR PORTABLE WASHER |
SCREWDRIVER |
||||
? |
Remove the exterior and interior packing. |
||||
|
|
||||
? |
You will need the following tools: |
|
|
||
|
? |
Wrench |
|
|
|
|
? |
Pliers |
|
|
|
? |
? |
Screwdriver |
|
|
|
Check to be sure you have all of the following parts: |
WRENCH |
PLIERS |
|||
?2 Inlet Hoses
?2 Faucet Adapters
?1 Noise Proof Plate With Screws
?4 Casters
?Remove shipping brace. Note - It should be saved and used (to prevent damage to washer components) whenever washer is moved or transported to a new location.
?Clean the interior surface with lukewarm water using a soft cloth.
?Allow 2 inches of space between the back and sides of the appliance.
7
?Put your laundry into the washer evenly. Uneven laundry may cause noise or vibration.
?Don’t use excessively hot water (50°C or more). Plastic parts may be deformed or damaged. Also, clothing may be deformed or bleached.
?Before washing, check all pockets. If nails or pins remain in pockets, they may damage the washer or clothes.
?Never splash water on the control panel.
?Plug the washer into an exclusive properly installed-grounded wall outlet. Do not under any circumstances cut or remove the third (ground) prong from the power cord. Any questions concerning power and/or grounding should be directed toward a certified electrician or an authorized Avanti Products service center.
SELECTING A LOCATION
Before you install the portable washer, select a location with the following characteristics:
?A hard level surface (if the surface is uneven, see Adjusting The Adjustable Foot).
?Away from direct sunlight. Direct sunlight may affect the acrylic coating, plastic and electrical components.
?Adequate ventilation.
?Away from sources of heat such as coal or gas. Make sure that the washing machine does not stand on its power cord. Ventilation openings must not be obstructed by carpeting when the portable washer is installed on a carpeted floor.
53 |
|
8 |
|
|
mm |
939mm
|
|
|
m |
|
|
m |
|
|
4 |
|
|
4 |
|
|
|
5 |
|
|
|
ADJUSTING THE ADJUSTABLE FOOT
If the floor is uneven adjust the adjustable foot (do not insert pieces of wood, or any other objects under the feet).
Loosen the adjustable foot by turning the level a djustable knob with your hand until it is at the desired height.
Tighten the adjustable foot by turning the level adjustable knob in the reverse direction.
Place the washer on a sturdy flat surface.
If the washer is placed on an uneven or weak surface, noise or vibration
occurs (Allowable is 1°).
For portable applications, the washing machine comes equipped with four north/south casters that can easily be installed to assist in the movement of the machine to and from the sink. Lay the unit on its back. Install the casters into the bottom of the base as indicated.
Return the machine to the upright position. When the machine is positioned for operation set the height of the adjustment foot slightly higher than the front caster to prevent movement of the machine during wash and spin operation.
NOTE: Not all movement will be totally eliminated, this is normal.
CORRECT INCORRECT INCORRECT
LOOSEN |
TIGHTEN |
|||||||||
|
|
|
|
|
|
|
LEVEL |
|||
|
|
|
|
|
|
ADJUSTABLE KNOB |
||||
|
|
|
|
|
|
|
ADJUSTABLE FOOT |
|
||
|
|
|
|
|
|
|
||||
|
|
|
|
|
|
|
||||
Fixed foot |
|
|
|
|
|
|
|
Adjustable foot |
||
|
|
|
|
|
|
|||||
Caster |
|
|
|
|
|
|
|
Caster |
||
Caster |
|
|
|
|
|
|
|
Caster |
||
Fixed foot |
|
|
|
|
|
|
Fixed foot |
|||
|
|
|
|
|
||||||
8
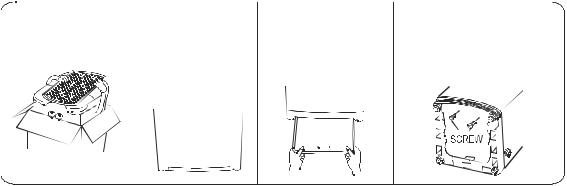
INSTALLING THE NOISE PROOF PLATE
Take the noise proof |
The opening of the |
plate out of the |
noise proof plate is |
package . |
at the bottom of |
|
the machine. |
Insert the noise proof |
Lay down the machine |
plate into the washing |
and secure the noise proof |
machine base. |
plate by fastening the two |
|
set screws. |
9
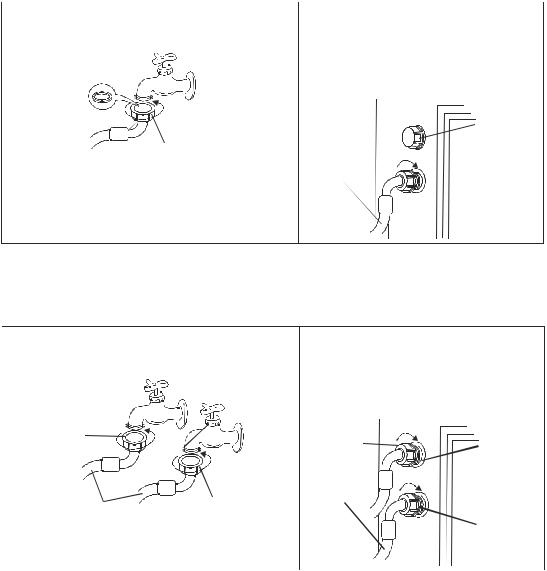
CONNECTING THE WATER SUPPLY HOSE
The water supply hose must be connected to the washing machine at one end and to the water faucet at the other. Do not stretch the water supply hose. If the hose is too short and you do not wish to move the water faucet, replace the hose with a longer, high-pressure hose.
Select appropriate faucet as shown in the figures below. If none of these faucets are available, use the faucet adapter provided.
The end of faucet spout should be longer than 10mm (0.4”), or the connector cannot be fixed properly. Water leakage could develop.
1.Connect the water inlet hose to the faucet by turning the connecting nut.
Rubber ring seal
CONNECTING
NUT
Be sure a rubber ring is inside the connecting nut.
2.Then connect the other end of water inlet hose to the cold connector in water mixing valve by turning the connecting nut.
|
|
|
LID OF |
|
|
|
HOT WATER |
CONNECTING |
|
|
CONNECTOR |
NUT |
|
|
|
|
|
|
WATER
INLET HOSE
 COLD WATER
CONNECTOR
If you have both cold and hot water supplied, connect the inlet hoses by matching cold to cold and hot to hot.
1.Connect the water inlet hoses to the faucets by turning the connecting nuts.
CONNECTING
NUT
2.Unscrew the lid of hot water connector in water mixing valve, and then connect
the other end of water inlet hoses to the connectors in water mixing valve by turning the connecting nuts.
CONNECTING |
|
|
|
|
|
|
NUT |
|
|
|
|
|
HOT WATER |
|
|
|
|
|
||
|
|
|
|
|
|
CONNECTOR |
|
|
WATER |
|
|
|||
WATER INLET HOSE |
CONNECTING |
INLET HOSE |
|
|
|
|
|
|
|
|
|
||||
|
|
|
|
|
|
||
NUT |
|
|
|
|
|
|
|
|
|
|
|
|
|
||
|
COLD WATER |
Be sure the rubber rings are inside the connecting nuts. |
CONNECTOR |
|
10
 Loading...