

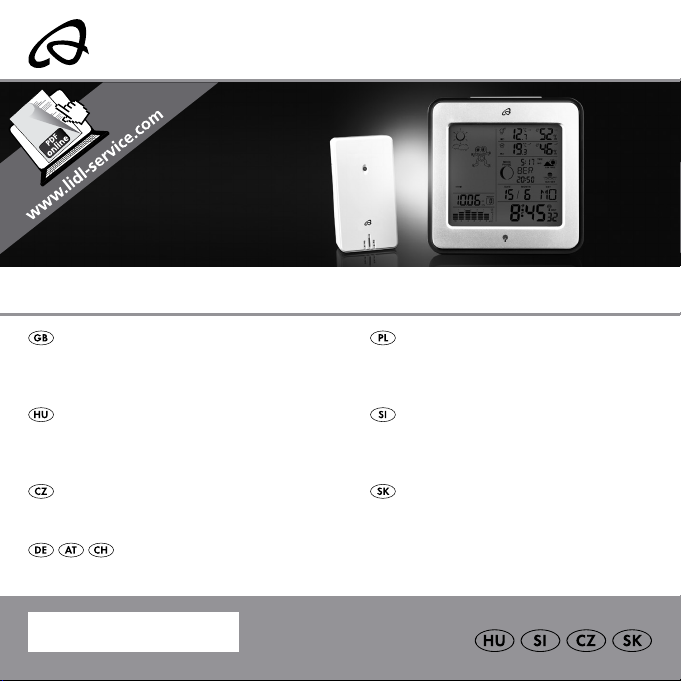
Page 1
RADIO-CONTROLLED WEATHER STATION
RADIO-CONTROLLED
WEATHER STATION
Operation and Safety Notes
RÁDIÓVEZÉRELT
IDŐJÁRÁSÁLLOMÁS
Kezelési és biztonsági utalások
BEZDRÁTOV Á METEOSTANICE
Pokyny pro obsluhu a bezpečnostní pokyny
FUNK-WETTERSTATION
Bedienungs- und Sicherheitshinweise
IAN 104568
STACJA METEO STEROWANA
RADIOWO
Wskazówki dotyczące obsługi i bezpieczeństwa
RADIJSKO VODENA
VREMENSKA pOSTAJA
Navodila za upravljanje in varnostna opozorila
METEOSTANICA
Pokyny pre obsluhu a bezpečnostné pokyny
Page 2

GB Operation and Safety Notes Page 7
PL Wskazówki dotyczące obsługi i bezpieczeństwa Strona 42
HU Kezelési és biztonsági utalások Oldal 79
SI Navodila za upravljanje in varnostna opozorila Stran 116
CZ Pokyny pro obsluhu a bezpečnostní pokyny Strana 153
SK Pokyny pre obsluhu a bezpečnostné pokyny Strana 189
DE / AT / CH Bedienungs- und Sicherheitshinweise Seite 225
Page 3
A
27 24 21
26 25 23 22
15
16
17
18
19
20
10
11
12
13
14
1
2
9
3
5
6
7
8
4
3
Page 4
B
4
33
32
31
30
29
28
Page 5

C
34 35 36 37 38 39
40
5
Page 6
D
6
42
41
43
44
45
Page 7

Intended use .......................................................................................... Page 9
Parts description ................................................................................ Page 9
Technical data .......................................................................................Page 11
Included items ...................................................................................... Page 12
Safety
General Safety Information ......................................................................... Page 13
Safety Instructions for Batteries ...................................................................Page 14
Before use
Setting up the devices .................................................................................. Page 15
Preparing to use the outdoor sensor ........................................................... Page 16
Preparing the weather station for use ......................................................... Page 17
Operation
Receiving the DCF radio time signal ........................................................... Page 19
Setting the 12 / 24 hour mode / °C / °F / hPa / inHg /
time zone / time / date / language manually ..............................................Page 20
Setting the alarm time .................................................................................. Page 22
Activating / deactivating the alarm function ............................................... Page 23
Switching off the alarm signal ..................................................................... Page 23
SNOOZE function .......................................................................................Page 23
Preparing to use the weather forecasting function .....................................Page 24
Selecting the location ...................................................................................Page 26
7 GB
Page 8

Selecting the location manually .................................................................. Page 26
Lunar phases.................................................................................................Page 30
Reading the barometric pressure for the last 12 hours .............................Page 30
Adjusting the air pressure indication ........................................................... Page 31
Setting the channel .......................................................................................Page 32
Displaying temperature and temperature trend ......................................... Page 33
Displaying the humidity and humidity trend ............................................... Page 33
Displaying the maximum / minimum temperature / humidity ..................... Page 34
Temperature and frost alarm ....................................................................... Page 35
Activating / deactivating the the temperature and frost alarm .................. Page 35
Background lighting ..................................................................................... Page 36
Battery state display .....................................................................................Page 36
Changing the batteries ................................................................................ Page 36
Troubleshooting .................................................................................Page 37
Cleaning and care ............................................................................. Page 38
Disposal ..................................................................................................... Page 39
Warranty .................................................................................................. Page 40
Information
Declaration of Conformity ........................................................................... Page 41
8 GB
Page 9
Radio-controlled weather station
Intended use
The weather station displays the indoor and outdoor temperatures in Celsius (°C) or
Fahrenheit (°F) and their maximum and minimum values. It also displays the indoor and
outdoor humidity (%RH) as well as their maximum and minimum values. Additional
display values of weather station include the weather forecast, the time in 12 / 24-hour
clock modes and the date. The weather station displays the sunrise and sunset times
for that day and the lunar phase as well. In addition, the weather station has two
different alarm functions. The device is not intended for commercial use.
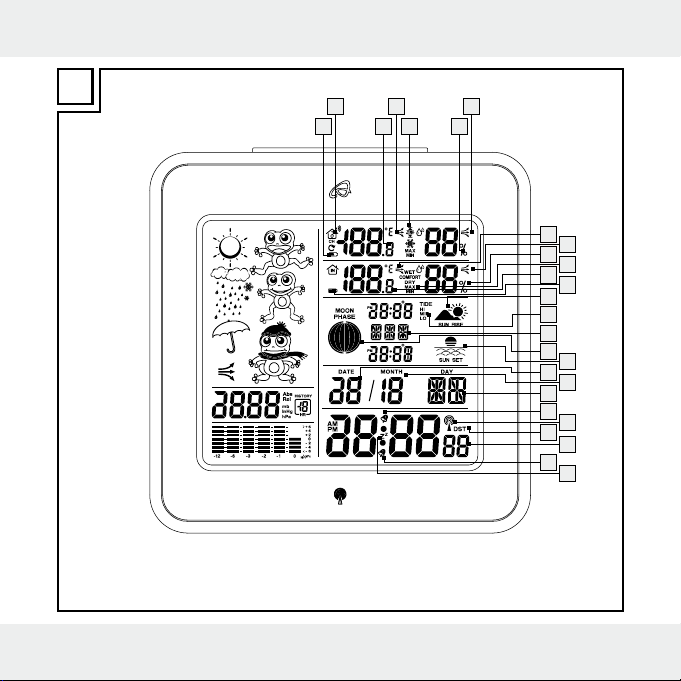
Parts description
Weather station:
1
Date display
2
Month display
3
Alarm 1
4
SNOOZE display
5
Radio tower symbol
6
DST display (summer time)
7
Time display
9 GB
Page 10
8
Alarm 2
9
Day of week display
10
Sunrise / time of sunrise
11
Tide display
12
Location
13
Lunar phase
14
Sundown / time of sundown
15
Temperature trend (indoor)
16
Humidity trend (indoor)
17
Humidity (indoor)
18
Comfor t indicator (maximum / minimum)
19
Inside temperature (°C / °F)
20
Battery state display
21
Humidity trend (outdoor)
22
Humidity (outdoor)
23
Temperature and frost alarm (maximum / minimum)
24
Temperature trend (outdoor)
25
Outdoor temperature (°C / °F)
26
Battery state display (outdoor sensor)
27
Selected channel
28
Barometric pressure bar display
29
Barometric pressure display of the last hour
30
A bsolute / relative barometric pressure
31
Barometric pressure trend
10 GB
Page 11
32
Weather forecast
33
SNOOZE / LIGHT button
34
MODE button
35
+ button
36
– button
37
Channel button (CH)
38
HISTORY ABS / REL button
39
CITY button
40
Battery compartment
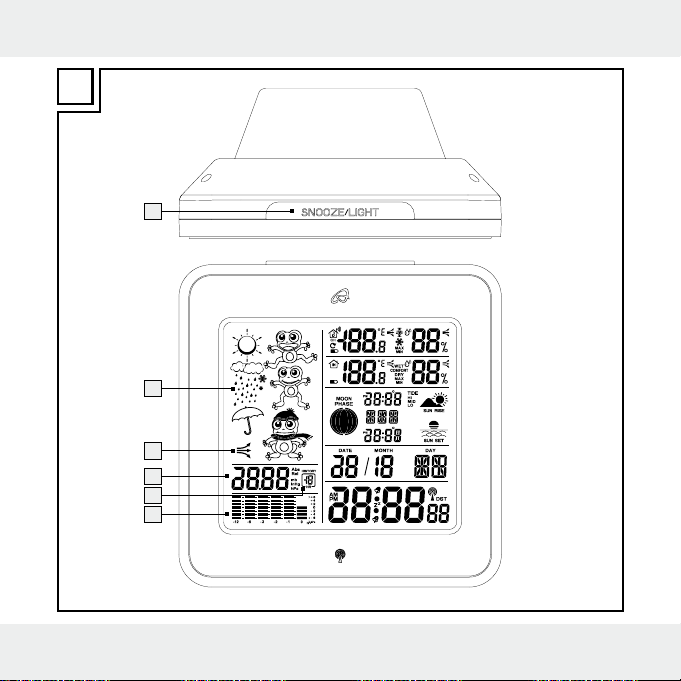
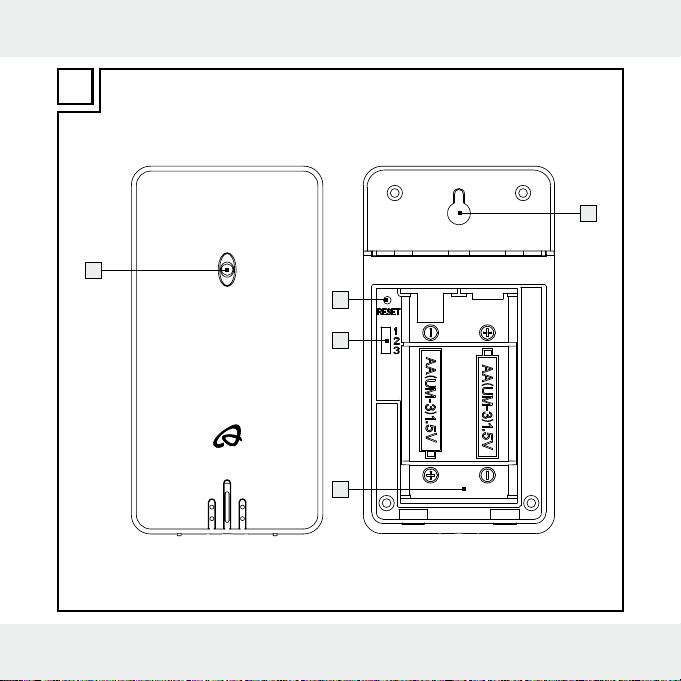
Outdoor sensor:
41
Control LED
42
Mount
43
RESET button
44
Channel selector switch
45
Battery compartment
Technical data
Weather station:
Temperature measurement range: 0 to +50 °C
+32 to +122 °F
Temperature resolution: 0.1 °C
11 GB
Page 12
Humidity measurement range: 20 %–95 %
Humidity resolution: 1 %
Radio signal: DCF
Batteries: 3 x AA, 1.5 V
Air pressure range: 850 - 1050 hPa
Outdoor sensor:
Temperature measurement range: –20 to +65 °C
–4 to +149 °F
Humidity measurement range: 20 %–95 %
Humidity resolution: 1 %
HF transmission signal: 433 MHz
HF transmission range: max. 30 metres (in open area)
Batteries: 2 x AA, 1.5 V
Included items
1 Weather station
1 Outdoor sensor
3 Batteries AA, 1.5 V
2 Batteries AA, 1.5 V
1 Operating instructions
12 GB
Page 13
Safety
Please read all safety information and instructions. Failure to comply with the safety
information and instructions may result in an electric shock, fire and / or severe injuries.
KEEP ALL THE SAFETY ADVICE AND INSTRUCTIONS IN A SAFE PLACE FOR
FUTURE REFERENCE!
General Safety Information
Children frequently underestimate the dangers.
Children should be kept away from the product at all times.
This appliance can be used by children aged from 8 years and above and
persons with reduced physical, sensory or mental capabilities or lack of experience and knowledge if they have been given supervision or instruction concerning use of the appliance in a safe way and understand the hazards
involved. Children shall not play with the appliance. Cleaning and user
maintenance shall not be made by children without supervision.
Do not use the device if it is damaged.
13 GB
Page 14
Safety Instructions for Batteries
DANGER TO LIFE! Batteries can be swallowed, which may represent a danger
to life. If a battery has been swallowed, medical help is required immediately.
Remove the batteries from the device if they have not been used for a long period.
CAUTION! DANGER OF EXPLOSION! The batteries must never be
recharged!
When inserting the battery, ensure the correct polarity! This is shown in the
battery compartments.
If necessary, clean the contacts on the batteries and on the device before
inserting them.
Remove spent batteries from the device immediately. There is an increased
danger of leaks!
Batteries must not be disposed of in the normal domestic waste!
Every consumer is obliged to dispose of batteries properly in accordance with
the regulations!
Keep batteries away from children. Do not throw batteries into a fire. Never
short-circuit them or take them apart.
Always replace all the batteries at the same time.
Use only batteries of the same type.
If the batteries in your device have leaked, remove them immediately to prevent
damage to the device!
14 GB
Page 15
Avoid contact with the skin, eyes and mucous membranes. In the event of contact
with fluid leaking from a battery, thoroughly flush the affected area with water
and / or seek the advice of a doctor!
Before use
Setting up the devices
Put the batteries first into the outdoor sensor.
CAUTION! When choosing where to position the weather station, make sure
that it is not exposed to direct sunlight, vibrations, dust, heat, cold or moisture. Do
not place the devices close to sources of heat, e.g. radiators. Otherwise they may
be damaged.
Do not place the devices on valuable or sensitive surfaces unless these are
appropriately protected. Otherwise they may be damaged.
Please ensure that neighbouring devices are not operated at the same frequency
of 433 MHz. Such devices may cause interference to the radio connection.
Do not place the devices next to or on metal plates. Otherwise the quality of
radio wave transmission may be reduced.
15 GB
Page 16
Do not install the devices in buildings made of reinforced concrete, e.g. airports,
high-rise buildings, factories or cellars. Otherwise the transmission of the radio
waves between the devices may be severely impaired.
Preparing to use the outdoor sensor
Remove the battery compartment cover from the back of the outdoor sensor.
Remove the battery safety strip. The outdoor sensor is now ready for operation
and the control LED
Close the battery compartment cover.
Installing the Outdoor Sensor:
Note: You will need an electric drill for this step.
Find an appropriate place for the outdoor sensor.
Note: Please ensure that you install the outdoor sensor within a radius of 30 m
from the weather station. Check that there are no obstacles between the outdoor
sensor and the weather station. Otherwise there may be interference of the
transmission of data.
For wall mounting:
Hang the outdoor sensor with the mount 42 on one screw.
16 GB
41
lights up briefly.
Page 17

Preparing the weather station for use
Removing the battery safety strip:
Open the battery compartment 40 on the back of the weather station.
Pull out the battery safety strip.
Then close the battery compartment.
As soon as the battery safety strip has been removed, the weather station starts to
receive the radio signal.
Note: Do not move the weather station while it is receiving the signal. This may
disrupt reception.
Connecting the weather station with the outdoor sensor and the
DCF radio signal:
After removal of the battery safety strip the weather station attempts to establish a
connection with the outdoor sensor. This process can take a few minutes. On successful
connection with the outdoor sensor, the selected channel symbol
LC display with the channel of the outdoor sensor (if necessary you can change the
channel of the outdoor sensor as shown in the section “Setting the channel”). If the
connection with the outdoor sensor is not established automatically, this can be done
manually by pressing RESET button
43
of the sensor.
27
appears in the
17 GB
Page 18

As soon as the weather station has established a connection with the outdoor sensor
it automatically begins to receive the DCF radio signal. This process takes several
minutes and is indicated in the LC display by a flashing radio tower symbol
5
.
When the DCF radio signal is being successfully received, the radio tower symbol
is shown permanently in the display. If at the time of putting the device into operation it is not possible to synchronise with the atomic clock, you can also carry out
the clock adjustments manually (“Setting the 12 / 24 hour mode / °C / °F / hPa /
inHg / time zone / time / date / language manually”).
Radio signal (DCF):
The DCF signal (time signal transmitter) consists of time pulses emitted by one of
the most accurate clocks in the world close to Frankfurt / Main, Germany.
In ideal conditions, your weather station can pick up this signal over a distance of
up to approx. 2000 km around Frankfurt / Main. Reception of the radio signal
generally takes approx. 3–10 minutes.
Reception can be considerably impaired by obstacles (e.g. concrete walls) or sources
of interference (e.g. other electrical devices). In the event of reception problems,
change the position of the weather station (e.g. to somewhere near a window).
18 GB
Page 19
Operation
Receiving the DCF radio time signal
After a connection with the outdoor sensor is established or 3 minutes after the battery
safety strip is removed, the weather station automatically begins to search for the
DCF radio signal. The search is shown in the LC display by the radio tower symbol
flashing.
Note: In buildings made of reinforced concrete the reception of the radio signal
may be severely impaired (see “Setting up the devices”).
In order to correct any deviations from the exact time, the clock is automatically
synchronised with the DCF radio signal every day at 1:00, 2:00 and 3:00.
Reception of the DCF radio signal can also be started manually on the weather station.
Press the + and – button 35, 36 at the same time. The weather station attempts
to receive the DCF radio signal. This process takes several minutes and is indicated in the LC display by a flashing radio tower symbol.
If the connection with the DCF radio signal cannot be established, the search is
stopped.
Note: If the clock of the weather station cannot receive the DCF radio signal due
to errors, too great a distance from the transmitter or similar reasons, it is possible
to set the time manually. If reception of the DCF signal is successful, the manual
settings are overwritten.
5
19 GB
Page 20
Setting the 12 / 24 hour mode / °C / °F / hPa / inHg /
time zone / time / date / language manually
The reception of DCF radio signal where the weather station has been positioned may
become degraded or interrupted. If this happens you can set the device manually.
Follow these steps:
1.
Press and hold down the MODE button 34 for about 3 seconds. “12 Hr” or “24 Hr”
blinks in the display. Press the + or – button
format.
Note: The AM symbol in the time display
12 hour mode. The PM symbol in the time display stands for after noon in
12 hour mode.
2. Confirm your setting by pressing the MODE button. The temperature unit “°C “
or “°F” flashes in the display. Press the + or – button to choose the desired
temperature unit.
3. Confirm your setting by pressing the MODE button. The barometric pressure’s
unit flashes in the display. Press the + or – button to set the desired unit (hPa /
inHg).
4. Confirm your setting by pressing the MODE button. The time zone indicator
flashes in the display. Press the + or – button to set the desired value (-2 to +2).
Note: The standard setting for the time zone is GMT+1. Set the weather station
to correspond to your time zone.
20 GB
35, 36
to choose the desired hour
7
stands for before noon in the
Page 21

5. Confirm your setting by pressing the MODE button. The hour value of the time
display flashes. Press the + or – button to set the desired value.
Note: The time and date settings will be done automatically if the weather
station receives the DCF signal. You should manually adjust the time and date
if you have no reception of DCF.
Tip: Hold the + or – button pressed down. This will speed up the process of
setting the values. You can also use this fast setting option for subsequent settings.
If you do not press any button for 20 seconds, the LCD automatically reverts to
the standard display.
6. Confirm your setting by pressing the MODE button. The minute indicator of the
time display blinks. Press the + or – button to set the desired value.
7. Confirm your setting by pressing the MODE button. The year indicator flashes
in the time display. Press the + or – button to set the desired value.
8. Confirm your setting by pressing the MODE button. The month indicator flashes
in the date display
1
. Press the + or – button to set the desired value.
9. Confirm your setting by pressing the MODE button. The day indicator flashes
in the date display. Press the + or – button to set the desired value.
10. Confirm your setting by pressing the MODE button. At the place of the day of
the week display
9
, the language indicator of this display flashes. Press the +
or – button to choose the desired language.
Note: You have the choice of German (GE), English (EN), Italian (IT), French
(FR) and Spanish (SP) (German is set as the standard language).
11. Confirm your setting by pressing the MODE button.
21 GB
Page 22
Setting the alarm time
1. Press the MODE button 34 briefly in order to get to alarm mode. The currently
set waking time appears in the LC display.
2. Press and hold down the MODE button for about 2 seconds. The hours display
flashes.
3. Press the + or – button
4. Confirm your setting by pressing the MODE button. The minutes display flashes.
Repeat step 3 to set the minutes.
5. Confirm your setting by pressing the MODE button.
Tip: Hold the + or – button pressed down. This will speed up the process of
setting the values. You can also use this fast setting option for subsequent settings.
If you do not press any button for 20 seconds, the LCD automatically reverts to
the standard display.
Note: You can set two different alarms separately.
6. Press the MODE button twice briefly if the weather station is in time display
mode. Press the MODE button once briefly if the weather station is in ALARM 1
mode. This brings you now to ALARM 2 mode.
7. Repeat steps 2–5 to set the value for ALARM 2.
22 GB
35, 36
to set the desired value.
7
Page 23

Activating / deactivating the alarm function
1. Briefly press the MODE button 34 briefly once or twice to reach ALARM 1 or
ALARM 2 mode.
2. Press the + button
in the LC display. The alarm has been activated.
3. Press the button + again. The ALARM 1 or ALARM 2 symbol in the LC display
goes out. The alarm has been deactivated.
35
. The ALARM 1 symbol 3 or ALARM 2 symbol 8 appears
Switching off the alarm signal
Press any button except the SNOOZE- / LIGHT button 33 to stop the alarm
signal. It is not necessary to reactivate the alarm. It switches itself automatically
to the alarm time which has already been set.
Note: The alarm signal sounds for approx. 2 minutes.
SNOOZE function
Press the SNOOZE- / LIGHT button 33 as the alarm signal sounds to get to
SNOOZE mode. The alarm signal sounds again after approx. 5 minutes.
23 GB
Page 24
Preparing to use the weather forecasting function
Note: Please take the weather forecast from your local weather forecasting service
into account as well as the forecast from your weather station. If there are discrepancies
between the information from your device and from the local weather forecasting
service, please take the advice of the latter as authoritative.
The weather forecast is calculated from evaluation of fluctuations in the barometric
pressure and may deviate from the actual weather conditions.
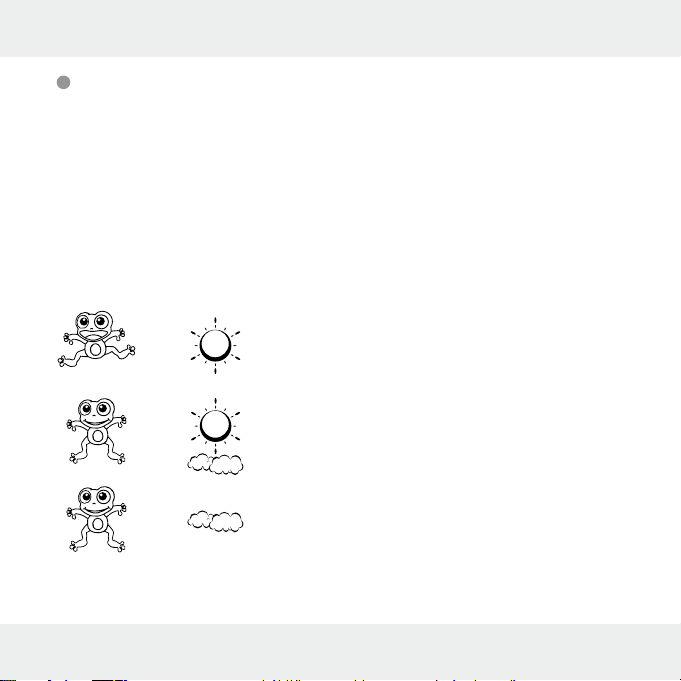
The weather station displays the following weather symbols:
24 GB
+
+
+ = cloudy
= sunny
= slightly cloudy
Page 25
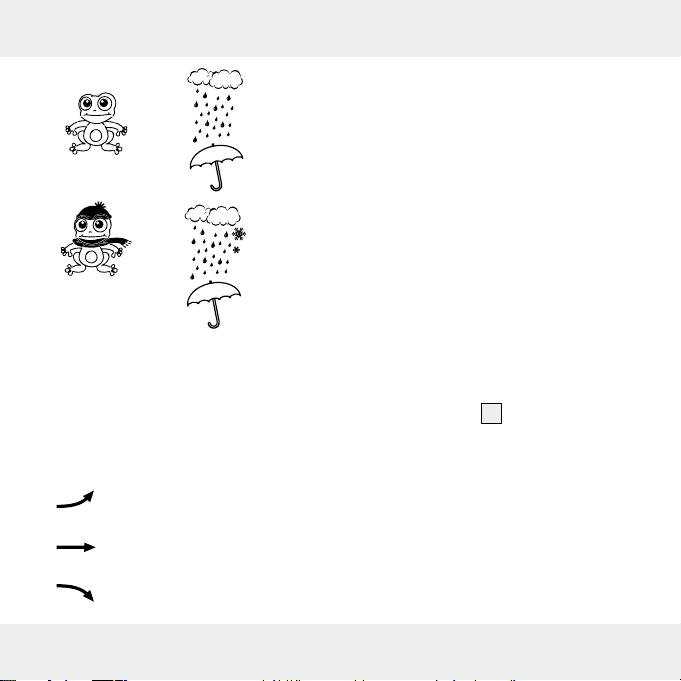
+ = rainy
+
= rain + snow
The weather symbols indicate the weather fluctuation over the next eight hours and
not the current weather.
The weather station can display the barometric pressure trend
31
.
You may see the following displays:
The barometric pressure will rise.
The barometric pressure will remain constant.
The barometric pressure will fall.
25 GB
Page 26
Selecting the location
Press the CITY button 39. The location display 12 blinks and the longitude
and latitude are displayed.
Press the + or – button 35, 36 to select your location.
Press the CITY button to confirm your entry. If the abbreviation for your location
does not appear in the display, you may enter a user-defined location (see
“Selecting the location manually”).
After a brief moment, the weather station display the times for sunrise and sundown,
the lunar phases and low tide (TIDE LO), mean sea level (TIDE MID) and high tide
(TIDE HI).
Selecting the location manually
Press the CITY button 39 down for approx. 2 seconds and keep it pressed.
Press the + or – button
Press the CITY button to confirm your entry. Enter the 2nd and 3rd letters in the
same fashion.
GMT appears in the LC display and the time zone indicator blinks.
Press the + or – button to set the difference from your time zone to GMT.
Press the CITY button to confirm your entry. Set the longitude and latitude of
your location in the same fashion.
26 GB
35, 36
to select the beginning letters of your location.
Page 27
After a brief moment, the weather station display the times for sunrise and sundown,
the lunar phases and low tide (TIDE LO), mean sea level (TIDE MID) and high tide
(TIDE HI).
You can choose from the following countries and cities:
Germany
(DE)
Berlin BER
Bremen BRE
Köln KOE
Dortmund DOR
Dresden DRE
Düsseldorf DUS
Erfurt ERF
Frankfurt FRA
Freiburg FRE
Hamburg HAM
Hannover HAN
Hof HOF
Kaiserslautern KAI
Kassel KAS
Kiel KIE
Leipzig LEI
Magdeburg MAG
München MUN
Australia
(AU)
Austria
(AT)
Nürnberg NUR
Osnabrück OSN
Passau PAS
Regensburg REG
Rostock ROS
Saarbrücken SAA
Stuttgart STU
Ulm ULM
Würzburg WUR
Canberra CBR
Melbourne MEL
Sydney SYD
Bregenz BRE
Graz GRZ
Innsbruck INN
Linz LNZ
Salzburg SLZ
Belgium
(BE)
Bosnia &
Herzegovina (BA)
Croatia
(HR)
Czech
(CZ)
Denmark
(DK)
Vienna WIE
Villach VIL
Wels WEL
Antwerp ANT
Bruges BRG
Brussels BRU
Libramont LIB
Liege LIE
Sarajevo SAR
Split SPL
Zagreb ZAG
Brno BRN
Prague PRG
Aalborg ALB
27 GB
Page 28
Finland
(FI)
France
(FR)
28 GB
Copenhagen KOB
Odense ODE
Helsinki HEL
Ajaccio AJA
Biarritz BIA
Bordeaux BOR
Brest BRE
Cher-
bourg-Octeville
Clermont-Ferrand
Dijon DIJ
Lille LIL
Lyon LYO
Marseille MRS
Metz MET
Nantes NAN
Nice NIC
Orleans ORL
Paris PAR
Perpignan PER
Rouen ROU
Strasbourg STR
Toulouse TOU
CHE
CMF
Greece
Athens AHN
(GR)
Hungary
Budapest BUD
(HU)
Ireland
Dublin DUB
(IE)
Italy (IT) Ancona ANC
Bari BAR
Bolzano BOZ
Cagliari CAG
Florence FIR
Foggia FOG
Genoa GEN
Lecce LEC
Messina MES
Milan MIL
Naples NAP
Palermo PAL
Parma PAR
Perugia PER
Rome ROM
San Remo SRE
Triest TRI
Turin TOR
Venice VEN
Verona VER
Liechtenstein (LI)
Luxemburg (LU)
Monaco
(MC)
Netherlands
(NL)
New
Zealand
(NZ)
Norway
(NO)
Poland
(PL)
Portugal
(PT)
Vaduz VDZ
Luxembourg LUX
Monte Carlo MCM
Amsterdam AMS
Arnhem ARN
Eindhoven EIN
Groningen GRO
Rotterdam ROT
The Hague DHA
Wellington WLG
Bergen BGN
Lillehammer LIL
Oslo OSL
Cracow KRA
Gdansk GDA
Poznan POZ
Warsaw WAR
Faro FAR
Page 29

Russian
Federation (RU)
Serbia
(RS)
Slovakia
(SK)
Slovenia
(SI)
Spain
(ES)
Lisbon LIS
Porto POR
St. Petersburg PET
Belgrade BEO
Bratislava BRV
Kosice KOS
Ljubliana LUB
Alicante ALI
Andorra AND
Badajoz BAD
Barcelona BAR
Bilbao BIL
Cordoba COR
Eivissa Ibiza IBZ
La Coruña LCO
Las Palmas LPA
Leon LEO
Madrid MAD
Malaga MAL
Palma de Mal-
lorca
PAL
Sweden
(SE)
Switzerland
(CH)
United
Kingdom
(GB)
Salamanca SAL
Sevilla SEV
Valencia VAL
Zaragoza ZAR
Gothenburg GOT
Karlstad KAR
Stockholm STO
Basel BAS
Berne BRN
Chur CHU
Geneva GEN
Lucerne LUC
Lugano LUG
Sion SIO
St. Gallen SGL
Zurich ZUR
Aberdeen ABD
Belfast BEL
Birmingham BIR
Cardiff CAR
Glasgow GLW
London LON
United
States
(US)
Manchester MAN
Newcastle
upon Tyne
Plymouth PLY
Los Angeles LAX
New York NYC
Washington WAS
NEC
29 GB
Page 30
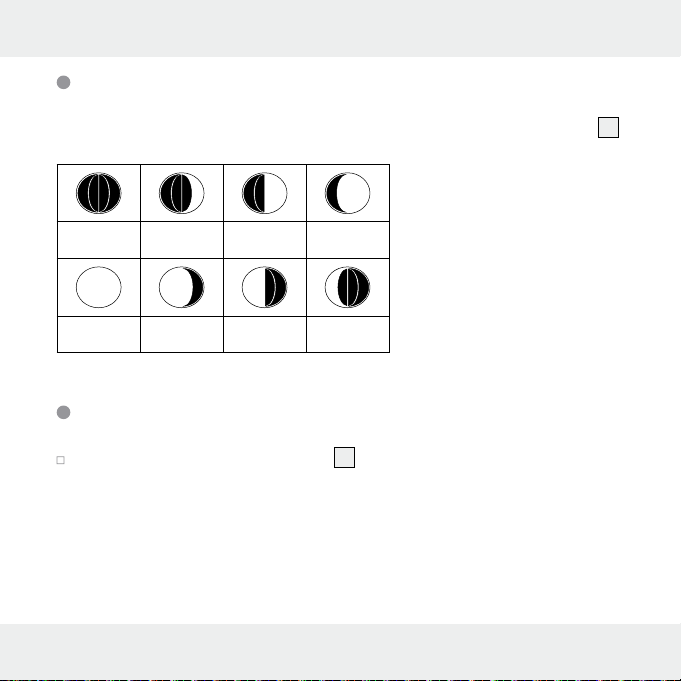
Lunar phases
The weather station has a display which automatically displays the current lunar phase 13.
New moon Waxing half-
Full moon Waning full
moon
moon
Half-moon Waxing full
Half-moon Waning half-
moon
moon
Reading the barometric pressure for the last 12 hours
Press the HISTORY ABS / REL button 38 repeatedly to read the barometric
pressure values for the last 12 hours.
0HR = present barometric pressure
–1HR = barometric pressure an hour earlier
–2HR = barometric pressure two hours earlier, etc.
30 GB
Page 31

Adjusting the air pressure indication
The forecast of this weather station is basing on an analysis of the change of the
air pressure.
The barometric pressure
As the air pressure generally decreases with the height beyond sea level, the public
weather service always announces the so-called relative air pressure. This relative
air pressure is adjusted to the topography of the country in order to get comparable
values.
You can adjust the air-pressure of your weather station to the proportion of its place.
For that you have to adjust your weather station uniquely the current air pressure.
Ask your local weather forecast service for the barometric pressure at sea level or
get the current value from the Internet.
You can adjust the weather station like this:
Press and hold the HISTORY ABS / REL button 38 for approx. 3 seconds. After
that press the + or – button
relative air pressure.
Chose „Rel“ and press the HISTORY ABS/REL button for confirmation. The air
pressure indication blinks. Now you can chose the correct value by pressing
the + or – button.
Confirm your choice by pressing the HISTORY ABS / REL button. Your weather
station now shows the relative air pressure.
30
is factory provided adjusted to the absolute air pressure.
35, 36
, to interchange between the absolute or
31 GB
Page 32

If you want your weather station to announce the absolute air pressure, proceed
like this:
Press and hold the HISTORY ABS / REL button for approx. 3 seconds. After-
wards press the + or – button, to change to the absolute air pressure. Confirm
by pressing the HISTORY ABS / REL button.
Setting the channel
The weather station receives the outdoor sensor signal automatically after you have
made all the settings. The symbol for humidity (outdoor)
25
ture
flashes during this time.
Note: In the event of interference from nearby equipment transmitting radio
signals, please select a different channel for the outdoor sensor by pressing the
CH button
37
on the weather station or the channel selector switch 44 on the
outdoor sensor. The relevant data is shown in the LC display.
- 1: Outdoor sensor channel 1
- 2: Outdoor sensor channel 2
- 3: Outdoor sensor channel 3
-
: automatic channel change
32 GB
22
and outdoor tempera-
Page 33

Displaying temperature and temperature trend
The current indoor temperature 19 and the temperature trend (indoors) 15 are
shown in the LC display.
After successfully connecting with the outdoor sensor, the weather station can display
the outdoor temperature
the following displays:
The temperature is rising.
The temperature is remaining constant.
The temperature is falling.
25
and the temperature trend (outdoor) 24. You may see
Displaying the humidity and humidity trend
The current humidity trend (indoors) 16 and the current humidity (indoors) 17 are
shown in the LC display.
The COMFORT indicator
The following categories are available:
18
displays the humidity in three categories.
33 GB
Page 34

DRY = Humidity < 40 %
COMFORT = Humidity 40–70 %, indoor temperature 20 °C–28 °C
WET = Humidity > 70 %
After a successful connection has been made with the outdoor sensor, the weather
station shows the humidity trend (outdoors)
the LC display.
21
and the humidity (outdoors) 22 in
Displaying the maximum / minimum
temperature / humidity
The minimum / maximum temperature / humidity is measured for the first time after
the batteries have been inserted and stored in the weather station.
The maximum and minimum values for temperature, hygrometer and barometric
pressure are automatically saved.
If the weather station is in time display 7, press the + button 35 to display the
maximum values.
Press the + button twice to display the minimum values.
Hold the + button down for approx. 3 seconds to erase the stored maximum
and minimum values.
34 GB
Page 35

Temperature and frost alarm
The temperature alarm is a short beep, which sounds as soon as the outdoor
temperature exceeds or falls below the preset temperature range. Follow the below
procedures to set the desired temperature range.
Press the – button 36 to get top the temperature alarm mode.
Hold the – button down for 3 seconds. The maximum temperature display
blinks. Press the + or – button to set the values.
Press the MODE button 34 to confirm your setting. The minimum temperature
display blinks. Press the + or – button to set the values.
Press the MODE button to confirm your setting.
Activating / deactivating the the temperature
and frost alarm
If more than one outdoor sensor is activated, press the channel button 37 to
select one.
Press the – button 36 repeatedly to activate the temperature and frost alarms.
If the frost alarm alarm is activated, the corresponding symbol
the outdoor temperature. The alarm signal sounds at –1 °C to + 3 °C.
23
appears next to
35 GB
Page 36

If the temperature alarm is activated, the corresponding symbol appears next to the
outdoor temperature. The alarm signal sounds at the set values.
If the temperature and frost alarm are activated, both symbols appear in the display.
Background lighting
Press the SNOOZE / LIGHT button 33. The backlight illuminates for 5 seconds.
Battery state display
The battery state display 20, 26 appears in the weather station’s LC display if the
batteries are weak. Make sure you replace the batteries at the earliest opportunity
(see “Changing the batteries”).
Changing the batteries
Weather station:
Replace the batteries if the LC display becomes illegible or if the battery display
is shown.
36 GB
20
Page 37

Remove the battery compartment cover on the back of the weather station.
Remove the used batteries.
Insert 3 new batteries type AA, 1.5 V.
Note: Make sure that the polarity is correct when you insert the battery. The
correct polarity is shown inside the battery compartment
40
.
Close the battery compartment.
Outdoor sensor:
Replace the batteries if battery display
26
is shown.
Remove the battery compartment cover from the back of the outdoor sensor.
Remove the used batteries.
Insert 2 new batteries type AA, 1.5 V.
Note: Make sure you insert the batteries with the correct polarity. The correct
polarity is shown inside the battery compartment
45
.
Close the battery compartment.
Troubleshooting
Note: This device has delicate electronic components. This means that if it is placed
near an object that transmits radio signals, it could cause interference.
37 GB
Page 38

If the display indicates a problem, move such objects away from the weather
station or outdoor sensor or remove the batteries from the weather station or
outdoor sensor for a short while and then replace them.
Obstacles such as concrete walls can also cause that the reception is disturbed. In
this case, change the location (eg near a window). Please take note that the external sensor should always be set up within max. 30 meters (open space) from the
base station. The specified range is the free-field range and means that no obstacle
should be between the remote sensor and the base station. A “visual contact”
between remote sensor and base station often improves the transmission.
Cold (outdoor temperatures below 0 ° C) can reduce the battery power of the outdoor sensor and thereby negatively impair the radio transmission. Another factor
that may cause harmful interference, are dead or weak batteries in the outdoor
sensor. Replace them by new ones.
If your weather station is not working correctly, please perform a new start by
pressing the RESET button
43
.
Cleaning and care
Under no circumstances should you use liquids or detergents, as these will
damage the device.
Clean only the outside of the device with a soft, dry cloth.
38 GB
Page 39

Under no circumstances should you spray the outdoor sensor, e.g. with a garden
hose. The outdoor sensor is only protected against rain from above.
Disposal
The packaging is made entirely of recyclable materials, which you may
dispose of at local recycling facilities.
Contact your local refuse disposal authority for more details of how to dispose of
your worn-out product.
When your device has come to the end of its life, please do not throw it
out with your household refuse, but in the interests of the environment take
it to a suitable centre where it can be disposed of properly. Information
on collection points and their opening hours can be obtained from your
local authority.
Faulty or used batteries must be recycled in accordance with Directive 2006 / 66 / EC.
Return the batteries and / or the device through the appropriate collection facilities.
Environmental damage through
incorrect disposal of the batteries!
Pb
39 GB
Page 40

Batteries may not be disposed of with the usual domestic waste. They may contain
toxic heavy metals and are subject to hazardous waste treatment rules and regulations.
The chemical symbols for heavy metals are as follows: Cd = cadmium, Hg = mercury,
Pb = lead. That is why you should dispose of used batteries at a local collection point.
Warranty
The device has been manufactured to strict quality guidelines and meticulously examined before delivery. In the event of product defects you have legal rights
against the retailer of this product. Your legal rights are not limited in any way by
our warranty detailed below.
The warranty for this device is 3 years from the date of purchase. Should this device show any fault in materials or manufacture within three years from the date of
purchase, we will repair or replace it - at our choice - free of charge to you.
The warranty period begins on the date of purchase. Please keep the original sales
receipt in a safe location. This document is required as your proof of purchase. This
warranty becomes void if the device has been damaged or improperly used or
maintained.
The warranty applies to faults in material or manufacture. This warranty does not
cover product parts subject to normal wear, thus possibly considered consumables
40 GB
Page 41

(e.g. batteries) or for damage to fragile parts, e.g. switches, rechargeable batteries
or glass parts.
Information
Declaration of Conformity
We, OWIM GmbH & Co. KG, Stiftsbergstraße 1, D-74167 Neckarsulm, hereby
declare under our sole responsibility that the product: Radio-controlled weather
station, Model No.: Z31915, Version: 02 / 2015, to which this declaration refers,
complies with the standards / normative documents of 1999 / 5 / EC. You can
download these conformance documents if required from www.owim.com.
41 GB
Page 42

Zastosowanie zgodne zprzeznaczeniem ................ Strona 44
Opis części ............................................................................................ Strona 44
Dane techniczne............................................................................... Strona 46
Zawartość zestawu ...................................................................... Strona 48
Bezpieczeństwo
Ogólne zasady bezpieczeństwa ............................................................. Strona 48
Wskazówki bezpieczeństwa dotyczące baterii ..................................... Strona 49
Przed uruchomieniem
Ustawianie urządzenia ............................................................................. Strona 50
Uruchamianie czujnika zewnętrznego .................................................... Strona 51
Uruchamianie stacji pogodowej .............................................................. Strona 52
Obsługa
Odbiór sygnału radiowego DCF ............................................................. Strona 54
Ręczne ustawianie formatu 12- / 24-godzinnego / °C / °F /
hPa / inHg / strefy czasowej / godziny / daty / języka ........................... Strona 55
Ustawianie budzika .................................................................................. Strona 58
Włączanie / wyłączanie funkcji budzika ................................................ Strona 59
Wyłączanie sygnału budzika .................................................................. Strona 59
Funkcja drzemki (SNOOZE) .................................................................... Strona 59
Włączanie prognozy pogody ................................................................. Strona 60
Wybór lokalizacji ...................................................................................... Strona 62
42 PL
Page 43

Ręczny wybór lokalizacji .......................................................................... Strona 62
Fazy księżyca ............................................................................................ Strona 66
Odczytywanie wskazań ciśnienia atmosferycznego
zostatnich 12 godzin .............................................................................. Strona 66
Ustawienie ciśnienia atmosferycznego .................................................... Strona 67
Wybór kanału ........................................................................................... Strona 68
Wyświetlanie temperatury itrendu temperatury ..................................... Strona 69
Wyświetlanie wilgotności powietrza itrendu wilgotności powietrza .... Strona 70
Wyświetlanie maksymalnej / minimalnej temperatury /
wilgotności powietrza ............................................................................... Strona 70
Alarm temperatury imrozu ....................................................................... Strona 71
Włączanie / wyłączanie alarmu temperatury imrozu ........................... Strona 72
Podświetlenie ............................................................................................. Strona 72
Wskaźnik baterii ....................................................................................... Strona 72
Wymiana baterii ....................................................................................... Strona 73
Usuwanie usterek .......................................................................... Strona 74
Czyszczenie ikonserwacja .................................................... Strona 75
Utylizacja .............................................................................................. Strona 75
Gwarancja ........................................................................................... Strona 76
Informacje
Deklaracja zgodności ............................................................................... Strona 77
43 PL
Page 44

Stacja meteo sterowana radiowo
Zastosowanie zgodne zprzeznaczeniem
Stacja pogodowa wskazuje temperaturę wewnętrzną izewnętrzną powietrza
wstopniach Celsjusza (°C) lub Fahrenheita (°F), jak również jej maksymalne
iminimalne wartości. Ponadto informuje ozewnętrznej iwewnętrznej wilgotności
powietrza (%RH) oraz jej maksymalnych iminimalnych wartościach. Pozostałe
wyświetlane informacje to prognoza pogody, czas wformacie 12- / 24-godzinnym
oraz data. Stacja pogodowa wskazuje również czas wschodu izachodu Słońca
wdanym dniu oraz fazy Księżyca. Stacja posiada ponadto dwie funkcje alarmu.
Urządzenie nie jest przeznaczone do zastosowania komercyjnego.
Opis części
Stacja pogodowa:
1
Wskaźnik daty
2
Wskaźnik miesiąca
3
Alarm 1
4
Wskaźnik drzemki (SNOOZE)
5
Symbol wieży radiowej
6
Wskaźnik DST (czas letni)
44 PL
Page 45

7
Wskaźnik czasu
8
Alarm 2
9
Wskaźnik dnia tygodnia
10
Wschód Słońca / czas wschodu Słońca
11
Wskaźnik pływów
12
Lokalizacja
13
Faza Księżyca
14
Zachód Słońca / czas zachodu Słońca
15
Trend temperatury (wpomieszczeniu)
16
Trend wilgotności powietrza (wpomieszczeniu)
17
Wilgotność powietrza (wpomieszczeniu)
18
Wskaźnik komfortu (wart. maksymalna / minimalna)
19
Temperatura wewnętrzna (°C / °F)
20
Wskaźnik baterii
21
Trend wilgotności powietrza (na zewnątrz)
22
Wilgotność powietrza (na zewnątrz)
23
Alarm temperatury imrozu (wart. maksymalna / minimalna)
24
Trend temperatury (na zewnątrz)
25
Temperatura zewnętrzna (°C / °F)
26
Wskaźnik baterii (czujnik zewnętrzny)
27
Wybrany kanał
28
Wskaźnik słupkowy ciśnienia atmosferycznego
29
Wskaźnik ciśnienia atmosferycznego zostatniej godziny
30
Ciśnienie atmosfer yczne bezwzględne / względne
45 PL
Page 46

31
Trend ciśnienia atmosferycznego
32
Prognoza pogody
33
Pr zycisk SNOOZE / LIGHT
34
Przycisk MODE
35
Przycisk +
36
Przycisk –
37
Przycisk kanału (CH)
38
Przycisk HISTORY ABS/REL
39
Przycisk CITY
40
Komora baterii
Czujnik zewnętrzny:
41
Kontrolka LED
42
Element montażowy
43
Przycisk RESET
44
Przełącznik kanału
45
Komora baterii
Dane techniczne
Stacja pogodowa:
Zakres pomiarowy temperatury: 0 do +50 °C
+32 do +122 °F
46 PL
Page 47

Dokładność pomiaru temperatury: 0,1 °C
Zakres pomiarowy wilgotności
powietrza: 20–95 %
Dokładność pomiaru wilgotności
powietrza: 1 %
Sygnał radiowy: DCF
Baterie: 3 x AA, 1,5 V
Zakres pomiarowy ciśnienia: 850 - 1050hPa
Czujnik zewnętrzny:
Zakres pomiarowy temperatury: –20 do +65 °C
–4 do +149 °F
Zakres pomiarowy wilgotności
powietrza: 20–95 %
Dokładność pomiaru
wilgotności powietrza: 1 %
Sygnał transmisji HF: 433 MHz
Zasięg transmisji HF: maks. 30 metrów (w terenie)
Baterie: 2 x AA, 1,5 V
47 PL
Page 48

Zawartość zestawu
1 stacja pogodowa
1 czujnik zewnętrzny
3 baterie AA, 1,5 V
2 baterie AA, 1,5 V
1 instrukcja obsługi
Bezpieczeństwo
Należy przeczytać wszystkie wskazówki dotyczące bezpieczeństwa oraz pozostałe instrukcje. Nieprzestrzeganie wskazówek dotyczących bezpieczeństwa oraz
pozostałych instrukcji może skutkować porażeniem prądem, pożarem i /
lub odniesieniem ciężkich obrażeń.
WSZELKIE INSTRUKCJE WRAZ ZE WSKAZÓWKAMI BEZPIECZEŃSTWA NALEŻY ZACHOWAĆ!
Ogólne zasady bezpieczeństwa
Dzieci często nie zdają sobie sprawy znie-
bezpieczeństw. Dzieci nie powinny mieć dostępu do produktu.
48 PL
Page 49

Niniejsze urządzenie może być używane przez dzieci od lat 8 oraz przez
osoby z obniżonymi zdolnościami fizycznymi, sensorycznymi lub mentalnymi
lub brakiem doświadczenia i/lub wiedzy, jeśli pozostają pod nadzorem lub
zostały pouczone w kwestii bezpiecznego użycia urządzenia i rozumieją wynikające z niego zagrożenia. Dzieci nie mogą bawić się urządzeniem. Czyszczenie i konserwacja przez użytkownika nie mogą być bez nadzoru
przeprowadzane przez dzieci.
Nie należy używać urządzenia, gdy jest ono uszkodzone.
Wskazówki bezpieczeństwa dotyczące baterii
ZAGROŻENIE ŻYCIA! Połknięcie baterii może być groźne dla życia.
Wprzypadku połknięcia baterii należy natychmiast skorzystać zpomocy
ekarskiej.
Jeżeli baterie nie były używane przez dłuższy czas, należy je wyjąć zurzą-
dzenia.
OSTROŻNIE! NIEBEZPIECZEŃSTWO WYBUCHU! Zabrania się po-
nownego ładowania baterii!
Umieszczając baterie wurządzeniu należy zwrócić uwagę na odpowiednie
ułożenie biegunów! Jest ono oznakowane wkomorze baterii.
Wrazie potrzeby przed założeniem oczyścić styki baterii iurządzenia.
Zużyte baterie należy niezwłocznie wyjąć zurządzenia. Wprzeciwnym razie
zwiększa się ryzyko wycieku elektrolitu!
49 PL
Page 50

Nie wyrzucać zużytych baterii razem zodpadami domowymi!
Każdy użytkownik jest ustawowo zobowiązany do odpowiedniego utylizowa-
nia baterii!
Baterie należy przechowywać wmiejscu niedostępnym dla dzieci, nie należy
wrzucać ich do ognia, rozbierać na części lub powodować zwarcia.
Wszystkie baterie należy wymieniać równocześnie.
Używać wyłącznie baterii tego samego typu.
Wprzypadku wystąpienia wycieku zbaterii znajdujących się wurządzeniu
należy je natychmiast wyjąć, aby zapobiec jego uszkodzeniu!
Unikać kontaktu ze skórą, oczami ibłonami śluzowymi. Wrazie kontaktu
zelektrolitem przemyć dane miejsce dużą ilością wody i / lub zasięgnąć po-
rady lekarza!
Przed uruchomieniem
Ustawianie urządzenia
Najpierw włożyć baterie do czujnika zewnętrznego a następnie
do stacji pogody.
OSTROŻNIE! Przy wyborze miejsca ustawienia należy zadbać, aby urządzenie nie było narażone na bezpośrednie promieniowanie słoneczne, wibracje,
pył, działanie skrajnie wysokich lub niskich temperatur oraz wilgoci. Nie należy
50 PL
Page 51

ustawiać urządzenia wpobliżu źródeł wysokich temperatur, na przykład grzejników. Grozi to uszkodzeniem urządzenia.
Nie ustawiać urządzenia na wartościowych lub delikatnych powierzchniach
bez odpowiedniej ochrony. W przeciwnym razie może dojść do uszkodzenia
powierzchni.
Należy upewnić się, że urządzenia używane wbliskiej odległości nie korzystają
ztej samej częstotliwości 433 MHz. Urządzenia te mogą powodować zakłócenie połączenia radiowego.
Nie należy ustawiać urządzeń obok lub na płytach metalowych. Mogą one
ograniczać transmisję radiową między urządzeniami.
Nie ustawiać urządzenia wbudynkach zżelazobetonu, na przykład wpor-
tach lotniczych, wieżowcach, fabrykach lub wpiwnicach. Może to znacznie
ograniczać transmisję radiową między urządzeniami.
Uruchamianie czujnika zewnętrznego
Zdjąć osłonę komory baterii na tylnej ściance czujnika zewnętrznego.
Wyjąć pasek zabezpieczający. Czujnik zewnętrzny jest teraz gotowy do
pracy ikontrolka LED
Zamknąć osłonę komory baterii.
41
zaświeci się przez krótki czas.
51 PL
Page 52

Montaż czujnika zewnętrznego:
Wskazówka: Do montażu potrzebna jest wiertarka.
Wybrać odpowiednie miejsce montażu czujnika zewnętrznego.
Wskazówka: Upewnić się, że czujnik zewnętrzny jest umieszczony wpro-
mieniu 30 m od stacji pogodowej. Upewnić się, że pomiędzy czujnikiem zewnętrznym istacją pogodową nie ma żadnych przeszkód, które mogłyby
prowadzić do zakłócenia sygnału. Wprzeciwnym razie transmisja danych
może zostać zakłócona.
Montaż na ścianie:
Zawiesić czujnik zewnętrzny na śrubie za pomocą elementu montażowego 42.
Uruchamianie stacji pogodowej
Usuwanie paska zabezpieczającego baterii:
Otworzyć komorę baterii 40 znajdującą się na tylnej ściance stacji pogodowej.
Wyjąć pasek zabezpieczający.
Ponownie zamknąć komorę baterii.
Stacja pogodowa rozpoczyna odbiór sygnału radiowego od razu po wyjęciu paska zabezpieczającego baterii.
52 PL
Page 53

Wskazówka: Nie należy zmieniać pozycji stacji pogodowej wtrakcie odbioru
sygnału. Wprzeciwnym razie może dojść do zakłóceń odbioru.
Połączenie stacji pogodowej zczujnikiem zewnętrznym iodbiór
sygnału DCF:
Po wyjęciu paska zabezpieczającego stacja pogodowa próbuje nawiązać połączenie zczujnikiem zewnętrznym. Proces ten może trwać kilka minut. Po nawiązaniu połączenia zczujnikiem zewnętrznym na wyświetlaczu wyświetlony zostanie
wybrany symbol kanału
27
czujnika zewnętrznego (wrazie potrzeby należy zmienić kanał czujnika zewnętrznego według instrukcji zawartych wczęści „Wybór kanału“). Jeśli automatyczne nawiązanie połączenia zakończy się niepowodzeniem,
należy nacisnąć przycisk RESET
43
wcelu ręcznego nawiązania połączenia.
Po nawiązaniu połączenia zczujnikiem zewnętrznym stacja pogodowa rozpoczyna
automatyczne wyszukiwanie sygnału DCF. Proces ten zajmuje kilka minut iw jego
trakcie wyświetlany jest migający symbol wieży radiowej
5
.
Po znalezieniu sygnału DCF symbol wieży radiowej przestaje migać. Jeżeli wmomencie uruchamiania nie jest możliwa synchronizacja zzegarem atomowym, to
ustawienie czasu zegarowego można wykonać również ręcznie (patrz „Ręczne
ustawianie formatu 12- / 24-godzinnego / °C / °F / hPa / inHg / strefy czasowej /
godziny / daty /języka“).
53 PL
Page 54

Sygnał radiowy (DCF):
Sygnał DCF (nadajnik sygnału czasowego) składa się z impulsów czasowych,
które są wysyłane przez jeden z najdokładniejszych zegarów świata, znajdującego się w pobliżu Frankfurtu nad Menem w Niemczech.
Woptymalnych warunkach stacja pogodowa odbiera sygnał DCF wodległości
do 2000 km od Frankfurtu nad Menem. Wyszukiwanie sygnału trwa zreguły ok. 3
do 10 minut.
Odbiór sygnału może zostać znacznie ograniczony przez przeszkody (na przykład
ściany betonowe) lub źródła zakłóceń (na przykład inne urządzenia elektryczne).
Wprzypadku wystąpienia problemów zodbiorem sygnału należy zmienić miejsce
ustawienia stacji (np. bliżej okna).
Obsługa
Odbiór sygnału radiowego DCF
Po nawiązaniu połączenia zczujnikiem zewnętrznym lub 3minuty po wyjęciu paska zabezpieczającego baterii zegar stacji pogodowej rozpoczyna automatyczne
wyszukiwanie sygnału DCF. Proces ten zajmuje kilka minut iwjego trakcie wyświetlany jest migający symbol wieży radiowej
54 PL
5
.
Page 55

Wskazówka: W budynkach zżelazobetonu odbiór sygnału radiowego może
być znacznie ograniczony (zobacz „Ustawianie urządzenia”).
Wcelu skorygowania ewentualnych odchyleń od dokładnego czasu, stacja pogodowa przeprowadza automatyczną synchronizację zsygnałem DCF codziennie
ogodzinie 1:00, 2:00 i 03:00.
Odbiór sygnału DCF przez stację radiową można również uruchomić ręcznie.
Nacisnąć jednocześnie przycisk + i – 35, 36. Stacja pogodowa rozpoczyna
wyszukiwanie sygnału radiowego DCF. Proces ten zajmuje kilka minut iw jego
trakcie wyświetlany jest migający symbol wieży radiowej.
Wprzypadku braku połączenia zsygnałem DCF wyszukiwanie zostaje przerwane.
Wskazówka: Jeśli zegar stacji pogodowej nie odbiera sygnału DCF zpowodu
usterek, zbyt dużej odległości od nadajnika itp., można ustawić czas ręcznie.
Wmomencie znalezienia sygnału DCF wartości ustawione ręcznie zostaną nadpisane.
Ręczne ustawianie formatu 12- / 24-godzinnego / °C / °F /
hPa / inHg / str efy czasowej / godziny / daty / j ęzyka
Wmiejscu ustawienia stacji pogodowej może dojść do zakłócenia lub przerwania
odbioru sygnału radiowego DCF. Wtakim przypadku istnieje możliwość ręcznego
ustawienia urządzenia.
55 PL
Page 56

Wtym celu należy:
1. Nacisnąć i przytrzymać przycisk MODE
pojawi się jednostka „12 Hr“ oder „24 Hr“. Przydusić przycisk + lub -
34
przez ok. 3 sekund. Na monitorze
35 36
aby wybrać format godzin.
Wskazówka: Symbol AM przy wskaźniku czasu
7
oznacza wformacie
12-godzinnym godziny przedpołudniowe. Symbol PM przy wskaźniku czasu
oznacza wformacie 12-godzinnym godziny popołudniowe.
2. Zatwierdzić wybór przyciskiem MODE. Na monitorze pojawi się jednostka
temperatury „C“ lub „F“. Przydusić przycisk z + lub - aby wybrać jednostkę
temperatury.
3. Zatwierdzić wybór przyciskiem MODE. W monitorze pojawi się jednostka
ciśnienia powietrza. Przydusić przycisk z + lub -, aby ustawić wybraną jednostkę (hPa / in Hg).
4. Za
twierdzić wybór przyciskiem MODE. Wskaźnik strefy czasowej na wyświe-
tlac
zu zacznie migać. Nacisnąć przycisk + lub – , aby wybrać żądaną wartość (-2 do +2).
Wskazówka: Domyślna strefa czasowa to GMT+1. Ustawić stację pogodową
odpowiednio do strefy czasowej użytkownika.
5. Zatwierdzić wybór przyciskiem MODE. Wskaźnik godziny wpolu czasu zacznie migać. Nacisnąć przycisk + lub – , aby wybrać żądaną wartość.
Wskazówka: Godzina i data uregulowane zostaną automatycznie jak
tylko stacja pogody otrzyma sygnał DCF. Jeżeli brak sygnału DCF godzinę i
datę należy ustawić manualnie.
56 PL
,
Page 57

Wskazówka: Nacisnąć iprzytrzymać przycisk + lub –. Wten sposób
można przyspieszyć dokonywanie ustawień. Szybkie nastawianie można wykorzystać również podczas zmiany kolejnych wartości. Jeżeli wciągu
20 sekund nie zostanie naciśnięty żaden przycisk, wyświetlacz powróci automatycznie do wskazania domyślnego.
6. Zatwierdzić wybór przyciskiem MODE. Wskaźnik minut wpolu czasu zacznie
migać. Nacisnąć przycisk + lub – , aby wybrać żądaną wartość.
7. Zatwierdzić wybór przyciskiem MODE. Wskaźnik roku wpolu czasu zacznie
migać. Nacisnąć przycisk + lub – , aby wybrać żądaną wartość.
8. Zatwierdzić wybór przyciskiem MODE. Wskaźnik miesiąca wpolu daty
1
zacznie migać. Nacisnąć przycisk + lub – , aby wybrać żądaną wartość.
9. Zatwierdzić wybór przyciskiem MODE. Wskaźnik dnia wpolu daty zacznie
migać. Nacisnąć przycisk + lub – , aby wybrać żądaną wartość.
10. Zatwierdzić wybór przyciskiem MODE. Zamiast wskaźnika dnia tygodnia
9
w
monitorze miga wskaźnik języka. Przydusić przycisk z + lub - aby wybrać język.
Wskazówka: Dostępne są języki niemiecki (GE), angielski (EN), włoski (IT),
francuski (FR) i hiszański (SP) (języka niemiecki jest ustawiony jako język standardowy).
11. Zatwierdzić wybór przyciskiem MODE.
57 PL
Page 58

Ustawianie budzika
1. Nacisnąć przycisk MODE 34, aby przejść do trybu budzika. Na wyświetlaczu
pojawi się aktualnie ustawiony czas pobudki.
2. Nacisnąć iprzytrzymać przycisk MODE przez ok. 2 sekundy. Wskaźnik godziny zacznie migać.
3. Nacisnąć przycisk + lub –
4. Zatwierdzić wybór przyciskiem MODE. Wskaźnik minut zacznie migać. Powtórzyć krok 3, aby ustawić wartość dla minut.
5. Zatwierdzić wybór przyciskiem MODE.
Wskazówka: Nacisnąć iprzytrzymać przycisk + lub –. Wten sposób
można przyspieszyć dokonywanie ustawień. Szybkie nastawianie można wykorzystać również podczas zmiany kolejnych wartości. Jeżeli wciągu 20 sekund
nie zostanie naciśnięty żaden przycisk, wyświetlacz powróci automatycznie
do wskazania domyślnego.
Wskazówka: Istnieje możliwość ustawienia dwóch różnych czasów pobudki.
6. Dwa razy nacisnąć krótko przycisk MODE , gdy stacja pogodowa znajduje
się wtrybie wskazywania czasu
MODE, jeśli aktywny jest tryb ALARM 1. Aktywny jest teraz tryb ALARM 2.
7. Powtórzyć kroki 2–5 wcelu ustawienia wartości dla ALARMU 2.
58 PL
35, 36
, aby wybrać żądaną wartość.
7
. Nacisnąć krótko jeden raz przycisk
Page 59

Włączanie / wyłączanie funkcji budzika
1. Nacisnąć krótko jeden lub dwa razy przycisk MODE 34, aby przejść do trybu
ALARM 1 lub ALARM 2.
2. Nacisnąć przycisk +
alarmu 2
3. Ponownie nacisnąć przycisk +. Symbol alarmu 1 lub alarmu 2 nie będzie wyświetlany. Budzik jest wyłączony.
8
35
. Na wyświetlaczu pojawi się symbol alarmu 1 3 lub
. Budzik jest włączony.
Wyłączanie sygnału budzika
Nacisnąć dowolny przycisk, zwyjątkiem przycisku SNOOZE / LIGHT 33, aby
wyłączyć sygnał budzika. Ponowne aktywowanie budzika nie jest konieczne.
Włączy się on automatycznie wnastawionym czasie.
Wskazówka: Budzik dzwoni około 2minuty.
Funkcja drzemki (SNOOZE)
Nacisnąć przycisk SNOOZE / LIGHT 33, aby przejść do trybu drzemki
wtrakcie sygnału budzika. Budzik włączy się ponownie po upływie ok. 5 minut.
59 PL
Page 60

Włączanie prognozy pogody
Wskazówka: Należy zawsze uwzględniać prognozę pogody lokalnych służb
meteorologicznych. Wprzypadku rozbieżności między prognozą urządzenia alokalnych służb meteorologicznych, należy kierować się wskazaniami tych ostatnich.
Prognoza pogody obliczana jest na podstawie wahań ciśnienia atmosferycznego
imoże różnić się od pogody rzeczywistej.
Stacja pogodowa wyświetla następujące symbole pogody:
60 PL
+
+
+ = zachmurzenie
= słonecznie
= lekkie zachmurzenie
Page 61

+ = deszcz
+
= deszcz ze śniegiem
Symbole pogody wskazują pogodę na następne osiem godzin, nie wskazują aktualnej pogody.
Stacja pogodowa wskazuje również trend ciśnienia atmosferycznego
31
.
Możliwe są następujące wskazania:
Ciśnienie atmosferyczne wzrośnie.
Ciśnienie atmosferyczne bez zmian.
Ciśnienie atmosferyczne spadnie.
61 PL
Page 62

Wybór lokalizacji
Nacisnąć przycisk CITY 39. Wskaźnik lokalizacji 12 zacznie migać iwyświe-
tli się stopień długości iszerokości geograficznej.
Nacisnąć przycisk + lub – 35, 36, aby wybrać właściwą lokalizację.
Zatwierdzić wybór przyciskiem CITY. Jeśli skrót danej lokalizacji nie wyświetla
się, można zdefiniować ją ręcznie (patrz „Ręczny wybór lokalizacji“).
Po krótkim czasie stacja pogodowa wskaże czas wschodu izachodu Słońca, fazy
Księżyca, atakże odpływ (TIDE LO), średni poziom pływów (TIDE MID) oraz przypływ (TIDE HI).
Ręczny wybór lokalizacji
Nacisnąć iprzytrzymać przycisk CITY 39 przez ok. 2 sekundy.
Nacisnąć przycisk + lub –
Zatwierdzić wybór przyciskiem CITY. Wybrać 2 i 3 literę wten sam sposób.
Na wyświetlaczu pojawi się symbol GMT, awskaźnik strefy czasowej zacznie
migać.
Nacisnąć przycisk + lub – , aby ustawić różnicę strefy czasowej wstosunku
do GMT.
Zatwierdzić wybór przyciskiem CITY. Wten sam sposób wybrać stopień dłu-
gości iszerokości geograficznej.
62 PL
35, 36
, aby wybrać pierwszą literę danej lokalizacji.
Page 63

Po krótkim czasie stacja pogodowa wskaże czas wschodu izachodu Słońca, fazy
Księżyca, atakże odpływ (TIDE LO), średni poziom pływów (TIDE MID) oraz przypływ (TIDE HI).
Można wybrać następujące kraje imiasta:
Germany
(DE)
Berlin BER
Bremen BRE
Köln KOE
Dortmund DOR
Dresden DRE
Düsseldorf DUS
Erfurt ERF
Frankfurt FRA
Freiburg FRE
Hamburg HAM
Hannover HAN
Hof HOF
Kaiserslautern KAI
Kassel KAS
Kiel KIE
Leipzig LEI
Magdeburg MAG
München MUN
Australia
(AU)
Austria
(AT)
Nürnberg NUR
Osnabrück OSN
Passau PAS
Regensburg REG
Rostock ROS
Saarbrücken SAA
Stuttgart STU
Ulm ULM
Würzburg WUR
Canbera CBR
Melbourne MEL
Sydney SYD
Bregenz BRE
Graz GRZ
Innsbruck INN
Linz LNZ
Salzburg SLZ
Belgium
(BE)
Bosnia &
Herzegovina (BA)
Croatia
(HR)
Czech
(CZ)
Denmark
(DK)
Vienna WIE
Villach VIL
Wels WEL
Antwerp ANT
Brugge BRG
Brussels BRU
Libramont LIB
Liege LIE
Sarajevo SAR
Split SPL
Zagreb ZAG
Brno BRN
Prague PRG
Alborg ALB
63 PL
Page 64

Finland
(FI)
France
(FR)
64 PL
Copenhagen KOB
Odense ODE
Helsinki HEL
Ajaccio AJA
Biarritz BIA
Bordeaux BOR
Brest BRE
Cherbourg-
-Octeville
Clermont-Fer-
rand
Dijon DIJ
Lille LIL
Lyon LYO
Marseille MRS
Metz MET
Nantes NAN
Nice NIC
Orleans ORL
Paryż PAR
Perpignan PER
Rouen ROU
Strasbourg STR
Toulouse TOU
CHE
CMF
Greece
Athens AHN
(GR)
Hungary
Budapest BUD
(HU)
Ireland
Dublin DUB
(IE)
Italy (IT) Ancona ANC
Bari BAR
Bolzano BOZ
Cagliari CAG
Florence FIR
Foggia FOG
Genua GEN
Lecce LEC
Messina MES
Milan MIL
Naples NAP
Palermo PAL
Parma PAR
Perugia PER
Rome ROM
San Remo SRE
Triest TRI
Turin TOR
Venice VEN
Verona VER
Liechtenstein (LI)
Luxemburg (LU)
Monaco
(MC)
Netherlands
(NL)
New Zealand
(NZ)
Norway
(NO)
Poland
(PL)
Portugal
(PT)
Vaduz VDZ
Luksemburg LUX
Monte Carlo
Amsterdam AMS
Arnhem ARN
Eindhoven EIN
Groningen GRO
Rotterdam ROT
The Hague DHA
Wellington WLG
Bergen BGN
Lillehammer LIL
Oslo OSL
Cracow KRA
Gdansk GDA
Poznan POZ
Warsaw WAR
Faro FAR
MCM
Page 65

Russian
Federation (RU)
Serbia
(RS)
Slovakia
(SK)
Slovenia
(SI)
Spain
(ES)
Lisbon LIS
Porto POR
St. Petersburg PET
Belgrade BEO
Bratislava BRV
Kosice KOS
Ljubliana LUB
Alicante ALI
Andorra AND
Badajoz BAD
Barcelona BAR
Bilbao BIL
Cordoba COR
Eivissa Ibiza IBZ
La Coruna LCO
Las Palmas LPA
Leon LEO
Madryt MAD
Malaga MAL
Palma de Mal-
lorca
PAL
Sweden
(SE)
Switzerland
(CH)
United
Kingdom
(GB)
Salamanca SAL
Sevilla SEV
Valencia VAL
Zaragoza ZAR
Gothenburg GOT
Karlstad KAR
Stockholm STO
Basel BAS
Berne BRN
Chur CHU
Geneva GEN
Lucerne LUC
Lugano LUG
Sion SIO
St. Gallen SGL
Zurich ZUR
Aberdeen ABD
Belfast BEL
Birmingham BIR
Cardiff CAR
Glasgow GLW
United
States
(US)
Londyn LON
Manchester MAN
Newcastle
upon Tyne
Plymouth P LY
Los Angeles LAX
Nowy Jork NYC
Washington WAS
NEC
65 PL
Page 66

Fazy księżyca
Stacja pogodowa automatycznie wskazuje aktualną fazę Księżyca 13.
Nów
Pełnia Księżyc
Księżyc
dążący do
pierwszej
kwadry
ubywający
do ostatniej
kwadry
Pierwsza
kwadra
Ostatnia
kwadra
Księżyc
dążący do
pełni
Księżyc
ubywający do
nowiu
Odczytywanie wskazań ciśnienia atmosferycznego
zostatnich 12 godzin
Ponownie nacisnąć przycisk HISTORY-ABS / REL 38, aby odczytać wartości
ciśnienia atmosferycznego z ostatnich 12 godzin.
0HR = aktualne ciśnienie atmosferyczne
66 PL
Page 67

–1HR = ciśnienie atmosferyczne sprzed godziny
–2HR = ciśnienie atmosferyczne sprzed dwóch godzin itd.
Ustawienie ciśnienia atmosferycznego
Prognoza pogody w tej stacji pogody opiera się na ocenie zmian w ciśnieniu
atmosferycznym.
Wskaźnik ciśnienia atmosferycznego
ciśnienie powietrza. Ponieważ ciśnienie powietrza powszechnie opada wraz z
wysokością poziomu morza, publiczna służba meteorologiczna podaje z reguły
względne ciśnienie atmosferyczne. Względne ciśnienie powietrza dopasowane
jest do topografii terenu, aby otrzymać wartości porównywalne.
Możliwe jest dopasowanie wskaźnika względnego ciśnienia w Państwa stacji
pogody do sytuacji terenu. W tym celu należy jednorazowo wprowadzić w stacji
pogody aktualne względne ciśnienie powietrza. Wartości te otrzymać można w
lokalnej służbie meteorologicznej lub w internecie.
Regulacja wygląda w następujący sposób:
Należy przydusić i przytrzymać przycisk HISTORY ABS / REL 38 przez ok.
3 sekund. Następnie należy przydusić przycisk + lub –
pomiędzy wskaźnikiem ciśnienia atmosferycznego absolutnego / względnego.
30
ustawiony jest fabrycznie na absolutne
35, 36
, aby wybrać
67 PL
Page 68

Należy wybrać „Rel“ i potwierdzić przyciskiem HISTORY ABS / REL. Zaczyna
migać wskazanie ciśnienia atmosferycznego. Teraz można wybrać wartość
przyduszając przycisk + lub – .
Dane należy potwierdzić przyckając przycisk HISTORY ABS / REL. Stacja
pogody ukazuje teraz względne ciśnienie atmosferyczne.
W przypadku wybrania absolutnego ciśnienia atmosferycznego należy postępować w następujący sposób:
Należy przydusić i przytrzymać przycisk HISTORY ABS / REL przez ok. 3 sekund.
Następnie należy przydusić przycisk + lub –, aby wybrać absolutne ciśnienie
atmosferyczne. Dane należy potwierdzić przyckając przycisk HISTORY
ABS / REL.
Wybór kanału
Po dokonaniu niezbędnych ustawień, stacja pogodowa łączy się zczujnikiem zewnętrznym automatycznie. Podczas nawiązywania połączenia migają symbole
wilgotności powietrza (na zewnątrz)
Wskazówka: W razie zakłóceń powodowanych przez znajdujące się w pobliżu urządzenia, które transmitują sygnały radiowe, należy wybrać inny kanał dla
czujnika zewnętrznego poprzez naciśnięcie przycisku CH
68 PL
22
oraz temperatury zewnętrznej 25.
37
na stacji pogodowej
Page 69

lub przełącznika wyboru kanału 44 na czujniku zewnętrznym. Na wyświetlaczu
pojawią się następujące informacje.
- 1: kanał czujnika zewnętrznego 1
- 2: kanał czujnika zewnętrznego 2
- 3: kanał czujnika zewnętrznego 3
-
: automatyczna zmiana kanału
Wyświetlanie temperatury itrendu temperatury
Wyświetlacz wskazuje aktualną temperaturę wewnętrzną 19 oraz trend temperatury (wewnętrznej)
Temperatura zewnętrzna
po połączeniu zczujnikiem zewnętrznym. Możliwe są następujące wskazania:
Temperatura wzrasta.
Temperatura nie zmienia się.
Temperatura spada.
15
.
25
itrend temperatury (zewnętrznej) 24 wyświetlane są
69 PL
Page 70

Wyświetlanie wilgotności powietrza itrendu
wilgotności powietrza
Wyświetlacz wskazuje aktualny trend wilgotności powietrza (wpomieszczeniu) 16
oraz aktualną wilgotność powietrza (w pomieszczeniu)
informuje owilgotności powietrza.
Możliwe są następujące wskazania:
DRY = wilgotność powietrza < 40 %
COMFORT = wilgotność powietrza 40–70 %, temperatura wewnętrzna
20 °C–28 °C
WET = wilgotność powietrza > 70 %
17
. Wskaźnik komfortu 18
Trend wilgotności powietrza (na zewnątrz)
22
wnątrz)
są wyświetlane po połączniu stacji zczujnikiem zewnętrznym.
21
oraz wilgotność powietrza (na ze-
Wyświetlanie maksymalnej / minimalnej
temperatury / wilgotności powietrza
Stacja pogodowa po raz pierwszy mierzy izapisuje minimalną / maksymalną temperaturę / wilgotność powietrza po włożeniu baterii.
70 PL
Page 71

Maksymalne iminimalne wartości temperatury, wilgotności powietrza iciśnienia
atmosferycznego zapisywane są automatycznie.
Wtrybie wskazywania czasu 7 nacisnąć przycisk + 35, aby wyświetlić war-
tości maksymalne.
Nacisnąć dwukrotnie przycisk +, aby wyświetlić wartości minimalne.
Przytrzymać przycisk + przez ok. 3 sekundy, aby skasować zapisane wartości
minimalne imaksymalne.
Alarm temperatury imrozu
Alarm temperatury jest krótkim sygnałem, rozbrzmiewającym jak tylko temperatura
powietrza przekroczy wprowadzone temperatury powietrza. W celu regulacji
wybranego zakresu temperatury proszę postępować w następujący sposób:
Nacisnąć przycisk – 36, aby przejść do trybu alarmu temperatury.
Przytrzymać przycisk – przez ok. 3 sekundy. Wskaźnik temperatury maksymal-
nej zacznie migać. Nacisnąć przycisk + lub – , aby wybrać żądaną wartość.
Zatwierdzić wybór przyciskiem MODE 34. Wskaźnik temperatury minimalnej
zacznie migać. Nacisnąć przycisk + lub – , aby wybrać żądaną wartość.
Zatwierdzić wybór przyciskiem MODE.
71 PL
Page 72

Włączanie / wyłączanie alarmu temperatury imrozu
Jeśli aktywny jest więcej niż jeden czujnik zewnętrzny, nacisnąć przycisk ka-
37
nału
, aby wybrać jeden znich.
Ponownie nacisnąć przycisk – 36, aby włączyć alarm temperatury imrozu.
Jeśli alarm mrozu jest włączony, obok temperatury zewnętrznej pojawi się odpowiedni
23
symbol
Jeśli alarm temperatury jest włączony, obok temperatury zewnętrznej pojawi się
odpowiedni symbol. Alarm zostanie włączony przy ustawionych wartościach
temperatury.
Jeśli włączony jest alarm temperatury imrozu, wyświetlane są oba symbole.
. Sygnał alarmu aktywowany jest przy temperaturze –1 °C do + 3 °C.
Podświetlenie
Nacisnąć przycisk SNOOZE / LIGHT 33. Podświetlenie włączy się na 5 sekund.
Wskaźnik baterii
Gdy baterie są bliskie wyczerpania, na wyświetlaczu pojawia się wskaźnik stanu
20, 26
baterii
niem (patrz „Wymiana baterii”).
72 PL
. Należy dokonać wymiany baterii przed ich całkowitym wyczerpa-
Page 73

Wymiana baterii
Stacja pogodowa:
Wymienić baterie, jeśli wyświetlacz staje się nieczytelny lub pojawi się wskaźnik
20
baterii
Zdjąć osłonę komory baterii na tylnej ściance stacji pogodowej.
Wyjąć zużyte baterie.
Włożyć 3 nowe baterie AA, 1,5 V.
Zamknąć komorę baterii.
Czujnik zewnętrzny:
Wymienić baterie, jeśli pojawi się wskaźnik baterii
Zdjąć osłonę komory baterii na tylnej ściance czujnika zewnętrznego.
Wyjąć zużyte baterie.
Włożyć 2 nowe baterie AA, 1,5 V.
Zamknąć komorę baterii.
.
Wskazówka: Zwrócić uwagę na odpowiednie ułożenie biegunów. Jest ono
oznakowane w komorze baterii
40
.
26
.
Wskazówka: Zwrócić uwagę na odpowiednie ułożenie biegunów. Jest ono
oznakowane wkomorze baterii
45
.
73 PL
Page 74

Usuwanie usterek
Wskazówka: Urządzenie zawiera elektroniczne elementy konstrukcyjne.
Dlatego możliwe jest jego zakłócenie przez znajdujące się w jego bezpośrednim
pobliżu urządzenia emitujące fale radiowe.
Jeżeli na wyświetlaczu pojawią się zakłócenia, należy usunąć tego rodzaju
urządzenia zpola zasięgu stacji pogodowej / czujnika zewnętrznego lub na
krótko wyjąć baterie ze stacji pogodowej / czujnika zewnętrznego.
Przeszkody jak np. betonowe ściany mogą również prowadzić do tego, że odbiór
będzie zakłócony. W tym przypadku należy zmienić położenie (np. w pobliżu
okna). Należy koniecznie przestrzegać, aby sensor zewnętrzny został ustawiony
zawsze w promieniu maks. 30 metrów (wolne pole) od stacji bazowej. Podany zasięg jest zasięgiem w wolnym polu i oznacza, że nie powinna stać żadna przeszkoda pomiędzy zewnętrznym sensorem a stacją bazową.
„Kontakt wzrokowy“ pomiędzy zewnętrznym sensorem a stacją bazową poprawia
często transmisję.
Chłód (temperatury zewnętrzne poniżej 0°C) może negatywnie wpłynąć na wydajność baterii sensora zewnętrznego i przez to również na transmisję radiową.
Kolejnym faktorem, który może prowadzić do zakłóceń odbioru, są puste lub słabe
baterie sensora zewnętrznego. Należy je wymienić na nowe.
Jeżeli stacja pogody nie pracuje prawidłowo, należy przeprowadzić ponowne uruchomienie przyciskając przycisk RESET
74 PL
43
.
Page 75

Czyszczenie ikonserwacja
Wżadnym wypadku nie używać cieczy oraz rozpuszczalników, ponieważ
powodują one uszkodzenia.
Czyścić urządzenie wyłącznie zzewnątrz przy użyciu miękkiej suchej ściereczki.
Wżadnym wypadku nie należy spryskiwać czujnika zewnętrznego wodą, np.
przy użyciu węża ogrodowego. Czujnik zewnętrzny zabezpieczony jest wyłącznie przed deszczem padającym zgóry.
Utylizacja
Opakowanie wykonane jest wyłącznie zmateriałów przyjaznych dla
środowiska, które można poddać utylizacji wmiejscowych punktach
recyklingu.
Informacje na temat możliwości utylizacji zużytych produktów można uzyskać
wurzędzie gminy lub miasta.
Wcelu ochrony środowiska naturalnego nie należy wyrzucać wyeksploatowanego urządzenia razem zodpadami domowymi, lecz przekazać je do utylizacji wspecjalistycznym zakładzie. Informacji na temat
punktów zbiórki odpadów przeznaczonych do utylizacji oraz godzin
ich otwarcia udzielają lokalne placówki administracji publicznej.
75 PL
Page 76

Uszkodzone lub zużyte baterie muszą być poddane procesowi recyklingu zgodnie
zdyrektywą 2006 / 66 / WE. Baterie i / lub urządzenie pozostawić wpunkcie
zbiórki odpadów.
Niewłaściwa utylizacja baterii stwarza zagrożenie dla
środowiska naturalnego!
Pb
Baterii nie należy wyrzucać razem zodpadami domowymi. Mogą one zawierać
trujące metale ciężkie idlatego należy je traktować jak odpady niebezpieczne.
Symbole chemiczne metali ciężkich są następujące: Cd = kadm, Hg = rtęć, Pb =
ołów. Dlatego też zużyte baterie należy przekazywać do komunalnych punktów
gromadzenia odpadów niebezpiecznych.
Gwarancja
Urządzenie wyprodukowano według wysokich standardów jakości i poddano
skrupulatnej kontroli przed wysyłką. W przypadku wad produktu nabywcy przysługują ustawowe prawa. Gwarancja nie ogranicza ustawowych praw nabywcy
urządzenia.
Szanowny kliencie, uzyskują Państwo na niniejsze urządzenie 3 lata gwarancji od
daty zakupu. Gwarancja wygasa w razie zawinionego przez użytkownika uszkodzenia produktu, niewłaściwego użycia lub konserwacji.
76 PL
Page 77

W przypadku wystąpienia w ciągu trzech lat od daty zakupu wad materiałowych
lub fabrycznych, dokonujemy – według własnej oceny – bezpłatnej naprawy lub
wymiany urządzenia.
Świadczenie gwarancyjne obejmuje wady materiałowe i fabryczne. Gwarancja
nie obejmuje części produktu ulegających normalnemu zużyciu, uznawanych za
części zużywalne (np. baterie) oraz uszkodzeń części łamliwych, np. przełączników, akumulatorów lub wykonanych ze szkła.
Informacje
Deklaracja zgodności
My OWIM GmbH & Co. KG, Stiftsbergstraße 1, D-74167 Neckarsulm, niniejszym
oświadczamy, ponosząc za to pełną odpowiedzialność, że produkt: Stacja meteo
sterowana radiowo, nr modelu: Z31915, wersja: 02 / 2015, do ktόrego odnosi się
niniejsza deklaracja, jest zgodny znormami /dokumentami normatywnymi dyrektywy 1999 / 5 / WE. Dokumenty te można pobrać ze strony www.owim.com.
77 PL
Page 78

78 PL
Page 79

Rendeltetésszerű használat .................................................Oldal 81
A részek ismertetése ..................................................................Oldal 81
Műszaki adatok .............................................................................Oldal 83
A szállítmány tartalma .............................................................Oldal 84
Biztonság
Általános biztonsági tudnivalók ..............................................................Oldal 85
Biztonsági tanácsok az elemek használatához .....................................Oldal 86
Az üzembevétel előtt
A készülék felállítása ...............................................................................Oldal 87
A kültéri érzékelő üzembevétele .............................................................Oldal 88
Az időjárás állomás üzembevétele .........................................................Oldal 89
Kezelés
A DCF-rádiójel vételezése .......................................................................Oldal 91
12- / 24- órás formátum / °C / °F / hPa / inHg / időzóna /
pontos idő / dátum / nyelv kézi beállítása ..............................................Oldal 92
Az ébresztési időpont beállítása .............................................................Oldal 94
Az ébresztési funkció aktiválása / deaktiválása.....................................Oldal 95
A riasztási hangjelzés kikapcsolása .......................................................Oldal 95
SNOOZE (szundi) funkció ......................................................................Oldal 96
Az időjárás előrejelzés üzembevétele ....................................................Oldal 96
Állomáshely kiválasztása ........................................................................Oldal 98
79 HU
Page 80

Állomáshely kézi kiválasztása .................................................................Oldal 99
Holdfázisok ..............................................................................................Oldal 103
Az elmúlt 12 óra légnyomásának a leolvasása ....................................Oldal 103
A légnyomás- kijelzés beállítása .............................................................Oldal 104
A csatorna beállítása ...............................................................................Oldal 105
A hőmérséklet és a hőmérséklet trend kijelzése .....................................Oldal 106
A levegő páratartalmának és a páratartalom trendnek a kijelzése .....Oldal 106
A maximális / minimális hőmérséklet / páratartalom kijelzése ..............Oldal 107
Hőmérséklet és fagyásponti hőmérséklet riasztás .................................Oldal 108
Hőmérséklet és fagyásponti hőmérséklet riasztás
aktiválása / deaktiválása .........................................................................Oldal 108
Háttér megvilágítás ..................................................................................Oldal 109
Az elemekre vonatkozó kijelzések ..........................................................Oldal 109
Az elemek cseréje ....................................................................................Oldal 110
Hibák elhárítása ............................................................................Oldal 111
Tisztítás és ápolás .........................................................................Oldal 112
Megsemmisítés ................................................................................Oldal 112
Garancia ...............................................................................................Oldal 113
Információk
Megfelelőségi nyilatkozat .......................................................................Oldal 114
80 HU
Page 81

Rádióvezérelt időjárásállomás
Rendeltetésszerű használat
Az időjárás állomás Celsius (°C) vagy Fahrenheit (°F) fokokban kijelzi a beltéri és
a kültéri hőmérsékletet, valamint azok maximális és minimális értékeit. Ezen kívül
kijelzi a beltéri és a kültéri páratartalmat (% RH) és azok maximális és minimális értékeit. Az időjárás állomás további kijelzései az időjárás előrejelzése, a pontos idő
12- / 24 órás formátumban, valamint a dátum. Ezen kívül az időjárás állomás kijelzi
a napi napkelte és naplemente időpontjait és a holdfázisokat is. Az időjárás állomás
rendelkezik még két különböző riasztási funkcióval. A készülék nem ipari alkalmazásra készült.
A részek ismertetése
Időjárás állomás:
1
Dátum kijelző
2
Hónap kijelző
3
1. riasztás
4
SNOOZE (szundi funkció) kijelző
5
Rádiótorony szimbólum
6
DST-kijelző (nyári időszámítás)
81 HU
Page 82

7
Pontos idő kijelző
8
2. riasztás
9
Hétköznap kijelző
10
Napkelte / naplemente időpontja
11
Árapály kijelző
12
Állomáshely
13
Holdfázis
14
Naplemente / naplemente időpontja
15
Hőmérséklet trend (beltéri)
16
Páratartalom trend (beltéri)
17
Páratartalom (beltéri)
18
Komfort-indikátor (maximum / minimum)
19
Beltér i hőmérséklet (°C / °F)
20
Az elemekre vonatkozó kijelzések
21
Páratartalom trend (kültéri)
22
Páratartalom (kültéri)
23
Hőmérséklet és fagyásponti hőmérséklet riasztás (maximum / minimum)
24
Hőmérséklet trend (kültéri)
25
Kültéri hőmérséklet (°C / °F)
26
Az elemekre vonatkozó kijelzések (kültéri érzékelő)
27
Kiválasztott csatorna
28
Légnyomás oszlopos kijelzése
29
Utolsó óra légnyomásának a kijelzése
30
A bszolut / relativ légnyomás
82 HU
Page 83

31
Légnyomás trend
32
Időjárás előrejelzés
33
SNOOZE / LIGHT-gomb (szundi / világítás-gomb)
34
MODE-gomb
35
+ gomb
36
– gomb
37
Csatorna-gomb (CH)
38
HISTORY ABS / REL-gomb
39
CITY-gomb
40
Elemrekesz
Kültéri érzékelő:
41
Ellenőrző-LED
42
Felakasztó szerkezet
43
RESET-gomb
44
Csatorna kiválasztó kapcsoló
45
Elemrekesz
Műszaki adatok
Időjárás állomás:
Hőmérséklet mérési tartomány: 0-tól +50 °C-ig
+32-től +122 °F-ig
83 HU
Page 84

Hőmérséklet felbontás: 0,1 °C
Levegő páratartalom mérési tartomány: 20–95 %
Páratartalom felbontás: 1 %
Rádiójel: DCF
Elem: 3 x AA, 1,5 V
Légnyomás- tartomány: 850 - 1050 hPa
Kültéri érzékelő:
Hőmérséklet mérési tartomány: –20-tól +65 °C-ig
–4-től +149 °F-ig
Levegő páratartalom mérési tartomány: 20 - 95 %
Páratartalom felbontás: 1 %
HF közvetitési jel: 433 MHz
HF átviteli hatótávolság: max. 30 méter (szabad terepen)
Elem: 2 x AA, 1,5 V
A szállítmány tartalma
1 Időjárás állomás
1 kültéri érzékelő
3 elem, AA 1,5 V
2 elem, AA 1,5 V
1 kezelési utasítás
84 HU
Page 85

Biztonság
Olvassa el az összes biztonsági tudnivalókat és utasításokat. A biztonsági tudnivalók és utasítások betartásánál elkövetett mulasztások áramütéseket, tűz kitörését
és / vagy súlyos sérüléseket okozhatnak.
ŐRIZZE MEG VALAMENNYI BIZTONSÁGI TUDNIVALÓT ÉS UTASÍTÁST A
JÖVŐ SZÁMÁRA!
Általános biztonsági tudnivalók
A gyerekek gyakran lebecsülik a veszé-
lyeket. Tartsa a gyerekeket mindig távol a terméktől.
A készüléket 8 éves kor feletti gyermekek, valamint korlátozott fizikai, érzékszervi
vagy szellemi képességgel élő vagy nem megfelelő tapasztalattal és tudással
rendelkező személyek csak felügyelet mellett, illetve a készülék biztonságos
használatára vonatkozó felvilágosítás és a lehetséges veszélyek megértése
után használhatják. A gyermekek nem játszhatnak a készülékkel. A tisztítást és
az ápolást gyermekek felügyelet nélkül nem végezhetik.
Ne vegye üzembe a készüléket, ha az sérült.
85 HU
Page 86

Biztonsági tanácsok az elemek használatához
ÉLETVESZÉLY! Az elemeket le lehet nyelni, és az életveszélyes lehet. Ha valaki
egy elemet lenyelt, azonnal orvoshoz kell fordulni.
Távolítsa el a készülékből az elemeket, ha azokat hosszabb ideig nem használta.
VIGYÁZAT! ROBBANÁSVESZÉLY! Sohase töltse fel újra az elemeket!
A behelyezésnél ügyeljen a helyes polaritásra! Azt az elemrekeszekben meg-
jelölték.
S
zükség esetén a behelyezés előtt tisztítsa meg az elemek és a készülék kapcsa
A lemerült elemeket távolítsa el azonnal a készülékből. Az elemek fokozott
kifolyásveszélye áll fenn!
Az elemek nem tartoznak a háztartási szemétbe!
A törvény minden fogyasztót kötelez arra, hogy az elemeket szabályszerűen
semmisítse meg!
Tartsa az elemeket a gyerekektől távol, ne dobja az elemeket tűzbe, ne zárja
az elemeket rövidre és ne szedje azokat szét.
Mindig egyszerre cserélje ki az elemeket.
Csak azonos típusú elemeket használjon.
Ha az elemek a készülékben kifolytak, a készülék károsodásának az elkerülé-
sére vegye ki azokat azonnal a készülékből!
Kerülje el az elemsavnak a bőrrel, szemmel és nyálkahártyával való
érintkezését. Ha az elemsavhoz hozzáér, mossa le az érintett helyet bőven
vízzel és / vagy forduljon orvoshoz!
86 HU
it.
Page 87

Az üzembevétel előtt
A készülék felállítása
Először tegye az elemeket a külső töltőbe és csak azután az időjárás-állomásba.
VIGYÁZAT! A felállítási hely kiválasztása alkalmával biztosítsa, hogy a ké-
szülék ne legyen kitéve közvetlen napsugarak, rezgések, hő, hideg és nedvesség
hatásának. Ne helyezze a készülékeket hőforrások, pl. fűtőtestek közelébe. Ellenkező esetben a készülék károsodása fenyeget.
Ne helyezze a készüléket megfelelő védőalátét nélkül értékes vagy érzékeny
felületekre. Ellenkező esetben azokat károsodás érheti.
B
iztosítsa, hogy a szomszédos készülékek ne üzemeljenek ugyanazzal a 433 M
es frekvenciával. Azok a készülékek megzavarhatják a rádiós összeköttetést.
Ne helyezze a készüléket fémlapokra, vagy azok közelébe. A készülékek
közötti rádiós összeköttetést ez legyengítheti.
Ne állítsa fel a készülékeket vasbeton épületekben, pl. repülőterek épületeiben,
toronyházakban, gyárépületekben, vagy pincékben. Az erősen befolyásolná a
készülékek közötti rádiós összeköttetést.
Hz-
87 HU
Page 88

A kültéri érzékelő üzembevétele
Távolítsa el a kültéri érzékelő hátsó oldalán az elemrekesz fedelét.
Távolítsa el az elem biztosító csíkot. A kültéri érzékelő most készen áll az
üzemelésre és az ellenőrző-LED
Zárja le az elemrekeszt a fedelével.
A kültéri érzékelő felszerelése:
Tudnivaló: Ehhez a művelethez egy fúrógépre van szüksége.
Keressen a kültéri érzékelő számára egy megfelelő helyet.
Tudnivaló: Ügyeljen arra, hogy a kültéri érzékelőt az időjárás állomáshoz
képest 30 m sugarú körleten belül szerelje fel. Biztosítsa, hogy a kültéri érzékelő
és az időjárás állomás között ne legyenek zavaró hatású akadályok. Ellenkező
esetben azok az adatálvitelt zavarhatják.
Falra szerelés:
Függessze a kültéri érzékelőt a felfüggesztő szerkezettel 42 a csavarra.
88 HU
41
röviden felvillan.
Page 89

Az időjárás állomás üzembevétele
Az elem biztosító csík eltávolítása:
Nyissa fel az időjárás állomás 40 hátsó oldalán az elemrekeszt.
Húzza ki az elem biztosító csíkot.
Végezetül zárja le újra az elemrekeszt.
Mihelyt az elem biztosító csíkot eltávolította, az időjárás állomás elkezdi a rádiójelek
vételét.
Tudnivaló: A vételezés ideje alatt ne változtassa meg az időjárás állomás állomáshelyét. Ellenkező esetben vételezési zavarok állhatnak elő.
Kösse össze az időjárás állomást a kültéri érzékelővel és a
DCF rádiójellel:
Az időjárás állomás az elem biztosító csík eltávolítása után megkísérli a kültéri
érzékelővel való összeköttetés létrehozását. Ez a folyamat eltarthat pár percig. A
kültéri érzékelővel történő sikeres kapcsolat létrehozása esetén az LC-kijelző kijelzi
a csatorna-szimbólumot
változtassa meg a kültéri érzékelő csatornáját „A csatornák beállítása“ fejezet
szerint). Ha automatikus kapcsolat nem hozható létre, akkor nyomja meg a RESET-
43
gombot
a kapcsolat kézi létrehozásához.
Mihelyt az időjárás állomás létrehozta az összeköttetést a kültéri érzékelővel,
27
és a kültéri érzékelő kiválasztott csatornáját (esetleg
89 HU
Page 90

azonnal automatikusan elkezdi a DCF-rádiójel vételezését. Ez a folyamat igénybe
vesz néhány percet és ezt az LC-kijelző a villogó rádiótorony-szimbólummal
5
jelzi.
A DCF-rádiójel sikeres vételezése esetén az LC-kijelző a rádiótorony-szimbólumot
állandóan kijelzi. Ha az üzembevétel időpontjában az atomórával való
szinkronizálás nem lehetséges, a pontos idő beállítását kézzel is elvégezheti (lásd
„12- /
24-órás formátum / °C / °F / hPa / inHg / időzóna / pontos idő / dátum / nyelv kézi
beállítása”).
Rádiójel (DCF):
A DCF jel (időjel adó) időimpulzusokból áll, amelyeket Frankfurt / Main közelében
Németországban a világ egyik legpontosabb órája sugároz ki.
Az időjárás állomása ezeket a jeleket optimális feltételek mellett Frankfurt / Maintól számítva kb. 2000 km távolságig vételezi. A rádiójel vételezése általában kb.
3–10 percig tart.
A vételt akadályok (pl. betonfalak) vagy zavarforrások (pl. más elektromos készülékek) jelentősen korlátozhatják. Esetleg, ha a vételezésnél problémák állnak elő,
változtassa meg az időjárás állomás állomáshelyét (pl. egy ablak közelébe).
90 HU
Page 91

Kezelés
A DCF-rádiójel vételezése
Az időjárás állomás órája a kültéri érzékelővel való sikeres összeköttetés után azonnal,
vagy 3 perccel az elem biztosító csík eltávolítása után, automatikusan elkezdi a
DCF-rádiójel keresését. A keresést az LC-kijelző a rádótorony szimbólum
villogásával jelzi.
Tudnivaló: Vasbeton épületekben a rádiójel vételezése erősen korlátozott lehet
(lásd „A készülék felállítása fejezetet”).
A pontos időtől való eltérés kiigazítására, az óra naponta 1:00, 2:00 és 03:00
órakor automatikusan végrehajtja a DCF-rádiójellel való szinkronizálást.
A DCF-rádiójel vételezését az időjárás állomáson kézzel is be lehet indítani.
Nyomja meg egyidejűleg a + és – gombokat 35, 36. Az időjárás állomás
megkisérli a DCF-rádiójel vételezését. Ez a folyamat igénybe vesz néhány
percet és ezt az LC-kijelző a villogó rádiótorony-szimbólummal jelzi.
Ha a DCF-rádiójel vételezése nem történik meg, a keresés megszakad.
Tudnivaló: Ha az időjárás állomás órája a DCF-rádiójelet hibák, az adóhoz való
túl nagy távolság, vagy hasonlók miatt nem tudja vételezni, megvan a lehetőség a
pontos idő kézi beállítására. Amikor a DCF-rádiójel vételezése sikerül, a kézzel
beállított értékek átíródnak.
5
91 HU
Page 92

12- / 24- órás formátum / °C / °F / hPa / inHg /
időzóna / pontos idő / dátum / nyelv kézi beállítása
A DCF-rádiójel vételezését a felállítás helyén valami megzavarhatja, ill.
megszakíthatja. Ebben az esetben lehetősége van a készülék kézi beállítására.
Járjon el a következőképpen:
1. Nyomja meg és tartsa kb. 3 másodpercen keresztül lenyomva a MODE-
34
gombot
tásához nyomja meg a +, vagy - gombot
Tudnivaló: A pontos idő kijelzésen a 12 órás formátumban az AMszimbólum
ban a PM-szimbólum a délutánt jelzi.
2. Erősítse meg a bevitelét a MODE-gomb megnyomásával. A hőmérséklet
mértékegysége „°C“ , vagy „°F“ villog a kijelzőn. A hőmérséklet mértékegységének kiválasztásához nyomja meg a +, vagy - gombot.
3. Erősítse meg a bevitelét a MODE-gomb megnyomásával. ás- mértékegység vil-
log a kijelzőn. A kívánt mértékegység (hPa / inHg) beállításához nyomja meg
a +, vagy - jelet.
4. Erősítse meg a bevitelét a MODE-gomb megnyomásával. Az időzóna kijelzés
villog a kijelzőben. Nyomja meg a + vagy a – gombot a kívánt érték beállításához (-2-től +2-ig).
Tudnivaló: Az időzóna alapbeállítása GMT+1. Állítsa be az időjárás
állomást az időzónájának megfelelően.
92 HU
. „12 Hr“ vagy „24 Hr“ villog a kijelzőn. Az óraformátum kiválasz-
35, 36
.
7
a délelőttöt jelzi. A pontos idő kijelzésen a 12 órás formátum-
Page 93

5. Erősítse meg a bevitelét a MODE-gomb megnyomásával. A pontos idő kijelzé-
sen az órák kijelzése villog. Nyomja meg a + vagy a – gombot a kívánt érték
beállításához.
Tudnivaló: Az óra és dátum automatikusan beállítódik, amint az időjárásállomás a DCF- rádiójelet nem fogadja. Így állítsa be kézzel az időt és a
dátumot, ha nem fogad rádiójelet.
Tipp: Tartsa lenyomva a + vagy – gombot! Így a kívánt értéket gyorsítva állíthatja be. Ezt a gyorsított beállítást a következő beállítási eljárásoknál is alkalmazhatja. Ha 20 másodpercen keresztül egyetlen gombot se nyom meg, az
LC-kijelző automatikusan az alapkijelzésre vált vissza.
6.
Erősítse meg a bevitelét a MODE-gomb megnyomásával. A pontos idő kijelzés
en
a percek jelzése villog. Nyomja meg a + vagy a – gombot a kívánt érték beállításához.
7. Erősítse meg a bevitelét a MODE-gomb megnyomásával. A pontos idő kijelzésen az évek kijelzése villog. Nyomja meg a + vagy a – gombot a kívánt érték
beállításához.
8. Erősítse meg a bevitelét a MODE-gomb megnyomásával. A dátum kijelző hónap kijelzése
1
villog. Nyomja meg a + vagy a – gombot a kívánt érték be-
állításához.
9. Erősítse meg a bevitelét a MODE-gomb megnyomásával. A dátum kijelző nap
kijelzése villog. Nyomja meg a + vagy a – gombot a kívánt érték beállításához.
10. Erősítse meg a bevitelét a MODE-gomb megnyomásával. A hét napja kijelzés
9
helyett a kijelző nyelvi jelzése villog. A kívánt nyelv kiválasztásához nyomja
meg a +, vagy - gombot .
93 HU
Page 94

Tudnivaló: Német (GE), angol (EN), olasz (IT), francia (FR) és spanyol (SP)
nyelvek között lehet választani (alapnyelvként a német került beállításra).
11. Erősítse meg a bevitelét a MODE-gomb megnyomásával.
Az ébresztési időpont beállítása
1. Röviden nyomja meg a MODE-gombot 34 a riasztás üzemmódba kerüléshez.
Az LC-kijelzőn megjelenik a beállított ébresztési idő.
2. Nyomja meg és tartsa kb. 2 másodpercen keresztül a MODE-gombot lenyomva.
Az órák kijelzése villog.
3. Nyomja meg a + vagy a – gombot
4. Erősítse meg a bevitelét a MODE-gomb megnyomásával. A percek kijelzése
villog. A percek beállításához ismételje meg a 3. lépést.
5. Erősítse meg a bevitelét a MODE-gomb megnyomásával.
Tipp: Tartsa lenyomva a + vagy – gombot! Így a kívánt értéket gyorsítva
állíthatja be. Ezt a gyorsított beállítást a következő beállítási eljárásoknál is
alkalmazhatja. Ha 20 másodpercen keresztül egyetlen gombot se nyom meg,
az LC-kijelző automatikusan az alapkijelzésre vált vissza.
Tudnivaló: Két különböző riasztási időpontot beállítására van lehetősége.
94 HU
35, 36
, a kívánt érték beállításához.
Page 95

6. Nyomja meg röviden kétszer a MODE-gombot, amikor az időjárás állomás az
időjelzés
7
üzemmódban van. Nyomja meg egyszer röviden a MODEgombot, ha az időjárás állomás az 1. riasztás üzemmódban van. Most bekerül a 2. riasztás üzemmódba.
7. Ismételje meg a 2–5-ig lépéseket a 2. riasztás értékeinek a beállításához.
Az ébresztési funkció aktiválása / deaktiválása
1. Nyomja meg röviden egyszer vagy kétszer a MODE-gombot 34, hogy bekerüljön az 1. riasztás vagy a 2. riasztás üzemmódba.
2. Nyomja meg a + gombot
szimbólum
8
megjelenik az LC-kijelzőn. A riasztás most aktiv.
35
. Az 1. riasztás szimbólum 3 vagy a 2. riasztás
3. Nyomja meg ismét a + gombot. Az LC-kijelzőben kialszik az 1. riasztás vagy a
2. riasztás szimbólum. A riasztást deaktiválta.
A riasztási hangjelzés kikapcsolása
Nyomjon meg a SNOOZE- / LIGHT-gombok kivételével 33 egy bármelyik tet-
szőleges gombot, hogy kikapcsolja a riasztási hangjelzést. A riasztást nem kell
újra aktiválni. A beállított riasztási időben magától automatikusan bekapcsolódik.
Tudnivaló: A riasztási hangjelzés kb. 2 percen keresztül hallható.
95 HU
Page 96

SNOOZE (szundi) funkció
Nyomja meg a SNOOZE- / LIGHT-gombot 33, hogy bekerüljön a SNOOZE-
üzemmódba, miközben a riasztási hangjelzés hallható. Kb. 5 perc múlva a riasztási hangjelzés újra felhangzik.
Az időjárás előrejelzés üzembevétele
Tudnivaló: Kérjük hallgassa meg a helyi meteorológiai intézet időjárás előrejelzését
is. Ha a készüléke és a helyi meteorológiai szolgálat előrejelzése között ellentmondások lennének, forduljon a helyi meteorológiai szolgálathoz.
Az időjárás előrejelzés a légnyomás ingadozások kiértékelése alapján kerül meghatározásra és ezért eltérhet a tényleges időjárástól.
Az időjárás állomás a következő időjárás-szimbólumokat jelzi ki:
96 HU
+
= napos
Page 97

+
= kissé felhős
+ = felhős
+ = esős
+
= esős + havas
Az időjárás-szimbólumok az időjárás változást a következő 8 órára adják meg és
nem az aktuális időjárást.
97 HU
Page 98

Az időjárás állomás a légnyomás-trendet 31 is kijelezheti.
A következő kijelzések lehetségesek:
A légnyomás emelkedik.
A légnyomás állandó marad.
A légnyomás csökken.
Állomáshely kiválasztása
Nyomja meg a CITY-gombot 39. Az állomáshely kijelző 12 villog és kijelzésre
kerülnek a hosszúsági és szélességi fokok.
Nyomja meg a + vagy a – gombot 35, 36, az állomáshelyének a kiválasztá-
sához.
Bevitele megerősítéséhez nyomja meg a CITY-gombot. Ha nem jelenik meg a
kijelzőn az állomáshelyének a rövidítése, akkor az állomáshely a felhasználó
által is bevihető (lásd „Állomáshely kézi kiválasztása“).
Egy kevés idő eltelte után az időjárás állomás mutatja a napfelkelte és a
naplemente, a holdfázisok és az apály (TIDE LO) idejét, a közepes vízállást (TIDE
MID) és a dagály (TIDE HI) idejét.
98 HU
Page 99

Állomáshely kézi kiválasztása
Nyomja meg és tartsa kb. 2 másodpercen keresztül a CITY-gombot 39 le-
nyomva. Nyomja meg a + vagy a – gombot
jének a kiválasztásához.
Bevitele megerősítéséhez nyomja meg a CITY-gombot. Ugyanígy állítsa be
a második és a harmadik betűt.
Az LC-kijelzőn megjelenik a GMT és az időzóna kijelző villogni kezd.
Nyomja meg a + vagy a – gombot, hogy beállíthassa a GMT és az Ön idő-
zónája közötti különbséget.
Bevitele megerősítéséhez nyomja meg a CITY-gombot. Ugyanígy állítsa be
állomáshelyének a hosszúsági és szélességi fokát.
Egy kevés idő eltelte után az időjárás állomás mutatja a napfelkelte és a naplemente, a holdfázisok és az apály (TIDE LO) idejét, a közepes vízállást (TIDE MID)
és a dagály (TIDE HI) idejét.
35, 36
, állomáshelye kezdőbetű-
99 HU
Page 100

A következő országokat és városokat lehet kiválasztani:
Germany
(DE)
100 HU
Berlin BER
Bremen BRE
Köln KOE
Dortmund DOR
Dresden DRE
Düsseldorf DUS
Erfurt ERF
Frankfurt FRA
Freiburg FRE
Hamburg HAM
Hannover HAN
Hof HOF
Kaiserslautern KAI
Kassel KAS
Kiel KIE
Leipzig LEI
Magdeburg MAG
München MUN
Nürnberg NUR
Osnabrück OSN
Passau PAS
Regensburg REG
Australia
(AU)
Austria
(AT)
Belgium
(BE)
Rostock ROS
Saarbrücken SAA
Stuttgart STU
Ulm ULM
Würzburg WUR
Canbera CBR
Melbourne MEL
Sydney SYD
Bregenz BRE
Graz GRZ
Innsbruck INN
Linz LNZ
Salzburg SLZ
Vienna WIE
Villach VIL
Wels WEL
Antwerp ANT
Brugge BRG
Brussels BRU
Libramont LIB
Bosnia &
Herzegovina
(BA)
Croatia
(HR)
Czech
(CZ)
Denmark
(DK)
Finland
(FI)
France
(FR)
Liege LIE
Sarajevo SAR
Split SPL
Zagreb ZAG
Brno BRN
Prague PRG
Alborg ALB
Copenhagen KOB
Odense ODE
Helsinki HEL
Ajaccio AJA
Biarritz BIA
Bordeaux BOR
Brest BRE
Cherbourg-
Octeville
CHE
 Loading...