

Page 1

E3862
Second Edition V2
April 2008
Xonar DX
PCI Express Audio Card
Quick installation guide
Page 2

English
1.1 System requirements
To ensure a successful installation of the Xonar DX audio card, your computer must
meet the following requirements:
• One PCI Express 1.0 (or higher) compatible slot for the audio card
• One available 4-pin power cable from PC’s power supply unit
• Microsoft® Windows® Vista/XP(32/64bit)/MCE2005
• Intel® Pentium® 4 1.4GHz or AMD Athlon 1400 CPU or faster CPU
• 256 MB DRAM system memory
• 60 MB available HDD space for driver installation package
• CD-ROM drive (or DVD-ROM drive) for software installation
• High-quality headphones, powered analog speakers, or digital speakers with
Dolby Digital decoder to enjoy the Ultra-High Fidelity sounds of the card
1.2 Package contents
Check your ASUS Xonar DX audio card package for the following items:
• ASUS Xonar DX audio card
• ASUS Xonar DX support CD (including Portable Music Processor™ Lite and
RMAA V6.0.6 utilities)
• Additional low-profile bracket
• S/PDIF TOSLINK optical adapter x1
• Quick installation guide
2
ASUS Xonar DX Quick installation guide
Page 3
1.2 Card installation
To install the Xonar DX audio card:
1. Touch the metal back or side panel of the computer to avoid static electricity.
2. Power OFF the computer, the monitor, and all other peripheral devices
connected to your computer.
3. Unplug the computer power cord from your computer and power outlet.
4. Remove the chassis cover.
5. Locate an empty PCIE slot on the motherboard.
6. Connect the power cable of the power supply to the power connector on the
audio card.
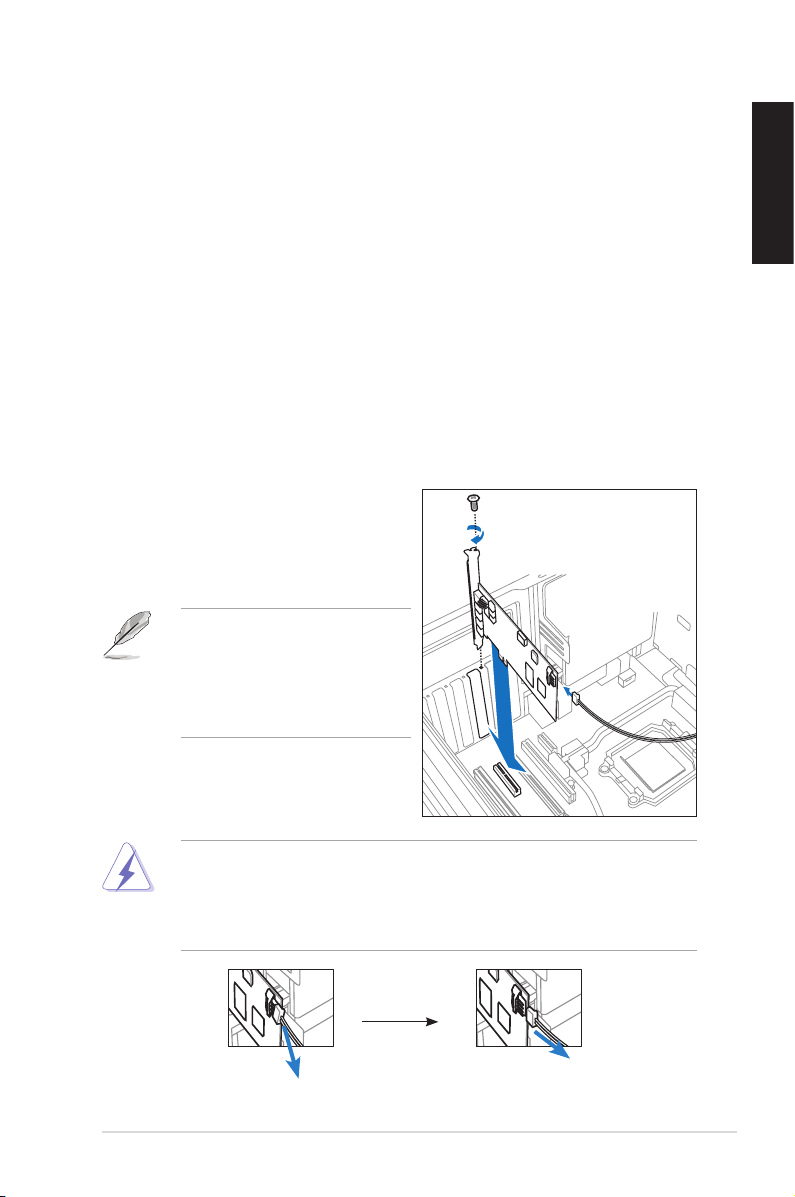
7. Align and insert the audio card into the PCIE slot until it seats in place. Make
sure the goldfingers are properly inserted to the slot.
8. Secure the bracket screw that holds the audio card in place. Refer to the
picture below for the bracket screw hole.
9. Put back the chassis cover.
10. Reconnect all cables.
11. Plug the power cord to the computer
and to a power outlet.
12. Power ON the computer.
The PCI Express high-quality
audio card requires additional
power from your computer. If the
power cable is not connected
properly, the audio card will not
work at all.
English
When removing the power cable from the Xonar DX audio card, make sure to
pull outward the 4-pin header first, then unplug it from the power connector as
the following pictures show. Do not forcefully remove the header from the power
connector; doing so may pull up the power connector from the audio card and
cause damage!
ASUS Xonar DX Quick installation guide
3
Page 4

English
1.3 Driver installation
After installing the Xonar DX audio card on your computer, you need to install
the device driver that enables the Xonar DX audio card to work with Windows
operating system.
The version and content of the driver CD are subject to change without notice.
If you have already installed the ASUS Xonar DX audio card, the Found New
Hardware Wizard window may pop up before or during driver installation. See
figure below.
1.3.1 Installing the Audio Card Driver
To install the device driver:
1. Click Cancel from the Found New Hardware wizard window.
2. Insert the ASUS Xonar DX support CD into your optical drive.
If autorun is enabled, the ASUS Xonar Card Driver screen appears
automatically. Go to step 5.
If Autorun is not enabled in your computer, perform step 3.
3. Click My Computer on your desktop and double-click the optical drive icon.
4. Double-click the setup.exe icon located on the optical drive.
5. Follow the on-screen instructions to complete the installation. Read the “END
USER LICENSE AGREEMENT” in the process and make sure that you
understand and accept it before continuing the installation.
6. When the installation finishes, you may be prompted to restart your computer.
You can choose to restart the computer later if desired.
4
ASUS Xonar DX Quick installation guide
Page 5

1.4 Connecting audio device
1.4.1 Back ports
SPDIF Out
Line / Mic In
Front Out
Side Surround
Center & Subwoofer
Back Surround
1.4.2 Connecting analog speakers
English
2 Speakers
ASUS Xonar DX Quick installation guide
Front Out
5
Page 6

English
2.1 Speakers
Front Out
4 Speakers
Front Out
Side Surround
6
ASUS Xonar DX Quick installation guide
Page 7

4.1 Speakers
5.1 Speakers
English
Front Out
Side Surround
ASUS Xonar DX Quick installation guide
Front Out
Side Surround
Center & Subwoofer
7
Page 8

English
6.1 Speakers
Front Out
Side Surround
Center & Subwoofer
Back Surround
7.1 Speakers
Front Out
Side Surround
Center & Subwoofer
Back Surround
8
ASUS Xonar DX Quick installation guide
Page 9

1.4.3 Connecting digital speakers
SPDIF Out
Plug the optical TOSLINK adapter into the S/PDIF-Out port. Then, connect your
decoder’s S/PDIF In port to the optical adapter with the TOSLINK optical cable.
SPDIF Out
1.4.4 Connecting Line-In audio sources
English
ASUS Xonar DX Quick installation guide
Line In
9
Page 10

English
1.4.5 Connecting headphone / microphone
10
ASUS Xonar DX Quick installation guide
 Loading...