


ASUS WIFI-TV User Manual
WiFi-TV
IEEE 802.11a/b/g
Wireless LAN Adapter and
Digital/Analog TV/FM Radio Tuner
PCI Card
User guide

E2042E2042
E2042
E2042E2042
First Edition V1First Edition V1
First Edition V1
First Edition V1First Edition V1
April 2005April 2005
April 2005
April 2005April 2005
Copyright © 2005 ASUSTeK COMPUTER INC. All Rights Reserved.Copyright © 2005 ASUSTeK COMPUTER INC. All Rights Reserved.
Copyright © 2005 ASUSTeK COMPUTER INC. All Rights Reserved.
Copyright © 2005 ASUSTeK COMPUTER INC. All Rights Reserved.Copyright © 2005 ASUSTeK COMPUTER INC. All Rights Reserved.
No part of this manual, including the products and software described in it, may be reproduced,
transmitted, transcribed, stored in a retrieval system, or translated into any language in any form
or by any means, except documentation kept by the purchaser for backup purposes, without the
express written permission of ASUSTeK COMPUTER INC. (“ASUS”).
Product warranty or service will not be extended if: (1) the product is repaired, modified or
altered, unless such repair, modification of alteration is authorized in writing by ASUS; or (2)
the serial number of the product is defaced or missing.
ASUS PROVIDES THIS MANUAL “AS IS” WITHOUT WARRANTY OF ANY KIND, EITHER
EXPRESS OR IMPLIED, INCLUDING BUT NOT LIMITED TO THE IMPLIED WARRANTIES
OR CONDITIONS OF MERCHANTABILITY OR FITNESS FOR A PARTICULAR PURPOSE.
IN NO EVENT SHALL ASUS, ITS DIRECTORS, OFFICERS, EMPLOYEES OR AGENTS BE
LIABLE FOR ANY INDIRECT, SPECIAL, INCIDENTAL, OR CONSEQUENTIAL DAMAGES
(INCLUDING DAMAGES FOR LOSS OF PROFITS, LOSS OF BUSINESS, LOSS OF USE
OR DATA, INTERRUPTION OF BUSINESS AND THE LIKE), EVEN IF ASUS HAS BEEN
ADVISED OF THE POSSIBILITY OF SUCH DAMAGES ARISING FROM ANY DEFECT OR
ERROR IN THIS MANUAL OR PRODUCT.
SPECIFICATIONS AND INFORMATION CONTAINED IN THIS MANUAL ARE FURNISHED
FOR INFORMATIONAL USE ONLY, AND ARE SUBJECT TO CHANGE AT ANY TIME
WITHOUT NOTICE, AND SHOULD NOT BE CONSTRUED AS A COMMITMENT BY ASUS.
ASUS ASSUMES NO RESPONSIBILITY OR LIABILITY FOR ANY ERRORS OR
INACCURACIES THAT MAY APPEAR IN THIS MANUAL, INCLUDING THE PRODUCTS
AND SOFTWARE DESCRIBED IN IT.
Products and corporate names appearing in this manual may or may not be registered
trademarks or copyrights of their respective companies, and are used only for identification or
explanation and to the owners’ benefit, without intent to infringe.
iiii
ii
iiii

Contents
Notices ................................................................................................. v
Safety information .............................................................................. vi
About this guide ................................................................................ vii
WiFi-TV specifications summary ......................................................... ix
Chapter 1:Chapter 1:
Chapter 1:
Chapter 1:Chapter 1:
1.1 Welcome! .............................................................................. 1-2
1.2 Package contents ................................................................. 1-2
1.3 Special features .................................................................... 1-3
1.3.1 Wireless LAN features ............................................ 1-3
1.3.2 TV features ............................................................ 1-4
1.4 Card layout ........................................................................... 1-5
1.5 LED indicator ........................................................................ 1-5
Chapter 2:Chapter 2:
Chapter 2:
Chapter 2:Chapter 2:
2.1 Card installation .................................................................... 2-2
2.1.1 System requirements ............................................. 2-2
2.1.2 Installing the card ................................................... 2-2
2.2 Connecting devices and accessories .................................... 2-3
2.2.1 Digital cable TV and FM radio ................................. 2-3
2.2.2 Analog cable TV ..................................................... 2-3
2.2.2 Television, VCR, or camcorder ................................ 2-3
2.2.3 Wi-Fi antenna .......................................................... 2-4
Product introductionProduct introduction
Product introduction
Product introductionProduct introduction
InstallationInstallation
Installation
InstallationInstallation
2.3 Driver installation ................................................................. 2-6
2.3.1 Running the support CD ......................................... 2-6
2.3.2 Drivers menu .......................................................... 2-6
2.3.3 Manual menu ........................................................... 2-7
2.3.4 ASUS contact information ...................................... 2-7
2.3.5 Wi-Fi driver and utilities installation ........................ 2-8
Chapter 3:Chapter 3:
Chapter 3:
Chapter 3:Chapter 3:
3.1 Recommended network setup .............................................. 3-2
3.1.1 Ad-hoc mode .......................................................... 3-2
3.1.2 Infrastructure mode................................................ 3-2
3.1.3 Software Access Point (Soft AP) ........................... 3-3
3.1.4 Wireless bridge (Wireless Distribution System) ..... 3-4
3.2 Using the One Touch wizard ................................................. 3-5
3.2.1 Launching the setup wizard ................................... 3-5
3.2.2 Creating your own wireless LAN (One Touch) ........ 3-5
3.2.3 Connecting to an access point ............................... 3-8
3.2.4 Connecting to another wireless device .................. 3-9
Wi-Fi featuresWi-Fi features
Wi-Fi features
Wi-Fi featuresWi-Fi features
3.2.5 Customizing your setup ........................................3-11
iiiiii
iii
iiiiii

Contents
3.3 Other software support ...................................................... 3-14
3.3.1 Control Center ...................................................... 3-14
3.3.2 Wireless Settings .................................................. 3-16
3.3.3 Mobile Manager ..................................................... 3-17
3.3.4 Site Monitor .......................................................... 3-18
Chapter 4:Chapter 4:
Chapter 4:
Chapter 4:Chapter 4:
4.1 Using PowerCinema .............................................................. 4-2
4.1.1 Launching PowerCinema ......................................... 4-2
4.1.2 Optimizing your computer for multimedia .............. 4-3
4.1.3 Navigating through the home page ........................ 4-6
4.1.4 Using the player controls........................................ 4-6
4.1.5 Watching TV ........................................................... 4-7
4.1.6 Watching movies .................................................... 4-9
4.2 Using PowerDirector ........................................................... 4-10
4.2.1 Adjusting the sound recording settings ............... 4-10
4.2.2 Creating movies .................................................... 4-10
Appendix:Appendix:
Appendix:
Appendix:Appendix:
A.1 Wireless LAN channels ......................................................... A-2
A.1.1 IEEE 802.11b/g ...................................................... A-2
A.1.2 IEEE 802.11a .......................................................... A-3
A.2.1 Using the remote controller ................................... A-4
A.2 Remote controller ................................................................. A-4
TV featuresTV features
TV features
TV featuresTV features
Reference informationReference information
Reference information
Reference informationReference information
A.2.2 Remote controller layout ........................................ A-5
A.2.3 Remote controller functions ................................... A-5
A.2.4 Mouse mode ........................................................... A-6
A.3 International TV systems and standards .............................. A-7
iviv
iv
iviv

Notices
Federal Communications Commission StatementFederal Communications Commission Statement
Federal Communications Commission Statement
Federal Communications Commission StatementFederal Communications Commission Statement
This device complies with Part 15 of the FCC Rules. Operation is subject to
the following two conditions:
•
This device may not cause harmful interference, and
•
This device must accept any interference received including interference
that may cause undesired operation.
This equipment has been tested and found to comply with the limits for a
Class B digital device, pursuant to Part 15 of the FCC Rules. These limits are
designed to provide reasonable protection against harmful interference in a
residential installation. This equipment generates, uses and can radiate radio
frequency energy and, if not installed and used in accordance with
manufacturer’s instructions, may cause harmful interference to radio
communications. However, there is no guarantee that interference will not
occur in a particular installation. If this equipment does cause harmful
interference to radio or television reception, which can be determined by
turning the equipment off and on, the user is encouraged to try to correct
the interference by one or more of the following measures:
•
Reorient or relocate the receiving antenna.
•
Increase the separation between the equipment and receiver.
•
Connect the equipment to an outlet on a circuit different from that to
which the receiver is connected.
•
Consult the dealer or an experienced radio/TV technician for help.
The use of shielded cables for connection of the monitor to the graphics
card is required to assure compliance with FCC regulations. Changes or
modifications to this unit not expressly approved by the party
responsible for compliance could void the user’s authority to operate
this equipment.
FCC RF Radiation Exposure StatementFCC RF Radiation Exposure Statement
FCC RF Radiation Exposure Statement
FCC RF Radiation Exposure StatementFCC RF Radiation Exposure Statement
This equipment complies with the FCC RF radiation exposure limits set forth
for an uncontrolled environment. This equipment should be installed and
operated with a mininum distance of 20 cm between the radiator and your
Canadian Department of Communications StatementCanadian Department of Communications Statement
Canadian Department of Communications Statement
Canadian Department of Communications StatementCanadian Department of Communications Statement
This digital apparatus does not exceed the Class B limits for radio noise
emissions from digital apparatus set out in the Radio Interference
Regulations of the Canadian Department of Communications.
This class B digital apparatus complies with Canadian ICES-003.This class B digital apparatus complies with Canadian ICES-003.
This class B digital apparatus complies with Canadian ICES-003.
This class B digital apparatus complies with Canadian ICES-003.This class B digital apparatus complies with Canadian ICES-003.
vv
v
vv

Safety information
Electrical safetyElectrical safety
Electrical safety
Electrical safetyElectrical safety
•
To prevent electrical shock hazard, disconnect the power cable from the
electrical outlet before relocating the system.
•
When adding or removing devices to or from the system, ensure that the
power cables for the devices are unplugged before the signal cables are
connected. If possible, disconnect all power cables from the existing
system before you add a device.
•
Before connecting or removing signal cables from the motherboard,
ensure that all power cables are unplugged.
•
Seek professional assistance before using an adapter or extension cord.
These devices could interrupt the grounding circuit.
•
Make sure that your power supply is set to the correct voltage in your
area. If you are not sure about the voltage of the electrical outlet you are
using, contact your local power company.
•
If the power supply is broken, do not try to fix it by yourself. Contact a
qualified service technician or your retailer.
Operation safetyOperation safety
Operation safety
Operation safetyOperation safety
•
Before installing the motherboard and adding devices on it, carefully read
all the manuals that came with the package.
•
Before using the product, make sure all cables are correctly connected
and the power cables are not damaged. If you detect any damage,
contact your dealer immediately.
•
To avoid short circuits, keep paper clips, screws, and staples away from
connectors, slots, sockets and circuitry.
•
Avoid dust, humidity, and temperature extremes. Do not place the
product in any area where it may become wet.
•
Place the product on a stable surface.
•
If you encounter technical problems with the product, contact a qualified
service technician or your retailer.
vivi
vi
vivi

About this guide
This user guide contains the information you need when installing and
configuring the card.
How this guide is organizedHow this guide is organized
How this guide is organized
How this guide is organizedHow this guide is organized
This guide contains the following parts:
••
Chapter 1: Product introductionChapter 1: Product introduction
•
Chapter 1: Product introduction
••
Chapter 1: Product introductionChapter 1: Product introduction
This chapter describes the card features and the new technologies it
supports.
••
Chapter 2: Hardware and driver installationChapter 2: Hardware and driver installation
•
Chapter 2: Hardware and driver installation
••
Chapter 2: Hardware and driver installationChapter 2: Hardware and driver installation
This chapter provides step by step instructions on how to install card
and the card drivers and utilities to your computer.
••
Chapter 3: WiFi featuresChapter 3: WiFi features
•
Chapter 3: WiFi features
••
Chapter 3: WiFi featuresChapter 3: WiFi features
This chapter provides information on the Wi-Fi features of the card
including the recommended setup and bundled utilities.
••
Chapter 4: TV featuresChapter 4: TV features
•
Chapter 4: TV features
••
Chapter 4: TV featuresChapter 4: TV features
This chapter provides information on the TV features of the card and
the bundled software application.
••
Appendix: Reference informationAppendix: Reference information
•
Appendix: Reference information
••
Appendix: Reference informationAppendix: Reference information
The Appendix provides information on the wireless LAN channels,
remote controller, and TV standards in your location.
Where to find more informationWhere to find more information
Where to find more information
Where to find more informationWhere to find more information
Refer to the following sources for additional information and for product
and software updates.
1.1.
ASUS websitesASUS websites
1.
ASUS websites
1.1.
ASUS websitesASUS websites
The ASUS website provides updated information on ASUS hardware
and software products. Refer to the ASUS contact information.
2.2.
Optional documentationOptional documentation
2.
Optional documentation
2.2.
Optional documentationOptional documentation
Your product package may include optional documentation, such as
warranty flyers, that may have been added by your dealer. These
documents are not part of the standard package.
viivii
vii
viivii

Conventions used in this guideConventions used in this guide
Conventions used in this guide
Conventions used in this guideConventions used in this guide
To make sure that you perform certain tasks properly, take note of the
following symbols used throughout this user guide.
DANGER/WARNING: DANGER/WARNING:
DANGER/WARNING: Information to prevent injury to yourself
DANGER/WARNING: DANGER/WARNING:
when trying to complete a task.
CAUTION:CAUTION:
CAUTION: Information to prevent damage to the components
CAUTION:CAUTION:
when trying to complete a task.
IMPORTANT: IMPORTANT:
IMPORTANT: Instructions that you MUST follow to complete a
IMPORTANT: IMPORTANT:
task.
NOTE: NOTE:
NOTE: Tips and additional information to help you complete a
NOTE: NOTE:
task.
TypographyTypography
Typography
TypographyTypography
Bold textBold text
Bold text Indicates a menu or an item to select.
Bold textBold text
Italics
<Key> Keys enclosed in the less-than and greater-than
<Key1+Key2+Key3> If you must press two or more keys
Command Means that you must type the command exactly
Used to emphasize a word or a phrase.
sign means that you must press the enclosed key.
Example: <Enter> means that you must press the
Enter or Return key.
simultaneously, the key names are linked with a
plus sign (+).
Example: <Ctrl+Alt+D>
as shown, then supply the required item or value
enclosed in brackets.
Example: At the DOS prompt, type the command
line:
format a:
viiiviii
viii
viiiviii

WiFi-TV specifications summary
WiFi specificationsWiFi specifications
WiFi specifications
WiFi specificationsWiFi specifications
InterfaceInterface
Interface
InterfaceInterface
Wi-Fi StandardWi-Fi Standard
Wi-Fi Standard
Wi-Fi StandardWi-Fi Standard
TechnologyTechnology
Technology
TechnologyTechnology
PCI bus
IEEE 802.11g; IEEE 802.11a; IEEE 802.11b
Orthogonal Frequency Division Multiplexing (OFDM)
Direct Sequence Spread Spectrum (DSSS)
Data transferData transfer
Data transfer
Data transferData transfer
ratesrates
rates
ratesrates
SupportedSupported
Supported
SupportedSupported
networksnetworks
networks
networksnetworks
OperatingOperating
Operating
OperatingOperating
channelschannels
channels
channelschannels
SecuritySecurity
Security
SecuritySecurity
OperatingOperating
Operating
OperatingOperating
distancedistance
distance
distancedistance
Operating temp.Operating temp.
Operating temp.
Operating temp.Operating temp.
Storage temp.Storage temp.
Storage temp.
Storage temp.Storage temp.
802.11a/g : 54, 48, 36, 24,18, 12, 9, and 6 Mbps
802.11b : 11, 5.5, 2, and1 Mbps
Infrastructure mode
Ad-hoc mode (peer-to-peer)
Software Access Point (Soft AP) mode*
Wireless Bridge (Wireless Distribution System) mode*
802.11b/g : 2.40 ~ 2.4835 GHz
802.11a : 4.92 ~ 5.08 GHz
5.15 ~ 5.35 GHz
5.47 ~ 5.805 GHz
64 or 128-bit Wired Equivalent Privacy (WEP) encryption
Wi-Fi Protected Access (WPA)
Indoor : 130 ft (40 m)
Outdoor : 1000 ft (310 m) LOS**
-20ºC ~ 65ºC
-30ºC ~ 75ºC
CompatibilityCompatibility
Compatibility
CompatibilityCompatibility
Supported OSSupported OS
Supported OS
Supported OSSupported OS
AccessoryAccessory
Accessory
AccessoryAccessory
LEDLED
LED
LEDLED
Software supportSoftware support
Software support
Software supportSoftware support
®®
®
**
On WindowsOn Windows
*
On Windows
**
On WindowsOn Windows
****
Line-of-sightLine-of-sight
**
Line-of-sight
****
Line-of-sightLine-of-sight
®®
2000/XP/2003 Server only 2000/XP/2003 Server only
2000/XP/2003 Server only
2000/XP/2003 Server only 2000/XP/2003 Server only
IEEE 802.11a/b/g devices
Windows® 2000/XP/2003 Server (32-bit version)
Omni-directional dual-band antenna with magnetic base
Green data transmission (AIR) LED
One Touch Wizard
Control Center
Wireless Settings
Mobile Manager
Site Monitor (client mode)
(Continued on the next page)
ixix
ix
ixix

WiFi-TV specifications summary
TV specificationsTV specifications
TV specifications
TV specificationsTV specifications
InterfaceInterface
Interface
InterfaceInterface
TV StandardTV Standard
TV Standard
TV StandardTV Standard
SupportedSupported
Supported
SupportedSupported
technologytechnology
technology
technologytechnology
PCI bus
NTSC/PAL/SECAM
Analog TV
Digital TV (DVB-T)
FM radio
PortsPorts
Ports
PortsPorts
Software supportSoftware support
Software support
Software supportSoftware support
Supported OSSupported OS
Supported OS
Supported OSSupported OS
AccessoriesAccessories
Accessories
AccessoriesAccessories
Specifications are subject to change without notice.Specifications are subject to change without notice.
Specifications are subject to change without notice.
Specifications are subject to change without notice.Specifications are subject to change without notice.
Analog PAL/SECAM
Digital PAL/SECAM
Audio-Video In
CyberLink PowerCinema
CyberLink PowerDirector
Intervideo® WinDVD Suite
Windows® XP
WiFi-TV remote controller with USB IR receiver
Audio-Video cable
PAL/SECAM to NTSC RF adapter
FM antenna
xx
x
xx

This chapter describes the card
features and the new technologies it
supports.
introduction
Product
1

1.1 Welcome!
®®
®
Thank you for buying an ASUSThank you for buying an ASUS
Thank you for buying an ASUS
Thank you for buying an ASUSThank you for buying an ASUS
®®
WiFi-TV! WiFi-TV!
WiFi-TV!
WiFi-TV! WiFi-TV!
The WiFi-TV card delivers a host of new features and latest technologies,
making it another standout in the long line of ASUS quality products!
Before you start installing the card, drivers, and software applications,
check the items in your package with the list below.
1.2 Package contents
Check your WiFi-TV package for the following items.
PCI CardPCI Card
PCI Card ASUS WiFi-TV PCI card
PCI CardPCI Card
CableCable
Cable Audio-Video cable
CableCable
AccessoriesAccessories
Accessories Remote controller with two “AAA” batteries
AccessoriesAccessories
USB remote controller IR receiver with mounting tape
PAL/SECAM to NTSC RF adapter
Omni-directional dual-band antenna
FM antenna
Support CDSupport CD
Supp or t CD ASUS WiFi-TV support CD includes:
Support CDSupport CD
• Card drivers
• CyberLink PowerCinema
• Cyberlink PowerDirector
DocumentationDocumentation
Documentation User guide
DocumentationDocumentation
If any of the above items is damaged or missing, contact your retailer.
1-21-2
1-2
1-21-2
Chapter 1: Product introductionChapter 1: Product introduction
Chapter 1: Product introduction
Chapter 1: Product introductionChapter 1: Product introduction

1.3 Special features
1.3.11.3.1
1.3.1
1.3.11.3.1
54 Mbps speed advantage54 Mbps speed advantage
54 Mbps speed advantage
54 Mbps speed advantage54 Mbps speed advantage
With data transmission rate up to five times faster than IEEE 802.11b
standards, the WiFi-TV breaks the wireless data transmission speed barrier
to give you faster Internet connection and file sharing capabilities.
One Touch setup wizardOne Touch setup wizard
One Touch setup wizard
One Touch setup wizardOne Touch setup wizard
Designed for novice home users and experts alike, the One Touch setup
wizard guides you through the entire setup process without the hassles of
configuring confusing network settings.
The One Touch wizard guides you in configuring the WiFi-TV as an access
point and intelligently configures the Internet connection sharing settings
so you can share your Internet connection with other computers in your
home or office network.
Easy integration and flexibilityEasy integration and flexibility
Easy integration and flexibility
Easy integration and flexibilityEasy integration and flexibility
Because WiFi-TV uses IEEE 802.11a/b/g standard, you can easily integrate
all wireless devices using different wireless standards. This flexibility lets
you use the WiFi-TV card in almost any wireless LAN environment.
Wireless LAN featuresWireless LAN features
Wireless LAN features
Wireless LAN featuresWireless LAN features
Soft access point functionSoft access point function
Soft access point function
Soft access point functionSoft access point function
If you are using a Windows® 2000/XP/Server 2003 operating system, you
can transform the WiFi-TV card into a Software Access Point (Soft AP).
When in Soft AP mode, WiFi-TV can support an unlimited number of client
computers with wireless LAN adapters making it an ideal solution for homes
and offices with single Internet connection or network printer.
Wireless bridge capabilityWireless bridge capability
Wireless bridge capability
Wireless bridge capabilityWireless bridge capability
Integrate several wireless LANs using the wireless bridge capability of the
WiFi-TV. With the bundled software utilities, you can connect several
wireless LANs in no time without buying expensive wireless LAN peripherals.
Full software supportFull software support
Full software support
Full software supportFull software support
The WiFi-TV support CD includes the latest utilities that could help you set
up and create a wireless home or office network. These utilities also assist
you in integrating the card to an existing wireless network.
Moveable omni-directional dual-band antennaMoveable omni-directional dual-band antenna
Moveable omni-directional dual-band antenna
Moveable omni-directional dual-band antennaMoveable omni-directional dual-band antenna
A moveable, omni-directional, dual-band antenna comes with your WiFi-TV
card to maximize your wireless coverage.
ASUS WiFi-TVASUS WiFi-TV
ASUS WiFi-TV
ASUS WiFi-TVASUS WiFi-TV
1-31-3
1-3
1-31-3

1.3.21.3.2
1.3.2
1.3.21.3.2
Watch TV on your PCWatch TV on your PC
Watch TV on your PC
Watch TV on your PCWatch TV on your PC
The WiFi-TV card lets you watch TV on your PC. With a digital cable TV/FM
radio and analog cable TV interfaces, WiFi-TV supports both digital (DVB-T)
and analog cable TV and FM radio signals. Digital cable TV signals provide
clearer, sharper images, and stereo quality sound. Contact your local cable
TV provider for the availability of this service.
Supports various TV standardsSupports various TV standards
Supports various TV standards
Supports various TV standardsSupports various TV standards
The card supports NTSC, PAL, or SECAM TV standard. If the TV standard in
your area is NTSC, use the PAL/SECAM to NTSC RF adapter to receive TV
signals from your digital or analog cable TV provider.
ConnectivityConnectivity
Connectivity
ConnectivityConnectivity
If you want to watch on your television set or create a movie from your
digital video recorder, you can use the supplied AV cable to connect the
WiFi-TV to your television or camcorder. With this, you still enjoy digital or
analog cable TV signals anytime. You can also use the AV cable to connect
other multimedia devices such as VCRs and digital cameras.
TV featuresTV features
TV features
TV featuresTV features
Full software supportFull software support
Full software support
Full software supportFull software support
Your WiFi-TV package includes the PowerCinema application that allows you
to watch and record your favorite TV programs, watch DVD/VCD movies,
browse photos stored in your computer, or listen to your favorite music CD
or FM radio station.
If you want to watch or create a movie from your home videos, you can
connect your video recorder to the Audio-Video port and create a movie
using the bundled PowerDirector application.
1-41-4
1-4
1-41-4
Chapter 1: Product introductionChapter 1: Product introduction
Chapter 1: Product introduction
Chapter 1: Product introductionChapter 1: Product introduction
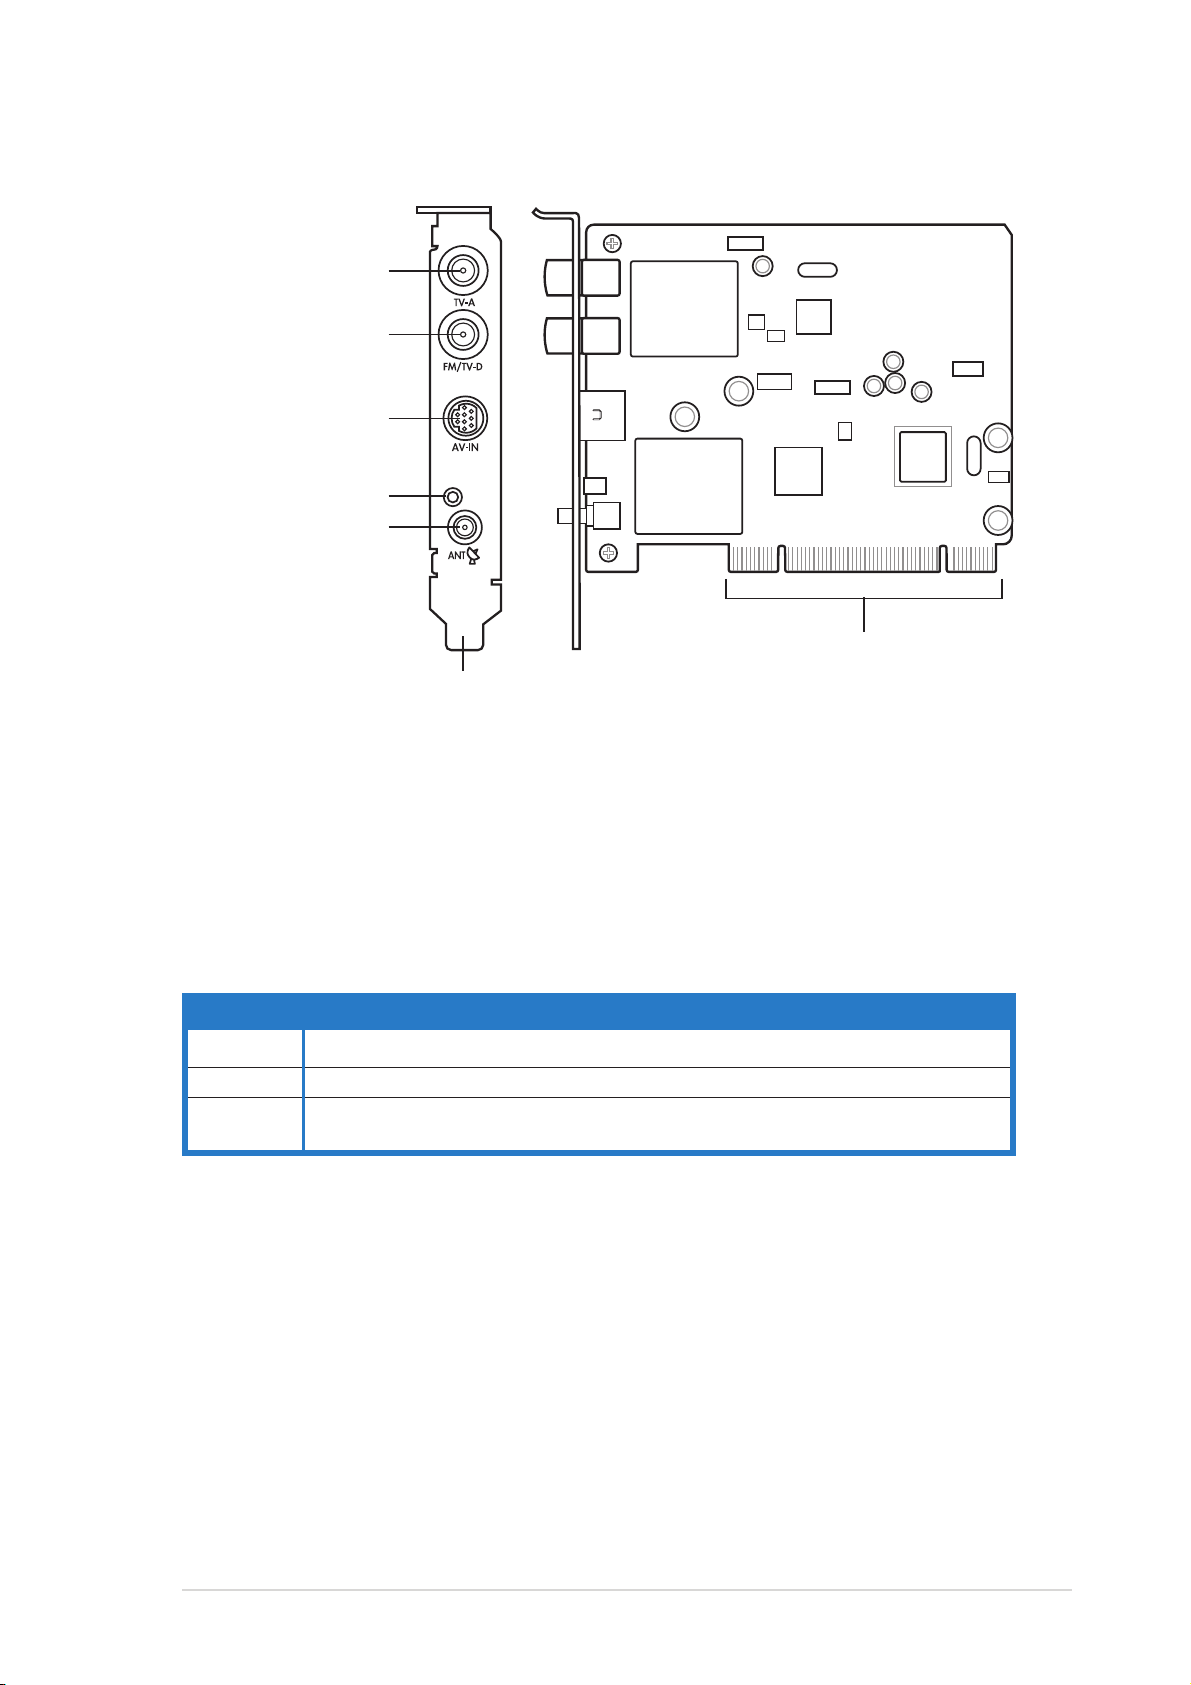
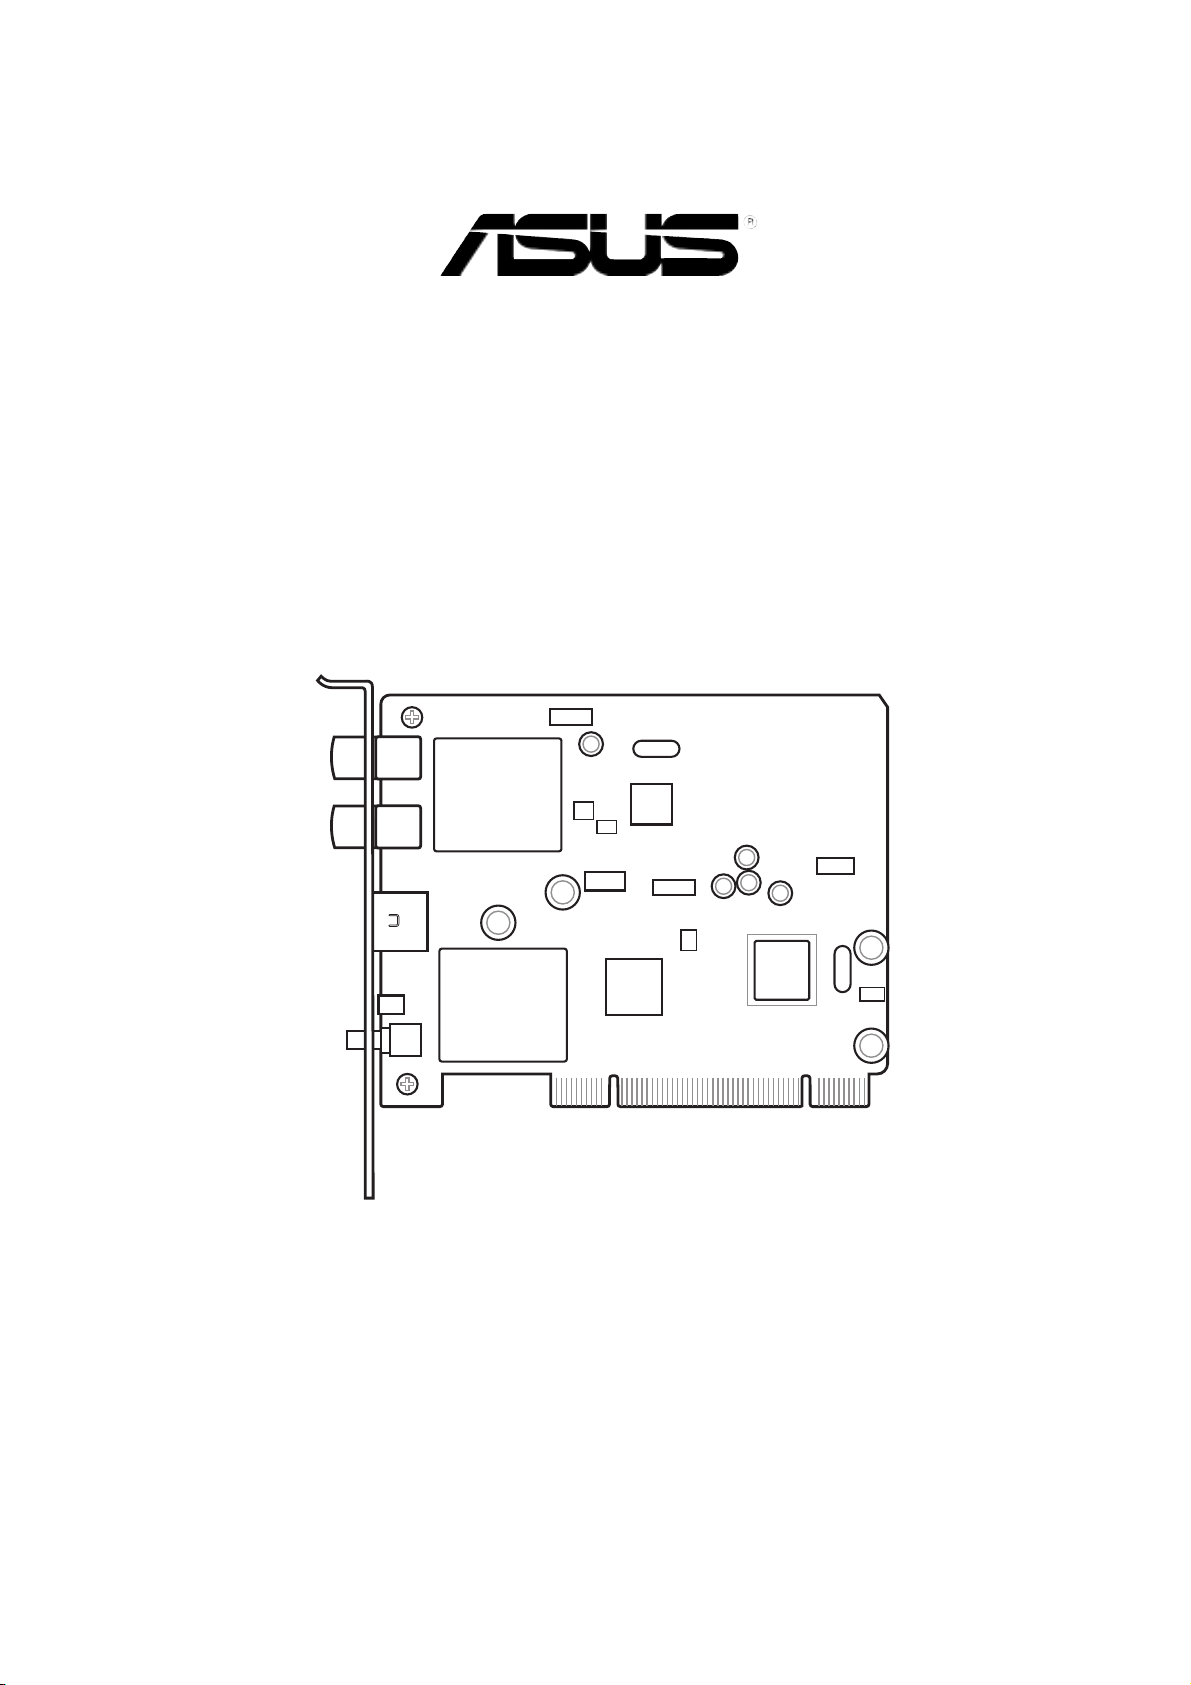
1.4 Card layout
Analog TV port
Digital TV/
FM radio port
Audio-Video port
Wi-Fi activity LED
Wi-Fi antenna port
BracketBracket
Bracket
BracketBracket
PCI connectorsPCI connectors
PCI connectors
PCI connectorsPCI connectors
1.5 LED indicator
The card comes with a wireless LAN activity LED. Refer to the table below
for the LED indications.
Wireless LAN LED indicationsWireless LAN LED indications
Wireless LAN LED indications
Wireless LAN LED indicationsWireless LAN LED indications
StatusStatus
Status
StatusStatus
OnOn
O n The WiFi-TV is on but has no data activity
OnOn
OffOff
O f f The WiFi-TV card is off
OffOff
FlashingFlashing
Flashing The WiFi-TV card is transmitting and/or receiving data
FlashingFlashing
The WiFi-TV card scanning for available access points or another wireless device
IndicationIndication
Indication
IndicationIndication
ASUS WiFi-TVASUS WiFi-TV
ASUS WiFi-TV
ASUS WiFi-TVASUS WiFi-TV
1-51-5
1-5
1-51-5

1-61-6
1-6
1-61-6
Chapter 1: Product introductionChapter 1: Product introduction
Chapter 1: Product introduction
Chapter 1: Product introductionChapter 1: Product introduction

This chapter provides step by step
instructions on how to install card and
the card drivers and utilities to your
computer.
Installation
2
2.1 Card installation
2.1.12.1.1
2.1.1
2.1.12.1.1
Before installing the WiFi-TV card, make sure that your system meets the
following requirements.
• Intel
AMD Athlon™ processor
• Windows
• 64 MB system memory (minimum)
• Microsoft DirectX 9.0 or higher
• Windows Media Player 9 or higher
• Optical drive for utilities and driver installation
• Available PCI slot
• Local digital or analog cable TV subscription
2.1.22.1.2
2.1.2
2.1.22.1.2
System requirementsSystem requirements
System requirements
System requirementsSystem requirements
®
Pentium™ 4 600+ series processor
®
2000/XP/2003 Server
Installing the cardInstalling the card
Installing the card
Installing the cardInstalling the card
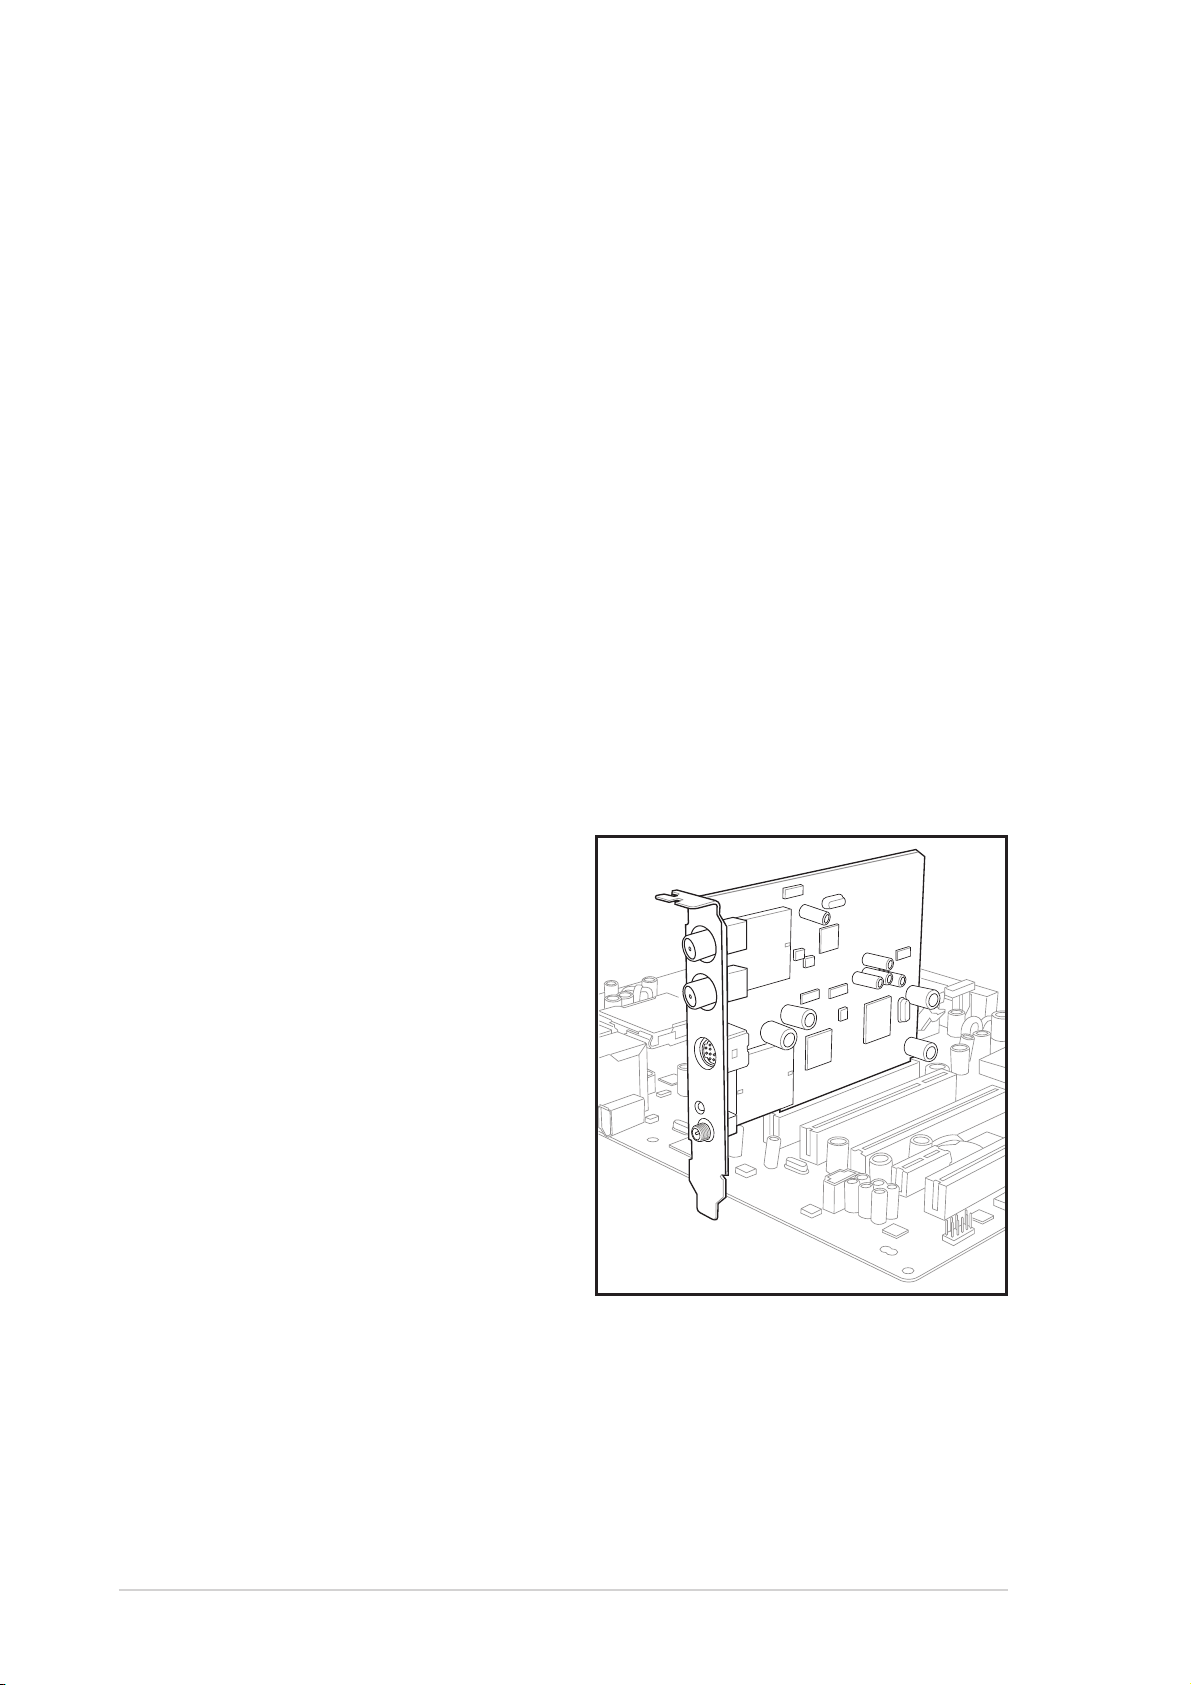
To install the WiFi-TV card:
1. Remove the system unit
cover (if your motherboard is
already installed in a chassis).
2. Remove the bracket opposite
the PCI slot that you intend
to use. Keep the screw for
later use.
3. Align the card connector with
the slot and press firmly until
the card is completely seated
on the slot. Refer to the
drawing on the right.
4. Secure the card to the
chassis with the screw you
removed earlier.
5. Replace the system cover.
2-22-2
2-2
2-22-2
Chapter 2: InstallationChapter 2: Installation
Chapter 2: Installation
Chapter 2: InstallationChapter 2: Installation
 Loading...