

Q4393
External Slim Optical Drive
Quick Installation Guide
In 33 Languages
English Česky Bahasa Indonesia Română
Français Dansk Latviski Slovensky
Deutsch Nederlands Lietuvių Slovenščina
Italiano Eesti Bahasa Malaysia Svenska
Español Suomi Norsk
усский
български
First Edition V1 Published December 2008
Copyright © 2008 ASUSTeK Computer INC. All Rights Reserved.
15G066098000
Ελληνικά Polski Türkçe
Magyar Português
Українська
繁體中文
簡体中文
日本語
ไทย
(Kurulum Kılavuzu)
Safety Information
Using the device
• Do not place damaged discs inside the device. A damaged disc may break while in use and damage the device.
• Use of any controls, adjustments, or procedures other than those specified in this manual may result to hazardous radiation
exposure.
• Do not attempt to disassemble the drive.
• Do not move the device from a cold to a warm or hot environment. Drastic change of temperature is harmful to the device.
• Before moving or uninstalling the drive, remove any disc in it.
• Prevent liquids or any metal to get into the device, If this situation occurs, contact your retailer for help.
• Do not use any evaporating solvents to clean the device. If you accidentally sprayed any solvent on the device. use a clean cloth to
wipe it. You may also use a neutral cleaner to dilute the solvent to easily wipe it from the device.
• Do not turn off the computer while the device is in reading or writing mode.
• Do not place discs into the device immediately if they came from a cold environment, specially during cold seasons. Wait until the
discs have reached room temperature.
CD-ROM Drive Safety Warning
CLASS 1 LASER PRODUCT
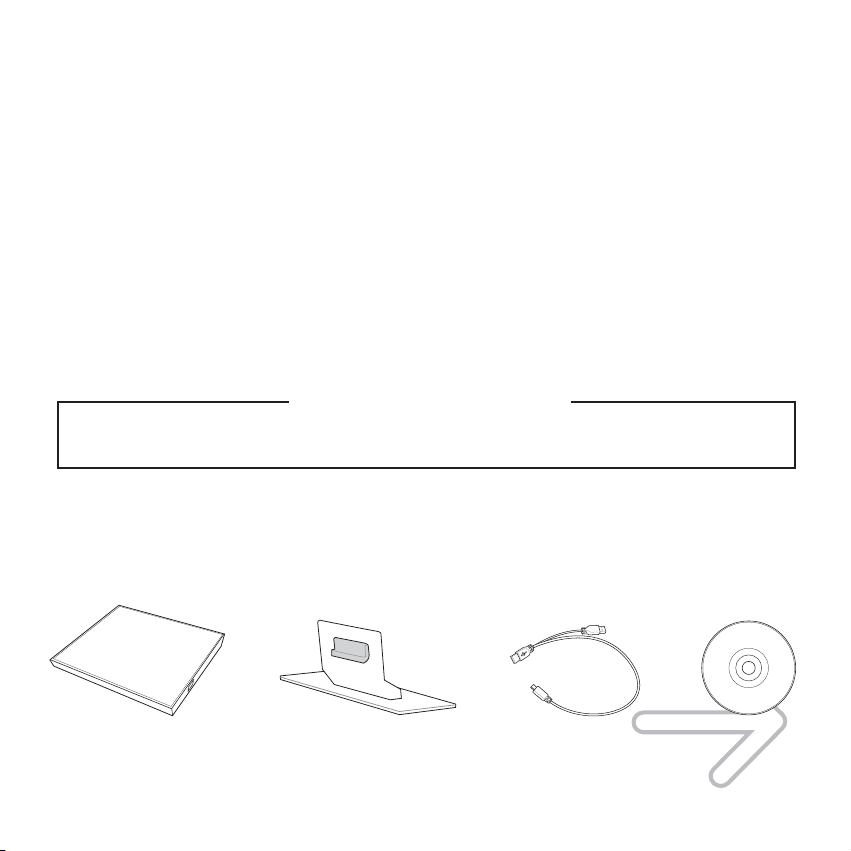
Package contents
Optical drive Stand USB Y cable Software
1
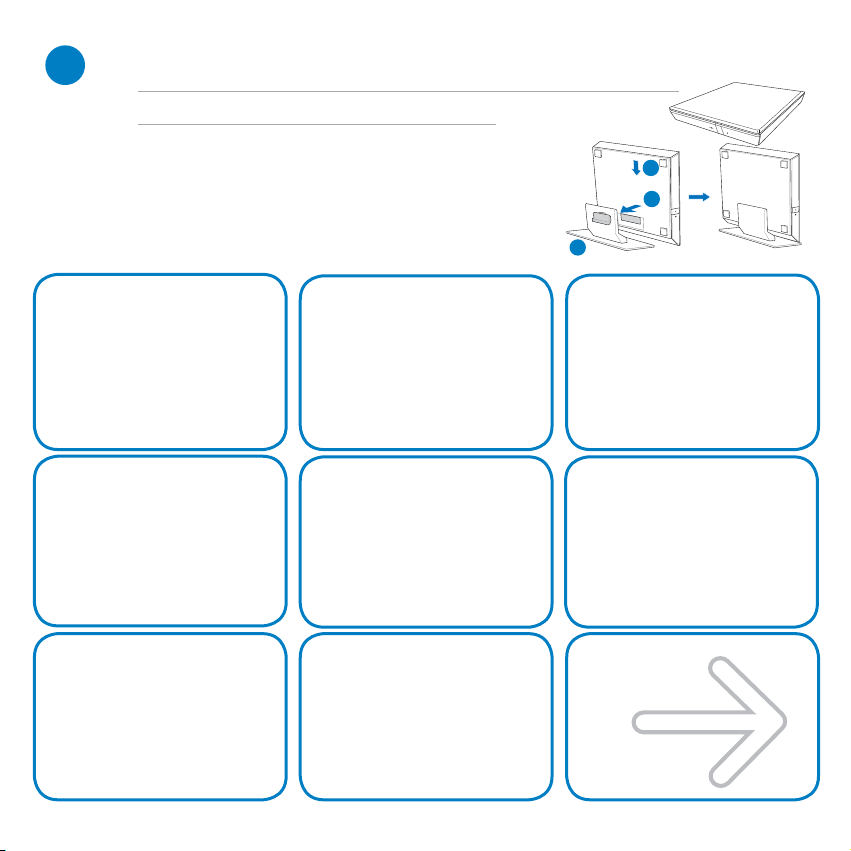
Place the optical drive on a stable surface.
You can either lay the optical drive horizontally on a stable surface, or use it with the bundled stand.
NOTE:
To install the optical drive onto the vertical stand:
A. Place the vertical stand on a stable surface.
B. Align the groove on the back of the optical drive to the bracket of the stand.
C. Carefully push down the optical drive until it firmly fits the stand.
To uninstall the optical drive from the stand:
Hold the stand firmly with one hand, and carefully pull upward the optical
drive with the other hand until it separates from the stand.
Placez le lecteur optique sur une surface
stable.
REMARQUE: Vous pouvez placer le lecteur optique
en position horizontale sur une surface stable ou
utiliser le socle l’accompagnant.
Pour installer le lecteur optique sur le socle vertical :
A. Placez le socle sur une surface stable.
B. Alignez la fente située à l’arrière du lecteur optique avec le
crochet du socle.
C. Appuyez légèrement sur le lecteur optique jusqu’à ce qu’il
soit correctement fixé au socle.
Pour retirer le lecteur optique de son socle:
Maintenez fermement le socle d’une main, et soulevez
délicatement le lecteur optique avec votre autre main jusqu’
à ce qu’il se désengage du socle.
Coloque la unidad óptica sobre una superficie
estable.
NOTA: Puede colocar la unidad óptica de en posición
horizontal sobre una superficie estable o utilizarla con el
soporte suministrado.
Para instalar la unidad óptica en el soporte vertical:
A. Coloque el soporte vertical sobre una superficie estable.
B. Alinee el surco situado en la parte posterior de la unidad
óptica con la abrazadera del soporte.
C. Presione la unidad óptica hacia abajo hasta que encaje
firmemente en el soporte.
Para extraer la unidad óptica del soporte vertical:
Sostenga el soporte firmemente con una mano y tire con
cuidado de la unidad óptica hacia arriba con la otra hasta
separarla del soporte.
Umístěte optickou jednotku na stabilní povrch.
POZNÁMKA: Můžete umístit optickou jednotku vodorovně
na stabilní povrch nebo ji můžete použít s dodaným
stojánkem.
Pokyny pro vložení optické jednotky do svislého stojánku:
A. Umístěte svislý stojánek na stabilní povrch.
B. Zorientujte drážku na zadní straně optické jednotky s
držákem stojánku.
C. Opatrně zasuňte optickou jednotku tak, aby byla pevně
usazena ve stojánku.
Pokyny pro vyjmutí optické jednotky ze stojánku:
Uchopte stojánek pevně jednou rukou a opatrně vysuňte
optickou jednotku druhou rukou, dokud se jednotka
neoddělí ze stojánku.
Legen Sie das optische Laufwerk auf eine
stabile Oberfläche.
HINWEIS: Sie können das optische Laufwerk entweder flach
auf eine stabile Oberfläche legen oder es mit dem mitgelieferten
Ständer senkrecht aufstellen.
So installieren Sie das optische Laufwerk im Ständer:
A. Legen Sie das optische Laufwerk auf eine stabile Oberfläche.
B. Richten Sie die Einkerbung an der Rückseite des
optischen Laufwerks mit der Klemme am Ständer aus.
C. Drücken Sie das optische Laufwerk vorsichtig in die
Befestigung hinein, bis es ordnungsgemäß mit dem
Ständer verbunden ist.
So entfernen Sie das optische Laufwerk aus dem Ständer:
Halten Sie den Ständer mit einer Hand fest und ziehen Sie
das optische Laufwerk vorsichtig mit der anderen Hand
nach oben aus dem Ständer heraus.
оместите оптический привод на устойчивую
поверхность.
римечание: ы можете установить оптический привод
вертикально или горизонтально.
Установка оптического привода вертикально:
A. оместите подставку на устойчивую поверхность.
B. ыровняйте углубление на задней стороне оптического привода с
кронштейном подставки.
C. Осторожно нажмите привод вниз пока он не будет закреплен на
основании.
нятие оптического привода с подставки:
Удерживая одной рукой подставку, осторожно поднимите
другой рукой оптический привод пока он не снимется с
подставки.
Anbring det optiske drev på en stabil overflade.
BEMÆRK: Du kan enten lægge det optiske drev vandret på en
stabil overflade eller bruge det med den medfølgende konsol.
Sådan installeres det optiske drev på den lodrette konsol:
A. Anbring den lodrette konsol på en stabil overflade.
B. Indpas rillen bag på det optiske drev med konsollens
holder.
C. Skub forsigtigt det optiske drev nedad, indtil det sidder
sikkert på konsollen.
Sådan fjernes det optiske drev fra den lodrette konsol:
Hold fast i standeren med én hånd og træk forsigtigt det
optiske drev opad med den anden, indtil det er frigjort fra
konsollen.
C
B
A
Posizionare l’unità ottica su una superficie
stabile.
NOTA: L’unità ottica può essere posizionata in orizzontale su
una superficie stabile o può essere utilizzata con il supporto
in dotazione.
Per installare l’unità ottica su un supporto verticale:
A. Posizionare il supporto verticale su una superficie stabile.
B. Allineare la scanalatura presente nella parte posteriore
dell’unità ottica con la staffa del supporto.
C. Spingere con attenzione l’unità ottica fino a quando non si
blocca sul supporto.
Per disinstallare l’unità ottica dal supporto verticale:
Tenere saldamente il supporto con una mano, e tirare con
attenzione l’unità ottica verso l’alto con l’altra mano, fino a
quando non si stacca dal supporto.
оставете оптичното устройство на стабилна
повърхност.
АА: ожете или да поставите оптичното
устройство хоризонтално на стабилна повърхност или да го
използвате със стойката от комплекта.
а да инсталирате оптичното устройство на вертикална стойка:
A. оставете вертикалната стойка на стабилна повърхност.
B. одравнете каналчето на задната страна на оптичното устройство
със скобата на стойката.
C. нимателно натиснете надолу оптичното устройство докато то не
пасне в стойката.
емонтиране на оптичното устройство от вертикална стойка:
ръжте стойката здраво с една ръка и внимателно
издърпайте оптичното устройство нагоре с другата ръка
докато не се отдели от стойката.
Plaats het optische station op een stabiel oppervlak.
OPMERKING: u kunt het optische station horizontaal op
een stabiel oppervlak plaatsen of het gebruiken met de
bijgeleverde voet.
Het optische station in de verticale houder installeren:
A. Plaats de verticale voet op een stabiel oppervlak.
B. Lijn de groef op de achterkant van het optische station uit
op de haak van de voet.
C. Duw het optische station voorzichtig omlaag tot het stevig
in de voet past.
Het optische station uit de houder verwijderen:
Houd de voet stevig vast met één hand en trek het
optische station met de andere hand voorzichtig omhoog
tot het loskomt van de voet.
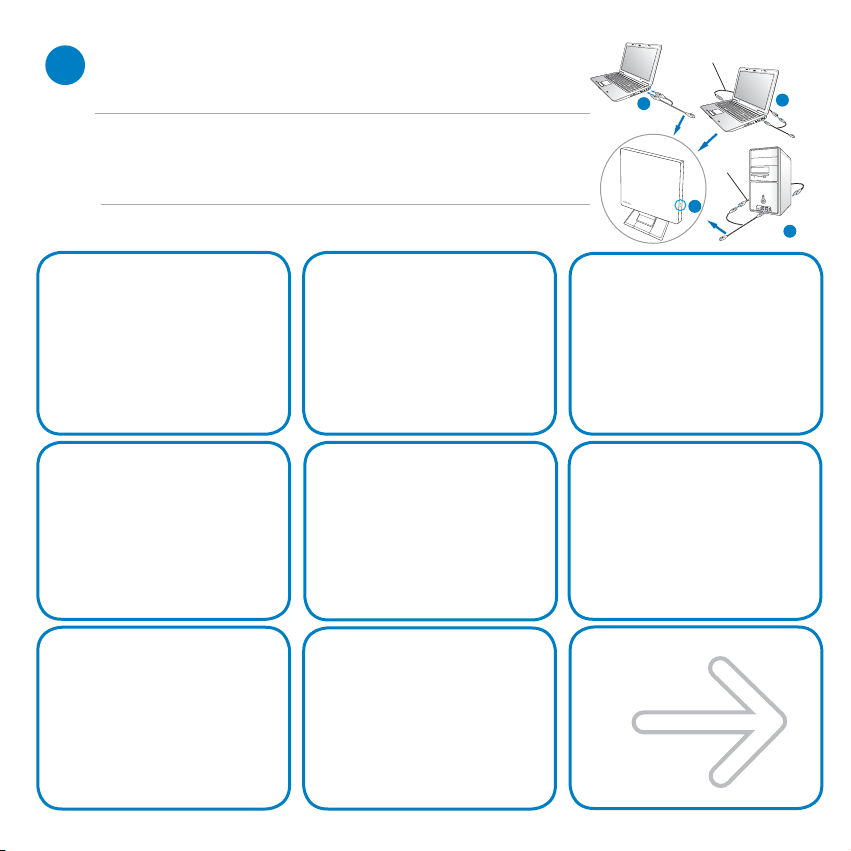
Connect the optical drive to your computer.
2
A. Connect the bundled USB Y cable to your computer.
NOTES:
• The bundled USB Y cable comes with two USB connectors and one mini-USB connector. We
recommend that you connect both USB connectors to two USB ports on your computer for
sufficient power supply (see A1).
• For some computers that cannot provide sufficient power, you may need an extension cable (see A2).
• The extension cable is purchased separately.
• We DO NOT guarantee the performance of the optical drive connected using a USB hub.
B. Connect the mini-USB connector of the bundled USB Y cable to the mini-USB port of
the optical drive (see B).
Connectez le lecteur optique à votre
ordinateur.
A. Connectez le câble USB Y sur l’un des ports USB de
votre ordinateur.
REMARQUES:
• Il est recommandé de connecter les deux extrémités du
câble USB Y, livré avec le lecteur optique, à votre ordinateur
pour garantir une alimentation suffisante. (Voir A1).
• Pour les modèles d’ordinateurs ne pouvant pas fournir l’
alimentation adéquate, utilisez un câble d’extension (Voir A2).
• Le câble d’extension est vendu séparément.
• Nous ne garantissons pas les performances du lecteur
optique lorsque ce dernier est connecté à un hub USB.
B. Connectez l’extrémité mini-USB du câble USB Y au port
mini-USB du lecteur optique (Voir B).
Conecte la unidad óptica a su equipo.
A. Conecte el cable USB en Y suministrado a su equipo.
NOTAS:
• El cable USB en Y suministrado está equipado con dos conectores
USB y un conector mini-USB. Recomendamos conectar ambos
conectores USB a dos puertos USB de su equipo para alcanzar el
nivel de alimentación necesario (consulte el punto A1).
• Es posible que algunos equipos no sean capaces de suministrar la
energía suficiente y deba utilizar un cable prolongador (consulte el
punto A2).
• El cable prolongador se adquiere por separado.
• NO garantizamos el rendimiento de la unidad óptica conectada a
través de un concentrador USB.
B. Conecte el conector mini-USB del cable USB en Y
suministrado al puerto mini-USB de la unidad óptica
(consulte el punto B).
Připojte optickou jednotku k počítači.
A. Připojte dodaný kabel USB Y k počítači.
POZNÁMKY:
• Dodaný kabel USB Y je opatřen dvěma konektory USB a
jedním konektorem mini-USB. Pro zajištění dostatečného
napájení doporučujeme připojit oba konektory USB ke
dvěma portům USB v počítači (viz A1).
• U některých počítačů, které nemohou poskytnout
dostatečné napájení, bude pravděpodobně třeba použít
prodlužovací kabel (viz A2).
• Prodlužovací kabel je třeba zakoupit samostatně.
• NEZARUČUJEME funkčnost optické jednotky připojené
prostřednictvím rozbočovače USB.
B. Připojte konektor mini-USB dodaného kabelu USB Y k
portu mini-USB optické jednotky (viz B).
Verbinden des optischen Laufwerks mit Ihren
Computer.
A. Schließen Sie das mitgelieferte USB Y-Kabel an Ihren
Computer an.
HINWEISE:
• Das mitgelieferte USB Y-Kabel ist mit zwei USB-Steckern und einem
Mini-USB-Stecker ausgerüstet. Wir empfehlen Ihnen, dass Sie beide
USB-Stecker in die USB-Anschlüsse Ihres Computers stecken, um eine
ausreichende Stromversorgung zu gewährleisten (siehe A1).
• Für Computer, die keine ausreichende Leistung zur Verfügung stellen
können, benötigen Sie ein Verlängerungskabel (siehe A2).
• Das Verlängerungskabel muss extra gekauft werden.
• Wir garantieren die Leistung des optischen Laufwerks NICHT, wenn es über
einen USB-Hub angeschlossen wurde.
B. Stecken sie den Mini-USB-Stecker des mitgelieferten
USB Y-Kabels in den Mini-USB-Anschluss des optischen
Laufwerks (siehe B).
одключение оптического привода к компьютеру.
A. одключите поставляемый USB Y кабель к вашему компьютеру.
римечания:
• оставляемый USB Y кабель имеет два обычных USB разъема
и один мини-USB разъем. ля обеспечения достаточного
питания рекомендуется подключить оба USB разъема
поставляемого USB Y кабеля к вашей системе. (рис A1).
• сли нет разъемов, находящихся рядом, вы можете
использовать USB удлинитель (рис A2).
• USB удлинитель приобретается отдельно.
• ASUS не гарантирует производительность оптического
привода, подключенного через USB хаб.
B. одключите мини-USB разъем поставляемого USB Y кабеля к
мини-USB разъему оптического привода (рис B).
Forbind det optiske drev til computeren.
A. Forbind det medfølgende USB Y kabel til computeren.
BEMÆRKINGER:
• Det medfølgende USB Y kabel leveres med to USB
stik og et mini-USB stik.For at opnå tilstrækkelig effekt,
anbefaler vi, at du forbinder begge USB stik til to USB
porte på din computer (se A1).
• Til nogle computere, som ikke har tilstrækkelig effekt,
kan du behøve et forlængerkabel (se A2).
• Forlængerkablet anskaffes separat.
• Vi garanterer IKKE for det optiske drevs ydelse, hvis det
er forbundet til en USB stikdåse.
B. Forbind det medfølgende USB Y kabels mini-USB stik til
det optiske drevs mini-USB port (se B).
USB Extension cable
FF
O
ON
A1
USB Extension cable
B
Collegamento dell’unità ottica al computer.
A. Collegare il cavo USB a Y al computer.
NOTE:
• Il cavo USB a Y dotato di due connettori USB e un
connettore mini USB. Si raccomanda di collegare
entrambi i connettori USB a due porte USB de computer
per avere una alimentazione sufficiente (vedere A1).
• Per alcuni computer che non riescono ad erogare una
quantit sufficiente di energia elettrica, potrebbe rendersi
necessario utilizzare un cavo di prolunga (vedere A2).
• Il cavo di prolunga deve essere acquistato
separatamente.
• NON si garantiscono le prestazioni dell’unità ottica, se
collegata utilizzando un hub USB.
B. Collegare il connettore mini USB del cavo USB a Y in
dotazione alla porta mini USB dell’unità ottica (vedere B).
вържете оптичното устройство с компютъра.
A. вържете USB Y кабела от комплекта към ашия компютър.
А:
• USB Y кабелът от комплекта има два USB конектора и един
mini-USB конектор. репоръчваме и да свържете и двата USB
конектора към два USB порта на компютъра за достатъчно
захранване (вижте А1).
• а компютри, които не могат да осигурят достатъчно енергия,
се нуждаете от удължител (вижте А2).
• Удължителят трябва да бъде закупен отделно.
• гарантираме производителността на оптичното устройство
свързано посредством USB хъб.
B. вържете mini-USB конектора на USB Y кабела от комплекта
към mini-USB порта на оптичното устройство (вижте ).
Sluit het optische station aan op uw computer.
A. Sluit de bijgeleverde USB-Y-kabel aan op uw computer.
OPMERKINGEN:
• De bijgeleverde USB-Y-kabel bevat twee USB-aansluitingen en één
mini-USB-aansluiting. Wij raden u aan beide USB-aansluitingen aan
te sluiten op de twee USB-poorten op uw computer voor voldoende
stroomtoevoer (zie A1).
• Voor sommige computers die niet voldoende stroom kunnen leveren,
kunt u mogelijk een verlengkabel nodig hebben (zie A2).
• De verlengkabel moet afzonderlijk worden aangeschaft.
• Wij bieden GEEN garantie voor de prestaties van het optische station
dat is aangesloten via een USB-hub.
B. Sluit de mini-USB-aansluiting van de bijgeleverde
USB-Y-kabel aan op de mini-USB-poort van het optische
station (zie B).
A2
F
F
O
N
O
A2
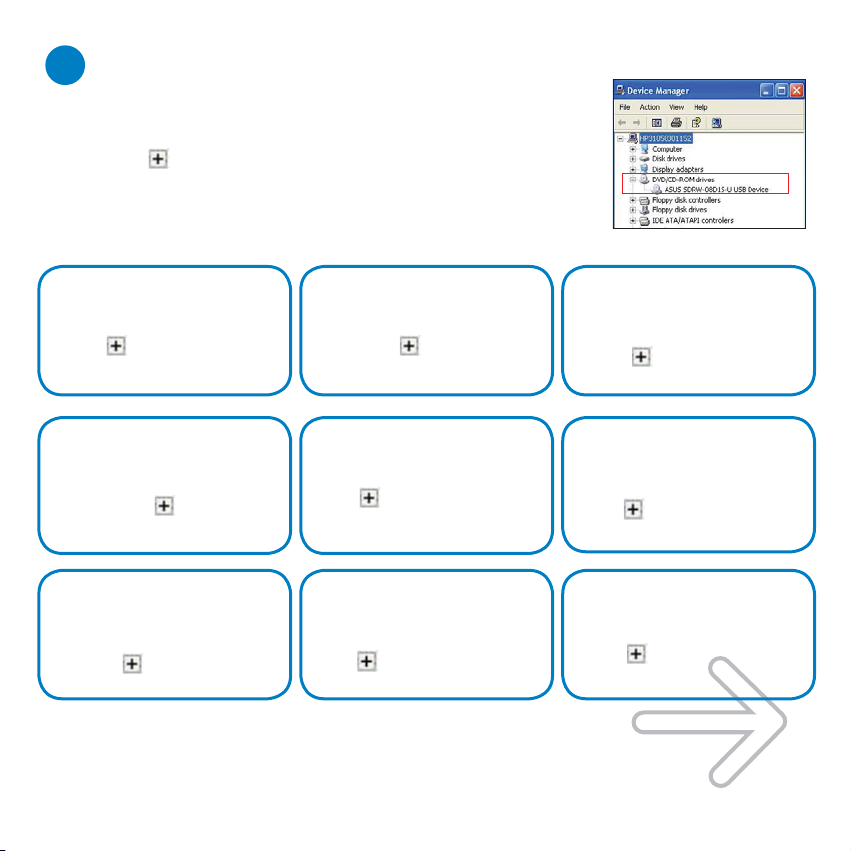
Ensure that your system detects the external optical
3
drive.
A. From your Windows® desktop, right-click
Hardware > Device Manager
B. Click
before DVD/CD-ROM drives to unfold the list. When the external optical
.
My Computer
drive is detected, the name of the external optical drive appears in the list.
, then click
Properties >
Assurez-vous que le système détecte le
lecteur optique externe.
A. Dans le bureau de Windows®, faites un clic droit sur
Poste de travail
> Gestionnaire de périphériques
B. Cliquez sur au niveau des lecteurs DVD/CD-ROM
pour afficher la liste. Si le lecteur optique externe a été
détecté, son nom doit apparaître dans la liste.
Asegúrese de que su sistema detecta la
unidad óptica externa.
A. Desde su escritorio de Windows®, haga clic con el
botón secundario en
en
Properties (Propiedades) > Hardware > Device
Manager (Administrador de dispositivos).
B. Haga clic en el símbolo situado junto a las
unidades de DVD / CD-ROM para desplegar la lista.
Una vez detectada la unidad óptica externa, aparecerá
en la lista el nombre de la unidad óptica.
Zkontrolujte, zda počítač rozpozná externí
optickou jednotku.
A. Na pracovní ploše operačního systému Windows
®
klepněte pravým tlačítkem myši na položku
Computer (Tento počítač)
(Vlastnosti) > Hardware > Device Manager (Správce
zařízení).
B. Klepnutím na před jednotkami DVD/CD-ROM
zobrazte seznam. Když je externí optická jednotka
rozpoznána, je v seznamu uveden její název.
, puis cliquez sur
My Computer (Mi PC)
a potom na
Propriétés > Matériel
.
y después
My
Properties
Vergewissern Sie sich, dass Ihr System das
externe optische Laufwerk erkennt.
A. Rechtsklicken Sie auf dem Windows®-Bildschirm auf
B. Klicken Sie auf das vor den DVD/CD-ROM-
Убедитесь, что система обнаружила внешний
оптический привод.
A. а рабочем столе Windows® нажмите правой кнопкой мыши
B. ажмите перед DVD/CD-ROM приводами для появления
Kontroller, at systemet genkender det
eksterne, optiske drev.
A. På Windows® desktop, rskrivebordet, højreklik på
B. Klik på foran DVD/CD-ROM drev for at se listen.
und klicken Sie dann auf
Arbeitsplatz
> Hardware > Gerätemanager.
Laufwerken, um die Liste anzuzeigen. Wenn das externe
optische Laufwerk erkannt wurde, erscheint der Name
des externen optischen Laufwerks in der Liste.
My Computer, затем выберите Properties > Hardware > Device
Manager.
списка. огда внешний привод обнаружен, его имя появится в
списке.
My Computer (Denne computer)
på
Properties (Egenskaber) > Hardware > Device
Manager (Enhedsstyrer).
Når det eksterne, optiske drev er genkendt, ses drevets
navn på listen.
Eigenschhaften
, og klik derefter
Veri ficare che il sistema rilevi l’unità ottica
esterna.
A. Dal desktop di Windows®, fare clic con il tasto destro
su
My Computer (Computer)
Properties (Proprietà) > Hardware > Device Manager
(Gestione periferiche).
B. Fare clic su davanti alle unità DVD/CD-ROM per
visualizzare l’elenco. Quando viene rilevata l’unità ottica, il
nome dell’unità ottica esterna viene visualizzato nell’elenco.
Уверете се, че системата е открила външното
оптично устройство.
A. От работния плот на Windows®, натиснете с десния бутон на
мишката My Computer (оят компютър), след което Properties
(войства) > Hardware (ардуер) > Device Manager (испечер
на хардуерни устройства).
B. атиснете пред DVD/CD-ROM устройствата, за да
отворите списъка. огато бъде открито външно оптично устройство,
името на външния оптичен диск ще се появи в списъка.
Controleer of uw systeem het externe
optische station kan detecteren.
A. Klik op het bureaublad van Windows® met de
rechtermuisknop op
en klik vervolgens op
Hardware > Device Manager (Apparaatbeheer)
B. Klik op voor de dvd/cd-romstations om de lijst
uit te vouwen. Wanneer het externe optische station
is gedetecteerd, verschijnt de naam van het externe
optische station in de lijst.
, quindi fare clic su
My Computer (Deze computer)
Properties (Eigenschappen) >
.
,
Veenduge, et teie süsteem tuvastab välise
optilise seadme.
A. Windows® 'i töölaual paremklõpsake ikooni
(Minu arvuti)
> Hardware (Riistvara) > Device Manager (Seadme
.
haldur)
B. Klõpsake ikooni
avada. Kui väline optiline seade on tuvastatud, siis ilmub
selle nimi loendisse.
, seejärel valige
Properties (Atribuudid)
DVD/CD-ROM draivi ees, et loendit
My Computer
Varmista, että järjestelmäsi havaitsee ulkoisen
optisen aseman.
A. Napsauta hiiren oikealla painikkeella Windows
-työpöydältä,
My Computer (Oma tietokone)
jälkeen napsauta
Hardware (Laitteisto) > Device Manager (Laitehallinta).
B. Napsauta
purkamiseksi. Kun ulkoinen optinen asema on havaittu,
ulkoisen optisen aseman nimi tulee näkyviin luettelossa.
Properties (Ominaisuudet) >
ennen DVD/CD-ROM -asemia luettelon
®
, sen
Σιγουρευτείτε ότι το σύστημά σας μπορεί να
ανιχνεύσει την εξωτερική οπτική μονάδα.
A. Από την επιφάνεια εργασίας των Windows®, κάντε
δεξί κλικ στο
My Computer (Ο Υπολογιστής
, και κάντε κλικ στο
μου)
Hardware (Υλικό) > Device Manager (Διαχείριση
Συσκευών).
B. Κάντε κλικ στο που βρίσκεται μπροστά από
τους οδηγούς DVD/CD-ROM για να ανοίξει η λίστα.
Όταν ανιχνευτεί η εξωτερική οπτική μονάδα,
εμφανίζεται στη λίστα το όνομα της εξωτερικής
μονάδας οδήγησης.
Properties (Ιδιότητες) >
Győződjön meg arról, hogy a rendszer
automatikusan érzékeli a külső optikai meghajtót.
A. A Windows® asztalon az egér jobb oldali gombjával
kattintson a
kattintson a
Device Manager (Eszközkezelő).
B. Kattintson a jelre a DVD/CD-ROM meghajtók előtt.
Ha a rendszer érzékeli a külső optikai meghajtót, a külső
optikai meghajtó neve megjelenik a listában.
Įsitikinkite, kad sistema atpažįsta išorinį optinį
diską.
A. „Windows®“ darbalaukyje, dešiniu klavišu spustelėkite
Mano kompiuteris (My Computer)
Ypatybės (Properties) > Techninė įranga (Hardware) >
Įtaisų tvarkytuvė (Device Manager).
B. Kad sąrašas išsiskleistų, spustelėkite prieš DVD / CD-
ROM įrenginius esantį . Kai išorinis optinis diskas
atpažįstamas, sąraše atsiranda išorinio optinio disko
pavadinimas.
Upewnij się, że posiadany system wykrywa
zewnętrzny napęd optyczny.
A. Na pulpicie Windows®, kliknij prawym przyciskiem
M
y Computer (Mój komputer)
Properties (Właściwości) > Hardware (Urządzenia)>
Device Manager (Menedżer urządzeń)
B. Kliknij przed napędami DVD/CD-ROM w celu
rozwinięcia listy. Po wybraniu zewnętrznego napędu
optycznego, na liście pokaże się nazwa zewnętrznego
napędu optycznego.
Presvedčte sa, že systém zistil externú optickú
mechaniku.
A. V rámci pracovnej plochy Windows® pravým tlačidlom
kliknite na
na
Properties (Vlastnosti) > Hardware (Hardvér) >
Device Manager (Správca zariadení).
B. Kliknite na pred mechanikami DVD/CD-ROM, čím
otvoríte zoznam. Po zistení externej optickej mechaniky
sa názov externej optickej mechaniky objaví v zozname.
My Computer (Sajátgép)
Properties (Tulajdonságok) > Hardware >
ikonra, majd
, tada spragtelėkite
, a następnie kliknij
.
My Computer (Môj počítač)
; následne kliknite
Memastikan sistem mendeteksi external optical
drive (penggerak optik eksternal).
A. Dari desktop Windows®, klik-kanan
B. Klik sebelum drive DVD/CD-ROM membuka daftar.
Pastikan bahawa sistem anda mengesan
pemacu optik luaran.
A. Untuk desktop Windows® anda, klik kanan
B. Klik sebelum pemacu DVD/CD-ROM untuk
Certifique-se de que o seu sistema detecta a
unidade óptica.
A. A partir do ambiente de trabalho do Windows® , clique com
o botão direito em
depois clique em
> Device Manager (Gestor de dispositivos).
B. Clique no sinal antes das Unidades de DVD/CD-
ROM para expandir a lista. Quando a unidade óptica externa
for detectada, será exibido o nome da unidade na lista.
Prepričajte se, da je vaš operacijski sistem
zaznal zunanji optični gonilnik.
A. Na vašem Windows® namizju, z desnim gumbom kliknite
B. Kliknite predenj DVD/CD-ROM gonilnik prikaže
, kemudian klik
(Komputerku)
> Hardware (Perangkat Keras) > Device Manager
(Manajer Piranti).
Saat external optical drive terdeteksi, namanya akan
muncul dalam daftar.
kemudian klik
Properties > Hardware > Device
Manager.
membuka senarai. Apabila pemacu optik luaran dikesan,
nama pemacu optik luaran muncul dalam senarai.
My Computer (O meu computador)
Properties (Propriedades) > Hardware
My Computer (Moj računalnik)
(Lastnosti) > Hardware (Strojna oprema) > Device
Manager (Upravitelj naprav).
seznam. Ko je zunanji optični gonilnik zaznan, se na
seznamu pojavi ime zunanjega optičnega gonilnika.
My Computer
Properties (Properti)
My Computer,
, nato kliknite
Properties
,
Pārliecinieties, ka jūsu sistēma detektē ārējo
optisko draivu.
A. Jūsu Windows® darbvirsmā noklikšķiniet ar labo klikšķi uz
Mans dators (My Computer)
uz
Īpašības (Properties) > Aparatūra (Hardware) >
Ierīces pārvaldnieks (Device Manager).
B. Noklikšķiniet uz , lai DVD / CD-ROM draivs atver
sarakstu. Kad ārējais optiskais draivs ir atklāts, sarakstā
parādīsies ārējā optiskā draiva nosaukums.
Kontroller at systemet oppdager den eksterne
optiske stasjonen.
A. Fra Windows® desktop høyreklikk
(Min Computer)
> Hardware (Maskinvare) > Device Manager
(Enhetsbehandling)
B. Klikk på foran DVD/CD-ROM-stasjoner for å få opp
listen. Når den eksterne optiske stasjonen er oppdaget vil
navnet på den eksterne optiske stasjonen komme frem på
listen.
Asiguraţi-vă că sistemul dvs detectează drive-ul
optic extern.
A. Din desktopul dvs Windows®, efectuaţi click dreapta pe
right
My Computer (Computerul meu)
Properties (Proprietăţi) > Hardware > Device Manager
(Administrare dispozitiv).
B. Click înainte ca drive-ul DVD/CD-ROM să
desfăşoare lista. Atunci când drive-ul optic extern este
detectat, numele drive-ului optic extern apare în listă.
Se till att ditt system upptäcker den externa
optiska enheten.
A. Från Windows® skrivbord högerklicka på
(Den här datorn)
(Egenskaper) > Hardware (Hårdvara) > Device
Manager (Enhetshanteraren).
B. Klicka på före DVD/CD-ROM enheterna för att
veckla ut listan. När den externa optiska enheten är
upptäckt kommer namnet på den externa optiska enheten
att visas i listan.
un pēc tam noklikšķiniet
, klikk så
, klicka sedan på
My Computer
Properties (Egenskaper)
.
, apoi click pe
My Computer
Properties

ตรวจดูให้แน่ใจว่าระบบของคุณตรวจพบออปติคัลไ
ดรฟ์ภายนอก
A. จากเดสก์ทอป Windows®, คลิกขวาที่ My Computer (ค
อมพิวเตอร์ของฉัน), จากนั้นคลิก Properties (คุณสมบัติ)
> Hardware (ฮาร์ดแวร์) > Device Manager (ตัว
จัดการอุปกรณ์)
B. คลิก
ก่อนไดรฟ์ DVD/CD-ROM เพื่อกระจายรายกา
ร เมื่อระบบตรวจพบออปติคัลไดรฟ์ภายนอก ชื่อของออปติคั
ลไดรฟ์ภายนอกจะปรากฏในรายการ
Sisteminizin harici optik sürücüyü
algıladığından emin olun.
A. Windows® masaüstünüzden,
(Bilgisayarım)
(Özellikler) > Hardware (Donanım) > Device Manager
(Aygıt Yöneticisine)
B. DVD/CD-ROM sürücüleri listeyi açmadan önce
tıklayın. Harici optik sürücü algılandığında, harici optik
sürücünün adı listede belirir.
My Computer
'a sağ tıklayın ve daha sonra
tıklayın.
Properties
ереконайтеся, що система визначає зовнішній
оптичний дисковод.
A. робочого столу Windows® правою кнопкою миші клацніть по
My Computer (ій комп’ютер), потім клацніть по Properties
(ластивості) > Hardware (Апаратне забезпечення) > Device
Manager (енеджер пристрою).
B. лацніть по
список. оли визначено зовнішній оптичний дисковод, назва
зовнішнього оптичного дисковода з’являється у списку.
перед дисками DVD/CD-ROM, щоб розкрити
請確認您的系統已偵測到外接光碟機。
A. 從 Windows 桌面,右鍵點選 我的電腦,接
著點選 內容 > 硬體 > 裝置管理員。
B. 點選 DVD/CD-ROM 光碟機前面的
開清單。當偵測到外接光碟機裝置時,此外
接光碟機的名稱將顯示在清單中。
以展
請確認您的系統已偵測到外接光驅。
A. 從 Windows 桌面,右鍵點選“我的電
腦”,接著點選 屬性 > 硬件 > 設備管理
器。
B. 點選 DVD/CD-ROM 驅動器前面的
展開列表。當偵測到外接光驅設備時,此外
接光驅的名稱將顯示在列表中。
以
光学ドライブがシステムで検出されるかを確認する
A. Windows®デスクトップから「マイコンピュータ」を右
クリックし、「プロパティ」→「ハードウェア」→「デ
バイスマネージャ」の順に開きます。
(右の写真は英語版です)
B. DVD/CD-ROMドライブの左にある マークをクリッ
クし、リストを展開します。光学ドライブが検出されて
いれば、光学ドライブの名前がリストに表示されます。

Safely remove the external optical drive.
4
The external optical drive supports Plug & Play. Follow the steps below to safely remove the drive.
A. From the task bar of your computer, click the Safely Remove Hardware icon ( ).
B. When a message
Safely remove USB Mass Storage Device
pops up, click the message.
C. When a message
from your computer.
NOTE:
Retirer le lecteur optique en toute sécurité.
Le lecteur optique externe supporte la norme Plug & Play. Suivez
les étapes ci-dessous pour retirer le lecteur en toute sécurité.
A. Dans la zone de notification, cliquez sur l’icône ( ).
B. Lorsque le message
sécurité
C. Lorsque le message
toute sécurité
de votre ordinateur.
REMARQUE:
démarrage du système ou lorsque le voyant DEL du lecteur
optique clignote.
Extraer la unidad óptica externa con seguridad.
La unidad óptica externa es compatible con Plug & Play. Siga los
pasos siguientes para extraer la unidad con seguridad.
A. Desde la barra de tareas de su equipo, haga clic en el icono
Quitar hardware de forma segura
B. Cuando aparezca el mensaje
almacenamiento masivo USB de forma segura
en él.
C. Si aparece el mensaje
dispositivo de forma segura del equipo
cable USB en Y del equipo.
NO desconecte el cable USB en Y si el sistema se está
NOTA:
iniciando o el indicador LED de la unidad óptica externa está
parpadeando.
Bezpečně odeberte externí optickou jednotku.
Tato externí optická jednotka podporuje technologii Plug & Play.
Podle následujících pokynů bezpečně odeberte jednotku.
A. Na hlavním panelu počítače klepněte na ikonu
odebrání hardwaru
B. Po zobrazení zprávy
paměťové zařízení
C. Po zobrazení zprávy
počítače
POZNÁMKA:
restartuje nebo když bliká indikátor LED externí optické jednotky.
Retirer le périphérique en toute
apparaît, cliquez sur le message.
Le matériel peut être retiré en
apparaît, déconnectez le câble USB Y
NE déconnectez PAS le câble USB Y lors du
Ahora se puede quitar el
( ).
Bezpečně odebrat velkokapacitní
klepněte na tuto zprávu.
Nyní lze zařízení bezpečně odebrat z
odpojte kabel USB Y od počítače.
NEODPOJUJTE kabel USB Y, když se systém
The device can now be safely removed from the computer
DO NOT disconnect the USB Y cable when the system is booting up or the LED indicator of the external optical drive is flashing.
( ).
Quitar dispositivo de
, haga clic
, desconecte el
Bezpečné
Externes optisches Laufwerk sicher entfernen.
Das externe optische Laufwerk unterstützt Plug & Play. Folgen
Sie den Schritten, um das Laufwerk sicher zu entfernen.
A. Klicken Sie in der Taskleiste auf das Symbol
Storage Device - Laufwerk (E:) entfernen
B. Wenn die Nachricht
erscheint, klicken Sie auf die Nachricht.
C. Wenn eine Nachricht
werden
Ihren Computer.
HINWEIS:
Computer heraus, wenn das System hochgefahren wird
oder die LED-Anzeige des externen optischen Laufwerks
blinkt.
езопасное отключение внешнего оптического привода.
нешний оптический привод поддерживает Plug & Play. ля
отключения устройства выполните следующие инструкции:
A. панели задач вашего компьютера нажмите иконку Safely
Remove Hardware ( ).
B. ри появлении сообщения Safely remove USB Mass Storage
Device нажмите на это сообщение.
C. огда появится сообщение The device can now be safely
removed from the computer отключите USB Y кабель от
компьютера.
римечание: икогда не отключайте USB Y при загрузке системы
или мигании индикатора на внешнем оптическом приводе.
Du kan nu fjerne det optiske drev.
Det eksterne, optiske drev understøtter “plug and play”. Fjern
drevet på følgende måde.
A. På computerens jobbjælke, klik på
ikonen ( ).
B. Når meddelelsen
klik på meddelelsen.
C. Når en meddelelse
dukker op, fjern USB Y kablet fra computeren.
BEMÆRK:
eller, hvis det eksterne drevs LED indikatorlampe blinker.
Hardware sicher entfernen
Hardware kann jetzt entfernt
erscheint, ziehen Sie das USB Y-Kabel aus
Ziehen Sie das USB Y-Kabel nicht aus Ihren
Fjern USB masselagerenhed
Drevet kan nu fjernes fra computeren
Fjern IKKE USB Y kablet, mens systemet genstarter
USB Mass
().
Fjern Hardware
dukker op,
pops up, disconnect the USB Y cable
Rimuovere in modo sicuro l’unità ottica esterna.
L’unità ottica esterna supporta la funzionalità Plug&Play.
Per rimuovere in modo sicuro l’unità seguire le istruzioni
riportate di seguito.
A. Dalla barra delle attività del computer, fare clic sull’icona
Rimozione sicura dell’hardware
B. Quando viene visualizzato il messaggio
sicura dispositivo di archiviazione di massa USB
fare clic sul messaggio.
C. Quando viene visualizzato il messaggio
rimuovere il dispositivo da computer in modo sicuro
scollegare il cavo USB a Y dal computer.
NON scollegare il cavo USB a Y durante l’avvio del
NOTA:
sistema o se l’indicatore LED dell’unità ottica esterna lampeggia.
езопасно премахване на външното оптично устройство.
ъншното оптично устройство поддържа Plug & Play. ледвайте
стъпките по-долу, за да премахнете устройството.
A. От лентата със задачи на ашия компютър, натиснете иконата
езопасно премахване на хардуер ( ).
B. огато се отвори съобщението езопасно премахване
на USB устройство за съхранение на данни натиснете
съобщението.
C. огато се появи съобщение ега това устройство може
безопасно да бъде отстранено от компютъра, изключете
USB Y кабела от компютъра.
АА: изваждайте USB Y кабела докато системата се
зарежда или индикаторът на външното оптично устройство мига.
Het externe optische station veilig verwijderen.
Het externe optische station ondersteunt Plug & Play. Volg de
onderstaande stappen om het station veilig te verwijderen.
A. Klik in de taakbalk van uw computer op het pictogram
Hardware veilig verwijderen
B. Wanneer het bericht
C. Wanneer het bericht
OPMERKING:
systeem wordt opgestart of terwijl de LED van het externe
optische station knippert.
verschijnt, klik dan op dit bericht.
verwijderen
verwijderd van de computer
Y-kabel los van uw computer.
Koppel de USB-Y-kabel NIET los terwijl het
( ).
Rimozione
,
È ora possibile
( ).
USB-massaopslagapparaat veilig
Het apparaat kan nu veilig worden
verschijnt, koppelt u de USB-
,
Eemaldage väline optiline seade.
Välisel optilisel seadmel on funktsiooni Plug & Play toetus.
Optilise seadme eemaldamiseks järgige alltoodud samme.
A. Arvuti tööriistaribal klõpsake ikooni
B. Kui hüpikaknas ilmub teade
C. Kui hüpikaknas ilmub teade
MÄRKUS:
taaskäivitub või kui välise optilise seadme LED indikaator
vilgub.
Távolítsa el biztonságosan a külső optikai meghajtót.
A külső optikai meghajtó támogatja a Plug & Play (csatold
és játszik) funkciót. A meghajtó biztonságos eltávolítása
érdekében kövesse a következő utasításokat:
A. A számítógép Windows tálcáján kattintson a
B. Amikor megjelenik a
C. Amikor megjelenik a
MEGJEGYZÉS:
elindul vagy a külső optikai meghajtó LED kijelzője villog.
Išorinio optinio disko saugus šalinimas.
Išorinis optinis diskas palaiko „Plug & Play“. Norėdami
saugiai pašalinti įrenginį, sekite žemiau aprašytus žingsnius.
A. Kompiuterio užduočių juostoje spustelėkite piktogramą
B. Kai pasirodys pranešimas
C. Kai atsiranda pranešimas
PASTABA:
kraunasi arba mirksi išorinio optinio disko šviestukas.
Bezpiecznie odłącz zewnętrzny napęd optyczny
Zewnętrzny napęd optyczny obsługuje Plug & Play. Wykonaj
podane poniżej czynności w celu bezpiecznego odłączenia
napędu.
A. Na pasku zadań komputera, kliknij ikonę
B. Po wyświetleniu komunikatu
C. Po wyświetleniu komunikatu
UWAGA:
uruchamiania lub, gdy miga wskaźnik LED zewnętrznego
napędu optycznego.
( ).
eemaldamine
turvaline eemaldamine
turvaliselt arvutist eemaldada
kaabel arvutist lahti.
ÄRGE lahutage USB Y kaablit, kui süsteem
biztonságos eltávolítása
biztonságos eltávolítása
üzenet, húzza ki az USB Y kábelt a
eltávolítható
számítógépből.
NE húzza ki az USB Y kábelt, amikor a rendszer
Saugiai pašalinti techninę įrangą“
talpiosios atminties įrenginį
saugiai pašalinti iš kompiuterio
atjunkite USB Y laidą.
NEATJUNKITE USB Y laido kai sistema
usuwanie sprzętu
urządzenia pamięci masowej USB
bezpiecznie odłączyć od komputera
Y od komputera.
( ).
NIE należy odłączać kabla USB Y podczas
Riistvara turvaline
USB massmäluseadme
, siis klõpsake teadet.
Seadme saab nüüd
, siis ühendage USB Y
ikonra ( ).
USB adattároló eszköz
felirat, kattintson az üzenetre.
Az eszköz biztonságosan
Saugiai pašalinti USB
Dabar įrenginį galima
Bezpieczne usuwanie
Sprzęt można teraz
hardver
( ).
, jį spragtelėkite.
, nuo kompiuterio
Bezpieczne
, kliknij komunikat.
, odłącz kabel USB
„
Poista ulkoinen optinen asema.
Ulkoinen optinen asema tukee Plug & Play -ominaisuutta.
Noudata alla olevia vaiheita aseman turvallista poistamista
varten.
A. Napsauta tietokoneesi tehtäväpalkissa
turvallinen poistaminen
B. Kun viesti
USB-massamuistilaitteen turvallinen
ponnahtaa esiin, napsauta viestiä.
poistaminen
C. Kun viesti
Laite voidaan nyt poistaa turvallisesti
ponnahtaa esiin, irrota USB Y–kaapeli
tietokoneesta
tietokoneestasi.
ÄLÄ irrota USB Y –kaapelia, kun järjestelmä on
HUOMAA:
käynnistymässä tai ulkoisen optisen aseman LED-ilmaisin
vilkkuu.
Melepaskan external optical drive dengan aman.
External optical drive mendukung Plug & Play (Pasang &
Main). Ikuti langkah-langkah berikut untuk melepaskan drive
dengan aman.
A. Dari task bar (batang tugas) komputer, klik ikon
Lepaskan Perangkat Keras dengan hati-hati
B. Ketika pesan
C. Ketika pesan
PERHATIAN:
sistem sedang dinyalakan atau indikator LED external
optical drive berkedip-kedip.
Keluarkan pemacu optik luaran dengan selamat.
Pemacu optik luaran menyokong Plag & Main. Ikut langkah
di bawah untuk mengeluarkan pemacu dengan selamat.
A. Daripada bar tugas komputer anda, klik ikon
B. Apabila mesej
C. Apabila mesej
NOTA:
sedang but atau penunjuk LED pemacu optik luaran
berkelip.
Remover a unidade óptica externa com
segurança.
A unidade óptica externa suporta Plug & Play. Siga os passos
indicados abaixo para remover a unidade com segurança.
A. A partir da barra de tarefas do seu computador, clique no
B. Quando for exibida a mensagem
C. Quando for exibida a mensagem
NOTA:
estiver a arrancar ou quando o indicador LED da unidade
óptica externa estiver a piscar.
Lepaskan Alat Penyimpan Mass USB
muncul, klik pesan tersebut.
dengan aman
Alat ini bisa dilepaskan dari komputer
muncul, lepaskan kabel USB Y dari
dengan aman
komputer.
JANGAN melepaskan kabel USB Y ketika
Remove Hardware
Device
removed from the computer
kabel USB Y dari komputer anda.
JANGAN keluarkan kabel USB Y apabila sistem
ícone
de armazenamento de massa USB
mensagem.
agora ser removido com segurança do sistema
desligue o cabo USB Y do seu computador.
NÃO desligue o cabo USB Y quando o sistema
( ).
Safely remove USB Mass Storage
pop timbul, klik mesej tersebut.
The device can now be safely
Remover o hardware com segurança
Laitteiston
-kuvaketta ( ).
pop timbul, keluarkan
Remover Dispositivo
, clique na
O dispositivo pode
( ).
Safely
( ).
,
Αφαιρέστε με ασφάλεια την εξωτερική οπτική
μονάδα.
Η εξωτερική οπτική μονάδα υποστηρίζει τη λειτουργία
Τοποθέτησης-και-Άμεσης-Λειτουργίας (Plug & Play).
Ακολουθήστε τα παρακάτω βήματα για να αφαιρέσετε με
ασφάλεια τη μονάδα οδήγησης.
A. Από τη γραμμή λειτουργιών του υπολογιστή σας, κάντε
κλικ στο εικονίδιο
B. Όταν εμφανιστεί το μήνυμα
συσκευής αποθήκευσης USB,
C. Όταν εμφανιστεί το μήνυμα
αφαιρέσετε με ασφάλεια τη συσκευή από τον
υπολογιστή
υπολογιστή σας.
ΣΗΜΕΙΩΣΗ:
σύστημα κάνει επανεκκίνηση ή όταν η λυχνία ένδειξης LED
της εξωτερικής οπτικής μονάδας αναβοσβήνει.
Droša ārējā optiskā draiva noņemšana.
Ārējais optiskais draivs atbalsta Plug & Play tehnoloģiju.
Draiva drošai noņemšanai, izpildiet sekojošos soļus.
A. Jūsu datora uzdevumu joslā noklikšķiniet uz ikonas
Droši noņemt aparatūru
B. Kad uznirst ziņa
noklikšķiniet uz šīs ziņas.
C. Kad uznirst ziņa
datora
PIEZĪME:
vai ārējā optiskā draiva LED rādītājs mirgo.
Trygg fjerning av den eksterne optiske stasjonen.
Den eksterne optiske stasjonen støtter Plug & Play. Følg
trinnene nedenfor for trygt å fjerne stasjone.
A. Fra PC-ens oppgavelinje kan du klikke på trygg
av maskinvare-ikonet
B. Når meldingen
masselagringsenhet
meldingen.
C. Når meldingen
kommer opp kan du frakoble USB Y-kabelen fra PC-en.
: IKKE koble fra USB Y-kabelen når systemet starter opp
MERK
eller LED-indikatoren til den eksterne optiske stasjonen blinker.
Îndepărtarea în siguranţă a drive-ului optic extern.
Drive-ul optic extern suportă aplicaţia Plug & Play
(Conectează & Redă). Urmaţi paşii de mai jos pentru a
îndepărta în siguranţă drive-ul.
A. Din bara dvs de sarcină a computerului dvs, click pe
icoana
B. Atunci când mesajul
Dispozitivul de stocare în masă USB
mesaj.
C. Atunci când mesajul
îndepărtat de la computer
USB Y de la computerul dvs.
NU deconectaţi cablul USB Y atunci când sistemul
NOTĂ:
porneşte sau când LED-ul indicator al drive-lui optic extern
pâlpâie.
Ασφαλής Αφαίρεση Υλικού
Ασφαλής αφαίρεση
κάντε κλικ στο μήνυμα.
, αποσυνδέστε το καλώδιο USB Y από τον
ΜΗΝ αποσυνδέετε το καλώδιο USB Y όταν το
, atvienojiet USB Y kabeli no datora.
NEATVIENOJIET USB Y kabeli, ja sistēma sāknē
Îndepărtează în siguranţă hardware-ul
Μπορείτε τώρα να
( ).
USB zibatmiņas droša noņemšana,
Ierīci tagad var droši noņemt no
( ).
Trygg fjerning av USB-
kommer opp kan du klikke på
Enheten kan nå trygt fjernes fra PC-en
Îndepărtează în siguranţă
Dispozitivul poate fi acum
apare, deconectaţi cablul
( ).
fjerning
( ).
apare, click pe

Bezpečné odinštalovanie externej optickej mechaniky.
Externá optická mechanika podporuje funkciu Plug & Play.
Aby ste mechaniku bezpečne odinštalovali, postupujte
podľa dolu uvedených krokov.
A. V rámci panela nástrojov svojho počítača kliknite na
ikonu
Bezpečné odstránenie hardvéru
B. Po zobrazení hlásenia
zariadenie veľkokapacitnej pamäte s podporou USB
kliknite na toto hlásenie.
C. Po zobrazení hlásenia
bezpečne odpojiť od počítača
od počítača.
POZNÁMKA:
bootovania systému alebo pokiaľ LED indikátor externej
mechaniky bliká.
Bezpečne odinštalovať
Zariadenie možno teraz
NEODPÁJAJTE USB Y kábel počas
( ).
, odpojte USB Y kábel
Pazljivo odstranite zunanji optični gonilnik.
Zunanji optični gonilnik podpira Plug & Play sistem. Pri
odstranitvi gonilnika, upoštevajte spodaj opisana navodila.
A. Od opravilne vrstice na vašem računalniku kliknite ikono
Varno odstranite napravo
B. Ko se prikaže sporočilo
napravo za masovno shranjevanje
sporočilo.
C. Ko se prikaže sporočilo
odstrani od računalnika
vašega računalnika.
NE ODSTRANITE USB Y kabla, ko se sistem
OPOMBA:
zaganja ali, ko svetleča dioda na zunanjem optičnem
gonilniku utripa.
( ).
Varno odstranite USB
kliknite na
Naprava se sedaj lahko varno
izklučite USB Y kabel iz
Säker borttagning av den externa optiska
enheten.
Den externa optiska enheten stödjer plug-and-play. Följ
stegen nedan för att säkert ta bort enheten.
A. Från aktivitetsfältet på datorn klickar du på ikonen
“Säker borttagning av hårdvara”
B. När ett meddelande
masslagringsenhet
C. När meddelandet
datorn
NOTERA:
startar eller LED indikatorn på den externa optiska enheten
blinkar.
Säker borttagning av USB
poppar upp, klicka på meddelandet.
Enheten kan nu säkert tas bort från
poppar upp kopplar du bort USB Y-kabeln från datorn.
Koppla INTE bort USB Y-kabeln när systemet
( ).
ถอดออปติคัลไดรฟ์ภายนอกอย่างปลอดภัย
ออปติคัลไดรฟ์ภายนอกสนับสนุนระบบพลัก & เพลย์ ทำตามขั้น
ตอนด้านล่างเพื่อถอดไดรฟ์อย่างปลอดภัย
A. จากทาสก์บาร์ของคอมพิวเตอร์ของคุณ, คลิกไอคอน
ถอดฮาร์ดแวร์อย่างปลอดภัย ( )
B. เมื่อข้อความ ถอดอุปกรณ์เก็บข้อมูล USB อย่างปลอดภัย
ปรากฏขึ้น, ให้คลิกที่ข้อความ
C. เมื่อข้อความ ขณะนี้สามารถถอดอุปกรณ์นี้จากคอมพิวเตอ
ร์ได้อย่างปลอดภัย ปรากฏขึ้น, ให้ถอดสายเคเบิล Y USB จา
กคอมพิวเตอร์ของคุณ
หมายเหตุ: อย่าถอดสายเคเบิล Y USB ในขณะที่ระบบกำลังบูต |
หรือไฟแสดงสถานะ LED ของออปติคัลไดรฟ์ภายนอกกำลังกะพริบ
安全從系統移除光碟機。
外接光碟機支援隨插即用功能。請依照以下步驟移
除光碟機。
A. 從電腦的工作列中,點選安全移除硬體圖示( )。
B. 當出現 安全移除 USB Mass Storage Device 訊息時,
點選該訊息。
C. 當出現 USB Mass Storage Device 裝置現在可安全地從
系統移除 訊息時,將 USB Y 排線從電腦上移除。
注意:當系統正在啟動或外接光碟機的 LED 指示燈
正在閃爍時,請勿移除 USB Y 排線。
Harici optik sürücüyü güvenli bir şekilde kaldırın.
Harici optik sürücü Tak & Çal'ı desteklemektedir. Sürücüyü
güvenli bir şekilde kaldırmak için aşağıdaki adımları takip
edin.
A. Bilgisayarınızın görev çubuğundan,
simgesini ( ).
Kaldır
B.
USB Yığın Depolama Aygıtını Güvenle Kaldır
ekrana geldiğinde, iletiye tıklayın.
C.
Bu aygıt şimdi güvenle bilgisayardan kaldırılabilir
iletisi ekrana geldiğinde, USB Y kablosunu bilgisayardan
çıkarın.
Sistem ön yükleme yaparken veya harici optik
NOT:
sürücünün LED göstergesi yanıp sönerken USB Y
kablosunun bağlantısını KESMEYİN.
安全從系統移除光驅。
外接光驅支持即插即用功能。請依照以下步驟移除
光驅。
A. 從電腦的任務欄中,點選安全刪除硬件圖標( )。
B. 當出現“安全刪除 USB Mass Storage Device”信
息時,點選該信息。
C. 當出現“USB Mass Storage Device 設備現在可安全
地從系統移除”信息時,將 USB Y 數據線從電腦上
移除。
注意:當系統正在啟動或外接光驅的 LED 指示燈正
在閃爍時,請勿移除 USB Y 數據線。
Donanımı Güvenle
iletisi
езпечно зніміть зовнішній оптичний дисковод.
овнішній оптичний дисковод підтримує «микай і працюй!».
иконайте наступні кроки, щоб безпечно зняти дисковод.
A. а панелі задач на комп' ютері клацніть по піктограмі
езпечно зняти апаратне забезпечення ( ).
B. оли вискакує повідомлення езпечно зніміть пристрій
масового зберігання USB, клацніть по ньому.
C. оли вискакує повідомлення епер можна безпечно зняти
пристрій з комп’ютера, від’єднайте кабель USB Y від комп’
ютера.
ІА: від’єднуйте кабель USB Y, коли система здійснює
первинне завантаження або коли спалахує світлодіодний індикатор
зовнішнього оптичного дисковода.
光学ドライブを安全に取り外す
光学ドライブはPlug&Playをサポートしています。取り外
す際は次の手順で取り外します。
A. コンピュータのタスクバーから、 アイコンをクリ
ックします。
B. 「SafelyremoveUSBMassStorageDevice」のメッセ
ージが表示されたら、メッセージをクリックします。
C. 「Thedevicecannowbesafelyremovedfromthe
computer」のメッセージが表示されますので、USBY
ケーブルをコンピュータから取り外します。
注:システムの起動中、または光学ドライブのLEDインジ
ケータが点滅しているときは、USBYケーブルを取り外さ
ないでください。

Troubleshooting
If your computer cannot detect the external optical drive, follow the steps below:
1. Shut down your computer.
2. Check if the USB Y cable is connected properly. See Step 2
3. Turn on your computer.
For more technical service, contact your retailer or the ASUS Technical Support.
NOTE:
Connect the optical drive to your computer
for details.
Dépannage
Si votre ordinateur ne parviens pas à détecter le
lecteur optique externe, suivez les instructions
suivantes :
1. Arrêtez votre ordinateur.
2. Vérifiez que le câble USB Y est correctement connecté.
Voir 2
Connectez le lecteur optique à votre
pour de plus amples détails.
ordinateur
3. Allumez votre ordinateur.
Pour toute assistance, contactez votre
REMARQUE:
revendeur ou le service après vente d’ASUS.
Resolución de problemas
Si su equipo no detecta la unidad óptica externa, siga
los pasos siguientes:
1. Apague su equipo.
2. Compruebe si el cable USB en Y está conectado
correctamente. Consulte el Paso 2
óptica a su equipo
3. Encienda su equipo.
Si desea recibir asistencia técnica, póngase en
NOTA:
contacto con su distribuidor o con el Departamento de
asistencia técnica de ASUS.
si desea obtener más información.
Conecte la unidad
Odstraňování problémů
Pokud počítač nemůže rozpoznat externí optickou
jednotku, postupujte podle následujících kroků:
1. Vypněte počítač.
2. Zkontrolujte, zda je kabel USB Y řádně připojen.
Podrobnosti viz Krok 2
počítači
3. Zapněte počítač.
POZNÁMKA: Potřebujete-li další technickou pomoc, obraťte
se na prodejce nebo na odbornou pomoc společnosti ASUS.
Připojte optickou jednotku k
.
Fehlerbehebung
Wenn Ihr Computer das externe optische Laufwerk
nicht erkennt, folgen Sie bitte den nachstehenden
Schritten:
1. Schalten Sie Ihren Computer aus.
2. Überprüfen Sie, ob das USB Y-Kabel richtig verbunden
ist. Siehe Schritt 2
Laufwerks mit Ihren Computer
3. Schalten Sie Ihren Computer ein.
HINWEIS:
Sie bitte Ihren Händler oder den ASUS Kundendienst.
Verbinden des optischen
für Details.
Für mehr technische Unterstützung kontaktieren
Устранение неисправностей
сли ваш компьютер не может обнаружить внешний
оптический привод, выполните следующие действия:
1. ыключите компьютер.
2. роверьте правильность подключения USB Y кабеля.
одробную информацию смотрите в разделе 2 одключение
оптического привода к компьютеру.
3. ключите компьютер.
римечание: ля дополнительного технического обслуживания
обратитесь к вашему продавцу или в техподдержку ASUS.
Fejlfinding
Hvis computeren ikke kan genkende det eksterne,
optiske drev, skal du gøre som følger:
1. Sluk for computeren.
2. Tjek, om USB Y kablet er korrekt tilsluttet. Se Trin
2
Forbind det optiske drev til din computer
yderligere oplysninger.
3. Tænd for computeren.
For yderligere teknisk service, kontakt din
BEMÆRK:
forhandler eller ASUS Teknisk Hjælp.
for
Risoluzione dei problemi
Se il computer non rileva l’unità ottica esterna, seguire
le istruzioni riportate di seguito:
1. Spegnere il computer.
2. Controllare che il cavo USB a Y sia collegato
correttamente. Si veda il punto 2
dell’unità ottica al computer
informazioni.
3. Accendere il computer.
Per avere maggiore assistenza tecnica, rivolgersi al
NOTA:
rivenditore o al supporto tecnico ASUS.
Collegamento
per avere magiori
Отстраняване на проблеми
Ако ашият компютър открие външно оптично устройство,
следвайте стъпките по-долу:
1. зключете компютъра.
2. роверетедали USB Y кабелът е свързан правилно. ижте
стъпка 2 вързване на оптичното устройство към ашия
компютър за повече информация.
3. ключете компютъра си.
АА: а техническо обслужване, свържете се с ашия
търговски представител или с техническата поддръжка на ASUS.
Probleemoplossing
Volg de onderstaande stappen als uw computer het
externe optische station niet kan detecteren:
1. Schakel uw computer uit.
2. Controleer of de USB-Y-kabel correct is aangesloten.
Zie Stap 2
Het optische station aansluiten op uw
voor details.
computer
3. Schakel uw computer in.
neem contact op met uw leverancier of
OPMERKING:
met de technische ondersteuning van ASUS voor meer
technische ondersteuning.

Tõrkeotsing
Kui arvuti ei suuda välist optilist seadet tuvastada, siis järgige
alltoodud samme:
1. Sulgege arvuti.
2. Kontrollige, kas USB Y kaabel on korralikult ühendatud.
Üksikasju vt sammust 2
arvutiga
3. Lülitage arvuti sisse.
Täiendavaks tehniliseks teeninduseks võtke
MÄRKUS:
ühendust ASUS'e tehnilise toega.
.
Ühendage optiline seade
Vianetsintä
Jos tietokoneesi ei voi havaita ulkoista optista asemaa,
seuraa alla olevia vaiheita:
1. Sammuta tietokone.
2. Tarkasta, onko USB Y–kaapeli liitetty oikein. Katso Vaihe
2
Liitä optinen asema tietokoneeseesi
varten.
3. Laita tietokone päälle.
Saadaksesi lisää teknistä palvelua ota yhteys
HUOMAA:
myyjääsi tai ASUS-yhtiön tekniseen tukeen.
yksityiskohtia
Αντιμετώπιση Προβλημάτων
Αν ο υπολογιστής σας δεν μπορεί να ανιχνεύσει την εξωτερική
οπτική μονάδα, ακολουθήστε τα παρακάτω βήματα:
1. Κλείστε τον υπολογιστή σας.
2. Ελέγξτε αν το καλώδιο USB Y είναι σωστά
συνδεδεμένο. Δείτε το Βήμα 2
μονάδας στον υπολογιστή
3. Ενεργοποιήστε τον υπολογιστή σας.
Για περισσότερη τεχνική υποστήριξη,
ΣΗΜΕΙΩΣΗ:
επικοινωνήστε με
την Τεχνική Υποστήριξη της ASUS.
το κατάστημα λιανικής πώλησης ή
Σύνδεση της οπτικής
για λεπτομέρειες.
Hibaelhárítás
Amennyiben a rendszer nem érzékeli automatikusan a külső
optikai meghajtót, kövesse a következő utasításokat:
1. Kapcsolja ki a számítógépet.
2. Ellenőrizze, hogy az USB Y kábel megfelelően csatlakozzon
a számítógéphez. A részletekért lásd a
meghajtót csatlakoztassa a számítógéphez
3. Kapcsolja be a számítógépet.
MEGJEGYZÉS:
forgalmazót vagy az ASUS Terméktámogató Részlegét.
Bővebb technikai információért keresse fel a
Az optikai
2. pontját.
Trik čių šalinimas
Jeigu kompiuteris neatpažįsta išorinio optinio disko, sekite
žemiau aprašytus žingsnius:
1. Išjunkite kompiuterį.
2. Patikrinkite ar tinkamai prijungtas USB Y laidas.
Detalesnės informacijos ieškokite 2 žingsnyje
optinį diską prie kompiuterio
3. Įjunkite kompiuterį.
Jei reikia daugiau techninės pagalbos, susisiekite
PASTABA:
su pardavėju arba ASUS techniniu aptarnavimu.
Rozwiązywanie problemów
Jeśli komputer nie wykrywa zewnętrznego napędu
optycznego, wykonaj podane poniżej czynności:
1. Wyłącz komputer.
2. Sprawdź, czy jest prawidłowo podlączony kabel USB
Y. Szczegółowe informacje znajdują się w czynności 2
Podłączanie napędu optycznego do komputera
3. Włącz komputer.
W celu uzyskania dalszych informacji technicznych,
UWAGA:
skontaktuj się ze sprzedawcą lub z pomocą techniczną ASUS.
Prijunkite
.
.
Pemecahan Masalah
Jika komputer tidak mendeteksi external optical drive, ikuti
langkah-langkah berikut:
1. Matikan komputer.
2. Periksa apakah kabel USB Y tersambung dengan benar.
Lihat Langkah 2
komputer
3. Matikan komputer.
PERHATIAN:
Dukungan Teknis ASUS.
Sambungkan penggerak optik ke
untuk lebih jelasnya.
Untuk layanan teknis, hubungi penjual atau
Menyelesaikan masalah
Jika komputer anda tidak dapat mengesan pemacu optik
luaran, ikut langkah di bawah:
1. Matikan komputer anda.
2. Periksa sama ada kabel USB Y disambungkan dengan
baik. Lihat Langkah 2
komputer anda
3. Hidupkan komputer anda.
Untuk mendapatkan perkhidmatan teknikal, hubungi
NOTA:
peruncit anda atau Sokongan Teknikal ASUS.
Sambungkan pemacu optik pada
untuk mendapatkan maklumat.
Resolução de problemas
Se o seu computador não detectar a unidade óptica, siga os
passos indicados abaixo:
1. Desligue o computador.
2. Ve rifique se o cabo USB Y está correctamente ligado.
Consulte o Passo 2
computador
3. Ligue o computador.
Para serviço mais técnico, contacte o seu vendedor
NOTA:
ou o Suporte técnico ASUS.
Ligue a unidade óptica ao
para obter mais detalhes.
Trau cējummeklēšana
Ja jūsu dators nevar atklāt ārējo optisko draivu, tad izpildiet
sekojošos soļus:
1. Izslēdziet jūsu datoru.
2. Pārbaudiet, vai USB Y kabelis ir pareizi savienots. Sīkākai
informācijai, skatiet soli 2
.
datoram
3. Ieslēdziet jūsu datoru.
Tehniskā servisa pakalpojumiem sazinieties ar jūsu
PIEZĪME:
izplatītāju vai ar ASUS tehnisko atbalstu.
Pievienojiet optisko draivu jūsu
Feilsøking
Hvis PC-en ikke kan oppdage den eksterne optiske stasjonen
kan du følge trinnene nedenfor:
1. Slå av PC-en.
2. Kontroller om USB Y-kabelen er riktig tilkoblet. Se trinn
2
Koble den optiske stasjonen til PC-en
opplysninger.
3. Slå på PC-en.
For mer teknisk service kan du kontakt forhandleren
MERK:
eller teknisk støtte hos ASUS.
for flere
Remedierea defecţiunilor
Dacă computerul dvs nu poate detecta drive-ul optic extern,
urmaţi paşii de mai jos:
1. Închideţi computerul.
2. Ve rificaţi dacă este corespunzător conectat cablul USB
Y. Vezi Pasul 2
pentru detalii.
3. Porniţi computerul.
NOTĂ:
vânzătorul sau Asistenţa Tehnică ASUS.
Conectează drive-ul optic la computer
Pentru detalii service mai tehnice, contactaţi

Riešenie problémov
Pokiaľ váš počítač nedokáže zistiť externú optickú
mechaniku, postupujte podľa dolu uvedených krokov:
1. Vypnite počítač.
2. Skontrolujte správnosť pripojenia USB Y kábla.
Podrobnosti nájdete v kroku 2
mechaniky k počítaču
3. Zapnite počítač.
Ďalšiu technickú pomoc získate u predajcu
POZNÁMKA:
alebo technickej podpory spoločnosti ASUS.
Pripojenie optickej
.
Iskanje in odstranjevanje motenj
Če vaš računalnik ne more zaznati zunanjega optičnega
gonilnika, sledite naslednjemu postopku:
1. Izključite vaš računalnik.
2. Preverite, da je vaš USB Y kabel pravilno priključen.
Glej korak 2
Povežite optični gonilnik z računalnikom
za več podrobnosti.
3. Zaženite vaš računalnik.
Za izdatnejšo tehnično podporo kontaktirajte
OPOMBA:
vašega prodajalca ali ASUS tehnično podporo.
Felsökning
Om din dator inte kan hitta den externa optiska enheten följ
stegen nedan:
1. Stäng av datorn.
2. Kontrollera om USB Y-kabeln är ordentligt ansluten. Se
Steg 2
Anslut den optiska enheten till din dator
detaljer.
3. Slå på datorn.
För mer teknisk service kontakta din återförsäljare
Notera:
eller ASUS tekniska support.
för
การแก้ไขปัญหา
ถ้าคอมพิวเตอร์ตรวจไม่พบออปติคัลไดรฟ์ภายนอก
ให้ปฏิบัติตามขั้นตอนด้านล่าง:
1. ปิดคอมพิวเตอร์ของคุณ
2. ตรวจดูว่าสายเคเบิล Y USB เชื่อมต่ออยู่อย่างเหมาะสม
สำหรับรายละเอียด ให้ดูขั้นที่ 2
เชื่อมต่อออปติคัลไดรฟ์เข้ากับคอมพิวเตอร์ของคุณ
3. เปิดคอมพิวเตอร์ของคุณ
หมายเหตุ: สำหรับบริการด้านเทคนิคเพิ่มเติม
ให้ติดต่อร้านค้าปลีกของคุณ หรือฝ่ายสนับสนุนด้านเทคนิคของ
ASUS
疑難排解
若您的電腦無法偵測到外接光碟機,請執行以下步驟:
1. 關閉您的電腦。
2. 檢查 USB Y 排線是否連接正確。詳細內容請參考步
驟 2 「將光碟機連接到您的電腦」。
3. 開啟電腦。
注意:更多技術服務,請連絡您的經銷商或華碩
技術支援。
Sorun Giderme
Bilgisayarınız harici optik sürücüyü algılamıyorsa, aşağıdaki
adımları takip edin:
1. Bilgisayarınızı kapatın.
2. USB Y kablosunun doğru şekilde bağlanıp
bağlanmadığını kontrol edin. Ayrıntılar için
Sürücüyü Bilgisayarınıza Bağlayın
bakınız.
3. Bilgisayarınızı açın.
Daha fazla teknik yardım için, satıcınız veya ASUS
NOT:
Teknik Destek ile temasa geçin.
Optik
Aşama 2'ye
疑難排解
若您的電腦無法偵測到外接光驅,請執行以下步驟:
1. 關閉您的電腦。
2. 檢查 USB Y 數據線是否連接正確。詳細內容請參
考步驟 2 「將光驅連接到您的電腦」。
3. 開啟電腦。
注意:更多技術服務,請聯絡您的經銷商或華碩
技術支持。
Усунення несправностей
Якщо комп’ютер не здатний визначити зовнішній оптичний
дисковод, виконайте наступні кроки:
1. имкніть систему комп’ютера.
2. еревірте, чи правильно підключений кабель USB Y. одробиці
див. у році 2 ідключіть оптичний дисковод до комп’ютера.
3. имкніть комп’ютер.
ІА: об отримати більш специфічне технічне
обслуговування, зверніться до розповсюджувача або технічної
підтримки ASUS.
トラブルシューティング
お使いのコンピュータで光学ドライブが検出されない場合
は、次の手順で問題を解決してください。
1. コンピュータをシャットダウンします。
2. USBYケーブルが正しく接続されていることを確認しま
す。詳細はステップ2の「光学ドライブをコンピュータ
に接続する」をご参照ください。
3. コンピュータの電源をONにします。
注:問題が解決しない場合など、技術的なサポートサービ
スをご利用される場合は、販売店またはASUSのサポートセ
ンターにご相談ください。

System requirements for playing Blu-Ray discs (for Blu-Ray drive only)
®
Windows
• Operating system:
• Processor:
• Memory:
• Graphics Card:
• Use HDCP compatible display and VGA card to get High Definition digital output.
NOTES:
• Refer to Cyberlink website
• Specifications are subject to change without notice.
XP with Service Pack 2 installed or Windows® Vista
®
Pentium
D 945 (3.4 GHz) or higher
1 GB or more is recommended
®
NVIDIA
GeForce 7600 GT or ATI X1600 series or above
http://www.cyberlink.com for more details.
 Loading...