

Page 1
LSI MegaRAID User’s Manual
Q2143
August 2005
Page 2

Copyright Information
No part of this manual, including the products and software described
in it,may be reproduced, transmitted, transcribed, stored in a retrieval
system,or translated into any language in any form or by any means,
exceptdocumentation kept by the purchaser for backup purposes, without
theexpress written permission of ASUSTeK COMPUTER INC. (“ASUS”).
ASUS PROVIDES THIS MANUAL “AS IS” WITHOUT WARRANTY OF
ANY KIND, EITHER EXPRESS OR IMPLIED, INCLUDING BUT NOT
LIMITED TO THE IMPLIED WARRANTIES OR CONDITIONS OF
MERCHANTABILITY OR FITNESS FOR A PARTICULAR PURPOSE. IN
NO EVENT SHALL ASUS, ITS DIRECTORS,OFFICERS, EMPLOYEES
OR AGENTS BE LIABLE FOR ANY INDIRECT, SPECIAL, INCIDENTAL,
OR CONSEQUENTIAL DAMAGES (INCLUDING DAMAGES FOR
LOSS OF PROFITS, LOSS OF BUSINESS, LOSS OF USE OR DATA,
INTERRUPTION OF BUSINESS AND THE LIKE), EVEN IF ASUS HAS
BEEN ADVISED OF THE POSSIBILITY OF SUCH DAMAGES ARISING
FROM ANY DEFECT OR ERROR IN THIS MANUAL OR PRODUCT.
Product warranty or service will not be extended if: (1) the product is
repaired, modified or altered, unless such repair, modification of alteration
is authorized in writing by ASUS; or (2) the serial number of the product
is defaced or missing.
Products and corporate names appearing in this manual may or may not
be registered trademarks or copyrights of their respective companies,
and are used only for identification or explanation and to the ownersʼ
benefit, without intent to infringe.
SPECIFICATIONS AND INFORMATION CONTAINED IN THIS
MANUAL ARE FURNISHED FOR INFORMATIONAL USE ONLY, AND
ARE SUBJECT TO CHANGE AT ANY TIME WITHOUT NOTICE, AND
SHOULD NOT BE CONSTRUED AS A COMMITMENT BY ASUS. ASUS
ASSUMES NO RESPONSIBILITY OR LIABILITY FOR ANY ERRORS
OR INACCURACIES THAT MAY APPEAR IN THIS MANUAL,
INCLUDING THE PRODUCTS AND SOFTWARE DESCRIBED IN IT.
Copyright © 2005 ASUSTeK COMPUTER INC. All Rights Reserved.
Page 3

LSI MegaRAID Userʼs Manual
Table of Contents
About This Manual .....................................................................ii
Chapter 1: RAID Setup ............................................................1-1
1.1 Change the Speed of SCSI Channel ..........................1-1
1.2 RAID 0 or RAID 1 Setup .............................................1-3
1.3 RAID 5 Setup ..............................................................1-9
1.4 RAID 50 Setup ..........................................................1-15
1.5 RAID 10 Setup ..........................................................1-21
1.6 Rebuild the Arrays .....................................................
1.7 Migration Setup .........................................................1-28
1.8 Hot Spare Setup .......................................................1-29
1.9 Clear RAID ................................................................1-31
Chapter 2 Setup for Operation Systems ......................................
2.1 Install Drives for SCSI RAID ............................................
2.1.1 Microsoft® Windows® .........................................................
2.1.2 Red Hat Linux® ...................................................................
1-27
i
Page 4

LSI MegaRAID Userʼs Manual
About This Manual
This manual is designed for users who have already acquired knowledge
of peronal computer integration so as to help establish a powerful ASUS
server.
Overview
The structure of this manual is listed as follows:
1. Overview : How to use this manual
This chapter will make a description of how to use this manual as well as
guide throughout the contents of the following chapters.
2. Chapter 1: RAIDs Setup
With a step-by-step description, this chapter shows the procedures of
setting up a RAID on your system at the time when system is powered on
and not yet enters the operation system.
3. Chapter 2: Setup for Operation Systems
This chapter will guide you throught the relevant settings after entering
the operation systems.
Special Messages
This manual uses the following icons to call your attention to specific
instructions or explanations.
Warning: Provides messages of high importance, including
messages relating to personal safety or system integrity.
Caution: Draws attention so as to prevent possible
unappropriate actions which could leads to damages to the
system.
ii
Page 5

LSI MegaRAID Userʼs Manual
Important: Important tips or things to be paid attention to.
Note: Tips, definitions, or further explanations
More Information about This Product
You could get, via the following two media, information about the ASUS
products you are using as well as the upgrade information for both
software and hardware.
1. ASUS Website
Visit ASUS global website and acquire all kinds of information about
ASUS hardware and software products.
2. Other Documents
Besides the articles listed as the contents of shipping package, there
also may have other documents within the package, such as warranty
documents provided by your dealer.
iii
Page 6

Page 7

1
RAID Setup
With step-by-step descriptions, this
chapter introducess the procedures
of setting up a RAID on your system
at the time when system is powered
on and not yet enters the operation
system.
Page 8
LSI MegaRAID Userʼs Manual
1.1
Change the Speed of SCSI Channel
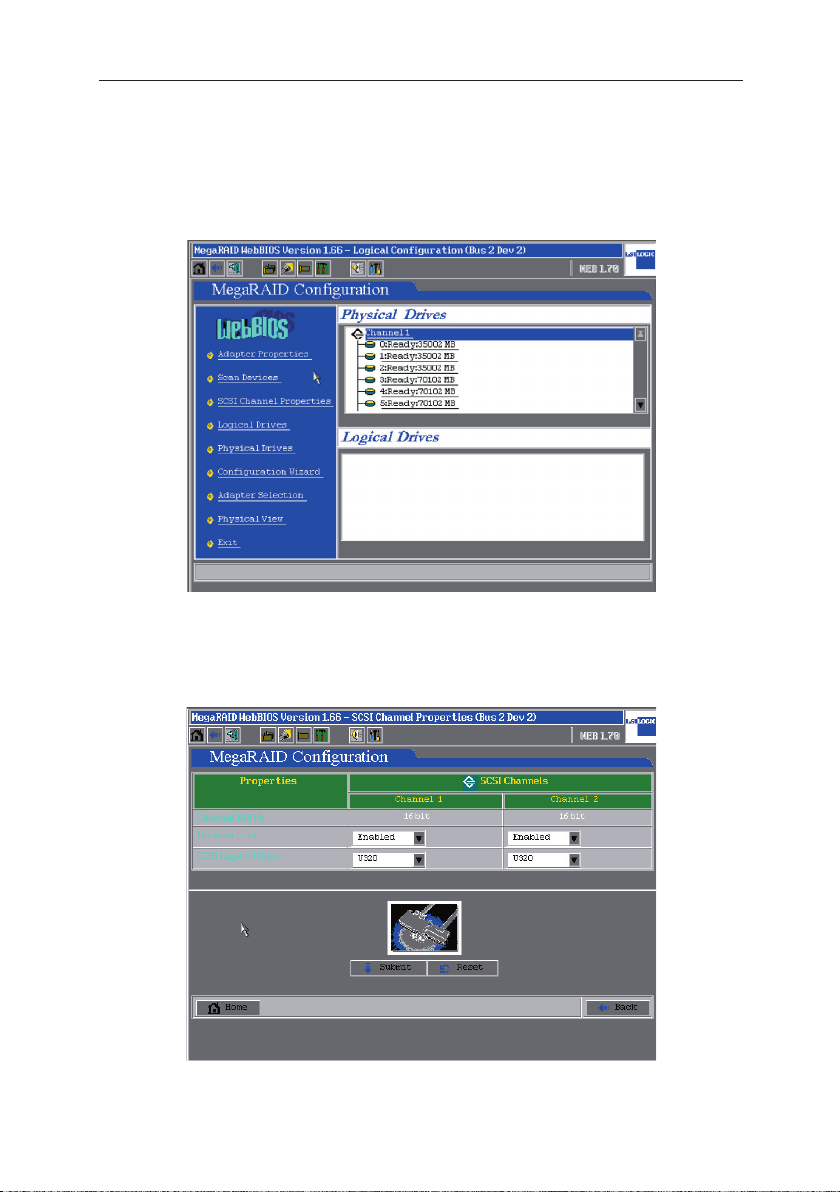
1. Press Ctrl + H at the same time and enter the MegaRAID WebBIOS
configuration window. Select with your mouse or keyboard the SCSI
Channel Properties in the WebBIOS configuration menu.
2. The window will show the current operation speed of the SCSI channels.
You could enable one single channel (320-1) or two channels as well.
(320-0,320-2)
1-1
Page 9
LSI MegaRAID Userʼs Manual
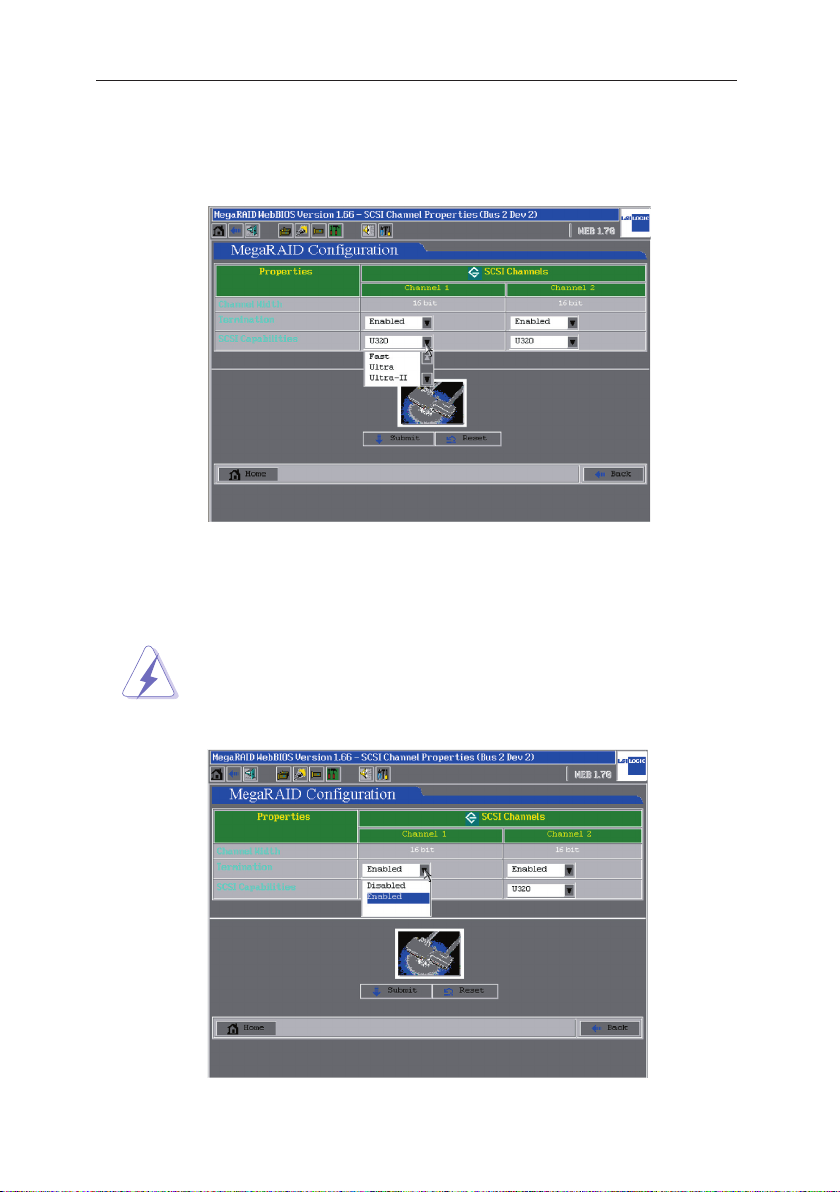
3. Click on the arrow of SCSI Capabilities box and open the drop down
menu. The four speed selections are Fast, Ultra, Ultra-II, U160, and
U320. Select a suitable speed and click the Submit button to save the
new configuration.
4. If it is to disable one of the channels (the disabled channel will not be
accessed to any storage devices), you could set the Termination of
this very channel to Disabled and click Submit to apply.
Warning: Do not make unnecessary changes to the settings
of Termination. The default setting is Enabled so that there
would be no such occasions that the system could not find
storage devices.
1-2
Page 10
LSI MegaRAID Userʼs Manual
1.2 RAID 0 or RAID 1 Setup
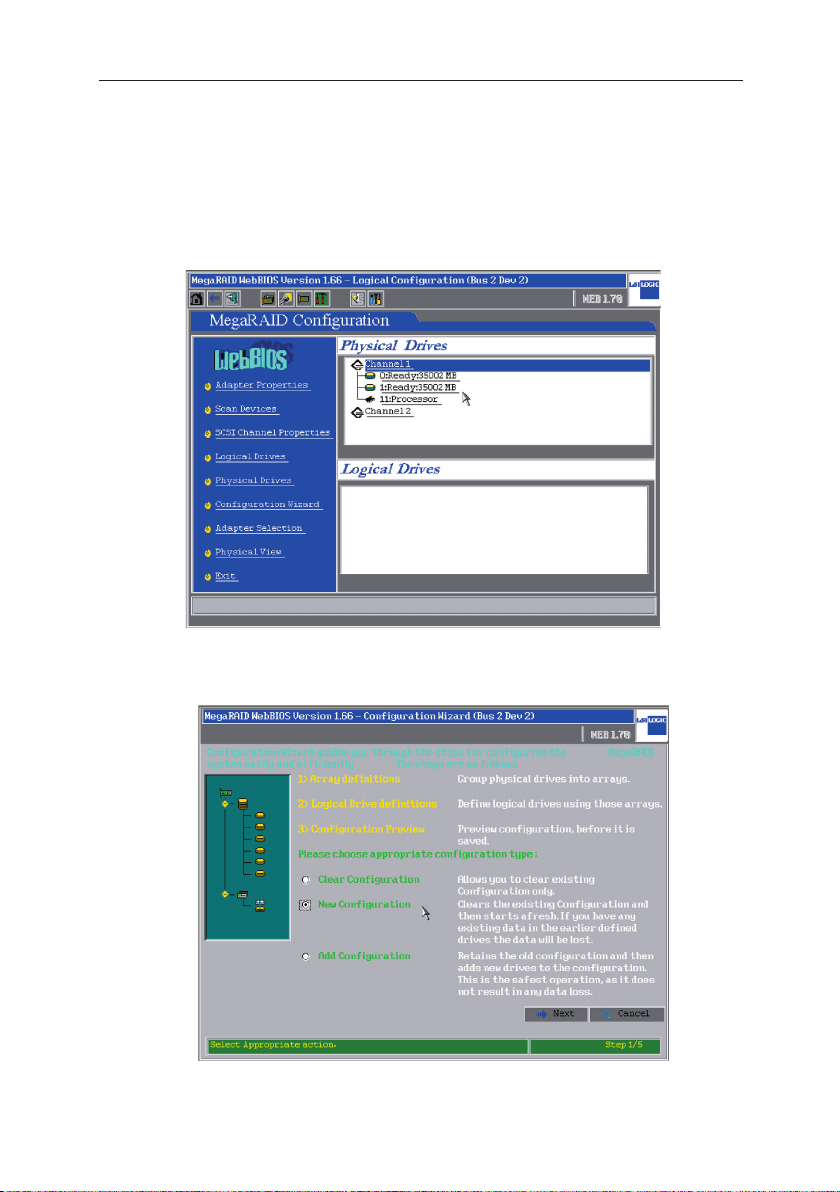
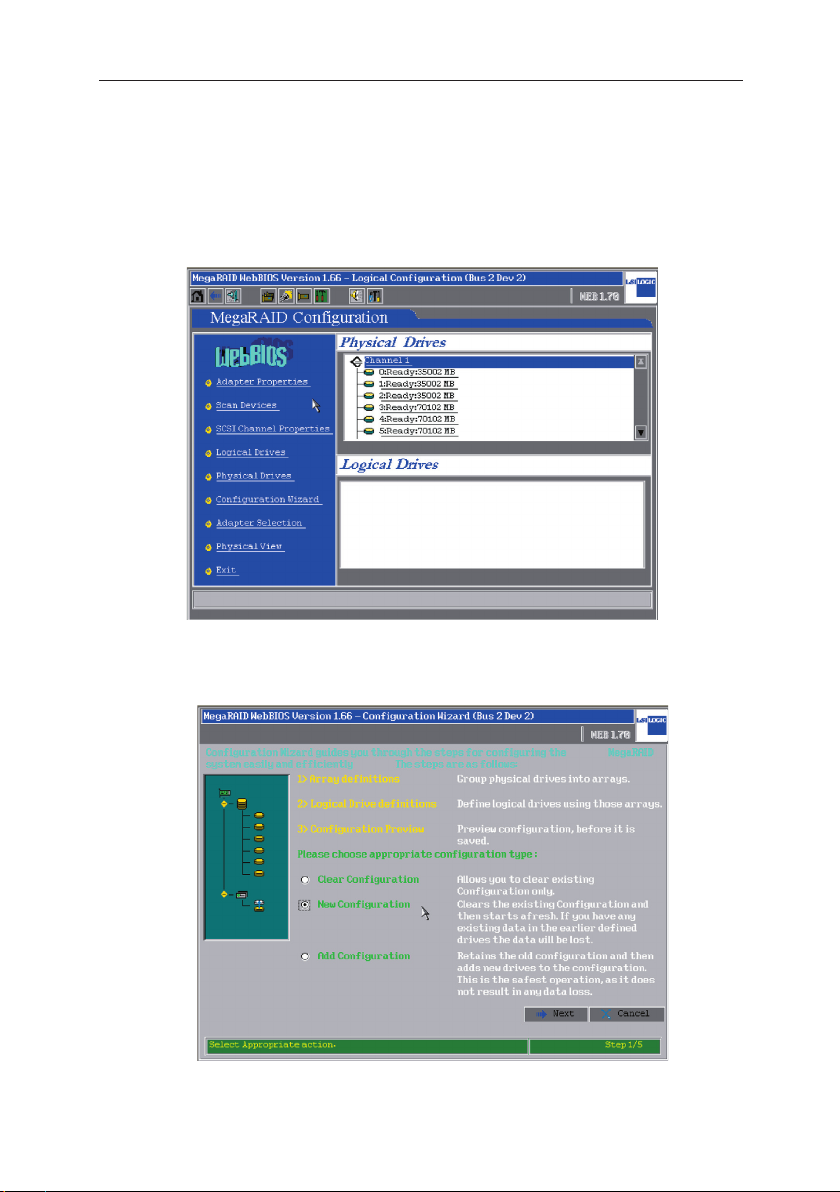
1. Press at the same time Ctrl + H and enter the MegaRAID WebBIOS
configuration window where information about all physical drivers
installed is displayed. Click Configuration Wizard to start RAID
setup.
2. If this is the first time to setup a RAID on your system, please select
New Configuration
and click Next to continue.
1-3
Page 11
LSI MegaRAID Userʼs Manual
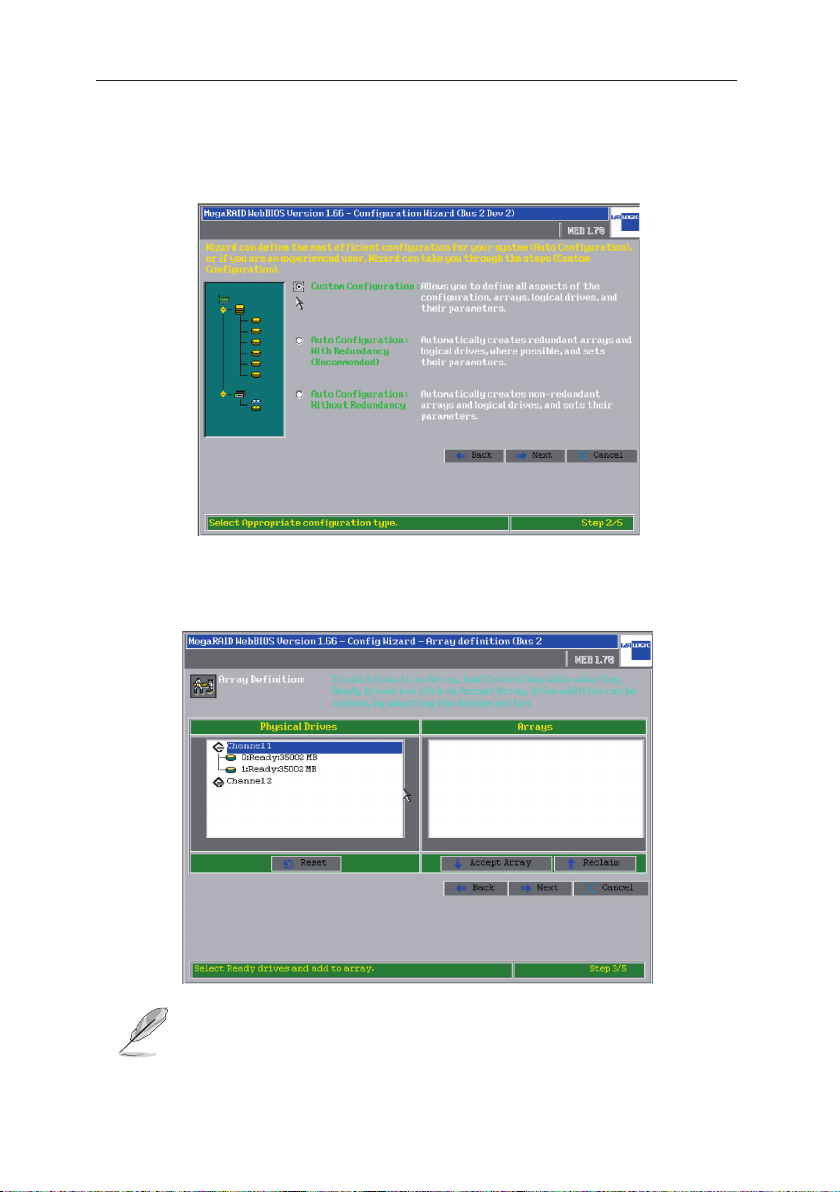
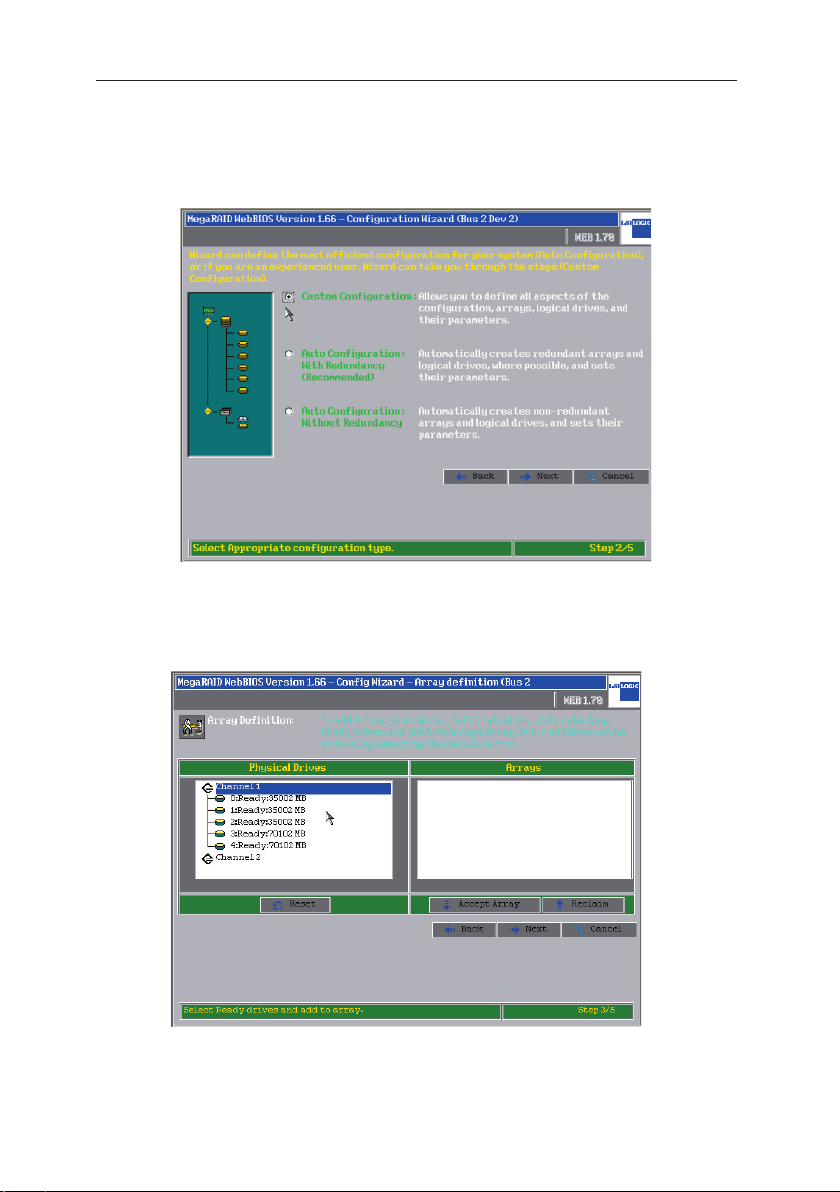
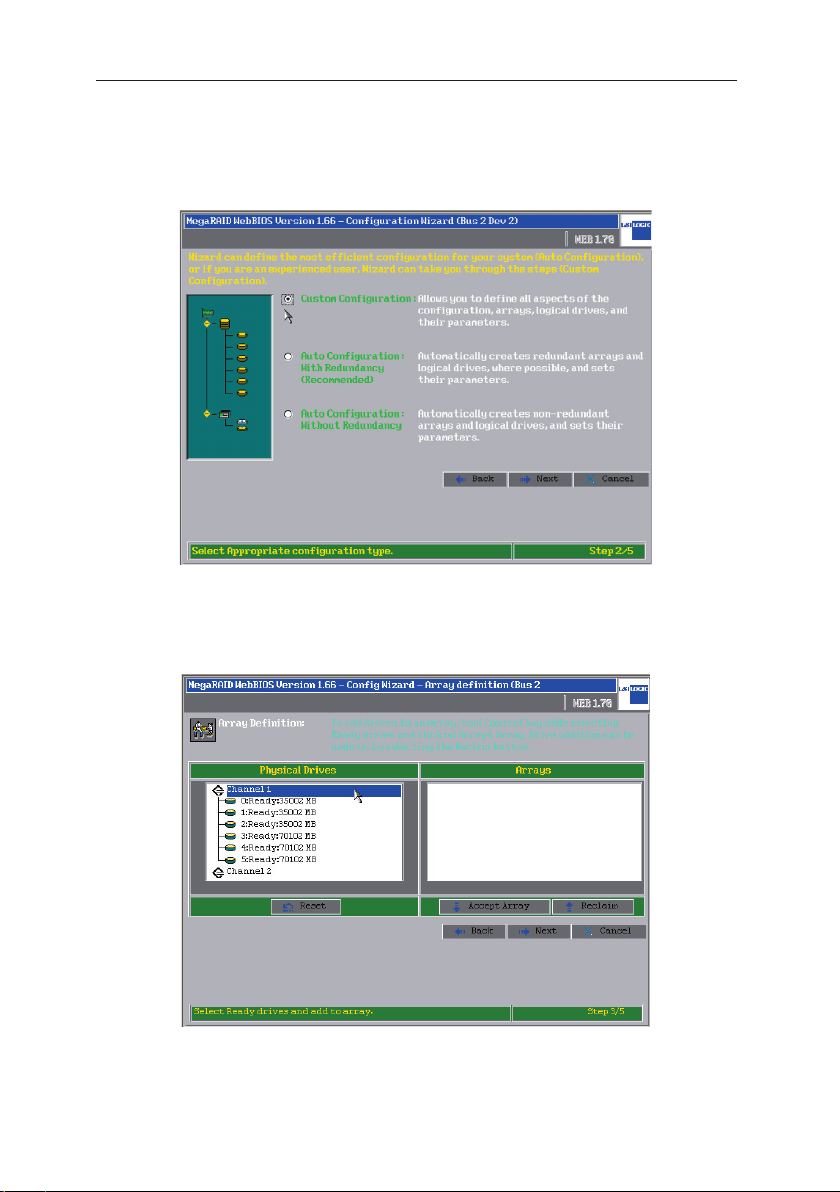
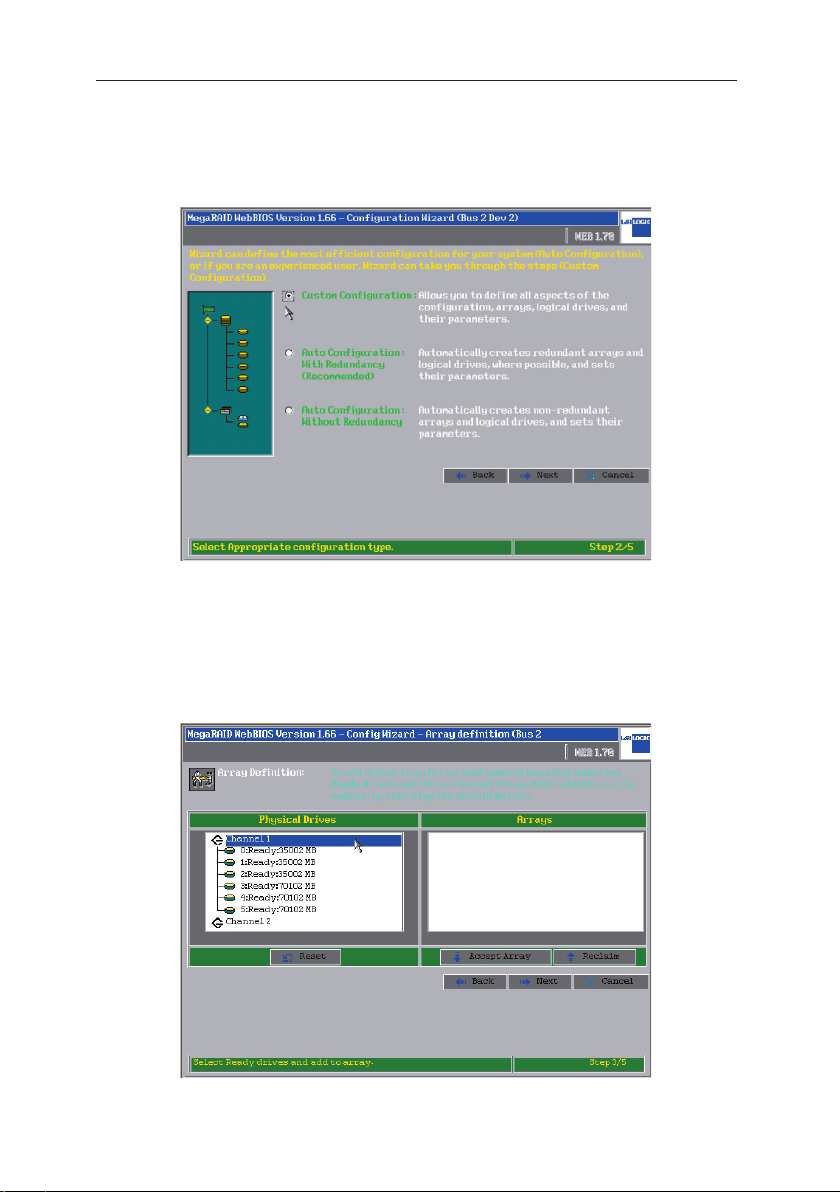
3. If the setting is to meet special requirements, please click on Custom
Configuration. You could also let the Configuration Wizard to set up
a RAID automatically by selecting Auto Configuration. Press Next to
continue.
4. Press and hold on the Ctrl key on your keyboard and select two ready
drives with your mouse, then click Accept Array to setup RAID 1.
1-4
The minimum requirements of hard drives for different types
of RAID are: RAID 0: at least two disks; RAID 1: at least two
disks and the number of disks must be even.
Page 12
LSI MegaRAID Userʼs Manual
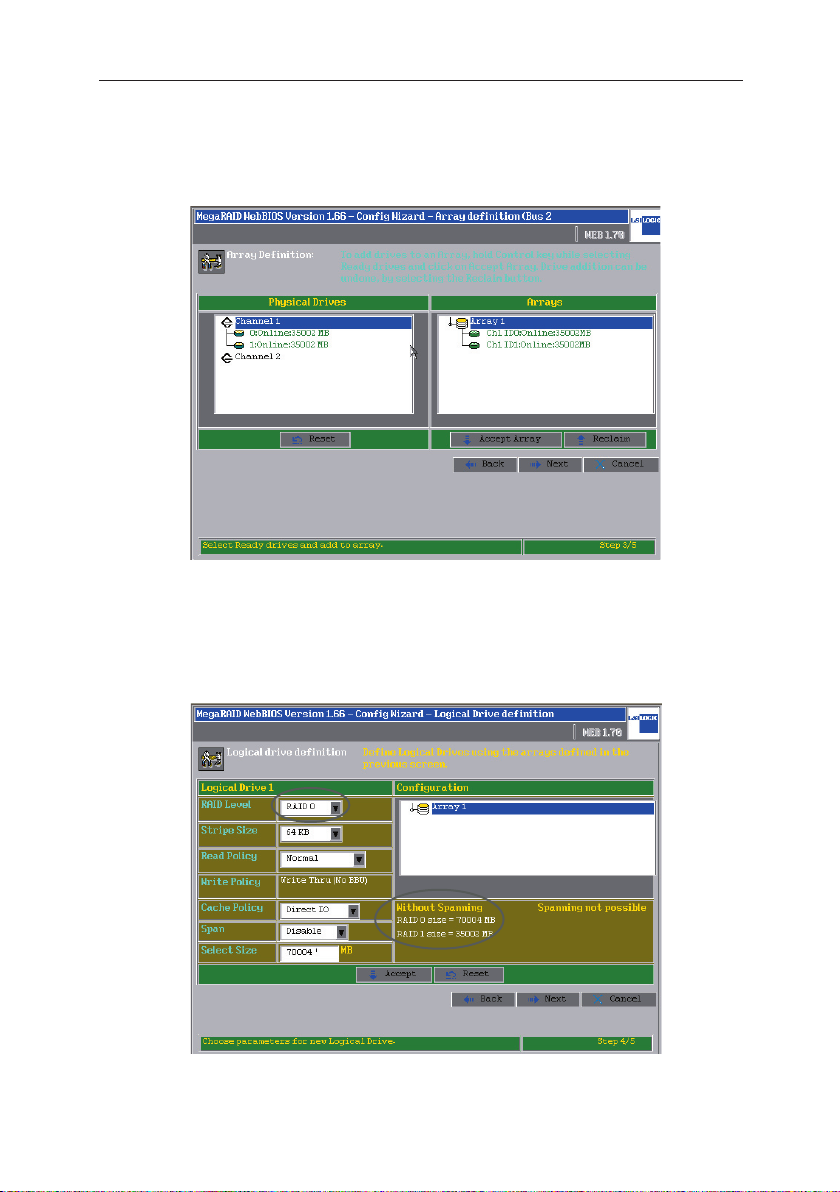
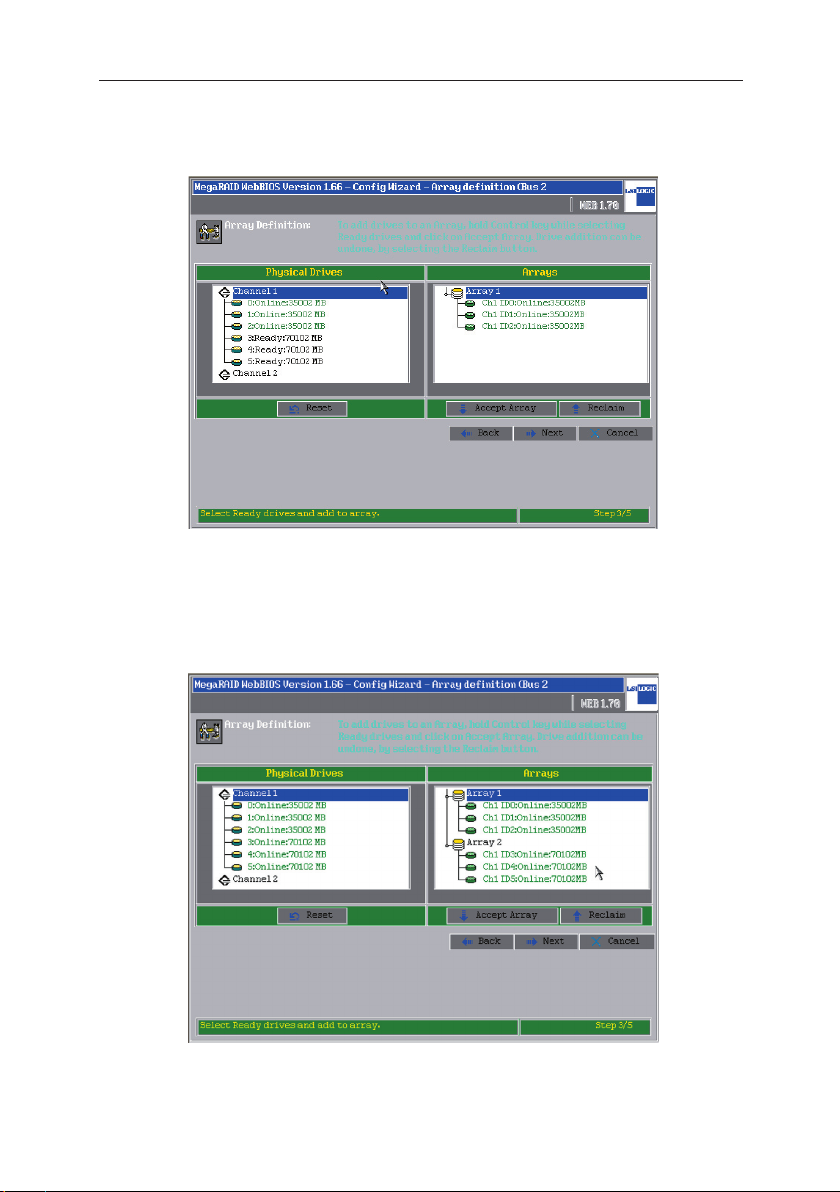
5. In the right side windows you could view the information of all RAIDs
(arrays). Click Accept Array and Next to continue.
6. For RAID 0 configuration, set the RAID Level as RAID 0, and input
the RAID 0 size value within the circled area into the Select Size box
(For example: RAID 0 size= 70004 MB). Then click Accept and Next
to continue.
1-5
Page 13
LSI MegaRAID Userʼs Manual
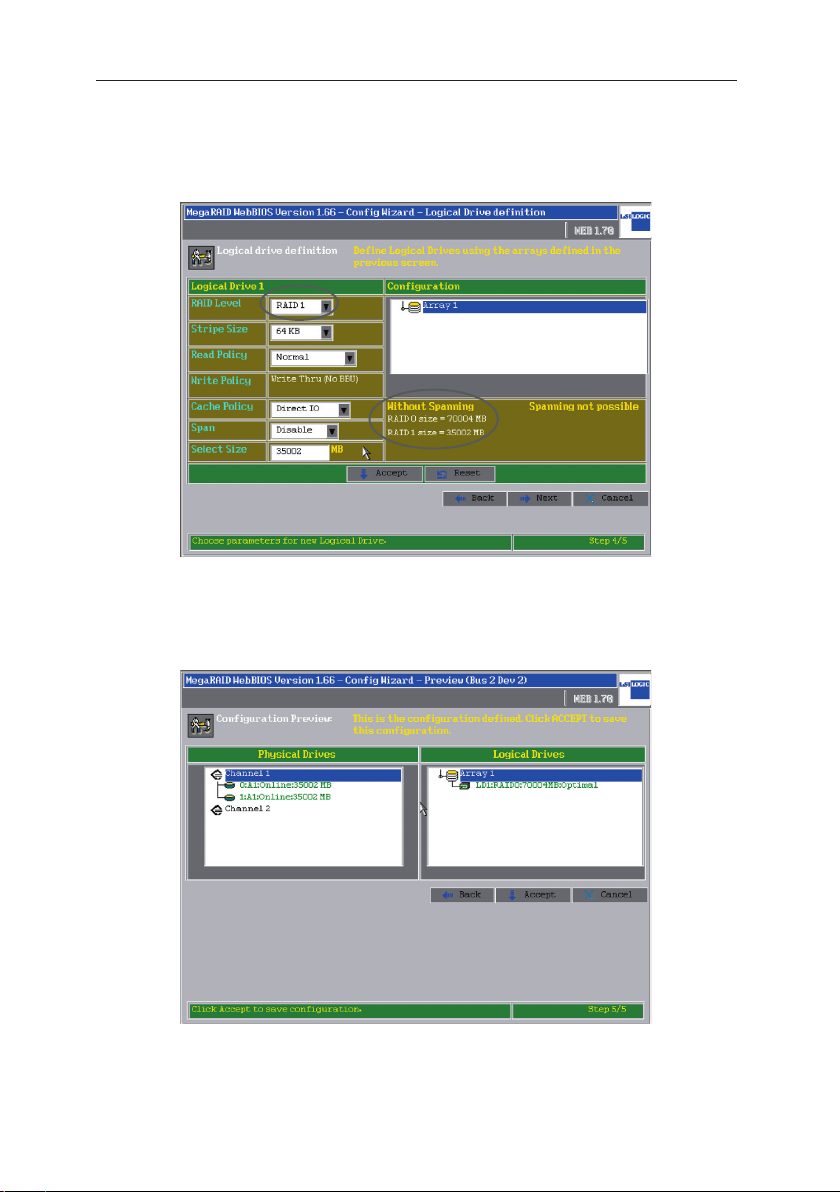
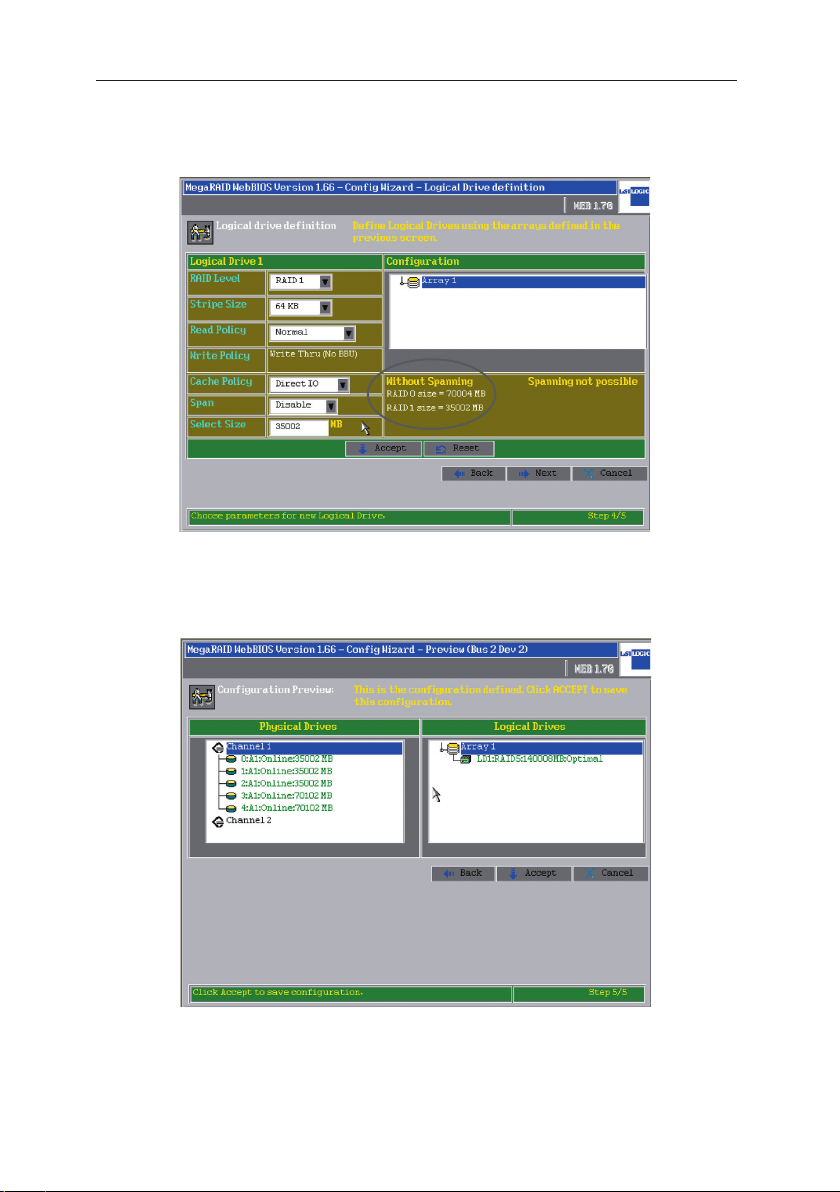
7. For RAID 1 configuration, set the RAID Level as RAID 1, and input
the RAID 1 size value within the circled area into the Select Size box
(For example: RAID 1 size= 35002 MB). Then click Accept and Next
to continue.
8. The Logical Drives window now displays the status of the configured
RAID, Click on Accept to continue.
1-6
Page 14
LSI MegaRAID Userʼs Manual
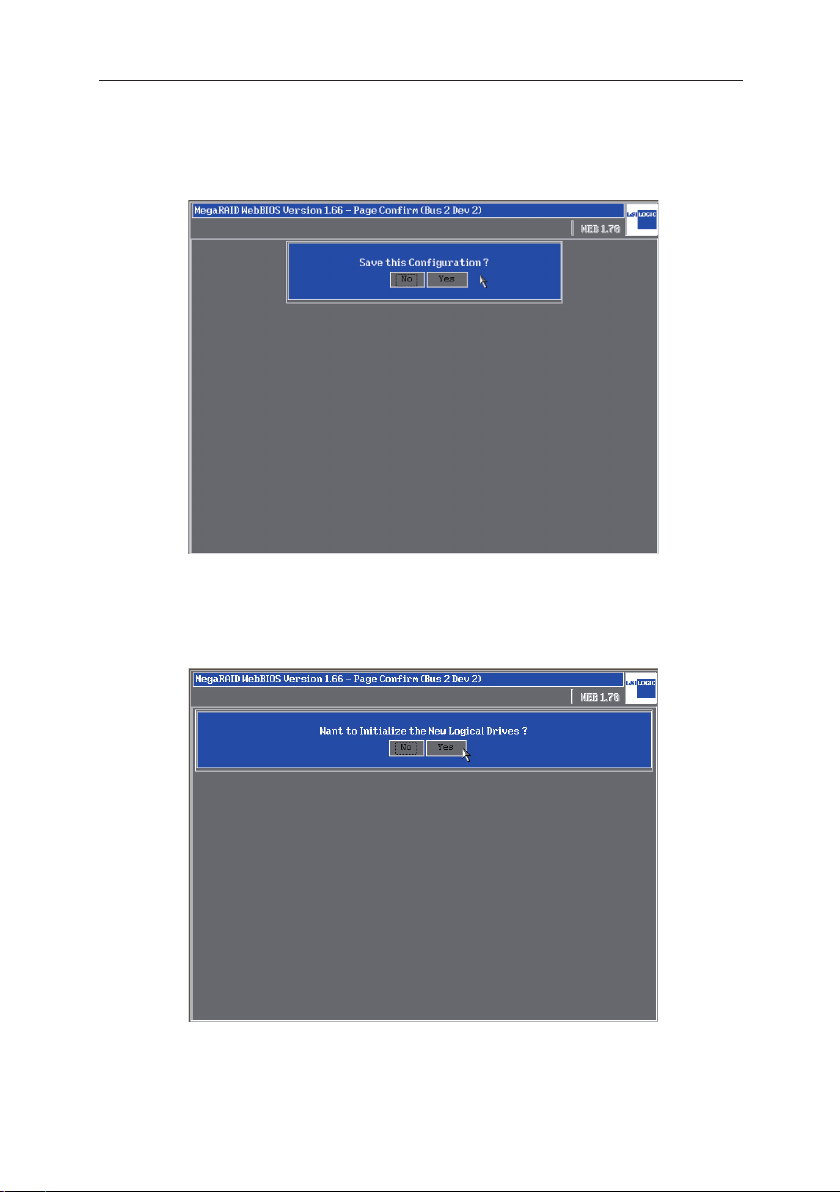
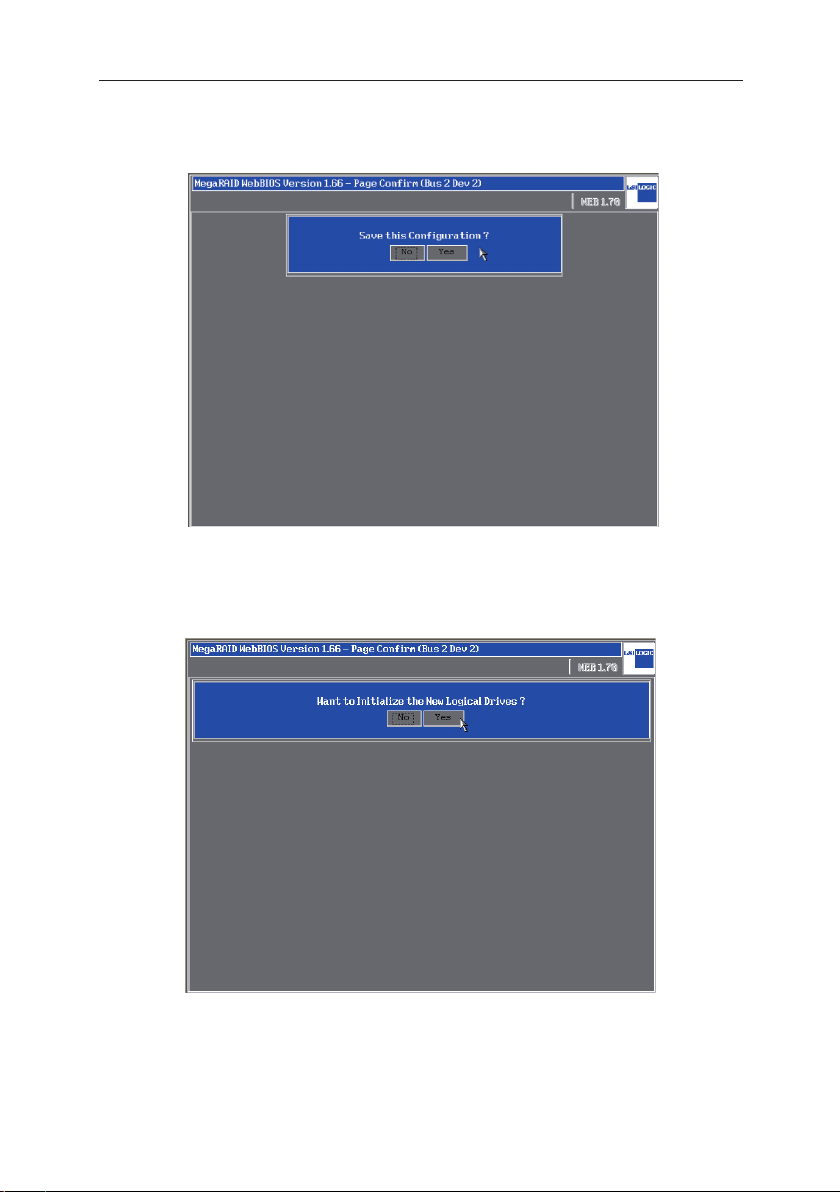
9. Click Yes to save the setup.
10. Click Yes to initialize the new logical drives.
1-7
Page 15
LSI MegaRAID Userʼs Manual
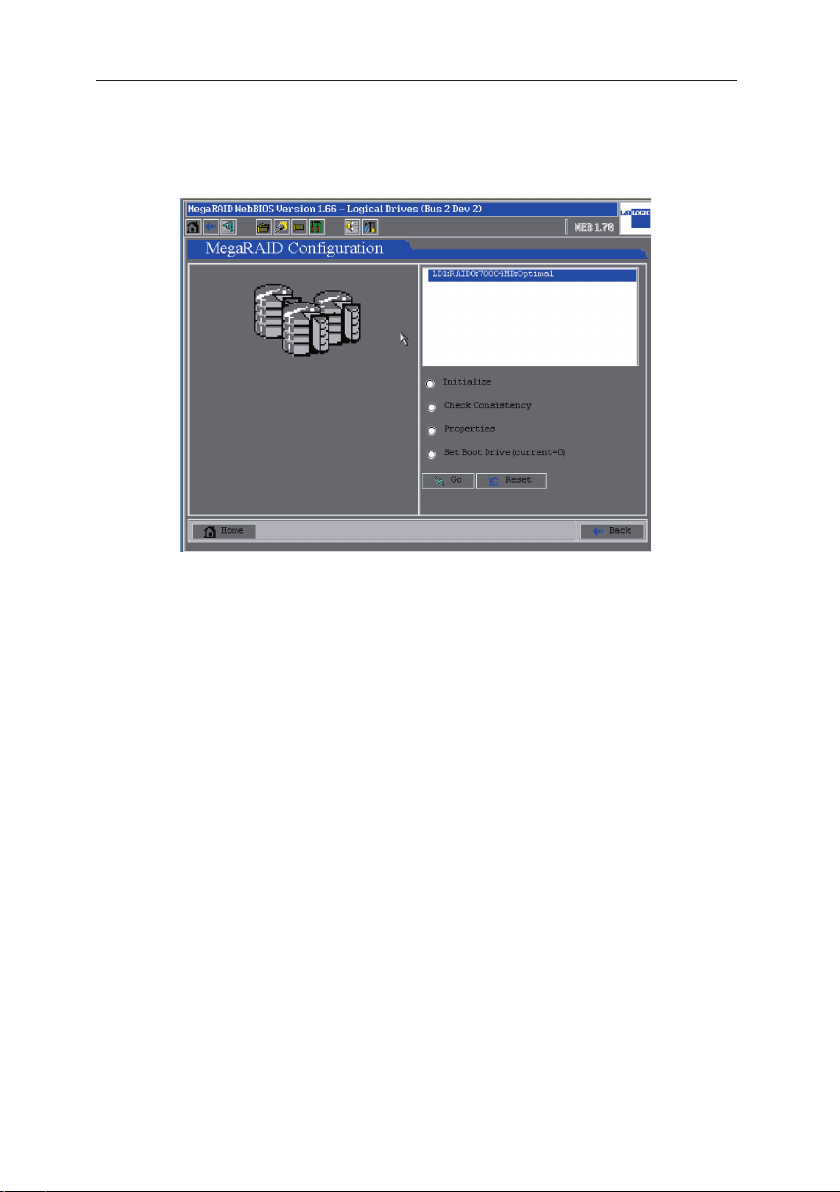
11. If no boot device is ever set, please select Set Boot Drive and then
select Go to change the settings so that the RAID storage devices
could become the first boot device.
1-8
Page 16

LSI MegaRAID Userʼs Manual
1.3 RAID 5 Setup
1. Press at the same time Ctrl + H and enter the MegaRAID WebBIOS
configuration window where information about all physical drivers
installed is displayed. Click Configuration Wizard to start the RAID
settings.
2. If this is the first time to setup a RAID on your system, please select
New Configuration
and click Next to continue.
1-9
Page 17
LSI MegaRAID Userʼs Manual
3. If the setting is to meet individual requirements, please select Custom
Configuration. You could also let the Configuration Wizard set up
a RAID automatically by selecting Auto Configuration. Click Next to
continue.
4. Hold on the
1-10
Ctrl key on your keyboard and select with your mouse
five ready drives, then click on Accept Array to setup Array 1. At least
three hard disks are needed for establishing RAID 5.
Page 18
LSI MegaRAID Userʼs Manual
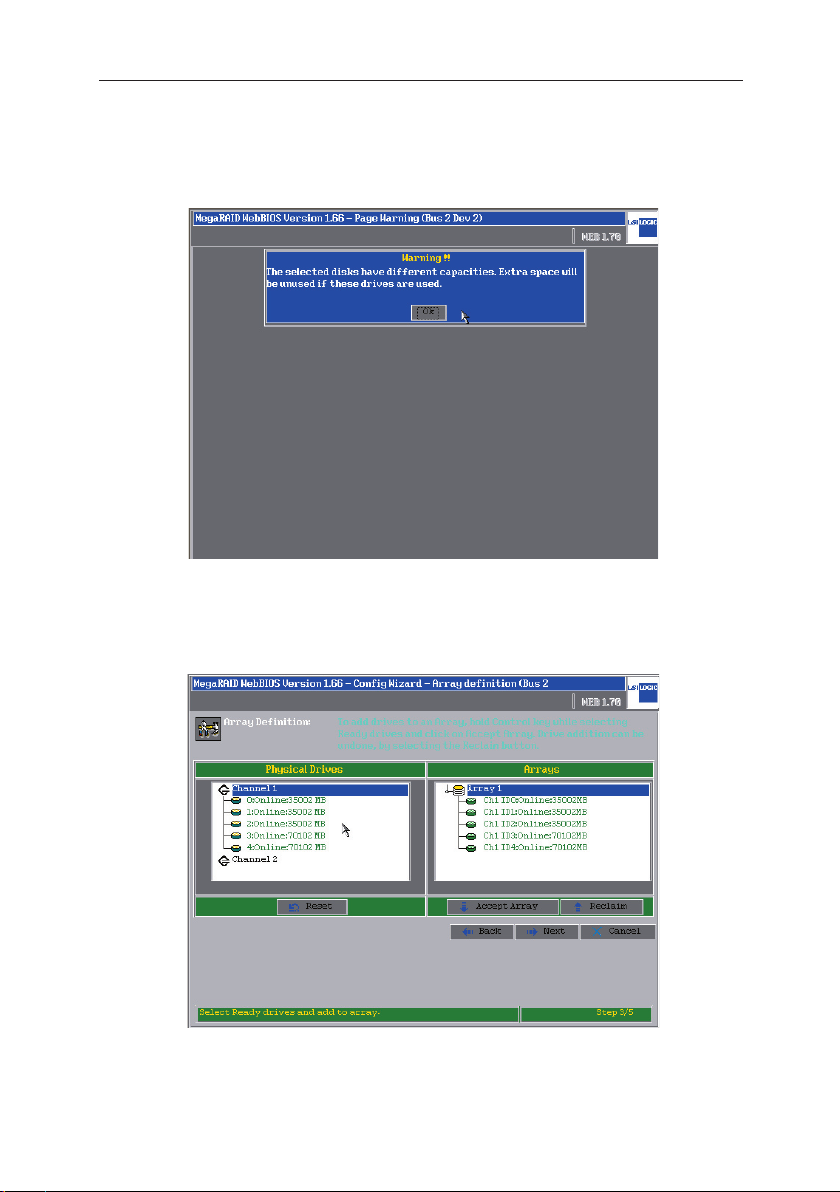
5. This warning window will prompt out when hard disks of different sizes
are deployed in a RAID. If hard disks of identical space are used, this
window would not appear. (We recommend using hard disks of a same
model for RAID configurationn)
6. You could see the information of RAID in the Array Definition window.
Click Next to continue the settings.
1-11
Page 19
LSI MegaRAID Userʼs Manual
7. Set RAID Level as RAID 5 and input the Select Size box with the
RAID 5 size value within the circled area.
8. You could see information of all RAID settings in the left side window.
Click Accept to continue.
1-12
Page 20
LSI MegaRAID Userʼs Manual
9. Click Yes to save the configuration, or click No to cancel the settings.
10. Click Yes to initialize the new logical drives.
1-13
Page 21

LSI MegaRAID Userʼs Manual
11. If no boot device is ever set, please select Set Boot Drive and then
click Go to change the settings so that the RAID storage device could
become the first boot device.
1-14
Page 22
LSI MegaRAID Userʼs Manual
1.4 RAID 50 Setup
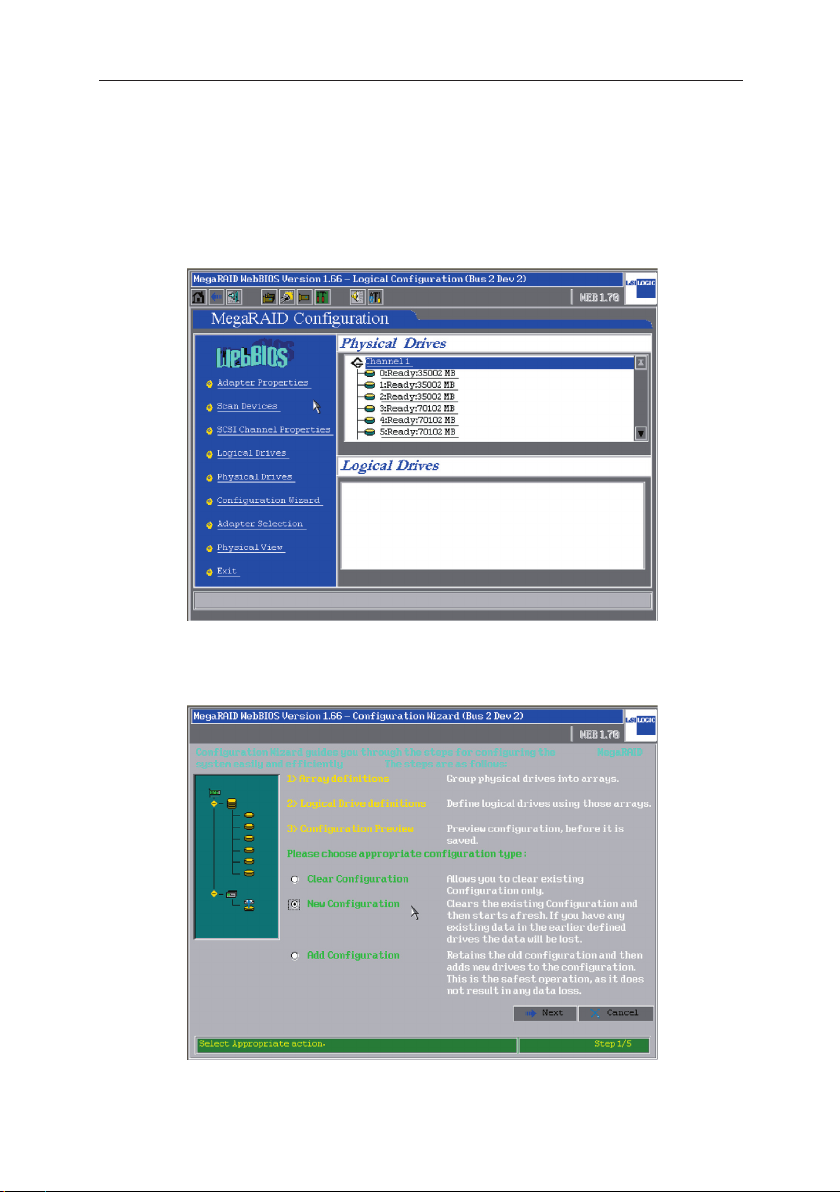
1. Press at the same time Ctrl + H and enter the MegaRAID WebBIOS
configuration window where information about all physical drivers
installed is displayed. Click Configuration Wizard to start the RAID
settings.
2. If this is the first time to set up a RAID on your system, please select
New Configuration and click Next.
1-15
Page 23
LSI MegaRAID Userʼs Manual
3. If the setting is to meet individual requirements, please select Custom
Configuration. You could also let the Configuration Wizard to set up
a RAID automatically by selecting Auto Configuration. Then press
Next to continue.
4. Hold on the
1-16
Ctrl key on your keyboard and select with your mouse
three ready drives, then click on Accept Array to setup RAID 50. Note:
a minimum of 6 hard drives is needed for RAID 50.
Page 24
LSI MegaRAID Userʼs Manual
5. The three disks are now set as Array 1. Click Accept Array to continue.
6. Then set the rest three hard disks as Array 2 and click Accept Array
Press Next to continue.
.
1-17
Page 25
LSI MegaRAID Userʼs Manual
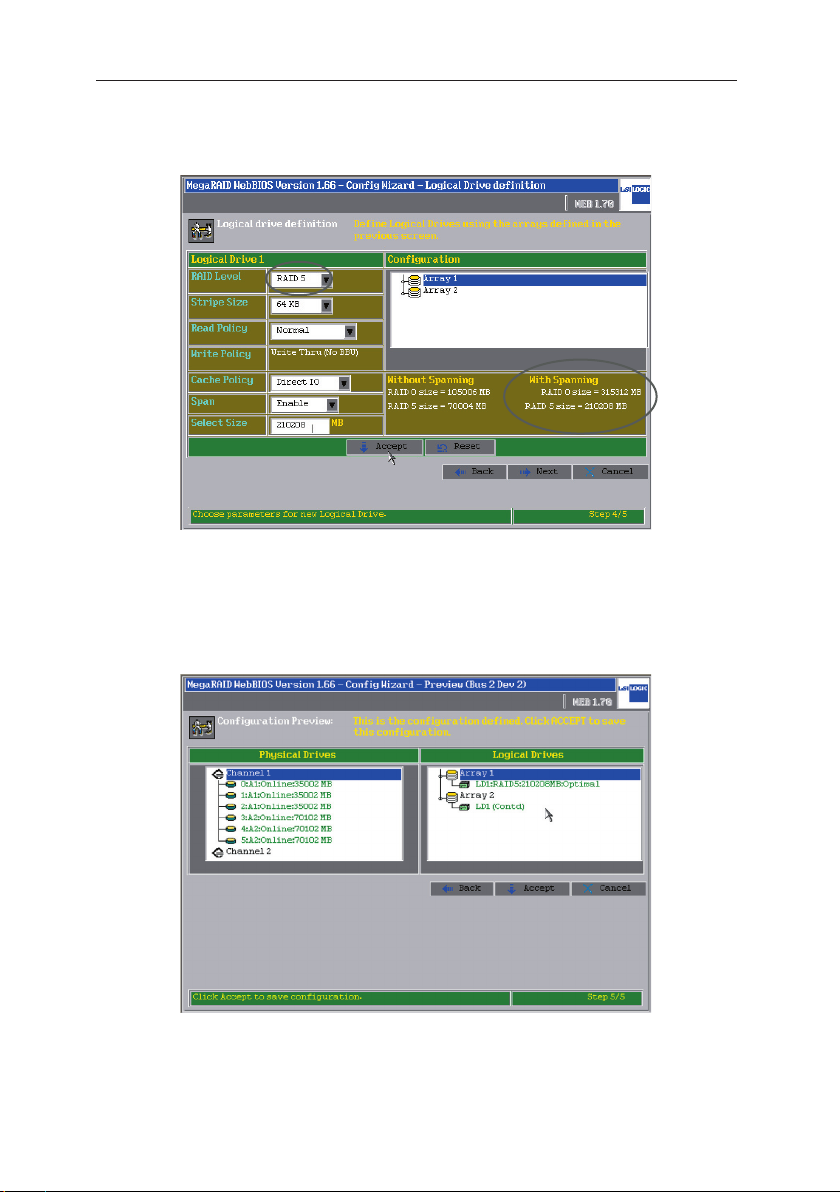
7. Select Array 1 and set the RAID Level as RAID5 and Span as Enabled.
Then input the RAID 5 size value with spanning in the circled area into
the Select Size box. Click Accept to continue.
8. You could now view all the RAID setup information in the Configuration
Preview window. The two arrays then form a RAID 50, with the Array
2 being the continuance of RAID 1.
1-18
Page 26
LSI MegaRAID Userʼs Manual
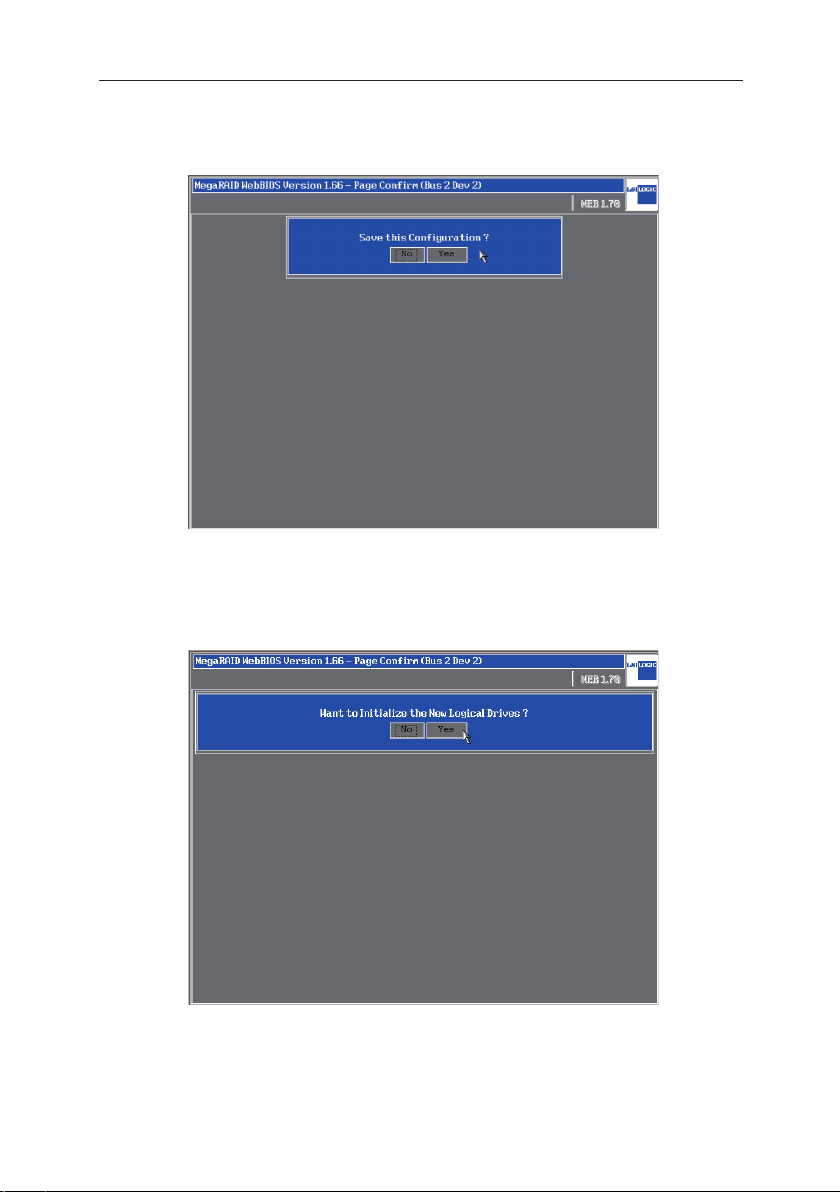
9. Click Yes to save the configuration.
10. Click Yes to initialize the new logical drives.
1-19
Page 27
LSI MegaRAID Userʼs Manual
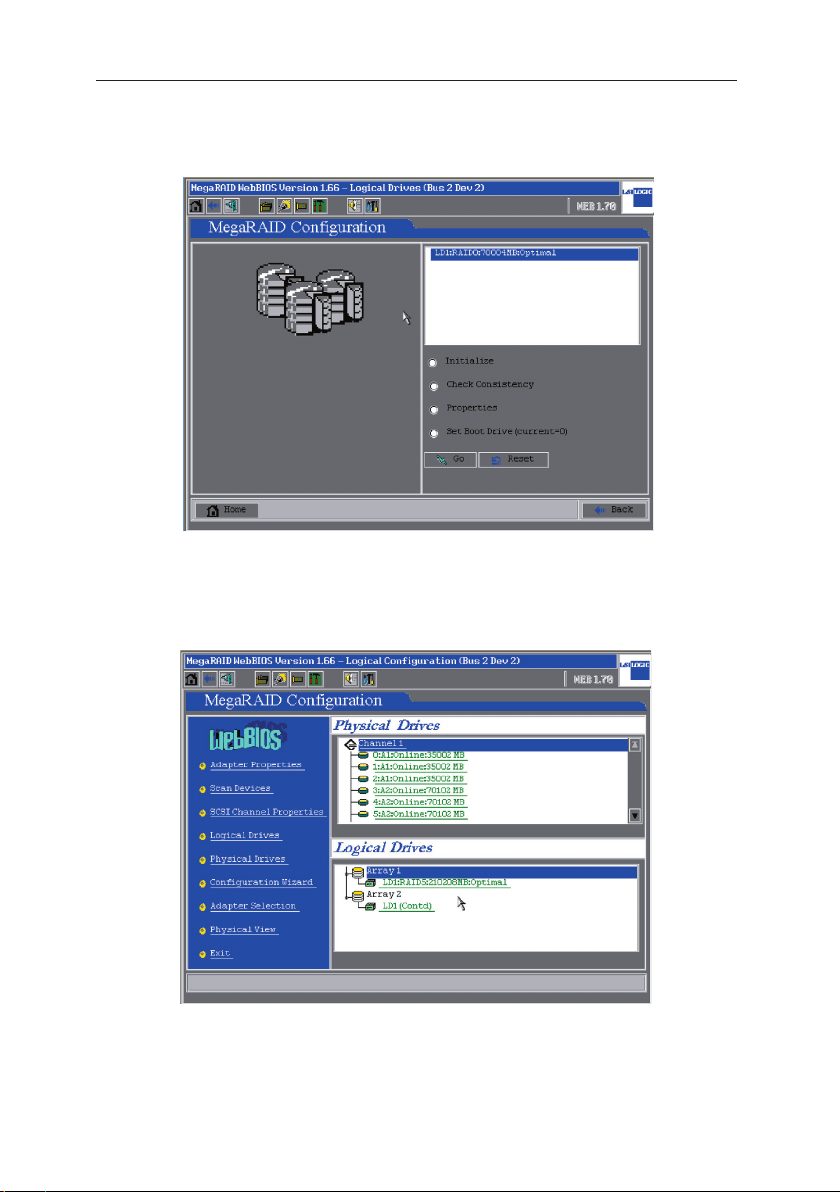
11. If no boot storage device is ever set, please select Set Boot Drive
and then select Go to change the settings so that the RAID storage
device could become the first boot device.
12. Now you could see information about all physical drives and logical
drives in the home page of WebBIOS.
1-20
Page 28
LSI MegaRAID Userʼs Manual
1.5 RAID 10 Setup
1. Press Ctrl + H at the same time and enter the MegaRAID WebBIOS
configuration window, where information about all physical drivers
installed is displayed. Click Configuration Wizard to start the RAID
settings.
2. If this is the first time to setup a RAID on your system, click
Configuration and then click Next to continue.
New
1-21
Page 29
LSI MegaRAID Userʼs Manual
3. If the setting is to meet individual requirements, please select Custom
Configuration. You could also let the Configuration Wizard set up a
RAID automatically by selecting Auto Configuration. Click Next to
continue.
4. Hold on the Ctrl key of your keyboard and select with your mouse two
ready drives, click on Accept Array to set up Array 1 as RAID 0. Repeat
this procedure to setup Array 2. At least four hard disks are need to setup
RAID 10.
1-22
Page 30

LSI MegaRAID Userʼs Manual
5. Select two hard disks as and set them as Array1, and the rest Array
2. At least two hard disks are needed for setting up RAID 1, and the
number of disks must be even.
6. This warning window will prompt out when hard disks of different sizes
are deployed in a RAID. If hard disks of identical space are used, this
window would not appear. (We recommend using hard disks of a same
model for RAID configuration)
1-23
Page 31

LSI MegaRAID Userʼs Manual
7. You could now see information of all RAID settings. When you have
finished the setting for Array 1 and Array 2, please click Next to
continue.
8. Set Array 1 as RAID 1, and set the
Size box with the RAID 1 size value within the circled area; then click
Accept and Next to apply.
1-24
Span as Enable. Input the Select
Page 32

LSI MegaRAID Userʼs Manual
9. You could then see the information of RAID settings in the Configuration
Preview window. The two arrays form a RAID 10, with the Array 2 being
the continuance of the Array 1.
10. Click Yes to save the settings, or to click No to cancel the configuration.
1-25
Page 33

LSI MegaRAID Userʼs Manual
11. Click Yes to initialize the new array of Logical Drives.
12. If no boot device is ever set, please select Set Boot Drive and then
select Go to change the settings so that the RAID storage device could
become the first boot device.
1-26
Page 34

LSI MegaRAID Userʼs Manual
1.6 Array Rebuild
1. When one of the hard disks within the array is removed and substituted
with new disk, the array could automatically start the rebuilding
process. You could check the information of the rebuilding progress
in the MegaRAID WebBIOS configuration window. If you would like
to check the rebuilding speed, please click on the Rebuild Progress
button.
2. The rebuilding progress is displayed in the left side window. If
necessary, you could select Abort and then click Go to cancel the
rebuilding process.
Caution: Do not launch unnecessary abortion to the array
rebuilding process, nor to cut the power supply during
the rebuilding process, in case the existing data being
destroyed.
1-27
Page 35

LSI MegaRAID Userʼs Manual
1.7 Migration Setup
1. If new hard disks are to be installed onto the SCSI backplane, please
select Scan Devices to discover the disk first. Then you will find the
ready disk in the Physical Drives window. Click on Logical Drives to
set up Migration.
2. There are two available options for Migration setup:
I. RAID Migration only: to make the Array 1 to do the “RAID Migration”
automatically.
II. RAID Migration (with addition): to make the Array 1 and the new hard
disk to do the “RAID Migration”. In this option, you could change the
existing RAID to any RAID type you want to setup. Click “Go” to apply
the settings.
1-28
Page 36

LSI MegaRAID Userʼs Manual
1.8 Hotspare Setup
1. Select a ready physical drive and set it as Hotspare.
Note: The disks already set as a part of RAID (Online) could
not be selected.
2. Select Make Hotspare and click Go to set this hard disk as Hotspare.
1-29
Page 37

LSI MegaRAID Userʼs Manual
3. If it is to stop the Hotspare function, select Offline and click Go to
cancel.
4. The hard disk assigned as Hotspare will be highlighted in pink characters,
which means the Hotspare setting is completed.
1-30
Page 38

LSI MegaRAID Userʼs Manual
1.9 Clear Arrays
1. Press Ctrl + H at the same time and enter the MegaRAID WebBIOS
configuration window, where information about all physical drivers
installed is displayed. Click Configuration Wizard to start the setup.
2. Select Clear Configuration tab, and then click Next.
1-31
Page 39

LSI MegaRAID Userʼs Manual
3. You could find no Logical Drivers in the right side window, which means
the disk arrays have already been cleared. Click Accept to continue.
4. Click Yes and save the configuration.
1-32
Page 40

LSI MegaRAID Userʼs Manual
5. In the right side windows, all the storage devices are listed in the
Physical Drives window, while the Logical Drives window is blank.
1-33
Page 41

Page 42

2
System Setup
This chapter will guide you throught
the relevant settings after entering
the operation systems.
Page 43

LSI MegaRAID Userʼs Manual
2.1 Install Drives for Operation Systems
The SCSI RAID device installed in this server works in compliance with
operating system such as Microsoft® Server 2003, RedHat Linux®, and
SuSE Linux®. Next, we are to get on with the drive installation procedures
for these respective OS.
2.1.1 Microsoft® Windows®
Insert the support CD with the label reading LSI MegaRAID SCSI 3200/320-1 320 & ASUS AZ CRB into your optical drive and open the Driver
folder. There are, in this folder, drivers for all operating systems for
creating a installation floppy disk. For example, if it is to make a drive disk
for Windows® OS, please open Driver\Windows, where you could see
several different folders for different Windows® OS. If it is to create a driver
disk for Windows 2000®, please click open the folder named Windows
2000, then insert a blank disk into your floopy drive, then click MakeDisk.
exe to make the disk. If your OS is Windows 2003®, after selecting the
folder, you are to make one more selection between win2003 32bit and
win2003 64bit.
You could also get access ASUS global website to download the
driver. Unzip the file in Windows® OS and run the *.exe file, the driver
would automatically write into the floopy disk. If the unzipped files are not
*.exe file, please copy these files directly into a blank disk.
1. As soon as the screen for Windows® installation prompts, press
immediately F6.
*.zip
2-1
Page 44

LSI MegaRAID Userʼs Manual
2. When a screen as follows prompts out, press S to install driver for the
operation system.
3. Insert the drive disk previously prepared into the floppy drive, and press
Enter.
2-2
Page 45

LSI MegaRAID Userʼs Manual
4. For Windows 2000®, please select LSI MAGARAID Product for
Windows 2000 Driver; For Windows 2003®, please select LSI
MEGARAID Products for Windows 2003 (x86).
5. For Windows 2003 Server®, when driver program is selected, a
following window would prompt out, displayig the detected preset driver
of Windows 2003 Server®. Press S and select to install from the floopy
disk.
Then please follow the instructions of Windows® and complete the
installation. DO NOT take out the floopy disk until the first time system
restart is completed.
2-3
Page 46

LSI MegaRAID Userʼs Manual
2.1.2 RedHat Linux®
You could get access ASUS global website to download the *.zip driver.
Unzip the file in Windows® OS and run the *.exe file, the driver would
automatically write into the floopy disk. If the unzipped files are not *.exe
file, please copy these files directly into a blank disk.
1. Insert the Linux® installation CD into your optical drive and start the
system. Then input linux dd when the following screen appears, and
press Enter.
2-4
2. Then you could see the reading action in the following screen.
Page 47

LSI MegaRAID Userʼs Manual
3. Insert the drive disk into the floopy drive, and follow the instruction to
proceed with the installation. Press Yes, and then press Enter.
4. Select fd0 to install from floopy drive. Select OK and press Enter.
If a USB floopy drive is deployed, please select sda to install
from the floopy disk.
2-5
Page 48

LSI MegaRAID Userʼs Manual
5. The operating system now is reading from the drive disk in the floopy
drive.
6. When the installation is completed, please select No and press Enter to
enter the Linux® OS; if more drivers are to be installed, please select
Yes and press Enter, then repeat the step 3-4 to proceed with the
installation.
2-6
Page 49

LSI MegaRAID
Q2143
August 2005
Page 50

Intel Xeon Pentium Intel
Windows MS-DOS Microsoft
1)
2)
©2005
LSI MegaRAID
Q2143 V1.0
2005 07
II
Page 51

..........................................................................................
........................................................
.........................................................................................
V
VI
VI
1.1 SCSI
1.2 RAID 0 RAID 1
1.3
1.4 RAID 50
1.5 RAID 10
1.6
1.7
1.8 Hotspare
RAID 5
Migration
.........................................................................
................................................................
................................................................
................................................................
....................................................................
...............................................................
1.9
2.1 SCSI RAID
2.1.1 Windows
2.1.2
Red Hat Linux
.........................................................................
.................................................................
....................................................
...................................................
..........................................
.....................................................
1-2
1-4
1-10
1-13
1-22
1-28
1-29
1-30
1-32
2-2
2-2
2-5
LSI MegaRAID
III
Page 52

1.
2.
Windows RAID
3.
RAID
IV
Page 53

1.
2.
http://tw.asus.com
LSI MegaRAID
V
Page 54

VI
Page 55

Windows
RAID
Page 56

LSI Ctrl+H
LSI WebBIOS
Copyright© AMERICAN MEGATRENDS, INC. Press <Ctrl> <M>
to Run Configuration Utility Or press <Ctrl> <H> for WebBIOS.
WebBIOS [Start]
1.1 SCSI
1. WebBIOS SCSI Channel
Properties
1-2
Page 57

2. 320-1 320-0 320-2
3. SCSI Capabilities
Fast Ultra Ultra-II U160 U320 Submit
LSI MegaRAID
1-3
Page 58

4.
Termination Disabled Submit
Termination Enabled
1.2 RAID 0 RAID 1
1. <Ctrl+H> MegaRAID BIOS
Physical Drivers
Configuration Wizard RAID
1-4
Page 59

2. RAID New Configuration
Next
3. Custom Configuration
Auto Configuration Configuration Wizard RAID
LSI MegaRAID
1-5
Page 60

4. <Ctrl> 2 Ready Drives
Accept Array RAID 1
RAID 1 2 RAID 0 2
5. RAID(Array) RAID
1 Accept Array Next
1-6
Page 61

6. RAID RAID 0 RAID 1 RAID
Select Size Accept
Next RAID 0 RAID 0 size = 70004
MB Accept Next
7. RAID 1 RAID
RAID 1 size Select Size
RAID 1 size = 35002 MB Accept Next
LSI MegaRAID
1-7
Page 62

8. Logical Drivers RAID
Accept
9. Yes
1-8
Page 63

10. Yes Logical Drives
Initialize
11. Set Boot Drive
Go RAID 1
LSI MegaRAID
1-9
Page 64

1.3 RAID 5
1. <Ctrl+H> MegaRAID BIOS
Physical Drivers
Configuration Wizard RAID
2. RAID New Configuration
Next
1-10
Page 65

3. Custom Configuration
Auto Configuration Configuration Wizard RAID
4. <Ctrl> 3 Ready Drives
Accept Array Array 1 RAID 5
RAID 5 3
LSI MegaRAID
1-11
Page 66

5. RAID
6. RAID Array 1
Next
1-12
Page 67

7. RAID 5 Select Size
RAID 5 Size = Accept
8. RAID Accept
LSI MegaRAID
1-13
Page 68

9. Yes No
10. Yes Logical Drives
Initialize
1-14
Page 69

11. Set Boot Drive
Go RAID 1
LSI MegaRAID
1-15
Page 70

1.4 RAID 50
1. <Ctrl+H> MegaRAID BIOS
Physical Drivers
Configuration Wizard RAID
2. RAID New Configuration
Next
1-16
Page 71

3. Custom Configuration
Auto Configuration Configuration Wizard RAID
4. Physical Drivers Ready
6
RAID 50 6 8 10
LSI MegaRAID
1-17
Page 72

5. <Ctrl> 3 Ready Drives
Accept Array 3 Array 1
6. 3 Array 2 Accept Array
Arrays Array 1 Array 2 Next
1-18
Page 73

7. Array 1 RAID RAID 5 Span
Enabled With spanning RAID
5 Select Size RAID 5 Size =
Accept
7 1L26 1Z26
1I37 1Z37 RAID 5 [Spna]
[Enable] Array 1 R5=(size) <Ctrl>
Configuration Array 1 Array 2 [Accept]
[Next]
8. Array 2 Array 1 RAID
50
LSI MegaRAID
1-19
Page 74

9. Yes
10. Yes Logical Drives
Initialize
1-20
Page 75

11. Set Boot Drive
Go RAID 1
12. WebBIOS Physical Logical Drivers Array` RAID
LSI MegaRAID
1-21
Page 76

1.5 RAID 10
1. <Ctrl+H> MegaRAID BIOS
Physical Drivers
Configuration Wizard RAID
2. RAID New Configuration
Next
1-22
Page 77

3. Custom Configuration
Auto Configuration Configuration Wizard RAID
4. <Ctrl> 2 Ready Drives
Accept Array Array 1 RAID 0 Array 2
RAID 10 4
LSI MegaRAID
1-23
Page 78

5. RAID
6. Array 2 Array 1
Next
1-24
Page 79

7. Array 1 RAID 1 Span Enabled
With Spannong RAID 1 size
Select Size RAID 1 Size = Accept
Next
7 1L26 1Z26
1I37 1Z37 RAID 1 [Spna]
[Enable] Array 1 R1=(size) <Ctrl>
Configuration Array 1 Array 2 [Accept]
[Next]
8. Array 2 Array 1 RAID
10
LSI MegaRAID
1-25
Page 80

9. Yes No
10. Yes Logical Drives
Initialize
1-26
Page 81

11. Set Boot Drive
Go RAID 1
LSI MegaRAID
1-27
Page 82

1.6
1. MegaRAID WebBIOS
Rebuild Progress
2. Rebuilding Progress
Abort Go
1-28
Page 83

1.7 Migration
1. SCSI backplane Scan
Devices Physical Drivers Ready
Logical Drivers Array Migration
2.
A. RAID Migration only Array 1 RAID Migration
1. Array RAID RAID Migration only
2. Go
B. RAID Migration with addition Array
[RAID Migration with addition] RAID
Go
LSI MegaRAID
1-29
Page 84

1.8 Hotspare
1. Ready Physical Drives Hotspare
RAID Online
Hotspare RAID RAID 1 RAID
5 RAID 10 RAID 50
2. Make Hptspare Go Hotspare
1-30
Page 85

3. Hotspare
4. Hotspare Offline
Go
LSI MegaRAID
1-31
Page 86

1.9
1. <Ctrl+H> MegaRAID BIOS
Physical Drivers Configuration Wizard
2. Clear Configuration Next
1-32
RAID array
Page 87

3. Logical Drives
Accept
4. Yes
LSI MegaRAID
1-33
Page 88

5. WebBIOS
Physical Drivers Ready Logical Drivers
1-34
Page 89

Windows
RAID
Page 90

2.1 SCSI RAID
SCSI RAID Microsoft Windows
Windows
Operating System
®
Server 2003 RedHat Linux®SuSE Linux
®
2.1.1 Windows
LSI MegaRAID SCSI 320-0/320-1 320 & ASUS AZ CRB
Driver
Windows SCSI RAID
Driver\Windows\ Windows
Windows 2000 Windows 2000
MakeDisk.exe
Windows 2003 win2003 32bit
64bit MakeDisk.exe
*.zip Windows
*.exe
MakeDisk.exe
®
2000
OS
2. Windows <F6>
3. <S>
2-2
Page 91

4. <Enter>
5. Windows 2000 LSI MEGARAID Products for Windows 2000
Driver Windows 2003 Server LSI MEGARAID Products
for Windows 2003 (x86)
Windows XP RAID 320-0
AZCRB [MegaRAID SCSI 320-0 controller]
RAID 320-1 [MegaRAID SCSI 320-1 RAID controller]
RAID 320-2 [MegaRAID SCSI 320-
2 RAID controller]
LSI MegaRAID
2-3
Page 92

6. Windows XP Windows 2003 Server
Windows
<S>
7. Windows
2-4
Page 93

2.1.2 Red Hat Linux
[LSI MegaRAID]
Driver
Red Hat SuSe 9.0 SCSI RAID
\Driver\Linux\Redhat\2.10.8\Linux_2.10.8.2-1\Redhat and SuSe
9.0\Drivers\ megaraid2-v2.10.8.2-rhl90-kernels.img
Red Hat 9.0
*.zip Windows
*.exe
MakeDisk.exe
2. Linux linux
dd Enter
LSI MegaRAID
2-5
Page 94

3.
4. Yes
Enter
2-6
Page 95

5. fd0 OK Enter
USB sda USB
6.
LSI MegaRAID
2-7
Page 96

7. No Enter Linux
Yes Enter
3 4
2-8
 Loading...