

Page 1
PIKE 6480
SAS RAID card
Page 2

ii
E4380
First Edition
February 2009
Copyright © 2009 ASUSTeK COMPUTER INC. All Rights Reserved.
No part of this manual, including the products and software described in it, may be reproduced,
transmitted, transcribed, stored in a retrieval system, or translated into any language in any form or by any
means, except documentation kept by the purchaser for backup purposes, without the express written
permission of ASUSTeK COMPUTER INC. (“ASUS”).
Product warranty or service will not be extended if: (1) the product is repaired, modied or altered, unless
such repair, modication of alteration is authorized in writing by ASUS; or (2) the serial number of the
product is defaced or missing.
ASUS PROVIDES THIS MANUAL “AS IS” WITHOUT WARRANTY OF ANY KIND, EITHER EXPRESS
OR IMPLIED, INCLUDING BUT NOT LIMITED TO THE IMPLIED WARRANTIES OR CONDITIONS OF
MERCHANTABILITY OR FITNESS FOR A PARTICULAR PURPOSE. IN NO EVENT SHALL ASUS, ITS
DIRECTORS, OFFICERS, EMPLOYEES OR AGENTS BE LIABLE FOR ANY INDIRECT, SPECIAL,
INCIDENTAL, OR CONSEQUENTIAL DAMAGES (INCLUDING DAMAGES FOR LOSS OF PROFITS,
LOSS OF BUSINESS, LOSS OF USE OR DATA, INTERRUPTION OF BUSINESS AND THE LIKE),
EVEN IF ASUS HAS BEEN ADVISED OF THE POSSIBILITY OF SUCH DAMAGES ARISING FROM ANY
DEFECT OR ERROR IN THIS MANUAL OR PRODUCT.
SPECIFICATIONS AND INFORMATION CONTAINED IN THIS MANUAL ARE FURNISHED FOR
INFORMATIONAL USE ONLY, AND ARE SUBJECT TO CHANGE AT ANY TIME WITHOUT NOTICE,
AND SHOULD NOT BE CONSTRUED AS A COMMITMENT BY ASUS. ASUS ASSUMES NO
RESPONSIBILITY OR LIABILITY FOR ANY ERRORS OR INACCURACIES THAT MAY APPEAR IN THIS
MANUAL, INCLUDING THE PRODUCTS AND SOFTWARE DESCRIBED IN IT.
Products and corporate names appearing in this manual may or may not be registered trademarks or
copyrights of their respective companies, and are used only for identication or explanation and to the
owners’ benet, without intent to infringe.
Page 3

iii
Contents
Contents ...................................................................................................... iii
Notices ......................................................................................................... iv
Safety information ....................................................................................... v
About this guide ......................................................................................... vi
PIKE 6480 specications summary ........................................................ viii
Chapter 1: Product introduction
1.1 Welcome! ...................................................................................... 1-2
1.2 Package contents .........................................................................
1-2
1.3 Card layout ...................................................................................
1-3
1.4 System requirements ...................................................................
1-3
1.5 Card installation ...........................................................................
1-4
Chapter 2: RAID conguration
2.1 Setting up RAID ............................................................................ 2-2
2.1.1 RAID denitions ..............................................................
2-2
2.1.2 Installing hard disk drives ................................................
2-2
2.2 Marvell
®
88SE6480 SAS RAID BIOS setup utility ...................... 2-3
2.2.1 Creating an array ............................................................
2-4
2.2.2 Deleting an array .............................................................
2-7
2.2.3 Wipe out disk ..................................................................
2-8
2.2.4 Spare Management ........................................................
2-9
2.2.5 Advanced Operation ......................................................
2-11
2.2.6 Controller Conguration ................................................
2-12
Chapter 3: Driver installation
3.1 RAID driver installation ............................................................... 3-2
3.1.1 Creating a RAID driver disk ............................................
3-2
3.1.2 Windows
®
OS .................................................................. 3-4
3.1.3 Red Hat
®
Enterprise Linux OS ...................................... 3-10
3.1.4 SUSE Linux Enterprise Server OS ...............................
3-12
3.2 Support CD information ............................................................
3-14
3.2.1 Running the support CD ...............................................
3-14
3.2.2 Utilities menu ................................................................
3-14
3.2.3 Make disk ......................................................................
3-15
3.2.4 Contact information .......................................................
3-15
Page 4
iv
Notices
Federal Communications Commission Statement
This device complies with Part 15 of the FCC Rules. Operation is subject to the
following two conditions:
•
This device may not cause harmful interference, and
•
This device must accept any interference received including interference that
may cause undesired operation.
This equipment has been tested and found to comply with the limits for a Class
B digital device, pursuant to Part 15 of the FCC Rules. These limits are designed
to provide reasonable protection against harmful interference in a residential
installation. This equipment generates, uses and can radiate radio frequency energy
and, if not installed and used in accordance with manufacturer’s instructions, may
cause harmful interference to radio communications. However, there is no guarantee
that interference will not occur in a particular installation. If this equipment does
cause harmful interference to radio or television reception, which can be determined
by turning the equipment off and on, the user is encouraged to try to correct the
interference by one or more of the following measures:
•
Reorient or relocate the receiving antenna.
•
Increase the separation between the equipment and receiver.
•
Connect the equipment to an outlet on a circuit different from that to which the
receiver is connected.
•
Consult the dealer or an experienced radio/TV technician for help.
Canadian Department of Communications Statement
This digital apparatus does not exceed the Class B limits for radio noise emissions
from digital apparatus set out in the Radio Interference Regulations of the
Canadian Department of Communications.
This class B digital apparatus complies with Canadian ICES-003.
The use of shielded cables for connection of the monitor to the graphics card is
required to assure compliance with FCC regulations. Changes or modications
to this unit not expressly approved by the party responsible for compliance
could void the user’s authority to operate this equipment.
DO NOT throw the motherboard in municipal waste. This product has been designed to
enable proper reuse of parts and recycling. This symbol of the crossed out wheeled bin
indicates that the product (electrical and electronic equipment) should not be placed in
municipal waste. Check local regulations for disposal of electronic products.
DO NOT throw the mercury-containing button cell battery in municipal waste. This
symbol of the crossed out wheeled bin indicates that the battery should not be
placed in municipal waste.
Page 5

v
Safety information
Electrical safety
•
To prevent electrical shock hazard, disconnect the power cable from the
electrical outlet before relocating the server.
•
When adding or removing devices to or from the server, ensure that the
power cables for the devices are unplugged before the signal cables are
connected. If possible, disconnect all power cables from the existing server
before you add a device.
•
Before connecting or removing signal cables from the server, ensure that all
power cables are unplugged.
•
Seek professional assistance before using an adapter or extension cord.
These devices could interrupt the grounding circuit.
•
Ensure that your power supply is set to the correct voltage in your area.
If you are not sure about the voltage of the electrical outlet you are using,
contact your local power company.
•
If the power supply is broken, do not try to x it by yourself. Contact a
qualied service technician or your retailer.
Operation safety
•
Before installing any component to the server, carefully read all the manuals
that came with the package.
•
Before using the product, ensure all cables are correctly connected and the
power cables are not damaged. If you detect any damage, contact your dealer
immediately.
•
To avoid short circuits, keep paper clips, screws, and staples away from
connectors, slots, sockets and circuitry.
•
Avoid dust, humidity, and temperature extremes. Do not place the product in
any area where it may become wet.
•
Place the product on a stable surface.
•
If you encounter technical problems with the product, contact a qualied
service technician or your retailer.
Page 6

vi
About this guide
This user guide contains the information you need when installing and conguring
the server management board.
How this guide is organized
This guide contains the following parts:
• Chapter 1: Product introduction
This chapter offers the ASUS PIKE 6480 SAS RAID card features and the
new technologies it supports.
• Chapter 2: RAID conguration
This chapter provides instructions on setting up, creating, and conguring
RAID sets using the available utilities.
• Chapter 3: Driver installation
This chapter provides instructions for installing the RAID drivers on different
operating systems.
Where to nd more information
Refer to the following sources for additional information and for product and
software updates.
1. ASUS websites
The ASUS website provides updated information on ASUS hardware and
software products. Refer to the ASUS contact information.
2. Optional documentation
Your product package may include optional documentation, such as warranty
yers, that may have been added by your dealer. These documents are not
part of the standard package.
Page 7
vii
Typography
Bold text Indicates a menu or an item to select.
Italics
Used to emphasize a word or a phrase.
<Key> Keys enclosed in the less-than and greater-than sign means
that you must press the enclosed key.
Example: <Enter> means that you must press the Enter or
Return key.
<Key1+Key2+Key3> If you must press two or more keys simultaneously, the key
names are linked with a plus sign (+).
Example: <Ctrl+M>
Command Means that you must type the command exactly as shown,
then supply the required item or value enclosed in brackets.
Example: At the DOS prompt, type the command line:
format a:
DANGER/WARNING: Information to prevent injury to yourself
when trying to complete a task.
CAUTION: Information to prevent damage to the components
when trying to complete a task.
NOTE: Tips and additional information to help you complete a
task.
IMPORTANT: Instructions that you MUST follow to complete a
task.
Conventions used in this guide
To ensure that you perform certain tasks properly, take note of the following
symbols used throughout this manual.
Page 8
viii
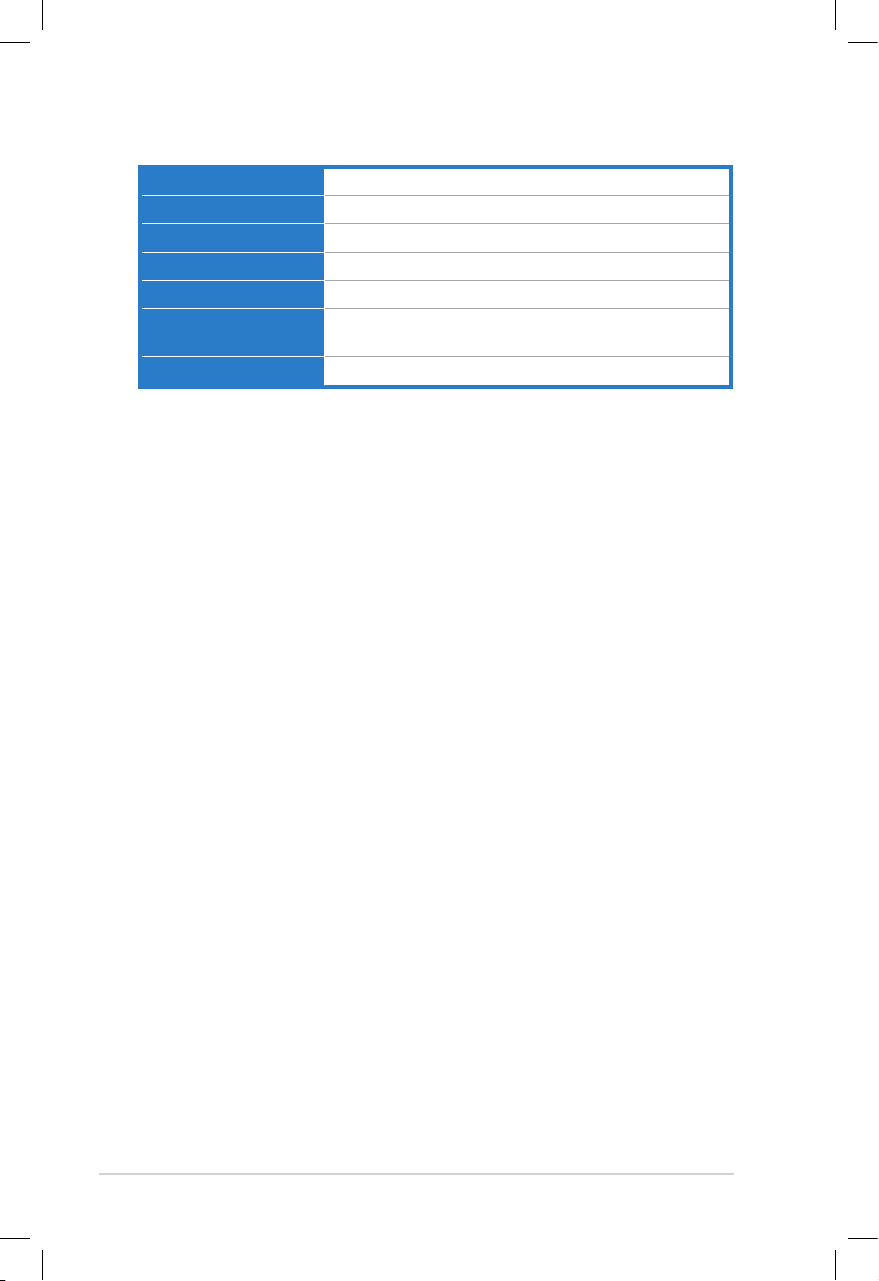
PIKE 6480 specications summary
* Specications are subject to change without notice.
Chipset Marvell 88SE6480
Interface ASUS PIKE interface
Ports 8 ports
RAID levels RAID 0 / RAID1 / RAID10 / RAID5
Devices supported SAS / SATA II / SATA devices
Data transfer rate SATA 1.5 Gb/s per PHY
SATA II and SAS 3.0 Gb/s per PHY
Form factor 6.44 in x 1.57 in (1U compatible)
Page 9

1
Chapter 1: Product
introduction
This chapter offers the ASUS PIKE 6480
SAS RAID card features and the new
technologies it supports.
Page 10
1-2 Chapter 1: Product introduction
1.1 Welcome!
Thank you for buying an ASUS® PIKE 6480 SAS RAID card!
The ASUS PIKE 6480 allows you to create RAID 0, RAID 1, RAID 10, and RAID 5
set(s) from SAS hard disk drives connected to the SAS connectors on the
motherboard
Before you start installing the SAS RAID card, check the items in your package
with the list below.
If any of the above items is damaged or missing, contact your retailer.
1.2 Package contents
Check your package for the following items.
• ASUS PIKE 6480 SAS RAID card
• Support CD
• User guide
Page 11
ASUS PIKE 6480 1-3
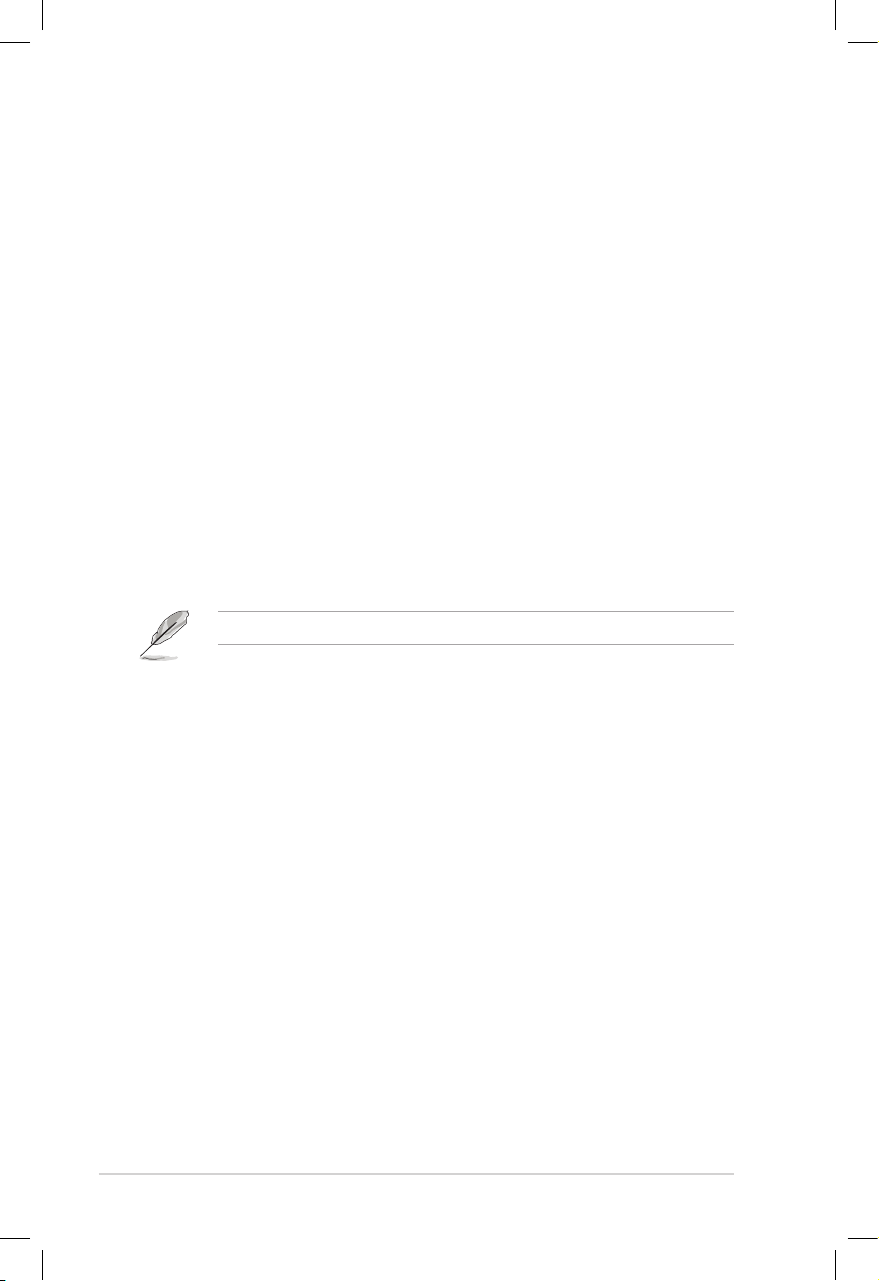
1.3 Card layout
The illustration below shows the major components of the SAS RAID card.
1.4 System requirements
Before you install the PIKE 6480 SAS RAID card, check if your system meets the
following requirements:
• Workstation or server motherboard with a PIKE RAID card slot
• SAS or SATA hard disk drives and cables
• Supporting operating system:
Windows® and Linux operating systems (refer to website for details)
• Other requirement:
- Appropriate thermal solution
- Certied power supply module
1. ASUS PIKE interface-1: PCI-E x4
2. ASUS PIKE interface-2: 8-port SAS signal with SGPIO interface*
1
1
2
2
* The SGPIO interface is used for visibility into drive activity, failure and reboot
status, so that users could build high-performatnce and reliable storage
systems. Refer to the motherboard manual for detailed information about
using the SGPIO connectors on the motherboard.
Page 12
1-4 Chapter 1: Product introduction
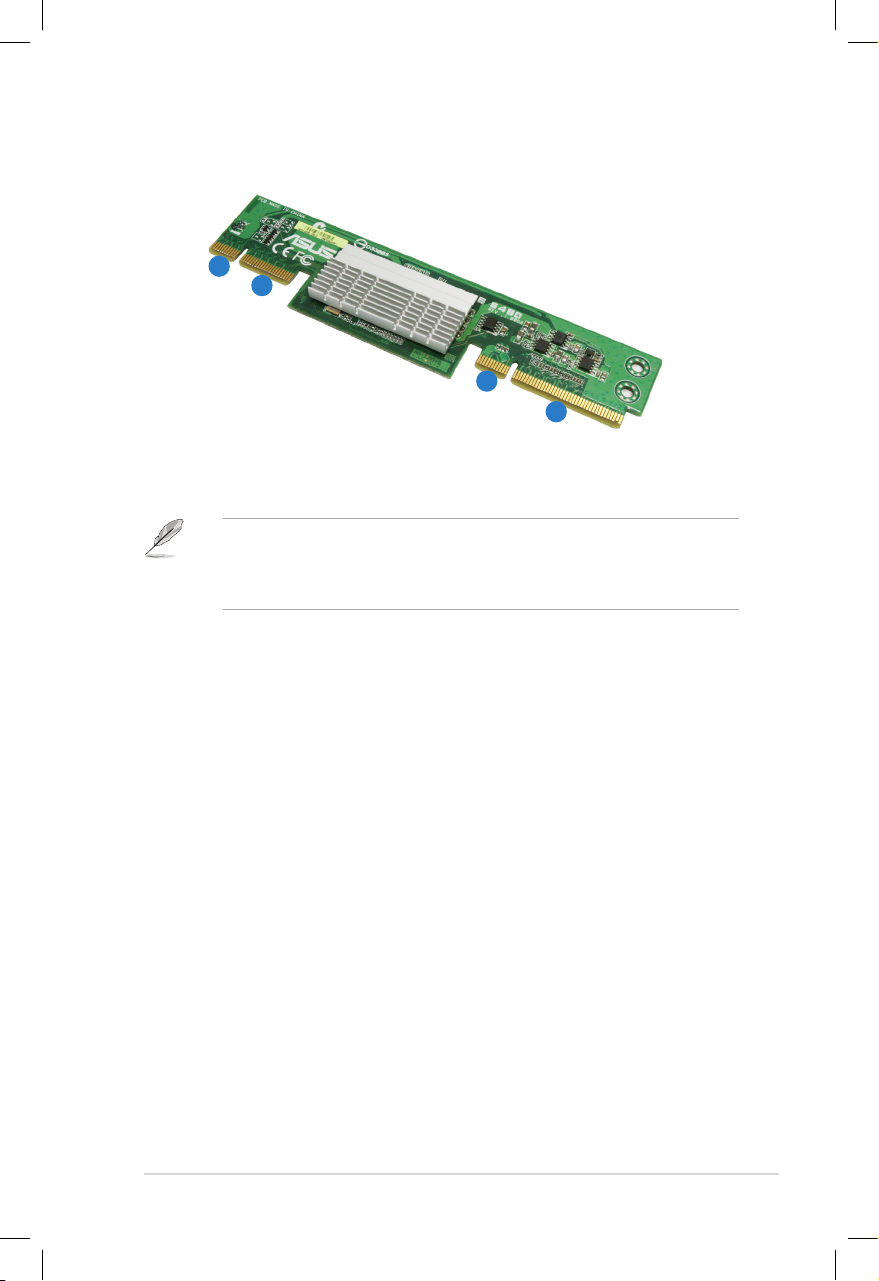
1.5 Card installation
Follow below instructions to install the RAID card on your motherboard.
1. Locate the PIKE RAID card slot
on the motherboard.
2. Align the golden ngers of the
RAID card with the PIKE RAID
card slot.
3. Insert the RAID card into the
PIKE RAID card slot. Ensure it’s
completely inserted into the PIKE
RAID card slot.
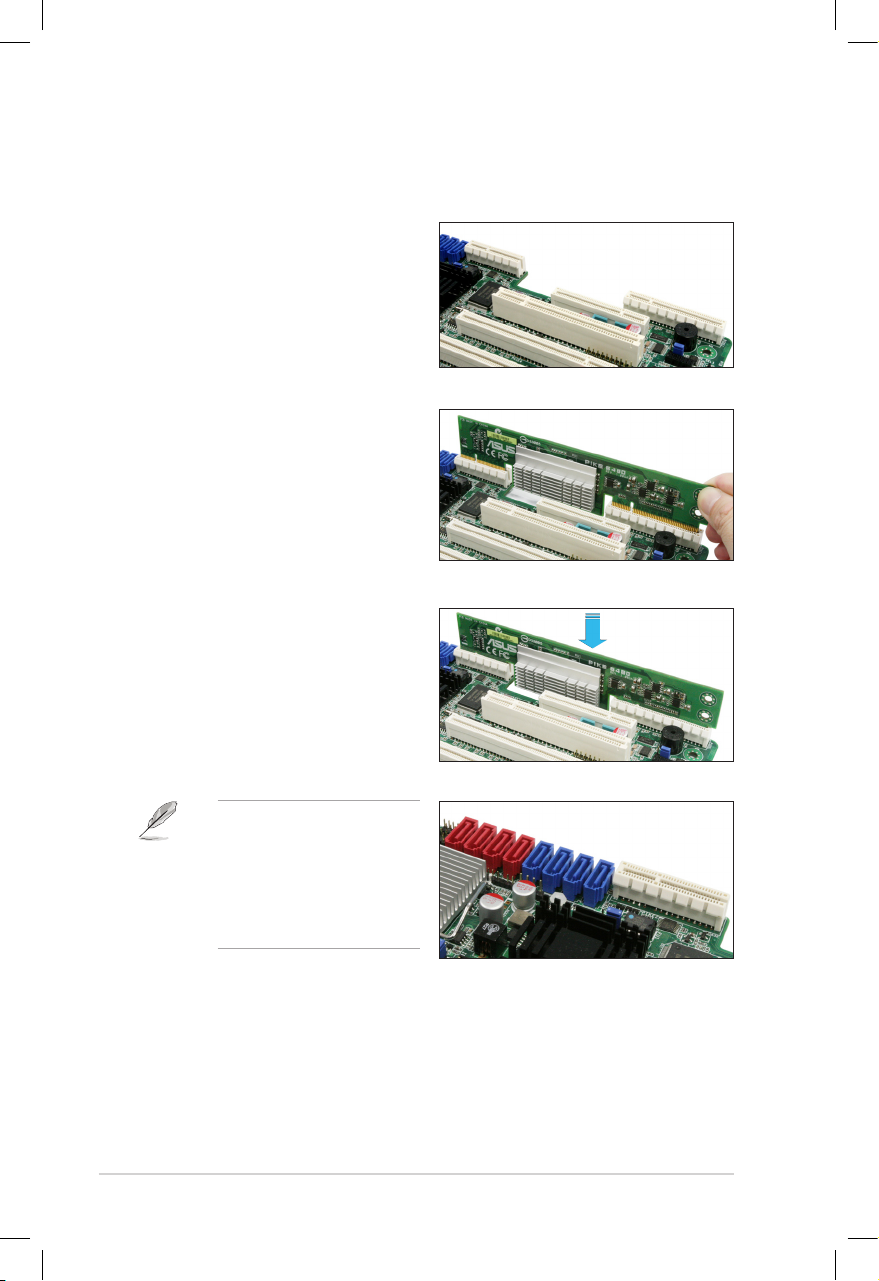
Connect the SAS hard disk
drives to SAS connectors
1-4 (red) on the motherboard
when using four ports. The
SAS connectors 5-8 (blue)
function when using eight
ports.
Page 13

2
Chapter 2: RAID
conguration
This chapter provides instructions on
setting up, creating, and conguring RAID
sets using the available utilities.
Page 14

2-2 Chapter 2: RAID conguration
2.1 Setting up RAID
The RAID card supports RAID 0, RAID 1, RAID 5, and RAID 10 set(s).
2.1.1 RAID denitions
RAID 0
(Data striping)
optimizes two identical hard disk drives to read and write
data in parallel, interleaved stacks. Two hard disks perform the same work as a
single drive but at a sustained data transfer rate, double that of a single disk alone,
thus improving data access and storage. Use of two new identical hard disk drives
is required for this setup.
RAID 1
(Data mirroring)
copies and maintains an identical image of data from
one drive to a second drive. If one drive fails, the disk array management software
directs all applications to the surviving drive as it contains a complete copy of
the data in the other drive. This RAID conguration provides data protection and
increases fault tolerance to the entire system. Use two new drives or use an
existing drive and a new drive for this setup. The new drive must be of the same
size or larger than the existing drive.
RAID 5 stripes both data and parity information across three or more hard
disk drives. Among the advantages of RAID 5 conguration include better
HDD performance, fault tolerance, and higher storage capacity. The RAID
5 conguration is best suited for transaction processing, relational database
applications, enterprise resource planning, and other business systems. Use a
minimum of three identical hard disk drives for this setup.
RAID 10 is data striping and data mirroring combined without parity (redundancy
data) having to be calculated and written. With the RAID 10* conguration you get
all the benets of both RAID 0 and RAID 1 congurations. Use four new hard disk
drives or use an existing drive and three new drives for this setup.
If you want to boot the system from a hard disk drive included in a created RAID
set, copy rst the RAID driver from the support CD to a oppy disk before you
install an operating system to the selected hard disk drive.
2.1.2 Installing hard disk drives
The RAID card supports SAS hard disk drives for RAID set conguration. For
optimal performance, install identical drives of the same model and capacity when
creating a disk array.
To install SAS hard disk drives for RAID conguration
1. Install the SAS drives into the drive bays following the instructions in the
system user guide.
2. Connect a SAS signal cable to the signal connector at the SAS backplane or
on the back of the SAS drive.
3. Connect a power cable to the power connector at the SAS backplane or on
the back of the SAS drive.
Page 15

ASUS PIKE 6480 2-3
2.2 Marvell® 88SE6480 SAS RAID BIOS
setup utility
The Marvell® 88SE6480 SAS RAID BIOS setup utility allows you to create
RAID 0, 1, 10 ,and 5 set(s) from SAS hard disk drives that are connected to the
PIKE 6480 SAS RAID card.
• DO NOT combine Serial ATA and SAS disk drives in one volume.
• The RAID setup screens shown in this section are for reference only and
may not exactly match the items on your screen due to the controller
version difference.
To enter the Marvell® RAID BIOS setup utility:
1. Turn on the system after installing all SAS hard disk drives.
2. During POST, press <Ctrl> + <M> to enter the utility main menu.
The RAID BIOS setup screens shown in this section are for reference only and
may not exactly match the items on your screen.
4. Press <Enter> and select a desired adapter for RAID conguration.
Marvell BIOS Setup (c) 2008 Marvell Technology Group Ltd.
ENTER/SPACE:Select, ESC:Back/Exit
VendorID:DeviceID: 11AB:6480
BIOS Version: 3.1.0.18
PCI Slot: 00
Adapter Serial Number: VA2400WWXX0000000005
IRQ Number: 0E
Raid Mode: RAID0 RAID1 RAID10 RAID5
Port 0 SAS Address: 5005043011AB0028
Port 1 SAS Address: 5005043011AB0029
Port 2 SAS Address: 5005043011AB002A
Port 3 SAS Address: 5005043011AB002B
Port 4 SAS Address: 5005043011AB002C
Port 5 SAS Address: 5005043011AB002D
Port 6 SAS Address: 5005043011AB002E
Port 7 SAS Address: 5005043011AB002F
[Selection] [Controller] [ Devices ] [ RAID ]
Adapter 0
Select Adapter
Adapter 0
Marvell BIOS Setup (c) 2008 Marvell Technology Group Ltd.
ENTER/SPACE:Select, ESC:Back/Exit
[Selection] [Controller] [ Devices ] [ RAID ]
Page 16

2-4 Chapter 2: RAID conguration
2.2.1 Creating an array
To create a RAID set:
1. From the utility menu bar, select
RAID > Create array.
2. Press <Enter>. The screen shows the disks you can add to make up
the RAID set. Use the arrow key to select a disk and press <Enter> or
<Space> to include this disk in the array.
3. After you have selected the desired disks, select
NEXT to create array.
Marvell BIOS Setup (c) 2008 Marvell Technology Group Ltd.
ENTER/SPACE:Select, ESC:Back/Exit
[Selection] [Controller] [ Devices ] [ RAID ]
RAID Cong
Create array
Delete array
Wipe out disk
Spare Management
RAID Cong
Select free disks to create
Port Disk Name Size Max Speed Status
0 SAS : ST3146855SS 139.9GB SAS 3.0 FREE
1 SAS : ST3146855SS 139.9GB SAS 3.0 FREE
2 SAS : ST3146855SS 139.9GB SAS 3.0 FREE
3 SAS : ST3146855SS 139.9GB SAS 3.0 FREE
4 SAS : ST3146855SS 139.9GB SAS 3.0 FREE
5 SAS : ST3146855SS 139.9GB SAS 3.0 FREE
6 SAS : ST3146855SS 139.9GB SAS 3.0 FREE
7 SAS : ST3146855SS 139.9GB SAS 3.0 FREE
NEXT
Marvell BIOS Setup (c) 2008 Marvell Technology Group Ltd.
ENTER/SPACE:Select, ESC:Back/Exit
[Selection] [Controller] [ Devices ] [ RAID ]
Page 17

ASUS PIKE 6480 2-5
4. The Create Array screen appears.
5. Use the arrow key to select the
RAID Level item and press <Enter> to
display the available RAID set. Select a RAID set and press <Enter>. After
you have selected the desired RAID set, select Next to create array.
• The available RAID sets vary with the number of disks you select. The
RAID sets that you are not allowed to create are grayed out.
• Except for the
RAID Level item, we recommend you keep the default
values for the other items in Create Array screen.
RAID Cong
Select free disks to create
Port Disk Name Size Max Speed Status
*0 SAS : ST336754SS 139.9GB SAS 3.0 FREE
*1 SAS : ST336754SS 139.9GB SAS 3.0 FREE
*2 SAS : ST336754SS 139.9GB SAS 3.0 FREE
*3 SAS : ST336754SS 139.9GB SAS 3.0 FREE
*4 SAS : ST336754SS 139.9GB SAS 3.0 FREE
*5 SAS : ST336754SS 139.9GB SAS 3.0 FREE
*6 SAS : ST336754SS 139.9GB SAS 3.0 FREE
*7 SAS : ST336754SS 139.9GB SAS 3.0 FREE
NEXT
Create Array
RAID Level : RAID0
Max Size(MB) : 4477896
Stripe Size : 64KB
Quick Init : No
Cache Mode : WriteBack
Array Name :
Disks ID : 0 1 2 3 4 5 6 7
NEXT
Marvell BIOS Setup (c) 2008 Marvell Technology Group Ltd.
ENTER/SPACE:Select, ESC:Back/Exit
[Selection] [Controller] [ Devices ] [ RAID ]
Marvell BIOS Setup (c) 2008 Marvell Technology Group Ltd.
ENTER/SPACE:Select, ESC:Back/Exit
[Selection] [Controller] [ Devices ] [ RAID ]
RAID Cong
Select free disks to create
Port Disk Name Size Max Speed Status
*0 SAS : ST336754SS 139.9GB SAS 3.0 FREE
*1 SAS : ST336754SS 139.9GB SAS 3.0 FREE
*2 SAS : ST336754SS 139.9GB SAS 3.0 FREE
*3 SAS : ST336754SS 139.9GB SAS 3.0 FREE
*3 3 SAS : ST336754SS 139.9GB SAS 3.0 FREE
*3 3 SAS : ST336754SS 139.9GB SAS 3.0 FREE
*3 3 SAS : ST336754SS 139.9GB SAS 3.0 FREE
*3 3 SAS : ST336754SS 139.9GB SAS 3.0 FREE
NEXT
Create Array
Raid Level : RAID0
Max Size(MB) : 146480
Stripe Size : 64KB
Quick Init : No
Cache Mode : WriteBack
Array Name :
Disks ID : 0 1 2 3 4 5 6 7
NEXT
*RAID0
RAID1
RAID10
RAID5
Page 18

2-6 Chapter 2: RAID conguration
6. A conrmation screen appears. Press <Y> to conrm the array creation.
7. The newly created array appears in the
RAID menu.
Marvell BIOS Setup (c) 2008 Marvell Technology Group Ltd.
ENTER/SPACE:Select, ESC:Back/Exit
[Virtual Disks]
ID Name Size Level Status Stripe CacheMode
0 1120GB RAID0 ONLINE 64KB WriteBack
[Physical Disks]
Port Disk Name Size Max Speed Status
0 SAS : ST3146855SS 140GB SAS 3.0 ASSIGNED
1 SAS : ST3146855SS 140GB SAS 3.0 ASSIGNED
2 SAS : ST3146855SS 140GB SAS 3.0 ASSIGNED
3 SAS : ST3146855SS 140GB SAS 3.0 ASSIGNED
4 SAS : ST3146855SS 140GB SAS 3.0 ASSIGNED
5 SAS : ST3146855SS 140GB SAS 3.0 ASSIGNED
6 SAS : ST3146855SS 140GB SAS 3.0 ASSIGNED
7 SAS : ST3146855SS 140GB SAS 3.0 ASSIGNED
[Selection] [Controller] [ Devices ] [ RAID ]
Marvell BIOS Setup (c) 2008 Marvell Technology Group Ltd.
[Selection] [Controller] [ Devices ] [ RAID ]
RAID Cong
Create the array?[Y]
Select free disks to create
Port Disk Name Size Max Speed Status
*0 SAS : ST336754SS 139.9GB SAS 3.0 FREE
*1 SAS : ST336754SS 139.9GB SAS 3.0 FREE
*2 SAS : ST336754SS 139.9GB SAS 3.0 FREE
*3 SAS : ST336754SS 139.9GB SAS 3.0 FREE
*4 SAS : ST336754SS 139.9GB SAS 3.0 FREE
*5 SAS : ST336754SS 139.9GB SAS 3.0 FREE
*6 SAS : ST336754SS 139.9GB SAS 3.0 FREE
*7 SAS : ST336754SS 139.9GB SAS 3.0 FREE
NEXT
Create Array
Raid Level : RAID0
Max Size(MB) : 4477896
Stripe Size : 64KB
Quick Init : No
Cache Mode : WriteBack
Array Name :
Disks ID : 0 1 2 3 4 5 6 7
NEXT
Page 19

ASUS PIKE 6480 2-7
2.2.2 Deleting an array
To delete a RAID set:
1. From the utility menu bar, select
RAID > Delete array, and then press
<Enter>. The Delete array screen appears.
2. Select a desired array to delete, select
NEXT, and then Press <Enter>. Press
<Y> after the conrmation screen appears.
Marvell BIOS Setup (c) 2008 Marvell Technology Group Ltd.
ENTER/SPACE:Select, ESC:Back/Exit
[Selection] [Controller] [ Devices ] [ RAID ]
RAID Cong
Delete array
ID Name Size Level Status Stripe CacheMode
0 1120GB RAID0 ONLINE 64KB WriteBack
NEXT
Marvell BIOS Setup (c) 2008 Marvell Technology Group Ltd.
[Selection] [Controller] [ Devices ] [ RAID ]
RAID Cong
Delete the array?[Y]
Delete array
ID Name Size Level Status Stripe CacheMode
*0 1120GB RAID0 ONLINE 64KB WriteBack
NEXT
3. Press <Y> again to conrm and delete the selected array.
You cannot recover lost data if you delete an array. Ensure you back up
important data before deleting an array.
Page 20

2-8 Chapter 2: RAID conguration
2.2.3 Wipe out disk
To erase the reserved sectors of the selected disk:
1. From the utility menu bar, select
RAID > Wipe out disk, and then press
<Enter>. The Wipe out disk screen appears.
2. Select a desired disk to erase the reserved sectors. Select
NEXT, and then
press <Enter>. Press <Y> after the conrmation screen appears.
Marvell BIOS Setup (c) 2008 Marvell Technology Group Ltd.
ENTER/SPACE:Select, ESC:Back/Exit
[Selection] [Controller] [ Devices ] [ RAID ]
RAID Cong
Select disk to wipe out:
Port Disk Name Size Max Speed Status
0 SAS : ST3146855SS 140GB SAS 3.0 ASSIGNED
1 SAS : ST3146855SS 140GB SAS 3.0 ASSIGNED
2 SAS : ST3146855SS 140GB SAS 3.0 ASSIGNED
3 SAS : ST3146855SS 140GB SAS 3.0 ASSIGNED
4 SAS : ST3146855SS 140GB SAS 3.0 ASSIGNED
5 SAS : ST3146855SS 140GB SAS 3.0 ASSIGNED
6 SAS : ST3146855SS 140GB SAS 3.0 ASSIGNED
7 SAS : ST3146855SS 140GB SAS 3.0 ASSIGNED
NEXT
Marvell BIOS Setup (c) 2008 Marvell Technology Group Ltd.
[Selection] [Controller] [ Devices ] [ RAID ]
RAID Cong
Delete the disk's reserved sectors?[Y]
Select disk to wipe out:
3. Press <ESC> to exit the Wipe out disk screen.
You cannot recover lost data if you erase sectors of a disk. Ensure you back up
important data before erasing sectors of a disk.
Port Disk Name Size Max Speed Status
*0 SAS : ST3146855SS 140GB SAS 3.0 ASSIGNED
1 SAS : ST3146855SS 140GB SAS 3.0 ASSIGNED
2 SAS : ST3146855SS 140GB SAS 3.0 ASSIGNED
3 SAS : ST3146855SS 140GB SAS 3.0 ASSIGNED
4 SAS : ST3146855SS 140GB SAS 3.0 ASSIGNED
5 SAS : ST3146855SS 140GB SAS 3.0 ASSIGNED
6 SAS : ST3146855SS 140GB SAS 3.0 ASSIGNED
7 SAS : ST3146855SS 140GB SAS 3.0 ASSIGNED
NEXT
Page 21

ASUS PIKE 6480 2-9
2.2.4 Spare Management
You may congure one disk as a global hot spare to protect critical data on RAID
set(s). You may create the hot spare disk before or after you create a RAID set.
Refer to this section when adding a hot spare disk on an existing volume.
If a disk on a RAID set fails, the utility automatically rebuilds the failed disk
data on the hot spare. When the failed disk is replaced, the utility assigns the
replacement as the new hot spare.
To create a hot spare
1. From the utility menu bar, select
RAID > Spare Management, and then
press <Enter>. The Spare Management screen appears.
Marvell BIOS Setup (c) 2008 Marvell Technology Group Ltd.
ENTER/SPACE:Select, ESC:Back/Exit
[Selection] [Controller] [ Devices ] [ RAID ]
RAID Cong
Spare Management
Port Disk Name Size Max Speed Status
0 SAS : ST3146855SS 139.9GB SAS 3.0 FREE
NEXT
2. Select a desired drive to create a hot spare. Select NEXT, and then press
<Enter>. Press <Y> after the conrmation screen appears.
Marvell BIOS Setup (c) 2008 Marvell Technology Group Ltd.
[Selection] [Controller] [ Devices ] [ RAID ]
RAID Cong
Set spare?[Y]
Spare Management
Port Disk Name Size Max Speed Status
*0 SAS : ST3146855SS 139.9GB SAS 3.0 FREE
NEXT
3. Press <ESC> to exit the Spare Management screen.
Page 22

2-10 Chapter 2: RAID conguration
To clean a hot spare
1. From the utility menu bar, select
RAID > Spare Management, and then
press <Enter>. The Spare Management screen appears.
Marvell BIOS Setup (c) 2008 Marvell Technology Group Ltd.
ENTER/SPACE:Select, ESC:Back/Exit
[Selection] [Controller] [ Devices ] [ RAID ]
RAID Cong
Spare Management
Port Disk Name Size Max Speed Status
0 SAS : ST3146855SS 139.9GB SAS 3.0 SPARE
NEXT
2. Select a desired drive to clean the hot spare. Select NEXT, and then press
<Enter>. Press <Y> after the conrmation screen appears.
Marvell BIOS Setup (c) 2008 Marvell Technology Group Ltd.
[Selection] [Controller] [ Devices ] [ RAID ]
RAID Cong
Clean spare?[Y]
Spare Management
Port Disk Name Size Max Speed Status
*0 SAS : ST3146855SS 139.9GB SAS 3.0 SPARE
NEXT
3. Press <ESC> to exit the Spare Management screen.
Page 23

ASUS PIKE 6480 2-11
2.2.5 Advanced Operation
From the utility menu bar, select Devices, and then press <Enter>. The Advanced
Operation screen appears. You can run Disk Verify and Low Level Format in the
Advanced Operation screen.
Marvell BIOS Setup (c) 2008 Marvell Technology Group Ltd.
ENTER/SPACE:Select, ESC:Back/Exit
[Selection] [Controller] [ Devices ] [ RAID ]
Select Device For Advanced Operation
[Physical Disks]
Port Disk Name Size Max Speed
0 SAS : ST3146855SS 140GB SAS 3.0
1 SAS : ST3146855SS 140GB SAS 3.0
2 SAS : ST3146855SS 140GB SAS 3.0
3 SAS : ST3146855SS 140GB SAS 3.0
3 SAS : ST3146855SS 140GB SAS 3.0
3 SAS : ST3146855SS 140GB SAS 3.0
3 SAS : ST3146855SS 140GB SAS 3.0
3 SAS : ST3146855SS 140GB SAS 3.0
To run Disk Verify
1. In the
Advanced Operation screen, use the arrow key to select a disk and
press <Enter> or <Space>. The Advanced Menu appears. Select Disk
Verify and press <Enter>.
2. Press <Y> after the conrmation screen appears.
3. The utility veries the selected disk. When completed, press <ESC> to return
to the Advanced Operation screen.
Marvell BIOS Setup (c) 2008 Marvell Technology Group Ltd.
ENTER/SPACE:Select, ESC:Back/Exit
[Selection] [Controller] [ Devices ] [ RAID ]
Select Device For Advanced Operation
[Physical Disks]
Port Disk Name Size Max Speed
0 SAS : ST3146855SS 140GB SAS 3.0
1 SAS : ST3146855SS 140GB SAS 3.0
2 SAS : ST3146855SS 140GB SAS 3.0
3 SAS : ST3146855SS 140GB SAS 3.0
4 SAS : ST3146855SS 140GB SAS 3.0
5 SAS : ST3146855SS 140GB SAS 3.0
6 SAS : ST3146855SS 140GB SAS 3.0
7 SAS : ST3146855SS 140GB SAS 3.0
Advanced Menu
Disk Verify
Page 24

2-12 Chapter 2: RAID conguration
2.2.6 Controller Conguration
From the utility menu bar, select Controller, and then press <Enter>. The
Controller Cong screen appears and allows you to change controller settings.
[Controller Cong]
INT 13h [Enable]
Silent Mode [Enable]
Halt On Error [Disable]
Straggered Spin Up Options
HDD-Detect Time(s) Options
Marvell BIOS Setup (c) 2008 Marvell Technology Group Ltd.
ENTER/SPACE:Select, ESC:Back/Exit
[Selection] [Controller] [ Devices ] [ RAID ]
INT 13h [Enable]
Allows you to enable or disable the Interrupt 13h support. Set this item to [Enable]
if you want to use the device(s) connected to PIKE 6480 as boot device. Set this
item to [Disable] if you want to use the device(s) connected to PIKE 6480 as data
device. Conguration options: [Disable] [Enable]
Silent Mode [Enable]
Allows you to enable or disable the BIOS POST silent mode. When enabled, the
information of the drives connected to PIKE 6480 will be hidden during system
POST. Conguration options: [Disable] [Enable]
Halt On Error [Disable]
Allows you to enable or disable the Halt On Error function. When enabled, the
BIOS POST will halt when an error (such as virtual drive status changes) occurs
and require user’s conrmation to continue.
Conguration options: [Disable] [Enable]
Staggered Spin UP
Allows you to select the number of ports per spin up group and the spin up delay
time per second between groups.
Number of Devices Per Group
Conguration options: [1] [2] – [7] [8]
Group Spin Up Delay(s)
Conguration options: [0] [1] – [6] [7]
HDD-Detect Time(s)
Conguration options: [0] [1] – [9] [10]
Page 25

3
Chapter 3: Driver
installation
This chapter provides instructions for
installing the RAID drivers on different
operating systems.
Page 26

3-2 Chapter 3: Driver update
3.1 RAID driver installation
After creating the RAID sets for your server system, you are now ready to install
an operating system to the independent hard disk drive or bootable array. This part
provides instructions on how to install or update the RAID card drivers.
The RAID card driver might be included in the Linux OS installation CD, and
could be loaded automatically during OS installation. However, we recommend
using the RAID driver packaged in the RAID card support CD for better
reliability.
3.1.1 Creating a RAID driver disk
You may have to use another system to create the RAID driver disk from the
support CD.
A oppy disk with the RAID driver is required when installing Windows® or Linux
operating system on a hard disk drive that is included in a RAID set. You can create
a RAID driver disk in DOS (using the Makedisk application in the support CD).
To create a RAID driver disk in DOS environment:
1. Place the support CD in the optical drive.
2. Restart the computer, then enter the BIOS Setup.
3. Select the optical drive as the rst boot priority to boot from the support CD.
Save your changes, then exit the BIOS Setup.
4. Restart the computer.
5. The Make Disk menu appears. Select
PIKE 6480 SAS/SATA card Driver,
and press <Enter> to enter the sub-menu.
Create Driver Diskette Menu
PIKE 6480 SAS/SATA card Driver
FreeDOS command prompt
Page 27

ASUS PIKE 6480 3-3
7. Place a blank, high-density oppy disk to the oppy disk drive.
8. Press <Enter>.
9. Follow screen instructions to create the driver disk.
6. Use the arrow keys to select the type of RAID driver disk you want to create.
PIKE 6480 SAS/SATA card Driver
Windows 32/64 bit
RHEL 4 UP4 32 bit
RHEL 4 UP4 64 bit
RHEL 4 UP7 32 bit
RHEL 4 UP7 64 bit
RHEL 5 32 bit
RHEL 5 64 bit
RHEL 5 UP1 32 bit
RHEL 5 UP1 64 bit
RHEL 5 UP2 32 bit
RHEL 5 UP2 64 bit
SLES 10 32 bit
SLES 10 64 bit
SLES 10 SP1 32 bit
SLES 10 SP1 64 bit
SLES 10 SP2 32 bit
SLES 10 SP2 64 bit
Fedora Core 6 32 bit
Fedora Core 6 64 bit
Fedora 8 32 bit
Fedora 8 64 bit
Fedora 9 32 bit
Fedora 9 64 bit
Back
Exit
Page 28

3-4 Chapter 3: Driver update
3.1.2 Windows® OS
During Windows® OS installation
To install the RAID card driver when installing Windows® OS:
1. Boot the computer using the Windows
®
OS installation CD. The Window®
Setup starts.
2. Press <F6> when the message “Press F6 if you need to install a third party
SCSI or RAID driver...” appears at the bottom of the screen.
3. The next screen appears. Press <S> to specify an additional device.
Windows Setup
S=Specify Additional Device ENTER=Continue F3=Exit
Setup could not determine the type of one or more mass storage devices
installed in your system, or you have chosen to manually specify an adapter.
Currently, Setup will load support for the following mass storage
devices(s):
<none>
* To specify additional SCSI adapters, CD-ROM drives, or special
disk controllers for use with Windows, including those for
which you have a device support disk from a mass storage device
manufacturer, press S.
* If you do not have any device support disks from a mass storage
device manufacturer, or do not want to specify additional
mass storage devices for use with Windows, press ENTER.
Windows Setup
Press F6 if you need to install a third party SCSI or RAID driver...
Page 29

ASUS PIKE 6480 3-5
4. Insert the RAID driver disk you created earlier to the oppy disk drive, then
press <Enter>.
Windows Setup
ENTER=Continue ESC=Cancel F3=Exit
Please insert the disk labeled
Manufacturer-supplied hardware support disk
into Drive A:
* Press ENTER when ready.
5. Select the RAID controller driver from the list, then press <Enter>.
6. The Windows® Setup loads the RAID card drivers from the RAID driver disk.
When next screen appears, press <Enter> to continue installation.
7. Setup then proceeds with the OS installation. Follow screen instructions to
continue.
Windows Setup
ENTER=Select F3=Exit
You have chosen to congure a SCSI Adapter for use with Windows,
using a device support disk provided by an adapter manufacturer.
Select the SCSI Adapter you want from the following list, or press ESC
to return to the previous screen.
Marvell 64xx/63xx SAS Controller 32bit Driver
Marvell 64xx/63xx SAS Controller 64bit Driver
Page 30

3-6 Chapter 3: Driver update
3. Double-click the Marvell 6480 SAS Controller.
After Windows® OS installation
To update the RAID card driver after installing Windows® OS:
1. Right-click the
My Computer icon on the desktop and select Properties from
the menu.
2. Click the
Hardware tab on the top, then click the Device Manager button.
Page 31

ASUS PIKE 6480 3-7
4. Click the Driver tab on the top, then click Update Driver.
5. Toggle No, not this time, then click Next to continue.
6. Toggle
Install from a list or specic location, then click Next to continue.
Page 32

3-8 Chapter 3: Driver update
7. Toggle Don’t choose. I will choose the driver to install, then click Next to
continue.
8. Highlight
Marvell 6480 SAS Controller, then click Have Disk.
9. Select from the drop-down menu and locate the driver.
Page 33

ASUS PIKE 6480 3-9
10. Click Next to start updating the driver.
11. After completing driver update, click
Finish to close the wizard. It is
recommended to restart the computer for the device to work properly.
Page 34

3-10 Chapter 3: Driver update
3.1.3 Red Hat® Enterprise Linux OS
To install the RAID card driver when installing Red Hat® Enterprise OS:
1. Boot the system from the Red Hat
®
OS installation CD.
2. At the
boot:, type linux dd, then press <Enter>.
- To install or upgrade in graphical mode, press the <ENTER> key.
- To install or upgrade in text mode, type: linux text <ENTER>.
- Use the function keys listed below for more information.
[F1-Main] [F2-Options] [F3-General] [F4-Kernel] [F5-Rescue]
boot: linux dd
4. Select fd0 using the <Tab> key when asked to select the driver disk source.
Press <Tab> to move the cursor to OK, then press <Enter>.
3. Select
Yes using the <Tab> key when asked if you have the driver disk, then
press <Enter>.
Main Menu
Do you have a driver disk?
Yes No
Driver Disk Source
You have multiple devices which could
serve as sources for a driver disk.
Which would you like to use?
OK
Cancel
fd0
scd0
Page 35

ASUS PIKE 6480 3-11
6. When asked if you will load additional RAID controller drivers, select No, then
press <Enter>.
5. Insert the Red Hat® Enterprise RAID driver disk to the oppy disk drive, select
OK, then press <Enter>.
The drivers for the RAID card are installed to the system.
Insert Driver Disk
Insert your driver disk into /dev/fd0
and press “OK” to continue.
OK
Back
7. Follow the screen instructions to continue the OS installation.
More Driver Disks?
Do you wish to load any more
driver disks?
Yes No
Page 36

3-12 Chapter 3: Driver update
3.1.4 SUSE Linux Enterprise Server OS
To install the RAID card driver when installing SUSE Linux Enterprise Server OS:
1. Boot the system from the SUSE OS installation CD.
2. Use the arrow keys to select
Installation from the Boot Options menu.
F1 Help F2 Language F3 1280 x 1024 F4 DVD F5 Driver
Boot from Hard Disk
Installation
Installation--ACPI Disabled
Installation--Local APIC Disabled
Installation--Safe Settings
Rescue System
Memory Test
Boot Options |
3. Press <F5>, then select Yes from the menu. Press <Enter>.
F1 Help F2 Language F3 1280 x 1024 F4 DVD F5 Driver
Boot from Hard Disk
Installation
Installation--ACPI Disabled
Installation--Local APIC Disabled
Installation--Safe Settings
Rescue System
Memory Test
Boot Options |
Yes
No
File
Page 37

ASUS PIKE 6480 3-13
4. Insert the RAID driver disk to the oppy disk drive. Make sure that Installation
from the Boot Options menu is selected, then press <Enter>.
F1 Help F2 Language F3 1280 x 1024 F4 DVD F5 Driver
Boot from Hard Disk
Installation
Installation--ACPI Disabled
Installation--Local APIC Disabled
Installation--Safe Settings
Rescue System
Memory Test
Boot Options |
5. When below screen appears, select the oppy disk drive (fd0) as the driver
update medium. Select OK, then press <Enter>.
Please choose the Driver Update medium.
OK Back
fd0: Floppy
sr0: CD-ROM, TEAC DV-516E
sda: Disk, SEAGATE ST336754SS
sdb: Disk, SEAGATE ST336754SS
Other device
The drivers for the RAID controller are installed to the system.
Page 38

3-14 Chapter 3: Driver update
3.2 Support CD information
The support CD that came with the SAS RAID card package contains the drivers
that you can install to avail all product features.
The contents of the support CD are subject to change at any time without
notice. Visit the ASUS website (www.asus.com) for updates.
3.2.1 Running the support CD
Place the support CD to the optical drive. The CD automatically displays the
Drivers menu if Autorun is enabled in your computer.
• You have to install the PIKE 6480 SAS RAID card on your motherboard
BEFORE you can launch the Autorun function of the support CD.
• If Autorun is NOT enabled in your computer, browse the contents of the
support CD to locate the le ASSETUP.EXE from the BIN folder. Double-click
the ASSETUP.EXE to run the CD.
3.2.2 Utilities menu
The Utilities menu shows the available device drivers if the system detects
installed devices. Install the necessary drivers to activate the devices.
The screen display and driver options may vary under different operating
system versions.
Page 39

ASUS PIKE 6480 3-15
3.2.4 Contact information
Click the Contact tab to display the ASUS contact information. You can also nd
this information on the inside front cover of this user guide.
3.2.3 Make disk
The Make disk menu contains items to create the Marvell® RAID driver disk.
Page 40

3-16 Chapter 3: Driver update
 Loading...