

Page 1
Page 2

Content
English ........................................................................................1
Deutsch ....................................................................................18
Français ....................................................................................35
한국어
日本語
简体中文
繁體中文
.......................................................................................52
.......................................................................................69
...................................................................................
.................................................................................102
86
Page 3
TM
ASUS® PhysX
Installation Guide
1
English
Page 4
2
English
E249 8
Firs t Ed i tio n
Marc h 20 0 6
Copyright © 2006 ASUSTeK COMPUTER INC. All Rights Reserved.
No part of this manual, including the products and software described in it, may be reproduced,
transmitted, transcribed, stored in a retrieval system, or translated into any language in any form
or by any means, except documentation kept by the purchaser for backup purposes, without the
express written permission of ASUSTeK COMPUTER INC. (“ASUS”).
Product warranty or service will not be extended if: (1) the product is repaired, modied or altered,
unless such repair, modication of alteration is authorized in writing by ASUS; or (2) the serial
number of the product is defaced or missing.
ASUS PROVIDES THIS MANUAL “AS IS” WITHOUT WARRANTY OF ANY KIND, EITHER
EXPRESS OR IMPLIED, INCLUDING BUT NOT LIMITED TO THE IMPLIED WARRANTIES
OR CONDITIONS OF MERCHANTABILITY OR FITNESS FOR A PARTICULAR PURPOSE.
IN NO EVENT SHALL ASUS, ITS DIRECTORS, OFFICERS, EMPLOYEES OR AGENTS BE
LIABLE FOR ANY INDIRECT, SPECIAL, INCIDENTAL, OR CONSEQUENTIAL DAMAGES
(INCLUDING DAMAGES FOR LOSS OF PROFITS, LOSS OF BUSINESS, LOSS OF USE OR
DATA, INTERRUPTION OF BUSINESS AND THE LIKE), EVEN IF ASUS HAS BEEN ADVISED
OF THE POSSIBILITY OF SUCH DAMAGES ARISING FROM ANY DEFECT OR ERROR IN
THIS MANUAL OR PRODUCT.
SPECIFICATIONS AND INFORMATION CONTAINED IN THIS MANUAL ARE FURNISHED
FOR INFORMATIONAL USE ONLY, AND ARE SUBJECT TO CHANGE AT ANY TIME WITHOUT
NOTICE, AND SHOULD NOT BE CONSTRUED AS A COMMITMENT BY ASUS. ASUS
ASSUMES NO RESPONSIBILITY OR LIABILITY FOR ANY ERRORS OR INACCURACIES
THAT MAY APPEAR IN THIS MANUAL, INCLUDING THE PRODUCTS AND SOFTWARE
DESCRIBED IN IT.
Products and corporate names appearing in this manual may or may not be registered trademarks
or copyrights of their respective companies, and are used only for identication or explanation
and to the owners’ benet, without intent to infringe.
ASUS Ph y s XTM Instal l a t i on Guid e
Page 5

Contents
Notices .................................................................................................4
Safety information ...............................................................................5
1. ASUS® PhysXTM installation ................................................... 6
1.1 Installation requirements ....................................................6
1.2 Card Installation .................................................................
1.3 Driver Installation ...............................................................
2. PhysXTM control panel .........................................................11
2.1 Lanuching PhysX Control Panel ........................................11
2.2 Info ..................................................................................
2.3 Demo ...............................................................................
2.4 Settings ...........................................................................
2.5 Help .................................................................................
3. Troubleshooting ................................................................. 14
3.1 Problems and solutions table ...........................................14
3.2 Verifying the PhysX
3.3 Verifying the PhysX
TM
Card ...............................................15
TM
Driver .............................................16
3
English
6
8
12
12
13
13
4. Uninstalling the Driver and Utilities ....................................17
ASUS Ph y s XTM Instal l a t i on Guid e
Page 6
4
English
Notices
Federal Communications Commission Statement
This device complies with Part 15 of the FCC Rules. Operation is subject to
the following two conditions:
•
This device may not cause harmful interference, and
•
This device must accept any interference received including interference
that may cause undesired operation.
This equipment has been tested and found to comply with the limits for a Class
B digital device, pursuant to Part 15 of the FCC Rules. These limits are designed
to provide reasonable protection against harmful interference in a residential
installation. This equipment generates, uses and can radiate radio frequency
energy and, if not installed and used in accordance with manufacturer’s
instructions, may cause harmful interference to radio communications.
However, there is no guarantee that interference will not occur in a particular
installation. If this equipment does cause harmful interference to radio or
television reception, which can be determined by turning the equipment off
and on, the user is encouraged to try to correct the interference by one or
more of the following measures:
•
Reorient or relocate the receiving antenna.
•
Increase the separation between the equipment and receiver.
•
Connect the equipment to an outlet on a circuit different from that to
which the receiver is connected.
•
Consult the dealer or an experienced radio/TV technician for help.
The use of shielded cables for connection of the monitor to the graphics
card is required to assure compliance with FCC regulations. Changes or
modications to this unit not expressly approved by the party responsible for
compliance could void the user’s authority to operate this equipment.
Canadian Department of Communications Statement
This digital apparatus does not exceed the Class B limits for radio noise
emissions from digital apparatus set out in the Radio Interference Regulations
of the Canadian Department of Communications.
This class B digital apparatus complies with Canadian ICES-003.
ASUS Ph y s XTM Instal l a t i on Guid e
Page 7
Safety information
Electric al s af ety
5
•
To prevent electrical shock hazard, disconnect the power cable from the
electrical outlet before relocating the system.
•
When adding or removing devices to or from the system, ensure that
the power cables for the devices are unplugged before the signal cables
are connected. If possible, disconnect all power cables from the existing
system before you add a device.
•
Before connecting or removing signal cables from a motherboard, ensure
that all power cables are unplugged.
•
Make sure that your power supply is set to the correct voltage in your
area. If you are not sure about the voltage of the electrical outlet you are
using, contact your local power company.
•
If the power supply is broken, do not try to fix it by yourself. Contact a
qualified service technician or your retailer.
Operation safety
•
Before installing devices on your motherboard, carefully read all the manuals
that came with the package.
•
Before using the product, make sure all cables are correctly connected
and the power cables are not damaged. If you detect any damage, contact
your dealer immediately.
•
To avoid short circuits, keep paper clips, screws, and staples away from
connectors, slots, sockets and circuitry.
•
Avoid dust, humidity, and temperature extremes. Do not place the product
in any area where it may become wet.
•
Place the product on a stable surface.
•
If you encounter technical problems with the product, contact a qualified
service technician or your retailer.
English
The symbol of the crossed out wheeled bin indicates that the product
(electrical and electronic equipment) should not be placed in municipal
waste. Check local regulations for disposal of electronic products.
ASUS Ph y s XTM Instal l a t i on Guid e
Page 8

6
English
1. ASUS
®
PhysXTM installation
1.1 Installation requirements
To ensure a successful installation of the PhysX card, your computer must
meet the following requirements:
(Note: The games the customers may buy may have higher specications. The
specications below are subject to change without notice.)
• Intel® Pentium® 4, Intel® Celeron® or higher, AMD® AthlonTM 64, AMD®
SempronTM or AMD® AthlonTM XP or higher
®
• Microsoft
or later upgrade
• 256MB system memory or higer
• Geforce6800, Radeon X800 graphic card or higher is recommended for
most games
• 50MB free hard disk space or greater
• PCI Slot revision 2.2 or later, 3.3V
• Free 4-pin Peripheral Power Cable
Before the installation, check your ASUS PhysX card package for the following
items:
• ASUS PhysX
• ASUS PhysX
• Product serial number
• CD serial number
When the above items are ready, you can begin the installation that includes
two steps: (1) card installation, and (2) driver installation.
Windows® XP/Professional/Home (32bit Edition), with SP1
TM
PPU card
TM
PPU support CD
1.2 Card installation
To install ASUS PhysX card:
1. Touch the metal back or side panel of the computer to avoid static
electricity.
2. Power OFF the computer, the monitor, and all other peripheral devices
connected to your computer.
3. Unplug the computer power cord from your computer and power outlet.
4. Remove the chassis cover.
5. Locate an empty PCI slot on the motherboard.
ASUS Ph y s XTM Instal l a t i on Guid e
Page 9
7
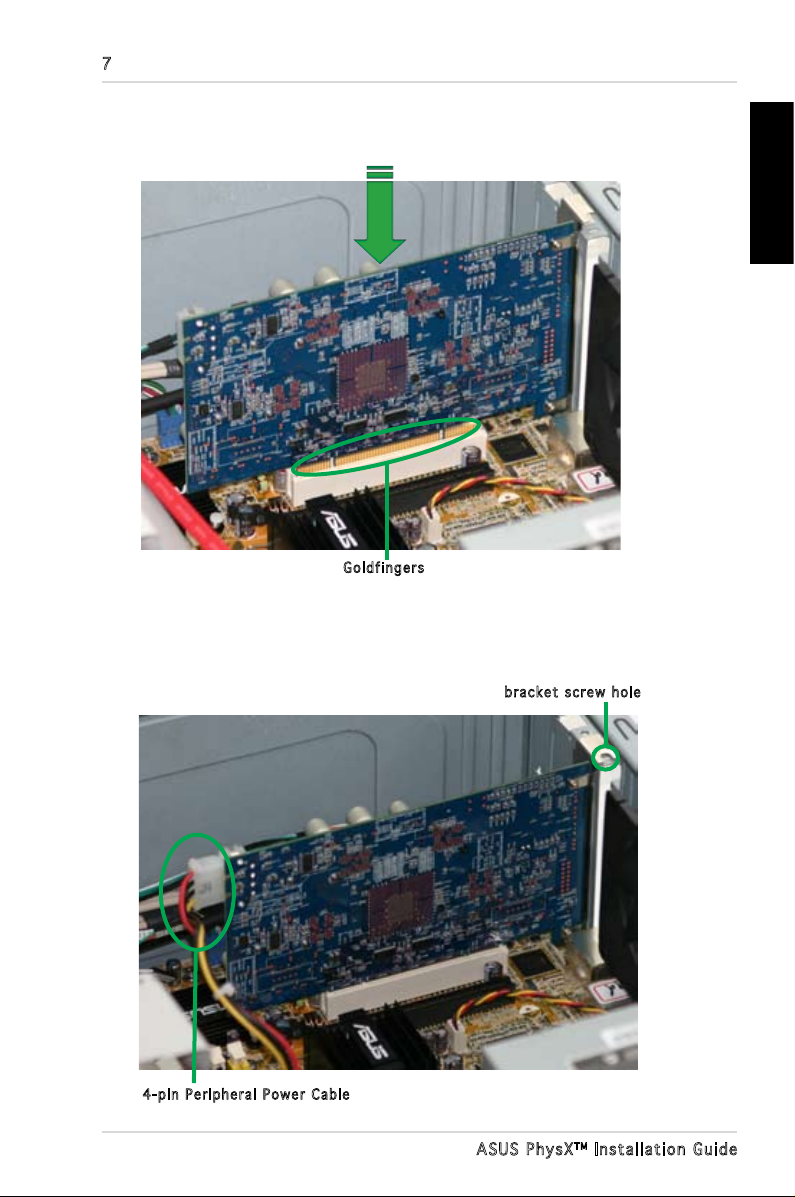
6. Align and insert the PhysX card into the PCI slot until it seats in place.
Make sure the goldngers are properly inserted to the slot.
Gol d f i n g e r s
7. Secure the bracket screw that holds the PhysX card in place. Refer to the
picture below for the barcket screw hole.
8. Connect one 4-pin Peripheral Power Cable to the power connector on the
card as shown below.
bra c k e t s c r e w hole
English
4-p i n P e r i p heral Power C a b l e
ASUS Ph y s XTM Instal l a t i on Guid e
Page 10

8
English
9. Put back the chassis cover.
10. Reconnect all cables.
11. Plug the power cord to the computer and to a wall socket & power strip.
12. Power ON the computer.
1.3 Driver installation
After installing the PhysX card on your computer, you need to install the device
driver that enables the PhysX card to work with Windows operating system.
(Note: The version and content of the driver CD are subject to change without
notice.)
If you have already installed the ASUS PhysX card, the Found Ne w Hardware
Wiza r d window may pop up before or during driver installation. See gure
below.
To install the device driver:
1. Click
2. Insert the ASUS PhysX support CD into your optical drive.
If autorun is enabled, the ASUS PhysX Card Driver screen appears
If Autorun is not enabled in your computer, perform step 3.
3. Click
ASUS Ph y s XTM Instal l a t i on Guid e
Canc e l from the Fo u nd N ew H ardw are wiza r d window.
automatically. Go to step 5.
My C o mpu t er on your desktop.
Page 11
9
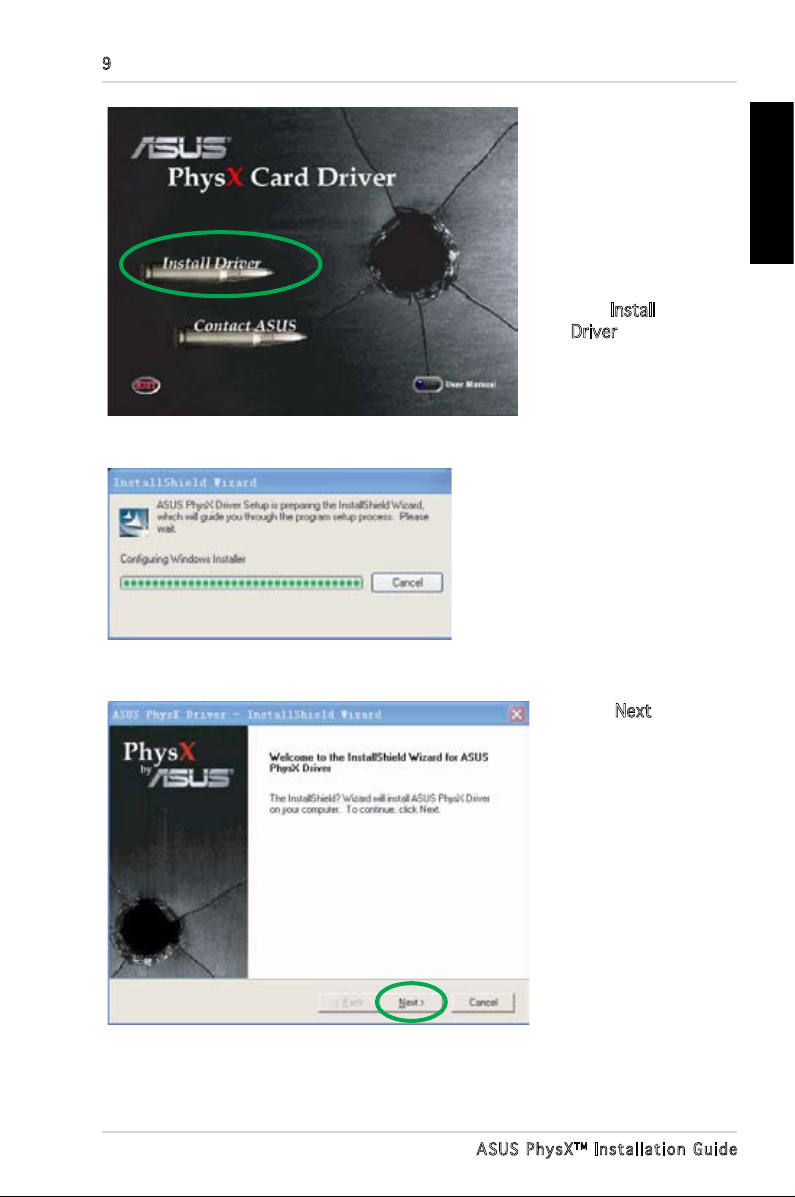
4. Double click the
optical drive
icon. The ASUS
PhysX Card
Driver screen
appears.
5. From the ASUS
Card Driver
screen, double
click Install
Driver.
T h e S e t u p
pr e p a re s t h e
I n s t a l l S h i e l d
Wi z ar d w hi c h
wi ll guide you
t h r o u g h t h e
program setup
process.
English
6. Click Next on
the Welcome
to the
InstallShield
Wizard screen.
ASUS Ph y s XTM Instal l a t i on Guid e
Page 12
English
10
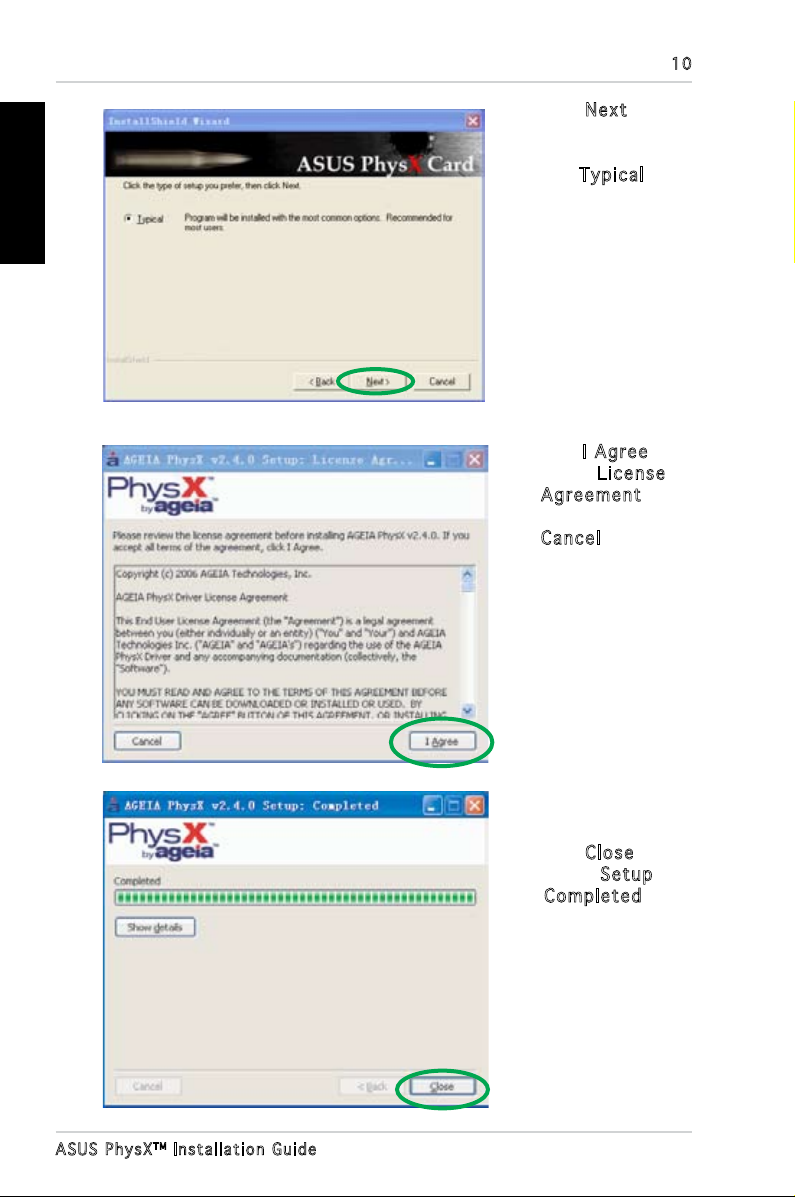
7. Click Next from
the InstallShield
Wizard window.
The Typi c al
installation type
is selected by
default.
8. Click
The ASUS PhysX device
driver s ar e cop i ed
onto your system.The
installation may take
sev e ral minutes to
complete.
9. Click
I Ag r ee
on the Lice n se
Agre e men t
window, or click
Canc e l to exit
the installation
program.
Clos e
on the Setu p
Comp l ete d
window to exit
the ASUS PhysX
Installer and
complete the
installation.
ASUS Ph y s XTM Instal l a t i on Guid e
Page 13
11
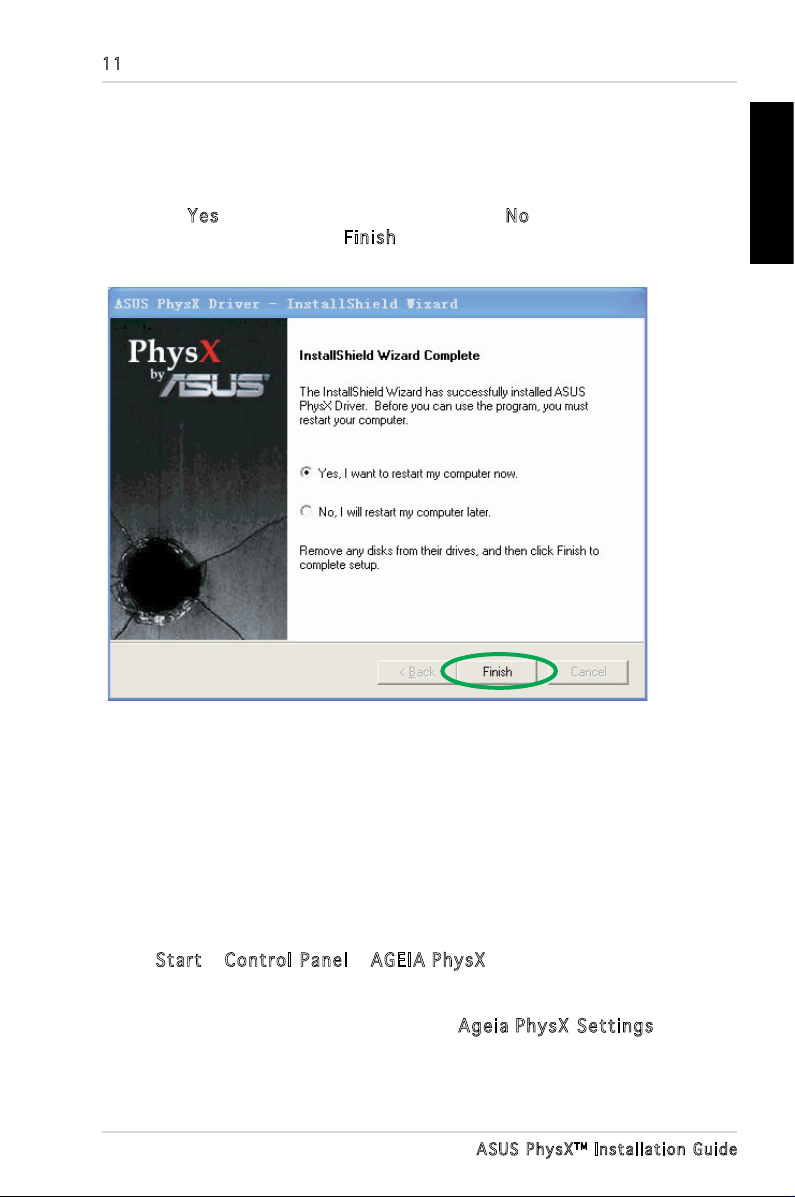
Note: If you have not installed the ASUS PhysX card yet, a window will
tell you to install the card and a pop-up dialog box provides additional
instructions.
10. Select Yes to restart your computer, or select N o to restart your
computer later. Then click Fini sh to exit the Installation Wizard.
2. PhysXTM control panel
English
The PhysX Control Panel helps you to obtain driver and hardware
information, view demos, adjust system settings and access technical
support service.
2.1 lanuching PhysX Control Panel
To launch the ASUS PhysX control panel:
Select Star t > Con t rol Pan e l > AGE IA Ph ysX,
Or
Right-click the System Tray Icon, then select Agei a Phy sX S e tti n gs.
ASUS Ph y s XTM Instal l a t i on Guid e
Page 14
English
12
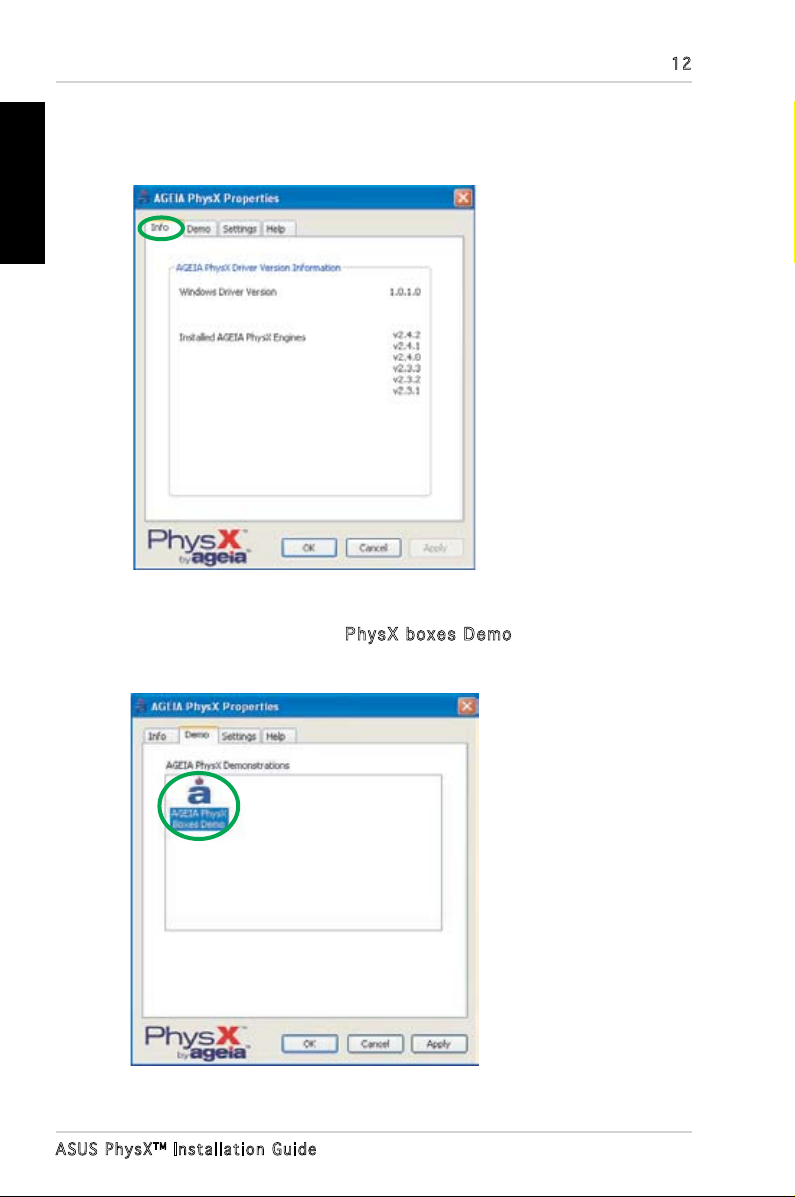
2.2 Info
The Info tab displays the PhysX driver and hardware information.
2.3 Demo
In the Demo tab, you can click the Phys X bo x es D emo icon to launch the
installed demo.
ASUS Ph y s XTM Instal l a t i on Guid e
Page 15
13
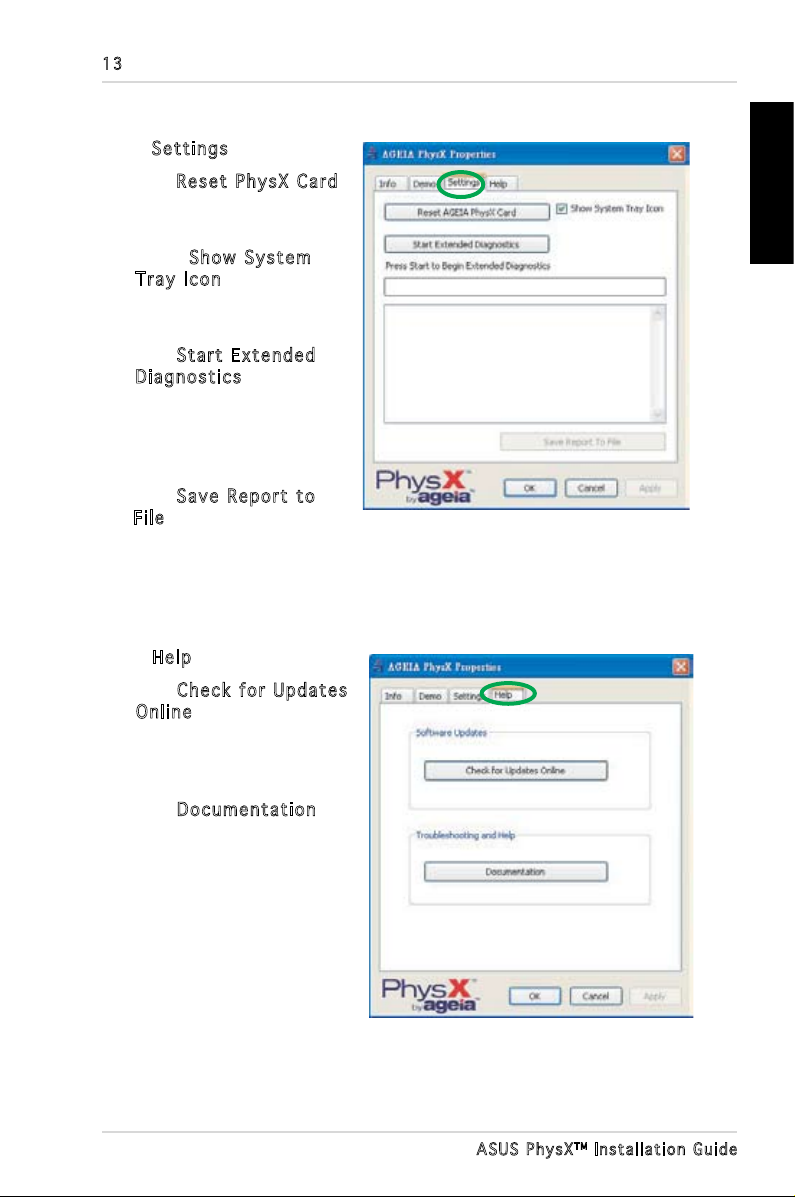
2.4 Settings
In the Sett i ngs tab you can:
• Click
button to execute a soft
reset of the card.
• Select
T ray Ico n checkbox
to display the icon on your
Desktop.
• Click
Dia g nost ics to run
extended diagnostics
on the ASUS PhysX card.
The text box displays the
result of the diagnostics.
• Click
Fi l e to save the diagnostics
result for future technical
support use.
Rese t Ph y sX C ard
Show Sys t em
Star t Ex t end e d
Save Rep o rt t o
2.5 Help
In the Help tab you can:
• Click
O nli n e button to obtain
your device driver update
information or update it
online.
• Click
more documentation
of PhysX card.
Chec k fo r Up d ates
Docu m ent a tio n for
English
ASUS Ph y s XTM Instal l a t i on Guid e
Page 16
14
English
3. Troubleshooting
Use the following tips if you experience problems during installation. Contact your
vendor for more advanced troubleshooting help.
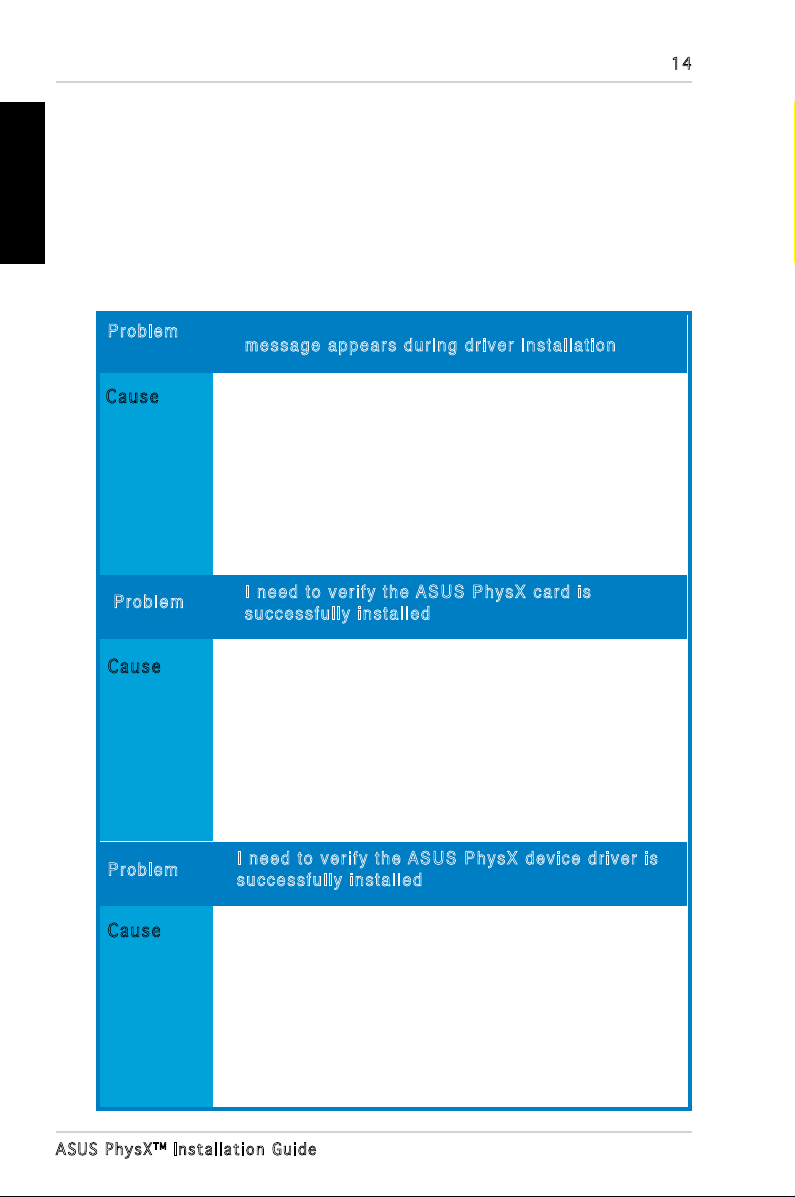
3.1 Problems and solutions table
Prob l em
Caus e
Solution
Prob l em
Caus e
“ C o n ne c t t h e D e v i c e t o t h e C o m p u t er ”
mess a ge a ppe a rs d uri n g dr iver ins t all a tio n
4-pin Peripheral Power Cable is not plugged into the
card.
Plug 4-pin Peripheral Power Cable into the card.
I ne e d t o ve r ify the ASU S Ph y sX c ard is
succ e ssf u lly ins t alle d
Solution
Prob l em
Caus e
Solution
ASUS Ph y s XTM Instal l a t i on Guid e
Follow the instruction in “Verifying the PhysX card”
on page 10.
I ne e d t o ve r ify the ASU S Ph y sX d evi c e d r iver is
succ e ssf u lly ins t alle d
Follow the instruction in “Verifying the PhysX card
driver” on page 11.
Page 17
15
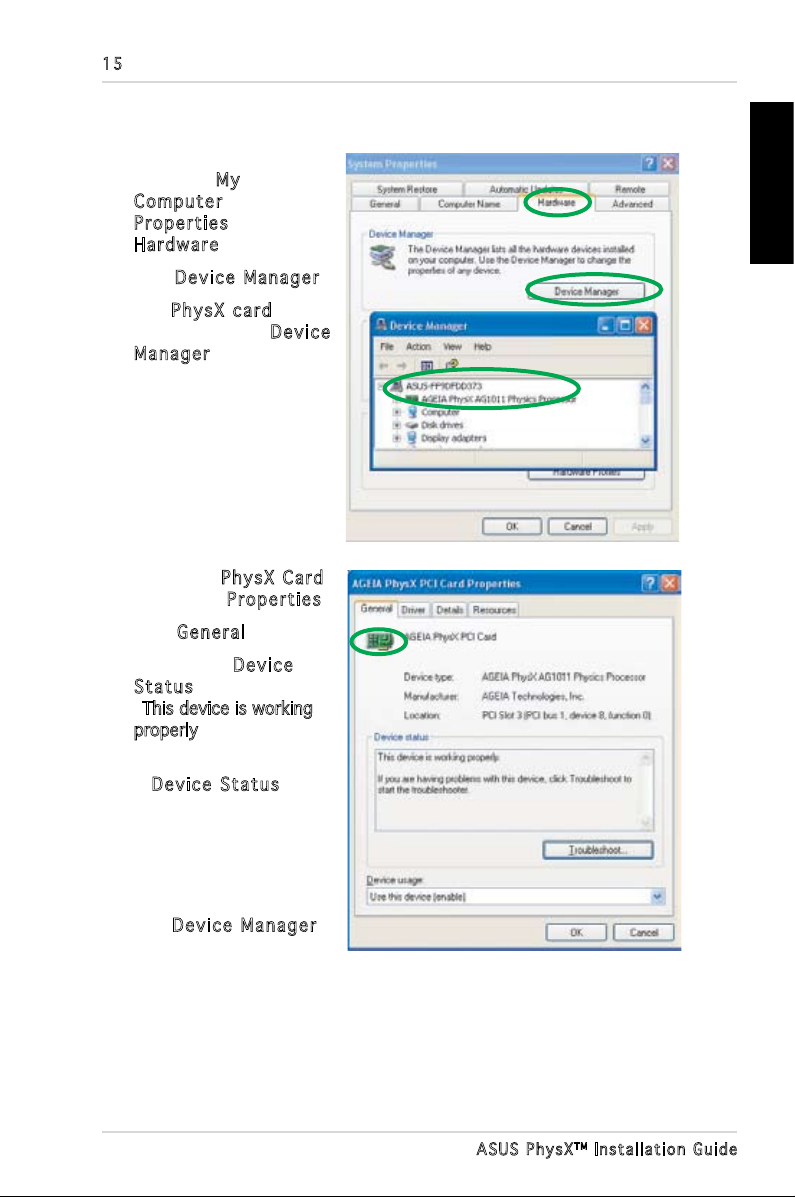
3.2 Verifying the PhysX Card
1. On your PC desktop,
right-click My
Comp u ter , select
Prop e rti e s >
Hard w are .
2. Click
3. Find
among the list in Devi ce
Mana g er window, and
go to step 5.
4. If you can not nd
PhysX card in device
list,you may have to re install the card, or/and
plug power cable into the
card.
5. Right-click P hysX Car d ,
then select Prop erti e s.
6. Click
7. Check if the
Stat u s text box displays
“
properly” messege. if it
does, go to step 9.
8. If
not show the message,
try re-installing ASUS
PhysX device driver,
or use Windows
troubleshooting.
9. Exit
Devi c e M a nag e r.
Phys X ca r d
Gene r al tab.
Devi c e
This device is working
Devi c e S t atu s does
Devi c e M a nag e r.
English
ASUS Ph y s XTM Instal l a t i on Guid e
Page 18
English
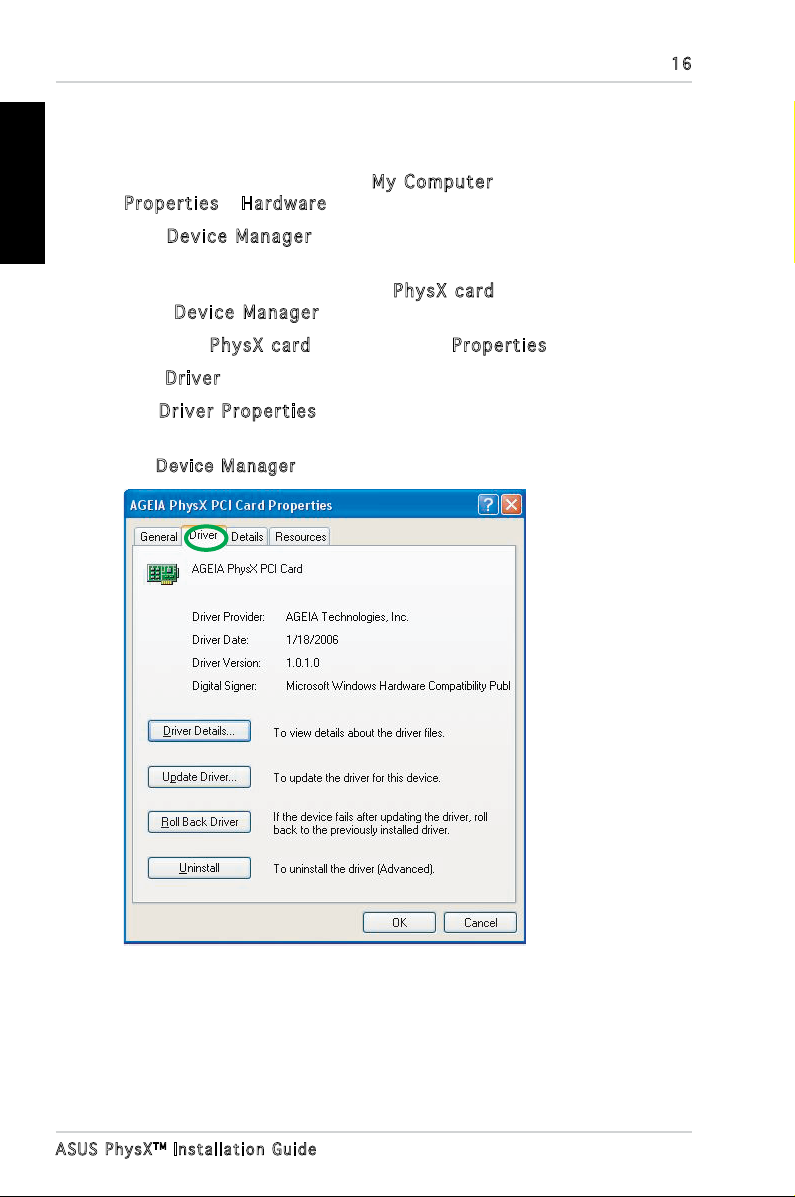
3.3 Verifying the PhysX Driver
1. On your PC desktop, right-click My Co mput e r icon, then select
P r ope r ties > Hard ware tab.
2. Click
3. If the ASUS PhysX card and driver have been successfully installed and
power is supplied to the card, the
in the D e vic e Man ager window.
4. Right-click
5. Click
6. The
Driver’s information.
7. Exit
Dev i ce M ana g er.
Phys X ca r d icon is listed
Phys X ca r d icon, then select Pr o per t ies .
Driv e r tab.
Driv e r P r ope r ties window displays the PhysX Card Device
Devi c e M a nag e r.
16
ASUS Ph y s XTM Instal l a t i on Guid e
Page 19
17
4. Uninstalling the Driver and
Utilities
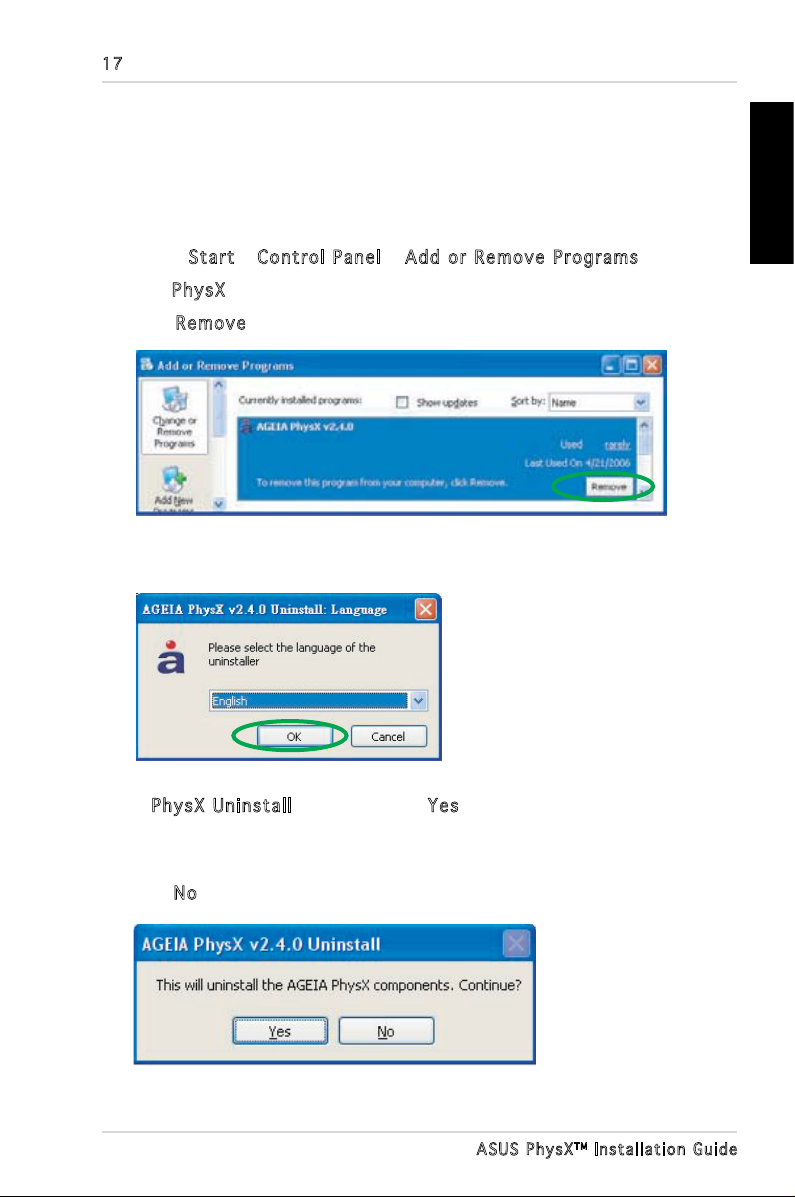
To uninstall PhysX driver and utilities:
1. Select
2. Find
3. Click
4. Select the language of the uninstaller then click OK.
Star t > Con t rol Pan e l > Ad d or Rem o ve P rog r ams .
Phys X icon, click it.
Remo v e button.
English
5. In Phys X Un i nsta ll dialog box, click Ye s to uninstall PhysX driver and
utilities from your computer.
Or
Click
No to keep the PhysX driver and utilities on your computer.
ASUS Ph y s XTM Instal l a t i on Guid e
Page 20
18
Deutsch
TM
ASUS® PhysX
Installationshilfe
Page 21

G249 8
Erst e Au s gab e
Apri l 20 0 6
Copyright © 2006 ASUSTeK COMPUTER INC. Alle Rechte vorbehalten.
Kein Teil dieses Handbuchs, einschließlich der darin beschriebenen Produkte und Software,
darf ohne ausdrückliche, schriftliche Genehmigung von ASUSTeK COMPUTER INC. (“ASUS”)
in irgendeiner Form, ganz gleich auf welche Weise, vervielfältigt, übertragen, abgeschrieben, in
einem Wiedergewinnungssystem gespeichert oder in eine andere Sprache übersetzt werden.
Produktgarantien oder Service werden nicht geleistet, wenn: (1) das Produkt
repariert, modiziert oder abgewandelt wurde, außer schriftlich von ASUS genehmigte
Reparaturen, Modizierung oder Abwandlungen; oder (2) die Seriennummer des
Produkts unkenntlich gemacht wurde oder fehlt.
ASUS STELLT DIESES HANDBUCH “SO, WIE ES IST”, OHNE DIREKTE ODER
INDIREKTE GARANTIEN, EINSCHLIESSLICH, JEDOCH NICHT BESCHRÄNKT AUF
GARANTIEN ODER KLAUSELN DER VERKÄUFLICHKEIT ODER TAUGLICHKEIT
FÜR EINEN BESTIMMTEN ZWECK, ZUR VERFÜGUNG. UNTER KEINEN
UMSTÄNDEN HAFTET ASUS, SEINE DIREKTOREN, VORSTANDSMITGLIEDER,
MITARBEITER ODER AGENTEN FÜR INDIREKTE, BESONDERE, ZUFÄLLIGE
ODER SICH ERGEBENDE SCHÄDEN (EINSCHLIESSLICH SCHÄDEN AUF
GRUND VON PROFITVERLUST, GESCHÄFTSVERLUST, BEDIENUNGSAUSFALL
ODER DATENVERLUST, GESCHÄFTSUNTERBRECHUNG UND ÄHNLICHEM),
AUCH WENN ASUS VON DER WAHRSCHEINLICHKEIT DERARTIGER SCHÄDEN
AUF GRUND VON FEHLERN IN DIESEM HANDBUCH ODER AM PRODUKT
UNTERRICHTET WURDE.
SPEZIFIK AT I ONEN U N D I NFORMAT I O N EN IN D I E S EM HAN D B U C H
DIENEN AUSSCHLIESSLICH DER INFORMATION, KÖNNEN JEDERZEIT
OHNE ANKÜNDIGUNG GEÄNDERT WERDEN UND DÜRFEN NICHT ALS
VERPFLICHTUNG SEITENS ASUS AUSGELEGT WERDEN. ASUS ÜBERNIMMT
FÜR EVENTUELLE FEHLER ODER UNGENAUIGKEITEN IN DIESEM HANDBUCH
KEINE VERANTWORTUNG ODER HAFTUNG, EINSCHLIESSLICH DER DARIN
BESCHRIEBENEN PRODUKTE UND SOFTWARE.
In diesem Handbuch angegebene Produkt- und Firmennamen können u.U.
eingetragene Warenzeichen oder Urheberrechte der entsprechenden Firmen sein
und dienen nur der Identizierung oder Erklärung zu Gunsten des Eigentümers, ohne
Rechte verletzen zu wollen.
19
Deutsch
ASUS Ph y s XTM Instal l a t i onshilf e
Page 22
20
Deutsch
Inhalt
Erklärungen .........................................................................................21
Sicherheitsinformationen ....................................................................22
1. ASUS® PhysXTM-Installation .................................................23
1.1 Installationsanforderungen ...............................................23
1.2 Karteninstallation .............................................................23
1.3 Treiberinstallation .............................................................25
2. PhysXTM-Einstellungsfenster ................................................ 28
2.1 PhysX-Einstellungsfenster öffnen .....................................28
2.2 Information .......................................................................29
2.3 Demonstration ..................................................................29
2.4 Einstellungen ....................................................................30
2.5 Hilfe ..................................................................................
3. Problembehandlung ............................................................31
3.1 Probleme und mögliche Lösungen ....................................31
3.2 Überprüfung der ASUS PhysXTM-Karte ..............................32
3.3 Überprüfung des ASUS PhysXTM-Treibers..........................33
30
4. Deinstallation von Treiber und Hilfsprogrammen ................ 34
ASUS Ph y s XTM Instal l a t i onshilf e
Page 23

Erklärungen
Erklärun g de r Federal Com mu ni cations C om mi ss ion
Dieses Gerät stimmt mit den FCC-Vorschriften Teil 15 überein. Sein Betrieb
unterliegt folgenden zwei Bedingungen:
• Dieses Gerät darf keine schädigenden Interferenzen erzeugen, und
• Dieses Gerät muss alle empfangenen Interferenzen aufnehmen,
einschließlich derjenigen, die einen unerwünschten Betrieb erzeugen.
Dieses Gerät ist auf Grund von Tests für Übereinstimmung mit den
Einschränkungen eines Digitalgeräts der Klasse B, gemäß Teil 15 der FCCVorschriften, zugelassen. Diese Einschränkungen sollen bei Installation
des Geräts in einer Wohnumgebung auf angemessene Weise gegen
schädigende Interferenzen schützen. Dieses Gerät erzeugt und verwendet
Hochfrequenzenergie und kann, wenn es nicht gemäß den Anweisungen
des Herstellers installiert und bedient wird, den Radio- und Fernsehempfang
empndlich stören. Es wird jedoch nicht garantiert, dass bei einer bestimmten
Installation keine Interferenzen auftreten. Wenn das Gerät den Radio- oder
Fernsehempfang empndlich stört, was sich durch Aus- und Einschalten des
Geräts feststellen lässt, ist der Benutzer ersucht, die Interferenzen mittels
einer oder mehrerer der folgenden Maßnahmen zu beheben:
• Empfangsantenne neu ausrichten oder an einem anderen Ort aufstellen.
• Den Abstand zwischen dem Gerät und dem Empfänger vergrößern.
• Das Gerät an die Steckdose eines Stromkreises anschließen, an die nicht
auch der Empfänger angeschlossen ist.
• Den Händler oder einen erfahrenen Radio-/Fernsehtechniker um Hilfe
bitten.
21
Deutsch
Um Übereinstimmung mit den FCC-Vorschriften zu gewährleisten, müssen
abgeschirmte Kabel für den Anschluss des Monitors an die Grakkarte
verwendet werden. Änderungen oder Modizierungen dieses Geräts, die
nicht ausdrücklich von der für Übereinstimmung verantwortlichen Partei
genehmigt sind, können das Recht des Benutzers, dieses Gerät zu betreiben,
annullieren.
E r k l ä r u n g d e s k a n a d i s c h e n M i n i s t e r i u m s f ü r
Telekomm un ik at ion
Dieses Digitalgerät überschreitet keine Grenzwerte für Funkrauschemissionen
der Klasse B, die vom kanadischen Ministeriums für Telekommunikation in den
Funkstörvorschriften festgelegt sind.
Dieses Digitalgerät der Klasse B stimmt mit dem kanadischen ICES-003
überein.
ASUS Ph y s XTM Instal l a t i onshilf e
Page 24

22
Deutsch
Sicherheitsinformationen
Elektris ch e Si cherheit
• Um die Gefahr eines Stromschlags zu verhindern, ziehen Sie die
Netzleitung aus der Steckdose, bevor Sie das System an einem anderen
Ort aufstellen.
• Beim Anschließen oder Trennen von Geräten an das oder vom System
müssen die Netzleitungen der Geräte ausgesteckt sein, bevor die
Signalkabel angeschlossen werden. Ziehen Sie ggf. alle Netzleitungen vom
aufgebauten System, bevor Sie ein Gerät anschließen.
• Vor dem Anschließen oder Ausstecken von Signalkabeln an das oder vom
Motherboard müssen alle Netzleitungen ausgesteckt sein.
• Erbitten Sie professionelle Unterstützung, bevor Sie einen Adapter oder
eine Verlängerungsschnur verwenden. Diese Geräte könnte den Schutzleiter
unterbrechen.
• Prüfen Sie, ob die Stromversorgung auf die Spannung Ihrer Region richtig
eingestellt ist. Sind Sie sich über die Spannung der von Ihnen benutzten
Steckdose nicht sicher, erkundigen Sie sich bei Ihrem Energieversorgung
sunternehmen vor Ort.
• Ist die Stromversorgung defekt, versuchen Sie nicht, sie zu reparieren.
Wenden Sie sich an den qualifizierten Kundend ienst oder Ihre
Verkaufsstelle.
Betriebs si ch er heit
• Vor Installation des Motherboards und Anschluss von Geräten müssen Sie
alle mitgelieferten Handbücher lesen.
• Vor Inbetriebnahme des Produkts müssen alle Kabel richtig angeschlossen
sein und die Netzleitungen dürfen nicht beschädigt sein. Bemerken Sie eine
Beschädigung, kontaktieren Sie sofort Ihren Händler.
• Um Kurzschlüsse zu vermeiden, halten Sie Büroklammern, Schrauben
und Heftklammern fern von Anschlüssen, Steckplätzen, Sockeln und
Stromkreisen.
• Vermeiden Sie Staub, Feuchtigkeit und extreme Temperaturen. Stellen Sie
das Produkt nicht an einem Ort auf, wo es nass werden könnte.
• Stellen Sie das Produkt auf eine stabile Fläche.
• Sollten technische Probleme mit dem Produkt auftreten, kontaktieren Sie
den qualifizierten Kundendienst oder Ihre Verkaufsstelle.
Das durchgestrichene Symbol der Mülltonne zeigt an, dass das Produkt
(elektrisches und elektronisches Zubehör) nicht im normalen Hausmüll
entsorgt werden sollte. Bitte erkundigen Sie sich nach lokalen Regelungen
zur Entsorgung von Elektroschrott.
ASUS Ph y s XTM Instal l a t i onshilf e
Page 25
23
1. ASUS
®
PhysXTM-Installation
1.1 Installationsanforderungen
Um eine erfolgreiche Installation der PhysX-Karte zu gewährleisten, stellen Sie
sicher, dass Ihr Computer die folgenden Anforderungen erfüllt:
(Hinweis: Zusätzlich gekaufte Spiele haben evtl. höhere Spezikationen. Die folgenden
Spezikationen können ohne Vorankündigung geändert werden.)
• Intel® Pentium® 4, Intel® Celeron® oder höher, AMD® AthlonTM 64, AMD®
SempronTM oder AMD® AthlonTM XP oder höher
®
• Microsoft
oder neuerem Ugrade
• mind. 256MB Systemspeicher
• Geforce6800, Radeon X800 Grakkarte oder höher wird für die meisten
Spiele empfohlen
• mind. 50MB freier Festplattenspeicher
• PCI-Steckplatzrevision 2.2 oder später, 3.3V
• 4-pol. Peripherie-Stromkabel
Vor der Installation sollten Sie die im ASUS PhysX Card-Paket enthaltenen
Artikel anhand folgender Liste überprüfen:
• ASUS PhysX
• ASUS PhysX
• Seriennummer des Produkts
• Seriennummer der CD
Wenn alle oben genannten Artikel vorhanden sind, können Sie die Installation
beginnen: (1) Karteninstallation, und (2) Treiberinstallation.
Windows® XP/Professional/Home (32bit Edition), mit SP1
TM
PPU-Karte
TM
PPU Support-CD
Deutsch
1.2 ASUS® PhysXTM Karteninstallation
So installieren Sie die ASUS PhysX-Karte:
1. Berühren Sie die Metallrückwand oder Seite des Computers, um statische
Entladungen zu vermeiden.
2. Schalten Sie den Computer, den Monitor, und alle weiteren an den Computer
angeschlossenen Peripheriegeräte aus.
3. Ziehen Sie den Netzstecker des Computers aus der Steckdose.
4. Entfernen Sie die Gehäuseabdeckung.
5. Suchen Sie einen unbelegten PCI-Steckplatz am Motherboard.
ASUS Ph y s XTM Instal l a t i onshilf e
Page 26
Deutsch
24
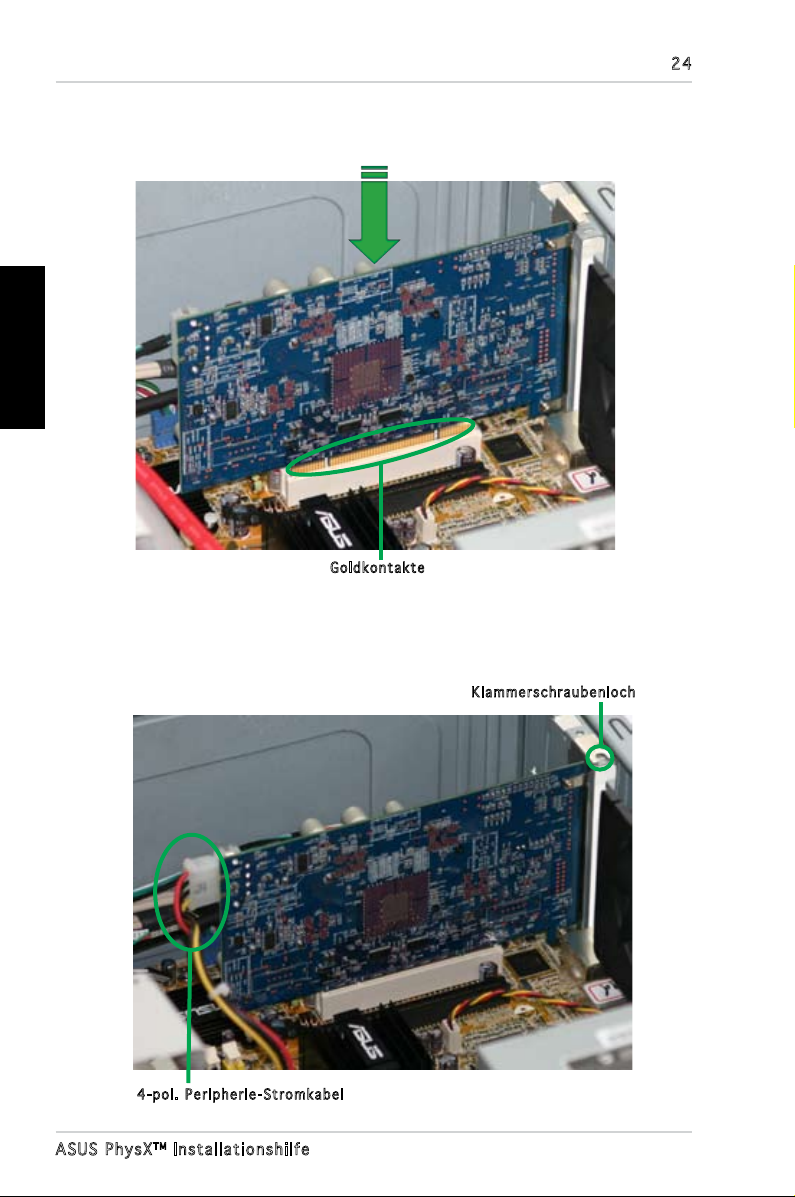
6. Richten Sie die PhysX-Karte auf den PCI-Steckplatz aus und drücken Sie
sie vorsichtig hinein, bis sie richtig eingesteckt ist. Die goldenen Kontakte
müssen ebenfalls ganz eingesteckt sein.
Gol d k o n t a k t e
7. Sichern Sie die Klammerschraube, welche die PhysX-Karte festhält. Siehe
nachstehende Abbildung.
8. Verbinden Sie ein 4-pol. Peripherie-Stromkabel mit dem Stromanschluss,
wie im Folgenden gezeigt.
Kla m m e r s c h r a ubenloch
4-p o l . P e r i pherie-Stro m k a b e l
ASUS Ph y s XTM Instal l a t i onshilf e
Page 27
25
9. Bringen Sie die Gehäuseabdeckung wieder an.
10. Schließen Sie alle Kabel wieder an, die Sie zuvor entfernt haben.
11. Stecken Sie das Stromkabel wieder in den Stromanschluss des Computers
und das andere Ende wieder in die Steckdose.
12. Schalten Sie den Computer ein.
1.3 Treiberinstallation
Nach der Installation der PhysX-Karte müssen Sie die passenden Gerätetreiber
installieren, damit die PhysX-Karte unter Windows-Betriebssystemen
funktionieren kann.
(Hinweis: Die Version und der Inhalt der Treiber-CD können ohne Vorankündigung
geändert werden. )
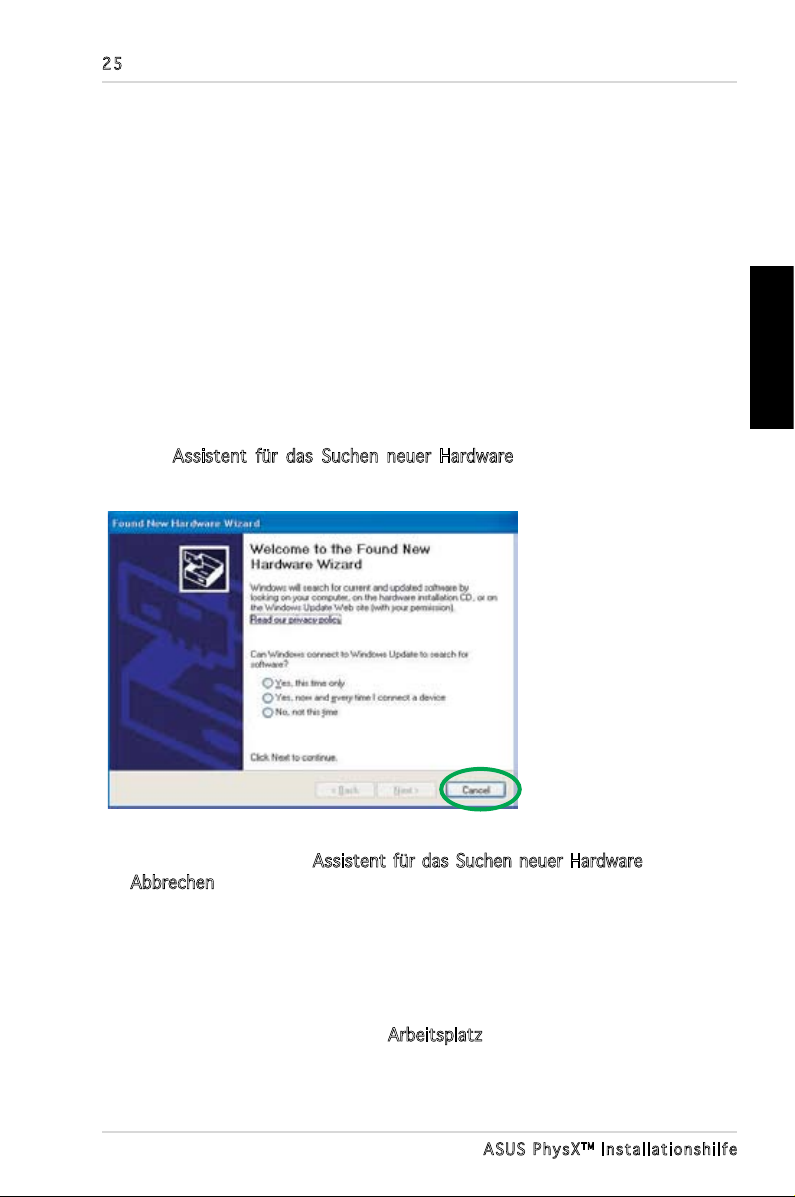
Wenn Sie die ASUS PhysX-Karte bereits installiert haben, erscheint u.U. das
Fenster Assistent für das Suchen neuer Hardware vor oder während der
Treiberinstallation. Siehe folgende Abbildung.
Deutsch
So installieren Sie den Gerätetreiber:
1. Klicken Sie im Fenster
Abbrechen.
2. Legen Sie die ASUS PhysX Support-CD in Ihr optisches Laufwerk ein.
Falls Autorun auf Ihrem Computer aktiviert ist, erscheint der ASUS
PhysX-Kartentreiberbildschirm automatisch. Gehen Sie zu Schritt 5.
Falls Autorun auf Ihrem Computer nicht aktiviert ist, fahren Sie mit
Schritt 3 fort.
3. Klicken Sie auf dem Desktop auf
Assistent für das Suchen neuer Hardware auf
Arbeitsplatz.
ASUS Ph y s XTM Instal l a t i onshilf e
Page 28
Deutsch
26
4. Doppelklicken
Sie das
Symbol für
Ihr optisches
Laufwerk. Der
ASUS PhysXKartentreiberbildschirm wird
angezeigt.
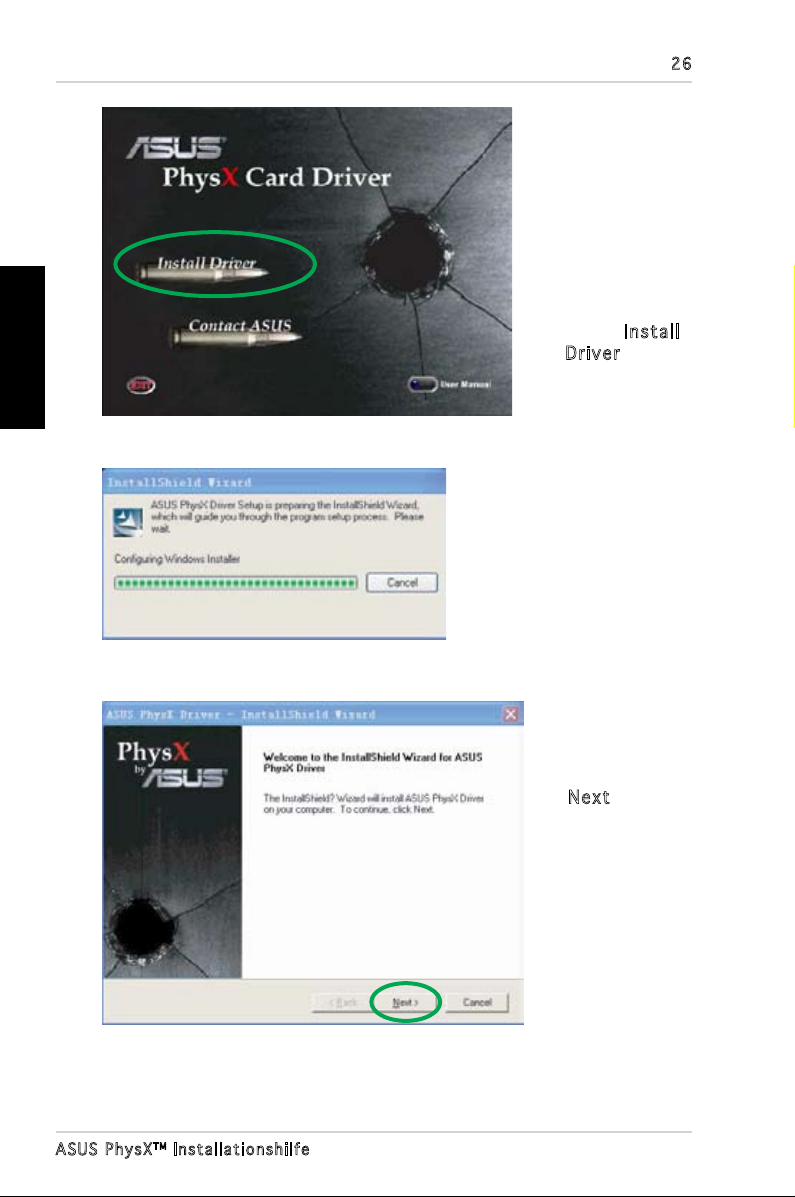
5. Doppelklicken
Sie auf Inst a ll
Driv e r.
Es wird der
Installationsassistent
angezeigt, der
Sie durch den
Installationsprozess führt.
ASUS Ph y s XTM Instal l a t i onshilf e
6. Klicken
Sie bei der
Willkommensanzeige auf
Next .
Page 29
27
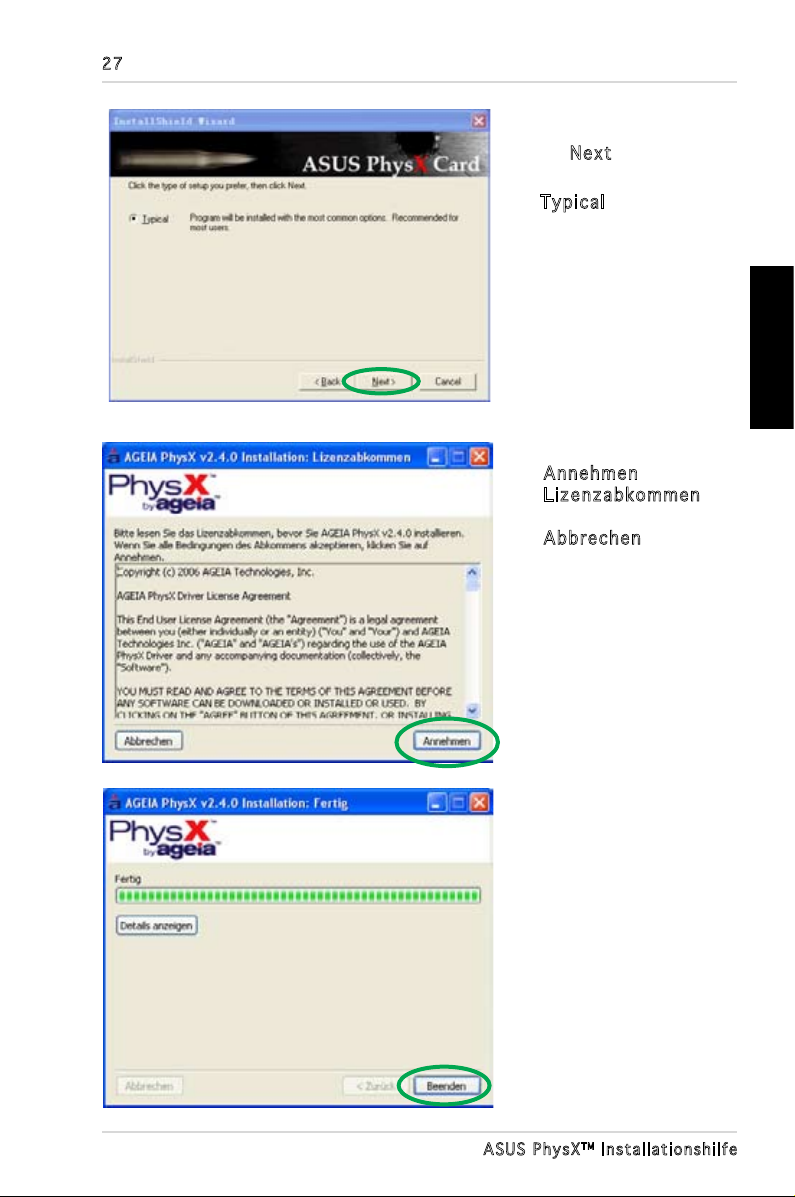
7. Klicken Sie im
nächsten Fenster
auf Next .
Der Installationstyp
Typi c al ist
standardmäßig
ausgewählt.
Deutsch
8. Klicken Sie
Anne h men im Fenster
Lize n zab k omm e n,
oder klicken Sie auf
Abbr e che n , um das
Installationsprogramm
zu verlassen
Die ASUS PhysX-
Gerätetreiber werden
jetzt auf Ihr System
kopiert, wie in der
nachstehenden
Abbildung gezeigt. Der
Installationsvorgang
kann einige Minuten
dauern.
9. Klicken Sie im
Fenster Installation:
Fertig auf Beenden,
um die Installation
zu beenden.
ASUS Ph y s XTM Instal l a t i onshilf e
Page 30
28
Deutsch
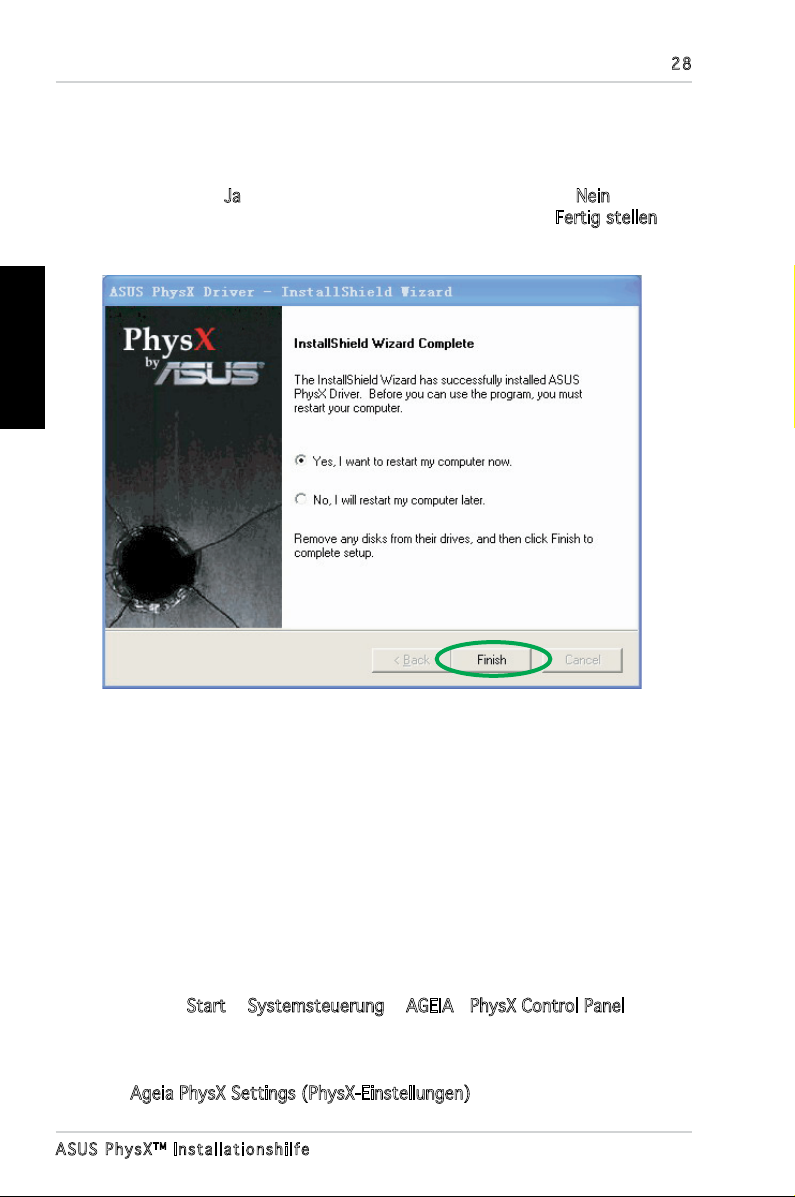
Hinweis: Wenn Sie die ASUS PhysX-Karte noch nicht installiert haben,
erscheinen ein Fenster, das Sie zur Installation auffordert, sowie eine
Pop-up-Dialogbox mit weiteren Instruktionen.
10. Wählen Sie Ja, um den Computer neu zu starten, oder Nein, um Ihren
Computer später neu zu starten. Klicken Sie dann auf Fertig stellen, um
den Installationsassistenten zu verlassen.
2. ASUS® PhysXTMEinstellungsfenster
Mit Hilfe des ASUS PhysX-Einstellungsfensters haben Sie Zugriff auf Treiber-
und Hardware-Informationen, vorinstallierte Demos, Systemeinstellungen,
sowie Problemerkennungshilfen.
2.1 PhysX-Einstellungsfenster öffnen
So öffnen Sie das ASUS PhysX-Einstellungsfenster:
Wählen Sie Start > Systemsteuerung > AGEIA >PhysX Control Panel
Oder
Rechtsklicken Sie auf das PhysX-Symbol in der Windows-Taskleiste, und wählen
Sie Ageia PhysX Settings (PhysX-Einstellungen).
ASUS Ph y s XTM Instal l a t i onshilf e
Page 31

29
2.2 Info
Das Info -Fenster zeigt die ASUS PhysX-Treiber- und Hardware-Informationen
an.
2.3 Demo
Im Demo -Fenster können Sie eines der installierten Demos ansehen, indem
Sie auf das jeweilige Symbol klicken.
Deutsch
ASUS Ph y s XTM Instal l a t i onshilf e
Page 32

Deutsch
2.4 Einstellungen
Das Eins t ell u nge n -Fenster enthält folgende Optionen:
AGEI A Ph y sX- K arte
•
zurü c kse t zen : Wählen
Sie diese Option, um ein
weiches Reset der Karte
durchzuführen.
S y m b o l l e i s t e n - S y m b o l
•
anzeig e n: Wählen Sie diese
Option, um das Symbol in
der Windows-Tas k l e iste
anzeigen zu lassen.
Erwe i ter t e D i agno se
•
ausf ü hre n : Wählen Sie
diese Option, um die
ASUS PhysX-Karte einer
erweiterten Diagnose
zu unterziehen, und die
gewonnenen Informationen
im Fenster anzuzeigen.
Report-Datei a bspeichern: Wählen Sie diese Option, um die Ergebnisse
•
der Diagnose für spätere technische Hilfe in einer Datei zu speichern.
30
2.5 Hilfe
Das Hilf e -Fenster enthält
folgende Optionen:
Chec k fo r Up d ates
•
Onli n e: Wählen Sie diese
Option, um Aktualisierungsinformationen für Ihren
Gerätetreiber zu erhalten
oder den Treiber online zu
aktualisieren.
Doku m ent a tio n : Wählen
•
Sie diese Option, um nach
weiteren Dokumentationen
für die ASUS PhysX-Karte
zu suchen.
ASUS Ph y s XTM Instal l a t i onshilf e
Page 33

31
3. Problembehandlung
Falls Sie bei der Installation auf Probleme stoßen, können folgende Hinweise
evtl. hilfreich sein. Für tiefer greifende Hilfe sollten Sie sich an Ihren Händler
wenden.
3.1 Probleme und mögliche Lösungen
Prob l em
Ursa c he
Lösung
Prob l em
Ursa c he
Lösung
Prob l em
Die Nachricht “
ersc h ein t be i de r Tr eib e rin s tall atio n
Das 4-pol. Peripherie-Stromkabel ist nicht mit der
Karte verbunden.
Verbinden Sie das 4-pol. Peripherie-Stromkabel mit
der Karte.
Es m u ss g epr ü ft w erde n, o b di e A SUS P hys X Kart e ko r rek t in s tall iert ist
Folgen Sie den Anweisungen unter “Überprüfung der
PhysX-Karte” auf Seite 10.
Es m u ss g epr ü ft w erde n, o b de r A SUS P hys X Gerä t etr e ibe r ko r rekt ins t all i ert ist
G e rä t a m C o m p u t er a n s c hl ie ß e n ”
Deutsch
Ursa c he
Lösung
Folgen Sie den Anweisungen unter “Überprüfung des
PhysX-Treibers” auf Seite 11.
ASUS Ph y s XTM Instal l a t i onshilf e
Page 34

Deutsch
3.2 Überprüfung der ASUS PhysX-Karte
1. Rechtsklicken Sie
auf dem Desktop auf
das Arbe i tsp l atz Symbol, und wählen
Sie Eige n sch a fte n >
Hard w are .
2. Klicken Sie auf
Mana g er.
3. Suchen Sie die
Phys X -Ka r te in der
Liste, und gehen Sie
weiter zu Schritt 5.
4. Wenn die ASUS PhysXKarte nicht in der Liste
angezeigt wird, müssen
Sie evtl. die Karte
erneut installieren,
und/oder das IDE-Kabel
mit der Karte verbinden.
5. Rechtsklicken Sie auf
die ASUS Phy s XKart e und wählen Sie
Eige n sch a fte n .
6. Klicken Sie den
Allg e mei n -Tab.
7. Prüfen Sie, ob unter
Gerä t est a tus die
Nachricht “Das Gerät
ist betriebsbereit”
angezeigt wird. Wenn
dies der Fall ist, gehen
Sie zu Schritt 9.
8. Wenn die Nachricht nicht
angezeigt wird, können
Sie versuchen, den ASUS
PhysX-Gerätetreiber
erneut zu installieren, oder die Windows-Hilfe verwenden.
9. Verlassen Sie den
Gerä t e-
ASUS
Gerä t e-M a nag e r.
32
ASUS Ph y s XTM Instal l a t i onshilf e
Page 35

33
3.3 Überprüfung des ASUS PhysX-Treibers
1. Rechtsklicken Sie auf dem Desktop auf das Arb e itsp latz -Symbol, und
wählen Sie Eige n sch a fte n > Har d ware .
2. Klicken Sie auf
3. Wenn die ASUS PhysX-Karte und der dazugehörige Treiber auf Ihrem
Computer erfolgreich installiert wurden, und die Karte von der IDE-
Schnittstelle mit Strom versorgt wird, wird sie im Gerä te-M anag e rFenster angezeigt.
4. Rechtsklicken Sie auf den Namen der Karte und wählen Sie
Eige n sch a fte n .
5. Klicken Sie auf den
6. Das Fenster mit den
Treiberanbieter und die Details der Treiberversion für den ASUS PhysX-
Kartentreiber an.
7. Verlassen Sie den
Gerä t e-M a nag e r.
Trei b er-Tab.
Trei b ere i gen s chaf ten zeigt den
Gerä t e-M a nag e r.
Deutsch
ASUS Ph y s XTM Instal l a t i onshilf e
Page 36

Deutsch
4. Deinstallation von Treiber
und Hilfsprogrammen
So deinstallieren Sie den PhysX-Treiber und die Hilfsprogramme:
1. Wählen Sie
ände r n o d er e ntfe rnen .
2. Klicken Sie auf das
3. Klicken Sie auf
4. Wählen Sie die passende Sprache und klicken Sie auf OK.
Star t > Sys t ems t eue r ung > Sof twar e Pr o gra m me
ASUS Phy s X-Symbol.
Entf e rne n .
34
5. Klicken Sie in der sich daraufhin öffnenden ASUS PhysX Uninstall-
Dialogbox auf Ja, um den ASUS PhysX-Treiber und die dazugehörigen
Hilfsprogramme zu deinstallieren.
Oder
Klicken Sie auf
Hilfsprogramme auf Ihrem Computer zu belassen.
ASUS Ph y s XTM Instal l a t i onshilf e
Nein , um den ASUS PhysX-Treiber und die
Page 37

35
TM
ASUS® PhysX
Manuel d’installation
Français
Page 38

36
Français
F249 8
Prem i ère édi t ion
Avri l 20 0 6
Copyright © 2006 ASUSTeK COMPUTER INC. Tous droits réservés.
Aucun extrait de ce manuel, incluant les produits et logiciels qui y sont décrits, ne peut être
reproduit, transmis, transcrit, stocké dans un système de restitution, ou traduit dans quelque langue
que ce soit sous quelque forme ou quelque moyen que ce soit, à l’exception de la documentation
conservée par l’acheteur dans un but de sauvegarde, sans la permission écrite expresse de ASUSTeK
COMPUTER INC. (“ASUS”).
La garantie sur le produit ou le service ne sera pas prolongée si (1) le produit est
réparé, modié ou altéré, à moins que cette réparation, modication ou altération ne
soit autorisée par écrit par ASUS; ou (2) si le numéro de série du produit est dégradé
ou manquant.
ASUS FOURNIT CE MANUEL “TEL QUE” SANS GARANTIE D’AUCUNE SORTE, QU’ELLE SOIT
EXPRESSE OU IMPLICITE,COMPRENANT MAIS SANS Y ETRE LIMITE LES GARANTIES OU
CONDITIONS DE COMMERCIALISATION OU D’APTITUDE POUR UN USAGE PARTICULIER. EN
AUCUN CAS ASUS, SES DIRECTEURS, CADRES, EMPLOYES OU AGENTS NE POURRONT ÊTRE
TENUS POUR RESPONSABLES POUR TOUT DOMMAGE INDIRECT, SPECIAL, SECONDAIRE OU
CONSECUTIF (INCLUANT LES DOMMAGES POUR PERTE DE PROFIT, PERTE DE COMMERCE,
PERTE D‘UTILISATION DE DONNEES, INTERRUPTION DE COMMERCE ET EVENEMENTS
SEMBLABLES), MEME SI ASUS A ETE INFORME DE LA POSSIBILITE DE TELS DOMMAGES
PROVENANT DE TOUT DEFAUT OU ERREUR DANS CE MANUEL OU DU PRODUIT.
LES SPECIFICATIONS ET INFORMATIONS CONTENUES DANS CE MANUEL SONT FOURNIES
A TITRE INFORMATIF SEULEMENT, ET SONT SUJETTES A CHANGEMENT A TOUT
MOMENT SANS AVERTISSEMENT ET NE DOIVENT PAS ETRE INTERPRETEES COMME UN
ENGAGEMENT DE LA PART D’ASUS. ASUS N‘ASSUME AUCUNE RESPONSABILITE POUR
TOUTE ERREUR OU INEXACTITUDE QUI POURRAIT APPARAITRE DANS CE MANUEL,
INCLUANT LES PRODUITS ET LOGICIELS QUI Y SONT DECRITS.
Les produits et noms de sociétés qui apparaissent dans ce manuel ne sont utilisés
que dans un but d’identication ou d’explication dans l’intérêt du propriétaire, sans
intention de contrefaçon
Guide d ’ i n s tallati o n A SUS Phys XTM
Page 39

Table des matières
Notes ................................................................................................38
Informations sur la sécurité ................................................................39
1. Ins ta lla tion d’A SU S® Ph ysXTM .. .. ... ..... ... .. ... ..... .. 40
1.1 Pré-requis d’installation ....................................................40
1.2 Installation de la carte ASUS® PhysXTM .............................40
1.3 Installation du pilote ASUS® PhysXTM ................................42
2. Pan ne au de co nfi gu rat ion A SUS® Ph ysXTM .. ... .. . 45
2.1 Lancer le panneau de conguration ASUS PhysX ............45
2.2 Onglet Info .......................................................................46
2.3 Onglet Démo ....................................................................46
2.4 Onglet Paramètres ...........................................................47
2.5 Onglet Aide ......................................................................47
3. Dép an nag e .... ... .. ... ..... ... .. ... ..... ... .. ... ..... ... .. ... . 48
3.1 Tableau correspondance problèmes/solutions .................48
3.2 Vérier la carte ASUS PhysXTM ........................................49
3.3 Vérier le pilote ASUS PhysXTM .........................................50
37
Français
4. Dés in sta ller pil ot e e t uti lit ai res ..... ... .. ... ..... ... . 51
Guide d ’ i n s tallati o n A SUS Phys X
TM
Page 40

38
Français
Notes
Rapport Fédéral De la Commission Des Communications
Ce dispositif est conforme à l’alinéa 15 des règles établies par la FCC.
L'opération est sujette aux 2 conditions suivantes:
• Ce dispositif ne peut causer d'interférence nuisible, et
• Ce dispositif se doit d'accepter toute interférence reçue, incluant toute
interférence pouvant causer des resultats indésirés.
Cet équipement a été testé et s'est avéré être conforme aux limites établies
pour un dispositif numérique de classe B, conformément à l'alinéa 15 des règles
de la FCC.Ces limites sont conçues pour assurer une protection raisonnable
contre l’interférence nuisible à une installation réseau. Cet équipement génère,
utilise et peut irradier de l'énergie à fréquence radio et, si non installé et
utilisé selon les instructions du fabricant, peut causer une interférence nocive
aux communications radio. Cependant, il n'est pas exclu qu'une interférence
se produise lors d'une installation particulière.Si cet équipement cause une
interférence nuisible au signal radio ou télévisé, ce qui peut-être déterminé par
l'arrêt puis le réamorçage de celui-ci, l'utilisateur est encouragé à essayer de
corriger l'interférence en s'aidant d'une ou plusieurs des mesures suivantes:
• Réorientez ou replacez l'antenne de réception.
• Augmentez l'espace de séparation entre l'équipement et le récepteur.
• Reliez l’équipement à une sortie sur un circuit différent de celui auquel le
récepteur est relié.
• Consultez le revendeur ou un technicien expérimenté radio/TV pour de
l’aide.
L’utilisation de câbles protégés pour le raccordement du moniteur à la carte
de graphique est exigée pour assurer la conformité aux règlements de la
FCC.Les changements ou les modications apportés à cette unité n'étant
pas expressément approuvés par la partie responsable de la conformité
pourraient annuler l’autorité de l’utilisateur à manipuler cet équipement.
Rapport du Département Canadien des communications
Cet appareil numérique ne dépasse pas les limites de classe B en terme
d'émissions de nuisances sonore, par radio, par des appareils numériques,
et ce conformément aux régulations d’interférence par radio établies par le
département canadien des communications.
Cet appareil numérique de la classe B est conforme à la norme
canadienne ICES-003
Guide d ’ i n s tallati o n A SUS Phys XTM
Page 41

Informations de sécurité
Sécurité é le ct rique
• Pour éviter tout risque de choc électrique, débranchez le câble
d’alimentation de la prise de courant avant de toucher au système.
• Lorsque vous ajoutez ou enlevez des composants, vérifiez que les câbles
d’alimentation sont débranchés avant de relier les câbles de signal. Si
possible, déconnectez tous les câbles d’alimentation du système avant
d’ajouter un périphérique.
• Avant de connecter ou de déconnecter les câbles de signal de la carte
mère, vérifiez que tous les câbles d’alimentation sont bien débranchés.
• Demandez l’assistance d’un professionnel avant d’utiliser un adaptateur
ou une rallonge. Ces appareils risquent d’interrompre le circuit de terre.
• Vérifiez que votre alimentation délivre la tension électrique adaptée à
votre pays. Si vous n’en êtes pas certain, contactez votre fournisseur
électrique local.
• Si l’alimentation est cassée, n’essayez pas de la réparer vous-même.
Contactez votre revendeur.
Sécurité pour les manipulations
• Avant d’installer la carte mère et d’y ajouter des périphériques, prenez le
temps de bien lire tous les manuels livrés dans la boîte.
• Avant d’utiliser le produit, vérifiez que tous les câbles sont bien branchés
et que les câbles d’alimentation ne sont pas endommagés. Si vous relevez
le moindre dommage, contactez votre revendeur immédiatement.
• Pour éviter les court-circuits, gardez les clips, les vis et les agraffes loin
des connecteurs, des slots, des sockets et de la circuiterie.
• Evitez la poussière, l’humidité et les températures extrêmes. Ne placez
pas le produit dans une zone susceptible de devenir humide.
• Placez le produit sur une surface stable.
• Si vous avez des problèmes techniques avec votre produit contactez un
technicien qualifié ou appelez votre revendeur.
39
Français
Le symbole représentant une benne à roue barrée indique que le produit
(équipement électrique et électronique) ne doit pas être déposé à la
décharge publique. Veuillez consulter les dispositions de votre localité
concernant les produits électroniques.
Guide d ’ i n s tallati o n A SUS Phys X
TM
Page 42

40
Français
1. Installation ASUS
®
PhysX
TM
1.1 Pré-requis d’installation
Pour pouvoir installer avec succès la carte PhysX, votre ordinateur doit
disposer de la conguration requise :
(Note : Les jeux achetés par l’utilisateur peuvent nécessiter une conguration
supérieure. Les exigences ci-dessous peuvent être modiées sans avertissement.)
• Processeur Intel® Pentium® 4, Intel® Celeron® ou supérieur, AMD®
Athlon
• Microsoft
ou mise à jour ultérieure
• 256 Mo de mémoire système
• 50 Mo d’espace disque disponible
• Carte graphique Geforce6800, Radeon X800 ou supérieure,
(recommandée pour la plupart des jeux)
• Lecteur CD ou DVD
• Slot PCI disponible révision 2.2 ou ultérieure, 3.3V
• Câble d’alimentation périphérique 4 broches disponible
Avant l’installation, vériez que la boîte de votre carte ASUS PhysX
contient les éléments suivants :
• Carte PPU ASUS PhysX
• CD de support de la carte ASUS PPU PhysX
• Numéro de série du produitr
• Numéro de série du CD
Après avoir réuni l’ensemble des éléments ci-dessus, vous pourrez procéder
à l’installation qui consiste en 2 étapes : (1) installation de la carte, et (2)
installation du pilote.
TM
64, AMD® SempronTM, ou AMD® AthlonTM XP ou supérieur
®
Windows® XP/Professionel/Familial (Edition 32bit), avec SP1
TM
TM
1.2 Installation de la carte ASUS® PhysX
Pour installer la carte ASUS PhysX :
1. Déchargez-vous de l’électricité statique en touchant une partie
métallique de l’ordinateur (panneau arrière ou latéral).
2. Eteignez l’ordinateur, le moniteur, et tous les autres périphériques
connectés à l’ordinateur.
3. Retirez le cordon d’alimentation de l’ordinateur et de la source
d’alimentation externe.
4. Retirez le couvercle du boîtier.
5. Repérez un slot PCI disponible sur la carte mère.
Guide d ’ i n s tallati o n A SUS Phys X
TM
TM
Page 43

6. Alignez et insérez délicatement la carte PhysX dans le slot PCI, jusqu’à
ce qu’elle soit bien en place. Assurez-vous que les connecteurs dorés
adhèrent bien au slot.
41
Con n e c t e u r s dorés
7. Serrez la vis du support de xation pour maintenir la carte PhysX en
place. Se référer à l’image ci-dessous pour localiser le pas de vis du
support de xation.
8. Branchez un câble d’alimentation ATX 4 broches au connecteur
d’alimentation auxiliaire de la carte. Voir image ci-dessous.
Pas d e v i s du support
Câb l e d ’ a l i mentation AT X 4 b r o ches
Français
Guide d ’ i n s tallati o n A SUS Phys X
TM
Page 44

42
9. Replacez le couvercle du boîtier.
10. Reconnectez tous les câbles précédement retirés.
11. Connectez le câble d’alimentation à l’ordinateur et à la source
d’alimentation externe.
12. Allumez l’ordinateur
Français
1.3 Installation du pilote ASUS® PhysX
TM
Après avoir installé la carte PhysX et allumé votre ordinateur, vous
devez maintenant installer le pilote pour permettre à la carte PhysX de
fonctionner sous Windows.
(Note : La version et le contenu du CD de support peuvent être modiés sans
avertissement.)
Si vous avez déjà installé la carte PhysX, une fenêtre Ass i stan t No uvea u
maté r iel dét e cté devrait apparaître avant ou pendant l’installation du
pilote. Voir capture décran ci-dessous..
Pour installer le pilote :
1. Quand la fenêtre Ass ista n t N o uvea u ma téri el d é tec t é s’afche,
cliquez sur Annu ler.
2. Insérez le CD de support ASUS PhysX dans votre lecteur optique.
Si la fonction d’exécution automatique est activée, l’écran ASUS PhysX Card
Driver (Pilote de la carte ASUS PHysX) apparaîtra. Procédez à l’étape 5.
Si la fonction d’exécution automatique n’est pas activée sur votre
ordinateur, procédez à l’étape 3.
3. Cliquez sur
Guide d ’ i n s tallati o n A SUS Phys X
Post e de tra v ail sur le Bureau.
TM
Page 45

4. Double cliquez
sur l’icône du
lecteur optique.
L’écran ASUS
PhysX Card
Driver (Pilote
de la carte Asus
PhysX) apparaît.
5. Dans cet
écran, double
cliquez sur
Inst a ll D riv e r
(Ins t all e r l e
pilo t e).
L’installeur
prépare
l’assistant
InstallShield
Wizard qui
vous guidera
tout au long
du processus
d’installation.
43
Français
6. Cliquez sur Next
(Sui v ant )
à l’écran de
bienvenue
de l’assistant
InstallShield
Wizard.
Guide d ’ i n s tallati o n A SUS Phys X
TM
Page 46

44
7. Cliquez sur
Next (Su i van t )
dans l’assistant
InstallShield.
L’installation Typi c al
(Typique) est
sélectionnée par
défaut.
Français
8. Dans la fenêtre
Licence agreement
(Accord de Licence),
cochez la case I
accept (J’accepte)
ou, Cancel (Annuler)
pour quitter
le programme
d’installation. Les
chiers du pilote
ASUS PhysX sont
maintenant copiés
sur votre ordinateur
L’installation peut
prendre plusieurs
minutes.
9. Cliquez sur
Clos e
(Fer m er) dans
la fenêtre Setu p
comp l ete d
(Ins t all a tio n
Term i née ) pour
quitter l’assistant
d’installation ASUS
PhysX et terminer
l’installation.
Guide d ’ i n s tallati o n A SUS Phys X
TM
Page 47

Note : Si vous n’avez pas encore installé la carte ASUS PhysX, un
message s’afchera vous invitant à le faire. Une boîte de dialogue
contextuelle vous fournira des instructions supplémentaires.
10. Sélectionnez Yes (Oui) pour redémarrer votre ordinateur
immédiatement ou No ( N on) pour le redémarrer plus tard. Puis
cliquez sur Finish (Terminer) pour quitter l’assistant d’installation.
45
Français
2 ASUS® PhysXTM control panel
AGEIA PhysX™ Control Panel (Panneau de conguration) vous permet
d’obtenir les informations matérielles, ainsi que celles du pilote AGEIA
PhysX™, de visionner les démos, d’ajuster les paramètres système, ainsi
qu’accéder au support technique.
2.1 Lancer ASUS PhysX Control Panel
Pour lancer ASUS PhysX control panel:
Sélectionnez Déma r rer > P a nnea u de con f igu r ati o n > Phys X
Cont r ol P ane l .
OU
Faites un clic droit sur l’icône PhysX de la zone de notication, puis
sélectionnez Paramètres PhysX..
Guide d ’ i n s tallati o n A SUS Phys X
TM
Page 48

46
Français
2.2 Info
L’onglet Info afche les informations matérielles et celle du pilote ASUS PhysX.
2.3 Démo
Dans l’onglet Démo, cliquez sur l’icône x pour lancer une des démos préinstallées.
Guide d ’ i n s tallati o n A SUS Phys X
TM
Page 49

2.4 Paramètres
Dans l’onglet Para m ètr e s,
vous pouvez :
• Cliquer sur le bouton
Réin i tia l isa t ion de l a
cart e Phy s X pour procéder
à une réinitialisation
logicielle de la carte
• Cocher la case
l’ic ô ne d ans la b arre
d’ét a t s y stè m e pour
afcher l’icône sur votre
Bureau.
• Cliquer sur
Exte n ded Dia g nost ics
pour lancer des diagnostics
approfondis sur la carte
ASUS PhysX. Le champ de
texte afchera les résultats
des diagnostics.
• Cliquer sur
un é t at v ers un f ichi er
an de sauvegarder le
rapport pour une utilisation
ultérieure (support
technique).
Affi c her
Déma r rag e de
Enre g ist r er
2.5 Aide
Dans l’onglet Help , vous pouvez
:
• Cliquer sur le bouton
for u pda t es o nlin e
(Véri f iez les mise s
à jo u r e n li g ne) pour
obtenir les informations de
mise à jour du pilote ou le
mettre à jour en ligne.
• Cliquez sur
Docu m ent a tio n
pour accéder à de
la documentation
supplémentaire concernant
la carte PhysX.
Chec k
47
Français
Guide d ’ i n s tallati o n A SUS Phys X
TM
Page 50

48
3 Dépannage
Faites usage des astuces suivantes si vous rencontrez des problèmes lors de
l’installation. Contactez votre revendeur pour un dépannage plus poussé.
3.1 Tableau correspondance problèmes/
solutions
Français
Prob l ème
Caus e
Solution
Prob l ème
Caus e
Solution
Prob l ème
L e m es s a ge C o n n e c t t h e D e v i c e t o t h e
C o m p u t e r a p p ar a î t d u ra n t l ’ i n st a l la t i on d u
pilo t e.
Le câble d’alimentation périphérique 4 broches n’est
pas connecté à la carte.
Connectez le câble d’alimentation périphérique 4
broches à la carte.
Je s o uh a i te v ér i f ie r si l a c a r te AS U S P h y sX a
été c or r e ct e m en t in s t all é e
Suivez les instructions à la section “Vérifer la carte
PhysX” page10.
Je s o uh a i te v ér i f ie r si l e p i l ot e A S U S P h ys X a
été c or r e ct e m en t in s t all é
Caus e
Solution
Guide d ’ i n s tallati o n A SUS Phys X
Suivez les instructions à la section “Vérifer le pilote
PhysX” page 11.
TM
Page 51

3.2 Vérier la carte ASUS PhysX
Vérier si la carte ASUS
PhysX™ est bien présente
1. Sur le Bureau, faites un
clic-droit sur l’icône Post e
de t r ava i l, puis sélectionnez
Prop r iét é s > Maté riel .
2. Cliquez sur le bouton
Gest i onn a ire de
péri p hér i que s .
3. Recherchez
card dans la liste du
Gestionnaire de périphériques.
Si elle est présente, procédez
directement à l’étape 5.
4. Si la carte ASUS PhysX
n’apparaît pas dans la liste,
vous devrez probablement
réinstaller la carte et/ou
connecter le câble IDE à cette
dernière.
5. Faites un clic-droit sur
ASUS Phy s X c a rd ( cart e
Asus Phys X, et sélectionnez
Prop r iét é s.
6. Cliquez sur l’onglet
Géné r al.
7. Vériez que le champ
Etat du p éri p héri que »
«
afche bien le message :
péri p hér i que fonc tion ne
corr e cte m ent .Dans ce
cas, procédez directement à
l’étape 9.
8. Dans le cas échéant,
tentez de réinstaller le pilote
ASUS PhysX™, ou utilisez le
dépannage de Windows.
9. Quittez le
de p é rip h éri q ues.
ASUS Phy s X
Le
Gest i onn a ire
49
Français
Guide d ’ i n s tallati o n A SUS Phys X
TM
Page 52

50
Français
3.3 Vérier le pilote ASUS PhysX
1. Sur le Bureau, faites un clic-droit sur l’icône Po ste de tr ava il, puis
sélectionnez Prop r iét é s > Maté riel ).
2. Cliquez sur le bouton
3. Si la carte et le pilote ASUS PhysX ont été installés sur votre ordinateur, et
qu’une alimentation IDE est connectée à la carte, l’icône de la carte AS US
Phys X apparaît alors dans le Ge s tio n nai r e de pér iphé riqu e s.
4. Faites un clic-droit sur le nom de la carte, et sélectionnez
5. Cliquez sur l’onglet
6. La fenêtre
Déta i ls du p i lot e contient les informations relatives au pilote
ASUS PhysX.
7. Quittez le
Gest i onn a ire de p érip héri q ues .
Gest i onn a ire de p érip héri q ues
Prop r iét é s.
Pilo t e pour ouvrir la fenêtre Dé t ail s du pilo te.
Guide d ’ i n s tallati o n A SUS Phys X
TM
Page 53

4. Désinstaller pilote et
utilitaires
Pour désinstaller le pilote PhysX et les utilitaires :
1. Sélectionnez
Supp r ime r de s pro gram mes.
2. Recherchez l’icône
3. Cliquez sur le bouton
4. Sélectionnez la langue du désinstalleur puis cliquez sur OK.
Déma r rer > Pa nnea u de co n figu rati on > Ajo u ter /
ASUS Phy s X, puis cliquez dessus.
Supp r ime r .
51
Français
5. Dans la boîte de dialogue Dés i nst a lla t ion de A SUS P hys X , cliquez
sur Oui pour supprimer de votre ordinateur le pilote PhysX et les
utilitaires.
Ou
Cliquez sur
sur votre ordinateur.
Non pour conserver le pilote pilote PhysX et les utilitaires
Guide d ’ i n s tallati o n A SUS Phys X
TM
Page 54

52
TM
ASUS® PhysX
설설 설설설
한국어
Page 55

53
K249 8
초판
200 6 년 3 월
Copyright © 2006 ASUSTeK COMPUTER INC. All Rights Reserved.
본 설명서에 기술된 제품과 소프트웨어들은 보완을 목적으로 보관되는 경우를 제외하고는
ASUSTeK COMPUTER INC.(이하 “ASUS”)의 서면 동의 없이 임의의 양식이나 수단을 통해
다른 언어로 번역, 저장매체로 보관, 복사, 전달, 재구성 할 수 없습니다.
다음과 같은 경우 ASUS는 제품 보증 및 서비스를 제공하지 않습니다. (1)ASUS가 공식적으
로 인증한 장소 및 그에 속한 전문 기사에 의해 제품의 수리 및 변경, 개조된 경우를 제외하
고, 기타 ASUS가 공식적으로 인증하지 않은 장소 및, 사람에 의해 변경, 개조된 제품; 또는
(2)제품 시리얼 번호가 손상되거나 없어진 경우.
ASUS설 설 설설설설 설설 설 설설설 설설설 설설 설설설, 설설 설설설 설설 설설설 설설
설설설 설설 설설, 설설 설설설 설설 설설설 설설 설설 설설설 설설설 설설설 설설 설설
설설. 설설 ASUS설 설설, 설설, 설설설 설설설 설 설설설설설설설설 설설설 설설설, 설
설설설설설 설설설 설설 설설 설설설, 설설설설설 설설설설 설설( 설설설 설설, 설설설
설 설설, 설설 설 설설설설 설설, 설설설설 설설 설설 설설 설설설 설설설 설설)설 설
설설 설 설설설 설설설 설설 설설설설. ASUS설 설설설 설 설설설 설설설 설설 설 설설설
설설 설설설 설설설설 설설설 설설설설 설설설설.
본 설명서 안에 기입되어 있는 각종 정보 및 사양은 제품 사용시 필요한 정보만을 제공하고
있으며, 별도의 언급이나 설명 없이 내용이 변경될 수 있습니다. 본 설명서 안에 기입되어 있
는 제품 및 기타 소프트웨어에 대한 기입상의 오타나 부정확한 부분에 대해서는 ASUS 본사
혹은 서비스 센터로 신고하여 주시면 즉시 보완 조치할 것을 약속 드립니다.
설 설설설 설설 설설설설설 설설설 설설설 설설 설설, 설설설 설설 설 설설 설설설 설설
설설설 설설설설 설설 설설설설 설설설설, 설설 설설 설설설설 설설설 설설설설 설설설
설설 설설 설설 설설 설설설 설설 설설설설설설 설설설설설.
한국어
ASUS PhysXTM 설설 설 설설
Page 56

54
설설
설설설설 55
설설 설설 56
1. ASUS® PhysXTM 설설 . . .. .. . .. .. .. . .. .. . .. . .. .. .. . .. .. . .. . .. .. .. . .. . .. .. .. . .. .. . .. . .. .. 5 7
1.1 설설 설설 설설설설 .................................................................................................................57
1.2 설설 설설 57
1.3 설설설설 설설 .......................................................................................................................
2. Ph y sXTM 설 설 설 62
2.1 PhysX 설설설 설설 ............................................................................................................62
2.2 설설 .........................................................................................................................
2.3 설설 .........................................................................................................................
2.4 설설 .........................................................................................................................
2.5 설설설 64
3. 설설 설 설 .. . .. . .. .. .. . .. .. . .. . .. .. .. . .. .. . .. . .. .. .. . .. . .. .. .. . .. .. . .. . .. .. .. . .. 6 5
한국어
3.1 설설 설 설설설설 설 ................................................................................................................65
3.2 PhysXTM 설설 설설 설설 .....................................................................................................66
3.3 PhysX
TM
설설설설 설설 설설 .................................................................................................67
59
63
63
64
4. 설설 설 설설 설 설설 설 설 설 . .. . .. .. .. . .. . .. .. .. . .. .. . .. . .. .. .. . .. .. . .. . .. .. .. . .. . .. .. .. . .. .. . . 6 8
ASUS PhysXTM 설설 설 설설
Page 57

설설설설
설설설 설설 설설설 설설설
본 장치는 FCC 규정 제 15조를 준수하며 작동 조건은 다음과 같습니다.
• 본 장치는 해로운 장해를 일으키지 않습니다.
• 본 장치는 불필요한 작동을 유발하는 장해를 포함하여 모든 장해를 수용해야
합니다.
본 기기는 FCC 규정 제 15조에 의거하여 테스트 되었으며, B등급 디지털 장치에 대
한 제한 사항을 준수합니다. 이러한 제한 사항은 주거 지역에서 장치 설치 시에 유해
한 간섭을 방지하기 위한 것입니다. 본 장치는 RF(Radio Frequency) 에너지를 생
성, 사용하고 방출하므로, 지시 사항에 따라 장치를 설치하지 않을 경우 전파 간섭이
발생할 수 있습니다. 장치의 전원을 껐다 켜봄으로써, 라디오 또는 텔레비전 수신에
대한 유해한 간섭이 발생하는지의 여부를 확인할 수 있습니다. 간섭이 발생하는 경
우, 다음과 같은 방법으로 전자파 장애를 교정하는 것이 좋습니다.
• 수신 안테나의 방향을 바꾸거나 위치를 바꾸어 주십시오.
• 기기와 수신기 사이의 거리를 조정해 주십시오.
• 기기를 수신기에 연결된 콘센트가 아닌 다른 콘센트에 연결하십시오.
• 판매 대리점이나 경험이 풍부한 기술자에게 도움을 요청하십시오.
55
F C C 설 설 설 설 설 설 설 설 설 설 설 설 설 설 / T V 설 설 설 설 설 설 설 설 설 설 설 F C C 설
설 설 설 설 설 설 설 설 설 설 설 설 설 설 설 설 설 설 설 설 설 설 설 설 . 설 설 설 설 설 설 설 설
설 설 설 설 설 설 설 설 설 설 설 설 설 설 설 . I / O 설 설 설 설 설 설 설 설 설 설 설 설 설 설 설
설 설 설 설 설 설 설 설 설 설 설 설 설 . 설 설 설 설 설 설 설 설 설 설 설 설 설 설 설 설 설 설 설
설설 설설설 설설, 설설설설 설설 설설 설설설 설설설설 설 설설설설.
설설설 설설설 설설
이 디지털 장치는 캐나다 통신부의 전자파 장해 규정에서 정한 디지털 장치의 무선
잡음 방출에 대한 B등급 한도를 초과하지 않습니다.
이 B등급 디지털 장치는 캐나다 ICES-003의 규정을 따릅니다.
(Cet appareil numérique de la classe B est conforme à la norme NMB-003 du
Canada.)
ASUS PhysXTM 설설 설 설설
한국어
Page 58

56
설설 설설
설설 설 설 설설
•
전기 단락에 의한 파손을 막기 위해, 시스템을 재 배치하기 전에 전기 콘센트에
서 전원 케이블을 제거해 주시기 바랍니다.
• 시스템에 장치를 추가하거나 세스템에서 장치를 제거할 경우, 신호 케
이블을 연결하기 전, 전원 케이블에 연결되어 있지 않은지 확인해 주십
시오.
장치를 연결하기 전에, 시스템에 연결되어 있는 모든 전원 케이블을 제거
해 주십시오.
• 마더보드에 신호 케이블을 연결, 제거하기 전에, 전원 케이블이 제거되
어 있는지 확인해 주십시오.
• 파워 서플라이에 공급되는 전력이 올바른지, 사용하는 지역에 알맞은지
확인해 주십시오.
의해 주시기 바랍니다.
• 파워 서플라이가 고장났다면, 직접 수리하지 마시고 인증된 서비스 센터
나 구입처에 문의해 주시기 바랍니다.
만약 사용하는 지역의 전압을 알 수 없다면, 전력 회사에 문
설설 설설 설설
• 마더보드에 장치를 설치하기 전에, 제품 구성물에 포함되어 있는 모든
한국어
설명서를 읽어주시기 바랍니다.
• 제품을 사용하기 전에 모든 케이블을 올바르게 연결하고 전원 케이블의
손상 여부를 확인해 주시기 바랍니다.
의해 주시기 바랍니다.
•
전기 단락을 방지하기 위해, 클립, 나사, 스테이플과 같은 물건을 커넥터나, 슬
롯, 회로판에서 멀리 떨어뜨려 놔 주십시오.
• 먼지, 습기, 높은 온도의 환경에서 사용하지 마십시오.
품을 놓지 마십시오.
• 제품을 평평한 곳에 놓고 사용해 주십시오.
• 만약 기술적 문제가 발생했다면 인증된 서비스 센터나 구입처에 문의해
주십시오.
.
만약 손상 되었다면 구입처에 즉시 문
젖어있는 곳에 제
설 설 설 설 설 설 설 설 설 설 설 설 설 설 설 설 설 설 , 설 설 설 설 설 설 설 설 설 설 설 설 설 설
설 설설설설. 설설 설설설 설설 설설 설설 설설설 설설설설 설설설설 설설설설.
ASUS PhysXTM 설설 설 설설
Page 59

57
®
1. ASUS
PhysXTM 설설
1.1 설설 설설 설설설설
PhysX 카드를 설치하려면 다음과 같은 최소 사양이 갖춰진 컴퓨터가 필요합니다.
(참조: 게임을 즐기려는 사용자는 더 높은 사양의 하드웨어를 갖추어야 합니다. 아래의 사양은
사전 통보 없이 변경될 수 있습니다.)
• Intel® Pentium® 4, Intel® Celeron® 또는 그 이상 버전, AMD® AthlonTM 64,
AMD® SempronTM, AMD® AthlonTM XP ㄸH는 그 이상 버전
®
• Microsoft
이상 업그레이드 버전
• 256MB 시스템 메모리 또는 그 이상
• 게임용으로는 Geforce6800, Radeon X800 그래픽 카드 또는 그 이상 버전을
권장해 드립니다.
• 50MB 하드 디스크 여유 공간
• PCI 슬롯 버전 2.2 또는 그 이상 버전, 3.3V
• 4핀 보조 전원 케이블
설치하기 전에, 다음의 ASUS PhysX 카드 구성물을 확인해 주십시오.
• ASUS PhysX
• ASUS PhysX
• 제품 시리얼 번호
• CD 시리얼 번호
위의 항목이 모두 갖추어져 있으면 카드 카드와 드라이버를 설치할 수 있습니다.
Windows® XP/Professional/Home (32bit Edition) SP1 또는 그
TM
PPU 카드
TM
PPU 지원 CD
한국어
1.2 설설 설설
ASUS PhysX 카드 설치 방법
1. 정전기를 방지하기 위해 먼저 컴퓨터의 금속 커버를 손으로 만져 보시기 바랍니
다.
2. 컴퓨터와 모니터, 컴퓨터에 연결되어 있는 그 외의 모든 주변 장치의 전원을 꺼
주십시오.
3. 컴퓨터와 전원 콘센트에서 전원 코드를 제거해 주십시오.
4. 케이스 커버를 제거해 주십시오.
5. 마더보드의 5 V/3.3 V PCI 슬롯을 확인해 주십시오.
ASUS PhysXTM 설설 설 설설
Page 60

58
6. PCI 슬롯에 PhysX 카드를 완전히 장착될 때까지 눌러 주십시오. 금색핀 부분이
슬롯에 올바르게 삽입되었는지 확인해 주십시오.
Gol d f i n g e r s
7. PhysX 카드를 고정시키기 위해 브래킷을 나사로 고정시켜 주십시오. 브래킷 나
한국어
사 구멍은 아래 그림을 참조해 주십시오.
8. 다음 그림과 같이 4핀 보조 전원 케이블을 보조 전원 커넥터에 연결해 주십시
오.
브래킷 나 사 구 멍
4핀 A T X 전 원 케 이 블
ASUS PhysXTM 설설 설 설설
Page 61

59
9. 케이스 커버를 다시 설치해 주십시오.
10. 모든 케이블을 다시 연결해 주십시오.
11. 컴퓨터와 콘센트, 전원 멀티탭에 전원 코드를 연결해 주십시오.
12. 컴퓨터의 전원을 켜주십시오.
1.3 설설설설 설설
PhysX 카드를 설치한 후, 컴퓨터의 전원을 켜주십시오. Windows 운영 시스템에서
PhysX 카드를 사용하려면 장치의 드라이버를 설치해야 합니다.
(참조: 드라이버 CD의 버전과 내용물은 사전 통보 없이 변경될 수 있습니다.)
만약 이미 ASUS PhysX 카드가 설치되었다면, 새 하드웨어 발견 마법사 창이 나타
나거나 장치 드라이버 설치시, 다음과 같은 그림이 나타납니다.
한국어
장치 드라이버 설치 방법
새 하드웨어 발견 마법사 창에서 취소 버튼을 눌러 주십시오.
1.
2. ASUS PhysX 지원 CD를 옵티컬 드라이브에 넣어 주십시오. 만약 자동 실행
이 되지 않는다면 3번 항목을 참조해 주시고, 자동 실행 기능이 작동한다면
5번 항목으로 넘어가 주십시오.
3. 바탕화면의
내 컴퓨터를 클릭해 주십시오.
ASUS PhysXTM 설설 설 설설
Page 62

60
4. 옵티컬 드라이
브 아이콘을 더
블 클릭해 주
십시오. ASUS
PhysX 카드 드
라이버 화면이
나타납니다.
5. ASUS 카드 드라
이버 화면이 나
타나면 드라이
버 설 치 를 더블
클릭해 주십시
오.
InstallShield 마
법사가 프로그
램 설치 과정을
도와줍니다.
한국어
ASUS PhysXTM 설설 설 설설
6. N ex t 버튼
을 클릭하면
InstallShield
마법사 화면이
타납니다.
Page 63

61
7. InstallShield 마버사
창에서 다음 버튼을
클릭해 주십시오.
기본값으로 설정된
기본 설 치 유형을
선택해 주십시오.
8. 라이 센 스 동의
서에서 동의함 버
튼을 클 릭 하거 나
설치를 중 단하 려
취소를 클 릭
면
해 주 십 시 오.
ASUS PhysX 장치
드라이버가 시스
템에 복사됩니다.
설치 과정은 몇 분
정도 걸릴 수 있습
니다.
한국어
9.
설치 완 료 창이
나타나면 닫음 버
튼을 클릭해
ASUS PhysX 설치
자를 닫고 설치를
완료해 주십시오.
ASUS PhysXTM 설설 설 설설
Page 64

62
참조: 만약 ASUS PhysX 카드가 아직 설치되지 않았다면, 카드를 설치하라는 창이
나타나며 추가 지시사항이 적혀 있는 팝업창이 나타날것입니다.
10. 예를 클릭하면 시스템을 다시 시작하게 되며 아 니 오 를 선택하면 시스템을 나
중에 다시 시작하게 됩니다. 마침 버튼을 클릭해 설치 마법사를 종료해 주십
시오.
한국어
2. PhysXTM 설설설
ASUS PhysX 제어판에서는 드라이버와 하드웨어 정보를 확인하고, 데모 보기, 시
스템 설정 조정, 기술 지원 서비스 접속과 같은 기능을 이용할 수 있습니다.
2.1 PhysX 설설설 설설
ASUS PhysX 제어판 실행 방법
시작 > 제 어 판 > AG E I A >P h y sX 제 어판 을 선택해 주십시오.
설설
시스템 트레이 아이콘에서 마우스 오른쪽 버튼을 클릭한 후, Age i a Ph y s X 설 정
을 클 릭 해 주 십 시 오.
ASUS PhysXTM 설설 설 설설
Page 65

63
2.2 설설
정보 탭에서는 ASUS PhysX 드라이버와 하드웨어 정보를 확인할 수 있습니다.
2.3 설설
데모 탭에서는 A S US P h ys X 데 모 아이콘을 클릭해 설치된 데모를 실행시킬 수
있습니다.
한국어
ASUS PhysXTM 설설 설 설설
Page 66

2.4 설설
설정 탭에서는 다음과 같은 작업을
수행할 수 있습니다.
Phy s X 카 드 재설 정 버튼을
•
누르면 카드의 소프트 리셋을
실행할 수 있습니다.
시스템 트 레이 아 이콘 의
•
체크 박스를 선택하면 바탕화
면에 아이콘이 나타납니다.
확장 진 단 시 작 을 선택하면
•
ASUS PhysX 카드 진단 프로그
램이 실행됩니다. 텍스트 박스
에는 진단 결과가 나타납니다.
파일에 보 고 저 장 을 클릭
•
해 진단 결과를 저장합니다.
64
한국어
2.5 설설설
도움말 탭에서는 다음의 정보를
확인할 수 있습니다.
•
O nl i n e 버튼을 클릭해 장치
드라이버의 업데이트 정보를
확인하고 업데이트를 수행할
수 있습니다.
•
PhysX 카드에 관한 더 많은
정보를 확인할 수 있습니다.
ASUS PhysXTM 설설 설 설설
Che c k f o r U p d at e s
문서 버튼을 클릭해 ASUS
Page 67

65
3 설설 설설
만약 ASUS PhysX 카드를 설치하는 동안 문제가 발생한다면 다음의 팁을 이용해
문제를 해결해 주시기 가랍니다. 다음의 내용으로 문제가 해결되지 않을 경우 제품
구입처에 문의해 주시기 바랍니다.
3.1 설설 설설 설 설설 설설 설
문제
원인
해결 방법
문제
원인
해결 방법
문제
드 라 이 버 를 설 치 하 는 동 안 컴 퓨 터 에 장 치 를 연
결 하 라 는 메 시 지 가 나 타 납 니 다 .
4핀 보조 전원 케이블이 카드에 연결되지 않았습니다.
4핀 보조 전원 케이블을 카드에 연결해 주십시오.
ASU S Ph y s X 카 드 를 잘 설치 했 는 지 확 인 하 고 싶 습
니다.
한국어
페이지 10에 있는 “PhysX 카드 설치 확인” 항목을 확인해
주십시오.
ASU S Ph y s X 장 치 드 라 이 버가 잘 설치 되 었 는지 확
인하고 싶 습니 다 .
원인
해결 방법
페이지 11에 있는 “PhysX 카드 드라이버 설치 확인” 항목
을 확인해 주십시오.
ASUS PhysXTM 설설 설 설설
Page 68

66
3.2 PhysX 설설 설설 설설
1. PC의 바탕화면에 있는 내
컴퓨터 ,아이콘에서 마우스
오른쪽 버튼을 클릭한 후,
속성 > 하 드 웨 어를 선택해
주십시오.
장치 관 리 자를 클릭해 주
2.
십시오.
장치 관 리 자 창에 있는
3.
목록 중에 ASU S Ph y s X
카드가 있으면 5번째 항목
으로 넘어 가 주십시오.
4. 장치 목록에서 ASUS PhysX
카드를 찾을 수 없다면, 카
드를 다시 장착하거나 IDE
케이블을 다시 연결해 주십
시오.
5. AS U S P h y sX 카 드 항목
에서 마우스 오른쪽 버튼을
한국어
클릭한 후, 속성을 클릭해
주십시오.
일반 탭을 클릭해 주십시
6.
오.
장치 상 태 항목의 텍스트
7.
상자에 “이 장치가 올바르
게 작동하고 있습니다.” 라
는 메시지가 나와 있는지
확인해 주시고 나와 있다면
9번째 항목으로 넘어가 주십
시오.
장치 상 태 에 메시지가
8. If
나타나지 않았다면 ASUS
PhysX 장치 드라이버를 재
설치 하거나 Windows 문제
해결 을 이용해 주십시오.
장치 관 리 자 창을 닫아 주
9.
십시오.
ASUS PhysXTM 설설 설 설설
Page 69

67
3.3 PhysX 설설설설 설설 설설
1. PC의 바탕화면에 있는 내 컴 퓨 터,아이콘에서 마우스 오른쪽 버튼을 클릭한
후, 속성 > 하 드 웨 어를 선택해 주십시오.
장치 관 리 자를 클릭해 주십시오.
2.
3. ASUS PhysX 카드와 드라이버가 올바르게 설치되어 있거나 IDE 전원이 카드
에 올바르게 공급되고 있으면
에 나타납니다.
ASU S Ph y s X 카 드 아이콘에서 마우스 오른쪽 버튼을 클릭한 후, 속성 을 클
4.
릭해 주십시오.
드라이 버 탭을 클릭해 주십시오.
5.
드라이 버 속성 창에는 ASUS PhysX 카드 장치 드라이버의 정보가 나타납니
6.
다. .
7. 장 치 관 리 자 창을 닫아 주십시오.
ASU S Ph y s X 카 드 아이콘이 장치 관 리자 창
한국어
ASUS PhysXTM 설설 설 설설
Page 70

68
4. 설설설설설 설설설설 설설
PhysX 드라이버와 유틸리티 제거 방법
시작 > 제 어 판 > A 프 로 그램 추 가/ 제 거 를 선택해 주십시오.
1.
ASU S Ph y s X아이콘을 선택해 주십시오.
2.
제거 버튼을 클릭해 주십시오.
3.
4. 언어를 선택한 후에 확인 버튼을 클릭해 주십시오.
한국어
5. A S US P hy s X 제 거 팝업 창에서 예 버튼을 클릭하면 ASUS PhysX 드라이버
와 유틸리티를 컴퓨터에서 제거됩니다.
또는
아니오 버튼을 클릭하면 ASUS PhysX 드라이버와 유틸리티가 제거되지 않습
니다.
ASUS PhysXTM 설설 설 설설
Page 71

TM
ASUS® PhysX
インストールガイド
69
日本語
Page 72

70
J249 8
初版
2006 年4月
Copyright © 2006 ASUSTeK COMPUTER INC. All Rights Reserved.
バックアップの目的で利用する場合を除き、本書に記載されているハードウェア・ソフトウェアを含む、
全ての内容は、ASUSTeK Computer Inc. (ASUS)の文書による許可なく、編集、転載、引用、放送、複
日本語
写、検索システムへの登録、他言語への翻訳などを行うことはできません。
以下の場合は、保証やサービスを受けることができません。
(1)ASUSが明記した方法以外で、修理、改造、交換した場合。
(2)製品のシリアル番号が読むことができない状態である場合。
ASUSは、本マニュアルについて、明示の有無にかかわらず、いかなる保証もいたしません。ASUSの
責任者、従業員、代理人は、本書の記述や本製品に起因するいかなる損害(利益の損失、ビジネス
チャンスの遺失、データの損失、業務の中断などを含む)に対して、その可能性を事前に指摘したか
どうかに関りなく、責任を負いません。
本書の仕様や情報は、個人の使用目的にのみ提供するものです。また、予告なしに内容は変更される
ことがあり、この変更についてASUSはいかなる責任も負いません。本書およびハードウェア、ソフトウ
ェアに関する不正確な内容について、ASUSは責任を負いません。
本マニュアルに記載の製品名及び企業名は、登録商標や著作物として登録されている場合があり
ますが、本書では、識別、説明、及びユーザーの便宜を図るために使用しており、これらの権利を侵
害する意図はありません。
ASUS Ph ysXTM インストールガイド
Page 73

もくじ
ご注意 .......................................................................................................................72
安全上のご注意 .........................................................................................................73
1. ASUS® PhysXTM インストール ..................................................................74
1.1 設定条件 ................................................................................................74
1.2 カードを取り付ける ...............................................................................74
1.3 ドライバをインストールする .................................................................76
2. Phy sXTM コントロールパネル .... ... ... ... .. ... ... ... .. ... ... ... .. ... 79
2.1 PhysX コントロールパネルを起動する ...............................................79
2.2 情報 ......................................................................................................
2.3 でも .....................................................................................................
2.4 設定 .....................................................................................................
2.5 ヘルプ ....................................................................................................81
3. トラブルシューティング .. ... .. ... ... ... .. ... ... ... .. ... ... ... ..... ... ... 82
3.1 トラブルと解決策 ...................................................................................82
3.2 PhysXTM カードを確認する ...................................................................83
3.3 PhysXTM ドライバを確認する ...............................................................84
71
80
80
81
4. ドライバとユーティリティをアンインストールする .. ... .. ... ... .. 85
ASUS Ph ysXTM インストールガイド
日本語
Page 74

72
ご注意
Federal Communications Commission Statement
This device complies with Part 15 of the FCC Rules. Operation is subject to
the following two conditions:
•
This device may not cause harmful interference, and
•
This device must accept any interference received including interference that
may cause undesired operation.
This equipment has been tested and found to comply with the limits for a Class
B digital device, pursuant to Part 15 of the FCC Rules. These limits are designed
to provide reasonable protection against harmful interference in a residential
installation. This equipment generates, uses and can radiate radio frequency
energy and, if not installed and used in accordance with manufacturer’s
instructions, may cause harmful interference to radio communications.
However, there is no guarantee that interference will not occur in a particular
installation. If this equipment does cause harmful interference to radio or
television reception, which can be determined by turning the equipment off
and on, the user is encouraged to try to correct the interference by one or
more of the following measures:
•
Reorient or relocate the receiving antenna.
•
Increase the separation between the equipment and receiver.
•
Connect the equipment to an outlet on a circuit different from that to which
the receiver is connected.
•
Consult the dealer or an experienced radio/TV technician for help.
The use of shielded cables for connection of the monitor to the graphics
card is required to assure compliance with FCC regulations. Changes or
modications to this unit not expressly approved by the party responsible for
日本語
compliance could void the user’s authority to operate this equipment.
Canadian D ep ar tment of Co mm un ications St at em ent
This digital apparatus does not exceed the Class B limits for radio noise
emissions from digital apparatus set out in the Radio Interference Regulations
of the Canadian Department of Communications.
Th is cla ss B dig it al app ar a t u s co m p li es wit h Ca na di an ICE S -
003.
ASUS Ph ysXTM インストールガイド
Page 75

安全上のご注意
電気の取扱い
•
作業を行う場合は、感電防止のため電源コードをコンセントから抜いてから行って
ください。
•
周辺機器を接続または取り外す場合は、本製品および周辺機器の電源コードをコ
ンセントから抜いてから行ってください。可能ならば、関係するすべての機器の電
源コードをコンセントから抜いてから行ってください。
•
ケーブルを接続または取り外す場合は、電源コードをコンセントから抜いてから行
ってください。
•
正しい電圧でご使用ください。ご使用になる地域の出力電力がわからない場合は、
お近くの電力会社にお尋ねください。
•
電源装置の修理は販売代理店などに依頼してください。
操作上の注意
・ 作業を行う前に、本製品に付属のマニュアルを全て熟読してください。
・ 電源を入れる前に、ケーブルが正しく接続されていることを確認してください。また電
源コードに損傷がないことを確認してください。
・ マザーボード上にクリップやネジなどの金属を落とさないようにしてください。短絡事
故の原因になります。
・ 埃・湿気・高温・低温を避けてください。湿気のある場所で本製品を使用しないでくだ
さい。
・ 本製品は安定した場所に設置してください。
・ 本製品を修理する場合は、販売代理店などに依頼してください。
73
左のマークは、本製品が電気製品または電子装置であり、地域のゴミと一
緒に捨てられないことを示すマークです。廃棄の際は、地方自治体の廃棄
処理に関する条例または規則等に従って下さい。
ASUS Ph ysXTM インストールガイド
日本語
Page 76

74
日本語
1. ASUS
®
PhysXTM インストール
1.1 設定条件
PhysX カードを設定する前に、コンピュータが設定条件を満たしていることを確認してく
ださい。
(注:より高い仕様が必要となるゲームもあります。また、仕様は予告なく変更する場合がありま
す。)
• Intel® Pentium® 4、Intel® Celeron® 以上、AMD® AthlonTM 64、AMD® SempronTM 、
AMD
• Microsoft
• システムメモリ 256MB 以上
• Geforce6800、Radeon X800 ビデオカード以上推奨
• 空きハードディスク容量 50MB 以上
• PCI スロット レビジョン 2.2 以降、3.3V
• 4ピン ペリフェラル電源ケーブル
PhysX カードを設定する前に、ASUS PhysX カードパッケージの内容を確認してく
ださい。
• ASUS PhysX
• ASUS PhysX
• 製品シリアルナンバー
• CD シリアルナンバー
上記の項目を確認したら、(1) カードを取り付ける (2) ドライバをインストールする、の順
に、取り付け、インストールを行ってください。
®
AthlonTM XP 以上
®
Windows® XP/Professional/Home (32bit Edition)、SP1 以降
TM
PPU カード
TM
PPU サポート CD
1.2 カードを取り付ける
手順
1. コンピュータケース背面の金属板、サイドパネルに触れ、静電気対策を行います。
2. コンピュータ、モニタ、コンピュータに接続した周辺機器の電源を全てオフにします。
3. コンピュータと電源コンセントから電源コードを抜きます。
4. カバーを取り外します。
5. マザーボードの空き 5 V/3.3 V PCI スロットの位置を確認します。
ASUS Ph ysXTM インストールガイド
Page 77

75
6. PCI スロットにPhysX カードをしっかりと挿し込みます。 ゴールドフィンガーが正確に
挿し込まれていることを確認してください。
ゴー ルドフィンガー
7. PhysX カード を固定するブラケットネジを締めます。(下図参照)
8. 4 ピン ペリフェラル電源ケーブルを、カードのペリフェラル電源コネクタに接続します。
(下図参照)
4ピンペリフェラル 電源ケーブル
ブラケットのネジ穴
日本語
ASUS Ph ysXTM インストールガイド
Page 78

9. カバーを元に戻します。
10. ケーブルを全て再接続します。
11. 電源コードをコンピュータとコンセントに接続します。
12. コンピュータの電源をオンにします。
1.3 ドライバをインストールする
PhysX カードを取り付け、コンピュータの電源をオンにしたら、Windows OS で PhysX カ
ードを起動させるためのデバイスドライバをインストールします。
(注:ドライバ CD の内容やバージョンは予告なく変更する場合があります。)
ASUS PhysX カードが取り付けてある場合は、ドライバのインストール前もしくは途中
に、「 新しい ハーアドウェアの検 索ウィザ ードの 開始 」ウィンドウが表示されます。
(下図参照)
76
日本語
デバイスドライバをインストールする
1. 「新しい ハ ーアドウェアの検索ウィザードの開始」ウィンドウが表示されたら「キ
ャンセル」をクリックします。
2. ASUS PhysX サポート CD を光学ドライブに挿入します。オートラン機能がオフの場
合は 3 へ、オンの場合は ASUS PhysX Card Driver 画面が表示されます。5 へ進ん
でください。
3. デスクトップの
ASUS Ph ysXTM インストールガイド
マイコンピュータ クリックしてください。
Page 79

77
4. 光学ドライブアイ
コンをダブルクリ
ックすると、ASUS
PhysX Card
Driver 画面が表
示されます。
5. ASUS Card
Driver 画面で
Inst all Dr i ver
をダブルクリック
します。
InstallShield
Wizard が準備
されます。指示に
従ってプログラ
ムのセットアップ
を行います。
6. Welcome
to the
InstallShield
Wizard 画面で
Next をクリッ
クします。
ASUS Ph ysXTM インストールガイド
日本語
Page 80

7. Next from the
InstallShield Wizard
画面で Nex t をクリ
ックします。
デフォルトでのイン
ストールタイプは
Typic al です。
8. ライセンス契約 書
画面で 同 意する
をクリックするか、
キャンセルをクリ
ックしてインストー
ルプログラムから
退出します。
ASUS PhysX デバイ
スドライバがシステ
ムにコピーされま
す。この作業には
数分かかります。
78
日本語
ASUS Ph ysXTM インストールガイド
セットアップ完了
9.
ウィンドウで閉じ
るをクリックして
ASUS PhysX
Installer から退出
し、インストール完
了です。
Page 81

79
注:ASUS PhysX カードをまだ取り付けていない場合は、カードを取り付けることを
指示するウィンドウが表示され、ダイアローグボックスに手順が表示されます。
10. Yes I w ant to re sta rt my com put e r no w. を選択してコンピュータを再起
動させるか、No を選択して後でコンピュータを再起動します。Fin i sh をクリックして
Installation Wizard から退出します。
2. PhysXTM コントロールパネル
ASUS PhysX コントロールパネルから、ドライバ、ハードウェア情報の取得、デモ、システム
設定、テクニカルサポートサービス へのアクセスが簡単に行えます。
2.1 ASUS PhysX コントロールパネルを起動する
手順
スタート → コントロー ルパネル → AG EIA P hysX の順にクリックします。
または
システムトレイアイコンを右クリックし Agei a Ph y sX Set tin g s を選択します。
ASUS Ph ysXTM インストールガイド
日本語
Page 82

2.2 情報
情報タブで ASUS PhysX ドライバとハードウェア情報が確認できます。
2.3 デモ
デモタブで、 A SU S Ph ysX bo x es Dem o アイコンをクリックするとインストールした
デモを起動することができます。
80
日本語
ASUS Ph ysXTM インストールガイド
Page 83

81
2.4 設定
設定タブでは以下のことが可能です。
AGEIA PhysX カードのリセット
•
ボタンをクリックすると、カードを
ソフトリセットします。
システムトレイアイコンの表示
•
をチェックすると、デスクトップに
アイコンが表示されます。
拡張診断の開始をクリックする
•
と、ASUS PhysX カードの拡張
診断を実行し、テキストボックス
に情報を表示します。
(「スタートを押して拡張診断を開
始」の「スタート」とは、拡張診断の
開始 ボタンのことです。)
• レポートをファイルに保 存
をクリックし、診断結果を保存し
て、テクニカルサポートでご利用
ください。
2.5 ヘルプ
ヘルプタブでは以下のことが可能
です。
Chec k f o r U pda tes
•
Onlin e ボタンをクリックする
と、デバイスドライバのアップデ
ート情報、またはオンラインでア
ップデートが可能です。
文書ボタンをクリックすると、
•
ASUS PhysX カードの詳しい説
明を得ることができます。
日本語
ASUS Ph ysXTM インストールガイド
Page 84

82
3. トラブルシューティング
インストール中にトラブルがあった場合は、以下のトラブルシューティングをご参照くだ
さい。トラブルシューティングにて問題が解決されない場合は、販売店にお問い合わせ
ください。
3.1 トラブルと解決策
日本語
トラブル
原因
解決策
トラブル
原因
解決策
トラブル
コンピュー タ にデ バイスを 接 続すると、ドライバのイ
ンストール中にメッセージが表示されます。
4ピンペリフェラル電源ケーブルがカードに接続されていない。
4ピンペリフェラル電源ケーブルをカードに接続してください。
ASUS Ph y sX カードが正しく取り付けられたことを確 認
する方法がわかりません。
10ページの「PhysX を確認する」をご覧ください。
ASUS Ph y sX デバイスドライバが正しくインストールさ
れたことを確認する方 法がわかりません。
原因
解決策
ASUS Ph ysXTM インストールガイド
11ページの「PhysXカードドライバを確認する」をご覧ください。
Page 85

83
3.2 ASUS PhysX カードを確認する
1. デスクトップで、マイコンピュ
ータを右クリックし、
プロパティ → ハードウェア
の順にクリックします。
デバイスマネージャ を
2.
クリックします。
デバイスマネージャ ウィ
3.
ンドウのリストに ASU S
PhysX ca rd が確認できた
ら、5 番に進みます。
4. ASUS PhysX が確認できな
い場合は、カードを取り付け
直し、 IDE ケーブルを接続し、
直してください。
5. A S US Phy s X C ard を右ク
リックして、
択します。
全般タブをクリックします。
6.
デバイスの 状態のテキスト
7.
ボックスに「このデバイスは正
常に動作しています。」という
メッセージが表示された場合
は、9番に進みます。
デバイスの 状態でメッセー
8.
ジが表示されない場合は、
ASUS PhysX デバイスドラ
イバを再インストールするか、
Windows のトラブルシュー
ティングをご利用ください。
デバイスマネージャを退出
9.
します。
プロパティを選
日本語
ASUS Ph ysXTM インストールガイド
Page 86

84
3.3 ASUS PhysX ドライバを確認する
1. デスクトップで マイコンピュータ アイコンを右クリックし、
プロパティ → ハードウェア タブの順にクリックします。
デバイスマネージャ をクリックします。
2.
3. ASUS PhysX カードとドライバが正しく設定され、IDE 電源がカードに供給されてい
ると、
ます。
4.
5.
6.
が表示されます。
7. デバイスマネージャ から退出します。
デバイスマネージャ ウィンドウにA S US Phy sX c ard アイコンが表示され
ASUS Ph y sX Car d アイコンを右クリックし、プロパティ tを選択します。
ドライバ タブをクリックします。
ドライバファイルの 詳 細 ウィンドウには ASUS PhysX Card デバイスドライバ情報
日本語
ASUS Ph ysXTM インストールガイド
Page 87

85
4. ドライバとユーティリティを
アンインストールする
手順
スタート → コントロールパネル → プログラムの追 加と削除の順に選択し
1.
ます。
ASUS Ph y sX アイコン を選択します。
2.
削除 ボタンをクリックします。
3.
4. アンインストーラの言語を選択して OK をクリックします。
5. AS U S P hys X アンインストールダイアログボックスではいをクリックすると
ASUS PhysX ドライバとユーティリティは削除されます
または
いいえをクリックすると ASUS PhysX ドライバとユーティリティのアンインストール
をキャンセルします。
ASUS Ph ysXTM インストールガイド
日本語
Page 88

86
TM
华硕® PhysX
安装指南
简体中文
Page 89

SC2 4 9 8
第一版
200 6 年 3月
版权所有 • 不得翻印 © 2006 华硕电脑
本产品的所有部分 , 包括配件与软件等 , 其所有权都归华硕电脑公司 ( 以下简称华硕 )
所有 , 未经华硕公司许可 , 不得任意仿制、拷贝、腾抄或转译。本使用手册没有任何
形式的担保、立场表达或其他暗示。若有任何因本使用手册或其所提到之产品的所
有信息 , 所引起直接或间接的资料流失、利益损失或事业终止 , 华硕及其所属员工恕
不为其担负任何责任。除此之外 , 本使用手册所提到的产品规格及信息仅供参考 , 内
容亦会随时更新 , 恕不另行通知。本使用手册的所有部分 , 包括硬件及软件 , 若有任
何错误 , 华硕没有义务为其担负任何责任。
用户手册中所谈论到的产品名称仅做识别之用 , 而这些名称可能是属于其他公司的注
册商标或版权。
本产品的名称或版本都会印在主板 / 显卡上 , 版本数字的编码方式是用三个数字组成 ,
并有一个小数点做间隔 , 如 1.22、1.24 等 ...... 数字越大 , 表示版本越新 , 而越左边位
数的数字更动表示更动幅度也越大。主板 / 显卡、BIOS 或驱动程序改变 , 用户手册
都会随之更新。更新的详细说明请您到华硕的互联网站上浏览或是直接与华硕公司
联系。
87
简体中文
华硕 Ph y s XTM 安装指南
Page 90

88
目录
安全性须知..................................................................................................... 89
1. 华硕® P h ys XTM 安 装 .... .. . .. .. . .. . .. .. . .. .. . .. . .. .. . .. .. . .. . .. .. . .. .. . .. . . 9 0
1.1 安装要求 ...................................................................................... 90
1.2 华硕® PhysX 卡安装 .................................................................... 90
1.3 华硕® PhysX 驱动程序安装 ......................................................... 92
2. Ph y sXTM 控 制 面板 .. .. . .. . .. .. . .. .. . .. . .. .. . .. .. . .. . .. .. . .. .. . .. . .. .. . .. .. . . 9 5
2.1 启用 PhysX 控制面板 ..................................................................95
2.2 信息 ...........................................................................................
2.3 演示 ...........................................................................................
2.4 设置 ...........................................................................................
2.5 帮助 ...........................................................................................
3. 问题 解 决 . .. . .. .. . .. .. . .. . .. .. . .. .. . .. .. . .. . .. .. . .. .. . .. . .. .. . .. .. . .. . .. .. . .. 98
3.1 问题及解决方法表 .......................................................................98
3.2 检验华硕 PhysX 卡 ...................................................................... 99
3.3 检验华硕 PhysX 驱动程序 ......................................................... 100
96
96
97
97
4. 卸载 驱 动和 应用 程 序 ... .. . .. .. . .. . .. .. . .. .. . .. . .. .. . .. .. . .. . .. .. . .. .. . .. . . 1 01
简体中文
华硕 Ph y s XTM 安装指南
Page 91

89
安全性须知
电气 安全 性
• 为了避免可能的电击造成严重伤害,在搬动电脑以前请务必将电脑电源线从电
源插座中拔掉。
• 当您要安装或移除硬件时,请确保在连接该设备的信号线前,电源线已被拔掉。
如果可能的话,在安装以前请先拔掉电脑的所有电源线。
• 当您要从主板连接或拔除任何信号线以前,请确保所有的电源线已事先拔掉。
• 在使用适配卡或扩展卡以前,我们建议您可以先寻求专业人士的帮助。因为这
些设备有可能会干扰到接地的回路。
• 请确定电源的电压已调整到本国/本区所使用标准值。若您不确定您所属区域
的电压标准值,请就近询问当地的电力公司人员。
• 若电源已损坏,请不要尝试自行修理。请尽快与专业技术服务人员或经销商联
系。
操作安全性
• 在您安装主板或硬件设备前,请务必详细阅读本手册里的相关信息。
• 在使用产品之前,请确定所有的排线、电源线都已正确连接好。若您发现有任
何重大的瑕疵,请尽快联系您的经销商。
• 为避免发生电路短路的问题,请务必将所有多余的螺丝、回形针及其他零件收
好,不要遗留在主板上或电脑主机中。
• 灰尘、湿气以及剧烈的温度变化都会影响到主板的使用寿命。因此请尽量避免
放置在这些地方。
• 请勿将电脑主机放置在容易摇晃的地方。
• 若在本产品的使用上有任何的技术性问题,请尽快和专业技术服务人员或经销
商联系。
这个画叉的带轮子的箱子表示这个产品(电子设备)不能直接放入垃圾
箱中。请根据不同地方的规定处理电子产品。
华硕 Ph y s XTM 安装指南
简体中文
Page 92

90
1. 华硕
®
PhysXTM 安装
1.1 安装要求
为确保成功安装 PhysX 卡,您的计算机需符合以下最低要求:
(注意:用户购买的游戏可能有更高的规格要求。以下的规格如果发生改变,恕不另行通知。)
• Intel Pentium 4,Intel Celeron,AMD AthlonTM 64,AMD SempronTM 或 AMD
AthlonTM XP
• Microsoft Windows XP/Professional/Home (32bit 版本),带 SPI
• 256MB 系统内存
• 推荐大多数游戏使用 Geforce6800、Radeon X800 显卡或更高版本
• 50MB 空置硬盘空间
• PCI 2.2 插槽,3.3V
• 可用的 4-pin 外接电源线
安装之前,检查您的华硕 PhysX 卡包装盒内是否包含以下项目:
• 华硕 PhysXTM PPU 卡
• 华硕 PhysXTM PPU 随机光盘
• 产品序列号
• 光盘序列号
上述项目齐备之后,您可以开始两步安装,包括:(1) 卡安装,(2) 驱动安装。
1.2 华硕® PhysXTM 卡安装
安装华硕 PhysX 卡:
1. 触摸机箱后面或侧面金属板以防止静电。
2. 关闭计算机、显示器和其他与计算机连接设备的电源。
3. 从计算机和外部插座上拔下电源线。
简体中文
4. 移除机箱盖。
5. 在主板上找到一个空置的 5 V/3.3 V PCI 插槽用来安装华硕 PhysX 卡。
华硕 Ph y s XTM 安装指南
Page 93

91
6. 将 PhysX 卡对准 PCI 插槽均匀向下按,直至卡完全插入至对应槽位中。确保金
手指正确地插入插槽。
金手指
7. 将支架螺丝锁紧以固定 PhysX 卡。见下图的支架螺丝孔。
8. 如下图所示,将一条 4-pin 外接电源线连接到 PhysX 卡上的电源接口。
4-p i n 外 接 电 源 线
支架螺 丝 孔
简体中文
华硕 Ph y s XTM 安装指南
Page 94

92
9. 重新装上机箱盖。
10. 重新连接所有接线。
11. 将电源线连接到计算机,并接入墙上的插座。
12. 打开计算机电源。
1.3 华硕® PhysX
安装好 PhysX 卡并打开计算机电源之后,您需要安装驱动,以在 Windows 操作系统
下运行 PhysX 卡。
(注意:随机光盘的版本若有变动恕不另行通知。)
如果您已经安装了华硕 PhysX 卡,那么在安装驱动之前或过程中可能会弹出发现新
硬件向导窗口。见下图。
TM
驱动程序安装
安装设备驱动程序:
简体中文
1. 在
2. 将华硕 PhysX 随机光盘放入您的光驱中。若您的计算机自动运行此光盘,请转至
步骤 5。
点击您桌面上的我的电脑。
3.
华硕 Ph y s XTM 安装指南
找到新的硬件向导窗口中点击取消。
Page 95

4. 双击光 驱 图标,
将 出 现 华 硕
PhysX 卡驱动程
序页面。
5. 在 华 硕 P h y s X
卡驱 动 程序页面
中双击 In s t a l l
Dr i ve r (安 装
驱动程 序 ) .
出现指导您程序
设置过程的安装
向导。
93
6. 点 击 安 装向 导
欢 迎 页 面上 的
N e x t ( 下 一
步)。
华硕 Ph y s XTM 安装指南
简体中文
Page 96

94
7. 在 安 装 向 导 窗 口 中
点击 N e x t ( 下 一
步)。
默认选择
(典型 ) 安装。
8. 在
口中选择我接受 ,
或点击
安装程序。
华硕 PhysX 装置
驱动器已拷贝到您
的系统中。
安装过程可能需要
几分钟时间完成。
T y p i c a l
许可证 协 议 窗
取消退出
简体中文
华硕 Ph y s XTM 安装指南
9. 点击
口中的关闭,退出
华硕 PhysX 安装程
序。安装完成。
安装已完成窗
Page 97

注意:如果您还没有安装华硕 PhysX 卡,窗口将提示您安装,并弹出对话框给
您附加的说明。
10. 选择 Y e s (是)重启您的电脑,或选择 No (否)稍后重启。点击 F i ni s h
(完成)以退出安装向导。
95
2. PhysXTM 控制面板
使用 PhysX 控制面板功能可以获得 PhysX 驱动和硬件信息、查看演示、修改系统设
置,以及技术支持。
2.1 启用 PhysX 控制面板
启用华硕 PhysX 控制面板:
选择 开始 > 控 制 面 板 > A G E IA P h ys X ,
或
右击 PhysX 系统任务栏图标, 然后选择 Age i a Ph y s X 设 置 。
华硕 Ph y s XTM 安装指南
简体中文
Page 98

96
2.2 信息
信息窗口显示了 PhysXTM 驱动和硬件的信息。
2.3 演示
在演示窗口,点击 AGE I A P h y sX b ox e s De m o 图标启动已安装的演示。
简体中文
华硕 Ph y s XTM 安装指南
Page 99

2.4 设置
在设置窗口您可以:
• 点击复位 P hy s X 卡按 钮 , 进
行 PhysX 卡软复位。
• 选择显示系统托盘图标单选框,
在您电脑桌面上显示图标。
• 点击启 动可扩展 的诊断程 序,
启动华硕 PhysX 卡的扩展诊断
并在文本
框中显示诊断结果。
• 点击将报告保存到文件中,以将
诊断信息保存至文件,用于日后
的技术支持。
2.5 帮助
在帮助窗口您可以:
• 点击 Check for Updates Online
按钮以获得驱动的更新信息或在
线更新驱动。
• 点击说明文件以查看华硕 PhysX
卡的更多信息。
97
华硕 Ph y s XTM 安装指南
简体中文
Page 100

98
3. 问题解决
若您在安装过程中遇到问题,请尝试下面的方法。您可以联系供应商获取更多帮
助。
3.1 问题及解决方法表
问题
原因
解决方法
问题
原因
解决方法
问题
在 驱 动 的 安 装 过 程 中 出 现 信 息 : “ 将 设 备 连 接 到 计 算 机 ”
4-pin 外接电源线未连接到卡上。
将 4-pin 外接电源线插到卡上。
我 需 要 检 验 华 硕 P h y s X 卡 是 否 安 装 成 功
参照第 10 页“检验 PhysX 卡”的说明。
我 需 要 检 验 华 硕 P h y s X 设 备 驱 动 是 否 安 装 成 功
原因
简体中文
解决方法
华硕 Ph y s XTM 安装指南
参照第 11 页“检验 PhysX 卡驱动程序”的说明。
 Loading...