


Asus O!PLAY BDS-700, O!PLAY BDS-500 Manual
O!PLAY
Blu-ray/HD Media Player
BDS-700/BDS-500
Owner’s Manual
Copyright © 2011
All Rights Reserved
O!PLAY Blu-ray/HD Media Player BDS-700/BDS-500 Owner’s Manual
Original Issue: August 2011
Changes may be made periodically to the information in this publication without obligation to notify any person of such revision or changes. Such changes will be incorporated in new editions of this manual or supplementary documents and publications. ASUS makes no representations or warranties, either expressed or implied, with respect to the contents hereof and specifically disclaims the implied warranties of merchantability or fitness for a particular purpose.
Record the model number, serial number, purchase date, and place of purchase information in the space provided below. The serial number and model number are recorded on the label affixed to your player. All correspondence concerning your unit should include the serial number, model number, and purchase information.
O!PLAY Blu-ray/HD Media Player BDS-700/BDS-500
Model Number : __________________________________
Serial Number:____________________________________
Purchase Date: ___________________________________
Place of Purchase: ________________________________
All trademarks and registered trademarks are the properties of their respective companies.
1
NOTICE
NOTICE iii
The exclamation point within an equilateral triangle is intended to alert the user to the presence of important operating and maintenance (servicing) instructions in the literature accompanying the product.
Cautions and Warnings
WARNING: TO PREVENT FIRE OR ELECTRIC SHOCK HAZARD, DO NOT EXPOSE THIS PRODUCT TO RAIN OR MOISTURE.
WARNING: Do not install this equipment in a confined space such as a book case or similar unit.
CAUTION: Do not block any ventilation openings. Install in accordance with the manufacturer’s instructions. Slots and openings in the system are provided for ventilation and to ensure reliable operation of the product and to protect it from over heating. The openings shall be never be blocked by placing the product on a bed, sofa, rug or other similar surface. This product shall not be placed in a built-in installation such as a bookcase or rack unless proper ventilation is provided or the manufacturer’s instruction has been adhered to.
 Safety Information
CAUTION: TO REDUCE THE RISK OF ELECTRIC SHOCK. DO NOT REMOVE COVER (OR BACK). NO USER SERVICEABLE PARTS INSIDE. REFER SERVICING TO QUALIFIED SERVICE PERSONNEL.
This lightning flash with arrowhead symbol within an equilateral triangle is intended to alert the user to the presence of uninsulated dangerous voltage within the product’s enclosure that may be of sufficient magnitude to constitute a risk of electric shock to anyone.
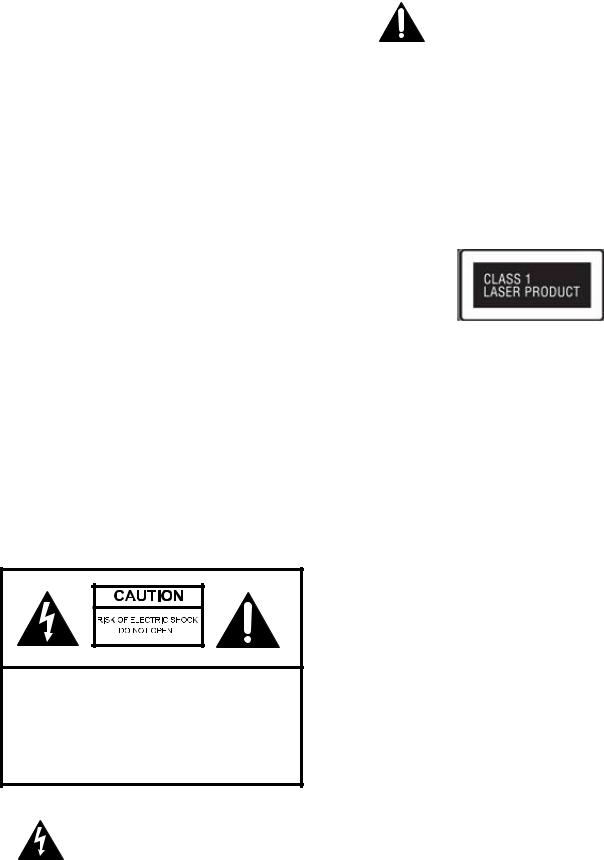
 Laser compliance statement
The optical drive in this player is a laser product. The optical drive’s classification label (shown below) is located on the drive.
CAUTION: CLASS 3B VISIBLE OR INVISIBLE LASER RADIATION WHEN OPEN. DO NOT STARE INTO BEAM.
 Important Safety Instructions
1.Read these instructions.
2.Keep these instructions.
3.Heed all warnings.
4.Follow all instructions.
5.Do not use this apparatus near water.
6.Clean only with dry cloth.
7.Do not block any ventilation openings. Install in accordance with the manufacturer’s instructions.
8.Do not install near any heat sources such as radiators, heat registers, stoves, or other apparatus (including amplifiers) that produce heat.
9.Do not defeat the safety purpose of the polarized or grounding-type plug. A polarized plug has two blades with one wider than the other. A grounding type plug has two blades and a third grounding prong. The wide blade or the third prong are provided for your safety. If the provided plug does not fit into your outlet, consult an electrician for replacement of the obsolete outlet.
10.Protect the power cord from being walked on or pinched particularly at plugs, convenience receptacles, and the point where they exit from the apparatus.
11.Only use attachments/accessories specified by the manufacturer.

iv
12. Use only with the cart, stand, tripod, bracket, or table specified by the manufacturer, or sold with the apparatus. When a cart is used, use caution when moving the cart/apparatus combination to avoid injury from tip-over.
13.Unplug this apparatus during lightning storms or when unused for long periods of time.
14.Refer all servicing to qualified service personnel. Servicing is required when the apparatus has been damaged in any way, such as power-supply cord or plug is damaged, liquid has been spilled or objects have fallen into the apparatus, the apparatus has been exposed to rain or moisture, does not operate normally, or has been dropped.
15.The apparatus shall not be exposed to dripping or splashing and that no object filled with liquids, such as vases, shall be placed on the apparatus.
Warning: To reduce the risk of fire or electric shock, do not expose this apparatus to rain or moisture.
16.The player shall be connected to a mains socket outlet with a protective earthing connection.
17.An appliance coupler is used as the disconnect device, the disconnect device shall remain readily operable.
 FCC Statement
This device complies with Part 15 of the FCC Rules. Operation is subject to the following two conditions:
(1)This device may not cause harmful interference.
(2)This device must accept any interference received, including interference that may cause undesired operation.
Warning! This equipment has been tested and found to comply with the limits for a Class B digital device, pursuant to Part 15 of the FCC Rules. These limits are designed to provide reasonable protection against harmful interference when the equipment is
operated in a commercial environment. This equipment generates, uses and can radiate radio frequency energy and, if not installed and used in accordance with the instructions, may cause harmful interference to radio communications. Operation of this equipment in a residential area is likely to cause harmful interference in which case the user will be required to correct the interference at his own expense.

Contents
1
NOTICE
Cautions and Warnings |
iii |
Safety Information |
iii |
Laser compliance statement |
iii |
Important Safety Instructions |
iii |
FCC Statement |
iv |
2
Introductions
Playable Discs |
1 |
File Compatibility |
2 |
3
Parts And Control
Opening the Box |
4 |
The Remote Control |
5 |
The Blu-ray/HD Media Player |
7 |
Front Panel |
7 |
LCD Display |
7 |
Rear Panel |
8 |
4
Installation
Connecting the Blu-ray/HD Media Player |
9 |
Connecting the player to your display |
9 |
Connecting your player to your AVR |
10 |
Connecting a USB device |
11 |
Connecting the AC power cord |
11 |
Preparing the Remote Control |
12 |
Network Connections |
12 |
Wired Network Connection |
12 |
Wireless Network Connection |
12 |
5
Getting Started
Easy Setup Wizard |
14 |
Network Setup |
15 |
Wired Network Setup |
15 |
Wireless Network Setup |
16 |
6
General Operation
Home Menu Overview |
17 |
Playing BD-Video/DVD-Video/Audio CD Disc |
17 |
Enjoying BD-LIVE |
17 |
Enjoying Blu-ray 3D |
17 |
Region Code |
18 |
v
Playing Video Files |
18 |
To access video files in the Video menu: |
18 |
File Folder Playback |
18 |
Playing Photo Files |
18 |
To access photo files in the Photo menu: |
18 |
Playing Music/Audio Files |
19 |
To access music files in the Music menu: |
19 |
Accessing Internet Services |
20 |
Youtube |
20 |
Internet Radio |
20 |
Picasa |
20 |
Flickr |
21 |
Option Menu |
21 |
Under Disc, Video and Music Playback |
21 |
Under Photo Playback |
22 |
7
Advanced Operation
Special functions on Remote Control |
23 |
DLNA operation |
25 |
Setup Menu |
25 |
Playback |
25 |
Video |
26 |
Audio |
26 |
Network |
27 |
8
Appendix
Maintenance |
28 |
Notes on Discs |
28 |
Handling the Unit |
28 |
Updating the Firmware |
28 |
Manual Update |
28 |
Online Update |
28 |
Troubleshooting |
30 |
Parental Control Area Code |
31 |
Trademarks and Licenses |
32 |
Video Output Resolution |
34 |
Audio Output Resolution |
35 |
Speaker Setup (Under PCM Multi-channel mode) |
36 |
File Format Support and Limitation |
37 |
Product Specifications |
41 |
Important Information Relating to Network Service42
Internet Radio Service Notice |
42 |
Open Source Software Notice |
42 |
1
2
Introductions
Playable Discs
Type |
Disc Logo |
Type Detail |
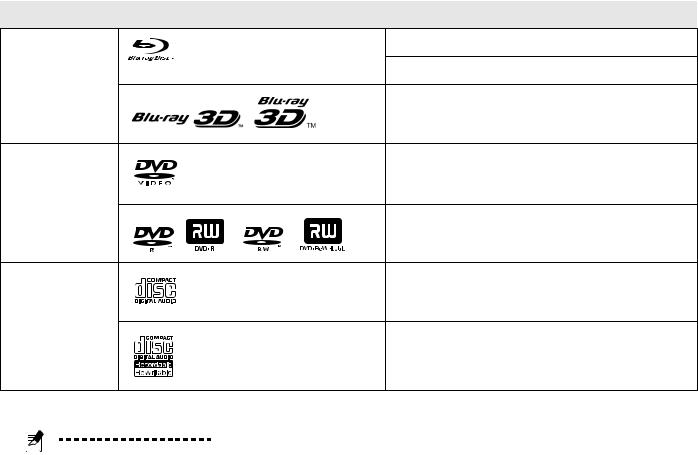
Blu-Ray Disc* |
|
BD-Video |
|
|
BD-R, BD-RE,BD-ROM |
|
|
3D BD-Video |
DVD Disc |
|
DVD-Video |
|
|
DVD-ROM, DVD+R, DVD-R, DVD+RW, |
|
|
DVD-RW |
CD Disc |
|
Audio CD |
|
|
CD-R, CD-RW, CD-ROM |
Notes:
1.Customers should note that permission is required in order to download MP3 / WMA files and music from the Internet. ASUS has no right to grant such permission.
Permission should always be sought from the copyright owner.
2.Since the Blu-ray Disc specifications are new and evolving, some discs may not be playable depending on the disc type and the version.
3.Depending on the recording software & the finalization, some recorded discs (CD-R/RW, DVD±R/ RW, BD-R/RE) may not be playable.
4.BD-R/RE, DVD±R/RW and CD-R/RW discs recorded using a personal computer or a DVD or CD Recorder may not play if the disc is damaged or dirty, or if there is dirt or condensation on the player’s lens.
5.If you record a disc using a personal computer, even if it is recorded in a compatible format, there are cases in which it may not play because of the settings of the application software used to create the disc. (Check with the software publisher for more detailed information.)
6.This player requires discs and recordings to meet certain technical standards in order to achieve optimal playback quality.
7.Depending on the conditions of the recording equipment or the CD-R/RW (or DVD±R/RW) disc itself, some CD-R/ RW (or DVD±R/RW) discs cannot be played on the unit.
8.Pre-recorded DVDs are automatically set to these standards. There are many different types of recordable disc formats (including CD-R containing MP3 or WMA files) and these require certain pre-existing conditions to ensure compatible playback.

File Compatibility
Note: See “File Format Support and Limitation” on page 37 for more details on limitations.
USB External Storage
Supported: USB Mass storage class devices. Max. 1 Ampere current supply for each USB port.
File System
Supported: FAT16, FAT32, NTFS, EXT3.
AV File Formats
Supported: Avi, DivX, Mkv, Ts (m2t), Mt2s (.mts), Mpg, Vob, Mpeg, Wmv/Asf, Mov, Mp4, 3gp, M4v, Flv, Rmvb
Audio File Formats
Supported: Mp3, Wma, Flac, Aac, Ogg, Wav, Ac3,
Mka, Aiff, M4a, Dts
Picture File Formats
Supported: Bmp, Jpg, Jpeg, Png, Gif, Tif, Tiff
Subtitle File Formats
Supported: PGS, Sub+IDX, Smi, Srt, Ssa
ISO file and Others
Supoprted: BD-ISO, DVD-ISO (vob+ifo), file folder playback as ISO with BD/DVD folder (BDMV/ Video_TS folder inside)
Disc Support BD Media
Supported: BD-Rom, BD-RE SL, DL, BD-R SL, DL BD Profile supported: 1.0/1.1/2.0/5.0 (3D)
Disc Support DVD Media
Supported: DVD-Video SL/DL, DVD-R DL, DVD-
RW, DVD+R/DVD+R DL
Disc Support CD Media
Supported: CD-DA, CD-R/CD-RW
Others
Supported: AVCHD, BD managed copy disc
AVCHD
AVCHD (Advanced Video Codec High Definition)
•This player can playback AVCHD format discs. These discs are normally recorded and used in camcorders.
Introductions 2
•The AVCHD format is a high definition digital video camera format.
•The MPEG-4 AVC/H.264 format is capable of compressing images at higher efficiency than that of the conventional image compressing format.
•Some AVCHD discs use the “x.v.Color” format.
•This player can playback AVCHD discs using “x.v.Color” format.
•Some AVCHD format discs may not play depending on the recording condition.
•AVCHD format discs need to be finalized.
•“x.v.Color” offers a wider color range than normal DVD camcorder discs.
AVCHC and AVCHD logo are trademarks of Matsushita Electronic Industrial Co., Ltd. And Sony Corporation.
DivX® Plus HD
DivX Plus HD was launched in 2009 and is the brand name for the file type that DivX, Inc. has chosen for their high definition video format. DivX Plus HD files consist of high definition H.264/MPEG- 4 AVC video with surround sound Advanced Audio Coding (AAC) audio, wrapped up in the openstandard Matroska container, identified by the .mkv file extension. DivX Plus HD files leverage and extend on Matroska's ability to support multiple language tracks, subtitles, chapters, and additional bonus content.
DivX® Plus HD Profile
DivX has defined profiles which are subsets of MPEG-4/AVI and H264/MKV standards. Because the grouping is a specific subset of what is in the standards, there are certification processes for each of the profiles that device manufacturers must follow.
All DivX Plus HD certified devices bearing a DivX Plus logo will adhere to the profile outlined in the table below, as would any tools that support the DivX profiles. DivX Plus HD devices are also tested for compliance against the DivX HD 1080p profile for MPEG4/AVI certification in order to maintain backwards compatibility.
3
Profile |
+HD 1080p |
|
|
Codec |
MPEG4 part 10 (H.264) |
|
|
File Extension(s) |
.mkv |
|
|
Max. resolution |
1920×1080×30, |
(px×px×Hz) |
1280×720×60 |
|
|
Max VBV bit rate (bit/s) |
VCL: 20000000, |
|
NAL: 24000000 |
|
|
Min. VBV buffer size |
VCL: 3200, NAL: 3840 |
(KiB) |
|
|
|
Macroblocks |
244800 |
(per second) |
|
|
|
Subtitles |
8×SRT, SSA |
|
|
Audio |
8×MP3,AC3,AAC |
|
|
Compatibility Note
Because BD-ROM is a new format, certain disc, digital connection and other compatibility issues are possible. If you experience compatibility problems, please contact ASUS Customer Service Center.
Viewing high-definition content and upconverting standard DVD content may require a HDMI-capable input or HDCP capable DVI input on your display device.
Some BD-ROM and DVD discs may restrict the use of some operation commands or features.
Dolby TrueHD, Dolby Digital Plus and DTSHD are supported with maximum 7.1 channels if you use HDMI connection for the audio output of the unit.
3
Parts And Control
Opening the Box
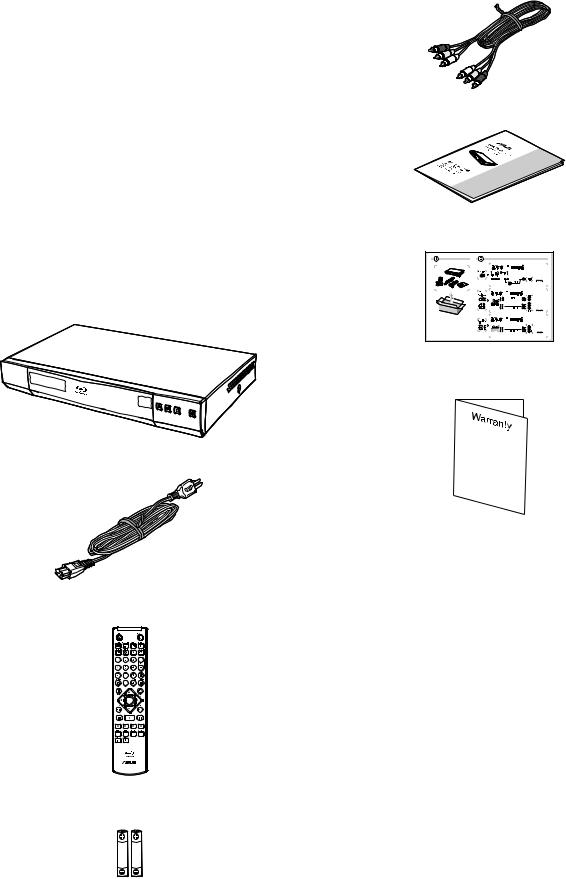
Please check if the following items are inside the box:
Blu-ray/HD Media Player
Power Cord
Remote Control
AAA Battery x 2
Parts And Control 4
Audio/Video Cable
Owner’s Manual
Quick Start Guide
Warranty Card
5
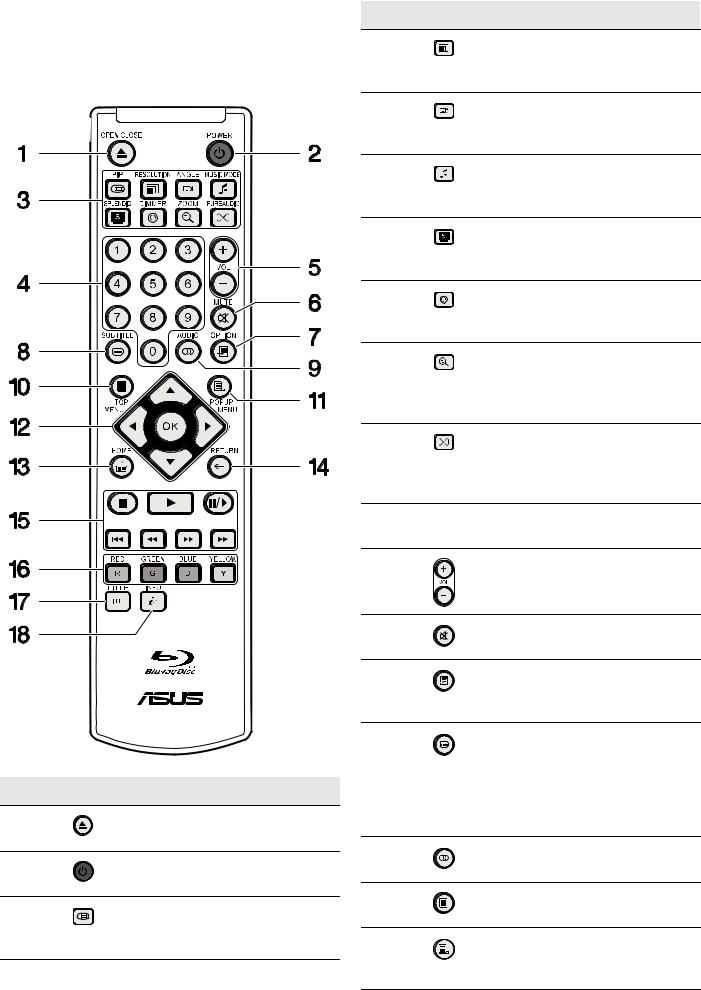
The Remote Control
The available functions of the remote control differ depending on the media/disc inserted or situation.
No. |
Icon |
Descriptions |
1 |
|
[OPEN/CLOSE] Open or closes |
|
|
the disc tray. |
2 |
|
[POWER] Toggles between |
|
|
power on and standby. |
3 |
|
[PIP] Turns on/off Bonus view |
|
|
PIP/SAP. See “PIP” on page 23 |
|
|
for more information. |
No. |
Icon |
Descriptions |
|
|
[RESOLUTION] Switch output |
|
|
resolution. See “Resolution” on |
|
|
page 23 for more information. |
|
|
[ANGLE] Changes camera |
|
|
angle. See “Angle” on page 23 |
|
|
for more information. |
|
|
[MUSIC MODE] Select EQ |
|
|
modes. See “Music Mode” on |
|
|
page 23 for more information. |
|
|
[SPLENDID] Selects scene |
|
|
modes. See “Splendid” on page |
|
|
23 for more information. |
|
|
[DIMMER] Turns on/off theLCD |
|
|
Display. See “Dimmer” on page |
|
|
23 for more information. |
|
|
[ZOOM] Change zoom in and |
|
|
out level of display frame. See |
|
|
“Zoom” on page 23 for more |
|
|
information. |
|
|
[PURE AUDIO] Turns off video |
|
|
output (HDMI may output |
|
|
black). See “Pure Audio” on |
|
|
page 24 for more information. |
4 |
|
0~9 Numeric buttons: Enters |
|
|
the title/chapter numbers, etc. |
5 |
|
[VOL] Adjust the volume of the |
|
|
display. |
6 |
|
[MUTE] Turns off audio output. |
7 |
|
[OPTION] Turns on the option |
|
|
menu. Different file formats |
|
|
have different options. |
8 |
|
[SUBTITLE] Change or turn off |
|
|
subtitle language. Press this |
|
|
button 2 times within two (2) |
|
|
seconds to switch between |
|
|
subtitle tracks when viewing |
|
|
DivX encoded video. |
9 |
|
[AUDIO] Changes audio |
|
|
languages or channels. |
10[TOP MENU] Invoke Blu-ray top menu or DVD title menu.
11[POPUP MENU] Invoke Blu-ray Pop up menu or DVD title menu.
Parts And Control 6
No. |
Icon |
Descriptions |
12 |
|
Move the highlight to select |
|
|
displayed item. |
Note: The up, down, left and right direction keys will be represented by ↑,↓,← ,→ symbols in the instructions.
Confirmation of selected item in menu.
13[HOME] Go to Home Menu of the player.
14[RETURN] Back to previous menu or mode.
15 |
[STOP] Stop playback. |
[PLAY] Play selected media.
[PAUSE] Pause selected media.
[PREVIOUS] Skip to previous track of chapter.
[REVERSE] Fast reverse playback.
[FORWARD] Fast forward playback.
[NEXT] Skip to next track or chapter.
16 |
Shortcut keys for interactive |
|
functions based on contents. |
17 |
[TITLE] Only applicable with |
|
DivX file format. During |
|
playback of a file with multiple |
|
titles or editions, pressing |
|
TITLE button will start playback |
|
of the next title or edition |
18 |
[INFO] Show media playback |
|
status informations. |
7
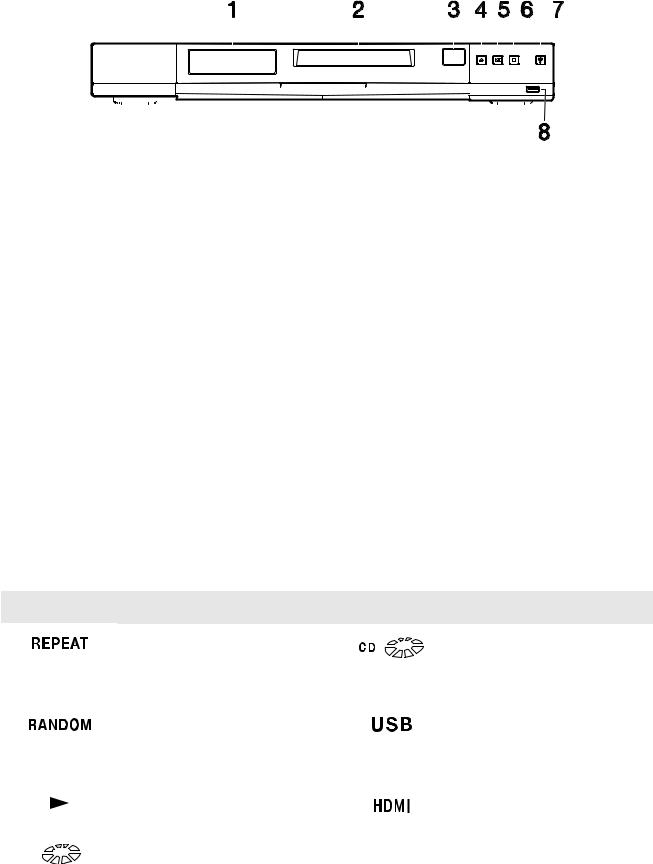
The Blu-ray/HD Media Player
 Front Panel
|
|
|
|
|
|
|
|
|
|
|
|
|
|
|
|
|
|
|
|
|
|
|
|
|
|
|
|
|
|
|
|
|
|
|
|
|
|
|
|
|
|
|
|
|
|
|
|
|
|
|
|
|
|
|
|
|
|
|
|
|
|
|
|
|
|
|
|
|
|
|
|
|
|
|
|
|
|
|
|
|
|
|
|
|
|
|
|
|
|
|
|
|
|
|
|
|
|
|
|
|
|
|
|
|
|
|
|
|
|
|
|
|
|
|
|
|
|
|
|
|
|
|
|
|
|
|
|
|
|
|
|
|
|
|
|
|
|
|
|
|
|
|
|
|
|
|
|
|
|
|
|
|
|
|
|
|
|
|
|
|
|
|
|
|
|
|
|
|
|
|
|
|
|
|
|
|
|
|
|
|
|
|
|
|
|
|
|
|
|
|
|
|
|
|
|
|
|
|
|
|
|
|
|
|
|
|
|
|
|
|
|
|
|
|
|
|
|
|
|
|
|
|
|
|
|
|
|
|
|
|
|
|
|
|
|
|
|
|
|
|
|
|
|
|
|
|
|
|
|
|
|
|
|
|
|
|
|
|
|
|
|
|
|
|
|
|
|
|
|
|
|
|
|
|
|
|
|
|
|
|
|
|
|
|
|
|
|
|
|
|
|
|
|
|
|
|
|
|
|
|
|
|
|
|
|
|
|
|
|
|
|
|
|
|
|
|
|
|
|
|
|
|
|
|
|
|
|
|
|
|
|
|
|
|
|
|
|
|
|
|
|
|
|
|
|
|
|
|
|
|
|
|
|
|
|
|
|
|
|
|
|
|
|
|
|
|
|
|
|
|
|
|
|
|
|
|
|
|
|
|
|
|
|
|
|
|
No. |
Item |
|
Description |
|||||||||||||||||||||||||||||||||||||||
|
|
|
|
|
|
|
|
|
|
|
|
|
|
|
|
|
|
|
|
|
|
|
|
|
|
|
|
|
|
|
|
|
|
|
|
|
|
|
|
|
|
|
1 |
LCD Display |
|
Displays status of the player. |
|||||||||||||||||||||||||||||||||||||||
2 |
Disc Tray |
|
Place disc on the tray to play. |
|||||||||||||||||||||||||||||||||||||||
3 |
IR Receiver |
|
For receiving signals from the remote control. |
|||||||||||||||||||||||||||||||||||||||
4 |
Eject |
|
Eject the disc from the player. |
|||||||||||||||||||||||||||||||||||||||
5 |
Play / Pause |
|
Start and pause playback. |
|||||||||||||||||||||||||||||||||||||||
6 |
Stop |
|
Stop playback. |
|||||||||||||||||||||||||||||||||||||||
7 |
Power Switch / |
|
Turn player on or off. |
|||||||||||||||||||||||||||||||||||||||
|
Power Indicator Light |
|
Blue: On |
|||||||||||||||||||||||||||||||||||||||
|
|
|
|
|
|
|
|
|
|
|
|
|
Red: Standby |
|||||||||||||||||||||||||||||
8 |
USB Port |
|
Connects to an external device with USB connector like an |
|||||||||||||||||||||||||||||||||||||||
|
|
|
|
|
|
|
|
|
|
|
|
|
external hard drive, flash drive, or USB Wi-Fi network |
|||||||||||||||||||||||||||||
|
|
|
|
|
|
|
|
|
|
|
|
|
adapter (BDS-500 only). Maximum current output is 1 |
|||||||||||||||||||||||||||||
|
|
|
|
|
|
|
|
|
|
|
|
|
Ampere. |
|||||||||||||||||||||||||||||
 LCD Display
Icons Descriptions Icons Descriptions
Lights up when user enables the Repeat function. See “Under Disc, Video and Music Playback” on page 21 for more information.
Lights up when user enables the Random function. See “Under Disc, Video and Music Playback” on page 21 for more information.
Lights up during playback.
Lights up when Audio CD is present.
Lights up when an USB storage device is recognized.
Lights up when a HDMI device is detected.
Lights up when a disc is present. |
|
|
|
Lights up during pause. |
|
|
|||
|
|
|
|
|
Lights up when BD-Video is present.
Lights up when DVD-Video is present.
Parts And Control 8
Lights up when system detects Dolby Digital or Dolby Digital 5.1/6.1 audio file and starts playback.
Lights up when system detects DTS, DTS 5.1 or DTS 7.1 audio file and starts playback.
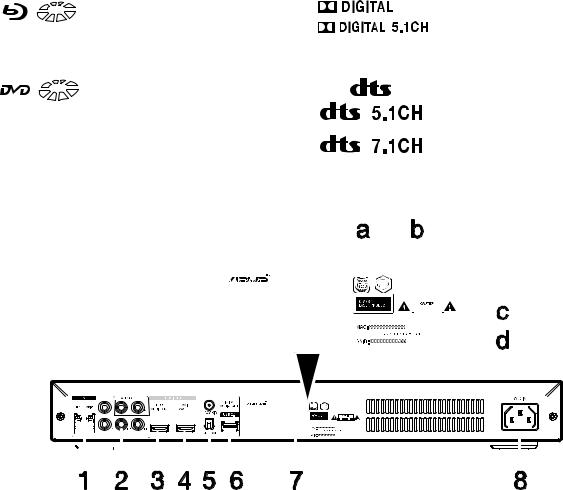
 Rear Panel
|
|
|
|
|
|
|
|
|
|
|
|
|
|
|
|
|
|
|
|
|
|
|
|
|
|
|
|
|
|
|
|
|
|
|
|
|
|
|
|
|
|
|
|
|
|
|
|
|
|
|
|
|
|
|
|
|
|
|
|
|
|
|
|
|
|
|
|
|
|
|
|
|
|
|
|
|
|
|
|
|
|
|
|
|
|
|
|
|
|
|
|
|
|
|
|
|
|
|
|
|
|
|
|
|
|
|
|
|
|
|
|
|
|
|
|
|
|
|
|
|
|
|
|
|
|
|
|
|
|
|
|
|
|
|
|
|
|
|
|
|
|
|
|
|
|
|
|
|
|
|
|
|
|
|
|
|
|
|
|
|
|
|
|
|
|
|
|
|
|
|
|
|
|
|
|
|
|
|
|
|
|
|
|
|
|
|
|
|
|
|
|
|
|
|
|
|
|
|
|
|
|
|
|
|
|
|
|
|
|
|
|
|
|
|
|
|
|
|
|
|
|
|
|
|
|
|
|
|
|
|
|
|
|
|
|
|
|
|
|
|
|
|
|
|
|
|
|
|
|
|
|
|
|
|
|
|
|
|
|
|
|
|
|
|
|
|
|
|
|
|
|
|
|
|
|
|
|
|
|
|
|
|
|
|
|
|
|
|
|
|
|
|
|
|
|
|
|
|
|
|
|
|
|
|
|
|
|
|
|
|
|
|
|
|
|
|
|
|
|
|
|
|
|
|
|
|
|
|
|
|
|
|
|
|
|
|
|
|
|
|
|
|
|
|
|
|
|
|
|
|
|
|
|
|
|
|
|
|
|
|
|
|
|
|
|
|
|
|
|
|
|
|
|
|
|
|
|
|
|
|
|
|
|
|
|
|
|
|
|
|
|
|
|
|
|
|
|
|
|
|
|
|
|
|
|
|
|
|
|
|
|
|
|
|
|
|
|
|
|
|
|
|
|
|
|
|
|
|
|
|
|
|
|
|
|
|
|
|
|
|
|
|
|
|
|
|
|
|
|
|
|
|
|
|
|
|
|
|
|
|
|
|
|
|
|
|
|
|
|
|
|
|
|
|
|
|
|
|
|
|
|
|
|
|
|
|
|
|
|
|
|
|
|
|
|
|
|
|
|
|
|
|
|
|
|
|
|
|
|
|
|
|
|
|
|
|
|
|
|
|
|
|
|
|
|
|
|
|
|
|
|
|
|
|
|
|
|
|
|
|
|
|
|
|
|
|
|
|
|
|
|
|
|
|
|
|
|
|
|
|
|
|
|
|
|
|
|
|
|
|
|
|
|
|
|
|
|
|
|
|
|
|
|
|
|
|
|
|
|
|
|
|
|
|
|
|
|
|
|
|
|
|
|
|
|
|
|
|
|
|
|
|
|
|
|
|
|
|
|
|
|
|
|
|
|
|
|
|
|
|
|
|
|
|
|
|
|
|
|
|
|
|
|
|
|
|
|
|
|
|
|
|
|
|
|
|
|
|
|
|
|
|
|
|
|
|
|
|
|
|
|
|
|
|
|
|
|
|
|
|
|
|
|
|
|
|
|
|
|
|
|
|
|
|
|
|
|
|
|
|
|
|
|
|
|
|
|
|
|
|
|
|
|
|
|
|
|
|
|
|
|
|
|
|
|
|
|
|
|
|
|
|
|
|
|
|
|
|
|
|
|
|
|
|
|
|
|
|
|
|
|
|
|
|
|
|
|
|
|
|
|
|
|
|
|
|
|
|
|
|
|
|
|
|
|
|
|
|
|
|
|
|
|
|
|
|
|
|
|
|
|
|
|
|
|
|
|
|
|
|
|
|
|
|
|
|
|
|
|
|
|
|
|
|
|
|
|
|
|
|
|
|
|
|
|
|
|
|
|
|
|
|
|
|
|
|
|
|
|
|
|
|
|
|
|
|
|
|
|
|
|
|
|
|
|
|
|
|
|
|
|
|
|
|
|
|
|
|
|
|
|
|
|
|
|
|
|
|
|
|
|
|
|
|
|
|
|
|
|
|
|
|
|
|
|
|
|
|
|
|
|
|
|
|
|
|
|
|
|
|
|
|
|
|
|
|
|
|
|
|
|
|
|
|
|
|
|
|
|
|
|
|
|
|
|
|
|
|
|
|
|
|
|
|
|
|
|
|
|
|
|
|
|
|
|
|
|
|
|
|
|
|
|
|
|
|
|
|
|
|
|
|
|
|
|
|
|
|
|
|
|
|
|
|
|
|
|
|
|
|
|
|
|
|
|
|
|
|
|
|
|
|
|
|
|
|
|
|
|
|
|
|
|
|
|
|
|
|
|
|
|
|
|
|
|
|
|
|
|
|
|
|
|
|
|
|
|
|
|
|
|
|
|
|
|
|
|
|
|
|
|
|
|
|
|
|
|
|
|
|
|
|
|
|
|
|
|
|
|
|
|
|
|
|
|
|
|
|
|
|
|
|
|
|
|
|
|
|
|
|
|
|
|
|
|
|
|
|
|
|
|
|
|
|
|
|
|
|
|
|
|
|
|
|
|
|
|
|
|
|
|
|
|
|
|
|
|
|
|
|
|
|
|
|
|
|
|
|
|
|
|
|
|
|
|
|
|
|
|
|
|
|
|
|
|
|
|
|
|
|
|
|
|
|
|
|
|
|
|
|
|
|
|
|
|
|
|
|
|
|
|
|
|
|
|
|
|
|
|
|
|
|
|
|
|
|
|
|
|
|
|
|
|
|
|
|
|
|
|
|
|
|
|
|
|
|
|
|
|
|
|
|
|
|
|
|
|
|
|
|
|
|
|
|
|
|
|
|
|
|
|
|
|
|
|
|
|
|
|
|
|
|
|
|
|
|
|
|
|
|
|
|
|
|
|
|
|
|
|
|
|
|
|
|
|
|
|
|
|
|
|
|
|
|
|
|
|
|
|
|
|
|
|
|
|
|
|
|
|
|
|
|
|
|
|
|
|
|
|
|
|
|
|
|
|
|
|
|
|
|
|
|
|
|
|
|
|
|
|
|
|
|
|
|
|
|
|
|
|
|
|
|
|
|
|
|
|
|
|
|
|
|
|
|
|
|
|
|
|
|
|
|
|
|
|
|
|
|
|
|
|
|
|
|
|
|
|
|
|
|
|
|
|
|
|
|
|
|
|
|
|
|
|
|
|
|
|
|
|
|
|
|
|
|
|
|
|
|
|
|
|
|
|
|
|
|
|
|
|
|
|
|
|
|
|
|
|
|
|
|
|
|
|
|
|
|
|
|
|
|
|
|
|
|
|
|
|
|
|
|
|
|
|
|
|
|
|
|
|
|
|
|
|
|
|
|
|
|
|
|
|
|
|
|
|
|
|
|
|
|
|
|
|
|
|
|
|
|
|
|
|
|
|
|
|
|
|
|
|
|
|
|
|
|
|
|
|
|
|
|
|
|
|
|
|
|
|
No. |
Item |
Description |
|||||||||||||||||||||||||||||||||||||||||||||||||||||||||||||||
|
|
|
|
|
|
|
|
|
|
|
|
|
|
|
|
|
|
|
|
|
|
|
|
|
|
|
|
|
|
|
|
|
|
|
|
|
|
|
|
|
|
|
|
|
|
|
|
|
|
|
|
|
|
|
|
|
|
|
|
|
|
|
|
|
|
1 |
LAN Port |
Connects to a LAN cable. |
|||||||||||||||||||||||||||||||||||||||||||||||||||||||||||||||
2 |
Component and Composite Ports |
Y, Pb, Pr, Yellow, Red and White connectors for video and |
|||||||||||||||||||||||||||||||||||||||||||||||||||||||||||||||
|
|
|
|
|
|
|
|
|
|
|
|
|
|
|
|
|
|
|
|
|
|
|
audio left/right output. |
||||||||||||||||||||||||||||||||||||||||||
3 |
HDMI Sub Audio Out |
Connects to Audio only HDMI input devices. Available |
|||||||||||||||||||||||||||||||||||||||||||||||||||||||||||||||
|
|
|
|
|
|
|
|
|
|
|
|
|
|
|
|
|
|
|
|
|
|
|
only for BDS-700 model. |
||||||||||||||||||||||||||||||||||||||||||
4 |
Main AV Out |
Connects to HDMI input devices such as LCD TVs or |
|||||||||||||||||||||||||||||||||||||||||||||||||||||||||||||||
|
|
|
|
|
|
|
|
|
|
|
|
|
|
|
|
|
|
|
|
|
|
|
Audio Video Receiver (AVR). |
||||||||||||||||||||||||||||||||||||||||||
5 |
Audio Ports |
Digital audio output ports for coaxial and optical input |
|||||||||||||||||||||||||||||||||||||||||||||||||||||||||||||||
|
|
|
|
|
|
|
|
|
|
|
|
|
|
|
|
|
|
|
|
|
|
|
devices such as surround sound systems. |
||||||||||||||||||||||||||||||||||||||||||
6 |
USB Port |
Connects to an external device with USB connector like |
|||||||||||||||||||||||||||||||||||||||||||||||||||||||||||||||
|
|
|
|
|
|
|
|
|
|
|
|
|
|
|
|
|
|
|
|
|
|
|
an external hard drive, flash drive, or USB Wi-Fi network |
||||||||||||||||||||||||||||||||||||||||||
|
|
|
|
|
|
|
|
|
|
|
|
|
|
|
|
|
|
|
|
|
|
|
adapter (BDS-500 only). Maximum current output is 1 A. |
||||||||||||||||||||||||||||||||||||||||||
7 |
Label |
Contains the following: |
|||||||||||||||||||||||||||||||||||||||||||||||||||||||||||||||
|
|
|
|
|
|
|
|
|
|
|
|
|
|
|
|
|
|
|
|
|
|
|
a. DVD region code |
||||||||||||||||||||||||||||||||||||||||||
|
|
|
|
|
|
|
|
|
|
|
|
|
|
|
|
|
|
|
|
|
|
|
b. BD region code |
||||||||||||||||||||||||||||||||||||||||||
|
|
|
|
|
|
|
|
|
|
|
|
|
|
|
|
|
|
|
|
|
|
|
c. MAC address of your player |
||||||||||||||||||||||||||||||||||||||||||
|
|
|
|
|
|
|
|
|
|
|
|
|
|
|
|
|
|
|
|
|
|
|
d. Serial number of your player |
||||||||||||||||||||||||||||||||||||||||||
8 |
AC-In |
Power cable which connects to a wall outlet. |
|||||||||||||||||||||||||||||||||||||||||||||||||||||||||||||||
9
4
Installation
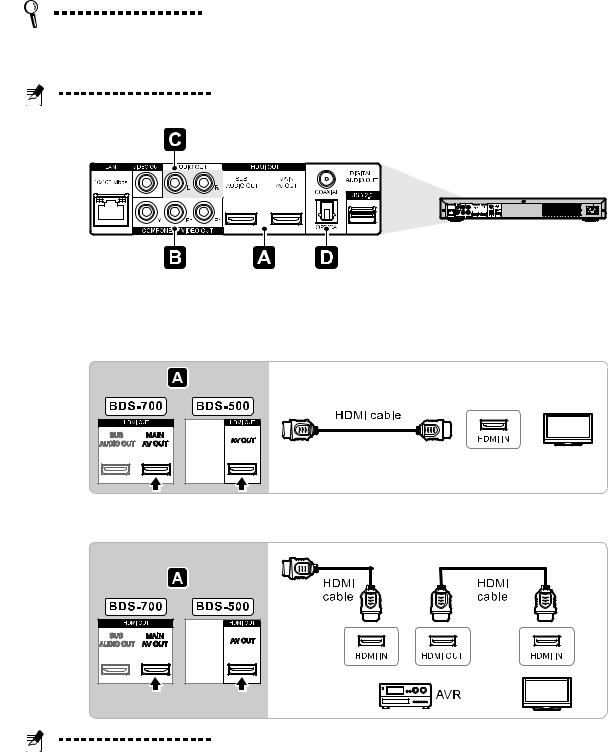
Connecting the Blu-ray/HD Media Player
Tip: Do not plug the AC power cord into the power socket until you have made all the necessary connections.
Note: The model used in the illustrations below is BDS-700. BDS-500 has only one HDMI port (A/V out).
 Connecting the player to your display
HDMI connection (Direct to Display):
HDMI connection (Through AVR):
Note: If your AVR does not support HDMI version 1.4, the 3D-BD contents may not be displayed. To remedy this problem, see “Separated HDMI audio and video connection (BDS-700 only)” on page 11.

Installation 10
Component display with audio connection:
Composite display with audio connection:
Note: Component and Composite video output resolution might be restricted depending on the contents. See page 35 for more information.
 Connecting your player to your AVR
HDMI connection
SPDIF Digital audio connection
Analog audio connection
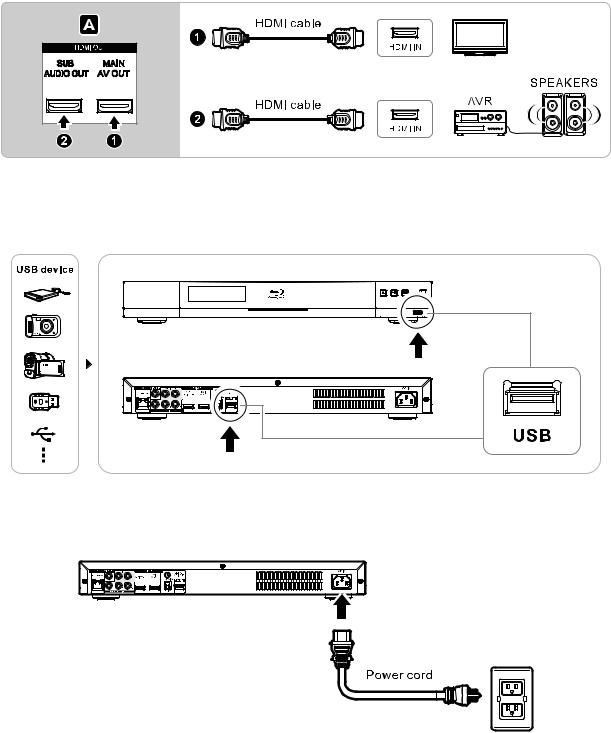
11
Separated HDMI audio and video connection (BDS-700 only)
 Connecting a USB device
You can connect a USB device (external hard drive, digital video, flash drive, etc.) to your player.
 Connecting the AC power cord
 Loading...