


 Loading...
> > > > > > >
M6
Reference
Guide
Declaration of Conformity
Manufacturer: InFocus Corporation, 27500 SW Parkway Avenue, Wilsonville, Oregon 97070 USA
European Office: Louis Armstrongweg 110, 1311 RL Almere, The Netherlands
We declare under our sole responsibility that this projector conforms to the following directives and norms:
EMC Directive 89/336/EEC, Amended by 93/68/EEC EMC: EN 55022
EN 55024 EN 61000-3-2 EN 61000-3-3
Low Voltage Directive 73/23/EEC, Amended by 93/68/EEC
Safety: IEC 60950-1: 1st Edition May, 2004
Trademarks
Microsoft, PowerPoint, Word, Excel and Windows are trademarks or registered trademarks of Microsoft Corporation. Digital Light Processing is a trademark or registered trademark of Texas Instruments. Adobe and Acrobat are trademarks or registered trademarks of Adobe Systems Incorporated. InFocus, In Focus, and INFOCUS (stylized) are either registered trademarks or trademarks of InFocus Corporation in the United States and other countries.
FCC Warning
This equipment has been tested and found to comply with the limits for a Class A digital device, pursuant to part 15 of the FCC Rules. These limits are designed to provide reasonable protection against harmful interference when the equipment is operated in a commercial environment. This equipment generates, uses, and can radiate radio frequency energy and, if not installed and used in accordance with the instruction manual, may cause harmful interference to radio communications. Operation of this equipment in a residential area is likely to cause harmful interference in which case the user will be required to correct the interference at his own expense. Changes or modifications not expressly approved by InFocus Corporation may void authority to operate the equipment.
EN 55022 Warning
This is a Class A product. In a domestic environment it may cause radio interference, in which case the user may be required to take adequate measures. The typical use is in a conference room, meeting room or auditorium.
Canada
This Class A digital apparatus complies with Canadian ICES-003.
Cet appareil numérique de la classe A est conforme à la norme NMB-003 du Canada.
Agency Approvals
UL, CUL, TUV
Other specific Country Approvals may apply, please see product certification label.
This user’s guide applies to models IN10, M6, LP70+, and M2+.
InFocus reserves the right to alter product offerings and specifications at any time.
1
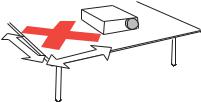
Table of Contents
Introduction |
3 |
Connecting a computer |
5 |
Required computer connections5 |
|
Displaying a computer image |
6 |
Adjusting the image |
7 |
Connecting a video device |
8 |
Shutting down the projector |
9 |
Troubleshooting your setup |
9 |
Using the keypad buttons |
16 |
Using the remote control |
17 |
Optimizing computer images |
18 |
Presentation features |
18 |
Optimizing video images |
18 |
Customizing the projector |
18 |
Using the menus |
19 |
Picture menu |
20 |
Settings menu |
23 |
Maintenance |
26 |
Cleaning the lens |
26 |
Cleaning the lamp filter screens 26 |
|
Using the security lock |
26 |
Replacing the projection lamp |
27 |
Appendix |
29 |
Projected image size |
29 |
Important Operating Considerations for Safety
•Place the projector in a horizontal position no greater than 15 degrees off axis.
•Locate the projector in a well-ventilated area without any obstructions to intake or exhaust vents. Do not place the projector on a tablecloth or other soft covering that may block the vents.
•Locate the projector at least 4' (1.2 m) away from any heating or cooling vents.
•Use only the power cord provided. A surge-protected power strip is recommended.
•Refer to this guide for proper startup and shutdown procedures.
•Warning: Hg – Lamp contains mercury. Manage in accordance with local disposal laws. See www.lamprecycle.org.
•In the unlikely event of a lamp rupture, particles may exit through the projector side vents. When the projector is turned on, keep people, food, and drinks out of the "keep out" area around the projector, as indicated by the "X" area below.
3’ |
|
|
|
/ |
|
|
|
1 |
|
|
m |
m |
|
.6 |
|
|
/0 |
|
|
|
2’ |
|
|
Follow these instructions to help ensure image quality and lamp life over the life of the projector. Failure to follow these instructions may affect the warranty. For complete details of the warranty, see the Warranty booklet.
2

Introduction
Your new XGA 1024x768 resolution digital projector is specifically designed for portability, connectivity, and collaboration. It is easy to connect, easy to use, easy to transport, and easy to maintain
Product specifications
To read the latest specifications on your multimedia projector, be sure to visit our website at www.infocus.com, as specifications are subject to change.
Accessories
The standard accessories that came with your projector are listed in the included user’s guide. Optional accessories can be found on our website at www.infocus.com or at your retailer or dealer.
Online Registration
Register your projector on our website at www.infocus.com/register to activate your warranty and receive product updates, announcements, and registration incentives.
Projector components and features
zoom ring |
keypad |
|
focus ring
 remote control sensor (IR)
connectors
remote control sensor (IR)
power connector security lock
foot release
speaker 
adjustable foot |
lamp housing |
leveling foot
3

Connector Panel
The projector provides computer and video connectors:
•one M1-D/A (HD, DVI, and computer)
•one S-video
•one composite RCA video
•one audio in
Connector panel
Computer
S-video
|
|
|
|
|
|
|
|
Audio in |
Composite video |
||
4

Connecting a computer
Required computer connections
Connect the black end of the computer cable to the Computer connector on the projector. Connect the blue end to the video port on your computer. If you are using a desktop computer, you first need to disconnect the monitor cable from the computer’s video port.
Some Macintosh® computers do not have a standard VESA-out video port. If the supplied computer cable will not connect to your computer, purchase the appropriate adapter from your Apple® reseller.
Connect the black power cable to the connector on the back of the projector and to your electrical outlet.
The LED turns amber.
NOTE: Always use the power cable that shipped with the projector.
Optional computer connections
To advance slides in a PowerPoint™ presentation using the up and down arrow buttons on the remote, plug the USB connector on the computer cable into the USB mouse connector on your computer.
To have sound with your presentation, connect an audio cable (sold separately) to your computer and to the Audio In connector on the projector.
computer
audio
5

Displaying a computer image
Remove the lens cap.
Press the Power button on the top of the projector or the remote.
The LED blinks green and the fans start to run. When the lamp comes on, the start up screen displays and the Power light is steady green. It can take a minute for the image to achieve full brightness.
? No startup screen? Get help on page 9.
remove lens cap
press Power button
Turn on your computer. |
turn on computer |
|
The computer’s image should appear on the projection screen. If it doesn’t, press the Source button.
Make sure your laptop’s external video port is active. |
|
Many laptops do not automatically turn on their external video port when a |
activate laptop’s external port |
projector is connected. Usually a key combination like FN + F8 or CRT/LCD |
|
key turns the external display on and off. Locate a function key labeled |
|
CRT/LCD or a function key with a monitor symbol. Press FN and the |
|
labeled function key simultaneously. Refer to your laptop’s documenta- |
|
tion to learn your laptop’s key combination. |
|
? No computer image? Get help on page 9. |
|
6

Adjusting the image
Adjust the height of the projector, if necessary, by pressing the release button to extend the elevator foot.
Rotate the leveling foot (located at the bottom back left corner), if necessary.
Position the projector the desired distance from the screen, so that the lens is perpendicular to the screen.
See page 29 for a table listing screen sizes and distances.
Adjust the zoom or focus rings by rotating them until the desired image size and focus are produced.
If the image is not square, adjust the vertical digital keystone by using the buttons on the keypad. Press the upper Keystone button to reduce the upper part of the image, and press the lower Keystone button to reduce the lower part.
You can also adjust the keystone via the menus. See page 20.
Adjust the Contrast or Brightness in the Picture menu.
See page 19 for help with the menus.
adjust height
adjust distance
33 ft./
10m
foot release button
leveling foot 
|
./ |
|
|
|
|
|
|
.2 |
ft |
m |
|
|
|
|
|
|
|
|
|
|
|
||
2 |
.8 |
|
|
|
|
|
|
2 |
6 |
|
|
/ |
|
|
|
|
|
|
|
t |
|
|
|
|
|
.7 |
f |
|
|
|
|
|
|
|
m |
|
|
||
|
|
6 |
|
|
|
|
|
|
|
|
|
2 |
|
|
|
|
|
|
|
|
|
|
m |
|
|
|
|
|
|
1 |
|
|
|
|
|
|
./ |
|
|
|
|
|
|
|
t |
|
|
|
|
|
|
.3 |
f |
|
|
9.9 ft./ |
|
|
|
|
|
||
|
3 |
|
|
|
|||
3m |
|
4.9 ft./ |
|
||||
|
|
1.5m |
|
|
|||
focus
zoom
adjust zoom and focus
adjust keystone
7

Connecting a video device
If your video device uses a round, four-prong S-video connector, plug the S-video cable into the S-video Out connector on the video device and into the Video 1 connector on the projector. If the device uses a composite video connector, plug the composite video cable into the Composite Out connector on the video device and into the Video 2 connector on the projector.
For audio, plug a mini-plug audio Y-cable into the Audio in connector on the projector and into the video device’s left and right audio out connectors.
Connect the black power cable to the connector on the back of the projector and to your electrical outlet.
NOTE: Always use the power cable that shipped with the projector.
connect S-video and audio cables
S-video
audio
audio
S-video
connect composite video and audio cables
video
audio
L R
video
audio
8
Shutting down the projector
The projector automatically blanks the screen after no active source is detected for 30 minutes. This blank screen helps preserve the life of the projector. The image returns when an active source is detected or a remote or keypad button is pressed.
Screen Save
You can make the blank screen appear after five minutes by turning on Screen Save in the Settings>System menu. See page 24. There are six time options for the Screen Save feature. They range from five minutes to 30 minutes with five minute intervals.
Power Save
The projector also has a Power Save feature that automatically turns the lamp off after no signal is detected for 20 minutes. After 10 additional minutes with no signal, the projector powers down. If an active signal is received before the projector powers down, the image is displayed. You must press the Power button to display an image after 30 minutes have passed. When Power Save is enabled, Screen Save is disabled. See page 24.
Turning off the projector
To turn off the projector, press the Power button and verify that you want to turn the projector off by pressing the Power button again within 3 seconds. You can cancel the shutdown by not pressing the Power button a second time. The lamp turns off and the LED blinks amber for 1 minute while the fans continue to run to cool the lamp. When the lamp has cooled, the LED lights amber and the fans stop. Unplug the power cable to completely power off the projector.
Troubleshooting your setup
If your image appears correctly on the screen, skip to the next section (page 17). If it does not, troubleshoot the setup.
LEDs
The Lamp LED on top of the projector (page 16) will alert you to certain problems.
A solid red Lamp LED means it is time to change the lamp. See page 27.
A blinking red Lamp LED means different things based on the number of “blinks”. After blinking 1-5 times, the light turns off for 2 seconds, then the blinking repeats.
•1 blink, lamp won’t turn on: Turn the projector off for at least one minute, then turn it on again. If the blinking continues, the lamp may need to be replaced.
•2 blinks: Remaining lamp life is low. Replace the lamp, see page 27.
•3 or 4 blinks: Unexpected shut down (3 blinks) or fan failure (4 blinks). Turn the projector off for at least one minute, then turn it on again. If the blinking continues, the projector may require service; go to www.infocus.com/support.
•5 blinks: The projector is overheating. Turn the projector off and remove anything that may be blocking its air vents. Leave the projector off for at least one minute to let it cool before turning it on again. Important: Continuous operation at high temperature may reduce the lifetime of the lamp and/or projector.
The other LED on top of the projector indicates the normal operating state of the projector.
•A solid green LED means the projector is on.
•A blinking green LED means the lamp is turning on. A green “blip” means the projector is in Screen Save or Power Save mode.
•A blinking amber LED means the lamp is either warming up or cooling down to enter standby mode; a solid amber LED means the projector is in standby mode.
9
Loading...