


 Loading...
> > > > > > >
User’s
Guide 
qЬбл=ЙенбкЙ=млЙкЫл=ЦмбЗЙ=бл=~о~бд~ДдЙ=зе=нЬЙ=ЙеЕдзлЙЗ=`a=~л=~е=^ЗзДЙ=^ЕкзД~н=йЗС=СбдЙ=бе=нЬЙ=СзддзпбеЦ=д~еЦм~ЦЙлW=aмнЕЬI=bеЦдблЬI=cкЙеЕЬI=dЙкг~еI=fн~дб~еI=kзкпЙЦб~еI= mзкнмЦмЙлЙI=pй~еблЬI=oмллб~еI=g~й~еЙлЙI=hзкЙ~еI=qк~Збнбзе~д=`ЬбеЙлЙI=pбгйдбСбЙЗ=`ЬбеЙлЙK=_ЙСзкЙ=млбеЦ=нЬбл=йкзаЙЕнзкI=йдЙ~лЙ=кЙ~З=нЬЙлЙ=белнкмЕнбзелK=
aЙтЙ=Ь~еЗдЙбЗбеЦ=бл=бе=тбае=ЦЙЬЙЙд=ДЙлЕЬбвД~~к=зй=ЗЙ=ДбаЦЙозЙЦЗЙ=ЕЗ=бе=ЗЙ=озкг=о~е=ЙЙе=йЗСJДЙлн~еЗ=E^ЗзДЙ=^ЕкзД~нFI=Йе=пЙд=бе=ЗЙ=оздЦЙеЗЙ=н~дЙеW=bеЦЙдлI=cк~елI= aмбнлI=fн~дб~~елI=kззклI=mзкнмЦЙЙлI=pй~~елI=kЙЗЙкд~еЗлI=oмллблЕЬI=g~й~елI=hзкЙ~~елI=нк~ЗбнбзеЙЙд=`ЬбеЙЙлI=оЙкЙЙеозмЗбЦЗ=`ЬбеЙЙлK=iЙЙл=зеЗЙклн~~еЗЙ=белнкмЕнбЙл= оззкЗ~н=м=ЗЙтЙ=йкзаЙЕнзк=ЦЙДкмбвнK
iЙ=гзЗЙ=ЗDЙгйдзб=ЕзгйдЙн=Йлн=ЗблйзебДдЙ=лмк=дЙ=`a=азбен=лзмл=СзкгЙ=ЗЙ=СбЕЬбЙк=йЗС=ЗD^ЗзДЙ=^ЕкзД~н=З~ел=дЙл=д~еЦмЙл=лмбо~енЙл=W=Ьздд~еЗ~блI=~еЦд~блI=Ск~е´~блI=
~ддЙг~еЗI=бн~дбЙеI=езко¨ЦбЙеI=йзкнмЦ~блI=Йлй~ЦездI=кмллЙI=а~йзе~блI=Езк¨ЙеI=ЕЬбезбл=нк~ЗбнбзееЙдI=ЕЬбезбл=лбгйдбСб¨K=^о~ен=ЗDмнбдблЙк=ЕЙ=йкзаЙЕнЙмкI=оЙмбддЙт=дбкЙ=
ЕЙл=белнкмЕнбзелK=
aбЙ=озддлн®еЗбЦЙ=_ЙемнтЙк~едЙбнмеЦ=блн=~мС=ЗЙк=бг=iбЙСЙкмгС~еЦ=ЙенЬ~днЙеЙе=`a=~дл=^ЗзДЙ=^ЕкзД~н=macJa~нЙб=бе=ЗЙе=СздЦЙеЗЙе=pйк~ЕЬЙе=оЙкСΩЦД~кW=kбЙЗЙкд®еЗблЕЬI= bеЦдблЕЬI=cк~ет∏лблЕЬI=aЙмнлЕЬI=fн~дбЙеблЕЬI=kзкпЙЦблЕЬI=mзкнмЦбЙлблЕЬI=pй~еблЕЬI=oмллблЕЬI=g~й~еблЕЬI=hзкЙ~еблЕЬI=qк~ЗбнбзеЙддЙл=`ЬбеЙлблЕЬ=меЗ=sЙкЙбеС~ЕЬнЙл=`ЬбеЙJ лблЕЬK=_бннЙ=дЙлЙе=pбЙ=ЗбЙлЙ=^епЙблмеЦЙе=озк=ЗЙк=sЙкпЙеЗмеЦ=ЗЙл=mкзаЙвнзклK=
i~=йкЙлЙенЙ=ЦмбЗ~=≠=ЗблйзебДбдЙ=лмд=`a=~ддЙЦ~нзI=ЕзгЙ=СбдЙ=^ЗзДЙ=^ЕкзД~н=йЗСI=еЙддЙ=лЙЦмЙенб=дбеЦмЙW=зд~еЗЙлЙI=беЦдЙлЙI=Ск~еЕЙлЙI=нЙЗЙлЕзI=бн~дб~езI=езкоЙЦЙлЙI=
йзкнзЦЬЙлЙI=лй~ЦездзI=кмллзI=Цб~ййзеЙлЙI=ЕзкЙ~езI=ЕбеЙлЙ=нк~Збтбзе~дЙ=Й=ЕбеЙлЙ=лЙгйдбСбЕ~нзK=mкбг~=Зб=мл~кЙ=имЙлнз=йкзбЙннзкЙI=дЙЦЦЙкЙ=дЙ=лЙЦмЙенб=блнкмтбзебK=
eЙдЙ=ЗЙееЙ=ДкмвЙкЬ™еЗДзвЙе=СбееЙл=й™=ЗЙе=оЙЗд~ЦнЙ=`aJЙе=лзг=Йе=^ЗзДЙ=^ЕкзД~н=йЗСJСбд=й™=С›дЦЙеЗЙ=лйк™вW=kЙЗЙкд~еЗлвI=ЙеЦЙдлвI=Ск~елвI=нулвI=бн~дбЙелвI=езклвI=
йзкнмЦблблвI=лй~елвI=кмллблвI=а~й~елвI=взкЙ~елвI=нк~ЗблазеЙдд=зЦ=СзкЙевдЙн=вбеЙлблвK=iЙл=Зблл=~еоблебеЦЙеЙ=С›к=йкзаЙвнзкЙе=н~л=б=ДкмвK=
bлнЙ=Цмб~=Зз=млм•кбз=ЕзгйдЙнз=Йлн•=Зблйзе∞оЙд=ез=`a=~еЙсзI=Езгз=мг=~кимбоз=йЗС=Зз=^ЗзДЙ=^ЕкзД~н=езл=лЙЦмбенЙл=бЗбзг~лW=Ьзд~еЗЖлI=беЦдЖлI=Ск~еЕЖлI=~дЙг©зI=
бн~дб~езI=езкмЙЦмЖлI=йзкнмЦмЖлI=Йлй~еЬздI=кмллзI=а~йзеЖлI=ЕзкЙ~езI=ЕЬбеЖл=нк~ЗбЕбзе~дI=ЕЬбеЖл=лбгйдбСбЕ~ЗзK=^енЙл=ЗЙ=мнбдбт~к=ЙлнЙ=йкзаЙнзкI=дЙб~=Йлн~л=белнкм´πЙлK=
bлнЙ=г~ем~д=ЗЙ=млз=Йлн•=ЗблйзебДдЙ=Йе=лм=нзн~дбЗ~З=Йе=Йд=`a=беЕдмбЗзI=Езгз=~кЕЬбоз=йЗС=ЗЙ=^ЗзДЙ=^ЕкзД~нI=Йе=дзл=лбЦмбЙенЙл=бЗбзг~лW=Ьзд~еЗ¨лI=беЦд¨лI=Ск~еЕЙлI= ~дЙг•еI=бн~дб~езI=езкмЙЦзI=йзкнмЦмЖлI=Йлй~¥здI=кмлзI=а~йзе¨лI=ЕзкЙ~езI=ЕЬбез=нк~ЗбЕбзе~дI=ЕЬбез=лбгйдбСбЕ~ЗзK=^енЙл=ЗЙ=мл~к=Йд=йкзуЙЕнзкI=дЙ~=Йлн~л=белнкмЕЕбзеЙлK
Данное руководство пользователя в полном объеме представлено на прилагаемом компакт-диске в виде pdf-файла Adobe Acrobat на следующих языках: английском, голландском, французском, немецком, итальянском, норвежском, португальском, испанском, русском, японском, корейском, традиционном и упрощенном китайском. Перед использованием проектора, прочитайте данные инструкции.
= `a ^ÇçÄÉ=^ÅêçÄ~í mac ==
CD Adobe Acrobat PDF : , , , , , , , , ,, , ( ) . .
CD Adobe Acrobat pdf
Adobe Acrobat (PDF)
Declaration of Conformity
Manufacturer: InFocus Corporation, 27700B SW Parkway Ave. Wilsonville, Oregon 97070 USA
European Office: Strawinskylaan 585, 1077 XX Amsterdam, The Netherlands
We declare under our sole responsibility that this projector conforms to the following directives and norms:
EMC Directive 89/336/EEC, Amended by 93/68/EEC EMC: EN 55022
EN 55024 EN 61000-3-2 EN 61000-3-3
Low Voltage Directive 73/23/EEC, Amended by 93/68/EEC Safety: EN 60950: 2000
December, 2003
Trademarks
Apple, Macintosh, and PowerBook are trademarks or registered trademarks of Apple Computer, Inc. IBM is a trademark or registered trademark of International Business Machines, Inc. Microsoft, PowerPoint, and Windows are trademarks or registered trademarks of Microsoft Corporation. Adobe and Acrobat are trademarks or registered trademarks of Adobe Systems Incorporated. InFocus, ProjectorNet, LiteShow, and LP are trademarks or registered trademarks of InFocus Corporation.
FCC Warning
This equipment has been tested and found to comply with the limits for a Class A digital device, pursuant to part 15 of the FCC Rules. These limits are designed to provide reasonable protection against harmful interference when the equipment is operated in a commercial environment. This equipment generates, uses, and can radiate radio frequency energy and, if not installed and used in accordance with the instruction manual, may cause harmful interference to radio communications. Operation of this equipment in a residential area is likely to cause harmful interference in which case the user will be required to correct the interference at his own expense.
EN 55022 Warning
This is a Class A product. In a domestic environment it may cause radio interference, in which case the user may be required to take adequate measures. The typical use is in a conference room, meeting room or auditorium.
Canada
This Class A digital apparatus complies with Canadian ICES-003.
Cet appareil numérique de la classe A est conforme à la norme NMB-003 du Canada.
Agency Approvals
UL, CUL, TUV, GOST
Other specific Country Approvals may apply, please see product certification label.
This user’s guide applies to models C160, C180, GEN200, and GEN201.
InFocus reserves the right to alter product offerings and specifications at any time.
2
Table of Contents
Introduction |
5 |
Connecting a computer |
7 |
Required computer connections |
7 |
Displaying a computer image |
9 |
First-time projector use with Windows 98 |
10 |
Adjusting the image |
12 |
Connecting a video device |
13 |
Displaying a video image |
14 |
Shutting down the projector |
16 |
Troubleshooting your setup |
16 |
Using the keypad buttons |
24 |
Using the remote control |
25 |
Using the audio |
26 |
Optimizing computer images |
27 |
Presentation features |
27 |
Optimizing video images |
28 |
Customizing the projector |
28 |
Using the menus |
29 |
Picture menu |
30 |
Settings menu |
33 |
Maintenance |
37 |
Cleaning the lens |
37 |
Replacing the projection lamp |
38 |
Cleaning the dust filter |
40 |
Using the security lock |
40 |
Appendix |
41 |
Accessories |
41 |
Red LED behavior and projector errors |
42 |
Projected image size |
42 |
If you are experienced in setting up presentation systems, use the included Quick Set Up card. For complete details on connecting and operating the projector, refer to this User’s Guide. Electronic versions of this User’s Guide in multiple languages are available on the included CD and on our website.
The website also has technical specifications (an interactive image size calculator, laptop activation commands, connector pin outs, a glossary, the product data sheet), a web store to buy accessories, and a page for online registration. See the inside of the back cover for a list of all contact numbers and relevant web addresses.
3

Important Operating Considerations for Safety
•Place the projector in a horizontal position no greater than 15 degrees off axis.
•Locate the projector in a well-ventilated area without any obstructions to intake or exhaust vents. Do not place the projector on a tablecloth or other soft covering that may block the vents.
•Locate the projector at least 4' (1.2 m) away from any heating or cooling vents.
•Use only InFocus-approved ceiling mounts.
•Use only the power cord provided. A surge-protected power strip is recommended.
•Refer to this manual for proper startup and shutdown procedures.
•In the unlikely event of the lamp rupturing, discard any edible items placed in the surrounding area and thoroughly clean the area along all sides of the projector. Wash hands after cleaning the area and handling the ruptured lamp. This product has a lamp which contains a very small amount of mercury. Dispose of it as required by local, state or federal ordinances and regulations. For more information see www.eiae.org.
Follow these instructions to help ensure image quality and lamp life over the life of the projector. Failure to follow these instructions may affect the warranty. For complete details of the warranty, see the Warranty section at the end of this user's guide.
Do not place objects or people in the 2 foot (.6m) area along the side of the projector. For ceiling mount applications, this area should be 5 feet (1.5m).
computer 2 |
|
|
computer 1 |
R |
S-video 1 |
|
||
monitor out |
network |
|
computer in |
L |
serial control |
|
audio in |
video 2 |
|
video in |
|
|
|
2 ft (.6m) |
|
|
5 ft (1.5m) |
4

Introduction
Your new digital projector provides computer and video inputs and has XGA 1024x768 resolution. The projector is easy to connect, easy to use, easy to maintain. An Interactive Display on the top of the projector gives you constant feedback on the status of the projector.
Online Registration
Register your projector on our website to receive product updates, announcements, and registration incentives. See the inside of the back cover for the web address.
Included items
carry case
projector |
|
|
|
lens cap |
remote |
|
|
|
|
documentation |
|
lens cap tether* |
|
|
|
|
|
power |
audio/video cable |
computer |
audio cable |
cable |
|
cable |
|
|
|
|
|
|
*The lens cap tether ships in the Documentation Pack. Attach it to the lens cap and the projector if desired.
Projector components and features
keypad
speakers
zoom |
elevator foot release |
|
focus |
remote control receiver (IR)
Interactive display
connectors
computer 2 |
audio out |
|
|
|
|
|
R |
|
|
|
|
|
|
S- |
|
|
|
|
|
computer 1 |
|
heat vent |
|
|
|
|
video 1 |
|
|
monitor out |
audio in |
network |
|
|
|
|
|
computer in |
|
serial |
control |
|
|
L |
|
|
|
|
|
audio |
video 2 |
|
|
|
|
in |
|
|
|
|
|
video in |
|
|
|
leveling  foot
foot
5

Connector Panel
The C160 provides one computer and two video connectors:
•one M1-D/A (HD, DVI, and computer)
•one S-video
•one composite RCA
It also has an RS-232 serial connector for serial control. The Command Line Interface (CLI) specifications and commands are on our website.
The C180 has an additional VESA computer input (HD, HD component, and computer) and an RJ-45 connector for networked control via ProjectorNet software.
Wireless Projection
You can use the projector’s M1 connector along with the InFocus LiteShow wireless adapter and software for cable-free digital projection.
Contact an authorized InFocus dealer or visit the website listed on the back inside cover of this User’s Guide for more information.
Connector panel of C160
external |
|
|
|
speaker |
M1-D/A |
|
|
monitor (audio out) |
|
s-video |
|
computer |
audio |
||
|
|
RS232 serial control |
|
|
|
R |
S-video 1 |
monitor out audio out |
computer 1 |
|
serial control |
|
|
||
audio in |
|
L |
video 2 |
|
|
audio in |
|
|
computer in |
|
video in |
composite |
lock |
|
computer |
video |
power |
audio |
|
connector |
Connector panel of C180
external |
|
|
|
|
speaker |
M1-D/A |
RJ-45 |
|
|
|
|
|
||
(audio out) computer |
audio |
s-video |
||
VESA computer |
|
|
RS232 serial control |
|
|
|
|
R |
S-video 1 |
computer 2 |
audio out |
computer 1 |
|
serial control |
|
network |
|||
|
|
|||
|
|
|
|
|
|
audio in |
|
L |
video 2 |
monitor out |
|
|
audio in |
|
|
|
|
|
|
|
|
computer in |
|
video in |
|
|
composite |
lock |
|
computer |
power |
|
monitor |
video |
||
audio |
|
connector |
|
|
|
6
Connecting a computer
|
connect computer cable |
|
|
Required computer connections |
|
R |
S-video 1 |
computer 1 |
|
|
|
computer 2 |
network |
serial control |
|
|
monitor out |
audioL in |
video 2 |
|
computer in |
video in |
|
Connect the black end of the computer cable to the to the Computer 1 con- |
|
|
|
|
|
|
nector on the projector. Connect the blue end to the video port on your com- |
|
|
|
|
|
|
|
|
|
|
|
||
puter. If you are using a desktop computer, you first need to disconnect the |
|
|
|
|
|
|
monitor cable from the computer’s video port. |
|
|
|
|
|
|
Connect the black power cable to the connector on the back of the projector |
connect power cable |
|||||
and to your electrical outlet. |
||||||
|
|
|
|
|
||
The Power LED on the projector’s keypad turns solid green. |
|
|
|
|
|
|
NOTE: Always use the power cable that shipped with the projector. |
|
|
|
|
|
|
|
|
|
|
|
||
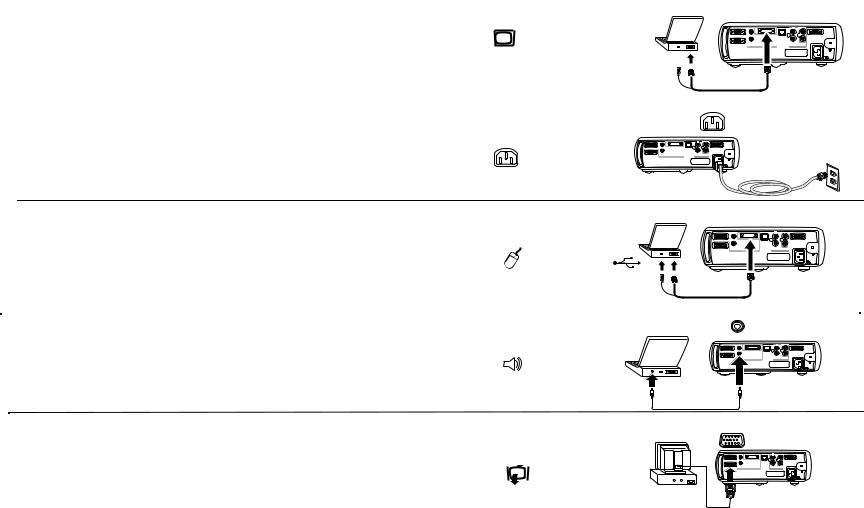
Optional computer connections
To advance slides in a PowerPoint™ presentation using the remote, plug the USB connector on the computer cable into the USB mouse connector on your computer. USB drivers must be installed to use the USB feature. For more information, see page 11.
To have sound with your presentation, connect the audio cable to your computer and to the computer Audio In connector on the projector.
If you are using a desktop computer and want to see the image on your computer screen as well as on the projection screen, plug the monitor cable to the black Monitor Out connector on the projector.
connect computer cable
|
R |
|
S-video 1 |
computer 2 |
computer 1 |
|
|
network |
|
serial control |
|
monitor out |
audioL in |
video 2 |
|
|
computer in |
video in |
|
connect audio cable
|
R |
S-video 1 |
computer 2 |
computer 1 |
|
network |
serial control |
|
|
L |
video 2 |
monitor out |
audio in |
|
|
computer in |
video in |
connect monitor cable
7
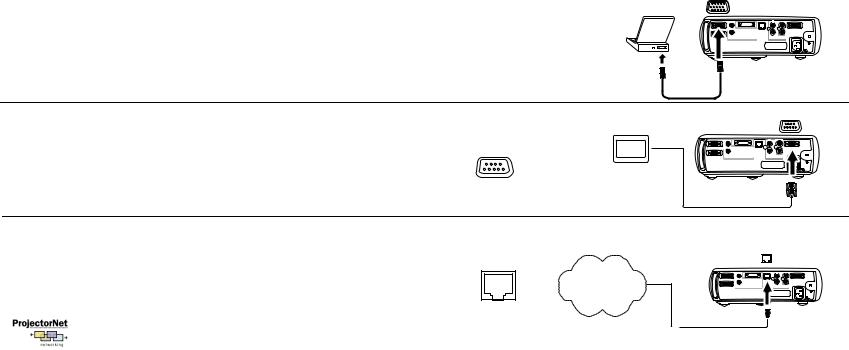
If you prefer connecting your C180 to your computer with an optional VESA cable, connect one end of the cable to the VESA port on your com-
puter, and connect the other end of the cable to the blue Computer 2 con- connect VESA cable nector on the projector.
|
R |
S-video 1 |
computer 2 |
computer 1 |
|
network |
serial control |
|
|
L |
video 2 |
monitor out |
audio in |
|
|
computer in |
video in |
You can control the projector from an LCD control panel or computer by
connecting an RS-232 cable to the projector’s Serial connector. Specific connect RS-232 cable RS-232 commands can be found in the Service and Support section of our
website.
|
R |
|
S-video 1 |
computer 2 |
computer 1 |
|
|
network |
|
serial control |
|
monitor out |
audioL in |
video 2 |
|
|
computer in |
video in |
|
The C180 can be managed by ProjectorNet networking software through its
Network connector. |
connect network cable |
|
|
Contact an authorized dealer or visit our website for information on |
|
ProjectorNet. |
Network |
|
|
R |
S-video 1 |
computer 2 |
computer 1 |
serial control |
network |
||
|
L |
video 2 |
monitor out |
audio in |
|
|
computer in |
video in |
8

Displaying a computer image
Remove the lens cap. |
remove lens cap |
|
Press the Power button on the top of the projector or the remote. |
press Power button |
The LED flashes green and the fans start to run. When the lamp comes on, the startup screen is displayed and the LED is steady green. It can take a minute for the image to achieve full brightness. The Interactive Display on the projector indicates the startup status.
? No startup screen? Get help on page 17.
turn on computer
Turn on your computer.
The computer’s image should appear on the projection screen. If it doesn’t, press the Computer button on the projector’s keypad.
activate laptop’s external port
Make sure your laptop’s external video port is active.
Many laptops do not automatically turn on their external video port when a projector is connected. Usually a key combination like FN + F5 is used to turn the external display on and off. Refer to your computer’s documentation to learn your computer’s key combination.
? No computer image? Try pressing the Auto Image button on the keypad. Get help on page 17.
9
First-time projector use with Windows 98
The first time you connect a computer running Windows 98 to the projector, the computer recognizes the projector as “new hardware” and the Add New Hardware Wizard appears. Follow these instructions to use the Wizard to load the correct driver (which was installed with your Windows operating system).
If you are running Windows 2000, Windows ME, or Window XP, skip these steps and go to “Adjusting the image” on page 12.
aClick Next to begin searching for the driver.
bMake sure “Search for the best driver” is selected, then click Next.
cUncheck any checked boxes, then click Next. Windows automatically locates the driver. If this driver has been removed, reload the driver using your Windows operating system CD.
d When Windows finds the driver, you are ready to install it. Click Next.
a
b
c
d
10
Skip this page if you did not connect the USB portion of the M1 computer cable
For Windows 98:
•If you connected the USB cable, the Add New Hardware Wizard appears again. Drivers must be installed to use the USB functionality.
•The Wizard launches two times.
The first time it detects a USB Human Interface Device (for the keyboard).
The second time it detects a USB Human Interface Device (for the mouse).
For Windows 2000, Windows ME, and Windows XP:
•The USB drivers are automatically installed.
11

Adjusting the image
Adjust the height of the projector, if necessary, by pressing the release button to extend the elevator foot.
Rotate the leveling foot (located at the bottom back right corner), if necessary.
adjust height |
release button |
|
|
||
|
rotate |
|
elevator |
leveling |
|
foot |
||
foot |
||
|
Position the projector the desired distance from the screen at a 90 degree |
|
angle to the screen. |
adjust distance |
See page 42 for a table listing screen sizes and distances. |
|
computer 2 |
|
|
computer 1 |
R |
S-video 1 |
|
||
monitor out |
network |
|
computer in |
L |
serial control |
|
audio in |
video 2 |
|
video in |
|
Adjust the zoom or focus rings by rotating them until the desired image size
and focus are produced. |
adjust zoom and focus |
|
zoom 
focus
If the image is not square, adjust the vertical digital keystone by using the
adjust keystone buttons on the keypad. 
Press the upper Keystone button to reduce the upper part of the image, and press the lower Keystone button to reduce the lower part.
You can also adjust the horizontal keystone of the C180 via the menus, or set the projector to automatically adjust the vertical keystone. See page 30.
Adjust the Contrast or Brightness in the Picture menu. |
adjust Contrast or Brightness |
|||
|
|
|
contrast |
|
See page 29 for help with the menus. |
|
|
|
brightness |
|
|
|
|
|
|
|
|
||
|
|
|
|
|
12

Connecting a video device
connect A/V cable
Standard video connections
Plug the audio/video (A/V) cable’s yellow connector into the video-out connector on the video device. Plug the other yellow connector into the yellow Video 2 connector on the projector.
Plug a white connector into the left audio out connector on the video device and plug a red connector into the right audio out connector on the video device. Plug the remaining white connector into the left audio in connector on the projector, and plug the red connector into the right audio in connector on the projector.
|
R |
S-video 1 |
computer 2 |
computer 1 |
serial control |
network |
||
|
L |
video 2 |
monitor out |
audio in |
|
|
|
|
|
computer in |
video in |
Connect the black power cable to the connector on the back of the projector and to your electrical outlet.
NOTE: Always use the power cable that shipped with the projector.
Optional video connections
If the video device uses a round, four-prong S-video connector, plug an S-video cable (sold separately) into the S-video connector on the video device and into the S-Video 1 connector on the projector. Use the A/V cable’s audio connectors as described directly above (the yellow connectors on the A/V cable are not used).
To connect a progressive scan EdTV or HD source, use the Component to M1 adapter (sold separately).
connect power cable
connect S-video and video cables 

|
R |
S-video 1 |
computer 2 |
computer 1 |
|
network |
serial control |
|
|
L |
video 2 |
monitor out |
audio in |
|
|
computer in |
video in |
13

Displaying a video image
Remove the lens cap. |
remove lens cap |
|
Press the Power button on the top of the projector or the remote. |
press Power button |
|
|
The LED flashes green and the fans start to run. When the lamp comes on, |
|
the startup screen is displayed and the LED is steady green. It can take a |
|
minute for the image to achieve full brightness. The Interactive Display on |
|
the projector indicates the startup status. |
|
? No startup screen? Get help on page 16. |
|
|
|
Plug in and turn on the video device. |
turn on video device |
|
The video device’s image should appear on the projection screen. If it doesn’t, press the Video button on the keypad.
Adjust the height of the projector by pressing the release button to extend |
|
|
the elevator foot. Rotate the leveling foot, if necessary. |
adjust height |
release button |
|
|
|
|
|
rotate |
|
elevator |
leveling |
|
foot |
|
|
foot |
|
|
|
|
Position the projector the desired distance from the screen at a 90 degree |
adjust distance |
|
angle to the screen. See page 42 for a table listing screen sizes and distances |
|
|
to the screen. |
|
|
computer 2 |
|
|
computer 1 |
R |
S-video 1 |
|
||
monitor out |
network |
|
computer in |
L |
serial control |
|
audio in |
video 2 |
|
video in |
|
14
Loading...