

Page 1

99645981 EN - 06/08
Page 2

OT8620
INSTRUCTIONS FOR USE
Page 3

Page 4

Instructions for use
Oven
Dear customer,
Thank you for choosing this quality product fro m
ASKO.
We hope it will meet all of your expectations and full
fill your needs for many years to come.
The Scandinavian design is a combination of clean
lines, everyday functionality and high quality. This is
the hallmarks for all of our products and this is why
they are so highly appreciated all over the world.
To get the most out of your new ASKO product, we
recommend that you read the installation and
operating instructions before using the machine.
Page 5

2
Please read these instructions before
installing and using your oven.
The oven has been designed for domestic
use only for cooking food. No asbestos has
been used in its construction.
Using for the first time
Before you use your oven for the first time,
leave it empty and, with the door closed,
turn it on to maximum temperature and let
it heat up for 15 minutes. This "runs the
oven in". During this time there may be
some smell from the mineral wool that
insulates the oven and there could be
some smoke. This is perfectly normal.
Normal use
- Always close the door properly. The oven
is fitted with a seal designed to work with a
closed door.
- Never lean or let anyone sit on the oven
door when it is open.
- The oven parts and accessories can
become hot when the door is left partially
open and the grill on. Always keep children
at a safe distance.
- When the oven is on it will get hot. Take
care not to touch the heating elements
inside the oven.
- Always protect your hands with oven
gloves or something similar when removing
food, accessories or containers from the
oven.
- Do not line your oven with kitchen foil.
The metal will increase the heat produced
and could ruin the food and damage the
enamel.
- Before carrying out the pyro-cleaning of
your oven, be sure to remove all oven
accessories and wipe away major spillage.
- Do not use a steam or high-pressure
cleaner.
- During the cleaning cycle accessible
surfaces become much hotter than during
normal cooking. Keep children at a
distance.
- Always check that the oven is off before
you clean the inside.
- For your safety your oven is equipped
with an AUTOMATIC STOP should you
inadvertently forget to turn off your oven.
After 10 hours' operation, the AS
(Automatic Stop) function is activated and
your oven stops heating. AS is displayed in
place of the time and a series of
2 successive pips is sounded for a certain
time.
Recommendations
Page 6

3
Contents
Recommendations 2
Using for the first time 2
Normal use 2
Contents 3
Your oven, how it works 4
Oven features 4
Introduction to the programmer 5
Accessories 6
Anti-tip safety shelf 6
Multi-purpose baking tray
(reserved for pastries) 6
Multi-purpose baking tray
(dripping pan) 6
45 mm multi-purpose dishFully
accessible sliding rail system 7
Child safety 7
Safety activation 7
Open with safety engaged 7
Safety deactivation 7
Using your appliance 8
Using the programmer 8
How to set the time 8
Immediate cooking 9
Programmed cooking 10
Cooking with immediate start and
programmed duration 10
Cooking with delayed start and
chosen cooking end time 11
Using the timer function 12
Oven cooking modes 13
Circulating heat* 13
Combined heat 13
Fan grill 13
Grill high 13
Conventional* 13
ECO* 14
Warming oven 14
Defrosting 14
Cleaning the outer surfaces 15
Cleaning the door 15
Disassembling the door 15
Troubleshooting 17
What if… 17
Installer's information 18
Connecting up 18
Housing 19
General maintenance 20
Changing the light bulb 20
Page 7
4
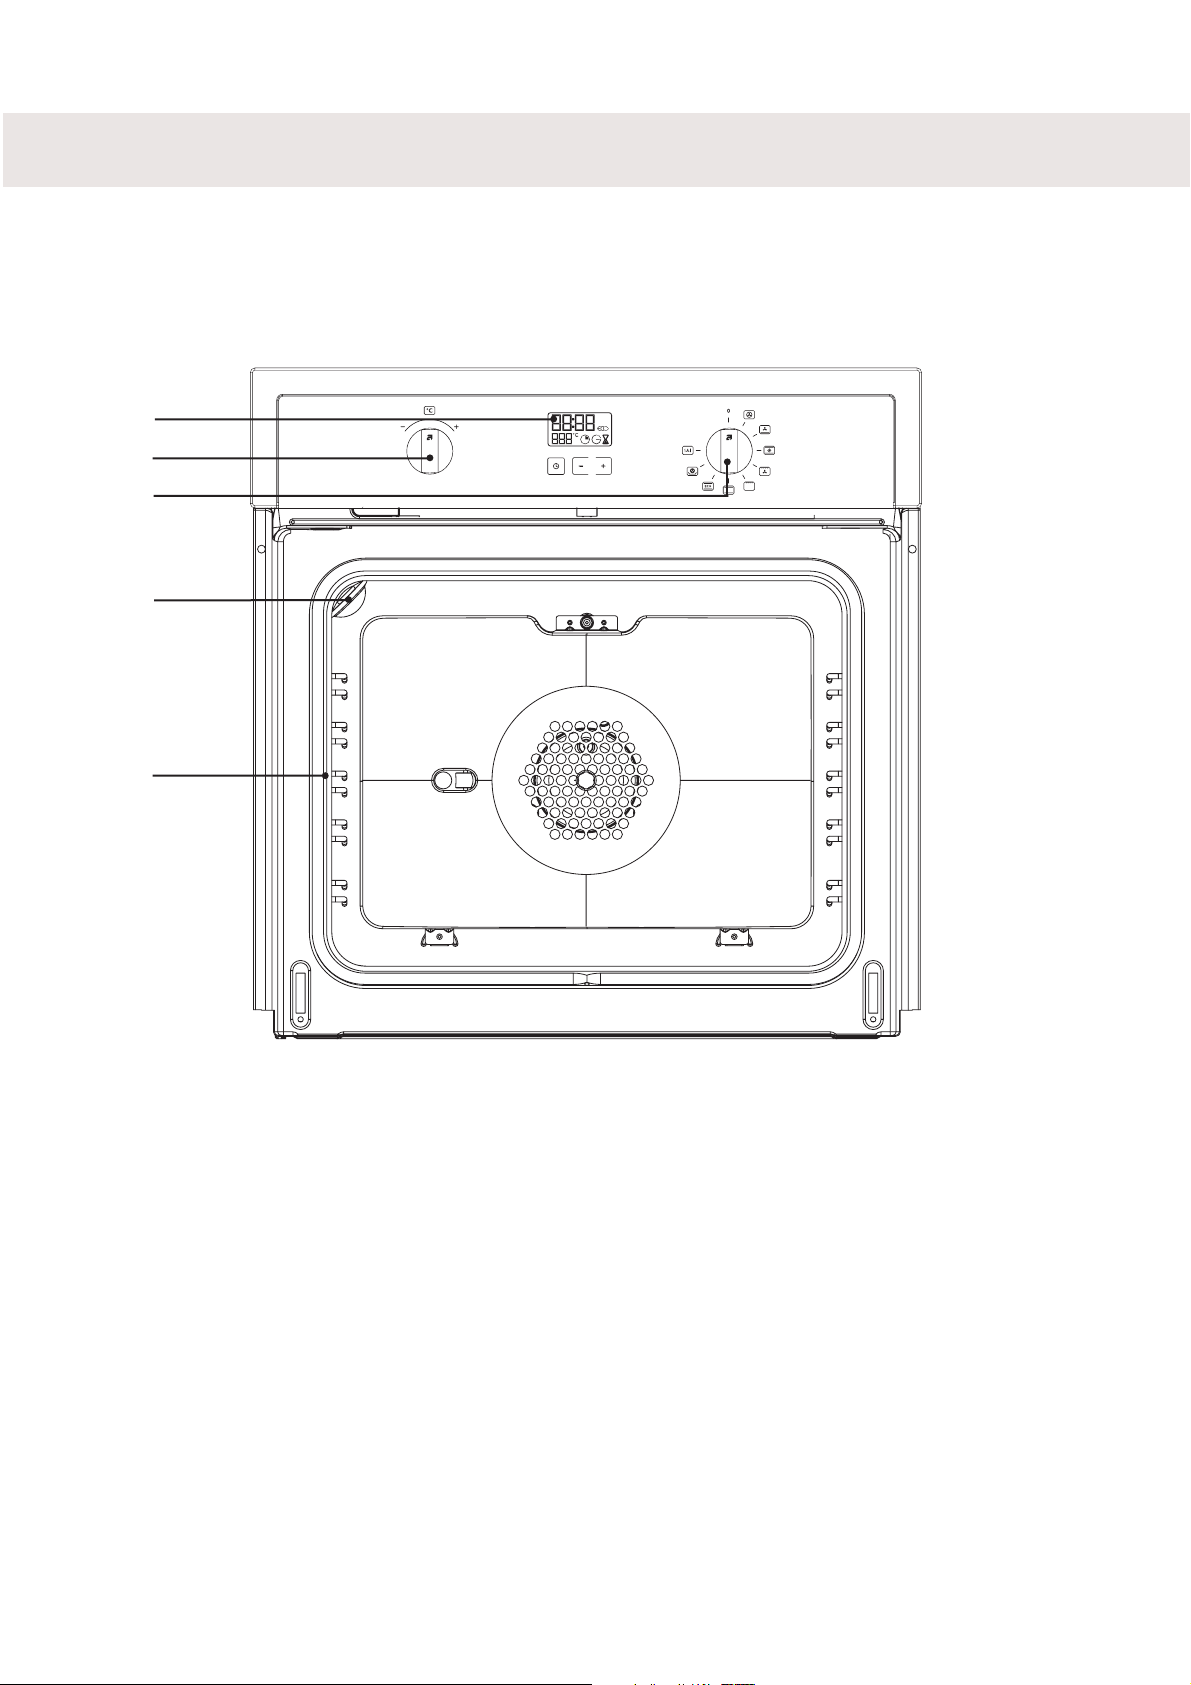
Oven features
1 Programmer
2 Temperature selector switch
3 Function selector switch
4 Light
5 Wire shelf supports
Your oven, how it works
3
5
1
2
4
Page 8
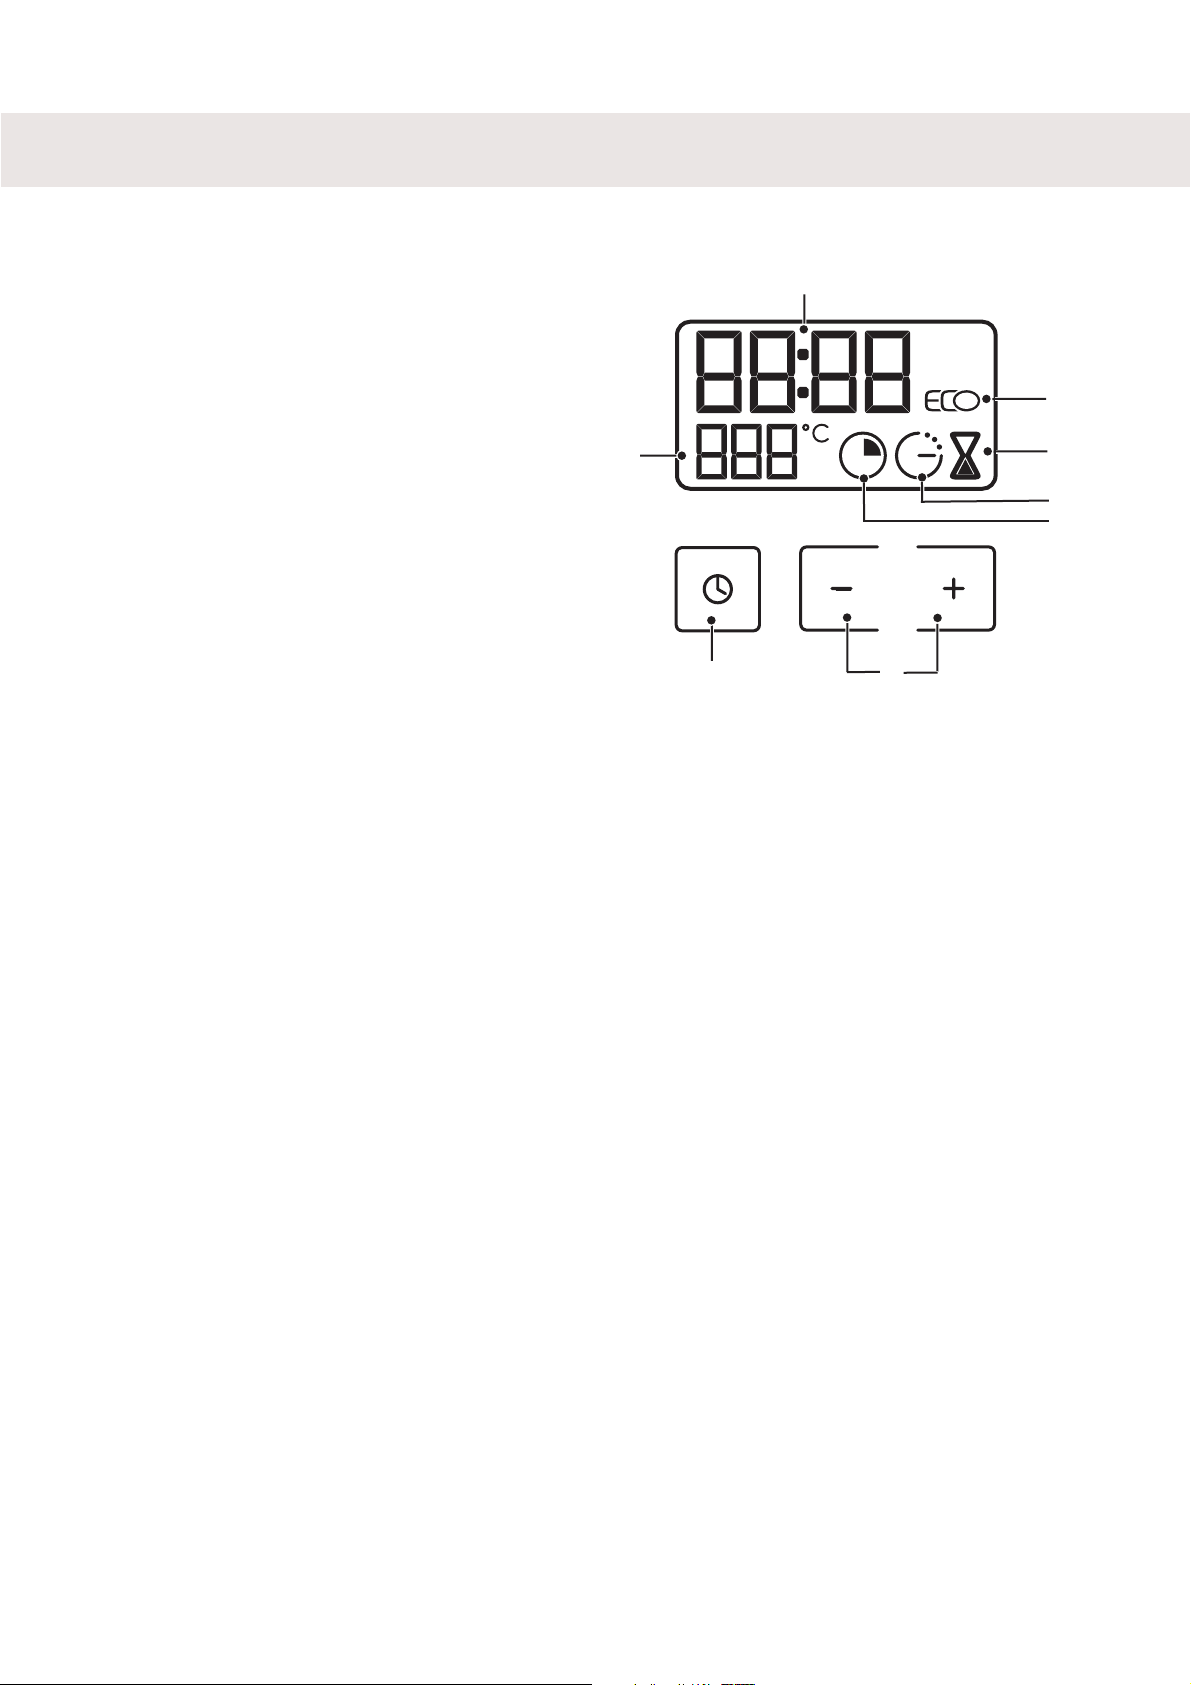
Introduction to the programmer
1 Time and cooking time display
2 ECO cooking indicator
3 Timer display
4 Cooking end time indicator
5 Cooking time indicator
6 Time setting buttons
7 Selection button
(cooking time and time)
8. Temperature display
5
Your oven, how it works
1
3
2
7
5
4
6
8
Page 9

6
Accessories
Anti-tip safety shelf
Food can either be placed on the shelf in a
dish or cake tin for cooking or browning. This
should be used for grilled meat (which should
be placed directly on it).
Multi-purpose baking tray
(reserved for pastries)
This tray has a raised edge and can be
used for baking pastries (choux buns,
meringues, small cakes, flaky pasties, etc).
Inserted in the runners under the shelf, it
catches the cooking juices and fat from
grilled meat. It can also be used half-filled
with water as a double boiler.
Joints should not be cooked in this tray
uncovered because fat could spit all over
the oven sides.
Multi-purpose baking tray
(dripping pan)
This is used to catch the cooking juices
and fat from cooking carried out in the high
grill or pulsed grill settings. It can also be
used as a cooking dish for suitably sized
joints (for example: a chicken surrounded
by vegetables, at medium temperature).
Inserted under the shelf,this pan catches
cooking juices and fat from grilled food. It
can also be used half filled with water as a
double boiler.
BACK
FRONT
Page 10

Child safety
Safety activation
- Open the door.
- Press the switch on the panel until the
system is engaged and then close the
door.
Open with safety engaged
- Press the lever and then open the door.
Safety deactivation
- Open the door and press the switch on
the panel.
7
45 mm multi-purpose dish
Fully accessible sliding rail
system
Thanks to the new sliding rail system with
support (fully accessible) handling food is
more practical and easier as the trays can
be effortlessly removed for simpler
handling. The trays can be completely
removed, providing full access. Their
stability ensures that food can be handled
safely, reducing the risk of burns. This
means that you can take food out of the
oven far more easily. The drip tray at the
bottom of the oven collects the juice and
fat from roasting, and can be used halffilled with water as a bain-marie. Do not
place meat or poultry directly on the drip
tray for roasting. This would inevitably
produce splashes and dirty the sides of the
oven.
Accessories
Page 11

8
Using the programmer
How to set the time
When plugged in
The display flashes 12:00.
Set the time by pressing the + or – buttons
(holding your finger on the button allows
you to scroll through the numbers rapidly).
Example: 12H30
Press the “ ” button to confirm.
The display stops flashing.
To set the time on the clock
The function selector switch must be
in the 0 position.
Press and hold the “ ” button for a few
seconds until the display starts flashing,
then release.
Audible beeps indicate that it is now
possible to set the time.
Adjust the clock setting with the + and –
buttons.
Press the “ ” button to confirm.
Warning
If there is no confirmation from the
“ ”, button, the time is recorded
automatically after a few seconds.
2
1
Using your appliance
Page 12

9
Immediate cooking
The programmer should display only the
time.
It should not be flashing.
Turn the function selector to the
position of your choice.
Example: position .
Your oven recommends the optimal
temperature for the chosen cooking mode.
It is, however, possible to adjust the
temperature by pushing the selection lever
towards + or –.
Example: temperature set to 180°C
Place your dish in the oven based on
the recommendations provided by
the cook book.
After these steps, the oven heats up and
the temperature indicator flashes.
A series of beeps will sound when the oven
reaches the selected temperature. The
temperature stops flashing.
To stop this heating, return the function
selector to 0.
Warning
After a cooking cycle, the cooling fan
continues to operate for a period of
time in order to guarantee optimal oven
reliability.
Warning
All types of cooking are done with the
door closed.
2
1
Using your appliance
Page 13

10
Using your appliance
Programmed cooking
Cooking with immediate start and
programmed duration
Select the desired cooking mode
and adjust the temperature.
Press the “ ” button until the
cooking time indicator starts to flash
“”.
The display flashes 0:00 to indicate that
you can now adjust the setting.
Press the + or – buttons to set the
desired time.
Example: 30 min. cooking time.
The cooking time is automatically recorded
after a few seconds.
The cooking time display stops flashing.
The countdown of the cooking time begins
immediately after it has been set.
After these three steps, the oven heats
up:
A series of beeps will sound when the oven
reaches the selected temperature.
At the end of cooking (end of programmed
time),
- the oven turns off,
- the cooking time indicator and 00:00 both
flash,
- a series of beeps sounds for a few
minutes.
Press any button to stop the beeping.
The display shows the time once again
when the function selector switch is
returned to 0.
3
2
1
Page 14

11
Cooking with delayed start and chosen
cooking end time
Cooking with delayed start and chosen
cooking end time
After setting the cooking time,
press the “ ” button
until the end of cooking indicator
flashes “ ”.
The display flashes to indicate that you can
now adjust the setting.
Press the + or - button to set the
desired cooking end time.
Example: end of cooking at 13:00.
The cooking end time is automatically
recorded after a few seconds.
The cooking end time display stops
flashing.
After these 2 steps, the oven heating is
delayed so that cooking ends at 13:00.
At the end of cooking (end of programmed
time),
- the oven turns off,
- the cooking time indicator and 0:00 both
flash,
- a series of beeps sounds for a few
minutes.
Press any button to stop the beeping.
The display shows the time once again
when the function selector switch is
returned to 0.
When the cooking is delayed in a cold
oven (by pulsed far or combined cooking),
the cavity lights up when cooking starts
and stays lit until cooking ends. The fan
keeps working when the cooking has
finished, until the oven has cooled down.
When the cooking is delayed in a hot oven
(by pulsed far or combined cooking), the
cavity lights up when cooking starts and
stays lit until cooking ends. The fan starts
working when the programme starts and
keeps working until the oven has cooled
down.
2
1
Using your appliance
Page 15

12
Using your appliance
Using the timer function
Your oven’s programmer can be used
as an independent timer that allows
you to count down a time without
operating the oven.
In this case, the timer display has priority
over the clock display.
Press the “ ” button until the timer
symbol begins flashing.
–> 0.00 and a small hourglass
both flash.
Adjust the chosen time by pressing
the buttons + or –.
Press the “ ” to confirm, or wait for
a few seconds.
The display stops flashing after a few
seconds and the timer starts working,
counting down the time in seconds.
Once the time has expired, the timer emits
a series of beeps to notify you.
Press any button to stop the beeping.
Warning
It is possible to change or cancel the
timer at any time.
3
2
1
Page 16

13
Circulating heat*
(recommended temperature 180°C
min. 35°C max. 235°C)
• Cooking is by a heating element at the
bottom of the oven and the oven fan.
• Rapid temperature increase: Some
dishes can be placed in the oven while it is
still cold.
• Recommended to retain moisture in white
meat, fish, vegetables.
For cooking multiple items on up to 3
levels.
Fan assisted base
(recommended temperature 205°C
min. 35°C max. 275°C)
• Cooking controlled by the bottom element
combined with a slight dose of the grill and
the fan.
• Cooking heat from the bottom with a
small amount of heat from the top.
• Place the grid on the lowest shelf support.
• Recommended for moist dishes (quiches,
juicy fruit tarts, etc...).
The crust will be thoroughly cooked on the
bottom.
Recommended for dishes that rise (cakes,
brioche, kugelhopf...) and for soufflés that
will not be hampered by a crust formed on
the top.
Combined heat
(recommended temperature 205°C
min. 35°C max. 275°C)
• Cooking is controlled by the upper and
lower heating elements and by the fan.
• Rapid temperature increase: Some
dishes can be placed in the oven while it is
still cold.
• Recommended for meats, fish and
vegetables, preferably placed in a
terracotta dish.
Fan grill
(recommended temperature 200°C
min. 180°C max. 230°C)
• Cooking controlled, alternately, by the
upper element and by oven fan.
• Preheating is unnecessary. Roasts and
poultry are juicy and crispy all over.
• Slide the drip tray onto the bottom shelf
support.
• Recommended for all poultry and spit
roasts, to thoroughly cook legs and large
cuts of beef. To keep fish steaks moist.
Grill high
(recommended temperature 275°C
min. 180°C max. 275°C)
• Cooking done by the upper element.
• Cooking done by the upper element.
•Recommended for grilling chops,
sausages, toast or prawns, placed on the
grid.
Conventional*
(recommended temperature 200°C
min. 35°C max. 275°C)
• Cooking done by the upper and lower
elements.
• After preheating, you will cook most of
your dishes.
• Recommended for slow, gentle cooking:
rich game... For retaining the juices in red
meat roasts. For simmering in a covered
stew pan dishes that were begun on the
hob (coq au vin, stew).
Oven cooking modes
Page 17

14
ECO*
(recommended temperature 200°C
min. 35°C max. 275°C)
• Cooking controlled by the upper and
lower heating elements.
• This position allows for energy savings
while preserving the quality of the cooking.
• The ECO position is used for energy label
performance.
• All cooking is done without preheating.
Warming oven
recommended temperature 80°C
min. 35°C max. 100°C)
• Heat regulated by the upper and lower
elements with use of fan.
• Recommended for leaving breads to rise
(keeping temperature below 40°C),
keeping dishes warm and thawing food.
Defrosting
(recommended temperature 30°C
min. 30°C max. 50°C)
• You can use your oven for defrosting,
with just a limited amount of heat as the fan
which circulates the air around the oven
accelerates the exchange of temperatures
between the dish and the appliance.
• Recommended for defrosting fragile
foodstuffs (strawberries and raspberries
etc.). By slightly increasing the temperature
you can defrost foodstuffs to be cooked
immediately afterwards (meat, etc.).
• Take care that you do not "over-
defrost" the food, leading to it being
partially cooked. Meat should be placed
on the oven shelf on the second level to
avoid it coming into contact with the juices
produced during defrosting (placing the
dripping pan on the first level).
Oven cooking modes
* Program(s) used to obtain the results indicated on the energy label in accordance with European
standard EN 50304 and European Directive 2002/40/CE.
Page 18

15
The Cleaning function
Cleaning the outer surfaces
To clean both the electronic programmer
window and the oven door, use a window
washing product applied to a soft cloth.
Do not use abrasive creams or scouring
sponges.
Cleaning the door
Disassembling the door
Warning
Before removing the glass, allow the
appliance to cool down.
Open the door completely and block
it open using the two red stops.
They are supplied with your
machine in the plastic pack.
Remove the first attached window as
follows:
Insert the two red stops in the A slots
designed for this.
Lever these parts to release the glass.
Clean the glass using a soft sponge
and washing-up liquid.
Do not immerse the glass in water.
Do not use abrasive creams or scouring
sponges. Rinse with clean water and dry
off with a lint-free cloth.
Warning
Do not use abrasive cleaning products
or hard metallic scrapers for cleaning
the oven’s glass door, as they could
scuff the surface and cause the glass
to shatter.
3
2
1
A
A
CLIC
CLIC
Page 19

16
If necessary, remove the door’s inner
glass assembly. This assembly is
composed of one or two sheets of
glass (depending on model), each of which
has a black rubber corner pad.
After cleaning, reposition the four
rubber pads, taking care to follow the
indications on the glass:
* top left: L
* top right: R
Place your inner glass assembly in
the door so that L and R are located
on the hinge side.
- If your oven is equipped with a single
inner sheet of glass, it must be located as
close as possible to the clipped glass.
Clip in your last glass sheet.
Remove the red plastic stops.
Your appliance is again operational.
8
7
6
5
4
The Cleaning function
L
R
CLAC
CLAC
Page 20

17
Troubleshooting
What if…
IF YOU REALIZE
THAT
POSSIBLE CAUSES WHAT SHOULD YOU DO?
The oven isn't heating.
• The oven isn't connected to the
power supply.
• The fuse has blown.
• The temperature selected is too low.
- Connect to power supply.
- Change the fuse, checking that it is
16A.
- Increase the temperature selected.
The lock symbol is
flashing on and off.
• The door lock is faulty. - Contact the After-Sales Service.
The light inside the
oven isn't working.
• The lamp is unusable.
• The oven isn't connected to the
power supply or the fuse has blown.
- Change the bulb.
- Connect to power supply or change
fuse.
Your oven makes a
beeping noise
• During cooking.
• When cooking is complete.
- The temperature of your choice has
been reached.
- Your programmed cooking cycle is
complete.
Page 21

18
Connecting up
As a specialist, you alone are competent to
install and connect up ASKO appliances.
Our guarantee therefore applies only and
exclusively to appliances which have been
installed and connected up by you in
accordance with the provisions of current
regulations.
Failure to meet this requirement would
incur the fitter's liability and release the
ASKO company from any liability.
The electrical connections are made before
the oven is installed in its housing.
• The oven must be connected using an
approved 3-core cable (live, neutral and
earth) with 1.5 mm square conductors.
This should be connected via a 3- pinsocket (live, neutral, and earth to the main
supply which should be should be a 220240V, alternating single-phase current.
If the oven is not connected using a plug
and socket, it must be connected to a
multi-pole switch with a minimum gap of
3 mm between contacts. The earth wire
(green and yellow) should be connected to
the terminal marked with the earth symbol
on the appliance and to the earth in the
switch.
• Where the oven is connected using a
separate plug and socket this must be
accessible after the oven has been
installed.
• The neutral wire (blue) of the oven must
be connected to the neutral in the main
supply.
• Tighten the clamp to hold the cable.
• Close the trapdoor using the two screws.
• The supply cable (H05 RR-F, H05 RN-F
or H05 W-F) must be long enough to allow
the oven to rest on the floor in front of its
housing.
With the oven sitting on the floor and
disconnected:
• Open the trapdoor at the bottom right
hand side at the back of the oven by
removing the 2 screws and swinging the
door away.
• Remove the sheath from each wire in the
new cable up to 12 mm.
• Twist the ends carefully together.
• Unscrew the terminal screws and remove
the wires that need changing.
• Pass the new cable through the wire
clamp to the right of the terminals.
• Connect the wires up in accordance with
the markings on the terminals.
• Make sure all wires are trapped under the
screws.
• The brown wire (live) going to terminal
marked L.
• The green and yellow wire (earth) going
to the one marked .
• The blue wire (neutral) going to the
terminal marked N.
• Tighten the screws and check, by tugging
on each wire, that they are firmly
connected.
• Tighten the clamp to hold the cable.
• Close the trapdoor using the two screws.
Installer's information
Electricity meter (mains)
(20A, singlephase 220-240 V
alternating current 50 Hz)
Socket
2 -pin with earth
220-240 V single phase
alternating current supply
Connecting cable
approx 1.50 m. long
Fused 16A or
differential circuit breaker
Page 22

19
Installer's information
Housing
NB
The oven may be housed either under
a work surface or built into a column
that is open* or closed with a suitable
opening.
Your oven works at its best and produces
excellent results when cooking and
cleaning itself, if its air circulation is not
compromised:
• The oven must be centred in the unit so
that there is a minimum distance of 5 mm
between it and the surrounding unit.
• The housing unit or its outer surface must
be capable of withstanding heat.
• To ensure the oven rests firmly in the
housing, screw it to the housing unit using
the holes on the side uprights provided
(see diagram).
To do this:
Remove the rubber stoppers
masking the fixing holes.
To prevent the housing unit
splintering, drill two holes 3 mm in
diameter in the wall of the housing
unit opposite the fixing holes.
Attach the oven using the two
screws.
Conceal the hole using the rubber
stoppers. (These also help to
cushion the closing of the oven
door).
(*) If the housing unit is open at the back, the gap
must not be more than 70 mm.
4
3
2
1
Fixation
crew position
Cutout 50x50
Fixation
screw position
Page 23

20
Leave the oven to cool down before
cleaning it manually.
In general, don't use any type of
scouring powder or metal-backed
sponge, or any sharp objects for
cleaning.
Changing the light bulb
• The bulb is located in the top of the oven.
Unscrew the protective shade (see
diagram).
Pull the bulb out.
The bulb used is a:
- 15 W
- 220-240 V
- 300°C
- E14 Cap
Change the bulb, replace the shade
and switch your oven back on at the
mains.
Warning
Switch off the power at the main switch
before attempting to change the bulb.
Leave the oven to cool if necessary.
3
2
1
General maintenance
Unscrew
Protective shade
Bulb fitting
Page 24

 Loading...