

Page 1

iSpark User Guide
Page 2

Table&of&Contents&
Introduction*..............................................................................................................................................*5!
Welcome*to*iSpark®!*.........................................................................................................................................*5!
Using*iSpark*..............................................................................................................................................*6!
The*Tool*Bar*.........................................................................................................................................................*6!
The**Drop?down*menu*......................................................................................................................................*6!
Browse!Projects:!the!Open!button!...............................................................................................................................!6!
Browse!Kits!............................................................................................................................................................................!8!
Create!a!new!Project!..........................................................................................................................................................!8!
Save!a!Project!........................................................................................................................................................................!8!
Import!/!Export!Projects!..................................................................................................................................................!9!
Importing!Presets!.............................................................................................................................................................!10!
Expansion!Store!................................................................................................................................................................!10!
Quantize*Record*...............................................................................................................................................*11!
Metronome*.........................................................................................................................................................*11!
Info*/*Register*....................................................................................................................................................*11!
CONNECT*..................................................................................................................................................*12!
BACKGROUND*AUDIO*.....................................................................................................................................*12!
WIST*......................................................................................................................................................................*12!
Link*.......................................................................................................................................................................*13!
MIDI*.......................................................................................................................................................................*13!
MIDI!Channel!selection!..................................................................................................................................................!13!
MAIN*PAGE*...............................................................................................................................................*14!
Transport*controls*...........................................................................................................................................*15!
Record/Record!Pending!................................................................................................................................................!15!
Stop!.........................................................................................................................................................................................!15!
Play!/!Pause!........................................................................................................................................................................!15!
Volume*/*Tempo*/*Shuffle*.............................................................................................................................*15!
Mute*/*Solo*..........................................................................................................................................................*15!
XY*pad*/*FX*selection*.......................................................................................................................................*16!
XY!pad!....................................................................................................................................................................................!16!
FX!selection!.........................................................................................................................................................................!16!
Instrument*param ete rs*..................................................................................................................................*16!
Pad*view*modes*................................................................................................................................................*17!
Pads!........................................................................................................................................................................................!17!
Patrns!.....................................................................................................................................................................................!17!
Seq!...........................................................................................................................................................................................!18!
Tune!........................................................................................................................................................................................!18!
Erase*/*Copy*.......................................................................................................................................................*19!
Erasing!when!not!recording!........................................................................................................................................!19!
Erasing!while!recording!................................................................................................................................................!19!
Copy!a!pattern!to!a!new!location!...............................................................................................................................!19!
Copy!a!Bank!to!another!Bank!......................................................................................................................................!19!
Roller*/*Looper*..................................................................................................................................................*19!
The!Looper!strip!...............................................................................................................................................................!19!
The!Roller!.............................................................................................................................................................................!20!
Pattern*position*/*length*bar*.......................................................................................................................*21!
Patterns!over!16!steps!long!..........................................................................................................................................!21!
Editing!pattern!length!....................................................................................................................................................!21!
Page 3

Step!Follow!..........................................................................................................................................................................!21!
Select!Step!group!(<<!!>>)!.............................................................................................................................................!21!
MIXER*PAGE*.............................................................................................................................................*22!
Channels*..............................................................................................................................................................*22!
Fader!......................................................................................................................................................................................!22!
VU!meters!.............................................................................................................................................................................!22!
Instrument!name!..............................................................................................................................................................!22!
FX!insert!button!.................................................................................................................................................................!23!
Aux!1!/!Aux!2!......................................................................................................................................................................!23!
Text!about!Pan!...................................................................................................................................................................!23!
Solo!/!Mute!..........................................................................................................................................................................!23!
Tracks*1?8*/*9?16*selection*...........................................................................................................................*23!
FX*Returns*..........................................................................................................................................................*23!
FX!button!..............................................................................................................................................................................!23!
Master*channel*..................................................................................................................................................*24!
FX!insert!button!.................................................................................................................................................................!24!
STUDIO*PAGE*..........................................................................................................................................*25!
Load*an*Instrument*.........................................................................................................................................*25!
Sample*/*FX*buttons*........................................................................................................................................*27!
Sample*mode*......................................................................................................................................................*27!
Sample!name!......................................................................................................................................................................!27!
Type!........................................................................................................................................................................................!27!
Layer!mode!..........................................................................................................................................................................!27!
Layer!select!.........................................................................................................................................................................!28!
Sample!...................................................................................................................................................................................!28!
Recording!a!sample!.........................................................................................................................................................!29!
Gain!.........................................................................................................................................................................................!30!
Reverse!..................................................................................................................................................................................!30!
Sample*window*.................................................................................................................................................*30!
Sample!start!/!end!markers!.........................................................................................................................................!30!
Audition!sample!window!..............................................................................................................................................!31!
Instrument!selection!buttons!......................................................................................................................................!31!
Controls:!top!row!..............................................................................................................................................................!31!
Controls:!bottom!row!......................................................................................................................................................!31!
Filter!Type!...........................................................................................................................................................................!32!
Choke!group!........................................................................................................................................................................!32!
FX*mode*...............................................................................................................................................................*32!
FX!overview!........................................................................................................................................................................!33!
On/Off!....................................................................................................................................................................................!33!
Select!FX!................................................................................................................................................................................!33!
Select!Preset!........................................................................................................................................................................!34!
Load!FX!Preset!...................................................................................................................................................................!34!
Save!FX!Preset!....................................................................................................................................................................!34!
Delete!FX!Preset!................................................................................................................................................................!35!
Wet/Dry!balance!...............................................................................................................................................................!35!
Effect!parameters!.............................................................................................................................................................!35!
FX*descriptions*.................................................................................................................................................*35!
Bit!Crusher!...........................................................................................................................................................................!35!
Chorus!...................................................................................................................................................................................!35!
Compressor!.........................................................................................................................................................................!36!
Delay!.......................................................................................................................................................................................!36!
Distortion!.............................................................................................................................................................................!36!
Page 4

Parametric!EQ!....................................................................................................................................................................!37!
Phaser!....................................................................................................................................................................................!37!
Destroyer!.............................................................................................................................................................................!37!
Flanger!..................................................................................................................................................................................!38!
Space!Pan!.............................................................................................................................................................................!38!
Sub!Generator!....................................................................................................................................................................!38!
Limiter!...................................................................................................................................................................................!39!
Analog!Chorus!....................................................................................................................................................................!39!
Analog!Delay!.......................................................................................................................................................................!39!
Detune!!(PS.Chorus)!........................................................................................................................................................!40!
Leslie!......................................................................................................................................................................................!40!
Vocal!filter!............................................................................................................................................................................!40!
Graphic!Equalizer!.............................................................................................................................................................!41!
Plate!Reverb!(Aux!1+2!/!Master!only)!.....................................................................................................................!41!
Reverb!(Aux!1+2!/!Master!only)!................................................................................................................................!41!
SEQUENCER*PAGE*(SEQ)*......................................................................................................................*42!
Overview*.............................................................................................................................................................*42!
Instrument/Track!selection!.........................................................................................................................................!42!
Data!entry!............................................................................................................................................................................!42!
Solo/Mute!............................................................................................................................................................................!42!
Automation*.........................................................................................................................................................*43!
Data!entry/editing!methods!........................................................................................................................................!44!
Pencil!......................................................................................................................................................................................!44!
Offset!......................................................................................................................................................................................!44!
Line!tool!................................................................................................................................................................................!44!
Eraser!.....................................................................................................................................................................................!44!
Fine!edit!................................................................................................................................................................................!44!
Add!automation!.................................................................................................................................................................!46!
Clear!automation!..............................................................................................................................................................!46!
Disable/Enable!automation!.........................................................................................................................................!46!
Pitch!automation!...............................................................................................................................................................!46!
Export!audio!.......................................................................................................................................................................!48!
Delete!.....................................................................................................................................................................................!49!
Bank/Pattern!......................................................................................................................................................................!50!
Bar!Steps!...............................................................................................................................................................................!50!
Time!Sig!................................................................................................................................................................................!51!
Resolution!............................................................................................................................................................................!51!
Window!range!selectors!................................................................................................................................................!52!
SONG*PAGE*...............................................................................................................................................*53!
Edit/Perform*mode*buttons*.........................................................................................................................*53!
Edit*mode*overview*.........................................................................................................................................*53!
Bank/Pattern!bar!..............................................................................................................................................................!54!
Editing!a!chain!...................................................................................................................................................................!54!
Audition!the!Song!.............................................................................................................................................................!55!
Combining!chains!.............................................................................................................................................................!55!
Perform*mode*overview*................................................................................................................................*56!
XY!pad!(filters)!...................................................................................................................................................................!56!
FX!pad!....................................................................................................................................................................................!56!
Hold!........................................................................................................................................................................................!57!
!
Page 5

Introduction
Welcome to iSpark®!
Combining the worlds of analog synthesis, physical modeling and samples with the
intuitive workflow of a drum machine, iSpark is a highly creative beat production center.
iSpark will get you to the right drum kit quickly and amaze you with its ease-of-use and
sonic power. Best of all, you can take it with you wherever you go!
iSpark provides vintage analog drum machines, sample based beatboxes and the ability
to record your own samples from the iPad microphone. iSpark’s engine further allows you
to break through their sonic boundaries through its extremely flexible sound design tools
and performance features.
With in-depth control over your sounds, an advanced loop mode and an XY touchpad with
8 real-time effects, iSpark will allow you to create unique beat experiments and constantly
feed your creativity with innovative ideas.
iSpark’s sonic power is nothing but huge, embedding three distinctive drum engines:
analog synthesis, sampling and physical modeling. Thanks to the automations available
on all parameters, every kit is very tunable and customizable, bringing a fun and
complementary approach to sample browsing while remaining interactive and userfriendly.
With its extensive sequencing and sound design capabilities, iSpark is your weapon of
choice to bring the best groove into your tracks whether you are working in the studio or
performing on stage.
Page 6

Using iSpark
The Tool Bar
At the top of each page in iSpark is a narrow strip called the Tool Bar. It contains basic
functions such as loading Projects and the Page Selection buttons.
1.
Project name / Drop-down menu
2.
Previous/Next Project
3.
Page selection: Main, Mixer, Studio, Sequence, Song
4.
Quantize Record on / off
5.
Click / Metronome
6.
Information
7.
Connect
We’ll go through each of these functions in the pages ahead.
The Drop-down menu
This section of the screen tells you the name of the current Project. Tapping this area will
open the Drop-down menu.
Browse Projects: the Open button
iSpark comes with 40 Projects, which provides 40 Drum Kits, 640 Instruments and over
1,200 Patterns created by some of the top sound designers in the world. You can use
these as-is or create and save your own grooves, sounds and kits with iSpark.
!
Page 7

To start browsing Projects, press the Open button in the Drop-down menu. Projects will
be listed in the Results List on the right side. To open one that looks interesting, select it
by pressing its name and then press OPEN:
To narrow the number of choices, use the Bank and Style filters on the left side. The
Results List will show which Projects match your filter selections.
Page 8

Browse Kits
An iSpark project contains 16 instruments and a number of patterns. If you want to keep
the current patterns but want to replace the 16 instruments with those from another
project, press the Load Kit button.
Create a new Project
To create a new Project, press the New button in the Toolbar Drop-down menu. This will
load 16 default instruments but all patterns will remain empty.
Save a Project
Save allows you to save your Project. You can save the current settings as a new Project
or overwrite the current settings.
When saving the Project you are able to select a Bank and specify the Project’s Style.
You can also create a new Bank and/or Style.
Give the Project a name and enter your name in the Author box. You can select an image
for the Project from the pictures on your iPad; just click on the icon box on the right.
After this your Project will be available in the Results list.
Page 9

Import / Export Projects
These functions enable iSpark to share projects with other iOS
programs.
Open the Drop-down menu from the top left corner of the Toolbar.
From here you can access the Import and Export functions.
The name of the current Project is visible at the top of the menu. It
is the one that iSpark will export.
Export Project
When you tap the Export label the Export process happens immediately.
When it is complete another window will open with information about the export file: its
location (the iTunes Share folder) and its name plus extension (.ispk).
After this you can exchange the .ispk file via the iTunes Share folder, email the file, or
open it in any other iOS program.
Import Project
Select the Import label in the drop-down menu and another window will open. It shows the
list of compatible Projects in the iTunes Share folder. From here you can choose to import
the Project or delete it from the list.
If you decide not to do either of those things, press Cancel and no changes will be made.
Page 10

Importing Presets
You can also import your own presets via iTunes file sharing.
To use this feature, connect your iPad to your computer and open iTunes. Select the iPad
icon at the top of the main window.
• Click on the “Apps” icon in the left navigation column.
• Scroll down to the “File Sharing” section.
• Select iSpark from the list of Apps.
• Under “iSpark Documents” click the “Add” button; this opens a dialog box to select
the location of the presets on your computer.
Expansion Store
You can purchase additional iSpark content from the Expansion Store. Open the Dropdown menu from the Toolbar and select Expansion Store. You will be taken to a special
page where you can view, audition and buy “Packs” our sound design team has put
together.
Each Pack contains a number of high-quality Projects, patterns and instruments.
Page 11

Make a selection and click the button that shows the price. After this the standard iOS inapp purchase window will open:
Once purchased, the pack will automatically be downloaded.
After the download is complete the pack will be visible in the list of Projects, Kits and
Instruments. Each pack will be located in its own Bank.
The [Pack Details] sidebar also contains a “Restore Purchases” button. It puts the list of
Packs you have purchased at the top of the browsing list of the Expansion Store. In the
event of data loss, this enables you to download each pack again individually.
Quantize Record
This button toggles quantize record mode on and off. Quantization will snap notes you
play while recording to a rhythmic grid according to the resolution of the pattern.
Metronome
Enable this button when you want to hear a click. The metronome works both during
recording and playback.
Info / Register
This button opens a window with software version, the user guide directory, and a link
that allows you to register your purchase of iSpark with Arturia.
Page 12

CONNECT
The Connect page is your gateway to accessing the MIDI, WIST, and Background Audio
functions. Press the Connect arrow on the right side of the iSpark Tool Bar to open up the
control panel.
BACKGROUND AUDIO
BACKGROUND AUDIO will allow iSpark to play sound while running in the background
when using other apps. It will continue to sustain sounds, play patterns, and receive MIDI
from other apps and external sources while you switch to a different app.
If you leave the app running in the background, it will consume CPU and battery power. If
you are trying to conserve battery power and are not using iSpark with other apps,
remember to turn off Background Audio.
!
WIST
Korg’s WIST technology allows any iPad running iSpark to sync to another device running
a WIST-compatible app. When two devices are working together via WIST, whichever is
the master is the only one capable of controlling settings; settings for the slaved device
Page 13

are inherited. Changing settings on either device disrupts synchronization and requires
reestablishing a WIST connection.
Tap the WIST LED button to enable WIST. WIST requires the use of Bluetooth, and if it’s
not currently enabled on your iPad, you will be prompted to do so. You can also manually
enable Bluetooth in your iPad’s SETTINGS app under General > Bluetooth. Any
secondary device needs to confirm the WIST connection before the devices will be
properly synchronized.
Once connected, the Master device’s transport triggers playback on all connected
devices, and slaved devices should begin playing in the same tempo.
Link
Ableton Link is a new technology that synchronizes beat, phase and tempo of Ableton
Live and Link-enabled iOS apps over a wireless network. It lets you play devices together
with the freedom of a live band. Anyone can start and stop their part while others keep
playing, and anyone can adjust the tempo and the rest will follow. You can use Link to
play with several instances of iSpark, Ableton Live, and other iOS apps.
MIDI
MIDI allows you to control iSpark via other software apps or external MIDI devices.
Pressing the MIDI Jack reveals a
menu with the listing of currently
connected devices.
By utilizing a camera connection kit
or other iOS MIDI interface you can
play iSpark using an external MIDI
device.
There are On/Off buttons on the left
that allow you to enable or disable
each MIDI controller individually.
MIDI Channel selection
iSpark allows you to set the MIDI channel it will receive. Options are OMNI, which means
it will respond to any incoming MIDI data, and channels 1 – 16. OMNI is the best option
when checking connections for the first time. If you are setting up a more complicated
system with multiple apps receiving from a DAW, you need to select a specific channel for
iSpark. Use the up/down buttons on either side of the MIDI Channel setting to do this.
Page 14
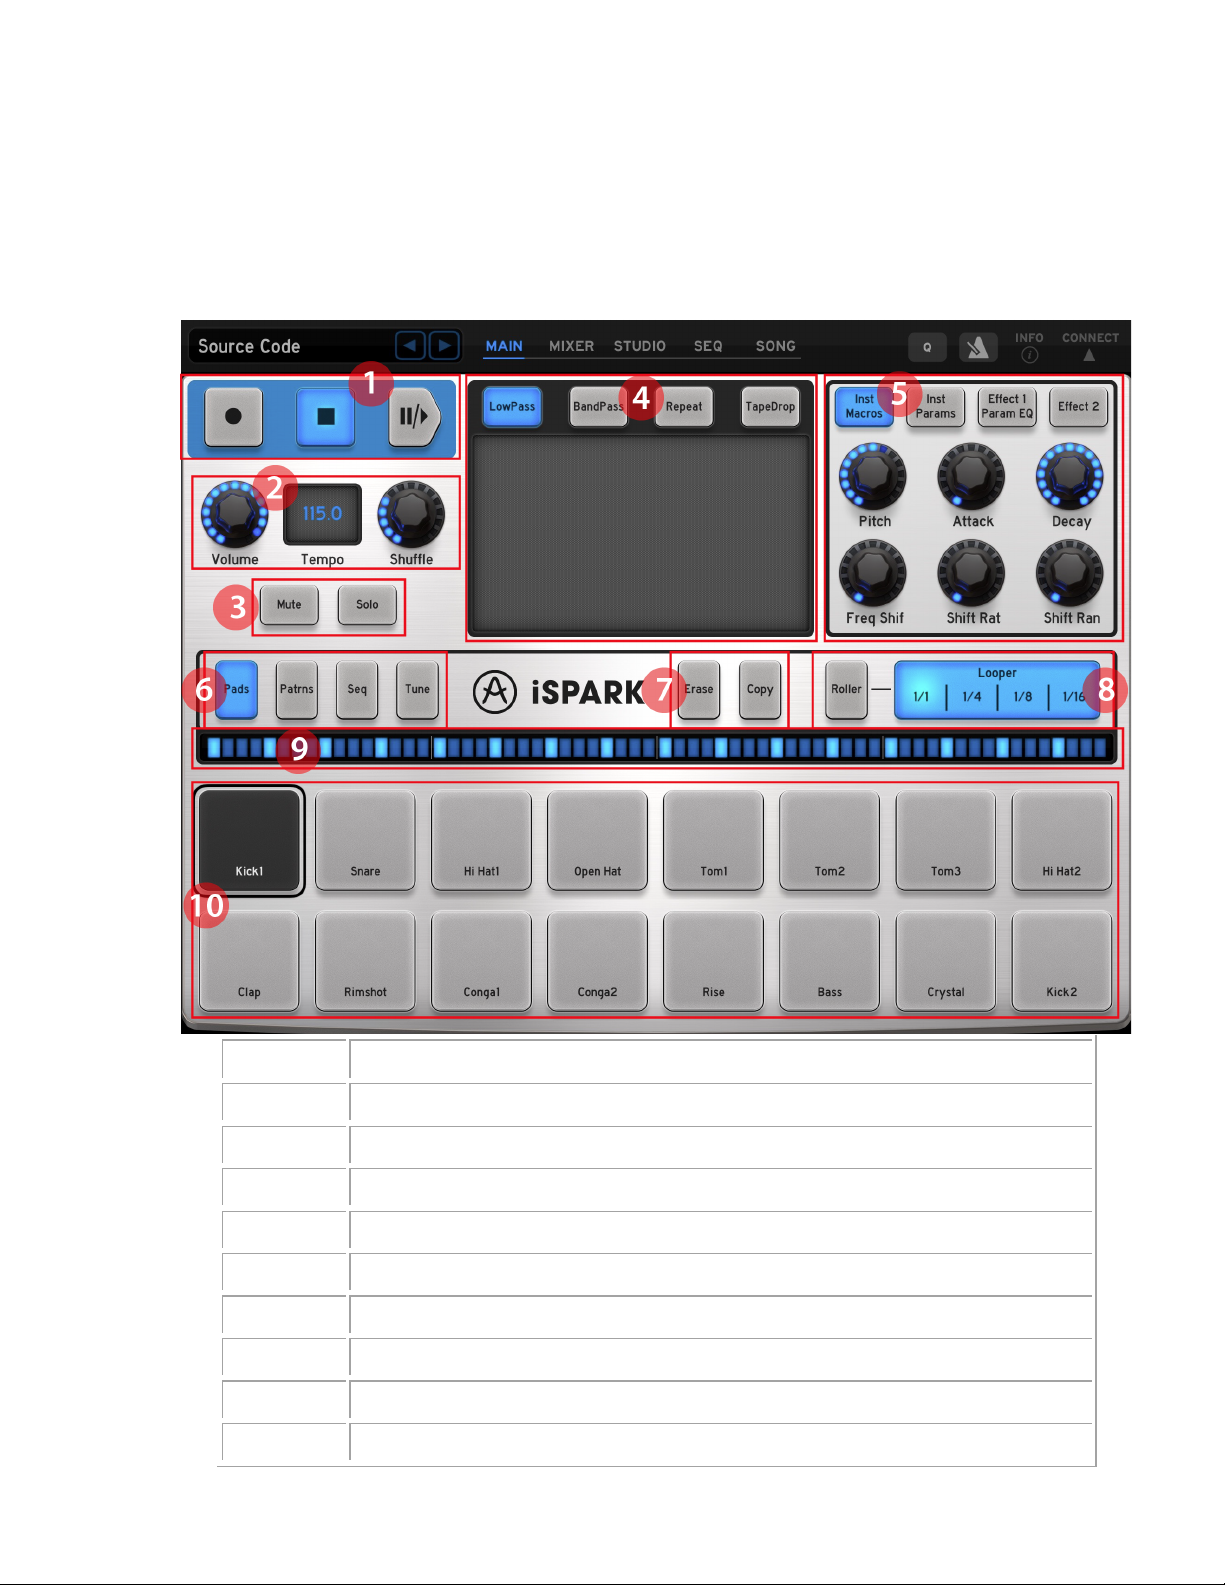
MAIN PAGE
The Main page is the quickest way to enter and edit pattern data. The screen is based on
Arturia’s drum controllers and offers real-time recording and step entry, plus several
performance options.
1.!
Transport!controls!
2.!
Volume!/!Tempo!/!Shuffle!
3.!
Mute!/!Solo!
4!
XY!pad!/!FX!Selection!buttons!
5.!
Instrument!parameters!
6.!
Pad!view!modes!
7.!
Erase/!Copy!!
8.!
Roller!/!Looper!
9.!
Pattern!position!/!length!bar!
10.!
Instrument!pads!!
Page 15
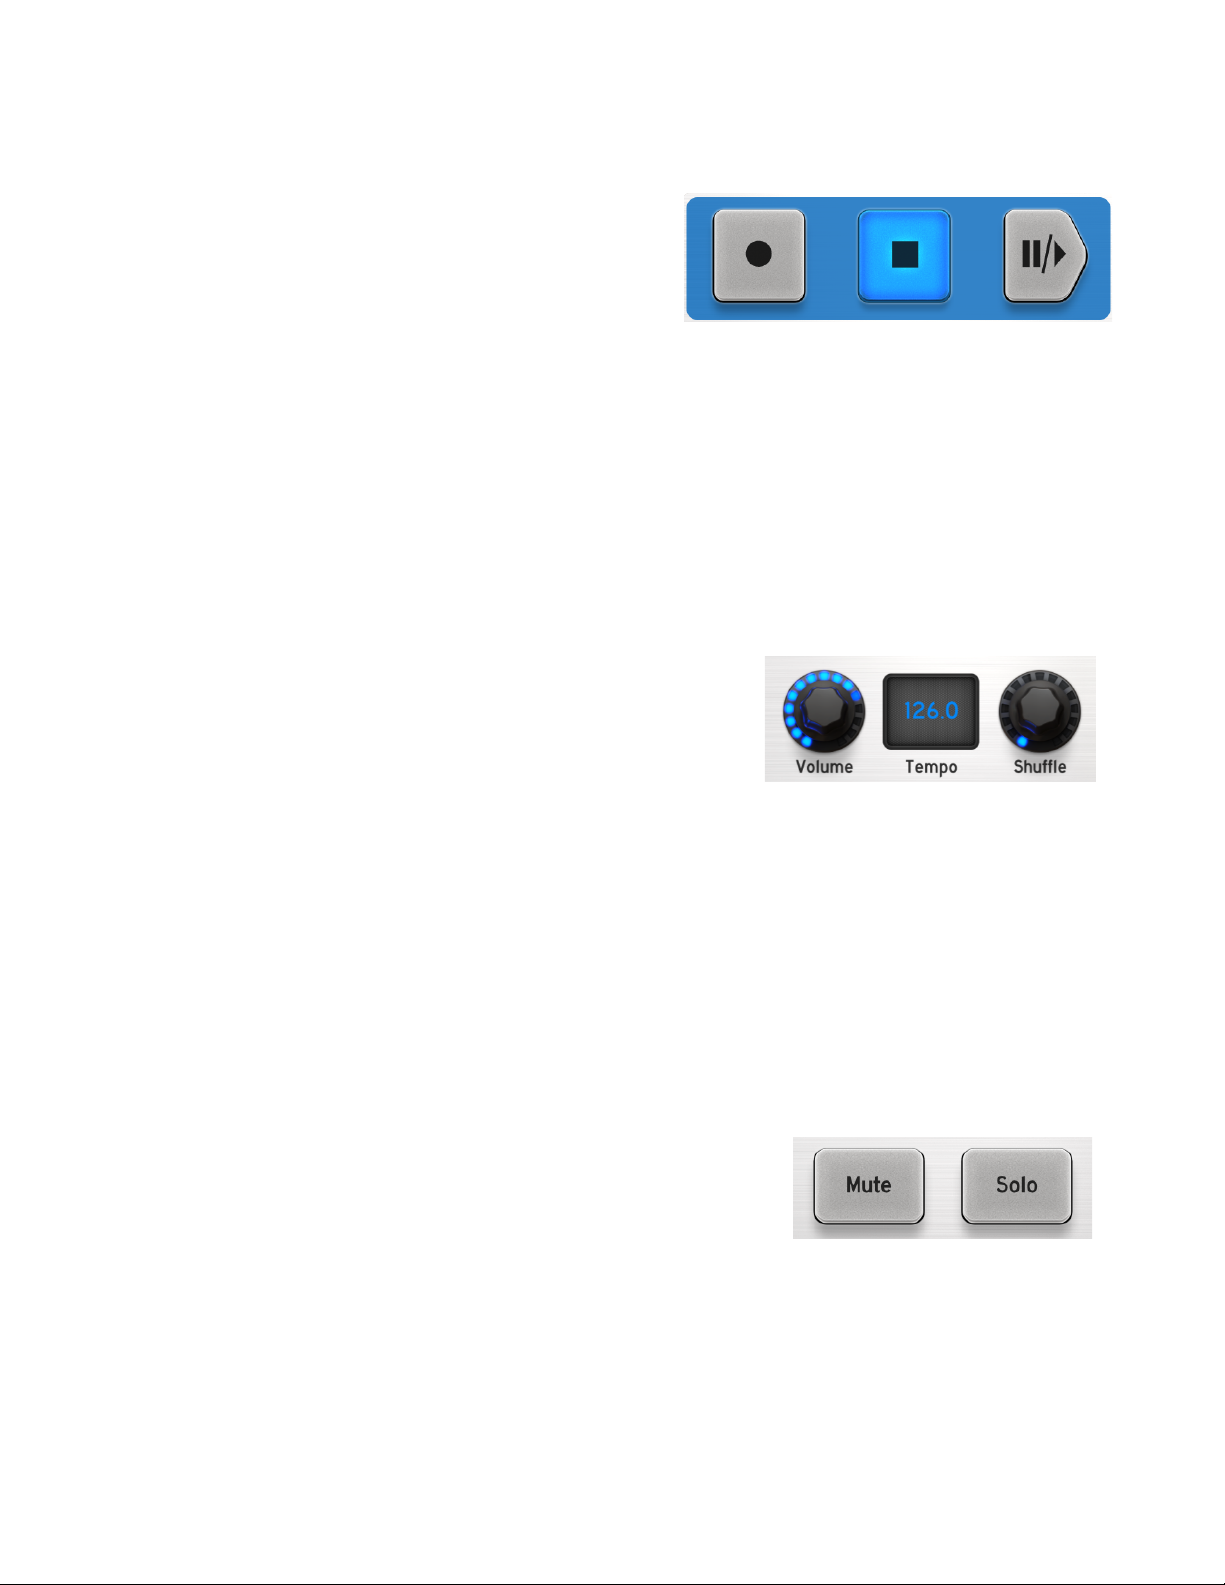
Transport controls
Record/Record Pending
Press the left button and it turns red. If a
pattern is running iSpark will start recording.
If iSpark is not running it will wait until you
press the Play / Pause button and then begin recording.
Stop
The middle button stops the playback or recording of a pattern. The next time the pattern
plays it starts from the beginning.
Play / Pause
The button on the right starts the pattern and can pause playback. When pressed again
the pattern resumes playback from the current pattern positon.
Volume / Tempo / Shuffle
This section controls the iSpark master volume,
tempo and shuffle amount.
Volume: Press and hold this knob, then slide your
finger up or down to change the master volume.
Tempo: Press and hold the center of the Tempo window and then drag it up or down to
change the master tempo. You can also set the Tempo by tapping inside the window
several times.
Shuffle: Press and hold this knob, then slide your finger up or down to change the
Shuffle amount. The effect is most obvious when two notes happen within an 1/8th note of
each other or less.
Mute / Solo
Use these buttons to specify which instruments you
want to hear while the pattern is playing. When active
the buttons turn blue.
Mute: Press this and select one or more instruments to silence. Their pads will turn blue
and their parts will not be heard during playback.
Solo: Selecting a pad after pressing the Solo button will silence all other instruments. It
is possible to use the Solo function on several instruments at the same time.
!
Page 16

XY pad / FX selection
The grey area of this window allows you to
alter the sound and playback of the pattern in
real-time. The effect is selected using the light
grey buttons at the top of this area.
XY pad
This area can be solid grey or sub-divided
depending on the selected effect. Press and
move your finger in this area during playback
to sweep a filter or loop the pattern temporarily
in smaller segments. These actions are not
recorded into the pattern.
FX selection
Press and hold one of the FX buttons for one
second and a drop-down menu will appear.
The current effect is indicated by a
checkmark on the right side of the list.
After selecting an effect from the list the XY
pad will be configured automatically for the
performance options of that effect.
Instrument parameters
The six knobs on the right side of the main window are
pre-assigned to control certain parameters of the selected
instrument. The assignments vary depending on the type
of instrument that has been assigned to each pad.
For example, touch the Inst Macros button and then a
drum pad. With a pattern playing, touch and hold the Pitch
knob and then move your finger up and down. This will
rotate the Pitch knob and change the pitch of the selected
drum.
The four buttons at the top select different sets of parameters. The Inst Macros and Inst
Params buttons control the parameters of the instrument itself; the Effect buttons control
the effects that have been assigned to the instrument. If an instrument has no Effects the
knobs will not have a parameter label.
!
Page 17

Pad view modes
These four buttons select different modes for the
Main page. When one is pressed it provides
different features on the lower half of the page.
The Erase, Copy, and Roller / Looper functions are available in all four modes.
Pads
This is where the “live” pattern recording takes place.
Press Record + Play and recording will begin. Then play the pads as you would any other
drum machine. The black outline around the SD pad means the Snare Drum was the last
one touched.
Different velocities will result as you play a pad from the bottom (low
velocities) to the top (higher velocities).
Patrns
In this mode the bank / pattern selection buttons are shown.
iSpark has four Banks of 16 patterns in each Project. Bank A, pattern 1 (A1) is the current
pattern.
If the “Instant Change” button is lit, pattern A1 will change immediately to the next pattern
you select during playback. If not, iSpark will wait until the end of A1 before it changes.
Page 18

Seq
This mode places a row of step entry pads above the drum pads.
In the picture above Kick 1 pad is selected. The 1-16 buttons represent the 16 steps in
the pattern for that pad. Step 1 in that row is blue, which means Kick1 plays on that step.
To view another instrument, touch its pad.
Use the Accent button to boost the velocity of a step. Each instrument has its own Accent
track.
We will describe the function of the << >> buttons and the Step Follow buttons in the
section about the Pattern Length bar.
Tune
Each instrument can be tuned up or down by as much as 2 octaves using this page.
Kick 1 is selected. To tune it downward 5 chromatic steps, press the -5 button. To tune it
upward by 3 steps, press the 3 button.
The current visible range is from -5 to +6. To shift the range by single increments use the
Step – and Step + buttons. To shift the range +/- 12 steps, use Octave – and Octave +.
Use the Instrument Select buttons at the bottom to edit a different instrument.
Page 19

Erase / Copy
The Erase button works differently depending on if the sequence is
recording or not.
Erasing when not recording
Pressing the Erase button when not recording allows you to do the following:
• Erase the sequence data for one pad within the pattern
o Press Erase and then press the desired pad.
• Erase an entire pattern within the selected Bank
o Press Erase followed by the pattern number. Be careful: If you press the
Bank button the entire Bank of patterns will be erased.
• Erase a bank of patterns
o Press Erase and then press the Bank button (A-D). All 16 patterns in the
selected Bank will be erased at the same time.
These operations can be done whether the pattern is running or stopped. To cancel the
process at any point, press Erase a second time.
Erasing while recording
To erase a portion of the data for a pad while recording, press the Erase button and then
press that pad at the right times. If you do not touch a drum pad, no data will be erased.
To cancel the process, press Erase a second time.
Copy a pattern to a new location
• Press the Copy button. The XY pad will prompt you to select a pattern or Bank.
• Select a source pattern within the current bank by pressing a pattern button. The
XY pad will confirm your selection.
• Select the destination pattern:
o If you press another pattern button, the source pattern will be copied to a
new location within the same Bank.
o If you press a new Bank button first and then a pattern button, the pattern
will be copied to a different Bank at the new pattern location.
To cancel the process at any point, press Copy a second time.
Copy a Bank to another Bank
Note: this process will overwrite all 16 patterns in the destination bank. If this is what you
want to do, here’s how:
• Press the Copy button. The XY pad will prompt you to select a pattern or Bank.
• Select the source Bank by pressing a Bank button. The XY pad will confirm your
selection.
• Select the destination Bank (A-D). The all 16 patterns from the source Bank will be
copied into the new Bank.
Roller / Looper
The Looper strip
The Looper strip allows you to set up a “loop within a
loop” and hear smaller sections of the pattern. This is
Page 20

a performance feature only; actions on the Looper strip are not recorded. However, it can
be used during recording or playback.
Touching the strip activates the Looper; removing your finger deactivates it. The loop will
begin at the nearest place that corresponds to the selected time division.
Sliding your finger left and right will adjust the size of the loop automatically to the time
value you select.
When you lift your finger the pattern will resume normal playback from the point the loop
would have reached prior to the activation of the Looper strip.
The Looper strip will remain active until you touch the strip a second time at the current
timing value.
Note that when the Looper is active the Roller button is not lit.
The Roller
When the Roller button is lit the Looper strip
displays the timing values for the Roller.
The Roller helps you perform perfectly timed drum
rolls from the pads. Turn on the Roller button and press a pad to hear the roll.
Once the Roller button is lit you only need to touch the strip when you want to change the
timing value. Then you can slide your finger from one value to the next to speed up the
roll or slow it down.
You can use the Roller function on several pads at the same time if you like.
The Roller will remain active until you touch the strip a second time at the current timing
value.
The Roller can be used whether a pattern is running or not, during Record or playback. A
roll can be performed at the highest resolution shown in the Roller strip, but its actions will
be recorded only up to the resolution of the pattern. So you can play a 32nd note roll, for
example, but if the pattern resolution is set to 1/16 then those are the smallest notes that
will be recorded.
Pattern resolution is described in the SEQ PAGE section of the user guide.
!
Page 21

Pattern position / length bar
This thin strip of lights tells you a lot about the current pattern:
• The blue lights show how many steps are in the pattern
• The unlit (grey) lights show the maximum number of steps available (64 total)
• The white light indicates the current position of the pattern during playback/record
• The brighter blue lights show where data exists within the pattern for the selected
pad
Patterns over 16 steps long
On the Main page, press the Seq button. Now look at the Pattern Length bar, where the
first 16 steps are bracketed. This means that those steps are the ones visible above the
pads. But the pattern is longer than 16 steps, since steps 17-32 also are lit.
During playback and recording the bracket will move between steps 1-16 and steps 17-32
to indicate the current pattern position. The picture below shows the bracket surrounding
steps 1-16.
Note also that the Step Entry button numbers above the pads have changed to 17-32.
Editing pattern length
Changing the length of a pattern couldn’t be simpler: just touch an area inside the Pattern
Length bar and the length will change. You can also adjust the length by sliding your
finger left and right on the Pattern Length bar.
Step Follow
iSpark allows you to specify whether you want the Step Entry button
numbers of a longer pattern to change while the pattern is running. To
make this happen, enable the Step Follow button.
If you want to focus on one group of 16 steps while allowing the entire pattern to play,
disable the Step Follow button.
Select Step group (<< >>)
You can manually shift the Step Entry button view from 1-16 to
17-32, etc. using the << and >> buttons.
Page 22

MIXER PAGE
iSpark provides a 16-channel mixer (1 channel per pad). Levels, effects, solo/mute
buttons, VU meters and Transport controls are here, just like on a real mixing console.
Channels
Each of the pad channels has the same features, so let’s look at one:
Fader
The fader works just like a real mixer channel fader; press your finger on
the fader and move it up and down to change the instrument level.
VU meters
To the right of the fader strip are two sets of lights that display the
instrument level while the pattern is running. If the instrument is panned to
the left or right the lights will indicate that as well.
Instrument name
The bottom of the channel strip shows the same name of the instrument
that appears on its Main page drum pad.
Page 23

FX insert button
Pressing the FX button will open a window that shows the insert effects
assigned to the channel. Two dedicated insert effects are available per
channel.
Aux 1 / Aux 2
These two knobs control the master effect sends for this channel. The
master effects are shared by all channels. Press your finger on the knob
and slide it up and down to change the send amount.
Text about Pan
Touch this knob and move your finger up and down to set the pan
position for the instrument.
Solo / Mute
Press these switches to solo or mute the selected channel.
Tracks 1-8 / 9-16 selection
Only eight channels are visible in the Mixer at one time. Use these
two buttons to switch between channels 1-8 and 9-16.
FX Returns
The Returns strip allows you to adjust the overall levels of the master FX. This is where
Aux 1 and Aux 2 send their signals.
FX button
Press this button to call up the FX selection window. Press it again to close the window.
See the Studio Page section to learn how to select different FX.
Page 24

Master channel
This is the final stage in the iSpark signal path. You may want to use the FX insert button
to place an EQ or a compressor on the master output to control the levels and add a
professional touch to your mix.
FX insert button
Press this button to call up the FX selection window. Press it again to close the window.
See the Studio Page section to learn how to select different FX.
!
Page 25

STUDIO PAGE
The Studio page goes “under the hood” for instrument selection, sample editing, FX
selection, filter settings and more. You also can mute or solo an instrument and control
the pattern with the Transport buttons.
Load an Instrument
Tap the Select button to load a single Instrument into the current Kit.
In the window below we see the iSpark Factory Bank and the Bass Drum Type are
selected in the Filters, and a Bass Drum selection in the Result List.
Page 26

The 16 buttons on the bottom of the window are the Pads from the current Kit. The
selected Pad is BD, which means that the Instrument in the Select list will be loaded into
that Pad (“LOAD ON PAD 1”) within the current kit.
You can preview an instrument before loading it: Either press the Play icon in the upper
right corner. Preview volume can be set here also.
!
Page 27

Sample / FX buttons
The two buttons in the upper right corner of the Studio window select
the Sample and FX modes. We’ll cover Sample mode first, so press
that button to select that mode.
Sample mode
Use the Instrument Select buttons along the bottom of this window to select the one you
want to edit. If you want to play the pattern while editing, take advantage of the Mute and
Solo buttons at the top of the window.
Sample name
You can see and edit the name of the instrument here using the iPad keyboard.
Type
Select a category for the sound by tapping in this field. A
drop-down menu will appear from which to make your
selection.
A check mark will appear to the right of the currently selected
category for the sound.
Layer mode
A sound can have up to six sample layers. Use the
pull-down menu to select how they will play back:
• Random: the layers will be chosen at random
and played back one at a time.
• Circular: iSpark will cycle through layers 1-6.
Page 28

• Stacked: All layers will play at once.
• Velocity: All active samples will be switched from 1 through 6 as velocity increases.
• Threshold: Samples will play at full volume but the one that plays will change
based on velocity.
Layer select
Each of the six layers can have an independent sample, each with its
own settings for Start point, End point, Gain and Reverse. Use this
window to select the layer you want to edit. A check mark indicates
which layer is currently selected.
Layers with parentheses around their numbers do not yet have a
sample assigned.
Sample
The Sample field allows you to select a different sample for the selected
layer. Touch it to open the Sample Chooser window:
Select one of the options in the list and navigate to the desired sample folder.
For example, the iTunes Share Folder can hold exported iSpark patterns (an audio
sample of the iSpark output. You’ll learn about this in the Sequence Page section).
Select “iTunes Share Folder” in the Sample Chooser window. A window will open:
Page 29

You can load one of the samples or back out by clicking Sample Chooser at the top of the
window. Other choices include:
• Close will return iSpark to the Sample Edit window
• Click Play to audition the sample
• Click Load to load the sample into the sound layer
• Delete will remove the selected sample from the folder.
Recording a sample
Touch the Sample name window to open the Sample Chooser. From the menu select
“Recordings”. This will open a new window.
At the bottom of that window are five options, one of which is “New”. Tap that and now
iSpark can use the iPad microphone to record a new sound.
When you are ready, press “Record” at the bottom of that window. Press “Stop” when you
are done recording. Press “Play” to audition your new sample. If you want to re-do the
sample, press Record again.
Page 30

Once you are happy with the recording, you can tap “Load” to place it in the current
Instrument or tap “Close” to save it in the Recordings list.
You may need to use the Sample start / end markers to make sure the pad only plays
back the part of the recording you want to hear. These are described below in the
“Sample Window” section.
Gain
Each of the six layers has an independent Gain setting. To adjust the Gain control, move
the knob up and down with your finger until you reach the proper level for the layer.
Reverse
Each of the layers can be set to play backward when triggered. Toggle the Reverse
button to turn this feature on and off per layer.
Sample window
Sample start / end markers
The Sample window provides a graphic representation of the audio file inside the current
layer. It is possible to play back only a portion of the sample, which can be a very useful
sound design tool.
For example, you can create a new bass drum by “hiding” a loud attack. Then you can
use the Gain control to emphasize the body of the bass drum instead. You can also mask
a noise at the end of a sample by adjusting the end point inward.
Page 31

To adjust either the start or the end point of a sample, press one of the small, brightly
colored rectangles at either end of the sample and use your finger to move it inward.
Once a marker has been moved into the middle of a sample it can be moved in either
direction. This is a non-destructive edit, so it is possible to play back the full sample again
whenever you like. To do this, simply drag the markers to their respective extremes.
Audition sample window
When an instrument is selected using the Instrument Selection
buttons an icon appears beneath the Sample window.
The icon also serves as an audition button, so when you want to hear
the sound without playing the pattern, press this button. It’s a good
way to check an edit quickly.
Instrument selection buttons
At the bottom of the Studio page are two rows of buttons labeled with the pad names. Use
these to select the Instrument that contains the sample(s) you want to edit.
Controls: top row
These controls affect the entire instrument. They are the same knobs you see on the
Main page when the Inst Macros button is selected.
The knob assignments are pre-determined and may change from one instrument to the
next. A common set of assignments might look like this:
• Pitch: this tunes the sample up and down over a wide range.
• Attack: A sample can begin quickly or fade in depending on this setting.
• Decay: This controls whether a sample plays for its full length or fades out quickly.
• Freq Shift: applies an envelope amount to a Bode frequency shifter
• Freq Rate: controls the decay and release times of that envelope
• Shift Range: adjusts the relationship of down- and upshifted signals.
To change a value, press one of the knobs and slide your finger up and down.
Once you have the instrument sounding the way you like, be sure to save your Project.
Controls: bottom row
These controls are mixer parameters, common for each instrument. You will see the
same knobs on the Main page when the Inst Macros button is selected. The last two
knobs are linked to the Filter Type window on the right side.
Page 32

• Volume: Sets the overall level of the instrument (all 6 layers).
• Pan: Use this to position the instrument somewhere in the stereo field.
• Send 1: Controls the amount of audio sent from the instrument to the Aux 1 effect.
• Send 2: Controls the amount of audio sent from the instrument to the Aux 2 effect.
• Cutoff: Use this to open or close the selected filter.
• Resonance: Determines the level of emphasis at the filter cutoff frequency.
• Filter Type: Select either low pass (LP), high pass (HP), or band pass (BP).
To change the value of a knob, press it and slide your finger up and down. To change the
Filter Type, tap the window and make a selection from the drop-down menu.
Once you have the instrument sounding the way you like, be sure to save your Project.
Filter Type
Three types of filters are available: low pass (LP), high pass (HP), and
band pass (BP). They have very different characteristics:
• LP: Affects higher frequencies first and lower frequencies last.
The Cutoff parameter sets the point at which the roll off begins.
• HP: Affects higher frequencies first and lower frequencies last.
The Cutoff parameter sets the point at which the roll off begins.
• BP: Rolls off both the higher and lower frequencies, leaving the middle frequencies
unaffected. The Cutoff parameter sets the point at which the roll offs begin.
To change the Filter Type, tap the window and make a selection from the drop-down
menu.
Choke group
The Choke group allows you to specify certain instruments as mutually
exclusive: when one plays it cuts off the other.
For example, when a closed hi-hat plays, the open hi-hat should not
continue to play. To make the performance of these two instruments
more realistic, assign them to the same Choke group.
There are eight groups available. Touch this window to select one of the groups for the
current instrument.
FX mode
To enter FX mode on the Studio page, press the FX button on the
upper right side of the page.
One or more effects may already have been assigned to the current
instrument, but if not then you will see at least one empty FX panel. It looks like this:
Page 33

To choose an effect touch the field containing the words “SELECT EFFECT” (also known
as the Name field). A drop-down menu will show a list of the available effects.
To disable an effect, click the on/off icon to the left of the name field. This is
also referred to as the Bypass switch.
FX overview
Each effect is different, but there are some general concepts we can cover before we
describe each one.
1
Bypass the effect for this channel
2
Select a new effect or remove it by selecting the dash (-)
3
Load an FX preset
4
Save FX preset
5
Delete FX preset
6
Wet/Dry balance
7
Effect parameters (varies)
On/Off
This button is also known as the Bypass switch. It will disable only the effect in which it
resides.
Select FX
When you click on one of the FX Type fields a pull-down
menu will appear. Use this to select the desired FX
module.
Page 34

Select Preset
Factory presets are provided for each effect. Use this
pull-down menu to select one, and then edit the
parameters to suit the Project. Be sure to use the SAVE
button to save your settings.
Load FX Preset
You can create and save your own presets for each
effect and then load them into any Project. They will
appear at the bottom of the Preset Selection list, as
shown in the picture to the right.
Use this pull-down menu to select the desired preset
from the list.
Save FX Preset
Click the SAVE button in the Preset Selection window to save changes you have made to
an FX preset.
The iPad keyboard will pop up so you can enter a name for the preset. Tap the Return
button to enter the name and close the window.
!
Page 35

Delete FX Preset
If you decide to remove one of your User presets from
the Preset Selection list, click the X next to the SAVE
button.
A confirmation window will appear. If you’re sure,
press Delete. If not, you can back out by pressing
Cancel.
Wet/Dry balance
Every FX module has a fader on the right side that allows you to set the balance between
the effected and non-effected (i.e., wet and dry) signal for that effect.
To adjust the balance, touch the fader with your finger and move it up or down.
Effect parameters
The available parameters are different for every FX module. Some have as few as three
parameters, and others have many more.
FX descriptions
After an effect has been selected you are able to edit its parameters. Be sure to use the
SAVE button to store a copy of your new preset for later use.
Bit Crusher
A bit crusher reduces the bit depth and sample rate of the audio signal. The result is a
very digital sounding distortion.
Chorus
Chorus is a classic effect that uses small delay times (that are modulated by an LFO) to
double a sound, making it seem fatter and thicker. Shape, rate and depth refer to the
LFO. Delay is the delay time and feedback is the amount of delayed signal added back to
Page 36

the dry signal. Both of these parameters emphasize the effect when increased. Spread
refers to the width of the sound in the stereo field.
Compressor
A compressor evens out differences in gain by reducing dynamics (difference in volume
between quiet sounds and loud sounds). This effect is often used to ‘fatten’ a sound by
making every individual element of the sound closer to the same volume. Every time a
sound goes over a certain volume (Threshold), it is reduced by a specified amount
(Ratio). Attack and Release determine how quickly the reduction is added and how
quickly it disappears. Makeup boosts the compressed signal’s level.
Delay
Use the Link function to apply the same
parameters to the left and right channels.
Use the Sync button to sync to the iSpark tempo
A delay repeats a sound, giving it more space and depth. Linking channels applies the left
channel’s delay time and feedback to the right channel. For separate parameters on both
channels Link should be deactivated. Ping Pong alternates the delayed signal between
the left and right channel (for an increased stereo effect), and dampening reduces high
frequencies by adding a Lowpass filter to the feedback chain.
Distortion
Page 37

A distortion saturates and distorts a sound by increasing the volume of a signal then
clipping the excess. This effect can add strength, high-end and volume to a sound.
Parametric EQ
Parametric EQ allows one to boost or reduce the volume of frequency bands. FREQ
selects the frequency and GAIN allows one to remove or add volume to that band. Width
(MID only) determines the width of the middle band around the specified FREQ.
Phaser
A phaser is similar to a chorus effect, in that it uses small delay times to affect a signal.
The result is a sweeping comb-filter sound.
Destroyer
!
A Destroyer is a digitizer effect which produces a distortion by the reduction of the
resolution or bandwidth of digital audio data. The resulting bit reduction may produce a
“warmer” sound impression, or a harsh one, depending on the amount of bit reducer and
resampler. Harmonic distortion adds overtones that are whole number multiples of a
sound wave's frequencies.
Page 38

Flanger
!
Flanging produces its effect by mixing two identical signals together, with one signal
delayed by a small and gradually changing period. Varying the time delay causes these to
sweep up and down the frequency spectrum. The delay time between signals is
modulated. Flanging can create both subtle and extreme effects, depending on the rate
and depth of the modulation. High values for Feedback will create repeated echoes.
Space Pan
!
Space panning is the spread of a sound signal into a new 3D sound field. The sound will
automatically be centered (pan set to 0), or the user can specify a different position. The
motion parameter will modulate the sound’s position in space.
Sub Generator
!
Sub Generator adds low frequency to your signal. Sub Oscillator adds a decaying boom.
Subgrunge and Subgrunge -1 Oct have a similar effect to compress low frequencies.
Subgrunge -1 Oct works at an octave below like an octave pedal guitar. Vintage SubHarm adds a smooth sub-octave using the release time parameter. Tune is the maximum
boosted frequency; at low values it helps reduce distortion. Threshold is used to gate the
low frequency effect and stop unwanted background rumbling.
Page 39

Limiter
!
A Limiter is a compressor with a high ratio and a fast attack time. A limiter reduces the
level of an audio signal if its amplitude exceeds a certain threshold. Attack and Release
determine how quickly the reduction is added and how quickly it disappears. “Knee”
controls whether the bend in the response curve is a sharp angle (hard knee) or has a
rounded edge (soft knee). A soft knee reduces the audible change from uncompressed to
compressed.
Analog Chorus
!
For a description of the Analog Chorus, see “Chorus”. The Analog chorus has a different
sound which might be better suited for some applications.
Analog Delay
!
The Analog Delay is a different algorithm from the “delay” effect plugin. The sound might
be preferable in some cases.
Page 40

Detune (PS.Chorus)
!
This module creates two copies of the sound, one panned left and the other panned right.
They are respectively pitched down and up. Detune controls the amount of pitch shifting
of the copies. Delay sets the timing offset between the dry signal and the copies.
Leslie
!
The Leslie speaker is an amplifier/loudspeaker combination that is used to create a
modulation effect based on the Doppler effect. Both the treble horn and the woofer
speaker have rotating parts, giving that distinctive tone.
The Speed selector controls the rotation speed: slow, fast, or stopped. The High
frequency section has controls for depth, stereo width, and the shape of the width
modulation. The Low frequency section has controls for stereo width and the shape of the
width modulation.
Vocal filter
!
The Vocal filter is a formant filter that recreates the sound of vowels. Setting the LFO to
On makes the red dot travel continually between the vowels. The Rate and Resonance
controls affect the speed of the travel and the harmonic emphasis along the way.
Drag the vowels to different places within their window to change the order and spacing
between them.
Page 41

Graphic Equalizer
!
The 10-band graphic equalizer allows you to shape the frequency content of your sound
by choosing the individual gains of each frequency band.
Plate Reverb (Aux 1+2 / Master only)
The Plate Reverb is only available for Aux and Master tracks
A reverb emulates the reflections of a sound in a different space (room, hall, etc). Reverb
adds depth and richness to a sound by ‘placing’ it in a separate physical space. The size
knob changes the size of the space. Predelay adds a small amount of delay to the sound
to imitate early reflections. Stereo refers to the width of the stereo field of the reverb.
Damping determines how much the reverb should be filtered using the Lo and Hi Cut filter
settings.
Reverb (Aux 1+2 / Master only)
The Reverb is only available for Aux and Master tracks
A reverb emulates the reflections of a sound in a different space (room, hall, etc). The
Material section (HF Damping and Brightness) sets the timber for the reverb (dark or
bright-sounding). The Shape section (Diffusion and Decay Time) sets the size and
duration of the reverb. The pre-delay section (Feedback and Time) adds a small delay to
the reverb to emulate early reflections.
! !
Page 42

SEQUENCER PAGE (SEQ)
The SEQ page allows you to view and edit the sequencing data on multiple tracks at the
same time.
Basic Transport controls are always available at the top of the page (Play/Pause/Stop).
The Record button is not available in this mode, but step-time data entry is possible in the
window below.
Overview
Instrument/Track selection
Six consecutive instrument tracks are visible at one time. To select a different range of
tracks to view, swipe up or down inside the track data window.
Data entry
Bright blue rectangles indicate the presence of note data on an instrument track.
There are two ways to enter note data on the tracks:
• Tap a numbered rectangle to toggle the note data on or off
• Swipe a finger gently across the rectangles to enter several notes in a row
Solo/Mute
Solo and Mute buttons are available for every track on the left side of the window.
!
Page 43

Automation
iSpark has an extensive array of parameter automation features. To enter Automation
mode, tap the Automation button on the left side of a track. Here’s an example of what
you could see:
On the left side of the window is list of automations where data already exists in the track.
“Velocity” is in blue text, which means that’s what the visible automation data is. The word
“Panning” is in grey, which means that if you tap that word you will see the panning
automation data.
Some automation parameters are positive-going only, while others (such as Panning)
have a center point and can be edited positively and negatively.
To close the Automation window and return to the multi-track view, touch the Automation
button again.
!
Page 44

Data entry/editing methods
Across the top of the Automation window are five buttons.
These buttons select the Automation Tools.
Pencil
When the pencil tool is selected you can use your finger to draw automation data across
the screen in a non-linear fashion. You can also use your finger to edit the data in a single
column.
Tap in an empty column and an automation event will be added for that pattern step.
Offset
Select this tool to adjust all of the values of the selected automation at the
same time. You will be able to move them up or down with your finger.
Note that this will also adjust values inside step groups that are not currently
visible (1-16, 17-32, etc.).
Line tool
This tool allows you to draw or adjust values by drawing a straight line
across the automation window. Press your finger on the center of the left
side of the window and swipe left or right in a diagonal direction. Values will
be entered or adjusted automatically.
When you have reached one of the right-most steps, keep your finger pressed down and
then slide the “end of the line” up and down. This will illustrate the ability of a line to be
drawn in a positive or negative direction.
Eraser
Use this tool to erase individual automation events or an entire range of
events from the automation window.
To erase only one event, tap that event. To erase a range of events, tap the
first event you want to erase and swipe your finger to the right. Alternatively,
you could tap the last event you want to erase and swipe your finger to the left.
Fine edit
This button activates fine editing/entry of automation data for most
parameters. It allows more precise editing by dividing the steps it affects into
4 sub-steps.
Note that fine editing does not work with Velocity, Time Shift or Repeat.
!
Page 45

Below is an example of fine editing of the Resonance parameter.
Notice that within a given step four different values can be present.
It is possible to toggle the Fine Edit button off and perform a coarse edit within an
automation window:
Note that the values within steps 7, 9 and 14 above are “flat”. To do something like this,
turn off the Fine Edit button and touch the automation window at the desired steps.
!
Page 46

Add automation
To add a new type of automation control to the selected track, click
the plus sign (“+”) under the blue Automation button. A menu will
appear with the list of available options.
After a selection is made the list will disappear. Now automation data
can be entered for the new parameter using the techniques described
above.
Note: Once an automation parameter has been added to a track it will
be hidden from the “add list” for that track. So the next time you add
an automation parameter you will see a shorter list.
Clear automation
To delete the automation of the selected parameter, click the word
“Clear” on the left side.
This is a destructive edit that cannot be undone, so a confirmation
window will appear:
To confirm the process, tap OK. To back out and leave the automation data untouched,
tap Cancel.
Disable/Enable automation
If you’d like to hear the track without one of the automations, tap the word “Disable” on
the left side.
After you do this, a set of parentheses will appear around the label for
that automation and the word “Disable” will change to “Enable.”
To enable the automation again, tap the word “Enable”.
It’s possible to have more than one automation parameter disabled
simultaneously.
Pitch automation
There are several types of Pitch automation:
• Chromatic: transpose the sound by a single chromatic step
• Octave: transpose the sound by an octave (12 chromatic steps)
• Fine editing: sub-divide pitch automation with 4x timing resolution
Each has its own unique features so we’ll cover them one at a time.
!
Page 47

Overview
The vertical shading scheme of the Pitch automation window follows the white and black
keys of one octave on a piano keyboard. In iSpark the “C” is light grey, the C# is darker
grey, and so on, from the bottom of the window to the top.
Note: The note names refer to relative transposition amounts; the actual pitch is determined by
the sample used by the instrument.
To place a Pitch automation event, press for one second in the desired rectangle.
An automation event placed on the bottom row means the root pitch of the sound will be
heard. If the event has been placed one row higher than the bottom, the sound will play
back one chromatic step higher than its original pitch, and so on.
The number inside the automation event represents the amount of octave transposition
the step contains. A value of 0 means octave transposition is not being applied to that
step.
Note: Sounds which sustain beyond a pattern step boundary will transpose during playback.
Below are some examples of each type of transposition.
Chromatic
The picture below shows three pitch automation events:
The first event means the sound will be played at its original (“root”) pitch with no octave
transposition. The second event tells the sound to play back one chromatic step higher
than its root pitch. The third event “resets” the instrument back to its root pitch.
To transpose an existing pitch automation event, press and hold any rectangle above or
below it and then slide the new pitch event into the desired location.
Note: Be sure to place a pitch event at the beginning of the pattern so it will start with the
instrument playing the desired pitch. Otherwise it will play at the last transposition amount it
encountered before the pattern looped.
Octave
A pitch automation event can be transposed quickly up or down in octave increments.
Page 48

To do this, tap lightly on the event to open the octave transposition window. Use the
arrows above and below the number to make changes.
A value of +1 means the step will play back an octave higher than its original pitch. The
range is 1 octave up (+1) and 2 octaves down (-2). The color of the event will change to
indicate the amount of change.
Here is another example combining chromatic and octave transposition amounts.
The first event is at root pitch; the second is an octave higher. The third is one chromatic
step above the root pitch.
The following example uses a negative octave transposition in the fifth step event.
The other events follow the examples given earlier.
Fine editing
Fine editing of Pitch is possible also. The major difference is that you will not be able to
access individual octave up / down buttons for the sub-divisions of a step.
To enable fine editing of Pitch, touch the fine edit icon in the upper portion of the Pitch
automation window. Then use the Automation Tools as you would with any other
automation parameter.
Export audio
You can sample the audio output of an iSpark pattern and use that as an
Instrument in another pattern. To initiate this, press the Export button.
iSpark will scan each step of the pattern as it samples the audio output. Once it is done
another window will appear and give you several options as the next step in the process.
Page 49

This new sample is already available to iSpark inside the iTunes Share directory. But if
you would like to copy it to the Pasteboard or open it inside another application, select
one of those options instead.
The process of accessing the iTunes Share directory is described in STUDIO Page /
Sample Mode / Sample.
Delete
This option must be used with caution because it will affect the entire pattern, not only the
selected instrument track.
All Automation will erase the automation data on every track within the pattern except
the Velocity data. It will also remove the automation parameter lists from each track,
leaving only Velocity in each list.
All Data will clear the pattern data as well as the automation data. Only the pattern length
will remain.
Select the option you want by tapping it, or press Cancel to leave the pattern data
untouched.
!
Page 50

Bank/Pattern
It is possible to select a different pattern within the same Bank or from a different Bank of
patterns without having to leave the SEQ Page To do this, tap inside the Bank/Pattern
field at the top of the main SEQ Page window.
Doing so will open the Bank/Pattern menu. Select a pattern button (1-16) to choose a
pattern within the current Bank.
To select a new pattern within a different Bank, press one of the Bank buttons (A-D) and
then select a pattern within the new Bank.
To close the menu, tap Bank/Pattern.
Bar Steps
The Bar Steps window holds two selection menus: Bars and Steps. The picture below
shows a pattern with the maximum number of bars and steps in 4/4 time.
Each value can be changed independently from this window. To
change the number of bars in the pattern, tap on the left side of the
slash.
A menu will appear from which you can make a selection. Note that
when you do, the number of available steps in the pattern may
increase or decrease.
For example, if you change the pattern length to 3 bars instead of 4, the number of
available steps will drop from 64 to 48.
It is possible to have an unusual number of steps in a
pattern, such as 14 (smaller than one 4/4 bar), or 45
(almost three 4/4 bars).
To change the number of steps in the pattern, click on
the right side of the slash. A menu will appear from
which you can make a selection.
Note that when you do, the number of available bars in
the pattern may increase or decrease.
Page 51

For example, if you change the number of steps from
64 to 45, the number of bars in the pattern will drop
from 4 to 3.
Remember that you also can change the length of
the pattern on the Main page by sliding your finger
across the Pattern Length bar. This is discussed in the MAIN Page section of this manual.
To close the menu, tap “Bar Steps” again.
Time Sig
To change the time signature of the pattern, tap on one of the numbers inside the Time
Sig window.
A menu will appear from which you can make a selection. Note that when you do, the
number of available bars and steps in the pattern may increase or decrease.
Remember that the number of options on either side of the slash may be affected by
other settings such as Resolution.
For example, with a resolution of 1/64th note, 16 is the only option for the lower numeral:
However, when the resolution is changed to 1/32nd note there are two options for the
lower numeral: 8 and 16.
To close the menu, tap “Bar Steps” again.
Resolution
To change the resolution of the pattern, tap inside the Resolution window. A menu will
appear from which you can make a selection.
The number of available options is affected by several factors, including the number of
measures in the pattern.
Page 52

Remember that a maximum number of 64 steps is available, so if your pattern is in 4/4
and it is 4 measures long, there are 64 sixteenth-note steps available. So it is not possible
in this case to select 1/32nd note resolution, so that option is not shown in the menu.
However, if your pattern is 2 bars long then it is possible to select 1/32nd note resolution
because that adds up to exactly 64 steps (two bars with 32 steps each).
The maximum possible resolution is 1/64th note. But it is only possible to select this
resolution inside a single measure of 4/4, or two bars of 4/8, etc.
Window range selectors
Click these buttons to display steps 1-16, 17-32, 33-48, or
49-64 in the current pattern. The sequence data window will
follow your selection so you can edit steps within the
selected range.
You may see one, two, three or all four of these buttons
depending on various factors such as the Bar Steps and/or
Resolution settings.
Page 53

SONG PAGE
The Song page allows you to chain patterns together to create longer sequences or an
entire song. A song can contain up to 128 steps, and any one of the Project’s 64 patterns
can be used as one or more of those steps, in any order.
There is not a Record button in the Transport section. It has been replaced with the Song
button. But the Play/Pause and Stop buttons function the same as they do on any other
page.
Note: the Song button must be lit in order for the song to play. Otherwise iSpark will loop
a single pattern.
Edit/Perform mode buttons
The Song page contains two main sections: Edit mode and Perform mode. We’ll start with
Edit mode and describe each area of the Song window.
Edit mode overview
Edit mode is where the construction of a Song takes place. You will drag Patterns from
the area under the Transport buttons into the “chains” in the lower half of the window.
Although the picture above shows the patterns listed in numerical order, they can be
arranged in whatever order you need them to be.
Page 54

Bank/Pattern bar
All 64 patterns from the Project can be accessed from the Bank/Pattern bar:
To select a pattern, tap the Bank button (A-D) and then select one of the 16 patterns
within that bank.
Drag and drop the selected pattern into the Edit panel to start constructing your song. You
can then select a different pattern and repeat the process, or drag/drop the same pattern
again if you want it to play a second time at that point in the song.
Editing a chain
There are two ways to edit an existing pattern chain: Replace or Insert. The source
pattern can be dragged from the Bank/Pattern bar or from one of the chains inside the
Edit panel.
Drag & drop: insert
To insert a pattern between two patterns in a chain, drag the desired pattern until you see
a bracket of red lines between the two patterns where you want the new pattern to be.
When you see the red brackets in the right place, release the new pattern. It be inserted
in the pattern chain at that location.
However, in order to make room for itself it will push all of the later patterns within the
chain back by one step. The last pattern in that chain will be removed from the chain.
!
Page 55

Drag & drop: replace
To replace a pattern within a chain, drag the
desired pattern on top of the one you want to
replace.
When the entire pattern is outlined in red, release
the new pattern. It will replace the old pattern
without affecting the other patterns in the chain.
Audition the Song
The Song button must be lit in order for the song to play.
Otherwise iSpark will loop the current pattern only.
But it can be useful to toggle the Song button on and off
when you want iSpark to loop one of the patterns within a chain for a while.
Timing is everything here: the status change of the Song button will not take effect in the
middle of a pattern; it will be applied to the next pattern.
Combining chains
The Edit panel contains 16 chains of up to 8 patterns each. These can loop within their
own 8 patterns or be linked to one or more adjacent chains.
1-8 / 9-16 buttons
Only 8 chains are visible at a time, so there are two buttons in the middle of the Song
page that allow you to switch the view between chains 1-8 and 9-16.
Chain Link
At the bottom of the Song page are two rows of buttons. The smaller buttons have
graphics inside that represent two chains with an arrow pointing to the second chain.
Those are the Chain Link buttons. They determine one of
two options when Song mode reaches the end of a chain:
• Button lit: proceed to the top of the next chain
• Button not lit: return to the top of the left-most chain
that has its Chain Link button lit.
For example, the chains in this picture would loop one after
the other.
Active/Next Chain
The larger button on the bottom is the Active/Next Chain button. When a song is playing
you can know instantly which chain is active by looking for this big blue button.
As soon as Song mode starts the last pattern in a chain the Active/Next button jumps to
the next chain so you know iSpark is about to play the first pattern in that chain.
To switch chains on the fly, just select the Active/Next button for the desired chain
manually. The newly selected chain will begin to play after Song mode reaches the end of
the current pattern.
Page 56

Perform mode overview
The XY/performance pads are identical to the ones on the Main page. But in Perform
mode there are two available at the same time.
The filter modules are on the left and the other FX are on the right.
XY pad (filters)
The XY pad on the left provides a handful of filter effects, with four
available on the preset buttons at the top of the pad.
To select a filter, hold one of the preset buttons for about 1 second. A
menu of filters will appear. A check mark indicates the current selection
for that preset button.
Make a selection and the menu will disappear. Then use the XY pad
the same way you would on the Main page.
FX pad
The FX pad on the right provides a handful of effects which are mostly
time-based. You can place any four of those effects on the preset
buttons at the top of the pad.
To select an effect, hold one of the preset buttons for about 1 second
and an effects menu will appear. Make a selection and the menu will
disappear.
A check mark indicates the current selection for that preset button.
!
Page 57

Hold
Part of what makes the FX pads different in Perform mode is that each one has its own
Hold button.
A Hold button allows the last activated position of its pad to be maintained until it receives
further input. So, for example you are able to sweep a filter to a certain frequency and
keep it there without having to keep your finger on the pad.
The Hold buttons can be activated independently. To deactivate a Hold button, tap it a
second time.
 Loading...