

ARRIS 2W5012NV User Manual

HomePortal® Intelligent Gateway
Configuration Guide
Firmware Version: 9.3.1.10

Notice to Users
© 2010 2Wire, Inc. All rights reserved. This manual in whole or in part, may not be reproduced, translated, or reduced to any machine-readable form without prior written approval.
2WIRE PROVIDES NO WARRANTY WITH REGARD TO THIS MANUAL, THE SOFTWARE, OR OTHER INFORMATION CONTAINED HEREIN AND HEREBY EXPRESSLY DISCLAIMS ANY
IMPLIED WARRANTIES OF MERCHANTABILITY OR FITNESS FOR ANY PARTICULAR PURPOSE WITH REGARD TO THIS MANUAL, THE SOFTWARE, OR SUCH OTHER INFORMATION,
IN NO EVENT SHALL 2WIRE, INC. BE LIABLE FOR ANY INCIDENTAL, CONSEQUENTIAL, OR SPECIAL DAMAGES, WHETHER BASED ON TORT, CONTRACT, OR OTHERWISE, ARISING
OUT OF OR IN CONNECTION WITH THIS MANUAL, THE SOFTWARE, OR OTHER INFORMATION CONTAINED HEREIN OR THE USE THEREOF.
2Wire, Inc. reserves the right to make any modification to this manual or the information contained herein at any time without notice. The software described herein is governed by the
terms of a separate user license agreement.
Updates and additions to software may require an additional charge. Subscriptions to online service providers may require a fee and credit card information. Financial services may
require prior arrangements with participating financial institutions.
2Wire, the 2Wire logo, and HomePortal are registered trademarks of 2Wire, Inc. All other company names may be trade names or trademarks of their respective owners.
6232010
5100-000899-000

Contents
About This Guide . . . . . . . . . . . . . . . . . . . . . . . . . . . . . . . . . . . . . . . . . . . . . vi
Audience. . . . . . . . . . . . . . . . . . . . . . . . . . . . . . . . . . . . . . . . . . . . . . . . . . . . . . . . . . . . . . . . . vi
Supported Hardware Platforms . . . . . . . . . . . . . . . . . . . . . . . . . . . . . . . . . . . . . . . . . . . . . vi
Document Layout . . . . . . . . . . . . . . . . . . . . . . . . . . . . . . . . . . . . . . . . . . . . . . . . . . . . . . . . .vi
Style Conventions . . . . . . . . . . . . . . . . . . . . . . . . . . . . . . . . . . . . . . . . . . . . . . . . . . . . . . . . vii
Related Documents. . . . . . . . . . . . . . . . . . . . . . . . . . . . . . . . . . . . . . . . . . . . . . . . . . . . . . . vii
Support . . . . . . . . . . . . . . . . . . . . . . . . . . . . . . . . . . . . . . . . . . . . . . . . . . . . . . . . . . . . . . . . . vii
CHAPTER 1 Introducing the HomePortal Intelligent Gateway Software . . . . . . . . . . . 1
CHAPTER 2 Accessing the User Interface. . . . . . . . . . . . . . . . . . . . . . . . . . . . . . . . . . . . . 3
System Link Tabs . . . . . . . . . . . . . . . . . . . . . . . . . . . . . . . . . . . . . . . . . . . . . . . . . . . . . . 4
Summary . . . . . . . . . . . . . . . . . . . . . . . . . . . . . . . . . . . . . . . . . . . . . . . . . . . . . . . . . . . . .4
Home Network Devices . . . . . . . . . . . . . . . . . . . . . . . . . . . . . . . . . . . . . . . . . . . . . . . . 4
Top Networking Features . . . . . . . . . . . . . . . . . . . . . . . . . . . . . . . . . . . . . . . . . . . . . . . 4
CHAPTER 3 Configuring the Internet Connection . . . . . . . . . . . . . . . . . . . . . . . . . . . . . .5
Selecting Broadband Interface Type . . . . . . . . . . . . . . . . . . . . . . . . . . . . . . . . . . . . . 6
Modifying Connection Type . . . . . . . . . . . . . . . . . . . . . . . . . . . . . . . . . . . . . . . . . . . . . 6
Modifying DSL and ATM Settings . . . . . . . . . . . . . . . . . . . . . . . . . . . . . . . . . . . . . . . . 7
Entering PPP Authentication Parameters . . . . . . . . . . . . . . . . . . . . . . . . . . . . . . . . . 8
Modifying Broadband IP Network Settings. . . . . . . . . . . . . . . . . . . . . . . . . . . . . . . . 8
Configuring Routing Mode. . . . . . . . . . . . . . . . . . . . . . . . . . . . . . . . . . . . . . . . . . . . . . 9
CHAPTER 4 Managing System Information . . . . . . . . . . . . . . . . . . . . . . . . . . . . . . . . . . 11
Viewing System Information . . . . . . . . . . . . . . . . . . . . . . . . . . . . . . . . . . . . . . . . . . . . . . . . 11
Creating System Password . . . . . . . . . . . . . . . . . . . . . . . . . . . . . . . . . . . . . . . . . . . . . . . . 12
Configuring System Password . . . . . . . . . . . . . . . . . . . . . . . . . . . . . . . . . . . . . . . . . . . . . 13
Configuring Date and Time . . . . . . . . . . . . . . . . . . . . . . . . . . . . . . . . . . . . . . . . . . . . . . . . 14
Setting Date and Time Automatically . . . . . . . . . . . . . . . . . . . . . . . . . . . . . . . . . . . 15
Manually Configuring Date and Time . . . . . . . . . . . . . . . . . . . . . . . . . . . . . . . . . . . . 16
Enabling Remote Firmware Upgrade. . . . . . . . . . . . . . . . . . . . . . . . . . . . . . . . . . . . . . . . 16
CHAPTER 5 Managing Broadband Settings . . . . . . . . . . . . . . . . . . . . . . . . . . . . . . . . . . 18
Viewing Broadband Status . . . . . . . . . . . . . . . . . . . . . . . . . . . . . . . . . . . . . . . . . . . . . . . . 18
Summary Status. . . . . . . . . . . . . . . . . . . . . . . . . . . . . . . . . . . . . . . . . . . . . . . . . . . . . . 19
Internet Details. . . . . . . . . . . . . . . . . . . . . . . . . . . . . . . . . . . . . . . . . . . . . . . . . . . . . . . 19
DSL Details . . . . . . . . . . . . . . . . . . . . . . . . . . . . . . . . . . . . . . . . . . . . . . . . . . . . . . . . . . 20
Traffic Statistics . . . . . . . . . . . . . . . . . . . . . . . . . . . . . . . . . . . . . . . . . . . . . . . . . . . . . . 21
DSL Link Errors. . . . . . . . . . . . . . . . . . . . . . . . . . . . . . . . . . . . . . . . . . . . . . . . . . . . . . . 22
Adding Static Routes . . . . . . . . . . . . . . . . . . . . . . . . . . . . . . . . . . . . . . . . . . . . . . . . . . . . . 23
Configuring IP Multicast Settings . . . . . . . . . . . . . . . . . . . . . . . . . . . . . . . . . . . . . . . . . . . 24
Viewing Multicast Settings. . . . . . . . . . . . . . . . . . . . . . . . . . . . . . . . . . . . . . . . . . . . . . . . . 25
Resolving Domain Name . . . . . . . . . . . . . . . . . . . . . . . . . . . . . . . . . . . . . . . . . . . . . . . . . . 26
iii

HomePortal® Intelligent Gateway 9.3.1.10 Configuration Guide Contents
CHAPTER 6 Managing LAN Devices . . . . . . . . . . . . . . . . . . . . . . . . . . . . . . . . . . . . . . . .28
Viewing LAN Status . . . . . . . . . . . . . . . . . . . . . . . . . . . . . . . . . . . . . . . . . . . . . . . . . . . . . . 29
Private Network . . . . . . . . . . . . . . . . . . . . . . . . . . . . . . . . . . . . . . . . . . . . . . . . . . . . . . 29
Interfaces. . . . . . . . . . . . . . . . . . . . . . . . . . . . . . . . . . . . . . . . . . . . . . . . . . . . . . . . . . . .30
Wireless. . . . . . . . . . . . . . . . . . . . . . . . . . . . . . . . . . . . . . . . . . . . . . . . . . . . . . . . . . . . .30
Devices . . . . . . . . . . . . . . . . . . . . . . . . . . . . . . . . . . . . . . . . . . . . . . . . . . . . . . . . . . . . . 31
Traffic Statistics . . . . . . . . . . . . . . . . . . . . . . . . . . . . . . . . . . . . . . . . . . . . . . . . . . . . . . 31
Setting Up Your Wireless Network. . . . . . . . . . . . . . . . . . . . . . . . . . . . . . . . . . . . . . . . . . 32
Securing the Wireless Network Using Encryption Key . . . . . . . . . . . . . . . . . . . . . . . . . 33
Configuring Wi-Fi Protected Setup Using PIN Method. . . . . . . . . . . . . . . . . . . . . . . . . 34
Configuring Wi-Fi Protected Setup Using PUSH Method. . . . . . . . . . . . . . . . . . . . . . . 35
Enabling Wireless Multimedia . . . . . . . . . . . . . . . . . . . . . . . . . . . . . . . . . . . . . . . . . . . . . . 36
Securing the Wireless Network Using MAC Filtering . . . . . . . . . . . . . . . . . . . . . . . . . . 36
Customizing Advance Wireless Settings. . . . . . . . . . . . . . . . . . . . . . . . . . . . . . . . . . . . . 38
Disabling Ethernet Ports . . . . . . . . . . . . . . . . . . . . . . . . . . . . . . . . . . . . . . . . . . . . . . . . . . 39
Setting Up DHCP to Assign Default Range of IP Address . . . . . . . . . . . . . . . . . . . . . . 40
Setting Up DHCP to Assign Manually Configured Range of IP Address . . . . . . . . . . 41
Allocating Static IP Address . . . . . . . . . . . . . . . . . . . . . . . . . . . . . . . . . . . . . . . . . . . . . . . 43
Configuring Public IP Network . . . . . . . . . . . . . . . . . . . . . . . . . . . . . . . . . . . . . . . . . . . . . 44
Enabling Public IP Network . . . . . . . . . . . . . . . . . . . . . . . . . . . . . . . . . . . . . . . . . . . . 44
Selecting Default Address Allocation Pool . . . . . . . . . . . . . . . . . . . . . . . . . . . . . . . 45
Assigning Public IP Network Address to LAN Client(s) . . . . . . . . . . . . . . . . . . . . 45
Configuring Supplementary Network . . . . . . . . . . . . . . . . . . . . . . . . . . . . . . . . . . . . . . . 46
Enabling Supplementary Network . . . . . . . . . . . . . . . . . . . . . . . . . . . . . . . . . . . . . . 46
Selecting Default Address Allocation Pool . . . . . . . . . . . . . . . . . . . . . . . . . . . . . . . 47
Assigning Public IP Network Address to LAN Client(s) . . . . . . . . . . . . . . . . . . . . 47
Configuring Default Address Allocation Pool for DHCP Server. . . . . . . . . . . . . . . . . . 48
Accessing ARP Table Data . . . . . . . . . . . . . . . . . . . . . . . . . . . . . . . . . . . . . . . . . . . . . . . . . 49
CHAPTER 7 Managing Voice-Based Services. . . . . . . . . . . . . . . . . . . . . . . . . . . . . . . . .50
Viewing VoIP Line Status . . . . . . . . . . . . . . . . . . . . . . . . . . . . . . . . . . . . . . . . . . . . . . . . . . 50
Configuring SIP Server . . . . . . . . . . . . . . . . . . . . . . . . . . . . . . . . . . . . . . . . . . . . . . . . . . . . 51
Configuring Lines . . . . . . . . . . . . . . . . . . . . . . . . . . . . . . . . . . . . . . . . . . . . . . . . . . . . . . . . 52
Viewing External Line Statistics . . . . . . . . . . . . . . . . . . . . . . . . . . . . . . . . . . . . . . . . . . . . 54
CHAPTER 8 Managing Firewall Settings . . . . . . . . . . . . . . . . . . . . . . . . . . . . . . . . . . . . .56
Disabling Firewall Service . . . . . . . . . . . . . . . . . . . . . . . . . . . . . . . . . . . . . . . . . . . . . . . . . 56
Viewing Firewall Status . . . . . . . . . . . . . . . . . . . . . . . . . . . . . . . . . . . . . . . . . . . . . . . . . . . 57
Configuring Firewall Settings . . . . . . . . . . . . . . . . . . . . . . . . . . . . . . . . . . . . . . . . . . . . . . 58
Hosting an Application . . . . . . . . . . . . . . . . . . . . . . . . . . . . . . . . . . . . . . . . . . . . . . . . 59
Adding User-Defined Applications . . . . . . . . . . . . . . . . . . . . . . . . . . . . . . . . . . . . . . 59
Configuring DMZ Mode . . . . . . . . . . . . . . . . . . . . . . . . . . . . . . . . . . . . . . . . . . . . . . . . . . . 61
Disabling Attack Detection . . . . . . . . . . . . . . . . . . . . . . . . . . . . . . . . . . . . . . . . . . . . . . . . 62
Managing Outbound Traffic. . . . . . . . . . . . . . . . . . . . . . . . . . . . . . . . . . . . . . . . . . . . . . . . 63
Configuring Firewall Security Enhancements. . . . . . . . . . . . . . . . . . . . . . . . . . . . . . . . . 64
Configuring Application Layer Gateway . . . . . . . . . . . . . . . . . . . . . . . . . . . . . . . . . . . . . 65
Configuring UPnP Security . . . . . . . . . . . . . . . . . . . . . . . . . . . . . . . . . . . . . . . . . . . . . . . . 65
Blocking Web Site Access . . . . . . . . . . . . . . . . . . . . . . . . . . . . . . . . . . . . . . . . . . . . . . . . . 66
Configuring Time of Day Restriction . . . . . . . . . . . . . . . . . . . . . . . . . . . . . . . . . . . . . . . . 67
CHAPTER 9 Viewing Logs. . . . . . . . . . . . . . . . . . . . . . . . . . . . . . . . . . . . . . . . . . . . . . . . .70
Viewing Specific Log Entries . . . . . . . . . . . . . . . . . . . . . . . . . . . . . . . . . . . . . . . . . . . 70
Contents iv

HomePortal® Intelligent Gateway 9.3.1.10 Configuration Guide Contents
Filtering Log Entries . . . . . . . . . . . . . . . . . . . . . . . . . . . . . . . . . . . . . . . . . . . . . . . . . . 71
Clearing Log Entries . . . . . . . . . . . . . . . . . . . . . . . . . . . . . . . . . . . . . . . . . . . . . . . . . . 71
CHAPTER 10 Using Diagnostics Features. . . . . . . . . . . . . . . . . . . . . . . . . . . . . . . . . . . . . 72
Diagnosing Broadband Link . . . . . . . . . . . . . . . . . . . . . . . . . . . . . . . . . . . . . . . . . . . . . . . 72
Status Monitor . . . . . . . . . . . . . . . . . . . . . . . . . . . . . . . . . . . . . . . . . . . . . . . . . . . . . . . 72
Link Test . . . . . . . . . . . . . . . . . . . . . . . . . . . . . . . . . . . . . . . . . . . . . . . . . . . . . . . . . . . . 73
Viewing DSL Diagnostic Information . . . . . . . . . . . . . . . . . . . . . . . . . . . . . . . . . . . . . . . . 74
DSL Details . . . . . . . . . . . . . . . . . . . . . . . . . . . . . . . . . . . . . . . . . . . . . . . . . . . . . . . . . . 74
DSL Link Errors. . . . . . . . . . . . . . . . . . . . . . . . . . . . . . . . . . . . . . . . . . . . . . . . . . . . . . . 75
Bitloading . . . . . . . . . . . . . . . . . . . . . . . . . . . . . . . . . . . . . . . . . . . . . . . . . . . . . . . . . . . 77
Testing IP Utilities . . . . . . . . . . . . . . . . . . . . . . . . . . . . . . . . . . . . . . . . . . . . . . . . . . . . . . . . 78
Viewing NAT Information. . . . . . . . . . . . . . . . . . . . . . . . . . . . . . . . . . . . . . . . . . . . . . . . . . 79
Enabling Syslog . . . . . . . . . . . . . . . . . . . . . . . . . . . . . . . . . . . . . . . . . . . . . . . . . . . . . . . . . . 80
Resetting the Gateway . . . . . . . . . . . . . . . . . . . . . . . . . . . . . . . . . . . . . . . . . . . . . . . . . . . . 81
Resetting System and Links. . . . . . . . . . . . . . . . . . . . . . . . . . . . . . . . . . . . . . . . . . . . 81
Resetting Device to Factory Default. . . . . . . . . . . . . . . . . . . . . . . . . . . . . . . . . . . . . 82
CHAPTER 11 Troubleshooting Configuration Issues . . . . . . . . . . . . . . . . . . . . . . . . . . . .83
Broadband Issues . . . . . . . . . . . . . . . . . . . . . . . . . . . . . . . . . . . . . . . . . . . . . . . . . . . . . . . .83
Connection Issues . . . . . . . . . . . . . . . . . . . . . . . . . . . . . . . . . . . . . . . . . . . . . . . . . . . . . . . .83
VoIP Issues . . . . . . . . . . . . . . . . . . . . . . . . . . . . . . . . . . . . . . . . . . . . . . . . . . . . . . . . . . . . . . 84
System Information Issues. . . . . . . . . . . . . . . . . . . . . . . . . . . . . . . . . . . . . . . . . . . . . . . . . 84
LAN Issues . . . . . . . . . . . . . . . . . . . . . . . . . . . . . . . . . . . . . . . . . . . . . . . . . . . . . . . . . . . . . . 84
Firewall Issues . . . . . . . . . . . . . . . . . . . . . . . . . . . . . . . . . . . . . . . . . . . . . . . . . . . . . . . . . . . 85
Diagnostic Issues. . . . . . . . . . . . . . . . . . . . . . . . . . . . . . . . . . . . . . . . . . . . . . . . . . . . . . . . . 85
APPENDIX A Glossary. . . . . . . . . . . . . . . . . . . . . . . . . . . . . . . . . . . . . . . . . . . . . . . . . . . . .86
Contents v

About This Guide
The HomePortal® Intelligent Gateway 9.3.1.10 Configuration Guide is designed to serve as a reference to configure
the gateway that uses the 9.3.1.10 firmware. This guide contains the following chapters:
Introducing the HomePortal Intelligent Gateway Software on page 1
Accessing the User Interface on page 3
Configuring the Internet Connection on page 5
Managing System Information on page 11
Managing Broadband Settings on page 18
Managing LAN Devices on page 28
Managing Voice-Based Services on page 50
Managing Firewall Settings on page 56
Viewing Logs on page 70
Using Diagnostics Features on page 72
Troubleshooting Configuration Issues on page 83
Acronyms on page 91
Glossary on page 86
Audience
This guide is intended for use by:
•End Users
•Sales Engineers
•Support Staff
• Service Provider Technicians
Supported Hardware Platforms
The following gateway hardware platforms are compatible with 9.3.1.10 firmware:
•5011NV
• 5012NV
Document Layout
Each chapter in this document has information (topics/subtopics) for configuring or viewing the links under
different tabs on the user interface of your gateway.
Each topic/subtopic in this document has the following sections:
•Objective
•Steps
• See Also
These sections help you to easily find your topics of interest and guide you through them in a simple and logical
manner.
vi

HomePortal® Intelligent Gateway 9.3.1.10 Configuration Guide About This Guide
The See Also section has cross-referenced links to other topics within this document, which may assist you in
enhancing your experience with the gateway.
Style Conventions
The following style conventions are used in this guide:
Note Notes contain incidental information about the subject. In this guide, they are used to provide
additional information about the product and to call attention to exceptions.
m
c
Typographical Conventions
Caution notes identify information that helps prevent damage to hardware or loss of data.
Warning notes identify information that helps prevent injury or death.
Convention Used For
Blue Text Cross references
Bold Interface elements that are clicked or selected
Italic Emphasis, book titles, variables, list terms
Monospace Command syntax and code
Monospace Italic Variables within command syntax and code
Related Documents
In addition to this guide, the HomePortal Intelligent Gateway Software documentation library includes:
Agile Part Number Description
5100-000900-000 HomePortal® 5011NV/5012NV Intelligent Gateway Installation Guide
5100-000923-000 HomePortal® Intelligent Gateway 9.3.1.10 CLI Reference Guide
5100-000874-000 HomePortal® 5012NV Intelligent Gateway Datasheet
Support
Technical support is available from the 2Wire Web site: http://support.2wire.com.
Style Conventions vii

CHAPTER 1
Introducing the HomePortal Intelligent Gateway Software
Welcome to the 2Wire family. The HomePortal Intelligent Gateway Software delivers a powerful user experience
with its easy-to-use features. It enables you to connect to the Internet and perform a host of functions which
makes your home network safe, convenient, and an enjoyable experience!
The HomePortal Intelligent Gateway Software enables high-speed Internet access and offers a host of other
features such as:
• Home Networking
Share files, printers, and a broadband connection with every computer and other network-ready
devices in the home or small office through the advanced LAN technology.
• Superior Wireless Performance
High-powered 802.11n wireless technology from 2Wire virtually eliminates wireless “cold spots” at
home. HomePortal intelligent gateway provides up to seven times the true power of traditional access
points, and increases wireless bandwidth by using powerful 400 mW transmitters.
• Parental Controls (Internet Access Controls and Content Screening)
Parental controls offer easy-to-use tools to limit access to specific Web sites, monitor browsing history
and usage, and enforce time restrictions on common applications. Parental control settings are
straightforward and easily managed by users.
• Advanced Firewall Monitoring
This feature monitors inbound and outbound network traffic for suspicious activities, which helps
eliminate security issues before they have a chance to proliferate. The firewall actively detects and
defends against common Internet threats (such as distributed denial of service attacks) using stateful
packet inspection. It is also subscriber-friendly, enabling simple configuration setup for common inhome applications such as online gaming.
• Network Address Translation (NAT)
NAT technology modifies network address information in datagram (IP) packet headers while in transit
across a traffic routing device for the purpose of remapping a given address space into another.
• IPTV
HomePortal intelligent gateway is optimized for the delivery of IPTV throughout the home. Hardware
accelerated QoS minimizes potential issues such as pixelation and image freezes, delivering a better
IPTV experience.
• DNS Resolution
Configure your gateway to resolve the domain name to IP address.
• Quality of Service (QoS)
QoS features such as policies, priority queuing, shaping, and management allow you to effectively
manage available Internet bandwidth.
• Logs
The gateway maintains internal logs of broadband status and WAN-side connection flows, letting you
or the ISP’s technician effectively diagnose issues.
• Ping Client
The gateway allows you to ping LAN and WAN side IP addresses within your network. This lets you
know whether a network device is responding or not.
• Intuitive Web Interface
Configure your gateway settings from the gateway's user-friendly Web interface.
• Parental Controls (Internet Access Controls and Content Screening)
Limits access to specific Web sites, monitor browsing history and usage, and enforce time restrictions
on common applications.
• Remote Firmware Upgrade
Enable remote firmware upgrades on the user interface of the gateway for using the latest firmware.
1

HomePortal® Intelligent Gateway 9.3.1.10 Configuration Guide Introducing the HomePortal Intelligent Gateway Software
See Also
Accessing the User Interface on page 3
Configuring the Internet Connection on page 5
2

CHAPTER 2
Accessing the User Interface
This chapter provides an overview about the accessible links on the user interface.
To launch the user interface, access any of the following URLs on the computer connected to the gateway:
• http://gateway.2Wire.net
• http://home
• http://192.168.1.254
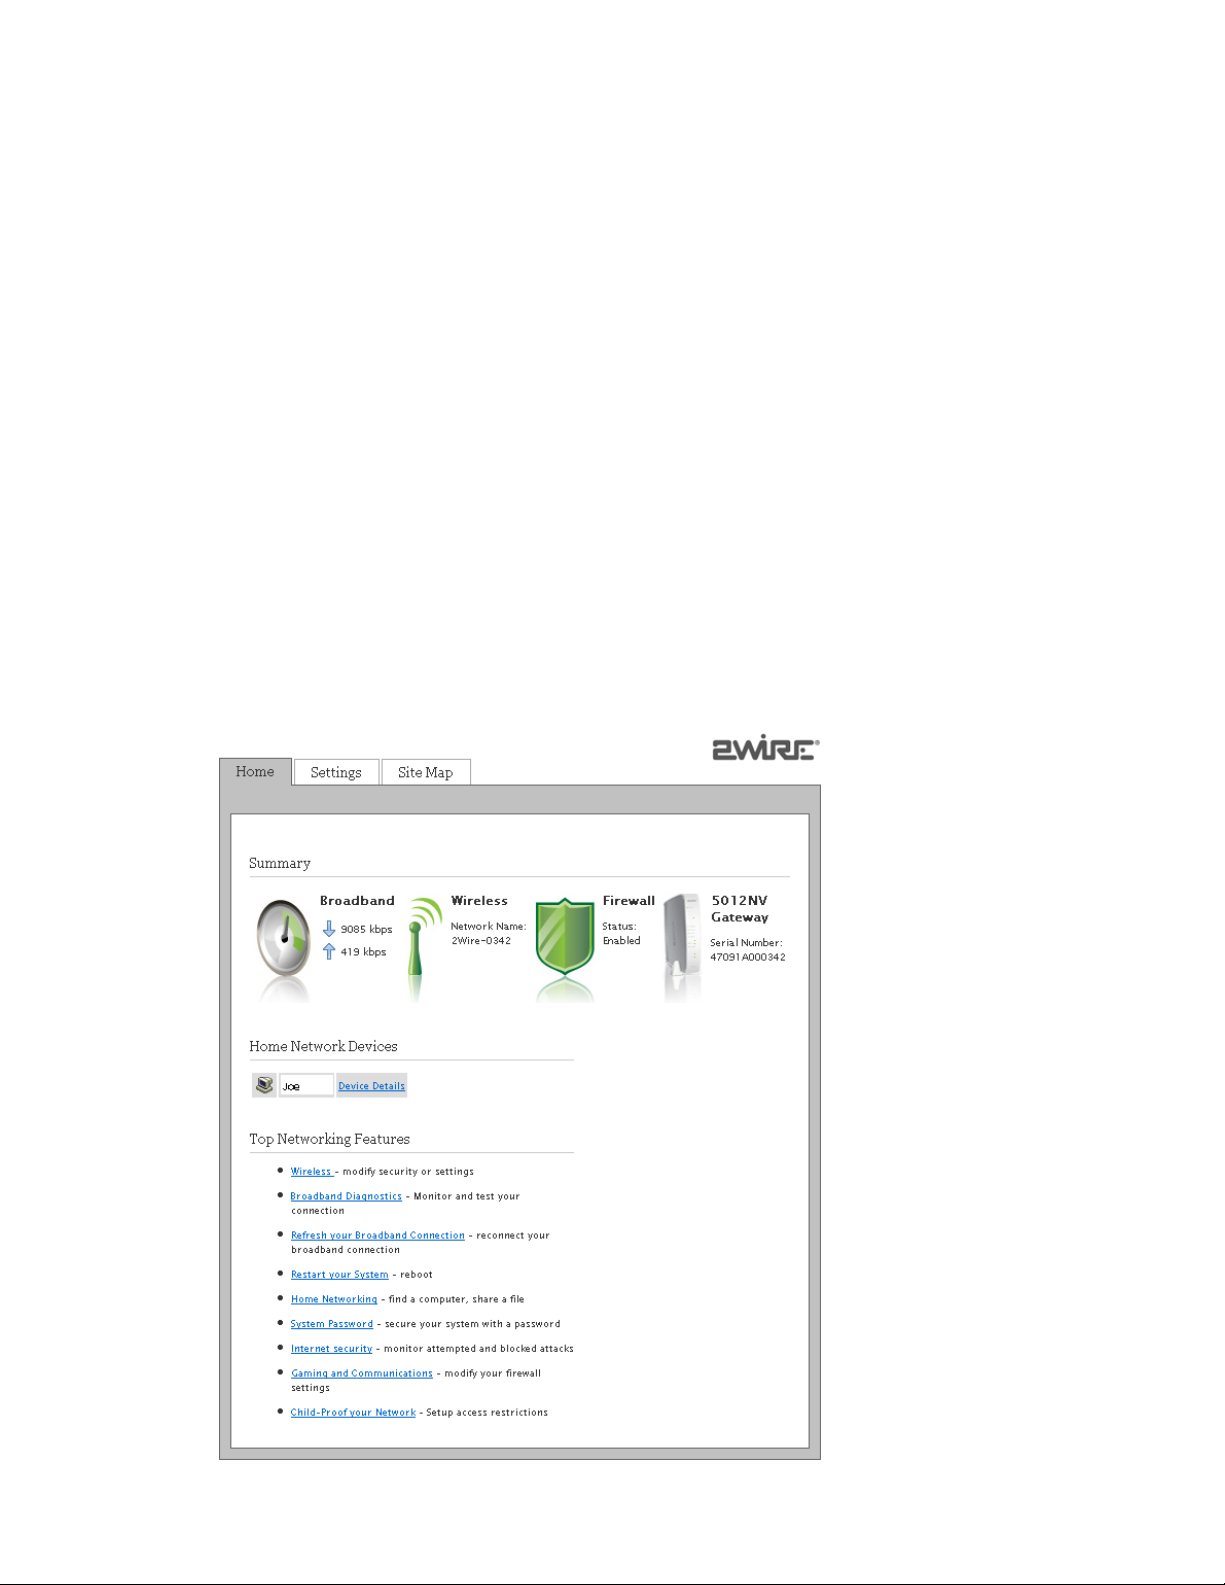
This opens the Home page.
Figure 1: Home page
3

HomePortal® Intelligent Gateway 9.3.1.10 Configuration Guide Accessing the User Interface
The Home page has gateway link tabs and three panels as listed below:
• System Link Tabs
-Home
- Settings
-Site Map
• Summary
• Home Network Devices
• Top Networking Features
System Link Tabs
Home
The Home tab provides the most relevant information about your broadband service at a glance. You can also
access links on this page that let you perform the related activities on the user interface of the gateway.
Settings
The Settings tab provides links to view and configure gateway information. Also, you can configure broadband
services, LAN settings, firewall settings, VoIP settings, and perform diagnostics on your gateway.
Site Map
The Site Map tab provides a tree-diagram view of the user interface. Click any link on this page to access the
corresponding page. This helps you to access the desired page directly without having to navigate through the
gateway link tabs.
Summary
The Summary panel displays the Broadband icon, network name (SSID) of the gateway next to the Wireless
icon, security status next to the Firewall icon, and serial number next to the 5012NV Gateway icon. Click an icon
to access the relevant page directly.
Home Network Devices
The Home Network Devices panel displays all network devices that are connected to the gateway. You can click
the links to view the network device details or view the shared files of the connected devices.
Top Networ k ing F eatu res
The Top Networking Features panel provides shortcuts to directly access the most commonly used gateway
pages. Click a link to access the relevant page directly.
See Also
Introducing the HomePortal Intelligent Gateway Software on page 1
Configuring the Internet Connection on page 5
4
CHAPTER 3
Configuring the Internet Connection
This chapter provides information to configure the Internet connection from the user interface.
Objective
To configure and connect to the Internet through the gateway.
Your Internet connection settings are automatically provisioned by your ISP. If the information is not populated,
then you have to manually configure your Internet connection settings.
If you are connecting through Direct IP, then you are not required to enter PPP authentication information.
However, if you are connecting through PPPoE or PPPoA, ensure that you have the following ATM information
and authentication settings from your ISP:
• Circuit identifier (VPI/VCI)
• Encapsulation method
• PPP username
•PPP password
Steps
1. Access the Home page of the gateway by entering the URL http://gateway.2Wire.net into a compatible
browser.
5

HomePortal® Intelligent Gateway 9.3.1.10 Configuration Guide Configuring the Internet Connection
2. On the Settings tab, click Broadband, and then click Link Configuration.
3. Perform the following tasks to activate the Internet service on your gateway:
- Selecting Broadband Interface Type on page 6
- Modifying Connection Type on page 6
- Modifying DSL and ATM Settings on page 7
- Entering PPP Authentication Parameters on page 8
- Modifying Broadband IP Network Settings on page 8
- Configuring Routing Mode on page 9
Selecting Broadband Interface Type
The WAN Inte r f ace Type panel allows you to select the type of broadband interface for connecting to the
Internet.
To select the broadband interface type:
1. On the Settings tab, click Broadband, and then click Link Configuration.
2. Navigate to the WAN Int e rface Type panel.
3. Select the type of WAN interface from Interface Type drop-down list box.
The types of connections available are Auto, DSL, or Ethernet. Selecting Auto enables the gateway to
automatically detect the type of connection used to connect to the broadband service.
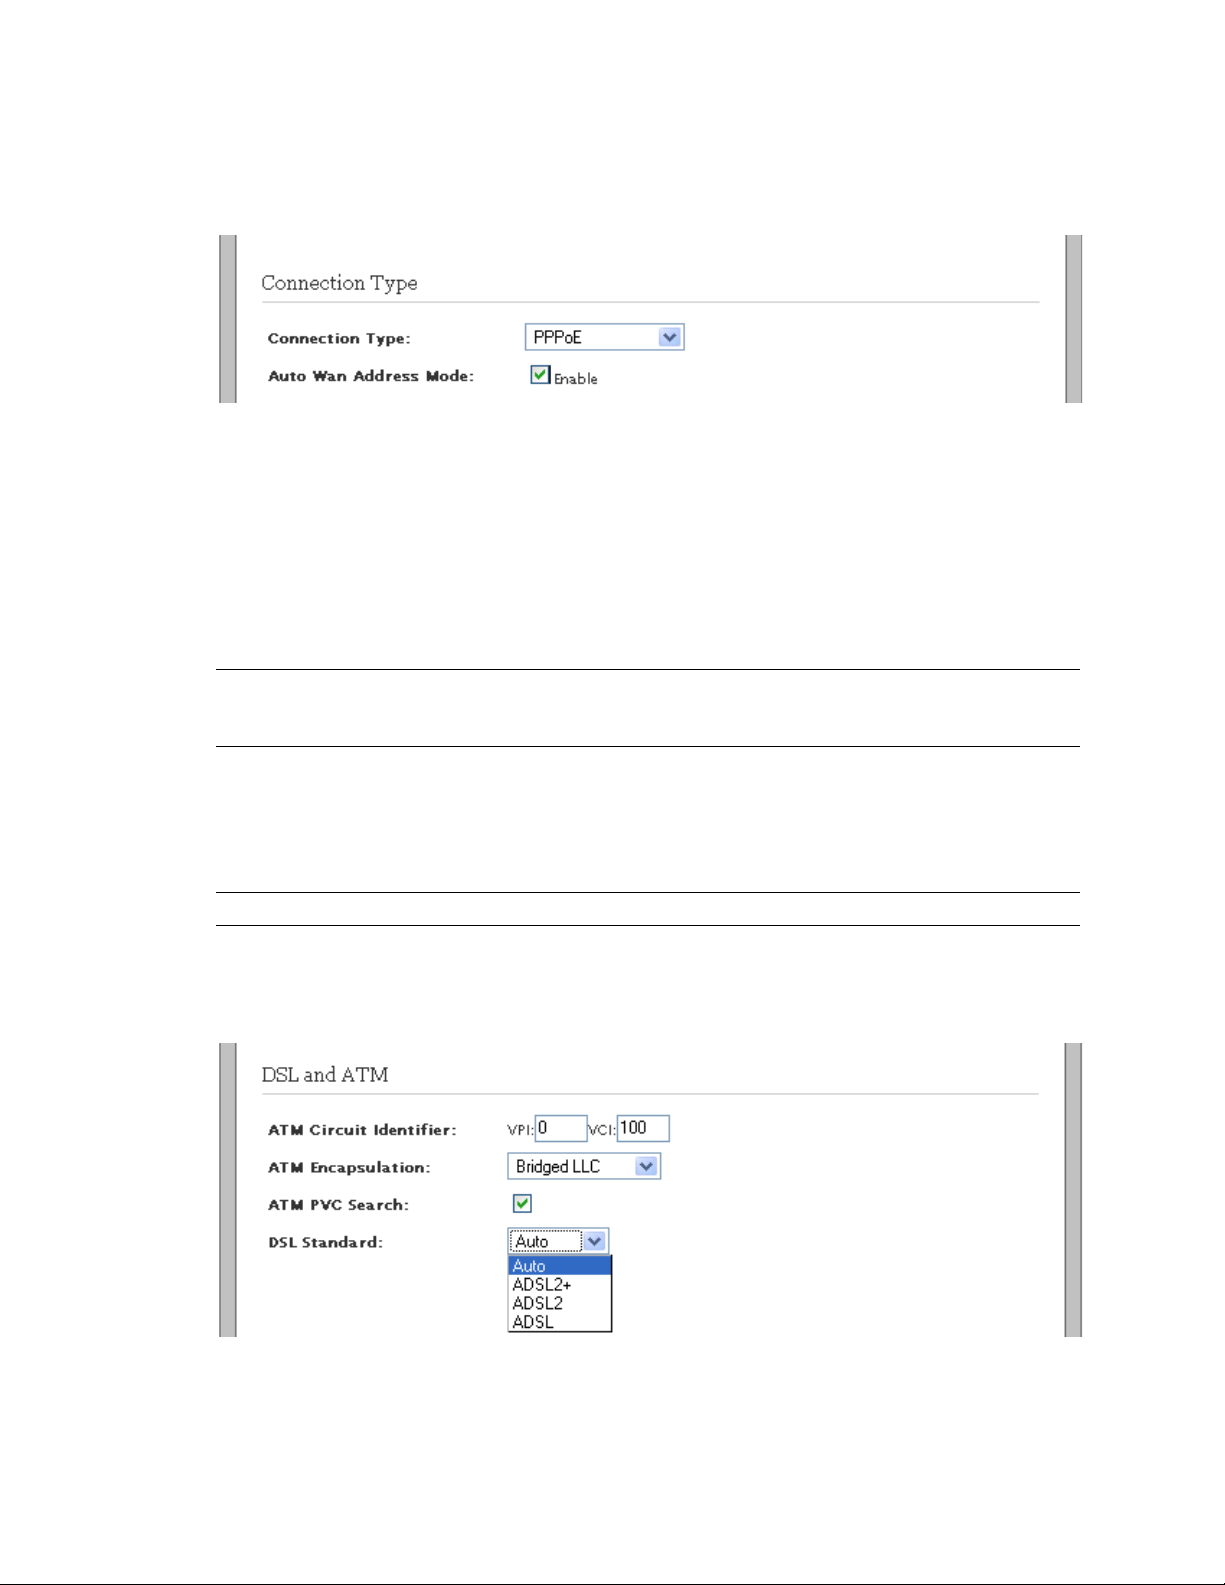
Modifying Connection Type
The Connection Type panel allows you to select the type of broadband connection type for connecting to the
Internet.
Note PPPoE is not displayed in the Interface Type drop-down list box, if you select Ethernet as the WAN
interface type.
6
HomePortal® Intelligent Gateway 9.3.1.10 Configuration Guide Configuring the Internet Connection
To select the broadband connection type:
1. On the Settings tab, click Broadband, and then click Link Configuration.
2. Navigate to the Connection Type panel.
3. Select the type of connection from Connection Type drop-down list box.
The types of connections available are PPPoE, PPPoA, Direct IP (DHCP), or Direct IP (Static).
- If you select PPPoE or PPPoA, entering PPP user credentials is necessary to authenticate yourself
as the subscriber on the server of the ISP.
- If you select Direct IP (DHCP) or Direct IP (Static), you are not required to enter your user name
and password.
4. Select the Enable check box next to the Auto Wan Address Mode field.
This lets the gateway to failover from PPPoE or PPPoA to other connection types, such as Direct IP
(DHCP) or Direct IP (Static).
Note If you select Direct IP (DHCP) or Direct IP (Static), then skip to Modifying Broadband IP Network
Settings on page 8. Also, ensure that the routing mode is enabled by referring to Configuring Routing
Mode on page 9.
Modifying DSL and ATM Settings
The DSL and ATM panel allows you to change the type of DSL line and manually configure the ATM settings. The
information required to configure this setting is provided by your ISP.
Note The DSL and ATM panel is not available if you select Ethernet as the WAN interface type.
To configure DSL and ATM settings:
1. On the Settings tab, click Broadband, and then click Link Configuration.
2. Navigate to the DSL and ATM panel.
3. Leave the VPI and VCI values next to the ATM Circuit Identifier field as is, if these text boxes are prepopulated.
If these text boxes are empty, then enter the VPI and VCI values for connecting to the ISP server.
7

HomePortal® Intelligent Gateway 9.3.1.10 Configuration Guide Configuring the Internet Connection
4. Select the encapsulation method from the ATM E n c a p s u l a t io n drop-down list box.
- Select Bridged LLC or Bridged VC-Mux for PPPoE type of connection.
- Select Routed LLC or Routed VC-Mux for PPPoA type of connection.
5. Select the ATM P VC Search check box to enable the PVC search.
PVC search enables the gateway to automatically detect and populate VPI and VCI values supported by
your ISP.
6. Select the type of DSL connection from the DSL Standard drop-down list box.
The types of standards available are ADSL, ADSL2, or ADSL2+. Selecting Auto enables the gateway to
automatically select the type of DSL standard for seamless connectivity.
Entering PPP Authentication Parameters
The PPP Authentication and Settings panel lets you enter the PPP authentication parameters which the gateway
uses to connect to the ISP. The PPPoE or PPPoA connection type requires PPP authentication parameters to be
entered manually.
To enter PPP authentication parameters:
1. On the Settings tab, click Broadband, and then click Link Configuration.
2. Navigate to the PPP Authentication and Settings panel.
3. Enter the PPPoE Username and Password in the PPP Authentication and Settings panel.
This information is provided by the ISP.
4. Leave the PPP on Demand text box as is, unless your ISP has indicated otherwise.
If the value is set to 0 minutes, the PPP session will be persistent (always-on). If the value is between 1
to 10080 minutes, the PPP session will timeout if the gateway does not detect outbound traffic
destined for the Internet in the specified time. However, when the gateway detects outbound traffic,
the session is re-established.
5. Leave the Upstream MTU value as is.
This is the maximum size allowed for data packets that are communicated on the network of your ISP.
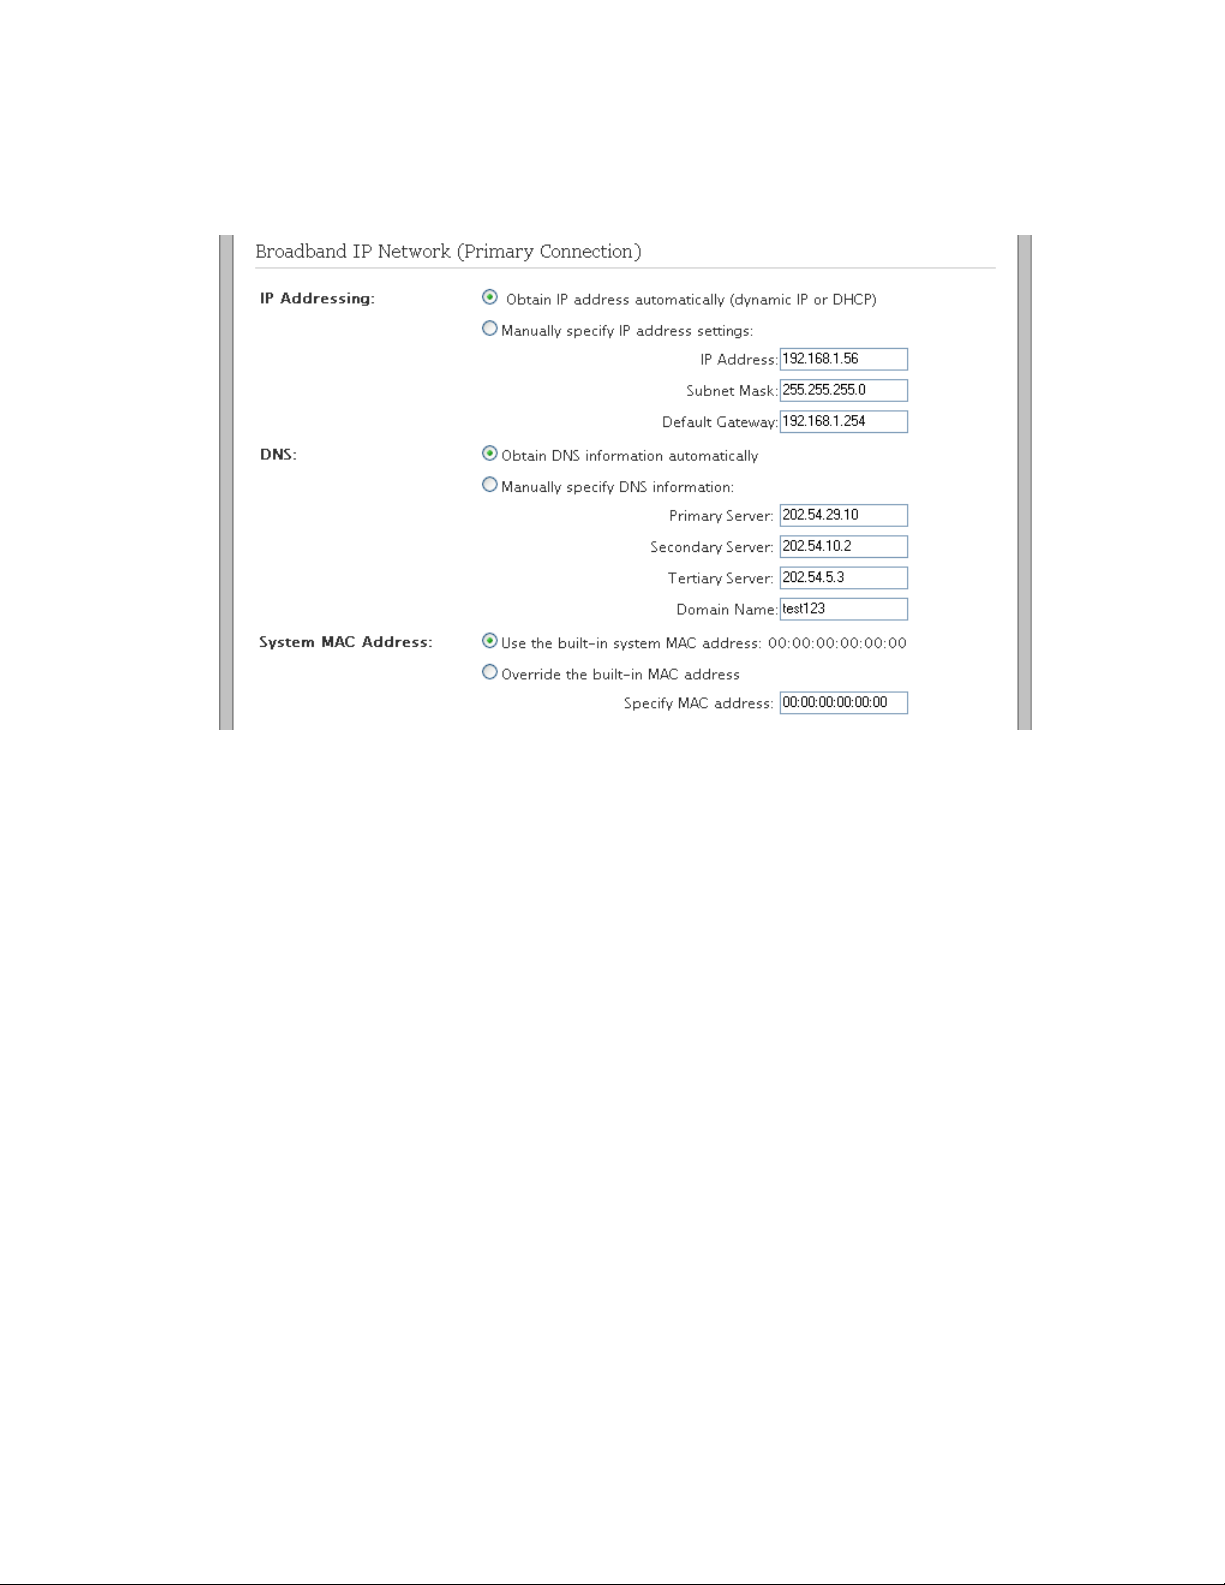
Modifying Broadband IP Network Settings
The Broadband IP Network (Primary Connection) panel lets you manually change the broadband IP and DNS
addresses provided by your ISP, if you do not want to use the assigned parameters. Also, you can override the
existing MAC address by specifying it manually.
8
HomePortal® Intelligent Gateway 9.3.1.10 Configuration Guide Configuring the Internet Connection
To modify broadband IP Network settings:
1. On the Settings tab, click Broadband, and then click Link Configuration.
2. Navigate to the Broadband IP Network (Primary Connection) panel.
3. Select the IP Addressing option:
- If you select Obtain IP address automatically (dynamic IP or DHCP) radio button, the associated
parameters are configured dynamically.
- If you select Manually specify IP address settings radio button, you have to enter the static IP
Address, Subnet Mask, and Default Gateway values in corresponding text boxes. Contact your ISP
to get this information.
4. Select the DNS addressing option:
- If you select Obtain DNS information automatically radio button, the associated parameters are
configured dynamically.
- If you select Manually specify DNS information radio button, you have to enter the Primary Server
address, Secondary Server address, Tertiary Server address, and Domain Name values in
corresponding text boxes. The tertiary server is the alternative DNS server to primary and
secondary DNS server. Contact your ISP to get this information.
5. Select the System MAC Address option:
- If you select Use the built-in system MAC address: 00:1e:c7:a1:9c:50 radio button, your gateway
connects to the Internet using the built-in MAC address.
- If you select Override the built-in MAC address radio button, you have to specify the MAC address
manually. You may have to override the existing MAC address if your cable modem connects to
network devices based on their MAC address.
Configuring Routing Mode
The Routing panel lets you enable the routing mode. The gateway is pre-configured in the routing mode.
Routing is disabled to configure your gateway in bridge mode.
To ensure that the gateway is in routed mode:
1. On the Settings tab, click Broadband, and then click Link Configuration.
2. Navigate to the Routing panel.
9
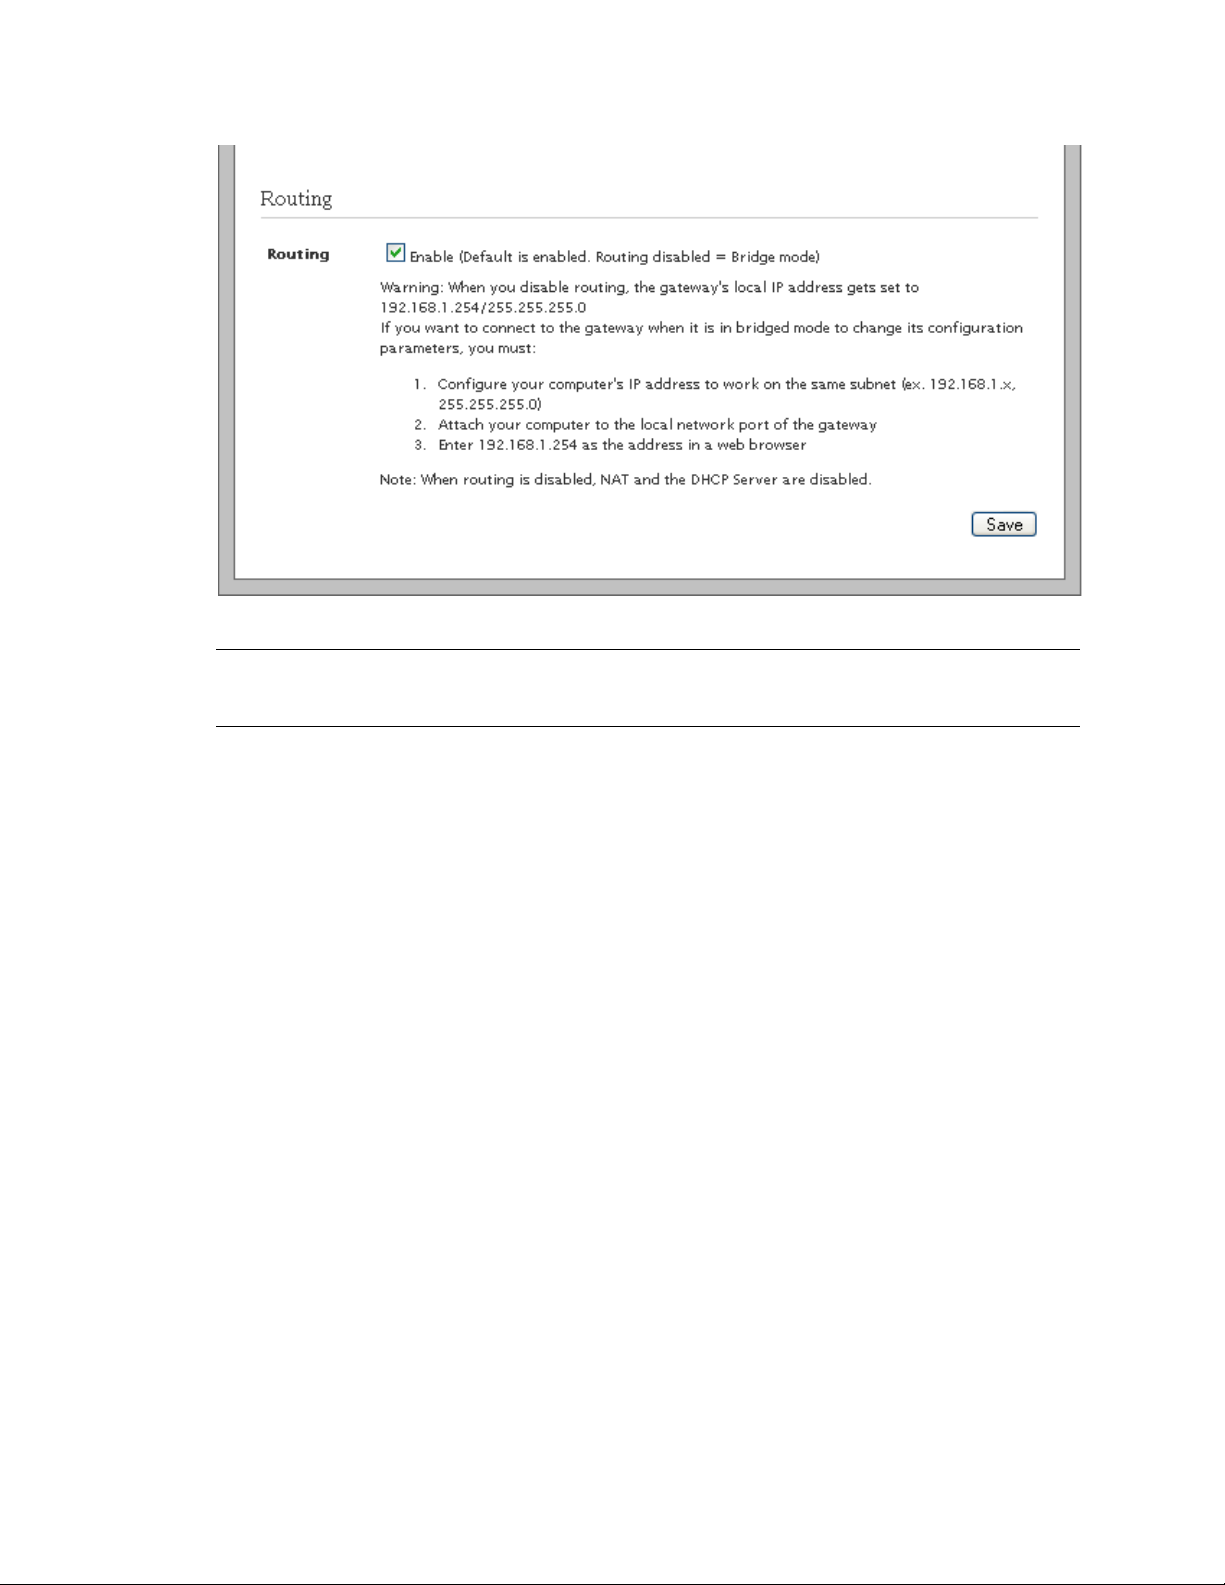
HomePortal® Intelligent Gateway 9.3.1.10 Configuration Guide Configuring the Internet Connection
3. Ensure that the Enable check box next to the Routing field is selected.
Note Routing is disabled to configure your gateway in bridge mode. When routing is disabled, the NAT and
the DHCP servers are also disabled. Also, ensure that the WAN protocol is compatible to bridging
mode.
4. Click Save.
The Internet LED on the gateway becomes solid green and you can access the Internet. Open a Web
browser to verify successful connection to the Internet.
See Also
Managing Broadband Settings on page 18
10

CHAPTER 4
Managing System Information
This chapter provides information about the tasks you can perform within the System Info tab. The links under
the System Info tab and their associated tasks are as follows:
• Status
- Viewing System Information on page 11
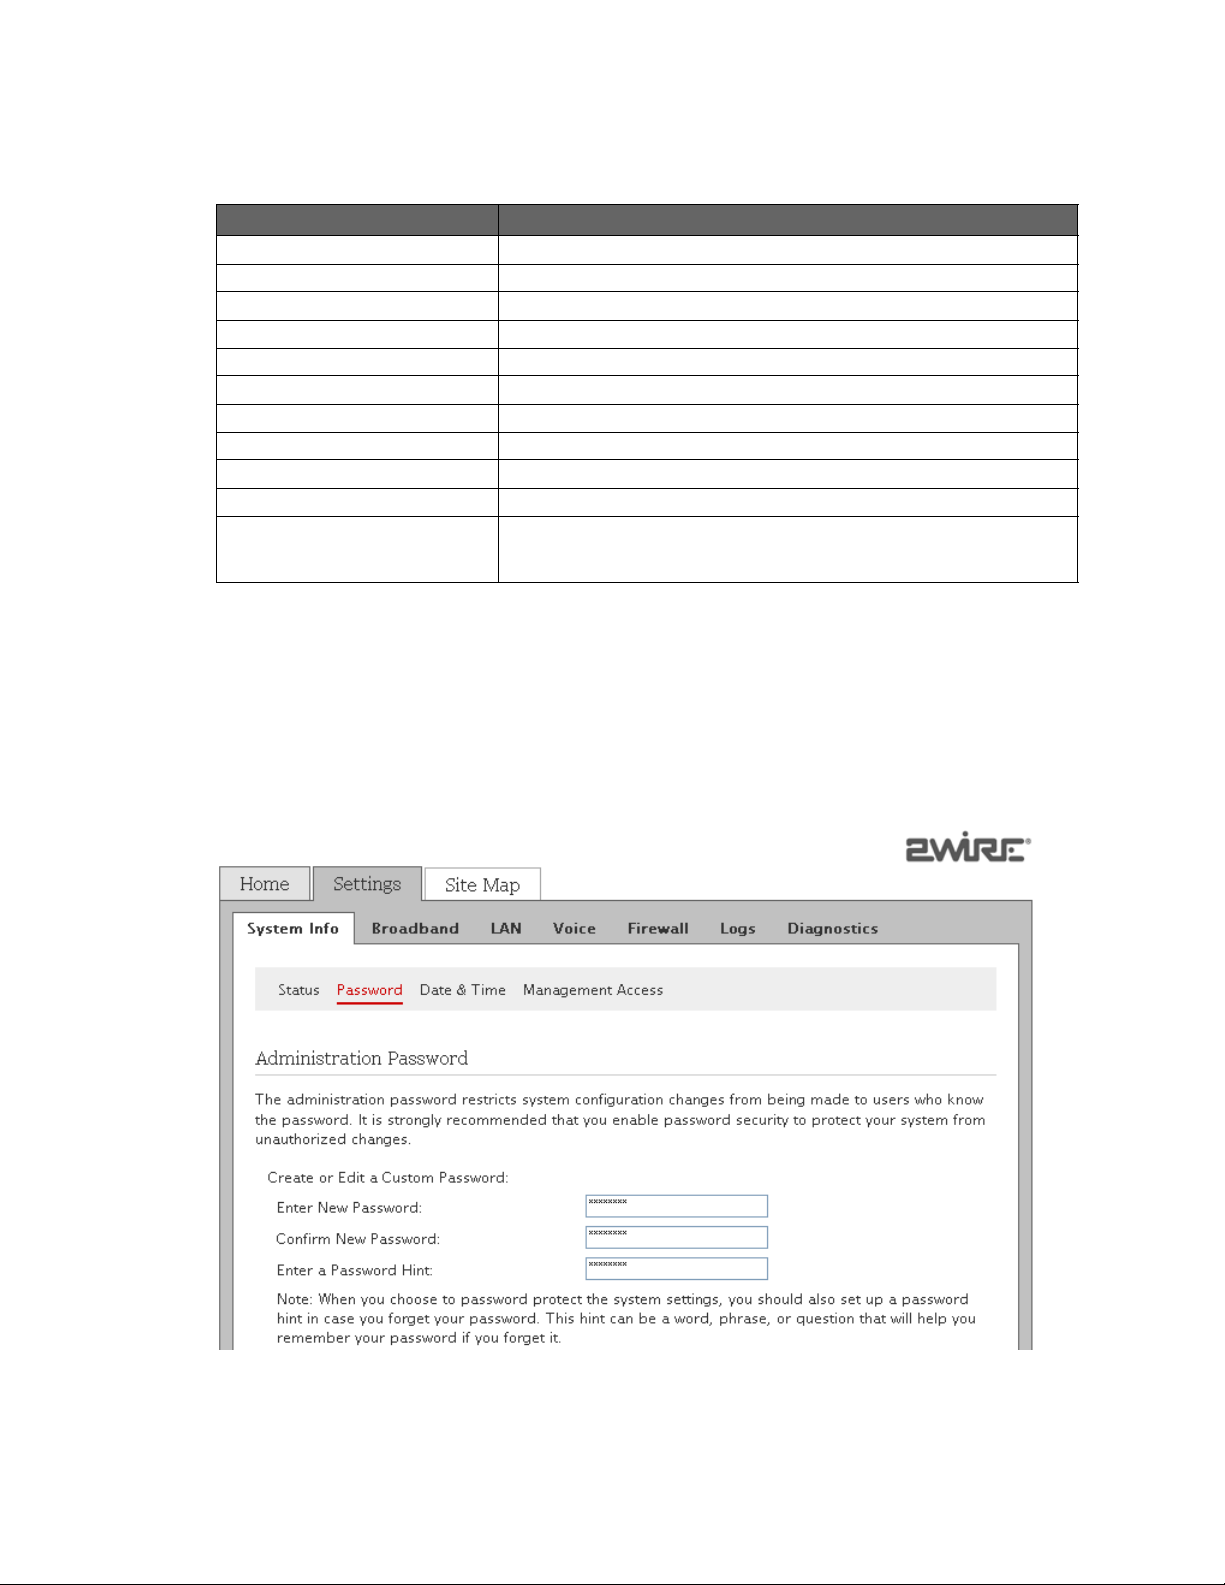
•Password
- Creating System Password on page 12
- Configuring System Password on page 13
• Date & Time
- Configuring Date and Time on page 14
• Management Access
- Enabling Remote Firmware Upgrade on page 16
Viewing System Information
View your gateway information at a glance. Find details pertaining to your gateway including the manufacturer
name, model and serial number, and hardware and software versions.
On the Settings tab, click System Info, and then click Status.
Refer to the following image and table for information about the parameters listed in the System Information
panel:
11
HomePortal® Intelligent Gateway 9.3.1.10 Configuration Guide Managing System Information
Parameter Description
Manufacturer Name of the gateway manufacturer.
Model Model number of the gateway.
Serial Number Serial number of the gateway.
Hardware Version Hardware version number of the gateway.
Software Version Software version number installed on the gateway.
Key Code Key code of the gateway.
First Use Date Date when the gateway was powered on for the first time out of factory.
Current Date and Time Your current date and time.
Time Since Last Boot Time elapsed since you last booted the gateway.
DSL Modem Hardware version of the DSL modem.
System Password Displays Default if you use the default system password for your gateway.
Displays Custom if you have created your own password for your gateway.
Displays None if you have not enabled password protection for your gateway.
Creating System Password
Objective
To create a password for your gateway in order to protect it against unauthorized access.
Steps
1. On the Settings tab, click System Info, and then click Password.
2. Enter a password in the Enter New Password text box.
The password is case-sensitive, and can contain alpha-numeric characters with no spaces.
Creating System Password 12
HomePortal® Intelligent Gateway 9.3.1.10 Configuration Guide Managing System Information
3. Enter the same password in the Confirm New Password text box.
4. Enter a hint in the Enter a Password Hint text box.
A password hint can be a word, a phrase, or a question that can help you in case you forget your
password.
Note It is strongly recommended that you enter a hint to act as a reminder.
5. Click Save.
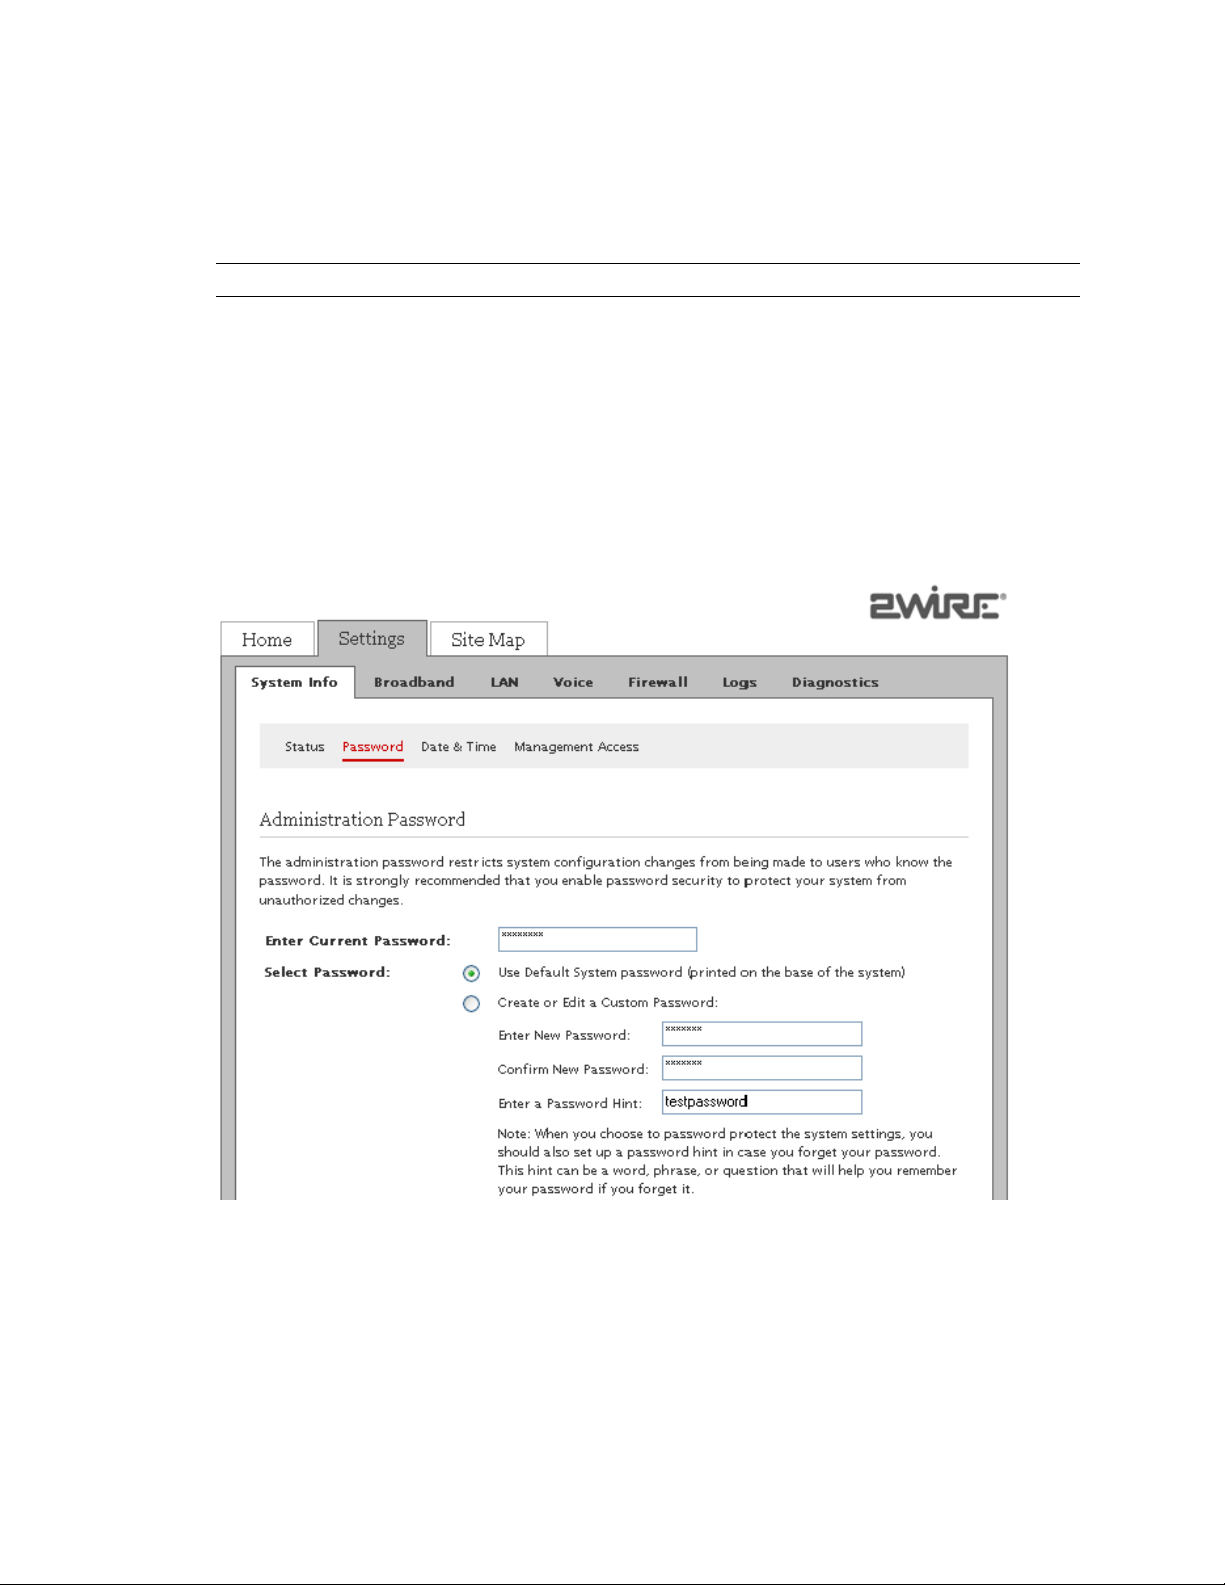
Configuring System Password
Objective
To modify the user defined password or use default password.
Steps
1. On the Settings tab, click System Info, and then click Password.
2. Enter the default password in the Enter Current Password text box.
The default password is printed on the base of the gateway.
Configuring System Password 13

HomePortal® Intelligent Gateway 9.3.1.10 Configuration Guide Managing System Information
3. Select the password option:
- If you select Use Default System password (printed on the base of the system) radio button, skip
to step 7 for using the default password. The lower section of the Password page displays the
location and identification of the default password. Once you have saved the configuration
changes, no further action is required.
-If you select Create or Edit a Custom Password radio button, continue to step 4 for modifying the
user defined password.
4. Enter a password in the Enter New Password text box.
The password is case-sensitive, and can contain up to 31 alpha-numeric characters with no spaces.
5. Enter the same password in the Confirm New Password text box.
6. Enter a hint in the Enter a Password Hint text box.
A password hint can be a word, a phrase, or a question that can help you in case you forget your
password.
Note It is strongly recommended that you enter a hint to act as a reminder.
7. Cl ic k Save.
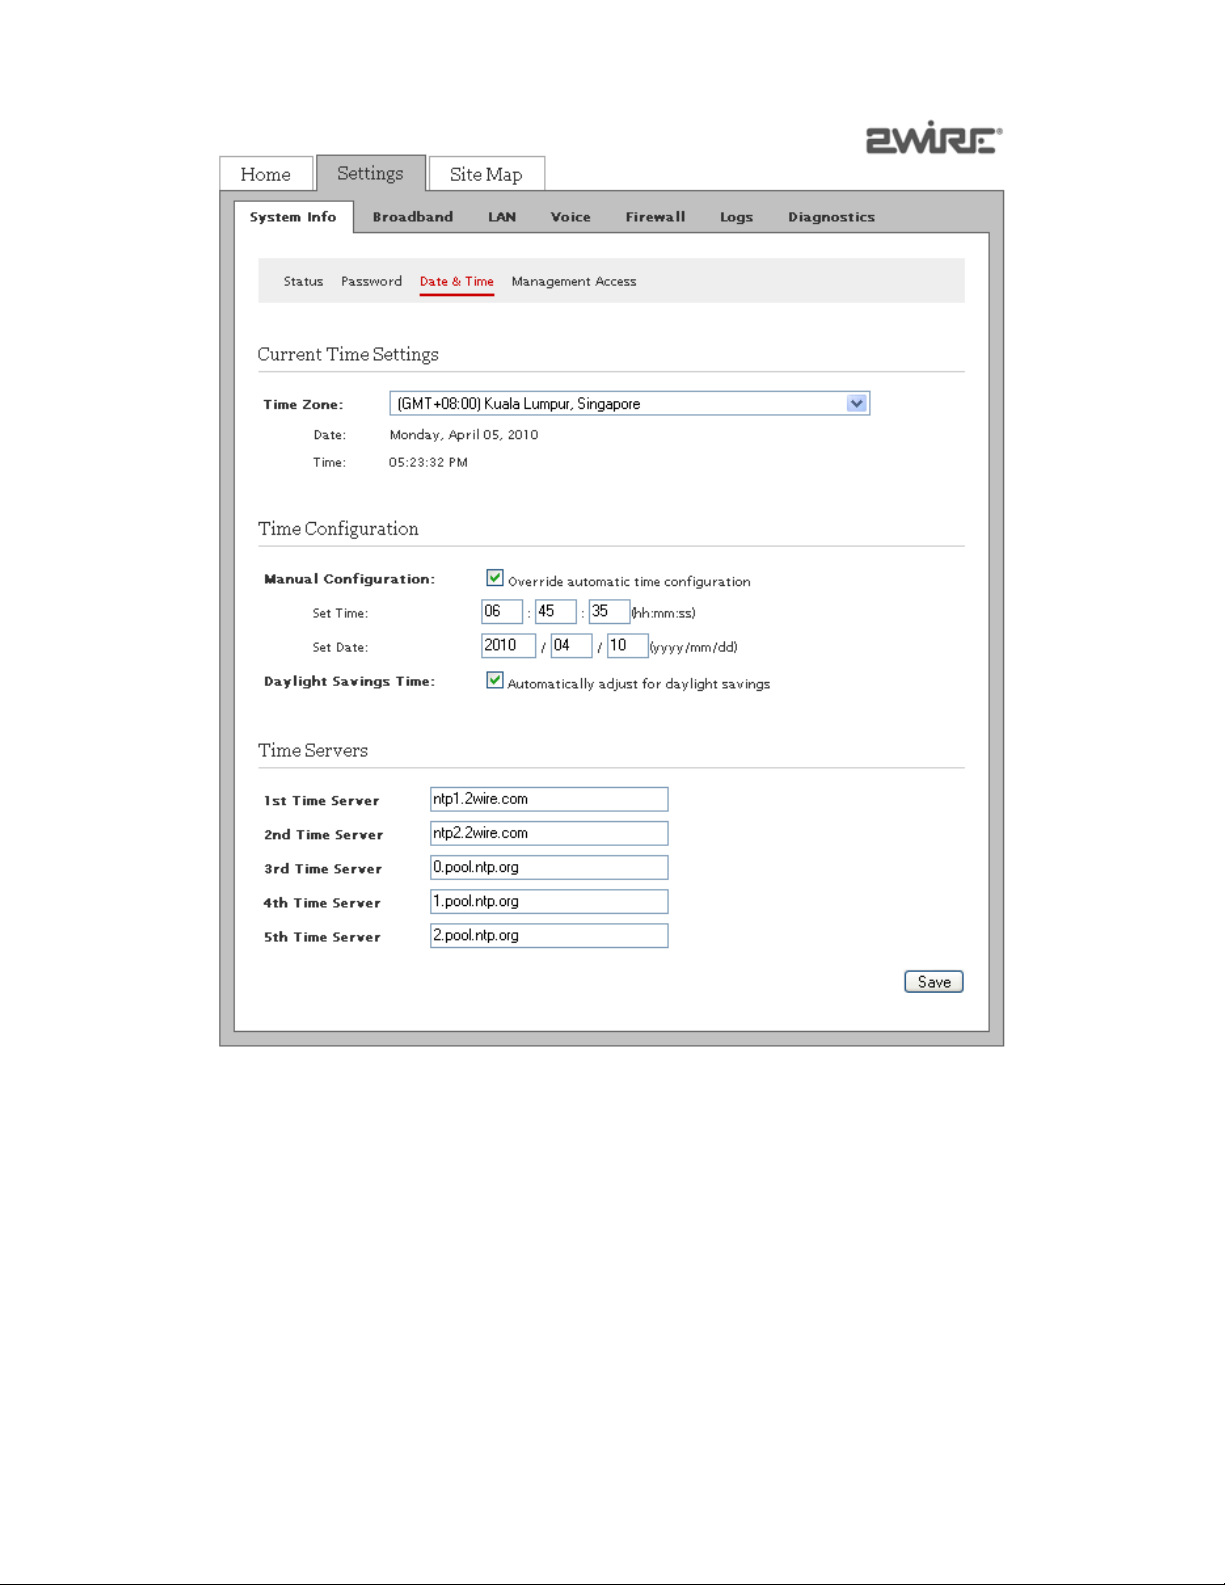
Configuring Date and Time
Objective
To configure the date and time on your gateway. You can either set up the date and time automatically or
configure it manually.
The gateway sets the time automatically using time servers on the Internet. It retrieves date and time
information in Greenwich Mean Time (GMT). Your local time is set using the Time Zone setting you configured
when you set up your gateway.
Note It is recommended that you use the automatically configured time zone settings.
Steps
1. On the Settings tab, click System Info, and then click Date & Time.
Configuring Date and Time 14
HomePortal® Intelligent Gateway 9.3.1.10 Configuration Guide Managing System Information
2. Perform any of the following tasks:
- Setting Date and Time Automatically on page 15
- Manually Configuring Date and Time on page 16
Setting Date and Time Automatically
To set date and time automatically:
1. On the Settings tab, click System Info, and then click Date & Time.
2. Navigate to the Current Time Settings panel.
3. Select the desired Time Zone from the drop-down list box.
4. Leave the Time Servers values in the Internet Time Servers (NTP) panel as is, unless you want to
change the location of the servers.
The gateway automatically updates the time and date based on the inputs from these servers.
5. Click Save.
Configuring Date and Time 15
HomePortal® Intelligent Gateway 9.3.1.10 Configuration Guide Managing System Information
Note Select the Daylight Savings Time check box in the Time Configuration panel if daylight savings time is
observed in your country/state.
Manually Configuring Date and Time
To manually configure the date and time:
1. On the Settings tab, click System Info, and then click Date & Time.
2. Navigate to the Time Configuration panel.
3. Select the Override automatic time configuration check box.
This task lets you override the automatically configured date and time settings on your gateway.
4. Enter the current time in the text boxes next to the Set Time field in the hh:mm:ss format.
5. Enter today’s date in the text boxes next to the Set Date field in the yyyy/mm/dd format.
6. Select the Automatically adjust for daylight savings check box.
7. Cl ic k Save.
Note When you configure the date and time manually, remember to select the Override automatic time
configuration check box.
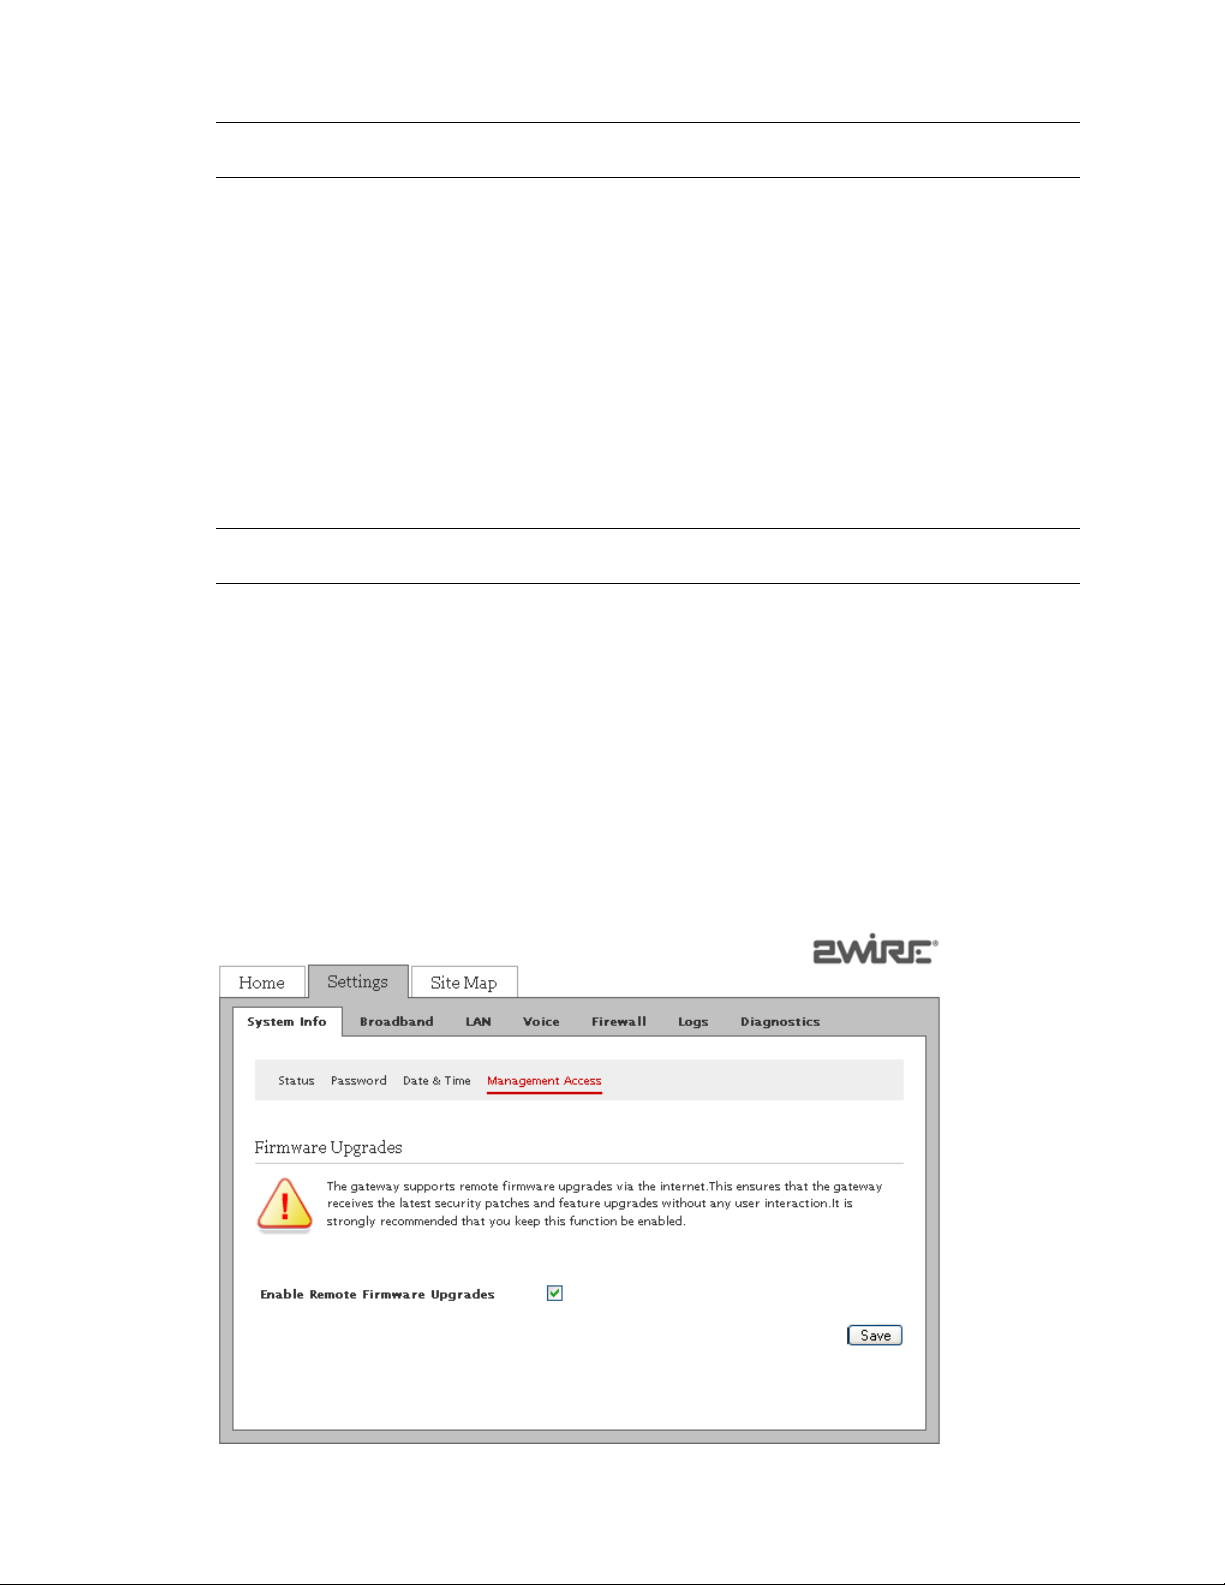
Enabling Remote Firmware Upgrade
Objective
To enable remote firmware upgrade.
If you enabled this feature, the firmware on your gateway upgrades remotely without any user intervention, thus
ensuring that the gateway has the latest security patches and feature upgrades for optimized performance.
Steps
1. On the Settings tab, click System Info, and then click Management Access.
This open the Firmware Upgrades page.
Enabling Remote Firmware Upgrade 16

HomePortal® Intelligent Gateway 9.3.1.10 Configuration Guide Managing System Information
2. Select the Enable Remote Firmware Upgrades check box.
3. Click Save.
See Also
Using Diagnostics Features on page 72
System Information Issues on page 84
Enabling Remote Firmware Upgrade 17

CHAPTER 5
Managing Broadband Settings
This chapter provides information about the tasks you can perform within the Broadband tab. The links under
the Broadband tab and their associated tasks are as follows:
• Status
- Viewing Broadband Status on page 18
• Link Configuration
- Configuring the Internet Connection on page 5
•Routing
- Adding Static Routes on page 23
• Multicast
- Configuring IP Multicast Settings on page 24
- Viewing Multicast Settings on page 25
•DNS Resolution
- Resolving Domain Name on page 26
Viewing Broadband Status
View the connectivity status, Internet connection details, modem type, and traffic statistics. You can also reset
the page to view up-to-date information.
Note Broadband and Service LEDs must be solid green on the front panel of the gateway. Also, ensure that
the user interface is accessible.
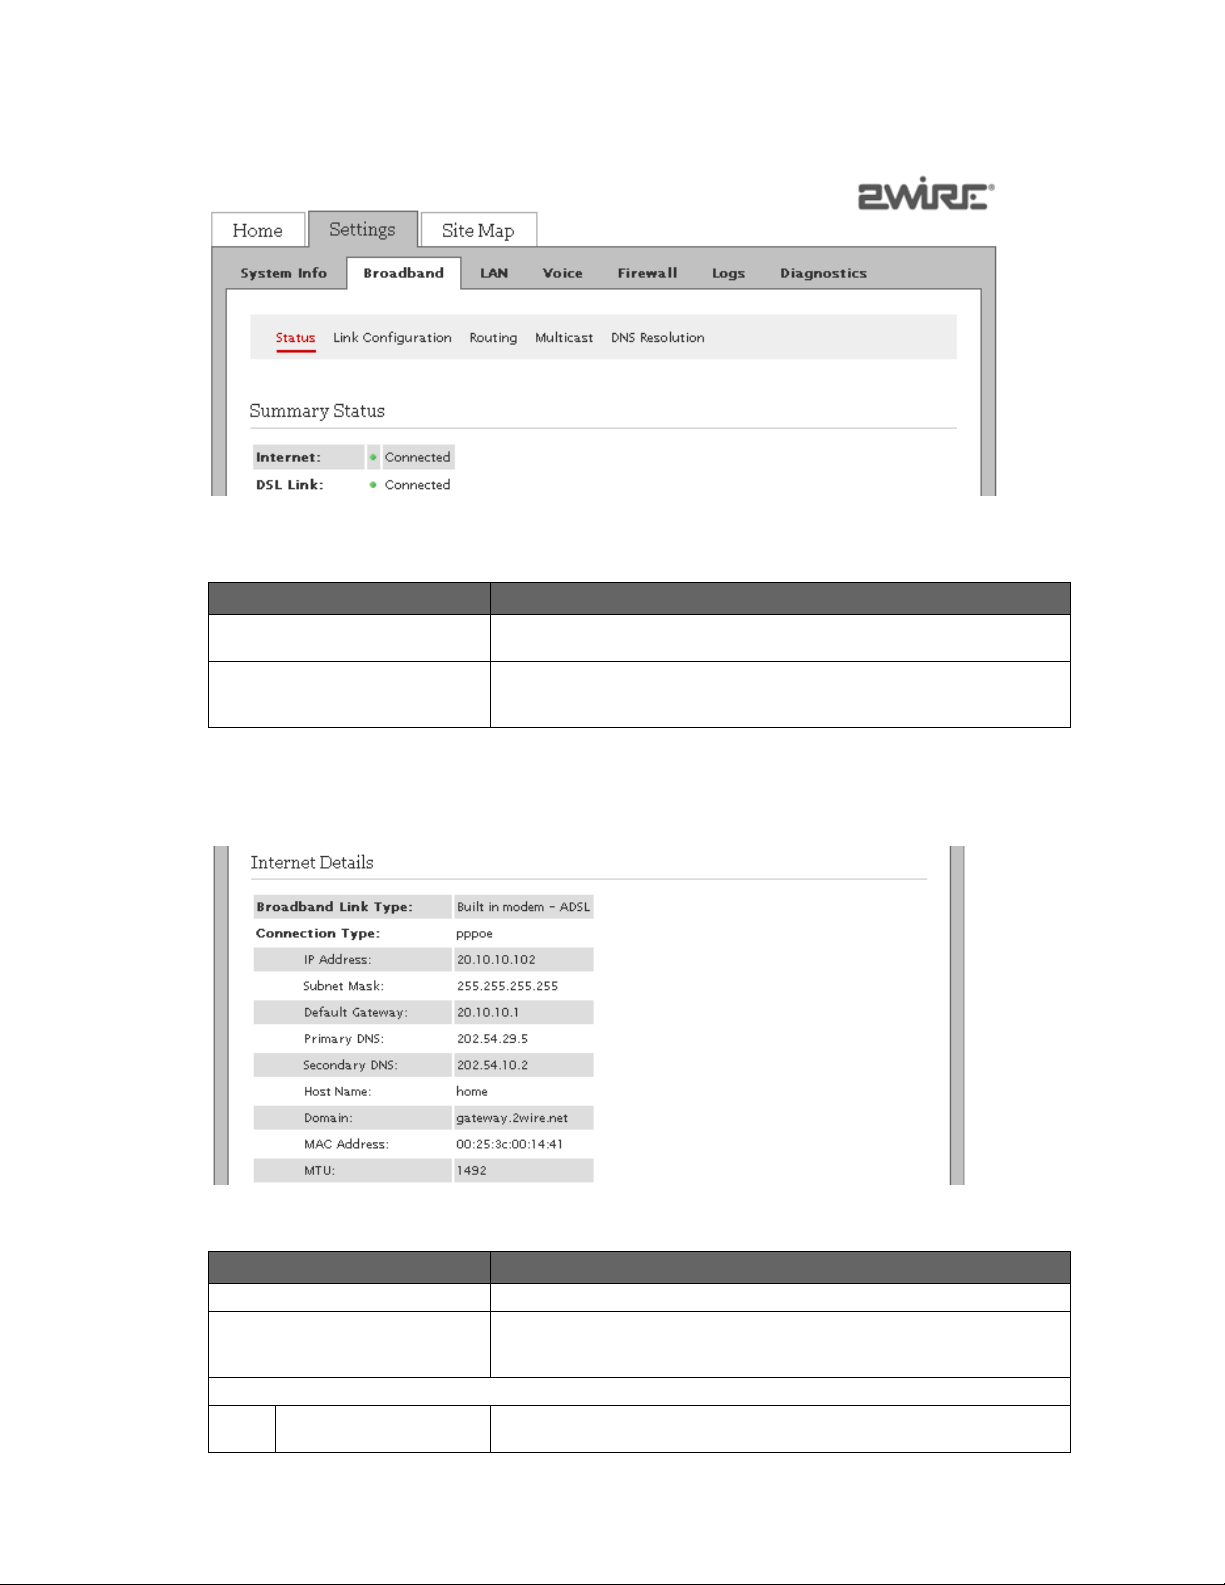
On the Settings tab, click Broadband, and then click Status. The following panels are displayed:
• Summary Status
• Internet Details
• DSL Details
• Traffic Statistics
• DSL Link Errors
Note The DSL Link field in the Summary Status panel, ATM Traffic section in the Traffic Statistics panel, DSL
Details panel, and DSL Link Errors panel are not visible if you select Ethernet as the WAN interface
type on the Link Configuration page.
18
HomePortal® Intelligent Gateway 9.3.1.10 Configuration Guide Managing Broadband Settings
Summary Status
Refer to the following image and table for information about the parameters listed in the Summary Status panel:
Parameter Description
Internet Displays the status of the Internet Connection.
DSL Link Displays the status of the DSL connection.
This displays Connected when the ISP acitvates your Internet connection.
This displays Connected when the DSL port of the gateway is connected to the
telephone jack. Ensure that your ISP activates the ADSL connection.
Internet Details
Refer to the following image and table for information about the parameters listed in the Internet Details panel:
Parameter Description
Broadband Link Type Indicates the type of broadband connection.
Connection Type Identifies the method by which the gateway connects to the ISP. The available
Current Internet Connection
IP Address Indicates the IP address assigned by the ISP to the gateway for connecting to
methods to connect to the ISP are PPPoE, PPPoA, Direct IP (DHCP), or Direct IP
(Static).
the Internet.
Viewing Broadband Status 19
HomePortal® Intelligent Gateway 9.3.1.10 Configuration Guide Managing Broadband Settings
Parameter Description
Subnet Mask Indicates the subnet mask assigned by the ISP to the gateway.
Default Gateway Indicates the default gateway address that assigns an IP address to your
Primary DNS Indicates the IP address of the primary DNS server that the gateway uses for
Secondary DNS Displays the backup if the Primary DNS fails to respond.
Host Name Displays the host name configured on the gateway.
Domain Displays the domain that associates your gateway with your ISP on the
MAC Address Displays the MAC address of the gateway.
MTU Indicates the maximum size of packets that are communicated on your ISP
gateway for accessing the Internet.
Domain Name resolution.
DNS allows Internet users to specify a name (domain name) to reach a Web
page (for example, www.domainname.com) instead of its Internet address (for
example, 111.222.111.222). When you enter the name of a Web location (URL),
the DNS looks up the name and resolves it to the Internet address of the Web
page.
broadband link.
network.
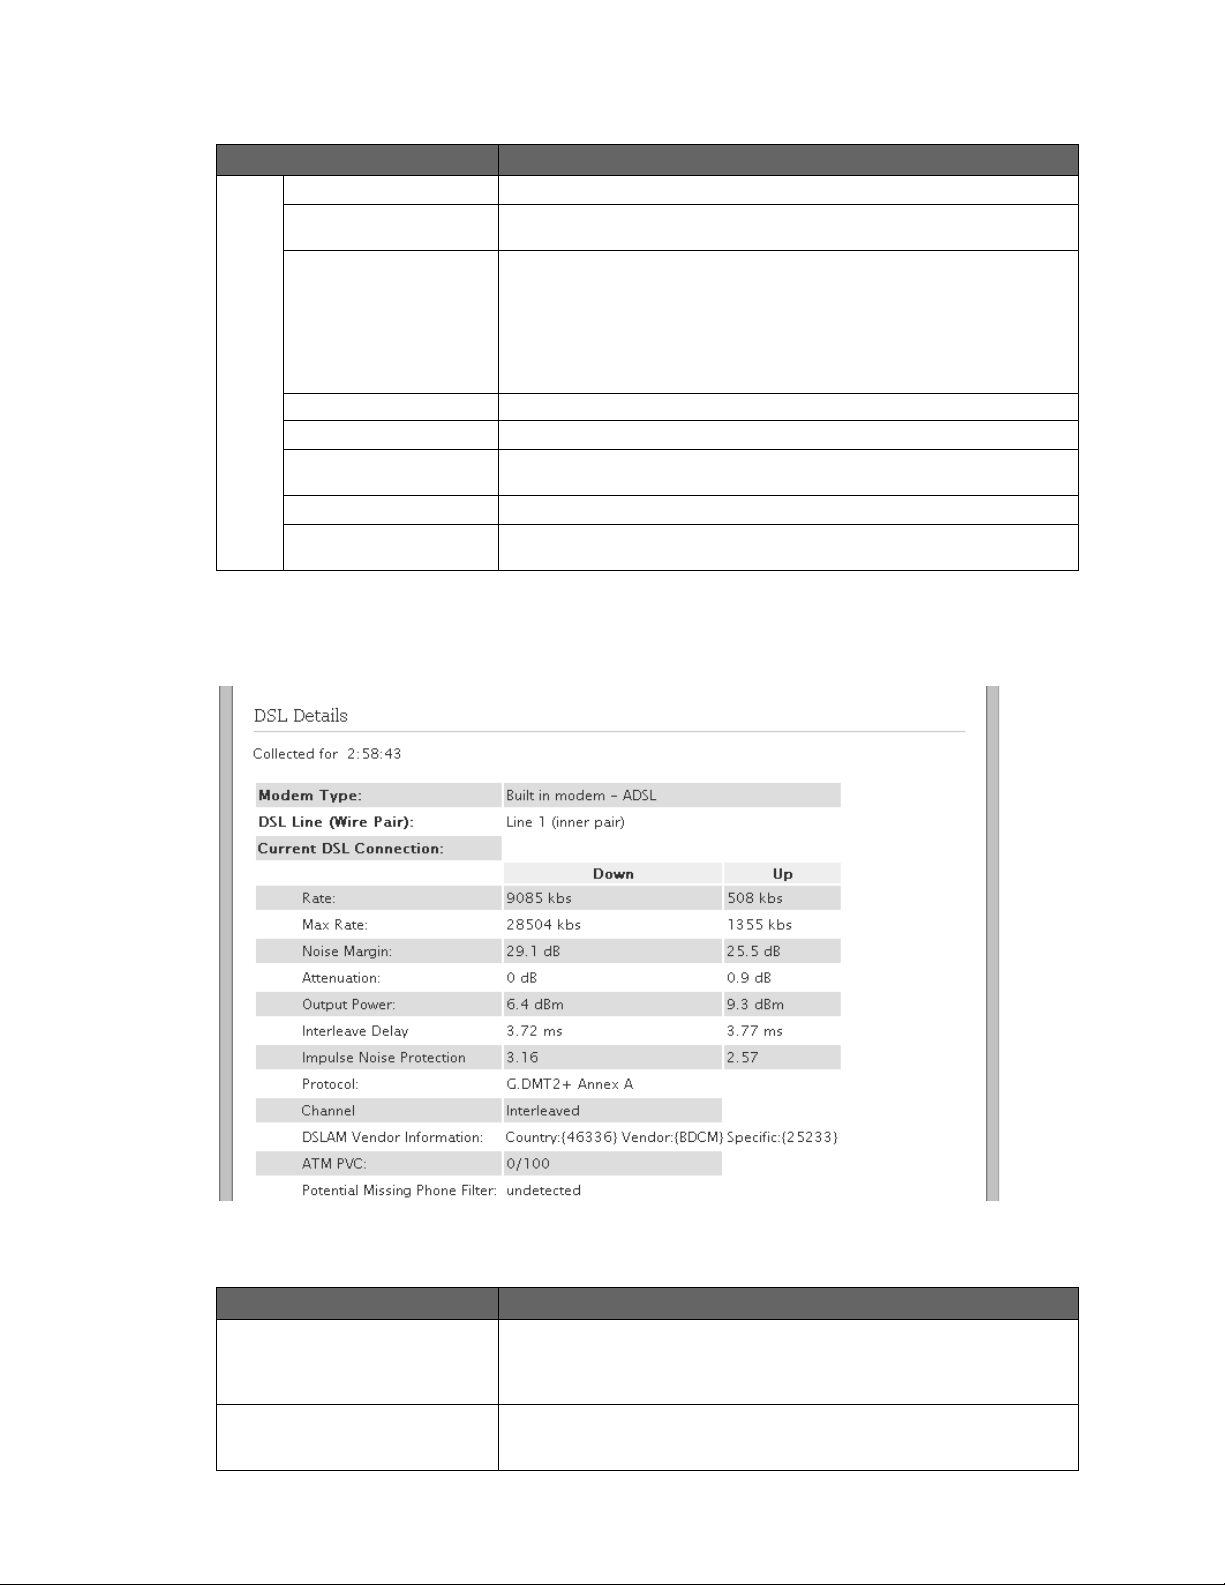
DSL Details
Refer to the following image and table for information about the parameters listed in the DSL Details panel:
Parameter Description
Modem Type Displays the type of modem:
DSL Line (Wire Pair) Displays Line 1 (inner pair), Line 2 (outer pair), or searching for DSL signal.
Viewing Broadband Status 20
• Built-in ADSL modem
-or-
• External broadband modem through the Internet
During installation, the gateway auto-detects whether the DSL signal is on Line
1 or Line 2.
HomePortal® Intelligent Gateway 9.3.1.10 Configuration Guide Managing Broadband Settings
Parameter Description
Current DSL Connection
Rate Displays the upload and download speeds in kilobits per second.
Max Rate Displays the maximum trained rates for upstream and downstream data in
Noise Margin Displays the current downstream and upstream noise margin in dB.
Attenuation Displays the current downstream and upstream DSL attenuation in dB.
Output Power Displays the current downstream and upstream DSL transmit and receive
Interleave Delay Displays the downstream and upstream interleave delay duration in
Impulse Noise Protection Displays the measurement of how much impulse noise can be mitigated. It is
Protocol Displays the protocol used to communicate between your gateway and your
Channel Displays the setting that is determined by your ISP’s DSLAM equipment. Values
DSLAM Vendor
Information
ATM PVC Displays the VPI/VCI value currently in use by your ISP.
Potential Missing Phone
Filter
kilobits per second.
power in dB.
milliseconds (ms).
dependent on the current line configuration.
ISP.
are Fast or Interleaved.
Lists information about the DSLAM, including country, DSLAM vendor, and
specifics.
Detects if the DSL port of the gateway is connected to the phone socket
through a DSL phoneline filter.
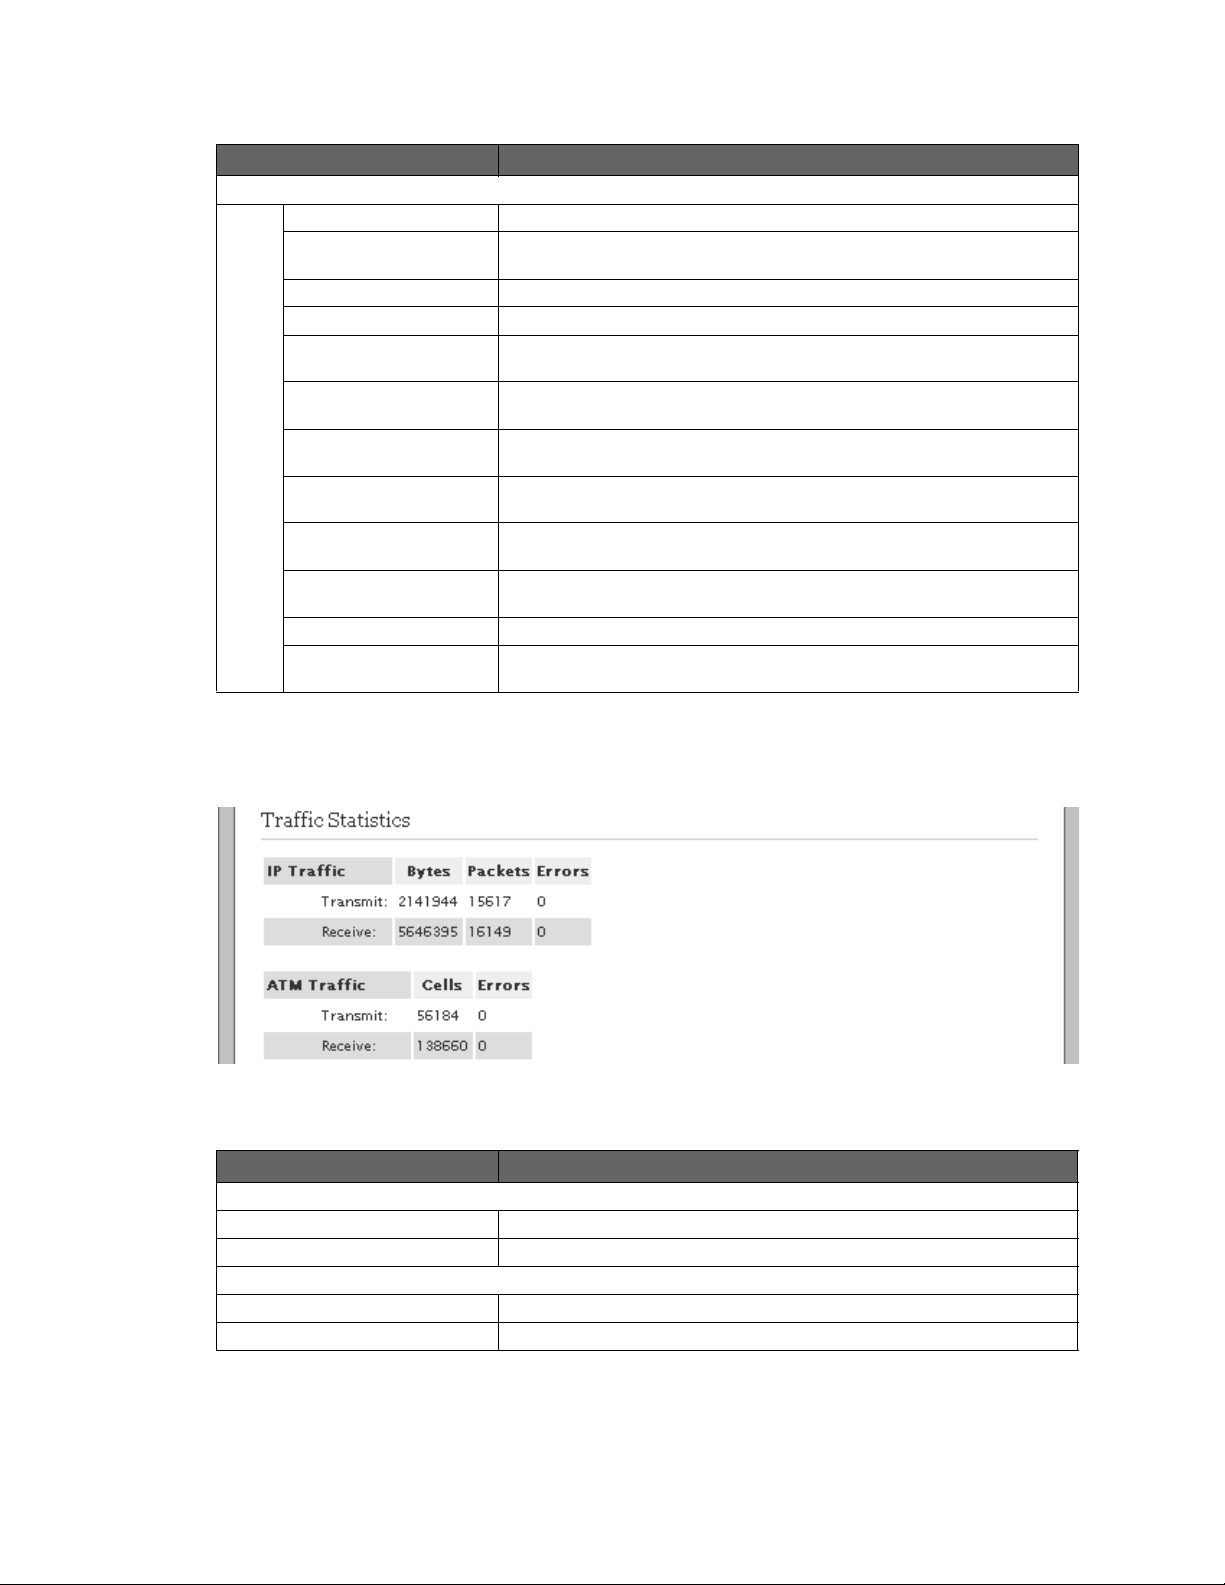
Traffic Statistics
Refer to the following image and table for information about the parameters listed in the Traffic Statistics panel:
Parameter Description
IP Traffic
Tran smi t Displays the cumulative number of bytes, IP packets, and errors transmitted.
Receive Displays the cumulative number of bytes, IP packets, and errors received.
ATM Traffic
Tran smi t Displays the cumulative number of ATM cells and errors transmitted.
Receive Displays the cumulative number of ATM cells and errors received.
Viewing Broadband Status 21

HomePortal® Intelligent Gateway 9.3.1.10 Configuration Guide Managing Broadband Settings
DSL Link Errors
Refer to the following image and table for information about the parameters listed in the DSL Link Errors panel:
Parameter Description
ATM
Loss of cell Delineation Displays the number of loss of cell delineation events since the last reset.
Cell Header Errors Displays the number of cell header errors since the last reset.
DSL
Link Retrains Displays the number of DSL retrains since the gateway was last restarted, and
DSL Training Errors Displays the number of failed DSL retrains since the gateway was last restarted,
Training Timeouts Displays the number of timeouts waiting for response from ATU-C since the
Loss of Framing Failures Displays the number of DSL loss of framing failures since the gateway was last
Loss of Signal Failures Displays the number of DSL loss of signal failures since the 2Wire gateway was
Cum. Seconds w/Errors Displays the number of cumulative errored seconds since the gateway was last
Viewing Broadband Status 22
the time elapsed since the last retrain.
and the elapsed time since the last failed retrain.
gateway was last restarted, and the elapsed time since the last initialization
timeout.
restarted, and the elapsed time since the last line search initialization.
last restarted, and the elapsed time since the last loss of signal failure.
restarted, and the elapsed time since the last error.
 Loading...