

Page 1
Libretto Istruzioni
Instructions Booklet
Mode d’emploi
Bedienungsanleitung
Gebruiksaanwijzing
Manual de instrucciones
Manual de instruções
Basic
Page 2

○○○○○○○○○○○○○○○○○○○○○○○○○○○○○○○○○○○○○○○○○○○○○○○
2
○○○○○○○○○○○○○○○○○○○○○○○○○○○○○○○○○○○○○○○
Page 3
○○○○○○○○○○○○○○○○○○○○○○○○○○○○○○○○○○○○○○○○○○○○○○○
1 - GENERALITÀ .......................................................................................................................... 6
2 - COMPONENTI ......................................................................................................................... 6
3 - AVVERTENZE PER LA SICUREZZA......................................................................................6
4 - INSTALLAZIONE ..................................................................................................................... 7
4.1 - Montaggio delle staffe di supporto ........................................................................................7
4.2 - Montaggio del corpo cappa (fig. 4) .......................................................................................8
4.3 - Connessione elettrica e controllo funzionale ........................................................................8
4.4 - Connessione aspirante o filtrante .........................................................................................8
4.5 - Montaggio del camino telescopico ........................................................................................9
1 - AVVERTENZE PER LA SICUREZZA....................................................................................10
2 - USO ....................................................................................................................................... 10
3 - MANUTENZIONE ..................................................................................................................10
3.1 - Filtri antigrasso metallici ...................................................................................................... 10
3.2 - Filtri in fibra sintetica ........................................................................................................... 10
3.3 - Filtro al carbone attivo ......................................................................................................... 11
3.4 - Illuminazione ....................................................................................................................... 11
3.5 - Pulizia ................................................................................................................................. 11
1 - GENERAL INFORMATION ................................................................................................... 12
2 - COMPONENTS ..................................................................................................................... 12
3 - SAFETY WARNINGS ............................................................................................................ 12
4 - INSTALLATION .....................................................................................................................13
4.1 - Fixing the wall brackets. ...................................................................................................... 13
4.2 - Fixing the canopy hood (fig. 4) ............................................................................................ 14
4.3 - Electrical connection and working test ................................................................................14
4.4 - Ducting or Recirculation fitting ............................................................................................ 14
4.5 - Fitting the telescopic chimney stack ...................................................................................15
1 - SAFETY WARNINGS ............................................................................................................ 16
2 - OPERATION ..........................................................................................................................16
3 - MAINTENANCE ....................................................................................................................16
3.1 - Metal grease filters .............................................................................................................. 16
3.2 - Thin synthetic filter ..............................................................................................................17
3.3 - Charcoal filters ....................................................................................................................17
3.4 - Worktop illumination ............................................................................................................ 17
3.5 - Cleaning .............................................................................................................................. 17
1 - GENERALITES .....................................................................................................................18
2 - COMPOSANTS ..................................................................................................................... 18
3 - CONSEILS CONCERNANT LA SECURITE ......................................................................... 18
4 - INSTALLATION .....................................................................................................................19
4.1 - Montage des brides de support. .........................................................................................19
4.2 - Montage du corps de hotte (fig. 4). .....................................................................................20
4.3 - Raccordement électrique et contrôle fonctionnel. ...............................................................20
4.4 - Connexion évacuation ou recyclage ...................................................................................20
4.5 - Montage de la cheminée téléscopique ...............................................................................21
1 - CONSEILS CONCERNANT LA SECURITE .........................................................................22
2 - UTILISATION ......................................................................................................................... 22
3 - ENTRETIEN ........................................................................................................................... 22
3.1 - Filtres à graisses métalliques .............................................................................................. 22
3
○○○○○○○○○○○○○○○○○○○○○○○○○○○○○○○○○○○○○○○
Page 4
○○○○○○○○○○○○○○○○○○○○○○○○○○○○○○○○○○○○○○○○○○○○○○○
3.2 - Filtres synthétiques .............................................................................................................23
3.3 - Filtres à charbon actif .......................................................................................................... 23
3.4 - Eclairage .............................................................................................................................23
3.5 - Nettoyage ............................................................................................................................ 23
1 - ALLGEMEINES .....................................................................................................................24
2 - BAUELEMENTE .................................................................................................................... 24
3 - SICHERHEITSHINWEISE .....................................................................................................24
4 - MONTAGE DES GERÄTES .................................................................................................. 25
4.1 - Montage der Haltebügel ...................................................................................................... 25
4.2 - Montage des Haubenkörpers (Abb. 4) ................................................................................27
4.3 - Elektrischer Anschluß und Funktionskontrolle ....................................................................27
4.4 - Anschluß Abluft- oder Umluftbetrieb ...................................................................................27
4.5 - Anbringung des teleskopierbaren Kamines ........................................................................ 28
1 - SICHERHEITSHINWEISE .....................................................................................................29
2 - ARBEITSWEISE DER DUNSTHAUBE .................................................................................29
3 - WARTUNG UND PFLEGE ....................................................................................................29
3.1 - Metall-Fettfilter .................................................................................................................... 29
3.2 - Fettfiltervlies ........................................................................................................................30
3.3 - Aktiv-Kohlefilter ...................................................................................................................30
3.4 - Beleuchtung ........................................................................................................................30
3.5 - Pflege .................................................................................................................................. 30
1 - ALGEMEEN ........................................................................................................................... 31
2 - ONDERDELEN ...................................................................................................................... 31
3 - WAARSCHUWINGEN VOOR DE VEILIGHEID ....................................................................31
4 - INSTALLATIE ........................................................................................................................32
4.1 - Montage van de ondersteunende beugels .......................................................................... 32
4.2 - Montage van de afzuigkap zelf ........................................................................................... 33
4.3 - Aansluiting op het elektriciteitsnet en controle van de werking ........................................... 33
4.4 - Afzuigende of filterende aansluiting ....................................................................................34
4.5 - Montage van de telescoopschoorsteen .............................................................................. 34
1 - WAARSCHUWINGEN VOOR DE VEILIGHEID ....................................................................35
2 - GEBRUIK ..............................................................................................................................35
3 - ONDERHOUD .......................................................................................................................36
3.1 - Metalen antivet-filter ............................................................................................................ 36
3.2 - Filters van synthetische vezels. ..........................................................................................36
3.3 - Aktief koolfilter ..................................................................................................................... 36
3.4 - Verlichting ........................................................................................................................... 37
3.5 - Reiniging .............................................................................................................................37
1 - GENERALIDADES ................................................................................................................38
2 - COMPONENTES ...................................................................................................................38
3 - ADVERTENCIAS DE SEGURIDAD ......................................................................................38
4 - INSTALACION .......................................................................................................................39
4.1 - Colocación de las placas de sujeción .................................................................................39
4.2 - Colocación del cuerpo de la campana (fig.4) ...................................................................... 40
○○○○○○○○○○○○○○○○○○○○○○○○○○○○○○○○○○○○○○○
4
Page 5

○○○○○○○○○○○○○○○○○○○○○○○○○○○○○○○○○○○○○○○○○○○○○○○
4.3 - Conexión eléctrica y control funcional ................................................................................40
4.4 - Conexión aspirante o filtrante ............................................................................................. 40
4.5 - Colocación de la chimenea telescopica ..............................................................................41
1 - ADVERTENCIAS DE SEGURIDAD ......................................................................................42
2 - USO ....................................................................................................................................... 42
3 - MANTENIMIENTO ................................................................................................................. 42
3.1 - Filtro antigrasa metálico ...................................................................................................... 42
3.2 - Filtros sintéticos .................................................................................................................. 43
3.3 - Filtro de carbón activo ......................................................................................................... 43
3.4 - Iluminación .......................................................................................................................... 43
3.5 - Limpieza .............................................................................................................................. 43
1 - INFORMAÇÕES GERAIS ..................................................................................................... 44
2 - COMPONENTES ...................................................................................................................44
3 - PRECAUÇÕES DE SEGURANÇA ....................................................................................... 44
4 - INSTALAÇÃO ........................................................................................................................45
4.1 - Montagem dos estribos de suporte ..................................................................................... 45
4.2 - Montagem do corpo da coifa (fig. 4) ................................................................................... 46
4.3 - Ligação eléctrica e controlo do funcionamento ................................................................... 46
4.4 - Conexão da versão aspirante ou filtrante ........................................................................... 46
4.5 - Montagem da chaminé telescópica ....................................................................................47
1 - PRECAUÇÕES DE SEGURANÇA ....................................................................................... 48
2 - UTILIZAÇÃO ......................................................................................................................... 48
3 - MANUTENÇÃO .....................................................................................................................48
3.1 - Filtros metálicos antigordura ...............................................................................................48
3.2 - Filtros de fibra sintética .......................................................................................................49
3.3 - Filtro de carvão activo .........................................................................................................49
3.4 - Iluminação ........................................................................................................................... 49
3.5 - Limpeza ..............................................................................................................................49
5
○○○○○○○○○○○○○○○○○○○○○○○○○○○○○○○○○○○○○○○
Page 6

○○○○○○○○○○○○○○○○○○○○○○○○○○○○○○○○○○○○○○○○○○○○○○○
Parte 1ª ISTRUZIONI PER L’INSTALLAZIONE
1 - GENERALITÀ
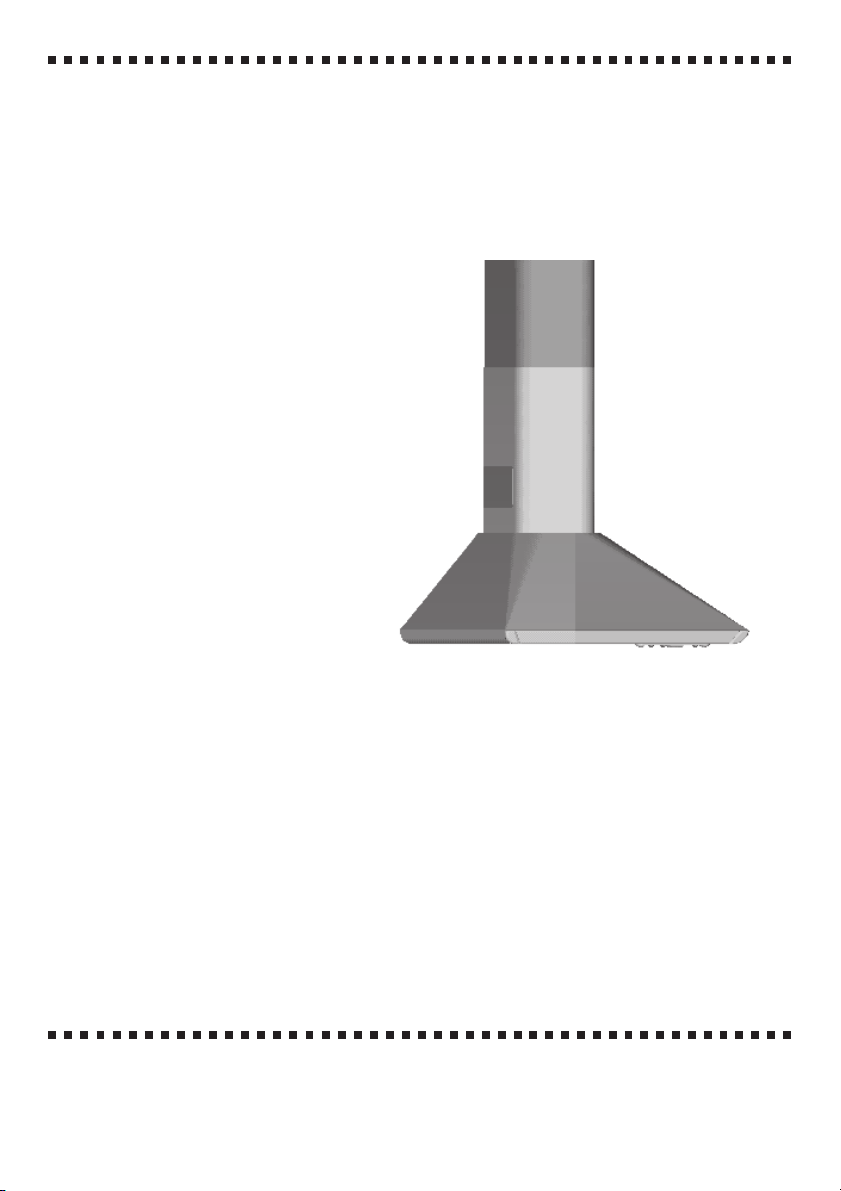
Questa cappa è predisposta per essere installata a muro, sopra un piano di cottura
posizionato a ridosso di una parete. Può essere utilizzata in versione aspirante (evacuazione esterna), oppure in versione filtrante (riciclo interno).
A causa della complessità e del peso dell’apparecchio si raccomanda che l’installazione
venga effettuata da personale specializzato, rispettando tutte le prescrizioni delle autorità competenti relative allo scarico dell’aria da evacuare. Il produttore declina qualsiasi
responsabilità per danni dovuti ad installazione non corretta o non conforme alle regole
dell’arte.
2 - COMPONENTI
La cappa è composta da (fig. 1):
2.1- n. 1 corpo cappa C completo di comandi, luce e gruppo ventilatore
2.2- n. 1 camino telescopico formato da:
n. 1 semitubo superiore S
n. 1 semitubo inferiore I
2.3- n. 1 raccordo aspirante 90x132 A (solo per versioni speciali)
2.4- n. 2 grigliette direzionate G
2.5- n. 1 flangia di riduzione Ø 150-120 K
2.6- n. 1 raccordo filtrante R
2.7- n. 1 deflettore D (solo per versioni speciali)
2.8- n. 1 prolunga filtrante P (solo per versioni speciali, vedi paragrafo 4.4 3 parte 1ª)
2.9- n. 1 sacchetto contenente:
n. 2 staffe 1 per il fissaggio del corpo cappa
n. 2 staffe 2 per il fissaggio del camino, viti, tasselli e documenti
2.10-n. 1 fondale F (opzionale)
I componenti A, D, P, sono presenti soltanto in apparecchi predisposti per installazioni
particolari.
3 - AVVERTENZE PER LA SICUREZZA
3.1- Non collegare l’apparecchio a condotti di scarico dei fumi prodotti da combustione
(caldaie, caminetti, ecc...).
3.2- Verificare che la tensione di rete corrisponda a quella riportata nella targhetta posta
all’interno della cappa.
3.3- Collegare la cappa alla rete interponendo un interruttore bipolare con apertura dei
contatti di almeno 3 mm.
3.4- Accertarsi che l’impianto elettrico domestico garantisca un corretto scarico a terra.
3.5- La distanza minima di sicurezza tra il piano di cottura e la cappa è di 65 cm.
3.6- Non fare cucine alla fiamma sotto la cappa.
3.7- Controllare le friggitrici durante l’uso: l’olio surriscaldato potrebbe infiammarsi.
3.8- Prima di procedere a qualsiasi operazione di pulizia o di manutenzione, disinserire
l’apparecchio togliendo la spina o agendo sull’interruttore generale.
3.9- Nel caso in cui nella stanza vengano utilizzati sia la cappa che apparecchi non azionati
da energia elettrica (ad esempio apparecchi utilizzatori a gas), si deve provvedere ad
una aerazione sufficiente dell’ambiente. Un uso proprio e senza rischi si ottiene quando la depressione massima del locale non supera 0,04 mbar; si evita in questo modo
un ritorno dei gas di scarico.
6
○○○○○○○○○○○○○○○○○○○○○○○○○○○○○○○○○○○○○○○
IT
Page 7

○○○○○○○○○○○○○○○○○○○○○○○○○○○○○○○○○○○○○○○○○○○○○○○
4 - INSTALLAZIONE
È possibile installare la cappa alla parete in tre diversi modi:
A - installazione della cappa con fondale (opzionale);
B - installazione della cappa senza fondale;
C - installazione della cappa in versione aspirante, con allineamento del camino alla estre-
mità superiore dei pensili.
In ogni caso per evitare un accidentale sganciamento della cappa, è sempre
necessario procedere all’installazione del camino come indicato nelle istruzioni.
Rispettare il seguente schema:
4.1- Montaggio delle staffe di supporto
4.2- Montaggio del corpo cappa
4.3- Connessione elettrica e controllo funzionale
4.4- Connessione aspirante o filtrante
4.5- Montaggio del camino telescopico
4.1 - Montaggio delle staffe di supporto
Installazione tipo A/B (fig. 2a-b)
1 - Tracciare sulla parete una linea verticale fino al soffitto, al centro della zona prevista
per il montaggio della cappa: serve per l’allineamento verticale della parti.
2 - Posizionamento delle staffe 1
Tracciare una linea orizzontale ad una distanza dal piano di cottura di:
a - con fondale (fig. 2a) d = 200 mm + H, dove H = altezza in mm della parte visibile del
fondale; questa misura, a causa dei vari tipi di fondali disponibili, va presa direttamente
sul fondale a corredo.
b - senza fondale (fig. 2b) d = 850 mm minimo.
Segnare sulla linea orizzontale i fori per il fissaggio delle staffe 1 ad una distanza Y =
100 mm tra l’interasse dei fori delle staffe e il centro della cappa.
3 - Posizionamento delle staffe 2
a - Appoggiare una delle staffe 2 sulla parete a circa 1 o 2 mm dal soffitto o dal limite su-
periore, allineando il suo centro (intagli) sulla linea verticale.
b - Segnare sulla parete i due fori asolati della staffa.
c - Appoggiare l’altra staffa 2 sulla parete, allineandola alla linea verticale, ad una distanza
X misurata come in fig. 2, pari all’altezza del semitubo superiore S in dotazione alla
cappa. La quota X può avere valori differenti, secondo le varie altezze disponibili del
semitubo superiore.
d - Segnare sulla parete i centri dei fori asolati della staffa.
4 - Con una punta Ø 8 mm forare tutti i centri segnati, quindi fissare a fondo le staffe 1 - 2
usando i tasselli Ø 8 mm e le relative viti in dotazione.
5 - Fondale (opzionale)
L’altezza della cappa dal piano di cottura è determinata, in questo caso, dall’altezza
del fondale F e dalla eventuale alzatina del piano delle basi. Il fondale va montato prima
di montare il corpo cappa, e, se si desidera fissarlo contro la parete sia superiormente
che inferiormente, è necessario montarlo alla giusta altezza, prima del montaggio del-
le basi o almeno del relativo piano superiore. Essendo questa operazione complessa va
effettuata solamente dall’installatore della cucina o da personale competente che conosca tutte le dimensioni finali dei mobili.
Limitandosi al solo fissaggio superiore procedere come segue:
○○○○○○○○○○○○○○○○○○○○○○○○○○○○○○○○○○○○○○○
7IT
Page 8

○○○○○○○○○○○○○○○○○○○○○○○○○○○○○○○○○○○○○○○○○○○○○○○
a - Appoggiare il fondale sul piano della basi come in fig. 2a, mandarlo a contatto della
parete e centrarlo rispetto alla base.
b - Segnare sulla parete i centri dei due fori della faldina superiore.
c - Forare la parete con una punta Ø 8 e fissare il fondale usando i tasselli Ø 8 e le viti in
dotazione.
d - La eventuale stabilizzazione della parte inferiore, se necessaria, viene lasciata all’in-
stallatore.
Installazione tipo C (fig. 3)
È possibile fare questo tipo di installazione utilizzando soltanto il semitubo inferiore I.
1 - Tracciare sulla parete una linea verticale al centro della zona prevista per il montaggio
della cappa fino al limite superiore che può essere rappresentato da una mensola in
legno: serve per l’allineamento verticale delle parti.
Tracciare una linea orizzontale ad una distanza X dall’estremità inferiore dalla mensola.
La quota X può avere valori differenti secondo le varie dimensioni disponibili del semitubo
inferiore ed è uguale all’altezza del semitubo I + 35 mm.
2 - Posizionamento delle staffe 1
Segnare sulla linea orizzontale i fori per il fissaggio delle staffe come indicato nel
paragrafo 4.1 2.
3 - Posizionamento delle staffe 2
a - Appoggiare una delle staffe 2 sulla parete a circa 1 o 2 mm dalla mensola, allineando
il suo cenatro (intagli) sulla linea verticale.
b - Segnare sulla perete i due fori asolati della staffa.
4 - Con una punta Ø 8 mm forare tutti i centri segnati. Fissare a fondo le staffe 1 - 2 usando
i tasselli Ø 8 mm e le relative viti in dotazione.
4.2 - Montaggio del corpo cappa (fig. 4)
1 - Agganciare il corpo cappa C alle staffe 1.
2 - Inserire le due viti di regolazione W da 4Mx25 (in dotazione negli accessori) nei fori
filettati delle staffe 1.
3 - Regolare verticalmente e livellare orizzontalmente la cappa ruotando le viti W.
4.3 - Connessione elettrica e controllo funzionale
1 - È necessario rispettare scrupolosamente le avvertenze 3.2, 3.3 e 3.4 del paragrafo 3
relative alla sicurezza.
2 - Effettuato il collegamento elettrico, verificare il corretto funzionamento di illuminazione,
accensione del motore, cambio delle velocità.
4.4 - Connessione aspirante o filtrante
1 - Connessione aspirante (installazione tipo A/B)
a - La cappa può essere collegata a tubazioni esterne per mezzo di un tubo rigido o flessi-
bile Ø 120 o 150 mm, la cui scelta è lasciata all’installatore.
Per installazione con tubo Ø 120, è necessario inserire la flangia di riduzione K sull’
uscita della cappa (fig. 5).
b - Collegare l’uscita dell’aria alla tubazione esterna con il tubo rigido o flessibile da fissare
con adeguate fascette stringitubo (fig.6).
Il materiale adatto e necessario per questa ultima operazione deve essere reperito dall’
installatore.
8
○○○○○○○○○○○○○○○○○○○○○○○○○○○○○○○○○○○○○○○
IT
Page 9

○○○○○○○○○○○○○○○○○○○○○○○○○○○○○○○○○○○○○○○○○○○○○○○
Se si vuole installare la cappa in versione aspirante con uscita dell’aria laterale dal
semitubo inferiore I con tubi rettangolari, è necesario inserire il deflettore D nel raccordo
R per chiudere il foro non utilizzato (fig. 7).
c - Togliere gli eventuali filtri al carbone attivo (vedi paragrafo 3.3 2 parte 2ª).
2 - Connessione aspirante (installazione tipo C)
Questo tipo di installazione permette di collegare la cappa alla tubazione di evacuazione
esterna per mezzo di tubi rettangolari con dimensioni nominali 90x132, utilizzando soltanto il semitubo inferiore I (fig. 3).
a - Fare un foro da 120 mm nella mensola posta tra i due pensili sopra il piano di cottura.
b - Collegare la flangia di uscita dell’aria al raccordo aspirante A.
c - Collegare il raccordo aspirante A alla tubazione di evacuazione esterna, utilizzando il
tubo rettangolare 90x132.
Anche in questo caso tubi e fascette devono essere reperite dall’installatore.
d - Togliere gli eventuali filtri al carbone attivo (vedi paragrafo 3.3 2 parte 2ª).
3 - Connessione filtrante (solo installazione tipo A/B)
a - L’aria filtrata viene reimmessa nell’ambiente attraverso le due grigliette laterali direzio-
nate poste sul semitubo inferiore I, la cui posizione, per esigenze diverse, è caratterizzata da due differenti altezze (fig. 8 e 9).
b - Posizione bassa (fig. 8): collegare il raccordo filtrante R direttamente all’uscita rotonda
del diffusore, spingendolo verso il basso.
c - Posizione alta (fig. 9): collegare la prolunga P all’uscita rotonda del diffusore, spingen-
dolo verso il basso e applicare analogamente il raccordo R sulla prolunga P.
d - Aggiungere gli eventuali filtri al carbone attivo all’interno del corpo cappa (vedi paragrafo
3.3 2 parte 2ª).
N.B. - Non applicare la grigliette direzionate; questa operazione deve essere fatta dopo
l’installazione del camino.
4.5 - Montaggio del camino telescopico
1- Installazione tipo A/B (fig. 10)
a - Per applicare il semitubo superiore S, allargare leggermente le due falde laterali, aggan-
ciarle dietro le staffe 2 e richiuderle fino a battuta. Fissare il semitubo alle staffe 2 con
quattro delle viti in dotazione negli accessori.
b - Applicare in modo analogo il semitubo inferiore I tra la staffa inferiore 2 e la parete tenen-
do presente che alla base, il perimetro del semitubo deve essere inserito nella apposita
sede del corpo cappa e agganciato alle linguette laterali (vedi ingrandimento).
2- Installazione tipo C (fig. 11)
Applicare il semitubo inferiore I allargando leggermente le due falde laterali, agganciarle
dietro la staffa 2 e richiuderle fino a battuta, tenendo presente che alla base il perimetro
del semitubo deve essere inserito nella apposita sede del corpo cappa e agganciato alle
linguette laterali (vedi ingrandimento).
ATTENZIONE - In caso di smontaggio del semitubo inferiore, devono essere sganciate le due linguette laterali poste all’interno del corpo cappa (fig. 12).
3 - Applicare le due grigliette direzionate a scatto sulla lamiera nelle apposite sedi, in modo
che il simbolo sia orientato verso l’alto e il simbolo verso l’avanti.
Inoltre, per le versioni filtranti, verificare che le grigliette si inseriscano correttamente
all’interno del raccordo filtrante R (fig. 13).
○○○○○○○○○○○○○○○○○○○○○○○○○○○○○○○○○○○○○○○
9IT
Page 10

○○○○○○○○○○○○○○○○○○○○○○○○○○○○○○○○○○○○○○○○○○○○○○○
Parte 2ª ISTRUZIONI PER L’USO E LA MANUTENZIONE
1 - AVVERTENZE PER LA SICUREZZA
È assolutamente necessario rispettare tutte le avvertenze riportate al paragrafo 3 della
1a parte - Istruzioni per l’installazione. In aggiunta, è molto importante fare particolare
attenzione, nell’uso e nella manutenzione, alle seguenti avvertenze:
1.1- Effettuare una scrupolosa e tempestiva manutenzione dei filtri antigrasso e al carbone
attivo secondo gli intervalli consigliati dal Fabbricante, o più frequentemente per un
uso particolarmente gravoso (oltre le 4 ore giornaliere).
1.2- Non lasciare fiamme libere a forte intensità sotto la cappa in funzione: togliendo le
pentole, spegnere la fiamma o almeno, per brevi periodi e sotto sorveglianza, tenerla
al minimo.
1.3- Regolare sempre le fiamme in modo da evitare una evidente fuoriuscita laterale delle
stesse rispetto al fondo delle pentole: si risparmia energia e si evitano pericolose
concentrazioni di calore.
1.4- Non fare mai un uso improprio dell’apparecchio, che è stato progettato esclusivamente per abbattere gli odori in cucina.
1.5- Per sostituire il cavo di alimentazione, rivolgersi al Centro di Assistenza più vicino.
2 - USO
Quadro comandi (fig. 14)
Lo schema dei comandi è il seguente:
TASTO L = Accende e spegne l’impianto di illuminazione
TASTO M = Accende e spegne il motore
TASTO V = Determina le velocità di esercizio, così suddivise:
1 = Velocità minima, adatta ad un ricambio d’aria continuo particolarmente
silenzioso, in presenza di pochi vapori di cottura.
2 = Velocità media, adatta alla maggior parte delle condizioni di uso, dato
l’ottimo rapporto tra portata d’aria trattata e livello di rumorosità.
3 = Velocità massima, adatta a fronteggiare le massime emissioni di vapori
di cottura, anche per tempi prolungati.
3 - MANUTENZIONE
Una costante manutenzione garantisce un buon funzionamento ed un buon rendimento
nel tempo. Particolari attenzioni vanno rivolte ai filtri antigrasso metallici e, per le sole
cappe filtranti, ai filtri al carbone attivo.
3.1 - Filtri antigrasso metallici
1 - Pulizia
È necessario lavare con normale detersivo domestico questi filtri al massimo ogni 2
mesi; la loro dimensione compatta consente il lavaggio anche in lavastoviglie.
2 - Smontaggio dei filtri
Togliere un filtro alla volta, sostenendolo al di sotto con una mano e tirando indietro la
maniglia in acciaio inox (fig. 15).
Rimontare facendo attenzione a mantenere la maniglia varso la parte visibile.
3.2 - Filtri in fibra sintetica
1 - Sostituire quando il colore rosso-violaceo dei punti, visibili attraverso la griglia, si è diffu-
so su gran parte della superficie del filtro e, in ogni caso, non oltre 2 mesi di uso.
10
○○○○○○○○○○○○○○○○○○○○○○○○○○○○○○○○○○○○○○○
IT
Page 11

○○○○○○○○○○○○○○○○○○○○○○○○○○○○○○○○○○○○○○○○○○○○○○○
N.B. - Questo filtro non può essere lavato, perchè perderebbe tutte le sue caratteristiche. Il fabbricante declina ogni responsabilità per danni derivanti dall’inosservanza di
questa norma.
2 - Modalità per la sostituzione
- Aprire la griglia (fig. 16a) premendo i tasti U verso la parte posteriore fino a fondo
corsa.
- Ruotare la griglia verso il basso, scanciarla dai perni posteriori con un movimento diagonale (fig. 16b).
- Appoggiare la griglia su un piano e togliere i fermafiltri Q (fig. 16c).
- Sostituire il filtro in modo che i punti colorati siano rivolti verso la griglia.
- Rimontare i fermafiltri e la griglia con il procedimento inverso, avendo cura di verificare
che i ganci metallici comandati dai tasti U siano entrati fino in fondo nella loro sede.
ATTENZIONE - È necessario rispettare i tempi di manutenzione o sostituzione indicati, per evitare un possibile incendio se i filtri sono saturi di grassi.
3.3 - Filtro al carbone attivo
1 - Funzionamento
I filtri al carbone attivo hanno la capacità di trattenere gli odori fino a raggiungere la
saturazione. Non sono lavabili e non sono rigenerabili e vanno pertanto sostituiti almeno
ogni 4 mesi o, più frequentemente per un uso particolarmente intenso.
2 - Sostituzione
Togliere i filtri antigrasso metallici o la griglia di aspirazione, rimuovere i filtri al carbone
attivo posti alle estremità del diffusore girandoli nel verso delle frecce A. Rimontare i
nuovi filtri girandoli nel verso delle frecce B (fig. 17).
3.4 - Illuminazione
È costituita da 1 tubo al neon da 15W, o da 2 lampade da 40W.
Per effettuare una sostituzione operare come segue (fig. 18):
1 - Togliere il terminale metallico T adiacente la scatola comandi. Il vetro rimane agganciato
sulle linguette Z.
2 - Far scorrere il vetro verso la scatola comandi fino a liberare la punta opposta (freccia 1),
quindi tirare leggermente verso il basso (freccia 2) e poi far scorrere in senso inverso a
quello iniziale (freccia 3) fino a liberare totalmente il vetro.
Sostituire le lampade o il neon e rimontare il vetro con sequenza inversa.
3.5 - Pulizia
La pulizia esterna ed interna della cappa deve essere effettuata con l’uso di un panno
umido e detersivo liquido neutro.
Evitare assolutamente l’uso di sostanze abrasive, in particolare sulle superfici di acciaio
inox satinato.
○○○○○○○○○○○○○○○○○○○○○○○○○○○○○○○○○○○○○○○
11IT
Page 12

○○○○○○○○○○○○○○○○○○○○○○○○○○○○○○○○○○○○○○○○○○○○○○○
a
Part 1
INSTALLATION INSTRUCTIONS
1 - GENERAL INFORMATION
This canopy hood is designed to be fixed to any rigid vertical surface, over a gas or
electric hotplate and can be used either in the extraction mode (ducted to the outside) or
in the recirculation mode (internal recycling). Before commencing the installation, consideration should be given to the difficulties to be found during installation and to the bulky
weight of the hood. The installation work must be undertaken by a qualified and competent
person in conformity to the rules concerning the evacuation of contaminated air. The
manufacturer disclaims all liability for any damage or injury caused as a result of not
following the instructions for instal-lation contained in the following text.
2 - COMPONENTS
The cooker hood is made up of the following components (fig 1):
2.1- n. 1 canopy item C, including controls, worktop illumination and fan unit.
2.2- n. 1 telescopic chimney stack formed by:
- n. 1 U-shaped upper section item S
- n. 1 U-shaped lower section item I
2.3- n. 1 evacuation spigot 90x132 item A (only for special executions)
2.4- n. 2 recirculation venting grilles item G
2.5- n. 1 reduction flange Ø 150-120 item K
2.6- n. 1 recirculation spigot item R
2.7- n. 1 deflector item D (only for special executions)
2.8- n. 1 additional recirculation spigot item P (only for special executions, see paragraph 4.4
3 part 1a)
2.9- n. 1 fixing kit including:
- n. 2 wall brackets item 1 to fix the canopy hood
- n. 2 wall brackets item 2 to fix the chimney- rawl, plugs, screws and documentation
2.10 -splashback (optional) item F
Components A, D, P, are enclosed only in appliances which are designed for particular
types of installation.
3 - SAFETY WARNINGS
3.1- When used in the extraction mode the cooker hood ducting must not be connected to
a flue which is used for exhausting fumes from appliances supplied with energy other
than electric such as a central heating flue or water heating flue.
3.2- Before connecting to the mains supply ensure that the mains voltage corresponds
with the voltage on the rating plate inside the hood.
3.3- Connect the cooker hood to the mains via a double pole switch which has 3 mm
clearance between the contacts.
3.4- The appliance must be earthed.
3.5- When istalled, the hood must be positioned at least 65 cm above a cooking appliance.
3.6- Never do flambé cooking under this cooker hood.
3.7- Never leave frying pans unattended during use as overheated fats and oils may catch
fire.
3.8- Before carring out any kind of maintenance or cleaning, disconnect the hood from the
mains supply.
3.9- If the room where the cooker hood is to be used contains a fuel burning appliance
such as a central heating boiler then this must be of the room sealed or balanced flue
12
○○○○○○○○○○○○○○○○○○○○○○○○○○○○○○○○○○○○○○○
GB
Page 13

○○○○○○○○○○○○○○○○○○○○○○○○○○○○○○○○○○○○○○○○○○○○○○○
type. If other types of flue or appliance are fitted en-sure that there is an adequate
supply of air into the room. When the cooker hood is used in conjunction with other
appliances supplied with energy other than electric, the negative pressure in the room
must not exceed 0,04 mbar to prevent fumes being drawn back into the room by the
cooker hood.
4 - INSTALLATION
The cooker hood may be fixed using one of three methods:
A - installation of the cooker hood with splashback (optional);
B - installation of the cooker hood without splashback;
C - installation of the cooker hood aligning the top of the chimney with the top of the adjoining
cabinets.
To avoid accidents when fitting the hood and chimney to the wall please read and carry
out the installation instruction.
For easy installation proceed as follows:
4.1- Fix the wall brackets.
4.2- Fix the canopy hood.
4.3- Connect the hood to the mains supply and ensure that it works properly.
4-4- Set the hood for recirculation or evacuation.
4.5- Fix the telescopic chimney stack.
4.1 - Fixing the wall brackets.
Installation type A/B (fig. 2a-b)
1 - Draw a vertical line on the wall, from the centre of the cooking appliance up to the ceiling,
using a marking pen. This is to ensure the correct vertical alignment of the wall fixing
brackets.
2 - Fixing the wall brackets item 1
Draw a horizontal line on the wall ensuring that the distance from the cooktop is as
follows:
a - when the splasback is to be installed: (fig. 2a) d = 200 mm + H, where H is the height of
the visible part of the splashback; as the splashback can be of different heights, the
correct figure can only be obtained by measuring the actual height of the splashback to
be fitted.
b - without splashback (fig. 2b) d = 850 mm minimum.
Mark on the horizontal line the centres of the two keyholes of the bracket item 1 at a
distance Y = 100 mm between the centres of the holes and the centre of the cooker
hood.
3 - Fixing the wall brackets item 2
a - Place one of the two brackets (item 2 fig. 1) 15 mm from the ceiling or from a horizontal
line drawn between the top of the adjoining wall cabinets, ensuring that the bracket is
level and mark the centres for the keyhole bracket fixing screws.
b - Place the other wall bracket (item 2 fig. 1) on the wall at “X” distance. This measure-
ment should be determined by the height of the upper chimney stack and mark the centres for the keyhole bracket fixing screws.
4 - Pilot drill all the hole positions as marked on the wall using an 8 mm drill and fix the wall
brackets 1-2 using the rawl plugs and screws supplied.
5 - Splashback (optional)
When a splashback is to be fitted, the distance between the cooker hood and the cooking
○○○○○○○○○○○○○○○○○○○○○○○○○○○○○○○○○○○○○○○
13GB
Page 14
○○○○○○○○○○○○○○○○○○○○○○○○○○○○○○○○○○○○○○○○○○○○○○○
appliances will be determined by the height of the splashback, item F. The splashback is
to be installed before installing the canopy. If the splashback is to be fixed to the wall
using both the top and bottom fixing holes care must be taken to ensure that the
splashback is fitted at the correct height before fixing it into position.
The fitting should be undertaken by a a competent person with experience in this type of
installation.
If the splashback is to be fixed through only the top fixing holes proceeds as follows:
a - Put the splashback on the worktop as illustrated in fig. 2a; then holding it against the wall
to ensure that it is correctly positioned mark the holes for the top fixing screws on the
wall.
b - Pilot drill the wall using an 8 mm drill and fix the splashback using the 8 mm rawl plugs
and screws supplied.
c - If the fixing holes in the bottom of the splashback are not to be used to secure the
splashback to the wall the installer should ensure that the bottom edge is tucked down
behind the rear of the worktop.
Installation type C (fig. 3)
This type of installation may be carried out using only the U-shaped lower chimney item
I.
1 - Draw a vertical line on the wall from the centre of the cooking appliance up to the upper
limit which can be represented by a wooden shelf to ensure the correct vertical alignment
of the wall fixing brackets. The measurement X may differ according to the height of the
U-shaped lower chimney. The measurement must correspond to the height of the chimney
I, plus 35 mm.
2 - Fixing the wall brackets item 1
Mark the fixing hole for the brackets on the horizontal line as shown in pragraph 4.1 2.
3 - Fixing the wall brackets item 2
a - Place one of the two wall brackets as shown in paragraph 4.1.3.
b - Mark the centres for the two keyhole fixing bracket screws on the wall.
4 - Pilot drill all the centres using an 8 mm drill and fix the wall brackets 1-2 using the 8 mm
rawl plugs and screws supplied.
4.2 - Fixing the canopy hood (fig. 4)
1 - Hook the canopy hood, item C, onto the wall fixing brackets ensuring the security fixing
screws align with the holes in the centre of the back pa-nel of the cooker hood as illustrated
in fig. 4.
2 - Fit the two regulation screws, item W, of 4Mx25 (supplied) into the keyholes of the wall
brackets
3 - The canopy can be aligned or adjusted in height by using the two adjustement screws
item W.
4.3 - Electrical connection and working test
1 - The safety measures 3.2, 3.3 and 3.4 of paragrapf 3 are to be strictly observed.
2 - Once the electrical connection has been com-pleted, check that worktop illumination,
motor and speed work properly.
4.4 - Ducting or Recirculation fitting
1 - Ducting fitting (installation type A/B)
a - The cooker hood can be ducted to the outside using either rigid or flexible fire retardant
14
○○○○○○○○○○○○○○○○○○○○○○○○○○○○○○○○○○○○○○○
GB
Page 15

○○○○○○○○○○○○○○○○○○○○○○○○○○○○○○○○○○○○○○○○○○○○○○○
ducting of 120 or 150 mm. The choice is left to the installer. When 120 mm ducting is to
be used it will be necessary to install the reduction flange item K on the air outlet fig. 5.
The installer should provide suitable ducting and sealing material for the installation.
The cooker hood can also be ducted to the outside through one of the rectangular openings located in either side of the lower section of the chimney stack. In this case the
deflector (item D) should be fitted into the spigot (item R) to close the aperture which is
not used (fig. 7).
c - If the hood is provided with the charcoal filters fitted, the filters should be removed.
.
2 - Ducting connection (Installation type C)
This type of installation allows the connection of the cooker hood to the outside by 90x132
mm rectangular pipes using only the U-shaped lower chimney item I (fig. 3).
a - Pilot drill a 120 mm hole in the shelf placed above the hotplate.
b - Connect the air outlet collar to the ducting spigot A.
c - Connect the ducting spigot item A to the outside using the 90x132 mm rectangular pipe.
The installer should ensure that the ducting material is available.
d - Remove the charcoal filters (see paragraph 3.3 2 part 2a).
3 - Recirculation fitting (only installation type A/B)
a - When the hood is installed in the recircu-lation mode, the air is recirculated into the
kitchen through the two venting grilles located on either side of the lower U-shaped
chimney. The two grilles can be positioned in either a lower or upper position as illustrated in fig. 8 and 9.
b - Lower position (fig. 8): fit the recirculation spigot item R into the round outlet on top of the
canopy while pressing down on the spigot until it snaps into position.
c - Upper position (fig. 9): fit the additional spigot, item P, into the round outlet on top of the
canopy while pressing down on the spigot until it snaps into position. Then fit the
recirculation spigot R into the top of the spigot, item P, and install the charcoal filters
inside the canopy as instructed in paragraph 3.3 2 part 2a).
Nota: The two venting grilles must not be fitted into the chimney stack until the chimney
stack has been installed onto the wall above the canopy.
4.5 - Fitting the telescopic chimney stack
1 - Installation type A/B (fig. 10)
a - To fit the upper section item S first expand the chimney slightly to allow it to fit over the
wall brackets (item 2 fig. 1) and then secure the upper section using the 4 screws supplied.
b - The lower section item I of the chimney stack should be fitted as above paying attention
to fit the lower part of the section into the recess in the top of the canopy hood (see close
up 10).
2 - Installation type C (fig. 11)
To fit the lower section expand the chimney slightly to allow it to fit over the wall brackets,
item 2 and then secure the lower section using the 4 screws supplied.
ATTENTION: Should the U-shaped lower chimney subsequently be removed. the
two fixing lugs which fit into the top of the canopy must be unhooked, as illustrated
in fig. 12.
3 - Once the chimney stack has been installed, fit the two venting grilles into the apertures
located on either side of the lower chimney section. The grilles are marked with two
arrows and should be fitted with one arrow pointing upwards and the other toward the
front . When the hood is used in the recirculation mode ensure that the grilles are
properly secured to the recirculation spigot item R, as illustrated in fig. 13.
○○○○○○○○○○○○○○○○○○○○○○○○○○○○○○○○○○○○○○○
15GB
Page 16

○○○○○○○○○○○○○○○○○○○○○○○○○○○○○○○○○○○○○○○○○○○○○○○
a
Part 2
OPERATION AND MAINTENANCE INSTRUCTIONS
1 - Safety warnings
It is most important that all the warnings shown in paragraph 3 of the Installation
Instructions are strictly observed. Moreover, pay special attention to the following warnings during the use and maintenance of the cooker hood:
1.1- The grease filters and the charcoal filter should be cleaned or replaced as recommended by the manufacturer or more frequently if the hood is used consistently over 4
hours per day.
1.2- When using a gas hob in connection with the cooker hood never leave the burners of
the hob uncovered while the hood is in use or when the pans have been removed.
Switch off the gas before removing the pan, or for just short periods and never leave
the hob unattended.
1.3- Always ensure that the flame is kept at the correct intensity to prevent the flame from
licking round from the bottom of the pan; this will save energy and will avoid a dangerous concentration of heat.
1.4- Always ensure that the appliance is used in accordance with the manufacturer’s instructions for the removal of contaminated air and odours during cooking.
1.5- To replace the mains cable, please contact your nearest After Sales Service.
2 - OPERATION
Control panel (fig. 14)
The cooker hood can be operated as follows:
SWITCH L = controls the worktop illumination;
SWITCH M = controls the power to the motor;
SWITCH V = controls the fan speed:
Position 1 = low speed, should be selected when simmering or using only one
pan; the noise level is kept to the minimun.
Position 2 = medium speed, should be selected for normal cooking. This speed
offers the best ratio between air capacity and noise level.
Position 3 = top speed, should be selected when frying or cooking food with
strong odours, even for a long period.
3 - MAINTENANCE
Regular maintenance and cleaning will ensure good performance and reliability, while
extending the working life of the hood. Special attention should be paid to the grease
filters and to the charcoal filters when the hood is used in the recirculation mode.
3.1 - Metal grease filters
1 - Cleaning
The metal grease filter should be cleaned every two months with normal usage and can
be cleaned in a dishwasher or by hand using a mild detergent or liquid soap.
2 - Replacement
The metal grease filter panels are easily removed, one at a time, by applying slight
inward pressure to the actuators to release the securing bolts (fig. 15). Care should be
taken to support the filter with one hand while releasing the securing bolts with the other
hand. The filter panels should be refitted with bolt side facing downwards.
16
○○○○○○○○○○○○○○○○○○○○○○○○○○○○○○○○○○○○○○○
GB
Page 17

○○○○○○○○○○○○○○○○○○○○○○○○○○○○○○○○○○○○○○○○○○○○○○○
3.2 - Thin synthetic filter
On certain models the metal grease filters are replaced with a lower grille panel containing
a paper grease filter with saturation indicators.
1 - The paper filter visible through the perforated metal grille cannot be washed and should
be replaced when the violet colour of the dots has spread over the whole surface and, in
any case, not later than every 2 months. The manufacturer declines any liability for
any injury or damage caused as a result of not following this instruction.
2 - Replacement
- To remove the filter for subsequent replacement first open the metal grille panel (fig.
16a) by pressing back on the two slide catches towards the rear wall which will allow the
grille panel to open and hinge downward from the rear.
- To remove the metal grille panel slide the right hand edge forward until the hinge pin
comes away from the recess in the side casing as illustrated in fig 16b.
- The filter is easily removed from the grille by pushing the wire clips to one side and
removing as illustrated in fig. 16c.
- Replace the filter ensuring that the saturation indicators face downwards.
- Replace the wire clips and metal grille panel by reversing the operation ensuring that
the lower grille is securely fastened to the casing. ATTENTION - THERE COULD BE
A POSSIBLE FIRE HAZARD IF THE FILTERS ARE NOT REPLACED ACCORDING
TO THESE INSTRUCTIONS.
3.3 - Charcoal filters
1 - Functioning
In the recycling mode the charcoal filters absorb smells and odours. This hood is designed
to be fitted with two charcoal filters on both sides of the fan unit (fig. 17). The charcoal
filter cannot be washed and should be replaced at least every 4 months or more frequently
if the hood is used consistently.
2 - Replacement
To remove the charcoal filters place on hand on one filter at a time and turn it toward the
front part. The charcoal filter can now be removed. Always ensure to replace both filters
at the same time.
3.4 - Worktop illumination
A 15W fluorescent strip lamp or two 40W lamps ensure the illumination of the worktop.
To replace the strip lamp or the lamps operate as follows as illustrated in fig. 18:
Remove the lighting diffuser by unscrewing the screw in the metal clip (item T) near the
control box. The glass diffuser is kept in position by the retaining lugs (item Z). Pull the
glass diffuser slightly down as shown by arrow 2, then slide the glass backwards as
directed by arrow 3, until the glass diffuser can be removed. When changing the lamps
or the fluorescent strip lamp, an identical replacement must be fitted to ensure the safe
working of the cooker hood. To refit the glass diffuser, reverse the operation.
3.5 - Cleaning
The metal work, both inside and outside, should be cleaned regularly by using a mild
household detergent or liquid soap.
Care should be taken not to use abrasive cleaning materials, especially when cleaning
stainless steel surfaces.
○○○○○○○○○○○○○○○○○○○○○○○○○○○○○○○○○○○○○○○
17GB
Page 18

○○○○○○○○○○○○○○○○○○○○○○○○○○○○○○○○○○○○○○○○○○○○○○○
1ère Partie INSTRUCTIONS POUR L’INSTALLATION
1 - GENERALITES
Cette hotte est destinée à être installée au mur, au dessus d’un plan de cuisson. Elle
peut être utilisée en version évacuation (raccordement extérieur) ou recyclage (recyclage
interne). A cause de la complexité e du poids de l’ap-pareil il est préférable que l’installation
soit effectuée par un spécialiste tout en respectant les prescriptions des autorités
concernant l'évacuation de l'air. La responsabilité du producteur ne saurait être engagée
pour tout incident ou accident provoqué par une installation défectueuse.
2 - COMPOSANTS
La hotte se compose de (fig. 1):
2.1- n. 1 corps de hotte complet avec commandes, éclairage et groupe d’aspiration.
2.2- n. 1 cheminée téléscopique composée de:
n. 1 demi-cheminée supérieure S
n. 1 demi-cheminée inférieure I
2.3- n. 1 raccord aspirant 90x132 A (seulement pour des exécutions spéciales)
2.4- n. 2 grilles directionnelles G
2.5- n. 1 buse de réduction Ø 150-120 K
2.6- n. 1 raccord filtrant R
2.7- n. 1 déflecteur D (seulement pour des exécutions spéciales)
2.8- n. 1 prolongateur filtrant P (seulement pour des exécutions spéciales, voir paragraphe
4.4 3 1ère partie)
2.9- n. 1 sachet contenant:
n. 2 brides 1 pour fixer le corps de hotte
n. 2 brides 2 pour fixer la cheminée vis, chevilles et documentation.
2.10 -n. 1 panneau mural F (en option)
Les composants A, D, P sont livrés seulement pour appareils qui sont prévus pour des
types d’installation particuliers.
3 - CONSEILS CONCERNANT LA SECURITE
3.1- N’utilisez jamais pour le raccordement une cheminée servant de conduit de fumée
(chaudières, cheminées, etc...).
3.2- Vérifiez que la tension du secteur soit identique aux valeurs indiquées sur la plaquette
signalétique figurant à l’intérieur de la hotte.
3.3- Reliez la hotte au réseau en interposant un interrupteur bipolaire avec ouverture des
contacts de 3 mm au moins.
3.4- Assurez-vous que l’installation éléctrique de votre logement ait une mise à la terre
correcte.
3.5- La distance de sûreté minimum entre le plan de cuisson et la hotte est de 65 cm.
3.6- Il est interdit de faire flamber des préparations sous la hotte.
3.7- Lorsque des fritures sont effectuées sous la hotte en fonctionnement, elles doivent
faire l’objet d’une surveillance permanente: l’huile surchauffée pourrait s’enflammer.
3.8- Avant d’effectuer le nettoyage ou l’entretien de la hotte, débranchez l’appareil ou
agissez sur l’interrupteur omnipolaire de votre installation.
3.9- Une ventilation convenable de la pièce doit être prévue si une hotte de cuisine et des
appareils alimentés par une énergie autre que l’énergie électrique évacuent les fumées
simultanément. Une utilisation sans dangers est possible si la dépression maximum
qui se crée dans la pièce est inférieure à 0,04 mbar, ce que évite un retour des gaz
de décharge dans la pièce.
18
○○○○○○○○○○○○○○○○○○○○○○○○○○○○○○○○○○○○○○○
FR
Page 19

○○○○○○○○○○○○○○○○○○○○○○○○○○○○○○○○○○○○○○○○○○○○○○○
4 - INSTALLATION
La hotte peut être installée de trois façons diffé-rentes:
A - installation de la hotte avec panneau mural (en option);
B - installation de la hotte sans panneau mural;
C - installation de la hotte en version évacuation, avec cheminée alignée à l’extremité
supérieure des armoires.
Pour éviter un décrochement accidentel de la hotte il est indispensable d’installer
la cheminéee en suivant strictement les instructions.
Respectez l’ordre des opérations suivantes:
4.1- Montage des brides de support
4.2- Montage du corps de hotte
4.3- Raccordement électrique et contrôle fonctionnel
4.4- Connexion évacuation ou recyclage
4.5- Montage de la cheminée téléscopique.
4.1 - Montage des brides de support.
Installation type A/B (fig. 2a-b)
1 - Tracer sur le mur une ligne verticale jusqu’au plafond, au centre de l’endroit prévu pour
le montage de la hotte: elle sert pour efffectuer l’alignement vertical des différentes parties.
2 - Positionnement des brides 1:
Tracez une ligne horizontale à une distance du plan de cuisson de:
a - avec panneau (fig. 2a) d = 200 mm + H, où H = hauteur en mm de la partie visible du
panneau. Cette cote, à cause des différents types de panneaux disponibles, doit être
mesurée directement sur le panneau en dotation.
b - sans panneau (fig. 2b) d = 850 mm mini-mum. Marquez sur la ligne horizontale les trous
pour fixer les brides 1 à une distance Y = 100 mm entre le centre des deux trous et le
centre de la hotte.
3 - Positionnement des brides 2
a - Placez une des brides 2 sur le mur à environ 1 ou 2 mm du plafond ou de la limite
supérieure en alignant son centre sur la ligne verticale.
b - Marquez sur le mur les deux boutonnières de la bride.
c - Placez l’autre bride 2 sur le mur, en l’alignant à la ligne verticale, à une distance X
mesurée comme dans la fig. 2, identique à la hauteur de la demi-cheminée supérieure S
en dotation avec la hotte. La cote X peut avoir différentes valeurs, selon la hauteur de la
demi-cheminée supérieure
d - Marquez sur le mur les centres des boutonnières de la bride.
4 - Percez les centres marqués avec un foret Ø 8 mm. Fixez les brides 1 - 2 à fond, en
utilisant les chevilles Ø 8 mm et les vis fournies avec l’appareil.
5 - Panneau mural (en option)
La hauteur de la hotte du plan de cuisson est déterminée dans ce cas par la hauteur du
panneau F et par l’éventuelle hauteur du bord arrière du plan de la base. Le panneau
doit être monté avant de monter le corps de hotte et, si on veut le fixer au mur soit en
haut qu’en bas, il est nécessaire de le monter à la juste hauteur, avant de monter la
base ou du moins le plan supérieur. A cause de la complexité de l’ opération, il est
préférable que l’installation soit effectuée par un spécialiste ou par une personne
compétente qui connaisse les dimensions finales des meubles
En se limitant seulement à la fixation en haut respectez l’ordre des opérations suivantes:
○○○○○○○○○○○○○○○○○○○○○○○○○○○○○○○○○○○○○○○
19FR
Page 20

○○○○○○○○○○○○○○○○○○○○○○○○○○○○○○○○○○○○○○○○○○○○○○○
a - Mettez le panneau sur le plan de la base comme à la fig. 2a, placez-le contre le mur et
centrez-le par rapport à la base.
b - Marquez sur le mur les centres des deux trous supérieurs.
c - Percez les centres marqués avec un foret Ø 8 et fixez le panneau en utilisant les chevilles
Ø 8 et les vis en dotation.
d - l’éventuelle stabilisation de la partie inférieure, si nécessaire, est laissée à l’installateur.
Installation type C (fig. 3)
Ce type d’installation peut être effectué en utilisant seulement la demi-cheminée inférieure
I.
1 - Tracez sur le mur une ligne verticale au centre de l’endroit prévu pour le montage de la
hotte jusqu’à la limite supérieure représentée par une planche en bois: elle sert pour
l’alignement vertical des parties. Tracez une ligne horizontale à une distance X du bord
inférieur de la planche. La cote X peut avoir des valeurs différentes selon les dimensions de la demi-cheminée et correspond à la hauteur de la demi-cheminée I + 35 mm.
2 - Positionnement des brides 1
Marquez sur la ligne horizontale les trous pour fixer les brides comme indiqué au
paragraphe 4.1 2.
3 - Positionnement des brides 2
a - Placez une des brides 2 sur le mur à environ 1 ou 2 mm de la planche, en alignant son
centre sur la ligne verticale.
b - Marquez sur le mur les deux boutonnières de la bride.
4 - Percez les centres marqués avec un foret Ø 8 mm. Fixer à fond les brides en utilisant les
chevilles Ø 8 et les vis en dotation.
4.2 - Montage du corps de hotte (fig. 4).
1 - Accrochez le corps de hotte C aux brides 1.
2 - Insérez les deux vis de réglage W 4Mx25 (fournies) dans les trous des brides 1.
Réglez verticalement et nivelez horizontalement la hotte en utilisant les vis W.
4.3 - Raccordement électrique et contrôle fonctionnel.
1 - Il est nécessaire de respecter scrupuleusement les conseils 3.2, 3.3, 3.4 du paragraphe
3 concernant la sécurité.
2 - Le raccordement électrique effectué, vérifiez le bon fonctionnement de l’éclairage, du
moteur et du changement des vitesses d’aspiration.
4.4 - Connexion évacuation ou recyclage
1 - Connexion évacuation (installation type A/B)
a - La hotte peut être branchée à un conduit extérieur, à travers un tuyau rigide ou flexible
de Ø 120 ou 150 mm; le choix est laissé à l’installateur. Pour installer un tuyau Ø 120, il
est nécessaire d’insérer la buse de réduction K sur la sortie du diffuseur (fig. 5).
b - Fixez la buse de sortie de l’air au conduit d’évacuation extérieur en utilisant le tuyau
rigide ou flexible à fixer avec des colliers. Le matériel nécessaire pour cette dernière
opération doit être réperé par l’installateur (fig. 6). Si l’on désire installer la hotte en
version évacuation avec sortie latérale sur la cheminée inférieure I à travers des tuyaux
rectangulaires, il est nécessaire d’insérer le déflecteur D dans le raccord R pour boucher
le trou non utilisé (fig. 7).
c - Retirez les éventuels filtres à charbon actif (voir par. 3.3 2 partie 2a).
20
○○○○○○○○○○○○○○○○○○○○○○○○○○○○○○○○○○○○○○○
FR
Page 21

○○○○○○○○○○○○○○○○○○○○○○○○○○○○○○○○○○○○○○○○○○○○○○○
2 - Connexion évacuation (Installation type C)
Ce type d’installation permet de relier la hotte à un conduit d’évacuation extérieur en
utilisant des tuyaux rectangulaires à dimensions 90x132, en utilisant seulement la demicheminée inférieure I (fig. 3).
a - Percez un trou de 120 mm Ø dans la planche placée entre les deux armoires.
b - Reliez la buse de réduction au raccord aspirant A.
c - Reliez le raccord aspirant A au conduit d’évacuation extérieur, en utilisant le tuyau
rectangulaire 90x132. Le matériel nécessaire doit être réperé par l’installateur.
d - Retirez les éventuels filtres à charbon actif (voir paragraph 3.3 2 partie 2a).
3 - Connexion recyclage (seulement pour installations type A/B)
a - L’air filtré est evacué dans la pièce à travers les deux grilles latérales directionnelles pla-
cées sur la demi-cheminée inférieure I, dont la position, pour différentes exigeances, est
caracterisée par deux différentes hauteurs (fig. 8 e 9).
b - Position basse (fig. 8): reliez le raccord fil-trant R directement à la sortie ronde du dif-
fuseur, en le poussant vers le bas.
c - Position haute (fig. 9): reliez le prolongateur P à la sortie ronde du diffuseur et appliquez
de la même façon le raccord R sur le prolongateur P.
d - Ajoutez les éventuels filtres à charbon actif à l’intérieur du corps de hotte (voir para-
graphe 3.3 2 partie 2a).
Nota: N’appliquez pas encore les petites grilles directionnelles; cette opération doit être
effectuée en fin de montage.
4.5 - Montage de la cheminée téléscopique
1 - Installation type A/B (fig. 10)
a - Pour appliquer la demi-cheminée supérieure S, élargissez légèrement les deux pans
latéraux, accrochez-les derrière les brides 2 et refermez-les jusq’à la butée. Fixez la
demi-cheminée aux brides 2 en utilisant quatre vis fournies.
b - Appliquez de la même façon la demi-cheminée inférieure I entre la bride inférieure 2 et le
mur, en tenant compte que à la base, il est nécessaire d’insérer le périmètre de la demicheminée dans le logement spécial du corps de hotte et de l’accrocher aux languettes
latérales (voir agrandissement).
2 - Installation type C (fig. 11)
Appliquez la demi-cheminée inférieure I en élargissant légèrement les deux pans latéraux,
accrochez-les derrière la bride 2 et refermez-les jusq’à la butée, en tenant compte que à
la base, il est nécessaire d’insérer le périmètre de la demi-cheminée dans le logement
spécial du corps de hotte et de l’accrocher aux languettes latérales.
ATTENTION - En cas de démontage de la demi-cheminée inférieure, les deux
languettes latérales placées à l’intérieur du corps de hotte doivent être decrochées
(fig. 12).
3 - Encliquetez les deux petites grilles dans leur logement de façon à ce que le symbole
soit orienté vers le haut et le symbole vers le devant.
En outre, pour les versions recyclage, vérifiez que les grilles s’insèrent correctement à
l’intérieur du raccord filtrant R (fig. 13).
○○○○○○○○○○○○○○○○○○○○○○○○○○○○○○○○○○○○○○○
21FR
Page 22

○○○○○○○○○○○○○○○○○○○○○○○○○○○○○○○○○○○○○○○○○○○○○○○
2ème Partie INSTRUCTIONS POUR L’UTILISATION ET L’ENTRETIEN
1 - CONSEILS CONCERNANT LA SECURITE
Il est absolument nécessaire de respecter tous les avertissements du paragraphe 3 de
la première partie - Instructions pour l’installation. En outre, il est très important de
faire attention, lors de l’utilisation et de l’entretien, aux avertissemnets suivants:
1.1- Effectuez un scrupuleux et régulier entretien des filtres à graisses et à charbon actif,
selon les intervalles conseillées par le fabricant, ou, plus souvent, pour une utilisation
particulièrement intense (plus de 4 heures par jour).
1.2- Ne laissez jamais des flammes libres à forte intensité sous la hotte en fonctionnement:
en retirant les marmites, éteignez la flamme ou du moins, pour de courtes périodes et
sous surveillance, tenez-la au minimum.
1.3- Réglez toujours la flamme de façon à eviter une fuite latérale de la même par rapport
au fond des marmites: vous économisez de l’énergie et vous évitez de dangereuses
concentrations de chaleur.
1.4- N’utilisez jamais incorrectement votre appareil, qui est destiné uniquement à abattre
les odeurs dans la cuisine.
1.5- Pour remplacer le cable d’alimentation, adressez-vous au Service après vente le plus
proche.
2 - UTILISATION
Groupe des commandes (fig. 14)
Le schéma des commandes est le suivant:
TOUCHE L = mise en fonctionnement et arrêt de l’éclairage
TOUCHE M = mise en marche et arrêt du moteur
TOUCHE V = choix de la vitesse d’aspiration:
1 = Vitesse minimum: pour ventiler la pièce, particulièrement
silencieuse, pour les plats émettant peu de vapeurs.
2 = Vitesse moyenne: en conditions normales, étant donné le rapport
optimal entre la capacité de dépuration et le niveau de bruit.
3 = Vitesse maximum: en cas de forte concentration d’odeurs et de
vapeurs, même pour de longues périodes.
3 - ENTRETIEN
Un entretien régulier de votre hotte est la garantie d’un bon fonctionnement et d’un bon
rendement. Des attentions particulières sont à adresser aux filtres à graisses métalliques
et, pour les seules hottes filtrantes, aux filtres à charbon actif.
3.1 - Filtres à graisses métalliques
1 - Nettoyage
Lavez ces filtres avec un produit détergent du commerce au maximum tous les deux
mois. Grâce à leur dimension compacte vous pouvez également les laver dans votre
lave-vaisselle.
2 - Démontage des filtres
Enlevez un filtre à la fois en le soutenant avec une main et en agissant sur le verrou (fig.
15).
22
○○○○○○○○○○○○○○○○○○○○○○○○○○○○○○○○○○○○○○○
FR
Page 23

○○○○○○○○○○○○○○○○○○○○○○○○○○○○○○○○○○○○○○○○○○○○○○○
3.2 - Filtres synthétiques
1 - Ces filtres sont équipés de points violets, témoins de saturation:
Les filtres doivent être changés lorsque ces points, visibles à travers la grille d’aspiration,
s’étalent sur toute la surface, ou, au plus tard, tous les deux mois.
ATTENTION: L’accumulation des graisses dans les filtres peut nuire au rendement
de votre appareil et provoquer des risques d’incendie. Le fabricant décline toute
responsabilité dans le cadre d’un entretien pas conforme aux instructions.
2 - Remplacement des filtres
- Décrochez la grille d’aspiration (fig. 16a) en poussant vers l’arrière sur les verrous U.
- Pivotez la grille vers le bas jusq’à la décrocher (fig. 16b).
- Placez la grille sur un plan et ôtez les arrêts métalliques Q comme indiqué à la fig. 16c.
- Remplacez le filtre de façon à ce que les points violets se trouvent du côté visible.
- Remontez les arrêts en inversant les opérations et assurez-vous que les crochets soient
bien placés dans leur logement.
ATTENTION: Afin d’éviter des risques d’incendie provoqués par une accumulation de
graisse dans les filtres, il est nécessaire de respecter les conseils d’entretien et de remplacement.
3.3 - Filtres à charbon actif
1 - Fonctionnement
Les filtres à charbon actif ont la capacité de retenir les odeurs jusqu’à saturation. Ils ne
sont pas lavables et ne peuvent être régénérés; par conséquence, ils doivent être changés
tous les quatre mois ou plus souvent, selon la fréquence d’utilisation.
2 - Remplacement
Enlevez les filtres à graisses métalliques ou la grille d’aspiration, ôtez les filtres à charbon
actif placés aux bouts du diffuseur métalliques en les tournant en sens inverse à celui
des aiguilles d’une montre. Remontez les nouveaux filtres en les tournant dans le sens
des aiguilles d’une montre (fig. 17).
3.4 - Eclairage
Il est constitué par 1 tube néon de 15W ou par 2 lampes de 40W.
Pour changer le tube, procédez comme suit (fig. 18):
a - Otez les réglettes de fixation T se trouvant près des commandes. Le verre reste en place
sur les brides Z.
b - Faites coulisser le verre vers les commandes (flèche 1). Tirez ensuite légèrement vers le
bas (flèche 2), puis faites coulisser en sens inverse par rapport à celui initial (flèche 3)
jusqu’à libérer le verre complètement.
c - Changez la lampe ou le tube néon et replacez le verre en sens inverse.
3.5 - Nettoyage
Nettoyez l’extérieur et l’intérieur de la hotte avec un chiffon humide et du détergent doux.
N’utilizes jamais de produits abrasifs, en particulier sur les surfaces en acier inox.
○○○○○○○○○○○○○○○○○○○○○○○○○○○○○○○○○○○○○○○
23FR
Page 24

○○○○○○○○○○○○○○○○○○○○○○○○○○○○○○○○○○○○○○○○○○○○○○○
Teil 1 MONTAGEHINWEISE
1 - ALLGEMEINES
Diese Dunstabzugshaube ist zur Wandmontage über einem Kochfeld vorgesehen. Die
Haube kann als Umluft- oder Abluft-Haube verwendet werden. Wegen des beträchtlichen
Eigengewichtes des Gerätes empfiehlt es sich, die Anbringung von geschultem Personal durchführen zu lassen, wobei alle behördlichen Bestimmungen über Luftableitung zu
beachten sind. Für Schäden, die durch nicht vorschriftsmäßige oder unsachgemäße
Anbringung verursacht werden, lehnt der Hersteller jegliche Haftung ab.
2 - BAUELEMENTE
Die Dunstabzugshaube besteht aus folgenden Einzelkomponenten (Abb. 1):
2.1- 1 Haubenkörper mit Schaltern, Beleuchtung und Gebläsegruppe
2.2- 1 Teleskopkamin bestehend aus:
1 oberes Halbrohr S
1 unteres Halbrohr I
2.3- 1 Abluftadapter 90x132 A (nur für Sonder-ausführungen)
2.4- 2 gerichtete Luftgitter G
2.5- 1 Verkleinerungsflansch Ø 150-120 K
2.6- 1 Umluftadapter R
2.7- 1 Verschluß für seitlichen Luftabgang D (nur für Sonderausführungen)
2.8- 1 Umluftverlängerung P (nur für Sonder-ausführungen, siehe Abschnitt 4.4 3 - Teil 1)
2.9- 1 Polybeutel mit:
2 Wandbleche 1 zur Befestigung des Haubenkörpers
2 Wandbleche 2 zur Befestigung des Kamines Schrauben, Dübel und Unterlagen
2.10 -1 Rückwand F (wahlweise)
Bestandteile A, D, P, werden nur blei Geräte die für besondere Installationsorten vorgeschon sird, beigelegt.
3 - SICHERHEITSHINWEISE
3.1- Die Dunstesse nicht an Rauch- oder Abgaskamine anschließen, die noch für offene
Feuerstellen benutzt werden. Bei der Ableitung von Abluft sind die behördlichen
Bestimmungen zu beachten. Gegebenenfalls ist der zuständige Schornsteinfeger-Meister
zu befragen.
3.2- Es ist sicherzustellen, daß die Netzspannung den Anschlußwerten auf dem Typenschild
im Inneren der Dunstesse entspricht.
3.3- Es muß gewährleistet sein, daß nach erfolgter Montage des Gerätes der
Schutzkontaktstecker erreichbar ist, andernfalls ist bei direktem Anschluß der Dunstesse
ein zweipoliger Schalter, mit einem Öffnungsweg von mindestens 3 mm für jeden Pol,
zwischenzuschalten.
3.4- Es ist sicherzustellen, daß die Wohnung über eine vorschriftsmäßige Erdung verfügt.
3.5- Der Sicherheitsabstand zwischen Kochstelle und Dunstesse soll mindestens 65cm
betragen.
3.6- Das Flambieren unter der Dunstesse ist zu unterlassen. Achtung Brandgefahr!
3.7- Frittiergeräte, die unter der Dunstesse betrieben werden, sind während der gesamten
Betriebsdauer zu beaufsichtigen. Achtung: Brandgefahr!
3.8- Die Filter dieser Dunstabzugshaube müssen in regelmäßigen Zeitabständen gereinigt
oder erneuert werden. Fettgetränkte Filter sind leicht brennbar: Daher ist der in dieser
Anleitung unter der Rubrik “Wartung” angegebene Reinigungsrhythmus unbedingt
24
○○○○○○○○○○○○○○○○○○○○○○○○○○○○○○○○○○○○○○○
DE
Page 25

○○○○○○○○○○○○○○○○○○○○○○○○○○○○○○○○○○○○○○○○○○○○○○○
einzuhalten.
3.9- Vor jedem Reinigungsvorgang, vor dem Filterwechsel und vor Instandsetzungsarbeiten
ist entweder der Gerätestecker aus der Steckdose zu ziehen, der Hauptschalter (allpolig)
abzuschalten oder die Sicherung herauszudrehen.
3.10-Wenn in dem Raum außer der Haube andere, nicht elektrisch betriebene Geräte (z.B.
Gas, Ölöfen) betrieben werden, muß für ausreichende Lüftung (Zuluft) gesorgt werden.
Bitte in diesem Zusammenhang den folgenden Absatz besonders beachten. Wichtiger
Hinweis für den Abluftbetrieb. Bei gleichzeitigem Betrieb einer Dunstab-zugshaube
und einer raumluftabhängigen Feuerstätte (wie z.B. Gas-, Öl-, oder kohlebetriebene
Heizgeräte, Durchlauferhitzer, Warmwasserbereiter) ist Vorsicht geboten, da beim
Absaugen der Luft durch die Dunstabzugshaube dem Aufstellraum die Luft entnommen
wird, die die Feuerstätte zur Verbrennung benötigt. Ein gefahrloser Betrieb ist möglich,
wenn bei gleichzeitigem Betrieb von Haube und raumluftabhängiger Feuerstätte ein
Unterdruck von höchstens 0,04mbar erreicht wird und damit ein Rücksaugen der
Feuerstättenabgase vermieden wird. Dies kann erreicht werden, wenn durch nicht
verschließbare Öffnungen, z.B. in Türen, Fenstern, Zuluft/Abluftmauerkästen oder andere
technische Maßnahmen, wie gegenseitige Verrieglung o.ä., die Verbrennungsluft
nachströmen kann. Anmerkung: Bei der Beurteilung muß immer der gesamte
Lüftungsverbund der Wohnung beachtet werden. Bei Betrieb von Kochgeräten, z.B.
Kochmulde und Gasherd wird diese Regel nicht angewendet. Im Zweifelsfalle muß der
zuständige Schornsteinfegermeister zu Rate gezogen werden.
4 - MONTAGE DES GERÄTES
Die Haube kann auf drei verschiedene Arten an der Wand befestigt werden:
A - Montage der Haube mit Rückwand (wahlweise)
B - Montage der Haube ohne Rückwand
C - Montage der Haube in Abluftversion mit Ausri-chtung des Kamines am Oberteil der Hän-
geschränke. In jedem Fall ist es notwenig, den Kamin wie beschrieben zu installieren,
um ein zufälliges Herunterfallen der Haube zu vermeiden.
Zur Erleichterung der Montage sollte nachstehendes Schema beachtet werden:
4.1- Anbringung der Haltebügel
4.2- Montage des Haubengehäuses
4.3- Elektrischer Anschluß und Funktionskontrolle
4.4- Anschluß für Abluft- oder Umluftbetrieb
4.5- Montage des teleskopierbaren Kamines
4.1 - Montage der Haltebügel
Installation Typ A/B (Abb. 2a-b)
1 - Festlegung der Gerätemitte (von der Kochfeldmitte aus festzustellen) und Anzeichnung
einer lotrechten Hilfslinie an der Wand, wonach die verschiedenen Teile senkrecht
ausgerichtet werden können.
2 - Anbringung der Wandbleche 1
Anzeichnung einer waagerechten Linie mit einem Abstand vom Kochfeld von:
a - Bei Verwendung eines Rückwandpaneels (Abb. 2a) d = 200 mm + H, wobei H die Höhe
in mm des sichtbaren Teils des Rückwandpaneels bedeutet. Da Rückwandpaneele in
verschiedenen Höhen existieren, wird das erforderliche Maß direkt gemäß dem der
Lieferung beigefügten Rückwandpaneel ermittelt.
b - ohne Rückwand (Abb. 2b) d = 850 mm mindestens. Die Mitte der beiden Bohrlöcher zur
Befestigung der Wandbleche 1 werden auf der waagerechten Linie mit einem Abstand Y
○○○○○○○○○○○○○○○○○○○○○○○○○○○○○○○○○○○○○○○
25DE
Page 26

○○○○○○○○○○○○○○○○○○○○○○○○○○○○○○○○○○○○○○○○○○○○○○○
von 100 mm zwischen der Achse der Bohrlöcher und der Haubenmitte markiert.
3 - Anbringung der Wandbleche 2
a - Eines der beiden Wandbleche 2 wird etwa 1-2 mm von der Decke oder oberen Be-
grenzung an der Wand angelegt, ausgelotet und in waagerechte Position gebracht.
b - Der jeweilige Mittelpunkt der ösenförmigen Bohrlöcher des Wandbleches wird auf der
Wand markiert.
c - Das andere Wandblech 2 wird an der Wand angehalten, ausgelotet und in waagerechte
Po-sition gebracht. Das Maß für den Abstand X wird nach Abb. 2 und durch Ausmessen
des mitgelieferten Teleskophalbrohres ermittelt. X entspricht der Länge dieses
Teleskopteiles, welches unterschiedlich lang sein kann.
d - Der jeweilige Mittelpunkt der ösenförmigen Bohrlöcher wird auf der Wand markiert.
4 - Mit einem Bohrer Ø 8 mm werden die markierten Mittelpunkte gebohrt. Unter Verwendung
der mitgelieferten Schrauben und Dübel 8 mm Ø werden die Wandbleche 1-2 fest
verankert.
5 - Rückwandpaneel (wahlweise)
Der Abstand der Haube vom Kochfeld wird bestimmt von der Höhe des Rückwandpaneels
F und des eventuell anzubringenden Aufsatzes an der Arbeitsplatte. Das Rückwandpaneel
wird vor der Anbringung der Haube montiert. Wenn man das Rückwandpaneel an dem
oberen und unteren Rand mit der Wand verschrauben will, ist es erforderlich, dieses auf
der gewünschten Höhe auszurichten, bevor der Unterschrank oder zumindest die
Arbeitsplatte montiert wird. Dieser Vorgang bedarf einer genauen Maßfeststellung und
sollte von entsprechend geschulten Personen vorgenommen werden. Wenn man sich
auf die obere Befestigung des Paneels beschränken will, ist wie folgt vorzugehen:
a - Rückwandpaneel auf der Arbeitsplatte auf-stützen, an die Wand drücken und an der
Mittellinie ausrichten (Abb. 2a).
b - Den jeweiligen Mittelpunkt der beiden Bohrlöcher der oberen Abkantung auf der Wand
markieren.
c - Mit einem Bohrer Ø 8 mm Löcher in die Wand bohren, die Dübel in die Bohrlöcher
einführen, das Rückwandpaneel an die Wand drücken und mit den beigefügten Schrauben
befestigen.
d - Die eventuelle Stabilisierung des unteren Bereiches bleibt dem Installateur überlassen.
Montage Typ C (Abb. 3)
Die Haube kann auf diese Art unter Verwendung nur des unteren Kaminteiles I montiert
werden.
1 - Festlegung der Gerätemitte und Anzeichnung einer lotrechten Hilfslinie bis zur oberen
Begrenzung, welche durch eine Holzplatte dargestellt sein kann. Die Hilfslinie dient zur
senk-rechten Ausrichtung der verschiedenen Teile. Anzeichnung einer waagerechten
Linie mit einem Abstand X vom Unterteil der Holzplatte. Wegen der verschiedenen Arten
der zur Verfügung stehenden Kaminteile kann der Abstand X verschiedene Werte haben,
entspricht aber immer der Höhe des Unterteiles I + 35 mm.
2 - Anbringung der Wandbleche 1
Die Bohrlöcher zur Befestigung der Wandbleche werden auf der waagerechten Linie wie
in Abschnitt 4.1 2 beschrieben angezeichnet.
3 - Anbringung der Wandbleche 2
a - Eins der zwei Wandbleche 2 wird etwa 1-2 mm von der Holzplatte an der Wand ange-
legt, ausgelotet und in waagerechte Position gebracht.
b - Der jeweilige Mittelpunkt der ösenförmigen Bohrlöcher des Wandbleches wird auf der
26
○○○○○○○○○○○○○○○○○○○○○○○○○○○○○○○○○○○○○○○
DE
Page 27

○○○○○○○○○○○○○○○○○○○○○○○○○○○○○○○○○○○○○○○○○○○○○○○
Wand markiert.
4 - Mit einem Bohrer 8 mm Ø werden die markierten Mittelpunkte gebohrt. Unter Verwendung
der mitgelieferten Schrauben und Dübel 8 mm Ø werden die Wandbleche 1-2 fest
verankert.
4.2 - Montage des Haubenkörpers (Abb. 4)
1 - Das Lüfterteil C wird an die Wandbleche 1 eingehakt.
2 - Die zwei mitgelieferten Regulierungsschrauben W von 4Mx25 in die Löcher der Haltebügel
1 einfügen.
3 - Durch Verdrehen der beiden W Schrauben kann das Lüfterteil senkrecht und waagerecht
reguliert werden.
4.3 - Elektrischer Anschluß und Funktionskontrolle
1 - Für den Anschluß an das 220-Volt-Wechselstromnetz ist die Dunstabzugshaube mit einem
festmontierten Kabel und einem Schutzkontaktstecker versehen. Der
Gesamtanschlußwert (Motor und Beleuchtung) ist dem Typenschild zu entnehmen.
2 - Die in der Montageanleitung besonders hervorgehobenen Sicherheitshinweise,
insbesondere die Punkte 3.2, 3.3, 3.4 von Abschnitt 3 sind strengstens zu beachten.
3 - Nach Durchführung des elektrischen Anschlusses wird die Funktionskontrolle bezüglich
Beleuchtung, Einschalten des Motors und Wechseln der Schaltstufen durchgeführt.
4.4 - Anschluß Abluft- oder Umluftbetrieb
1 - Anschluß im Abluftbetrieb (Installation Typ A/B)
a - Die Haube kann je nach Wahl durch den Installateur mittels eines festen oder flexiblen
Rohres von 120 oder 150 mm Ø an die Außenrohrleitung angeschlossen werden.
Um die Haube an eine Abluftleitung von 120 mm Ø Durchmesser anzuschließen, ist der
Verkleinerungsflansch K auf dem Luftabgang anzubringen (Abb. 5).
b - Das feste oder flexible Rohr wird mit zwei Rohrschellen sowohl am Adapter als auch am
Außenrohr angeschlossen (Abb. 6). Außenrohre gehören nicht zum Lieferumfang der
Haube, jedoch sind die Anschlüsse auf die im Handel erhältlichen Systeme abgestimmt.
Falls die Haube in Abluftversion mit seitlichem Luftabgang mittels rechteckigen Rohren
installiert werden sollte, ist das Verschlußteil D in den Stutzen R einzufügen, um die
unbenutzte Öffnung abzuschließen (Abb. 7).
c - Bei Abluftbetrieb ist im Inneren der Haube ein evtl. eingesetzter Aktivkohlefilter zu
entfernen (siehe Abschnitt 3.3 2 2ter Teil).
2 - Anschluß im Umluftbetrieb (Installation Typ C)
Diese Installationsart erlaubt es, die Haube an die Außenrohrleitung mittels rechteckigen
Rohre von 90x132 mm unter Verwendung nur des unteren Kaminteiles I anzuschließen
(Abb. 3).
a - An der oberen Holzplatte ist ein Loch von 120 mm Ø anzubringen.
b - Luftabgangsstutzen am Abluftadapter A anschließen.
c - Abluftadapter A mittels Rohre von 90x132 mm an die Außenrohrleitung anschließen.
Auch in diesem Fall sind Rohre und Schlauchschellen vom Installateur zu beschaffen.
d - Bei Abluftbetrieb sind im Inneren der Haube evtl. eingesetzte Filter zu entfernen (siehe
Abschnitt 3.3 2 2ter Teil).
3 - Anschluß im Umluftbetrieb (Installation Typ A/B)
a - Die gefilterte Luft wird im Umluftbetrieb durch die beiden seitlichen Luftleitgitter, die auf
unterschiedlicher Höhe im unteren Kaminteil I angeordnet sein können, in den Raum
○○○○○○○○○○○○○○○○○○○○○○○○○○○○○○○○○○○○○○○
27DE
Page 28

○○○○○○○○○○○○○○○○○○○○○○○○○○○○○○○○○○○○○○○○○○○○○○○
zurückgeleitet (Abb. 8 und 9).
b - Untere Stellung (Abb. 8): Umluft-Adapter R wird direkt mit dem Gebläseausgang
verbunden, indem man ihn nach unten in Richtung Gebläse drückt.
c - Obere Stellung (Abb. 9): Die Verlängerung P wird mit dem runden Gebläseausgang
verbunden, indem man sie nach unten in Richtung Gebläse drückt. Der Adapter R wird in
gleicher Weise auf der Verlängerung P angebracht.
d - Abschließend werden die Aktivkohle-Filter in das Lüfterteil eingesetzt (siehe Abschnitt
3.3 2 - 2ter Teil). Bemerkung: die Luftleitgitter können erst nach erfolgter Montage des
Kaminteiles eigesetzt werden.
4.5 - Anbringung des teleskopierbaren Kamines
1- Installation Typ A/B (Abb. 10)
a - Zur Anbringung des oberen Teleskopteiles S werden die seitlichen Schenkel leicht au-
seinandergebogen, hinter den Wandblechen 2 eingehängt und bis zum Anschlag geschlossen. Halbrohr an Wandblechen 2 mit vier mitgelieferten Schrauben befestigen.
b - Das untere Kaminteil I wird in gleicher Weise zwischen dem unterem Wandblech 2 und
der Wand eingehängt, und sodann um einige Millimeter nach unten, in den oberen
Ausschnitt des Lüfterteiles abgesenkt und an den seitlichen Laschen eingeclipst (siehe
Vergrößerung).
2- Installation Typ C (Abb. 11)
Zur Anbringung des unteren Kaminteiles I werden sie seitlichen Schenkel leicht
auseinandergebogen, hinter den Wandblechen 2 eingehängt, bis zum Anschlag
geschlossen, um einige Millimeter nach unten, in den oberen Ausschnitt des Lüfterteiles
abgesenkt und sodann an den seitlichen Laschen eingeclipst (siehe Vergrößerung).
ACHTUNG: Sollte es notwendig sein das untere Kaminteil zu enfernen, müssen
die seitlichen Laschen im Haubenkörper gelöst werden (Abb. 12).
3 - Die beiden Luftleitgitter werden in den seitlichen Öffnungen mit kräftigem Druck im Blech
eingerastet. Dabei soll der Pfeil nach oben und der Pfeil nach vorn weisen. Bemerkung:
Bei Umluftbetrieb soll jedes Gitter gut in eine Seite des Adapters R eingreifen (Abb. 13).
28
○○○○○○○○○○○○○○○○○○○○○○○○○○○○○○○○○○○○○○○
DE
Page 29

○○○○○○○○○○○○○○○○○○○○○○○○○○○○○○○○○○○○○○○○○○○○○○○
Teil 2 GEBRAUCHS- UND WARTUNGSHINWEISE
1 - SICHERHEITSHINWEISE
Alle Hinweise von Abschnitt 3, erster Teil sollen ausführlich beachtet werden. Außerdem ist es sehr wichtig, während Gebrauch und Wartung auf folgende Hinweise zu
achten:
1.1- Die Wartung der Fettfilter und das Auswe-chseln der Aktiv-Kohlefilter ist rechtzeitig
durchzuführen, und zwar in den vom Hersteller empfohlenen Zeitabständen oder, bei
besonders starkem Einsatz der Haube (mehr als 4 Stunden pro Tag), auch häufiger.
1.2- Niemals eine große Flamme bei eingeschalteter Dunsthaube unbedeckt lassen. Wenn
der Topf weggenommen wird, ist die Flamme abzuschalten oder für einen kurzen
Zeitraum auf kleinste Stellung zu drehen, trotzdem aber unbedingt im Auge zu behalten.
1.3- Die Flamme ist zu regulieren, um zu ver-meiden, daß sie sich seitlich über den Topfboden hinaus ausbreitet. Man spart auf diese Weise Energie und vermeidet eine
gefährliche Hitzekonzentration.
1.4- Die Dunstabzugshaube ist ausschließlich zum Absaugen von Küchengerüchen
vorgesehen. Bei nicht bestimmungsgemäßer Benutzung erlischt jede Hersteller-Garantie.
1.5- Um das Anschlußkabel zu wechseln, wenden sie sich bitte an die nächste
Kundendienststelle.
2 - ARBEITSWEISE DER DUNSTHAUBE
Display (Abb. 14)
Taste L = schaltet Beleuchtung ein und aus
Taste M = schaltet den Motor ein und aus
Taste V = dient der Wahl der Motorgeschwindigkeiten:
1 = kleinste Schaltstufe, geeignet für einen ständigen und besonders leisen
Luftaustausch bei geringer Kochdunstentwicklung
2 = mittlere Schaltstufe, geeignet für die meisten Anwendungsbedingungen,
da hierbei optimaler Wirkungsgrad Luftleistung/Geräuschpegel vorliegt
3 = höchste Schaltstufe, geeignet für die Beseitigung starker
Kochdunstentwicklung, auch über längere Zeit
3 - WARTUNG UND PFLEGE
Eine ständige Wartung garantiert eine gute Arbeitsweise sowie eine gute Leistung über
lange Zeit. Besondere Pflege ist den Metall-Fettfiltern und den Aktiv-Kohlefiltern (nur bei
Umluftbetrieb) zuzuwenden.
3.1 - Metall-Fettfilter
1 - Reinigung
Diese Filter sollen spätestens alle 2 Monate unter Zusatz von handelsüblichen Spülmitteln
ausgewaschen werden. Die kompakte Dimension er-laubt das Waschen in der
Spülmaschine.
2 - Filterentnahme
Einen Filter nach dem anderen entfernen, mit einer Hand anheben und Grifftaste zur
Filtermitte drücken (Abb. 15). Bei Wiede-reinsetzten beachten, daß die Grifftasten auf
der sichtbaren Seite sind.
○○○○○○○○○○○○○○○○○○○○○○○○○○○○○○○○○○○○○○○
29DE
Page 30

○○○○○○○○○○○○○○○○○○○○○○○○○○○○○○○○○○○○○○○○○○○○○○○
3.2 - Fettfiltervlies
1 - Das Fettvlies ist mit einer Sättigungsanzeige ausgestattet. Es muß ausgewechselt werden,
wenn die violetten Farbtupfer auf seiner Oberfläche, die man durch das Gitter sehen
kann, die gesamte Oberfläche violett eingefärbt haben. Auf jeden Fall muß der Filter alle
zwei Monate ausgewechselt werden. Bemerkung: Dieser Filter kann nicht ausgewa-
schen werden, da er sonst seine Eigenschaften verliert. Der Hersteller übernimmt
keine Gewährleistung für Schäden, die durch nicht Einhaltung dieses Hinweises
verursacht werden.
2 - Fettfilterwechsel
- Befestigungsriegel U am Fettfiltergitter nach hinten schieben (Abb. 16a).
- Fettfiltergitter festhalten, nach unten abklappen und abnehmen (Abb. 16b).
- Fettfiltergitter auf eine Arbeitsplatte legen, die beiden Enden der Drahtbügel Q nach
außen drücken und aus dem Filterrahmen nehmen (Abb. 16c)
- Den neuen Filter wieder einlegen, wobei darauf zu achten ist, daß die violetten Farbtupfer
nach unten weisen.
- Befestigungsriegel und Fettfiltergitter in umgekehrter Reihenfolge wieder einsetzen,
wobei darauf zu achten ist, daß die Riegel gut einrasten. ACHTUNG: Die Filter dieser
Dunstabzugshaube müssen in regelmäßigen Zeitabständen gereinigt oder erneuert
werden. Fettgetränkte Filter sind leicht brennbar.
3.3 - Aktiv-Kohlefilter
1 - Arbeitsweise
Die Aktiv-Kohlefilter nehmen die Gerüche bis zur Sättigung auf. Diese Filter können nicht
gereinigt und nicht regeneriert werden und müssen wenigstens alle 4 Monate gewechselt
werden, oder bei besonders starkem Einsatz der Haube auch häufiger.
2 - Geruchsfilterwechsel
Die Metall-Fettfilter entfernen und die Aktiv-Kohlefilter an beiden Seiten des Gebläses
abnehmen, indem man sie gegen den Uhrzeigersinn dreht. Neue Filter wieder einsetzen,
indem man diese im Uhrzeigersinn dreht (Abb. 17).
3.4 - Beleuchtung
Die Beleuchtung besteht aus einer Leuchtstoffröhre von 15 Watt oder aus zwei Lampen
von je 40 Watt. Um einen Austausch vorzunehmen, geht man gemäß Zeichnung
folgendermaßen vor (Abb.18):
1 - Die Kunststoffhalteleiste T neben der Schalterbox entfernen. Das Glas bleibt auf den
Laschen Z liegen.
2 - Man schiebt das lose Glas dann zunächst zu der Seite, auf der sich die Schalterbox
befindet (Pfeil 1), bis die gegenüberliegende Seite frei liegt. Das Glas sodann auf der
freien Seite etwas absenken (Pfeil 2), in entgegengesetzter Richtung (Pfeil 3) bewegen
und abnehmen. Leuchtstoffröhre oder Lampen austauschen und Glas in umgekehrter
Reihenfolge wieder einsetzen.
3.5 - Pflege
Die Reinigung wird innen und außen mit einem feuchten Tuch und einem milden Flüssigreinigungsmittel vorgenommen. Die Verwendung abschleifender Stoffe ist besonders auf
satinierten Inox-Stahl-Flächen zu vermeiden.
30
○○○○○○○○○○○○○○○○○○○○○○○○○○○○○○○○○○○○○○○
DE
Page 31

○○○○○○○○○○○○○○○○○○○○○○○○○○○○○○○○○○○○○○○○○○○○○○○
Eerste deel INSTRUCTIES VOOR DE INSTALLATIE
1 - ALGEMEEN
Deze kap is geschikt om aan de muur te worden geïnstalleerd, boven een kookplaat die
tegen een wand is geplaatst. Hij kan worden gebruikt in de afzuigversie (afvoer naar
buiten) of in de filterversie (recycling binnen). Vanwege de gecompliceerdheid en het
gewicht van het apparaat raadt men aan de installatie te laten uitvoeren door gespecialiseerde vakmensen, terwijl rekening gehouden dient te worden met alle voorschriften
van de bevoegde autoriteiten voor wat betreft de afvoer van de weg te leiden lucht. De
fabrikant wijst iedere verantwoordelijkheid voor schade die te wijten is aan een niet correcte
of niet volgens de regels uit-gevoerde installatie, af.
2 - ONDERDELEN
De afzuigkap bestaat uit (fig. 1):
2.1- 1 afzuigkap C, kompleet met commando’s, verlichting en ventilator
2.2- 1 telescoopschoorsteen bestaande uit:
1 bovenste halve buis S
1 onderste halve buis I
2.3- 1 afzuigverbindingsstuk 90x132 A (alleen voor speciale modellen)
2.4- 2 gerichte roostertjes G
2.5- 1 reduceerflens Ø 150-120 K
2.6- 1 filterverbindingsstuk R
2.7- 1 deflektor D (alleen voor speciale modellen)
2.8- 1 filterend verlengstuk P (alleen voor speciale modellen, zie paragraaf 4.4 3 1e deel)
2.9- 1 zakje met inhoud:
2 beugels 1 voor bevestiging van de afzuigkap zelf
2 beugels 2 voor bevestiging van de schoorsteen schroeven, pluggen en documenten
2.10 -1 ruggedeelte F (optional)
De comonenten A, D, en P zijn alleen aanwezig in apparaten die geschikt zijn voor
bijzondere installaties.
3 - WAARSCHUWINGEN VOOR DE VEILIGHEID
3.1- Sluit het apparaat niet aan op pijpen die door verbranding ontstane rook afvoeren (verwarmingsketels, open haarden enz...).
3.2- Controleer of de spanning van het elektriciteitsnet overeenstemt met de spanning die
op het gegevensplaatje aan de binnenkant van de kap staat aangegeven.
3.3- Verbind de afzuigkap met het elektriciteitsnet door een tweepolige schakelaar aan te
brengen met een opening van de contacten van ten minste 3 mm.
3.4- Vergewis U ervan dat het elektriciteitsnet in huis een correcte aarding heeft.
3.5- De minimum veiligheidsafstand tussen de kookplaat en de kap is 65 cm.
3.6- Flamboyeer niet onder de afzuigkap.
3.7- Houdt frituurpannen onder controle gedurende het gebruik: de oververhitte olie zou
kunnnen ontvlammen.
3.8- Voordat U welke reinigings- of onderhouds-werkzaamheden dan ook gaat uitvoeren,
dient U de stekker uit het stopcontact te trekken of de hoofdschakelaar uit te schakelen.
3.9- In het geval waarin in het vertrek zowel de afzuigkap als niet door elektriciteit aangedreven (b.v. gasapparaten) apparaten worden gebruikt, dient men te zorgen voor een
aangepaste ontluchting van het vertrek. Een juist gebruik zonder risico’s bereikt men
wanneer de maximum depressie van het vertrek de 0,04 mbar niet overschrijdt; men
voorkomt op deze manier een terugkeer van de vrijkomende gassen.
○○○○○○○○○○○○○○○○○○○○○○○○○○○○○○○○○○○○○○○
31NL
Page 32

○○○○○○○○○○○○○○○○○○○○○○○○○○○○○○○○○○○○○○○○○○○○○○○
4 - INSTALLATIE
De afzuigkap kan op drie verschillende manieren aan de wand worden geïnstalleerd:
A - installatie van de kap met een ruggedeelte (optional)
B - installatie van de kap zonder ruggedeelte
C - installatie waarbij de schoorsteen op één lijn gebracht wordt met de bovenkant van de
hangkastjes. In ieder geval, om te voorkomen dat de afzuigkap per ongeluk loshaakt,
is het altijd noodzakelijk voor de installatie van de schoorsteen te werk te gaan
zoals aangegeven wordt in de instructies.
Het volgende schema dient te worden gerespecteerd:
4.1- Montage van de ondersteunende beugels
4.2- Montage van de afzuigkap
4.3- Aansluiting op het elektriciteitsnet en controle van de werking
4.4- Afzuig- of filteraansluiting
4.5- Aansluiting van de telescoopschoorsteen
4.1 - Montage van de ondersteunende beugels
Installatie type A/B (fig. 2a-b)
1 - Trek op de wand een verticale lijn tot aan het plafond, in het midden van de zone waar de
afzuigkap gemonteerd gaat worden: dit dient voor de verticale opstelling op één lijn van
de onderdelen.
2 - Plaatsing van de beugels 1
Trek een horizontale lijn op een afstand tot de kookplaat van:
a - met ruggedeelte (fig. 2a): d = 200 + H, waarbij H = de hoogte in milimeters van het
zichtbare deel van het ruggedeelte; deze maat dient direct te worden genomen op het
bijgeleverde ruggedeelte, aangezien er verschillende soorten ruggedeelten worden
geleverd.
b - zonder ruggedeelte (fig. 2b) d = minimaal 850 mm.
Op de horizontale lijn de boringen voor de bevestiging van de beugels 1 aangeven op
een afstand Y = 100 mm tussen het midden van de gaten van de beugels en het midden
van de afzuigkap.
3 - Plaatsing van de beugels 2
a - Zet één van de beugels 2 tegen de muur op ongeveer 1 of 2 mm van het plafond of van
de bovengrens, terwijl U het midden ervan op de verticale lijn brengt.
b - Geef op de muur de twee ogen van de beugel aan.
c - Zet de andere beugel 2 tegen de wand op de verticale lijn, op een afstand X gemeten
zoals in fig. 2, op dezelfde hoogte als de bovenste halve buis S die bij de afzuigkap
geleverd wordt. De maat X kan verschillende waarden hebben, al naar gelang de
verschillende beschikbare lengtes van de bovenste halve buis.
d - Geef op de wand het midden van de ogen van de beugel aan.
4 - Met een boortje van Ø 8 mm alle aangegeven punten boren.
De beugels 1- 2 goed vastzetten door gebruik te maken van de pluggen Ø 8 mm en de
bijbehorende schroeven.
5 - Ruggedeelte (optional)
De afstand van de afzuigkap vanaf de kookplaat wordt bepaald, in dit geval, door de
hoogte van het ruggedeelte F en door de eventuele opstaande rand van de kookplaat.
Het ruggedeelte moet worden gemonteerd vòòr de afzuigkap, en, als men hem zowel
boven als onder wenst te bevestigen tegen de wand, is het noodzakelijk hem op de
32
○○○○○○○○○○○○○○○○○○○○○○○○○○○○○○○○○○○○○○○
NL
Page 33

○○○○○○○○○○○○○○○○○○○○○○○○○○○○○○○○○○○○○○○○○○○○○○○
juiste hoogte te monteren, voor de montage van de basis of tenminste van de daarbij
behorende plaat. Aangezien het om een gecompliceerde operatie gaat, dient deze
uitsluitend door de keukeninstallateur of door vakbekwaam personeel te worden
uitgevoerd, dat alle afmetingen van de meubels kent.
Indien men alleen de bovenkant wil vastzetten, dient men als volgt te werk te gaan:
a - Zet het ruggedeelte op de plaat van de basis zoals op fig. 2a, breng hem in contact met
de wand en plaats hem goed op het midden van de basis.
b - Geef het midden van de twee boringen van de bovenste strook aan.
c - Boor de wand met een boortje van Ø 8 mm en bevestig het ruggedeelte door gebruik te
maken van de pluggen Ø 8 mm en de bijgeleverde schroeven.
d - De eventuele stabilisatie van het onderste deel wordt, indien nodig, overgelaten aan de
installateur.
Installatie type C (fig. 3)
Het is mogelijk dit type installatie uit te voeren door alleen gebruik te maken van de
onderste halve buis I.
1 - Trek op de wand een verticale lijn in het midden van de zone waar de afzuigkap gaat
worden gemonteerd, tot aan de bovengrens die kan worden aangegeven door een houten
plank: dit dient om de delen vertikaal op één lijn te brengen. Trek een horizontale lijn op
een afstand X van de onderkant van de plank. De waarde X kan verschillende grootten
hebben, al naar gelang de verschillende beschikbare afmetingen van de onderste halve
buis en is gelijk aan de hoogte van de halve buis I + 35 mm.
2 - Plaatsing van de beugels 1
Geef de boringen voor de bevestiging van de beugels op de horizontale lijn aan zoals
aangegeven in paragraaf 4.1 2.
3 - Plaatsing van de beugels 2
a - Zet één van de beugels 2 tegen de wand op ongeveer 1 of 2 mm van de plank, en plaats
hem met het midden (inkeping) op de vertikale lijn.
b - Teken op de wand de twee gaten van de beugel.
4 - Met een boor van Ø 8 mm alle aangegeven gaten boren. Bevestig de beugels 1-2 zo
stevig mogelijk door gebruik te maken van de pluggen van Ø 8 mm en de bijbehorende
bijgeleverde schroeven.
4.2 - Montage van de afzuigkap zelf
1 - Haak de kap C aan de beugels 1
2 - Schroef de twee regelschroeven W van 4Mx25 (geleverd bij de accessoires) in de gaten
met schroefdraad van de beugels 1.
3 - Regel vertikaal en horizontaal de afzuigkap door aan de schroeven W te draaien.
4.3 - Aansluiting op het elektriciteitsnet en controle van de werking
1 - Het is noodzakelijk de waarschuwingen 3.2, 3.3, 3.4 van paragraaf 3 met betrekking tot
de veiligheid nauwgezet te respecteren.
2 - Als de elektrische aansluiting eenmaal is uitgevoerd, dient de correcte werking van de
verlichting, de ontsteking van de motor en de wisseling van de snelheden te worden
gecontroleerd.
○○○○○○○○○○○○○○○○○○○○○○○○○○○○○○○○○○○○○○○
33NL
Page 34

○○○○○○○○○○○○○○○○○○○○○○○○○○○○○○○○○○○○○○○○○○○○○○○
4.4 - Afzuigende of filterende aansluiting
1 - Afzuigende aansluiting (installatie type A/B)
a - De afzuigkap kan worden aangesloten op externe bebuizing met behulp van een slang
of buis met Ø 120 mm of 150 mm; de keuze hiervan wordt overgelaten aan de installateur. Voor de installatie van de buis Ø 120 mm, is het noodzakelijk de reduceerflens K
op de uitgang van de kap te monteren (fig. 5).
b - De uitgang van de lucht aansluiten op de externe bebuizing met een slang of buis die
bevestigd moeten worden met een geschikt buisklem (fig. 6). Het juiste en noodzakelijk
materiaal voor deze laatste operatie dient te worden verschaft door de installateur.
Als men de kap in de afzuigversie wil installeren met de uitgang van de lucht aan de zijkant van de onderste halve buis I met rechthoekige buizen, is he noodzakelijk de deflektor D aan te brengen in het verbindingsstuk om het niet gebruikte gat af te sluiten (fig. 7).
2 - Afzuigende aansluiting (type C)
Dit type installatie staat het toe de afzuigkap met de bebuizing voor afvoer naar buiten te
verbinden met behulp van rechthoekige buizen met nominale afmetingen van 90x132,
gebruik makend van alleen de onderste halve buis I (fig. 3).
a - Maak een gat van 120 mm in de plank tussen de twee hangkastjes boven de kookplaat.
b - Verbind de flens voor de uitgang van de lucht met het afzuigverbindingsstuk A.
c - Verbind het afzuigverbindingsstuk A met de bebuizing voor afvoer naar buiten, gebruik
makend van de rechthoekige buis 90x132
d - Verwijder de eventuele aktieve koolfilters (zie paragraaf 3.3 2 , 2e deel).
3 - Filterende aansluiting (alleen installatie type A/B)
a - de gefilterde lucht wordt teruggebracht in het vertrek door de twee gerichte zijroosters,
geplaatst op de onderste halve buis I, waarvan de positie, om verschillende redenen,
wordt gekarakteriseerd door twee verschillende hoogtes (fig. 8 en 9).
b - Lage positie (fig. 8): verbind het filterverbindingsstuk R direct met de ronde uitgang van
de verspreider, door hem naar beneden te drukken.
c - Hoge positie (fig. 9): verbind het verlengstuk P met de ronde uitgang van de verspreider,
door hem naar beneden te drukken en tegelijkertijd het verbindingsstuk F op het verlengstuk R aan te brengen.
d - Voeg de eventuele aktieve koolfilters toe aan de binnenkant van de afzuigkap (zie
paragraaf 3.3. 2, 2e deel).
N.B. - Breng de gerichte roostertjes niet aan; deze operatie dient te worden uitgevoerd
na de installatie van de schoorsteen.
4.5 - Montage van de telescoopschoorsteen
1 - Installatie type A/B (fig. 10)
a - Om de bovenste halve buis S aan te brengen, dient u de twee zijstukken een stukje
verder uit elkaar te trekken, hen achter de beugels 2 te haken en te weer sluiten tot aan
de aanslag. Bevestig de halve buis aan de beugels 2 met vier van de bij de accessoires
geleverde schroeven.
b - Op de zelfde wijze de onderste halve buis I aanbrengen tussen de onderste beugel 2 en
de wand, rekening houdend met het feit dat aan de basis, de omtrek van de halve buis
bevesigd moet worden op de daarvoor bestemde plaats in de afzuigkap zelf en aan de
zijlipjes moet worden gehaakt (zie uitvergroting).
34
○○○○○○○○○○○○○○○○○○○○○○○○○○○○○○○○○○○○○○○
NL
Page 35

○○○○○○○○○○○○○○○○○○○○○○○○○○○○○○○○○○○○○○○○○○○○○○○
2 - Installatie type C (fig. 11)
Bevestig de onderste halve buis I door de twee zijstukken een stukje uit elkaar te trekken,
hen achter de beugel 2 haken en hen weer sluiten tot aan de aanslag, rekening houdend
met het feit dat aan de basis de omtrek van de halve buis op de daarvoor bestemde
plaats in de afzuigkap zelf moet worden aangebracht en aan de zijlipjes moet worden
gehaakt (zie uitvergroting). ATTENTIE - In geval van demontage van de onderste
halve buis, moeten de twee zijlipjes aan de binnenkant van de afzuigkap worden
losgehaakt (fig. 12).
3 - Bevestig de twee gerichte roostertjes op de staalplaat op de daarvoor bestemde plaatsen,
zodat het symbool naar boven gericht staat en het symbool naar voren.
Bovendien, voor de filterversie, dient men te controleren of de roostertjes correct in de
binnenkant van het filterverbindingsstuk R passen (fig. 13).
2e deel INSTRUCTIES VOOR HET GEBRUIK EN HET ONDERHOUD
1 - WAARSCHUWINGEN VOOR DE VEILIGHEID
Het is absoluut noodzakelijk alle waarschuwingen die beschreven zijn in paragraaf 3
van het eerste deel- instructies voor de installatie, te respecteren. Bovendien is het erg
belangrijk bijzondere aandacht te schenken tijdens het gebruik en het onderhoud, aan
de volgende opmerkingen:
1.1- De antivetfilters en de aktieve koolfilters nauwgezet en op tijd onderhouden volgens
de raadgevingen van de fabrikant of vaker, indien er sprake is van intensief gebruik
(meer dan 4 uur per dag).
1.2- Laat geen grote vlammen onbedekt terwijl de afzuigkap in werking is: wanneer U
pannen van het vuur haalt, de vlam doven of in ieder geval, gedurende korte tijd en
onder bewaking, op het minimum zetten.
1.3- Regel de vlam altijd zodanig dat deze niet aan de zijkant van de pan omhoog komt:
men bespaart energie en men voorkomt gevaarlijke warmteconcentraties.
1.4- Gebruik het apparaat niet voor oneigenlijke doeleinden; het is uitsluitend ontworpen
om keukenluchtjes tegen te gaan.
1.5- Om de voedingskabel H te vervangen, dient men zich te wenden tot het dichtstbijzijnde
Servicecentrum.
2 - GEBRUIK
Knoppenpaneel (fig. 14)
Het schema van de knoppen is als volgt:
TOETS L = Schakelt de verlichting aan en uit
TOETS M = Schakelt de motor aan en uit
TOETS V = Bepaalt de bedrijfssnelheid, onderverdeeld in:
1 = Minimum snelheid, geschikt voor een continue bijzonder geruisloze
luchtverversing, wanneer er weinig kookluchten zijn.
2 = Gemiddelde snelheid, geschikt in de meeste gevallen, gezien de
optimale verhouding tussen hoeveelheid verwerkte lucht en
geluidsniveau.
3 = Maximum snelheid, geschikt om zeer sterke kookluchten tegen te gaan,
ook gedurende langere tijd.
○○○○○○○○○○○○○○○○○○○○○○○○○○○○○○○○○○○○○○○
35NL
Page 36

○○○○○○○○○○○○○○○○○○○○○○○○○○○○○○○○○○○○○○○○○○○○○○○
3 - ONDERHOUD
Een constant onderhoud garandeert een goede werking en een goed rendement ook na
verloop van tijd. Bijzondere aandacht dient te worden geschonken aan de metalen antivetfilters en, alleen voor filterkappen, aan het aktieve koolfilter.
3.1 - Metalen antivet-filter
1 - Reiniging
Het is noodzakelijk deze filters tenminste eenmaal in de twee maanden met een normaal
huisschoonmaakmiddel te reinigen; de compacte afmetingen maken het mogelijk de
filters ook in de vaatwasmachine te wassen.
2 - Demonteren van de filters
Verwijder één filter na het andere, terwijl U hem ondersteunt met én hand en terwijl U de
roestvrijstalen handgreep naar achteren trekt (fig. 15). Monteer opnieuw, erop lettend
dat de handgreep naar de zichtbare zijde wordt gehouden.
3.2 - Filters van synthetische vezels.
1 - Vervang deze wanneer de paarsrode kleur van de puntjes, die door het rooster heen
zichtbaar zijn, zich over het grootste deel van het oppervlak heeft verspreid, en, in ieder
geval, tenminste eenmaal per twee maanden. N.B. - Dit filer kan niet worden gewassen,
want dan zou het al zijn eigenschappen verliezen. De fabrikant wijst ieder aansprakelijkheid wegens schade die aan het niet respecteren van deze regel te wijten is,
af.
2 - Procedure voor de vervanging
- open het rooster (fig. 16a) door de toetsen U naar achteren te drukken zover U kunt.
- Draai het rooster naar beneden, haak hem los van de achterste pinnen met een diagonale beweging (fig. 16b).
- Zet het rooster op een vlak en verwijder de filterhouders Q (fig. 16c).
- Vervang het filter zodat de gekleurde puntjes te zien zijn door het rooster heen.
- Monteer de roosterhouder weer en het rooster door de procedure in omgekeerde
volgorde uit te voeren, ervoor zorgend dat de metalen haken die door de toetsen U
worden bewogen, tot op de volle diepte op hun plaats zitten.
ATTENTIE - Het is noodzakelijk de aangegeven tussenpozen voor reiniging en
onderhoud te respecteren, om een mogelijke brand te voorkomen wanneer de filters
verzadigd zijn met vet.
3.3 - Aktief koolfilter
1 - Werking
De aktieve koolfilters hebben het vermogen de geuren te onderdrukken tot aan hun
verzadiging. Ze kunnen niet worden gewassen en kunnen niet opnieuw worden gebruikt,
en moeten daarom tenminste eenmaal per vier maanden worden vervangen of vaker,
indien er sprake is van een bijzonder intensief gebruik.
2 - Vervanging
Verwijder de metalen antivetfilters of het afzuigrooster, verwijder de aktieve koolfilters
aan het einde van de metalen verspreider door hen tegen de klok in te draaien. Monteer
de nieuwe filters door hen met de klok mee te draaien (fig. 17).
36
○○○○○○○○○○○○○○○○○○○○○○○○○○○○○○○○○○○○○○○
NL
Page 37

○○○○○○○○○○○○○○○○○○○○○○○○○○○○○○○○○○○○○○○○○○○○○○○
3.4 - Verlichting
Bestaat uit een neonbuis van 15W, of uit twee lampjes van 40W. Om de lampen te
vervangen dient U als volgt te werk te gaan (fig. 18):
1 - Haal het metalen eindstuk T weg dat tegen de knoppendoos zit. Het glas blijft aan de
lipjes Z gehaakt.
2 - Laat het glas naar de knoppendoos glijden totdat de tegenoverliggende punt vrijkomt
(pijltje 1), dan voorzichtig naar beneden trekken (pijltje 2) en vervolgens in tegengestelde
richting laten glijden (pijltje 3) totdat het glas volledig vrijkomt. Vervang de lamp of neonbuis
en monteer het glas door bovenstaande handelingen in omgekeerde volgorde uit te
voeren.
3.5 - Reiniging
De reiniging aan de binnen- en buitenkant van de afzuigkap dient te worden uitgevoerd
met een vochtige doek en een neutraal vloeibaar schoonmaakmiddel.U mag absoluut
geen schuurmiddel gebruiken, in het bijzonder op de gesatineerde roestvrijstalen
oppervlakken.
○○○○○○○○○○○○○○○○○○○○○○○○○○○○○○○○○○○○○○○
37NL
Page 38

○○○○○○○○○○○○○○○○○○○○○○○○○○○○○○○○○○○○○○○○○○○○○○○
Parte 1ª INSTRUCCIONES DE INSTALACION
1 - GENERALIDADES
La campana ha sido proyectada para ser instalada adosada a la pared, colocada sobre
un plano de cocción. Se puede usar en dos versiones: filtrante (reciclaje interno del aire)
o aspirante (evacuación externa del aire). A causa de la complejidad del aparato se
recomienda que la instalación sea realizada por personal especializado.
El fabricante declina toda responsabilidad por daños debidos a una instalación incorrecta
o no conforme a las reglas del fabricante.
2 - COMPONENTES
La campana está compuesta por (fig. 1):
2.1- Nr. 1 cuerpo de la campana C completo de mandos, iluminación y grupo de ventilación.
2.2- Nr. 1 chimenea telescópica formada por:
Nr. 1 Tubo superior S
Nr. 1 Tubo inferior I
2.3- Collarín aspirante 90x132 A (solo para versiones especiales)
2.4- Nr. 2 Rejillas direccionadas G
2.5- Nr. 1 Reducción Ø 150-120 K
2.6- Nr. 1 Collarín filtrante R
2.7- Nr. 1 Deflector D (solo para versiones especiales)
2.8- Nr. 1 Prolongación filtrante P (solo para versiones especiales, ver párrafo 4.4 3 Parte
primera)
2.9- Nr. 1 Bolsa de plástico con:
- 2 Placas 1 para sujetar el cuerpo de la campana
- 2 Placas 2 para sujetar la chimenea
- Tornillos, tacos y documentación
2.10 -Panel posterior F (opcional)
Los componentes A, D, P, se encuentran solo en los aparatos preparados para una
instalacion particular.
3 - ADVERTENCIAS DE SEGURIDAD
3.1- No conectar el aparato a tuberías de evacuación de humos causados por combustión
(calderas, chimeneas, etc.).
3.2- Verificar que la tensión de la red corresponda a la indicada en la etiqueta situada en
el interior de la campana.
3.3- Conectar la campana a la red interponiendo un enchufe bipolar con una apertura en
los contactos de al menos 3 mm.
3.4- Asegurarse de que la instalación eléctrica garantice una correcta descarga a tierra.
3.5- La distancia mínima de seguridad entre el plano de cocción y la campana es de 65 cm.
3.6- No cocinar con llamas altas debajo de la campana.
3.7- Controlar las freidoras durante su uso: el aceite demasiado caliente podría incendiarse.
3.8- Antes de realizar cualquier tipo de limpieza o de manutención, desconectar el aparato
desenchufándolo o desconectando el interruptor general.
3.9- Si en la cocina se usan tanto la campana como otros aparatos no accionados con
energía eléctrica (por ejemplo aparatos a gas), se debera proceder a una aireación
suficiente del ambiente. Para usar el aparato adecuadamente y sin ningún riesgo la
depresión del ambiente no debe superar los 0,04 milibares, evitando de esta manera
que vuelvan a penetrar en el interior los gases que se desea eliminar.
38
○○○○○○○○○○○○○○○○○○○○○○○○○○○○○○○○○○○○○○○
ES
Page 39

○○○○○○○○○○○○○○○○○○○○○○○○○○○○○○○○○○○○○○○○○○○○○○○
4 - INSTALACION
La campana puede instalarse de tres maneras diferentes:
A - Con el panel posterior (opcional)
B - Sin panel posterior
C - Instalación de la campana en versión aspirante, alineándo la chimenea a la extremidad
superior de los armarios. Se recomienda seguir escrupulosamente las instrucciones
dadas para evitar que la campana pueda caerse accidentalmente durante su
colocación.
Para facilitar la instalación, respetar el siguiente esquema:
4.1- Colocar las placas de sujeción.
4.2- Montar el cuerpo de la campana.
4.3- Proceder a la conexión eléctrica y controlar las diversas funciones.
4.4- Proceder a la conexión aspirante o filtrante.
4.5- Montar la chimenea telescópica.
4.1 - Colocación de las placas de sujeción
Instalación tipo A/B (fig. 2a-b).
1 - Trazar en la pared un linea vertical hasta el techo en el centro de la zona donde se va a
colocar la campana. Dicha línea sirve para alinear verticalmente las diferentes piezas.
2 - Colocación de la placa de sujeción 1:
Marcar una línea horizontal a una distancia del plano de cocción de:
a - Con panel posterior (fig. 2a): d = 200 + H mm, donde H = a la altura en mm. de la parte
visible del panel. Esta medida, debido a los diferentes tipos de paneles disponibles,
debe tomarse directamente del panel elegido.
b - Sin panel (fig. 2b): d = 850 mm por lo menos. Marcar en la linea horizontal los agujeros
de la placa 1 a una distancia Y = 100 mm entre el eje de los agujeros de las placas y el
centro de la campana.
3 - Colocación de las placas 2:
a - Colocar una de las placas 2 sobre la pared a 1 o 2 mm. del techo o del límite superior,
alineándola con la línea vertical.
b - Marcar en la pared los centros de los dos agujeros de la placa.
c - Colocar la otra placa 2 en la pared, alineándola con la línea vertical a una distancia X
medida como se indica en la fig. 2. La medida debe ser igual a la altura del tubo superior S incluido en la dotación. La cota X puede tener valores diversos según las
diferentes alturas del tubo superior.
d - Marcar en la pared los centros de los agujeros de la placa.
4 - Con una punta de diámetro 8 agujerear los puntos marcados y fijar fuertemente las
placas 1 y 2 con los tacos de plástico de diámetro 8 y sus correspondientes tornillos
incluidos en la dotación.
5 - Panel posterior (opcional)
La altura a la que debe colocarse la campana respecto al plano de cocción debe ser
igual a la altura del panel posterior F mas la altura del reborde de la base si esta lo
tuviera. El panel F se coloca antes de colocar la campana y si se desea sujetarlo tanto
inferior como superiormente hace falta montarlo a la debida altura antes de montar la
base (superficie de marmol, granito, etc.). Siendo una operación bastante compleja deberá
ser efectuada por quien monte la cocina o por personal competente que conozca todas
las medidas finales de los muebles.
○○○○○○○○○○○○○○○○○○○○○○○○○○○○○○○○○○○○○○○
39ES
Page 40

○○○○○○○○○○○○○○○○○○○○○○○○○○○○○○○○○○○○○○○○○○○○○○○
Si nos limitamos a sujetarlo por la parte superior proceder de la siguiente manera:
a - Apoyar el panel sobre la base como se indica en la fig. 2a, colocarlo contra la pared y
centrarlo.
b - Marcar en la pared los centros de los agujeros de la falda superior.
c - Agujerear la pared con una punta de Ø 8 mm y sujetar el panel con los tacos Ø 8 y los
tornillos incluidos en la dotación.
d - La eventual estabilización de la parte inferior, si es necesaria, se deja en manos del
instalador.
Instalación tipo C (fig. 3)
Es posible realizar este tipo de instalación usando solo el tubo inferior I.
1 - Trazar en la pared una línea vertical en el centro de la zona donde se desea colocar la
campana. Dicha línea debera llegar hasta el límite superior que puede ser, por ejemplo,
una repisa de madera, y que nos servira para alinear verticalmente las diferentes piezas.
Trazar una línea horizontal a una distancia X desde la parte inferior de la repisa. La cota
X puede tener valores diferentes según lo que mida el tubo inferior. El valor total de la
cota X es igual a la altura del tubo I mas 35mm.
2 - Colocación de las placas 1
Marcar sobre la línea horizontal los agujeros para sujetar las placas como se indica en el
párrafo 4.1 2.
3 - Colocación de la placa 2
a - Apoyar una de las placas 2 en la pared a 1 o 2 mm de la repisa, alineándo su centro
sobre la línea vertical.
b - Marcar en la pared los dos agujeros de la placa.
4 - Con una punta de Ø 8 mm hacer todos los agujeros marcados. Sujetar fuertemente las
placas 1 y 2 usando los tacos y tornillos incluidos en la dotación.
4.2 - Colocación del cuerpo de la campana (fig.4)
1 - Enganchar el cuerpo de la campana C a las placas 1.
2 - Colocar los dos tornillos de regulación W de 4Mx25 (incluidos en la dotación en los
agujeros de la placa 1.
3 - Regular verticalmente y nivelar horizontalmente la campana apretando los tornillos W.
4.3 - Conexión eléctrica y control funcional
1 - Es necesario respetar escrupulosamente las indicaciones dadas en los puntos 3.2, 3.3,
3.4 del párrafo 3 que trata la seguridad.
2 - Una vez efectuada la conexión eléctrica, verificar el correcto funcionamiento de la ilumi-
nación, encendido del motor y cambio de las velocidades.
4.4 - Conexión aspirante o filtrante
1 - Conexión aspirante (Instalación tipo A/B)
a - La campana puede colegarse a tuberias externas mediante un tubo rígido o flexible de
diametro 120 o 150 mm. cuya elección se deja al instalador. Para realizar la instalación
con un tubo Ø 120, es necesario utilizar la reducción K en la salida de la campana (fig.
5).
b - Unir la salida del aire a la tubería exterior con el tubo rígido o flexible mediante fajillas
adecuadas (fig. 6). El material necesario para llevar a cabo esta operación deberá ser
adquirido por el instalador.
40
○○○○○○○○○○○○○○○○○○○○○○○○○○○○○○○○○○○○○○○
ES
Page 41

○○○○○○○○○○○○○○○○○○○○○○○○○○○○○○○○○○○○○○○○○○○○○○○
Si se desea instalar la campana en versión aspirante, con salida del aire lateral del tubo
inferior I, con tubos rectangulares, es necesario meter el deflector D en el raccord R
para cerrar el agujero que no se usa (fig. 7).
c - Quitar los filtros de carbón activo (ver parrafo 3.3 2 parte segunda).
2 - Conexión aspirante (Instalación tipo C)
Este tipo de instalación permite unir la campana a la tubería externa mediante tubos
rectangulares con dimensiones nominales de 90x132, usando solo el tubo inferior I (fig.
3)
a - Hacer un agujero de 120 mm en la repisa colocada entre los dos armarios sobre el plano
de cocción.
b - Unir la reducción de salida del aire al collarín A.
c - Unir el collarín aspirante A a la tubería externa usando el tubo rectangular de 90x132.
También en este caso los tubos y las fajillas deberan ser adquiridos por el instalador.
d - Quitar los filtros de carbón (ver parrafo 3.3 2 parte segunda).
3 - Conexión filtrante (Solo instalación tipo A/B)
a - El aire filtrado vuelve a entrar en el ambiente a través de las rejillas situadas en los
laterales del tubo inferior I, cuya posición, por diversas exigencias, se encuentran a
diferentes alturas (fig. 8 y 9).
b - Posición baja: (fig. 8) Unir el collarín filtrante R directamente a la salida rectangular del
difusor, apretando hacia abajo.
c - Posición alta: (fig. 9): Unir la prolongación P a la salida redonda del difusor, apretando
hacia abajo y aplicar analogamente el collarín R a la prolongación P.
d - Colocar el filtro de carbón activo en el interior de la campana (ver párrafo 3 3 parte
segunda). N.B. - No colocar las rejillas; esta operación debe realizarse cuando se haya
instalado la chimenea.
4.5 - Colocación de la chimenea telescopica
1 - Instalación tipo A/B (fig. 10)
a - Para colocar el tubo superior S ensanchar ligeramente las dos faldas laterales, engan-
charlas tras las placas de sujeción 2 y dejar volver las faldas a su posición inicial. Sujetar
el tubo a las placas 2 con cuatro tornillos incluidos en la dotación.
b - Colocar de manera similar el tubo inferior I entre la placa inferior 2 y la pared, teniendo
en cuenta que es necesario meter el perímetro del tubo en la sede correspondiente de la
campana enganchandolo en las lengüetas laterales (ver ampliación).
2 - Instalación tipo C (fig.11)
Colocar el tubo inferior I ensanchando las dos faldas laterales, engancharlas detras de
la placa 2 y dejarlas volver a su posición inicial, teniendo en cuenta que es necesario
meter el perimetro del tubo en la sede correspondiente de la campana enganchandolo
en las lengüetas laterales. (ver ampliación)
ATENCION - Si se desmonta el tubo inferior, deben desengancharse las dos lengüetas
laterales situadas en el interior de la campana (fig.12).
3 - Colocar las dos rejillas en sus sedes de manera que el simbolo este hacia arriba, y el
simbolo hacia delante. Ademas, en la versión filtrante controlar que las rejillas esten
colocadas perfectamente en el interior del tubo R (fig. 13).
○○○○○○○○○○○○○○○○○○○○○○○○○○○○○○○○○○○○○○○
41ES
Page 42

○○○○○○○○○○○○○○○○○○○○○○○○○○○○○○○○○○○○○○○○○○○○○○○
Parte 2ª INSTRUCCIONES DE USO Y MANUTENCION
1 - ADVERTENCIAS DE SEGURIDAD
Es absolutamente necesario respetar todas las advertencias hechas en el párrafo dos
de la primera parte- INSTRUCCIONES DE INSTALACION-. Además es muy importante
prestar una particular atención durante el uso y mantenimiento a las siguientes advertencias:
1.1- Efectuar una escrupulosa manutención de los filtros antigrasa y de carbón activo cambiándolos según los intérvalos indicados por el fabricante o, en caso de uso continuo,
mas frecuentemente (cuando se use la campana mas de cuatro horas al dia).
1.2- No dejar llamas de fuerte intensidad debajo de la campana mientras esta esté funcionando: si se retira del fuego una cazuela, apagar el quemador o por lo menos disminuir
la intensidad de la llama y tenerlo siempre bajo control.
1.3- Regular siempre la llama de manera que esta no sobresalga del borde de la cazuela:
de esta manera se ahorra energía y se evitan condensaciones de calor peligrosas.
1.4- No hacer uso impropio de la campana, se debe tener en consideración que ha sido
creada únicamente para evitar los malos olores en la cocina.
1.5- Para cambiar el cable de acometida, dirigirse al Servizio de Asistencia Técnica mas
cercano.
2 - USO
Mandos (fig. 14)
El esquema de los mandos es el siguiente:
Tecla L = Encendido y apagado de la luz.
Tecla M = Encendido y apagado del motor.
Tecla V = Varía la velocidad del motor de tres maneras diferentes:
1 = Velocidad mínima: adecuada para obtener un cambio del aire contínuo,
particularmente silencioso, en presencia de pocos vapores de cocción.
2 = Velocidad media: adecuada a la mayor parte de las condiciones de
uso, dada la óptima relación existente entre cantidad de aire tratado y
nivel de rumorosidad.
3 = Velocidad máxima: propicia para afrontar las emisiones máximas de
vapores, incluso durante periodos prolungados.
3 - MANTENIMIENTO
Una mantenimiento constante garantiza un buen funcionamiento y rendimiento a lo largo de su uso. Se deberá prestar una atención especial a los filtros antigrasa metálicos,
y, en caso de que la campana se use en versión filtrante, al filtro de carbón activo.
3.1 - Filtro antigrasa metálico
1 - Limpieza
Es necesario lavarlos con un detergente normal por lo menos una vez cada dos meses.
Su dimensión compacta permite su lavado en el lavavajillas.
2 - Para desmontar los filtros
Quitar un filtro a la vez colocando una mano debajo de este y tirar hacia atrás de la
manilla de acero (fig. 15).
Volver a montarlo teniendo en cuenta que la manilla debe quedar en la parte visible.
42
○○○○○○○○○○○○○○○○○○○○○○○○○○○○○○○○○○○○○○○
ES
Page 43

○○○○○○○○○○○○○○○○○○○○○○○○○○○○○○○○○○○○○○○○○○○○○○○
3.2 - Filtros sintéticos
1 - Sustituirlos cuando el color rojo-violeta de los puntos, visible a través de la rejilla, se
haya extendido a la mayor parte de la superficie del filtro o siempre que se hayan superado
los dos meses de uso.
NOTA- Este filtro no se puede lavar porque perdería todas sus características. El
fabricante declina toda responsabilidad por los daños causados por ignorar esta
norma.
2 - Modalida de substitución.
- Abrir la rejilla (fig. 16a) apretando las teclas U hacia la parte posterior.
- Girar la rejilla hacia abajo, desenganchándola de los pernos posteriores mediante un
movimiento diagonal (fig. 16b).
- Apoyar la rejilla sobre un plano y quitar las piezas que sujetan los filtros Q (fig. 16c).
- Sustituir el filtro de manera que los puntos coloreados se encuentren hacia la rejilla.
- Volver a montar las piezas que sujetan los filtros de manera inversa prestando atención
a que los ganchos metálicos comandados por las teclas U esten bien enganchados en
sus sedes.
ATENCION - Es necesario respetar los tiempos de mantenimiento o sustitución
indicados pare aevitar el riesgo de incendio debido a unos filtros saturados de
grasa.
3.3 - Filtro de carbón activo
1 - Funcionamiento:
El filtro de carbón activo posee la capacidad de retener los olores hasta que alcanza su
saturación. No es ni lavable ni regenerable y por lo tanto se debe proceder a su
sustitución cada cuatro meses o con mayor frecuencia si el uso de la campana es
particularmente intenso.
2 - Sustitución:
Quitar los filtros antigrasa metálicos o la rejilla de aspiración. Sacar los filtros de carbón
activo situados en las extremidades del difusor metálico girándolos en el sentido de las
flechas A. Volver a montar los filtros girándolos en el sentido de las flechas B (fig. 17).
3.4 - Iluminación
Esta formada por un tubo de neón de 15 W o por dos bombillas de 40W. Para cambiarlo
proseguir de la siguiente manera (fig. 18):
1 - Quitar la pieza metálica T situada junto a la caja de mandos. El cristal quedará enganchado
en las lengüetas Z.
2 - Correr el cristal hacia la caja de mandos hasta liberar la punta opuesta (Flecha 1). Po-
steriormente tirar hacia abajo (Flecha 2) y correrlo en sentido contrario al inicial (Flecha
3) hasta liberar por completo el cristal.
Sustituir la lámpara o el tubo de néon y volver a montar el cristal procediendo inversamente.
3.5 - Limpieza
La limpieza externa e interna de la campana debe llevarse a cabo con un paño humedo
y detergente líquido neutro. Evitar completamente el uso de substancias abrasivas, en
particular sobre las superficies de acero inoxidable satinado.
○○○○○○○○○○○○○○○○○○○○○○○○○○○○○○○○○○○○○○○
43ES
Page 44

○○○○○○○○○○○○○○○○○○○○○○○○○○○○○○○○○○○○○○○○○○○○○○○
1ª Parte INSTRUÇÕES PARA A INSTALAÇÃO
1 - INFORMAÇÕES GERAIS
Esta coifa foi preparada para ser instalada na parede à qual está encostada uma mesa
de cozedura. Pode ser utilizada na versão aspirante (com evacuação ao exterior) ou na
versão filtrante (com reciclagem interna). Devido à complexidade e ao peso do aparelho,
aconselha-se que a instalação seja feita por técnicos especializados e que todas as
prescrições das autoridades competentes em matéria de descarga de ar de evacuação
sejam respeitadas. O fabricante declina qualquer responsabilidade por danos provocados
por uma instalação incorrecta ou não em conformidade com a legislação em matéria.
2 - COMPONENTES
A coifa é composta por (fig. 1):
2.1- nº 1 corpo da coifa C provido de comandos, luz e grupo de ventilação
2.2- nº 1 chaminé telescópica formada por:
nº 1 semitubo superior S
nº 1 semitubo inferior I
2.3- nº 1 conexão aspirante 90x132 A (apenas para versões especiais)
2.4- nº 2 grelhas direccionadas G
2.5- nº 1 flange de redução Ø 150-120 K
2.6- nº 1 conexão filtrante R
2.7- nº 1 deflector D (apenas para versões especiais)
2.8- nº 1 extensão filtrante P (apenas para versões especiais, veja par. 4.4 3 da 1ª Parte)
2.9- nº 1 saco contendo:
nº 2 estribos 1 para a fixação do corpo da coifa
nº 2 estribos 2 para a fixação da chaminé parafusos, buchas e documentação
2.10 -nº1 fundo F (opcional)
Os componentes A, D, P, só estão disponíveis em aparelhos predispostos para instalações
particulares.
3 - PRECAUÇÕES DE SEGURANÇA
3.1- Não ligue o aparelho a canalizações de descarga dos fumos produzidos por combustão
(caldeiras, lareiras, etc ...).
3.2- Verifique se a tensão da rede corresponde à tensão indicada na plaqueta de
características colocada dentro da coifa.
3.3- Faça a ligação entre a coifa e a rede eléctrica interpondo um interruptor bipolar cuja
abertura dos contactos seja de pelo menos 3 mm.
3.4- Certifique-se de que a instalação eléctrica da sua casa possua uma ligação à terra
correcta.
3.5- A distância mínima de segurança entre a mesa de cozedura e a coifa é de 65 cm.
3.6- Não faça a flambagem de alimentos sob a coifa.
3.7- Tome cuidado com as frigideiras durante a sua utilização: o óleo excessivamente
aquecido pode inflamar-se.
3.8- Antes de efectuar qualquer operação de lim-peza ou de manutenção, desligue o aparelho
tirando a ficha da tomada de corrente ou carregando no interruptor geral.
3.9- Se usar coifas ou aparelhos que não funcionem com energia eléctrica (por exemplo
aparelhos a gás), o aposento deverá possuir uma ventilação adequada. A utilização
destes aparelhos será correcta e sem riscos quando a depressão máxima do local não
superar 0,04 mbar; desta maneira, evitar-se á um retorno do gás de descarga.
44
○○○○○○○○○○○○○○○○○○○○○○○○○○○○○○○○○○○○○○○
PT
Page 45

○○○○○○○○○○○○○○○○○○○○○○○○○○○○○○○○○○○○○○○○○○○○○○○
4 - INSTALAÇÃO
A coifa pode ser instalada na parede em três maneiras diferentes:
A - Instalação da coifa com fundo (opcional);
B - Instalação da coifa sem fundo;
C - Instalação da coifa na versão aspirante, com alinhamento da chaminé à extremidade
superior dos móveis suspensos.
De qualquer maneira, a fim de evitar que a coifa se solte acidentalmente, a instalação
da chaminé sempre deverá ser feita conforme as instruções.
Respeite a seguinte ordem:
4.1- Montagem dos estribos de suporte
4.2- Montagem do corpo da coifa
4.3- Ligação eléctrica e controlo do funcionamento
4.4- Conexão da versão aspirante ou filtrante
4.5- Montagem da chaminé telescópica
4.1 - Montagem dos estribos de suporte
Instalação tipo A/B (fig. 2a-b)
1 - Na parede, trace uma linha vertical até o tecto, no centro da zona prevista para a
montagem da coifa: a função desta linha é fazer o alinhamento vertical das partes que
compõem o aparelho.
2 - Colocação dos estribos 1
Trace uma linha horizontal a uma distância da mesa de cozedura de:
a - com fundo (fig. 2a) d = 200 mm + H, onde H = altura em mm da parte visível do fundo;
devido aos vários tipos de fundos disponíveis, esta medida deve ser tomada direc-tamente
no fundo fornecido com a coifa.
b - sem fundo (fig. 2b) d = 850 mm mínimo.
Na linha horizontal, marque os furos para a fixação dos estribos 1 com um espaço de Y
= 100 mm entre os furos dos estribos e o centro da coifa.
3 - Colocação dos estribos 2
a - Apóie um dos estribos 2 na parede a cerca de 1 ou 2 mm do tecto ou do limite superior,
alinhando o seu centro (entalhes) com a linha vertical.
b - Na parede, marque os dois furos ovais do estribo.
c - Apóie o outro estribo 2 na parede, alinhan-do-o com a linha vertical, a uma distância X
medida conforme indicado na fig. 2, igual à altura do semitubo superior S fornecido com
a coifa. O valor da cota X pode variar em função das várias alturas disponíveis do semitubo
superior.
d - Na parede, marque os centros dos furos ovais do estribo.
4 - Com uma broca de Ø 8 mm, fure todos os centros marcados. Prenda bem os estribos 1
e 2 usando as buchas de Ø 8 mm e os respectivos parafusos fornecidos.
5 - Fundo (opcional)
Neste caso, a altura da coifa com relação à mesa de cozedura é determinada pela altura
do fundo F e pela eventual elevação da mesa com relação às bases.
O fundo deve ser montado antes do corpo da coifa e, se desejar prendê-lo na parede
tanto por cima quanto por baixo, é preciso montá-lo à altura correcta antes da
montagem das bases ou, pelo menos, do respectivo plano superior. Por ser uma operação
complexa, esta deverá ser feita apenas pelo instalador do fogão ou por um técnico
competente que conheça as dimensões finais dos móveis.
○○○○○○○○○○○○○○○○○○○○○○○○○○○○○○○○○○○○○○○
45PT
Page 46

○○○○○○○○○○○○○○○○○○○○○○○○○○○○○○○○○○○○○○○○○○○○○○○
Se fizer apenas a fixação superior, siga estas instruções:
a - Apóie o fundo no plano da base conforme a fig. 2a, coloque-o em contacto com a parede
e faça a sua centragem com relação à base.
b - Na parede, marque os centros dos dois furos da folha superior.
c - Fure a parede com uma broca de Ø 8 e prenda o fundo usando as buchas Ø 8 e os
parafusos fornecidos.
d - Se for necessário fazer a estabilização da parte inferior, esta deverá ser feita pelo
instalador.
Instalação tipo C (fig. 3)
Este tipo de instalação pode ser feito utilizando-se apenas o semitubo inferior I.
1 - Na parede, trace uma linha vertical no centro da zona prevista para a montagem da
coifa até alcançar o limite superior, que pode ser representado por uma prateleira de
madeira: esta linha servirá para fazer o alinhamento vertical das partes que compõem o
aparelho. Trace uma linha horizontal a uma distância X da extremidade inferior da
prateleira. O valor da cota X pode variar em função das várias dimensões disponíveis do
semitubo inferior e é igual à altura do semitubo I + 35 mm.
2 - Colocação dos estribos 1
Na linha horizontal, marque os furos para a fixação dos estribos conforme indicado no
parágrafo 4.1 2.
3 - Colocação dos estribos 2
a - Apóie um dos estribos 2 na parede a cerca de 1 ou 2 mm da prateleira, alinhando o seu
centro (entalhes) com a linha vertical.
b - Na parede, marque os dois furos ovais do estribo.
4 - Com uma broca Ø 8 mm, fure todos os centros marcados. Prenda bem os estribos 1 - 2
usando as buchas Ø 8 mm e os respectivos parafusos fornecidos.
4.2 - Montagem do corpo da coifa (fig. 4)
1 - Prenda o corpo da coifa C nos estribos 1.
2 - Introduza os dois parafusos de regulação W de 4Mx24 (fornecidos com os acessórios)
nos furos roscados dos estribos 1.
3 - Regule a coifa na direcção vertical e faça o seu nivelamento na direcção horizontal
girando os parafusos W.
4.3 - Ligação eléctrica e controlo do funcionamento
1 - É preciso respeitar à risca as precauções de segurança 3.2, 3.3 e 3.4 do parágrafo 3.
2 - Depois de ter feito a ligação eléctrica, verifique o funcionamento correcto da iluminação,
do accionamento do motor e da mudança das velocidades.
4.4 - Conexão da versão aspirante ou filtrante
1 - Conexão da versão aspirante (instalação tipo A/B)
a - A coifa pode ser ligada às tubagens externas por meio de um tubo rígido ou flexível Ø
120 ou 150 mm: esta opção deverá ser feita pelo instalador. Para a instalação com o
tubo de Ø 120, é necessário instalar a flange de redução K na saída da coifa (fig. 5).
b - Faça a ligação entre a saída do ar e a tubagem externa usando o tubo rígido ou flexí-vel,
que deverá ser preso com braçadeiras apropriadas (fig. 6).
A obtenção do material indicado e necessário para esta última operação deverá ser feita
pelo instalador. Se desejar instalar a coifa na versão aspirante com saída lateral de ar
46
○○○○○○○○○○○○○○○○○○○○○○○○○○○○○○○○○○○○○○○
PT
Page 47

○○○○○○○○○○○○○○○○○○○○○○○○○○○○○○○○○○○○○○○○○○○○○○○
pelo semitubo inferior I com tubos rectangulares, é necessário instalar o deflector D na
conexão R para fechar o furo utilizado (fig. 7).
c - Retire os eventuais filtros de carvão activo (veja parágrafo 3.3 2, 2ª parte).
2 - Conexão da versão aspirante (instalação tipo C)
Este tipo de instalação permite fazer a ligação entre a coifa e a tubagem de evacuação
externa por meio de tubos rectangulares com dimensões nominais de 90x132, utilizandose apenas o semitubo inferior I (fig. 3).
a - Faça um furo de 120 mm na prateleira colocada entre os dois móveis suspensos por
cima do fogão.
b - Faça a ligação entre a flange de saída do ar e a conexão aspirante A.
c - Faça a ligação entre a conexão aspirante A e a tubagem de evacuação externa utilizando
o tubo rectangular de 90x132.
Também neste caso, os tubos e as braça-deiras deverão ser obtidos pelo instalador.
d - Retire os eventuais filtros de carvão activo (veja parágrafo 3.3 2, 2ª parte).
3 - Conexão da versão filtrante (apenas para instalação tipo A/B)
a - O ar filtrado é reintroduzido no ambiente através de duas pequenas grelhas laterais
direccionadas e colocadas no semitubo inferior I, cuja posição, por causa de exigências
diversas, é caracterizada por duas alturas diferentes (fig. 8 e 9).
b - Posição baixa (fig. 8): faça a ligação directa entre a conexão filtrante R e a saída redonda
do difusor, empurrando-a para baixo.
c - Posição alta (fig. 9): faça a ligação entre a extensão P e a saída redonda do difusor,
empurrando-a para baixo e, analogamente, faça a ligação entre a conexão R e a extensão P.
d - Instale os eventuais filtros de carvão activo dentro do corpo da coifa (veja parágrafo 3.3
2, 2ª parte). OBS - Não instale as grelhas direccionadas: esta operação deverá ser feita
depois da instalação da chaminé.
4.5 - Montagem da chaminé telescópica
1 - Instalação tipo A/B (fig. 10)
a - Para fazer a instalação do semitubo superior S, alargue ligeiramente as duas folhas la-
terais, prenda-as atrás dos estribos 2 e torne a fechá-las até o final do seu curso. Prenda o semitubo nos estribos 2 com quatro dos parafusos fornecidos com os acessórios.
b - Analogamente, instale o semitubo inferior I entre o estribo inferior 2 e a parede não se
esquecendo que, na base, o perímetro do semitubo deve ser introduzido na sede
apropriada do corpo da coifa e preso nas linguetas laterais (veja detalhe aumentado).
2 - Instalação tipo C (fig. 11)
Instale o semitubo inferior I alargando ligeira-mente as duas folhas laterais, prenda-as
atrás do estribo 2 e torne a fechá-las até o final do seu curso. Não se esqueça que, na
sua base, o perímetro do semitubo deverá ser introduzido na sede apropriada do corpo
da coifa e preso nas linguetas laterais (veja detalhe aumentado).
ATENÇÃO - Em caso de desmontagem do semitubo inferior, será necessário soltar
as duas linguetas laterais, colocadas dentro da coifa (fig. 12).
3 - Instale as duas grelhas direccionadas com posições préestabelecidas nas sedes
apropriadas da chapa, de modo que o símbolo fique virado para cima e que o símbolo
fique virado para frente . Para além disso, para as versões filtrantes, verifique se as
grelhas estão bem colocadas dentro da conexão filtrante R (fig. 13).
○○○○○○○○○○○○○○○○○○○○○○○○○○○○○○○○○○○○○○○
47PT
Page 48

○○○○○○○○○○○○○○○○○○○○○○○○○○○○○○○○○○○○○○○○○○○○○○○
2ª Parte INSTRUÇÕES PARA A UTILIZAÇÃO E PARA A MANUTENÇÃO
1 - PRECAUÇÕES DE SEGURANÇA
É absolutamente necessário respeitar todas as advertências contidas no parágrafo 3
da 1ª parte - Instruções para a instalação. Além disso, é muito importante prestar uma
atenção especial, durante a utilização e a manutenção, nas seguintes advertências:
1.1- Efectue uma manutenção cuidadosa e rápida dos filtros antigordura e de carvão activo
seguindo as instruções quanto aos intervalos fornecidas pelo Fabricante ou com uma
frequência maior em caso de utilização em condições particularmente difíceis (mais
de 4 horas diárias).
1.2- Não deixe chamas livres de forte intensidade sob a coifa enquanto esta estiver em
funcionamento: quando retirar as caçarolas, apague a chama ou, pelo menos, reduza
a sua intensidade desde que esta fique acesa por breves períodos e sob vigilância.
1.3- Sempre regule a chama de forma a evitar que supere excessivamente as bordas
laterais do fundo da caçarola: desta maneira, economiza-se energia e evita-se
concentrações de calor perigosas.
1.4- Nunca destine o aparelho a um uso impróprio, pois este foi projectado exclusivamente
para remover os odores do ambiente da cozinha.
1.5- Para substituir o cabo de alimentação, dirija-se ao Centro de Assistência mais próximo.
2 - UTILIZAÇÃO
Quadro de comandos (fig. 14)
O esquema dos comandos é o seguinte:
TECLA L = Para ligar e desligar a iluminação
TECLA M = Para ligar e desligar o motor
TECLA V = Para escolher uma dentre as velocidades de operação, que estão di-
vididas desta maneira:
1 = Velocidade mínima, indicada para uma troca de ar contínua, muito
silenciosa, em caso de pequena quantidade de vapores produzidos
durante a cozedura.
2 = Velocidade média, indicada para a maior parta das condições de
utilização, devido à óptima relação entre a quantidade de ar tra-tado e
a produção de ruído.
3 = Velocidade máxima, indicada para tratar as emissões máximas de
vapores produzidos durante a cozedura, até mesmo por longos períodos
de tempo.
3 - MANUTENÇÃO
Uma manutenção constante garante um bom funcionamento e um bom rendimento no
tempo. Deve-se prestar uma atenção especial nos filtros metálicos antigordura e, apenas
no caso de coifas filtrantes, nos filtros de carvão activo.
3.1 - Filtros metálicos antigordura
1 - Limpeza
Estes filtros devem ser lavados com um detergente normal a cada 2 meses no máximo.
As suas dimensões compactas também permitem a lavagem em máquinas de lavar
louça.
2 - Desmontagem dos filtros
Retire um filtro por vez segurando-o por baixo com uma mão e puxando o puxador de
48
○○○○○○○○○○○○○○○○○○○○○○○○○○○○○○○○○○○○○○○
PT
Page 49

○○○○○○○○○○○○○○○○○○○○○○○○○○○○○○○○○○○○○○○○○○○○○○○
aço inox para trás (fig. 15). Para tornar a montá-lo, tenha cuidado para man-ter o puxador
virado para a parte visível.
3.2 - Filtros de fibra sintética
1 - Substitua-os quando a cor vermelha dos pontos, visível através das grades, se tiver
difundido à maior parte da superfície do filtro e, de qualquer maneira, a substituição
deve ser feita a cada 2 meses no máximo. OSB: Este filtro não pode ser lavado
porque perderia todas as suas características. O fabricante declina qualquer
responsabilidade por danos provocados pelo não cumprimento desta norma.
2 - Como fazer a substituição
- Abra a grade (fig. 16a) empurrando as teclas U para a parte traseira até o final do seu
curso.
- Rode a grade para baixo e solte-a dos pinos traseiros com um movimento diagonal
(fig. 16b).
- Apóie a grade sobre uma superfície plana e retire os prendedores Q do filtro (fig. 16c).
- Substititua o filtro de forma que os pontos coloridos fiquem virados para a grade.
- Torne a montar os prendedores e a grade seguindo as instruções fornecidas no sentido
inverso e verifique se os ganchos metálicos comandados pelas teclas U estão bem
introduzidos na sua sede. ATENÇÃO - É necessário respeitar os intervalos de
manutenção ou de substituição indicados para evitar um possível incêndio se os
filtros ficarem saturados de gordura.
3.3 - Filtro de carvão activo
1 - Funcionamento
Os filtros de carvão activo possuem a capacidade de reter os odores até alcançarem a
saturação. Não podem ser lavados nem regenerados; portanto, devem ser substituídos
a cada 4 meses pelo menos ou mais frequentemente caso forem usados com uma
intensidade particularmente elevada.
2 - Substituição
Retire os filtros metálicos antigordura e a grade de aspiração, remova os filtros de carvão
activo colocados nas extremidades do difusor metálico girando na direcção seta A. Monte
os filtros novos girando na direcção seta B (fig. 17).
3.4 - Iluminação
Esta é constituída por um tubo de neon de 15W ou por 2 lâmpadas de 40W.
Para fazer a sua substituição das lâmpadas, siga estas instruções (fig. 18):
1 - Retire o terminal metálico T adjacente à caixa de comandos. O vidro fica preso nas
linguetas Z.
2 - Deslize o vidro em direcção à caixa de coman-dos até soltar a ponta oposta (seta 1).
Depois disso, puxe-o levemente para baixo (seta 2) e faça com que deslize no sentido
inverso ao inicial (seta 3) até que fique completamente solto.
Substitua a lâmpada ou o tubo de neon e torne a montar o vidro seguindo a ordem
inversa.
3.5 - Limpeza
A limpeza externa e interna da coifa deve ser feita com um pano húmido e detergente
liquido neutro.
Evite em qualquer circunstância o uso de substâncias abrasivas, principalmente nas
superfícies de aço inox acetinado.
○○○○○○○○○○○○○○○○○○○○○○○○○○○○○○○○○○○○○○○
49PT
Page 50

○○○○○○○○○○○○○○○○○○○○○○○○○○○○○○○○○○○○○○○○○○○○○○○
A
S
2
1
G
I
K
C
R
D
F
P
1
b
50
○○○○○○○○○○○○○○○○○○○○○○○○○○○○○○○○○○○○○○○
a
2
Page 51

○○○○○○○○○○○○○○○○○○○○○○○○○○○○○○○○○○○○○○○○○○○○○○○
W
3
4
5
6
7
○○○○○○○○○○○○○○○○○○○○○○○○○○○○○○○○○○○○○○○
51
Page 52

○○○○○○○○○○○○○○○○○○○○○○○○○○○○○○○○○○○○○○○○○○○○○○○
62
8
257
9
11
13
52
○○○○○○○○○○○○○○○○○○○○○○○○○○○○○○○○○○○○○○○
10
12
Page 53

○○○○○○○○○○○○○○○○○○○○○○○○○○○○○○○○○○○○○○○○○○○○○○○
14
16c
0 1
L
0 1
1 2 3
MV
16a
15
16b
A
A
A
B
B
A
○○○○○○○○○○○○○○○○○○○○○○○○○○○○○○○○○○○○○○○
B
B
1
17
2
3
T
18
53
Page 54

○○○○○○○○○○○○○○○○○○○○○○○○○○○○○○○○○○○○○○○○○○○○○○○
54
○○○○○○○○○○○○○○○○○○○○○○○○○○○○○○○○○○○○○○○
Page 55

○○○○○○○○○○○○○○○○○○○○○○○○○○○○○○○○○○○○○○○○○○○○○○○
○○○○○○○○○○○○○○○○○○○○○○○○○○○○○○○○○○○○○○○
55
Page 56

Quest’apparecchio é conforme alla norma europea sulla bassa tensione C.E.E. 73/23 relativa
alla sicurezza elettrica e alle norme europee: C.E.E. 89/336 relativa alla compatibilità elettromagnetica e C.E.E. 93/68 relativa alla marcatura CE.
This appliance complies with European regulations on low voltages, EEC Directive 73/23 on
electrical safety, and with the following European regulations: EEC Directive 89/336 on
electromagnetic compatibility and EEC Directive 93/68 on EC marking.
Cet équipement est conforme à la norme européenne sur la basse tension C.E.E. 73/23
relative à la sécurité électrique et aux normes européennes: C.E.E. 89/336 relative à la
compatibilité électromagnétique et C.E.E. 93/68 relative au marquage CE.
Dieses Gerät entspricht den europäischen Niederspannungsrichtlinien 73/23/EWG zur
elektrischen Sicherheit, den europäischen Richtlinien 89/336/EWG zur elektromagnetischen
Verträglichkeit und den Richtlinien 93/68/EWG zur CE-Kennzeichnung
Dit apparaat voldoet aan de Europese Laagspanningsrichtlijn 72/23/EEG inzake de elektrische
veiligheid en aan de Europese normen 89/336/EEG inzake de elektromagnetische
compatibiliteit en 93/68/EEG inzake de CE-markering.
Este aparato respeta la norma europea de baja tensión C.E.E. 73/23 que hace referencia a la
seguridad eléctrica y a las normas europeas: C.E.E. 89/336 relativa a la compatibilidad
electromagnética y C.E.E. 93/68 relativa a la marca CE.
Este aparelho está conforme a norma européia sobre baixa tensão C.E.E. 73/23 referente à
segurança elétrica e às normas européias, C.E.E. 89/336 referente à compatibilidade
eletromagnética e C.E.E. 93/68 inerente à marcação CE
436000137 01 - 011113
 Loading...