

Page 1
DAILY REFERENCE
GUIDE
EN
THANK YOU FOR PURCHASING AN
ARISTON PRODUCT
To receive more comprehensive help and
support, please register your product at
www. aristonchannel. com
Before using the appliance carefully read the Health and Safety guide.
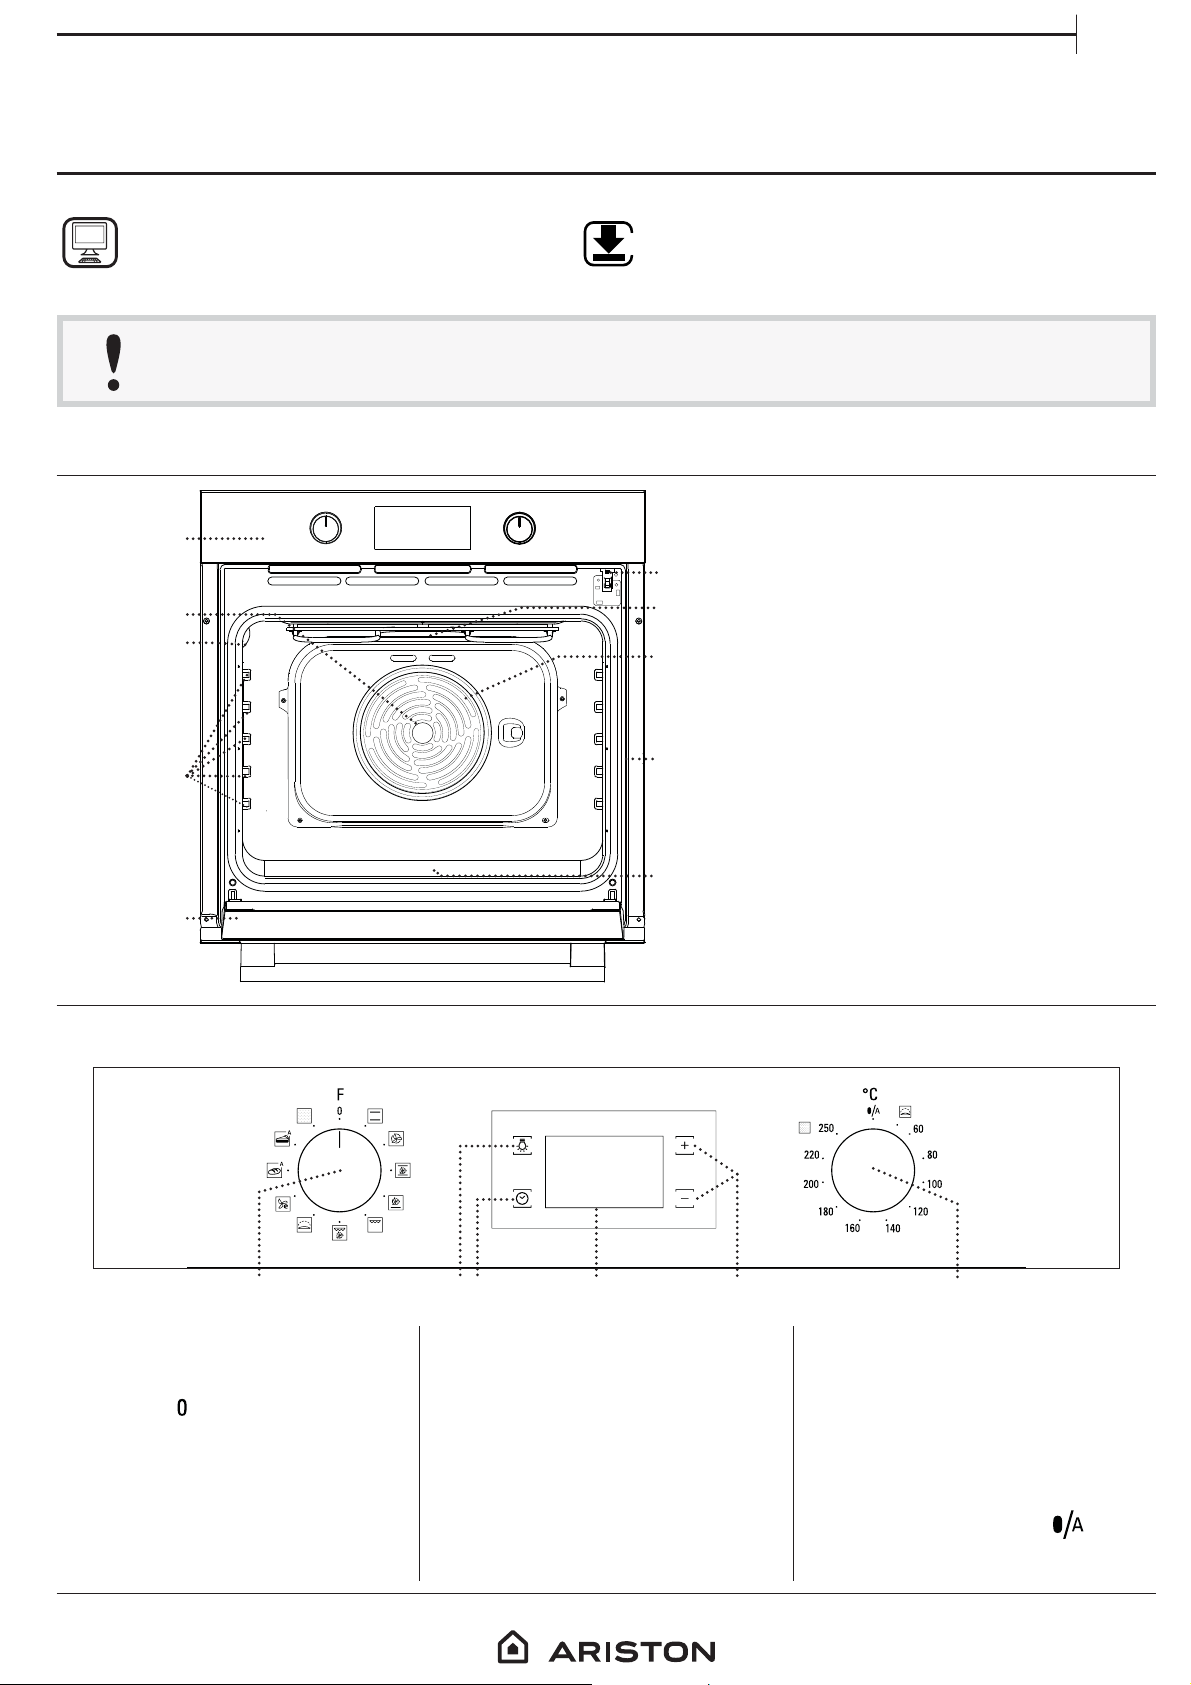
PRODUCT DESCRIPTION
1
2
3
4
5
You can download the Safety Instructions
and the Use and Care Guide by visiting our
website www. aristonchannel. com and
following the instructions on the back of
this booklet.
1. Control panel
2. Fan
6
7
8
9
10
3. Lamp
4. Shelf guides
(the level is indicated on the wall
of the cooking compartment)
5. Door
6. Door lock
(the level is indicated on the wall
of the cooking compartment)
7. Upper heating element/grill
8. Circular heating element
(non-visible)
9. Identification plate
(do not remove)
10. Bottom heating element
(non-visible)
CONTROL PANEL
13245
1. SELECTION KNOB
For switching the oven on by
selecting a function.
Turn to the
the oven off.
position to switch
2. LIGHT
With the oven switched on, press
to turn the oven compartment
lamp on or off.
3. TIME SETTING
For accessing the cooking time
settings, delayed start and timer.
For displaying the time when the
oven is off.
4. DISPLAY
6
5. ADJUSTMENT BUTTONS
For changing the cooking time
settings.
6. THERMOSTAT KNOB
Turn to select the temperature you
require when activating manual
functions.
Automatic functions use
.
1
Page 2
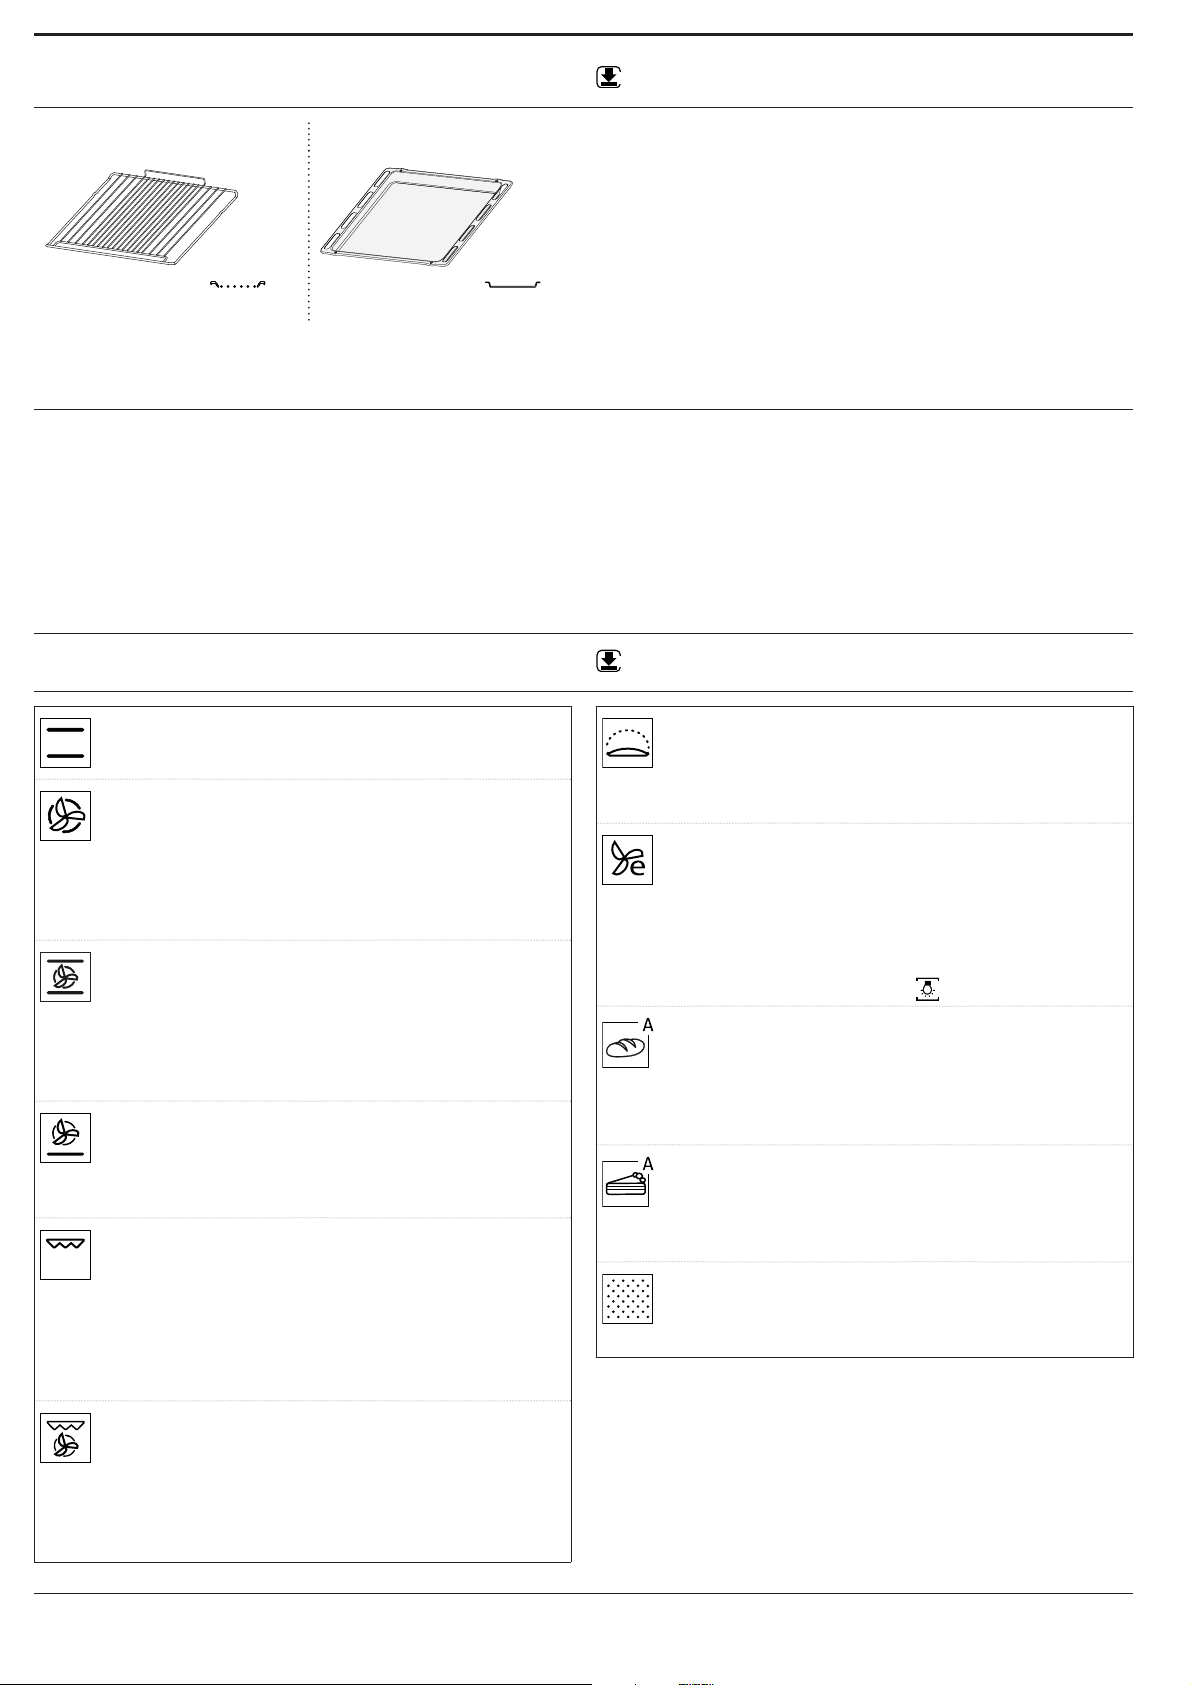
ACCESSORIES
WIRE SHELF BAKING TRAY
The number of accessories may vary depending on which model is purchased.
Other accessories can be purchased separately from the After-sales Service.
WWW
INSERTING THE WIRE SHELF
AND OTHER ACCESSORIES
. Insert the wire shelf onto the level you require by
holding it tilted slightly upwards and resting the
raised rear side (pointing upwards) down first. Then
slide it horizontally along the shelf guide as far as
possible.
. Other accessories, like the baking tray, are to be
inserted horizontally, letting them slide on the shelf
guides.
. The shelf guides can be removed to facilitate the
oven cleaning: pull them to remove from their seats.
Download the Use and Care Guide from
www. aristonchannel. com for more information
FUNCTIONS
CONVENTIONAL
For cooking any kind of dish on one shelf only.
FORCED AIR
For cooking different foods that require the
same cooking temperature on several shelves
(maximum three) at the same time. This function
can be used to cook different foods without odours
being transferred from one food to another.
MAXI COOKING
For cooking large joints of meat (above 2.5
kg). We recommend turning the meat over during
cooking to ensure that both sides brown evenly. We
also recommend basting the joint every so often to
prevent it from drying out excessively.
PIZZA
For baking different types and sizes of pizza
and bread. It is a good idea to swap the position of
the baking trays halfway through cooking.
GRILL
For grilling steaks, kebabs and sausages,
cooking vegetables au gratin or toasting bread.
When grilling meat, we recommend using a drip tray
to collect the cooking juices: Position the pan on any
of the levels below the wire shelf and add 200 ml of
drinking water.
WWW
www. aristonchannel. com for more information
Download the Use and Care Guide from
RISING
For helping sweet or savoury dough to rise
effectively. Turn the thermostat knob to the icon to
activate this function.
ECO FORCED AIR
For cooking roasts and stuffed roasting joints
on a single shelf. Food is prevented from drying out
excessively by gentle, intermittent air circulation.
When this ECO MODE function is in use, the light
will remain switched off during cooking but can be
switched on again by pressing
.
BREAD AUTO
This function automatically selects the ideal
temperature and baking time for bread. For best
results, carefully follow the recipe . Activate the
function when the oven is cold.
DESSERT AUTO
This function automatically selects the ideal
temperature and baking time for cakes. Activate the
function when the oven is cold.
AUTOMATIC CLEANING
For eliminating cooking spatters using a cycle
at a very high temperature (over 400 °C).
TURBO GRILL
For roasting large joints of meat (legs, roast
beef, chicken). We recommend using a drip tray to
collect the cooking juices: Position the pan on any
of the levels below the wire shelf and add 200 ml of
drinking water.
2
Page 3
USING THE APPLIANCE FOR THE FIRST TIME
EN
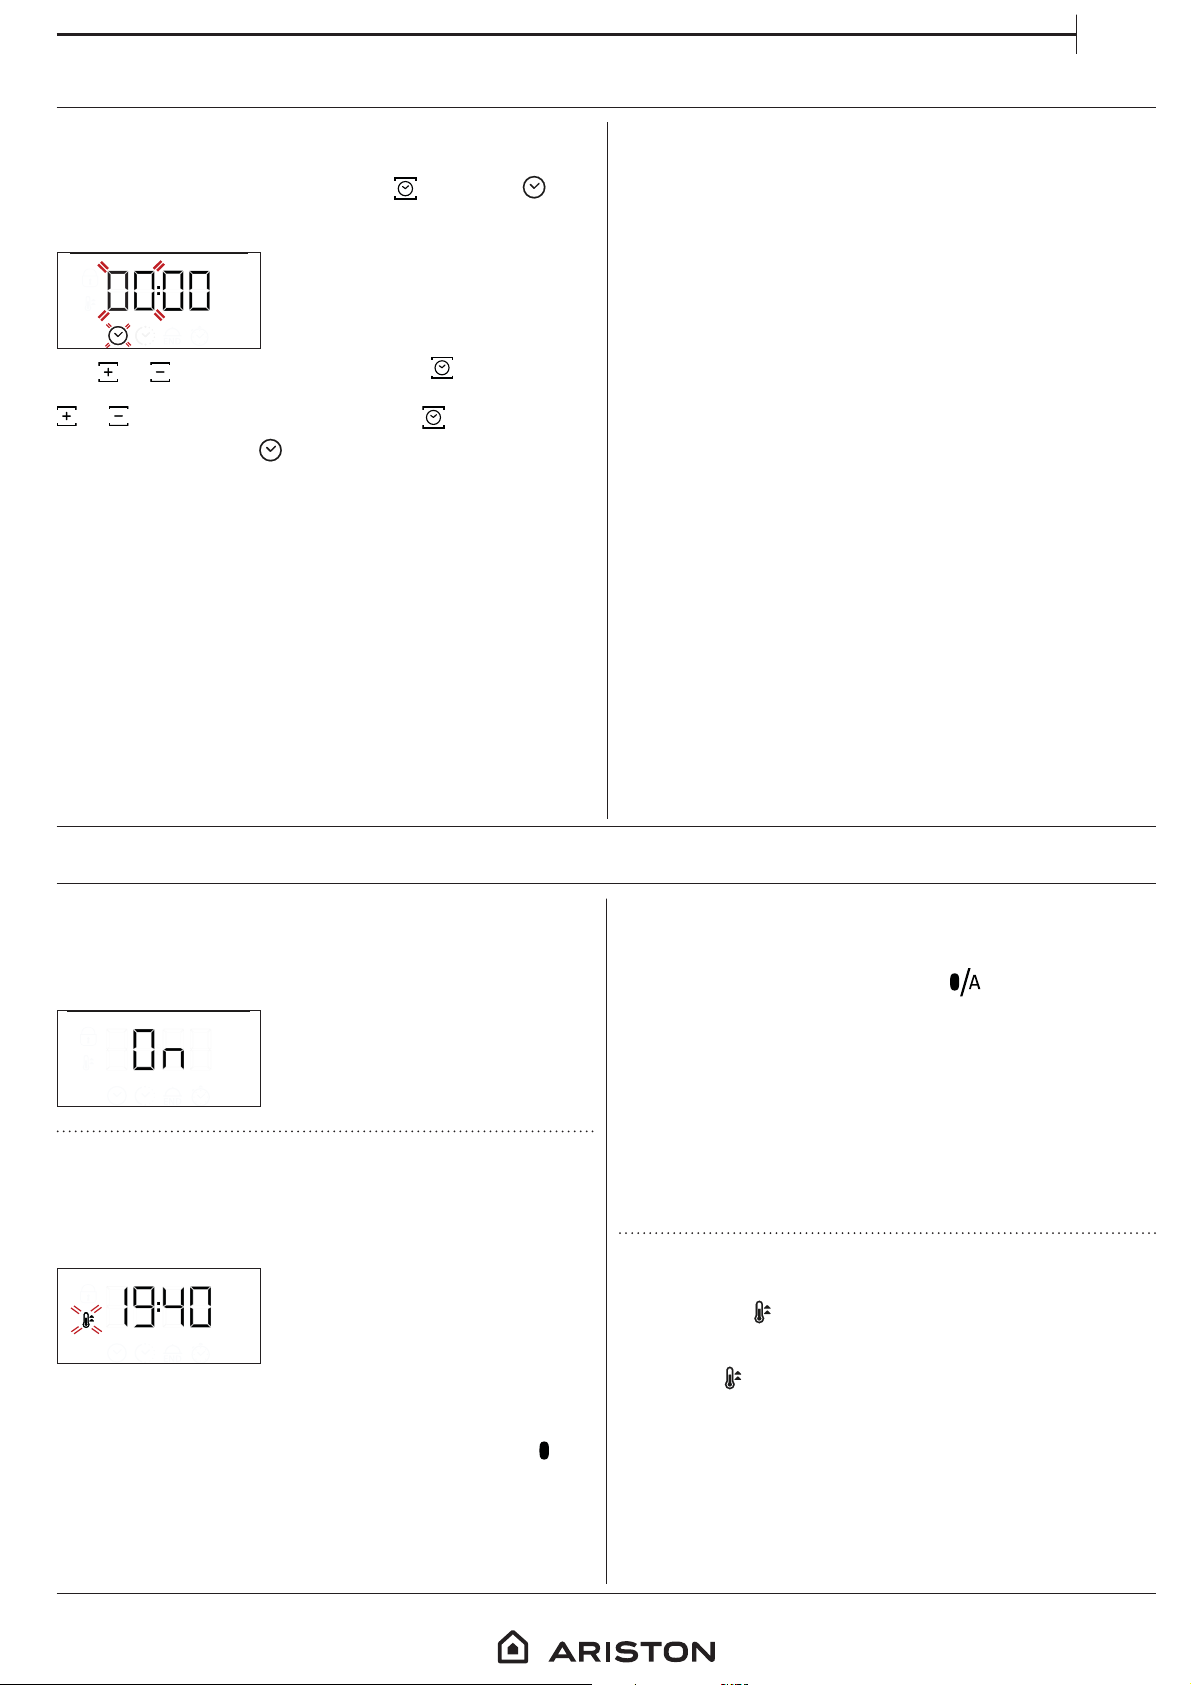
1. SETTING THE TIME
You will need to set the time when you switch on the
appliance for the first time: Press
icon and the two digits for the hour start flashing on
the display.
Use or to set the hour and press to confirm.
The two digits for the minutes will start flashing. Use
or to set the minutes and press to confirm.
Please note: When the icon is ashing, for example
following lengthy power outages, you will need to reset the
time.
until the
2. REHEAT THE OVEN
A new oven may release odours that have been left
behind during manufacturing: This is completely
normal.
Before starting to cook food, we therefore
recommend heating the oven with it empty in order
to remove any possible odours.
Remove any protective cardboard or transparent film
from the oven and remove any accessories from inside
it.
Heat the oven to 250 ° C for about one hour,
preferably using the “Maxi Cooking” function. The
oven must be empty during this time.
Follow the instructions for setting the function
correctly.
Please note: It is advisable to air the room after using the
appliance for the rst time.
DAILY USE
1. SELECT A FUNCTION
To select a function, turn the selection knob to the
symbol for the function you require: The display will
light up and an audible signal will sound.
2. ACTIVATE A FUNCTION
MANUAL
To start the function you have selected, turn the
thermostat knob to set the temperature you require.
Please note: During cooking you can change the function
by turning the selection knob or adjust the temperature by
turning the thermostat knob.
The function will not start if the thermostat knob is on
You can set the cooking time, cooking end time (only if you
set a cooking time) and a timer.
.
AUTOMATIC
To start the automatic function you have selected
(“Bread” or “Dessert”), keep the thermostat knob at the
position for automatic functions (
To finish cooking, turn the selection knob to position 0.
Please note: You can set the cooking end time and timer.
).
RISING
To start the “Rising” function, turn the thermostat
knob to the relevant symbol; if the oven is set to a
different temperature, the function will not start.
Please note: You can set the cooking time, cooking end time
(only if you set a cooking time) and a timer.
3. PREHEATING
Once the function starts, an audible signal and a
flashing icon
preheating phase has been activated.
At the end of this phase, an audible signal and the
fixed icon
has reached the set temperature: At this point, place
the food inside and proceed with cooking.
Please note: Placing the food in the oven before preheating
has nished may have an adverse eect on the nal cooking
result.
on the display indicate that the
on the display will indicate that the oven
3
Page 4

. PROGRAMMING COOKING
You will need to select a function before you can start
programming cooking.
DURATION
Keep pressing until the icon and “00:00” start
flashing on the display.
. SETTING THE TIMER
This option does not interrupt or program cooking
but allows you to use the display as a timer, either
during while a function is active or when the oven is
off.
Keep pressing
until the icon and “00:00” start
flashing on the display.
Use or to set the cooking time you require, then
press
to confirm.
Activate the function by turning the thermostat knob
to the temperature you require: An audible signal will
sound and the display will indicate that cooking is
complete.
Notes: To cancel the cooking time you have set, keep
pressing
then use
This cooking time includes a preheating phase.
until the icon starts ashing on the display,
to reset the cooking time to “00:00”.
PROGRAMMING THE END COOKING TIME/
DELAYED START
After a cooking time has been set, starting the
function can be delayed by programming its end
time: Press
until the icon and the current time
start flashing on the display.
Use or to set the time you want cooking to end
and press
to confirm.
Activate the function by turning the thermostat knob
to the temperature you require: The function will
remain paused until it starts automatically after the
period of time that has been calculated in order for
cooking to finish at the time you have set.
Use or to set the time you require and press
to confirm.
An audible signal will sound once the timer has
finished counting down the selected time.
Please note: To cancel the timer, keep pressing until
icon starts ashing, then use to reset the time to
the
“00:00”.
. AUTOMATIC CLEANING FUNCTION PYRO
Do not touch the oven during the Pyro cycle.
Keep children and animals away from the oven
during and after (until the room has nished
airing) running the Pyro cycle.
Remove all accessories (including the shelf guides)
from the oven before running the function.
If the oven is installed below a hob, make sure that
all the burners or electric hotplates are switched off
while running the self-cleaning cycle.
For optimum cleaning results, remove the worst
soiling with a damp sponge before using the Pyro
function. We recommend only running the Pyro
function if the appliance contains heavy soiling or
gives off bad odours during cooking.
To activate the automatic cleaning function, turn the
selection knob and the thermostat knob to the
icon.
The function will be activated automatically, the door
locked and the light inside the oven switched off:
The display will show the time remaining to the end,
alternating with “Piro” (Pyro).
Notes: To cancel the setting, switch the oven o by turning
the selection knob to position “
”.
END OF COOKING
An audible signal will sound and the display will
indicate that the function has finished.
Turn the selection knob to select a different function
or to position “
Please note: If the timer is active, the display will show “END”
alternately with the remaining time.
” to switch the oven off.
4
Please note: It is only possible to programme the end time
of this function. The duration is automatically set to 120
minutes.
Once the cycle has been completed, the door remains
locked until the temperature inside the oven has
returned to a safe level. Air the room during and after
running the Pyro cycle.
Page 5

COOKING TABLE
EN
RECIPE FUNCTION PREHEAT
Leavened cakes
Filled cake
(cheese cake, strudel, fruit pie)
Biscuits/tartlets
Choux buns
Meringues
TEMPERATURE
(°C)
DURATION
(MIN)
Yes 160-180 30-90
Yes 160-180 30-90
Yes 160 –200 35- 90
Yes 160 –200 40 -90
Yes 160-180 20-45
Yes 150 – 170 20-45
Yes 150 - 170 20-45
Yes 180 - 210 30-40
Yes 180-20 0 35- 45
Yes 180-20 0 35- 45
Yes 90 150 - 200
Yes 90 140 - 200
Yes 90 140 - 200
LEVEL
AND ACCESSORIES
2/3
4
1
2
4
2
3
4
2
5
3
3
4
2
5
3
3
4
2
5
3 1
1
1
Yes 190-2 50 15 -50
Pizza/bread
Yes 190-2 50 20-50
Bread -- 60
Yes 250 10 - 20
Frozen pizza
Yes 230 - 250 10 -25
Yes 180-20 0 4 0-55
Salty cakes
(vegetable pie, quiche)
Yes 180-200 45 - 60
Yes 180-200 45 - 60
-190-20020-30
Vols-au-vents/pu pastry crackers
- 180 -190 20 -40
- 180 -190 20 -40
1 / 2
4
2
3
4
3
4
5
3
4
5
2
2
2
3 1
2
3 1
FUNCTIONS
ACCESSORIES
Conventional Grill Turbo Grill Pizza Forced Air Maxi Cooking Bread Auto Eco Forced Air
Wire shelf
Baking dish or oven tray
on the wire shelf
Baking tray/oven tray on
wire shelf
Baking tray with 200 ml of
water
Baking tray
5
Page 6

RECIPE FUNCTION PREHEAT
Lasagne/baked pasta/
cannelloni/ans
TEMPERATURE
(°C)
Yes 19 0-20 0 45- 65
DURATION
(MIN)
Lamb/veal/beef/pork 1 kg Yes 19 0-200 80 -110
LEVEL
AND ACCESSORIES
2
3
Roast pork with crackling 2 kg Yes 180 -190 110 - 150
Chicken/rabbit/duck 1 kg Yes 200 -230 50-10 0
Turkey/goose 3 kg - 190-200 100 - 160
Baked Whole Fish (llet, whole) Yes 170 - 190 30 - 45
Stued vegetables
(tomatoes, courgettes, aubergines)
Yes 180-200 50 - 70
Toasted bread - 250 2 - 6
Fish llets/slices - 230 - 250 20 - 30*
Sausages / kebabs /
spare ribs / hamburgers
- 250 15 - 30*
Roast chicken 1-1.3 kg Yes 200 - 220 55 - 70**
Roast beef rare 1 kg Yes 200 - 210 35 - 50**
Leg of lamb/knuckle Yes 200 - 210 60 - 90**
Roast potatoes Yes 200 - 210 35 - 55**
2
2
2
2
2
5
4
5
2
3
4
1
3
3
3
Vegetable gratin - 200 - 210 25 - 55
Meat and potatoes Yes 190-200 45 - 100***
Fish and vegetables Yes 180 30 - 50***
Lasagne and meat Yes 200 50 - 100***
Complete meal: Fruit tart (level 5)/
lasagne
(level 3)/meat (level 1)
Yes 180-190 40 - 120***
Roast meat/stued roasting joints - 170 - 180 100 - 150
3
4
4
4
5
1
1
1
3 1
2
The time indicated does not include the preheating phase: We recommend placing the food in the oven and setting the
cooking time only after the required temperature has been reached.
* Turn food halfway through cooking.
** Turn food two thirds of the way through cooking (if
necessary).
*** Estimated length of time: dishes can be removed
Download the Use and Care Guide from
www. aristonchannel. com for the table of tested recipes,
compiled for the certication authorities in accordance with
the standard IEC60350-1.
from the oven at dierent times depending on personal
preference.
FUNCTIONS
ACCESSORIES
6
Conventional Grill Turbo Grill Pizza Forced Air Maxi Cooking Bread Auto Eco Forced Air
Wire shelf
Baking dish or oven tray
on the wire shelf
Baking tray/oven tray on
wire shelf
Baking tray with 200 ml of
water
Baking tray
Page 7

MAINTENANCE AND
CLEANING
WWW
EN
Download the Use and Care Guide from
www. aristonchannel. com for more information
Do not use steam cleaning
equipment.
Use protective gloves during all
operations.
EXTERIOR SURFACES
• Clean the surfaces with a damp microfibre cloth.
If they are very dirty, add a few drops of pH-neutral
detergent. Finish off with a dry cloth.
• Do not use corrosive or abrasive detergents. If any of
these products inadvertently comes into contact with
the surfaces of the appliance, clean immediately with
a damp microfibre cloth.
INTERIOR SURFACES
• After every use, leave the oven to cool and then
clean it, preferably while it is still warm, to remove
any deposits or stains caused by food residues. To
dry any condensation that has formed as a result of
cooking foods with a high water content, leave the
oven to cool completely and then wipe it with a cloth
or sponge.
REMOVING AND REFITTING THE DOOR
Carry out the required
operations with the oven cold.
Disconnect the appliance from
the power supply.
1. To remove the door, open it fully and lower the
catches until they are in the unlock position.
Do not use wire wool, abrasive
scourers or abrasive/corrosive
cleaning agents, as these could
damage the surfaces of the
appliance.
• If there is stubborn dirt on the interior surfaces, we
recommend running the automatic cleaning function
for optimal cleaning results.
• Clean the glass in the door with a suitable liquid
detergent.
• The door can be easily removed and refitted to
facilitate cleaning of the glasses.
ACCESSORIES
Soak the accessories in a washing-up liquid solution
after use, handling them with oven gloves if they
are still hot. Food residues can be removed using a
washing-up brush or a sponge.
CLICK & CLEAN CLEANING THE GLASS
1. After removing the door and resting it on a soft
surface with the handle downwards, simultaneously
press the two retaining clips and remove the upper
edge of the door by pulling it towards you.
2. Close the door as much as you can.
Take a firm hold of the door with both hands – do not
hold it by the handle.
Simply remove the door by continuing to close it
while pulling it upwards (a) at the same time until it is
released from its seating (b).
~15°
b
~60°
a
Put the door to one side, resting it on a soft surface.
3. Refit the door by moving it towards the oven,
aligning the hooks of the hinges with their seating
and securing the upper part onto its seating.
4. Lower the door and then open it fully.
Lower the catches into their original position: Make
sure that you lower them down completely.
5. Try closing the door and check to make sure that it
lines up with the control panel. If it does not, repeat
the steps above.
2. Lift and firmly hold the inner glass with both
hands, remove it and place it on a soft surface before
cleaning it.
3. Refit the intermediate pane (marked with “1R”)
before refitting the inside pane: To position the panes
of glass correctly, make sure that the “R” mark can be
seen in the left-hand corner. First insert the long side
of the glass indicated by “R” into the support seats,
then lower it into position.
Repeat this procedure for both panes of glass.
4. Refit the upper edge: A click will indicate correct
positioning. Make sure the seal is secure before
refitting the door.
7
Page 8

X
XXX
X
XXXXXX
X
XXX
XXXX
X
TROUBLESHOOTING
WWW
Problem Possible cause Solution
Download the Use and Care Guide from
www. aristonchannel. com for more information
The oven is not working. Power cut.
Disconnection from the
mains.
The display shows the letter “F”
Software problem. Contact you nearest Client After-sales Service
followed by a number.
USEFUL TIPS
HOW TO READ THE COOKING TABLE
The table lists the best function, accessories and
level to use to cook various different types of food.
Cooking times start from the moment food is placed
in the oven, excluding preheating (where required).
Cooking temperatures and times are approximate
and depend on the amount of food and the type
of accessory used. Use the lowest recommended
settings to begin with and, if the food is not cooked
enough, then switch to higher settings. Use the
accessories supplied and preferably dark-coloured
metal cake tins and baking trays. You can also use
Pyrex or stoneware pans and accessories, but bear in
mind that cooking times will be slightly longer.
Check for the presence of mains electrical
power and whether the oven is connected to
the electricity supply.
Turn off the oven and restart it to see if the
fault persists.
Centre and state the number following the
letter “F”.
WWW
www. aristonchannel. com for more information
Download the Use and Care Guide from
BREAD AUTO FUNCTION
For best results you should carefully follow the
instructions, using the recipe for mixing 1000 g of
dough: 600 g of flour, 360 g of water, 11 g of salt, 25 g
of fresh yeast (or two packets of yeast powder).
For optimal rising, allow about 90 minutes at room
temperature or 60 minutes in the oven using the
“Rising” function.
Put the dough into the (cold) oven, pour 100 cc of
cold drinking water on to the bottom of the oven and
activate the “Bread Auto” function. After cooking,
leave the dough to stand on a wire shelf until
completely cooled.
COOKING DIFFERENT FOODS AT THE SAME TIME
Using the “Forced Air” function, you can cook
different foods which require the same cooking
temperature at the same time (for example: fish and
vegetables), using different shelves. Remove the food
which requires a shorter cooking time and leave the
food which requires a longer cooking time in the
oven.
PRODUCT FICHE
WWW
The product fiche with energy data of this
appliance can be downloaded from the website
www. aristonchannel. com
HOW TO OBTAIN THE USE AND CARE GUIDE
WWW
>
Download the Use and Care Guide
from our website www. aristonchannel. com
(you can use this QR Code), specifying the
product’s commercial code.
> Alternatively, contact our Client After-sales Service.
CONTACTING OUR AFTERSALES SERVICE
You can find our contact details in the warranty
manual. When
contacting our Client
After-sales Service,
please state the codes
provided on your
product’s identification
plate.
X
X
XXXX
X
XX
XX
Model: xxxXXXXxx
X
X
XXXXXX XXXXXX XXXXX XXXXXXX
001
8
Printed in Italy
400010906003
 Loading...