

Ariete PANE EXPRESS ARTE 121 User Manual
Italianо
English
Български
mod.121
AVVERTENZE IMPORTANTI
LEGGERE SEMPRE QUESTE ISTRUZIONI PRIMA
DELL’USO Usando apparecchi elettrici è necessario
prendere le opportune precauzioni, tra le quali:
1.Controllate che la tensione riportata sul prodotto
corrisponda alla vostra fornitura.
2.Collocate l’apparecchio su una superficie solida,
piana, resistente al calore e vicina ad una presa di
corrente. Tenete lontano dalla portata dei bambini.
3. Tenete sempre lontano dai margini del vostro
piano di lavoro.
4.Non toccate superfici calde – usate guanti da forno
o canovacci per stoviglie ripiegati.
5.Lasciate almeno 5 cm intorno alla macchina per il
pane per permettere la ventilazione e non coprite per
nessun motivo le bocchette per vapore.
6.Non introducete mani o dita nella vaschetta durante
il funzionamento del-l’apparecchio.
7.Il cavo di collegamento deve unire la presa alla
base dell’apparecchio senza essere sottoposti ad
un’eccessiva tensione.
8.Posizionate il cavo di collegamento in modo che
non rimanga sospeso sopra la zona di lavoro, non vi
si urti accidentalmente o vi si inciampi.
9. Non poggiate l’apparecchio sopra o vicino a fonti di
calore come forni a gas o elettrici, che potrebbero
danneggiare il cavo elettrico.
10. Non usate vicino o sotto tende, credenze o
qualunque altro oggetto che rischi di essere
bruciacchiato o di incendiarsi.
11. Per evitare scosse elettriche, non immergete il filo
o la spina in acqua.
12. Non usate l’apparecchio con mani bagnate o
umide.
mod.121
IMPORTANT WARNINGS
ALWAYS READ THE INSTRUCTIONS BEFORE
USE
When using electrical appliances it is necessary to
take adequate precautions, namely:
1. Check that the voltage indicated on the product
corresponds to that of your power supply.
2. Place the appliance on a solid, level, heatresistant surface close to a power source. Keep out
of reach of children.
3. Keep the appliance away from the edges of the
work surface.
4. Do not touch hot surfaces – use oven gloves or
folded tea towels.
5. Leave at least 5 cm (2 inches) around the breadmaking machine to allow for ventilation. Under no
circumstances cover the steam vents.
6. Do not place your hands or fingers in the bowl
while the appliance is working.
7. The power cable must connect with the socket at
the base of the appliance without being subjected to
too much tension.
8. Arrange the connecting cable so that it is not
suspended above the working area and cannot be
knocked or tripped over.
9. Do not place the appliance over or near sources
of heat such as gas or electric ovens, which could
damage the power cable.
10. Do not use close to or under curtains,
sideboards or any other object where there is a risk
of scorching or catching fire.
11. To avoid electric shocks, do not immerse the
power cable or plug in water.
mod.121
ВАЖНО ПРЕДУПРЕЖДЕНИЕ
Винаги четете инструкциите преди употреба
При използване на електрически уреди е
необходимо да се вземат необходимите предпазни
мерки, а именно:
1. Проверете дали посоченото напрежение
съответства на вашето захранване.
2. Поставете уреда на твърда, нивелирана,
топлоустойчива повърхност близо до източника на
захранване. Да се съхранява на места,
недостъпни за
3. Дръжте уреда далеч от краищата на работната
повърхност.
4. Не докосвайте горещите повърхности използвайте ръкавици или сгънати кърпи за чай.
5. Оставете най-малко 5 см около машината за да
се даде възможност за вентилация. При никакви
обстоятелства не чпокривайте пара-отворите.
6. Не поставяйте ръцете и пръстите в купата,
докато уредът
7. Захранващият кабел трябва да се свърже с
гнездото в основата на уреда, без да се подлага
на голям натиск.
8. Сложете кабела така, че да не минава през
зоната на работа и да не предизвика спъване.
9. Не поставяйте уреда върху или в близост до
източници на топлина, като газови
които могат да повредят захранващия кабел.
10. Да не се използва в близост до завеси, бюфети
или други обекти, където има риск от нагряване
или запалване.
11. За да избегнете електрически удар, пазете
захранващия кабел или щепсела от вода.
12. Не използвайте уреда с мокри или влажни
деца.
работи.
или ел. фурни,
1

13. Non usate la macchina per pane come deposito.
14. Non usate accessori o strumenti di corredo
diversi da quelli da noi forniti.
15. Questa macchina per pane non deve essere
usata per scopi diversi da quello suo specifico ed è
adibita ad un utilizzo esclusivamente domestico.
16. Rimuovete sempre la spina dalla presa quando
l’apparecchiatura non è in funzione, durante
l’installazione di parti accessorie, mentre viene pulita
o durante il manifestarsi di qualsiasi interruzione del
funzionamento.
17. Pulite la parte esterna dell’apparecchiatura
unicamente con un panno inumidito. Lavate a mano
la vaschetta, il coltello impastatore, il misurino e il
cucchiaio dosatore usando una soluzione detergente
non aggressiva; risciacquate e asciugate
completamente. Non pulite con materiali abrasivi.
18. Il piano di cottura deve essere collocato nella
posizione corretta prima di mettere in funzione
l’apparecchiatura.
19. Staccate la spina dalla presa prima di rimuovere
la vaschetta.
20. Prestate estrema cautela nel rimuovere
un’apparecchiatura con parti calde.
21. Se il filo della spina è danneggiato, per la
sostituzione rivolgetevi al produttore, al suo
rappresentante o ad una persona con qualifiche
analoghe, in modo da prevenire ogni rischio.
22. Per mantenere al meglio il contenitore, ogni tanto
lavare bene e ungere con olio.
23. ATTENZIONE! SCOLLEGATE SEMPRE LA SPINA
DALLA PRESA QUANDO L’APPARECCHIO NON E’ IN
FUNZIONE.
24. NON IMMERGERE L’APPARECCHIO IN ACQUA O
ALTRI LIQUIDI, PER LA PULIZIA USARE UN PANNO
UMIDO.
25. Questo apparecchio NON DEVE ESSERE
USATO DAI BAMBINI, quindi tenerlo fuori dalla loro
portata.
26. L’uso di prolunghe non autorizzate dal
fabbricante dell’apparecchio può provocare incidenti.
27. Questo apparecchio è conforme alla direttiva
CEE 89/336 relativa alla compatibilità
elettromagnetica.
CONSERVARE SEMPRE QUESTE ISTRUZIONI
12. Do not use the appliance with wet or damp
hands.
13. Do not use the machine for storing bread.
14. Do not use accessories or tools other than those
provided by the manufacturer.
15. This bread-making machine must not be
employed for uses other than those specified. It is
intended for domestic use only.
16. Always remove the plug from the power supply
when the appliance is not being used, when
attaching accessories, during cleaning or when
there is any interruption to correct functioning.
17. Clean the external parts of the appliance only
with a damp cloth. Hand-wash the bowl, the pastry
fork, the measure and the measuring spoon using a
non-aggressive detergent solution. Rinse and dry
thoroughly. Do not clean with abrasive materials.
18. The hob must be placed in the correct position
before attempting to operate the equipment.
19. Always disconnect the plug from the outlet
before removing the pan.
20. Exercise extreme caution when removing
equipment with hot parts.
21. If the wire of the plug is damaged, please ask for
replacement manu ¬ king, his representative or a
person with similar qualifications, so as to prevent
any risk.
22. To keep the breadpan in optimum condition,
wash it well from time to time and wipe over with oil.
23. N.B.! ALWAYS DISCONNECT THE PLUG
FROM THE POWER SUPPLY WHEN THE
APPLIANCE IS NOT IN USE.
24. DO NOT IMMERSE THE APPLIANCE IN
WATER OR OTHER LIQUIDS. FOR CLEANING
USE ONLY A DAMP CLOTH.
25. This appliance MUST NOT BE USED BY
CHILDREN, keep it well out of their reach.
26. The use of extension cables not authorised by
the manufacturers of the appliance could cause
damage or accidents.
27. This appliance conforms to EEC 89/336
regarding electromagnetic compatibility.
KEEP THESE INSTRUCTIONS IN A SAFE
ръце.
13. Не използваите машината за съхраняване на
хляба.
14. Не използвайте други принадлежности или
инструменти, освен предвидените от
производителя.
15. Машината да не се използва за цели, различни
от посочените. Тя е предназначена само за
домашна употреба.
16. Винаги изключвайте щепсела от захранването
когато машината не се използва, когато поставяте
аксесоари, по време на почистване или когато има
прекъсване на правилното функциониране.
17. Чистете външните части на уреда само с
влажна кърпа, а купата, перката, чашата и
мерителна лъжичка - ръчно с помощта на
неагресивни детергентни разтвори. Изплакнете и
изсушете напълно. Да не се чисти с абразивни
материали.
18. Да се постави в правилната позиция, преди
използването на уреда.
19. Винаги изключвайте щепсела от контакта
преди да махнете купата.
20. Бъдете изключително внимателни при
отстраняване на оборудване с горещи
части.
21. Ако кабелът на щепсела е повреден, моля,
обърнете се за подмяна при посочения
представител или лице с подобни квалификации,
за да се избегне всякакъв риск.
22. За да се запази в оптимално състояние, след
измиване е добре от време на време да се намаже
с масло.
23. ВИНАГИ ИЗКЛЮЧВАЙТЕ ЩЕПСЕЛА
, КОГАТО
УРЕДЪТ НЕ СЕ ИЗПОЛЗВА.
24. НЕ ПОТАПЯЙТЕ УРЕДА В ТЕЧНОСТИ. ЗА
ПОЧИСТВАНЕ, ИЗПОЛЗВАЙТЕ САМО ВЛАЖНА
КЪРПА.
25. Този уред НЕ ТРЯБВА ДА СЕ ИЗПОЛЗВА ОТ
ДЕЦА, дръжте го далеч от тях.
26. Използването на удължители не са разрешава
от производителя и може да причини аварии.
27. Този уред отговаря на 89/336 ЕИО
по
отношение на електромагнитната съвместимост.
ТЕЗИ ИНСТРУКЦИИ ДА СЕ ПАЗЯТ НА СИГУРНО
МЯСТО
2
PLACE
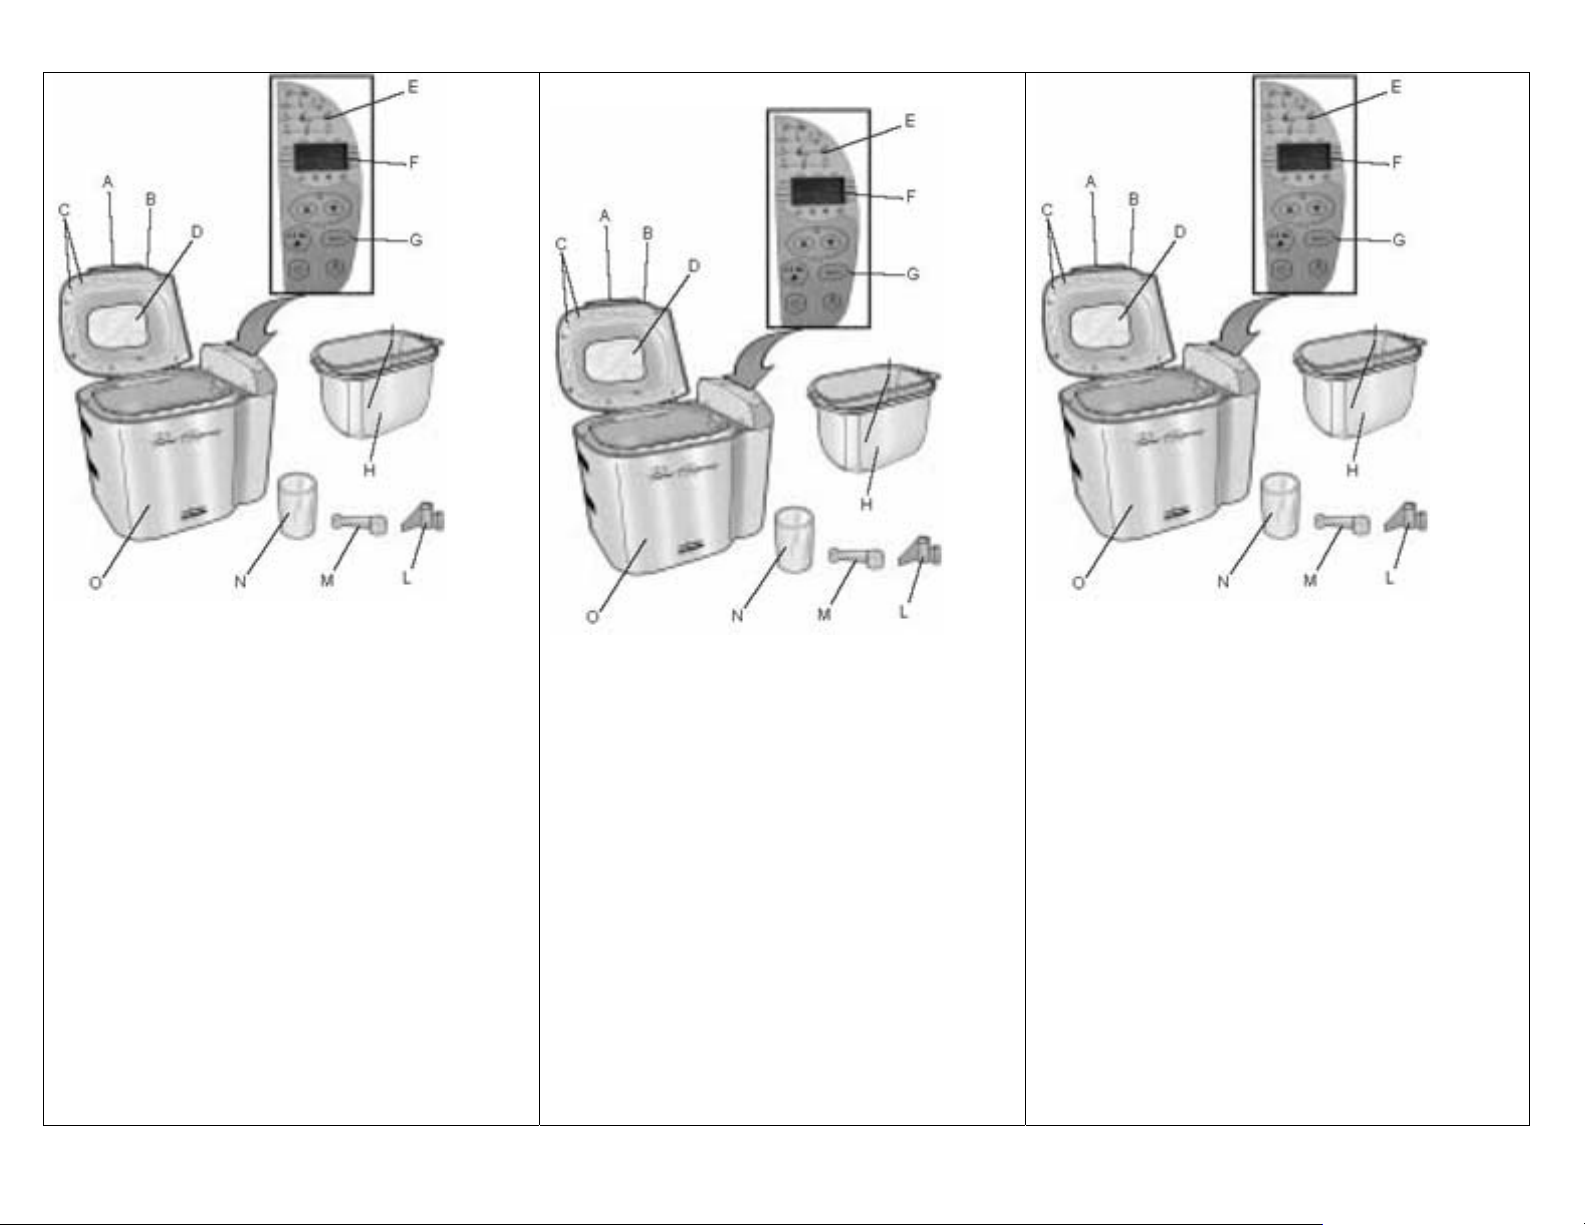
Descrizione dell’apparecchio
A. Manico del coperchio
B. Coperchio
C. Bocchette
D. Oblò
E. Lista dei programmi
F. Display
G. Comandi
H. Vaschetta
I. Manico della vaschetta
L. Pala
M. Cucchiaio dosatore
N. Misurino
O. Corpo dell’apparecchio
Description of the appliance
A. Lid handle
B. Lid
C. Steam vents
D. Window
E. List of programs
F. Display
G. Controls
H. Bowl
I. Bowl handle
L. Paddle
M. Measuring spoon
N. Measure
O. Appliance body
Описание на уреда
A. Дръжка на капака
B. Капак
C. Парни отвори
D. Прозорец
E. Списък на програми
F. Контролен дисплей
G. Командно табло
H. Купа
I. Дръжка на купата
L. Перка
M. Мерителна лъжица
N. Мерителна чаша
O. Тяло на уреда
3
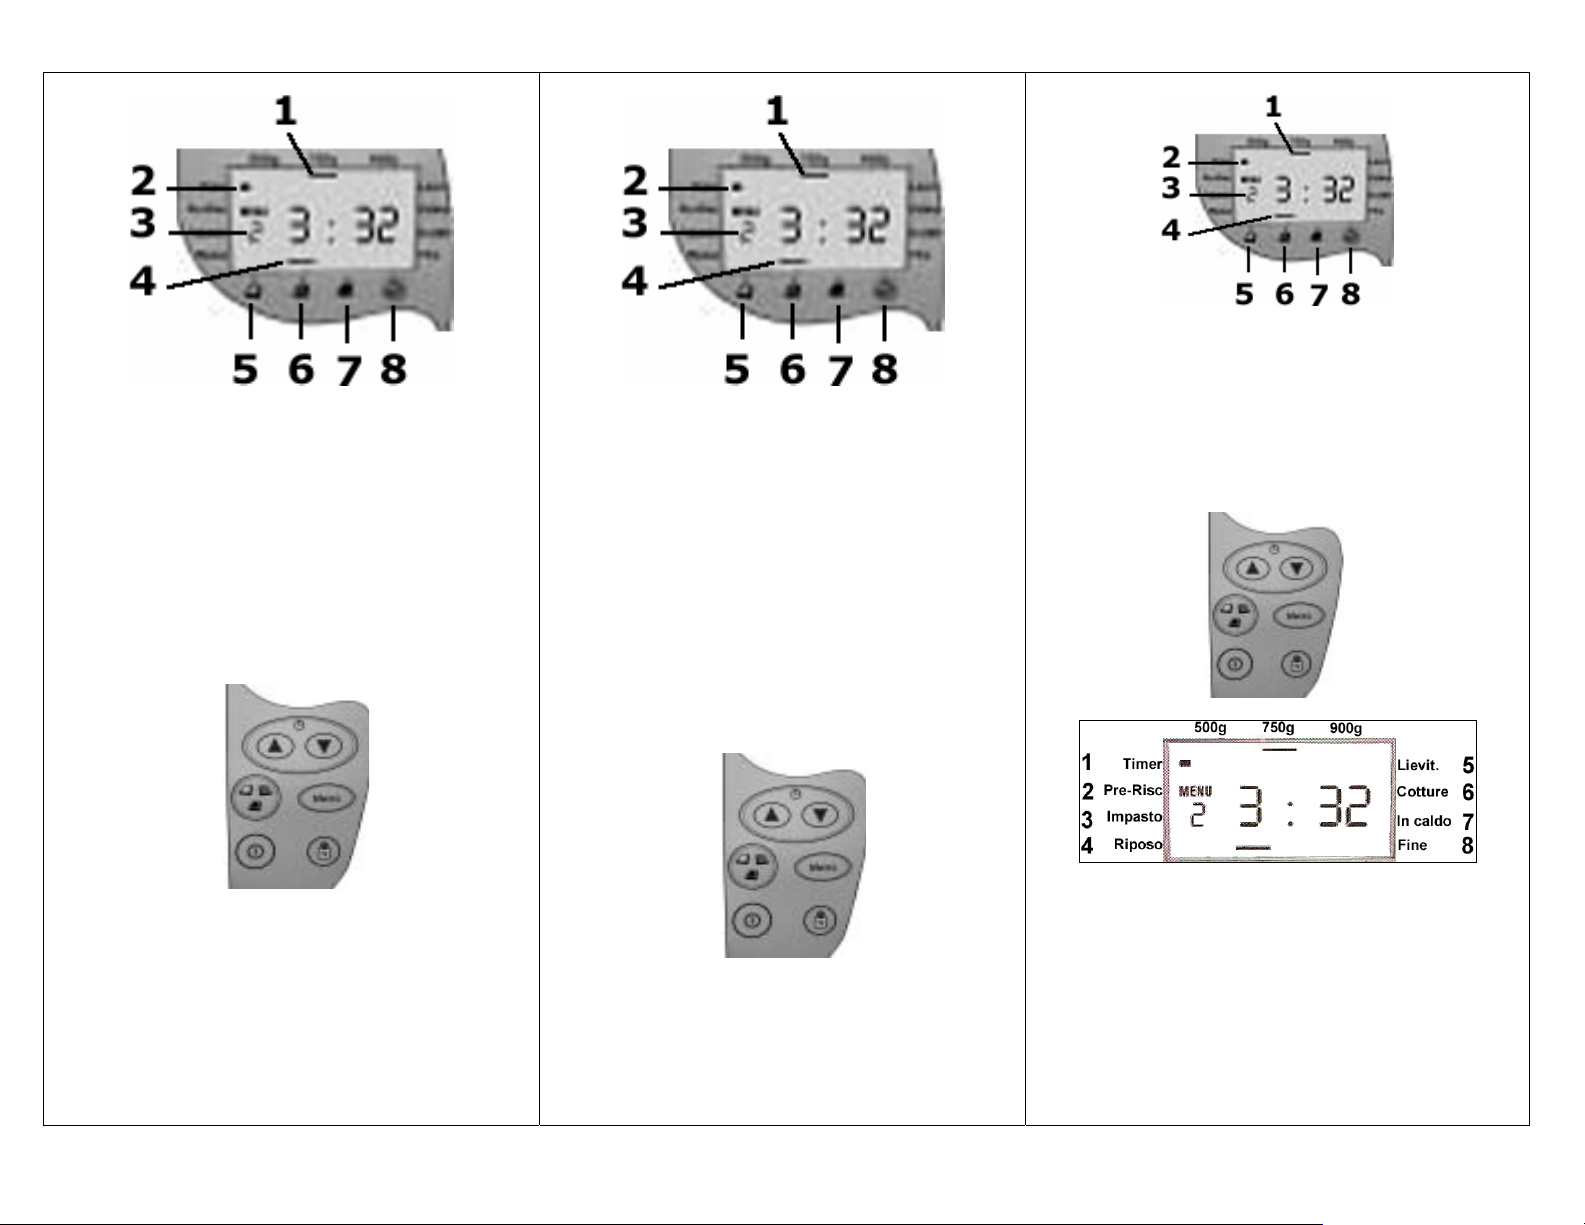
Display
Display
Контролен дисплей
1. Indicatore di dimensioni
2. Indicatore di progresso
3. Numero di programma
4. Indicatore di doratura
5. Lieve
6. Media
7. Intensa
8. Rapida
Comandi
Timer
Doratura
Avvio/Arresto
Menu
Peso pane a
cassetta
BREVI CENNI SULLE MACCHINE PER PANE
La vostra macchina Pane Express è un prodotto per
risparmiare fatica. Il suo vantaggio principale è che
tutte le operazioni di impastatura, lievitatura e cottura
avvengono all’interno di uno spazio contenuto. La
vostra macchina per pane Ariete sfornerà con facilità
e frequenza superbe pagnotte, se seguirete le
istruzioni ed avrete chiari alcuni principi di base.
1. Size indicator
2. Progress indicator
3. Program number
4. Browning indicator
5. Light
6. Medium
7. Intense
8. Fast
Controls
Timer
Browning
Menu
Start/Stop
Weight of load
BRIEF NOTES ON THE BREAD-MAKING
MACHINE
Your bread-making machine is a labour-saving
product. Its main advantage is that all the operations
of kneading, raising and baking take place inside an
1. Индикатор за теглото
2. Показател за напредъка
3. Номер на програмата
4. Индикатор за препичането
5. Леко (светло) препичане
6. Средено препичане
7. Интензивно препичане
8. Ускорен процес
Командно табло
Управление на
таймера
Избор на
препичането
Избор на
програма
Избор на
Старт/Стоп
теглото
Напредък:
1. Включен таймер за
отложен старт 5. Втасване
2. Затопляне
3. Месене 7. Поддържане топло
6. Печене
4. Почивка 8. Край
КРАТКИ БЕЛЕЖКИ ЗА МАШИНАТА ЗА ХЛЯБ
Вашата машина за хляб е продукт, който пести
труд. Основното предимство е, че всички
операции на месене, втасване и изпичане се
извършват в затворено пространство. Машината
4

L’apparecchiatura non può pensare al posto vostro.
Non può dirvi che avete dimenticato un ingrediente o
che ne avete usato un tipo sbagliato o che lo avete
misurato in modo non corretto. La prudente selezione
degli ingredienti è la fase più importante del processo
di preparazione del pane. E’ sufficiente tenere a
mente questa semplice regola: i migliori ingredienti =
i migliori risultati, ingredienti scadenti = risultati
scadenti.
FUNZIONAMENTO
1. Scegliete una ricetta
2. Misurate gli ingredienti
3. Introduceteli nella vaschetta – nell’ordine giusto
(Importante!)
4. Inserite la vaschetta nell’apparecchio
5. Chiudete il coperchio
6. Inserite la spina nella presa di corrente elettrica.
7. Selezionate un programma
8. Selezionate le dimensioni del pane che
desiderate, 500gr, 750gr, 900gr
9. Scegliete la doratura che desiderate – lieve,
media o intensa
10. Selezionate il timer (se necessario)
11. Avviate il programma
12. La vostra macchina per pane emetterà un bip:
. • per informarvi sul momento di aggiungere
ulteriori ingredienti
. • quando il pane è pronto
. • ogni 5 minuti durante l’ora successiva, per
sollecitarvi a prelevarne il contenuto.
FARE IL PANE PREPARAZIONE
1.Collocate l’apparecchio su una superficie solida,
piana, resistente al calore e vicina ad una presa di
corrente. Tenete lontano dalla portata dei bambini.
2. Non inserite ancora la spina.
3. Aprite il coperchio.
4.Tenete giù la macchina per il pane con una mano e
con l’altra tirate con fermezza il manico della vaschetta.
Quest’ultima viene mantenuta al suo posto da due
molle.
5. Controllate che la parte interna della vaschetta sia
pulita.
6. Sistemate il braccio impastatore sul perno posto sul
fondo della vaschetta.
7.Esso potrà essere inserito solo in un modo – il
suddetto perno e la parte inferiore del braccio
enclosed space. Your Ariete bread-making machine
will easily and regularly produce superb loaves, if
you follow the instructions and keep in mind one
basic principle. The appliance cannot think for you.
It cannot tell you that you have forgotten an
ingredient or that you have used one of the wrong
type or that you have measured something
incorrectly. Careful selection of ingredients is the
most important stage in the process of preparing
bread. Just bear this simple rule in mind: the best
ingredients = the best results, poor ingredients =
poor results.
DIRECTIONS FOR USE
Select a recipe
Measure out the ingredients
Place them in the breadpan – in the right order
(Important!)
Place the breadpan in the appliance
Close the lid
Plug the appliance into a power point.
Select a program
Select the size of loaf required 500g, 750g, 900g
Select the degree of browning required – light,
medium or intense
Select the timer (if necessary)
Start the program
Your bread-making machine will emit beeps:
. • to tell you when to add extra ingredients
. • when the bread is ready
. • every 5 minutes for the next hour, to urge
you to remove the contents
BREAD-MAKING PREPARATION
1.Place the appliance on a solid, flat, heat-resistant
surface and close to a power point. Keep it out of
the reach of children.
2. Do not plug in the appliance yet.
3. Open the lid.
4.Hold down the bread-making machine with one
hand and with the other firmly pull up the handle of
the breadpan. This is held in place by two springs.
5. Check that the interior of the breadpan is clean.
6. Place the kneading arm on its pivot at the bottom
of the breadpan.
7.This can be inserted one way only – both the pivot
ще може лесно и редовно да произвежда
превъзходен хляб, ако следвате инструкциите и
имате предвид един основен принцип. Уредът не
може да мисли вместо вас. Не може да ви каже,
забравили съставка или че сте използвали
че сте
грешна или че са измерили нещо неправилно.
Внимателният подбор на съставките е най-важен
етап в процеса на подготовка на хляб. Не
забравяйте това просто правило: добри съставки
= добри резултати, лоши съставки = слаби
резултати.
УКАЗАНИЯ ЗА УПОТРЕБА
Изберете рецепта
Измерете съставките
Поставете ги в купата, на чието дъно вече сте
сложили перката - в правилната подредба
(Важно!)
Поставете купата в уреда
Затворете капака
Включете уреда в ел.мрежата.
Изберете програма
Изберете желания размер на хляба 500 грама,
750 грама, 900 грама
Изберете необходимата степен на препичане леко, средно
или силно
Изберете таймер (ако е необходимо)
Стартирайте програмата
Вашата машина ще издава сигнал:
• за да добавите допълнителни съставки
• когато хлябът е готов
• на всеки 5 минути през следващия един час,
за да ви напомни да извадите хляба.
ПОДГОТОВКА
1. Поставете уреда на твърда, равна,
топлоустойчива повърхност и в близост до
контакта. Дръжте го далеч от достъпа на деца.
2. Не го включвайте все още.
3. Отворете капака.
4. Задръжте машина за хляб с една ръка, а с
другата дръпнете здраво дръжката на купата. Тя е
застопорена от двете страни.
5. Проверете дали купата е чиста.
6. Поставете перката в оста на дъното.
7. Тя ще се побере само един начин – опорната ос
5

impastatore sono a forma di D.
8.Riunite gli ingredienti. Misurateli, teneteli tutti a portata
di mano e pronti per essere aggiunti nella vaschetta.
9.Per il programma RAPIDO, ungete la parte interna
della vaschetta e la pala impastatore.
AGGIUNGERE GLI INGREDIENTI
10. Essi devono essere aggiunti nell’ordine giusto.
11. Tenete gli ingredienti aggiuntivi (frutta, noci, uva
passa ecc.) da una parte e aggiungeteli quando
l’apparecchio emette un bip (durante la seconda
impastatura).
12. Introducete per prima cosa l’ingrediente liquido.
Si tratta normalmente di acqua ma può includere latte
e/o uova. L’acqua deve essere tiepida (37 gradi), ma
non bollente. L’acqua troppo calda o troppo fredda
impedisce la lievitazione.
13. Non usate latte con il timer; potrebbe cagliare
prima che inizi il processo di preparazione del pane.
14. Aggiungete lo zucchero e il sale previsti nella
ricetta.
15. Aggiungete eventuali ingredienti “liquidi” (miele,
sciroppo, melassa ecc.)
16. Aggiungete eventuali ingredienti “secchi” (farina,
latte in polvere, erbe e spezie).
17. Se usate il timer, non vi sarà possibile aggiungere
frutta o noci durante il secondo impasto, quindi uniteli
ora.
18. Aggiungete per ultimo il lievito secco (o lievito in
polvere/bicarbonato di sodio). Ponetelo sopra gli altri
ingredienti – non mettetelo nell’acqua, altrimenti
inizierà ad agire troppo presto.
19. Se usate il timer, è indispensabile tenere lontani il
lievito (lievito in polvere/bicarbonato di sodio) e
l’acqua/liquido. Se non lo fate, il lievito entrerà in
azione, gonfierà e sgonfierà prima che inizi il
processo di preparazione del pane. Ne risulterà un
prodotto duro, denso, ruvido e commestibile come un
mattone di una casa. Consigliamo di fare un buco nel
centro della cupola della farina e di metterci il lievito.
CARICARE LA MACCHINA
20. Pulite gli eventuali schizzi sulla parte esterna
della vaschetta, quindi introducetela lentamente nella
macchina per pane. Gli schizzi all’interno della
and the lower part of the kneading arm are Dshaped.
8.Gather together the ingredients. Measure them at
and keep them close to hand, ready to be added to
the breadpan.
9.For the FAST program oil the interior of the
breadpan and the kneading arm.
ADDING THE INGREDIENTS
10. These must be added in the correct order.
11. Keep any additional ingredients (fruit, nuts,
raisins, etc) to one side and add them when the
appliance emits a beep (during the second
kneading).
12. First introduce the liquid ingredient. This will
normally be water, but may be milk and/or
eggs. The water should be hot (37°C) but not
boiling. Water which is too hot or too cold will
impede rising.
13. Do not use milk with the timer, as it could curdle
before the preparation process begins.
14. Add sugar and salt as specified in the recipe.
15. Add any additional "liquid" ingredients (honey,
syrup, treacle, etc).
16. Add any additional "dry" ingredients (flour,
powdered milk, herbs and spices).
17. If using the timer, it will not be possible to add
fruit or nuts during the second kneading, so add
them now.
18. Lastly add the dry yeast (or powdered
yeast/bicarbonate of soda). Place it on top of the
dry ingredients – do not place it in the water, or it
will start to act too soon.
19. If using the timer, it is essential to keep the
yeast (powdered yeast/bicarbonate of soda) away
from the water/liquid. If not, the yeast will start to
act, swelling and subsiding before the preparation
process has begun. The result will be a product
which is hard, dense, rough and about as edible as
a house brick. We recommend making a hole in the
heap of flour and placing the yeast in this.
LOADING THE MACHINE
20. Clean any splashes from the outside of the
и отворът на перката са с D-форма.
8. Смесете съставките. Измерете ги и ги дръжте
под ръка, готови да бъдат добавени в купата.
9. За програма УСКОРЕН ПРОЦЕС намаслете
вътрешната страна на купата и перката.
ДОБАВЯНЕ НА СЪСТАВКИ
10. Добавете ги в правилния ред.
11. Пригответе всички допълнителни съставки
(плодове, ядки, стафиди и т.н.) за добавяне,
когато устройството излъчи сигнал (по време на
второто месене).
12. Първо се поставят течните съставки. Това
обикновено се вода, но може да бъде мляко и/или
яйца. Водата трябва да
бъде топла (37° С), но не
вряла. Твърде гореща или твърде студена вода
ще пречи на втасването.
13. Да не се използва мляко с таймер, може да се
пресече преди началото на приготвянето на хляб.
14. Добавете захарта и солта, както е посочено в
рецептата.
15. Добавете допълнителните "течни" съставки
(мед, сироп,
меласа и т.н.).
16. Добавете всякакви допълнителни "сухи"
съставки (брашно, сухо мляко, билки и
подправки).
17. Ако използвате таймера, няма да можете да
добавите плодове или ядки по време на второто
месене, така че добавете ги сега.
18. Накрая добавете суха мая (набухвател / сода
бикарбонат). Поставете я върху другите сухи
съставки -
не я поставяйте във водата, за да не
започне да действа твърде скоро.
19. Ако използвате таймера, е важно да се запази
маята (набухвател / сода бикарбонат) далече от
вода / течност. Ако не, маята ще започне да
действа, ще се подуе и втаса преди началото на
процеса на изготвяне на хляб.. Резултатът ще е
продукт, който е твърд, дебел, груб и толкова
годен за консумация, колкото тухла.
Препоръчваме ви да направите кладенче в
брашното и да пуснете маята там.
ЗАРЕЖДАНЕ НА МАШИНАТА
20. Избършете всички пръски от външната страна
на купата, след това бавно я поставете в
6

macchina bruceranno in superficie. Gli schizzi sulla
resistenza ridurranno drasticamente la sua durata.
21. Premete la vaschetta in basso al di sotto delle
molle.
22. Se non scende, è probabilmente incastrato nella
presa di moto. Sollevatelo, girate di un quarto in
senso orario la presa di moto e provate di nuovo.
23. Cercate di non far schizzare niente nella
macchina per pane – se questo accade, togliete la
vaschetta e pulite.
24. Abbassate il manico fino a farlo urtare contro le
battute poste sulle prese della vaschetta. In questo
modo dovrebbe rimanere sollevato di circa 2.5 cm
sopra il bordo della vaschetta.
25. Chiudete il coperchio.
IMPOSTARE I COMANDI
26. Inserite la spina della macchina per pane nella
presa (accendete usando il pulsante avvio/arresto). Il
display mostrerà “TIMER” e “MENU”.
27. Premendo sul tasto “menù”, l’ora sotto il timer
continuerà a cambiare. Ignoratelo fino a che non
raggiungete i parametri desiderati.
Selezione menù
28. Premete e rilasciate il tasto Menù fino a quando il
numero di programma che desiderate appare sotto
“MENU” sul display. Ogni volta che si preme, il
numero cresce di 1 fino a raggiungere 12, dopodiché
ricomincia da 1.
Peso
29. Nei programmi 1, 2, 3 e 4, premete e rilasciate il
pulsante per portare l’indicatore di dimensioni “_“ in
alto sul display sulla misura che desiderate. Ogni
volta che premete il tasto, l’indicatore di dimensioni si
muove di uno spazio verso destra fino a raggiungere
900gr, per poi rico¬minciare da 500gr.
DORATURA
30. Nei programmi 1, 2 e 3, premete e rilasciate il
pulsante DORATURA ( per portare l’indicatore di
doratura in basso sul display sul tipo di doratura
desiderato (o sopra RAPIDA se si vuole usare
“COTTURA RAPIDA”). Ogni volta che premete,
l’indicatore di doratura si muove verso destra di uno
spazio fino a raggiungere RAPIDA, per poi tornare a
LIEVE.
breadpan, then place it slowly into the breadmaking machine. Any splashes inside the machine
will burn onto the surfaces. Any splashes on the
element will drastically shorten its life.
21. Press the breadpan below the springs (Fig.6).
22. If it will not go down fully, it is probably fouling
the drive. Lift it up, turn the drive of a turn clockwise
and try again.
23. Try not to splash anything into the breadmaking machine. If this happens, take out the
breadpan and clean off the splashes.
24. Lower the handle until it reaches the handle
mounts. In this way it should stay about 2.5 cm
above the rim of the breadpan.
25. Close the lid.
SETTING THE CONTROLS
26. Plug the appliance into the power point (start it
by using the START/STOP button). The display will
show "TIMER" and "MENU".
27. Pressing the MENU key, the time below the
timer will continue to change. Ignore this until it
reaches the required parameters.
Selecting the menu
28. Press and release the MENU key until the
required program number appears below MENU on
the display. Every time it is pressed, the number
increases by 1 until it reaches 12, when it starts
again from 1.
Weight of loaf
29. In programs 1, 2, 3 and 4, press and release
the button to bring the size indicator "_" at the top
of the display to the desired size. Every time the
key is pressed, the size indicator moves to the right
until it reaches 900g, then it starts again from 500g.
BROWNING THE CRUST
30. In programs 1, 2 and 3, press and release the
BROWNING button tobring the browning indicator
at the bottom of the display to the required level of
browning (or above FAST if you wish to use "FAST
BAKING). Every time it is pressed, the browning
indicator moves to the right by one space until it
reaches FAST, when it returns to LIGHT.
машината. Всяка пръска във вътрешността на
машината ще изгори върху повърхностите. Всяка
пръска върху елемент драстично ще скъси живота
му.
21. Натиснете купата за да се застопори от двете
страни
22.
Ако все пак не успеете, вдигнете я, завъртете я
по часовниковата стрелка на 180° и опитайте пак.
23. Опитайте се да не разливате нищо в машината
за хляб - ако това се случи, извадете купата и
почистете.
24. Свалете дръжката на купата до единия й ръб.
Тя трябва да остане около 2,5 см над ръба
на
купата.
25. Затворете капака.
ЗАРЕЖДАНЕ НА ПАРАМЕТРИТЕ
26. Включете машината в контакта (пуснете я с
помощта на START/STOP бутона). На дисплея ще
се покаже "TIMER" и "MENU".
27. При натискане на бутона MENU часът под
таймера ще се променя. Игнорирайте това, докато
не достигнете необходимите параметри.
Избиране на програма
28. Натискайте и отпускайте бутона MENU до
необходимия номер на програмата, който
се
появява под MENU на дисплея. Всеки път, когато
натиснете, номерът се увеличава с 1, докато не
достигне 12, а след това отново започва от 1.
Тегло на хляба
29. В програми 1, 2, 3 и 4 натискайте и отпускайте
бутона за тегло, за да премести показателя "_" в
горната част на дисплея до желания размер. Всеки
път, когато
ключът е натиснат, движи показателя
надясно, докато достигне 900 гр., а след това
започва отново от 500 гр.
ПРЕПИЧАНЕ
30. В програми 1, 2 и 3 натискайте и отпускайте
бутона за препичане до желаното ниво на
показателя в долната част на дисплея (или до
УСКОРЕН ПРОЦЕС, ако искате да използвате
бързо печене). Всеки път, когато натиснете,
показателят се движи надясно докато стигне
УСКОРЕН ПРОЦЕС, след това се връща на
СВЕТЛО.
7

AVVIARE LA MACCHINA PER PANE
31. Quando siete soddisfatti delle impostazioni,
premete il pulsante AVVIO/ ARRESTO e osservate
la macchina mentre entra in azione. Il pulsante
AVVIO/ARRESTO si illumina, i due punti del timer (:)
lampeggiano, il timer inizia il conto alla rovescia
mostrando il tempo residuo, l’indicatore di progresso
si muove intorno al display per mostrare quale tipo di
processo è in corso (IMPASTATURA, RIPOSO,
LIEVITATURA, COTTURA, ecc).
CONSISTENZA DELL’IMPASTO
32. Controllate il prodotto durante i primi 5 minuti di
impastatura. Dovrebbe formarsi una pagnotta liscia.
In caso contrario, è probabile che dobbiate rivedere
gli ingredienti.
Se dovete aprire il coperchio, fatelo durante
l’impastatura o il tempo di riposo. In tutti gli altri
momenti pregiudicherete la buona riuscita del pane.
Se l’impasto sembra colloso o si attacca ai lati della
vaschetta, spargetevi sopra un cucchiaino di farina
alla volta. Se è troppo asciutto, versatevi un
cucchiaino di acqua calda alla volta. Potete
rimuovere delicatamente gli ingre¬dienti rimasti
attaccati ai lati della macchina usando una spatola di
legno o di plastica. (Il metallo rovina il rivestimento
antiaderente).
Non lasciate lo sportello aperto più a lungo di quanto
vi occorre – apritelo, aggiungete ciò che dovete e
richiudetelo subito.
Aspettate fino a quando la farina/acqua è
completamente assorbita nell’impasto prima di
aggiungerne altra.
Chiudete il coperchio prima della fine dell’ultima
impastatura, altrimenti il pane non lieviterà
correttamente.
INGREDIENTI AGGIUNTIVI
33. Gli ingredienti aggiuntivi – frutta, noci, uva passa
ecc. - possono essere uniti durante i programmi 2, 3,
4, 8, 9 e 10. Tra i 5 e i 10 minuti durante la seconda
impastatura la macchina per pane produrrà un bip
sonoro quattro volte. Aprite il coperchio, introducete
gli ingredienti aggiuntivi sopra l’impasto e
chiudete il coperchio. Non toccate o muovete
l’impasto.
Se non volete aggiungere niente, ignorate i bip.
STARTING THE BREAD-MAKING MACHINE
31. When you are satisfied with the settings, press
the START/STOP button and watch as the
machine goes into action. The START/STOP
button lights up, the two dots on the timer (:) flash,
the timer starts to count down the time remaining,
the progress indicator moves around the display to
show what type of process is happening
(KNEADING, REST, RISING, BAKING, etc).
DOUGH CONSISTENCY
32. Check the dough during the first 5-minute
kneading period. It should form a smooth ball. If
not, you will probably have to adjust the
ingredients. If you have to open the lid, do so
during the kneading or rest stages. At any other
time it will result in the bread spoiling. If the dough
seems sticky or sticks to the sides of the breadpan,
sprinkle a spoonful of flour on the top. If it is too
dry, pour on a spoonful of warm water. You can
carefully remove any ingredients sticking to the
sides of the machine using a wooden or plastic
utensil (metal will ruin the non-stick coating).
Do not leave the lid open any longer than
necessary – open it, add what is needed and close
it immediately.
Wait until the flour or water has been completely
absorbed into the dough before adding any more.
Close the lid before the end of the first kneading,
otherwise the bread will not rise properly.
ADDITIONAL INGREDIENTS
33. Additional ingredients (fruit, nuts, raisins, etc)
can be added during programs 2, 3, 4, 8, 9 and 10.
Between 5 and 10 minutes during the second
kneading the bread-making machine will emit a
beep four times. Open the lid, add the additional
ingredients on top of the dough and close the lid.
Do not touch or stir the dough. If you do not wish to
add anything, ignore the beeps.
СТАРТИРАНЕ НА МАШИНАТА
31. Когато сте доволни от настройките, натиснете
START/STOP и машината влиза в действие.
Индикаторът над бутона светва, двете точки на
таймера (:) започват да примигват, таймерът за
обратно отброяване започва да показва
оставащото време, индикаторът за напредък
показва какъв е процесът в момента (МЕСЕНЕ,
ПОЧИВКА, ВТАСВАНЕ, ПЕЧЕНЕ и т.н.).
КОНСИСТЕНЦИЯ НА ТЕСТОТО
32. Проверете тестото по време на първите 5
минути месене. То следва
да е във формата на
гладка топка. Ако не, вероятно ще трябва да се
коригират съставките. Ако ви се наложи да
отворите капака, направете го по време на месене
или почивка. По всяко друго време ще доведе до
разваляне на хляба. Ако тестото изглежда лепкаво
или залепва за стените на
купата, поръсва се една
супена лъжица брашно. Ако то е твърде сухо,
изсипва се супена лъжица топла вода. Можете да
отстраните залепнали по стените съставки с
помощта на дървена или пластмасова шпатула
(метал ще разруши незалепващото покритие).
Не оставяйте отворен капака по-дълго, отколкото е
необходимо – отворете го, добавете нужното
и го
затворете веднага.
Изчакайте, докато брашното и водата се
абсорбират напълно в тестото, преди да добавите
повече.
Затворете капака преди края на първото месене, в
противен случай хлябът няма да втаса правилно.
ДОПЪЛНИТЕЛНИ СЪСТАВКИ
33. Допълнителни съставки (плодове, ядки,
стафиди и т.н.) могат да се добавят по време
програми 2, 3, 4, 8, 9
и 10. Между 5 и 10 минути по
време на второто месене машината ще излъчва
сигнал четири пъти. Отворете капака, добавете
допълнителните съставки в горната част на
тестото и затворете капака. Не докосвайте и не
разбърквайте тестото. Ако не желаете да
добавите нещо, игнорирайте издавания сигнал.
8

TERMINE COTTURA
34. A termine cottura, la macchina per pane emette
alcuni bip per avvisare che il pane è pronto e
l’indicatore di progresso si sposta in posizione IN
CALDO.
PERIODO DI MANTENIMENTO IN CALDO
35. La macchina per pane manterrà il pane caldo per
un’ora. Durante questa ora l’indicatore di progresso si
mantiene in posizione IN CALDO e la macchina per
pane emette un bip sonoro ogni 5 minuti per invitarvi
a prelevarne il contenuto. Per ottenere un risultato
migliore, è opportuno togliere il pane appena pronto.
RIMUOVERE IL PANE
36. Mentre si raffredda, l’umidità del pane evapora
seccandolo e indurendolo. Se viene lasciato nella
vaschetta, l’umidità rimane intrappolata; essa non
può evaporare e pertanto viene assorbita dal pane
mentre raffredda, rendendolo molle e saturo di
umidità. La funzione di mantenimento in caldo
previene questa conseguenza fino a un certo punto,
ma, fondamentalmente, prima si toglie il pane, meglio
è.
37. Avrete bisogno di una griglia (per il pane), di una
superficie di appoggio resistente al calore (per la
vaschetta) e di guanti da forno o canovacci per
stoviglie ripiegati (per proteggere le mani).
38. Premete il pulsante AVVIO/ARRESTO e tenetelo
premuto fino a farlo suonare.
39. Staccate la spina della macchina per pane dalla
presa (prima spegnete utilizzando l’interruttore se
presente).
40. Aria calda e vapore fuoriusciranno quando
aprirete il coperchio, per cui non tenete mani,
braccia, viso ecc. nello spazio sovrastante la
macchina per il pane.
41. Indossate i guanti da forno (su entrambe le mani),
aprite il coperchio (usate il manico) e lasciatelo
posizionato sui suoi appoggi (cerniere).
42. Con i guanti da forno tenete giù la macchina per il
pane con una mano e con l’altra tirare verso l’alto con
fermezza il manico della vaschetta per disincastrare
quest’ultimo dalle molle.
AT THE END OF BAKING
34. At the end of the baking time, the bread-making
machine will emit a beep to let you know that the
bread is ready and the progress indicator will move
to the KEEP WARM position.
KEEP WARM "TIME"
35. The bread-making machine will keep the bread
warm for an hour. During this hour, the progress
indicator will stay at KEEP WARM and the breadmaking machine will emit a beep every 5 minutes
to invite you to remove the contents. For best
results, remove the bread as soon as it is ready.
EXTRACT THE BREAD
36. While it is cooling, the moisture in the bread
evaporates, drying it out and making it hard. If it is
left in the breadpan, the moisture remains trapped:
it cannot evaporate and is thus absorbed into the
bread while it is cooling, making it soft and
saturated with moisture. The function of keeping it
warm prevents this phenomenon up to a point, but
basically the sooner the bread is taken out, the
better it is.
37. You need a wire tray (for the bread), a
heatproof plate (for the breadpan) and oven gloves
or tea towels (to protect your hands).
38. Press the START/STOP button and keep it
pressed until it beeps.
39. Remove the plug of the bread-making machine
from the socket (first switching it off if a switch is
present).
40. Hot air and steam will billow out when you open
the lid, so do not allow hands, arms, face, etc. to
enter the area above the bread-making machine.
41. Wearing oven gloves (on both hands), open the
lid (using the handle) and let it rest on its hinges.
42. With oven gloves, hold down the bread-making
machine with one hand and with the other firmly
pull up the handle of the breadpan to remove it
from its springs.
43. Turn the breadpan upside down and shake it to
remove the bread.
44. Allow the bread to cool on a perforated tray.
В КРАЯ НА ПЕЧЕНЕТО
34. В края на печенето машината ще излъчи
сигнал за да ви
уведоми, че хлябът е готов и
показателят за напредъка ще се е преместил в
позиция ТОПЛЕНЕ.
ЗАПАЗВАНЕ НА ХЛЯБА ТОПЪЛ
35. Машината ще пази хляба приятно топъл за
един час. През това време показателят за
напредъка остава в позиция ТОПЛЕНЕ. Машината
ще излъчва сигнал на всеки 5 минути, за да ви
да извадите съдържанието. За най-добри
каня
резултати извадете хляба веднага след като е
готов.
ИЗВАЖДАНЕ НА ХЛЯБА
36. Докато се охлажда, влагата се изпарява,
хлябът изсъхва исе втвърдява. Ако остане в
купата, влагата е в капан, тя не може да се
изпарява, абсорбира се от хляба и го прави мек
и
влажен. Функцията за запазване на топлината
предотвратява това до определен момент, но
общо взето по-добре е да извадите хляба.
37. Имате нужда от две подложки (за хляба и за
купата) с повърхност, устойчива на топлина, и
ръкавици за фурна или сгънати кърпи (за защита
на ръцете).
38. Натиснете СТАРТ/СТОП
и го задръжте, докато
престана да издава сигнал.
39. Изключете машината като извадите щепсела
от контакта (първо изключете от ключа, ако има
такъв).
40. Горещ въздух и пара ще излязят, когато
отворите капака, така че не дръжте ръцете и
лицето в пространството над машината.
41. Носете ръкавици за фурна (и на двете ръце),
отворете капака (използвайте дръжката) докато
се опре на пантите.
42. С ръкавиците дръжте натисната машината с
една ръка, а с другата дръпнете здраво дръжката
на купата докато се откачи от застопоряването.
43. Обърнете купата надолу и я разклатете, за да
отстраните хляба.
44. Оставете го да изстине на подложка.
45. Ако
хлябът не излиза, плъзнете дървена или
9

43. Capovolgete la vaschetta e scuotetela per far
fuoriuscire il pane.
44. Lasciatelo raffreddare su un vassoio traforato.
45. Se il pane non si stacca dalla vaschetta, scorrete
una spatola di legno o di plastica sull’interno del
recipiente – evitate oggetti in metallo o appuntiti per
non grattare la superficie antiaderente.
46. Quando il pane si è leggermente raffreddato,
usate una spatola di legno o di plastica per
estrarre il braccio impastatore dalla parte inferiore del
pane. Evitate oggetti in metallo o appuntiti per non
grattare la superficie antiade¬rente.
47. Per ottenere risultati migliori, lasciate riposare il
pane per 20-30 minuti per farlo indurire e asciugare
prima di tagliarlo. Tagliarlo mentre è ancora caldo e
umido può renderlo saturo di umidità.
48. Prima di tagliare, accertatevi che la pala non sia
rimasta imprigionata nel pane.
USO CONTINUO
Se volete preparare altro pane, lasciate dapprima
raffreddare l’apparecchio. Se provate ad utilizzarlo
mentre è ancora caldo, apparirà un messaggio di
errore sul display (E01), verranno emessi alcuni bip e
la macchina per pane non entrerà in funzione. Se ciò
accade, premete il pulsante AVVIO/ARRESTO fino
all’emissione di un bip sonoro ed allo spegnimento
della spia luminosa, quindi rimuovete la vaschetta e
lasciate raffreddare completamente il dispositivo.
IL TIMER
L’uso più comune del timer è quello di preparare il
pane durante la notte in modo che sia pronto la
mattina dopo. Con il timer è possibile programmare
fino a 13 ore la preparazione.
Lo si può fare con i programmi
INTEGRALE, DOLCE, IMPASTO e IMPASTO PER DOLCI.
BASE, FRANCESE,
Non usate per pane o impasto contenente latte
fresco, yogurt, formaggio, uova, frutta, cipolle o
qualunque altro ingrediente che potrebbe deteriorarsi
se lasciato per alcune ore in un ambiente caldoumido. Seguite le istruzioni da 1 a 30 per avviare la
macchina per pane.
Non vi sarà possibile aggiungere frutta o noci durante
la seconda impastatura, quindi aggiungeteli durante
la fase 17.
45. If the bread will not come out of the breadpan,
run a wooden or plastic spatula along the inside of
the breadpan – do not use metal or sharp objects
as these may scratch the non-stick surfaces.
46. When the bread has cooled slightly, use a
wooden or plastic spatula to extract the kneading
arm from the bottom of the loaf. Do not use metal
or sharp objects as these may scratch the non-stick
surfaces.
47. For best results, let the bread rest for 20-30
minutes to allow it to harden and dry before slicing.
Slicing it while it is still hot and moist may soak it.
48. Before cutting, ensure that the arm is not stuck
in the bread.
CONTINUOUS USE
If you want to prepare more bread, allow the
appliance to cool. If you try to use it while it is still
hot, an error message (E01) will appear on the
display, the machine will emit a beep and the
bread-making machine will not work. If this
happens, press the START/STOP button until it
emits a beep andthe warning light goes out, then
remove the breadpan and allow it to cool
completely.
TIMER
The most common use of the timer is to prepare
bread during the night to be ready for the following
morning. With the timer it is possible to program up
to 13 hours cooking.
This can be done with the BASIC, FRENCH,
WHOLEMEAL, SWEET, DOUGH and SWEET
DOUGH programs.
Do not use for bread or dough containing fresh
milk, yoghurt, cheese, eggs, fruit, onions or any
other ingredient which could deteriorate if left for
several hours in a warm, damp environment.
Follow instructions 1 to 30 to start the breadmaking machine.
It will not be possible to add fruit or nuts during the
second kneading process, add them during stage
17.
Decide when you want your bread to be ready, for
example at 6 am. Check what time it is at the time
the program is started, for example 9 pm.
пластмасова шпатула от вътрешната страна на
съда - избягвайте остри метални предмети, тъй
като могат да надраскат незалепващо
повърхности.
46. Когата хлябът се охлади малко, с дървена или
пластмасова шпатула
извадете перката от дъното
на хляба. Не използвайте метални или остри
предмети за да не надраскат перката.
47. За най-добри резултати оставете хляба за 2030 минути да се втвърди и изсъхне преди да го
режете.
48. Преди рязане уверете се, че перката не е все
още в хляба.
ПРОДЪЛЖИТЕЛНА УПОТРЕБА
Ако искате да се приготвите още хляб, нека
уредът първо се охлади. Ако се опитате да го
използвате докато все още е горещ, ще видите
съобщение за грешка на дисплея (E01), ще бъдат
издадени няколко сигнала и машината няма да
влезе в действие. Ако това се случи, натиснете
START/STOP до
спирането на сигнала и угасване
на предупреждението, след което извадете купата
и оставете машината да се охлади напълно.
ТАЙМЕР
Най-честата употреба на таймера е за да се пече
хляб през нощта, така че да е готов на
следващата сутрин. С таймера можете да
програмирате до 13 часа отложен старт.
може да стане с програми БАЗОВ,
Това
ФРЕНСКИ, ПЪЛНОЗЪРНЕСТ, КОНФИТЮР,
ТЕСТО и СЛАДКО ТЕСТО. Да не се използва за
хляб или тесто, съдържащи прясно мляко, кисело
мляко, сирене, яйца, плодове, лук или друга
съставка, която би могла да се влоши, ако се
остави няколко часа в топла и влажна среда.
Следвайте инструкциите от 1 до 30, за да
стартирате машината за хляб. Няма да бъде
възможно да добавите плодове или ядки по
време на второто месене, добавете ги по време
на етап 17.
Преценете кога искате хлябът да е готов,
например в 6:00 часа. Проверете колко е часът,
когато стартирате програмата, например 21:00
10
 Loading...