

Page 1
11-01-06
Page 1 of 4
3783019
ARB TOYOTA HJ100 2002 IFS, SIDE STEP AND FRONT RAIL
PRODUCT No. FRONT RAIL 4413250 or 4413270
SIDE STEP 4413260
FITTING KIT 6171750
USE
QTY
DESCRIPTION
SIDE STEP TO CHASSIS
2
BOLT ‘U’ M12 x 1.75 x 175mm x 100mm
REAR
4
½” SPRING WASHERS
4
½” FLAT WASHERS
4 M12 NUTS
1 FOAM TAPE
4
SMALL SPACER
SIDE STEP TO CHASSIS
2
BOLT ‘U’ M12 x 1.75 x 175mm x 100mm
MIDDLE
4
½” FLAT WASHERS
4
½” SPRING WASHERS
4 M12 NUTS
2 SPACER
SIDE STEP TO CHASSIS
2
BOLT ‘U’ M12 x 1.75 x 175mm x 100mm
FRONT
4
½” FLAT WASHERS
4
½” SPRING WASHERS
4 M12 NUTS
2 SPACER
RAIL TO STEP LOCKING BOLT
4
M8 BOLT x 20mm
4
M8 FLAT WASHER
4
M8 FLANGE NUT
SIDE RAIL TO BULLBAR
4
SIDE RAIL CLAMP
6
M8 BOLT X 70mm DOME HEAD BLKZP
6
M8 NYLOC NUT BLACK
6
M8 FLAT WASHER X 17mm OD BLACK
4
SIDE/RAIL RUBBER PLUG
CHECKER TOP TO STEP
1
CHECKER TOP PLATE LHS
1
CHECKER TOP PLATE RHS
14
M6 BOLT x 25 mm DOME HEAD
14
M6 FLANGE NUT
14
M6 FLAT WASHER
2 ARB DECAL
Tools Required
Basic Metric Spanner and Socket set, “G” Clamp, 3.0mm, 8.5mm and 10mm drill bit, electric
drill, Stanley knife and a tube of neutral cure Silicon.
Page 2
11-01-06
Page 2 of 4
3783019
ASSEMBLY SEQUENCE FOR SIDE RAIL AND STEP.
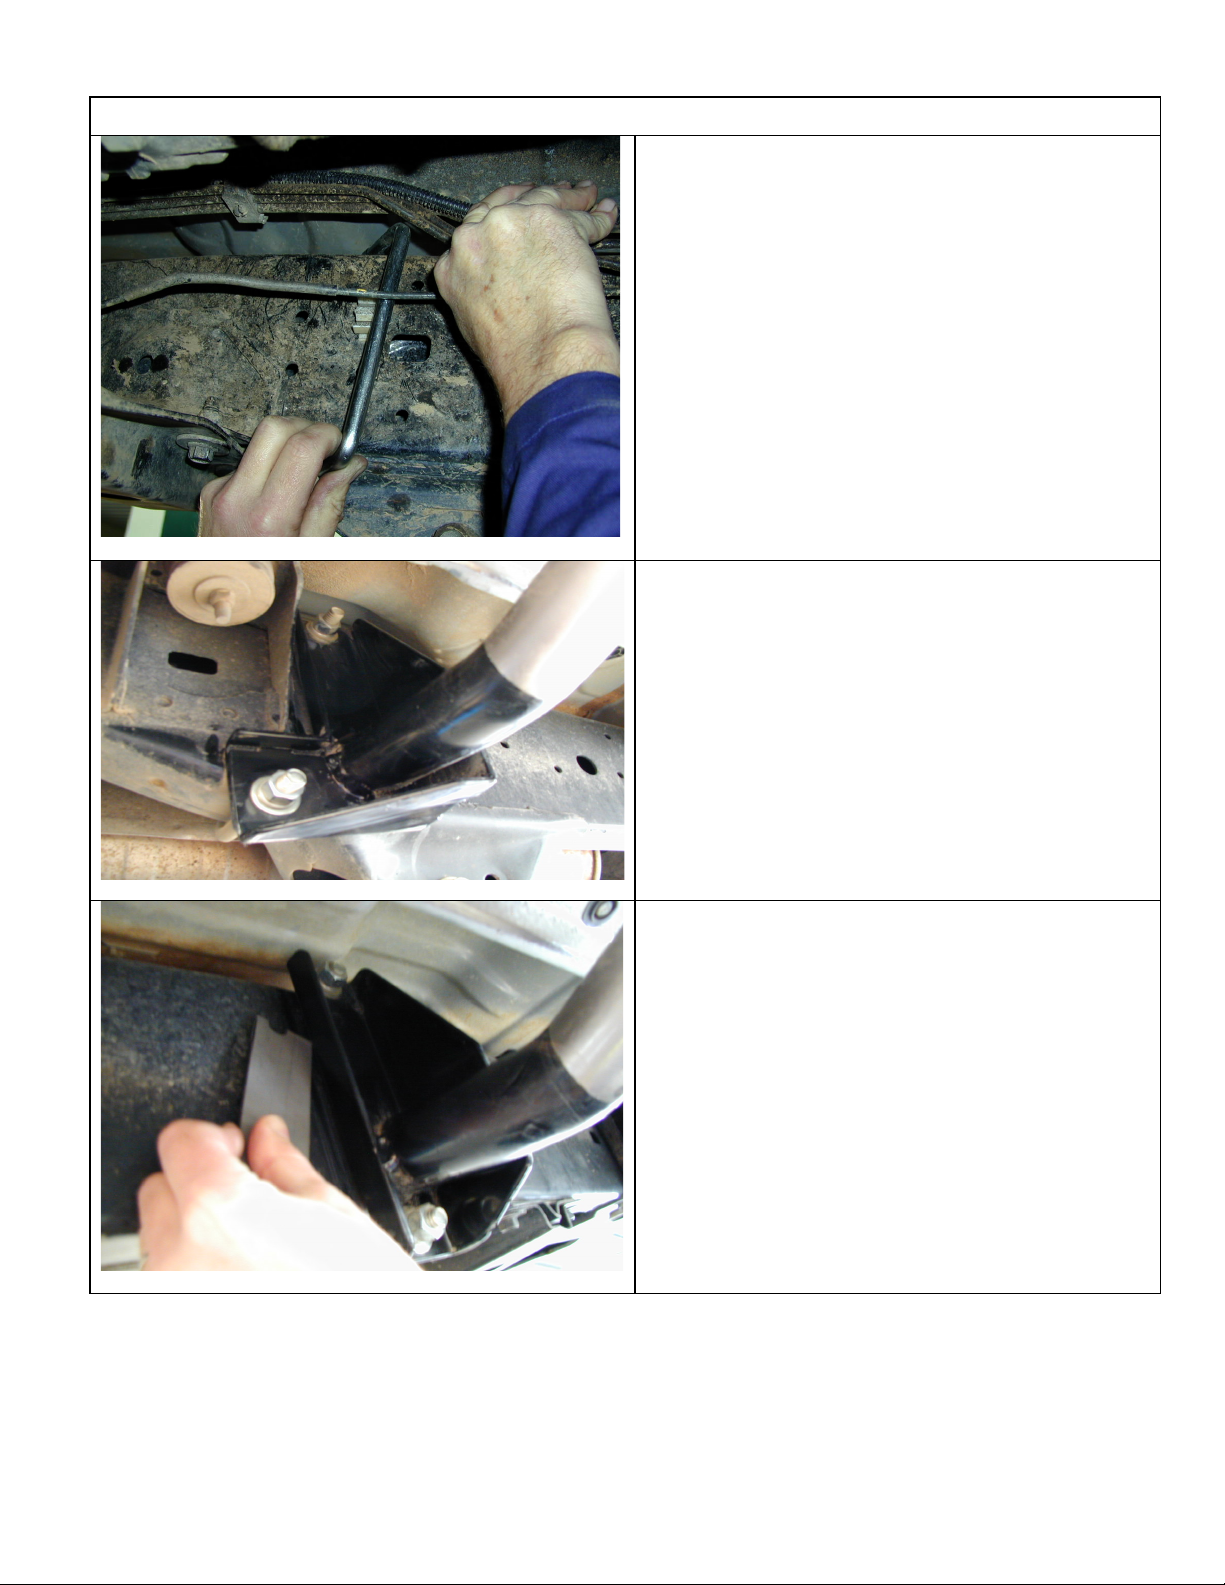
1. Lay the side step next to the vehicle in
position to see the approximate location of
the “U” bolts on the chassis. Fit the “U”
bolts to the chassis as shown.
WARNING
When fitting the “U” bolts to the chassis on
the left hand side of the vehicle, make sure
the “U” bolts fit under all cables and steel
brake lines giving plenty of clearance.
DO NOT CRUSH PIPING OR WIRING.
2. Fit the rubber plugs into the ends of the side
steps and also into the end of the front rail
that meets the bull bar.
3. With help, support the front of the step. Bolt
the rear bracket loosely into position using
½” flat washer, spring washer and M12 nut.
Finger tighten only.
4. Repeat this for both the front bracket and
center bracket. Once all brackets are
attached align the side rail to the vehicle and
tighten firmly.
NOTE:- Due to chassis variations the step
may need to be fitted with a spacer on one
side, to maintain a consistent gap from the
left hand to right hand side. These are
supplied in the kit, depending on the gap
one or two spacers per bracket will be used.
The spacer is placed between the chassis
rail and the side step bracket.
The front and center bracket use the long
spacer (319 3721) the rear bracket uses the
smaller type similar to the ones welded to
the rear bracket, and locate in the same
position.
Page 3

11-01-06
Page 3 of 4
3783019
5. Fit the rear of the front rail into the front
step. Using the M8 hardware, bolt the front
rail to the side step (finger tight at this
stage).
6. “G” clamp the bull bar clamps to the front of
the side rail and bull bar. Once the rail is
aligned to the front guard of the vehicle,
tighten the M8 bolt in the lower bracket then
drill and pin through the side step bracket to
lock the front rail into position using the M8
bolt and hardware supplied.
The mud flaps may need to be removed to
drill and pin the bracket, the wheel will
also need to be turned outboard to
provide sufficient access.
Ensure the side step and front rail tubes are
butted together firmly with no gap before
fastening tightly.
7. Drill thought the side rail and rail clamps
using a 8.5 mm drill bit and fasten with the
black M8 coach bolts and hardware supplied.
Page 4

11-01-06
Page 4 of 4
3783019
8. Run a bead of silicone along the top of the
step to eliminate vibration of the checker top
against the side rail step.
9. Fit and align the checker top using the M6
dome head bolts, washers and nuts and
tighten securely.
 Loading...