

Page 1
Impulse Response Utility
User Manual
Page 2

Apple Inc.
© 2007 Apple Inc. All rights reserved.
Under the copyright laws, this manual may not be
copied, in whole or in part, without the written consent
of Apple. Your rights to the software are governed by
the accompanying software licence agreement.
The Apple logo is a trademark of Apple Inc., registered
in the U.S. and other countries. Use of the “keyboard”
Apple logo (Option-Shift-K) for commercial purposes
without the prior written consent of Apple may
constitute trademark infringement and unfair
competition in violation of federal and state laws.
Every effort has been made to ensure that the
information in this manual is accurate. Apple Inc. is not
responsible for printing or clerical errors.
Note: Because Apple frequently releases new versions
and updates to its system software, applications, and
Internet sites, images shown in this book may be slightly
different from what you see on your screen.
Apple Inc.
1 Infinite Loop
Cupertino, CA 95014-2084
408-996-1010
www.apple.com
Logic, Mac, and Mac OS are trademarks of Apple Inc.,
registered in the U.S. and other countries.
Other company and product names mentioned herein
are trademarks of their respective companies. Mention
of third-party products is for informational purposes
only and constitutes neither an endorsement nor a
recommendation. Apple assumes no responsibility with
regard to the performance or use of these products.
Page 3

Using Impulse Response Utility
Impulse Response Utility is a multi-track audio recording and deconvolution
application. It allows you to create your own mono, stereo, and surround impulse
responses for Space Designer, the convolution-based reverb effect of Logic Studio.
All parameters and functions that you will need to create impulse responses are
contained in a single screen.
The Impulse Response Utility interface is divided into four areas:
 Hardware I/O Assignment area: Contains pop-up menus that allow you to select the
audio input and audio output.
 Monitor and Sweep Generator section: Offers monitoring and sine sweep generation
parameters, plus buttons to deconvolve your audio tracks into an impulse response
and audition your IR.
 Inputs/Track section: Lists all audio tracks used for your impulse response recordings.
 Editing area: Displays the audio information of the currently selected audio track.
3
Page 4

Deconvolution is the process used to create impulse responses from (recorded)
broadband audio sine sweeps. The following section covers deconvolution and its role
in the impulse response creation process. Further sections discuss the hardware
necessary for impulse response recording, and use of Impulse Response Utility to make
your own Space Designer Impulse Response (.sdir) files.
Deconvolution and Impulse Response Utility
Space Designer combines, or convolves , an impulse response of an acoustic space with
an audio signal. The end result is that your audio is placed “inside” the acoustic space,
represented by that impulse response. Think of an impulse response as the total echoes
(reflections) in a given physical space, following an initial signal spike. The impulse
response file is simply an audio file recording made in a space that contains these echoes.
Making an Impulse Response Recording
There are two practical methods used for impulse response recording.
Using a Transient Recording
The first method involves the recording of an impulse in a space, using a device such as
a starter pistol. The gunshot is the impulse, and the audio file you record captures both
the impulse (gunshot) and the room response.
The advantage of this method is that the recorded audio file can be used in
Space Designer without any further processing. You can simply use Impulse Response
Utility to record your starter pistol impulses, and then combine them into a
Space Designer Impulse Response (.sdir) file (and Space Designer setting file).
The disadvantage of this method is that it’s extremely difficult to make a perfect,
undistorted recording of a starter pistol shot. This is due to the extremely loud nature
of the initial transient of the shot. A further issue is that starter pistol shots contain very
little high or bass frequency information—which, in turn, limits the usable frequency
range of the convolved reverb.
Using a Broadband Sine Sweep
The second (and preferred) method for creating impulse responses involves playing a
broadband audio sine sweep into a space, and recording the sweep (and space) at
optimal recording levels. A sine sweep that covers the entire audible frequency range is
used, resulting in a broad-range, and often higher quality, impulse response.
4
Page 5

The recorded sine sweep audio file cannot directly be used as an impulse response. The
recorded file contains all the echoes and reflections—in other words, the response —of
the space, stretched out over the length of the sine sweep. This is very different to the
starter pistol approach, where the response is contained at the beginning of the file in
an impulse .
When you use a sine sweep, Impulse Response Utility uses a process called
deconvolution to time align and level align all recorded reflections—that are present
over the entire recorded sine sweep—into the very beginning of the file. This results in
an impulse response that Space Designer can use to combine, or convolve, with your
audio signal. Impulse Response Utility can then generate an .sdir setting from the
impulse response.
Setting Up Your Impulse Response Recording System
Prior to using Impulse Response Utility to create an impulse response, you need to set
up your recording hardware—allowing playback and recording of the sine sweep that
Impulse Response Utility will generate.
Ideally, you will have:
 One speaker for each (speaker) location required by the chosen format, if you are
going to be generating sine wave sweeps. As examples: If you are recording a true
stereo impulse response, you will need two speakers; if you are recording a six
channel surround impulse response, you will want six speakers, and so on. If you are
not generating sine wave sweeps, you don’t need speakers to play them back (the
sound is generated by the starter pistol).
Note: In many cases, it is sufficient to record one speaker position (but all
microphone positions required by the chosen impulse response format), and create a
mono/omni discrete impulse response. This will result in a less CPU-intensive impulse
response in the required format. See “Recording a Mono to Omni 5 Channel Impulse
Response” on page 32.
 One or more microphones to record the resulting audio from each speaker (or your
gunshot) combined with its echo reflections. The number of microphones you will
need depends on the chosen impulse response format. As examples; if you are
recording a six channel surround impulse response, there are six microphone
positions, so ideally you would have six microphones; if you are recording a six
channel B-Format encoded impulse response—where only one microphone position
and four tracks are required—you would need fewer microphones, and so on. Please
see “B-Format Surround Encoding” on page 28 for more information.
 An audio interface that offers enough outputs to send a broadband audio sine
sweep into each speaker (if using sine sweeps), and enough inputs to record the
resulting audio from each position.
5
Page 6
Note: You may also need additional microphone pre-amplifiers if you find that your
microphones can’t capture a strong enough signal, or your audio interface doesn’t offer
enough mic pre-amp inputs.
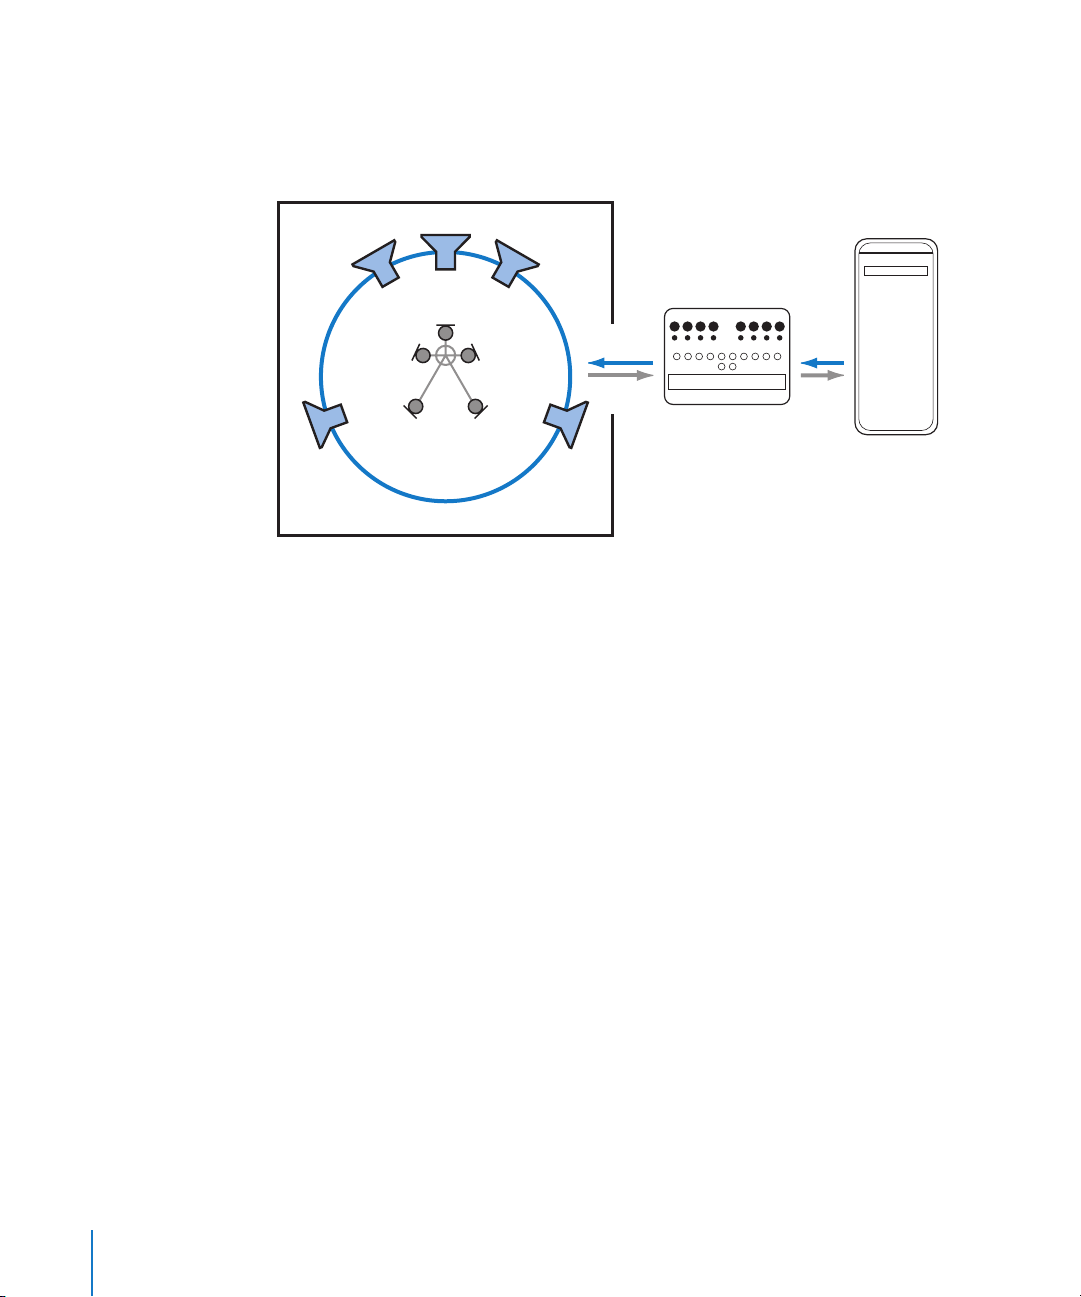
Example of speakers and microphones set up to capture a 5.1 multi-channel impulse response
L
Ls
C
Surround
microphone
tree
R
Rs
Audio interface
Computer
It is possible to make discrete multi-track impulse responses—even if you don’t have
enough speakers or microphones. As you’ll only be recording one sine sweep at a time,
you can set up as many speakers as you have, record them into Impulse Response
Utility, then move the speakers to new positions, and repeat the process. To give you
an example, imagine you only have a stereo pair of speakers, but want to create a
quadraphonic impulse response, which requires the recording of four tracks in four
different speaker positions. You could set up your pair of monitors, record their output,
then move them to record the other pair of tracks in the other two speaker positions.
This method of creating impulse responses is obviously more time consuming, and not
having all your speakers set up at once makes optimal monitor placement—relative to
each other—difficult. With time and careful planning, however, you can still achieve the
same results.
∏
Tip: You can also create multi channel impulse responses in Impulse Response Utility
through use of the Mono to Omni Discrete impulse response format. This only requires
the recording of one speaker by as many “channel” microphones as needed (for the
chosen format). The resulting impulse response places a lower strain on your CPU. See
“Recording a Mono to Omni 5 Channel Impulse Response” on page 32.
If you have enough monitors, but not enough microphones, you can set up the
required speakers, and simply move your available microphones between them. This
makes optimal microphone placement—relative to other microphones—difficult, but
you still have the advantage of optimal speaker placement (and let’s face it, it’s way
easier to move microphones than speakers!).
6
Page 7

If your audio interface doesn’t have enough inputs and outputs—for the number of
speakers and microphones you are using to create your impulse response—you can
still set up all mics and speakers. As you record different tracks into Impulse Response
Utility, you will need to disconnect/reconnect the speakers and microphones, in turn.
A more detailed discussion of speakers and microphones that are suitable for creating
impulse responses, as well as suggestions on speaker and microphone placement, is
found in “Microphone and Speaker Suggestions” on page 23.
Creating Impulse Responses in Impulse Response Utility
Creating an impulse response in Impulse Response Utility consists of the following
steps:
Step 1: Creating a new impulse response project
Configure your Impulse Response Utility project for the number of tracks your impulse
response format requires.
Step 2: Setting Impulse Response Utility parameters
Set the hardware I/O, monitor, and sweep parameters for your audio track recordings.
Step 3: Recording
Use Impulse Response Utility to record the audio tracks needed for your impulse
response.
Step 4: Deconvolving your audio recordings
Assuming you have recorded sine sweeps, click Deconvolve after all audio tracks have
been recorded. Impulse Response Utility will generate an impulse response from your
tracks.
Step 5: Editing and Auditioning
Cut silent portions, apply fades, and so on, to optimize your impulse response.
Step 6: Creating a Space Designer setting
Click Create Space Designer setting when finished with the steps above. This adds the
newly created impulse response to your list of available Space Designer settings.
The following sub-sections describe each step in detail.
7
Page 8
2
Creating Your Project
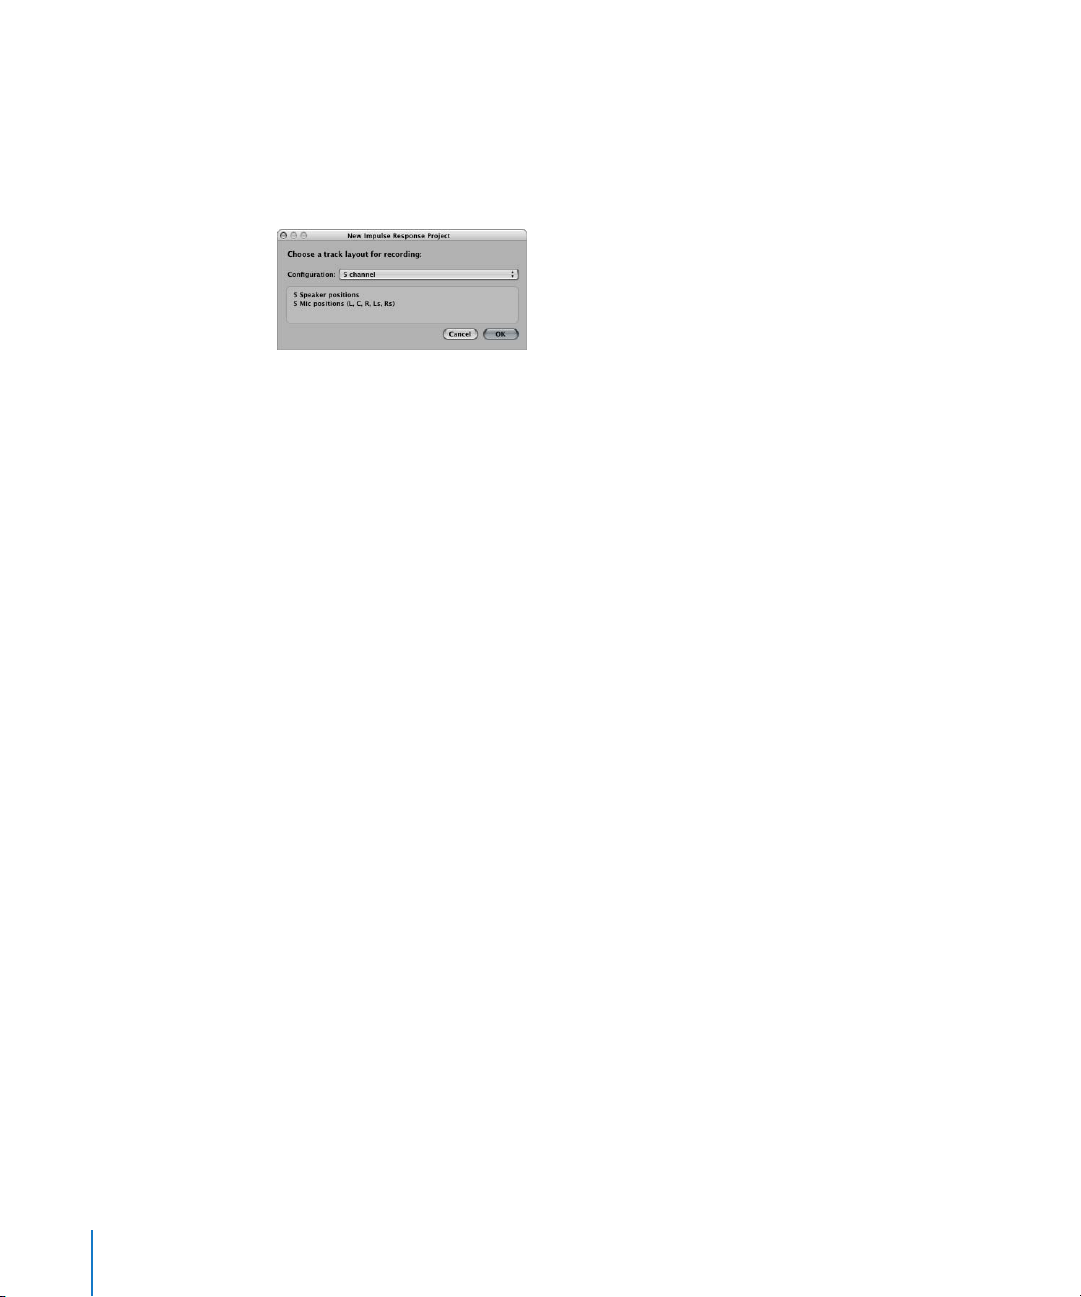
When you first open Impulse Response Utility, you will be presented with the New
Impulse Response Project dialog window. This is the first step in creating a new
impulse response project. You can also create a new impulse response project by
choosing File > New Project (or pressing Command-N).
Impulse Response Utility offers formats ranging from conventional stereo impulse
responses, true stereo (where each channel is processed discretely) and quadraphonic
formats, to five, six, or seven channel surround formats. These latter formats can be in
either: traditional multi-track, or B-Format encoding. Please see “B-Format Surround
Encoding” on page 28 for more information.
You can also create multi channel impulse responses in Impulse Response Utility by
using the Mono to Omni Discrete impulse response format. This only requires the
recording of one speaker by as many “channel” microphones as needed (for the chosen
format). The resulting impulse response places a lower strain on your CPU. See
“Recording a Mono to Omni 5 Channel Impulse Response” on page 32.
To create a new impulse response project:
1 Choose the desired impulse response format from the Configuration menu.
In the window below the Configuration menu, the dialog displays the number of
speaker and microphone positions required by the selected format.
Click OK
This exits the New Impulse Response Project dialog, and the required number of tracks
(determined by the format you chose) are shown in the Inputs/Track section.
8
Page 9

Setting Impulse Response Utility Parameters
Once you have created a new impulse response project, you will need to assign the
audio input and output device, monitor settings, and sweep generator settings.
Assigning Input and Output Hardware
You need to set up the audio input and output device in the Hardware I/O Assignment
area before you can use Impulse Response Utility.
The audio input selection determines the audio device used to record audio tracks. The
audio output selection determines the audio device used to monitor the recorded
signal, and to play back the generated sine sweep.
To select an audio input device:
m In the Audio Input menu, choose the desired audio interface driver.
To select an audio output device:
m In the Audio Output menu, choose the desired audio interface driver
Changing the Sample Rate
The Hardware I/O Assignments area also displays the current sample rate. You cannot
change the sample rate of your impulse response project in Impulse Response Utility. If
you want to record your audio tracks at a different sample rate, you will need to change
it in the Audio MIDI Setup utility, or in the software for your audio interface (if
applicable). Consult the documentation for your audio interface if you’re unsure.
9
Page 10
2
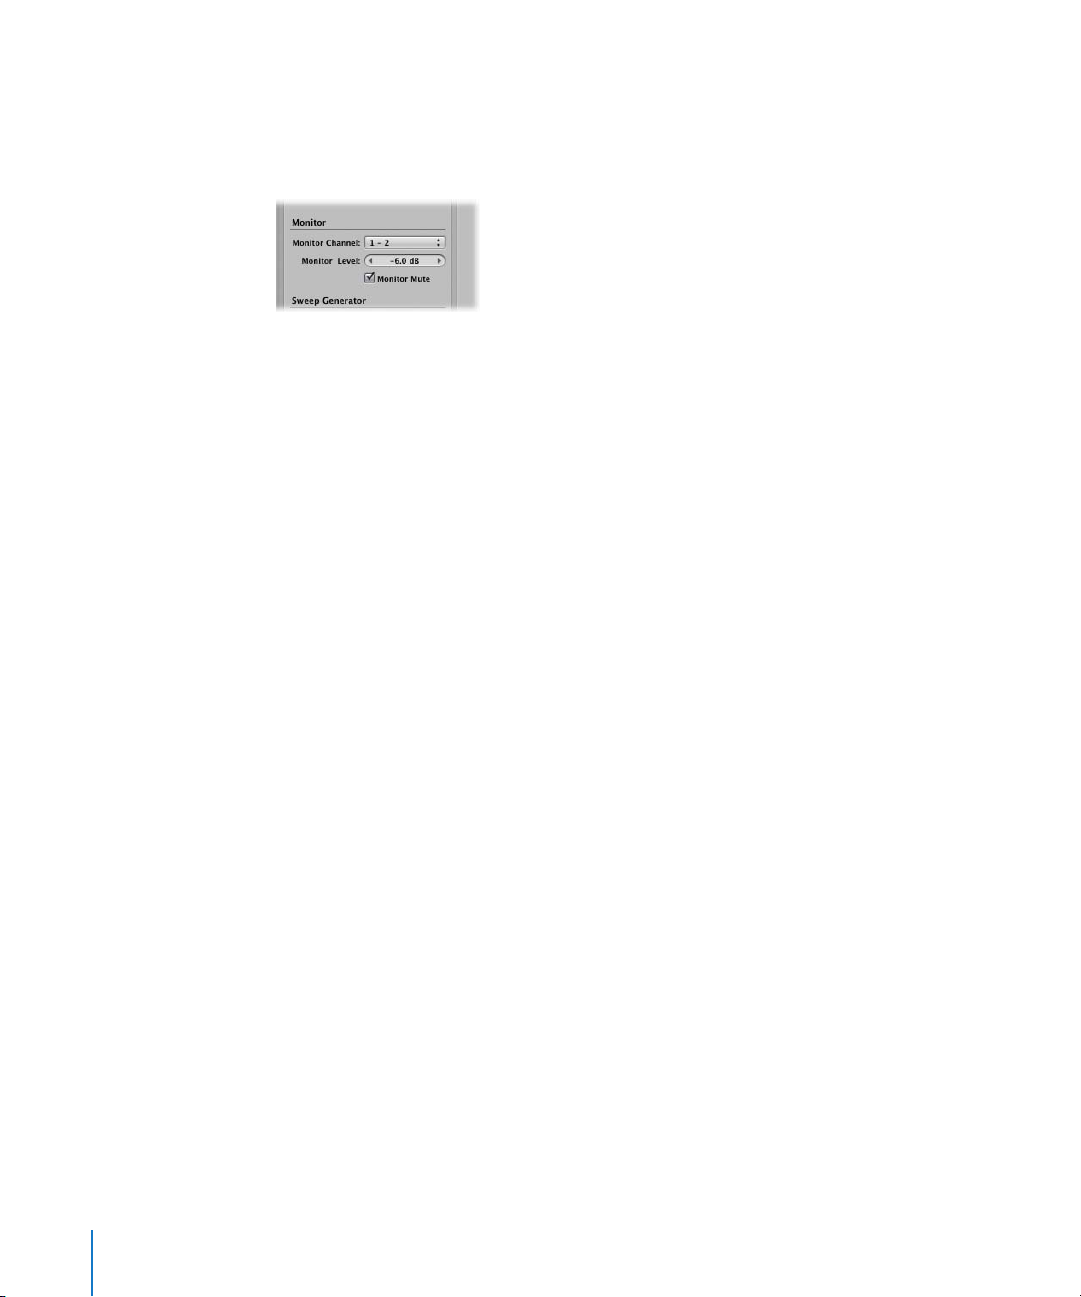
Configuring the Monitor Controls
Once you have recorded sine sweep tracks into Impulse Response Utility, you can
monitor them through a stereo output of your choice. The monitor controls determine
the monitor channel and level. You can also mute the monitor section.
To select the stereo monitor output channels:
m Choose the desired stereo output pair from the Monitor Channel menu.
To adjust the output level of the monitored signal:
1 Click inside the Monitor Level field.
Do one of the following:
 Drag left (or down) to reduce the volume, or right (or up) to raise the volume.
 Type a numeric value for the monitor level (any value above 0 dB will set the monitor
level at 0 dB.)
Important: To avoid audio feedback when recording, be sure to mute the monitor
output.
To mute the monitor output:
m
Enable the Monitor Mute checkbox.
10
Page 11

2
Configuring the Sweep Generator
The sweep generator produces a sine wave that sweeps smoothly up from 20 Hz to
20 kHz. The sweep generator parameters set the hardware output, volume, length,
reverb time, and pre-roll of the sine sweep.
To set the hardware output channel for the sine sweep:
m Use the Sweep Channel menu to choose the desired output channel.
To set the output level of the sine sweep:
1 Click inside the Sweep Level field.
Do one of the following:
 Drag left (or down) to reduce the volume, or right (or up) to raise the volume.
 Type a numeric value for the sweep level (any value above 0 dB will set the sweep
level at 0 dB.)
Sweep Length
There are three length options for the sine sweep:
 10s: A ten second sine sweep.
 50s: A fifty second sine sweep.
 Off: No sine wave sweep. Choose this setting if you are recording a starter pistol
impulse.
Ideally, you want your sine wave to be short. This avoids artifacts in your recording due
to air motion, rattling of interiors, and other ambient noise—making the 10 second
sine sweep a great choice. Unfortunately, short sweeps may not yield high enough
signal-to-noise ratios in some recording situations. If you find that the results obtained
from recording with a 10 second sweep aren’t all you hoped for, try the 50 second
sweep.
To set the sweep length of the sine sweep:
m Choose the desired sweep length from the Sweep Length menu.
11
Page 12

2
Reverb Time
The Reverb Time parameter determines the maximum recording time for each track. In
order to accurately capture the acoustic properties of a space, you should set a value
that is long enough to capture the decay phase of all reverberations and echoes.
If you are using the sweep generator, the reverb time will start when the sine sweep
ends. If you have the Sweep Length set to Off (in order to record a starter pistol shot
impulse response), the Reverb Time parameter determines the entire length of the
recording.
To set the reverb time:
1 Click inside the Reverb Time display.
Do one of the following:
 Drag left (or down) to reduce the time, or right (or up) to increase the time.
 Type a numeric value for the reverb time.
Preroll
You want to be sure that any operator noise, such as typing, readjusting microphones,
and so on, is not recorded. You can set a pre-roll for just this purpose; recording won’t
start immediately, giving you time to finish typing, make last minute mic corrections,
and so on. The pre-roll length equals the time you set with the Reverb Length parameter
.
To turn pre-roll on/off:
m
Click the pre-roll checkbox.
Test Tone Generator
Impulse Response Utility includes an integrated, sustaining (in other words, nonsweeping) sine wave tone generator, which helps you to calibrate your hardware
outputs. A number of frequencies are available: 100 Hz, 1 kHz, 5 kHz, and 10 kHz. Use
this test tone to ensure that your hardware output channel is connected properly, and
that your speakers can reproduce the selected sine wave frequency.
To set the frequency of the test tone:
m
Choose the desired frequency from the Test Tone menu.
To turn the test tone on/off:
m
Click inside the on box.
When the box is checked, you will immediately hear the test tone through the selected
sweep channel.
Note:
The level of the test tone is determined by the Sweep Level parameter.
12
Page 13

Recording Audio Into Impulse Response Utility
Once you have selected your hardware assignments, and configured the monitor and
sine sweep sections, it’s time to start recording audio tracks.
Recording in Impulse Response Utility consists of three basic steps:
1 Select an audio track in the Inputs/Tracks section.
Configure the audio track for recording.
Repeat this step for each track required by the chosen format.
Click the Sweep/Record button to begin recording.
If you are using the sweep generator, you will hear the sine wave sweep up through its
frequency range. Impulse Response Utility will record the result onto the selected audio
track(s).
If you have set the sweep generator to Off. Click Record, and shoot your starter pistol.
Impulse Response Utility will record the resulting impulse response onto the selected
track.
To select an audio track, do one of the following:
m Click in the desired track lane.
m Use the Up and Down Arrow keys to navigate through the track list.
2
3
4
Configuring Audio Tracks for Recording
The Inputs/Tracks section is automatically filled with the number of tracks required for
the impulse response recording, based on your selections in the New Impulse
Response Project dialog. Every track lane in the Inputs/Tracks section has a number of
parameters. Some are automatically configured by Impulse Response Utility; others you
will need to set before recording.
Track Parameters
 Speaker Position menu: Selects the speaker position label for the selected track. Both
Impulse Response Utility and Space Designer use these labels to identify, and
process, the audio files that comprise a multi-channel stereo or surround impulse
response. Impulse Response Utility automatically sets the speaker position label for
each track, but you can change these labels to any other position (available in the
current impulse response format), if desired.
13
Page 14

 Mic Position menu: Selects the mic position label for the selected track. Both Impulse
Response Utility and Space Designer use these labels to identify, and process, the
audio files that comprise a multi-channel stereo or surround impulse response.
Impulse Response Utility automatically sets the mic position label for each track, but
you can change these labels to any other position (available in the current impulse
response format), if desired.
 Input menu: Sets the physical input for each track. Be sure to select the correct input
before recording.
 S[olo] button: Click to engage or disengage solo mode for the selected track. When
the Solo button is engaged (yellow), the input signal is routed to the monitor
section, and the input level is displayed in the VU Meter (see “VU Meter” below). Only
one track may be soloed at a time.
 R[ecord-Enable] button: Places the selected track into record-ready mode. The R
button turns red when engaged. Clicking this button also activates the Solo button
for the selected track, allowing you to monitor the input signal before recording. You
can record-enable several tracks at once, for multi-channel recording. When you click
Sweep/Record, a recording will be made on all record-enabled tracks.
 L[ock] button: Locks the Sweep Length and Reverb Time parameters, ensuring that
subsequent recordings use the same values.
 Peak: Displays the peak level value in dB. If the level ever exceeds 0 dB, the peak
value is held until cleared. Clicking on the Peak column header resets the Peak
readout for all tracks.
 Level: Displays input meters for each track. These level meters always show the
current level of the physical inputs.
14
Lock Mode and the Sweep Generator
As soon as one track is locked, the sweep generator parameters are also locked. This
ensures that any subsequent recordings will use identical sweep settings. This is
necessary, as every track must use an identical sine sweep—in order to produce a
phase coherent, accurate sounding, multi-channel impulse response.
Page 15

VU Meter
Impulse Response Utility offers a VU meter that measures either; the signal level
present at the (soloed) track input, or the sweep generator output. During playback of
recorded audio, the VU Meter displays the level of the selected track. A status message
below the VU Meter shows its current operating mode. The VU Meter scale ranges from
0% to 100%, with 100% equalling 0 dB.
Recording
Once you have configured and record-enabled the desired tracks, click the Sweep/
Record button. If you are using the sweep generator, the button shows “Sweep”. If you
are not using the sweep generator (Sweep Length parameter is set to Off) the button
shows “Record”.
 Clicking Sweep automatically starts the recording process and generates the sine
sweep (using the sweep generator parameters you chose). The VU Meter is
automatically switched to display the sweep generator output.
 Clicking Record automatically begins the recording process. Shoot your starter pistol
and Impulse Response Utility will record the impulse response.
Recording will continue until the entire sine sweep (if the sweep generator is being
used) and Reverb Length time has elapsed. The recording automatically ends. You can
manually end the recording process by clicking the Sweep/Record button.
Note: The Sweep/Record button is disabled if no track is record-enabled.
Automatic Saving of Projects
Impulse Response Utility records into your computer RAM, not to hard disk. This means
that nothing you have recorded is saved, until you save your project!
For your convenience, Impulse Response Utility automatically saves your project to disk
after every recording.
If you haven’t saved your project, the Save dialog is launched, allowing you to name
your project, and choose a hard disk location. If you have already saved your project,
the save process happens automatically. See “Saving and Opening Projects” on page 22
for more information.
15
Page 16

Deconvolving Your Impulse Response
If you use the sweep generator, you will need to deconvolve your audio recordings—in
order to make them usable as an impulse response.
To deconvolve your audio tracks, do one of the following
m Click the Deconvolve button.
m Choose Edit > Deconvolve (or press Shift-Command-D).
Following deconvolution, your audio tracks will be a single impulse response that you
can audition, edit, and turn into an .sdir setting.
Note: While it is possible to deconvolve each audio track once recorded, there’s really
no point in working this way; it’s far more efficient to wait until all tracks are recorded,
and then deconvolve them.
16
Page 17

Editing and Auditioning Your Impulse Response
Once you have recorded (or deconvolved your recorded tracks into) impulse responses,
you can use the Editing area to do some “touching up” of your impulse response. You
can use the Audition IR window to hear how your impulse response sounds when
applied to a test audio file.
Editing Your Impulse Response
When you have finished recording your audio tracks, you may feel that they have
superfluous silence at the beginning or end of the file, don’t fade out early enough,
and so on. To address these minor issues, Impulse Response Utility allows you to cut,
crop, and fade your audio files in the Editing area.
To view an audio file in the Editing area:
m Select the audio file.
Your audio file will automatically appear in the Editing area.
You can choose from three different display modes in the Editing area:
 Waveform: Shows the recorded audio as a standard waveform. The horizontal axis
displays the elapsed time. The vertical axis displays the audio level as a percentage.
 Energy: Shows the sound energy distribution over time. The horizontal axis displays
the elapsed time. The vertical axis displays audio levels in dB.
 Spectrogram: Shows the frequency distribution over time. The horizontal axis
displays the elapsed time. The vertical axis displays the frequencies, which are color
coded by dB range. The color legend in the upper right corner of the Editing area
indicates the color schema.
These display modes allow you to effectively analyze your waveforms, making it easy to
identify material you need to cut or crop, or that requires a fade. The Spectrogram
mode, in particular—which simultaneously shows frequency, level, and time—allows
for very detailed analysis of your audio.
17
Page 18

Transport Buttons
The Editing area contains two transport buttons:
 Play: Starts or stops playback of the selected audio track. You can also use the Space
bar to start or stop playback.
 Cycle: Engages/disengages Cycle mode. When Cycle mode is engaged (the button is
darkened), playback of the selected track repeats continuously.
Editing Functions
Impulse Response Utility offers three editing functions, accomplished via the two
editing buttons at the top left of the Editing window: Cut, Crop, and Fade.
All edit functions are accomplished by using the same steps:
1 Click-drag over a portion of the audio in the Editing area.
2 Click the appropriate edit function button.
 Crop: If you make a selection that doesn’t extend to either the beginning or end of
the audio, the left edit button activates the Crop function. Clicking this button will
remove the audio to the right and left of your selection, without touching the
selected audio. You can also choose Edit > Crop (or press Command-X) to crop.
 Cut: If you make a selection that extends to either the very beginning or very end of
the audio, the left edit button activates the Cut function. Clicking this button will
remove the selected audio, without touching the unselected audio. You can also
choose Edit > Cut (or press Command-X) to cut.
 Fade: If you make a selection that includes either the very beginning or end of the
audio, you can select the Fade function. Clicking this button creates a gradual fade
over the length of the selection area. You can also choose Edit > Fade (or press
Command-F) to fade.
18
Note: In order to maintain phase coherency between all tracks of your impulse
response, edits are performed across all tracks equally. To ensure that your impulse
response cannot include tracks that are not edited equally, you are prevented from
recording further tracks once an edit has been made.
Page 19

Auditioning Your Impulse Response
To really know how your impulse response will sound when used in Space Designer,
you need to be able to listen to it in context. Impulse Response Utility includes an
Audition window for just this purpose; where the loaded impulse response can
convolve test audio files. The Audition window is divided into three sections: the
Impulse Response area, the Monitor area, and the Audio Test Files area.
Impulse Response Utility allows up to five audio files to be loaded/used as sources
when auditioning your impulse response. The Audition window also includes four builtin test source files.
To open the Audition window:
m Click the Audition IR button.
The Audition window will open. All editing functions are disabled while the Audition
window is open.
The Audition window offers the following parameters:
 Enable checkbox: Enables or disables individual impulse response recordings. Use
these boxes to select the specific file (or files) you want to audition.
 Input ID label: Identifies the specific impulse response file by its speaker > mic
positions.
 Output Channel menu: Selects the physical output channel used for playback of the
selected impulse response.
 Mix field: Determines the ratio of dry test source signal to wet effect signal.
19
Page 20

 Monitor Level field: Sets the overall auditioning volume.
 Test Audio File buttons: Plays one of the four built-in test source audio files.
 Open buttons: Click to load an audio file for use as a test source. Any uncompressed
audio file can be used.
 Play buttons: Click to play the selected audio file through the enabled impulse
response file (or files).
B-Format Impulse Responses
The appearance of the Audition window changes slightly when using a B-Format
impulse response. The B-Format Audition window removes the Output Channel
parameter from the Track area and includes a Loudspeaker area:
20
The Loudspeaker area includes the following parameters:
 Number of Loudspeakers: Determines the number of loudspeakers that Impulse
Response Utility will decode the impulse response into. Click the arrows to increase
or decrease the number of speakers, or double-click the number of speakers and
type in a new value.
 Loudspeaker Angle: Allows you to configure the angle of each loudspeaker. The
B-Format decoding takes this into account when recreating the recorded space.
 Output Channel: Sets the physical output channel for the selected loudspeaker.
Page 21

Creating a Space Designer Setting
Once you are satisfied with your impulse response, the final step is to generate a .sdir
file, and a plug-in setting. When done, your newly created impulse response can be
used in Space Designer.
To create a Space Designer setting, do one of the following
m Click the Create Space Designer Setting button.
m Choose File > Create Space Designer Setting.
Impulse Response Utility will generate an .sdir file of your impulse response and save it
in the following directory: ~/Library/Application Support/Logic/Impulse Responses.
It will also generate a plug-in setting file for your impulse response and save it in
the following directory: ~/Library/Application Support/Logic/Plug-In Settings/
Space Designer.
The next time you open Logic, your newly created impulse response will be available in
the Library, and within the Space Designer interface.
21
Page 22

Saving and Opening Projects
As mentioned earlier, Impulse Response Utility automatically saves your project as soon
as you record audio. You can manually save your project at any time, however. You can
also open a previously saved project, or revert the current project back to its last saved
state.
To save your project with its current name and location:
m Choose File > Save Project (or press Command-S) to save your IR Project with its current
name, in its current location.
To save your project with a new name or location:
m Choose File > Save As (or press Command-Shift-S).
The Impulse Response project file is a Mac OS X package file, that contains all files
associated with the project.
Opening Projects
If you’d like to continue working on a previously saved project, you first need to open it
To open a project, do one of the following
m Choose File > Open Project (or press Command-O), then navigate to your project file.
m
Choose File > Open Recent to open a hierarchical menu of recently opened project files
Reverting to Saved
If you aren’t happy with the edits or recordings made in your current project—and you
have saved the project—you can use the File > Revert to Saved command. This returns
the project to its last saved state.
.
.
22
Note: Once you use the Revert to Saved command, you will lose all unsaved changes.
Page 23

Microphone and Speaker Suggestions
The impulse response of a space is never just the space’s impulse response. The
recorded impulse response is always the response of the complete system—in other
words, every piece of equipment you use in the recording process. This includes, in
signal-flow order: the digital-to-analog converter, the amplifier and speakers (or
powered speakers), the room characteristics, the microphone(s), and finally the
microphone pre-amp and analog-to-digital converter. So, before leaving your studio to
do any location recording, you have to think about your equipment. These days, even
budget converters offer acceptable quality, so your main concern will be your selection
of speakers and microphones.
Speaker and Microphone Selection Suggestions
There are no rules as to which brand or make of microphone or speaker will result in
the best impulse response. A general guideline is to try using speakers and
microphones with a flat response (in other words, the speakers and microphones
should offer a very even signal at all frequencies). You can find microphones and
speakers that offer relatively flat responses at nearly all budget levels. Tube
microphones, which are generally valued for the tonal “color” that they add to the
signal, are not necessarily the best choice for recording impulse responses. In general,
microphones that work well as ambience mics are good candidates.
Speaker and Microphone Placement Suggestions
Where you place your speakers and microphones in the recording space will have a
large impact on the specific echoes and reflections that your impulse response
captures. It goes without saying that creativity is key, and experimentation the name of
the game!
There are, however, some general suggestions and guidelines that may help when
you’re first starting out.
One general suggestion for placement in environments with hard floors, made from
materials such as concrete: You may find that a “chirp” is recorded at the beginning of
your impulse response. This sound is actually the generated sine sweep coming
through the floor into the microphone. The speed of sound through floors and
concrete material is much faster than through air, resulting in a pre-impulse response
that starts before the impulse response you actually want to record. To get around this
potential problem, you can use “studio” drum pedestals and specialized microphone
mounts that have strong acoustic absorbers built into them. If you can’t carry around
pedestals, or afford expensive microphone mounts, try a thick carpet under the
speakers and microphone stand(s).
23
Page 24

Below are some specific approaches for you to experiment with when creating impulse
responses. Remember, these are just suggestions. There are no rules regarding how far
the speakers have to be placed away from the microphone array, the best angles, ideal
distances between speakers and microphones, and so on. You may want to try a
number of different techniques and placements to find the ideal arrangement. Creating
impulse responses is an art unto itself!
The Virtual Listener Approach
This is perhaps the most common technique for placing speakers and microphones
when creating impulse responses. The goal is to capture the effect of the echoes and
reflections coming from all around the space—as heard at the listening position. In this
approach, the speakers are set up at the edges of the room, and the microphone is
placed in the listening position.
The resulting impulse response (when later used in Space Designer to add reverb to
your signal) should sound like your audio is being played back from the various speaker
locations in the “space”. This method doesn’t require multiple microphones; a single
microphone can be turned towards each speaker in turn, and different audio
recordings can be made from the same location. The image below illustrates the virtual
listener approach to setting up five speakers (for a five channel surround impulse
response), with one microphone placed centrally in the space.
24
L
Ls
C
Surround
microphone
tree
R
Rs
This method can create the impression of the audio signal being completely immersed
in the simulated space.
Page 25

The Auralization Approach
Another common strategy for placing speakers and microphones in a space uses the
auralization approach. This technique attempts to capture the reflections from the
performer’s perspective. Place one or more speakers at the performer’s location (or
another audio source) and place the microphone at the listening position. The resulting
impulse response (when later used in Space Designer) should sound like your audio is
being played back from the specific location in which the speakers were placed. For
example, you can make a stereo impulse response of a particular stage using the
auralization technique, and when you use the IR in Space Designer, your audio should
sound like it is on that stage. The image below illustrates use of the auralization
technique to set up your speakers and microphones for a true stereo impulse response.
L
Stage
Audience
R
To capture a surround impulse response that represents being “in the audience” of a
space, set up two speakers in the performer’s position as above, but place a surround
array of microphones around the room. This can create a realistic feeling (and effect) of
being “in the audience” when the performance is coming from in front of you. This can
help to create a surround-like effect from a live stereo recording.
25
Page 26

The Virtual Echo Chamber Approach
A good alternative to the auralization approach is placement of your speakers and
microphones in a way that creates a virtual space which resembles a physical echo
chamber. To create this kind of impulse response, face the loudspeakers towards the
corners, and the microphones towards the opposite corners. This is how microphones
in a physical echo chamber would be placed. This eliminates a direct path from the
speaker to the microphone, and captures more reflections. The image below illustrates
how you could set up two speakers and two microphones to create a stereo impulse
response, using this virtual echo chamber approach.
L
R
This way you can mix the reverb into the dry signal, without any phase cancellation
issues caused by early reflections or direct signals. This approach works particularly well
if you want to keep your signal mostly dry, without any alteration or coloration from
the reverb, but still want to add a high fidelity reverb tail to your audio.
You can also use this method for surround or multi-channel reverbs. The main concept
to remember is that the speakers should be pointing at the wall, to eliminate direct
paths between microphones and speakers. The illustration below offers a possible
layout for a five channel reverb chamber. The loudspeakers, placed in a circle, are
directed at the walls, and the microphone array is in the center of the circle.
L
C
R
26
Ls
Surround
microphone
tree
Rs
Page 27

Recording Impulse Responses From Guitar Speakers and Hardware Devices
You aren’t limited to creating impulse responses from rooms and spaces. You can make
an impulse response from any device that you can play a broadband sine sweep into
(and record the results). Two examples are; guitar speaker cabinets and hardware
processing devices, such as tube equalizers and reverb effects units.
The sound of an electric guitar through a guitar amplifier is very heavily influenced by
the frequency response and tonal color of the guitar speaker cabinet. If you make an
impulse response from a guitar speaker cabinet, and then run a direct guitar amp
signal through that impulse response in Space Designer (set to 100% wet), the direct
signal will sound as if it was played through the speaker cabinet.
You will still need a microphone and audio interface to create an impulse response
from a guitar speaker, but you won’t need an additional monitor speaker for the sine
sweep—you will play the broadband sine wave into the guitar amp/speaker itself. If
your guitar amplifier has an effects return, you can use it to create the impulse
response. If your guitar amp does not have an effects return, you can either use a “reamp” box (that will raise the impedance of your audio interface’s line out to the level
required by your guitar amplifier at its input), or you can use a line level amplifier in
place of your guitar amplifier (to amplify the sine sweep through the guitar cabinet).
You can experiment with microphone placement just as you would when miking a
physical space, although the most common microphone placement is “close miking”—
placing your microphone as near as one inch from the speaker itself. The illustration
below shows how you might want to set up your guitar speaker cabinet when creating
your impulse response.
Guitar amplifier
with microphone
Audio interface
Computer
Imagine that you want to create an impulse response from your favorite tube
microphone pre-amp, allowing you to use its unique color on your audio. This way, you
can run a signal through this impulse response in Space Designer (set to 100% wet)
and add the color of your microphone pre-amp to your signal.
27
Page 28

This scenario requires neither speakers or microphones. You can simply connect the
output from your audio interface to the input of your hardware device, and play the
sine sweep through it. Connect the output of your hardware device to the input of
your audio interface, and record it back into Impulse Response Utility. You can use this
method to make impulse responses from classic hardware reverbs, multi-effects units,
equalizers, and so on.
You should take care when making impulse responses from hardware effects devices
that include modulation effects. Modulations such as phasing, choruses, and so on,
interfere with the sine sweep itself, which makes deconvolution difficult or impossible.
This is also true for some reverbs, such as classic Lexicon hardware reverb devices, in
which the reverb tails are modulated. In these cases, you may be better off sending a
recorded impulse (such as a recorded spike or gunshot) through the hardware effects
device, instead of a sine sweep.
B-Format Surround Encoding
B-Format is a special way of encoding spatial information. It represents space using four
audio streams: one to capture the sound pressure (W), and three to capture the X
(front-to-back), Y (left-to-right), and Z (top-to-bottom) room co-ordinates. The following
illustration shows you how these four audio streams interact with each other, to create
a three-dimensional spatial image.
28
Front
X
Y
Left
Height
Z
Right
Y
W
X
Rear
Z
Page 29

Space Designer can decode and convolve these four streams into reverbs, in all
supported surround formats. Space Designer offers a comprehensive library of
B-Format impulse responses that use all four streams (W, X, Y, and Z). As impulse
responses do not make use of Z-axis information, Impulse Response Utility only records
and encodes information from the W, X, and Y positions, saving CPU resources and disk
space. Impulse Response Utility allows you to encode all supported surround impulse
response formats in B-Format.
Advantages of B-Format Surround Encoding
One advantage of the B-Format is that it can capture a surround image with fewer
audio files. Normally, you need to record every speaker position from every
microphone position, to correctly record surround information. With B-Format, these
four (or three, in Impulse Response Utility) audio streams are all you need to capture
audio from each speaker.
As an example, imagine you are using a five channel setup, and want to use Impulse
Response Utility to create a five channel impulse response. Using traditional methods,
you would need to record all five speakers from all five microphone positions, resulting
in 25 audio files. If you choose to create your project as a five channel B-Format
impulse response, you will only need to record 15 audio files—three audio recordings
(W, X, and Y) from each of the five speaker positions. As you can see, B-Format encoded
surround impulse responses require far fewer audio files, which means they require less
hard drive space, as well as needing less RAM and CPU cycles when decoded in
Space Designer.
A second advantage to B-Format encoding is phase coherency when using multiple
microphones at once. Whenever you use multiple microphones, differences in the time
it takes sound to reach each microphone can result in phase cancellations and phase
shifts, which can affect the quality of your impulse response. As the point of reference
is always the same when using B-Format encoding, there will be no phase issues, even
when using multiple microphones to record your impulse response.
29
Page 30

Microphone Suggestions for B-Format Recording
Perhaps the ultimate B-Format recording microphones are the SoundField single point
source microphone series. These microphones contain all the capsules you will need to
make a complete B-Format reference recording in one pass, and include hardware to
send the separate axis streams to individual Impulse Response Utility tracks. You will
only need to swivel the mic once towards each speaker position, and the mic and
processing hardware does the rest. For those who can’t afford SoundField mics, Impulse
Response Utility provides additional microphone options for B-Format recording.
Capturing the W (sound pressure) signal requires an omni-directional microphone.
Capturing the X and Y axis signals requires a microphone with a figure-eight pattern (to
capture signal from the front and back of the mic). Therefore, with two figure-eight
patterned microphones—one pointed directly at the speaker source (X), and another
positioned perpendicularly (Y)—and an omni-directional microphone for the sound
pressure (W), you can record each speaker position in one pass. Be sure to arrange the
microphones so that their capsules are as close as possible to each other—ideally, you
want to have a single, tight point of reference for each speaker position.
You will need to swivel each of the figure-eight pattern microphones to each speaker
position. The omni-directional microphone will not need to be swivelled, as it has a
360-degree capsule.
Even if your budget is too limited for three separate microphones, you can still create
B-Format impulse responses by recording each audio stream separately into Impulse
Response Utility. All you need is a microphone that allows you to switch between
omni-directional and figure-eight patterns. Many good microphones (at all budget
levels) have this capability. You will need to do a significant amount of patternswitching and microphone swivelling, but it can be done.
30
Page 31

Tutorial
This section will walk you through the complete process of creating an impulse
response, from project start through to final Space Designer setting. For this tutorial,
imagine that you have permission to record in a particularly good-sounding local
concert hall. You have decided to record a discrete five channel surround impulse
response, as you’ll probably never have this opportunity again.
Creating a Five Channel Surround Impulse Response
Please follow the steps outlined below to create a discrete five channel surround
impulse response.
Step 1: Preparation: Microphone and speaker setup
The first thing you’ll want to do is set up your speakers and microphones. Imagine
you’ve decided to use the virtual listener approach—which requires five speakers and
at least one microphone in the middle—which can be turned towards each speaker in
turn. Ideally, you will have five identical, powered monitors. This will save you time
when recording audio, and will allow you to see all speakers at once, to ensure they are
each the same distance from the corners and walls, and so on. When all speakers have
been positioned, you need to set up your microphone in the middle of the hall. Make
sure everything is properly connected to your audio interface.
Step 2: Creating a new project
The next step is to open Impulse Response Utility and create a new five channel
impulse response project. The New Impulse Response Project dialog informs you that
this format requires five speaker positions and five mic positions. When you exit the
dialog, twenty-five audio tracks will appear in the Inputs/Tracks section—one for each
speaker position, from every microphone position.
Step 3: Configuring Impulse Response Utility parameters
Position your microphone towards the speaker you want to record (the left front
speaker, for example). Set up the Monitor section, sweep generator, and input for the
selected track.
Step 4: Recording
Record-enable the selected track, and click the Sweep button. Impulse Response Utility
will prompt you to name and save the new project after your first recording.
Swivel the microphone to the second surround position, record-enable the track, and
click the Sweep button. Once the recording has completed, the project will
automatically be saved in the background. You may want to play back the track in the
Editing area, just to double-check the recording.
31
Page 32

Repeat this process twenty-three more times, until you have recorded all twenty-five
audio tracks needed to capture all possible microphone and speaker position
combinations.
Step 5: Deconvolving
Click the Deconvolve button after you have recorded (and checked) the audio files at
each position. At this point, you should manually save the project.
Step 6: Editing and Auditioning
If you have any unwanted silence at the beginning or end of your impulse response,
use the Editing area to remove it. Use the Audition window to play some test material
through your impulse response, to make sure that you’re satisfied with the result. If not,
edit your impulse response further. If you still aren’t satisfied, go back to step two or
three, and start over.
Step 7: Creating a Space Designer Setting
Once you are fully satisfied with your impulse response, you’re ready to click on Create
Space Designer Setting. Impulse Response Utility generates the .sdir and
Space Designer settings files. Your new impulse response will be available the next time
you open Space Designer.
This basic workflow is the same, regardless of impulse response format or approach to
microphone and speaker placement. That’s all there is to it!
32
Recording a Mono to Omni 5 Channel Impulse Response
The above is an example of recording a true surround impulse response. In many cases,
it is sufficient to record one speaker position, thus creating a mono/omni discrete
impulse response. Mono/omni discrete impulse responses are not only easier and faster
to record, but also place a lower strain on the CPU.
To create a mono to Omni 5 Channel impulse response:
1 Choose the Mono/Omni to 5 channel template in the New Projects dialog.
You will see that mono/omni discrete projects only require one speaker.
2 Aim your speaker towards the ceiling or a back-wall.
3 Point your microphone to the first surround position: Front-Left, for example.
4 Record the sweep.
5 Repeat the process for all remaining microphone positions.
 Loading...