

Page 1

Countertop Corn ination Oven
Owner's Manual
Installer: Please leave this manual
with this appliance.
Consumer: Please read and keep
this manual for future reference. Keep
sales receipt and/or cancelled check
as proof of purchase.
A CM1580A
r
Contents
Important Safety Instructions ................................................................ 2-4
Installation ................................................................................................ 5
Model Number
Serial Number
Date of Purchase
If you have questions, write us
(include your model number and
phone number) or call:
Amana Appliances Consumer
Services
Amana Appliances
2800-220th Trail
Amana, IA 52204
1-800-843-0304 U.S.A.
1-866-587-2002 Canada
Internet: http://www.amana.com
Display and Features ............................................................................ 6-9
Cooking Methods ................................................................................... 10
Cookware Suggestions .......................................................................... 11
Microwave Cooking ........................................................................... 12-16
Convection Cooking ............................................................................... 17
Combination Cooking (microwave and convection) .......................... 18-19
Cooking Tips ..................................................................................... 20-23
Care and Cleaning ................................................................................. 24
Troubleshooting ...................................................................................... 25
Warranty ................................................................................................. 26
Guide de I'utilisateur ............................................................................... 27
Guia del Usuario .................................................................................... 55
Combination Oven
Keep instructions for future reference.
Be sure manual stays with oven.
B/01/03
MCS P/N 74007463
< 4 4
Q2003 Maytag Appliance Sales Co. Part No.8112P236-60
3828W5A2752
Page 2
IMPORTANT SAFETY INSTRUCTIONS
What You Need
to Know About
Safety instructions
Warning and Important Safety In-
structions appearing in this manual
are not meant to cover all possible
conditions and situations that may
occur. Common sense, caution, and
care must be exercised when
installing, maintaining, or operating
oven.
Always contact your dealer, distribu-
tor, service agent, or manufacturer
about problems or conditions you do
not understand.
,_WARNING I
>- To avoid risk of electrical shock
or death, this oven must be
grounded.
>- To avoid risk of electrical shock
or death, do not alter the plug.
Recognize Safety Symbols, Words, Labels
[ _ DANGER i
DANGER-- Immediate hazards which WILL result in severe personal injury or
death.
[ a,WARNmG i
WARNING--Hazards or unsafe practices which COULD result in severe per-
sonal injury or death.
l a,cAuvlo. 1
CAUTION-- Hazards or unsafe practices which COULD result in minor per-
sonal injury.
Grounding Instructions
Oven MUST be grounded. Grounding
reduces riskof electric shock by providing
an escape wire for the electric current if
an electrical short occurs. This oven is
equipped with a cord havinga grounding
wirewith a grounding plug.The plug must
be plugged into an outlet that is properly
installed and grounded.
Consult a qualified elec-
trician or servicer if _.-.<,.
grounding instructions __
are not completely
understood, or if doubt
exists as to whether the oven is properly
grounded.
Do not use an extension cord. If the
product power cord is too short, have a
qualified electrician install a three-slot
receptacle.This oven should be plugged
into a separate 60 hertz circuit with the
electrical rating as shown in specifica-
tions table. When the combination oven
is on a circuit with other equipment, an
increase in cooking times may be
required and fuses can be blown.
Microwave operates on standard house-
hold current, 110-120V.
FEDERAL COMMUNICATIONS COMMISSION RADIO FREQUENCY
INTERFERENCE STATEMENT ( U.S.A. ONLY)
This equipment generates and uses ISM frequency energy and if not installed and used properly, that is in strict
accordance with the manufacturer's instructions, may cause interference to radio and television reception. It has
been type tested and found to comply with limits for ISM Equipment pursuant to part 18 of FCC Rules, which are
designed to provide reasonable protection against such interference in a residential installation.
However, there is no guarantee that interference will not occur in a particular installation. If this equipment does
cause interference to radio or television reception, which can be determined by turning the equipment off and on,
the user is encouraged to try to correct the interference by one or more of the following:
• Reorient the receiving antenna of the radio or television.
• Relocate the Microwave Oven with respect to the receiver.
• Move the microwave oven away from the receiver.
• Plug the microwave oven into a different outlet so that the microwave oven and the receiver are on different
branch circuits.
The manufacturer is not responsible for any radio or TV interference caused by unauthorized modification to
this microwave oven. It is the responsibility of the user to correct such interference.
SAVE THESE INSTRUCTIONS
Page 3
Recognize this symbol as a SAFETY message
[ WARNING ]
When using electrical oven, basic safety precautions should be followed to reduce risk of burns, electric shock, fire,
or injury to persons or exposure to excessive microwave energy.
1. READ all instructions before using equipment. 12.
2. READ AND FOLLOW the specific PRECAU-
TIONS TO AVOID POSSIBLE EXPOSURE TO
EXCESSIVE MICROWAVE ENERGY in IMPOR-
TANT SAFETY INSTRUCTIONS.
,
This equipment MUST BE GROUNDED. Connect
only to properly grounded outlet. See GROUND-
ING INSTRUCTIONS in Installation Instructions.
,
Install or locate this equipment ONLY in accor-
dance with the installation instructions in this
manual.
,
Some products such as whole eggs and sealed
containers--for example, closed glass jars--are
able to explode and SHOULD NOT be HEATED
in this oven.
6. Use this equipment ONLY for its intended use as
described in this manual. Do not use corrosive
chemicals or vapors in this equipment. This type
of oven is specifically designed to heat, cook or
dry food. It is not designed for industrial or labora-
tory use.
7. As with any appliance, CLOSE SUPERVISION is
necessary when used by CHILDREN.
8. DO NOT operate this equipment if it has a dam-
aged cord or plug, if it is not working properly, or
if it has been damaged or dropped.
9. This appliance, including power cord, must be
serviced ONLY by qualified service personnel.
Special tools are required to service equipment.
Contact nearest authorized service facility for
examination, repair, or adjustment.
10. DO NOT cover or block any openings on this
appliance.
11. DO NOT heat baby bottles in oven.
Baby food jars shall be open when heated and
contents stirred or shaken before consumption, in
order to avoid burns.
13. DO NOT store this appliance outdoors. DO NOT
use this product near water - for example, near a
kitchen sink, in a wet basement, or near a swim-
ming pool, or similar locations.
14. DO NOT immerse cord or plug in water.
15. Keep cord AWAY from HEATED surfaces.
16. DO NOT let cord hang over edge of table or
counter.
17.
See door cleaning instructions in Care and
Cleaning section of this manual.
18.
DO NOT insert oversized foods or oversized uten-
sils in a microwave/convection oven as they may
create a fire, an electrical arc, or risk of electrical
shock.
19. DO NOT clean with metal scouring pads. Pieces
can break off the pad and touch electrical parts
involving risk of electrical shock.
20. DO NOT use paper products not intended for
cooking when equipment is operated in convec-
tion or combination mode.
21.
DO NOT store any materials, other than manufac-
turer's recommended accessories, in this equip-
ment when not in use.
22. DO NOT cover racks or any other part of the oven
with metal foil. Airflow restriction will cause over-
heating of the oven.
23. DO NOT spray oven cleaning solutions toward the
rear inner cavity surface. This will contaminate and
damage the convection heating assembly.
PRECAUTIONS TO AVOID POSSIBLE EXPOSURE TO
EXCESSIVE MICROWAVE ENERGY
A. DO NOT attempt to operate this oven with the door open since open door operation can result in harmful expo-
sure to microwave energy. It is important not to defeat or tamper with the safety interlocks.
B. DO NOT place any object between the oven front face and the door to allow soil or cleaner residue to accu-
mulate on sealing surfaces.
C. DO NOT operate the oven if it is damaged. It is particularly important that oven door close properly and that
there is no damage to: 1. door (bent), 2. hinges and latches (broken or loosened), 3. door seals and sealing
surfaces.
D. Oven should not be adjusted or repaired by anyone except properly qualified service personnel.
SAVE THESE INSTRUCTIONS
Page 4
IMPORTANT SAFETY INSTRUCTIONS
, WARNING
To avoid risk of fire in the oven cavity:
a.
DO NOT overcook food. Carefully attend oven
when paper, plastic, or other combustible mate-
rials are placed inside the oven to facilitate
cooking.
b,
Remove wire twist-ties from paper or plastic
bags before placing bag in oven.
c,
If materials inside the oven ignite, keep oven
door CLOSED, turn oven off and disconnect the
power cord, or shut off power at the fuse or cir-
cuit breaker panel.
d,
DO NOT use the cavity for storage. DO NOT
leave paper products, cooking utensils, or food
in the cavity when not in use.
, WARNING
Liquids such as water, coffee, or tea are able to be
overheated beyond the boiling point without appear-
ing to be boiling due to surface tension of the liquid.
Visible bubbling or boiling when the container is
removed from the microwave oven is not always
present. THIS COULD RESULT IN VERY HOT LIQ-
UIDS SUDDENLY BOILING OVER WHEN A
SPOON OR OTHER UTENSIL IS INSERTED INTO
THE LIQUID. To reduce the risk of injury to persons:
1. Do not overheat the liquid.
2. Stir the liquid both before and halfway through
heating it.
3. Do not use straight-sided containers with nar-
row necks.
4.
After heating, allow the container to stand in the
microwave oven for a short time before remov-
ing the container.
,
Use extreme care when inserting a spoon or
other utensil into the container.
CAUTION
To avoid risk of personal injury or property damage,
observe the following:
1. DO NOT deep fat fry in oven. Fat could overheat
and be hazardous to handle.
2. DO NOT cook or reheat eggs in shell or with an
unbroken yolk using microwave energy. Pressure
may build up and erupt. Pierce yolk with fork or
knife before cooking.
3. Pierce skin of potatoes, tomatoes, and similar
foods before cooking with microwave energy.
When skin is pierced, steam escapes evenly.
4. DO NOT leave oven unattended.
5. DO NOT use regular cooking thermometers in
oven when cooking in microwave or combination
mode. Most cooking thermometers contain mer-
cury and may cause an electrical arc, malfunction,
or damage to oven.
6. DO NOT use metal utensils in oven except when
recommended by microwave food manufacturers
or recipe requires metal utensils in convection or
combination mode. Heat food in containers made
of glass or china if possible.
7. Never use paper, plastic, or other combustible
materials that are not intended for cooking. If oven
temperature is high, material may ignite.
8. Oven temperature is at least 100° F in convection
mode. Verify plastic, paper or other combustible
materials are recommended by the manufacturer
to withstand the minimum oven temperature.
9. When cooking with paper, plastic, or other com-
bustible materials, follow manufacturer's recom-
mendations on product use.
10. DO NOT use paper towels which contain nylon
or other synthetic fibers. Heated synthetics could
melt and cause paper to ignite.
11. DO NOT heat sealed containers or plastic bags
in oven. Food or liquid could expand quickly and
cause container or bag to break. Pierce or open
container or bag before heating.
12. Racks, utensils, rack guides, and oven surfaces
may become hot during or after use. Use utensils
or protective clothing, like pan grips or dry oven
mitts, when necessary to avoid burns.
13. DO NOT unplug oven immediately after use.
Internal fan must cool oven to avoid damage of
electrical components.
14. To avoid pacemaker malfunction, consult physi-
cian or pacemaker manufacturer about effects of
microwave energy on pacemaker.
SAVE THESE INSTRUCTIONS
Page 5

Installation
Unpacking Oven
• Inspect oven for damage such as
dents in door or inside oven cavity.
• Report any dents or breakage to
source of purchase immediately.
Do not attempt to use oven if
damaged.
• Remove all materials from oven
interior.
• Ifoven has been stored in extreme-
ly cold area, wait a few hours
before connecting power.
Oven Placement
Do not install oven next to or above
source of heat, such as pizza oven
or deep fat fryer. This could cause
microwave oven to operate improp-
erly and could shorten life of elec-
trical parts.
Allow enough room for air move-
ment around oven.
• Install oven on level countertop
surface.
• Outlet should be located so that
plug is accessible when oven is in
place.
Built-In Capability
Refer to installation instructions.
For more information call:
1-800-843-0304 U.S.A.
1-866-587-2002 Canada
\
Oven Clearances
Am
Allow at least 4" of clearance
around top and sides of oven.
Proper air flow around oven
cools electrical components.
With restricted air flow, oven
may not operate properly and
life of electrical parts is reduced.
am
Install combination oven so oven
bottom is at least 3 feet (36 inch-
es) above floor.
Page 6

and Features
Door Seal
\
Safety Door
Lock System
Window
Door Screen
NOTE: A beep
sounds when a pad
on the control panel
is touched, to indi-
cate setting has been
entered.
Oven Front Plate
J
DoorOpen Button
Turntable
Rotating Ring
Convection / (_)nveetion O)mbination
Microwave
Display Window
Control Panel
OVEN SPECIFICATIONS
Power Supply 120 VAC,
60 Hz
Input Power 1,500 W
Cooking Power 1,000 W
(IEC 60705
Standard)
Frequency 2,450 MHz
Rated Current 13 A
Outer Dimensions 22%" x 14_"
(WxHxD) x 20"
Cavity Volume 1.5 Cu. Ft.
Net Weight 52 Ibs.
Your oven will be packed with the fol-
lowing materials:
Glass Turntable ....................... 1 each
Owner's Manual and
Cooking Guide ........................ 1 each
Rotating Ring .......................... 1 each
This microwave oven is designed for
household use only. It is not recom-
mended for commercial purposes
and will void the warranty,
AUTO/TIME DEFROST COOK i
PROGRAM
START
REMINDER RECALL i HELP
CLOCK CONTROL TIMER
for RECZPES REQUZRZ_GSTZRRZN,_OR TO
CHECI( FOODWZTHOUT CAI_CELZNGCOOI(ZNO
SET-UP
pRO,_l_m pI_ESS S_,RT/P_USE
Page 7
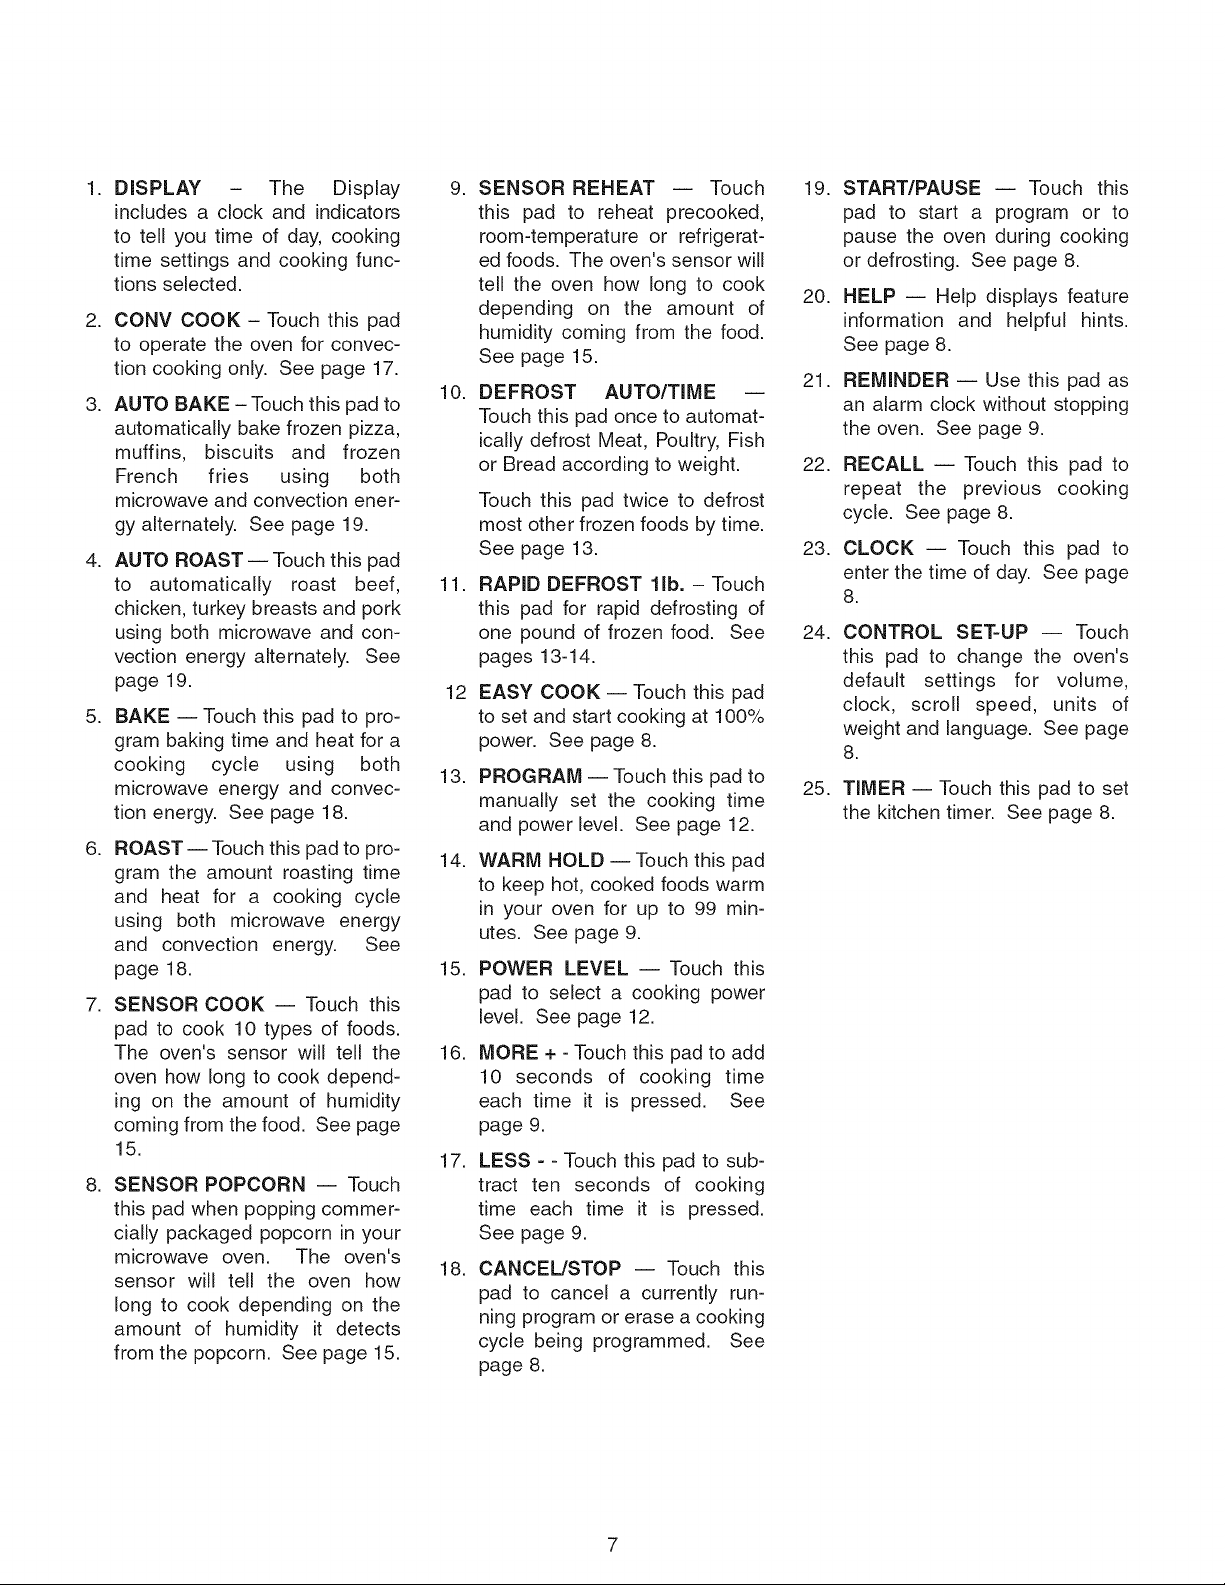
1. DISPLAY - The Display
includesa clockandindicators
to tell youtimeofday,cooking
timesettingsandcookingfunc-
tionsselected,
2. CONVCOOK- Touchthispad
to operatetheovenforconvec-
tioncookingonly.Seepage17.
3. AUTOBAKE- Touchthispadto
automaticallybakefrozenpizza,
muffins, biscuits and frozen
French fries using both
microwaveandconvectionener-
gyalternately.Seepage19.
4. AUTOROAST--Touchthispad
to automaticallyroast beef,
chicken,turkeybreastsandpork
usingbothmicrowaveandcon-
vectionenergyalternately.See
page19.
5. BAKE--Touchthispadto pro-
grambakingtimeandheatfora
cooking cycle using both
microwaveenergyandconvec-
tionenergy.Seepage18.
6. ROAST--Touchthispadtopro-
gramtheamountroastingtime
and heat for a cookingcycle
usingboth microwaveenergy
and convectionenergy. See
page18.
7. SENSORCOOK-- Touchthis
padto cook10typesof foods.
Theoven'ssensorwill tell the
ovenhowlongtocookdepend-
ingon the amountof humidity
comingfromthefood.Seepage
15.
8. SENSORPOPCORN-- Touch
thispadwhenpoppingcommer-
ciallypackagedpopcorninyour
microwaveoven. The oven's
sensorwill tell the ovenhow
longto cookdependingon the
amountof humidityit detects
fromthepopcorn.Seepage15.
g,
SENSOR REHEAT -- Touch
this pad to reheat precooked,
room4emperature or refrigerat-
ed foods. The oven's sensor will
tell the oven how long to cook
depending on the amount of
humidity coming from the food.
See page 15.
10.
DEFROST AUTO/TIME --
Touch this pad once to automat-
ically defrost Meat, Poultry, Fish
or Bread according to weight.
Touch this pad twice to defrost
most other frozen foods by time.
See page 13.
11.
RAPID DEFROST lib. - Touch
this pad for rapid defrosting of
one pound of frozen food. See
pages 13-14.
12
EASY COOK- Touch this pad
to set and start cooking at 100%
power. See page 8.
13.
PROGRAM -- Touch this pad to
manually set the cooking time
and power level. See page 12.
14.
WARM HOLD -- Touch this pad
to keep hot, cooked foods warm
in your oven for up to 99 min-
utes. See page 9.
15.
POWER LEVEL -- Touch this
pad to select a cooking power
level. See page 12.
16.
MORE + -Touch this pad to add
10 seconds of cooking time
each time it is pressed, See
page 9.
17.
LESS =- Touch this pad to sub-
tract ten seconds of cooking
time each time it is pressed,
See page 9.
18.
CANCEL/STOP -- Touch this
pad to cancel a currently run-
ning program or erase a cooking
cycle being programmed. See
page 8.
19.
START/PAUSE -- Touch this
pad to start a program or to
pause the oven during cooking
or defrosting. See page 8.
20.
HELP -- Help displays feature
information and helpful hints.
See page 8.
21.
REMINDER -- Use this pad as
an alarm clock without stopping
the oven. See page 9.
22.
RECALL -- Touch this pad to
repeat the previous cooking
cycle. See page 8.
23.
CLOCK --Touch this pad to
enter the time of day. See page
8.
24.
CONTROL SET-UP -- Touch
this pad to change the oven's
default settings for volume,
clock, scroll speed, units of
weight and language. See page
8.
25.
TIMER -- Touch this pad to set
the kitchen timer. See page 8.
Page 8

and Features (cont'd)
12-Hour Clock and
Timer
Oven is equipped with a 12-hour
clock and a timer that can be set up
to 99 minutes and 99 seconds. Clock
does not display AM or PM.
To set clock:
1. Touch CLOCK
pad.
• ENTERTIME
OF DAY scrolls
through display.
2. Enter desired
time by using digit
touch pads.
• TOUCH START
scrolls through
display.
3. Touch START/
PAUSE.
To set timer:
TIMER
1. Touch TIMER
pad.
• ENTERTIME
IN MIN. AND
SEC. scrolls
through display.
2. Enter desired
time by using digit
touch pads.
Maximum
amount of time
is 99 minutes
and 99 sec-
onds.
• TOUCH TIMER
scrolls through
display.
3. Touch TIMER.
• To cancel timer
at any time,
press TIMER
pad.
Start/Pause
This pad will start the
function you set, or
pause the oven temporarily during
cooking or defrosting. Press again to
restart oven from a pause.
Cancel/Stop
This pad cancels a
currently running
program and erases a cooking cycle
being programmed.
Recall
This feature enables
you to repeat the
previous cooking cycle without hav-
ing to reprogram the oven. To use
simply press CANCEL/STOP and
then RECALL.
Child Lock
Child Lock prevents acci-
dental programming by
children or when cleaning the oven
control. To set the child lock, press and
hold the 0 pad until LOCKED appears
in the display and tones are heard.
During Child Lock mode, LOCKED
displays when a touch pad is pressed.
To cancel child lock, touch and hold 0
until LOCKED disappears from dis-
play. After Child Lock is turned off, the
time of day displays and cooking func-
tions return to normal.
Function
Volume
Clock
Scroll Speed
Units
Demo
Language
Easy Cook
Press the EASY
COOK pad for each
minute of microwave cooking time
desired. At the end of the cooking
cycle, tones will sound.
To use Easy Cook:
1. Touch the EASY COOK pad for
each minute of microwave time
desired.
2. At the end of the cooking cycle,
the oven stops and tones sound.
Help
HELP displays feature
information and helpful
hints. To use the HELP feature, sim-
ply press the HELP pad, and then the
feature pad you would like informa-
tion about. Descriptive information
about that feature will be scrolled
through the display. After the help
information is displayed, oven leaves
help mode.
Control Set-up
This oven is designed
for individual prefer-
ences such as language
and volume control. To change an
option:
1. Press the CONTROL SET UP
pad
2. Press the pad for the option you
want to change.
3. Oven display scrolls selections
for that option.
4. Press pad for the desired selec-
tion for that option.
5. Oven makes change and leaves
option mode.
Pad Option
1 Mute, low, medium, loud
2 On or Off
3 Slow, normal or fast
4 Lbs. and o F or Kg ° C
5 On or off
6 English or Spanish
Page 9
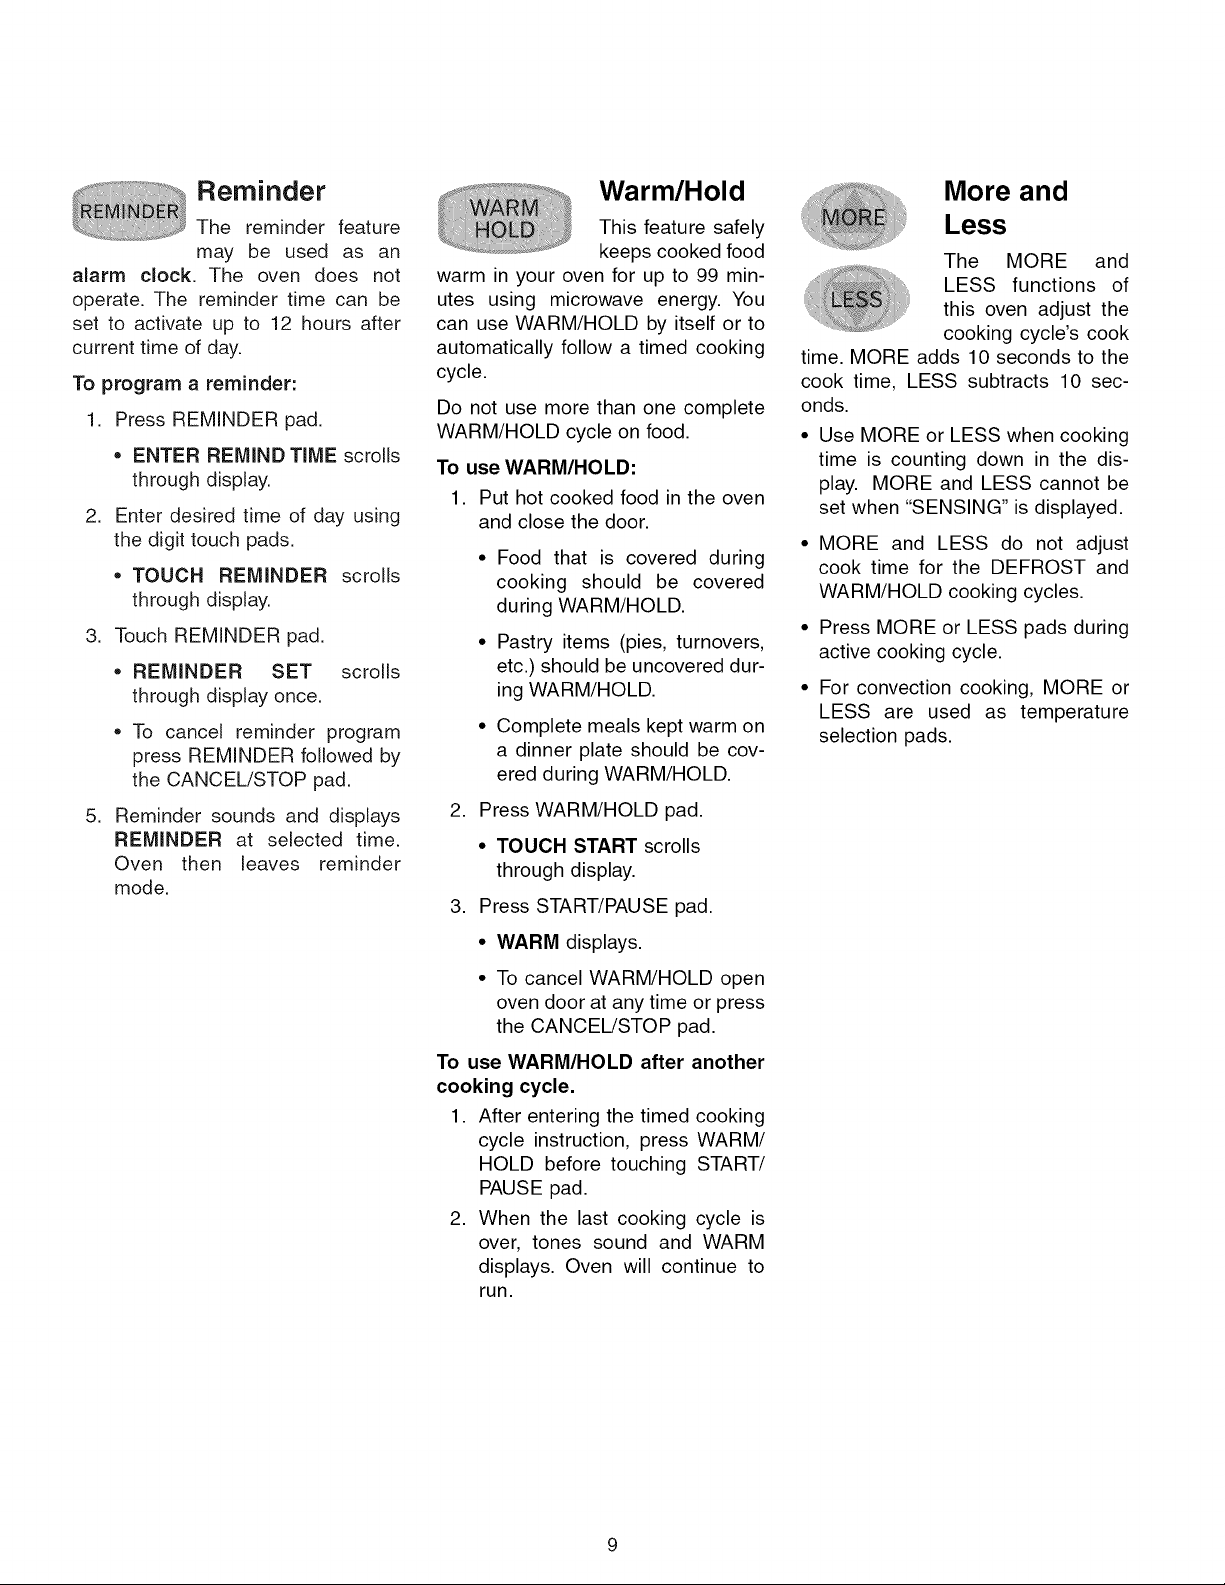
Reminder
The reminder feature
may be used as an
alarm clock. The oven does not
operate. The reminder time can be
set to activate up to 12 hours after
current time of day.
To program a reminder:
1. Press REMINDER pad.
• ENTER REMIND TIME scrolls
through display.
2. Enter desired time of day using
the digit touch pads.
• TOUCH REMINDER scrolls
through display.
3. Touch REMINDER pad.
• REMINDER SET scrolls
through display once.
• To cancel reminder program
press REMINDER followed by
the CANCEL/STOP pad.
5. Reminder sounds and displays
REMINDER at selected time.
Oven then leaves reminder
mode.
Warm/Hold
This feature safely
keeps cooked food
warm in your oven for up to 99 min-
utes using microwave energy. You
can use WARM/HOLD by itself or to
automatically follow a timed cooking
cycle.
Do not use more than one complete
WARM/HOLD cycle on food.
To use WARM/HOLD:
1. Put hot cooked food in the oven
and close the door.
• Food that is covered during
cooking should be covered
during WARM/HOLD.
• Pastry items (pies, turnovers,
etc.) should be uncovered dur-
ing WARM/HOLD.
• Complete meals kept warm on
a dinner plate should be cov-
ered during WARM/HOLD.
2. Press WARM/HOLD pad.
• TOUCH START scrolls
through display.
3. Press START/PAUSE pad.
More and
Less
The MORE and
LESS functions of
this oven adjust the
cooking cycle's cook
time. MORE adds 10 seconds to the
cook time, LESS subtracts 10 sec-
onds.
Use MORE or LESS when cooking
time is counting down in the dis-
play. MORE and LESS cannot be
set when "SENSING" is displayed.
• MORE and LESS do not adjust
cook time for the DEFROST and
WARM/HOLD cooking cycles.
• Press MORE or LESS pads during
active cooking cycle.
• For convection cooking, MORE or
LESS are used as temperature
selection pads.
• WARM displays.
• To cancel WARM/HOLD open
oven door at any time or press
the CANCEL/STOP pad.
To use WARM/HOLD after another
cooking cycle.
1. After entering the timed cooking
cycle instruction, press WARM/
HOLD before touching START/
PAUSE pad.
2. When the last cooking cycle is
over, tones sound and WARM
displays. Oven will continue to
run.
Page 10
Cookin Methods
Microwave Cooking
Microwave cooking uses high fre-
quency energy waves to heat the
food. When cooking, microwave
energy causes food molecules to
move rapidly. This rapid movement
between the food molecules creates
heat, which cooks the food.
Microwaves cook moist food and
foods of varying fat content more
quickly.
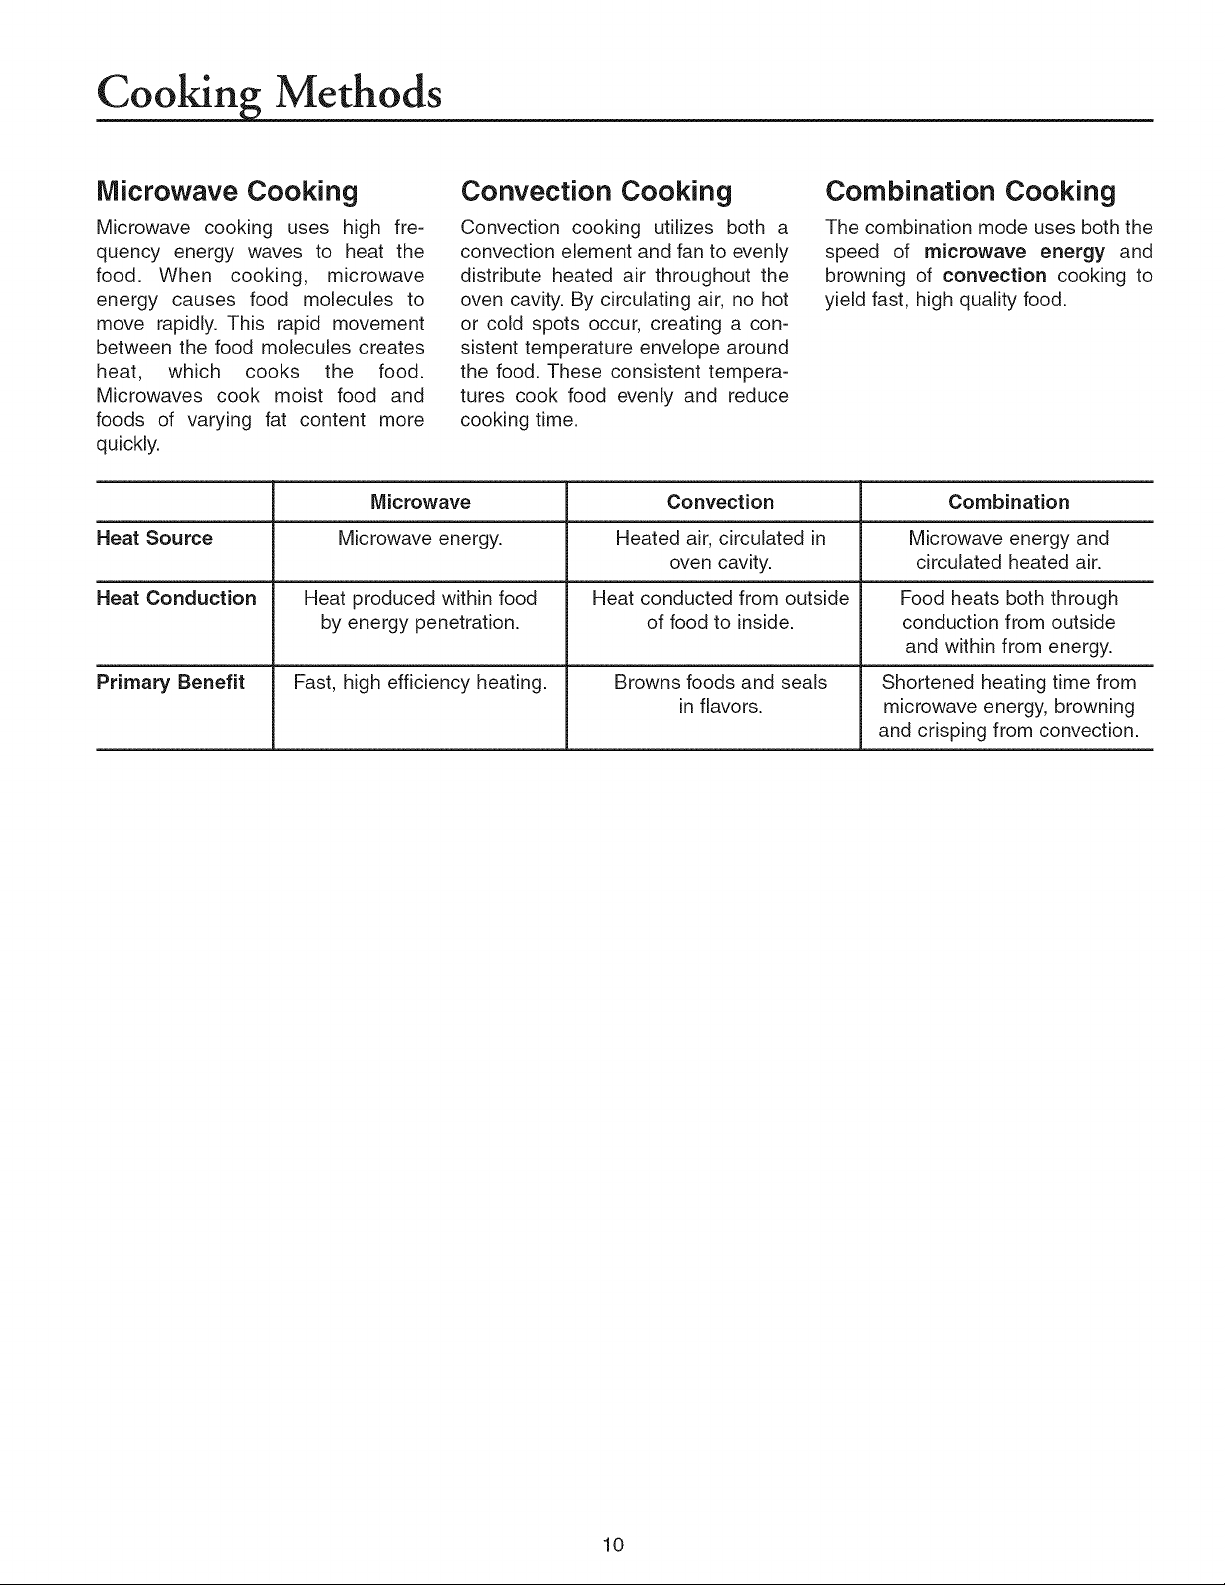
Microwave Convection Combination
Heat Source Microwave energy. Heated air, circulated in Microwave energy and
Heat Conduction Heat produced within food Heat conducted from outside Food heats both through
by energy penetration, of food to inside, conduction from outside
Primary Benefit Fast, high efficiency heating. Browns foods and seals Shortened heating time from
Convection Cooking
Convection cooking utilizes both a
convection element and fan to evenly
distribute heated air throughout the
oven cavity. By circulating air, no hot
or cold spots occur, creating a con-
sistent temperature envelope around
the food. These consistent tempera-
tures cook food evenly and reduce
cooking time.
oven cavity, circulated heated air.
in flavors, microwave energy, browning
Combination Cooking
The combination mode uses both the
speed of microwave energy and
browning of convection cooking to
yield fast, high quality food.
and within from energy.
and crisping from convection.
10
Page 11
Thecookingmethoduseddeterminesthecookwarethatcanbeused.Tosimplifychoices,usecookwarethatisapproved
forallthreecookingmethods:microwave,convectionandcombination.
Select Avoid
Heatresistantglass Non-heatresistantglass
Ceramicsorchina Metaltrimmedceramicsorchina
Pyrex Metalcookware
Heatresistantnon-stickutensils, Metalcookingutensils
suchasspatulas
Microwavecookwarethatissafe Paperproducts,straw,wickerand
to450° F wood
Handlesthataresecure Cookwarewithlooseorbroken
handles
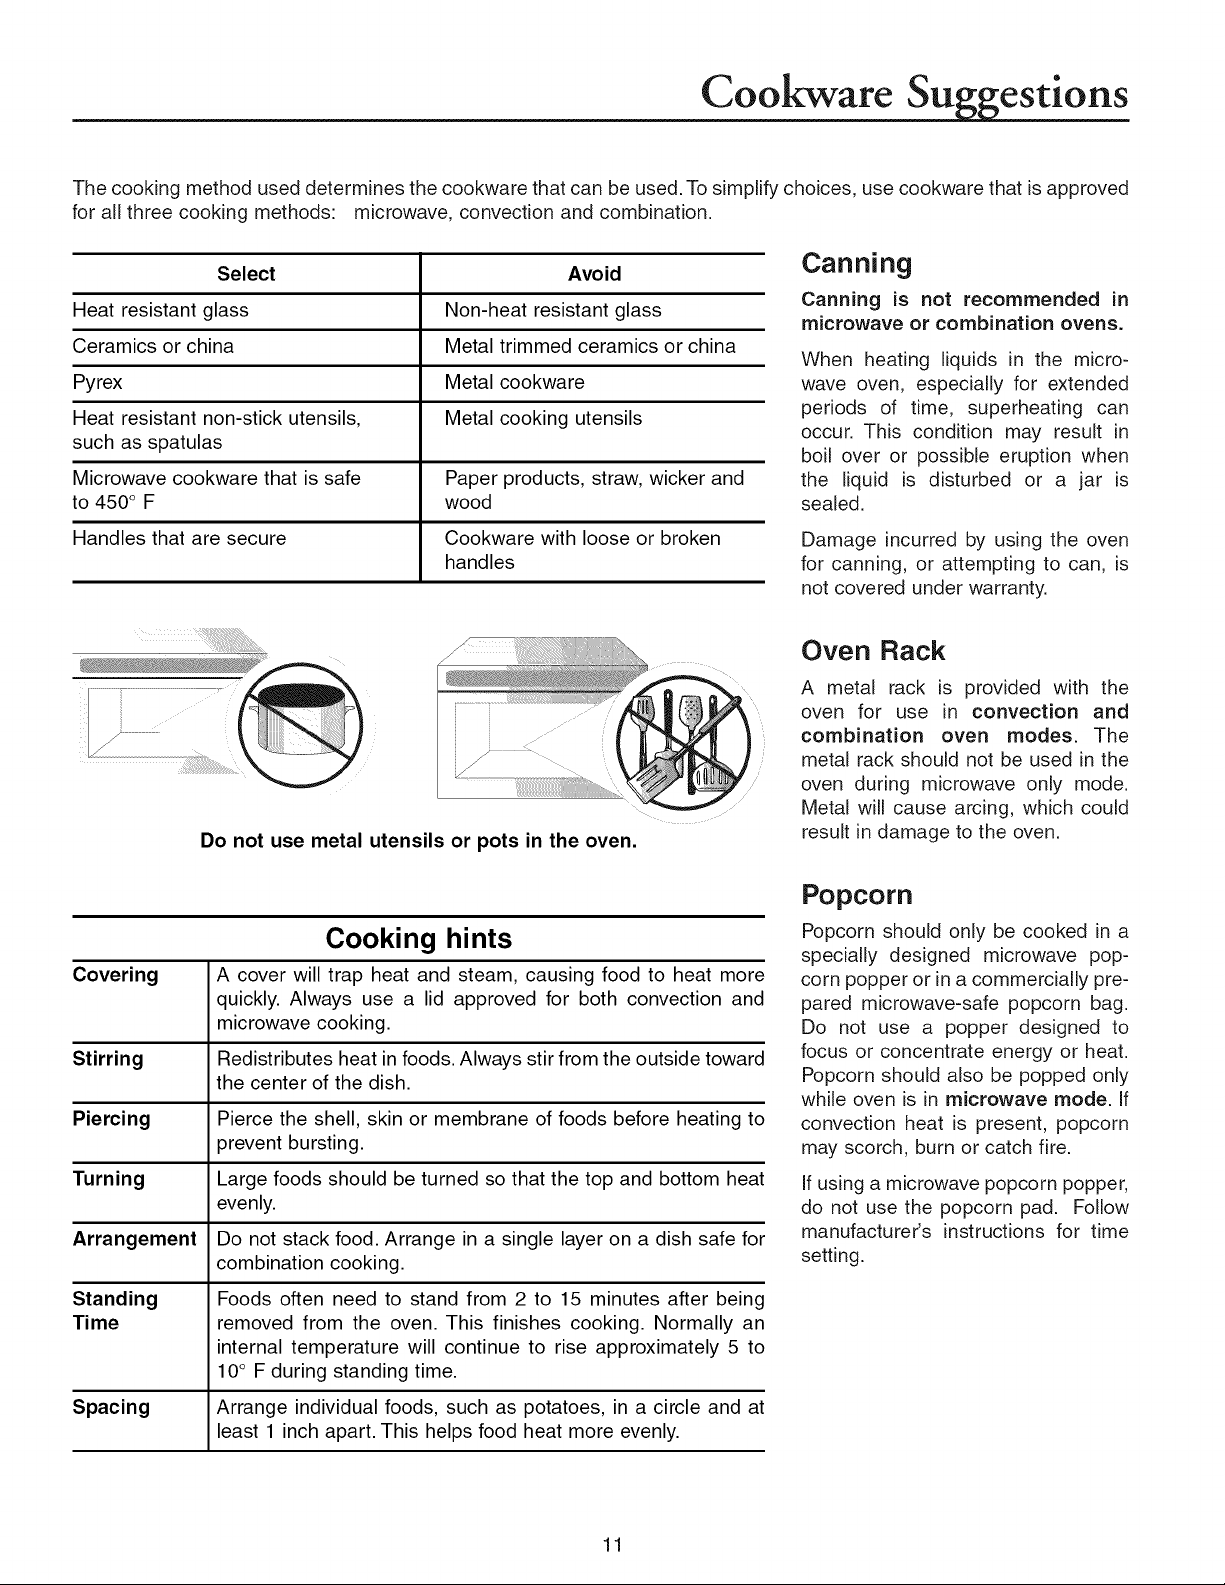
Do not use metal utensils or pots in the oven.
Canning
Canning is not recommended in
microwave or combination ovens.
When heating liquids in the micro-
wave oven, especially for extended
periods of time, superheating can
occur. This condition may result in
boil over or possible eruption when
the liquid is disturbed or a jar is
sealed.
Damage incurred by using the oven
for canning, or attempting to can, is
not covered under warranty.
Oven Rack
A metal rack is provided with the
oven for use in convection and
combination oven modes. The
metal rack should not be used in the
oven during microwave only mode.
Metal will cause arcing, which could
result in damage to the oven.
Cooking hints
Covering A cover will trap heat and steam, causing food to heat more
quickly. Always use a lid approved for both convection and
microwave cooking.
Stirring Redistributes heat in foods. Always stir from the outside toward
the center of the dish.
Piercing Pierce the shell, skin or membrane of foods before heating to
prevent bursting.
Turning Large foods should be turned so that the top and bottom heat
evenly.
Arrangement Do not stack food. Arrange in a single layer on a dish safe for
combination cooking.
Standing Foods often need to stand from 2 to 15 minutes after being
Time removed from the oven. This finishes cooking. Normally an
internal temperature will continue to rise approximately 5 to
10° F during standing time.
Spacing Arrange individual foods, such as potatoes, in a circle and at
least 1 inch apart. This helps food heat more evenly.
Popcorn
Popcorn should only be cooked in a
specially designed microwave pop-
corn popper or in a commercially pre-
pared microwave-safe popcorn bag.
Do not use a popper designed to
focus or concentrate energy or heat.
Popcorn should also be popped only
while oven is in microwave mode. If
convection heat is present, popcorn
may scorch, burn or catch fire.
If using a microwave popcorn popper,
do not use the popcorn pad. Follow
manufacturer's instructions for time
setting.
11
Page 12
lcrowave oo n
M" C ldg
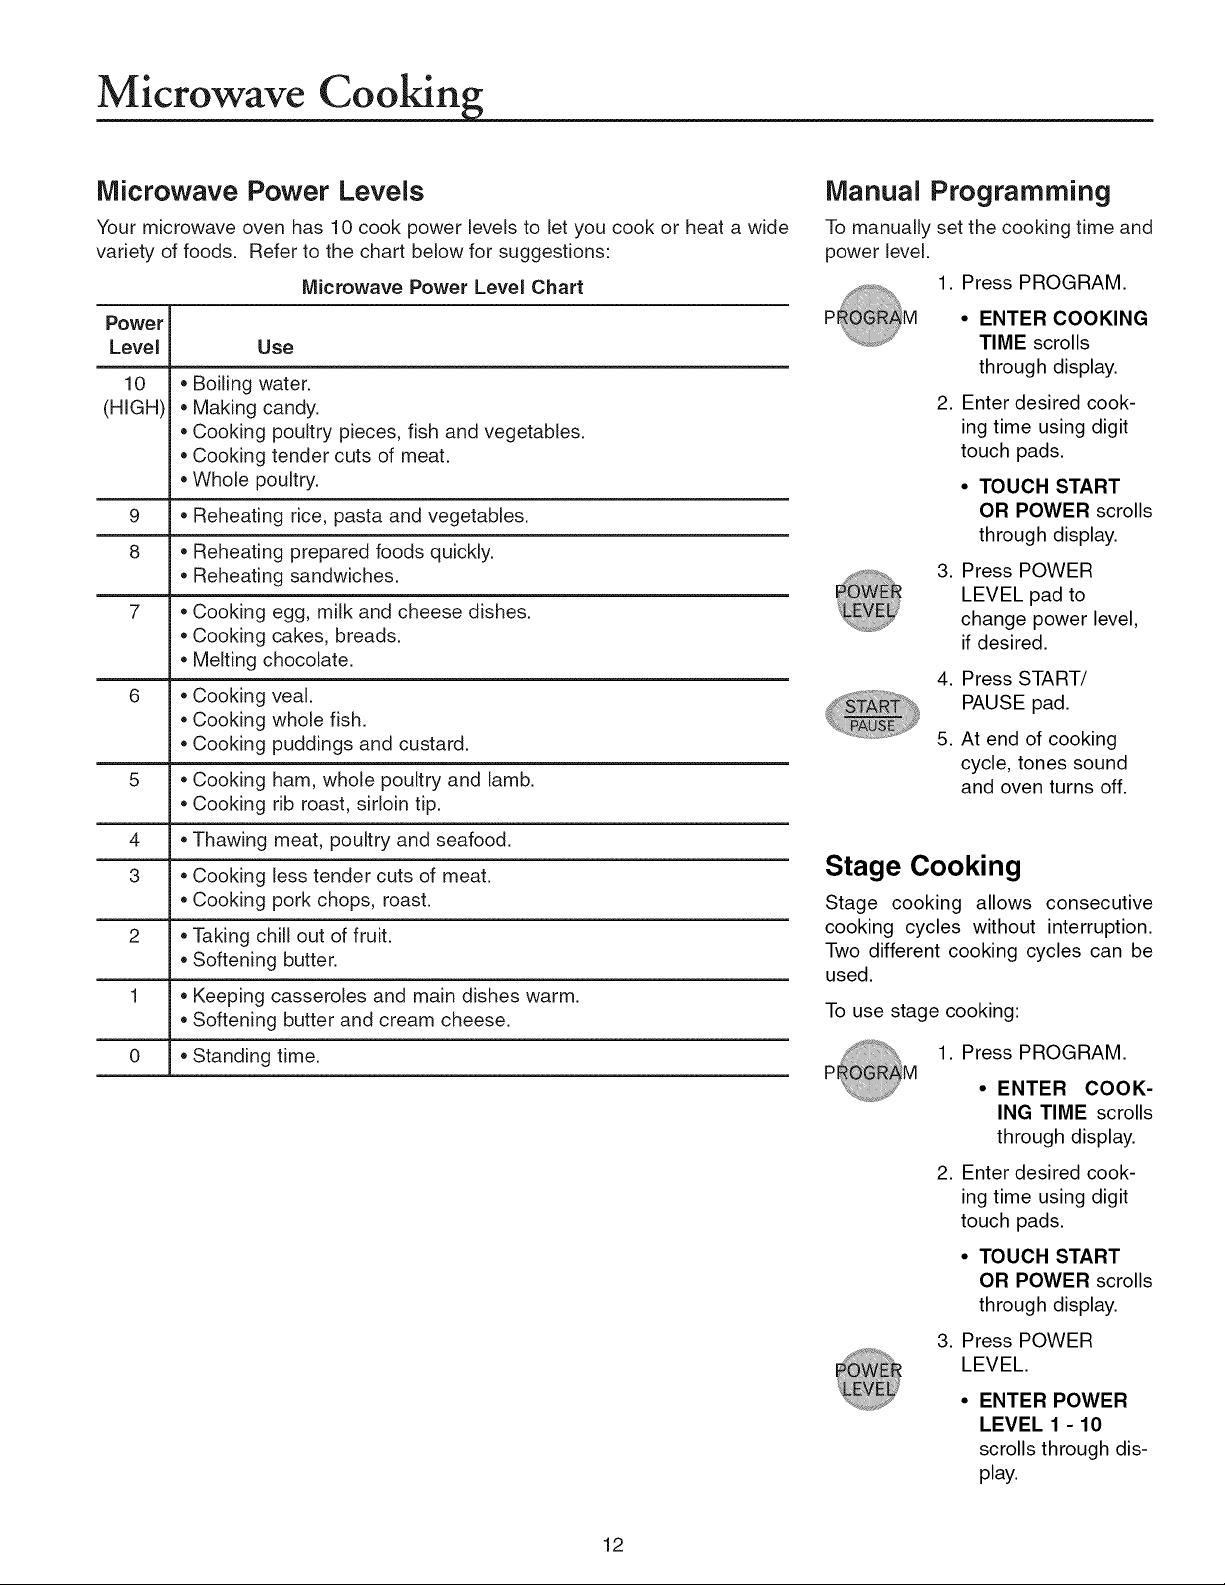
Microwave Power Levels
Your microwave oven has 10 cook power levels to let you cook or heat a wide
variety of foods. Refer to the chart below for suggestions:
Microwave Power Level Chart
Power
Level Use
10
• Boiling water.
(HIGH)
• Making candy.
• Cooking poultry pieces, fish and vegetables.
• Cooking tender cuts of meat.
• Whole poultry.
9 • Reheating rice, pasta and vegetables.
8 • Reheating prepared foods quickly.
• Reheating sandwiches.
7 • Cooking egg, milk and cheese dishes.
• Cooking cakes, breads.
• Melting chocolate.
6 • Cooking veal.
• Cooking whole fish.
• Cooking puddings and custard.
5 • Cooking ham, whole poultry and lamb.
• Cooking rib roast, sirloin tip.
Manual Programming
To manually set the cooking time and
power level.
1. Press PROGRAM.
PI M • ENTER COOKING
TIME scrolls
through display.
2. Enter desired cook-
ing time using digit
touch pads.
• TOUCH START
OR POWER scrolls
through display.
3. Press POWER
LEVEL pad to
change power level,
if desired.
,
Press START/
PAUSE pad.
,
At end of cooking
cycle, tones sound
and oven turns off.
4 • Thawing meat, poultry and seafood.
3 • Cooking less tender cuts of meat.
• Cooking pork chops, roast.
2 • Taking chill out of fruit.
• Softening butter.
1 • Keeping casseroles and main dishes warm.
• Softening butter and cream cheese.
0 • Standing time.
Stage Cooking
Stage cooking allows consecutive
cooking cycles without interruption.
Two different cooking cycles can be
used.
To use stage cooking:
1. Press PROGRAM.
M
• ENTER COOK-
ING TIME scrolls
through display.
2. Enter desired cook-
ing time using digit
touch pads.
• TOUCH START
OR POWER scrolls
through display.
3. Press POWER
LEVEL.
• ENTER POWER
LEVEL 1 - 10
scrolls through dis-
play.
12
Page 13
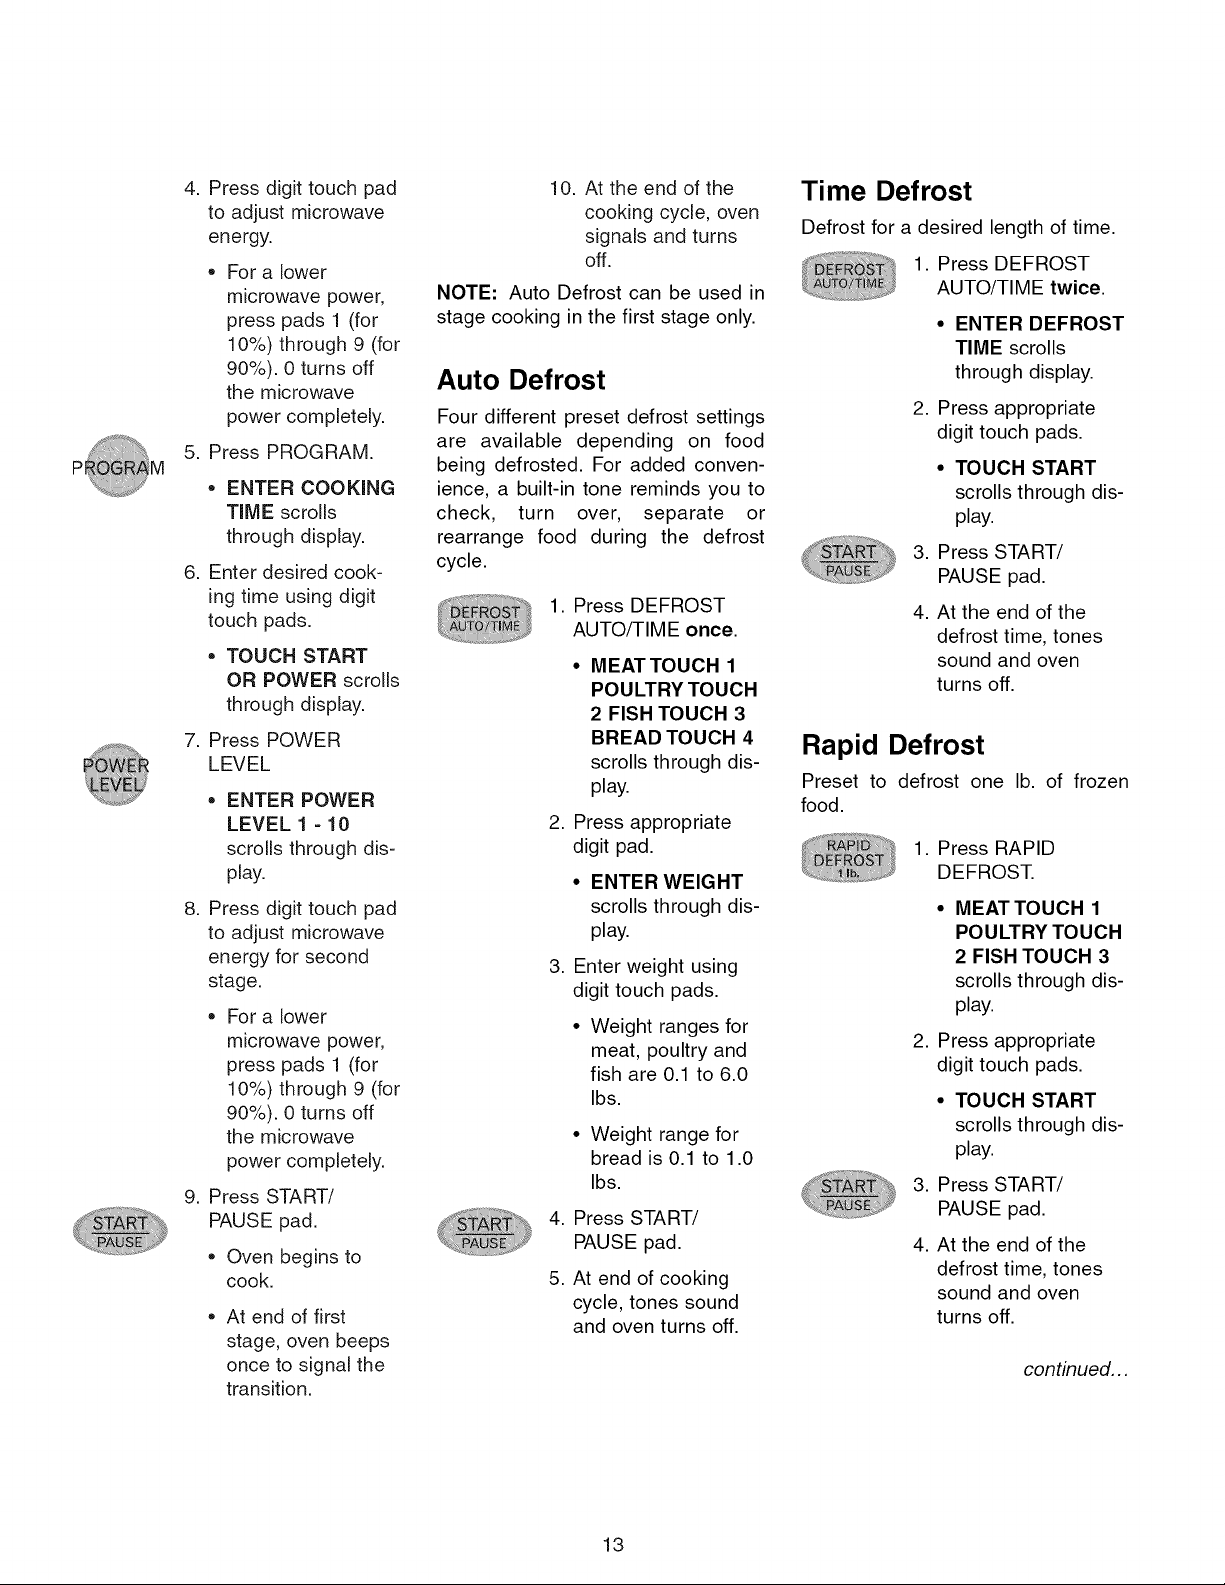
P_
4. Press digit touch pad
to adjust microwave
energy.
For a lower
microwave power,
press pads 1 (for
10%) through 9 (for
90%). 0 turns off
the microwave
power completely.
5. Press PROGRAM.
• ENTER COOKING
TIME scrolls
through display.
6. Enter desired cook-
ing time using digit
touch pads.
• TOUCH START
OR POWER scrolls
through display.
7. Press POWER
LEVEL
• ENTER POWER
LEVEL 1 =10
scrolls through dis-
play.
8. Press digit touch pad
to adjust microwave
energy for second
stage.
For a lower
microwave power,
press pads 1 (for
10%) through 9 (for
90%). 0 turns off
the microwave
power completely.
9. Press START/
PAUSE pad.
• Oven begins to
cook.
• At end of first
stage, oven beeps
once to signal the
transition.
10. At the end of the
cooking cycle, oven
signals and turns
off.
NOTE: Auto Defrost can be used in
stage cooking in the first stage only.
Auto Defrost
Four different preset defrost settings
are available depending on food
being defrosted. For added conven-
ience, a built-in tone reminds you to
check, turn over, separate or
rearrange food during the defrost
cycle.
1. Press DEFROST
AUTO/TIME once.
• MEATTOUCH 1
POULTRY TOUCH
2 FISH TOUCH 3
BREAD TOUCH 4
scrolls through dis-
play.
2. Press appropriate
digit pad.
• ENTER WEIGHT
scrolls through dis-
play.
3. Enter weight using
digit touch pads.
• Weight ranges for
meat, poultry and
fish are 0.1 to 6.0
Ibs.
• Weight range for
bread is 0.1 to 1.0
Ibs.
4. Press START/
PAUSE pad.
5. At end of cooking
cycle, tones sound
and oven turns off.
Time Defrost
Defrost for a desired length of time.
1. Press DEFROST
AUTO/TIME twice.
• ENTER DEFROST
TIME scrolls
through display.
2. Press appropriate
digit touch pads.
• TOUCH START
scrolls through dis-
play.
3. Press START/
PAUSE pad.
4. At the end of the
defrost time, tones
sound and oven
turns off.
Rapid Defrost
Preset to defrost one lb. of frozen
food.
1. Press RAPID
DEFROST.
• MEATTOUCH 1
POULTRY TOUCH
2 FISH TOUCH 3
scrolls through dis-
play.
2. Press appropriate
digit touch pads.
• TOUCH START
scrolls through dis-
play.
3. Press START/
PAUSE pad.
4. At the end of the
defrost time, tones
sound and oven
turns off.
continued...
13
Page 14
Microwave Cookin_g (cont'd)
Defrost Notes:
• Remove fish, shellfish, meat and
poultry from its original closed
paper or plastic package.
• Form the meat into a shape of a
doughnut before freezing.
• Remove thawed meat during
defrost and then continue defrost-
ing.
• Place foods in a shallow glass bak-
ing dish.
• The oven beeps approximately
midway through a defrost cycle to
remind you to check the food.
Pause the oven by opening the
door. Once food has been checked
or rearranged, close door and
press START/PAUSE to resume
the defrost cycle.
Sensor Operating
instructions
Sensor Cook allows you to cook most
of your favorite foods without select-
ing cooking times and power levels.
The display will indicate SENSING
during the initial sensing period. The
oven automatically determines
required cooking time for each food
item. When the internal sensor
detects a certain amount of humidity
coming from the food, it will tell the
oven how much longer to heat. The
display will show the remaining heat-
ing time. For best results for cooking
by Sensor, follow these recommen-
dations.
.
Food cooked with the sensor
system should be at normal
storage temperature.
.
Glass Tray (TURNTABLE) and
outside of container should be
dry to assure best cooking
results.
Sensor Cooking Guide
Appropriate containers and cover-
ings help assure good Sensor cook-
ing results.
1. Always use microwavable con-
tainers and cover them with lids
or vented plastic wrap.
.
Never use tight-sealing plastic
covers. They can prevent steam
from escaping and cause food to
overcook.
3. Match the amount to the size of
the container. Fill containers at
least half full for best results.
. Be sure the outside of the cook-
ing container and the inside of
the microwave oven are dry
before placing food in the oven.
Beads of moisture turning into
steam can mislead the sensor.
.
Foods should always be covered
loosely with microwavable plastic
wrap, waxed paper, or a lid.
.
Do not open the door or touch
the CANCEL/STOP pad during
the sensing time. When sensing
time is over, the oven beeps
twice and the remaining cooking
time will appear in the display
window. At this time you can
open the door to stir, turn, or
rearrange the food.
14
Page 15
Sensor Popcorn
A sensor detects steam from the food
and automatically adjusts cook time
for best cooking results. Com-
mercially packaged popcorn in 3.0 to
3.5 oz. bags can be used.
1. Put popcorn in the
center of the
turntable.
• DO NOT use the
metal convection
cooking rack for
popcorn cooking.
2. Press SENSOR
POPCORN.
• Oven will cook
popcorn automati-
cally using the sen-
sor system.
3. Oven begins
Popcorn cycle.
• To end cycle, open
door or press
CANCEL/STOR
4. At end of cooking
cycle, tones sound
and oven turns off.
Sensor Reheat
Designed to reheat precooked, room-
temperature or refrigerated foods
easily and quickly by detecting steam
from the food and automatically
adjusting cook time for best heating
results.
1. Press SENSOR
REHEAT.
• SELECT MENU 1 =
3 scrolls through
display.
2. Select desired cate-
gory using digit pads.
• Category 1 is for
an average sized
dinner plate
containing 1 to 2
cups of food.
Category 2 is to
reheat 1 to 4 cups
of soup or sauce in
a bowl or casserole
dish.
• Category 3 is to
reheat a 1 to 4 cup
portion of a casse-
role in a casserole
dish or small bowl.
Sensor Cook
A sensor detects steam from the food
and automatically adjusts cook time
for best cooking results for most
foods.
1. Press CANCEL/
STOR
2. Press SENSOR
COOK.
• SELECT MENU
0 - 9 scrolls
through display.
• See table on page
16 for category
options.
3. Enter desired cate-
gory using touch
pads.
4. Oven begins Sensor
Cook cycle.
• SENSING displays.
• To end cycle, open
door or press
CANC EL!STOR
5. At end of cooking
cycle, tones sound
and oven turns off.
[ k CAUTION
DO NOT leave microwave oven
unattended while popping corn.
I WARNING
To avoid risk of personal injury
or property damage, do not
cook popcorn with the metal
convection cooking rack.
3. Oven begins Sensor
Reheat cycle.
• SENSING displays.
• To end cycle, open
door or press
CANCEL/STOR
4. At end of cooking
cycle, tones sound
and oven turns off.
15
Page 16
Microwave Cooking_ (cont'd)
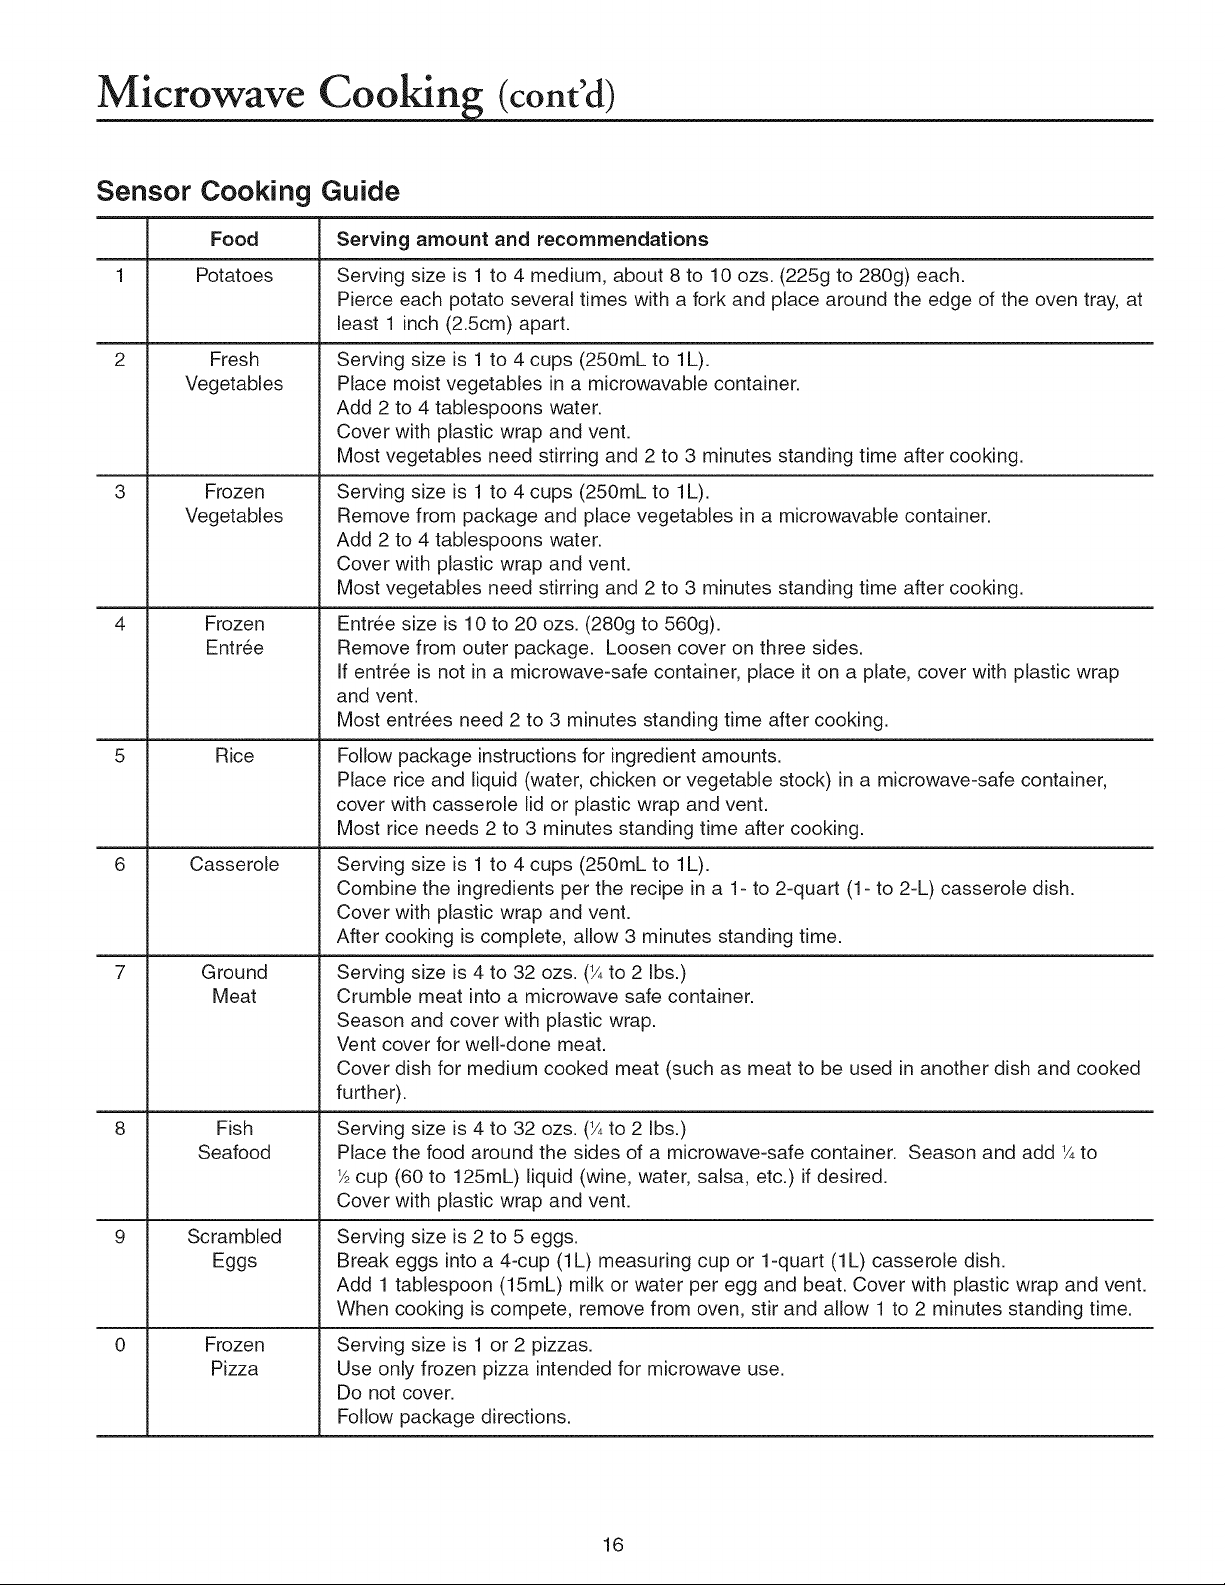
Sensor Cooking Guide
Food Serving amount and recommendations
1 Potatoes Serving size is 1 to 4 medium, about 8 to 10 ozs. (225g to 280g) each.
Pierce each potato several times with a fork and place around the edge of the oven tray, at
least 1 inch (2.5cm) apart.
2
4
5
6
Fresh
Vegetables
Frozen
Vegetables
Frozen
Entree
Rice
Casserole
Ground
Meat
Fish
Seafood
Scrambled
Eggs
Frozen
Pizza
Serving size is 1to 4 cups (250mL to 1L).
Place moist vegetables in a microwavable container.
Add 2 to 4 tablespoons water.
Cover with plastic wrap and vent.
Most vegetables need stirring and 2 to 3 minutes standing time after cooking.
Serving size is 1to 4 cups (250mL to 1L).
Remove from package and place vegetables in a microwavable container.
Add 2 to 4 tablespoons water.
Cover with plastic wrap and vent.
Most vegetables need stirring and 2 to 3 minutes standing time after cooking.
Entree size is 10 to 20 ozs. (280g to 560g).
Remove from outer package. Loosen cover on three sides.
If entree is not in a microwave-safe container, place it on a plate, cover with plastic wrap
and vent.
Most entrees need 2 to 3 minutes standing time after cooking.
Follow package instructions for ingredient amounts.
Place rice and liquid (water, chicken or vegetable stock) in a microwave-safe container,
cover with casserole lid or plastic wrap and vent.
Most rice needs 2 to 3 minutes standing time after cooking.
Serving size is 1to 4 cups (250mL to 1L).
Combine the ingredients per the recipe in a 1- to 2-quart (1- to 2-L) casserole dish.
Cover with plastic wrap and vent.
After cooking is complete, allow 3 minutes standing time.
Serving size is 4 to 32 ozs. (Y4to 2 Ibs.)
Crumble meat into a microwave safe container.
Season and cover with plastic wrap.
Vent cover for well-done meat.
Cover dish for medium cooked meat (such as meat to be used in another dish and cooked
further).
Serving size is 4 to 32 ozs. (Y4to 2 Ibs.)
Place the food around the sides of a microwave-safe container. Season and add 1Ato
V_cup (60 to 125mL) liquid (wine, water, salsa, etc.) if desired.
Cover with plastic wrap and vent.
Serving size is 2 to 5 eggs.
Break eggs into a 4-cup (1L) measuring cup or 1-quart (1L) casserole dish.
Add 1 tablespoon (15mL) milk or water per egg and beat. Cover with plastic wrap and vent.
When cooking is compete, remove from oven, stir and allow 1 to 2 minutes standing time.
Serving size is 1 or 2 pizzas.
Use only frozen pizza intended for microwave use.
Do not cover.
Follow package directions.
16
Page 17
onvectlon O0 In
C " C k'g
[
>-
To avoid risk of burns, handle
utensils, racks, and door with
care. Allow oven, utensils,
and racks to cool before
cleaning. Oven, utensils, and
racks, become hot during
operation.
>-
To avoid risk of personal
injury or property damage,
do not use oven without
turntable in place.
>-
To avoid risk of personal
injury or property damage,
do not cover turntable or rack
with aluminum foil.
>-
To avoid risk of property
damage, do not use light-
weight plastic containers,
plastic wraps or paper prod-
ucts during a convection
cooking cycle.
CAUTION
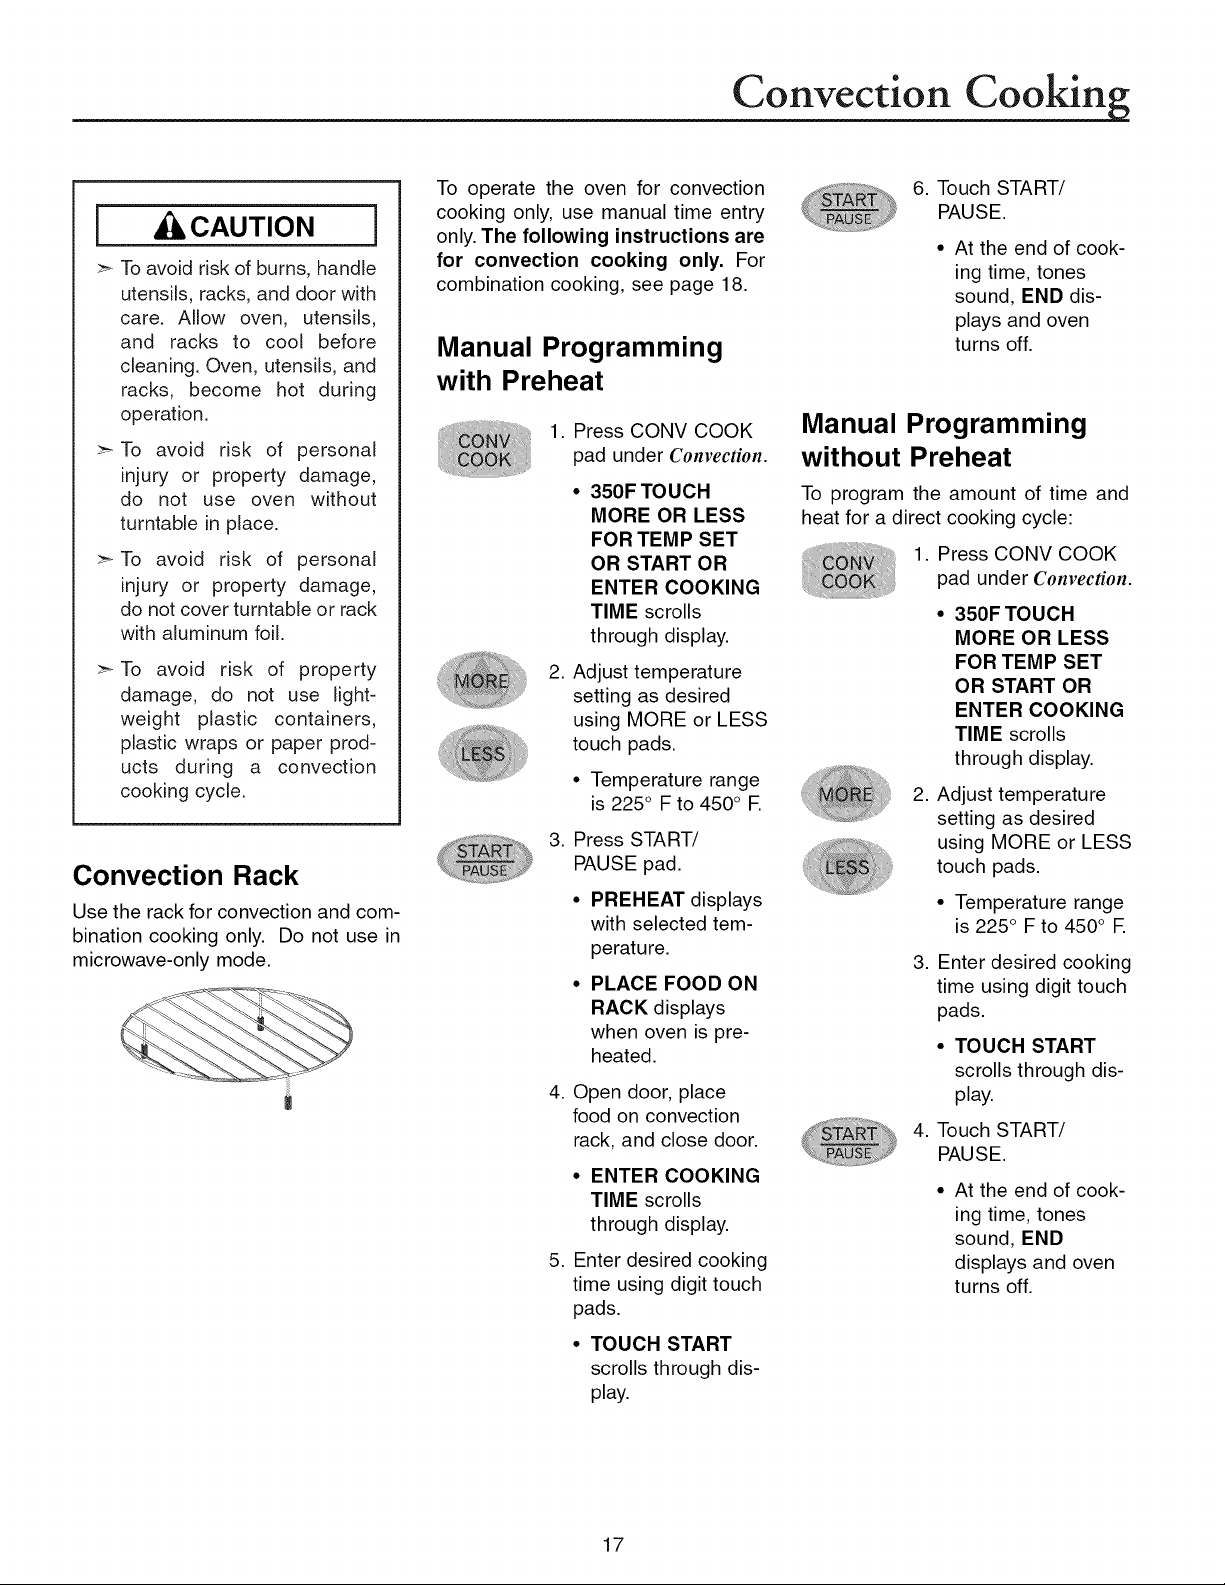
Convection Rack
Use the rack for convection and com-
bination cooking only. Do not use in
microwave-only mode.
To operate the oven for convection
cooking only, use manual time entry
only. The following instructions are
for convection cooking only. For
combination cooking, see page 18.
Manual Programming
with Preheat
1. Press CONV COOK
pad under Convection.
• 350F TOUCH
MORE OR LESS
FOR TEMP SET
OR START OR
ENTER COOKING
TIME scrolls
through display.
2. Adjust temperature
setting as desired
using MORE or LESS
touch pads.
• Temperature range
is 225° F to 450° E
3. Press START/
PAUSE pad.
• PREHEAT displays
with selected tem-
perature.
• PLACE FOOD ON
RACK displays
when oven is pre-
heated.
4. Open door, place
food on convection
rack, and close door.
• ENTER COOKING
TIME scrolls
through display.
5. Enter desired cooking
time using digit touch
pads.
• TOUCH START
scrolls through dis-
play.
6. Touch START/
PAUSE.
• At the end of cook-
ing time, tones
sound, END dis-
plays and oven
turns off.
Manual Programming
without Preheat
To program the amount of time and
heat for a direct cooking cycle:
1. Press CONV COOK
pad under Convection.
• 350F TOUCH
MORE OR LESS
FOR TEMP SET
OR START OR
ENTER COOKING
TIME scrolls
through display.
2. Adjust temperature
setting as desired
using MORE or LESS
touch pads.
• Temperature range
is 225° F to 450° E
3. Enter desired cooking
time using digit touch
pads.
• TOUCH START
scrolls through dis-
play.
4. Touch START/
PAUSE.
• At the end of cook-
ing time, tones
sound, END
displays and oven
turns off.
17
Page 18
Combination Cooking (microwave and convection)
The following instructions are for
combination cooking only.
For convection cooking, see page 17.
Notes:
Metal utensils should not be used
on the metal rack during combina-
tion cooking. Use glass utensils
whenever possible.
• A metal muffin tin or small, shallow
metal tray can be used if glass pan
is not available.
• If any arcing occurs, discontinue
use of that utensil.
CAUTION i
To avoid risk of burns, handle
utensils, racks, and door with
care. Allow oven, utensils,
and racks to cool before
cleaning. Oven, utensils, and
racks, become hot during
operation.
To avoid risk of personal
injury or property damage,
do not use oven without
turntable in place.
To avoid risk of personal
injury or property damage,
do not cover turntable or
rack with aluminum foil
To avoid risk of property
damage, do not use light-
weight plastic containers,
plastic wraps or paper prod-
ucts during a convection
cooking cycle.
Combination Roast
To program the amount of time and
heat for a cooking cycle using both
microwave energy and convection
energy.
1. Put food on the oven
rack and close oven
door.
2. Press ROAST pad
under Convection
Combination.
• 350F TOUCH
MORE OR LESS
FOR TEMP SET
OR ENTER
COOKING TIME
scrolls through dis-
play.
3. Adjust temperature
setting as desired
using MORE or
LESS touch pads.
• Temperature range
is 225° F to 450° E
• Microwave energy
cannot be adjusted
and is set at 40%.
• Cooking time can
be set from
0:01-99:99.
4. Touch START/
PAUSE.
• At the end of cook-
ing time, tones
sound, END dis-
plays and oven
turns off.
Combination Bake
To program the amount of time and
heat for a cooking cycle using both
microwave energy and convection
energy.
1. Put food on the oven
rack and close oven
door.
2. Press CANCEL/
STOP.
3. Press BAKE pad
under Convection
Combination.
• 375F TOUCH
MORE OR LESS
FOR TEMP SET
OR ENTER
COOKING TIME
scrolls through dis-
play.
4. Adjust temperature
setting as desired
using MORE or
LESS touch pads.
• Temperature range
is 225° F to 450° E
• Microwave energy
cannot be adjusted
and is set at 10%.
• Enter cooking time
in minutes.
5. Touch START/
PAUSE.
• At the end of cook-
ing time, tones
sound, END dis-
plays and oven
turns off.
18
Page 19
The following instructions are for
combination cooking only.
For convection cooking, see page
17.
Notes:
• When cooking frozen pizzas, place
the pizza directly on the convection
rack. Do not use a pizza pan or alu-
minum foil. Place the convection
rack securely on turntable and
away from the sides of the oven.
• For other baking/roasting place
food in appropriate utensil, then
place on convection rack.
Auto Bake
To automatically bake frozen pizza,
muffins, biscuits and frozen french
fries using both microwave and con-
vection energy alternately:
1. Press AUTO BAKE
pad under Convection
Combination.
• FROZEN PIZZA
TOUCH 1
MUFFINS
TOUCH 2
BISCUIT/
DINNER ROLL/
B. STICK
TOUCH 3
FROZEN FRENCH
FRIES TOUCH 4
scrolls through dis-
play.
2. Touch appropriate
digit touch pad.
• Muffins and biscuits
require a preheat
cycle and should
be placed on the
rack after the signal
sounds.
Frozen pizza MUST
be placed directly
on the convection
cooking rack. DO
NOT use a metal
pizza tray or alu-
minum foil.
Muffins, biscuits
and dinner rolls can
use metal muffin
tins if glass pan is
not available.
Bread sticks and
frozen french fries
can be placed on a
small shallow metal
pan, such as a tray,
if glass pan is not
available.
3. Press START/PAUSE
pad.
• If additional infor-
mation is needed,
oven will prompt in
display.
4. At the end of cooking
time, tones sound,
END displays and
oven turns off.
Auto Roast
Auto roast automatically roasts beef,
chicken, turkey breasts and pork
using both microwave and convection
energy alternately.
1. Press AUTO ROAST
pad under Convection
Combination.
• BEEF TOUCH 1
WHOLE CHICKEN
TOUCH 2
TURKEY BREASTS
TOUCH 3
PORKTOUCH 4
scrolls through dis-
play.
2. Touch appropriate
digit touch pad.
• ENTER WEIGHT
scrolls through dis-
play.
3. Use digit touch pads
to enter weight.
4. Press START/
PAUSE pad.
• If additional infor-
mation is needed,
oven will prompt in
display.
5. At the end of cooking
time, tones sound,
END displays and
oven turns off.
Chicken 2.5-6.0 Ibs.
Beef 2.0-4.0 Ibs.
Turkey 3.0-6.0 Ibs.
Pork 2.0-4.0 Ibs.
19
Page 20
Cookin Ti s
Meat Basics
For specific questions regarding
meat preparation, handling, or stor-
age contact USDA (United States
Department of Agriculture) Meat &
Poultry Hotline at (800) 535=4555.
Handling Hints
• When shopping, put meat in its
own separate plastic sack to keep
drips off other foods.
• Defrost frozen meats in refrigera-
tor, not at room temperature.
• Keep meat cool and covered until it
is time to cook.
• Wash hands with warm soapy
water before and after handling
meat or raw egg.
• Thoroughly wash any surface or
utensil raw meat or egg touched.
• Do not put cooked meat on the
same plate that held raw meat.
Cooking Tips
• Marinate meat in the refrigerator.
Throw out excess marinade that
came into contact with meat.
• Use an oven-proof meat ther-
mometer.
• Cook meat to internal temperature
recommended by USDA.
• When reheating foods, heat to an
internal temperature of at least
165° R
• While cooking meats, turn over at
least once.
Storage Safety
• Once carved, refrigerate unused
portion immediately.
• Keep hot foods hot and cold foods
cold when serving meals.
• Separate cooked foods into small
portions for fast cooling.
Do not store cooked ground meats
or meals containing ground meats
for longer than 3 to 4 days in the
refrigerator.
Do not allow cooked or uncooked
meat juices to come into contact
with ready-to-eat foods such as
fruits or vegetables.
Tenderizing
Braising is only one way to tenderize
less tender cuts. Before cooking, you
may pound, cube, marinate, or use
commercially prepared meat tender-
izers. You may then use a dry method
to cook the meat.
Marinades are acidic liquids such
as wine, citrus, or vinegar.
Marinades soften meat fibers but
only penetrate about one-fourth of
an inch into the interior of the meat.
Do not marinate meat for longer
than 24 hours.
• Pounding with a heavy meat ma!-
let breaks down the connective tis-
sue to tenderize meat.
• Cubing breaks down the structure
more than pounding. Cubing is
done at the meat counter.
Commercial tenderizers are pri-
marily enzymes that work on the
outer fourth inch on a meat cut.
Make sure to follow the manufac-
turer's directions.
Using a Meat
Thermometer
When using a meat thermometer,
remember to insert it at a slight
angle, in the thickest part of the meat,
away from fat and bone. The meat
should be removed when 5° F below
the desired final temperature. While
the meat sits before carving, it will
continue to cook internally, raising
the last 5° F by itself.
Meat thermometer
• Takes the guesswork out of cook-
ing to a desired 'doneness'.
• Helps reduce the risk of foodborne
illness.
Oven=safe Thermometer
(convection mode only)
• Inserted before the meat is placed
in the oven, this thermometer stays
with the meat while it cooks.
• The internal temperature will rise
slowly as the meat cooks.
• DO NOT use a metal thermometer
in the oven in COMBINATION
mode or MICROWAVE mode.
Instant-read Thermometer
Not oven safe, these thermometers
are placed in the meat when it is
removed from the oven.
While times may vary, an accurate
temperature is normally displayed
within one to two minutes.
When using an instant-read,
remember to clean the thermome-
ter stem with warm, soapy water
between readings.
2O
Page 21
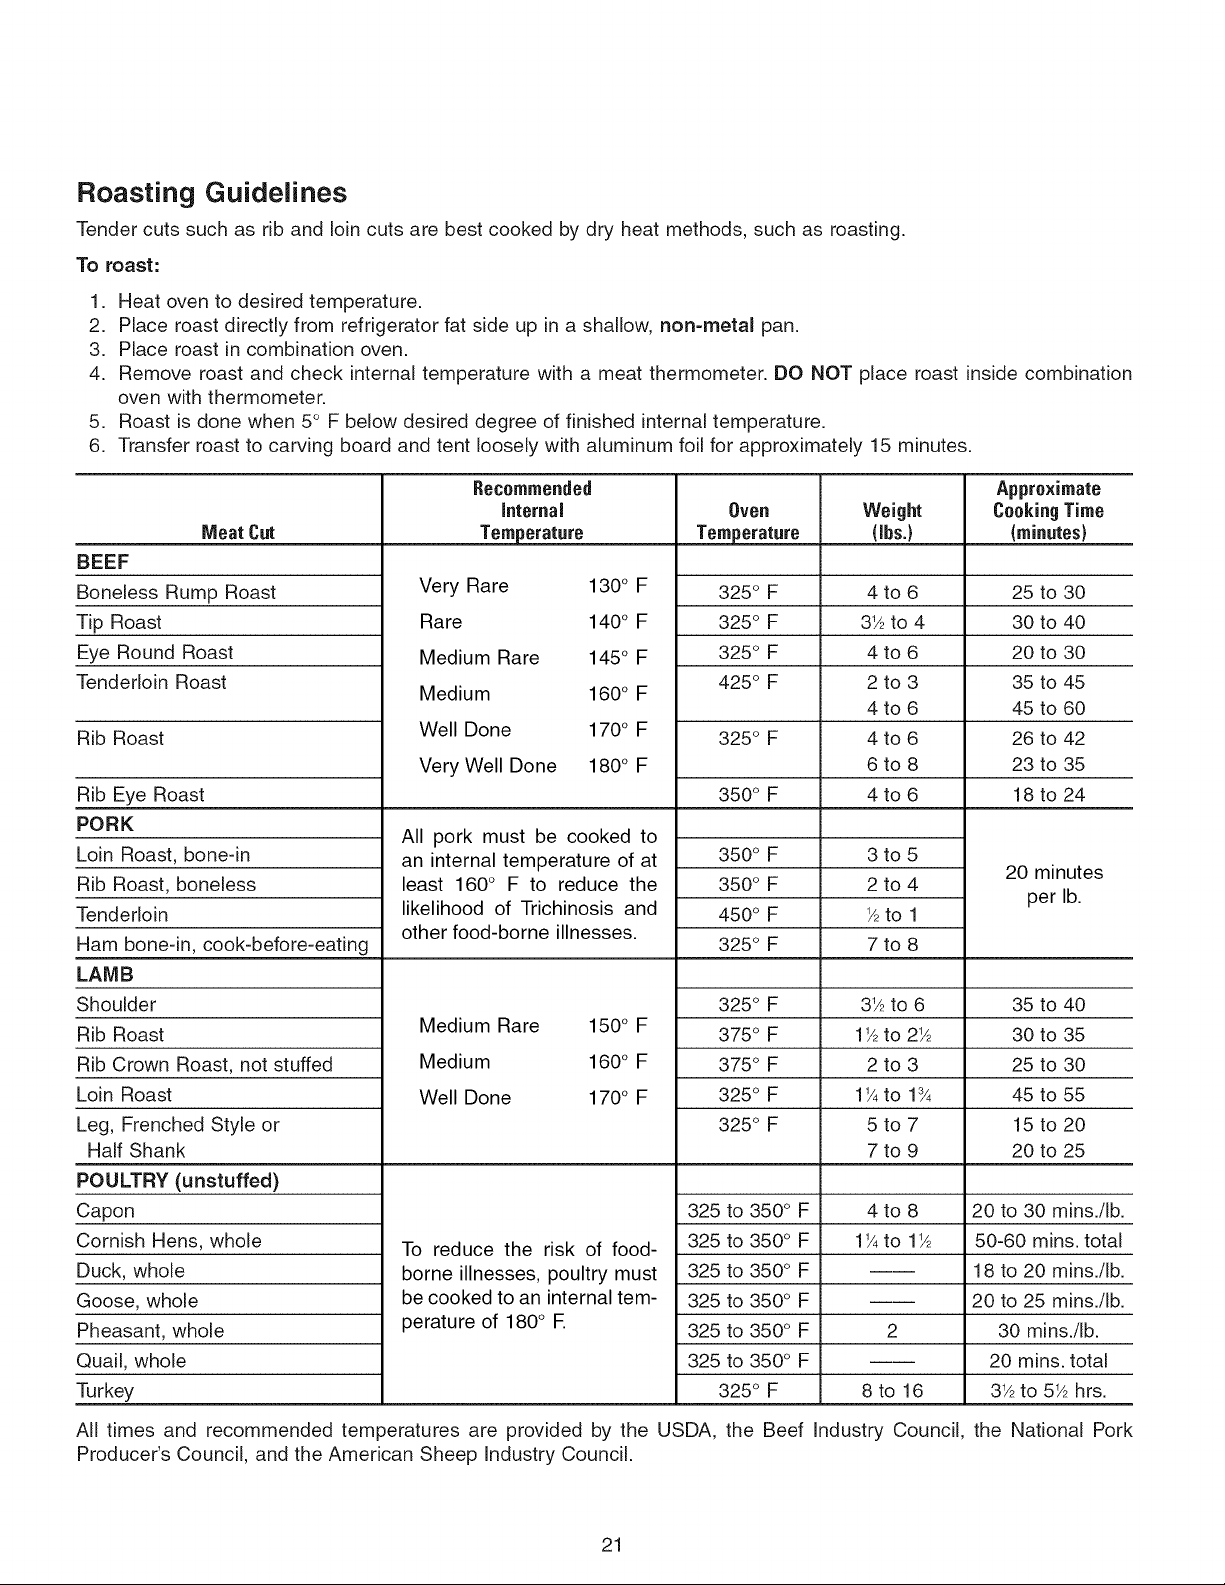
Roasting Guidelines
Tender cuts such as rib and loin cuts are best cooked by dry heat methods, such as roasting.
To roast:
1. Heat oven to desired temperature.
2. Place roast directly from refrigerator fat side up in a shallow, non=metal pan.
3. Place roast in combination oven.
4. Remove roast and check internal temperature with a meat thermometer. DO NOT place roast inside combination
oven with thermometer.
5. Roast is done when 5° F below desired degree of finished internal temperature.
6. Transfer roast to carving board and tent loosely with aluminum foil for approximately 15 minutes.
Meat Cut
BEEF
Boneless Rump Roast
Tip Roast
Eye Round Roast
Tenderloin Roast
Rib Roast
Rib Eye Roast
PORK
Loin Roast, bone-in
Rib Roast, boneless
Tenderloin
Ham bone-in, cook-before-eating
LAMB
Shoulder
Rib Roast
Rib Crown Roast, not stuffed
Loin Roast
Leg, Frenched Style or
Half Shank
POULTRY (unstuffed)
Capon
Cornish Hens, whole
Duck, whole
Goose, whole
Pheasant, whole
Quail, whole
Turkey
Recommended
internal
Temperature
Very Rare 130° F
Rare 140° F
Medium Rare 145° F
Medium 160° F
Well Done 170° F
Very Well Done 180° F
All pork must be cooked to
an internal temperature of at
least 160 ° F to reduce the
likelihood of Trichinosis and
other food-borne illnesses.
Medium Rare 150° F
Medium 160° F
Well Done 170° F
To reduce the risk of food-
borne illnesses, poultry must
be cooked to an internal tem-
perature of 180° F.
Oven
Temperature
325 ° F
325 ° F
325 ° F
425 ° F
325 ° F
350 ° F
350 ° F 3 to
350 ° F 2 to
450 ° F ½to
325 ° F 7 to
325 ° F 3½to 6
375 ° F 1½to 2½
375 ° F 2 to 3
325 ° F
325 ° F
325 to 350 ° F
325 to 350 ° F
325 to 350 ° F
325 to 350 ° F
325 to 350 ° F
325 to 350 ° F
325 ° F
4to6
3½ to 4
4to6
2to3
4to6
4to6
6to8
4to6
5
4
1
8
1_/4to 1_4
5to7
7to9
4to8
1_/4to 1½
2
8to 16
Approximate
CookingTime
(minutes)
25 to 30
30 to 40
20 to 30
35 to 45
45 to 60
26 to 42
23 to 35
18 to 24
20 minutes
per lb.
35 to 40
30 to 35
25 to 30
45 to 55
15 to 20
20 to 25
20 to 30 mins./Ib.
50-60 mins. total
18 to 20 mins./Ib.
20 to 25 mins./Ib.
30 mins./Ib.
20 mins. total
3½to 5½ hrs.
All times and recommended temperatures are provided by the USDA, the Beef Industry Council, the National Pork
Producer's Council, and the American Sheep Industry Council.
21
Page 22
Cookin Ti s
Cookies
* Shiny, flat cookie sheets should be
used. Avoid cookie pans with high
sides--this will cause uneven
browning on the top.
• Cookie sheet should not touch the
sides of the oven or door.
Cakes
Determine pan size from recipe
directions. Shiny pans work best for
cakes.
• Cake baked in too large a pan will
be thin and dry. Too small a pan
results in undercooked or unevenly
cooked cake and batter may spill.
Pies
• Pies should be baked in dark or
dull pans to increase browning.
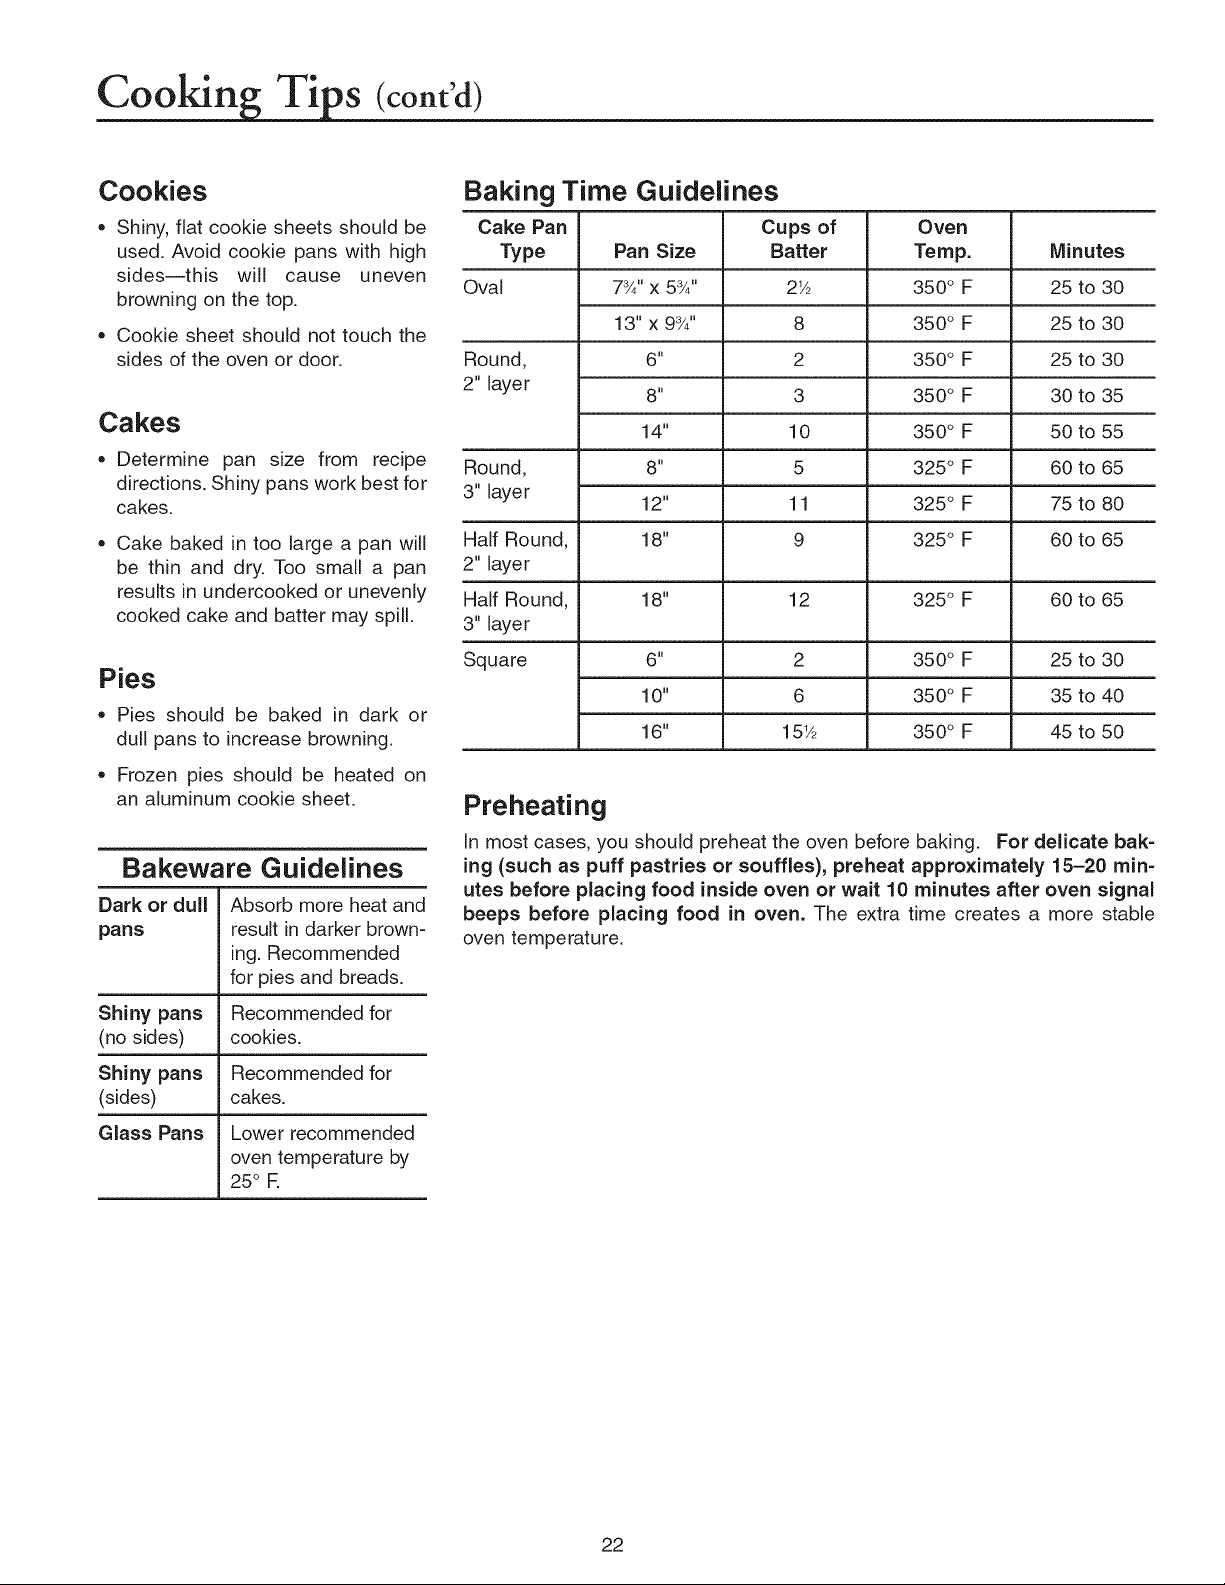
Baking Time Guidelines
Cake Pan Cups of Oven
Type Pan Size Batter Temp. Minutes
Oval 7_4"x 5_4" 2Y2 350° F 25 to 30
13" x 9_," 8 350° F 25 to 30
Round, 6" 2 350° F 25 to 30
2" layer 8" 3 350° F 30 to 35
14" 10 350° F 50 to 55
Round, 8" 5 325 ° F 60 to 65
3" layer 12" 11 325° F 75 to 80
Half Round, 18" 9 325 ° F 60 to 65
2" layer
Half Round, 18" 12 325° F 60 to 65
3" layer
Square 6" 2 350 ° F 25 to 30
10" 6 350 ° F 35 to 40
16" 151/.,. 350° F 45 to 50
Frozen pies should be heated on
an aluminum cookie sheet.
Bakeware Guidelines
Dark or dull Absorb more heat and
pans result in darker brown-
ing. Recommended
for pies and breads.
Shiny pans Recommended for
(no sides) cookies.
Shiny pans Recommended for
(sides) cakes.
Glass Pans Lower recommended
oven temperature by
25° R
Preheating
In most cases, you should preheat the oven before baking. For delicate bak=
ing (such as puff pastries or souffles), preheat approximately 15-20 min-
utes before placing food inside oven or wait 10 minutes after oven signal
beeps before placing food in oven. The extra time creates a more stable
oven temperature,
22
Page 23
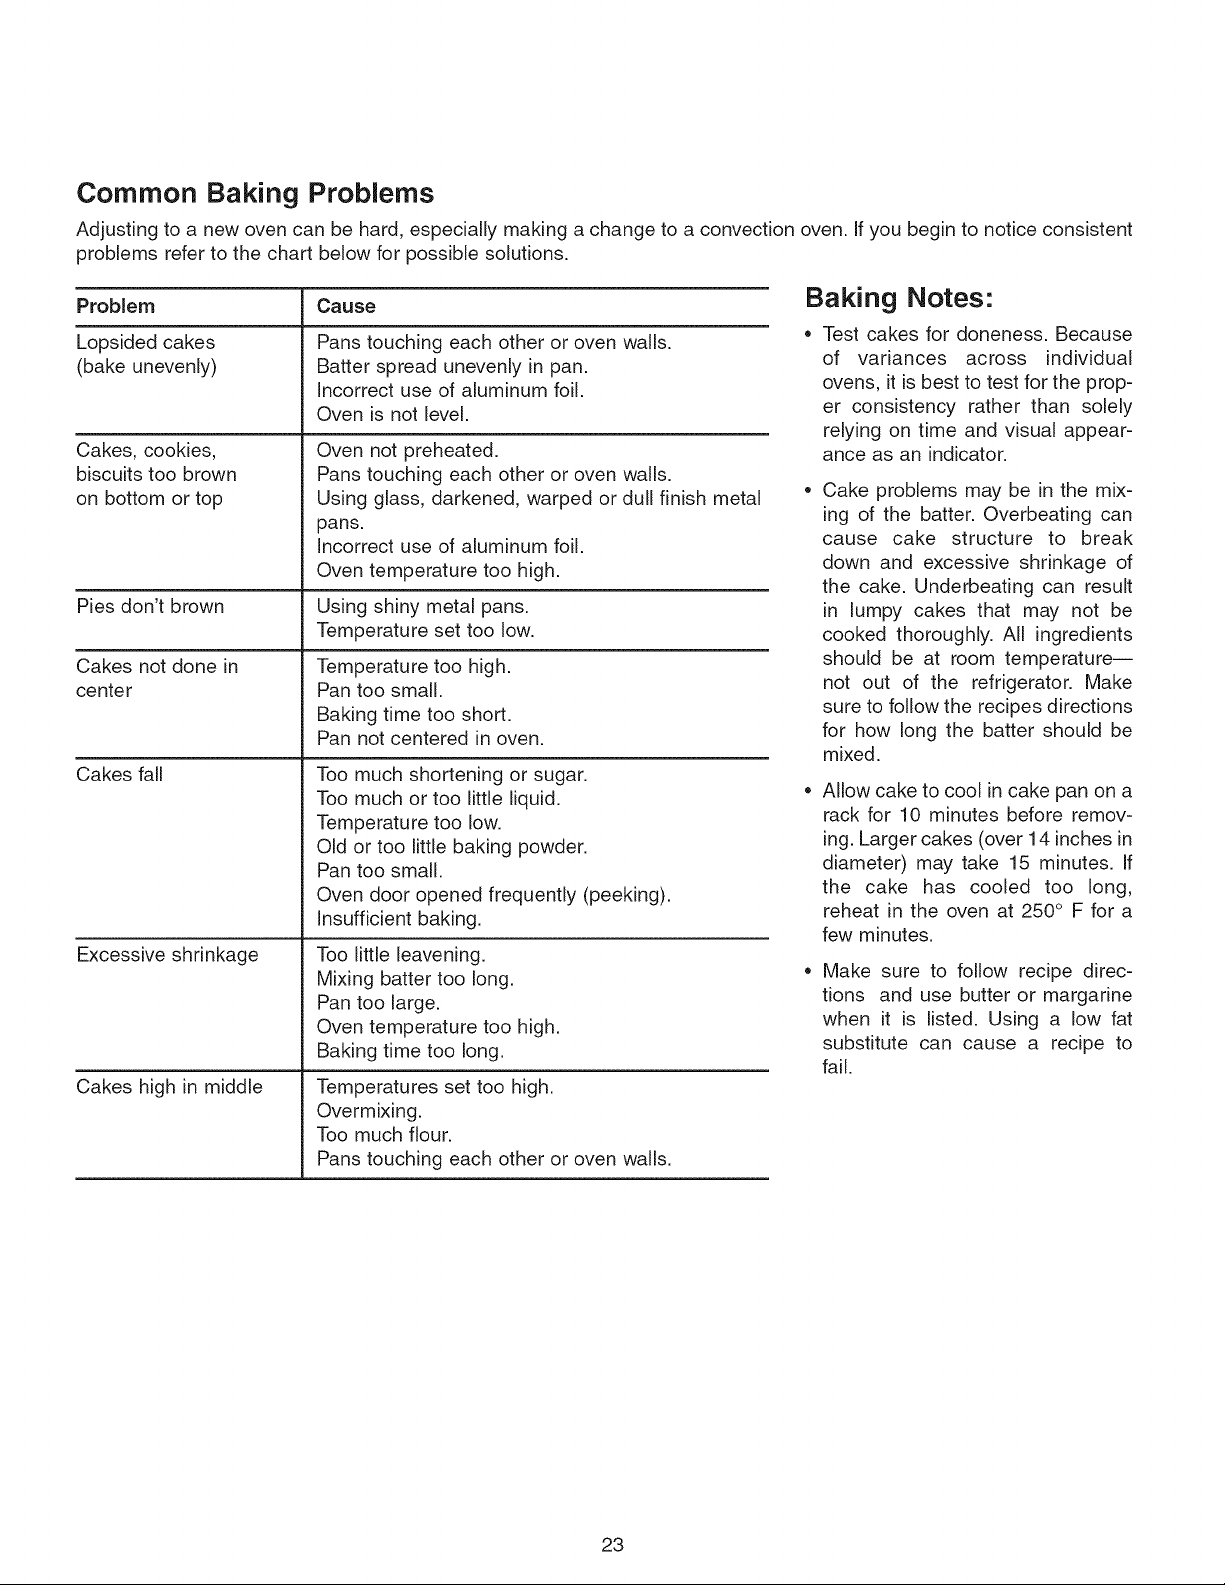
Common Baking Problems
Adjusting to a new oven can be hard, especially making a change to a convection oven. If you begin to notice consistent
problems refer to the chart below for possible solutions.
Problem
Lopsided cakes
(bake unevenly)
Cakes, cookies,
biscuits too brown
on bottom or top
Pies don't brown
Cakes not done in
center
Cakes fall
Excessive shrinkage
Cakes high in middle
Cause
Pans touching each other or oven walls.
Batter spread unevenly in pan.
Incorrect use of aluminum foil.
Oven is not level.
Oven not preheated.
Pans touching each other or oven walls.
Using glass, darkened, warped or dull finish metal
pans.
Incorrect use of aluminum foil.
Oven temperature too high.
Using shiny metal pans.
Temperature set too low.
Temperature too high.
Pan too small.
Baking time too short.
Pan not centered in oven.
Too much shortening or sugar.
Too much or too little liquid.
Temperature too low.
Old or too little baking powder.
Pan too small.
Oven door opened frequently (peeking).
Insufficient baking.
Too little leavening.
Mixing batter too long.
Pan too large.
Oven temperature too high.
Baking time too long.
Temperatures set too high.
Overmixing.
Too much flour.
Pans touching each other or oven walls.
Baking Notes:
= Test cakes for doneness. Because
of variances across individual
ovens, it is best to test for the prop-
er consistency rather than solely
relying on time and visual appear-
ance as an indicator.
Cake problems may be in the mix-
ing of the batter. Overbeating can
cause cake structure to break
down and excessive shrinkage of
the cake. Underbeating can result
in lumpy cakes that may not be
cooked thoroughly. All ingredients
should be at room temperature--
not out of the refrigerator. Make
sure to follow the recipes directions
for how long the batter should be
mixed.
Allow cake to cool in cake pan on a
rack for 10 minutes before remov-
ing. Larger cakes (over 14 inches in
diameter) may take 15 minutes. If
the cake has cooled too long,
reheat in the oven at 250° F for a
few minutes.
Make sure to follow recipe direc-
tions and use butter or margarine
when it is listed. Using a low fat
substitute can cause a recipe to
fail.
23
Page 24
Care and Cleanin
Clean oven frequently to maximize
oven life, performance, and
efficiency. A dirty oven cooks
inefficiently because moisture,
spills, and grease absorb convec-
tion and microwave energy.
i CAUTION
To prevent burns, handle uten-
sils, racks, and door with care.
Allow oven, utensils, racks to
cool before cleaning. Oven,
utensils, and racks, become hot
during operation.
I WARNING
To avoid electrical shock which
can cause severe personal
injury or death, unplug power
cord or open circuit breaker to
oven before cleaning oven.
Oven Turntable
Cleaning Oven Exterior
Clean the door and other exterior
surfaces with a clean cloth, sponge
or nylon pad using a mild detergent
and warm water solution. Wring cloth
well to remove excess water before
wiping oven.
• Do not use harsh or abrasive
cleaners or cleaners containing
ammonia.
Cleaning Oven Cavity
Wipe the oven inside with a soft cloth
and a mild detergent solution. Rinse
and wipe dry. Never use cleaning
powders, abrasives or other rough
pads.
Excessive oil splatters on the inside
top will be difficult to remove if left to
sit. Wipe splatters with a wet paper
towel as soon as they occur.
• Wear protective rubber gloves
when cleaning oven.
• Use only nylon scouring pad or
equivalent, to aid in removing soil
or build-up from the oven interior.
Cleaning Oven Door
For best performance and safety, the
inner door panel and the oven front
frame should be free of food or
grease build-up. Wipe often with a
mild detergent and then rinse. Wipe
dry with a soft cloth. DO NOT use
cleaning powders, abrasives or other
rough pads.
After cleaning the control panel,
touch CANCEL/STOP pad to clear
any entries that might have been
accidentally made while cleaning. To
avoid this problem, Child Lock may
be set prior to cleaning.
Cleaning Notes:
• Clean oven after every use.
• Clean interior, exterior, and door
according to instructions.
• Clean spills immediately.
• Remove oven racks, and clean
according to instructions.
• Wipe dry after cleaning.
The turntable and rotating ring are
removable. They should be hand-
washed in warm (not hot) water and
a mild detergent. Dry thoroughly with
a soft cloth. DO NOT use cleaning
powders, abrasives, steel wool, or
other rough pads. DO NOT put in an
automatic dishwasher.
• Turntable may be cleaned at the
sink. Be careful not to chip or
scratch the edges as this could
cause the turntable to break during
use.
• Rotating ring must be cleaned reg-
ularly.
• Turntable must ALWAYS be in
place when using this oven.
Do not use knife, metal utensil,
or steel wool pad to remove baked
on material. This will damage the
non-stick coating.
24
Page 25

Troubleshooting
[ _WARNING ]
To avoid risk of electrical shock which can cause severe personM injury or death, do not remove outer case at any
time. Only an authorized servicer should remove outer case.
Operation
Topic
Possible Cause
Solution
Oven not working
Arcing or sparking
Oven light not working
Clock and timer not
working
Light reflection around Normal • Light is reflected from light located between the oven cavity
microwave and the outer wall of oven.
Power outage
Cookware
Metal foil
Running oven empty
Normal
Bulb burned out
Power outage
• Make sure appliance is plugged in.
• Verify that circuit breaker is not tripped.
• Replace household fuse but do not change fuse capacity.
• Verify cookware is safe for microwave use.
• Do not use metal foil in oven.
• DO NOT run oven empty.
• Is oven operating? Oven must be operating for light to
come on.
• Light bulb may need to be replaced.
• Make sure appliance is plugged in.
• Verify that circuit breaker is not tripped.
• Replace household fuse but do not change fuse capacity.
25
Page 26

FULL ONE Year
Amana Appliances will repair or replace, including related labor, any part which proves defective as to workman-
ship or materials.
Limited Warranty
After one year from the date of original retail purchase, Amana will provide a free part, as listed below, to replace
any part that fails due to a defect in materials or workmanship. The owner will be responsible for paying all other
costs including mileage and transportation.
Second through Fifth Year
Amana will provide replacement magnetron, touchpad, and microprocessor, part and labor, which proves defective
as to workmanship or materials.
What is not covered by these
warranties
• Replacement of household fuses, resetting of circuit
breakers, or correction to household wiring or plumbing.
• Normal product maintenance and cleaning, including
light bulbs.
• Products with original serial numbers removed, altered,
or not readily determined.
• Products purchased for commercial, industrial, rental,
or leased use.
• Products located outside of the United States or
Canada.
• Premium service charges, if the servicer is requested
to perform service in addition to normal service or out-
side normal service hours or area.
• Adjustments after the first year.
• Repairs resulting from the following:
Improper installation, exhaust system, or maintenance.
Any modification, alteration, or adjustment not
authorized by Amana.
Accident, misuse, abuse, fire, flood, or acts of nature.
Connections to improper electrical current, voltage
supply, or gas supply.
Use of improper pans, containers, or accessories that
cause damage to the product.
• Travel.
If you need service
| Call the dealer from whom your appliance was pur-
chased or call Amana Appliances Consumer Services
at 1-800-843-0304, USA or 1-866-587-2002 Canada to
locate an authorized servicer.
Be sure to retain proof of purchase to verify warranty
status. Refer to WARRANTY for further information on
owner's responsibilities for warranty service.
If the dealer or service company cannot resolve the
problem, write to Amana Appliances Consumer
Services , 2800-220th Trail, Amana, Iowa, 52204, or
call 1=800=843=0304 U.S.A. or 1=866=587=2002
Canada.
NOTE: When writing or calling about a service prob-
lem, please include the following information:
a. Your name, address and telephone number;
b. Model number and serial number;
c. Name and address of your dealer or servicer;
d. A clear description of the problem you are having;
e. Proof of purchase (sales receipt).
User's guides, service manuals and parts information
are available from Amana Appliances Consumer
Services.
IN NO EVENT SHALL MAYTAG BE LIABLE FOR INCIDENTAL OR CONSEQUENTIAL DAMAGES.
This warranty gives you specific legal rights, and you may have others which vary from state to state. For example, some states do
not allow the exclusion or limitation of incidental or consequential damages, so this exclusion may not apply to you.
26
Page 27

icro=ondes combin6
uperficie de " "
Guide de I'utilisate
A CM1580A
Installateur : Remettre ce manuel au
proprietaire.
Consommateur : Lire le manuel et le
conservercomme reference.Conserverla
factured'achatoule chequeencaissecomme
preuvede I'achat.
Numerodemodele
Numerodeserie
Dated'achat
Pour toute question, nous ecrire ou nous
contacter(indiquerle numerodemodeleet le
numerode tel6phone),&'
AmanaAppliancesConsumerServices
AmanaAppliances
2800-220thTrail
Amana,IA 52204
1-800-843-0304(E.-U.)
1-866-587-2002(Canada)
(Lundi-vendredi,8 h - 20h -
heuredeI'Est)
SiteInternet: http://www.amana.com
Table des matieres
Instructions de securit6 importantes ............................. 28-30
Installation................................................... 31
Afficheur et Fonctions ........................................ 32-36
Methodes de Cuisson .......................................... 37
Suggestions d'ustensiles ........................................ 38
Cuisson au Four _.Micro-ondes ................................ 39-43
Cuisson Avec Convection ....................................... 44
Cuisson Combinee.......................................... 45-46
Conseils deCuisson......................................... 47-50
Entretien et Nettoyage.......................................... 51
Guide de Depannage........................................... 52
Garantie .................................................... 54
Guia del Usuario .............................................. 55
Four _ micro-ondes
Conservez ces instructions comme r6ferences.
Ce manuel dolt 6tre range pres du four.
< 4 4
Page 28

INSTRUCTIONS DE SECURITE IMPORTANTES
Ce que vous devez
savoir sur les
instructions de s_curite
Lesinstructionsdesecuriteimportanteset les
avertissernentsparaissantdanscemanuelne
sont pas destines & couvrir toutes les
situations et conditions eventuelles qui
peuventse presenter.II faut fairepreuvede
bonsensetdeprudenceIorsde I'installation,
de I'entretienou de I'utilisationd'un four &
micro-ondes.
Preneztoujourscontactavecvotredetaillant,
distributeur,agentde serviceou fabricant,au
sujetde problemesouconditionsquevousne
comprenezpas.
l_:k AVERTISSEMENT[
Pour eviter tout risque de choc
electriqueou m6mede mort, ce four
doit6trernis&laterreetsafichenedoit
pas6tre rnodifiee.
Instructions
de liaison a la
terre
II faut que ce four soit relie_ la terre.La
liaison & la terre permet I'evacuationdu
Reconnaissez les etiquettes, phrases ou symboles
sur le s_curite
[ _ DANGER i
DANGER-- risques immediats qui RESULTERONT en de graves blessures ou
m_me la mort.
[
AVERTISSEIVlENT --
[
ATTENTION --
courantverslaterre,ce quireduitle risquede
chocelectrique.Cefour est doted'uncordon
avec fichede branchement& trois broches,
pourliaison&laterre.Ondoitbrancherlafiche
sur une prise de courant convenablement
installeeetreliee&laterre.
En cas de non-comprehension des
instructionsde liaison & la terre ou en cas
d'incertitudequant&laqualitedelaliaison&la
terrede I'appareil,consulterun technicienou
electricienqualifi&
Nepasutiliserde rallongeelectrique.Si le
cordon de I'appareil est trop court, faire
risques ou pratiques non sores qui POURRAIENT resulter en
blessures mineures.
AVERTISSEMENT
risques ou pratiques non st_res, qui POURRAIENT
resulter en de graves blessures ou m_me la mort.
ATTENTION
installeruneprisedecourant&3alveoles.Ce
four doit 6tre branche sur un circuit
independantde 60 hertzauxcaracteristiques
nominales indiqueesdans le tableau des
specifications.Si le four est branchesur le
m6me circuit qu'un autre equipement, il
pourraiten resulter une augmentationdes
dureesdecuissonavecrisquequelesfusibles
negrillent.
Le four & micro-ondes fonctionnesur un
courant domestiquestandard de 110-120
volts.
i
i
I_NONCI_ SUR LES INTERFI_RENCES AVEC LES FRI_QUENCES RADIO-
COMMISSION FI_DI_RALE DES COMMUNICATIONS (I_.-U. SEULEMENT)
Cefourµ-ondesgeneredeI'energie&desfrequenceselevees;s'il n'estpasinstalleet utilisecorrectement,c'est-&-direenstricteconformite
aveclesinstructionsdufabricant,lefourpeutsusciterdesinterferencesperturbantlareceptiondesondesderadioettelevision.Cetappareilaete
testeet il a ete trouveconformeauxlimitesimposeesparles specificationsdela pattie18 desreglementsde la CommissionFederaledes
Communications(FCC)- portantsurlesequipementsISM,et quisontcon£uspouroffriruneprotectionraisonnable&detellesinterferencesdarts
uneinstallationresidentielle.
Cependant,il n'y a aucunegarantiequ'aucuneinterferencene se produiradansuneinstallationenparticulier.Sicetequipementn'entrafnepas
d'interferenceavecla receptiondes ondesde radioet de television(effetqui peut6tre diagnostiquepar I'arr6tpuis la miseen marchede
I'equipernent),I'utilisateurestencourage&essayerdecorrigerlasituationau rnoyend'uneoude plusieursdesrnesuressuivantes:
• ReorienterI'antennede receptiondetelevisionouderadio.
• Modifierlapositiondufourµ-ondesparrapportaurecepteurde radiooudetelevision.
• Boignerle fourµ-ondesdu recepteur.
• Brancherle four& micro-ondesdansuneprisedifferentedesortequele four& micro-ondeset le recepteursoientalimentespardescircuits
differents.
Lefabricant n'estpasresponsabledesinterferencesauxondesderadioetdetelevisioncauseesparunemodification non-autoriseedufour&
micro-ondes.IIrevient&I'utilisateurd'eliminerdetellesinterferences.
CONSERVEZ CES INSTRUCTIONS
28
Page 29

Reconnaissez ce symbole annon ant un message sur la SECURITE
I AVERTISSEMENT
Lors de I'utilisation d'appareils electriques, des precautions de securite de base doivent 6tre suivies pour reduire le risque de brQlure,
choc electrique, incendie ou blessure ainsi que le risque d'exposition excessive & I'energie des micro-ondes.
1. LIRE la totalite des instructions avant d'utiliser I'appareil.
2. LIRE ET RESPECTER les instructions specifiques
<<PRf--CAUTIONS .&. OBSERVER POUR f--VlTER UNE
EXPOSITION EXCESSIVE .&. I'I_NERGIE DES MICRO-
ONDES,, dans les INSTRUCTIONS DE sf--CURITf--
IMPORTANTES.
3. Cet appareil DOlT I_TRE RELII_ .&.LA TERRE. Brancher
I'appareil uniquement dans une prise de courant
convenablement reliee &la terre. Voir les INSTRUCTIONS DE
LIAISON .&.LATERRE & la section Instructions d'lnstallation.
4. Installer cet appareil UNIOUEMENT conformement aux
instructions d'installation fournies dans ce manuel.
5. Certains produits, comme oeufs entiers et contenants scelles,
par exemple bocaux fermes, peuvent exploser. II NE FAUT
PAS les faire CHAUFFER dans ce four.
6. Utiliser cet appareil UNIOUEMENT dans les applications
prevues dans ce manuel. Ne pas utiliser dans cet appareil un
produit emetteur de vapeur ou compose chimique corrosif. Ce
type de four est specifiquement con£u pour les op@ations de
chauffage, cuisson ou dessiccation d'aliments. II n'est pas
con£u pour une utilisation industrielle ou de laboratoire.
7. Comme pour tout appareil menager, il est necessaire de
SUPERVlSER I_TROITEMENT les ENFANTS Iors de
rutilisation de I'appareil.
8. NE PAS faire fonctionner ce four si le cordon ou la fiche de
branchement ont ete endommages, s'il ne fonctionne pas
correctement ou s'il a subi des dommages ou une chute.
9. SEUL un technicien est habilite & executer des travaux
d'entretien sur cet appareil, y compris le cordon
d'alimentation. Des outils speciaux sont necessaires pour ce
faire. Prendre contact avec retablissement de service agree le
plus proche pour permettre I'inspection, la reparation ou le
reglage.
10. NE PAS recouvrir ou obstruer un filtre ou une ouverture de
I'appareil.
11. NE PAS faire rechauffer de biberons dans le four.
12. Les petits pots pour bebe doivent 6tre ouverts Iorsqu'ils sont
chauffes au four µ-ondes, et leur contenu melange ou
agite avant d'6tre consomme, pour eviter toute brelure.
13. NE PAS remiser cet appareil & I'exterieur. NE PAS I'utiliser
& proximite d'eau, par exemple pres d'un evier de cuisine,
dans un sous-sol humide ou & proximite d'une piscine ou
endroit semblable.
14. NE PAS immerger le cordon ou la fiche de branchement
dans de I'eau.
15. Maintenir le cordon d'alimentation .&.DISTANCE de toute
surface CHAUFFI_E.
16. NE PAS laisser le cordon d'alimentation pendre sur le
rebord d'une table ou d'un plan de travail.
17. Voir les instructions pour le nettoyage de la porte dans la
section Entretien et nettoyage de ce manuel.
18. NE PAS inserer d'aliments surdimensionnes ou d'ustensiles
surdimensionnes dans un four & micro-ondes ou &
convection. IIs pourraient provoquer un feu, un arc
electrique, ou un risque de choc electrique.
19. NE PAS nettoyer le four avec des tampons & recurer
metalliques. Des morceaux de metal peuvent tomber du
tampon et toucher des composantes electriques, entrafnant
un risque de choc electrique.
20. NE PAS utiliser des produits en papier non prevus pour la
cuisson Iorsque le four est utilise en mode convection ou
combin&
21. NE PAS remiser de materiaux dans cet appareil, autres que
les accessoires recommandes par le fabricant, Iorsqu'il n'est
pas utilis&
22. NE PAS recouvrir les grilles ou toute autre partie du four
avec des feuilles d'aluminium. Une circulation d'air
restreinte fera surchauffer le four.
23. NE PAS vaporiser de produits de nettoyage vers I'arriere de
la surface interne de la cavite du four. Une telle operation
contaminera et endommagera I'ensemble de chauffage &
convection.
PRI CAUTIONS ,&,OB.SER.VER POUR I VITER UNE EXPOSITION
EXCESSIVE A L'ENERGIE DES MICRO-ONDES
A. NEPAStenterdefairefonctionnercefourIorsquelaporteestouverte;lefonctionnementdufourIorsquelaporteestouvertepourraitsusciterune
expositiondangereuse&I'energiedesmicro-ondes.IIestimportantdenepascirconveniroumodifierlesdispositifsd'interverrouillagedesecurit&
B. Veiller&neplacerAUCUNobjetentrelafaceavantdu fouret la porte,et&ne paslaisserdessouilluresouresidusdeproduitsdenettoyage
s'accumulersurlessurfacesdecontactporte/ch&ssis.
C. NEPASfairefonctionnerle fours'ilest endommag&IIestparticulierementimportantquelaportedufourpuissefermerparfaitementet qu'il
n'yaitaucunedet@iorationde:1.porte(deformation),2.charnieresetIoquets(brisesoudesserres),3.jointsdeporteet surfacesde contact.
D. Seulun personnelqualifieesthabilite&executerdesreglagesou r@arationssurlefourµ-ondes.
CONSERVEZ CES INSTRUCTIONS
29
Page 30

INSTRUCTIONS DE SECURITE IMPORTANTES
I AVERTISSEMENT
Pourreduirele risquedefeu danslacavitedufour'
a. NE PAScuire excessivementun aliment.Surveiller
attentivementI'appareilsi on a place un article en
papier,plastiqueou autremat&iaucombustibledans
lacavitepourfaciliterlacuisson.
b. Enleverlesattachesmetalliquesdessachetsenpapier
ouenplastiqueavantdelesplacerdanslefour.
C. AdvenantI'inflammationd'un article & I'int&ieurdu
four,MAINTENIRLA PORTEFERMEE,arr6terlefour
etdebrancherlecordond'alimentation,ouinterrompre
I'alimentationdu circuit au niveau du tableau de
fusiblesou dedisjoncteurs.
d. Ne rienremiserdansla cavitedufour.NEPASplacer
des produitsen papier,alimentsou ustensilesde
cuisinedanslacavitedufourIorsqu'iln'estpasutilis&
I AVERTISSEMENT I
Lesliquidescommeeau,cafeouthepeuventsurchaufferau-del&du
point d'ebullitionsans paraftre bouillir, en raisonde la tension
superficielledu liquide.Lorsquele contenantest retiredu four &
micro-ondes,il n'y a pastoujourspresenced'ebullitionou de bulles
visibles.CECIPEUTENTRAiNERL'I_BULLITIONSOUDAINE ET
LA PROJECTIONDE LIOUlDESTRESCHAUDSLORSQU'UNE
CUlLLERE OU AUTRE USTENSILEEST PLACI_ DANS LE
LIOUlDEPourreduirelerisquedeblessures:
1. Nepassurchaufferleliquide.
2. Remuerle liquideavantdele fairechaufferetau milieudutemps
dechauffage.
3. Ne pasutiliserde contenants& c6tes rectilignesavec goulots
etroits.
4. Apres le chauffage,prevoirun temps d'attenteet laisser le
contenantdanslefourµ-ondesavantde I'enretirer.
5. Userde prudenceenmettantunecuill&eouautreustensiledans
le contenant.
ATTENTION
Pour eviter les risquesde blessuresou de dommagesmat&Ms,
observerlesprecautionssuivantes:
1. NEPASfairefrire&grandefrituredanslefourµ-ondes.La
graissepourraitsurchaufferetpresenterun risque&manipuler.
2. NEPASfairecuireourechaufferdesoeufsdansbur coquilleou
avecunjauneentierdans un four& micro-ondes.La pression
pourraits'accumuleretfaireexploserI'oeuf.Percerlejauned'oeuf
&I'aided'unefourchetteoud'uncouteauavantde lefairecuire.
3. Percerla peau des pommesde terre, tomateset aliments
semblablesavantde les faire cuire au four & micro-ondes.
Lorsquela peauestpercee,la vapeurs'echappeuniformement.
4. NEPASlaisserle foursanssurveillance.
5. NEPASutiliserdethermometre&cuissonstandarddanslefour
µ-ondesIorsquele fourestutiliseen modeconvectionou
combin&Laplupartdesthermometrescontiennentdu mercure,
cequi peutentrafnerlaformationd'unarcelectrique,lemauvais
fonctionnementouencoreI'endommagementdufour.
6. NE PASutiliserd'ustensilemetalliquedansle four,saufsi une
telleutilisationest recommandeepar les fabricantsd'aliments
pour micro-ondesou si la recettedemandedes ustensiles
metalliquesen modeconvectionoucombin&Fairechaufferles
alimentsdans des ustensilesde verre ou de porcelainesi
possible.
7. Ne jamais utiliser de papier, plastiqueou autres mat&bux
combustiblesnonprevuspourla cuisson.Si la temp&aturedu
fourestele%e,lemat&iaupourraits'enflammer.
8. La temp&atureminimumdu four en mode convectionest de
37,8°C (100°F).Wrifier les recommandationsdufabricantpour
s'assurer que le papier, plastique, ou autres mat&iaux
combustiblesresistent&la temp&atureminimumdufour.
9. Lorsde la cuissonavecdu papier,plastiqueou autresmat&iaux
combustibles,suivre les recommandationsdu fabricant sur
I'utilisationdu produit.
10. NE PASutiliserde papieressuie-toutqui contientdu nylonou
autresfibressynthefiques.Les mat&iauxsynthetiqueschauffes
pourraientfondreetfaires'enflammerle papier.
11. NEPASfairechaufferdansle fourde sacplastiqueoucontenant
ferm&LeliquideouI'alimentpourraitsedilaterrapidementetfaire
casserlesachetou lecontenant.Percerou ouvrirlecontenantou
lesachetavantde lefairechaufferauxmicro-ondes.
12. Les grilles, ustensiles,supportsde grille, et surfacesdu four
peuventdevenirchaudspendantet apresI'utilisation.Utiliserdes
ustensilesoudes protections,commedesmaniquesou gantsde
cuisinesecs,Iorsqu'ilssontnecessairespoureviterles brQlures.
13. NE PASdebrancherle fourimmediatementapresutilisation.Le
ventilateurinternedoit refroidirle fourpoureviterd'endommager
lescomposantselectriques.
14. Poureviterle mauvaisfonctionnementd'unstimulateurcardiaque,
consulterun mededn ou le fabricantde ce stimulateurpour
connaftreles effetspotentielsde I'energiedes micro-ondessur
celui-ci.
CONSERVEZ CES INSTRUCTIONS
30
Page 31

Installation
Deballage du Four
. Inspecterle four;identifiertout dommage
eventuellement survenu en cours de
transport,et affectantla porteou la cavite
internedufour.
, Signalerimmediatementtoutedet&ioration
dufourau commer%ntquiI'avendu.
Ne pas tenter d'utiliser le four s'il est
endommag&
, Retirertousles mat&iauxet articlesplaces
&I'int&ieurdufour.
, Si le fouraete stockeen un lieutresfroid,
attendre quelques heures avant de le
brancher.
Emplacement du Four
, Ne pas installerle four pres de ou au-
dessusd'unesourcedechaleur,commeun
four& pizzaou une friteuse.Ceci pourrait
causerdes problemesde fonctionnement
pour le four & micro-ondeset pourrait
reduire la duree de vie des composants
electriques.
= Laisser suffisamment d'espace pour
permettrela circulationde I'airautour du
four.
o
Installerlefoursurunesurfaceplane.
o
Laprisedecourantdoit6tresitueedefa£on
&ce quela fichesoitaccessibleIorsquele
fourestenplace.
Capacite Incorporee
Seref&er&lesinstructionsd'installation.
Pourd'autreinformation,telephonerau •
1-800-843-0304E.-U.
1-866-587-2002Canada
\
Espace Libre Autour du
Four
A-- Laisser un espace libre d'au moins
10cm(4 po)au-dessusetsurles c6tes
du four. Une bonne circulation d'air
autourdu fourrefroiditles composants
electriques.Si la circulationdeI'air est
restreinte,il est possibleque le fourne
fonctionnepas correctementet que la
duree de vie des composantselectri-
quessoitreduite,
Bm
Installerle four combinede fa£on&ce
quelehasdufoursoit&aumoins90cm
(36po)dusol,
31
Page 32

Afficheur et Fonctions
Joint
verrouillage
Grilled'_cran
duhublot
Fagade du four
REMARQUE: I'appareil
emetun signalsonoreIors
de chaque pressionsur
unetouchedutableaude
commande, confirmant
I'entree de I'information
correspondante.
- Bouton d'ouverture
__ Plateau tournant
Anneau rotatif
Aflicheur
Tableau de
commande
de laporte
Specifications du Four
Alimentation 120VAC,
electrique 60 Hz
Demandedepuissance 1 500W
Puissancedecuisson 1 000W
(Norme
IE0607O5)
Frequence 2 450MHz
Demandedecourant 13A
Dimensionsexternes 57,5cm(22_Apo)x
(Largeurx Hauteurx 37,8cm(1478po)x
Profondeur) 50,8cm(20po)
Volumede lacavite 0,042m3(1,5pP)
Poidsnet 23,6kg(52Ib)
On trouvera les articles suivants dans
I'emballagedufourAmicro-ondes.
Plateautournantenverre................. 1
Manueldu proprietaireet
guidedecuisson....................... 1
Anneaurotatif.......................... 1
CefourL_micro-ondesest conguuniquement
pourI'utilisationmenagere.Lagarantienesera
pas honoree s'il est utilise darts une
applicationcommerciale.
Microwave
_o_
AUTO/TIME DEFROST COOK
POWER
REMINDERI !RECALL HELP
CLOCK CoNTRoL: TIMER
FOR RECZPES RECUZRZN,; STZRRZl_GORTO
CHECK FOODWZTHOUTC_mCELZ]_GCOOKZ_G
SET-UP
pROGP.A_ PRESS ST_T/PAUSE
J
32
Page 33

AFFICHEUR- I'afficheur inclut une
horlogeet desindicateurs;ils affichent
I'heure, les durees de cuisson et les
fonctionsde cuissons61ecfionn6es.
.
CONVCOOK(CUISSONAVECCON-
VECTION)- Appuyersur cette touche
pour ufiliser le four pour la cuisson
avec convection seulement. Pour
d'autresinformafions,voirpage44.
3. AUTO BAKE (CUISSON AUTO-
MATIQUE)- Appuyersurcette touche
pour commander la cuisson
automatique de pizza surgel6e, de
muffins,de biscuits,et de pommesde
terre frites surgel6es en ufilisant
1'6nergiedes micro-ondes et de la
convection en alternance. Pour
d'autresinformafions,voirpage46.
4. AUTO ROAST (ROTISSERIEAUTO-
MATIQUE)- Appuyersurcette touche
pour commander la r6fisserie auto-
mafique du boeuf, du poulet, des
poitrines de dinde et du porc en
ufilisanttour & tour les micro-ondeset
la convection. Pour d'autres
informations,voirpage46.
.
BAKE (CUISSON)- Appuyersur cette
touchepourprogrammerladuree et la
temperature de cuisson pour un
programmede cuissonufilisant tour &
tour les micro-ondeset la convection.
Pour d'autres informafions,voir page
46.
.
ROAST(ROTISSERIE)- Appuyersur
cettetouchepour programmerladuree
et la temperaturede r6fisseriepourun
programmede cuissonufilisant tour &
tour les micro-ondeset la convection.
Pour d'autres informafions,voir page
45.
.
SENSOR COOK (CUISSON AVEC
CAPTEUR)- Appuyersur cettetouche
pour commander la cuisson de 10
typesde mets. La dureede chauffage
sera d6termin6e par le circuit du
capteur en foncfion de la quanfite
d'humidit6 mise par le mets. Pour
d'autresinformafions,voirpage42.
.
SENSOR POPCORN (MAi'S A
ECLATER - AVEC CAPTEUR) -
Appuyer sur cette touche pour
commander une operation d'eclate-
meritdemaisensachetscommerciaux
dans le four & micro-ondes.La duree
de chauffagesera determin6epar le
circuit du capteur en fonction de la
quanfited'humidit6emisepar le maTs.
Pour d'autres informafions,voir page
42.
.
SENSOR REHEAT (RECHAUFFAGE
AVECCAPTEUR)- Appuyersur cette
touchepourcommanderle rechauffage
de mets pr6cuits, & la temperature
ambiante ou refrig6r6s. La duree de
chauffage sera d6termin6e par le
circuit du capteur en fonction de la
quantited'humiditeemisepar le mets.
Pour d'autres informafions,voir page
42.
10.
DEFROST AUTO/TiME (DECON-
GELATiON AUTOMATiQUE /MiN-
UTEE)- Appuyersurcette toucheune
fois pour commanderla d6congelation
de laviande, de lavolaille, du poisson
et du painen fonctiondu poids.
Appuyer sur cette touche une
deuxieme fois pour commander la
d6cong61ationde la plupartdesautres
aliments surgel6s. Pour d'autres
informations,voirpage40.
11.
RAPID DEFROST 1 LB. (D¢CON-
GELATION RAPIDE - 1 LB [0,45
KG]) - Appuyersur cettetouche pour
commander une operation de
d6cong61ationrapide pour une livre
(0,45 kg) d'aliments surgel6s. Pour
d'autres informations, voir pages 40-
41.
12.
EASY COOK (CUiSSON FACILE) -
Appuyer sur cette touche pour com-
mencer la cuisson au niveau de
puissance 100%. Pour d'autres
informafions,voir page35.
13.
PROGRAM (PROGRAMMER) -
Appuyer sur cette touche pour pro-
grammer manuellement la duree de
cuisson et le niveau de puissance.
Pour d'autres informations, voir page
39.
14.
WARM HOLD (MAINTEN DE LA
TEMPC:RATURE)- Appuyersur cette
touche pour maintenir la temperature
d'un mets cuit dans le four, pendant
une periode qui peut atteindre 99
minutes. Pour d'autres informafions,
voirpage36.
15.
POWER LEVEL (NIVEAU DE
PUISSANCE) - Appuyer sur cette
touche pour s61ectionnerle niveau de
puissancede chauffage.Pourd'autres
informations,voir page39-40.
16.
MORE+ (PLUS+) - Appuyersur cette
touche pour ajouter 10 secondes& la
duree de cuisson (pour chaque
pression). Pour d'autres informafions,
voirpage36.
17.
LESS- (MOINS-) - Appuyersur cette
touche pour reduire de 10 secondes
(pour chaque pression) la duree de
cuisson d6j& programmee. Pour
d'autresinformafions,voirpage36.
33
Page 34

Afficheur et Fonctions (suite)
18. CANCEL/STOP(ANNULER/ARR[::T}- 21.
Appuyersurcettetouchepourannulerle
programmede cuisson en cours de
fonctionnement ou pour effacer le
programmede cuisson en cours de
programmation.Pourd'autres informa-
tions,voirpage35.
19.
START/PAUSE(MISE EN MARCHE/
PAUSE)- Appuyersurcettetouchepour
commanderrexecutiond'unefonctionou
pourinterrompremomentanementlefour
pendantlacuissonou la decongelation.
Pourd'autresinformations,voirpage35.
20.
HELP (AIDE) - I'aide affiche des
informationssurlesfonctionsdufouret
des conseils utiles. Pour d'autres
informations,voir page35.
22.
23.
REMINDER (SIGNAL SONORE DE
RAPPEL)- Appuyersur cette touche
pour commanderun signalsonore de
rappel sans interrompre le fonction-
nement du four. Pour d'autres
informations,voirpage36.
RECALL(RAPPEL)- Appuyersurcette
touche pour r@eter le programmede
cuisson precedent. Pour d'autres
d'informations,voirpage35.
CLOCK (HORLOGE)- Appuyer sur
cettetouchepourentrerrheureexacte.
Pourd'autresinformations,voirpage35.
24.
CONTROLSET-UP(PARA[v]_:TRESDE
PROGRAM[v]ATION)- Appuyersurcette
touchepourmodifierles parametresde
programmafionutilisespar le four pour
signaux sonores, horloge, vitesse
d'affichage,unites de poidset langue.
Pourd'autresinformafions,voirpage35.
25.
TIMER ([v]INUTERIE)- Appuyer sur
cettetouchepourlaprogrammationdela
minuterie.Pourd'autresinformafions,voir
page35.
34
Page 35

Horloge (12 heures) et
rninuterie
Lefourestequiped'unehorlogeen format12
heuresetd'uneminuteriequipeut6trereglee
jusqu'&99minuteset 99 secondes.I'horloge
n'affichepas lessymbolesAM etPM.
Pourr_glerrhorloge :
1. Appuyersurla touche
CLOCK.
. ENTERTiMEOF
DAY(Entrerrheure)
defilesurrafficheur,
2. Entrerrheuredesiree
aveclestouches
numeriques.
. TOUCHSTART
(Appuyersur
START)defilesur
rafficheur.
3. Appuyersurla touche
START/PAUSE.
Pourr_glerlaminuterie:
1. Appuyersurla touche
TIMER.
. ENTERTIMEIN
MIN.ANDSEC.
(Entrerladureeen
mnet s.)defilesur
rafficheur.
2. Entrerladureedesiree
aveclestouches
numeriques.
, Ladureemaximum
estde99minuteset
99secondes.
. TOUCHTIMER
(Appuyersur
TIMER)defilesur
rafficheur.
3. Appuyersurla touche
TIMER.
, Pourannuletla
fonctionde minuterie
entouttemps,
appuyersurla
toucheTIMER.
Start/Pause
(Mise en
marchelPause)
Cette touche commanderexecution de la
fonctionchoisie, ou interromptmomentane-
merit le four pendant la cuisson ou la
decongelation.Appuyer L_nouveau sur la
touchepour remettrelefouren marcheapres
uneinterruption.
Cancel/Stop
(AnnuledArr t)
Cette touche annule le
programmede cuissonen coursde fonction-
nementou effaceleprogrammede cuissonen
coursdeprogrammation.
Recall
(Rappel)
Cette touche permet de
r@eter le programmede cuisson precedent
sansdevoirreprogrammerle four.Pourutiliser
cette fonction, appuyer sur la touche
CANCEL/STOPet ensuite appuyer sur la
toucheRECALL.
Child Lock (Ver-
rouillage pour les
enfants)
Cette fonction emp_che la programmation
accidenteiledu four & micro-ondes,par des
enfantsou Iors du nettoyagedu tableaude
commande. Pour verrouiller le tableau de
commande,maintenirla pressionsurla touche
0 jusqu'& ce que le message LOCKED
(verrouille) apparaisse sur rafficheur et
rappareilemettedessignauxsonores.Lorsque
le tableau de commandeest verrouill& le
messageLOCKEDapparaftsi unetoucheest
pressee. Pour deverrouiller le tableau de
commande,maintenirla pressionsurla touche
0 jusqu'& ce que le message LOCKED
disparaissesur rafficheur.Lorsquele tableau
de commandeest deverrouill& rheure est
afficheeet les fonctionsde cuissonsont de
retour&la normale.
Easy Cook
(Cuisson
facile)
Appuyersur la touche EASY COOK pour
chaqueminutede cuissonaux micro-ondes
desiree.,_ la fin du programmede cuisson,
rappareilemettradessignauxsonores.
Pourutiliser lafonction de cuissonfacile :
1. Appuyersur la toucheEASYCOOKpour
chaqueminutedecuissonaux micro-ondes
desiree.
2. ,&,la fin du programmede cuisson,le four
s'arr6teetemetdes signauxsonores.
Help (Aide)
La touche HELP commande
raffichage d'informationssur les diverses
fonctionset de conseilsutiles.Appuyersur la
touche HELP, puis selectionnerla touche
correspondant & la fonction desiree. De
rinformationsur cette fonction defilerasur
rafficheur.Apresraffichagede rinformation,le
fourquittele modeAide.
c Control Set-up
(Parametres de
programmation)
Ce four est con£u pour des preferences
individuellescommelalangueetlevolumedes
signauxsonores.Pourmodifierun parametre:
1. Appuyersur latoucheCONTROLSET-UR
2. Appuyersur latouchecorrespondantau
parametreL_modifier.
3. Lesselectionspourceparametredefilent
surrafficheur.
4. Appuyersur latouchecorrespondant&la
selectiondesiree.
5. Lefoureffectuelechangementetquittele
modeParametresdeprogrammation.
Param_tre
Volumedes
signauxsonores
Horloge
Vitessede
defilement
Unites
Demonstration
Langue
Touche
1
2
3
4
5
6
Selections
Inactif,bas,moyen,
eleve
Actifou Inactif
Lent,normalou
rapide
Ibet°Fou kget °C
Actifou inactif
Anglaisou
espagnol
35
Page 36

Afficheur et Fonctions (suite)
Reminder
(Signal sonore
de rappel)
La fonctionREMINDERpermetau fourd'etre
utilise pour emettre un signal sonore de
rappel. Le four ne se met pas en marche.
I'heuredu rappelpeut6tre regleejusqu'&12
heuresapresrheurecourante.
Pour programmerunsignal sonore:
1. Appuyersurla toucheREMINDER.
. ENTERREMiNDERTiME(Entrer
rheuredu signalsonore)defilesur
rafficheur.
2. Entrer rheure desiree avec les touches
numeriques.
, TOUCHREMINDER(Appuyersur
REMINDER)defilesurrafficheur.
3. Appuyersurla toucheREMINDER.
, REMINDERSET(Signalsonorede
rappelregle)defileunefoissur
rafficheur.
, Pourannulerle reveil,appuyersur la
toucheREMINDERetensuiteappuyer
surlatoucheCANCEL/STOR
4. I'appareilemetun signalsonoreetaffiche
REMINDERau momentdemand&Lefour
quitte ensuite le modeSignalsonorede
rappel.
Warm/Hold
(Maintien de la
temperature)
Utiliser cette fonction pour maintenir la
temperature d'un mets cults dans le four,
pendant une periode pouvant atteindre 99
minutes,en utilisantles micro-ondes.On peut
utiliser la fonction de maintien (touche
WARM/HOLD) independamment, ou
automatiquement apres I'execution d'un
programmede cuisson.
Nepas utiliserplusd'unprogrammecompletde
maintiendelatemperaturesurlesmets.
Pour utiliser la fonetion de maintien de la
temperature:
1. Placerlesmetscultschaudsdanslefouret
fermerlaporte.
• Durantla periodedemaintiendela
temperature,maintenircouvertunmets
qui a etecultcouvert.
• Nepascouvrirunarticlede p&tisserie
(tarte,chausson,etc.)durantla periode
de maintiendelatemperature.
• Unrepascompletqu'onmaintientau
chaudsur uneassiettepeut6trecouvert
durantla periodedemaintiende la
temperature.
2. Appuyersurla toucheWARM/HOLD.
• TOUCHSTART(Appuyersur START)
defilesur I'afficheur.
3. Appuyersurla toucheSTART/PAUSE.
• WARM(Chaud)apparaftsurI'afficheur.
• Pourannuletlafonctionde maintiende la
temperature,ouvrirla portedu fouren
touttempsouappuyersurlatouche
CANCEL/STOR
Pour utiliserla fonction de maintien de la
temperatureaprbs rexecution d'un autre
programmede cuisson:
1. Apres la programmationdes instructionsde
cuisson minutee, appuyer sur la touche
WARM/HOLDavantd'appuyersurla touche
START/PAUSE.
.
ApresI'executiondeladerniereoperationdu
programmede cuisson,I'appareilemetdes
signauxsonoreset afficheWARM(Chaud),
Lefourcontinue&fonctionner,
More and
Less (Plus et
Moins)
Utiliser les fonctions
MORE et LESS pour
ajuster la duree de
cuissondu programmede cuisson.MORE
ajoute10 secondes& la dureede cuisson,
LESSsoustrait10secondes.
• Utiliser MORE ou LESS Iorsque le
decompte de la duree de cuisson est
visiblesur I'afficheur.MOREet LESSne
peuventpas6treutilisesIorsqueSENSING
(Capteur)estaffich&
• MOREetLESSn'ajustentpasladureede
cuissondesprogrammesdedecongelation
etde maintiendelatemperature.
• Appuyersur les touchesMOREet LESS
pasla dureedecuissonduprogrammede
cuissonactif.
• Lors de la cuissonavec convection,les
touchesMOREetLESSsontutiliseespour
reglerlatemperature.
36
Page 37

M thodes de Cuisson
Cuisson au four
micro-ondes
La cuissonau four & micro-ondesutilisedes
ondes& haute frequencepour chaufferles
aliments.Pendantla cuisson,lesmicro-ondes
font bouger rapidementles moleculesdes
aliments.Cemouvementrapidedesmolecules
des alimentscreede la chaleur,qui cuit les
aliments.Lesmicro-ondescuisentlesaliments
humideset les aliments&teneurvariableen
grasplusrapidement.
Micro-ondes Convection Combin_
Sourcede Chaleur Micro-ondes. Airchaudencirculationdans Micro-ondesetair
ConductionThermique Chaleurproduiteparlapenetration ChaleurtransmisedeI'exterieur Lesalimentssontchauffes
desondesdartslesaliments, desalimentsversI'interieur. I'exterieurparconductionetL_
AvantagePrincipal Chauffagerapide,arendementele%. Brunitlesalimentset scelle Dureedecuissonpluscourteavecles
Cuisson avec
convection
LacuissonavecconvectionutiliseL_la foisun
elementde convectionet un ventilateurpour
repartir uniformementFair chaud darts la
cavitedufour.Lacirculationde Fairemp_che
laformationdezoneschaudesoufroides.Ces
temperaturesuniformescuisentles aliments
egalementetreduisentla dureedecuisson.
lacavitedu four. chaudcircule.
lessaveurs, micro-ondes,brunissageetaspect
Cuisson combinee
LacuissoncombineeutiliseL_lafoislarapidite
des micro-ondes et le brunissage de la
cuisson avec convection pour produire
rapidementdesalimentsdehautequalite.
I'interieurparlesmicro-ondes.
croustillantavecla convection.
37
Page 38

Su__u_ estions d'ustensiles
Lamethodedecuissonutiliseedeterminelesustensilesquipeuvent_treutilises.Poursimplifierleschoix,utiliserdesustensilesapprou%spourles
troismethodesdecuisson'aux micro-ondes,avecconvectionetcombinee.
Choisir I_viter
Verrerefractaire Verrenonrefractaire
Ceramiqueouporcelaine Ceramiqueouporcelaineavecgarnituremetallique
Pyrex Platsmetalliques
Ustensilestefloniseresistant&la Ustensilesmetalliques
chaleur,commedes spatules
Ustensilespourmicro-ondes,securitaires Produitsenpapier,paille,osieretbois
jusqu'&2320C(450° F)
Poigneesbienfixees Ustensilesauxpoigneesmalfixeesou brisees
Mise en conserves
La raise en conserves West pas
recommand_e darts les fours _ micro-
ondesoucombings.
LesliquidespeuventsurchaufferIorsqu'ilssont
chauffesdansle four & micro-ondes,surtout
pendantdeIonguesperiodesdetemps.Ceci
peut entra_ner I'ebullition soudaine et la
projectionde liquidestreschaudsIorsquele
liquideestagiteouqu'unbocalestscell&
Lesdommagesencourusen utilisantle four
pour la raise en conserves ne sont pas
couvertsparlagarantie.
Grille de four
Unegrille metalliqueestfournieavecle four
pour utilisation en mode convection ou
combin& Lagrillemetalliquenedoit pas_tre
J
utilisee darts le four en modemicro-ondes
seulement.Le metalentra_nerala production
d'arcelectrique,qui pourraitendommagerle
four.
Conseils pour la cuisson
Recouvrir Uncouvercleemprisonnelachaleuret lavapeur,chauffantlesalimentsplus
rapidement.Toujoursutiliserun couvercleapprouvepour la cuissonaux
micro-ondeset pourla cuissonavecconvection.
Remuer Redistribuela chaleurdansles aliments.Toujoursremuerde I'exterieurdu
metsversson centre.
Perforer Perforerla coquille,peau ou enveloppepelliculairedes alimentsavantla
cuissonpouremp6cherI'eclatement.
Retourner Lesgrosalimentsdoivent6treretournespourassurerunecuissonuniforme
du hautet dubas.
Disposer Nepasempilerlesaliments.Lesdisposeren uneseulecouchesur unplat
pouvant_treutilisedefa(;onsecuritairepourlacuissoncombinee.
Laisser Pourpermettrealacuissondeterminer,lesalimentsontsouventbesoind'une
reposer perioded'attentede2& 15minutesapresleursortiedufour.Dansla plupart
descas,latemperatureinterneaugmentede 2,7° C(5° F)a 5,5° C (10° F)
pendantlaperioded'attente.
Repartir Pouraiderles alimentsindividuels,commelespotatoesdeterre,a chauffer
plusuniformement,les repartirencercleen laissantau moins2,5cm (1 pc)
entrelesaliments.
Mars a eclater
Nefaireeclaterdu marsquedansundispositif
special pour eclatementde rods au four &
micro-ondesou des sachetscommerciaux
prevuspour6treutilisesdartsunfourµ-
ondes. Ne pas utiliser un disposifif pour
eclatement de mals con(;u pour faire
convergerouconcentrerlachaleur.I'operation
d'eclatementdu rods nepeut 6treeffectuee
quesilefourestenmodemicro-ondes.Sila
convectionest utilisee, le rods risque de
brQler,dese ratatineroudes'enflammer.
Dansle casdeI'emploid'undispositifspecial
pour eclatementde rods au four & micro-
ondes,ne pasutiliserla touchePOPCORN.
Respecterles dureesde cuissonindiquees
dansles instructionsdufabricant.
38
Page 39

Cuisson au Four fi Micro-ondes
Niveaux de Puissance du Four a Micro-ondes
Lefourµ-ondescomporte10niveauxdepuissancedechauffage,cequipermetdecuireou
dechaufferunegrandevari6ted'aliments.Letableauci-dessouspresentedessuggestions:
Utilisation des divers niveaux de puissance du four a micro-ondes
Niveaude
puissance
10
(I_LEVI_)
9 , Rechauffagede riz,p&teset 16gumes.
8 * Rechauffagerapided'unmetsprepar6.
7 , Cuissond'unmetsabased'oeufs,laitoufromage.
6 * Cuissond'unmetsdeveau.
5 * Cuissondejambon,volailleenti@eou agneau.
4 , D6cong61ationdeviande,volailleetproduitsdelamer.
3 * Cuissondepiecesdeviandemoinstendres.
2 , Legerrechauffagedesfruits.
1 * Maintiendelatemp@atured'unplatprincipaloumetsensauce.
0 * Perioded'attente.
Utilisation
, Ebullitiond'eau.
, Preparationdebonbons.
, Cuissondemorceauxdevolaille,poissonet16gumes.
, Cuissondepiecesdeviandetendres.
, Volailleenti@e.
, Rechauffagedesandwichs.
, Cuissondepain,g&teaux.
, Fusiondechocolat.
, Cuissond'unpoissonentier.
, Cuissondepoudingsetentremets.
, Cuissond'unr6tidec6tesoudepointedesurbnge.
, Cuissonder6ti,c6telettesde porc.
, Amollissementdebeurre.
• Amollissementdebeurreoufromageencreme.
Programmation
manuelle
Pourprogrammermanuellementla dureede
cuissonetleniveaude puissance.
1.Appuyer sur la touche
PROGRAM.
• ENTERCOOKINGTIME
(Entrerladureedecuisson)
defilesur I'afficheur.
2. Entrer la duree de cuisson
desir6e avec les touches
numeriques.
• TOUCHSTARTOR
POWER(Appuyersur
STARTousurPOWER)
defilesur I'afficheur.
3.Appuyer sur la touche
POWER LEVEL pour
changer le niveau de
puissance,sidesir6.
4.Appuyer sur la touche
START/PAUSE.
5.A la fin du programmede
cuisson, le four emet des
signauxsonoresets'arr6te.
Cuisson en plusieurs
etapes
La cuisson en plusieurs etapes permet
d'executerdes programmesde cuissoncon-
secutifssansinterruption.Deuxprogrammes
decuissondifferentspeuvent6treex6cutes.
39
Pourcommanderunecuissonen plusieurs
1.Appuyer sur la touche
PF
PROGRAM.
ENTERCOOKINGTIME
(Entrerladureede
cuisson)defilesur
I'afficheur.
2.Entrerla duree de cuisson
desir6e avec les touches
numeriques.
• TOUCHSTARTOR
POWER(Appuyersur
STARTou sur POWER)
defilesurI'afficheur.
suite...
Page 40

Cuisson au Four Micro-ondes (suite)
Pf
3.Appuyer sur la touche
POWERLEVEL.
, ENTERPOWERLEVEL
1 - 10 (Entrerle niveau:1
fl 10)defilesurI'afficheur.
4.Appuyer sur les touches
numeriquespour ajuster le
niveau de puissance des
micro-ondes.
Pourunniveaudepuis-
sancemoinsele%,
appuyersurlestouches1
(pour10%)&9(pour90%).
Latouche0arr6tecomple-
tementlesmicro-ondes.
5.Appuyer sur la touche
PROGRAM.
. ENTERCOOKiNGTiME
(Entrerladureedecuisson)
defilesurI'afficheur.
6.Entrer la duree de cuisson
desiree avec les touches
numeriques.
, TOUCHSTARTOR
POWER(Appuyersur
STARTou sur POWER)
defilesurI'afficheur.
7.Appuyer sur la touche
POWERLEVEL.
* ENTERPOWERLEVEL1
- 10(Entrerle niveau:1 fl
10)d6filesurI'afficheur.
8.Appuyer sur les touches
numeriquespour ajuster le
niveau de puissance des
micro-ondespourladeuxieme
etapeduprogramme.
, Pourunniveaudepuis-
sancemoinselev6,ap-
puyersurlestouches1
(pour10%)&9(pour90%).
Latouche0arr6tecomplet-
ementlesmicro-ondes.
9.Appuyer sur la touche
START/PAUSE.
Lefourcommencele
programmedecuisson.
,&,lafinde la premiere
etape,lefouremetun
signalsonorepourindiquer
latransition.
10.,_lafinduprogrammede
cuisson,lefouremetdes
signauxsonoresets'arr6te.
REMARQUE: Lafonctionde decongelation
automatiquenepeut6treutiliseequeIorsdela
premiereetape de la cuissonen plusieurs
etapes.
Decongelation
automatique
Quatre programmes pre-programmes de
decongelationautomatiquesont disponibles,
selonletyped'alimentfl decongeler.Pourplus
decommodit&dessignauxsonoresrappellent
de verifier,retourner,separerou redisposer
les aliments pendant le programme de
decongelation.
1.Appuyersur latouche
DEFROSTAUTO/TIMEune
seulelois.
MEATTOUCH1,
POULTRYTOUCH2, FISH
TOUCH3,BREADTOUCH
4 (Appuyersur1pourla
viande,appuyersur 2 pour
lavolaille,appuyersur3
pourlepoisson,appuyer
sur4 pourle pain)defile
surI'afficheur.
2.Appuyersur latouche
numeriqueappropriee.
• ENTERWEIGHT(Entrer
le poids)defilesur
I'afficheur.
3.Entrerlepoidsavecles
touchesnumeriques.
• Lagammede poidspour
laviande,lavolailleetle
poissons'etendde
45gfl 2,7kg (0,1fl 6,0Ib)
• Lagammede poidspour
le pains'etendde 45fl
450g(0,1fl 1,0Ib)
4.Appuyersur latouche
START/PAUSE.
5.A lafindu programmede
decongelation,I'appareilemet
dessignauxsonoreset
s'arr_te.
Decongelation minutee
Cettefonctioncommandeuneoperationde
decongelationpendantladureedesiree.
1.Appuyersur latouche
DEFROSTAUTO/TIME
deuxfois.
ENTERDEFROSTTIME
(Entrerladureede decon-
gelation)defilesur
I'afficheur.
2.Appuyersur lestouches
numeriquesappropriees.
• TOUCHSTART(Appuyer
surSTART)defilesur
I'afficheur.
3.Appuyersur latouche
START/PAUSE.
4.A lafindu programmedede-
congelation,lefouremetdes
signauxsonoresets'arr6te.
Decongelation rapide
Cettefonctionpre-programmeecommandela
decongelationd'unelivred'alimentssurgeles.
1.Appuyersur latouche
RAPIDDEFROST.
MEATTOUCH1
POULTRYTOUCH2
FISHTOUCH3
(Appuyersur1pourla
viande,appuyersur 2
pourla volaille,appuyer
sur3 pourlepoisson)
defilesurI'afficheur.
2.Appuyersur lestouches
numeriquesappropriees.
• TOUCHSTART
(AppuyersurSTART)
defilesurI'afficheur.
3.Appuyersur latouche
START/PAUSE.
4.A lafindu programmede
decongelation,lefouremet
dessignauxsonoreset
s'arr6te.
40
Page 41

Remarques sur la
d6cong61ation -
= RetJrerlespro@its- poisson, mollusques
etcrustaces,pi@edeviande,volaille- de
leur emballage d'origine (papier ou
plastique).
, Fa£onnerla viande en forme de beignet
avantde lacongeler.
, Pendantle programmede d6cong61ation,
retirerles pi@esdeviandedecongel6eset
ensuitepoursuivrelad6cong61ation.
, Placer les alimentsdarts un r6cipientde
verrepeuprofond.
, Lefouremetunsignalsonoreverslemilieu
du programme de decong61ationpour
rappelerde verifier les aliments.Ouvrirla
porte du four pour interrompre la
d6cong61ation.Lorsquelesalimentsontet6
v6rifiesou re-disposes,fermerla porte et
appuyer la touche START/PAUSEpour
poursuivrelad6cong61ation.
Cuisson commandee
par capteur
La fonction de contr61e de la cuisson
commandee par capteur permet de
commanderla cuissond'un metsfavorisans
devoirs61ectionnerunedureede cuissonet
une puissance de chauffage. I'appareil
affichera le messageSENSING (Capteur)
durantla periodededetectioninitiale.Lefour
µ-ondesdetermineautomatiquementla
duree de cuissonnecessaire pour chaque
metsou aliment.Lorsquele capteurinterne
detecte une certaine quantite d'humidite
emise par I'aliment,il determine la duree
r6siduelledela cuisson;I'afficheurpresentera
alorsletempsdecuissonr6siduel.Observerla
recommandationsuivantepour obtenir les
meilleurs resultats pour une cuisson
commandeeparcapteur:
1. Entreprendrela cuissonsur des aliments
qui se trouvent & une temperaturede
conservationnormale.
2. Veiller&cequeleplateautournantenverre
et la surfaceexterieuredu r6cipientsoient
secs.
.
Recouvrirles alimentsavecun couvercle,
du papier paraffine ou une feuille de
plastique(pourfoura micro-ondes).
.
Nepasouvrirlaportedufourniappuyersur
la toucheCANCEL/STOPdurantlaperiode
de detection. Lorsque la periode de
detectionest ecoul6e,le four emet deux
signauxsonores,et la dureede cuisson
r6siduelleapparaftsur I'afficheur.,_ partir
de ce momenton peut ouvrirla porte du
fourpourremuerouretournerles aliments
oupourmodifierleurrepartition.
Guide de cuisson avec
capteur
Pourobtenirles meilleursresultatsIorsd'une
cuissoncommandeeparcapteur,employerles
r6cipientsappropriesetrecouvrirlesaliments.
1. Toujoursutiliserunrecipientpourfour
micro-ondeset le recouvrir avec un
couvercleou une feuille de plastique
(laisserunevent).
2. Nejamaisplaceruncouvercleou filmde
plastiqueetanchesur un r6cipient;ceci
emp6che1'6vacuationde la vapeur et
peutprovoquerunecuissonexcessive.
3. Adapterlaquantite_.latailledu r6cipient.
Pour obtenir les meilleurs r6sultats,
remplirunr6cipienta50%ouplus.
4. Avantde placerlesalimentsdartslefour,
verifierquelessurfacesinternesdufour
etlessurfacesexternesdurecipientsont
seches.Latransformationenvapeurdes
residus d'eau peut provoquer une
detectionincorrecteparle capteur.
41
Page 42

Cuisson au Four Micro-ondes (suite)
Sensor Popcorn (Ma' 's
eclater - avec capteur)
Un capteur detecte la vapeur emise par
ralimentet ajusteautomatiquementla duree
decuissonpourde meilleursresultats.Utiliser
lesgrainsdemalsdessachetscommerciaux
de3,0et3,5onces(85et 99 g).
1.Placerle malsa edater au
centredu plateautournant.
, NEPASutiliserlagrille
metalliquepourcuisson
avecconvectionpourune
operationd'eclatement
du mals.
2.Appuyer sur la touche
SENSORPOPCORN.
, Lefourferaeclaterle
malsautomatiquement
en utilisantlesystemede
capteur.
3.Leprogrammed'eclatement
du malscommence.
* Pourmettrefinau
programmedecuisson,
ouvrirla porteou
appuyersurla touche
CANCEL/STOR
4.A la fin du programmede
cuisson, le four emet des
signauxsonoresets'arr6te.
I AVERTISSEMENTI
NE PASlaisserle four & micro-ondes
sanssurveillancedurantuneoperation
d'eclatementde mars.
ATTENTION I
Pourevitertoutrisquedeblessureou
de dommage materiel, ne pas
commanderuneoperationd'eclatement
de marsavecla grille metalliquepour
cuissonavecconvection.
Sensor Reheat
(Rechauffage avec
capteur)
Cettefonctionest con£uepourrechaufferles
metspre-cuits,& la temperatureambianteou
refrigeres, facilement et rapidement en
detectantla vapeuremisepar le mets et en
ajustantautomatiquementladureedecuisson
pourde meilleursresultats.
1.Appuyersurlatouche
SENSORREHEAT.
SELECTMENU1- 3
(Selectionnerlemenu'
1 &3) defilesur
rafficheur.
2.Selectionnerlacategorie
desireeaveclestouches
numeriques.
, Utiliserlacategorie1
pouruneassiettede
d_nermoyennecon-
tenantde 237&474mL
(1&2tasses)d'aliments.
, Utiliserlacategorie2
pourrechauffer237&
946mL(1 &4tasses)de
soupeousaucedansun
bolouunecocotte.
, Utiliserlacategorie3
pourrechaufferunepor-
tionde237&946mL(1
&4tasses)d'unplat
mijotedartsunecocotte
ouunpetitbol.
3.Lefourcommencele
programmede rechauffage
parcapteur.
, SENSING(Capteur)
appara_tsur rafficheur.
, Pourmettrefinau
programmedecuisson,
ouvrirlaporteou
appuyersurlatouche
CANCEL/STOR
4.A lafindu programmede
cuisson,lefouremetdes
signauxsonoresets'arr6te.
Sensor Cook (Cuisson
avec capteur)
Uncapteurdetectelavapeuremiseparles
alimentsetajusteautomatiquementla duree
decuissonpourlesmeilleursresultatspourla
plupartdesaliments.
1.Appuyersur latouche
CANCEL/STOR
2.Appuyersur latouche
SENSORCOOK.
SELECTMENUO-9
(Selectionnerunmenu'
0 &9)defilesur
rafficheur.
• Voirletableau&la page
43pourlalistedes
categories.
3.Entrerlacategoriedesiree
aveclestouches
numeriques.
4.Lefourcommencele
programmedecuissonpar
capteur.
• SENSING(Capteur)
apparaftsurI'afficheur.
• Pourmettrefinau
programmedecuisson,
ouvrirlaporteou
appuyersurlatouche
CANCEL/STOR
5.A lafindu programmede
cuisson,lefouremetdes
signauxsonoresets'arr6te.
42
Page 43

Guide de cuisson avec capteur
Aliment Quantit_set recommandations
1 Potatoes Quantiterecommandee: 1L_4 potatoesdeterremoyennes,environ225L_280g (8 L_10onces)chacune.Perforer
(Potatoesdeterre) chaquepommedeterreplusieursfoisavecunefourchette,et lesdisposerautourdu plateau,en laissantau moins
2,5cm (1po)entrechaquepommedeterre.
2
FreshVegetables
(Legumesfrais)
Quantiterecommandee: 250mL&1L (1a 4 tasses).
Placerleslegumeshumidesdansunrecipientpourfouramicro-ondes.
Ajouter30a.60mL(2&4cuillerees&table)d'eau.
Recouvriravecunefeuillee plastiqueetlaisserunevent.
Remuerlaplupartdeslegumeset laisserreposerpendant2 &3 minutesapreslacuisson.
FrozenVegetables
(Legumessurgeles)
FrozenEntree
(Repassurgeles)
Rice
(Riz)
Casserole
(Platmijote)
GroundMeat
(Viandehachee)
Quantiterecommandee: 250mL&1L (1a 4 tasses).
Placerleslegumeshumidesdansunrecipientpourfouramicro-ondes.
Ajouter30a.60mL(2&4cuillerees&table)d'eau.
Recouvriravecunefeuilledeplastiqueet laisserunevent.
Remuerlaplupartdeslegumeset laisserreposerpendant2 &3 minutesapreslacuisson.
Quantiterecommandee:280 &560g(10&20 onces).
Retirerde I'emballageexterne.Detacherle couverclesur troisc6tes.
Si lerepasn'estpasdansun recipientpourfourµ-ondes,le placersuruneassiette,recouvriravecune
feuilledeplastiqueetlaisserun event.
Laisserreposerlaplupartdesrepassurgelespendant2 &3 minutesapreslacuisson.
SuivrelesinstructionssurI'emballagepourlesquantitesdesingredients.
Placerlerizet le liquide(eau,bouillonde pouletou delegumes)dansun recipientpourfourµ-ondes,
recouvriravecuncouvercleou unefeuilledeplastiqueet laisserunevent.
Laisserreposerlaplupartdesrizpendant2 &3 minutesapreslacuisson.
Quantiterecommandee: 250mLa 1 L (1a4 tasses).
Melangerlesingredientsselonlarecettedansunplatacasserolede 1a2 L (1a 2 pintes).
Recouvriravecunefeuilledeplastiqueet laisserunevent.
Laisserreposerpendant3 minutesapreslacuisson.
Quantiterecommandee: 110&900g(4&32onces[_/4&2Ib]).
Emietterlaviandedansunrecipientpourfourµ-ondes.
Assaisonneret recouvriravecunefeuilledeplastique.
Laisseruneventpourdelaviandebiencuite.Recouvrirle recipientpourdela viande&point(parexemplesi la
viandedoit6treincorporeedansd'autresingredientsetcuitedavantage).
Fish,Seafood
(Poisson,produits
delamet)
ScrambledEggs
(Oeufsbrouilles)
FrozenPizza
(Pizzasurgeles)
Quantiterecommandee: 110&900g(4&32onces[Y4to2 Ib]).
Disposerlesalimentsautourdesc6tesd'unrecipientpourfourµ-ondes.Assaisonneretajouter60&
125mL(_/4&1/2tasse)deliquide(vin,eau,salsa,etc.)si desire.
Recouvrird'unefeuilledeplastiqueet laisserun event.
Quantiterecommandee: 2 &5oeufs.Briserlesoeufsdansunetasse&mesurerde 1 L (4tasses)ou dansun
recipient&casserolede 1 L(1pinte).
Ajouter15mL (1cuilleree&table)d'eauoudelaitpourchaqueoeufetfouetter.Recouvriravecunefeuillede
plastiqueet laisserunevent.Lorsquela cuissonestterminee,retirerdufour,remuer,et laisserreposerpendant1
&2minutes.
Quantiterecommandee: 1&2pizzas.
Utiliseruniquementlespizzassurgeleespourfourµ-ondes.
Nepasrecouvrir.SuivrelesinstructionssurI'emballage.
43
Page 44

Cuisson Avec Convection
[
ATTENTION
Pour eviter le risquede brQlures,
manipulerlesustensiles,lesgrilles
et la porte avec soin. Laisser
refroidirlefour,les ustensiles,et les
grillesavantdeles nettoyer.Lefour,
les ustensiles et les grilles
deviennent chauds pendant
I'op&ationdu four.
Poureviterle risquedeblessureou
de dommage mat&M, ne pas
utiliser le four sans le plateau
tournant.
Poureviterle risquedeblessureou
de dommage mat&M, ne pas
recouvrirle plateautournantou la
grilleavecunefeuilled'aluminium.
Poureviterle risquededommage
mat&M, ne pas utiliser de
recipients de plastique leger, de
feuillesde plastiqueou de produits
enpapierpendantunprogrammede
cuissonavecconvection.
Grille pour cuisson avec
convection
Utiliserla grille uniquementpour la cuisson
avecconvectionou combinee.NepasI'utiliser
enmodemicro-ondesseulement.
Lors de I'op&ationdu four pour la cuisson
avec convection seulement, utiliser
uniquementI'entreemanuelledeladuree.Les
instructions suivantes s'appliquent
uniquement_ la cuisson avec convection.
Pour des informations sur la cuisson
combinee,voir page45.
Programmation man-
uelle avec pre-chauffage
1.Appuyersurla toucheCONV
COOKsousConvection.
• 350FTOUCHMOREOR
LESSFORTEMPSET
ORSTARTORENTER
COOKINGTIME(350F
[177°C]Appuyersur
MOREou LESSpour
reglerla temp&atureou
appuyersurSTARTou
entrerladureedecuis-
son)defilesurI'afficheur.
2.Ajusterlereglagede
'_:iii iii_'_
temp&aturesidesireavec
lestouchesMOREou LESS.
• Lagammedetemp&a-
tureestde 177°C&
232°C(225°F&450°F).
3.Appuyersurla touche
START/PAUSE.
• PREHEAT(Prechauffage)
apparaftsurI'afficheur
avecla temp&ature.
• PLACEFOODONRACK
(Placerlesalimentssurla
grille)apparaftsur
I'afficheur&lafinde la
p&iodedepr&chauffage.
4.Ouvrirla porte,placerles
alimentssurlagrille,et
fermerla porte.
• ENTERCOOKINGTIME
(Entrerladureede
cuisson)defilesur
I'afficheur.
5.Entrerladureedecuisson
aveclestouches
num&iques.
• TOUCHSTART(Appuyer
surSTART)defilesur
I'afficheur.
6.Appuyersurlatouche
START/PAUSE.
• ,_lafinduprogramme
de cuisson,I'appareil
emetdessignaux
sonores,END(Fin)
apparaftsurI'afficheur
et lefours'arrtte.
Programmation
manuelle sans pre-
chauffage
Pourprogrammerla temp&atureet laduree
de cuissonpour un programmede cuisson
direct:
1.Appuyersur latouche
CONVCOOKsous
Convection.
350FTOUCHMORE
ORLESSFORTEMP
SETOR STARTOR
ENTERCOOKINGTIME
(350F[177°C]Appuyer
surMOREou LESS
pourreglerlatemp&a-
tureou appuyersur
STARTouentrerla
dureedecuisson)defile
surI'afficheur.
2.Ajusterle reglagede
temp&aturesi desireavec
lestouchesMOREou
LESS.
• Lagammedetemp&a-
tureest de107°C&
232°C(225°F&450°F).
3.Entrerladureedecuisson
aveclestouches
num&iques.
• TOUCHSTART(Appuyer
surSTART)defilesur
I'afficheur.
4.Appuyersur latouche
START/PAUSE.
• ,_la finduprogrammede
cuisson,I'appareilemet
dessignauxsonores,
END(Fin)apparaftsur
I'afficheuretle four
s'arr_te.
44
Page 45

• • t
Culsson Cornbmee (micro-ondes et convection)
Les instructionssuivantes s'appliquent
uniquementb lacuissoncombinee.
Pourdesinformationssur lacuissonavec
convection,voirpage44.
Remarques:
• Ne pasutiliserd'ustensilesmetalliquessur
la grille metalliquependant la cuisson
combinee.Utiliserdes ustensilesde verre
Iorsquec'estpossible.
• Utiliserunmoule&muffinsmetalliqueouun
petit plat metalliquepeuprofondsi aucun
platenverren'estdisponible.
• En cas de formation d'arc electrique,
discontinuerI'utilisationdecetustensile.
[ ,ATTENTION ]
Pour eviter le risquede br_lures,
manipulerlesustensiles,lesgrilles
et la porte avec soin. Laisser
refroidirlefour,les ustensiles,et les
grillesavantdeles nettoyer.Lefour,
les ustensiles et les grilles
deviennent chauds pendant
roperationdu four.
Poureviterle risquedeblessureou
de dommage materiel, ne pas
utiliser le four sans le plateau
tournant.
Poureviterle risquedeblessureou
de dommage materiel, ne pas
recouvrirle plateautournantou la
grilleavecunefeuilled'aluminium.
Poureviterle risquededommage
materiel, ne pas utiliser de
recipients de plastique leger, de
feuillesde plastiqueou de produits
enpapierpendantunprogrammede
cuissonavecconvection.
R6tisserie combinee
Utiliser cette fonction pour programmerla
dureeet la temperaturepour un programme
de cuisson utilisant les micro-ondeset la
convection.
1.Placerlesalimentssur la
grilledu fouret fermerla
portedufour.
2.Appuyersurlatouche
ROAST(ROTISSERIE)
s0us Convection
Combination.
350FTOUCHMORE
ORLESSFORTEMP
SETOR ENTER
COOKINGTIME
(350oF [190°C]Appuyer
surMOREou LESS
pourreglerlatemper-
atureouentrerla
dureede cuisson)defile
surrafficheur.
3.Ajusterlereglagede
temperaturesi desireavec
lestouchesMOREou
LESS.
• Lagammedetempera-
tureestde107°C&
232°C(225°F&450°F).
• Leniveaude puissance
desmicro-ondesest
programme&40%etne
peutpas 6treajust&
• Ladureedecuissondolt
6treentre00:01et99:99.
4.Appuyersurlatouche
START/PAUSE.
• ,&,la finduprogrammede
cuisson,rappareilemet
dessignauxsonores,
END(Fin)apparaftsur
I'afficheuretle four
s'arr_te.
Cuisson combinee
Utiliser cette fonction pour programmerla
dureeet la temperaturepour un programme
de cuisson utilisant les micro-ondeset la
convection.
1.Placerlesalimentssur la
grilledu fouret fermerla
portedufour.
2.Appuyersurlatouche
CANCEL/STOR
3.AppuyersurlatoucheBAKE
(CUlSSON)sous
ConvectionCombination
(Combin#).
• 3750FTOUCHMORE
OR LESSFORTEMP
SETOR ENTER
COOKINGTIME(375oF
[190°C]Appuyersur
MOREou LESSpour
reglerla temperatureou
entrerladureede
cuisson)defilesur
I'afficheur.
4.Ajusterlereglagede
temperaturesi desireavec
lestouchesMOREouLESS.
• Lagammedetempera-
tureestde 107°C&
232°C(225°F &450 °F).
• Leniveaudepuissance
desmicro-ondesest
programme&10%etne
peutpas6treajust&
• Entrerladureede
cuissonenminutes.
5.Appuyersurlatouche
START/PAUSE.
• ,_lafinduprogrammede
cuisson,rappareilemet
dessignauxsonores,
END(Fin)apparaftsur
I'afficheuretle four
s'arr_te.
45
Page 46

Cuisson Combin e (micro-ondes et convection) (suite)
Les instructionssuivantess'appliquent
uniquementb lacuissoncombinee.
Pour des informationssur la cuissonavec
convection,voirpage44.
Remarques:
• Pourcuiredes pizzassurgelees,placerla
pizzadirectementsurlagrilledeconvection.
Ne pas utiliserde plaquea pizzaou de
feuille d'aluminium. Placer la grille de
convection solidement sur le plateau
tournant,loindespatoisdufour.
• Pourtout autre type de cuissonou de
r6tisserie, placer les aliments darts un
ustensileappropri&et placerI'ustensilesur
la grillede convection.
ATTENTION
i
Pour eviter le risque de brQlures,
manipulerles ustensiles,les grilles
et la porte avec soin. Laisser
refroidirlefour,lesustensiles,etles
grillesavantdelesnettoyer.Lefour,
les ustensiles et les grilles
deviennent chauds pendant
I'operationdu four.
Poureviterlerisquede blessureou
de dommage materiel, ne pas
utiliser le four sans le plateau
tournant.
Poureviterlerisquede blessureou
de dommage materM, ne pas
recouvrirle plateautournantou la
grilleavecunefeuilled'aluminium.
Poureviterle risquede dommage
materiel, ne pas utiliser de
recipientsde plastique leger, de
feuillesde plastiqueou de produits
enpapierpendantunprogrammede
cuissonavecconvection.
Auto Bake (Cuisson
automatique)
Utiliser cette fonction pour commander la
cuisson automatique de pizza surgelee,
muffins,,, biscuits,_,etpommesdeterrefrites
surgeleesen utilisanttour & tour les micro-
ondeset laconvection.
1.AppuyersurlatoucheAUTO
BAKEsousConvection
Combination (Convection
combinee).
• FROZENPIZZATOUCH
1MUFFINSTOUCH2
BISCUIT/DINNER
ROLL/& STICKTOUCH
3 FROZENFRENCH
FRIESTOUCH4
(Appuyersur1pourla
pizzasurgelee,appuyer
sur2 pourlesmuffins,
appuyersur3 pourun
biscuit/petitpain/pain
b&ton,appuyersur 4
pourlespommesde
terrefritessurgelees)
defilesur I'afficheur.
2.Appuyersur latouche
numeriqueappropriee.
• Unprogrammedepre-
chauffageest necessaire
pourlesmuffinset les
,,biscuits,_.Placerces
alimentssurla grille
Iorsquelesignalsonore
sefaitentendre.
LapizzasurgeleeDOlT
6treplaceedirectement
surlagrillemetalliquede
convection.NEPAS
utiliserdeplaque& pizza
metalliqueoudefeuille
d'aluminium.
• Utiliserun moule&
muffinmetalliquepour
lesmuffins,,, biscuits_
etpetitspainssi unplat
enverren'estpas
disponible.
• Utiliserun petitplat
metalliquepeuprofond
pourlespainsb&tonet
pommesdeterrefrites
surgeleessi unplaten
verren'estpas
disponible.
3.Appuyersur latouche
START/PAUSE.
• Sid'autresinformations
sontnecessaires,lefour
I'indiquerasurI'afficheur.
4.A lafindu programmede
cuisson,I'appareilemetdes
signauxsonores,END(Fin)
apparaftsurI'afficheuret le
fours'arr6te.
Auto Roast (R6tisserie
automatique)
Utiliser cette fonction pour commanderla
r6tisserieautomatiqueduboeuf,dupoulet,des
poitrines de dinde et du porc en utilisant
I'energiedesmicro-ondeset de la convection
en alternance.
1.Appuyersur latoucheAUTO
ROASTsousConvection
Combination (Convection
combinee).
• BEEFTOUCH1WHOLE
CHICKENTOUCH2
TURKEYBREASTS
TOUCH3 PORKTOUCH
4 (Appuyersur 1pourle
boeuf,appuyersur2 pour
unpouletentier,appuyer
sur3 pourlespoitrines
dedinde,appuyersur4
pourleporc)defilesur
I'afficheur.
2.Appuyersur latouche
numeriqueappropriee.
• ENTERWEIGHT(Entrer
le poids)defilesur
I'afficheur.
3.Entrerlepoidsavecles
touchesnumeriques.
4.Appuyersur latouche
START/PAUSE.
• Sid'autresinformations
sontnecessaires,lefour
I'indiquerasurI'afficheur.
5.A lafindu programmede
cuisson,I'appareilemetdes
signauxsonores,END(Fin)
apparaftsurI'afficheuretle
fours'arr6te.
Poulet 1,1-2,7kg (2,5- 6,0 Ib)
Boeuf 0,9- 1,8kg (2,0- 4,0Ib)
Uinde 1,4- 2,7 kg(3,0- 6,0Ib)
Porc 0,9- 1,8kg(2,0- 4,0Ib)
46
Page 47

Conseils de Cuisson
Informations de base
sur la viande
Pour obtenirdes reponses& des questions
specifiques concernant la pr@aration, la
manipulationou rentreposagede la viande,
veuillezcommuniqueravec rUSDA (United
StatesDepartmentof Agriculture)Meatand
Poultry Hotlineau (800) 535-4555(ligne
directe pour la viande et volaille du
d@artement de ragriculture des Etats-
Unis).
Suggestions de
manipulation
. Lorsdes emplettes,placerlaviandedarts
un sac de plastiques@are pour eviter
qu'elle entreen contactavec les autres
aliments.
. Ne pas faire decongelerla viande a la
temperature de la piece. La faire
decongelerau refrigerateur.
. Garder la viandeau frais et recouverte
jusqu'aumomentdelacuisson.
. Se laver les mains avec de reau tiede
savonneuseavantetapresla manipulation
delaviandeoudesoeufscrus.
* Lavera fondtoute surfaceayantete en
contactavecla viandeoules oeufscrus.
. Ne pas remettrela viandecuite dartsun
platayantcontenulaviandecrue.
Conseils pour la cuisson
* Marinerla viande au refrigerateur.Jeter
tout excedentde marinadeayant ete en
contactavecla viandecrue.
, Utiliser un thermometre a viande qui
resistealachaleur.
. Fairecuirelaviandejusqu'alatemperature
internerecommandeeparrUSDA.
. La temperature interne des aliments
rechauffesdoit atteindreau moins74 °C
(165°F).
. Retournerlesviandesau moinsune fois
pendantlacuisson.
Entreposage s curitaire
* Apresledecoupagedelaviande,refrigerer
touteportioninutiliseeimmediatement.
. Garder chauds les aliments chauds et
garderfroidslesalimentsfroidsen servant
lesrepas.
. Diviser les aliments cuits en petites
portionspourunrefroidissementrapide.
. Ne pas conserverde la viande hachee
cuite ou des aliments contenantde la
viandehacheependant plusde 3 ou 4
joursau refrigerateur.
. Nepaspermettreauxsucsdeviandecuite
ou crue d'entrer en contact avec des
alimentspr6tsa mangercommeles fruits
etleslegumes.
Attendrissage
Lebraisagen'estqu'unedesfa_onsd'attendrir
les coupesde viande moinstendres.II est
aussi possiblede martelerla viande,de la
decouperen cubes,de la faire mariner,et
d'utiliser un attendrisseurcommercial.Une
methodeseche peutalors6tre utiliseepour
cuirelaviande.
Les marinades sont des liquidesacides
comme le vin, le jus de citron, ou le
vinaigre.Les marinadesattendrissentles
fibresde laviandemaisnepenetrentqu'un
quartde pouce(6 mm)dansla viande.Ne
pas faire marinerla viande plus de 24
heures.
. Le mart_lement de la viande avec un
maillet & viande Iourd brise le fissu
conjonctifpourattendrirlaviande.
. Led_coupageencubes briselastructure
delaviandeplusquelemartelement.Cette
operation est effectuee au comptoir &
viandes.
Les attenddsseurs commerciaux sont
principalementdes enzymesqui agissent
surlequartdepouce(6mm)externedela
viande.S'assurerdesuivrelesinstructions
dufabricant.
Utilisation du
thermometre a viande
Lorsderutilisationd'unthermometreAviande,
rinsererlegerementen biaisdartsla pattiela
plus @aissede la piece de viande,loin du
gras et des os. Retirerla viande du four
Iorsquela temperatureinterneest inferieure
de 2,70 C (50 F) a, la temperaturefinale
desiree.Pendantla perioded'attenteavantle
decoupage,la viande continue a cuire
rinterieur,et sa temperatures'eleve d'elle-
m_mejusqu'auniveaudesir&
Thermom_tre_viande
. Elimineraspect conjecturaldu degre de
cuisson.
. Aide a reduire le risque de maladie
d'originealimentaire
Thermom_trer_sistant_ lachaleur
(modeconvectionseulement)
. Cethermometreest inseredanslaviande
avantqu'ellenesoitmiseau fouret reste
en placependantlacuisson.
. La temperatureinterne s'eleve graduel-
lementpendantla cuissondelaviande.
. NEPASutiliserunthermometremetallique
dans le four en mode COMBINE ou
MICRO-ONDES.
Thermom_tre_ lectureinstantan_e
* Ces thermometresne resistentpas a la
chaleur.IIs sont inseresdans la viande
Iorsqu'elleestsortiedufour.
. Unetemperaturepreciseestgeneralement
afficheeen uneou deuxminutes,bienque
cestempspeuventvarier.
. Se rappeler de nettoyer la tige du
thermometrea lectureinstantaneeavecde
reau chaudesavonneuseapres chaque
lecturede latemperature.
47
Page 48

Conseils de Cuisson (suite)
Directives pour la r6tisserie
LesmeilleuresmethodesdecuissonpourlescoupestendrescommelesIongesetlesc6tessont&chaleurseche,commelar6tisserie.
Pourr6tir:
.
Fairechaufferlefour&latemperaturedesiree.
2.
Sortirle r6tidurefrigerateuret le placerimmediatementdansunplatpeuprofondet non-m_tallique,lec6tegrasverslehaut.
3.
Placerle r6tidansle fourcombin&
4.
Retirerle r6tiet verifierlatemperatureinterneavecunthermometre&viande.NEPASplacerler6ti danslefourcombineaveclethermometre.
5.
Ler6tiestpr6tIorsquela temperatureestinferieurede2,70C(50F)&la temperaturefinaledesiree.
6.
Placerle r6tisuruneplanche&decouperet recouvriravecunefeuilled'aluminium,en laissantunevent,pendantenviron15minutes.
Tempsdecuisson
Poids
(kg[Ib])
1,8&2,7kg(4&6Ib)
1,6a1,8kg(3Y2a4Ib)
1,8&2,7kg(4a 6Ib)
0,9a 1,4kg(2a 3Ib)
1,8a2,7kg(4a 6Ib)
1,8a2,7kg(4a 6Ib)
2,7a 3,6kg(6&8Ib)
1,8a2,7kg(4a 6Ib)
1,4&2,3kg(3&5Ib)
0,9&1,8kg(2&4Ib)
0,45&0,9kg(_ &1Ib)
3,2a 3.6kg(7a 8Ib)
1,6a2,7kg(3Y2&6 Ib)
0,68&1,1kg(11/2a 21AIb)
0,9&1,4kg(2&3Ib)
0,57a0,8kg(1_/4a 1_4Ib)
2,3&3,2kg(5&7Ib)
3,2&4,1kg(7&9Ib)
1,8&3,6kg(4&8Ib)
0,9kg(2Ib)
3,6&7,2kg(8&16Ib)
approximatif
(minutes)
25 a 30
30 a 40
20 a 30
35 & 45
45 a 60
26 & 42
23 & 35
18a24
20minutes
parIb(0,45kg)
35 a 40
30 a 35
25 a 30
45 a 55
15a20
20 & 25
20&30mn/Ib(0,45kg)
50a 60mnautotal
18a20mn/Ib(0,45kg)
20&25mn/Ib(0,45kg)
30mn/Ib(0,45kg)
20mnautotal
3_Aa5Y_heures
Coupedeviande
BOEUF
R6tidecrouperoul&sansos
R6tidepointe
R6tidenoixderonde
R6tidefilet
R6tidec6tes
R6tidefaux-filet
PORC
R6tideIonge,avecos
R6tidec6tes,sansos
Filet
Jambonavecos,&cuire
avantconsommation
AGNEAU
Epaule
Carred'agneau
Couronned'agneau
R6tideIonge
Gigota mancheoubasdegigot
VOLAILLE(nonfarcie)
Chapon
PoulettesdeCornouailles,entieres
Canard,entier
Oie,entiere
Faisan,entier
Cailles,entieres
Dinde
Temperatureinterne
reoommandee
Tressaignant 540C (1300F)
Saignant 600C (1400F)
A demi-saignant63oC(145oF)
,&,point 710C (1600F)
Biencuit 770C (170oF)
Tresbiencuit 820C(180oF)
Toujours faire cuire le porc
jusqu'&unetemperatureinterne
minimumde 710 C (160o F)
pour reduire le risque de
trichinose et autres maladies
d'originealimentaire.
demi-saignant660C(1500F)
A point 710C(1600F)
Biencult 770C(1700F)
Pour reduire le risque de
maladiesd'originealimentaire,
toujours faire cuire le poulet
jusqu'& une temperature
interne minimum de 820 C
(1800F).
Temperature
dufour
1630C(3250F)
1630C(3250F)
1630C(3250F)
2180C(4250F)
1630C(3250F)
1770C(3500F)
1770C(3500F)
1770C(3500F)
2320C(4500F)
1630C(3250F)
1630C(3250F)
1910C(3750F)
1910C(3750F)
1630C(3250F)
1630C(3250F)
163-1770C(325-3500F)
163-1770C(325-3500F)
163-1770C(325-3500F)
163-1770C(325-3500F)
163-1770C(325-3500F)
163-1770C(325-3500F)
1630C(3250F)
0,57&0,68kg(lY4&lY_Ib'
Touteslesdureeset lestemperaturesrecommandeessontfourniespar I'USDA,le BeefIndustryCouncil,leNationalPorkProducer'sCouncil,etle
AmericanSheepIndustryCouncil.
48
Page 49

Biscuits
= Utiliserdes plaques& biscuitsplates et
brillantes.Eviterlesplaques&biscuitsavec
de hautesparois;ceci peutentrafnerun
brunissageinegaldudessus.
= Laplaque&biscuitsnedoitpastoucherles
paroisdufour.
Baking Time Guidelines
Typedemoule Dimensions Quantit_de Temp.
gateau du moule p_te du four Minutes
)vale 19,7x14,6cm i595mL(21/2tasses) 1770C (350oF) 25&30
(7_4x 5F,po)
33x 25,8cm 1,9L(8tasses) 1770C (350oF) 25&30
(13x 9_4po)
G teaux
Determinerla taille du mouleselon les
instructions.Utiliser de preference les
moulesbrillants.
Les g&teauxcuits dans un moule trop
grandserontminceset secs.Lesg&teaux
cuitsdansunmouletroppetitserontcuits
inegalementou insuffisammentet la p&te
peutdeborder.
Tartes
Pourun meilleurbrunissage,utiliserune
assiette avec une surface sombre ou
matte.
Fairechaufferlestartessurgeleessur une
plaquea biscuitsenaluminium.
Directives concernant
les ustensiles
Ustensiles
sombresou
mats
Ustensiles
brillants
(sanspatois)
Ustensiles
brillants
(avecdespatois)
Ustensiles
en verre
Absorbentplusdechaleur
pourunbrunissageplus
fonc&Recommandespour
lestartesetlespains.
Recommandespourles
biscuits.
Recommandespourles
g&teaux.
Reduirela temperaturedu
fourrecommandeede
140C(250F)
:ton&5 cm 15,2cm(6po) 475mL(2tasses) 1770C (350oF) 25&30
2 po)de 20,3cm(8po) 710mL(3tasses) 1770C (350oF) 30&35
i_rofondeur 35,6cm(14po) 2,4 L (10tasses) 1770C (350oF) 50&55
:bnd,7,5cm 20,3cm(8 po) 1,2L(5tasses) 163oC (3250F) 60&65
3 po)de 30,5cm(12po) 2,6L (11tasses) 1630C (3250F) 75&80
i_rofondeur
)emi-rond,5cm 45,7cm(18po) 2,1 L(9tasses) 1630C (3250F) 60&65
2 po)de
i_rofondeur
)emi-rond,7,5cm 45,7cm(18po) 2,8L (12tasses) 1630C (3250F) 60&65
3 po)de
i_rofondeur
;arre 15,2cm(6 po) 475mL(2tasses) 1770C (3500F) 25&30
25,4cm(10po) 1,4L(6tasses) 1770C (3500F) 35a40
40,6cm(16po) 3,7 L(151/2tasses) 1770C (3500F) 45a 50
Prechauffage
Dartsla plupartdes cas, il est preferablede prechaufferle four avant la cuisson.Pourdes
p_tisseriesd_licates (commeles feuillet_s ou les souffles) pr_chaufferle four pendant
environ 15-20minutes avant de placerles aliments darts lefour ouattendre 10minutes
apr_sr_mission du signal sonoreavantdeplacerlesalimentsdartslefour.Leprechauffage
additionnelcree unetemperatureplusstable.
49
Page 50

Conseils de Cuisson (suite)
Problbrnes de cuisson courants
IIpeut6tredifficilede s'habituer&unnouveaufour,surtoutIorsdupassage&un four&convection.Encasdeproblemesfrequents,consulterle
tableauci-dessouspourdessolutionspossibles.
Probl_me
G&teauxasymetriques
(cuissonin6gale)
Brunissageexcessifdu
dessousoudu dessousdes
g&teauxetdesbiscuits
Lestartesnebrunissentpas
Lesg&teauxnecuisent
pasaucentre
Lesg&teauxretombent
Contractionexcessive
Centredesg&teauxtrop 61ev6
Cause
Lesmoulessetouchentou touchentles patoisdufour
Lap&ten'estpasrepartieuniformementdansle moule.
Utilisationincorrectede feuillesd'aluminium.
Lefourn'estpasdeniveau.
Lefourn'estpasprechauff6.
Lesmoulessetouchentou touchentles patoisdufour.
Utilisationdemoulesoudeplaquesdeverre,noircis,tordus
oumats.
Utilisationincorrectede feuillesd'aluminium.
Latemperaturedufouresttrop61ev6e.
Utilisationd'assiettesdemetalbrillant.
Latemperatureesttropbasse.
Latemperatureesttrop61ev6e.
Lemouleesttroppetit.
Ladureedecuissonesttropcourte.
Lemoulen'estpasplac6aucentredufour.
Tropdeshorteningou desucre.
Tropoupasassezdeliquide.
Latemperatureesttropbasse.
Bicarbonatedesoudeinsuffisantoutropvieux.
Lemouleesttroppetit.
Ouverturefrequentedelaportedufour.
Dureedecuissoninsuffisante.
Quantit6insuffisanted'agentde levage.
Lap&tea et6m61ang6ependantunep6riodetropIongue
Lemouleesttropgrand.
Latemperaturedufouresttrop61ev6e.
LadureedecuissonesttropIongue.
Latemperatureesttrop61ev6e.
Lap&tea et6tropm61ang6e.
Tropdefarine.
Lesmoulessetouchentou touchentles patoisdufour.
Remarques sur la
cuisson
* Testerlesg&teauxpours'assurerqu'ilssont
biencults.Acausedesvariancesdesfours
individuels,il estpref6rablede testersi les
g&teauxont atteint la bonneconsistance
plut6t que de se baserseulementsur la
dureedecuissonetI'apparencevisuelle.
* Les problemesdes g&teauxpeuvent6tre
causes par le m61ange.Un m61ange
excessifpeutbriserla structuredu g&teau
et causer une contractionexcessive.Un
m61angeinsuffisant peut causer des
g&teaux grumeleuxqui ne cuisent pas
completement.Touslesingredientsdoivent
6tre sortis du refrig6rateurprealablement
afin d'atteindrela temperatureambiante.
S'assurerde suivrelesinstructionsdartsla
recetteconcernantladureedem61ange.
* Laisserrefroidirle g&teausur une grille
pendant10minutesavantde le demouler.
Laisserrefroidirlesplusgrosg&teaux(avec
un diametrede plus de 35 cm [14 po])
pendant15 minutes.Si le g&teaua trop
refroidi,le rechaufferdartslefour&1210C
(250oF)pendantquelquesminutes.
, S'assurerde suivreles instructionsde la
recetteet d'utiliserdu beurre ou de la
margarineIorsquela recettele demande.
I'utilisationd'unsubstitut&faibleteneuren
graspeutcauser1'6checd'unerecette.
50
Page 51

Entretien et Netto a e
Nettoyer le four fr_quemment pour
maximisersadur_ede vie,son rendement
et son efficacit& Un four sale cult de fa_on
inefficacecar I'humidit& les r_sidus de
renversement et la graisse absorbent
r_nergie des micro-ondes et de la
convection.
[ : ,ATTENTION ]
Poureviterles br_lures,manipulerles
ustensiles,lesgrilleset la porteavec
soin. Laisser refroidir le four, les
ustensiles, et les grilles avant le
nettoyage.Lefour,lesustensileset les
grilles deviennent chauds pendant
I'operationdu four.
I L.AVERTISSEMENT I
Pour eviter des chocs electriques
pouvantentrafnerde gravesblessures
oum6mela mort,debrancherlecordon
d'alimentationdu four ou ouvrir le
disjoncteur avant d'entreprendre le
nettoyagedufour.
Plateau tournant
LeplateautournantetI'anneaurotatifpeuvent
_treenleves.Leslaver&la main&I'eautiede
(ne pas utiliser d'eau chaude) avec un
detergentdoux.Assechercompletementavec
unchiffondoux.NEPASutiliserde produitsen
poudre, abrasifs, tampons & recurer
metalliques,ou autrestamponsabrasifs.NE
PASlaveraulave-vaisselle.
Le plateautournant peut 6tre nettoye&
I'evier.Prendresoin de ne pasecaillerou
egratignerle bordcarcecipeutentrafnerla
cassuredu plateautournantpendantson
utilisation.
• I'anneau rotatif doit 6tre nettoye
regulierement.
• Le plateautournantdoit TOUJOURS6tre
enplaceIorsde I'operationdecefour.
Nettoyage de I'exterieur
du four
Nettoyer la porte et les autres surfaces
exterieuresdufouravecunchiffonpropre,une
epongeou un tampona recurerennylonen
utilisant une solution d'eau tiede et de
detergentdoux.Bienessorerle chiffonpour
eliminerI'excedentd'eau avantd'essuyerle
four.
• Nepas utiliserde detergentsagressifsou
abrasifset ne pas utiliserde detergents
contenantdeI'ammoniaque.
Nettoyage de la cavite
du four
EssuyerI'interieurdufouravecunchiffondoux
et une solutionde detergentdoux.Rinceret
essuyerpour secher.Ne jamais utiliser de
produits en poudre, abrasifs ou autres
tamponsabrasifs.
Si les residusde projectionexcessifssur le
hautde lasurfaceinternedu fournesontpas
essuyesimmediatement,ils serontdifficiles&
nettoyer.Essuyerles residusde projection
immediatementavec un papier essuie-tout
humide.
Porter des gants de caoutchouc pour
nettoyerlefour.
Utiliserseulementdes tampons& recurer
en nylon ou un produit equivalentpour
aider & nettoyerles tachesou la salete
accumuleedeI'interieurdu four.
Ne pas utiliserde couteau,d'ustensile
metallique ou de tampon b recurer
metallique pour enlever des saletes
incrustees.Ceciendommagerala surface
teflonis&
Nettoyage de la porte
du four
Pouroptimiserlaperformanceet lasecuritede
I'appareil, veiller & emp_cher toute
accumulationde residusalimentairesou de
graissesurle cadreavantdu fouret lasurface
interne du panneau de porte. Essuyer
frequemmentavecundetergentdouxetrincer.
Essuyerpoursecheravecunchiffondoux.NE
PASutiliserdeproduitsenpoudre,abrasifsou
autrestamponsabrasifs.
Apres le nettoyagedu tableaude contr61e,
appuyersurCANCEL/STOPpoureffacertoute
programmationayant ete faite accident-
ellementpendantlenettoyage.Poureviterce
probleme,utiliserlafonctionVerrouillagepour
lesenfantsavantle nettoyage.
Remarques sur le
nettoyage :
• Nettoyerle fourapreschaqueutilisation.
• Nettoyerlessurfacesinterneset externes,
et le panneau de porte selon les
instructions.
• Nettoyerles residusrenversesimmediate-
ment.
• Enleverles grillesdu four,et les nettoyer
selonlesinstructions.
• Essuyerpoursecherapresle nettoyage.
51
Page 52

Guide de anna e
[ AVERTISSEMENT i
Pourevitertoutchocelectriquequi pourraitentrafnerde gravesblessuresoum6mela mort,nejamais retirerleboftierexterieur,Seul un
r@arateurautorisepeutretirerle boftierexterieur,
Operation
Sujet
Causepossible
Solution
Lefournefonctionnepas
Arcselectriquesouetincelles
Lalampeinterieurene
fonctionne pas
L'horlogeet la minuteriene
fonctionnentpas
Refletlumineuxautour Normal • LalumiereestreflechiedeI'ampoulesitueeentrela cavitedufouret la
du micro-ondes surfaceexternedufour,
Pannedecourant
Ustensiles
Feuillemetallique
Operationdufourvide
Normal
AmpoulebrQlee
Pannedecourant
• VerifiersiI'appareilest branch&
• Verifiersile disjoncteurn'estpasdeclench&
• Remplacerle fusiblemaissanschangerla capacitedufusible.
• Verifiersiles recipientspeuvent6treutilisesaufourµ-ondes.
• Nepasutiliserdefeuilled'aluminiumdanslefour.
• NEPASopererle four&vide.
• Lefourest-ilenmarche?Lefourdoit6treenmarchepourquela lumiere
s'allume.
• I'ampoulepeutavoirbesoind'6treremplacee.
• VerifiersiI'appareilest branch&
• Verifiersile disjoncteurn'estpasdeclench&
• Remplacerle fusiblemaissanschangerla capacitedufusible.
52
Page 53

Remar_
53
Page 54

Garantie
f
Garantie d'une ANNI E ENTIERE
Amana Appliances reparera ou remplacera (ceci incluant les frais de main-d'oeuvre) toute piece defaillante manifestant un vice de
mat@iau ou de fabrication.
Garantielirnit_e
Au-del& d'une annee apres la date de I'acquisition au detail du produit, Amana Appliances fournira gratuitement une piece de
rechange (selon la liste ci-dessous) pour la piece qui aura subi une defaillance imputable & un vice de mat@iau ou de fabrication.
Le proprietaire de I'appareil devra payer tousles autres frais, y compris les frais de transport et eventuellement les frais de
deplacement.
De la seconde a la cinqui_me annee
Amana Appliances remplacera (pieces et main-d'oeuvre) le magnetron, le clavier de commande et le microprocesseur,
manifestant un vice de mat@iau ou de fabrication.
Ne sont pas couverts par ces garanties:
, Le remplacement de fusibles, le reenclenchement de
disjoncteurs ou la correction du reseau de plomberie ou de
I'alimentation electrique.
Le nettoyage et I'entretien normaux du produit, y compris le
remplacement d'ampoules.
Le produits dont les num@os de s@ie d'origine ont et6 enleves,
modifies ou ne sont pas facilement visibles.
• Les produits achetes & des fins commerciales, industrielles ou de
location.
Les produits situes &rext@ieur des t_tats-Unis ou du Canada.
, Les frais de service supplementaires dans le cas o_ un
reparateur doit effecteur des reparations en plus des reparations
normales, en dehors des heures de service normales ou encore
dans une region & rext@ieur de son district habituel.
, Des reglages apres la premier annee.
,, Des reparations resultant de raisons suivantes :
- Installation, systeme d'evacuation ou entretien incorrects.
- Toute modification ou tout reglage non autorises par Amana.
- Tout accident, mauvaise utilisation, usage abusif, incendie,
inondation ou catastrophe naturelle.
- Raccordement incorrect & ralimentation de gaz ou &
I'alimentation electrique, de tension ou intensite incorrecte.
- Utilisation d'ustensiles, contenants ou accessoires incorrects
qui endommagent le produit.
, Deplacement.
Si I'intervention d'un depanneur est
necessaire
| Contacter le detaillant chez qui I'appareil a ete achete, ou
contacter le service & la clientele de Amana Appliances
Consumer Services au 1-800-843-0304 aux t_.-U, et 1-866-587-
2002 au Canada, pour obtenir les coordonnees d'une agence de
service agreee.
| Veiller & conserver la facture d'achat pour justifier de la validite de
la garantie. Pour d'autres informations en ce qui concerne les
responsabilites du proprietaire & regard du service sous garantie,
voir le texte de la GARANTIE.
| Si le detaillant ou I'agence de service apres-vente ne peut
resoudre le probleme, ecrire & Amana Appliances Consumers
Services, 2800-220th Trail, Amana, Iowa, 52204, ou telephoner
au 1-800-843-0304 (t_.-U.) ou 1-866-587-2002 (Canada).
RElVlARQUE : Lors de tout contact concernant un probleme,
fournir rinformation suivante :
a. Nora, adresse et num@o de telephone du client ;
b. Num@o de modele et num@o de s@ie de rappareil ;
c. Nom et adresse du detaJllantou de ragence de service ;
d. Description claire du probleme observe ;
e. Preuve d'achat (facture de vente).
| Les guides d'utilisation, les manuels de service et les
renseignements des pieces sont disponibles aupres de Amana
Appliances Consumers Services.
EN AUCUN CAS MAYTAG NE SERA TENUE RESPONSABLE DE DOMMAGES DIRECTS OU INDIRECTS.
Cettegarantievousconf@edesdroitsjuridiquesspecifiques.Vouspouvezegalementjouird'autresdroits,variablesd'unetat &unautreoud'une
province&uneautre.Parexemple,certainsetatsouprovincesnepermettentpas I'exclusionou la limitationde dommagesdirectsou indirects.Cette
limitationpeutdoncnepass'appliquerdansvotrecas.
54
Page 55

Horno de Microondas
Combinaci6n del Tablero
Guia del Usuario
Instalador: Por favordejeestemanualjunto
conel electrodomestico,
Consumidor: Potfavorlea y conserveeste
manualpara referenciafutura, Conserveel
recibode compray/o el cheque cancelado
comocomprobantedecompra,
Nt_merode Modelo
Nt_merode Serie
A CM1580A
Tabla de Materias
Instrucciones Importantes Sobre Seguridad ....................... 56-58
Instalaci6n .................................................. 59
Pantella Digital y Characteristicas .............................. 60-63
M_thodos de Cocci6n .......................................... 64
Sugerencias para la selecci6n de utensilios ......................... 65
Cocci6n por Microondas ..................................... 66-70
Cocci6n por Convecci6n ........................................ 71
Cocci6n Combinada ......................................... 72-73
Fechade Compra
Si tiene preguntas, por favor escribanos
(incluyael numerodemodeloysu numerode
telefono)oIlamea:
Amana Appliances Consumer
Services
Amana Appliances
2800-220th Trail
Amana, IA 52204
1-800-843-0304 EE.UU.
1-866-587-2002 Canad&
(Lunes a Viernes desde las 8:00 a.m.
hasta las 8:00 p.m. Hora del Este)
Internet: http://www.amana.com
Sugerencias para Cocinar .................................... 74-77
Limpieza .................................................... 78
Localizati6n y Soluci6n de Averias ................................ 79
Garantia .................................................... 80
Horno de Microondas EMctrico
Conserve las instrucciones para referencia futura.
AsegOrese de que este manual permanezca con el homo.
{ 4 4
Page 56

INSTRUCCIONES IMPORTANTES DE SEGURIDAD
Informaci6n Sobre las
Instrucciones de
Seguridad
Lasadvertenciase instruccionesimportantes
sobreseguridadqueaparecenenestemanual
noestAndestinadasacubrirtodaslasposibles
circunstancias y situaciones que puedan
ocurrir. Se debe ejercer sentido comun,
precauci6ny cuidadocuandoinstale,efectue
mantenimientoocuandouseelmicroondas.
Siempre p6ngase en contacto con su
distribuidor,agentedeservicioofabricantesi
surgenproblemaso situacionesqueustedno
comprenda.
_ADVERTENCIA I
Para evitar el riesgo de un choque
electricoo la muerte,estehomodebe
setpuestoa tierrayel enchufenodebe
setmodificado.
Reconozca los Simbolos, Advertencias y Etiquetas de Seguridad
[ ,_PELIGRO i
PELIGRO-- RiesgosinmediatosqueCAUSARANlesi6npersonalgraveomortal.
[ ,_ADVERTENCIA i
ADVERTENClA-- Peligroso 3r_.cticasnosegurasquePODRIANcausarlesi6npersonalgrave
o mortal.
[ a,ATENCIO. i
ATENCION- Peligroso pra.cticas no seguras que PODRJANcausar Jesi6n personaJ menos
grave.
Instrucciones para la
Puesta a Tierra
puesto a tierra. La
El horno DEBE ser __
puestaa tierra reducela
posibilidadde un choque
electricoofreciendoun alambre de escape
paralacorrienteelectricasiesque ocurreun
cortocircuito.Estehomo esta.equipadocon
uncord6nelectricoprovistodeunenchufecon
puesta a tierra. El enchufe debe set
enchufado en un tomacorrienteque este
debidamenteinstaladoy puestoatierra.
Consultea un electricistao tecnicocalificado
si no comprendebien las instruccionesde
puestaa tierrao sitienedudasrespectoa la
puestaa tierradelhomo.
No use un cordon de extension. Si el
cord6nelectricodel aparatoes demasiado
corto,solicitea unelectricistacalificadoque
instaleuntomacorrientedetresalveolos.Este
homo debe set enchufadoen un circuito
separado de 60 Hz y usado con la
alimentaci6nelectricamostradaen latablade
especificaciones.Cuandoel homocomparte
el circuito con otros equipos,pueden ser
necesariostiemposde cocci6nmaslargosy
losfusiblessepuedenfun@.
El homo de microondasfunciona con la
corrienteestandardelhogarde110-120V.
DECLARACION DE INTERFERENCIA DE RADIOFRECUENCIA DE LA
COMISION FEDERAL DE COMUNICACIONES (EE.UU. SOLAMENTE)
Esteequipogeneray usaenergiadefrecuenciaISMy si noesinstaladoy usadoenformadebida,esdecirenestrictocumplimientocon las
instruccionesdelfabricante,puedecausarinterferenciaconlarecepci6nde la radioy de latelevisi6n.Seha comprobadoy confirmadoque
cumpleconloslimitesestipuladosparaequiposISM(Industriales,Cientificos,Medicos)envirtuddelasecci6n18delreglamentosdelaFCC,
que hansidodisefiadosparaproveerprotecci6nrazonablecontratalinterferenciaenunainstalaci6nresidencial.
Sinembargo,no se garantizaqueno ocurrira,interferenciaen algunainstalaci6ndeterminada.Si esteequipocausainterferenciacon la
recepci6nderadioy detelevisi6n,Iocualpuedeserdeterminadoapagandoy encendiendoel equipo,serecomiendaqueel usuariotratede
corregirlainterferenciamedianteunao masdelassiguientesrecomendaciones:
• Cambiededirecci6nlaantenaderecepci6nde la radiootelevisi6n.
• Ubiqueen otrolugarelhomodemicroondasconrespectoal receptor.
• Muevaelhomodemicroondasa unlugaralejadodel receptor.
• Enchufeelmicroondasenuntomacorrientediferentede modoqueelmicroondasyel receptorestenencircuitosdiferentes.
El fabricante noes responsablede ningunainterferenciade radioo televisi6ncausadaper modificaci6n no autorizada a estehomode
microondas.Esresponsabilidaddelusuariocorregirtalinterferencia.
CONSERVE ESTAS INSTRUCCIONES
56
Page 57

Reconozca este simbolo como un mensaje de SEGURIDAD
I ADVERTENCIA
Cuandouseaparatoselectricos,se debenseguirinstruccionesdeseguridadbasicasparareducirel riesgodequemaduras,choqueelectrico,
incendio,lesi6napersonaso exposici6na energiamicroondasexcesiva.
1. LEAtodaslasinstruccionesantesdeusaresteartefacto.
2. LEA Y SIGA las "PRECAUCIONESPARA EVlTARPOSIBLE
EXPOSIClONA ENERGIADEMICROONDASEXCESIVA"enLA
SECCIONINSTRUCCIONESIMPORTANTESDESEGURIDAD.
, EstehomoDEBESERPUESTOATIERRA.Enchufelosolamenteen
un tomacorrientePUESTOA TIERRAen formadebida.Vea las
INSTRUCCIONESDE PUESTAATIERRAen las instruccionesde
instalaci6n.
4. Instaleo ubiqueesteartefactoSOLAMENTEde acuerdocon las
instruccionesdeinstalaci6n.
5. Algunos productos tales como huevos enteros y envases
sellados- porejemplo,fiascosdevidrioscerrados- puedenexplotary
NODEBENsetCALENTADOSenestehomo.
6. Use este artefactoSOLAMENTEparael prop6sitoque ha sido
diseSadocomose describeen este manual. No use productos
quimicoscorrosivoso vaporesenesteartefacto.Estetipodehomoha
sidoespedficamentediseSadoparacalentar,cocinarosecaralimento.
NohasidodiseSadoparausoindustrialodelaboratorio.
7. AI igualque con cualquierelectrodomestico,es necesariauna
SUPERVISIONESTRICTAcuandoesusadopotNINOS.
8. NOhagafuncionaresteartefactosiel cord6nelectricoo elenchufe
esta.ndaSados,si no estafuncionandoen formadebidao si se ha
daSadoodejadocaer.
9. Este homo, incluyendoel cord6n electrico,debe ser reparado
SOLAMENTEpot personalde serviciocalificado. Se requieren
herramientasespecialespararepararestehomo.P6ngaseencontacto
con el centrode servicioautorizadomascercanoparael examen,
reparaci6noajustedelhomo.
10.NOcubranibloqueeelfiltrou otrosorificiosdelhomo.
11.NOcalientemamaderasenelhomo.
12.Losfiascosdealimentosdebebedebensetabiertosparacalentarlosy
elcontenidodeberevolverseosacudirseantesdelconsumo,paraevitar
quemaduras.
13.NOguardeesteartefactoalairelibre.NOuseesteproductocercadel
agua- potejemplo,cercadeunfregadero,enuns6tanohumedo,cerca
deunapiscinao lugaressimilares.
14.NOsumerjaelcord6nelectricoo elenchufeenelagua.
15.Mantengael cord6n electrico ALEJADO de las superficies
CALIENTES.
16.NOdejequeelcord6nelectricocuelguesobreelhordedelamesao de
laencimera.
17.Vealasinstruccionesdelimpiezade lapuertaenlasecci6nCuidadoy
Limpiezadeestemanual.
18.NOinsertealimentosde tamaSodemasiadograndeo utensiliosde
tamaSodemasiadograndeenunhomodemicroondas/convecci6npues
sepuedecrearunincendio,arcoelectricoo riesgodechoqueelectrico.
19.NOlimpieconesponjasderestregarmetalicas.Sepuedenromper
pedazosdelaesponjaytocarpiezaselectricascausandounriesgode
choqueelectrico.
20.NOuseproductosdepapelquenodebensetusadoscuandoelhomo
sehacefuncionarenmododeconvecci6nocombinado.
21.Aexcepci6ndelosmaterialesrecomendadosporelfabricante,NO
guardeningunmaterialenestehomocuandonoesteenuso.
22.NOcubralasparrillasniningunotrapartedelhomoconpapelde
aluminio.Larestricci6ndelacirculaci6ndelairepuedecausar
sobrecalentamientodelhomo.
23.NOrocieel homoconsolucionesdelimpiezaenlasupefficiedela
cavidadinteriortrasera.Estocontaminar&ydaSar&elconjunto
calefactordeconvecci6n.
PRECAUCIONES PARA EVITAR POSIBLE EXPOSICION A ENERGIA
DE iVllCRO-ONDAS EXCESIVA
A. NOintentehacerfuncionarestehomoconlapuertaabiertapuesse puedeproducirexposici6nperjudiciala la energiade microondas.Es
importantenomodificarnialterarlosentrecierresdeseguridad.
B. NOcoloqueningunobjetoentrelapartedelanteradelhomoy lapuertani dejequeseacumulesuciedado residuosde limpiadoresen las
superficiesde sellado.
C. NOhagafuncionareste hornosiestadaSado.Esparticularmenteimportanteque lapuertadelhomocierrebieny quenose hayadaSado:
1.lapuerta(doblada),2.lasbisagrasy pestillos(rotososueltos),3.lasjuntasde lapuertay superficiesde sellado.
D. El homonodebeset ajustadoni reparadopotningunapersonaque noseapersonaldeserviciocalificado.
CONSERVE ESTAS INSTRUCCIONES
57
Page 58

INSTRUCCIONES IMPORTANTES DE SEGURIDAD
I ADVERTENCIA
A findeevitarel peligrodeincendioenlacavidaddelhomo:
a, NO cocinedemasiadoel alimento.Prestecuidadosa
atenci6n al artefactocuandocoloqueen su interior
papel,pl&sticou otros materialescombustiblespara
facilitarlacocci6n.
b,
Retirelasatadurasdealambrede lasbolsasdepapelo
de pl&sticoantesde colocarlabolsaenelhomo.
C,
Si se incendianlos materialesque est&ndentrodel
homo, MANTENGA LA PUERTA DEL HORNO
CERRADA,apagueel homoy desenchufeel cord6n
electricoodesconectela energiaelectricaenel fusible
o en elpaneldeldisyuntor.
d,
NOuselacavidaddelhomoparaalmacenamiento.NO
guarde articulos de papel, utensilios de cocina o
alimentosen la cavidaddel homocuandono esteen
USO,
I ADVERTENCIA
Los liquidos tales como el agua, cafe o te pueden
calentarsem&sall&delpuntodeebullici6nsinqueparezca
que est&n hirviendodebidoa la tensi6n superficialdel
liquido. Nosiemprese ver&nlas burbujaso hervorcuando
el envaseesretiradodelhomo. ESTOPUEDERESULTAR
EN QUE LOS LIQUlDOS MUY CALIENTES SE
DERRAMENREPENTINAMENTECUANDOSE INSERTA
EN EL LIQUlDOUNA CUCHARAU OTROUTENSILIO.
Parareducirelriesgodelesi6na personas:
1. Nosobrecalienteel liquido.
2. Revuelvaelliquidoantesy a lamitaddecalentarse.
3. Nouseenvasesconladosrectosycuellosestrechos.
4. Despuesde calentar,dejeel envaseen el homo de
microondasporuncortotiempoantesderetirarlo.
5. Useextremocuidadocuandoinserteunacucharauotto
utensilioenelcontenedor.
ATENCION
Paraevitarriesgodeunalesi6npersonalo dafiosmateriales
observeIosiguiente:
1. NOfriacongrasaenelhomo. Lagrasapuedesobrecalentarse
yset peligrosademanipular.
2. NOcocinenirecalientehuevosenteroso conunayemanorota
usandoenergiade microondas.Puedehaberacumulaci6nde
presi6ny reventar.Perforelayemaconel tenedoro un cuchillo
antesdecocinar.
3. Perforela c&scaradelaspapas,tomatesy alimentossimilares
antesdecocinarlosconenergiamicroondas.Cuandola
c&scaraes perforada,elvaporescapauniformemente.
4. NOdejeelhomodesatendido.
5. NO useterm6metrosdecocinaregulatesenel homocuando
estecocinandoenmodomicroondaso combinado.Lamayoria
delosterm6metrosde cocinacontienenmercurioy pueden
causarunarcoelectrico,malfuncionamientoodafio al homo.
6. NO useutensiliosdemetalenel homoexceptocuandosea
recomendadopotlos fabricantesde alimentosparamicroondas
o sila recetaexigeutensiliosdemetalenelmodode
convecci6no combinado.Calienteelalimentoen contenedores
devidrioo deIozasies posible.
7. Nuncausepapel,pl&sticouotrosmaterialescombustiblesque
noestendestinadosparacocinarconellos. Sila temperatura
delhomoesalta,el materialpuedeencenderse.
8. Latemperaturadel homoesporIomenosde 100oFen el
modoconvecci6n.Verifiquesiel pl&stico,papelu otros
materialescombustiblessonrecomendadosporel fabricante
parasoportarla temperaturaminimadelhomo.
9. Cuandococineconpapel,pl&sticou otrosmateriales
combustibles,sigalasrecomendacionesdelfabricantesobreel
usodel producto.
10.NOusetoallasdepapelquecontengannil6nuotrafibra
sintetica.Lasfibrassinteticascalentadaspuedenderretirsey
encenderelpapel.
11.NOcalientebolsasdepl&sticonienvasesselladosenelhomo.
El liquidoo el alimentopuedeexpandirser@idamentey causar
la roturadelenvaseodela bolsa. Perforeo abraelcontenedor
o bolsaantesdecalentar.
12.Lasparrillas,utensilios,guiasdelas parrillasy superficiesdel
homopuedenestarcalientesduranteo despuesdel uso. Use
utensilioso ropasprotectorascomotomaollaso guantesde
homosecoscuandoseanecesarioparaevitarquemaduras.
13.NOdesenchufeel homoinmediatamentedespuesdeluso. El
ventiladorinternodebeenfriarel homoparaevitardafiodelos
componenteselectricos.
14.Paraevitarmalfuncionamientode marcapasos,consulteasu
medicoo al fabricantedelmarcapasorespectoa losefectosde
laenergiademicroondasenelmarcapaso.
CONSERVE ESTAS INSTRUCCIONES
58
Page 59

Instalaci6n
Desempaque del Horno
• Inspeccioneel homoparaverificarsitiene
dafiotalescomoabolladurasenlapuertao
dentrodela cavidaddelhomo.
• Reporteinmediatamentecualquierabolla-
durao roturaal lugardecompra.
Nointenteusarel hornosiestadafiado.
• Retiretodoslos materialesdel interiordel
horno.
• Siel hornohaestadoguardadoenunArea
extremadamentefria, espere unas pocas
horasantesdeenchufarlo.
Ubicaci6n del Homo
• Noinstaleel homo cercao arribade una
fuentedecalor,talcomounhomodepizza
o una freidora. Estopuedecausarque el
homo de microondasfuncioneinaprop-
iadamentey se reduzcala vidautil de las
piezasel6ctricas.
• Dejesuficienteespacioparacirculaci6ndel
airealrededordelhomo.
• Jnstaleel homo sobre una superficie
nivelada.
• El tomacorrientedebe estar colocadode
modoqueel enchufeIleguehasta61cuando
el homoesteensulugar.
Posibilidad de ser
Integrable
Referirselasinstruccionesdeinstalaci6n.
Parainformaci6nIlameal:
1-800-843-0304EE.UU.
1-866-587-2002Canada
\
Espacios
Libres del
Horno
A- Deje per Io menos 4" de espacio
alrededorde la parte superiory de los
ladosdel homo. Lacirculaci6ndel aire
apropiadaalrededordel homoenfrialos
componenteselectricos.Si lacirculaci6n
es restringida, el homo no puede
funcionarenformadebiday sereducela
vidat_tildelas piezaselectricas.
B_
Instaleelhomocombinadodemodoque
la parteinferior este per Io menosa 3
pies(36pulgadas)sobreel suelo.
5g
Page 60

ital y Character{sticas
Juntade la
Puerta
\
de la Puerta
Rejilla le la
Ventana
de la Puerta
.=Seguridad
NOTA:Cuandose oprime
una tecla del panel de
control se escucha una
serialsonoraparaindicar
que el ajuste ha sido
programado.
Placa Delantera del
Homo
S
Botbn para Abrir
la Puerta
Bandeja Giratoria
Anillo Giratorio
Convectian / Canvecti#n Cambinatian
PantaUa
Digital
Panel de
Control
Especificaciones
Del Homo
Alimentaci6nElectrica 120VAC,60Hz
PotenciadeEntrada 1.500W
PotenciadeCocci6n 1.000W(Norrna
60705IEC)
Frecuencia 2.450MHz
PotenciaNominal 13A
DimensionesExteriores 57,5cm(225_'')x
(Anchox Altox 37,8crn(147_'')x
Profundidad) 50,8crn(20")
CapacidadInterior 0,042rn3 (1,5
PiesC0bicos)
PesoNeto 23,6kg(52libras)
Su homo ser_.enviadocon los siguientes
articulos:
BandejaGiratoria ................... 1
Manualdel Usuarioy GuiadeCocci6n.... 1
AnilloGiratorio...................... 1
Este hornodemicroondasha sidodisefiado
para uso dom4stico solamente. No se
recomiendapara prop6sitoscomercialesy
estoanularialagarantia.
Microwave
: AUTO/TIME DEFROST COOK
'% _ _ii;_
REMINDER _ RECALL HELP
' CLOCK !: CONTROL TIMER
FOR RECIPES REQUIRIN,._ STIRRING OR TO
CI4ECK FOOD WITHOUT C_mCELI_G COOKING
SET-UP
PROCP_ PRESS ST_aT/pAUSE
60
Page 61

'DISPLAY' (Pantalla)- La pantalla
incluye un reloj e indicadoresque
muestranla horadel dia, los ajustesde
tiempo de cocciSny las funcionesde
cocci6nseleccionadas.
2. 'CONV. COOK' (Cocci6n por
Convecci6n) - Optima esta tecla para
que el homo funcione como homo de
convecci6nsolamente.Verp_.gina71.
3. 'AUTO BAKE' (Hornear Autom_tica-
mente) - Oprima esta tecla para
hornear autom&ticamente pizza,
panquecitos,bizcochosy papas fritas
congeladas usando energia de
microondasy energia de convecci6n
alternativamente.Vetp_.gina73.
4. 'AUTO ROAST' (Asar Autom_tica-
mente) - Oprima esta teclapara asar
autom_.ficamentecame de vacuno,
polio,pechugasdepavoy cerdousando
alternativamenteenergiade microondas
y de convecci6n.Verp_.gina73.
5. 'BAKE' (Hornear) - Oprima esta tecla
paraprogramarel tiempodehorneadoy
la temperaturaparaun ciclo de cocci6n
usandoambas,energiade microondasy
energiade convecci6n.Verp_.gina72.
6. 'ROAST' (Asar) - Oprima esta tecla
para programarel fiempode asadoy la
temperaturapara un ciclo de cocci6n
usando energia de microondas y de
convecci6n.Verp_.gina72.
7. 'SENSOR COOK' (Cocci6n pot
Sensor) - Oprima esta tecla para
cocinar10tiposde alimentos.El sensor
del homocalculate,el tiempode cocci6n
dependiendodelacantidaddehumedad
quedespidael alimento.Vetp_.gina69.
8. 'SENSOR POPCORN'(Palomitas de
[v]aizpot Sensor) - Oprimaestatecla
cuando prepare en su homo de
microondas palomitas de maiz
envasadascomercialmente. El sensor
del homo indicar_,al homo cuanto
tiempose debecocinardependiendode
la cantidadde humedadquedetecteen
el maiz. Vet p_.gina69.
9. 'SENSORREHEAT'(Recalentamiento
pot Sensor) - Optima esta tecla para
recalentaralimentosprecocinados,que
estan a temperatura ambiente o
refrigerados. El sensor del homo
indicate,al homocuantotiempose debe
cocinardependiendode la cantidadde
humedadque de@idael alimento. Vet
p_.gina69.
10. 'DEFROSTAUTO/TIME'(Descongelar
Autom_ticamente/Tiempo) - Oprima
esta tecla una vez para descongelar
autom_.ticamentecame, polio, pescado
o pansegunel peso.
Optima esta tecla dos veces para
descongelar la mayoria de los otros
alimentoscongeladossegun el tiempo.
Vetp_.gina67.
11. 'RAPID DEFROST1 lb.' (Descongelar
R_pidamente 0,45 kg) - Oprimaesta
teclaparadescongelarr@idamenteuna
libra de alimentos congelados. Ver
p_.gina67 y 68.
12. 'EASY COOK' (Coccibn Facil) -
Oprima esta tecla para programar y
comenzarlacocci6nusando100%de la
potencia.Verp_.gina62.
13. 'PROGRAM'(Programacion)- Oprima
estateclaparaprogramarmanualmente
el tiempo de cocci6n y el nivel de
potencia.Verp_.gina66.
14. 'WARM HOLD' ([v]antieneCaliente) -
Oprima esta tecla para mantener
calientes alimentos cocinados en su
homo hasta durante 99 minutos. Ver
p_.gina63.
15. 'POWER LEVEL' (Potencia de
Cocci6n) - Optima esta tecla para
seleccionar un nivel de potencia de
cocci6n.Vetp_.gina66.
16. 'MORE' + ([vlas)- Oprima esta tecla
paraagregar10segundosal tiempode
cocci6ncadavez queusted la oprime.
Vetp_.gina63.
17. 'LESS'- ([vlenos) - Optimaesta tecla
para quitar 10 segundos al tiempo de
cocci6ncadavez queusted la oprime.
Vetp_.gina63.
18. 'CANCEL/STOP' (Cancelar/Borrar) -
Oprima esta tecla para cancelar un
programa que este funcionando
actualmenteoborrarunciclode cocci6n
quehasidoprogramado.Vet p_.gina62.
19. 'START/PAUSE'(Comenzar/Detener)-
Optima esta tecla para comenzar un
programa o para detener el homo
durante la cocci6n o descongelaci6n.
Vetp_.gina62.
20. 'HELP' (Ayuda) - Esta tecla despliega
informaci6nsobre las caracteristicasy
sugerenciasutiles. Vetp_.gina62.
21. 'REMINDER' (Avisador) - Use esta
tecla como un reloj despertador sin
detenerel horno. Verp_.gina63.
22. 'RECALL'(Repita)- Oprimaestatecla
para repetirel ciclode cocci6nanterior.
Verp_.gina62.
23. 'CLOCK' (Reloj) - Oprima esta tecla
paracolocarlahoradel dia. Verp_.gina
62.
24. 'CONTROLSETUP(Programacion de
los Controles) - Oprimaestateclapara
cambiarlosajustesimplicitosdel homo,
tal como volumen, reloj, velocidadde
despliegue,unidadesde peso e idioma.
Vetp_.gina62.
25. 'TIMER'(Tempodzador)- Oprimaesta
tecla paraajustarel temporizadorde la
cocina.Vetp_.gina62.
61
Page 62

ital y Charactedsticas (cont.)
Reloj de 12 Horas y
Temporizador
El homo est,. equipadocon un reloj de 12
horas y un temporizadorque puede ser
programadohasta99 minutosy 99segundos.
El relojnomuestraAMo PM.
Paraprogramarel reloj:
1. Optimalatecla
'CLOCK'.
, Lapantallamuestra
'ENTERTIMEOF
DAY'(Programarla
horadeldia).
2. Coloquelahora
deseadausandolas
teclasnum&icas.
, Lapantallamuestra
'TOUCHSTART'
(OprimaStart).
3. Oprima
'START/PAUSE'
Paraprogramarel
TIMER
temporizador:
1. Optimalatecla
'TIMER'.
, Lapantallamuestra
'ENTERTiMEiN
MIN.ANDSEC.'
(Programela hora
enminutosy
segundos).
2. Programetiempo
deseadousandolas
teclasnum&icas.
, Lacantidadm_.xima
detiempoes99
minutosy 99
segundos.
, Lapantallamuestra
'TOUCHTIMER'
(Oprimael
temporizador).
3. Optima'TIMER'
, Paracancelarel
temporizadoren
cualquiermomento,
oprimalatecla
'TIMER'.
'Start/Pause'
(Comenzad
Detener)
Estateclapondr_,en marchala funci6nque
usted program6 o detendr_, el homo
temporalmente durante la cocci6n o
descongelaci6n. Oprima nuevamentepara
reanudar el funcionamiento del homo
despuesdeunapausa.
'Cancel/Stop'
(Cancelad
Borrar)
Esta tecla cancela un programaque est,.
funcionandoactualmentey borrael ciclo de
cocci6nqueest,.siendoprogramado.
'Recall'
(Repita)
Estacaracteristicapermitequeustedrepitael
ciclo de cocci6n previo sin tenet que
reprogramarel homo.Parausarsimplemente
optima 'CANCEL/ STOP'y luego optima
'RECALl'.
'Child Lock'
(Bloqueo para las
Nihos)
'ChildLock'evitala programaci6naccidental
por nifios o cuandose limpiael controldel
homo. Paraactivarel bloqueocontranifios,
optimay mantengaoprimidala tecla0hasta
queen la pantallaaparezca'LOCKED'y se
escuchensonidos. Durante el modo de
bloqueo contra nifios, cuando se oprime
cualquiertedala pantallamuestra'LOCKED'
(Bloqueado).Paracancelarel bloqueocontra
nifios,oprimay mantengaoprimidalatecla0
hastaquelapalabra'LOCKED'desaparezca
de la pantalla. Despuesde desactivarel
bloqueocontranifios,lahoradeldiaaparece
y las funciones de cocci6n vuelven a la
normalidad.
62
'Easy Cook'
(Coccion Facil)
Oprima la tecla 'EASY
COOK'paracadaminutode tiempode cocci6n
enmicroondasquedesee.AIfindeltiempode
cocci6n,seoir_.nsonidos.
Parausar'Easy Cook':
1. Oprimala tecla 'EASY COOK'paracada
minutode tiempodemicroondasdeseado.
2. AI final del ciclo de cocci6n,el homo se
defieney seoyensonidos.
'Help' (Ayuda)
'HELP' (Ayuda) despliega
informaci6nsobrecaracteristicasy sugerencias
utiles. Para usar la caracteristica'HELP',
simplementeoptimala tecla'HELP'y luegola
tecla de la caracteristicarespectoa la cual
usteddeseainformaci6n.Lapantallamostrar_.
informaci6n descriptiva a cerca de esa
caracteristica. Despues de mostrar la
informaci6nsobreayuda,el homodesactivael
modo'help'.
'Control Set-up'
(Programacion
de los Controles)
Este homo ha sido disefiado
para satisfacerpreferenciasindividualestales
como idioma y control del volumen. Para
cambiarunaopci6n:
1. Optima la tecla 'CONTROL SET UP'
(PROGRAMACIONDELOSCONTROLES).
2. Oprimala teclapara la opci6nqueusted
deseacambiar.
3. El homo muestra seleccionespara esa
opci6n.
4. Optimala tecla para la selecci6ndeseada
paraesaopci6n.
5. Elhomohaceelcambioydesactivaelmodo
opci6n.
Funcion
Volumen
fuerte
Reloj
Velocidadde
Despliegue
Unidades
Demo
Idioma
Tecla
Opcion
1
Mudo,bajo,mediano,
2
Activadoo Desactivado
3
Lenta,normalo
rapida
4
Librasy° Fo K9,°C
5
Activadoo Desactivado
6
Ingleso Espafiol
Page 63

'Reminder'
(Avisador)
La caractefistica'reminder'(avisador)puede
ser usada como un reloj despertador. El
homo no funciona. El tiempo del avisador
puede set programadopara que se active
hasta12horasdespuesde lahoraactualdel
dia.
Paraprogramarunavisador:
1, Optimalateda 'REMINDER',
. Lapantallamuestra'ENTERREMIND
TIME'(Programeel tiempodel
avisador),
2, Programe la hora deseada usando las
tedasnumericas.
. Lapantallamuestra'TOUCH
REMINDER'(Optimala teda
'Reminder').
3. Optimalatecla'REMINDER'.
. Lapantallamuestra'REMINDERSET'
(AvisadorProgramado).
. Paracancelarel programadelavisador
oprima'REMINDER'seguidode lateda
'CANCEL/STOP'.
5. El avisador suena y se despliega
'REMINDER'en la horaseleccionada.El
homo despues desacfiva el modo
'reminder'.
'Warm/Hold'
(Mantener
Caliente)
Esta caracteristica mantiene caliente, de
manerasegura,losalimentoscocinadosensu
homo hasta durante 99 minutos usando
energiade microondas, Ustedpuedeusar
'WARM/HOLD'porsi soloo automAticamente
a continuaci6n de un ciclo de cocci6n
programadoporreloj,
No use mAs de un ciclo 'WARM/HOLD'
completoenel alimento.
Parausar'WARM/HOLD':
,
Coloqueel alimentococinadocalienteen
el homoy cierrelapuerta,
• Elalimentoqueestuvocubiertodurante
la cocci6ndebemantenersecubierto
duranteelciclode'WARM/HOLD',
Losarticulosde pasteleria(pays,
empanadas,etc.)debenestar
descubiertosduranteelciclo
'WARM/HOLD'.
Lascomidascompletasquese
mantienencalientesenun platode
servirdebencubrirseduranteelciclo
'WARM/HOLD'.
2. Optimalatecla'WARM/HOLD'.
• Lapantallamuestra'TOUCHSTART'
(Oprima'Start').
3. Oprimalatecla'START/PAUSE'.
• Lapantallamuestra'WARM'(Caliente).
• Paracancelar'WARM/HOLD'abrala
puertadelhomoencualquiermomento
u oprimalatecla'CANCEL/STOP'.
Para usar 'WARM/HOLD'despues de otro
ciclo de coceion.
,
Despuesde programarla instrucci6ndel
ciclo de cocci6n pot reloj, optima
'WARM/HOLD'antes de oprimir la tecla
'START/PAUSE',
, Cuando el t_ltimociclo de cocci6n ha
terminado, se escuchan sonidos y la
pantalla muestra 'WARM', El horno
continuarafuncionando,
'More' y 'Less'
(Mas y
Menos)
Las funciones'MORE' y
'LESS'(Mas) (Menos)de
este homo ajustan el
tiempodecocci6ndelciclo.'MORE'agrega10
segundosaltiempodecocci6n.'LESS'reduce
10segundoseltiempodecocci6n.
• Use 'MORE'y 'LESS' cuandola pantalla
muestrala cuentadescendientedeltiempo
decocci6n.'MORE'y 'LESS'nopuedeser
programadocuandola pantallamuestrala
palabra'SENSING'(Detectando).
• 'MORE'y 'LESS' no ajusta el tiempode
cocci6n para los ciclos 'DEFROST'
(Descongelaci6n y 'WARM/HOLD'
(Mantenercaliente).
• Oprimalasteclas'MORE'o'LESS'durante
elcicloactivodecocci6n.
• Para cocci6n pot convecci6n,'MORE' o
'LESS'se usancomoteclasdeselecci6nde
temperatura.
63
Page 64

M thodos de Cocci6n
Cocci6n pot
Microondas
La cocci6n por microondasusa ondas de
energfade alta frecuenciapara calentarel
alimento. Cuando cocina, la energfa de
microondascausa que las moleculasdel
alimento se muevan rapidamente. Este
movimientor_.pidoentre las moleculasdel
alimentocreacalor,Iocuala suvezcocinael
alimento. Los microondas cocinan mas
rapidamentelos alimentos humedosy los
alimentoscon diversoscontenidosdegrasa.
Microondas Convecci6n Combinado
Fuentede Calor Energfade microondas. Airecaliente,circuladoenla Energfade microondasy aire
Conducci6ndel Calor Calorproducidodentrodelalimento Calorconducidodesdeelexterior Elalimentosecalientamediantela
potpenetraci6ndeenergfa, al interiordelalimento, conducci6ndecalordesdeel exterior
Beneficio Primordial Calentamientorapidomuyeficaz. Doralosalimentosy retiene
Cocci6n pot
Convecci6n
La cocci6npot convecci6nutiNzaambos,un
elementode convecci6ny un ventiladorpara
distribuir uniformementeel aire calientea
tra%sde la cavidaddel homo. AI circularel
aire,no se producenpuntoscalientesofrfos,
creandounatemperaturauniformealrededor
del alimento. Estastemperaturasuniformes
cocinanelalimentoen formaparejay reducen
eltiempodecocci6n.
cavidaddel homo. calientecirculado.
lossabores.
Cocci6n Combinada
El modocombinadousa la velocidadde la
energfade microondas y el doradode la
cocci6n por convecci6n para producir en
formarapidaalimentosdealtacalidad.
yde la energfadesdeel interior.
Tiempodecalentamientomascorto
graciasa laenergfademicroondas,
doradoyalimentosm&scrujientes
graciasa laconvecci6n.
64
Page 65

Su erencias ara la selecci6n de utensilios
Elmetododecocci6ndeterminalosutensiliosquepuedensetusados.Parasimplificarlasposibilidades,useutensiliosqueseanaprobadosparalos
tresmetodosdecocci6n:microondas,convecci6ny combinado.
Use Eviteusar
Vidrioresistentealcalor Vidrioquenosearesistenteal calor
Ceramicao Ioza CeramicaoIozacon adornosde metal
Pyrex Utensiliosdemetal
Utensiliosnopegajosoresistentesal calor, Utensiliosdecocinademetal
talescomoespatulas
Utensiliosparamicroondasquepuedenser Productosde papel,paja,mimbrey madera
usadosa 2320C(450oF)
Uanijasqueseanseguras Utensiliosconmanijassueltasorotas
Nouseenel hornoutensiliosniollasdemetal.
Corlservss
No se recomiendaprepararconservasen
los homos de microondas o combinados.
Cuandose calientanliquidosenel homo de
microondas,especialmentepor periodosde
fiempo prolongados, se puede producir
sobrecalentamiento.Estopuederesultaren
derramesoposibleerupci6ncuandoelliquido
esperturbadoocuandosesellaunfrasco.
La garanfia no cubre el dafio que ocurra
cuando el homo se use para preparar
conservas o cuando se intente preparar
conservas.
Parrilla del Homo
Conel homose incluyeunaparrillade metal
parausaren elmodode convecci6ny en el
modo combinado. La parrillade metalno
debeser usadaenel homoduranteel modo
microondas solamente. El metal puede
causararcoelectricoIocualpuederesultaren
dafioal homo.
Sugerencias para cocinar
Cubrir
Revolver Se redistribuyeel caloren losalimentos. Siemprerevuelvadesdeel exterior
Perforer Perforela cascara,pielomembranade losalimentosantesdecalentarlospara
Darvuelta Los alimentosgrandesdebendarsevueltade modoque la partesuperiore
Acomodar Noapilelosalimentosunosobreotto.Acom6delosen unasolacapaen unplato
Tiempode Los alimentosa menudonecesitanreposarde 2 a 15 minutosdespuesde set
Reposo retiradosdel homo. Estocompletalacocci6n. Normalmenteunatemperatura
Separaci6n Acomodelos alimentosindividualestalescomo papas,en uncirculoy pot Io
UnatapaatraparaelcaloryelvaporpotIocuallosalimentosse calentaranmas
rapidamente. Siempreuse una tapa que sea aprobadapara cocci6n pot
convecci6nypot microondas.
haciaelcentrodela fuente.
evitarexplosi6n.
inferiorsecalienteuniformemente.
quesearesistenteal mododecocci6ncombinado.
internacontinuaelevandoseaproximadamentede 2,70C(5oF)a 5,5oC(10oF)
duranteel tiempodereposo.
menosconunaseparaci6nde2,5cm(1pulgada).Estoayudaaqueel alimento
secalientemasuniformemente.
Palomitas de Maiz
Para prepararpalomitasde maiz,utiliceun
utensilio especialmentedisefiado para ese
prop6sitoo bolsasresistentesal microondas
comercialmentepreparadas. No use un
utensiliodisefiadoparaconcentrarla energia
o el calor. Las palomitasdeben ser pre-
paradassolamentecuandoel homoest,.enel
modo de microondas. Si hay calor por
convecci6npresente,laspalomitassepueden
chamuscar,quemaroincendiar.
Si usa un utensilioresistenteal microondas
paraprepararpalomitasde maizen el homo
demicroondas,nouselatecla'popcorn'.Siga
las instrucciones del fabricante para
programarel tiemponecesario.
65
Page 66

C o p "&,'it"* |
0(;(;1011 OF WIICFOOIIdaS
Niveles de Potncia de Microondas
Sumicroondascuentacon10nivelesde potenciaquele permitencocinaro calentarunaamplia
variedaddealimentos.Consultelatablasiguienteparaalgunassugerencias:
TabladeNivelesde PotenciadeMicroondas
Nivelde
Potencia
10
(HIGH)
[ALTO]
9
8
7
6
5
4
3
2
1
0
, Herviragua.
,Hacer dulces.
, Cocinarpresasdepolio,pescadoy verduras.
, Cocinarcortesdecameblandos.
, Cocerunpolioentero.
, Recalentararroz,fideosy verduras.
, Recalentarr_.pidamentealimentospreparados.
, Recalentaremparedados.
, Cocinarhuevos,lechey platillosconqueso.
, Cocinarpasteles,panes.
, Derretirchocolate.
, Cocinarternera.
, Cocinarunpescadoentero.
, Cocinarbudinesyflanes.
, Cocinarjam6n,polioenteroy cordero.
, Cocinarasadodecostilla,Iomo.
, Descongelarcamedevacuno,deavey mariscos.
, Cocinarcortesdecamemenusblandos.
, Cocinarchuletasdecerdo,asar.
, Entibiarfrutas.
, Ablandarmantequilla.
, Mantenerlas cacerolasy losplatillosprincipalescalientes.
, Ablandarmantequillay quesodecrema.
, Tiempode reposo.
O$o
Programaci6n Manual
Para programarmanualmenteel tiempode
cocci6ny el niveldepotencia.
1. Oprima'PROGRAM'.
• Lapantallarnuestra
'ENTERCOOKING
TIME'(Programeel
tiempodecocci6n).
2. Prograrneel tiernpode
cocci6ndeseadousando
lasteclasnurnericas.
• Lapantallamuestra
'TOUCHSTARTOR
POWER'(Oprima'Start'
o 'Power').
,
Oprimalatecla'POWER
LEVEE(Niveldepotencia)
sideseacambiarel nivel
depotencia.
,
Oprimalatecla
'START/PAUSE'.
5. AIfinaldel ciclodecocci6n
seoira.unaalarmasonora
yel homoseapagar&
Coccion por Etapas
La cocci6n por etapas ('Stage Cooking')
permite ciclosde cocci6n consecutivossin
interrupci6n.Se puedenusar dos ciclos de
cocci6ndiferentes.
Parausarel mododecocci6nporetapas:
1. Oprima'PROGRAM'.
• Lapantallarnuestra
'ENTERCOOKING
TIME'(Programeel
tiempodecocci6n).
2. Prograrne el tiernpo de
cocci6n deseado usando
lasteclasnurnericas.
66
• Lapantallamuestra
'TOUCHSTARTOR
POWER'(Oprima'Start'o
'Power').
,
Oprima 'POWER LEVEE
(Nivelde potencia).
• Lapantallamuestra
'ENTERPOWERLEVEL
1- 10'(Programeel nivel
de potenciaentre1y 10).
Page 67

4, Oprima la tecla numerica
paraajustarlaenergiade
microondas.
Paraunapotenciamicro-
ondasm_.sbaja,oprima
la tecla1(para10%)
hastael 9 (para90%).0
apagalapotenciade
microondascompleta-
mente.
5. Oprima'PROGRAM'
PI
, Lapantallamuestra
'ENTERCOOKING
TIME'(Programeel
tiempode cocci6n).
6. Programe el tiempo de
cocci6n deseado usando
lasteclasnumericas.
• Lapantallamuestra
'TOUCHSTARTOR
POWER'(Oprima'Start'
o 'Power')
7. Oprima 'POWER LEVEl'
(NIVELDEPOTENCIA)
, Lapantallamuestra
'ENTERPOWERLEVEL
1- 10'(Programeelnivel
depotenciaentre1y 10).
8. Optimalatecla num6rica
paraajustarlaenergiade
microondas para la
segundaetapa.
, Paraunapotenda
microondasmas baja,
optimalatecla1(para
10%)hastael 9 (para
90%).0 apagala poten-
ciademicroondascom-
pletamente.
9. Oprima la tecla 'START/
PAUSE'.
, El homocomienzala
cocci6n.
, AI findela primeraetapa
el homoemiteunasepal
sonoraparaindicarla
transici6n.
10.AIfin del cido de cocci6n,
el homoemiteunaseSaly
seapaga.
NOTA: 'Auto Defrost' (Descongelaci6n
Automatica)puede usarsesolamenteen la
primeraetapadelmodococci6npotetapas.
'Defrost Auto/Time'
(Descongelacion
Automatica/Tiempo)
Existen cuatro ajustes diferentes pre-
seleccionados de descongelaci6ndepen-
diendo del alimento que esta siendo
descongelado.Para mayorconveniencia,un
mecanismoincorporadode serial sonorale
recuerdacuandorevisar,darvuelta,separaro
redistribuirel alimentodurante el ciclo de
descongelaci6n.
1. Oprima'DEFROSTAUTO/
TIME'unavez.
• Lapantallamuestra
'MEATTOUCH1
POULTRYTOUCH2
FISHTOUCH3BREAD
TOUCH4'(Came
oprima1Aveoprima2
Pescadooprima3Pan
oprima4).
.
Oprimala tectanumerica
correspondiente.
• Lapantallamuestra
'ENTERWEIGHT'
(Programarpeso).
.
Programeel peso usando
lasteclasnumericas.
• Loslimitesdepesopara
lacame,avesy pescado
son45g a 2,7kg (0,1a
6 libras).
• Loslimitesdepesopara
el panes45a450g (0,1
a 1libra).
.
Optima la tecla 'START/
PAUSE'.
AIfinaldelciclodecocci6n
.
se escuchara,una alarma
sonora y el homo se
apagar&
'Time Defrost' (Tiempo
de Descongelacion)
Descongelaci6nduranteunperiododetiempo
deseado.
1. Oprima dos veces 'DE-
FROSTAUTO/TIME'.
• Lapantallamuestra
'ENTERDEFROST
TIME'(Programeel
tiempode descongel-
aci6n).
2. Oprimalas teclasnumeri-
casapropiadas.
• Lapantallamuestra
'TOUCHSTART'
(Optima'Start').
3. Optima la tecla 'START/
PAUSE.
4. AIfinaldel tiempode des-
congelaci6n se escucha
una sepal sonora y el
homose apaga.
'Rapid Defrost' (Descon-
gelacion Rapida)
Preprogramadopara descongelar1 libra de
alimentocongelado.
1. Oprima'RAPIDDEFROST'
(Descongelaci6nR@ida).
• Lapantallamuestra
'MEATTOUCH1
POULTRYTOUCH2
FISHTOUCH3'(Came
optima1Aveoprima2
Pescadooptima3Pan
optima4).
2. Oprimelasteclas
numericasapropiadas.
• Lapantallamuestra
'TOUCHSTART'
(Oprima'Start').
3. Optima la tecla 'START/
PAUSE'.
4. AI final del tiempo de
descongelaci6n se es-
cuchaunaseSalsonoray
el homose apaga.
cont_da,..
67
Page 68

Cocci6n or Microondas (cont.)
Notas sobre
Descongelacion:
. Retireelpescado,losmariscos,lacamey la
came de ave de sus envasesoriginaies
cerradosdepapelode plAsfico.
. Antesde congelarlacamedelelaformade
unarosquilla.
. Retirela came que se va descongelando
durante el proceso y luego continue
descongelando.
. Coloquelos alimentosen una bandejade
homearbajadevidrio.
. El homo emite una serial sonora
aproximadamentedurantelamitaddelddo
de descongelad6n para recordarleque
verifique el alimento. Detengael homo
abriendolapuerta.Unavezqueelalimento
ha sidorevisadoo reacomodado,derre la
puerta y oprima 'START/PAUSE'para
reanudarelciclodedescongelaci6n.
Instrucciones de
Funcionamiento del
Sensor
La cocd6n por sensorle permitecocinarla
mayoria de sus alimentos favoritos sin
seleccionarlos tiempos de cocci6n ni los
niveiesde potencia. La pantaliamostrar_.
'SENSING'duranteel periodode detecci6n
inicial. El homodeterminaautomaticamente
el tiempodecocci6nrequeridoparacadatipo
deaiimento.Cuandoelsensorinternodetecta
unaciertacantidadde humedadproveniente
delalimento,informar_,al homosobrecuanto
m_.stiempo debe caientar. La pantalia
mostrar_,eltiempodecalentamientorestante.
Paraobtenermejoresresultadosde lacocci6n
porsensor,sigaestasrecomendaciones.
1. Los alimentoscocinadoscon el sistema
sensordebenestara temperaturanormal
deconservaci6n.
2. LabandejaGIRATORIAy la parteexterior
del envase deben estar secos para
asegurarmejoresresultadosdelacocci6n.
3. Los alimentos deben estar siempre
cubiertosholgadamentecon envolturade
pi_.stico,papel encerado o una tapa
resistentealmicroondas.
Guia de Coccion pot
Sensor
Para asegurar buenos resultados con la
cocci6n por sensor, use envasesy tapas
apropiadas.
1. Siempre use envases resistentes al
microondas y cubralos con tapas o
envolturadepl_.sticoventilada.
2. Nuncause tapasde pl_.sticohermeticas.
Estaspuedenevitarqueescapeelvapory
el alimentopuedesobrecocerse.
3. Hagacoincidirla cantidadde alimentocon
el tama5odel envase. Llenelosenvases
pot Io menoshasta la mitadparaobtener
mejoresresuitados.
4. Aseguresede que la parte externa del
envase y el interior del homo de
microondasestensecosantesde colocar
el alimentoen el homo. Las gotas de
humedadse conviertenen vaporIo cual
puede dar la informaci6nincorrecta al
sensor.
No abra la puerta ni toque la tecla
'CANCEL/STOP'durante el tiempo de
detecci6n.Cuandoseacabaeltiempode
detecci6n,el homo emite dos serales
sonorasy el restodel tiempode cocci6n
aparecer_,enlapantalia.Enestemomento
ustedpuedeabrirla puertapara revolver,
darvueitaoreorganizarel aiimento.
68
Page 69

'Sensor Popcorn'
(Palornitas de Maiz por
Sensor)
Un sensordetectael vapor provenientedel
alimentoy automaticamenteajustael tiempo
de cocci6n para obtener los mejores
resultados. Se puedenusar las bolsas de
maiz para palomitas envasadas
comercialmentede3 a 3,5onzas(85a 99g).
1. Coloque el maiz en el
centro de la bandeja
giratoria.
, NOusela parrilla
met_.licade cocd6npor
convecci6nparacocinar
palomitasde maiz.
2. Oprima 'SENSOR POP-
CORN'(Palomitasdemaiz
porsensor).
, Elhomoautom_.tica-
mentecocinaralas
palomitasusandoel
sistemadel sensor.
.
El homocomienzael ciclo
'Popcorn' (Palomitas de
maiz).
, Paraterminarel ciclo
abralapuertau optima
latecla'CANCEL!
STOP'.
.
AI final de la cocci6n se
escucha una alarma
sonora y el homo se
apaga.
ATENCION }
NO deje el homo de microondas
desatendidocuandoeste preparando
palomitasde maiz.
ADVERTENClA I
Para evitar riesgo de una lesi6n
personalodaSosmateriales,nococine
palornitasde rnaiz usando la parrilla
metalicadecocci6npotconvecci6n,
'Sensor Reheat' (Recal-
entarniento por Sensor)
Ha sido dise_adopararecalentaralimentos
precocinados a temperatura ambiente o
refrigerados de manera f_.cil y r_.pida
detectandoelvaporprovenientedelalimentoy
autom_.ticamenteajustando el tiempo de
cocci6nparaobtenerlosmejoresresultados.
1. Oprima 'SENSOR RE-
HEAT' (Recalentamiento
porsensor).
, Lapantallamuestra
'SELECTMENU1- 3
(Seleccione menu 1 - 3).
2. Seleccione la categoria
deseadausandolasteclas
numericas.
, Lacategoria1esparaun
platodeservirdetamaSo
regularconcapacidad
para237a474mL(1a2
tazas)dealiment&
, Lacategoria2 espara
recalentar237a946mL
(1a4 tazas)de sopao
salsaenuntaz6no
cacerola.
, Lacategoria3 espara
recalentar237a946mL
(1a4 tazas)de una
cacerolaenunplatoo
taz6npequeSo.
3. Elhomocomienzael ciclo
de'SensorReheat'(Recal-
entamientoporsensor).
, Lapantallamuestra
'SENSING'(Detect-
ando).
, Paraterminarelciclo
abrala puertauoprima
'CANCEL/STOP'.
4. AI final de la cocci6nse
escucha una alarma
sonora y el homo se
apaga.
'Sensor Cook' (Coccion
por Sensor)
Un sensor detectael vapor provenientedel
alimentoy automaticamenteajustael tiempo
de cocci6n para obtener los mejores
resultadosparalamayoriade losalimentos.
1, Optima'CANCEL/STOP',
2, Optima'SENSORCOOK',
• Lapantallarnuestra
'SELECTMENU0- 9'
(Selecci0neelmenude
0-9).
• Vealatablaenlapa.gina
70paralasopcionesde
categorias.
3. Programe la categoria
deseadausandolasteclas.
. El homocomienzaelciclo
deCocci6nporSensor,
• Lapantallarnuestra
'SENSING'(Detect-
ando),
• Paraterrninarelciclo,
abrala puertauoprirna
'CANCEL/STOP',
5, AI final de la cocci6nse
escucha una alarma
sonora y el homo se
apaga,
69
Page 70

Cocci6n or Microondas (cont.)
Gufa de Coccion pot Sensor
Alimentos Porcionesy recomendaciones
1 Potatoes Laporci6nes1 a 4 papasmedianas,alrededorde225ga 280g (8a 10onzas)cadauna.
(Papas) Perforecadapapavariasvecesconuntenedorycoloquealrededordelbordede labandejadelhomo,potIo
menosa 2,5cm(1 pulgada)deseparaci6n.
2
FreshVegetables
(VegetalesFrescos)
Laporci6nesde250mLa 1L(1 a4tazas).
Coloquelosvegetaleshumedosenuncontenedorresistenteal microondas.
Agregue30a 60mL(2a 4 cucharadas)deagua.
Cubraconenvoituradepiasticoyventiie.
Lamayorfade losvegetalesnecesitansetrevueltosy 2 a 3 minutosdetiempodereposodespuesdela cocci6n.
FrozenVegetables
(Vegetales
Congelados)
FrozenEntree
(PlatilloPrincipal
Congelado)
Rice
(Arroz)
Casserole
(Cacerola)
GroundMeat
(CameMolida)
Laporci6nesde250mLa 1L(1 a4tazas)..
Retiredelpaqueteycoloquelosvegetalesen uncontenedorresistenteal microondas.
Agregue30a 60mL(2a 4 cucharadas)deagua.
CubraconenvolturadepB.sticoy ventile.
Lamayorfade losvegetalesnecesitansetrevueltosy 2 a 3 minutosdetiempodereposodespuesdela cocci6n.
Eltamafiodel platilloprincipalesde280g a 560g(10a20 onzas).
Retireelenvaseexterior.Levantetresladosdelatapa.
Sieiplatilloprincipalnoest,.en uncontenedorresistenteal microondas,col6queloenun plato,cubralo
conenvolturade pB.sticoyventile.
Lamayorfade losplatiNosprincipalesnecesitande2 a 3 minutosdetiempode reposodespuesdelacocci6n.
Sigalasinstruccionesdelenvaseparalascantidadesde losingredientes.
Coloqueel arrozy el agua(agua,caldodepoNoo devegetal)enun contenedorresistenteal microondas,cubra
conunatapadecacerolaoconenvolturapB.sticay ventile.
Lamayorfade losarrocesnecesitan2 a 3 minutosdetiempode reposodespuesdela cocci6n.
Tamafiode la porci6nes250mLa 1 L(1 a 4tazas).
Combinelosingredientessegunla recetaen unacacerolade1a 2 L(1 a2 cuartosdegal6n).
Cubraconenvolturadeplasticoyventiie
Unavezquehaterminadolacocci6n,dejereposardurante3 minutos.
Eltamafiode la porci6nesde 110a 900g(4a 32onzas[¼a 2 libras]).
Desmenucela cameen uncontenedorresistenteal microondas.
Sazoney cubraconenvolturapB.stica.
Levantelacubiertaparacamebiencocinada.
Cubraeiplatoparacamea mediococer(talcomocamequevaset usadaenottoplatilloy cocine
adicionalmente).
Fish,Seafood
(Pescado,Mariscos)
ScrambledEggs
(HuevosRevueltos)
FrozenPizza
PizzaCongelada)
Eltamafiode la porci6nesde 110a 900(4a32 onzas[74a2 libra@.
Coloqueel alimentoalrededordelosladosdeuncontenedorresistenteal microondas.Sazoney agreguede60
a 124mL(74a ½taza)de Ifquido(vino,agua,salsa,etc.)si sedesea.
Cubraconenvoituradepiasticoyventiie.
Eltamafiode la porci6nesde2a 5 huevos.
Dejecaerloshuevosenunenvasedemedirconcapacidadpara1 L (4 tazas)ounplatodecacerolade
1 L (1cuartodegai6n).
Agregue15mL(1cucharada)de iecheo aguaporcadahuevoy bata. Cubraconenvoiturade piasticoy ventiie.
Cuandoseterminelacocci6n,retiredelhomo,revuelvay dejereposardurante1a 2 minutos.
Tamafiode la porci6nesde 1a 2 pizzas.
Usesolamentepizzacongeladadestinadaa usoenelmicroondas.
Nocubra.
Sigalasinstruccionesindicadasen elenvase.
70
Page 71

[
ATENCION
Paraevitarriesgodequemaduras,
manipulelosutensilios,lasparrillas
ylapuertaconcuidado.Dejequeel
homo,los utensiliosy las parrillas
se enfrien antes de limpiarlos. El
homo,los utensiliosy las parrillas
sequedanmuycalientesduranteel
funcionamiento.
Para evitar riesgo de una lesiGn
personalo dafiosmateriales,nouse
el homosinla bandejagiratoriaen
sulugar.
ParaevitarriesgodelesiGnpersonal
o dafios materiales,no cubra la
bandejagiratoriao la parrilla con
papeldealuminio.
Para evitar riesgo de dafios
materiales,nousecontenedoresde
pl_.sticolivianooproductosdepapel
durante un ciclo de cocciGnpor
convecciGn.
Parrilla para Coccion
por Conveccion
Use la parrilla solamentecon el modo de
cocciGnpor convecciGny modocombinado.
No use en el modo de homo microondas
solamente.
Coccidn
Para usar el homo para cocciGn por
convecciGnsolamente,use la programaciGn
detiempomanualsolamente.Lassiguientes
instrucciones son para coccion por
conveccionsolamente. Para la cocciGn
combinada,verla pagina72.
Programacion Manual
con Precalentamiento
1. Oprimalatecla'CONV
COOK'bajo'Convection'.
• Lapantallamuestra
'350FTOUCHMORE
ORLESSFORTEMP
SETORSTARTOR
ENTERCOOKING
TIME'(3500F[177oC]
oprimama.so menos
paraajustarla
temperaturao 'Start'o
programeel tiempode
cocciGn).
2. Ajustelatemperaturacomo
Iodeseeusandolasteclas
'MORE'o 'LESS'.
• Ellimitedetemperatura
esde1070Ca 2320C
(2250Fa 4500F).
3. Optimalatecla
'START/PAUSE'.
Lapantallamuestra
'PREHEAT'(Precalenta-
miento)conla temp-
eraturaseleccionada.
• Cuantoelhomoseha
precalentado,la pantalla
muestra'PLACEFOOD
ONRACK'(Coloqueel
alimentoenla parrilla).
4. Abralapuerta,coloqueel
alimentoenla parrillade
convecciGnycierrela
puerta.
• Lapantallamuestra
'ENTERCOOKING
TIME'(Programeel
tiempodecocciGn).
.
Programeel tiempode
cocciGndeseadousando
lasteclasnumericas.
• Lapantallamuestra
'TOUCHSTART'
(Oprima'Start').off.
.
Oprimalatecla
'START/PAUSE'.
• AIfinaldel tiempode
cocciGn,seescucha
unaalarmasonora,la
pantallamuestra'END'
(Fin)y el homose
apaga.
Programacion Manual
sin Precalentamiento
Para programarla cantidadde tiempoy la
temperaturaparaunciclodecocciGndirecta:
1. Oprimalatecla'CONV
COOK'bajo'Convection'.
• Lapantallamuestra
'350FTOUCHMOREOR
LESSFORTEMPSET
ORSTARTOR ENTER
COOKINGTIME'(3500F
[1770C]oprimamaso
menosparaajustarla
temperaturao 'Start'o
programeel tiempode
cocciGn).
2. Ajustela temperaturacomo
Io desee usandolas teclas
'MORE'o 'LESS'.
• Ellimitedetemperatura
es de1070Ca 2320C
(2250Fa4500F).
.
Programe el tiempo de
cocciGndeseadousandolas
teclasnurnericas.
• Lapantallamuestra
'TOUCHSTART'
(Oprima'Start').
.
Oprima la tecla 'START/
PAUSE'.
• AIfinaldeltiempode
cocciGn,seescuchauna
alarmasonora,la
pantallamuestra'END'
(Fin)y el homoseapaga.
71
Page 72

Cocclon Combmada (microondas y convecclon)
o p • • p
Las siguientes instruccionesson para
coccioncombinadasolamente.
Paracocci6npot convecci6n,vea la pagina
71.
Notas:
• Nosedebenusarutensiliosde metalen la
parrilla meta.lica durante la cocci6n
combinada.Useutensiliosdevidriosiempre
queseaposible.
• Se puedeusar un moldede metal para
hacerpanquecitoso unmoldepocohondo
de metalpequefiosi esque nose dispone
deunabandejadevidrio.
• Si ocurrearcoelectrico,deje de usarese
utensilio.
ATENCION i
Paraevitarriesgodequemaduras,
manipulelosutensilios,lasparrillas
ylapuertaconcuidado.Dejequeel
homo,los utensiliosy las parrillas
se enfrien antes de limpiarJos.El
homo,los utensiliosy las parrillas
sequedanmuycalientesduranteel
funcionamiento.
Para evitar riesgo de una lesi6n
personalo dafiosmateriales,nouse
el homosinla bandejagiratoriaen
sulugar.
Paraevitarriesgodelesi6npersonal
o dafios materiales,no cubra la
bandejagiratoriao la parrilla con
papeldealuminio.
Para evitar riesgo de dafios
materiales,nousecontenedoresde
pl_.sticolivianooproductosdepapel
durante un ciclo de cocci6n por
convecci6n.
Asado Combinado
Para programar la cantidad de tiempo y
temperaturaparaunciclodecocci6nusando
ambas,energiade microondasy energiade
convecci6n:
1. Coloqueel alimentoen la
parrilladelhomoycierrela
puertadelhorno.
2. Optima la tecla 'ROAST'
bajo 'Convection Com-
bination'.
• Lapantallamuestra
'350FTOUCHMORE
ORLESSFORTEMP
SETORENTER
COOKINGTIME'(3500F
[1900C])oprimamaso
menosparaajustarla
temperaturao programe
eltiempodecocci6n).
3. Ajustelatemperaturacomo
Iodeseeusandolasteclas
'MORE'o 'LESS'.
• Ellimitedetemperatura
esde1770Ca 2320C
(2250Fa 4500F).
• Laenergiade
microondasnopuede
ajustaday estA
programadapara40%.
• Eltiempodecocci6n
puedeset programado
desde0:01-99:99.
4. Oprima la tecla 'START/
PAUSE'.
• AIfinaldeltiempode
cocci6n,seescuchauna
alarmasonora,la
pantallamuestra'END'
(Fin)y el homose
apaga.
Horneado Combinado
Para programarla cantidad de tiempo y
temperaturaparaun ciclodecocci6nusando
ambosenergiade microondasy energiade
convecci6n:
1. Coloqueel alimentoen la
parrilladel homoy cierre
la puertadelhorno.
2. Oprima'CANCEL/STOP'.
3. Oprima la tecla 'BAKE'
bajo 'Convection Com-
bination'.
• Lapantallamuestra
'375FTOUCHMORE
ORLESSFORTEMP
SETORENTER
COOKINGTIME'(375F
[1900C] oprimamaso
menosparaajustarla
temperaturao programe
eltiempodecocci6n).
.
Ajuste la temperatura
comoIodeseeusandolas
teclas 'MORE'o'LESS'.
• El limitede temperatura
esde 1770Ca 2320C
(2250Fa 4500F).
• Laenergiade
microondasnopuede
serajustaday esta
programadaa 10%.
• Programeel tiempode
cocci6nen minutos.
.
Oprima la tecla 'START/
PAUSE'.
• AIfinaldel tiempode
cocci6n,seescucha
unaalarmasonora,la
pantallamuestra'END'
(Fin)y el homose
apaga.
72
Page 73

Las siguientes instruccionesson para
coccioncombinadasolamente.
Paracocci6npor convecci6n,vea la pagina
71.
Notas:
, Cuando se cocinan pizzas congeladas,
coloquelapizzadirectamenteen la parrilla
de coccitn pot conveccitn. No use una
bandejade pizza ni papel de aluminio.
Coloque la parrilla de conveccitn
firmementeen la bandejagiratoriaalejada
delosladosdelhomo.
, Paraotto tipode horneado/asadocoloque
el alimentoen el utensilioapropiado,luego
coltquelosobrela parrilladeconveccitn.
'Auto Bake' (Hornear
Automaticamente)
Para hornear automAticamente pizza
congelada,panquecitos,bizcochosy papas
fritas congeladas usando energia de
microondasy deconveccitnalternativamente.
Usando alternativamente energia de
microondasy energiadeconveccitn:
1. Optimalatecla'AUTO
BAKE'bajo'Convection
Combination'.
Lapantallamuestra
'FROZENPIZZATOUCH
1 MUFFINSTOUCH2
BISCUff/DINNERROLL/
B.STICKTOUCH3
FROZENFRENCHFRIES
TOUCH4' (Pizzacon-
geladaoptima1panque-
citosoprima2 bizcochos/
panecillos/bagueta
oprima3papasfritas
congeladasoprima4).
.
Oprimalateclanumerica
apropiada.
• Losbizcochosy los
panquecitosrequierenun
ciclodeprecalentamiento
y debensetcolocadosen
laparrilladespuesdeque
suenelaserial.
• LapizzacongeladaDEBE
sercolocadadirecta-
menteen laparrillade
cocci6nporconvecci6n.
NOuseunabandejade
metalde pizzani papelde
aluminio.
• Lospanquecitos,biz-
cochosy panecillos
puedenusarmoldesde
panquecitossinose
disponedeunabandeja
devidrio.
• Lasbaguetasy laspapas
fritascongeladaspueden
sercolocadasenuna
pequerabandejade
metalnomuyprofunda,si
nosedisponedeuna
bandejadevidrio.
.
Oprimalatecla'START/
PAUSE'.
• Sisenecesitainformacitn
adicional,elhomolaindi-
caraen la pantalla.
.
AIfinaldeltiempodecoc-
citn, se escuchaunaalarma
sonora,la pantallamuestra
'END'(Fin)y el homose
apaga.
'Auto Roast' (Asar
Automaticamente)
'AutoRoast'asa automaticamentecarnede
res,camedeave,pechugasde pavoy cerdo
usando alternativamente la energia de
microondasy laenergiadeconveccitn.
1. Oprima la tecla 'AUTO
ROAST'bajo 'Convection
Combination'.
• Lapantallamuestra
'BEEFTOUCH1WHOLE
CHICKENTOUCH2
TURKEYBREAST
TOUCH3 PORKTOUCH
4'(Camede resoprima1
polioenterooprima2
pechugadepagooprima
3 cerdooprima4).
.
Oprima la tecla numerica
apropiada.
• Lapantallamuestra
'ENTERWEIGHT'(Pro-
gramarpeso).
.
Use las numericas para
programarel peso.
.
Oprima la tecla 'START/
PAUSE'.
• Sisenecesitainformacitn
adicional,elhomola
indicaraen lapantalla.
.
AI final del tiempo de
coccitn, se escucha una
alarma sonora, la pantalla
muestra 'END' (Fin) y el
homose apaga.
Polio 1,1- 2,7kg (2,5- 6 libras)
Camede Res 0,9- 1,8kg (2- 4 libras)
Pavo 1,4- 2,7kg(3- 6libras)
Cerdo 0,9- 1,8kg(2- 4 libras)
73
Page 74

erenclas ara OClnar
" C "
Informacion Bfisica
sobre la Came
Para preguntasespedficas respecto a la
preparad6n,manipulad6noalmacenamiento
de la came, p6ngaseen contacto con el
Departamento de Agdcultura de los
EstadosUnidos(USDA)Ilamandoa la linea
directa para Meat & Poultryal (800) 535-
4555.
Sugerencias para la
Manipulacion
. Cuandocomprecame, col6quelaen una
bolsa de plAsticoseparadapara que no
goteeotrosalimentos.
. Descongelelas carnes congeladasen el
refrigeradoro atemperaturaambiente.
. Mantengalacamefriay cubiertahastaque
seahoradecocinarla.
, LAveselas manosconagua tibiay jabSn
antes y despuesde manipularcame o
huevoscrudos.
. Lave bien cualquiersuperficieo utensilio
que hayasido tocadocon la came o los
huevoscrudos.
. No coloquecame cocinadaen el mismo
platodondebahiadejadocamecruda.
Sugerencias para
Cocinar
. Deje la came alifiada en el refrigerador.
Descarteelalifiosobrantequehayaestado
encontactocon lacame.
. Useun term6metroparacamesresistente
al microondas.
. Cocinela came a la temperaturainterna
recomendadaperelUSDA.
. Cuandorecalientealimentos,calientea una
temperaturainternade perIomenos740C
(1650F).
. Cuandococinecarnes,delasvueltaperIo
menosunavez.
Almacenamiento
Seguro
. Una vez trinchada,refrigerela porci6nno
usadainmediatamente.
. Cuando sirva las comidas mantenga
calientes los alimentos calientes y
mantengafrioslosalimentosfrios.
. Separe los alimentos cocinados en
pordonespequefiaspara que se enfrien
m_.sr_.pido.
. No guardeenel refrigeradorcame molida
cocinadao comidasque contengancame
molida per m_.sde 3 o 4 dias en el
refrigerador.
. Nodejequelosjugosde lacamecocinada
o crudatenga contactocon los alimentos
listos para comer tales como frutas o
vegetales.
Ablandamiento
Unade lasmanerasdeablandarla camees
brasearloscortesmenosblandos.Antesde
cocinar,usted puede golpear,cortaren cubos,
marinar o usar ablandadoresde carnes
preparados comercialmente. Usted luego
puedeusarun metodoseco paracocinarla
came.
. Las madnadas son liquidosacidostales
como vino, productoscitricos o vinagre.
Las marinadasablandanlas fibras de la
came pero solamente penetran
aproximadamenteuncuartodepulgadaen
el interiordela came. Nomarinela came
permasde24horas.
• AI golpearlacameconunmazopesadode
metal rompelos tejidos conectorespara
ablandarlacame.
Elcortedelacameencubos rompem_.sla
estructurade la came que golpearla. Los
cortesencubosehacenenel mes6nde la
came.
Los ablandadores comerciales son
primordialmenteenzimasquetrabajanenla
parte exteriora una profundidadde un
cuartode pulgadaen un corte de carne.
Aseguresede seguirlas instruccionesdel
fabricante.
Uso de un Termometro
para Came
Cuando use un term6metro para came,
recuerdeinsertarloen un leveangulo,en la
partemasgruesadelacame,lejosdelagrasa
ydelhueso.Lacamesedebesacardelhomo
cuandola temperaturaes 50 F inferiora la
temperaturafinal deseada. Cuandola came
esta reposandoantes de trincharla,seguira
cocinandoseinternamente,elevandoper si
mismalos2,70C (50F)finales.
Term&netroparaCame
. Evita tenet que adivinarcuandola came
llegaal t&minodecocci6ndeseado.
. Ayudaa reducirel riesgode intoxicaci6n
alimenticia.
TermbrnetroResistenteal Homo
(modode conveccidnsolamente)
. Este term6metroquese inserta antesde
quela cameseacolocadaen el homo,se
deja con la came cuando se esta
cocinando.
. La temperatura interna se elevar_.
lentamentea medida que la came se
cocina.
, NOuseunterm6metrodemetalenelhomo
en el modo COMBINADOo en el modo
MICROONDAS.
Term6metrode LecturaInstant_nea
, Aunque no resistentes al homo, estos
term6metrosson colocadosen la came
cuandose hasacadodelhomo.
* Aunque los fiempos pueden variar,
normalmentesedespliegaunatemperatura
exactadentrodeunoodosminutos.
. Cuando use un term6metro de lectura
instant_.nea,limpieel term6metroconagua
tibiaconjab6nentrecadalectura.
74
Page 75

Indicaciones para Asar Carnes
Loscortestiernostalescomocostillasy Iomosecocinanmejormediantemetodosdecalorseco,talescomocuandoseasan.
ParaAsar:
1.Calienteel homoalatemperaturadeseada.
2. Coloquelacamedirectamentedel refrigeradorconelladodelagrasahaciaarribaenunabandejanomet_lica baja.
3. Coloqueel asadoenhomocombinado.
4. Retireel asadoy verifiquela temperaturainternacon un termSmetroparacarne. NOcoloqueel asado dentrodel homo combinadoconel
termSmetro.
5. ElasadoestAhechocuandolatemperaturainternaes2,7oC (50F)inferiora la temperaturafinaldeseada.
6. Transfierael asadoa unatabladetrinchary cubraloflojamenteconpapeldealuminioduranteaproximadamente15minutos.
CortedeCame
OARNEDERES
Cuadrilsinhueso
VueltadeIomo
Peceto
Lomo
Costilla
Filetede costilla
OARNEDECERDO
Lomo,conhueso
Filetede costilla,sinhueso
Lomo
JamSnconhueso,cocinar
antesde comer
OORDERO
Paleta
Filetede costilla
Costillarparacorona,norelleno
Loimo
Pierna,estilofranceso 163° C(3250F)
mediopernil (325a 3500F)
OARNEDEAVE(sin rellenar)
Cap6n
Gallinasde Cornualles,enteras
Pato,entero
Ganso,entero
False.n,entero
Codorniz,entera
Pavo
TemperaturaInterna
Recomendada
Muycrudo 54° C (130°F)
Crudo 60°C (140°F)
Semicrudo 63°C (145°F)
A medioasar 71°C (160oF)
Bienasado 77°C (170oF)
Muybienasado 820C (180oF)
Todalacamede cerdodebeset
cocinada a una temperatura
internade per Io menos71° C
(160o) F para reducir la
probabilidadde triquinosisy de
otrasintoxicacionesalimenticias.
Semicrudo 66° C(150° F) 191° C(3750F)
A medioasar 71°C (1600F) 191° C(3750F)
Bienasado 77° C(1700F) 163° C(3250F)
Para reducir el riesgo de
intoxicaci6nalimenticia,lacame
deavedebesercocinadaa una
temperaturainterna de 820 C
(180° F). (325a3500F)
Tempuratura
delHomo
1630C(3250F)
1630C(3250F)
163° C(3250F)
2180C(425° F)
1630C(325° F)
177° C(3500F)
177° C(350° F)
177° C(3500F)
2320C(4500F)
1630C(325° F)
163° C(3250F)
163a1770C
(325a 3500F)
163a177° C
(325a 3500F)
163a177° C
(325a 3500F)
163a177° C
163a177° C
(325a 3500F)
163a177° C
(325a 3500F)
1630C(325°
F) 3,6a 7,2kg (8 a 16libras) 31/2a5½horas
Peso
(kg[libras])
1,8a 2,7 kg(4 a 6 libras)
1,6a 1,8 kg(3½a 4 libras)
1,8a 2,7 kg(4 a 6 libras)
0,9a 1,4kg(2a 3 libras)
1,8a 2,7 kg(4 a 6 libras)
1,8a 2,7 kg(4 a 6 libras)
2,7a 3,6kg(6a 8 libras)
1,8a 2,7 kg(4 a 6 libras)
1,4a 2,3 kg(3 a 5 libras)
0,9a 1,8kg(2a 4 libras)
0,45a 0,9kg(½a 1libras)
3,2a 3.6kg(7a 8 libras)
1,6a 2,7 kg(3½a 6 libras)
0,68a 1,1kg(1½a2½libras)
0,9a 1,4kg(2a 3 libras)
0,57a0,8kg (lY4a 1_4libras)
2,3a 3,2kg(5a 7 libras)
3,2a 4,1kg(7a 9 libras)
1,8a 3,6 kg(4 a 8 libras)
0,57a 0,68 kg(11/4a 11/2libras)
0,9kg(2 libras)
TiempodeCoccion
Alproximaclo(minutos)
25a30
30a40
20a30
35a45
45a60
26a42
23a35
18a24
20minutos
porlibra
(0,45kg)
35a40
30a35
25ta30
45a55
15a20
20a25
20 a30min/libra
(0,45kg)
50a60 mintotal
18a20min/libra
(0,45kg)
20 a25min/libra
(0,45kg)
30 rain/libra
(0,45kg)
20minau total
TodoslostiemposytemperaturasrecomendadassonproporcionadasporelUSDA,el ConsejodelaIndustriade laCamedeRes,elConsejo
NacionaldeProductoresdeCamedeCerdoyel ConsejodelaIndustriaOvejeraAmericana.
75
Page 76

ara Cocinar (cont.)
Galletas
, Sedebenusarbandejasdegalletasplanas
y brillantes. Evitelas bandejasdegalletas
quetenganbordesaltos- estoresultariaen
doradono uniformeen lapartesuperior.
, Lasbandejasdegalletasnodebentocarlos
ladosdelhomonilapuerta.
Pasteles
, Determineel tamafiodelmoldesegunlas
instruccionesde la receta. Los moldes
brillantessonmejoresparalospasteles.
, Los pasteles horneados en un molde
demasiadograndeser_.ndelgadosy secos.
En un moldedemasiadopeque5oquedan
semicrudosococinadosno uniformemente
y lamasapuedederramarse.
Pays
, Los pays deben hornearse en moldes
obscuros u opacos para aumentar el
dorado.
, Lospayscongeladosdebensetcalentados
enbandejasdegalletasde aluminio.
Utensilios de Homear
Moldes
obscuros
u opacos
Moldes
bdllantes
(sinlados)
Moldes
bdllantes
(conlados)
[v]oldesde
vidrio
AbsorbenmAscalory
producenun doradomAs
obscuro.Serecomiendan
parapaysy panes.
Serecomiendanpara
galletas.
Serecomiendanpara
pasteles.
Reduzca250Fla
temperaturarecomendada
del homo.
Sugerencias de Tiempo de Homeado
Tipode Molde
de Pastel
Ovalado 19,7 x 14,6cm
Redondo, para 15,2 cm (6")
capas de 5 cm (2") 20,3 cm (8")
Redondo,para 20,3cm(8")
capasde7,5cm(3") 30,5cm (12")
Semiredondo,para 45,7cm(18")
capasde5cm(2")
Semiredondo,para 45,7cm(18") 2,8L (12tazas) 1630C(3250F) 60 a 65
capasde7,5cm(3")
Cuadrado 15,2cm(6") 475mL(2 tazas) 1770C(3500F) 25 a 30
Tamariodel
[v]olde
7_4"x 5_4"
33 x 25,8 cm
13" x93/4''
35,6 cm (14")
25,4cm (10") 1,4L (6tazas) 1770C(3500F) 35 a 40
40,6cm (16") 3,7 L (151/2tazas) 1770C(3500F) 45 a 50
Tazasde
Batido
595mL(2_Atazas)
1,9L(8 tazas)
475mL(2 tazas)
710mL(3 tazas)
2,4L (10tazas)
1,2mL(5tazas)
2,6L (11tazas)
2,1L (9tazas)
Temp.
del Homo
1770C (3500
1770C (3500
1770C(3500F)
1770C(3500F)
1770C(3500F)
1630C(3250F)
1630C(3250F)
1630C(3250F)
F)
F)
Minutos
25 a 30
25 a 30
25 a 30
30 a 35
50 a 55
60 a 65
75 a 80
60 a 65
Precalentamiento
En la mayoriadeloscasos,usteddebeprecalentarelhomoantesdehornear. Parahorneado
delicado(talescomo pastelesdehojaldreosufl_s) precalienteel homo aproximadamente
15a20minutos antesdecolocarel alimentodentrodel homo oespere10minutosdespu_s
de queel homo emitelaserial antesdecolocar el alimentoen el homo. Eltiempoadicional
creaunatemperaturam_.sestable.
76
Page 77

Problernas de Homeado Cornunes
Esdificilajustarsea unhomonuevo,especialmentecuandosehaceuncambioa unhomodeconvecci6n.Si ustedcomienzaaobservarproblemas
deconsistencia,consultelatablasiguienteparaposiblessoluciones.
Problema
Pastelesdesequilibrados
(horneadosirregularmente)
Pasteles,galletas,bizcochos
demasiadodoradosen la
parteinferioro superior
Lospaysnosedoran
Lospastelesquedancrudos
enelcentro
Lospastelessebajan
Encogimientoexcesivo
Lospastelesquedanaltos
enelcentro
Causa
Losmoldesseest_.ntocandoo est_.ntocandolas paredes
delhomo.
El batidofuecolocadoenformairregularenelmolde.
Usoincorrectodelpapelde aluminio.
El homonoest,.nivelado.
El homonofueprecalentado.
Losmoldesseestantocandoo estantocandolasparedes
delhomo.
Seusaronmoldesdevidrio,obscuros,torcidoso metalicosde
acaboopaco
Usoincorrectodelpapelde aluminio.
Temperaturadelhomodemasiadoalta.
Seusaronmoldesde metalbrillantes.
Temperaturademasiadobaja.
Temperaturademasiadoalta.
MoldedemasiadopequeSo.
Sehome6durantetiempocorto.
El moldenoqued6centradoen elhomo.
Demasiadamantequillao az@ar.
Demasiadoo pocoliquido.
Temperaturademasiadobaja.
PolvodehornearaSejoo pocacantidad.
MoldedemasiadopequeSo.
Lapuertadelhomose abri6confrecuencia(paraver).
Horneadoinsuficiente.
Muypocalevadura.
Semezcl6el batidodurantemuchotiempo.
Moldedemasiadogrande.
Temperaturadelhomodemasiadoalta.
Sehome6durantemuchotiempo.
Temperaturasdemasiadoaltas.
Semezcl6demasiado.
Seus6demasiadaharina.
Losmoldesseest_.ntocandoo est_.ntocandolas paredesdel
homo.
Notas Sobre el
Horneado:
* Pruebe los pasteles para ver si est_.n
cocidos. Debidoa lasvariacionesen los
diversos hornos, es mejor probar para
conseguirlaconsistenciaapropiadaen vez
de confiarsolamenteen el tiempoyen la
aparienciavisualcomounindicador.
* Losproblemasdelpastelpuedenestarenla
mezcladelbatido.Sisemezclademasiado
se puederomperla estructuradel pastely
ocasionarencogimientoexcesivo.Sino se
mezcla Io suficiente puede resultar en
pastelescongrumosquenopuedenquedar
bien cocinados. Todoslos ingredientes
debenestara temperaturaambiente- no
reciensacadosdelrefrigerador.Asegurese
de seguir las instruccionesde la receta
respectoacuantotiempodebemezclarseel
batido.
Dejeenfriar el pastelen el moldeen una
parrJlladurante10minutosantesdesacarlo
delmolde.Lospastelesmasgrandes(m_.s
de 35 cm [14 pulgadas]de di_.metro)
puedenIlevarhasta15minutos.Sielpastel
sehaenfriadodemasiado,vuelvaa calentar
el homoa 1210C (2500F)potunospocos
minutos.
Aseguresedeseguirlasinstruccionesdela
receta y usar mantequilla o margarina
cuandose indique. Si se usaun sustituto
de pococontenidode grasapuedeafectar
negativamenteelresultadode unareceta.
77
Page 78

Cuidado Lira ieza
Limpie el homo con ffecuencia para
prolongar la vida _til, rendimiento y
eflciencia. Unhomosuciococinaen forma
deficientepuesla humedad, derramesy
grasaabsorbenlaenergJadeconvecci6ny
laenergJade microondas.
,ATENCION ]
Para evitar riesgo de quemaduras,
manipulelos utensilios,lasparrillasy la
puertaconcuidado.Dejequeel homo,
losutensiliosy las parrillasse enfrien
antes de limpiarbs. El homo, los
utensiliosy las parrillasse calientan
muchoduranteel funcionamiento.
I ADVERTENCIA I
Paraevitarchoqueelectricoque puede
causar una lesi6n personalgrave o
mortal,desenchufeel cord6no abrael
disyuntor del homo antes de la
limpieza.
Bandeja Giratoria del
Horno
Labandejagiratoriay elanillosonremovibles.
Se deben lavar a manoen agua tibia (no
caliente)y conundetergentesuave. Seque
bienconun patiosuave. NOuse polvosde
limpieza,abrasivos,lana de acero u otras
esponjas asperas. NO coloque en un
lavavajillasautomatico.
• Lamesagiratoriapuedesetlimpiadaenel
fregadero.Tengacuidadode no picarlao
rayarlos bordespues estopodriaresultar
enquelabandejase rompaduranteel uso.
• Elanillodebeset limpiadoregularmente.
• La bandejagiratoriadebeSIEMPREestar
ensulugarcuandoseusaestehomo.
Limpieza del Exterior
del Horno
Limpielapuertay otrassuperficiesexteriores
conunpatiolimpio,esponjao esponjadenil6n
usandounasoluci6nde undetergentesuavey
aguatibia. Estrujebienel patioparaquitarel
excesodeaguaantesdelimpiarel horno.
• No uselimpiadoresasperoso abrasivoso
limpiadoresquecontenganamoniaco.
Limpieza de la Cavidad
del Horno
Limpieel interiordelhornocon unpatiosuave
y unasoluci6ndedetergentesuave.Enjuague
y seque. Nunca use polvos de limpieza,
abrasivosu otrasesponjasasperas.
Las salpicadurasexcesivasde aceite en la
partesuperiorinteriorpuedenserdificilesde
eliminarsi se dejan estar por un tiempo.
Limpielas salpicadurascon una toalla de
papelmojadatanprontocomoeliasocurran.
• Use guantes de protectores de goma
cuandolimpieelhomo.
• Use solamenteesponjas de restregaro
similaresparaayudararetirarlasuciedado
la acumulaci6nde suciedaddel interiordel
homo.
No useun cuchillo,utensiliodemetalo
unaesponjadelanade aceropararaspar
el alimentoquemado.Estopuededatiar la
capanopegajoso.
Limpieza de la Puerta
del Horno
Paramejorrendimientoy seguridad,el panel
interiordela puertay elmarcodelanterodel
homonodebentenetacumulaci6ndegrasao
alimentos. Limpie a menudo con un
detergentesuavey luegoenjuague. Seque
conunpatiosuave.NOusepolvodelimpieza,
abrasivosu otrasesponjasasperas.
Despuesde limpiarelpaneldecontroloptima
la tecla 'CANCEL/STOP' para despejar
cualquier entrada que pueda haber sido
accidentalmente programada durante la
limpieza.Paraevitaresteproblema,se debe
activar la caracteristicade bloqueocontra
nitios('ChildLock')antesde hacerlalimpieza.
Notas sobre la
Limpieza:
• Limpieel hornodespuesdecadauso.
• Limpieelinterior,el exteriory lapuertade
acuerdoconlasinstrucciones.
• Limpieinmediatamentelosderrames.
• Retirelas parrillasdel homo y limpiede
acuerdoconlasinstrucciones.
• Sequedespuesdelalimpieza.
78
Page 79

L |o o p o p o
ocallzaclon Soluclon de Avenas
[ _ ADVERTENCIA ]
Paraevitarriesgode choqueelectricoque puedecausarunalesi6ngravepersonalomortal,noretirelacajaexterior(gabinete)en ningun
momento.Solamenteel personaldeservicioautorizadopuederetirarlacajaexteriordelhorno.
Funcionamiento
Problema CausaPosible Solucibn
El horno no trabaja Interrupci6ndella • Asegt_resedequeel homoesteenchufado.
energiaelectrica • Verifiquequeeldisyuntornose hayadisparado.
• Reemplaceel fusiblefundidoperonocambielacapacidaddelfusible.
Arcoelectricoo chispas
Laluzdelhornonotrabaja
Elrelojy temporizador
notrabajan
Reflexi6ndelaluzalredador Normal • Laluzsereflejade laluzubicadaentrelacavidaddel homoy la pared
del microondas exteriordelhomo.
Utensilios
Papelde aluminio
Funcionamientodelhomo
envacio
Normal
Focofundido
Interrupci6ndella
energiaelectrica
• Verifiquequelosutensiliosseanresistentesalmicroondas.
• Nousepapeldealuminioenelhomo.
• NOhagafuncionarel homovacio.
• _,Estafuncionandoel homo? El homodebeestarfuncionandoparaque la
luzseencienda.
• Elfocopuedenecesitarser reemplazado.
• Asegt_resedequeelhomoesteenchufado.
• Verifiquequeel disyuntornosehayadisparado.
• Reemplaceel fusiblefundidoperonocambielacapacidaddelfusible.
79
Page 80

Garantia
Garantia Completa de Un Afio
Amana Appliances reparar& o reemplazar& incluyendo mano de obra relacionada, cualquier pieza que falle debido a un defecto de
material o fabricaci6n.
Garantia Limitada
Despues de un afio de la fecha original de compra al pormenor, Amana proporcionara un repuesto gratis, como se indica a continuaci6n,
para reemplazar cualquier pieza que falle debido a un defecto de material o fabricaci6n. El propietario sera responsable de pagar todos
los otros gastos incluyendo kilometraje y transporte.
Del segundo al quinto afio
Amana proporcionara un tubo magnetr6n de repuesto, panel de teclas y microprocesador, la pieza y la mano de obra que falle
debido a un defecto de material o fabricaci6n.
J
Lo que no cubre estas garantias
, Reemplazo de los fusibles del hogar, reposici6n de los
disyuntores o correcci6n del alambrado o plomeria del hogar.
Mantenimiento y limpieza normal del producto, incluyendo
focos.
, Productos cuyos nQmeros de serie originales fueron
removidos, alterados o no son fAcilmente legibles.
Productos comprados para uso comercial, industrial o de
arriendo.
, Productos situados afuera de los Estados Unidos o CanadA.
, Costos de servicio adicionales, si el tecnico debe realizar
servicio extraordinario fuera de Io normal o fuera de las horas
o del Area de servicio normal.
, Ajustes despues del primer afio.
,, Reparaciones resultantes de Io siguiente:
- Instalaci6n, sistema de escape o mantenimiento incorrecto.
- Cualquier modificaci6n, alteraci6n o ajuste no autorizado
por Amana.
- Accidente, real uso, abuso, incendio, inundaci6n o actos
fortuitos.
- Conexiones a suministro de gas, suministro de voltaje o
corriente electrica incorrectas.
- Uso de utensilios, contenedores o accesorios no apro-
iados que pueden causar dafio al producto.
, Viaje.
Si usted necesita servicio
Llame al distribuidor donde compr6 su electrodomestico o Ilame
a Amana Appliances Consumer Services al 1-800-843-0304 en
EE.UU. y al 1-866-587-2002 en Canada para ubicar un tecnico
autorizado.
, Asegt_rese de conservar el comprobante de compra para
verificar el estado de la garanfia. Consulte la secci6n sobre la
GARANTIA para mayor informaci6n sobre las
responsabilidades del propietario para servicio bajo la garantia.
, Si el distribuidor o la compafiia de servicio no pueden resolver el
problema, escriba a Amana Appliances, 2800-220th Trail,
Amana, IA 52204 o Ilame al 1-800-843-0304 en EE.UU. y al
1-866-587-2002 en CanadA.
NOTA: Cuando Ilame o escriba acerca de un problema de
servicio, por favor incluya la siguiente informaci6n:
a. Su nombre, direcci6n y nQmero de telefono;
b. nQmero de modelo y nQmero de serie;
c. nQmero y direcci6n de su distribuidor o tecnico de servicio;
d. una descripci6n clara del problema;
e. comprobante de compra (recibo de compra).
Las guias del usuario, manuales de servicio e informaci6n sobre
las piezas pueden solicitarse a Amana Appliances Consumer
Services.
BAJO NINGUNA ClRCUNSTANCIA IVIAYTAGSERA RESPONSIBLE DE DAIIOS INCIDENTALES O CONSECUENTES.
Estagaranfialeotorgaderechoslegalesespecificosy ustedpuedetenetotrosderechosquevariandeunestadoaotro. Porejemplo,algunosestados
nopermitenla exclusi6no limitaci6ndedaSosincidentaleso consecuentes,porIotantoestaexdusi6npuedequenose apliqueensucaso.
B/01/03
MCS P/N 74007463
Q2003 Maytag Appliance Sales Co.
Part No,8112P236-60
3828W5A2752
 Loading...