

Page 1

Countertop Combination Oven
Owner's Manual
Combination Oven
Keep instructions for future reference.
Be sure manual stays with oven.
Contents
Important Safety Instructions ................................................................2-4
Installation ................................................................................................5
Display and Features ............................................................................6-9
Cooking Methods ...................................................................................10
Cookware Suggestions ..........................................................................11
Microwave Cooking ...........................................................................12-16
Convection Cooking ...............................................................................17
Combination Cooking (microwave and convection)..........................18-19
Cooking Tips .....................................................................................20-23
Care and Cleaning .................................................................................24
Troubleshooting ......................................................................................25
Warranty.................................................................................................26
Guide de l’utilisateur...............................................................................27
Guía del Usuario ....................................................................................55
B/01/03
©
2003 Maytag Appliance Sales Co. Part No.8112P236-60
MCS P/N 74007463 3828W5A2752
Installer: Please leave this manual
with this appliance.
Consumer: Please read and keep
this manual for future reference. Keep
sales receipt and/or cancelled check
as proof of purchase.
If you have questions, write us
(include your model number and
phone number) or call:
Amana Appliances Consumer
Services
Amana Appliances
2800-220th Trail
Amana, IA 52204
1-800-843-0304 U.S.A.
1-866-587-2002 Canada
Internet: http://www.amana.com
In our continuing effort to improve the quality and performance of our appliances, it
may be necessary to make
changes to the appliance without revising this guide.
Model Number
Serial Number
Date of Purchase
ACM1580A
Page 2
2
IMPORTANT SAFETY INSTRUCTIONS
What You Need
to Know About
Safety Instructions
Warning and Important Safety Instructions appearing in this manual
are not meant to cover all possible
conditions and situations that may
occur. Common sense, caution, and
care must be exercised when
installing, maintaining, or operating
oven.
Always contact your dealer, distributor, service agent, or manufacturer
about problems or conditions you do
not understand.
Recognize Safety Symbols, Words, Labels
DANGER
DANGER— Immediate hazards which WILL result in severe personal injury or
death.
WARNING
WARNING—Hazards or unsafe practices which COULD result in severe per-
sonal injury or death.
CAUTION
CAUTION— Hazards or unsafe practices which COULD result in minor per-
sonal injury.
SAVE THESE INSTRUCTIONS
FEDERAL COMMUNICATIONS COMMISSION RADIO FREQUENCY
INTERFERENCE STATEMENT ( U.S.A. ONLY)
This equipment generates and uses ISM frequency energy and if not installed and used properly, that is in strict
accordance with the manufacturer's instructions, may cause interference to radio and television reception. It has
been type tested and found to comply with limits for ISM Equipment pursuant to part 18 of FCC Rules, which are
designed to provide reasonable protection against such interference in a residential installation.
However, there is no guarantee that interference will not occur in a particular installation. If this equipment does
cause interference to radio or television reception, which can be determined by turning the equipment off and on,
the user is encouraged to try to correct the interference by one or more of the following:
• Reorient the receiving antenna of the radio or television.
• Relocate the Microwave Oven with respect to the receiver.
•Move the microwave oven away from the receiver.
• Plug the microwave oven into a different outlet so that the microwave oven and the receiver are on different
branch circuits.
The manufacturer is not responsible for any radio or TV interference caused by unauthorized modification to
this microwave oven. It is the responsibility of the user to correct such interference.
➣ To avoid risk of electrical shock
or death, this oven must be
grounded.
➣ To avoid risk of electrical shock
or death, do not alter the plug.
WARNING
Grounding Instructions
Oven MUST be grounded. Grounding
reduces risk of electric shock by providing
an escape wire for the electric current if
an electrical short occurs. This oven is
equipped with a cord having a grounding
wire with a grounding plug.The plug must
be plugged into an outlet that is properly
installed and grounded.
Consult a qualified electrician or servicer if
grounding instructions
are not completely
understood, or if doubt
exists as to whether the oven is properly
grounded.
Do not use an extension cord. If the
product power cord is too short, have a
qualified electrician install a three-slot
receptacle. This oven should be plugged
into a separate 60 hertz circuit with the
electrical rating as shown in specifications table. When the combination oven
is on a circuit with other equipment, an
increase in cooking times may be
required and fuses can be blown.
Microwave operates on standard household current, 110-120V.
Page 3

3
Recognize this symbol as a SAFETY message
When using electrical oven, basic safety precautions should be followed to reduce risk of burns, electric shock, fire,
or injury to persons or exposure to excessive microwave energy.
PRECAUTIONS TO AVOID POSSIBLE EXPOSURE TO
EXCESSIVE MICROWAVE ENERGY
A. DO NOT attempt to operate this oven with the door open since open door operation can result in harmful expo-
sure to microwave energy. It is important not to defeat or tamper with the safety interlocks.
B. DO NOT place any object between the oven front face and the door to allow soil or cleaner residue to accu-
mulate on sealing surfaces.
C. DO NOT operate the oven if it is damaged. It is particularly important that oven door close properly and that
there is no damage to: 1. door (bent), 2. hinges and latches (broken or loosened), 3. door seals and sealing
surfaces.
D. Oven should not be adjusted or repaired by anyone except properly qualified service personnel.
WARNING
1. READ all instructions before using equipment.
2. READ AND FOLLOW the specific PRECAU-
TIONS TO AVOID POSSIBLE EXPOSURE TO
EXCESSIVE MICROWAVE ENERGY in IMPOR-
TANT SAFETY INSTRUCTIONS.
3. This equipment MUST BE GROUNDED. Connect
only to properly grounded outlet. See GROUND-
ING INSTRUCTIONS in Installation Instructions.
4. Install or locate this equipment ONLY in accor-
dance with the installation instructions in this
manual.
5. Some products such as whole eggs and sealed
containers—for example, closed glass jars—are
able to explode and SHOULD NOT be HEATED
in this oven.
6. Use this equipment ONLY for its intended use as
described in this manual. Do not use corrosive
chemicals or vapors in this equipment. This type
of oven is specifically designed to heat, cook or
dry food. It is not designed for industrial or laboratory use.
7. As with any appliance, CLOSE SUPERVISION is
necessary when used by CHILDREN.
8. DO NOT operate this equipment if it has a damaged cord or plug, if it is not working properly, or
if it has been damaged or dropped.
9. This appliance, including power cord, must be
serviced ONLY by qualified service personnel.
Special tools are required to service equipment.
Contact nearest authorized service facility for
examination, repair, or adjustment.
10. DO NOT cover or block any openings on this
appliance.
11. DO NOT heat baby bottles in oven.
12. Baby food jars shall be open when heated and
contents stirred or shaken before consumption, in
order to avoid burns.
13. DO NOT store this appliance outdoors. DO NOT
use this product near water – for example, near a
kitchen sink, in a wet basement, or near a swimming pool, or similar locations.
14. DO NOT immerse cord or plug in water.
15. Keep cord AWAY from HEATED surfaces.
16. DO NOT let cord hang over edge of table or
counter.
17. See door cleaning instructions in Care and
Cleaning section of this manual.
18. DO NOT insert oversized foods or oversized utensils in a microwave/convection oven as they may
create a fire, an electrical arc, or risk of electrical
shock.
19. DO NOT clean with metal scouring pads. Pieces
can break off the pad and touch electrical parts
involving risk of electrical shock.
20. DO NOT use paper products not intended for
cooking when equipment is operated in convection or combination mode.
21. DO NOT store any materials, other than manufacturer's recommended accessories, in this equipment when not in use.
22. DO NOT cover racks or any other part of the oven
with metal foil. Airflow restriction will cause overheating of the oven.
23. DO NOT spray oven cleaning solutions toward the
rear inner cavity surface.This will contaminate and
damage the convection heating assembly.
SAVE THESE INSTRUCTIONS
Page 4
4
IMPORTANT SAFETY INSTRUCTIONS
To avoid risk of fire in the oven cavity:
a. DO NOT overcook food. Carefully attend oven
when paper, plastic, or other combustible materials are placed inside the oven to facilitate
cooking.
b. Remove wire twist-ties from paper or plastic
bags before placing bag in oven.
c. If materials inside the oven ignite, keep oven
door CLOSED, turn oven off and disconnect the
power cord, or shut off power at the fuse or circuit breaker panel.
d. DO NOT use the cavity for storage. DO NOT
leave paper products, cooking utensils, or food
in the cavity when not in use.
Liquids such as water, coffee, or tea are able to be
overheated beyond the boiling point without appearing to be boiling due to surface tension of the liquid.
Visible bubbling or boiling when the container is
removed from the microwave oven is not always
present. THIS COULD RESULT IN VERY HOT LIQ-
UIDS SUDDENLY BOILING OVER WHEN A
SPOON OR OTHER UTENSIL IS INSERTED INTO
THE LIQUID.To reduce the risk of injury to persons:
1. Do not overheat the liquid.
2. Stir the liquid both before and halfway through
heating it.
3. Do not use straight-sided containers with narrow necks.
4. After heating, allow the container to stand in the
microwave oven for a short time before removing the container.
5. Use extreme care when inserting a spoon or
other utensil into the container.
To avoid risk of personal injury or property damage,
observe the following:
1. DO NOT deep fat fry in oven. Fat could overheat
and be hazardous to handle.
2. DO NOT cook or reheat eggs in shell or with an
unbroken yolk using microwave energy. Pressure
may build up and erupt. Pierce yolk with fork or
knife before cooking.
3. Pierce skin of potatoes, tomatoes, and similar
foods before cooking with microwave energy.
When skin is pierced, steam escapes evenly.
4. DO NOT leave oven unattended.
5. DO NOT use regular cooking thermometers in
oven when cooking in microwave or combination
mode. Most cooking thermometers contain mercury and may cause an electrical arc, malfunction,
or damage to oven.
6. DO NOT use metal utensils in oven except when
recommended by microwave food manufacturers
or recipe requires metal utensils in convection or
combination mode. Heat food in containers made
of glass or china if possible.
7. Never use paper, plastic, or other combustible
materials that are not intended for cooking. If oven
temperature is high, material may ignite.
8. Oven temperature is at least 100° F in convection
mode. Verify plastic, paper or other combustible
materials are recommended by the manufacturer
to withstand the minimum oven temperature.
9. When cooking with paper, plastic, or other combustible materials, follow manufacturer's recommendations on product use.
10. DO NOT use paper towels which contain nylon
or other synthetic fibers. Heated synthetics could
melt and cause paper to ignite.
11. DO NOT heat sealed containers or plastic bags
in oven. Food or liquid could expand quickly and
cause container or bag to break. Pierce or open
container or bag before heating.
12. Racks, utensils, rack guides, and oven surfaces
may become hot during or after use. Use utensils
or protective clothing, like pan grips or dry oven
mitts, when necessary to avoid burns.
13. DO NOT unplug oven immediately after use.
Internal fan must cool oven to avoid damage of
electrical components.
14. To avoid pacemaker malfunction, consult physician or pacemaker manufacturer about effects of
microwave energy on pacemaker.
CAUTION
SAVE THESE INSTRUCTIONS
WARNING
WARNING
Page 5
5
Installation
Unpacking Oven
• Inspect oven for damage such as
dents in door or inside oven cavity.
•Report any dents or breakage to
source of purchase immediately.
Do not attempt to use oven if
damaged.
•Remove all materials from oven
interior.
• If oven has been stored in extremely cold area, wait a few hours
before connecting power.
Oven Placement
• Do not install oven next to or above
source of heat, such as pizza oven
or deep fat fryer. This could cause
microwave oven to operate improperly and could shorten life of electrical parts.
• Allow enough room for air movement around oven.
• Install oven on level countertop
surface.
• Outlet should be located so that
plug is accessible when oven is in
place.
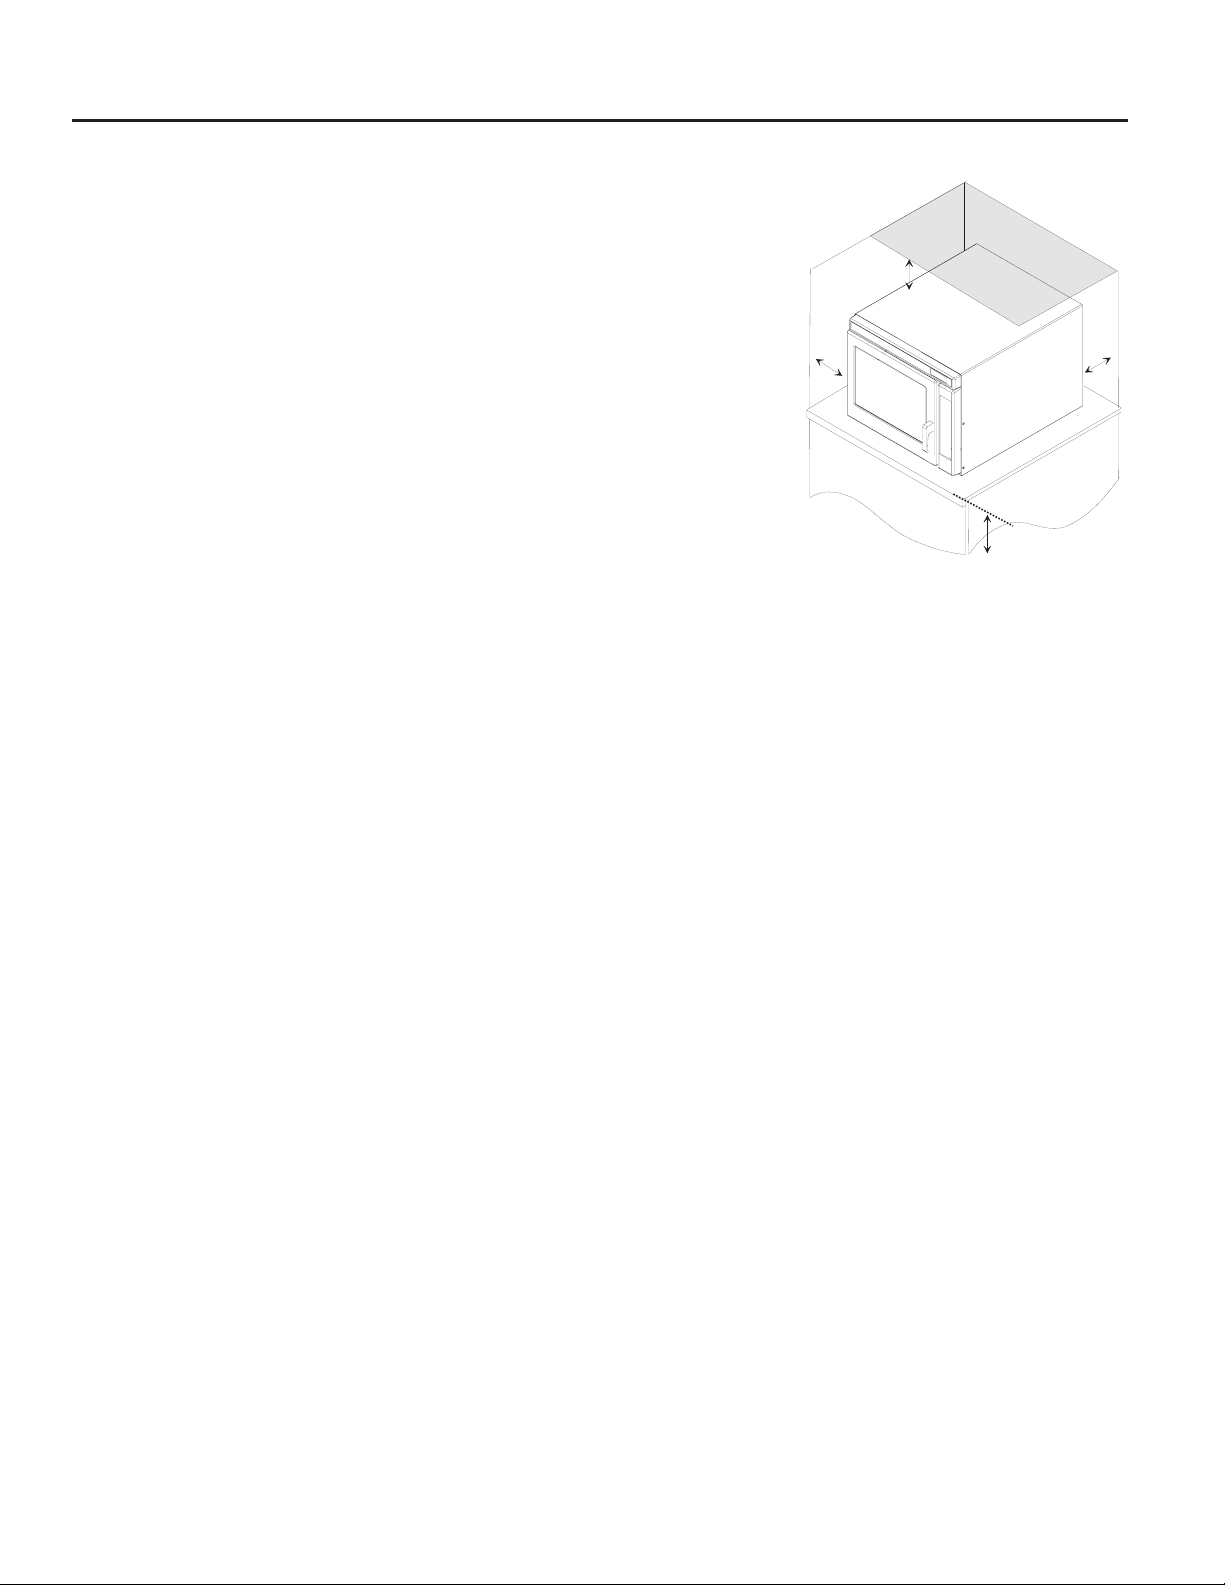
Oven Clearances
A— Allow at least 4” of clearance
around top and sides of oven.
Proper air flow around oven
cools electrical components.
With restricted air flow, oven
may not operate properly and
life of electrical parts is reduced.
B— Install combination oven so oven
bottom is at least 3 feet (36 inches) above floor.
Built-In Capability
Refer to installation instructions.
For more information call:
1-800-843-0304 U.S.A.
1-866-587-2002 Canada
A
A
B
A
Page 6

6
Display and Features
Your oven will be packed with the following materials:
Glass Turntable.......................1 each
Owner's Manual and
Cooking Guide........................1 each
Rotating Ring..........................1 each
This microwave oven is designed for
household use only. It is not recommended for commercial purposes
and will void the warranty.
NOTE: A beep
sounds when a pad
on the control panel
is touched, to indicate setting has been
entered.
OVEN SPECIFICATIONS
Power Supply 120 VAC,
60 Hz
Input Power 1,500 W
Cooking Power 1,000 W
(IEC 60705
Standard)
Frequency 2,450 MHz
Rated Current 13 A
Outer Dimensions 22
5
⁄8" x 147⁄8"
(WxHxD) x 20"
Cavity Volume 1.5 Cu. Ft.
Net Weight 52 lbs.
Convection / Convection Combination
Microwave
FOR RECIPES REQUIRING STIRRING OR TO
CHECK FOOD WITHOUT CANCELING COOKING
PROGRAM - PRESS START/PAUSE
Page 7

7
1. DISPLAY – The Display
includes a clock and indicators
to tell you time of day, cooking
time settings and cooking functions selected.
2. CONV COOK – Touch this pad
to operate the oven for convection cooking only. See page 17.
3. AUTO BAKE – Touch this pad to
automatically bake frozen pizza,
muffins, biscuits and frozen
French fries using both
microwave and convection energy alternately. See page 19.
4. AUTO ROAST — Touch this pad
to automatically roast beef,
chicken, turkey breasts and pork
using both microwave and convection energy alternately. See
page 19.
5. BAKE — Touch this pad to pro-
gram baking time and heat for a
cooking cycle using both
microwave energy and convection energy. See page 18.
6. ROAST — Touch this pad to pro-
gram the amount roasting time
and heat for a cooking cycle
using both microwave energy
and convection energy. See
page 18.
7. SENSOR COOK — Touch this
pad to cook 10 types of foods.
The oven's sensor will tell the
oven how long to cook depending on the amount of humidity
coming from the food. See page
15.
8. SENSOR POPCORN — Touch
this pad when popping commercially packaged popcorn in your
microwave oven. The oven's
sensor will tell the oven how
long to cook depending on the
amount of humidity it detects
from the popcorn. See page 15.
9. SENSOR REHEAT — Touch
this pad to reheat precooked,
room-temperature or refrigerated foods. The oven's sensor will
tell the oven how long to cook
depending on the amount of
humidity coming from the food.
See page 15.
10. DEFROST AUTO/TIME —
Touch this pad once to automatically defrost Meat, Poultry, Fish
or Bread according to weight.
Touch this pad twice to defrost
most other frozen foods by time.
See page 13.
11. RAPID DEFROST 1lb. – Touch
this pad for rapid defrosting of
one pound of frozen food. See
pages 13-14.
12 EASY COOK — Touch this pad
to set and start cooking at 100%
power. See page 8.
13. PROGRAM — Touch this pad to
manually set the cooking time
and power level. See page 12.
14. WARM HOLD — Touch this pad
to keep hot, cooked foods warm
in your oven for up to 99 minutes. See page 9.
15. POWER LEVEL — Touch this
pad to select a cooking power
level. See page 12.
16. MORE + - Touch this pad to add
10 seconds of cooking time
each time it is pressed. See
page 9.
17. LESS - - Touch this pad to sub-
tract ten seconds of cooking
time each time it is pressed.
See page 9.
18. CANCEL/STOP — Touch this
pad to cancel a currently running program or erase a cooking
cycle being programmed. See
page 8.
19. START/PAUSE — Touch this
pad to start a program or to
pause the oven during cooking
or defrosting. See page 8.
20. HELP — Help displays feature
information and helpful hints.
See page 8.
21. REMINDER — Use this pad as
an alarm clock without stopping
the oven. See page 9.
22. RECALL — Touch this pad to
repeat the previous cooking
cycle. See page 8.
23. CLOCK — Touch this pad to
enter the time of day. See page
8.
24. CONTROL SET-UP — Touch
this pad to change the oven's
default settings for volume,
clock, scroll speed, units of
weight and language. See page
8.
25. TIMER — Touch this pad to set
the kitchen timer. See page 8.
Page 8
8
Display and Features (cont’d)
12-Hour Clock and
Timer
Oven is equipped with a 12-hour
clock and a timer that can be set up
to 99 minutes and 99 seconds. Clock
does not display AM or PM.
To set clock:
1. Touch CLOCK
pad.
• ENTER TIME
OF DAY scrolls
through display.
2. Enter desired
time by using digit
touch pads.
• TOUCH START
scrolls through
display.
3. Touch START/
PAUSE.
To set timer:
1. Touch TIMER
pad.
• ENTER TIME
IN MIN. AND
SEC. scrolls
through display.
2. Enter desired
time by using digit
touch pads.
•Maximum
amount of time
is 99 minutes
and 99 seconds.
• TOUCH TIMER
scrolls through
display.
3. Touch TIMER.
•To cancel timer
at any time,
press TIMER
pad.
Start/Pause
This pad will start the
function you set, or
pause the oven temporarily during
cooking or defrosting. Press again to
restart oven from a pause.
Cancel/Stop
This pad cancels a
currently running
program and erases a cooking cycle
being programmed.
Recall
This feature enables
you to repeat the
previous cooking cycle without having to reprogram the oven. To use
simply press CANCEL/STOP and
then RECALL.
Child Lock
Child Lock prevents acci-
dental programming by
children or when cleaning the oven
control. To set the child lock, press and
hold the 0 pad until LOCKED appears
in the display and tones are heard.
During Child Lock mode, LOCKED
displays when a touch pad is pressed.
To cancel child lock, touch and hold 0
until LOCKED disappears from display. After Child Lock is turned off, the
time of day displays and cooking functions return to normal.
Easy Cook
Press the EASY
COOK pad for each
minute of microwave cooking time
desired. At the end of the cooking
cycle, tones will sound.
To use Easy Cook:
1. Touch the EASY COOK pad for
each minute of microwave time
desired.
2. At the end of the cooking cycle,
the oven stops and tones sound.
Help
HELP displays feature
information and helpful
hints. To use the HELP feature, simply press the HELP pad, and then the
feature pad you would like information about. Descriptive information
about that feature will be scrolled
through the display. After the help
information is displayed, oven leaves
help mode.
Control Set-up
This oven is designed
for individual prefer-
ences such as language
and volume control. To change an
option:
1. Press the CONTROL SET UP
pad
2. Press the pad for the option you
want to change.
3. Oven display scrolls selections
for that option.
4. Press pad for the desired selection for that option.
5. Oven makes change and leaves
option mode.
Function Pad Option
Volume 1 Mute, low, medium, loud
Clock 2 On or Off
Scroll Speed 3 Slow, normal or fast
Units 4 Lbs. and ° F or Kg ° C
Demo 5 On or off
Language 6 English or Spanish
Page 9

9
Reminder
The reminder feature
may be used as an
alarm clock. The oven does not
operate. The reminder time can be
set to activate up to 12 hours after
current time of day.
To program a reminder:
1. Press REMINDER pad.
• ENTER REMIND TIME scrolls
through display.
2. Enter desired time of day using
the digit touch pads.
• TOUCH REMINDER scrolls
through display.
3. Touch REMINDER pad.
• REMINDER SET scrolls
through display once.
•To cancel reminder program
press REMINDER followed by
the CANCEL/STOP pad.
5. Reminder sounds and displays
REMINDER at selected time.
Oven then leaves reminder
mode.
Warm/Hold
This feature safely
keeps cooked food
warm in your oven for up to 99 minutes using microwave energy. You
can use WARM/HOLD by itself or to
automatically follow a timed cooking
cycle.
Do not use more than one complete
WARM/HOLD cycle on food.
To use WARM/HOLD:
1. Put hot cooked food in the oven
and close the door.
•Food that is covered during
cooking should be covered
during WARM/HOLD.
•Pastry items (pies, turnovers,
etc.) should be uncovered during WARM/HOLD.
• Complete meals kept warm on
a dinner plate should be covered during WARM/HOLD.
2. Press WARM/HOLD pad.
• TOUCH START scrolls
through display.
3. Press START/PAUSE pad.
• WARM displays.
•To cancel WARM/HOLD open
oven door at any time or press
the CANCEL/STOP pad.
To use WARM/HOLD after another
cooking cycle.
1. After entering the timed cooking
cycle instruction, press WARM/
HOLD before touching START/
PAUSE pad.
2. When the last cooking cycle is
over, tones sound and WARM
displays. Oven will continue to
run.
More and
Less
The MORE and
LESS functions of
this oven adjust the
cooking cycle’s cook
time. MORE adds 10 seconds to the
cook time, LESS subtracts 10 seconds.
• Use MORE or LESS when cooking
time is counting down in the display. MORE and LESS cannot be
set when “SENSING” is displayed.
• MORE and LESS do not adjust
cook time for the DEFROST and
WARM/HOLD cooking cycles.
• Press MORE or LESS pads during
active cooking cycle.
•For convection cooking, MORE or
LESS are used as temperature
selection pads.
Page 10

10
Cooking Methods
Microwave Cooking
Microwave cooking uses high frequency energy waves to heat the
food. When cooking, microwave
energy causes food molecules to
move rapidly. This rapid movement
between the food molecules creates
heat, which cooks the food.
Microwaves cook moist food and
foods of varying fat content more
quickly.
Convection Cooking
Convection cooking utilizes both a
convection element and fan to evenly
distribute heated air throughout the
oven cavity. By circulating air, no hot
or cold spots occur, creating a consistent temperature envelope around
the food. These consistent temperatures cook food evenly and reduce
cooking time.
Combination Cooking
The combination mode uses both the
speed of microwave energy and
browning of convection cooking to
yield fast, high quality food.
Microwave Convection Combination
Heat Source Microwave energy. Heated air, circulated in Microwave energy and
oven cavity. circulated heated air.
Heat Conduction Heat produced within food Heat conducted from outside Food heats both through
by energy penetration. of food to inside. conduction from outside
and within from energy.
Primary Benefit Fast, high efficiency heating. Browns foods and seals Shortened heating time from
in flavors. microwave energy, browning
and crisping from convection.
Page 11

11
Cookware Suggestions
The cooking method used determines the cookware that can be used. To simplify choices, use cookware that is approved
for all three cooking methods: microwave, convection and combination.
Canning
Canning is not recommended in
microwave or combination ovens.
When heating liquids in the microwave oven, especially for extended
periods of time, superheating can
occur. This condition may result in
boil over or possible eruption when
the liquid is disturbed or a jar is
sealed.
Damage incurred by using the oven
for canning, or attempting to can, is
not covered under warranty.
Oven Rack
A metal rack is provided with the
oven for use in convection and
combination oven modes. The
metal rack should not be used in the
oven during microwave only mode.
Metal will cause arcing, which could
result in damage to the oven.
Popcorn
Popcorn should only be cooked in a
specially designed microwave popcorn popper or in a commercially prepared microwave-safe popcorn bag.
Do not use a popper designed to
focus or concentrate energy or heat.
Popcorn should also be popped only
while oven is in microwave mode.If
convection heat is present, popcorn
may scorch, burn or catch fire.
If using a microwave popcorn popper,
do not use the popcorn pad. Follow
manufacturer’s instructions for time
setting.
Select Avoid
Heat resistant glass Non-heat resistant glass
Ceramics or china Metal trimmed ceramics or china
Pyrex Metal cookware
Heat resistant non-stick utensils, Metal cooking utensils
such as spatulas
Microwave cookware that is safe Paper products, straw, wicker and
to 450° F wood
Handles that are secure Cookware with loose or broken
handles
Do not use metal utensils or pots in the oven.
Cooking hints
Covering A cover will trap heat and steam, causing food to heat more
quickly. Always use a lid approved for both convection and
microwave cooking.
Stirring Redistributes heat in foods. Always stir from the outside toward
the center of the dish.
Piercing Pierce the shell, skin or membrane of foods before heating to
prevent bursting.
Turning Large foods should be turned so that the top and bottom heat
evenly.
Arrangement Do not stack food. Arrange in a single layer on a dish safe for
combination cooking.
Standing Foods often need to stand from 2 to 15 minutes after being
Time removed from the oven. This finishes cooking. Normally an
internal temperature will continue to rise approximately 5 to
10° F during standing time.
Spacing Arrange individual foods, such as potatoes, in a circle and at
least 1 inch apart. This helps food heat more evenly.
Page 12

12
Microwave Power Levels
Your microwave oven has 10 cook power levels to let you cook or heat a wide
variety of foods. Refer to the chart below for suggestions:
Power
Level Use
10 • Boiling water.
(HIGH) • Making candy.
• Cooking poultry pieces, fish and vegetables.
• Cooking tender cuts of meat.
•Whole poultry.
9•Reheating rice, pasta and vegetables.
8•Reheating prepared foods quickly.
• Reheating sandwiches.
7•Cooking egg, milk and cheese dishes.
• Cooking cakes, breads.
• Melting chocolate.
6•Cooking veal.
• Cooking whole fish.
• Cooking puddings and custard.
5•Cooking ham, whole poultry and lamb.
• Cooking rib roast, sirloin tip.
4•Thawing meat, poultry and seafood.
3•Cooking less tender cuts of meat.
• Cooking pork chops, roast.
2•Taking chill out of fruit.
• Softening butter.
1•Keeping casseroles and main dishes warm.
• Softening butter and cream cheese.
0•Standing time.
Microwave Power Level Chart
Microwave Cooking
Manual Programming
To manually set the cooking time and
power level.
1. Press PROGRAM.
• ENTER COOKING
TIME scrolls
through display.
2. Enter desired cooking time using digit
touch pads.
• TOUCH START
OR POWER scrolls
through display.
3. Press POWER
LEVEL pad to
change power level,
if desired.
4. Press START/
PAUSE pad.
5. At end of cooking
cycle, tones sound
and oven turns off.
1. Press PROGRAM.
• ENTER COOK-
ING TIME scrolls
through display.
2. Enter desired cooking time using digit
touch pads.
• TOUCH START
OR POWER scrolls
through display.
3. Press POWER
LEVEL.
• ENTER POWER
LEVEL 1 - 10
scrolls through display.
Stage Cooking
Stage cooking allows consecutive
cooking cycles without interruption.
Tw o different cooking cycles can be
used.
To use stage cooking:
Page 13

13
4. Press digit touch pad
to adjust microwave
energy.
•For a lower
microwave power,
press pads 1 (for
10%) through 9 (for
90%). 0 turns off
the microwave
power completely.
5. Press PROGRAM.
• ENTER COOKING
TIME scrolls
through display.
6. Enter desired cooking time using digit
touch pads.
• TOUCH START
OR POWER scrolls
through display.
7. Press POWER
LEVEL
• ENTER POWER
LEVEL 1 - 10
scrolls through display.
8. Press digit touch pad
to adjust microwave
energy for second
stage.
•For a lower
microwave power,
press pads 1 (for
10%) through 9 (for
90%). 0 turns off
the microwave
power completely.
9. Press START/
PAUSE pad.
•Oven begins to
cook.
• At end of first
stage, oven beeps
once to signal the
transition.
10. At the end of the
cooking cycle, oven
signals and turns
off.
NOTE: Auto Defrost can be used in
stage cooking in the first stage only.
Auto Defrost
Four different preset defrost settings
are available depending on food
being defrosted. For added convenience, a built-in tone reminds you to
check, turn over, separate or
rearrange food during the defrost
cycle.
1. Press DEFROST
AUTO/TIME once.
• MEAT TOUCH 1
POULTRY TOUCH
2 FISH TOUCH 3
BREAD TOUCH 4
scrolls through display.
2. Press appropriate
digit pad.
• ENTER WEIGHT
scrolls through display.
3. Enter weight using
digit touch pads.
•Weight ranges for
meat, poultry and
fish are 0.1 to 6.0
lbs.
•Weight range for
bread is 0.1 to 1.0
lbs.
4. Press START/
PAUSE pad.
5. At end of cooking
cycle, tones sound
and oven turns off.
Time Defrost
Defrost for a desired length of time.
1. Press DEFROST
AUTO/TIME twice.
• ENTER DEFROST
TIME scrolls
through display.
2. Press appropriate
digit touch pads.
• TOUCH START
scrolls through display.
3. Press START/
PAUSE pad.
4. At the end of the
defrost time, tones
sound and oven
turns off.
Rapid Defrost
Preset to defrost one lb. of frozen
food.
1. Press RAPID
DEFROST.
• MEAT TOUCH 1
POULTRY TOUCH
2 FISH TOUCH 3
scrolls through display.
2. Press appropriate
digit touch pads.
• TOUCH START
scrolls through display.
3. Press START/
PAUSE pad.
4. At the end of the
defrost time, tones
sound and oven
turns off.
continued…
Page 14

14
Defrost Notes:
•Remove fish, shellfish, meat and
poultry from its original closed
paper or plastic package.
•Form the meat into a shape of a
doughnut before freezing.
• Remove thawed meat during
defrost and then continue defrosting.
• Place foods in a shallow glass baking dish.
• The oven beeps approximately
midway through a defrost cycle to
remind you to check the food.
Pause the oven by opening the
door. Once food has been checked
or rearranged, close door and
press START/PAUSE to resume
the defrost cycle.
Microwave Cooking (cont’d)
Sensor Operating
Instructions
Sensor Cook allows you to cook most
of your favorite foods without selecting cooking times and power levels.
The display will indicate SENSING
during the initial sensing period. The
oven automatically determines
required cooking time for each food
item. When the internal sensor
detects a certain amount of humidity
coming from the food, it will tell the
oven how much longer to heat. The
display will show the remaining heating time. For best results for cooking
by Sensor, follow these recommendations.
1. Food cooked with the sensor
system should be at normal
storage temperature.
2. Glass Tray (TURNTABLE) and
outside of container should be
dry to assure best cooking
results.
3. Foods should always be covered
loosely with microwavable plastic
wrap, waxed paper, or a lid.
4. Do not open the door or touch
the CANCEL/STOP pad during
the sensing time. When sensing
time is over, the oven beeps
twice and the remaining cooking
time will appear in the display
window. At this time you can
open the door to stir, turn, or
rearrange the food.
Sensor Cooking Guide
Appropriate containers and coverings help assure good Sensor cooking results.
1. Always use microwavable containers and cover them with lids
or vented plastic wrap.
2. Never use tight-sealing plastic
covers. They can prevent steam
from escaping and cause food to
overcook.
3. Match the amount to the size of
the container. Fill containers at
least half full for best results.
4. Be sure the outside of the cooking container and the inside of
the microwave oven are dry
before placing food in the oven.
Beads of moisture turning into
steam can mislead the sensor.
Page 15

15
1. Put popcorn in the
center of the
turntable.
• DO NOT use the
metal convection
cooking rack for
popcorn cooking.
2. Press SENSOR
POPCORN.
•Oven will cook
popcorn automatically using the sensor system.
3. Oven begins
Popcorn cycle.
•To end cycle, open
door or press
CANCEL/STOP.
4. At end of cooking
cycle, tones sound
and oven turns off.
1. Press SENSOR
REHEAT.
• SELECT MENU 1 -
3 scrolls through
display.
2. Select desired category using digit pads.
• Category 1 is for
an average sized
dinner plate
containing 1 to 2
cups of food.
• Category 2 is to
reheat 1 to 4 cups
of soup or sauce in
a bowl or casserole
dish.
• Category 3 is to
reheat a 1 to 4 cup
portion of a casserole in a casserole
dish or small bowl.
3. Oven begins Sensor
Reheat cycle.
• SENSING displays.
•To end cycle, open
door or press
CANCEL/STOP.
4. At end of cooking
cycle, tones sound
and oven turns off.
Sensor Popcorn
A sensor detects steam from the food
and automatically adjusts cook time
for best cooking results. Commercially packaged popcorn in 3.0 to
3.5 oz. bags can be used.
Sensor Reheat
Designed to reheat precooked, roomtemperature or refrigerated foods
easily and quickly by detecting steam
from the food and automatically
adjusting cook time for best heating
results.
DO NOT leave microwave oven
unattended while popping corn.
CAUTION
To avoid risk of personal injury
or property damage, do not
cook popcorn with the metal
convection cooking rack.
WARNING
Sensor Cook
A sensor detects steam from the food
and automatically adjusts cook time
for best cooking results for most
foods.
1. Press CANCEL/
STOP.
2. Press SENSOR
COOK.
• SELECT MENU
0 - 9 scrolls
through display.
• See table on page
16 for category
options.
3. Enter desired category using touch
pads.
4. Oven begins Sensor
Cook cycle.
• SENSING displays.
•To end cycle, open
door or press
CANCEL/STOP.
5. At end of cooking
cycle, tones sound
and oven turns off.
Page 16

16
Microwave Cooking (cont’d)
Food Serving amount and recommendations
1Potatoes Serving size is 1 to 4 medium, about 8 to 10 ozs. (225g to 280g) each.
Pierce each potato several times with a fork and place around the edge of the oven tray, at
least 1 inch (2.5cm) apart.
2Fresh Serving size is 1 to 4 cups (250mL to 1L).
Vegetables Place moist vegetables in a microwavable container.
Add 2 to 4 tablespoons water.
Cover with plastic wrap and vent.
Most vegetables need stirring and 2 to 3 minutes standing time after cooking.
3Frozen Serving size is 1 to 4 cups (250mL to 1L).
Vegetables Remove from package and place vegetables in a microwavable container.
Add 2 to 4 tablespoons water.
Cover with plastic wrap and vent.
Most vegetables need stirring and 2 to 3 minutes standing time after cooking.
4Frozen Entrée size is 10 to 20 ozs. (280g to 560g).
Entrée Remove from outer package. Loosen cover on three sides.
If entrée is not in a microwave-safe container, place it on a plate, cover with plastic wrap
and vent.
Most entrées need 2 to 3 minutes standing time after cooking.
5 Rice Follow package instructions for ingredient amounts.
Place rice and liquid (water, chicken or vegetable stock) in a microwave-safe container,
cover with casserole lid or plastic wrap and vent.
Most rice needs 2 to 3 minutes standing time after cooking.
6 Casserole Serving size is 1 to 4 cups (250mL to 1L).
Combine the ingredients per the recipe in a 1- to 2-quart (1- to 2-L) casserole dish.
Cover with plastic wrap and vent.
After cooking is complete, allow 3 minutes standing time.
7Ground Serving size is 4 to 32 ozs. (
1
⁄4
to 2 lbs.)
Meat Crumble meat into a microwave safe container.
Season and cover with plastic wrap.
Vent cover for well-done meat.
Cover dish for medium cooked meat (such as meat to be used in another dish and cooked
further).
8 Fish Serving size is 4 to 32 ozs. (
1
⁄4 to 2 lbs.)
Seafood Place the food around the sides of a microwave-safe container. Season and add
1
⁄4 to
1
⁄2 cup (60 to 125mL) liquid (wine, water, salsa, etc.) if desired.
Cover with plastic wrap and vent.
9 Scrambled Serving size is 2 to 5 eggs.
Eggs Break eggs into a 4-cup (1L) measuring cup or 1-quart (1L) casserole dish.
Add 1 tablespoon (15mL) milk or water per egg and beat. Cover with plastic wrap and vent.
When cooking is compete, remove from oven, stir and allow 1 to 2 minutes standing time.
0Frozen Serving size is 1 or 2 pizzas.
Pizza Use only frozen pizza intended for microwave use.
Do not cover.
Follow package directions.
Sensor Cooking Guide
Page 17

17
Convection Cooking
➣ To avoid risk of burns, handle
utensils, racks, and door with
care. Allow oven, utensils,
and racks to cool before
cleaning. Oven, utensils, and
racks, become hot during
operation.
➣ To avoid risk of personal
injury or property damage,
do not use oven without
turntable in place.
➣ To avoid risk of personal
injury or property damage,
do not cover turntable or rack
with aluminum foil.
➣ To avoid risk of property
damage, do not use lightweight plastic containers,
plastic wraps or paper products during a convection
cooking cycle.
CAUTION
Convection Rack
Use the rack for convection and combination cooking only. Do not use in
microwave-only mode.
To operate the oven for convection
cooking only, use manual time entry
only. The following instructions are
for convection cooking only. For
combination cooking, see page 18.
Manual Programming
with Preheat
1. Press CONV COOK
pad under Convection.
• 350F TOUCH
MORE OR LESS
FOR TEMP SET
OR START OR
ENTER COOKING
TIME scrolls
through display.
2. Adjust temperature
setting as desired
using MORE or LESS
touch pads.
•Temperature range
is 225° F to 450° F.
3. Press START/
PAUSE pad.
• PREHEAT displays
with selected temperature.
• PLACE FOOD ON
RACK displays
when oven is preheated.
4. Open door, place
food on convection
rack, and close door.
• ENTER COOKING
TIME scrolls
through display.
5. Enter desired cooking
time using digit touch
pads.
• TOUCH START
scrolls through display.
6. Touch START/
PAUSE.
• At the end of cook-
ing time, tones
sound, END displays and oven
turns off.
1. Press CONV COOK
pad under Convection.
• 350F TOUCH
MORE OR LESS
FOR TEMP SET
OR START OR
ENTER COOKING
TIME scrolls
through display.
2. Adjust temperature
setting as desired
using MORE or LESS
touch pads.
•Temperature range
is 225° F to 450° F.
3. Enter desired cooking
time using digit touch
pads.
• TOUCH START
scrolls through display.
4. Touch START/
PAUSE.
• At the end of cook-
ing time, tones
sound, END
displays and oven
turns off.
Manual Programming
without Preheat
To program the amount of time and
heat for a direct cooking cycle:
Page 18

18
Combination Cooking (microwave and convection)
➣ To avoid risk of burns, handle
utensils, racks, and door with
care. Allow oven, utensils,
and racks to cool before
cleaning. Oven, utensils, and
racks, become hot during
operation.
➣ To avoid risk of personal
injury or property damage,
do not use oven without
turntable in place.
➣ To avoid risk of personal
injury or property damage,
do not cover turntable or
rack with aluminum foil.
➣ To avoid risk of property
damage, do not use lightweight plastic containers,
plastic wraps or paper products during a convection
cooking cycle.
CAUTION
The following instructions are for
combination cooking only.
For convection cooking, see page 17.
Notes:
• Metal utensils should not be used
on the metal rack during combination cooking. Use glass utensils
whenever possible.
•A metal muffin tin or small, shallow
metal tray can be used if glass pan
is not available.
• If any arcing occurs, discontinue
use of that utensil.
Combination Roast
To program the amount of time and
heat for a cooking cycle using both
microwave energy and convection
energy.
1. Put food on the oven
rack and close oven
door.
2. Press ROAST pad
under Convection
Combination.
• 350F TOUCH
MORE OR LESS
FOR TEMP SET
OR ENTER
COOKING TIME
scrolls through display.
3. Adjust temperature
setting as desired
using MORE or
LESS touch pads.
•Temperature range
is 225° F to 450° F.
•Microwave energy
cannot be adjusted
and is set at 40%.
• Cooking time can
be set from
0:01–99:99.
4. Touch START/
PAUSE.
• At the end of cook-
ing time, tones
sound, END displays and oven
turns off.
Combination Bake
To program the amount of time and
heat for a cooking cycle using both
microwave energy and convection
energy.
1. Put food on the oven
rack and close oven
door.
2. Press CANCEL/
STOP.
3. Press BAKE pad
under Convection
Combination.
• 375F TOUCH
MORE OR LESS
FOR TEMP SET
OR ENTER
COOKING TIME
scrolls through display.
4. Adjust temperature
setting as desired
using MORE or
LESS touch pads.
•Temperature range
is 225° F to 450° F.
•Microwave energy
cannot be adjusted
and is set at 10%.
• Enter cooking time
in minutes.
5. Touch START/
PAUSE.
• At the end of cook-
ing time, tones
sound, END displays and oven
turns off.
Page 19

19
Notes:
• When cooking frozen pizzas, place
the pizza directly on the convection
rack. Do not use a pizza pan or aluminum foil. Place the convection
rack securely on turntable and
away from the sides of the oven.
•For other baking/roasting place
food in appropriate utensil, then
place on convection rack.
Auto Bake
To automatically bake frozen pizza,
muffins, biscuits and frozen french
fries using both microwave and convection energy alternately:
1. Press AUTO BAKE
pad under Convection
Combination.
• FROZEN PIZZA
TOUCH 1
MUFFINS
TOUCH 2
BISCUIT/
DINNER ROLL/
B. STICK
TOUCH 3
FROZEN FRENCH
FRIES TOUCH 4
scrolls through display.
1. Press AUTO ROAST
pad under Convection
Combination.
• BEEF TOUCH 1
WHOLE CHICKEN
TOUCH 2
TURKEY BREASTS
TOUCH 3
PORK TOUCH 4
scrolls through display.
2. Touch appropriate
digit touch pad.
• ENTER WEIGHT
scrolls through display.
3. Use digit touch pads
to enter weight.
4. Press START/
PAUSE pad.
• If additional infor-
mation is needed,
oven will prompt in
display.
5. At the end of cooking
time, tones sound,
END displays and
oven turns off.
Auto Roast
Auto roast automatically roasts beef,
chicken, turkey breasts and pork
using both microwave and convection
energy alternately.
Chicken 2.5–6.0 lbs.
Beef 2.0–4.0 lbs.
Tu rkey 3.0–6.0 lbs.
Pork 2.0–4.0 lbs.
The following instructions are for
combination cooking only.
For convection cooking, see page
17.
2. Touch appropriate
digit touch pad.
• Muffins and biscuits
require a preheat
cycle and should
be placed on the
rack after the signal
sounds.
•Frozen pizza MUST
be placed directly
on the convection
cooking rack. DO
NOT use a metal
pizza tray or aluminum foil.
•Muffins, biscuits
and dinner rolls can
use metal muffin
tins if glass pan is
not available.
• Bread sticks and
frozen french fries
can be placed on a
small shallow metal
pan, such as a tray,
if glass pan is not
available.
3. Press START/PAUSE
pad.
• If additional infor-
mation is needed,
oven will prompt in
display.
4. At the end of cooking
time, tones sound,
END displays and
oven turns off.
Page 20

20
Cooking Tips
Meat Basics
For specific questions regarding
meat preparation, handling, or storage contact USDA (United States
Department of Agriculture) Meat &
Poultry Hotline at (800) 535-4555.
Handling Hints
• When shopping, put meat in its
own separate plastic sack to keep
drips off other foods.
•Defrost frozen meats in refrigerator, not at room temperature.
•Keep meat cool and covered until it
is time to cook.
•Wash hands with warm soapy
water before and after handling
meat or raw egg.
• Thoroughly wash any surface or
utensil raw meat or egg touched.
• Do not put cooked meat on the
same plate that held raw meat.
Cooking Tips
• Marinate meat in the refrigerator.
Throw out excess marinade that
came into contact with meat.
• Use an oven-proof meat thermometer.
• Cook meat to internal temperature
recommended by USDA.
•When reheating foods, heat to an
internal temperature of at least
165° F.
• While cooking meats, turn over at
least once.
Storage Safety
• Once carved, refrigerate unused
portion immediately.
•Keep hot foods hot and cold foods
cold when serving meals.
• Separate cooked foods into small
portions for fast cooling.
• Do not store cooked ground meats
or meals containing ground meats
for longer than 3 to 4 days in the
refrigerator.
• Do not allow cooked or uncooked
meat juices to come into contact
with ready-to-eat foods such as
fruits or vegetables.
Tenderizing
Braising is only one way to tenderize
less tender cuts. Before cooking, you
may pound, cube, marinate, or use
commercially prepared meat tenderizers.You may then use a dry method
to cook the meat.
• Marinades are acidic liquids such
as wine, citrus, or vinegar.
Marinades soften meat fibers but
only penetrate about one-fourth of
an inch into the interior of the meat.
Do not marinate meat for longer
than 24 hours.
• Pounding with a heavy meat mallet breaks down the connective tissue to tenderize meat.
• Cubing breaks down the structure
more than pounding. Cubing is
done at the meat counter.
• Commercial tenderizers are pri-
marily enzymes that work on the
outer fourth inch on a meat cut.
Make sure to follow the manufacturer’s directions.
Using a Meat
Thermometer
When using a meat thermometer,
remember to insert it at a slight
angle, in the thickest part of the meat,
away from fat and bone. The meat
should be removed when 5° F below
the desired final temperature. While
the meat sits before carving, it will
continue to cook internally, raising
the last 5° F by itself.
Meat thermometer
•Takes the guesswork out of cooking to a desired ‘doneness’.
• Helps reduce the risk of foodborne
illness.
Oven-safe Thermometer
(convection mode only)
• Inserted before the meat is placed
in the oven, this thermometer stays
with the meat while it cooks.
• The internal temperature will rise
slowly as the meat cooks.
• DO NOT use a metal thermometer
in the oven in COMBINATION
mode or MICROWAVE mode.
Instant-read Thermometer
• Not oven safe, these thermometers
are placed in the meat when it is
removed from the oven.
•While times may vary, an accurate
temperature is normally displayed
within one to two minutes.
• When using an instant-read,
remember to clean the thermometer stem with warm, soapy water
between readings.
Page 21

21
Roasting Guidelines
Tender cuts such as rib and loin cuts are best cooked by dry heat methods, such as roasting.
To r oast:
1. Heat oven to desired temperature.
2. Place roast directly from refrigerator fat side up in a shallow, non-metal pan.
3. Place roast in combination oven.
4. Remove roast and check internal temperature with a meat thermometer. DO NOT place roast inside combination
oven with thermometer.
5. Roast is done when 5° F below desired degree of finished internal temperature.
6. Transfer roast to carving board and tent loosely with aluminum foil for approximately 15 minutes.
All times and recommended temperatures are provided by the USDA, the Beef Industry Council, the National Pork
Producer’s Council, and the American Sheep Industry Council.
Recommended Approximate
Internal Oven Weight Cooking Time
Meat Cut Temperature Temperature (lbs.) (minutes)
BEEF
Boneless Rump Roast 325° F 4 to 6 25 to 30
Tip Roast 325° F 3
1
⁄2 to 4 30 to 40
Eye Round Roast 325° F 4 to 6 20 to 30
Tenderloin Roast 425° F 2 to 3 35 to 45
4 to 6 45 to 60
Rib Roast 325° F 4 to 6 26 to 42
6 to 8 23 to 35
Rib Eye Roast 350° F 4 to 6 18 to 24
PORK
Loin Roast, bone-in 350° F 3 to 5
Rib Roast, boneless 350° F 2 to 4
Tenderloin 450° F
1
⁄2
to 1
Ham bone-in, cook-before-eating 325° F 7 to 8
LAMB
Shoulder 325° F 3
1
⁄2 to 6 35 to 40
Rib Roast 375° F 1
1
⁄2 to 21⁄2 30 to 35
Rib Crown Roast, not stuffed 375° F 2 to 3 25 to 30
Loin Roast 325° F 1
1
⁄4 to 13⁄4 45 to 55
Leg, Frenched Style or 325° F 5 to 7 15 to 20
Half Shank 7 to 9 20 to 25
POULTRY (unstuffed)
Capon 325 to 350° F 4 to 8 20 to 30 mins./lb.
Cornish Hens, whole 325 to 350° F 1
1
⁄4 to 11⁄2 50-60 mins. total
Duck, whole 325 to 350° F –––– 18 to 20 mins./lb.
Goose, whole 325 to 350° F –––– 20 to 25 mins./lb.
Pheasant, whole 325 to 350° F 2 30 mins./lb.
Quail, whole 325 to 350° F –––– 20 mins. total
Tu r ke y 325° F 8 to 16 3
1
⁄2 to 51⁄2 hrs.
Very Rare 130° F
Rare 140° F
Medium Rare 145° F
Medium 160° F
Well Done 170° F
Very Well Done 180° F
Medium Rare 150° F
Medium 160° F
Well Done 170° F
To reduce the risk of foodborne illnesses, poultry must
be cooked to an internal temperature of 180° F.
All pork must be cooked to
an internal temperature of at
least 160° F to reduce the
likelihood of Trichinosis and
other food-borne illnesses.
20 minutes
per lb.
Page 22

22
Cooking Tips (cont’d)
Cookies
• Shiny, flat cookie sheets should be
used. Avoid cookie pans with high
sides—this will cause uneven
browning on the top.
• Cookie sheet should not touch the
sides of the oven or door.
Cakes
• Determine pan size from recipe
directions. Shiny pans work best for
cakes.
• Cake baked in too large a pan will
be thin and dry. Too small a pan
results in undercooked or unevenly
cooked cake and batter may spill.
Pies
• Pies should be baked in dark or
dull pans to increase browning.
•Frozen pies should be heated on
an aluminum cookie sheet.
Preheating
In most cases, you should preheat the oven before baking. For delicate baking (such as puff pastries or souffles), preheat approximately 15–20 minutes before placing food inside oven or wait 10 minutes after oven signal
beeps before placing food in oven. The extra time creates a more stable
oven temperature.
Bakeware Guidelines
Dark or dull Absorb more heat and
pans result in darker brown-
ing. Recommended
for pies and breads.
Shiny pans Recommended for
(no sides) cookies.
Shiny pans Recommended for
(sides) cakes.
Glass Pans Lower recommended
oven temperature by
25° F.
Baking Time Guidelines
Cake Pan Cups of Oven
Type Pan Size Batter Temp. Minutes
Oval 7
3
⁄4" x 53⁄4"2
1
⁄2 350° F 25 to 30
13" x 9
3
⁄4"8 350° F 25 to 30
Round, 6" 2 350° F 25 to 30
2" layer
8" 3 350° F 30 to 35
14" 10 350° F 50 to 55
Round, 8" 5 325° F 60 to 65
3" layer
12" 11 325° F 75 to 80
Half Round, 18" 9 325° F 60 to 65
2" layer
Half Round, 18" 12 325° F 60 to 65
3" layer
Square 6" 2 350° F 25 to 30
10" 6 350° F 35 to 40
16" 15
1
⁄2
350° F 45 to 50
Page 23

23
Common Baking Problems
Adjusting to a new oven can be hard, especially making a change to a convection oven. If you begin to notice consistent
problems refer to the chart below for possible solutions.
Baking Notes:
•Test cakes for doneness. Because
of variances across individual
ovens, it is best to test for the proper consistency rather than solely
relying on time and visual appearance as an indicator.
• Cake problems may be in the mixing of the batter. Overbeating can
cause cake structure to break
down and excessive shrinkage of
the cake. Underbeating can result
in lumpy cakes that may not be
cooked thoroughly. All ingredients
should be at room temperature—
not out of the refrigerator. Make
sure to follow the recipes directions
for how long the batter should be
mixed.
• Allow cake to cool in cake pan on a
rack for 10 minutes before removing. Larger cakes (over 14 inches in
diameter) may take 15 minutes. If
the cake has cooled too long,
reheat in the oven at 250° F for a
few minutes.
•Make sure to follow recipe directions and use butter or margarine
when it is listed. Using a low fat
substitute can cause a recipe to
fail.
Problem Cause
Lopsided cakes Pans touching each other or oven walls.
(bake unevenly) Batter spread unevenly in pan.
Incorrect use of aluminum foil.
Oven is not level.
Cakes, cookies, Oven not preheated.
biscuits too brown Pans touching each other or oven walls.
on bottom or top Using glass, darkened, warped or dull finish metal
pans.
Incorrect use of aluminum foil.
Oven temperature too high.
Pies don’t brown Using shiny metal pans.
Temperature set too low.
Cakes not done in Temperature too high.
center Pan too small.
Baking time too short.
Pan not centered in oven.
Cakes fall Too much shortening or sugar.
Too much or too little liquid.
Temperature too low.
Old or too little baking powder.
Pan too small.
Oven door opened frequently (peeking).
Insufficient baking.
Excessive shrinkage Too little leavening.
Mixing batter too long.
Pan too large.
Oven temperature too high.
Baking time too long.
Cakes high in middle Temperatures set too high.
Overmixing.
Too much flour.
Pans touching each other or oven walls.
Page 24

24
Care and Cleaning
Clean oven frequently to maximize
oven life, performance, and
efficiency. A dirty oven cooks
inefficiently because moisture,
spills, and grease absorb convection and microwave energy.
To prevent burns, handle utensils, racks, and door with care.
Allow oven, utensils, racks to
cool before cleaning. Oven,
utensils, and racks, become hot
during operation.
CAUTION
To avoid electrical shock which
can cause severe personal
injury or death, unplug power
cord or open circuit breaker to
oven before cleaning oven.
WARNING
Cleaning Oven Exterior
Clean the door and other exterior
surfaces with a clean cloth, sponge
or nylon pad using a mild detergent
and warm water solution. Wring cloth
well to remove excess water before
wiping oven.
• Do not use harsh or abrasive
cleaners or cleaners containing
ammonia.
Cleaning Oven Cavity
Wipe the oven inside with a soft cloth
and a mild detergent solution. Rinse
and wipe dry. Never use cleaning
powders, abrasives or other rough
pads.
Excessive oil splatters on the inside
top will be difficult to remove if left to
sit. Wipe splatters with a wet paper
towel as soon as they occur.
•Wear protective rubber gloves
when cleaning oven.
• Use only nylon scouring pad or
equivalent, to aid in removing soil
or build-up from the oven interior.
• Do not use knife, metal utensil,
or steel wool pad to remove baked
on material. This will damage the
non-stick coating.
Cleaning Oven Door
For best performance and safety, the
inner door panel and the oven front
frame should be free of food or
grease build-up. Wipe often with a
mild detergent and then rinse. Wipe
dry with a soft cloth. DO NOT use
cleaning powders, abrasives or other
rough pads.
After cleaning the control panel,
touch CANCEL/STOP pad to clear
any entries that might have been
accidentally made while cleaning. To
avoid this problem, Child Lock may
be set prior to cleaning.
Cleaning Notes:
• Clean oven after every use.
• Clean interior, exterior, and door
according to instructions.
• Clean spills immediately.
•Remove oven racks, and clean
according to instructions.
•Wipe dry after cleaning.
Oven Turntable
The turntable and rotating ring are
removable. They should be handwashed in warm (not hot) water and
a mild detergent. Dry thoroughly with
a soft cloth. DO NOT use cleaning
powders, abrasives, steel wool, or
other rough pads. DO NOT put in an
automatic dishwasher.
•Turntable may be cleaned at the
sink. Be careful not to chip or
scratch the edges as this could
cause the turntable to break during
use.
•Rotating ring must be cleaned regularly.
•Turntable must ALWAYS be in
place when using this oven.
Page 25

25
Tr oubleshooting
To avoid risk of electrical shock which can cause severe personal injury or death, do not remove outer case at any
time. Only an authorized servicer should remove outer case.
WARNING
Operation
Topic Possible Cause Solution
Oven not working Power outage • Make sure appliance is plugged in.
•Verify that circuit breaker is not tripped.
• Replace household fuse but do not change fuse capacity.
Arcing or sparking Cookware • Verify cookware is safe for microwave use.
Metal foil • Do not use metal foil in oven.
Running oven empty • DO NOT run oven empty.
Oven light not working Normal • Is oven operating? Oven must be operating for light to
come on.
Bulb burned out • Light bulb may need to be replaced.
Clock and timer not Power outage • Make sure appliance is plugged in.
working • Verify that circuit breaker is not tripped.
• Replace household fuse but do not change fuse capacity.
Light reflection around Normal • Light is reflected from light located between the oven cavity
microwave and the outer wall of oven.
Page 26

26
Warranty
IN NO EVENT SHALL MAYTAG BE LIABLE FOR INCIDENTAL OR CONSEQUENTIAL DAMAGES.
This warranty gives you specific legal rights, and you may have others which vary from state to state. For example, some states do
not allow the exclusion or limitation of incidental or consequential damages, so this exclusion may not apply to you.
FULL ONE Year
Amana Appliances will repair or replace, including related labor, any part which proves defective as to workmanship or materials.
Limited Warranty
After one year from the date of original retail purchase, Amana will provide a free part, as listed below, to replace
any part that fails due to a defect in materials or workmanship. The owner will be responsible for paying all other
costs including mileage and transportation.
Second through Fifth Year
Amana will provide replacement magnetron, touchpad, and microprocessor, part and labor, which proves defective
as to workmanship or materials.
What is not covered by these
warranties
• Replacement of household fuses, resetting of circuit
breakers, or correction to household wiring or plumbing.
• Normal product maintenance and cleaning, including
light bulbs.
• Products with original serial numbers removed, altered,
or not readily determined.
• Products purchased for commercial, industrial, rental,
or leased use.
• Products located outside of the United States or
Canada.
•Premium service charges, if the servicer is requested
to perform service in addition to normal service or outside normal service hours or area.
• Adjustments after the first year.
• Repairs resulting from the following:
-
Improper installation, exhaust system, or maintenance.
-Any modification, alteration, or adjustment not
authorized by Amana.
- Accident, misuse, abuse, fire, flood, or acts of nature.
- Connections to improper electrical current, voltage
supply, or gas supply.
- Use of improper pans, containers, or accessories that
cause damage to the product.
•Travel.
If you need service
❚ Call the dealer from whom your appliance was pur-
chased or call Amana Appliances Consumer Services
at 1-800-843-0304, USA or 1-866-587-2002 Canada to
locate an authorized servicer.
❚ Be sure to retain proof of purchase to verify warranty
status. Refer to WARRANTY for further information on
owner’s responsibilities for warranty service.
❚ If the dealer or service company cannot resolve the
problem, write to Amana Appliances Consumer
Services , 2800-220th Trail, Amana, Iowa, 52204, or
call 1-800-843-0304 U.S.A. or 1-866-587-2002
Canada.
NOTE: When writing or calling about a service problem, please include the following information:
a. Your name, address and telephone number;
b. Model number and serial number;
c. Name and address of your dealer or servicer;
d. A clear description of the problem you are having;
e. Proof of purchase (sales receipt).
❚ User’s guides, service manuals and parts information
are available from Amana Appliances Consumer
Services .
 Loading...