

Page 1

FOR CAR USE ONLY/ POUR APPLICATION AUTOMOBILE UNIQUEMENT/ NUR FÜR
AUTOMOBIL GEBRAUCH/ PARA USO EN AUTOMÓVILES/ SOLO PER L’UTILIZZO IN
AUTOMOBILE/ ТОЛЬКО ДЛЯ ИСПОЛЬЗОВАНИЯ В АВТОМОБИЛЯХ
Advanced Dash Cam
DVR-C310R
DVR-C310S
• OWNER’S MANUAL
Please read before using this equipment.
RVC-C310
• MANUAL DE OPERACIÓN
Léalo antes de utilizar este equipo.
• MODE D’EMPLOI
Veuillez lire avant d’utiliser cet appareil.
• BEDIENUNGSANLEITUNG
Lesen Sie diese Bedienungsanleitung bitte vor
Gebrauch des Gerätes.
• ISTRUZIONI PER L’USO
Si prega di leggere prima di utilizzare il attrezzatura.
• РУКОВОДСТВО ПО ЭКСПЛУАТАЦИИ
Прочтите настоящее руководство перед началом
использования оборудования.
Page 2

FCC Statement
This device complies with Part 15 of the FCC Rules. Operation is subject to the following two conditions: (1)
this device may not cause harmful interference, and (2) this device must accept any interference received,
including interference that may cause undesired operation.
This equipment has been tested and found to comply with the limits for a Class B digital device, pursuant
to Part 15 of the FCC Rules. These limits are designed to provide reasonable protection against harmful
interference in a residential installation. This equipment generates, uses and can radiate radio frequency
energy and, if not installed and used in accordance with the instructions, may cause harmful interference
to radio communications. However, there is no guarantee that interference will not occur in a particular
installation. If this equipment does cause harmful interference to radio or television reception, which can
be determined by turning the equipment off and on, the user is encouraged to try to correct the interference
by one or more of the following measures:
• Reorient or relocate the receiving antenna.
• Increase the separation between the equipment and receiver.
• Connect the equipment to an outlet on a circuit different from that to which the receiver is connected.
• Consult the dealer or an experienced radio/TV technician for help.
• This appliance and its antenna must not be co-located or operation in conjunction with any other antenna
or transmitter.
• A minimum separation distance of 20cm must be maintained between the antenna and the person for this
appliance to satisfy the RF exposure requirements.
FCC CAUTION: Any changes or modifications to the equipment not expressly approved by the party
responsible for compliance could void your authority to operate the equipment.
FCC ID: 2ADTG-DVRC310R
Information to user : RSS-247
This equipment complies with IC radiation exposure limits set forth for an uncontrolled environment. This
equipment should be installed and operated with minimum distance 20 cm between the radiator & your
body.
This device contains licence-exempt transmitter(s)/receiver(s) that comply with Innovation, Science and
Economic Development Canada’s licence-exempt RSS(s).
Please be cautioned the changes or modifications not expressly approved by the party responsible for
compliance could void the user’s authority to operate the equipment.
Notice: Operation is subject to the following two conditions : (1) this device may not cause interference, and
(2) this device must accept any interference, including interference that may cause undesired operation of
the device.
This Class B digital apparatus complies with Canadian ICES-003.
IC: 12594A-DVRC310R
Page 3

Contents
Operating Instructions 4
1. Product overview 8
1.1 Included items 8
1.1.1 DVR-C310R (2 camera, USA/Canada only) 8
1.1.2 DVR-C310S (1 camera) 9
1.1.3 RVC-C310 (Rear view only) 9
1.2 Part names 10
1.2.1 Front camera (main unit) - front view 10
1.2.2 Front camera (main unit) - rear view 10
1.2.3 Rear camera (RVC-C310) 11
1.3 Removing and inserting the memory card 11
1.4 Overviewing connection diagram 12
1.4.1 2 Camera connection diagram
(DVR-C310R / RVC-C310) 12
1.4.2 1 Camera connection diagram
(DVR-C310S) 13
1.4.3 Car charger connection diagram 13
4. Using the mobile viewer 23
4.1 Connect the product to a smartphone 23
4.2 Viewing the mobile viewer screen layout 23
5. Using the PC viewer 24
5.1 System requirements 24
5.2 Learning about the PC viewer 24
5.2.1 Installing the PC viewer 24
5.2.2 PC viewer screen layout (for Windows) 25
5.2.3 Playing recorded videos on the PC
viewer (for Windows) 26
5.2.4 PC viewer screen layout (for Mac) 27
5.2.5 Playing recorded videos on the PC
viewer (for Mac) 28
6. Settings 29
6.1 Managing the memory card 29
6.2 Setting the Camera 29
2. Installing the product 14
2.1 Installing the front camera (main unit) 14
2.1.1 Selecting an installation location 14
2.1.2 Securing the product 14
2.1.3 Connecting the power cable with the car
charger 16
2.2 Installing the rear camera 16
2.2.1 Selecting an installation location 16
2.2.2 Securing the rear camera 17
2.2.3 Connecting the rear camera cable 18
2.3 Installing the external GPS receiver 19
3. Using recording features 20
3.1 Turning the product on or off 20
3.2 Learning about file storage locations 20
3.3 Using the continuous recording feature 21
3.4 Recording manually 21
6.3 Setting recording features 30
6.4 Read Safety settings 31
6.5 Configuring the system settings 31
7. Accessing the product information 32
7.1 Viewing product information 32
7.2 Accessing and configuring the GPS 32
8. Upgrading the firmware 33
9. Troubleshooting 34
10. Specifications 35
3.5 Using parking mode 22
3
Page 4

Operating Instructions
Points to Observe for Safe Usage
Read this manual carefully before using the system components. They contain instructions on how to
use this product in a safe and effective manner. Alpine cannot be responsible for problems resulting from
failure to observe the instructions in this manual.
This manual uses various pictorial displays to show you how to use this product safely and to alert you to
potential dangers resulting from improper connections and operation. Following are the meanings of these
pictorial displays. It is important to fully understand the meanings of these pictorial displays in order to use
this manual and the system properly.
Safety symbols in this guide
"Warning" - This symbol means Important Instructions. Failure to heed them can result in serious injury or
death.
"Caution" - This symbol means Important Instructions. Failure to heed them can result in Injury or material
property damage.
"Note" - This symbol means useful information that helps users better utilize the product's features.
Safety information for proper use
Driving and product operation
• MINIMIZE DISPLAY VIEWING WHILE DRIVING. Viewing the display may distract the driver from looking
ahead of the vehicle and cause an accident.
• OPERATION OF THE SYSTEM WHILE DRIVING IS DANGEROUS. Users should stop vehicle before operating
the software.
• THIS SOFTWARE IS DESIGNED FOR USE EXCLUSIVELY IN THE UNIT. It cannot and may not be used in
conjunction with other hardware.
4
Page 5

Power supply and product installation
• DO NOT WATCH VIDEO WHILE DRIVING. Watching the video may distract the driver from looking ahead of the
vehicle and cause an accident.
• DO NOT DISASSEMBLE OR ALTER. Doing so may result in an accident, fire or electric shock.
• USE ONLY IN CARS WITH A 12 VOLT NEGATIVE GROUND. (Check with your dealer if you are not sure.) Failure to
do so may result in fire, etc.
• USE THE CORRECT AMPERE RATING WHEN REPLACING FUSES. Failure to do so may result in fire or electric
shock.
• DO NOT BLOCK VENTS OR RADIATOR PANELS. Doing so may cause heat to build up inside and may result in fire.
• USE THIS PRODUCT FOR MOBILE 12V APPLICATIONS. Use for other than its designed application may result in
fire, electric shock or other injury.
• MAKE THE CORRECT CONNECTIONS. Failure to make the proper connections may result in fire, battery drain, or
product damage.
• BEFORE WIRING, DISCONNECT THE CABLE FROM THE NEGATIVE BATTERY TERMINAL. Failure to do so may
result in electric shock or injury due to electrical shorts.
• DO NOT ALLOW CABLES TO BECOME ENTANGLED IN SURROUNDING OBJECTS. Arrange wiring and cables in
compliance with the manual to prevent obstructions when driving. Cables or wiring that obstruct or hang up on
places such as the steering wheel, gear lever, brake pedals, etc. can be extremely hazardous.
• DO NOT SPLICE INTO ELECTRICAL CABLES. Never cut away cable insulation to supply power to other
equipment. Doing so will exceed the current carrying capacity of the wire and result in fire or electric shock.
• DO NOT DAMAGE PIPE OR WIRING WHEN DRILLING HOLES. When drilling holes in the chassis for installation,
take precautions so as not to contact, damage or obstruct pipes, fuel lines, tanks or electrical wiring. Failure to
take such precautions may result in fire.
• DO NOT USE BOLTS OR NUTS IN THE BRAKE OR STEERING SYSTEMS TO MAKE GROUND CONNECTIONS. Bolts
or nuts used for the brake or steering systems (or any other safety-related system), or tanks should NEVER be
used for installations or ground connections. Using such parts could disable control of the vehicle and cause
fire etc.
• DO NOT INSTALL IN LOCATIONS WHICH MIGHT HINDER VEHICLE OPERATION, SUCH AS THE STEERING WHEEL
OR SHIFT LEVER. Doing so may obstruct forward vision or hamper movement etc. and results in serious
accident.
• DO NOT OPERATE ANY FUNCTION THAT TAKES YOUR ATTENTION AWAY FROM SAFELY DRIVING YOUR VEHICLE.
Any function that requires your prolonged attention should only be performed after coming to a complete stop.
Always stop the vehicle in a safe location before performing these functions. Failure to do so may result in an
accident.
Children
KEEP SMALL OBJECTS SUCH AS SCREWS OUT OF THE REACH OF CHILDREN. Swallowing them may result in
serious injury. If swallowed, consult a physician immediately.
5
Page 6

Other information about the product
Product management and operation
• HALT USE IMMEDIATELY IF A PROBLEM APPEARS. Failure to do so may cause personal injury or damage to
the product. Return it to your authorized Alpine dealer or the nearest Alpine Service Center for repairing.
• HAVE THE WIRING AND INSTALLATION DONE BY EXPERTS. The wiring and installation of this unit requires
special technical skill and experience. To ensure safety, always contact the dealer where you purchased
this product to have the work done.
• USE SPECIFIED ACCESSORY PARTS AND INSTALL THEM SECURELY. Be sure to use only the specified
accessory parts. Use of other than designated parts may damage this unit internally or may not securely
install the unit in place. This may cause parts to become loose resulting in hazards or product failure.
• ARRANGE THE WIRING SO IT IS NOT CRIMPED OR PINCHED BY A SHARP METAL EDGE. Route the cables
and wiring away from moving parts (like the seat rails) or sharp or pointed edges. This will prevent
crimping and damage to the wiring. If wiring passes through a hole in metal, use a rubber grommet to
prevent the wire's insulation from being cut by the metal edge of the hole.
• DO NOT INSTALL IN LOCATIONS WITH HIGH MOISTURE OR DUST. Avoid installing the unit in locations with
high incidence of moisture or dust. Moisture or dust that penetrates into this unit may result in product
failure.
• Use a soft dry cloth for periodic cleaning of the product. For more severe stains, please dampen the cloth
with water only. Anything else has the chance of dissolving the paint or damaging the plastic.
• Be sure the temperature inside the vehicle is between +45°C (+113°F) and 0°C (+32°F) before turning your
unit on.
• If you have problems, do not attempt to repair the unit yourself. Return it to your Alpine dealer or the
nearest Alpine Service Station for servicing.
6
Page 7

Warning and Notices
• This device should never be mounted in or to a vehicle in a way that interferes with the operations of
the vehicle, including, but not limited to, airbags, lane detection systems, navigation device, and so forth.
Doing so may result violation of state or national laws, injury, or death. Always mount this device so that it
does not obstruct the driver’s view. Any fines, penalties, or damages resulting from improperly or illegally
operating this device are not the responsibility of Alps Alpine Co., Ltd. or any of its affiliates, subsidiaries,
principals, officers, employees or shareholders.
• Do not operate or manipulate this device while driving, such as change settings, review footage, access
information, change the device location or angle, or otherwise manipulate this device while driving. Do not
allow this device to distract from safe driving.
• Do not mount this device where driver or passenger head impact is likely in the case of an accident,
including, but not limited to areas directly in front of the driver or passengers.
• It may be a violation of state or national laws to secure this device to a dash board or windshield. It is the
user’s responsibility to know and follow the applicable laws in the jurisdictions where this device is used.
• Do not use this device contrary to the instructions in this manual or contrary to national and state laws.
• It may be a violation of state or national laws to video or audio record someone with this device without
their consent. This may include audio recording a passenger in your vehicle without his or her consent. It
is the user’s responsibility to know and follow the applicable laws in the jurisdictions where this device is
used.
• Publishing the recordings made with this device on social media or other places on the internet without
consent of those in the recordings may violate state or national privacy laws. It is the user’s responsibility
to know and follow the applicable laws in the jurisdictions where this device is used.
• This product uses lithium batteries. For your safety, do not overcharge this device. Do not leave this device
plugged in when the vehicle is not turned off. Do not leave this device in extreme temperatures. Damaged,
overcharged, or misused lithium batteries can explode or otherwise cause fire. Failure to heed these
warning may result in injury or death.
7
Page 8
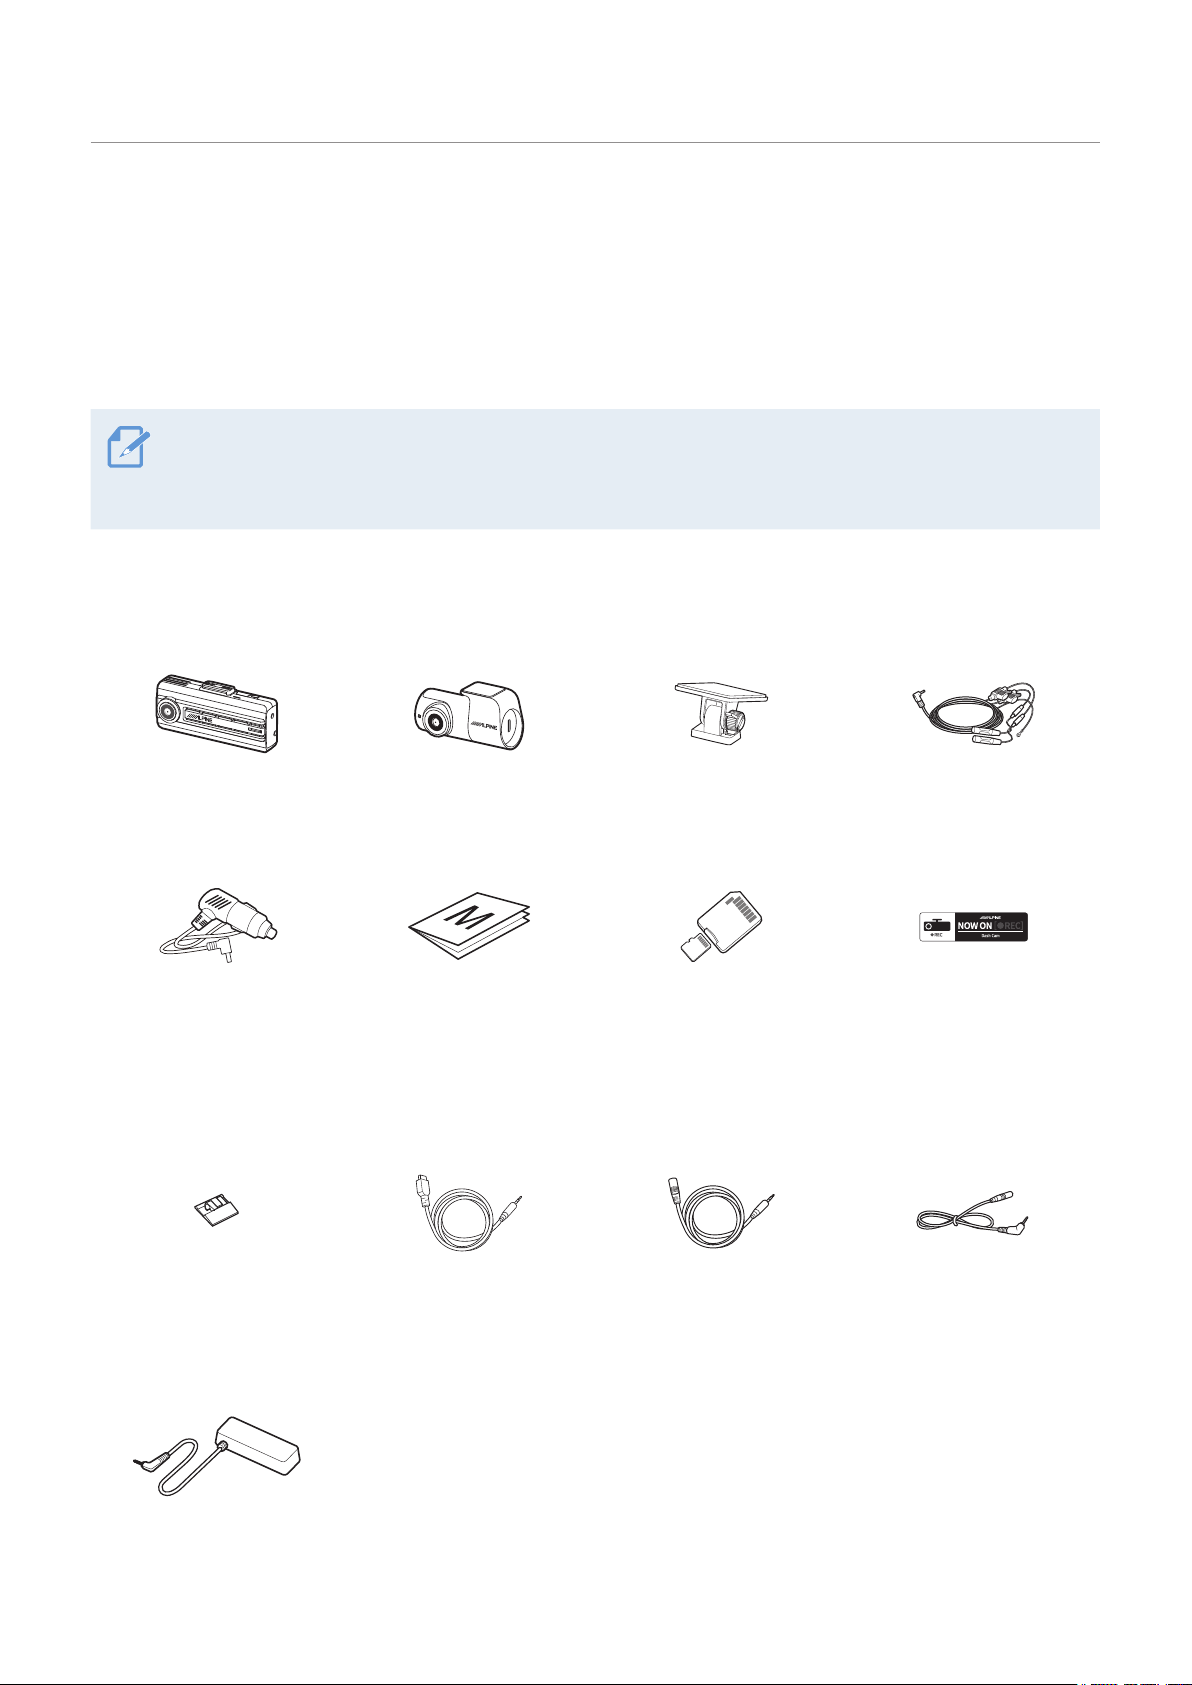
1. Product overview
1.1 Included items
Ensure that all the items are included when you open the product box.
• The standard items may change without prior notice.
• GPS reception may be affected by interference from the vehicle's windshield, particularly those treated
with anti-UV protective coating, or built-in defroster.
1.1.1 DVR-C310R (2 camera, USA/Canada only)
Front camera (main unit) Rear camera Mount Hardwiring cable
Quick start guide /
Car charger
Cable clamp holder Rear camera cable
External GPS receiver
User guide / Warranty /
Registration card
(stored in the microSD card)
microSD card with adapter
(consumable)
Rear camera extension
cable
Dash cam recording
warning sticker
Rear camera connection
cable
8
Page 9
1.1.2 DVR-C310S (1 camera)
Product overview
Front camera (main unit) Mount Hardwiring cable
Quick start guide /
User guide
(stored in the microSD card)
Car charger
Cable clamp holder
Dash cam recording
warning sticker
microSD card with adapter
(consumable)
External GPS receiver
1.1.3 RVC-C310 (Rear view only)
Rear camera
Cable clamp holder
Rear camera cable
Rear camera extension
cable
Rear camera connection
cable
9
Page 10
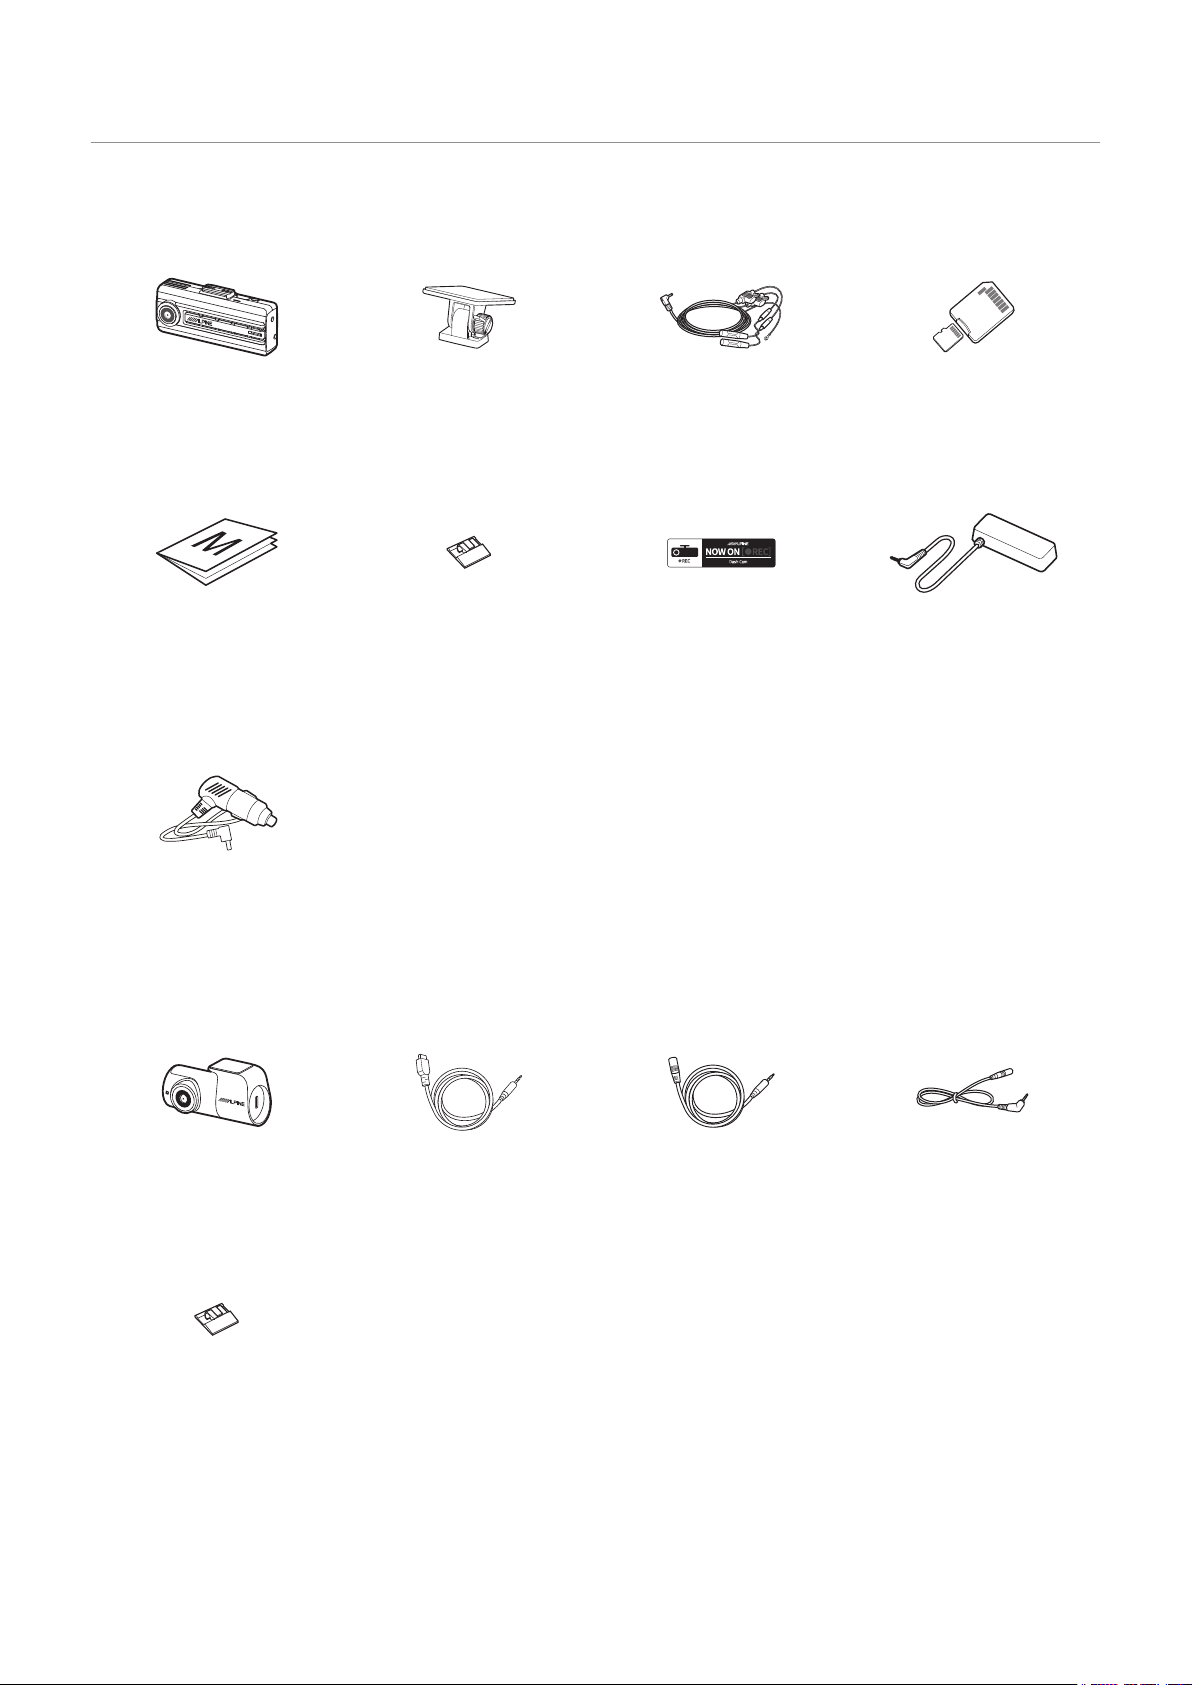
Product overview
1.2 Part names
1.2.1 Front camera (main unit) - front view
Mount connector
Used to connect the mount.
Front camera lens
Records the front view.
DC-IN power port
Used to connect the
power cable.
GPS port
Used to connect the
external GPS receiver
V-IN input port
Used to connect the
rear camera.
.
1.2.2 Front camera (main unit) - rear view
REC button
• Short press: Starts manual recording
• Press and hold for 3 seconds: Audio recording ON/OFF
• Press and hold for 5 seconds: Memory card format
Wi-Fi LED
Indicates the Wi-Fi
connection status.
ST
ATUS LED
Indicates the
recording status.
Speaker
Outputs the voice guide and buzzer
sounds to indicate the product’s status.
Wi-Fi button
Press to connect the product to a
smartphone via Wi-Fi network.
Reset button
Insert the tip of a sharp
object to reset the product
when an error occurs.
10
Memory card slot
Insert a memory card to save recordings.
Microphone
Used for voice recording.
Page 11
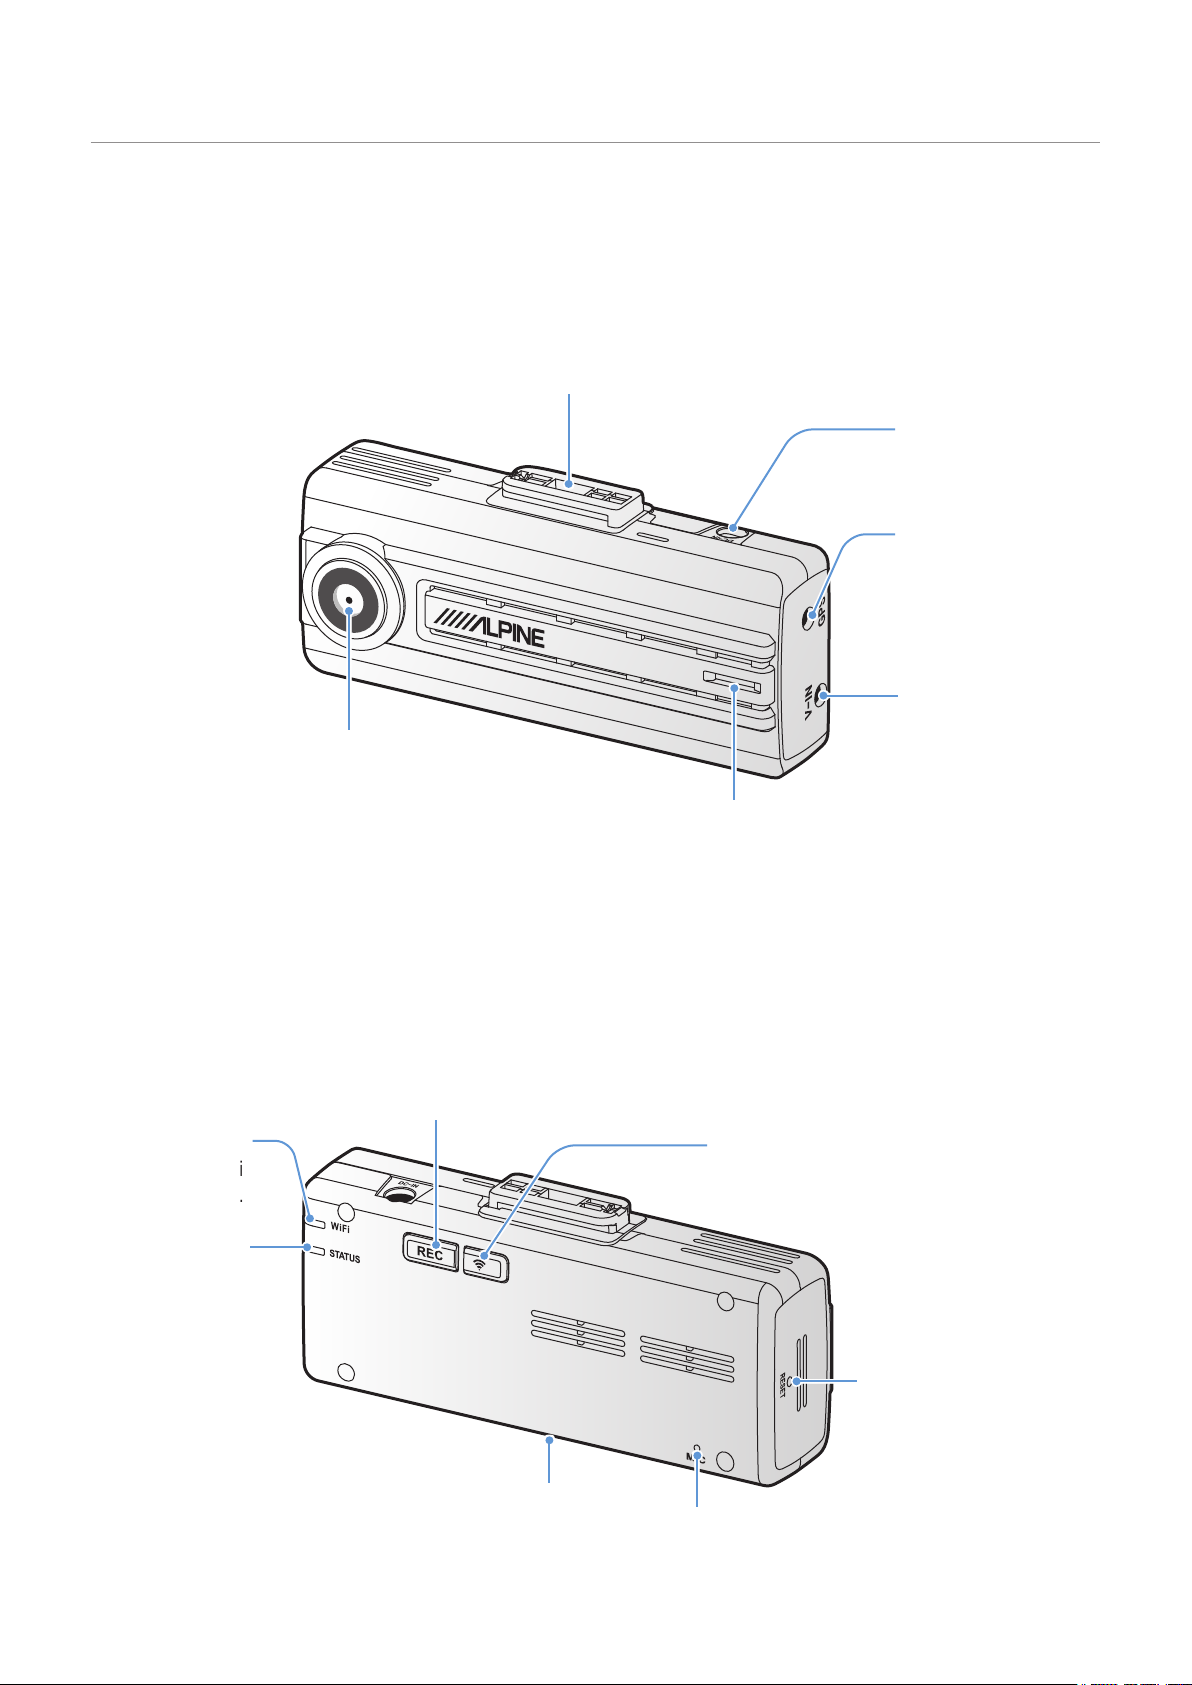
1.2.3 Rear camera (RVC-C310)
Rear camera lens
Records the rear view.
Product overview
Adhesive mount
Used to fix the rear camera in the vehicle.
Connection port
Used to connect the rear
camera to the front camera
using a rear camera cable.
1.3 Removing and inserting the memory card
Follow the instructions to remove the memory card from the product or to insert the memory card into the
product.
Before removing the memory card, ensure that the
product is turned off. Gently push the bottom of the
memory card with your fingernail to release it, and
then remove it from the product.
To insert the memory card into the memory card slot,
ensure that the metal contacts on the memory card
are facing toward the product’s buttons, and insert it
into the slot until you hear a click.
• Ensure that the product is turned off before removing the memory card. The recorded video files may be
corrupted or lost if you remove the memory card while the product is on.
• Ensure that the memory card is in the correct direction before inserting it into the product. The memory
card slot or the memory card may be damaged if it is inserted incorrectly.
• Use only authentic memory cards from Alpine. Alpine does not guarantee the compatibility and normal
operation of third-party memory cards.
To prevent loss of recorded video files, periodically back up the video files on a separate storage device.
11
Page 12
Product overview
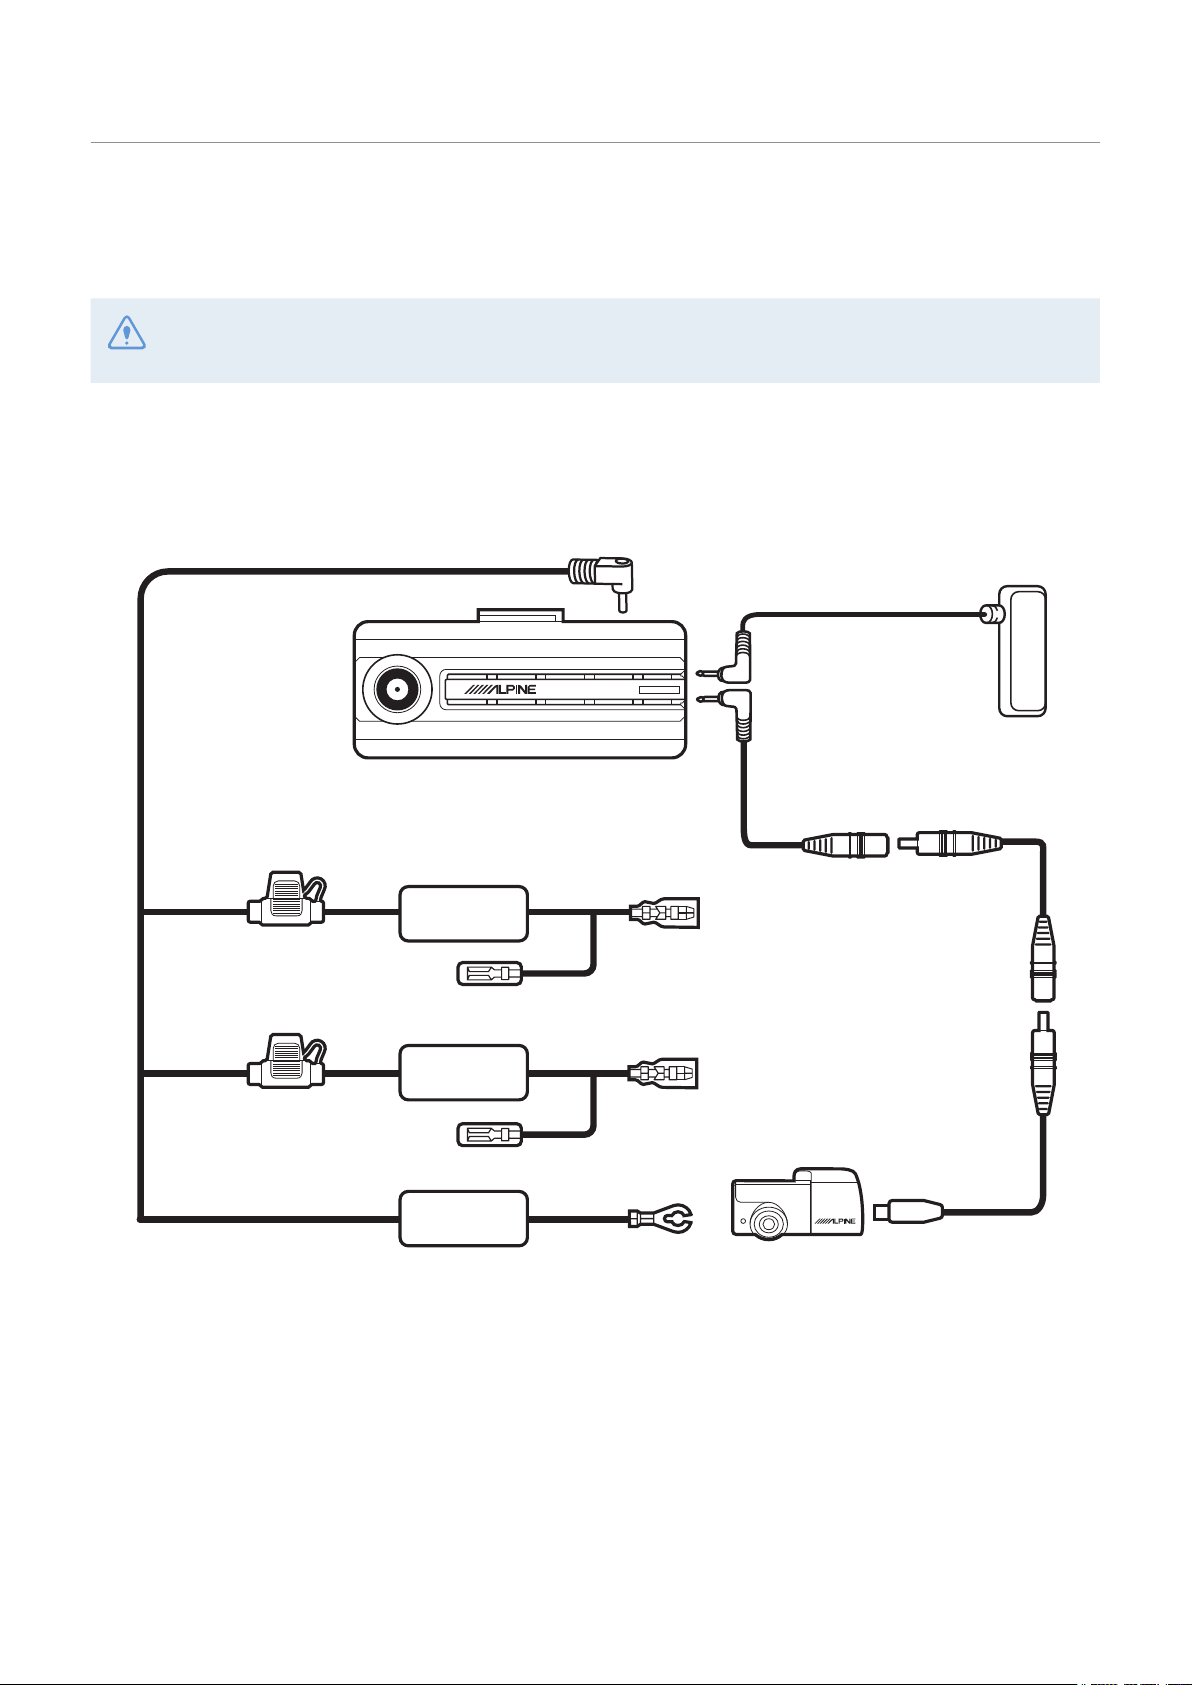
1.4 Overviewing connection diagram
Follow the connection diagram to properly install the product.
The connection diagram is for reference only. The product must be professionally installed in the vehicle by
an Alpine authorized dealer/a trained specialist mechanic.
1.4.1 2 Camera connection diagram (DVR-C310R / RVC-C310)
Hardwiring cable
External GPS
receiver
BATTERY
ACC
GND
Yellow
Red
Black
Rear camera
connection cable
Rear camera
connection cable
Rear camera
cable
Rear camera
12
Page 13

1.4.2 1 Camera connection diagram (DVR-C310S)
Hardwiring cable
Yellow
BATTERY
Product overview
External GPS receiver
ACC
GND
1.4.3 Car charger connection diagram
Car charger
cable
Red
Black
Car charger
13
Page 14

2. Installing the product
20 cm
2.1 Installing the front camera (main unit)
Follow the instructions to properly install the product.
2.1.1 Selecting an installation location
Select an installation location that can record the
entire view in front of the vehicle without obstructing
the driver’s vision. Ensure that the front camera lens
is located in around the center of the windshield.
Keep it as far away as possible from other antennas.
Should not be installed on vehicle equipped with
front radar or front camera ADAS systems.
If a GPS navigating device is installed on the dashboard,
its GPS reception may be affected depending on the
dashboard camera's installation location.
Adjust the installation location of the GPS navigating
device to ensure that the two devices are separated by
at least 20 centimeters (approximately 8 inches).
2.1.2 Securing the product
Follow the instructions to secure the product at the installation location.
1
1
➊➊
Align the mount to the mount rail on the product,
and then slide it until you hear a click (
carefully remove the protective film (
➊➊
➋➋
). Then,
).
2
➋➋
After determining the installation location, wipe the installation location on the windshield with a dry
2
cloth.
14
Page 15

Installing the product
2
1
3
4
5
➊➊
1
➊➊
➋➋
2
➋➋
Remove the protective film from the adhesive mount,
and then press the mount to the installation location.
Remove the product from the mount and push the
mount against the windshield to ensure that the
mount is firmly fixed.
Align the product to the mount, and then slide it into
the locking position until you hear a click.
• The product may fall and be damaged during vehicle operation if it is not firmly fixed to the mount.
• If you need to remove the mount from the windshield to alter the installation location, be careful not
to damage the windshield’s film coat.
6
To confirm the camera angle, record a video after installation and check the video using the mobile
viewer or the PC viewer. If necessary, adjust the camera angle again. For more information about the
mobile viewer or the PC viewer, refer to "4. Using the mobile viewer" or "5. Using the PC viewer".
Set the vertical angle of the camera appropriately
and tighten the screw of the mount firmly.
15
Page 16

Installing the product
2.1.3 Connecting the power cable with the car charger
When the engine and electrical accessories are turned off, connect the car charger.
Connect the cigar socket power cable to the product’s
1
➊➊
2
➋➋
DC-IN power connector and insert the cigar jack into the
vehicle’s power socket.
The location and specifications of the power socket
may differ by vehicle make and model.
• Use an authentic cigar socket power cable. If you use another manufacturer's cable, the product may be
damaged or electrical fire or electrocution may result due to the voltage difference.
• Do not cut or modify the power cable yourself. Doing so may damage the product or the vehicle.
• For safe driving, arrange the cables to prevent the driver's vision from being obstructed or interfering with
driving.
2.2 Installing the rear camera
Refer to the following instructions to properly install the rear camera.
2.2.1 Selecting an installation location
Select a location on the rear windshield where there
is no defrost grid wire and the camera can record
the entire rear view.
16
• For vehicles with a sunshade attached to the rear windshield, select a location where using the sunshade
will not interfere with camera operation.
• The adhesive part of the rear camera should not touch the defrost grid.
Page 17

Installing the product
2
2.2.2 Securing the rear camera
Refer to the following instructions to secure the product to the installation location.
After determining the installation location, wipe the installation surface of the windshield with a dry
1
cloth.
Check the installation location before you secure the rear camera to the rear windshield. After
securing the rear camera to the windshield, it is hard to remove the camera or change the installation
location due to the strong adhesive.
2
3
1
➊➊
➋➋
Remove the protective film from the adhesive mount
and camera lens.
Before attaching the rear camera, check the
position of the lens. The TOP label should be
above the lens.
Attach the product with the Alpine logo facing inside
the vehicle and press the adhesive tape firmly to
secure the camera.
If the product is installed in reverse, the rear
view will be recorded upside down.
4
Adjust the camera's vertical angle.
17
Page 18

Installing the product
2.2.3 Connecting the rear camera cable
Power off the product and connect the rear camera cable to the front camera (main unit).
2
1
Connect one end of the rear camera cable to the
front camera’s V-IN port.
Connect the other end of the rear camera cable to
the rear camera's connection port.
For safe driving, arrange the cables to prevent
the driver's vision from being obstructed or
interfering with driving.
Turn on the ACC or start the engine to check if the product is powered on. After the product is powered
3
on, the Status LED and the voice guidance will be turned on.
The product is powered on when the ACC mode is turned on or when the engine starts.
18
Page 19

Installing the product
2.3 Installing the external GPS receiver
To activate the ADAS feature or record driving information (the speed and location), follow the instructions
and install the external GPS receiver on the upper part of the front windshield. Install the external GPS
receiver near the product, taking its cable length into account.
2
1
Remove the film from the back of the external GPS
receiver.
Attach the external GPS receiver's adhesive surface
to the upper part of the front windshield and press
the adhesive part firmly to secure it.
Before installation, make sure the external GPS
receiver's cable length is sufficient and check
the cable routing path.
3
Turn on the ACC or starts the engine to check that the product is powered on. After the product is
4
powered on, the Status LED and the voice guide are turned on.
The product is powered on when electric accessories are turned on or the engine starts.
Connect the external GPS receiver to the product’s
GPS connector.
Check the GPS connector location again before
connecting the GPS receiver. If you connect
the external GPS receiver to the DC-IN power
connector, the pins inside the port may be
damaged.
19
Page 20

3. Using recording features
REC_2020_08_01_10_25_30_
REC_2020_08_01_10_25_30_R
3.1 Turning the product on or off
The product is turned on automatically and continuous recording starts when you turn on the ACC or start
the engine.
Wait until the product is completely booted up after turning it on, and then begin operating the vehicle. The
video recording does not begin until the product is completely turned on (booted up).
3.2 Learning about file storage locations
Videos are stored in the following folders according to their recording mode.
On the mobile viewer Continuous
In the memory card cont_rec evt_rec manual_rec motion_rec parking_rec
Play videos on Window/Mac/Smartphone by using the ALPINE Recording Viewer application. If you play
videos by inserting the memory card in devices such as a smartphone or a tablet PC, the video files may be
lost.
A file name is composed of the recording start date and time, and the recording option.
Continuous
Incident
F
Recording conditions
• F: Front camera
• R: Rear camera
Manual
Recording
Motion
Detection
Parking
Incident
20
Page 21

Using recording features
3.3 Using the continuous recording feature
Connect the power cable to the product’s DC-IN power port and then turn on the vehicle’s electrical
accessories or start the engine. The status LED and the voice guide are turned on, and the continuous
recording starts.
During continuous recording, the product operates as follows.
Mode Operation description STATUS LED
Continuous
recording
Incident
continuous
recording*
* When an impact to the vehicle is detected during continuous recording, incident continuous recording starts with a
buzzer sound.
• The video recording does not begin until the product is completely booted up and the GPS signal is
received. After the booting up is finished you may begin operating the vehicle.
• When incident continuous recording starts, the buzzer sounds as a notification.
• To enable recording, insert a memory card into the product.
During driving, videos are recorded in 1 minute segments and stored
in the "cont_rec" folder.
When an impact to the vehicle is detected, a video is recorded for 20
seconds, from 10 seconds before the detection to 10 seconds after
the detection, and stored in the "evt_rec" folder.
(light on)
(flickers)
3.4 Recording manually
You can record a scene you want to capture while driving and store it as a separate file.
To start manual recording, press the REC button. Then, manual recording will start with the voice guide.
During manual recording, the product operates as follows.
Mode Operation description STATUS LED
Manual
recording
When you press the REC button, a video will be recorded for 1 minute, from
10 seconds before to 50 seconds after pressing the button, and stored in
the "manual_rec" folder.
(flickers)
21
Page 22

Using recording features
3.5 Using parking mode
When the product is connected to the vehicle via the hardwiring cable, the operating mode is switched to
parking mode with the voice guide after the engine or electrical accessories are turned off.
Parking mode operates only when the hardwiring cable is connected. The hardwiring cable must be
professionally installed to the vehicle by an Alpine authorized dealer/a trained specialist mechanic.
• To use all recording modes, insert a memory card into the product.
• Depending on the battery charging status of the vehicle, the duration of parking mode may differ. If you
want to use parking mode for an extended period, check the battery level to prevent battery depletion.
If you do not want to use parking mode or you want to change the mode settings, from the mobile viewer,
>
tap Dash Cam Settings
Refer to the following table to set the Parking Mode options.
Record Settings.
Option Operation description STATUS LED
Motion
Detection
Energy
Saving
motion
or impact
detected
Motion
detected
Impact
detected
impact
detected
Impact
detected
OFF
No
No
Monitors movement in the area or impacts to the vehicle. Video
will be recorded only when motion or an impact is detected.
When a moving objects is detected while parking, a video is
recorded for 20 seconds, from 10 seconds before detection to
10 seconds after detection, and stored in the "motion_rec" folder.
When an impact is detected while parking, a video is recorded for
20 seconds, from the moment 10 seconds before detection to 10
seconds after detection, and stored in the "parking_rec" folder.
Monitors impacts to the vehicle. Video will be recorded only when
an impact is detected.
When an impact is detected while parking, a video is recorded for
20 seconds from within 1 second after detection and stored in the
"parking_rec" folder.
The product is powered off when electric accessories and the
engine are turned off.
(flickers slowly)
(flickers)
(flickers)
Off
(flickers)
Off
22
If parking mode settings are changed, the videos recorded with the previous settings will be deleted. To
prevent data loss, back up all parking mode videos before changing parking mode settings.
Page 23

4. Using the mobile viewer
You can view and manage recorded videos and configure various product features on your smartphone.
• The following are the mobile phone requirements for using the ALPINE Recording Viewer application:
- Android 7.0 (Nougat) or higher
- iOS 11.4 or higher
• The Wi-Fi password is required when you connect the product to a smartphone for the first time. Enter
“123456789” in the password input field.
4.1 Connect the product to a smartphone
On your smartphone, open the Google Play Store or Apple App store and download and install ALPINE
1
Recording Viewer.
Run ALPINE Recording Viewer.
2
Tap Dash cam connection is required. at the bottom of the screen and follow the on-screen
3
instructions to connect the product to a smartphone.
4.2 Viewing the mobile viewer screen layout
The following provides brief information about the mobile viewer’s screen layout.
Move to the live view
screen.
View and play the
recorded videos.
View the product
information.
Move to main menu.
Configure the dash cam settings.
View the connected Wi-Fi
network or add a new network.
Displays the connection status of
the product.
View the application information and terms of use.
23
Page 24

5. Using the PC viewer
You can view and manage the recorded videos and configure various product features on your PC.
5.1 System requirements
The following are the system requirements for running the PC viewer.
• Processor: Intel Core i5, or higher
• Memory: 4 GB or more
• Operating system: Windows 7 or later (64-bit is recommended), macOS X10.8 Mountain Lion or later
• Other: DirectX 9.0 or higher / Microsoft Explorer version 7.0 or higher
The PC viewer will not operate properly on PC systems running an operating system other than those listed
in the system requirements.
5.2 Learning about the PC viewer
5.2.1 Installing the PC viewer
You can download the latest PC viewer software from the Alpine website.
The PC viewer installation file (setup.exe) is stored in the root folder of the memory card that is provided
with the product. Follow the instructions to install the PC viewer on your PC.
Insert the memory card into a memory card reader connected to your PC.
1
Move the installation file to the desktop, run it, and complete the installation according to the
2
instructions given in the installation wizard.
After the installation is complete, there will be a shortcut icon to ALPINE Recording PC Viewer.
24
Page 25

5.2.2 PC viewer screen layout (for Windows)
The following provides brief information about the PC viewer's screen layout.
➊➊
➋➋
➌➌
➍➍ ➎➎
Using the PC viewer
➏➏
➐➐
➑➑
➓➓
Number Description
➊➊
➋➋
➌➌
➍➍
➎➎
➏➏
➐➐
➑➑
➒➒
Open a file, or save a video with a different name.
View or configure the dash cam settings, and set the language for the PC viewer.
Display the current video in full screen. Tap the Back ( ) button to return to the previous screen.
Switch between the front and rear videos.
Minimize, expand, or close the software.
Displays the rear camera video file name.
Displays the recorded rear camera video.
Display the map screen.
Displays the playlist.
➒➒
➓➓
Indicates the G sensor value at the time of recording.
Indicates the vehicle’s driving speed at the time of recording.
Displays the current and total running time of the current video.
Displays the progress of video playback.
Play or control a video.
Displays the recorded front camera video.
Displays the front camera video file name.
25
Page 26

Using the PC viewer
5.2.3 Playing recorded videos on the PC viewer (for Windows)
Follow the instructions to play recorded videos.
Turn off the product and remove the memory card.
1
Insert the memory card into a memory card reader connected to your PC.
2
Double-click the shortcut to the PC viewer to open the program. The video files in the memory card will
3
be automatically added to the playlist in the bottom-right corner of the PC viewer screen. The playlist
section layout is as follows.
Select a folder.
Displays a list of videos
in the selected folder.
Double-click a video file after selecting a video folder, or click the Play (▶) button after selecting a
4
video file. The selected video file will be played.
If the video files on the memory card are not automatically added to the playlist when you run the PC viewer,
click File▼ > Open, select the removable storage device for the memory card, and click Confirm.
26
Page 27

5.2.4 PC viewer screen layout (for Mac)
The following provides brief information about the PC viewer's screen layout.
Using the PC viewer
➊➊
➋➋ ➌➌
➍➍
➎➎
➏➏
➐➐
➑➑
➒➒
➓➓
Number Description
➊➊
➋➋
➌➌
➍➍
➎➎
➏➏
➐➐
➑➑
➒➒
➓➓
Set the language for the PC viewer.
Set the speed unit.
Switch between the front and rear videos.
View or configure the dash cam settings.
Save the current scene.
Print the current scene.
Displays the current rear video.
Displays the map screen.
Open a file, or save a video with a different name.
Displays the playlist.
Displays the GPS information at the time of recording.
Indicates the vehicle’s driving speed at the time of recording.
Indicates the G sensor value at the time of recording.
Displays the current and total running time of the current video.
Play or control a video.
Displays the progress of video playback.
Displays the current front video. Right-click this pane to display the current video in full screen.
27
Page 28

Using the PC viewer
5.2.5 Playing recorded videos on the PC viewer (for Mac)
Follow the instructions to play recorded videos.
Turn off the product and remove the memory card.
1
Insert the memory card into your Mac using a SD card reader or SD card adapter provided.
2
Open the PC viewer.
3
Click and locate the memory card.
4
The video files in the memory card will be automatically added to the playlist in the bottom-right
corner of the PC viewer screen. The playlist section layout is as follows.
Select a folder.
Displays a list of videos
in the selected folder.
Double-click a video file after selecting a video folder, or click the Play (▶) button after selecting a
5
video file. The selected video file will be played.
28
Page 29

6. Settings
You can set the product features according to your needs and preferences using the mobile viewer or the
PC viewer. The following procedures are based on the mobile viewer.
The product will stop recording while configuring settings on the mobile viewer.
6.1 Managing the memory card
From the mobile viewer, tap Dash Cam settings > Memory Card Settings to manage the memory card settings.
Options Description
You can partition the memory card to adjust the storage space for different types of
Memory Partition
video recordings.
Select from Continuous Priority/Incident Priority/Parking Priority/Manual Priority/
Driving Recording Only for the memory partition type.
Formatting Memory Card
Do not disconnect the power or remove the memory card from the product while partitioning or formatting.
Doing so may cause serious damage to the data stored in the memory card.
You can format the memory card that is inserted in the product. In Formatting Memory
Card, tap Format
>
OK to proceed with formatting the memory card.
6.2 Setting the Camera
From the mobile viewer, tap Dash Cam settings > Camera Settings to adjust the camera settings.
Options Description
Brightness-front
You can set the brightness of the front view recording.
Select from Dark/Mid/Bright for the brightness of the front camera.
29
Page 30

Settings
6.3 Setting recording features
From the mobile viewer, tap Dash Cam settings > Record Settings to manage the recording features settings.
Options Description
You can set the detection sensitivity for recording when an impact is detected while
Continuous Mode Incident
Recording Sensitivity
Set Privacy Recording
driving. When you set the sensitivity, you must consider the road conditions, traffic
situation, or your driving style.
Select from Disabled/Lowest/Low/Mid/High for the sensitivity.
You can set the privacy recording feature to delete your recorded files after a set
amount of time to protect the privacy of others. Select from Disables/1min(max.
2min)/3min(max. 4min) for the privacy recording setting.
This feature is only available in Europe.
Parking Mode
Impact Sensitivity in
Parking Mode
Motion Detection
Sensitivity
Record Timer
Battery Protection
Wintertime Battery
Protection
You can set the operating mode of the product while the vehicle is parked.
Select from Disabled/Motion Detection/Energy Saving for the parking mode.
You can set the detection sensitivity for recording when impact is detected while
parking.
Select from Lowest/Low/Mid/High/Highest for the sensitivity.
The motion detection feature records a video when a moving object is detected near
your vehicle.
Select from Lowest/Low/Mid/High/Highest for the sensitivity.
When you activate the record timer feature, the product will record a video in parking
mode for a preset time.
Select from 3hrs/6hrs/12hrs/24hrs/48hrs/72hrs for the recording time.
The battery cut-off voltage is set to 12V (11.6-12.3) by default.
To protect the battery in wintertime, you can turn off the power at a voltage that is
+0.2V higher than the voltage set in the Battery cutoff voltage.
Select the month(s) to apply the battery protection feature.
30
• To use parking mode, you must install the hardwiring cable. If continuous power is not supplied to the
product, the product will stop recording when the vehicle engine is turned off.
• The vehicle's battery will not be charged while the vehicle is parked. If you record in parking mode for an
extended period, the vehicle’s battery may be depleted and you may not be able to start the vehicle.
• For more information about parking mode, refer to "3.5 Using parking mode" on page 22.
• If the off voltage value is too low, the product may consume the battery completely depending on various
conditions, such as vehicle type or temperature.
Page 31

Settings
6.4 Read Safety settings
From the mobile viewer, tap Dash Cam settings > Road Safety Settings to manage the road safety features.
Options Description
When the vehicle approaches or passes the speed limit zone, the safety camera alert
Safety Cameras
Mobile Zone Alert
system will collect GPS signals and safety camera data.
Select from Enabled/Disabled for the safety camera feature.
The mobile zone alert feature audibly warns the driver about speed cameras and
mobile speed zones in the driver’s area.
Select from Enabled/Disabled for the mobile zone alert feature.
6.5 Configuring the system settings
From the mobile viewer, tap Dash Cam Settings > System Settings to configure the hardware system
settings.
Options Description
Language
Volume
Time Zone
Daylight Saving
Speed Unit
Speed Stamp
If you select 0 for the volume level, the voice guidance will be disabled.
Select the desired language.
Select the desired volume level.
Select the desired time zone.
Select from Enabled/Disabled for the daylight saving.
Select from km/h/mph for the speed unit.
The driving speed during recording can be recorded in a file. Select from Enabled/
Disabled for the speed stamp.
31
Page 32

7. Accessing the product information
New users may benefit from the basic product information that can be accessed from the Menu screen.
7.1 Viewing product information
From the mobile viewer, tap Dash Cam Info to view product information. The following product information
menus will be displayed on the screen.
• Model Name
• LOCAL ID
• Firmware Ver.
• GPS Info
• Memory Size
7.2 Accessing and configuring the GPS
A GPS module is used to include the location data in the recorded videos. From the mobile viewer, tap Dash
>
Cam Info
speed, current altitude, and Horizontal Dilution of Precision (HDOP) will be displayed on the screen.
Tap
GPS Info to view the GPS features. The connection status, signal strength, time (UTC), vehicle
to initialize the GPS, and allow it to locate the current position.
Horizontal Dilution of Precision (HDOP)
HDOP is a value that refers to GPS deviation due to satellite positioning.
32
Page 33

8. Upgrading the firmware
A firmware upgrade is provided to enhance the product’s features, operation or to increase stability. For
optimal operation of the product, ensure that you keep the firmware up to date.
Follow the instructions to upgrade the firmware.
On your PC, open a web browser and go to Alpine website.
1
Select the product and download the latest firmware upgrade file.
2
Unzip the downloaded file.
3
Disconnect power to the product and remove the memory card.
4
Open the memory card on a PC and copy the firmware upgrade file to the root folder of the memory
5
card.
While the power is disconnected from the product, insert the memory card into the memory card slot
6
on the product.
Connect the power cable to the product, and then turn on the power (ACC ON) or start the engine to
7
turn on the product. The firmware upgrade starts automatically, and the system will restart once the
firmware update is completed.
Do not disconnect the power or remove the memory card from the product during the upgrade. Doing
so may cause serious damage to the product, or to the data stored in the memory card.
33
Page 34

9. Troubleshooting
The following table lists the problems users may encounter while using the product and measures to
resolve them. If the problem persists after taking the measures provided in the table, contact the customer
service center.
Problems Solution
• Make sure the power cable (the car charger or the hardwiring cable) is
Cannot power on the product
connected to the vehicle and the product properly.
• Check the vehicle’s battery level.
The voice guide and/or buzzer
do not sound.
The video is unclear or hardly
visible.
The memory card cannot be
recognized.
The recorded video cannot be
played on a PC.
GPS signal cannot be received
even though the external GPS
receiver is installed.
Check if the volume is set to the minimum.
• Ensure that the protective film on the camera lens has been removed. The
video may look unclear if the protective film is still on the camera lens.
• Check the installation location of the front or rear camera, turn on the product,
and then adjust the camera's viewing angle.
• Ensure that the memory card has been inserted in the correct direction. Before
inserting the memory card, ensure that the metal contacts on the memory card
are facing toward the lens of the product.
• Turn off the power, remove the memory card, and then check to ensure that the
contacts in the memory card slot are not damaged.
• Ensure that the memory card is an authentic product distributed by Alpine.
Alpine does not guarantee compatibility and normal operation of third-party
memory cards.
The recorded videos are stored as MP4 video files. Ensure that the video player
installed on your PC supports the playback of MP4 video files.
The GPS signal may not be received in out-of-service areas, or if the product is
located between tall buildings. Also, GPS signal reception may not be available
during storms or heavy rain. Try again on a clear day at a location that is known
to have a good GPS reception. It may take up to 5 minutes until GPS reception is
established.
Before contacting a service center
Please back up all important data stored in the memory card. The data in the memory card may be deleted
during repair. Every product requested for repair is regarded as a device that has had its data backed up.
The customer service center does not back up your data. Alpine is not responsible for any loss, such as
data loss.
34
Page 35

10. Specifications
To see the product specifications, refer to the following table.
Item Specification Remarks
Model name DVR-C310R / DVR-C310S / RVC-C310
Dimensions / Weight
Memory microSD card 16 GB, 32 GB, 64 GB, 128GB (UHS-I)
Recording mode
Camera sensor 2.1M Pixels, CMOS, 1080p Rear camera: 1.0M Pixels
Angle of view (Lens) Approximately 144° (diagonally) Rear camera: approximately 140°
ideo
V
Audio PCM (Pulse code modulation) Built-in microphone
98.5 x 40.6 x 26.9 mm / 61 g
(except mount)
Continuous Rec
Incident Rec
Manual Rec
Parking Rec (parking mode) Motion detection / Energy saving
FHD
(1920 x 1080 @ 30fps / H.264 / MP4)
Rear camera: 60.5 x 32.3 x 26.7 mm / 24.8 g
Records videos in 1-minute segments
(dual channels are supported for recording the
front and rear view)
Records 10 seconds before and after the incident
(total 20 seconds)
Records from 10 seconds before and 50 seconds
after manually starting the recording
(total 1 minute)
Rear camera: HD (1080 x 720 @ 30fps / H.264 / MP4)
Acceleration sensor 3-axis acceleration sensor (3D, ±3G)
GPS External GPS
Wireless Single-band 2.4GHz, 802.11 b/g/n
Power consumption 2ch: 3.6 W / 1ch: 2.7 W Except for the fully charged supercapacitor / GPS
LED indicator Wi-Fi LED, Status LED
Alarm Built-in speakers V
Operating temperature -4 – 140℉ / -20 – 60℃
oice guide (buzzer sounds)
35
Page 36

Specifications
For the approximate recording times of each memory partition setting, refer to the tables below.
• For more information about the memory partition settings, refer to "6.1 Managing the memory card" on
page 29.
• For more information about the parking mode, refer to "3.5 Using parking mode" on page 22.
• Continuous Priority
Parking
Mode
Motion
Detection
Energy
Saving
Card
Size
16 GB Approx. 94 min Approx. 50 min Approx. 13 min Approx. 91 min Approx. 38 min
32 GB Approx. 188 min Approx. 100 min Approx. 25 min Approx. 181 min Approx. 75 min
64 GB Approx. 376 min Approx. 200 min Approx. 50 min Approx. 362 min Approx. 150 min
128 GB Approx. 752 min Approx. 400 min Approx. 100 min Approx. 724 min Approx. 300 min
• Incident Priority
Parking
Mode
Motion
Detection
Card
Size
16 GB Approx. 68 min Approx. 88 min Approx. 13 min Approx. 106 min Approx. 87 min
32 GB Approx. 136 min Approx. 176 min Approx. 25 min Approx. 211 min Approx. 173 min
64 GB Approx. 272 min Approx. 352 min Approx. 50 min Approx. 422 min Approx. 346 min
Continuous Rec Incident Rec Manual Rec
Continuous Rec Incident Rec Manual Rec
Motion Detection
(while parking)
Motion Detection
(while parking)
Parking
Incident
Parking
Incident
36
Energy
Saving
128 GB Approx. 544 min Approx. 704 min Approx. 100 min Approx. 844 min Approx. 692 min
16 GB Approx. 68 min Approx. 88 min Approx. 13 min Approx. 106 min Approx. 87 min
32 GB Approx. 136 min Approx. 176 min Approx. 25 min Approx. 211 min Approx. 173 min
64 GB Approx. 272 min Approx. 352 min Approx. 50 min Approx. 422 min Approx. 346 min
128 GB Approx. 544 min Approx. 704 min Approx. 100 min Approx. 844 min Approx. 692 min
Page 37

• Parking Priority
Specifications
Parking
Mode
Motion
Detection
Energy
Saving
Card
Size
16 GB Approx. 53 min Approx. 42 min Approx. 13 min Approx. 314 min Approx. 38 min
32 GB Approx. 105 min Approx. 83 min Approx. 25 min Approx. 627 min Approx. 75 min
64 GB Approx. 210 min Approx. 166 min Approx. 50 min Approx. 1,254 min Approx. 150 min
128 GB Approx. 420 min Approx. 332 min Approx. 100 min Approx. 2,508 min Approx. 300 min
• Manual Priority
Parking
Mode
Motion
Detection
Card
Size
16 GB Approx. 53 min Approx. 63 min Approx. 60 min Approx. 38 min Approx. 38 min
32 GB Approx. 105 min Approx. 125 min Approx. 120 min Approx. 75 min Approx. 75 min
64 GB Approx. 210 min Approx. 250 min Approx. 240 min Approx. 150 min Approx. 150 min
Continuous Rec Incident Rec Manual Rec
Continuous Rec Incident Rec Manual Rec
Motion Detection
(while parking)
Motion Detection
(while parking)
Parking
Incident
Parking
Incident
128 GB Approx. 420 min Approx. 500 min Approx. 480 min Approx. 300 min Approx. 300 min
16 GB Approx. 53 min Approx. 63 min Approx. 60 min Approx. 38 min Approx. 38 min
Energy
Saving
32 GB Approx. 105 min Approx. 125 min Approx. 120 min Approx. 75 min Approx. 75 min
64 GB Approx. 210 min Approx. 250 min Approx. 240 min Approx. 150 min Approx. 150 min
128 GB Approx. 420 min Approx. 500 min Approx. 480 min Approx. 300 min Approx. 300 min
• Driving Recording Only
Parking
Mode
Motion
Detection
Energy
Saving
Card
Size
16 GB Approx. 123 min Approx. 42 min Approx. 13 min - -
32 GB Approx. 246 min Approx. 83 min Approx. 25 min - -
64 GB Approx. 492 min Approx. 166 min Approx. 50 min - -
128 GB Approx. 984 min Approx. 332 min Approx. 100 min - -
16 GB Approx. 123 min Approx. 42 min Approx. 13 min - -
32 GB Approx. 246 min Approx. 83 min Approx. 25 min - -
64 GB Approx. 492 min Approx. 166 min Approx. 50 min - -
Continuous Rec Incident Rec Manual Rec
Motion Detection
(while parking)
Parking
Incident
128 GB Approx. 984 min Approx. 332 min Approx. 100 min - -
37
Page 38

Specifications
Hereby, Alpine Electronics (Europe) declares that the radio equipment type DVR-C310R, DVR-C310S is in
compliance with Directive 2014/53/EU.
The full text of the EU declaration of conformity is available at the following internet address: http://www.
alpine.com/e/research/doc/
Information on Disposal of Old Electrical and Electronic Equipment and Battery (applicable for countries
that have adopted separate waste collection systems)
If you want to dispose this product, do not mix it with general household waste. There is a separate
collection system for used electronic products in accordance with legislation that requires proper
treatment, recovery and recycling. Contact your local authority for details in locating a recycle facility
nearest to you. Proper recycling and waste disposal will help conserve resources whist preventing
detrimental effects on our health and the environment.
WiFi (IEEE 802.11b/g/n) in the 2.4GHz ISM band (2412 ~ 2472MHz)
Maximum Power [17.99dBm / 63mW (EIRP)]
Rx only: GNSS (1563~1610MHz), GPS L1 (1575.42MHz) + GLONASS L1 (1602.00MHz)
Important information on the software
About the software licence of the product
The software installed in the product contains open-source software.
See the following Alpine website for details on the open source software.
.alpine-usa.com
www
www.alpine-europe.com
38
Page 39

www.alpine-usa.com
www.alpine-europe.com
ALPINE ELECTRONICS OF AMERICA, INC.
1500 Atlantic Boulevard, Auburn Hills,
Michigan 48326, USA
Phone: 1-800-ALPINE-1 (1-800-257-4631)
For contact information on your respective country, please visit www.alpine-europe.com.
Ver. 1.0 (Oct. 2020)
ALPS ALPINE EUROPE GmbH
Ohmstrasse 4
85716 Unterschleissheim
Germany
 Loading...