

Page 1

FOR CAR USE ONLY/NUR FÜR AUTOMOBIL GEBRAUCH/POUR APPLICATION AUTOMOBILE
2
UNIQUEMENT/PARA USO EN AUTOMÓVILES/SOLO PER L’UTILIZZO IN AUTOMOBILE/ENDAST FÖR
BILBRUK/
REAR VIEW CAMERA SYSTEM
HCE-C300R
OWNER’S MANUAL
•
BEDIENUNGSANLEITUNG
•
MODE D’EMPLOI
•
MANUAL DE OPERACIÓN
•
ISTRUZIONI PER L’USO
•
ANVÄNDARHANDLEDNING
•
ALPINE ELECTRONICS MARKETING, INC.
1-1-8 Nishi Gotanda,
Shinagawa-ku,
Tokyo 141-0031, Japan
Phone 03-5496-8231
ALPINE ELECTRONICS OF AMERICA, INC.
19145 Gramercy Place, Torrance,
California 90501, U.S.A.
Phone 1-800-ALPINE-1 (1-800-257-4631)
ALPINE ELECTRONICS OF CANADA, INC.
777 Supertest Road, Toronto,
Ontario M3J 2M9, Canada
Phone 1-800-ALPINE-1 (1-800-257-4631)
Please read before using this equipment.
Lesen Sie diese Bedienungsanleitung bitte vor
Gebrauch des Gerätes.
Veuillez lire avant d’utiliser cet appareil.
Léalo antes de utilizar este equipo.
Si prega di leggere prima di utilizzare l’attrezzatura.
Innan du använder utrustningen bör du läsa
igenom denna användarhandledning.
ALPINE ELECTRONICS OF AUSTRALIA PTY. LTD.
161-165 Princes Highway, Hallam
Victoria 3803, Australia
Phone 03-8787-1200
ALPINE ELECTRONICS GmbH
Wilhelm-Wagenfeld-Str. 1-3,
80807 München, Germany
Phone 089-32 42 640
ALPINE ELECTRONICS OF U.K. LTD.
Alpine House
Fletchamstead Highway,
Coventry CV4 9TW, U.K.
Phone 0870-33 33 763
ALPINE ELECTRONICS FRANCE S.A.R.L.
(RCS PONTOISE B 338 101 280)
98, Rue de la Belle Etoile, Z.I. Paris Nord Il,
B.P. 50016, 95945 Roissy Charles de Gaulle
Cedex, France
Phone 01-48638989
ALPINE ITALIA S.p.A.
Viale C. Colombo 8, 20090 Trezzano
Sul Naviglio (MI), Italy
ALPINE ELECTRONICS DE ESPAÑA, S.A.
Portal de Gamarra 36, Pabellón, 32
01013 Vitoria (Alava)-APDO 133, Spain
ALPINE ELECTRONICS (BENELUX) GmbH
Leuvensesteenweg 510-B6,
1930 Zaventem, Belgium
Phone 02-484781
Phone 945-283588
Phone 02-725-13 15
EN
DE
FR
ES
IT
SE
CT
CS
YAMAGATA Co., Ltd.
2-6-34, Takashima, Nishi-ku, Yokohama-shi,
Kanagawa, 220-8515 Japan
Designed by ALPINE Japan
Printed in Japan (Y)
68-18693Z26-B
Page 2

Page 3

ENGLISH
Contents
Operating Instructions
WARNING
DANGER ........................................... 2
WARNING ........................................2
CAUTION .........................................3
NOTICE ............................................. 4
Feature
About Object Detection
Function ..........................................5
Cautions Regarding Object Detection
Function .................................................. 6
About Selection of Warning Objects ...... 7
Display of Detected Object ..............8
Warning Icon when No Object is
Detected ................................................ 10
Moving object verification icon ............10
Camera Image ..................................11
About the rear camera guide ................. 12
Error between the display and actual
road surface ..........................................13
Warning Message Displays .................... 13
About Calibration ...........................14
Camera Operation
Turning the Rear Camera On and
Off ..................................................15
Displaying the rear image by shifting the
gear lever ...............................................15
Displaying the rear image through
operation from connected
products ................................................15
Changing the Rear Image
Configuration ...............................16
Adjusting Alarm Volume ...............16
Adjusting Detection Sensitivity .....16
Installation and Connections
Installation of the Rearview
Camera System ............................17
Mounting the Rearview Camera ...17
1. Preparation ..........................................17
2. Installing the Rearview camera ......... 18
3. Installing the Buzzer ........................... 20
4. Installing the Switch ...........................20
5. Installing the Control Unit ................21
Connections .....................................22
System Example ..............................24
Connecting a product that has the direct
camera input connector ...................... 24
Connecting a product that has RCA
video input terminals ..........................24
Confirmation ..................................25
Calibration
Introduction .....................................26
What is Calibration? ............................... 26
Setting Flowchart ....................................26
Switching between “Calibration Mode”
and “Normal Use Mode” .....................26
Preparation .......................................26
Accessory parts........................................26
Necessary tools ........................................ 26
Necessary space for work ....................... 27
Prepare the Car Body .............................27
Affixing the calibration sheets .......27
About Operation in Calibration
Mode .............................................30
Performing Calibration ..................31
Information
Specifications ...................................35
In Case of Difficulty .......................35
1-EN
Page 4
Operating Instructions
WARNING
DANGER
This symbol means important instructions.
What to do in the case of an extremely critical
situation wherein someone may suffer grave
or mortal injury.
DO NOT PROCEED TO BACK UP YOUR VEHICLE WHILE
PEOPLE ARE IN YOUR VIEW OR THE CAMERA’S VIEW.
SERIOUS INJURY OR DEATH CAN RESULT.
WARNING
This symbol means important instructions.
Failure to heed them can result in serious
injury or death.
WHEN USING A CAMERA SYSTEM, THE DRIVER MUST
VISUALLY CHECK ACTUAL CONDITIONS AROUND
THE VEHICLE. MAKE SURE THERE ARE NO PERSONS
OR ANIMALS IN THE AREA IN WHICH YOU ARE
MANEUVERING OTHERWISE YOU COULD INJURE THEM.
A camera assists the driver by sending images to the screen
showing conditions in view of the camera. The camera uses
a wide-angle lens, therefore, there is a difference in distance
perspective between what is normally seen and what appears
on the screen. Also, the images shown by the rearview camera
are reversed, so as to appear the same as what is seen through
the rearview mirror.
The camera may not perform to full capability due to
variables such as:
•
weather conditions such as hard rain, snow, fog or mud
•
extremely high or low temperatures near camera
•
slope of vehicle and/or roadway
•
direct exposure to very bright light such as headlamp or
bright sunlight
•
moving from very dark to very bright light and vice versa
such as in parking garages or tunnels
•
extremely low light areas
•
walls or objects that are located diagonally in relation to
the camera
•
retracted mirrors that change camera viewing angle
•
open doors or trunks
•
changes to height of vehicle due to loading capacity or
hydraulic suspensions
•
objects located at the corner of the vehicle
WHEN USING AN OBJECT SENSOR SYSTEM, THE
DRIVER MUST VISUALLY CHECK ACTUAL CONDITIONS
AROUND THE VEHICLE. MAKE SURE THERE ARE NO
PERSONS OR ANIMALS IN THE AREA IN WHICH YOU ARE
MANEUVERING OTHERWISE YOU COULD INJURE THEM.
The Object detection function assists the driver in checking
behind and around the vehicle but is not a substitute for using
your own eyes. The system may not perform to full capability
due to variables such as:
•
weather conditions such as hard rain, snow, fog or mud
•
dense exhaust fumes obscuring the sensor
extremely high or low temperatures near sensor
•
slope of vehicle and/or roadway
•
direct exposure to very bright light such as headlamp or
•
bright sunlight
moving from very dark to very bright light and vice versa
•
such as in parking garages or tunnels
walls or objects that are located diagonally in relation to
•
the sensor
open doors or trunks
•
changes to height of vehicle due to load capacity or
•
hydraulics
speed of vehicle and/or approaching object
•
objects moving perpendicular to vehicle at same speed as
•
vehicle
walls or objects that are located diagonally in relation to
•
the sensor
large groups of moving objects, such as pedestrians in
•
crosswalk
when an object and vehicle are not moving
•
when an object approaches the vehicle from an angle
•
greater than 5 degrees
objects more than 12 feet or 3.7 meters behind vehicle
•
objects hidden by vehicle
•
•
narrow objects such as a cone or pole
•
objects located above the area that the sensor can scan
•
non-moving small objects that are low to the ground
•
approaching a flat wall, such as parking structure or
guardrail
•
other vehicles traveling at speed in excess of 24 mph or
40 km
•
own vehicle traveling over 3 mph or 5 km
CHECK THAT THE CAMERA AND/OR SENSOR MOUNTING
IS ATTACHED SECURELY, AND THAT THE SCREWS ARE
TIGHT BEFORE DRIVING.
Failure to do so may result in an accident.
WHEN INSTALLING OR CHECKING A CAMERA AND/OR
OBJECT SENSOR, DO SO AFTER PARKING THE CAR IN A
LEVEL, SAFE PLACE, TURNING OFF THE ENGINE, AND
APPLYING THE HAND BRAKE.
Failure to do so may result in an accident.
WHEN INSTALLING CAMERA AND/OR OBJECT SENSOR,
BE SURE TO USE SPECIFIC VEHICLE CALIBRATION
KIT OTHERWISE IT WILL NOT ACCURATELY DISPLAY
IMAGES.
Failure to do so may result in an accident.
MINIMIZE DISPLAY VIEWING WHILE DRIVING.
Viewing the display may distract the driver from looking
ahead of the vehicle and cause an accident.
DO NOT DISASSEMBLE OR ALTER.
Doing so may result in an accident, fire or electric shock.
KEEP SMALL OBJECTS SUCH AS BOLTS OR SCREWS OUT
OF THE REACH OF CHILDREN.
Swallowing them may result in serious injury. If swallowed,
consult a physician immediately.
USE THE CORRECT AMPERE RATING WHEN REPLACING
FUSES.
Failure to do so may result in fire or electric shock.
2-EN
Page 5
MAKE THE CORRECT CONNECTIONS.
When making connections to the vehicle’s electrical system,
be aware of the factory installed components (e.g. on-board
computer). Do not tap into these leads to provide power
for this unit. When connecting the device to the fuse box,
make sure the fuse for the intended circuit of the device has
the appropriate amperage. Failure to do so may result in fire
or damage to the unit and/or the vehicle. When in doubt,
consult your Alpine dealer.
BEFORE WIRING, DISCONNECT THE CABLE FROM THE
NEGATIVE BATTERY TERMINAL.
Failure to do so may result in electric shock or injury due to
electrical shorts.
DO NOT ROUTE ELECTRICAL CABLES NEAR HOT OR
MOVING PARTS.
Route the cables and wiring away from hot or moving parts,
and fix them securely to avoid heat/mechanical damage to
the cable insulation, which may result in a short circuit, fire
or electric shock.
DO NOT SPLICE INTO ELECTRICAL CABLES.
Never cut away cable insulation to supply power to other
equipment. Doing so will exceed the current carrying
capacity of the wire and result in fire or electric shock.
DO NOT INSTALL IN LOCATIONS WHICH MIGHT HINDER
VEHICLE OPERATION, SUCH AS THE STEERING WHEEL
OR SHIFT LEVER.
Doing so may obstruct forward vision or hamper movement
etc. and results in serious accident.
DO NOT DAMAGE PIPE OR WIRING WHEN DRILLING
HOLES.
When drilling holes in the chassis for installation, take
precautions so as not to contact, damage or obstruct pipes,
fuel lines, tanks or electrical wiring. Failure to take such
precautions may result in fire.
DO NOT USE BOLTS OR NUTS IN THE BRAKE OR
STEERING SYSTEMS TO MAKE GROUND CONNECTIONS.
Bolts or nuts used for the brake or steering systems (or any
other safety-related system), or tanks should NEVER be used
for installations or ground connections. Using such parts
could disable control of the vehicle and cause fire etc.
DO NOT ALLOW CABLES TO BECOME ENTANGLED IN
SURROUNDING OBJECTS.
Arrange wiring and cables in compliance with the manual
to prevent obstructions when driving. Cables or wiring that
obstruct or hang up on places such as the steering wheel, shift
lever, brake pedals, etc. can be extremely hazardous.
USE THIS PRODUCT FOR MOBILE 12V APPLICATIONS.
Use for other than its designed application may result in fire,
electric shock or other injury.
USE ONLY IN CARS WITH A 12 VOLT NEGATIVE GROUND.
(Check with your dealer if you are not sure.) Failure to do so
may result in fire, etc.
WHEN USING A DRILL TO MAKE A HOLE, TAKE
PRECAUTIONS SUCH AS WEARING GOGGLES SO
FRAGMENTS DO NOT GET INTO THE EYES.
Failure to do so may result in injury.
CALIBRATION REQUIRED.
If this camera system is not calibrated, its detection function
will not work properly. It must be calibrated before use.
Calibration is also necessary after remounting.
BE CAREFUL WHEN SETTING THE ALARM VOLUME.
Set the alarm volume to an audible level. If the alarm cannot
be heard due to the volume of the car radio, etc., it might
result in an accident.
BE AWARE OF DIFFERENCES IN DETECTION SENSITIVITY
LEVELS.
If the sensitivity level of the object detector is changed
from a high setting to a low setting, be aware of differences
in detection levels. Objects that were detected under the
previous level will not be detected anymore, and this might
result in an accident.
BE AWARE OF THE OPERATING CONDITIONS OF THE
OBJECT DETECTION FUNCTION.
The warning function only works when the gear lever is in
the reverse position (R). Using the detection feature with
reverse OFF may result in an accident.
DO NOT USE WITH A TOW TRUCK.
If reversed while connected to a tow truck, it will falsely
detect the tow truck. Also, it cannot detect objects near the
tow truck, which may result in an accident.
DO NOT JUDGE SITUATIONS BASED ONLY ON THE
WARNING OF THE OBJECT DETECTION FUNCTION.
Warnings may not always be given even when vehicles or
people are in danger of being hit. This is due to many factors
such as vehicle speed or distance from your vehicle.
DO NOT IGNORE OBJECT DETECTION FUNCTION
WARNINGS.
If an object detection warning occurs, check the surrounding
area thoroughly.
CAUTION
This symbol means important instructions.
Failure to heed them can result in injury or
material property damage.
DO NOT ATTACH THE CAMERA AND/OR OBJECT SENSOR
MOUNTING TO FLUOROCARBON RESIN FINISHED CAR
BODIES OR GLASS.
Doing so could cause the strength of the camera mounting to
weaken, which could cause it to fall of and cause accidents,
injury, or damage to the car body.
DO NOT ATTACH THE CAMERA AND/OR OBJECT SENSOR
MOUNTING TO ANY SURFACE WHERE THE ENTIRE
ADHESIVE SURFACE CANNOT BE APPLIED.
Doing so could cause the strength of the camera mounting to
weaken, which could cause it to fall of and cause accidents,
injury, or damage to the car body.
EXCEPT FOR THE CAMERA AND/OR OBJECT SENSOR, DO
NOT ATTACH ANY PARTS TO AREAS WHICH WILL GET
WET, OR WHERE THERE IS A LOT OF HUMIDITY OR DUST.
Failure to do so may result in fire or damage.
USE SPECIFIED ACCESSORY PARTS AND INSTALL THEM
SECURELY.
Be sure to use only the specified accessory parts. Use of other
than designated parts may damage this unit internally or may
not securely install the unit in place. This may cause parts to
become loose resulting in hazards or product failure.
3-EN
Page 6

HAVE THE WIRING AND INSTALLATION DONE BY
EXPERTS.
The wiring and installation of this unit requires special
technical skill and experience. To ensure safety, always
contact the dealer where you purchased this product to have
the work done.
ARRANGE THE WIRING SO IT IS NOT CRIMPED OR
PINCHED BY A SHARP METAL EDGE.
Route the cables and wiring away from moving parts (like
the seat rails) or sharp or pointed edges. This will prevent
crimping and damage to the wiring.
HALT USE IMMEDIATELY IF A PROBLEM APPEARS.
Failure to do so may cause personal injury or damage to the
product. Return it to your authorized Alpine dealer or the
nearest Alpine Service Centre for repairing.
CHECK WIRING WHEN ATTACHING.
Double-check your wiring to ensure all connections are
correct and secure. Also, do not apply unnecessary force to
the harness. This can result in battery failure, performance
failure, connector damage, or wire breakage.
NOTICE
•
About Care of Device
Do not assert any excess pressure to the camera, object
sensor or the mounting, as this could cause the device’s
direction to shift, or the device mounting to come off.
•
To prevent the camera lens, object sensor, mounting
and cords from changing colour or shape, or from
deteriorating, wipe with a chemical-free, damp cloth.
•
When washing the vehicle, do not use an automatic car
washer, or high-pressure washer. Doing so could cause
the camera and/or object sensor to come off, damage to
the device cords, or may allow water to enter the camera
and/or object sensor.
•
Be sure to disconnect the cable from the (–) battery post
before installing your HCE-C300R. This will reduce any
chance of damage to the unit in case of a short circuit.
•
Be sure to connect the colour coded leads according to
the diagram. Incorrect connections may cause the unit to
malfunction or damage to the vehicle’s electrical system.
•
When making connections to the vehicle’s electrical
system, be aware of the factory installed components (e.g.
on-board computer). Do not tap into these leads to provide
power for this unit. When connecting the HCE-C300R to
the fuse box, make sure the fuse for the intended circuit of
the HCE-C300R has the appropriate amperage. Failure to
do so may result in damage to the unit and/or the vehicle.
When in doubt, consult your Alpine dealer.
•
In some cases, to attach the device, a hole must be drilled
in the car body, requiring use of touch-up paint (retail
product) for rust-prevention, and should be prepared
beforehand.
•
Route the cables and wiring away from hot or moving
parts, and fix them securely to avoid heat/mechanical
damage to the cable insulation, which may result in shortcircuit, fire or electric shock.
•
About Calibration Settings
Obstacle detection performance adjustment and guidance
mark settings configuration require that the camera
installation information be entered. If the camera
information is not entered, correct detection results may
not be provided. Therefore, be sure to perform calibration.
When the camera is reinstalled or when the vehicle is
changed, be sure to perform readjustment.
•
About Rear Camera
The rear camera of this camera system is a dedicated
product. Do not connect it to other cameras.
4-EN
•
About Power Connection
Connect a reverse input cable (orange/white) to the
power cable of the rear lamp. For details, consult a dealer
purchased the camera, or car dealer.
•
Connect this to a power cable of the rear lamp, but not to
the positive (+) of the rear lamp signal cable.
•
Do not use a mobile phone and wireless device near the
camera.
•
Doing so may result in noise on the screen or malfunction.
It is recommended to use a mobile phones or wireless
devices away from the camera.
•
About Camera Installation Location
Before installing, make sure there is a enough space to be
able to install the camera.
If possible, install the camera in the centre of the bumper
or other fitting. If the camera is installed at a distance left
or right of centre, the image may differ from the real view.
•
Choose the mounting locations for the control unit, camera
and buzzer carefully. This location must be able to support
the product weight when mounted by the supplied screws.
Otherwise, damage to the vehicle may result.
Page 7
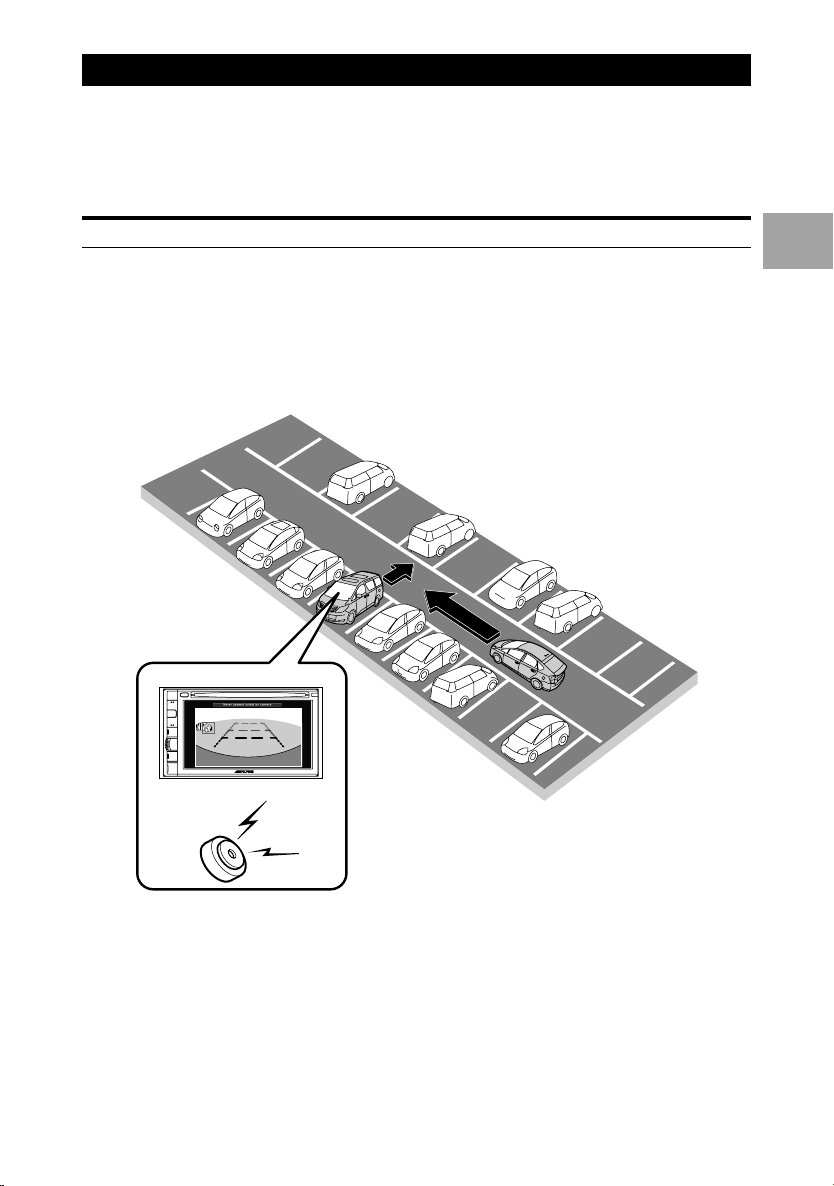
Feature
This camera system displays a live video of the area behind the vehicle. A separately installed monitor is
required to view this video. When the vehicle is placed in reverse, besides video, the system also detects
various objects (such as other cars or people) moving behind the vehicle. There is a visual and audible
warning given for each object detected.
There are 4 different display configurations for the rear view.
About Object Detection Function
This camera system detects objects from the camera image and warns drivers with a display and an
alarm.
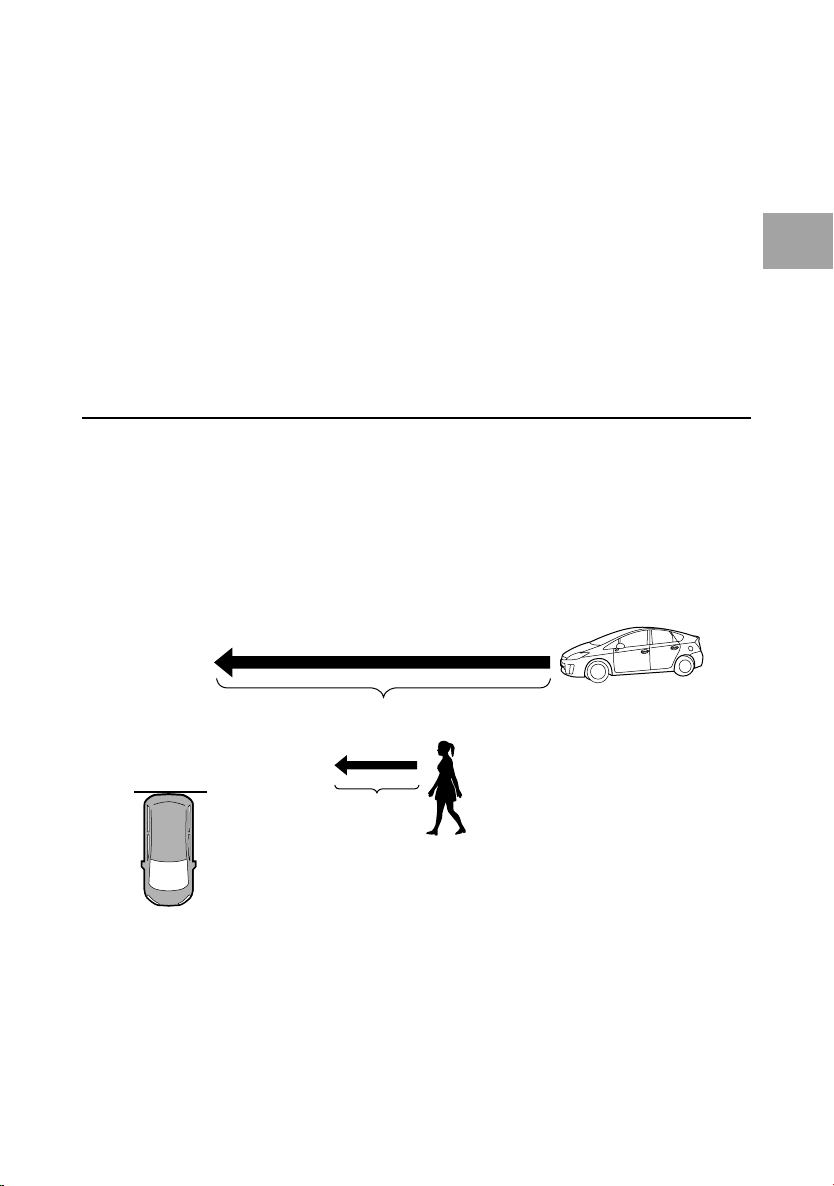
The object detection function is useful in the following situations:
When you reverse the car to exit a parking space at a shopping mall, this function helps to detect cars
•
that are driving from the right or the left and gives an audible warning.
When you reverse the car to exit your garage toward the street, this function helps to detect cars that
•
are driving down the street and gives an audible warning.
Beep Beep Beep
Objects moving away from vehicle are not detected.
•
You can adjust the volume of the warning beeps. Refer to “Adjusting Alarm Volume” (page 16).
•
You can adjust the sensitivity to objects. Refer to “Adjusting Detection Sensitivity” (page 16).
•
5-EN
Page 8
Cautions Regarding Object Detection Function
This camera system is designed to help the driver make safe driving decisions. It must not
replace a thorough, visual inspection around the vehicle by the driver, before proceeding.
•
This system cannot detect every object within range of coming in contact with your vehicle.
•
This camera distorts object size and distance from the vehicle. We are not responsible for any accidents caused by
driver misjudgement or conclusions based on objects seen or unseen by this system.
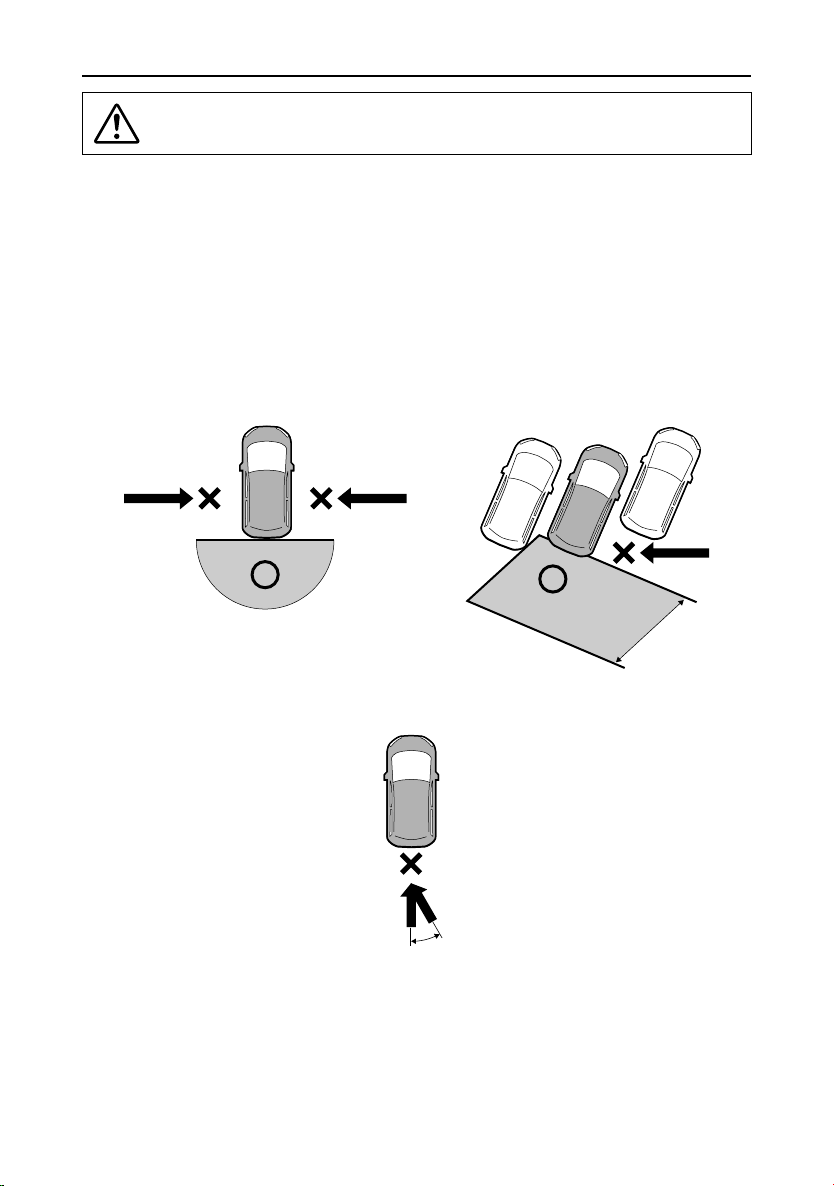
This system uses the camera’s image to detect moving objects. Therefore, only objects seen by the camera
are detectable.
There be times when a false warning is given with no moving object in the display. In other cases, no
warning at all is given although moving vehicles are visible in the display.
In addition, a warning may not be given or may be delayed in the following cases or for the following
objects.
Object out of the camera’s scope
e
Your vehicle
3.7 m
6-EN
Objects approaching from directly behind
e
30°
When both the vehicle and objects are motionless
•
Motionless objects are difficult to detect. Therefore, there may be cases where a warning is not given or the
–
distance is not correct. Be sure to perform a visual check.
Road paint (for example, crosswalks), tire chocks, curbstones
•
Thin objects (for example, cones and poles)
•
Low objects (for example, infants, children and small bicycles/tricycles)
•
Large objects (for example, concrete block walls and guardrails)
•
Objects not within 3.7 m behind the vehicle
•
Objects approaching from a slope
•
Page 9
If multiple pedestrians crossing. If multiple pedestrians continuously approaching.
•
When the object moves at the same speed as the vehicle
•
Motionless objects when the vehicle moves very slowly
•
Object moving at an extremely low speed
•
When objects disappear from the camera’s scope because of exhaust gases, rain, fog, snow, or mud
•
False detection because of exhaust gases, rain, snow, or road surface reflections
•
When the vehicle moves at speeds equal to or more than 5 mph (5 km/h)
•
When the object moves at speeds equal to or more than 25 mph (40 km/h)
•
When the detection range becomes narrower because the camera’s scope is interrupted by the vehicle’s body
•
When tires are changed or the vehicle is loaded with heavy objects after calibration
•
A particularly dark location at night
•
A light flashing near the vehicle or its own hazard lamps flashing.
•
When light hits the camera directly (If a license plate lamp has been customized to be brighter than normal, etc.)
•
If the vehicle is tilted
•
Reflection of light on the road surface while driving the vehicle
•
Moving object that starts moving near the vehicle
•
If the vehicle shadow shows up in the camera image
•
If the headlights of another car reflect on the body of the vehicle to the side
•
About Selection of Warning Objects
If multiple objects are detected, a warning is given for the most critical object in both the right and left
images. An alarm sounds for the nearest object on either the right or left side.
The warning objects are selected according to the “arrival time” to the vehicle. Therefore, objects at
higher speeds are recognized as high priority from a longer distance. Even when a moving object at
lower speeds (for example, pedestrians) is closer to the vehicle, another moving object with a shorter
arrival time (for example, a car) is preferentially displayed if such an object is detected.
For example: There is a pedestrian moving towards your vehicle at 2.5 mph (4 km/h) and a car from your
vehicle approaching at 12 mph (20 km/h). The car will reach your vehicle earlier. In this case, a warning
is given for the car.
Your vehicle
12 mph (20 km/h)
Arrival time is shorter
2.5 mph (4 km/h)
Arrival time is longer
Car
Pedestrian
7-EN
Page 10
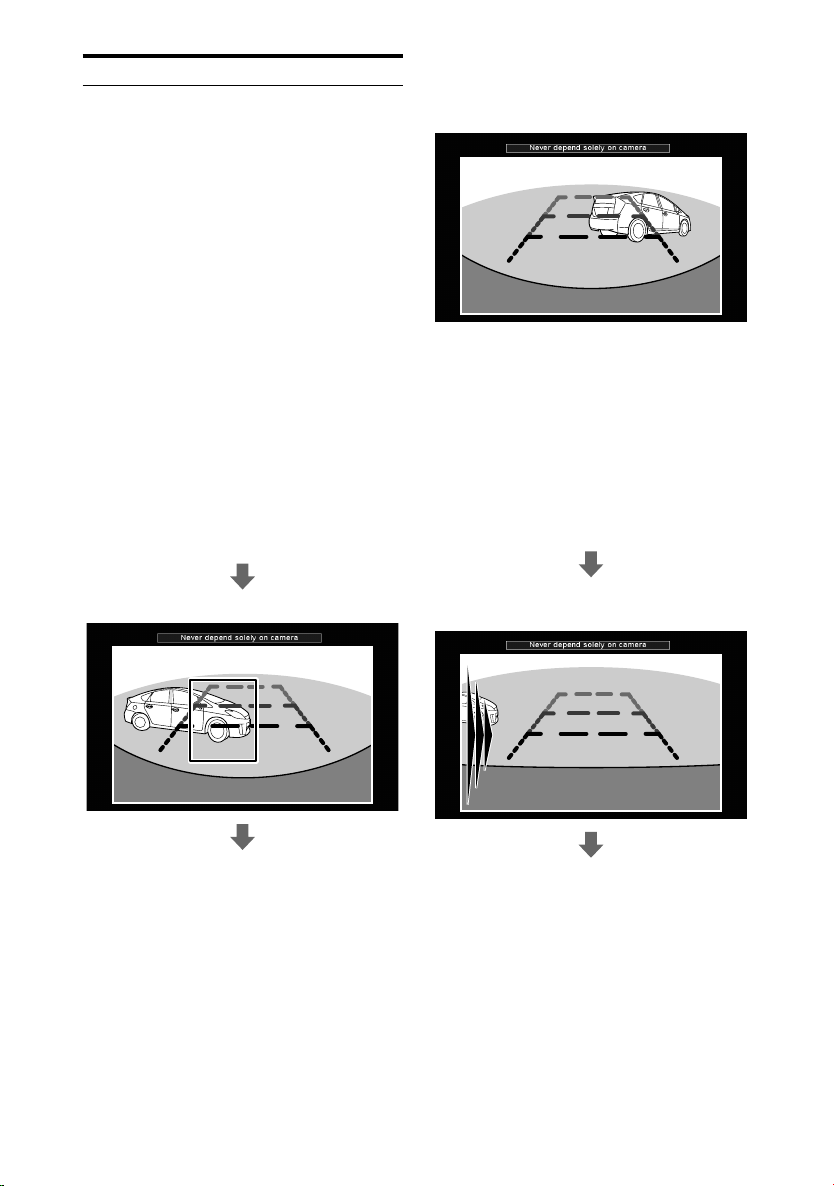
Display of Detected Object
The display when an object is detected differs
depending on image configurations.
When there are lots of objects present, such as in a
•
crowd of people, the outer frame light will blink as a
warning. Individual objects will not be detected.
Because this camera system detects objects based on
•
a Panorama View image, warnings can occur even if
an object does not show on the Ground View / Rear
View screen.
Panorama View Display
e
Indications
A small box appears on an object that enters the
camera’s view. The box follows the object moving
through the display.
The box represents the objects approximate position
•
relative to your vehicle. There may be times when
the box does not appear or does not follow the object
accurately.
When an object is detected, the screen is
enclosed by a red frame (first time only). An
alarm also starts to sound.
The warning ends when the object comes
directly behind the vehicle. No warning also
occurs when the object moves away from the
vehicle.
Rear View Display Indications
e
A triangle mark appears on the leftmost or
rightmost side of the screen, indicating that an
object is approaching from a side. After the object
appears on the screen, a small box appears at the
approximate location.
When an object is detected, the screen is
enclosed by a red frame (first time only). An
alarm also starts to sound.
The system boxes off the object in red.
8-EN
If the object comes into the warning area, a
red triangle arrow appears.
Page 11
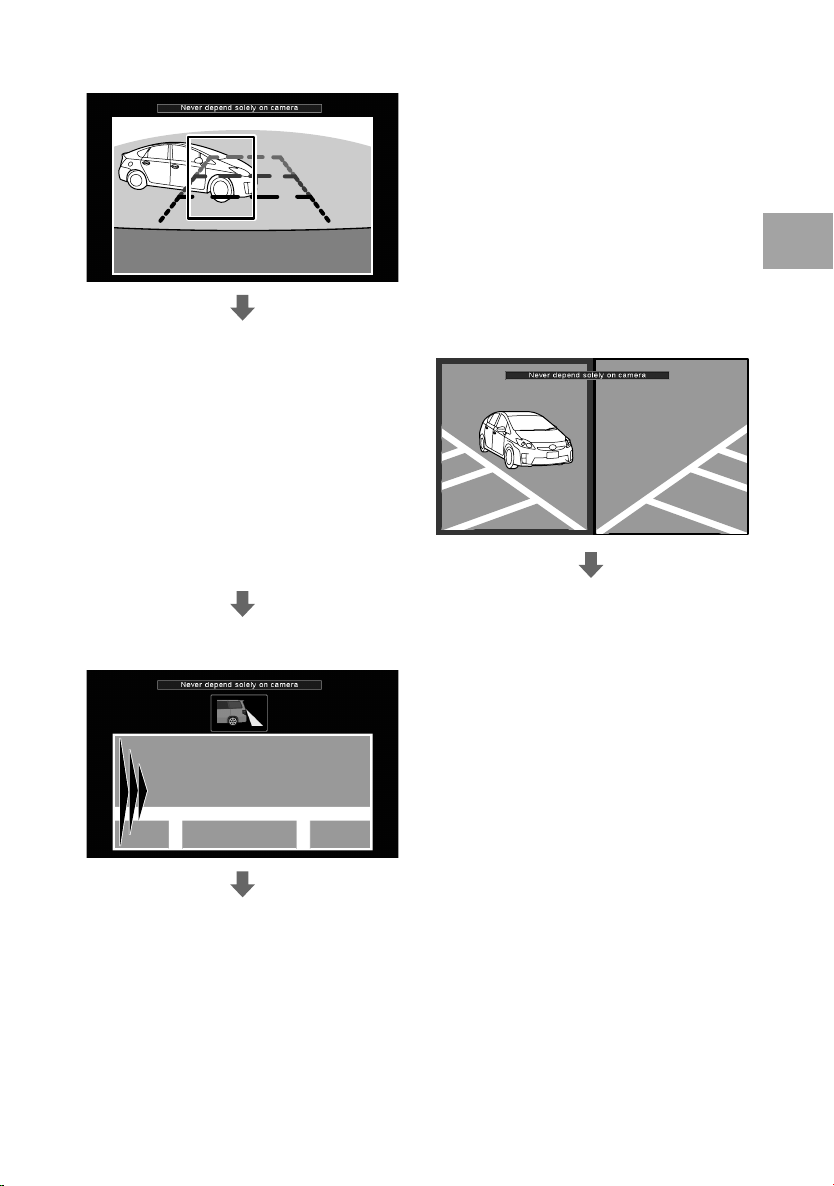
When the object comes into the screen, the
system boxes off the obstacle in red.
The warning ends when the object comes
directly behind the vehicle. No warning also
occurs when the object moves away from the
vehicle.
Ground View Display Indications
e
A triangle mark appears on the leftmost or
rightmost side of the screen, indicating that an
object is approaching from a side.
When an object is detected, the screen is
enclosed by a red frame (first time only). An
alarm also starts to sound.
If the object comes into the warning area, a
red triangle arrow appears.
The warning ends when the object comes
directly behind the vehicle. No warning also
occurs when the object moves away from the
vehicle.
•
The Ground View displays only a small area.
Even if no warning occurs, make sure to check the
surrounding area thoroughly.
Corner View Display Indications
e
The direction from which a detected object is
approaching is indicated on the left or right side
of the screen.
The left or right side screen frame (whichever
side the object is detected) blinks red.
The warning ends when the object comes
directly behind the vehicle. No warning also
occurs when the object moves away from the
vehicle.
9-EN
Page 12

Warning Icon when No Object is
Detected
The system detects an object only when the gear
lever is in the reverse position (R).
If a rear camera image is displayed without placing
•
the gear lever in the reverse position (when you
call a rear camera image from the menu screen for
example), object detection is not active.
When object detection is not active, an icon
appears at the upper left of the screen.
Warning icon
Moving object verification icon
This icon displays when the system is determining
if an object nearby the vehicle is moving or
stationary. Warnings are delayed slightly while
this icon is being displayed.
10-EN
The moving object verification icon may be displayed
•
even if vehicle speed increases.
Page 13

Camera Image
With HCE-C300R, you can select and switch
image configurations.
The guidelines display varies with the image
configuration.
For details on how to switch image
configurations, refer to “Camera Operation” (page
15)
The guidelines shown here are for illustrative
•
purposes only. The guidelines in the actual image
will be different.
Rear View
Ground View
Panorama View
(180°)
Corner View
Corner View
Panorama View:
Displays a general perspective of what is behind
the car. Use this when you want to view a wider
than normal area behind the car.
Rear View:
Displays what is directly behind the car. Use this
when reversing into a parking space, for example.
Ground View:
Displays an image down to the lower section of
the car. Use this to determine the car’s position in
relation to the curb, etc.
Corner View:
Displays a divided image left and right of centre.
Use this mainly when checking the left and right
directional view.
No guidelines appear in Corner View.
•
The rearview camera image is reversed to have the
•
same perspective as the rearview mirror. However,
due to the camera’s fisheye lens, there is a distortion
of the actual distance as it appears in the display.
Images may not be clearly displayed in the following
•
conditions. This is normal.
In the dark (nighttime, etc.)
–
The temperature near the lens is high or low.
–
The camera has water droplets on it or the
–
humidity is high (rainy day, etc.).
Foreign substances (dirt, etc.) are on or around the
–
camera.
Sun light or the light of a headlamp directly enters
–
the camera lens.
The guidelines in the display may not always
•
correspond to actual distances from objects being
viewed. Factors such as road surface, number of
passengers, load weight, suspension adjustments,
etc. can affect the accuracy of the display. Always use
visual inspection to verify safe driving conditions of
your surroundings.
11-EN
Page 14

About the rear camera guide
e
Indication mark meaning
When you put the car in reverse gear, the monitor
switches to the rear camera view. Guidelines
appear to help in determining distances to
surrounding objects (vehicles, walls, etc.).
Distance guidelines
e
The distance guidelines represents the distance to
the road surface, so you cannot judge the distance
to an object based on these marks.
<Screen>
C
B
A (about
20” (0.5m))
A Car width extension marks (red, yellow
and green in order of proximity)
The marks are extensions of the vehicles
width. They provide guidance when backing
into a parking space.
B Distance guidelines
The horizontal lines represent the distance
from the rear of the car (from the rear end of
the bumper).
The lines do not move in synchronization
•
with the steering wheel.
Each line represents a distance of 0.5 m or
•
20” (red), 1 m or 39” (yellow) and 2 m or 79”
(green) behind the vehicle.
Depending on the condition of the car or road
•
surface, the range of vision may vary.
The camera’s range of vision has a limit. Objects
•
near both ends of the bumper and objects under the
bumper may be out of sight of the camera.
The rear camera image may have a tint which is
•
different from the actual surroundings.
Depending on the car, the guidance may deviate to
•
the right or left. This is not a malfunction.
<Positions of A, B and C>
about 39” (1m)
In the display, according to the distance
guidelines, the truck seems to be parked
about 39” (1 m) away (at position B). In fact,
however, if you reversed to position A, you
would collide with the truck.
In the display, positions A, B and C seem to
be located in order of proximity. However,
position A and C are the same distance, and
B is further away than positions A and C.
The car width extension mark represents the distance
•
to the road surface, so when an object on the road
surface is displayed on the screen, the mark does not
represent the actual distance to the object.
In the following conditions, screen visibility may be
•
impaired. This is not a malfunction.
When it is dark (at night, etc.).
–
When the temperature around the camera lens is
–
high or low.
When water drops adhere to the camera, or when
–
the humidity is high (such as rainy weather, etc.).
When foreign bodies (such as mud, etc.) adhere to
–
the camera or its peripheral area.
When sunlight or headlights directly strike the
–
camera lens.
12-EN
Page 15

Error between the display and
actual road surface
Under the following conditions, errors are
produced between the display guidelines and the
actual road surface. (The illustrations represent a
case when the camera is installed in the standard
position.)
When there is a steep upward
e
slope behind the car (example)
<Screen>
Actual distance
Distance guidelines
<Situation of the car>
Actual distance
e
When there is a steep downward
slope behind the car (example)
<Screen>
<Situation of the car>
Error Error
In the case of a downward slope behind
the car, the distance guidelines will appear
further away than the actual distance.
If there is an object on the downward slope,
it may appear closer than its actual position.
Also, an error may occur between the
guidance and the actual path of the car on
the road surface.
Error
Error
The distance guidelines represents the
distance to a flat road surface. Therefore in
the case of an upward slope behind the car,
the distance guidelines appear further from
the vehicle than their actual position. For
example, if there is an object on the upward
slope, it may appear further away than its
actual position.
Also, an error may occur between the
guidance and the actual path of the car on
the road surface.
Warning Message Displays
This camera system displays warning messages in
the upper part of the screen.
If the connected navigation/monitor also displays a
•
warning message, its message will appear first.
13-EN
Page 16

About Calibration
In order to effectively identify approaching
objects, it is necessary to configure the guidance
and install data. This data is entered during the
Calibration mode and ensures the most consistent
detection results.
For details on how to configure the calibration
settings, refer to “Calibration” (page 26).
A message appears on the screen if the system has
•
not been calibrated.
14-EN
Page 17

Camera Operation
Displaying the rear image through
operation from connected products
e
Operation from IVA-D511 series
VIEW
SET.
Operation is carried out by pressing the switch, or
shifting the gear lever.
The following settings may be required depending
on the connected navigation/monitor.
Rear camera connection: ON setting
•
Setting to ON is required to display the camera
image on the navigation/monitor.
Camera guidelines display: OFF setting
•
This camera system has its own, calibrated
guidelines. It is not necessary to display the
guidelines found in the navigation/monitor
system being used.
Refer also to the owner’s manual of the product to
•
connect.
Turning the Rear Camera On
and Off
Displaying the rear image by
shifting the gear lever
1 Press SOURCE/C on the unit.
The SOURCE selection screen is displayed.
2 Touch [Camera].
The Camera mode is activated and the rear
view video is displayed.
3 Touch [Guide Off].
4 Touch [ ] to access to Visual selection
screen, and then touch [Normal] to
return to previous main screen.
Operation from IVA-W520 series
e
1 Press VISUAL on the unit.
The VISUAL selection screen is displayed.
2 Touch [CAMERA].
The Camera mode is activated and the rear
view video is displayed.
3 Touch [ESC].
4 Touch [VISUAL] to access to Visual
selection screen, and then touch
[NORMAL] to return to previous main
screen.
1 Shift the gear lever to the reverse
position (backing up).
The video image behind the car and the
audible warnings depends upon the gear
shift position.
2 If you shift the gear lever to a position
other than reverse (backing up), the
monitor returns to the previous screen.
Refer also to the Owner’s Manual of the connected
•
monitor/navigation system.
Be sure to also check behind and around the car
•
visually. Use the camera image to assist in showing
conditions behind and around the car.
Depending on where the unit is installed, actual
•
conditions may differ from the displayed image.
Operation from iXA-W404 series
e
1 Press (CAMERA).
The Camera mode is activated and the rear
view video is displayed.
Pressing again will return to Audio/Visual
mode.
Operation from iXA-W407BT
e
series
1 Press C SOURCE to activate mode
switching screen.
2 Slide the display horizontally with your
finger to select Camera mode.
15-EN
Page 18

Changing the Rear Image
Configuration
Adjusting Detection
Sensitivity
1 Press VIEW.
The image configuration changes every time
VIEW is pressed.
Rear View
Panorama View
Corner View
Ground View
Adjusting Alarm Volume
The audible warning has 3 selectable volume
levels. The default is the “Middle” setting.
1 Press and hold SET. for at least 1 second.
The volume adjustment screen appears.
2 Press SET. to switch to a desired volume
level.
Object detection has 2 selectable sensitivity levels.
The default is “High.”
1 Press and hold SET. for at least 1 second.
The volume adjustment screen appears.
2 Press and hold SET. for at least 1 second
again.
The sensitivity adjustment screen appears.
3 Press SET. to switch to a desired
detection sensitivity level.
Pressing the button toggles the detection
sensitivity level.
High Low
Low: Detects mainly moving objects.
Almost no motionless objects are
detected.
High: Detects moving objects and
motionless objects.
Pressing the button toggles the volume level.
Low
Middle
3 Press and hold SET. for at least 1 second.
The sensitivity adjustment screen appears.
4 To return to the normal mode, press and
hold SET. for at least 1 second again.
The buzzer volume can be altered accidentally. Use
•
with the appropriate volume level.
16-EN
High
4 To return to the normal mode, press and
hold SET. for at least 1 second.
For details on the detection function, refer to
•
“Cautions Regarding Object Detection Function”
(page 6).
Page 19

Installation and
Perform calibration (page 26)
Connections
Be sure to disconnect the cable from the (–) battery post
•
before installing your HCE-C300R. This will reduce any
chance of damage to the unit in case of a short circuit.
Be sure to connect the colour coded leads according to
•
the diagram. Incorrect connections may cause the unit to
malfunction or damage to the vehicle’s electrical system.
When making connections to the vehicle’s electrical
•
system, be aware of the factory installed components (e.g.
on-board computer). Do not tap into these leads to provide
power for this unit. When connecting the HCE-C300R to
the fuse box, make sure the fuse for the intended circuit of
the HCE-C300R has the appropriate amperage. Failure to
do so may result in damage to the unit and/or the vehicle.
When in doubt, consult your Alpine dealer.
Route the cables and wiring away from hot or moving
•
parts, and fix them securely to avoid heat/mechanical
damage to the cable insulation, which may result in shortcircuit, fire or electric shock.
When fixing the control unit, camera, and alarm to the
•
vehicle with screws, attaching to weak spots may damage
vehicle parts.
If the camera is not mounted securely, shifting positions
•
will cause deterioration of detection performance.
The cable may break due to stress caused when opening
•
and closing the door/trunk of the vehicle.
If the control unit becomes wet, the electrical circuitry may
•
short out.
Attaching with double stick tape may leave a mark on the
•
vehicle interior.
This camera system is meant to be used as a rear camera. It
•
cannot be used as a front or side camera.
This camera system cannot be used as a corner sensor.
•
The camera is designed specifically for use with this
•
system. The system cannot be used with a different camera.
This product cannot be installed in or used with anything
•
other than a car (in other words, it cannot be used with
motorcycles, mobility vehicles, or electric wheelchairs or as
a household security camera, etc.).
Fixing the control unit
Mounting the Rearview
Camera
1. Preparation
1 Check accessory parts.
Rearview camera (50 cm)BControl unit
A
Power cable
C
(Solderless connector)
Camera extension cable
E
(8m)
Self-Tapping screw
G
(Control unit)
(M4 × 8)
Monitor connector
D
extension cable (3 m)
Velcro fastener
F
(Control unit)
Mounting (Base for
H
attaching the camera)
Installation of the Rearview
Camera System
Installing the Rearview camera (page 18)
Installing the buzzer and operation switch
(page 20)
Checking the installation location of the
control unit (page 21)
Connect the device (page 22)
X4
Angle adjustment screw
I
(Base for attaching the
camera) (M3 × 6)
X2
Self-Tapping screw (Base
K
for attaching the camera)
(M3 × 8)
X4
Hexagonal wrench
J
Switch (3m)
L
17-EN
Page 20

Switch adhesive sheet
M
Buzzer
O
Buzzer extension cable
Q
(3m)
Buzzer adhesive sheet
S
Cord clamp (Switch)
N
X3
Mounting (Buzzer)
P
Self-Tapping screw
R
(Buzzer) (M6 × 10)
Cord clamp (Buzzer)
T
2. Installing the Rearview camera
1 Determine a mounting location for the
camera.
When choosing the location, make sure
that the camera and bracket won’t come in
contact with any part of the vehicle. Check
the contact points after making the angle
adjustments to the camera.
The location should be flat to provide the
self-adhesive on the base to make good
surface contact. Also, ensure access to both
of the angle-adjustment screws for proper
tightening using the supplied hex wrench.
Recommended installation
e
location
Cord clamp (Camera
U
extension cable)
X5
Waterproofing pad
W
adhesive sheet
Calibration sheet
Y
(1000 × 200 mm)
Waterproofing pad
V
Calibration sheet
X
(2039 × 100 mm)
X3
X2
See the following table to
determine the attachment angle
Install the camera so that this rounded part is
clearly visible then viewed from the side of the
vehicle.
<Attachment angles>
Camera height Angle (degrees)
inch mm
51.2 1300 40 - 59
47.2 1200 38 - 57
43.3 1100 35 - 55
39.4 1000 33 - 52
35.4 900 30 - 49
31.5 800 27 - 46
27.6 700 24 - 42
23.6 600 21 - 38
19.7 500 18 - 33
17.7 450 16 - 30
If the unit is not installed within the designated
•
(from horizontal plane)
angle, calibration cannot be executed correctly.
Camera installation height
e
Lowest: 430 mm (16.9”)
Highest: 1300 mm (51.2”)
18-EN
Largest left and right offset
e
400 mm (15.7”) from the centre of the vehicle
both in the left and right directions
Page 21

Depth
e
A maximum of 300 mm (11.8”) from the tip of
the rear bumper
Install the camera as outward as possible to ensure
•
the detection range of 180°.
Provide enough clearance for proper trunk and door
•
closure without making contact with the camera.
Also, ensure that the camera cable is not being
pinched or damaged.
Attach the camera in a position where it does not
•
touch the license plate.
Make sure there are no objects protruding between
•
the camera and bumper (wipers, rear-side racks,
etc.).
Do not install the camera near the reverse lamp.
•
If any part of the vehicle body blocks the camera
•
coverage area, detection of that area will not be
possible.
2 Installing the camera and the camera
mounting bracket to the car.
Making holes for the camera cable
e
(1) Drill a 13 mm (1/2”) hole at the
mounting location for the camera
cable. Drill 2.5 mm (3/32”) holes for
mounting the bracket. Apply touch-up
paint as necessary.
(2) Make sure the mounting surface is
clean of debris, dirt, etc.
(3) Attach the camera to the mounting
bracket H with the supplied
adjustment screws I.
(4) Make sure the camera is facing directly
behind the vehicle. It’s horizontal
viewing angle should be at 90° to
the rear bumper. Adjust its vertical
viewing angle to about 45° to the
ground behind the vehicle.
(5) Pull the camera cable inside the car
through the 13 mm (1/2”) hole made
in step (1).
(6) Peel off the protective sheet covering
the adhesive strip on the bracket H.
Attach the bracket to the surface just
cleaned.
If mounting to plastic, use a self-tapping screw to
•
attach the camera bracket K.
3 Secure the camera cable. Attach the
waterproof pad V with the waterproof
pad adhesive sheet W, and secure any
slack cable around the waterproof pad
V using the cord clamp U.
Attaching the Camera
e
Angle adjustment
screw
Make sure that the ALPINE
logo of the camera is
facing up.
Reverse In
Camera cable
Ensure the cable does not get caught in the trunk,
•
rear door(s) or any hinges.
The cable should go on the outside of car hinges and
•
harness covers.
After completing wiring, open and close the trunk
•
and the rear doors several times to confirm the cable
is not getting caught or rubbing anywhere.
19-EN
Page 22

3. Installing the Buzzer
4. Installing the Switch
1 Attach the buzzer O with the supplied
double-faced adhesive tape S or screw
R.
•
Before attaching the buzzer, wipe off any dust, oil,
etc., on the attaching surface with a suitable cleaning
cloth (sold separately).
•
Attach the buzzer in a location where driving is not
hindered.
•
Locations that are subject to high temperatures can
cause warping. Do not install in areas that receive
direct sunlight, such as the dashboard.
•
This is not a water resistant device. Do not get the
unit wet. Also, install so that the cable feed opening is
facing downwards to avoid water drops on the cable
falling into the alarm unit.
•
If the alarm hole is closed off, sound output may
become unstable. Do not place anything within 10
mm of the alarm hole.
e
Attaching with the double-face adhesive
tape
(1) Peel off the protective sheet on one
side, and apply it to the back of the
buzzer.
(2) Peel off the protective sheet on the
other side and apply to the desired
location in the car (under a seat, etc.).
If necessary, secure the cable with the
supplied cord clamp T.
1 Attach the switch L according to the
following illustration.
Attach the supplied switch adhesive sheet
M. Peel off the protective sheet, and apply
it to the back of the switch, then peel off
the other protective sheet and install in the
desired location. If necessary, secure the cable
with the supplied cord clamps N.
Before attaching the switch, wipe off any dust, oil,
•
etc., on the attaching surface with a suitable cleaning
cloth (sold separately).
Attach the switch in a location where driving is not
•
hindered.
Switch
20-EN
Attaching with the screws
e
(1) Assemble the buzzer O and its
mounting bracket P.
(2) Install it in the desired location in
the car (under the seat, etc.) with the
supplied self-tapping screw R.
If necessary, secure the cable with the
supplied cord clamp T.
Page 23

5. Installing the Control Unit
1 Attach the control unit B with the Velcro
fastener F or self-tapping screw G.
It is recommended to install the control unit on the
•
rear of the instrument panel, or under a seat.
e
Attaching with Velcro fastener
(1) Attach the Velcro fastener (hard side)
F to the bottom of the control unit B.
Control unit
Velcro fastener
Attach the Velcro fastener in an area on the bottom
•
of the unit undersurface where the label is not
attached.
(2) Attach the Velcro fastener (soft side)
F to the floor, and secure the control
unit B.
•
When attaching the Velcro fastener (hard side) F
to the floor carpet, do so without the Velcro fastener
(soft side) F attached.
e
Attaching with the self-tapping screw
(1) Attaching the control unit with the
self-tapping screw G in a flat location.
Control unit
21-EN
Page 24

Connections
N
A
(Red)
(Yellow)
D
(Black)
(Orange/White)
(Orange/Black)
(Bright Green)
ACC
BATT
GND
REVERSE
CAMERA CONTROL
ALERT OUT
VIDEO OUTPUT
REAR CAMERA OUT
SWITCH
BUZZER
B
Ignition Key
C
E
Battery
F
G
H
I
J
K
L
To plus side of the reverse lamp
signal lead of the vehicle
To Alpine’s Camera Control lead
or Reverse lead
To Alpine’s Aler t In lead
To Video Input Connector when
connecting with the navigation or
monitor that has no direct camera
input connector
To the direct camera input
connector of the navigation or
monitor
Switch (Included)
Buzzer extension
cable (3m) (included)
Buzzer
(Included)
22-EN
CAMERA IN
M
Camera extension
cable (8m) (Included)
REAR
Rearview camera
(Included)
Currently not used.*
Page 25

A Power cable
B Switched Power Lead (Ignition)
Connect this lead to an open terminal on the
vehicle’s fuse box or another unused power
source which provides (+)12V only when
the ignition is turned on or in the accessory
position.
C Battery Lead
Connect this lead to the positive (+) post of
the vehicle’s battery.
D Fuse 7.5A
E Ground Lead
Connect this lead to a good chassis ground on
the vehicle. Make sure the connection is made
to bare metal and is securely fastened using
the sheet metal screw provided.
F Reverse Input Lead
Connect to the plus side of the car’s reverse
lamp that lights when the transmission is
shifted into reverse (R).
Switches the video picture to the rearview
camera. This is achieved by putting the car
into reverse (R).
G Camera Control Lead
Use to connect with products that do not
have the camera screen display function other
than the linkage with the gear lever shifted
into the reverse position (R).
H Alert Out Lead*
Outputs an obstacle detection signal.
Currently not used.
*
I Video Output Connector (Yellow)
Connects to the Video Input Connector when
connecting with the navigation or monitor
that has no direct camera input connector.
J Rear Camera Output Connector
Connects to the direct camera input
connector of the navigation or monitor.
K Switch Connector
L Buzzer Connector
M Rear Camera Input Connector
N SETUP switch (ON/OFF)
Use this switch when calibration is performed.
23-EN
Page 26

System Example
Connecting a product that has the direct camera input connector
AV head unit with direct
connection
INE-S900R, IVA-D511 series,
iXA-W404 series, iXA-W407BT
series, etc.
Monitor connector
extension cable
(Included)
Rear Camera Output
Connector
Connecting a product that has RCA video input terminals
Direct Camera Input
Connector
24-EN
Navigation or monitor
(commercial product)
Video Input
Connector
Orange/Black
RCA Extension Cable
(Sold Separately)
Orange/White
Reverse Lead
Video Output
Connector
Yellow
Camera Control Lead
Use this connection for products which only have a Reverse lead trigger for the camera display.
*
•
When you route and arrange cables around the vehicle interior, do so as to avoid hot/moving parts.
•
Connect the cameras by referring carefully to connection instructions or labels.
IVA-W520 series, etc.
Page 27

Confirmation
1 Securing leads, etc.
Make sure leads are not pinched by moving
parts such as the seat rail, etc. Also check for
damage from sharp edges or protrusions.
Refer to “2. Installing the Rearview camera.”
(page 18)
2 Connect the battery (-) terminal.
3 Turn on the engine key. Make sure the
unit is operating correctly by referring to
the Owner’s Manual.
4 Make sure all factory components such
as the brake lamps, etc., work correctly.
25-EN
Page 28

Calibration
Introduction
What is Calibration?
In order to effectively identify approaching
objects, it is necessary to configure the guidance
and install data. This data is entered during the
Calibration mode and ensures the most consistent
detection results.
Also, the warning message language and the cm/
inch selection can be set in the Calibration mode.
Recalibration is required whenever the camera
•
position is changed or the camera is installed in a
different vehicle.
If this camera system is used without being
•
calibrated, or if the calibration sheet is not installed
correctly, object detection performance will be
degraded. Calibration must be performed.
If the vehicle height changes after calibration, the
•
system must be re-calibrated.
Be sure the shift gear lever is in the P position and
•
apply the hand brake before starting work.
Do not operate the gear lever during calibration.
•
Always work in a flat location.
•
When starting the engine, provide adequate
•
ventilation around the car.
Make sure that all connections are securely made.
•
Do not work in a poorly lit place or in direct sunlight.
•
Setting Flowchart
Use the switch to perform calibration.
After connecting the camera system with the
navigation/monitor, prepare the car body.
Set the SETUP switch of the control unit to
“OFF.”
Setting ACC to “ON” activates the system in
the normal use mode.
Switching between “Calibration
Mode” and “Normal Use Mode”
HCE-C300R has two modes: “Normal Use Mode”
and “Calibration Mode.” You can use the SETUP
switch on the control unit to switch the mode. If
ACC is set to ON with the SETUP switch “ON”,
the system starts in the calibration mode, and if
ACC is set to ON with the SETUP switch “OFF”,
the system starts in the normal use mode. The
factory setting is “OFF”.
Preparation
Accessory parts
Calibration sheet A Calibration sheet B
External box Interior box
26-EN
Affix the calibration sheet.
Set the SETUP switch of the control unit to
“ON.”
Set ACC to “ON”.
Perform calibration of the camera.
Set ACC to “OFF”.
Necessary tools
Tape measure Adhesive tape (for
positioning mark)
Pen (for positioning
mark)
Page 29

Necessary space for work
Keep a space of 2 m or more behind your car.
2m
Prepare the Car Body
Check air pressure of all the tires for any
•
unbalance. If not in balance, apply the specified
pressure to all the tires.
Be sure the shift gear lever is in the P position
•
and apply the hand brake.
When working with the engine running, be sure
•
to provide adequate ventilation.
Make sure that no dirt (mud, ice, snow, or other
•
foreign objects) adhere to the camera surface.
Work on image adjustment by sitting in the
•
driver’s seat with no other passenger in the car.
The image of this camera system may deviate due
•
to the number of passengers or load in the vehicle;
however, this is not a fault of the system.
When the camera is reinstalled or when the car is
•
changed, be sure to perform readjustment.
The detection performance may be degraded when
•
tires are changed or the vehicle is loaded with heavy
items after calibration.
Interior box
Calibration sheet B
(2) Line up with the centre line on
calibration sheet B and draw a
centre line on the interior box.
Pen
Centre line
Affixing the calibration sheets
Affix the calibration sheets and measure the
camera installation location.
1 Using calibration sheet B, draw a centre
line with a marker or pen on the side of
the interior box.
(1) Place the interior box on calibration
sheet B so that it aligns with the
sheet line.
Draw a centre line on the short side of the
interior box. Draw the centre line across the
entire length of the side of the box.
27-EN
Page 30

2 Affix the calibration sheets A on the
ground so they align with the vehicle
width.
Calibration sheet A
Calibration sheet A
Affixing the calibration sheet for the right tire
side:
(1) Align the corner of the “RIGHT TIRE”
side of the calibration sheet and the
corner of the bottom surface of the
external box, make sure that the
sheet and box line up straight, and
affix with adhesive tape.
External box
(2) Align the interior box on top of
the external box with the affixed
calibration sheet, and place it up
against the right rear tire. Align the
mark on the interior box with the
centre of the rear tire.
Right rear tire
Interior box
External box
Align the centre line of the interior box with
the centre of the tire.
(3) Spread the calibration sheet out
straight and affix it with adhesive
tape so it does not move.
Calibration sheet A
28-EN
A
B
A’
Affix so that the A-A’ and B-B’ sides line up
•
straight.
Stabilize with adhesive tape in about 3
•
places so that the calibration sheet does
not slip.
B’
Calibration sheet A
Adhesive tape
(4) Remove the external box from the
calibration sheet.
•
Make sure the calibration sheet affixed to
the ground does not move.
•
The sheet to the side of the rear tire does
not need to be affixed to the ground.
Page 31

This completes the affixing of the calibration
sheet on the right tire side. Affix a calibration
sheet to the left tire side in the same way.
For the left tire side, when affixing the
•
calibration sheet to the external box, align
the corner of the “LEFT TIRE” side of the
calibration sheet and the corner of the
bottom surface of the external box, making
sure that the sheet and box line up straight,
and affix with adhesive tape.
The left and right calibration sheets must
•
be affixed in a parallel fashion. Measure
the widths between the sheets for the area
directly underneath the bumper and the
sheet edges, and make sure they are within
±5 cm (1.97”).
3 Measure the camera installation location
(Depth, Height, Offset).
(1) Stack the external box and internal
box and place them so they are up
against the car in the vicinity of the
centre of the rear bumper.
Interior box
External box
(2) Measure numeric values in 3 places.
Camera
Depth
Offset
Depth: Measure the length from the
Height: Measure the height from the
Offset: Measure the length from the
•
camera to the box.
ground to the camera.
centre of the vehicle to the
camera.
Write the measured values down for
reference.
4 Stretch the measuring tape until
it reaches both the left and right
calibration sheets and place it on the
ground so that it aligns with the inside of
the box.
•
Place the measuring tape so that it touches
the exact same measure mark on both the
left and right calibration sheets.
Height
External box/
Interior box
Tape measure
29-EN
Page 32

5 Move the measuring tape 40 measuring
marks back from the location in step 4.
40 measuring marks (40 cm)
Tape measure
Make sure that the measure mark values
•
are the same for both the left and right
calibration sheets.
6 Measure the distance between the
insides of the left and right calibration
sheets and mark the centre spot with
adhesive tape. Move from the centre to
the camera side a distance equivalent to
the numerical value of the camera offset
measured in step 3, and mark that spot
with adhesive tape.
7 Place calibration sheet B on the ground
so that the sheet centre line aligns with
the offset spot marked in step 6, and
affix calibration sheet B to the ground
with adhesive tape so it is parallel with
the measuring tape.
Calibration sheet B
Offset
Make sure that the measuring tape lines up
•
with the measure mark values, and are the
same for both the left and right calibration
sheets.
About Operation in
Calibration Mode
1 Press VIEW, select the item, and press
SET. to execute.
30-EN
Camera
Adhesive tape
VIEW
Offset
SET.
Adhesive tape
VIEW : Selects a desired item. (The switch
that is selected is enclosed by a
yellow frame.)
SET. : Executes the selection.
Page 33

Performing Calibration
•
Measure and input calibration data carefully.
Errors can result in image distortion, guideline
misplacement, and degradation of detection
performance.
•
If the ignition key is turned off during calibration,
the settings will not be saved.
1 Set the SETUP switch of the control unit
to “ON.”
2 Set the ignition key to ACC ON.
The camera system starts in calibration mode.
3 Display the camera screen and press
VIEW.
Refer to “Turning the Rear Camera On and
•
Off” (page 15).
4 Press VIEW, select “Change” for (cm) or
(Inch), and press SET. to execute.
The Graphic display range adjust screen
appears.
Execute calibration at the selected unit.
•
Select “Change” under “Language” in the
•
Top menu screen to change the display text
language. For operation instructions, refer
to the step 19.
5 Press SET. to adjust the display range.
Line with which to align
the end of the bumper
The Top menu screen appears.
Adjust so that the bumper appears within
the orange adjustment frame. The bumper
should take up about 10% of the area inside
the frame.
If the bumper takes up too much space
•
or almost does not show at all, adjust the
installation angle of the camera to fit within
the angle range on page 18.
If the adjustment frame is set to the
•
bottommost position, the area outside the
camera range (black circle edge) might
be displayed in the bottom portion of the
screen. If the area outside the camera range
is distracting, set the adjustment frame one
level upwards.
6 Press VIEW, select “Next,” and press SET.
to execute.
The Input Camera Position screen appears.
31-EN
Page 34

7 Press SET. repeatedly to change the
value of “Depth.”
You can specify the depth in 0.5 inch/1 cm
increments by pressing SET..
Setting value: 0 to 11.5 inches/0 to 30 cm
8 Press VIEW, select “Height,” and press
SET. repeatedly to change the value.
You can specify the height from the ground
to the camera in 0.5 inch/1 cm increments by
pressing SET..
Setting value: 17 to 51 inches/
43 to 130 cm
9 Press VIEW, select “Offset,” and press
SET. repeatedly to change the value.
10
Press VIEW, select “Vehicle Width,” and
press SET. repeatedly to change the
value.
You can specify the car width in 2 inchs/5 cm
increments by pressing SET..
Setting value: 56 to 86 inches/
Do not specify a value less than the actual
•
car width.
If there is no setting that matches the
•
vehicle width, set the nearest value larger
than the actual vehicle width.
11
Press VIEW, select “Next,” and press SET.
to execute.
The Camera Angle Adjustment screen
appears.
12
Press SET. repeatedly until the
calibration sheet is parallel to the orange
lines.
140 to 220 cm
32-EN
You can specify the offset value in 0.5 inch/1
cm increments by pressing SET..
Setting value: -15.5 to +15.5 inches/
The right side of the vehicle is plus and the
•
left side is minus.
-40 to +40 cm
You can specify the angle in 0.5° increments
by pressing SET..
Pressing VIEW repeatedly selects the left
arrow, right arrow, “Next” switch, left arrow,
etc.
A slight lag time exists between pressing the
•
switch and the screen display change.
13
Press VIEW, select “Next,” and press SET.
to execute.
The Camera Angle Adjustment screen
appears.
Page 35

14
Press SET. repeatedly and adjust so that
the bottom part of the calibration sheet
lines up with the line at the bottom of
the screen.
Pressing VIEW repeatedly selects the up
arrow, down arrow, “Next” switch, up arrow,
etc.
15
Press VIEW, select “Next,” and press SET.
to execute.
The Camera Angle Adjustment screen
appears.
16
Press SET. repeatedly and adjust so
that the calibration sheet fits inside the
screen frame.
18
Press VIEW, select “Next,” and press SET.
to execute.
The Language selection screen will appear.
Language selection is also possible by
•
selecting “Change” on the “Options”
– “Language” of step 4 (page 31).
19
Select “ON/OFF” for the warning
message display. Press SET. repeatedly
to select either “Disp/ON” or “Disp/OFF.”
Disp/ON: Warning messages will appear.
Disp/OFF: Warning messages will not appear.
The warning message of the connected
•
navigation/monitor will appear first. If the
warning message of this camera system
overlaps the warning message of another
connected device, set to “Disp/OFF:”
20
Press VIEW.
The Language selection mode is activated.
21
Press SET. repeatedly to select the
preferred language.
The default setting is English.
Pressing VIEW repeatedly selects the left
arrow, right arrow, “Retry” switch, “Next”
switch, left arrow, etc.
17
If the 3 calibration sheets fit inside the
frames go to step 18.
If the calibration sheet does not fit insides the
frame, Press VIEW, select “Retry” and press SET.
to execute.
The screen will return to the screen shown in
Step 12 to start the calibration process again.
If the calibration sheets A and B do not
•
fit inside the frame. Please refer to page 27
for calibration sheet setup procedure.
33-EN
Page 36

22
Press VIEW, select “Done,” and press SET.
to execute.
The specified values are saved.
Saving takes approximately 4 minutes.
•
After saving, the message screen
automatically appears.
Caution
If the ignition key is set to ACC OFF before the
•
screen notifying that saving is completed appears, the
data is not saved.
23
Set the ignition key to ACC OFF.
34-EN
24
Set the SETUP switch of the control unit
to “OFF.”
25
Set the ignition key to ACC ON.
The camera system starts in the normal use
mode.
Page 37

Information
Specifications
e
Camera section
Image sensor . . . . . . . . . . . . . . 1/4 Type Colour CMOS
Effective Number of Pixels . . 640 (horizontal) × 480
Lens Section . . . . . . . . . . . . . . . Focal length f = 0.8 mm,
Angle of Field . . . . . . . . . . . . . . Horizontal: 190 °,
Automatic Image Adjusting
Function . . . . . . . . . . . . . . . . . . . Automatic metering
Synchro-System. . . . . . . . . . . . Internal synchronization
Resolution (Horizontal) . . . . . 250 lines (centre area)
Illumination Range . . . . . . . . . 2 to 100,000 lx
Operating Temperature
Range . . . . . . . . . . . . . . . . . . . . . -22 to +158 °F
Storage Temperature
Range . . . . . . . . . . . . . . . . . . . . . -40 to +185 °F
External Dimensions . . . . . . .
(W × D × H)
Weight . . . . . . . . . . . . . . . . . . . . 30 g (including cable)
Control unit section
e
Power Requirements . . . . . . . 14.4 V DC
Ground Type . . . . . . . . . . . . . . . Negative ground type
Output Image . . . . . . . . . . . . . . Mirror image, CVBS
Output Drive Capacity . . . . . 75 ohm (W)
Operating Temperature
Range . . . . . . . . . . . . . . . . . . . . . -4 to +140 °F
External Dimensions . . . . . . .
(W × D × H)
Weight . . . . . . . . . . . . . . . . . . . . 450 g (including cable)
Image sensor, aspect
ratio 4 : 3
(vertical) approximately
0.3 Megapixels
brightness F = 2.6
Vertical: 155 °
(Control unit output:
180 °)
adjustment, Automatic
white balance
adjustment
(-30 to +70 °C)
(-40 to +85 °C)
21 × 21 × 23.8mm
(53/64” × 53/64” ×
15/16”) (excluding cable)
(11 to 16 V allowable)
(NTSC Colour signal
system)
(-20 to +60 °C)
176 × 110 × 30 mm
(6-15/16” × 4-5/16” ×
1-3/16”)
In Case of Difficulty
The camera image does not appear. (Images
•
other than that of the camera are normal.)
Cause Solution
The ignition key is
set to a position other
than ON.
No fuse is installed, or
there is a break in the
connection.
The connection is not
correctly established.
The reverse signal
line of the connected
product is not
connected.
The video connection
cable is not connected
to the camera input
of the connected
product.
The rear camera
image does not
display, and the
calibration mode
appears.
The camera image is not normal. (Images other
•
than that of the camera are normal.)
Symptom Cause/Solution
The display screen
flickers.
The screen is difficult
to read.
The camera image
sways.
The camera image is
unclear.
Set the ignition key to ON.
Install a fuse, or replace a
relevant fuse after checking
the cause.
Check whether the connection
is correctly established while
referring to this owner’s
manual.
Connect the reverse signal line
while referring to the owner’s
manual of the connected
product.
Connect the video connection
cable to the camera input
while referring to the owner’s
manual of the connected
product.
The control unit SETUP
switch might be ON.
Turn the ignition key to OFF
and then set the SETUP switch
to OFF. Wait for approximately
1 minute and then turn the
ignition key to ON again.
If a place illuminated by a
fluorescent lamp is captured,
the display screen may flicker.
This is not a failure.
If a dark place or a partially
bright light is captured, or if
the temperature of the main
body of the camera is high, the
screen may be difficult to read.
This is not a malfunction.
Check the installation
status, and check screws for
looseness.
If the camera lens is dirty, wipe
the lens softly with a soft cloth
moistened with water.
35-EN
Page 38

Object Detection Function
•
Symptom Cause/Solution
The object warning is
not displayed and/or
the alarm does not
sound.
The alarm does not
sound.
Detection
performance is poor.
The alarm got louder
or softer.
The device detects
motionless objects.
The reverse line is not
connected.
Refer to the owner’s manual
for the connected product and
connect the reverse line.
The camera is set to the Alarm
volume adjusting mode or
Detection sensitivity adjusting
mode.
Return to normal mode
referring to “Adjusting
Alarm Volume” (page 14)
or “Adjusting Detection
Sensitivity” (page 15).
The camera lens might be
dirty.
If the camera lens is dirty,
gently wipe it with a damp
cloth.
You might be accidentally
changing the alarm volume.
Refer to “Adjusting Alarm
Volume” (page 16) and set the
volume to a suitable level.
You might have accidentally
set the sensitivity level to
“high.”
Refer to “Adjusting Detection
Sensitivity” (page 16) and set
the sensitivity to a suitable
level.
Others
•
Symptom Cause/Solution
There are noises on
the radio.
If there are noises on the radio,
keep the camera cables and
the video cables away from
the wire harness, the radio
antenna, and the antenna
cables of the vehicle.
If there is a serious symptom, for example, the
distance guidance marks deviates significantly
from the actual distance, stop using this system
and contact your ALPINE dealer.
36-EN
Page 39

 Loading...