

Page 1

◆
Extended
®
Ethernet
AT-MC601
AT-MC602
Installation
and
User’s Guide
PN 613-50538-00 Rev B
Page 2

Copyright © 2004 Allied Telesyn, Inc.
www.alliedtelesyn.com
All rights reserved. No part of this publication may be reproduced without prior written permission from Allied Telesyn, Inc.
Microsoft is a registered trademark of Microsoft Corporation, Netscape Navigator is a registered trademark of Netscape
Communications Corporation. All other product names, company names, logos or other designations mentioned herein are
trademarks or registered trademarks of their respective owners.
Allied Telesyn, Inc. reserves the right to make changes in specifications and other information contained in this document without
prior written notice. The information provided herein is subject to change without notice. In no event shall Allied Telesyn, Inc. be liable
for any incidental, special, indirect, or consequential damages whatsoever, including but not limited to lost profits, arising out of or
related to this manual or the information contained herein, even if Allied Telesyn, Inc. has been advised of, known, or should have
known, the possibility of such damages.
Page 3

Electrical Safety and Emission Statement
Standards: This product meets the following standards.
U.S. Federal Communications Commission
Declaration Of Conformity
Manufacture Name: Allied Telesyn, Inc. (www.alliedtelesyn.com)
Declares that the product: Extended Ethernet
Model Numbers: AT-MC601, AT-MC602
This product complies with FCC Part 15B, Class A Limits:
This device complies with part 15 of the FCC Rules. Operation is subject to the following two conditions: (1) This device must
not cause harmful interference, and (2) this device must accept any interference received, including interference that may
cause undesired operation.
Radiated Energy
Note: This equipment has been tested and found to comply with the limits for a Class A digital device pursuant to Part 15 of FCC
Rules. These limits are designed to provide reasonable protection against harmful interference in a residential installation. This
equipment generates, uses and can radiate radio frequency energy and, if not installed and used in accordance with
instructions, may cause harmful interference to radio or television reception, which can be determined by turning the
equipment off and on. The user is encouraged to try to correct the interference by one or more of the following measures:
- Reorient or relocate the receiving antenna.
- Increase the separation between the equipment and the receiver.
- Connect the equipment into an outlet on a circuit different from that to which the receiver is connected.
- Consult the dealer or an experienced radio/TV technician for help.
Changes and modifications not expressly approved by the manufacturer or registrant of this equipment can void your
authority to operate this equipment under Federal Communications Commission rules.
FCC Part 68 Product Identifier
This equipment complies with Part 68 if the FCC rules and the requirements adopted by the ACTA. On the bottom of the
equipment is a label that contains, among other information, a product identifier in the following format:
• US: A5TOT00BMC60X
If requested, this number must be provided to the telephone company.
Industry Canada
This equipment complies with Industry Canada CS03 Standard, Certificate Number: IC:336A-MC60X.
This Class A digital apparatus meets all requirements of the Canadian Interference-Causing Equipment Regulations.
Cet appareil numérique de la classe A respecte toutes les exigences du Règlement sur le matériel brouilleur du Canada.
Warning: In a domestic environment this product may cause radio interference in which case the user may be required to take
adequate measures.
3
Page 4

AT-MC601 and AT-MC602 Installation and User’s Guide
RFI Emission EN55022 Class A, FCC Part 15 Class A, C-TICK
Immunity EN55024 2
E
lectrical Safety EN60950, UL60950, FCC Part 68 3
Important: Appendix C contains translated safety statements for installing this equipment. When you see the , go to Appendix
C for the translated safety statement in your language.
Wichtig: Anhang C enthält übersetzte Sicherheitshinweise für die Installation dieses Geräts. Wenn Sie
Anhang C den übersetzten Sicherheitshinweis in Ihrer Sprache nach.
Vigtigt: Tillæg C indeholder oversatte sikkerhedsadvarsler, der vedrører installation af dette udstyr. Når De ser symbolet , skal
De slå op i tillæg C og finde de oversatte sikkerhedsadvarsler i Deres eget sprog.
Belangrijk: Appendix C bevat vertaalde veiligheidsopmerkingen voor het installeren van deze apparatuur. Wanneer u de
raadpleeg Appendix C voor vertaalde veiligheidsinstructies in uw taal.
Important: L'annexe C contient les instructions de sécurité relatives à l'installation de cet équipement. Lorsque vous voyez le
symbole
Tärkeää: Liite C sisältää tämän laitteen asentamiseen liittyvät käännetyt turvaohjeet. Kun näet
turvaohjetta liitteestä C.
Importante: l’Appendice C contiene avvisi di sicurezza tradotti per l’installazione di questa apparecchiatura. Il simbolo
di consultare l’Appendice C per l’avviso di sicurezza nella propria lingua.
Viktig: Tillegg C inneholder oversatt sikkerhetsinformasjon for installering av dette utstyret. Når du ser
for å finne den oversatte sikkerhetsinformasjonen på ønsket språk.
Importante: O Anexo C contém advertências de segurança traduzidas para instalar este equipamento. Quando vir o símbolo
leia a advertência de segurança traduzida no seu idioma no Anexo C.
Importante: El Apéndice C contiene mensajes de seguridad traducidos para la instalación de este equipo. Cuando vea el símbolo
, reportez-vous à l'annexe C pour consulter la traduction de ces instructions dans votre langue.
-symbolin, katso käännettyä
1
sehen, schlagen Sie in
ziet,
, indica
, åpner du til Tillegg C
,
, vaya al Apéndice C para ver el mensaje de seguridad traducido a su idioma.
Obs! Bilaga C innehåller översatta säkerhetsmeddelanden avseende installationen av denna utrustning. När du ser
till Bilaga C för att läsa det översatta säkerhetsmeddelandet på ditt språk.
, skall du gå
4
Page 5

Contents
Electrical Safety and Emission Statement ............................................................................................................................................... 3
Preface ......................................................................................................................................................................................................................7
How This Guide is Organized ............................................................................................................................................................................. 7
Document Conventions ...................................................................................................................................................................................... 8
Contacting Allied Telesyn Technical Support ..............................................................................................................................................9
Online Support ............................................................................................................................................................................................... 9
E-mail and Telephone Support ................................................................................................................................................................ 9
Returning Products ....................................................................................................................................................................................... 9
For Sales or Corporate Information ........................................................................................................................................................ 9
Obtaining Management Software Updates ........................................................................................................................................ 9
Chapter 1
Product Description .........................................................................................................................................................................................10
Summary of Features ..........................................................................................................................................................................................10
Overview .................................................................................................................................................................................................................11
Location of Components ...................................................................................................................................................................................12
Hardware Features ..............................................................................................................................................................................................13
VDSL Line Port .............................................................................................................................................................................................. 13
PSTN Port........................................................................................................................................................................................................ 14
10/100 Mbps Twisted Pair Ethernet Port ............................................................................................................................................ 14
Status LEDs .................................................................................................................................................................................................... 16
MGMT Port ..................................................................................................................................................................................................... 17
Management Cable .................................................................................................................................................................................... 17
AC Power Supply Input Port .............................................................................................................................................................................18
External AC/DC Power Adapter.............................................................................................................................................................. 18
Software Features ................................................................................................................................................................................................19
Chapter 2
Installation ............................................................................................................................................................................................................20
Installation Safety Precautions ........................................................................................................................................................................21
Additional Compliance Warning Statements ................................................................................................................................... 22
Selecting a Site for the Network Extender ..................................................................................................................................................23
Cables Not Included ............................................................................................................................................................................................24
Unpacking the Network Extender .................................................................................................................................................................25
Installing the AT-MC601 Subscriber Unit ....................................................................................................................................................26
Using the Subscriber Unit on a Desktop............................................................................................................................................. 26
Wall-Mounting the Subscriber Unit...................................................................................................................................................... 27
Cabling the Subscriber Unit..................................................................................................................................................................... 28
Powering On the Subscriber Unit.......................................................................................................................................................... 29
5
Page 6

AT-MC601 and AT-MC602 Installation and User’s Guide
Installing the AT-MC602 Provider Unit .........................................................................................................................................................30
Cabling the Provider Unit......................................................................................................................................................................... 32
Powering On the Provider Unit.............................................................................................................................................................. 33
Warranty Registration .........................................................................................................................................................................................34
Chapter 3
Configuration ......................................................................................................................................................................................................35
Starting a Configuration Session ....................................................................................................................................................................36
Downloading Software Updates ........................................................................................................................................................... 36
Cabling Preparations.................................................................................................................................................................................. 36
Opening the Configuration Software .................................................................................................................................................. 37
Configuring the Provider Unit .........................................................................................................................................................................38
Configuration................................................................................................................................................................................................ 38
VDSL Status.................................................................................................................................................................................................... 40
Ethernet Status............................................................................................................................................................................................. 42
Configuring the Subscriber Unit .....................................................................................................................................................................45
Chapter 4
Troubleshooting ................................................................................................................................................................................................47
LEDs.................................................................................................................................................................................................................. 47
Error Messages ............................................................................................................................................................................................. 48
Appendix A
Default Configuration Settings ..................................................................................................................................................................51
Appendix B
Technical Specifications .................................................................................................................................................................................52
Physical Specifications .......................................................................................................................................................................................52
Environmental Specifications ..........................................................................................................................................................................52
Power Specifications ...........................................................................................................................................................................................52
Safety and Electromagnetic Compatibility Certifications .....................................................................................................................53
Appendix C
Translated Electrical Safety and Emission Information ..................................................................................................................54
6
Page 7

Preface
This guide contains instructions on how to install and configure the
AT-MC601 and AT-MC602 Extended Ethernet units.
How This Guide is Organized
This manual contains the following chapters and appendices:
Chapter 1, Product Description, describes the features and
components of the network extenders.
Chapter 2, Installation, contains installation instructions for each unit.
Chapter 3, Configuration, explains how to use the configuration
software. The AT-S57 software is used to configure the network
extenders.
Chapter 4, Troubleshooting, provides information on how to resolve
common problems that might occur with the network extenders.
Appendix A, Default Settings, lists the default software settings.
Appendix B, Technical Specifications, lists the technical specifications
for the network extenders.
Appendix C, Translated Electrical Safety and Emission Information,
contains multi-language translations of the warnings and cautions in the
manual.
7
Page 8
Document Conventions
This document uses the following conventions:
Note
Notes provide additional information.
Warning
Warnings inform you that performing or omitting a specific action
may result in bodily injury.
Caution
Cautions inform you that performing or omitting a specific action
may result in equipment damage or loss of data.
AT-MC601 and AT-MC602 Installation and User’s Guide
8
Page 9

AT-MC601 and AT-MC602 Installation and User’s Guide
Contacting Allied Telesyn Technical Support
This section provides Allied Telesyn contact information for technical
support as well as sales or corporate information.
Online Support You can request technical support online by accessing the Allied Telesyn
Knowledge Base from the following web site:
http://kb.alliedtelesyn.com. You can use the Knowledge Base to
submit questions to our technical support staff and review answers to
previously asked questions.
E-mail and
Telephone
Support
Returning
Products
For Sales or
Corporate
Information
Obtaining
Management
Software
Updates
For Technical Support via E-mail or telephone, refer to the Support &
Services section of the Allied Telesyn web site:
http://www.alliedtelesyn.com.
Products for return or repair must first be assigned a Return Materials
Authorization (RMA) number. A product sent to Allied Telesyn without a
RMA number will be returned to the sender at the sender’s expense.
To obtain a RMA number, contact Allied Telesyn’s Technical Support at
our web site: http://www.alliedtelesyn.com
You can contact Allied Telesyn for sales or corporate information at our
web site: http://www.alliedtelesyn.com. To find the contact information
for your country, select Contact Us then Worldwide Contacts.
New releases of management software for our managed products can
be downloaded from either of the following Internet sites:
• Allied Telesyn web site: http://www.alliedtelesyn.com
• Allied Telesyn FTP server: ftp://ftp.alliedtelesyn.com
If you would prefer to download new software from the Allied Telesyn
FTP server from your workstation’s command prompt, you will need FTP
client software and you will be asked to log in to the server. Enter
‘anonymous’ as the user name and your email address for the password.
9
Page 10

Chapter 1
Product Description
The AT-MC601, AT-MC602 Extended Ethernet products are designed to
transmit data at very high speeds over unshielded pairs of copper wires
using VDSL technology on your existing telephone line.
Summary of Features
❑ VDSL (Very high-bit-rate Digital Subscriber) Line port
❑ PSTN (Public Switched Telephone Network) port
❑ 10/100 Mbps Ethernet port with an RJ-45 connector
❑ Auto MDI/MDI-X
❑ Auto-Negotiation for speed and duplex mode (IEEE 803.3u-
compliant)
❑ Status LEDs
❑ Management port
❑ AT-S57 configuration software
❑ 12V DC external power supply input port
10
Page 11
Overview
AT-MC601 and AT-MC602 Installation and User’s Guide
These devices can be used in multi-dwelling units (MDU), multi-tenant
buildings (MTU), and in the hospitality industry, such as airports, hotels,
and convention centers.
These units are sold in pairs with the AT-MC601 functioning as the
subscriber and the AT-MC602 functioning as the provider. In an MDU,
such as a university dormitory, the subscriber unit would be installed in
each room and connected to a provider unit through the telephone
outlet. Each AT-MC602 or provider unit would be located in the building
wiring closet.
The AT-MC601 Extended Ethernet unit can be used as a desktop or
wallmount device while the AT-MC602 unit must be installed in an
AT-MCR12 rackmount chassis. Refer to ”Installing the AT-MC602 Provider
Unit” on page 30" for installation details. These units are easy to install.
They can be configured and managed through the MGMT port using the
software provided on the installation CD.
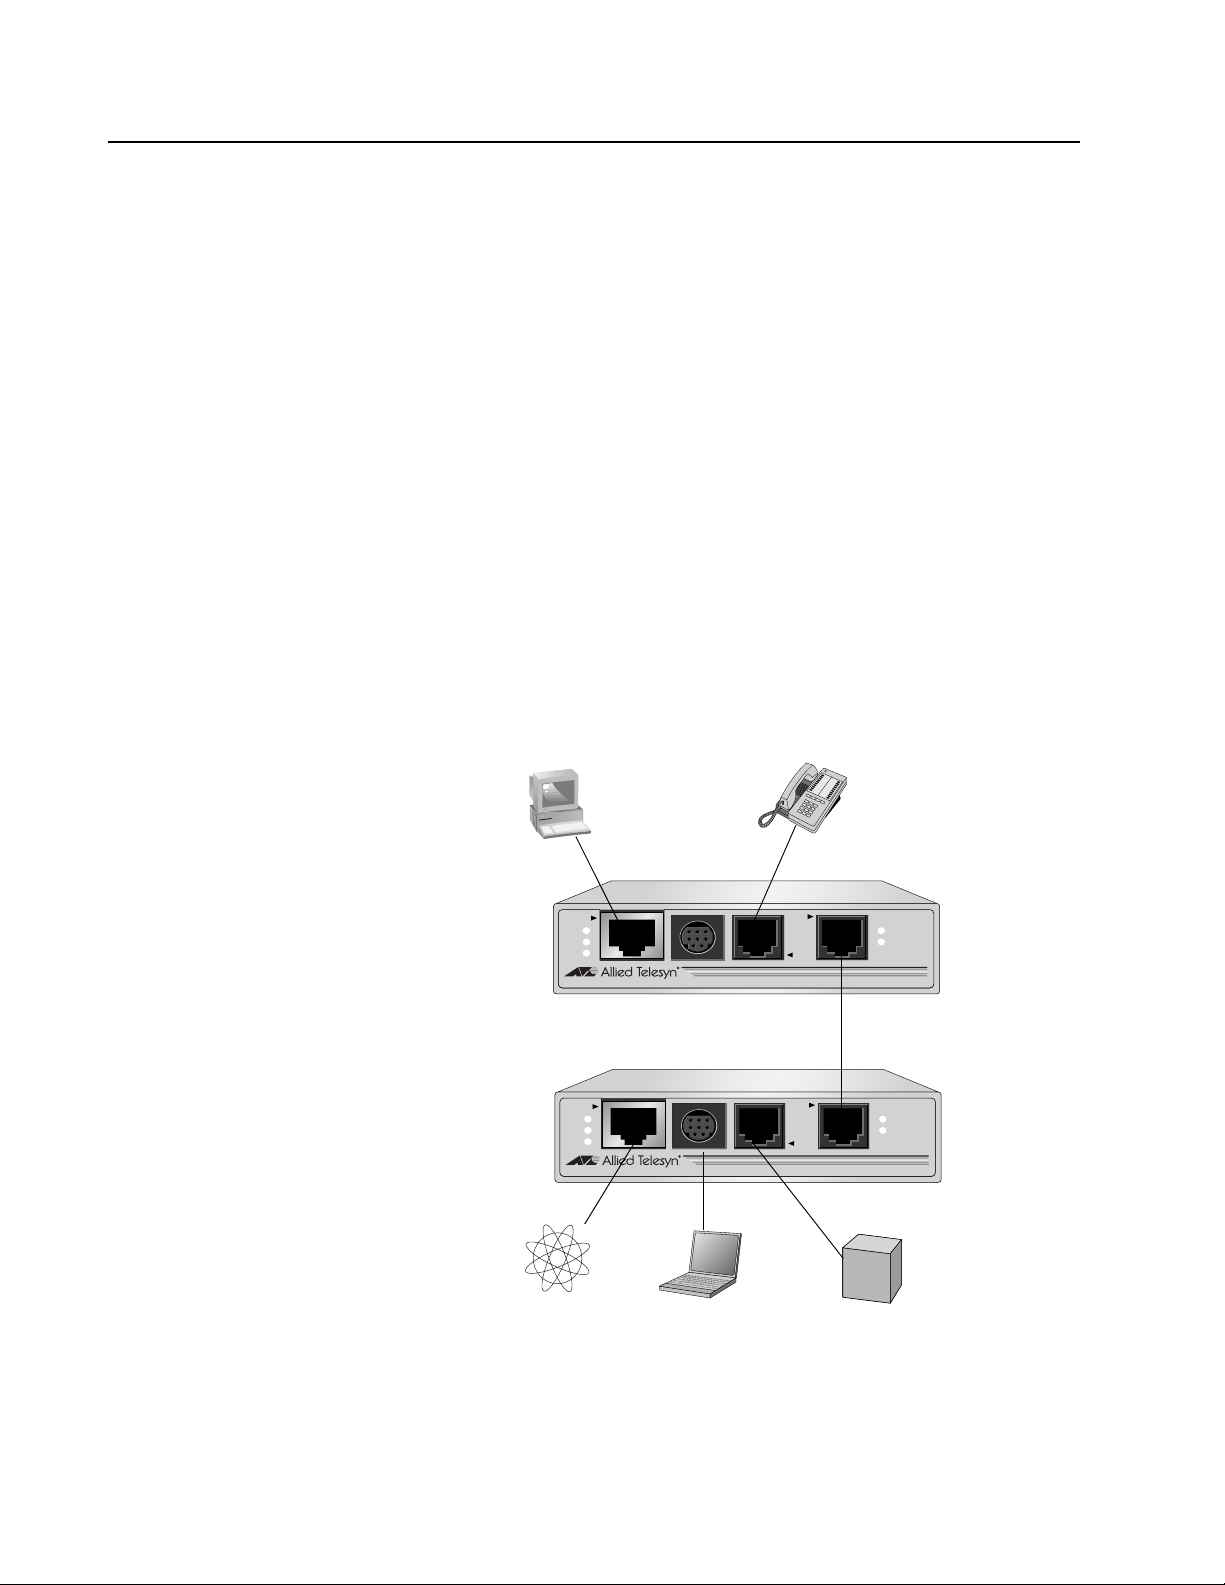
When both the AT-MC601 Subscriber and the AT-MC602 Provider have
been installed, the network extender system topology shown in Figure 1
is complete.
LINE
PSTN
LINE
PSTN
Telephone
ERR
LINK
VDSL Line through
wall/interior phone line
ERR
LINK
Telco
PBX
Line
Computer’s
Ethernet Port
AT-MC601
Subscriber
Unit
AT-MC602
Provider
Unit
Internet
Service
Provider
10BaseT/
100BaseTX
LINK
ACT
PWR
AT-MC601
10BaseT/
100BaseTX
LINK
ACT
PWR
AT-MC602
VDSL EXTENDED ETHERNET
MGMT
MGMT
VDSL EXTENDED ETHERNET
Laptop
Figure 1 Network Extender System Topology
11
Page 12
Location of Components
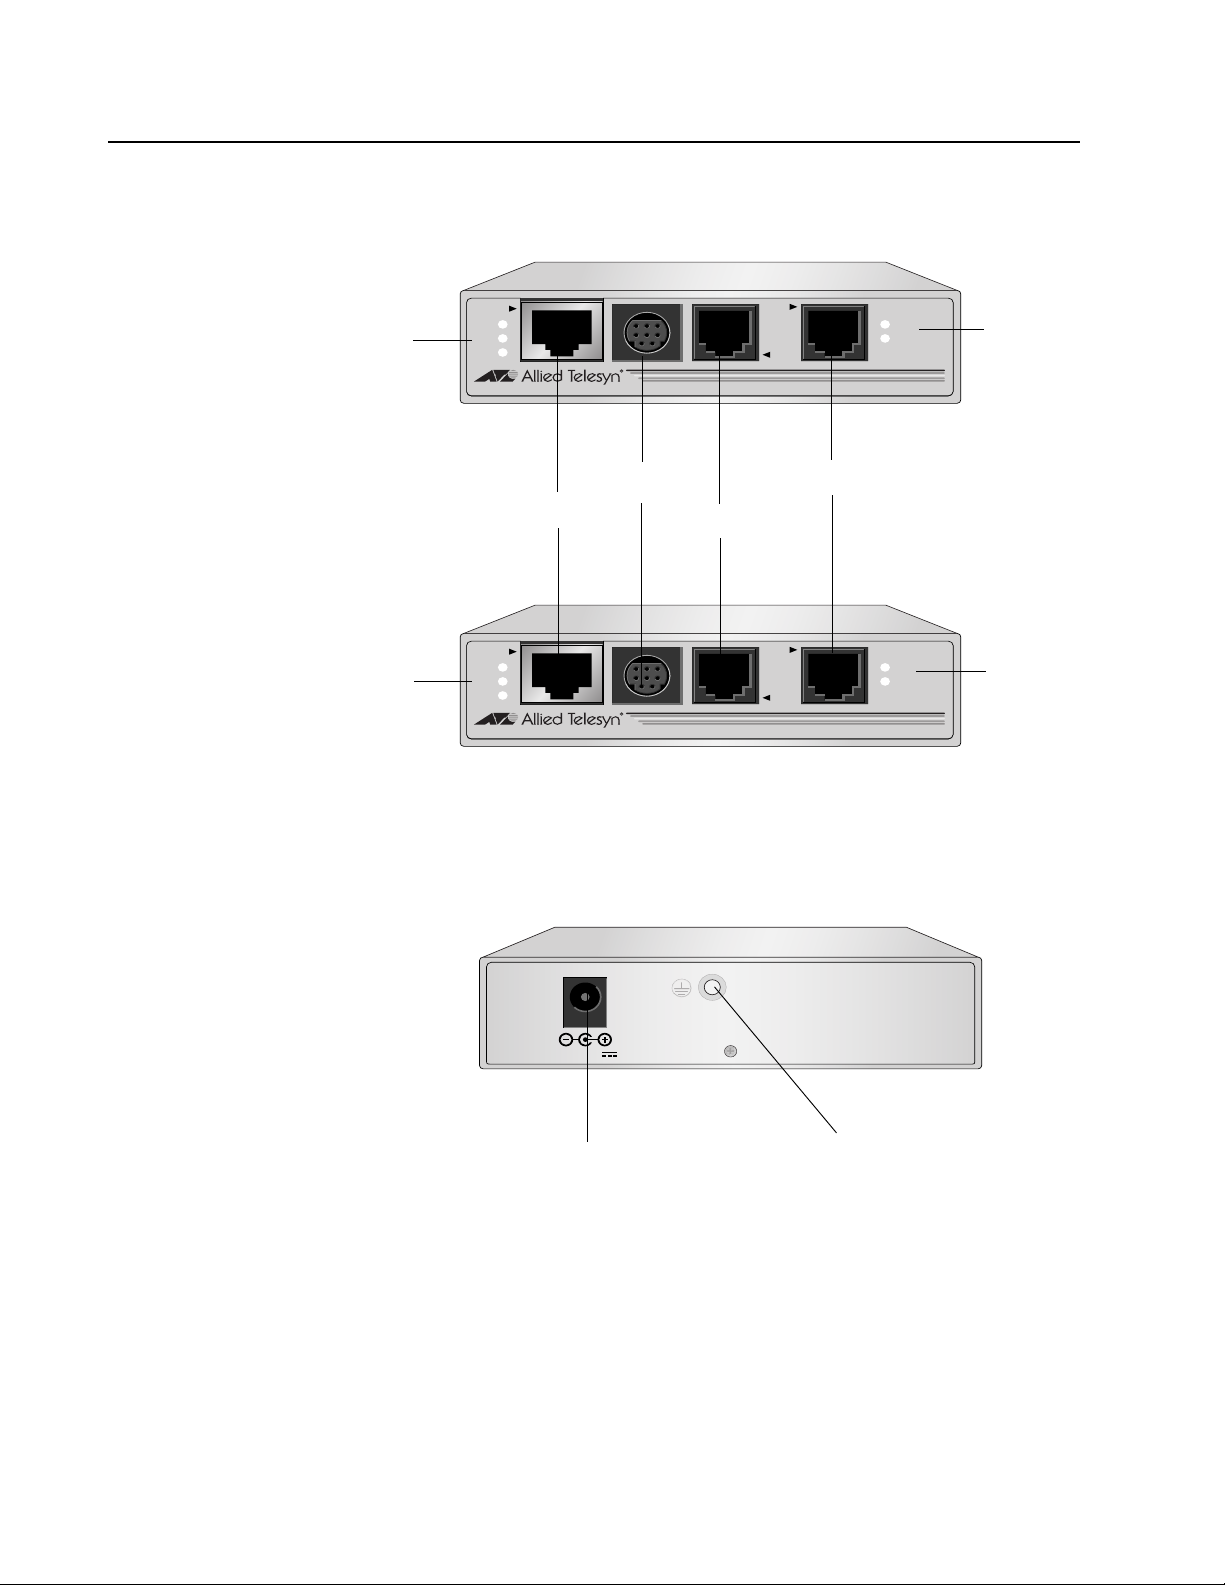
Figure 2 illustrates the front panels of the AT-MC601 and AT-MC602
network extenders.
AT-MC601 and AT-MC602 Installation and User’s Guide
Ethernet
Status
LEDs
Ethernet
Status
LEDs
10BaseT/
100BaseTX
LINK
ACT
PWR
AT-MC601
Ethernet Port
10BaseT/
100BaseTX
LINK
ACT
PWR
AT-MC602
MGMT
VDSL EXTENDED ETHERNET
Management Port
PSTN Port
MGMT
VDSL EXTENDED ETHERNET
LINE
PSTN
VDSL Line Port
LINE
PSTN
ERR
LINK
ERR
LINK
VDSL Line
LEDs
VDSL Line
LEDs
Figure 2 Front Panels
Figure 3 illustrates the rear panel of the AT-MC601 and AT-MC602
network extenders.
12 VD C
DC Power Supply Port
Figure 3 Rear Panel
M4 Self-Clinching Nut
12
Page 13

Hardware Features
The following sections describe these hardware features of the
AT-MC601 and AT-MC602 network extenders:
AT-MC601 and AT-MC602 Installation and User’s Guide
❑ VDSL Line port
❑ PSTN port
❑ 10/100 Mbps twisted pair Ethernet port
❑ Status LEDs
❑ Management port
❑ Management cable
❑ 12V DC power supply input port
❑ External AC/DC power adapter
Note
The AT-MC602 unit can only be installed in an AT-MCR12 chassis.
VDSL Line Port The VDSL Line port allows you to connect the AT-MC601 Subscriber unit
to a telephone jack (wall outlet) and the AT-MC602 Provider unit to the
inside phone line at the wiring closet. The two units need to be within
1,200 meters of each other in order for the port to operate properly. The
port transmits voice data at a frequency of 8-10 KHz and Ethernet data at
frequencies of 300 KHz to 8 MHz. This port features an RJ-11 connector.
Table 1 lists the RJ-11 port pinouts and their assignments.
Table 1 VDSL - RJ-11 Port Pinouts
Pin Assignment
1 pass-through 6
2 pass-through 5
3 Ethernet and phone ring
4 Ethernet and phone tip
5 pass-through 2
6 pass-through 1
13
Page 14

AT-MC601 and AT-MC602 Installation and User’s Guide
PSTN Port The PSTN port allows you to connect the AT-MC601 Subscriber unit to a
telephone and the AT-MC602 Provider unit to the outside telco box. This
port features an RJ-11 connector.
Table 2 lists the RJ-11 port pinouts and their assignments.
Table 2 PSTN - RJ-11 Port Pinout
Pin Assignment
1 pass-through 1/6
2 pass-through 2/5
3 Ethernet and phone ring
4 Ethernet and phone tip
5 pass-through 5/2
6 pass-through 6/1
10/100 Mbps
Twisted Pair
Ethernet Port
The AT-MC601 and AT-MC602 network extenders each have one twisted
pair Ethernet port. The twisted pair ports feature RJ-45 connectors with a
maximum operating distance of 100 meters (328 feet). For the port
pinout details, refer to ”RJ-45 Port Pinouts” on page 15.
Type of Cabling.The 10/100Base-TX twisted pair port on the ATMC601 and AT-MC602 network extenders are designed to operate with
Category 3 or better unshielded twisted pair cables. For 10 Mbps
operation on the twisted pair ports, Category 3 or better 100 ohm
unshielded twisted pair cabling is required. For 100 Mbps operation on
the twisted pair ports, Category 5 and Enhanced Category 5 (5E) 100
ohm unshielded twisted pair cabling is recommended.
Auto MDI/MDI-X.An RJ-45 twisted pair port on a 10/100 Mbps
Ethernet network device can have one of two possible wiring
configurations: MDI or MDI-X. The RJ-45 port on a PC, router, or bridge is
typically wired as MDI, while the twisted pair port on a switch or hub is
usually MDI-X.
The AT-MC601 and AT-MC602 network extenders feature automatic
MDI/MDI-X. Each port automatically determines the configuration of the
port on the device to which it is connected and then configures itself
appropriately. For example, if a port on a network extender is connected
to a port on a bridge, which is typically wired as MDI, the port on the
network extender automatically configures itself as MDI-X. This feature
allows you to use either straight-through or crossover cables when
connecting devices to the network extender.
14
Page 15
AT-MC601 and AT-MC602 Installation and User’s Guide
Auto-Negotiation.The network extenders Auto-Negotiate the
speed and duplex mode of the Ethernet link, so that the link comes up in
the highest performance configuration supported by both ends.
Half- and Full-duplex Mode.Duplex mode refers to the way an
end-node sends and receives data on the network. An end-node can
operate in either half- or full-duplex mode, depending on its capabilities.
An end-node that is operating in half-duplex mode can either send data
or receive data, but it cannot do both at the same time. An end-node
that is operating in full-duplex mode can send and receive data
simultaneously. The best network performance is achieved when an
end-node can operate at full-duplex, since the end-node is able to send
and receive data simultaneously.
The AT-MC601 and AT-MC602 network extenders can operate in either
half- or full-duplex mode. The network extender can operate with endnodes capable of either half-duplex, full-duplex, or that can AutoNegotiate the duplex mode. However, it is important to remember that
the two end-nodes connected to the ports on the network extenders
must be able to operate in the same duplex mode.
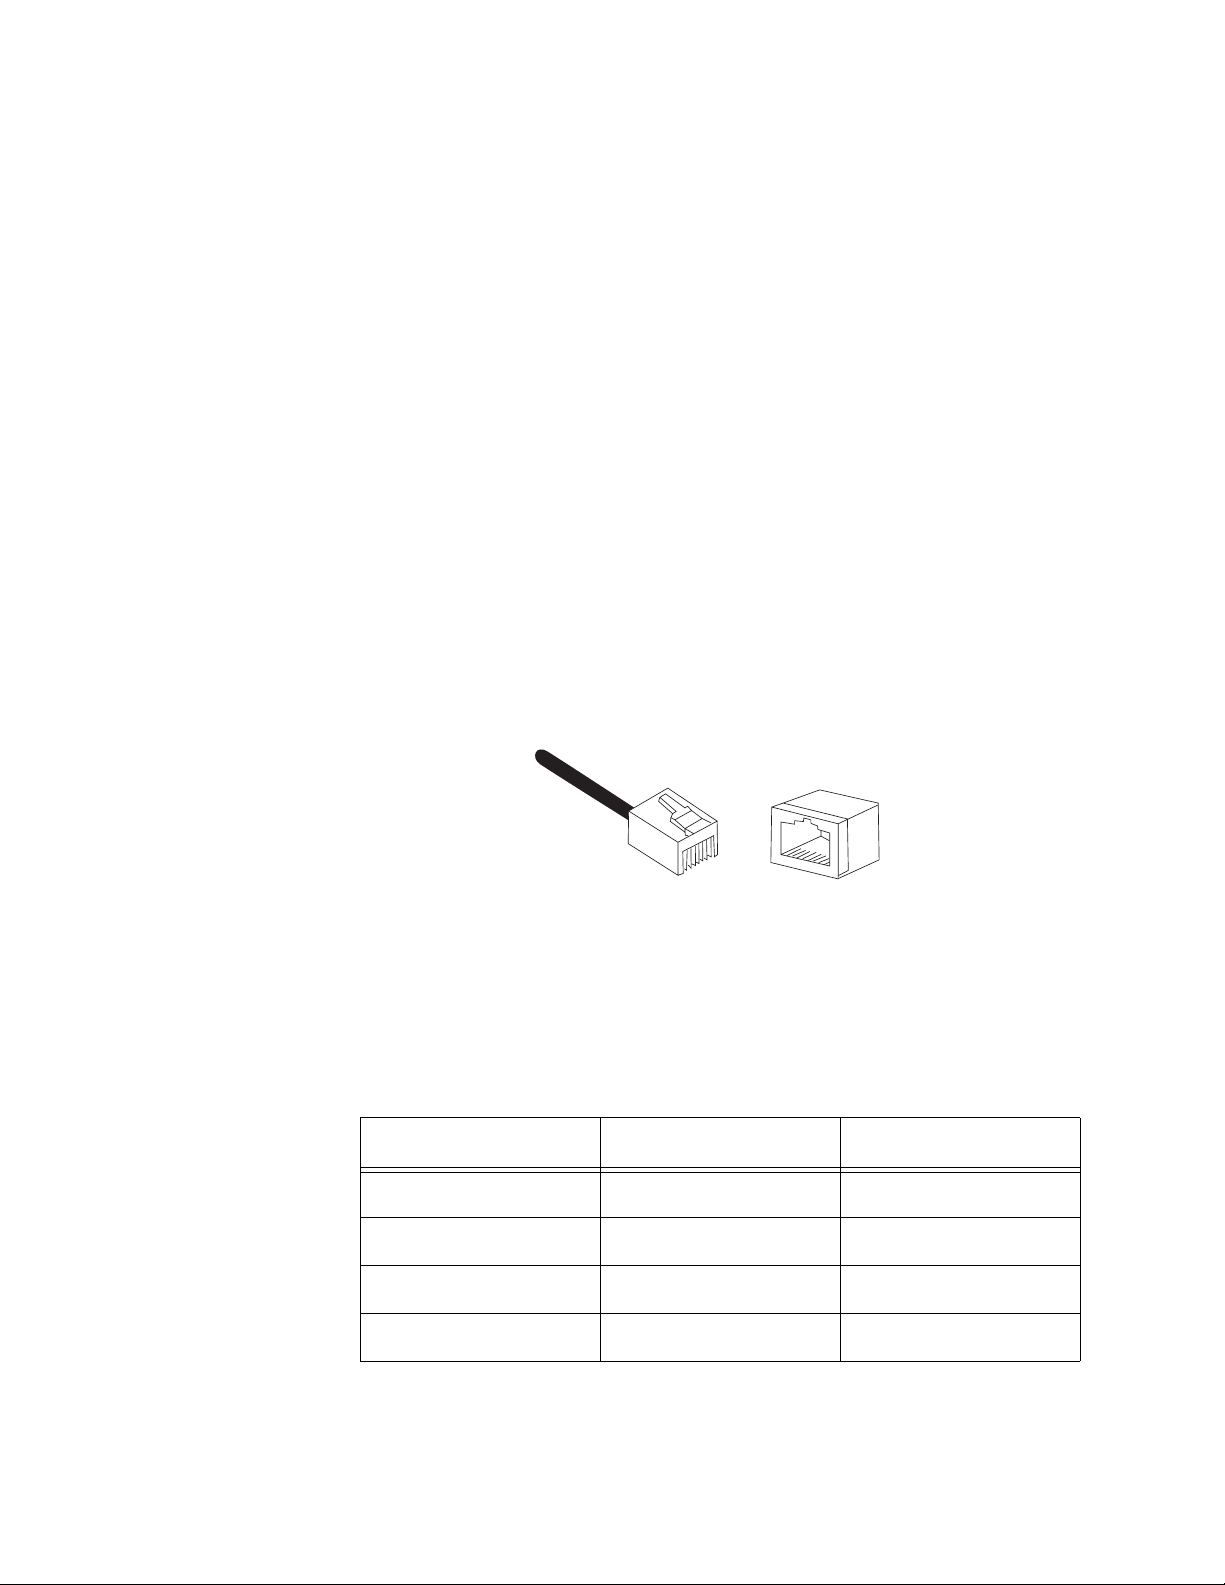
RJ-45 Port Pinouts.Figure 4 illustrates the pin assignments of an
RJ-45 connector and port.
8
1
8
1
Figure 4 RJ-45 Connector and Port Pin Assignments
Table 3 lists the RJ-45 10Base-T/100Base-TX connector pins and their
signals when the port is operating in either MDI or MDI-X configuration.
Table 3 RJ-45 Port Pinouts
Pin MDI Signal MDI-X Signal
1TX+RX+
2TX-RX-
3RX+TX+
6RX-TX-
15
Page 16

AT-MC601 and AT-MC602 Installation and User’s Guide
Status LEDs The AT-MC601 and AT-MC602 network extenders feature the following
status LEDs:
❑ Power
❑ Ethernet: link and activity
❑ VDSL Line: link and error
Table 4 defines the LEDs for the AT-MC601 and AT-MC602 network
extenders.
Table 4 Status LEDs
LED Color Description
PWR Green Power is applied to the unit.
10/100Base-TX Port
LINK Green A link has been established on the port.
ACT Green Data is being received on the ports.
LINE Port
ERR Green An error has been detected on the port.
LINK Green A link has been established on the port.
16
Page 17
AT-MC601 and AT-MC602 Installation and User’s Guide
MGMT Port The management port features a 8-pin DIN connector for connecting
the network extenders to your laptop or PC-compatible computer for
configuration using the provided management cable.
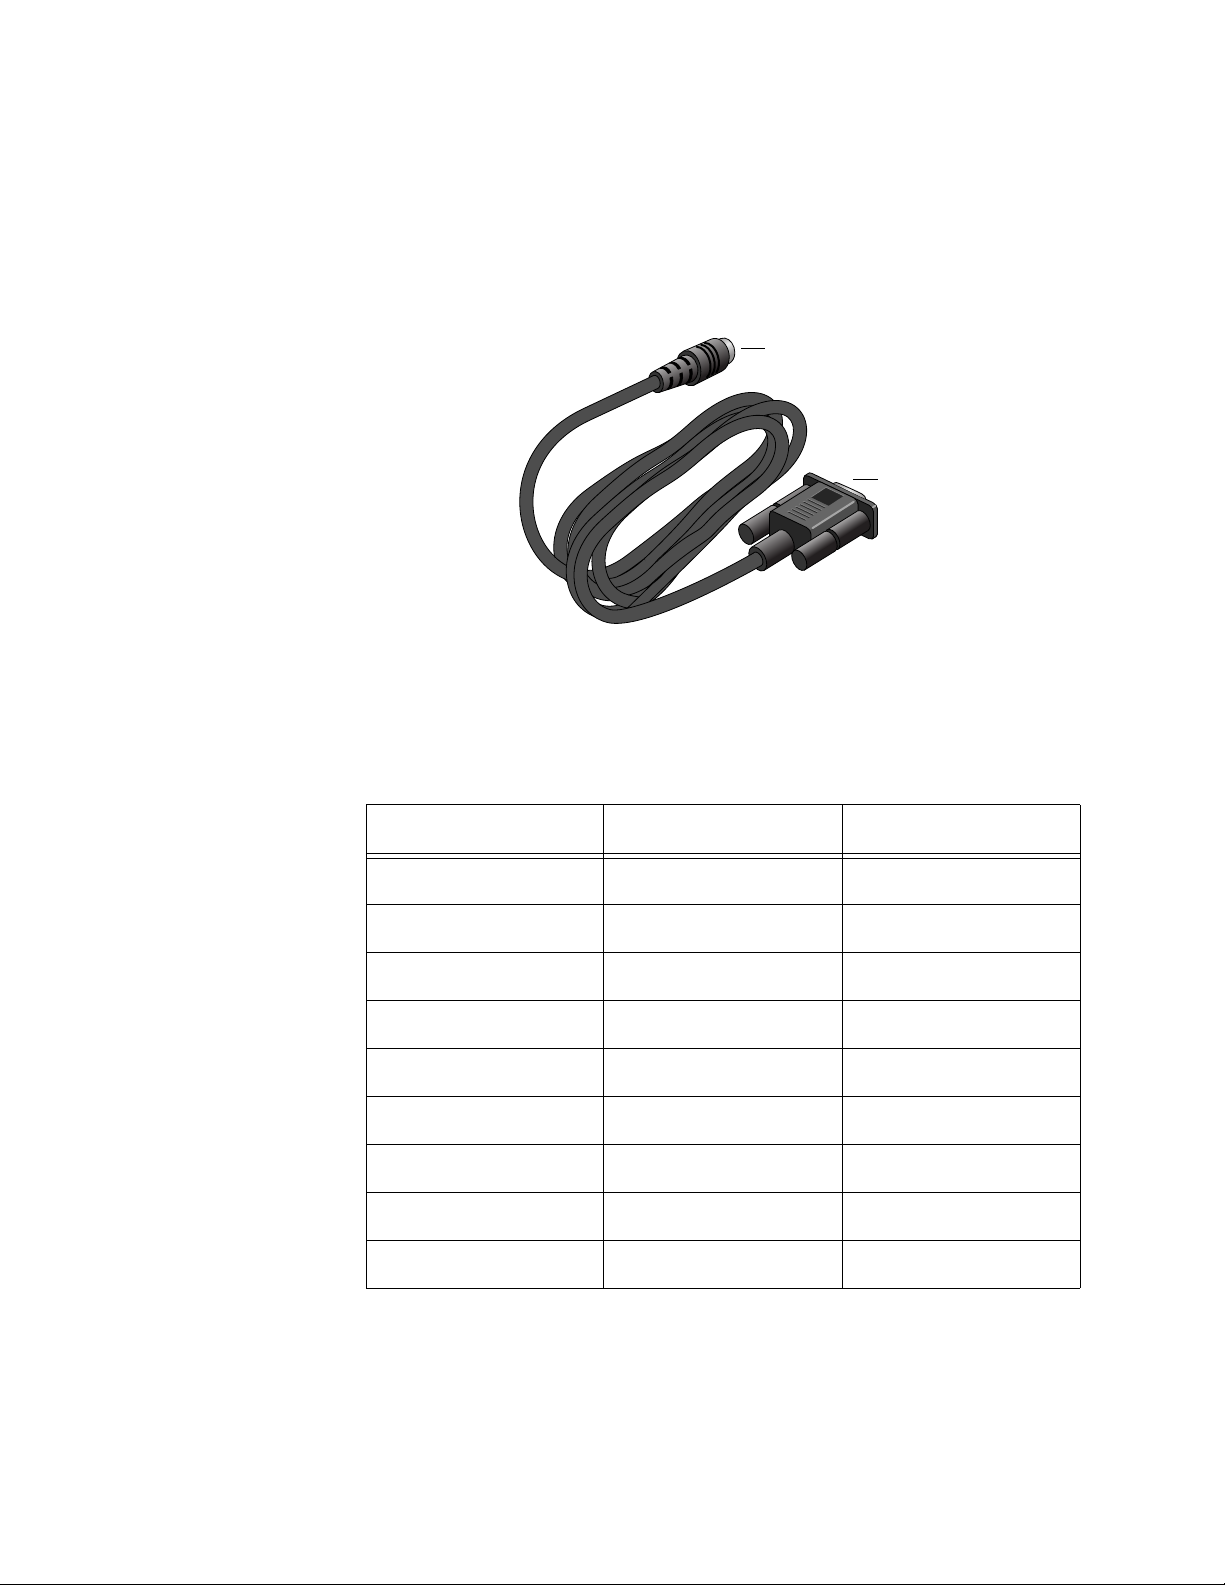
Management
Cable
The management cable included with the AT-MC602 Provider unit
features a 9-pin RS-232 connector to attach to your computer and an
8-pin DIN connector to attach to the network extender.
8-pin DIN connector
9-pin RS-232
connector
Figure 5 Management Cable
Table 5 lists the management cable connector pins and their signals.
Table 5 Management Cable Pinouts
RS-232 Pin DIN Pin Signal
1 1 Not Used
22TXD
38RXD
45DSR
56GND
63DTR
7 4 CTS
87RTS
9 (N/A) Not Used
17
Page 18

AC Power Supply Input Port
The network extender has a single DC power supply socket on the back
panel. The unit does not have a power switch. To turn the network
extender ON or OFF, you connect or disconnect the power cord.
AT-MC601 and AT-MC602 Installation and User’s Guide
External AC/DC
Power Adapter
An external AC/DC power adapter is included with the network extender
for desktop or wall-mount operation. The power adapter supplies 12V
DC to the network extender. Allied Telesyn supplies an approved safety
compliant AC power adapter specifically designed for each region the
network extender is sold. Each type of power adapter has an
unregulated output of 12V DC at 1A.
Note
The power adapter mentioned above is not required to be used with
the AT-MC602 Provider unit because the AT-MC602 Provider unit
can only be installed in the AT-MCR12 chassis
18
Page 19

Software Features
The AT-S57 software used to configure the AT-MC601 and AT-MC602
network extenders has the following features:
AT-MC601 and AT-MC602 Installation and User’s Guide
❑ Determine the VDSL link status
❑ Set the upstream and downstream data transfer rates
❑ Monitor the status of the VDSL parameters on both the local and
remote units
❑ Monitor the status of the Ethernet parameters on both the local
and remote units
❑ Link recovery
Note
The features listed here are further described in ”Configuration” on
page 35.
19
Page 20

Chapter 2
Installation
This chapter contains the installation procedures for the network
extenders. The installation process is described in the following sections:
❑ Installation Safety Precautions
❑ Selecting a Site for the Network Extender
❑ Required Cables
❑ Unpacking the Network Extender
❑ Installing the AT-MC601 Subscriber Unit
❑ Installing the AT-MC602 Provider Unit
❑ Warranty Registration
20
Page 21

Installation Safety Precautions
Please review the following safety precautions before you begin to
install the network extenders. Refer to ”Translated Electrical Safety and
Emission Information” on page 54 for translated safety statements in
your language.
Caution
Power to the hub must be sourced only from the adapter. 4
Europe—EC
Use TÜV licensed AC adapter of 12 V DC, min 500 mA.
Other Countries
Use a Safety Agency Approved AC adapter of 12 V DC, min 500 mA.
Caution
Power cord is used as a disconnection device: To de-energize
equipment, disconnect the power cord. 5
AT-MC601 and AT-MC602 Installation and User’s Guide
Warning
Lightning Danger: Do not work on this equipment or cables
during periods of lightning activity. 6
Caution
Air vents: The air vents must not be blocked on the unit and must
have free access to the room’s ambient air for cooling. 7
Caution
Operating Temperature: This product is designed for a maximum
ambient temperature of 40°C. 9
Caution
All Countries: Install this product in accordance with local and
national electric codes. 10
21
Page 22

AT-MC601 and AT-MC602 Installation and User’s Guide
Additional
Compliance
Warning
Statements
Additional telecommunication-related compliance warning statements
used with the AT-MC601 and AT-MC602 Extended Ethernet units are
listed below:
Warning
When using your telephone equipment, basic safety precautions
should always be followed to reduce the risk of fire, electronic
shock and injury to persons, including the following:
1. Do not use this product near water, for example, near a bathtub,
washbowl, kitchen sink, or laundry tub in a wet basement or
near a swimming pool.
2. Avoid using a telephone (other than a cordless type) during an
electrical storm. There may be remote risk of electric shock from
lightning.
3. Do not use the telephone to report a gas leak in the vicinity of
the leak.
Caution
To reduce the risk of fire, use only No. 26 AWG or larger
telecommunication line cord.
Caution
Mechanical Mounting: The attached rackmounting ears must be
used to securely mount the device onto the rack.
22
Page 23

Selecting a Site for the Network Extender
Observe the following requirements when choosing a site for your
network extender:
❑ Make sure that the AT-MC602 Provider unit is installed in the
AT-MCR12 chassis.
❑ If you plan to install the AT-MCR12 in an equipment rack, check to
be sure that the rack is safely secured and that it will not tip over.
Devices in a rack should be installed starting at the bottom, with
the heavier devices near the bottom of the rack.
❑ If you are installing the network extender on a table, be sure that
the table is level and secure.
❑ The power outlet for the network extender should be located near
the unit and should be easily accessible.
❑ The site should provide for easy access to the ports on the front of
the network extender. This will make it easy for you to connect
and disconnect cables, as well as view the LEDs.
AT-MC601 and AT-MC602 Installation and User’s Guide
❑ To allow proper cooling of the network extender, air flow around
the unit and through its vents on the side should not be restricted.
❑ Do not place objects on top of the network extender.
❑ Do not expose the network extender to moisture or water.
❑ Make sure that the site is a dust-free environment.
❑ You should use dedicated power circuits or power conditioners to
supply reliable electrical power to the network extenders.
23
Page 24

Cables Not Included
The AT-MC601 and AT-MC602 network extenders require the three
cables described in Table 6 below. These cables are not included with
the network extenders.
Port Cable Connector
AT-MC601 and AT-MC602 Installation and User’s Guide
Table 6 Cables
Ethernet Category 3 or better
100-ohm unshielded
straight-through or
crossover twisted pair
cable
PSTN standard telephone
cable
VDSL Line standard telephone
cable
RJ-45
RJ-11
RJ-11
24
Page 25

Unpacking the Network Extender
To unpack the network extender:
1. Remove all components from the shipping package and store the
packaging material in a safe location.
Note
You must use the original shipping material if you need to return the
unit to Allied Telesyn.
2. Place the network extender on a level, secure surface.
3. Make sure the following hardware components are included in your
network extender package. If any item is missing or damaged, contact
your Allied Telesyn sales representative for assistance.
❑ One AT-MC601 or AT-MC602 Network Extender
❑ Four protective feet
AT-MC601 and AT-MC602 Installation and User’s Guide
❑ Two Phillips-head screws for wall-mounting
❑ Two plastic anchors for wall-mounting
❑ One power adapter
❑ One management cable (provided for AT-MC602 model only)
❑ Documentation and configuration software CD
❑ Warranty and registration card
25
Page 26

Installing the AT-MC601 Subscriber Unit
The AT-MC601 Subscriber unit will most likely be used as a stand-alone
device, or can be used as a desktop device, or mounted onto a wall,
using the keyholes on the bottom of the unit. The screws and plastic
anchors used for mounting the unit are provided.
AT-MC601 and AT-MC602 Installation and User’s Guide
Using the
Subscriber Unit
on a Desktop
To use the Subscriber unit on a desktop, perform the following
procedure:
1. Remove all equipment from the package and store the packaging
material in a safe place.
2. Attach the four protective feet (provided) to each corner of the
bottom of the unit, as illustrated in Figure 6.
AT-MC601
PWR
ACT
LINK
100BaseTX
10BaseT/
LINK
ERR
PSTN
LINE
VDSL EXTENDED ETHERNET
MGMT
Figure 6 Attaching Protective Feet to the Subscriber Unit
26
Page 27

AT-MC601 and AT-MC602 Installation and User’s Guide
Wall-Mounting
the Subscriber
Unit
The Subscriber unit can be mounted onto a wall using the keyholes on
the bottom of the unit. The screws and plastic anchors used for
mounting the unit are provided.
To wall-mount the Subscriber Unit, perform the following procedure:
1. If attached, remove the protective feet, data cables, and power cord
from the unit.
2. Select a wall location for the device.
3. Install the screws and plastic anchors onto the wall, as shown in
Figure 7.
LINK
ERR
LINE
ET
N
R
PSTN
HE
ET
ED
D
N
TE
L EX
S
VD
MGMT
AT-MC601
PWR
ACT
LINK
100BaseTX
aseT/
10B
Figure 7 Installing the Screws and Plastic Anchors Onto The Wall
4. Position the switch onto the wall screws so that the ports are facing
the ceiling, as shown in Figure 8.
R
R
E
K
LIN
E
IN
L
N
T
S
P
T
M
G
M
VDSL EXTENDED
ETHERNET
/
T
e
s
X
a
T
e
B
s
0
a
1
B
0
0
1
K
IN
L
T
C
A
R
W
P
AT-MC601
Figure 8 Positioning The Switch Onto The Wall Screws
27
Page 28

AT-MC601 and AT-MC602 Installation and User’s Guide
Cabling the
Subscriber Unit
To cable the Subscriber unit, perform the following steps:
1. First, connect the Ethernet cable from the Ethernet port to the
Ethernet port on the computer, as shown in Figure 9.
10BaseT/
100BaseTX
LINK
ACT
P
W
R
AT-MC601
VDSL EXTENDED ETHERNET
LIN
E
M
G
M
T
ERR
P
STN
LINK
Figure 9 Ethernet to Computer
2. Then, connect a telephone line cable from the PSTN port to the
telephone, as shown in Figure 10.
10BaseT/
100BaseTX
L
IN
K
A
C
T
P
W
R
AT-MC601
V
DSL EXTEND
L
IN
E
M
G
M
T
ED
ETH
ER
NET
E
R
R
P
S
T
N
L
IN
K
Figure 10 PSTN to Telephone
28
Page 29

AT-MC601 and AT-MC602 Installation and User’s Guide
MCR12
LINE
10BaseT/
100BaseTX
LINK
ACT
PWR
ERR
LINK
MGMT
AT-MC602
VDSL EXTENDED ETHERNET
PSTN
3. Next, connect a telephone line cable from the VDSL Line port to the
wall/interior telephone line, as shown in Figure 11, so that the
Subscriber unit can communicate with the Provider unit.
10BaseT
/
100B
as
eTX
LINK
ACT
PWR
AT-MC601
V
D
LINE
MGMT
S
L E
X
T
E
N
D
E
D
E
T
H
E
R
N
E
T
ERR
PSTN
LINK
Wall/Interior Phone Line
Figure 11 VDSL Line to Wall/Interior Phone Line
Note
The procedure for connecting the management cable is described
in ”Cabling Preparations” on page 36.
Powering On
the Subscriber
Unit
Power on the Subscriber unit using the power adapter provided, as
shown in Figure 12.
12V DC
Figure 12 Power On The Subscriber Unit
29
Page 30

Installing the AT-MC602 Provider Unit
The AT-MC602 Provider unit can only be installed in an AT-MCR12
rackmount chassis.
Warning
To prevent exposure to electric shock, the AT-MC602 Provider Unit
must be installed in a RESTRICTED ACCESS LOCATION and
performed by QUALIFIED SERVICE PERSONNEL.
Note
For Finland, Norway, and Sweden – When the AT-MC602 and the
AT-MCR12 are used, a permanent ground conductor must be
installed on the AT-MCR12 chassis.
For installation instructions of this ground conductor, refer to the
AT-MCR12 Media Converter Rackmount Chassis Installation Manual
(PN 613-10725-00).
AT-MC601 and AT-MC602 Installation and User’s Guide
To install the Provider unit in an AT-MCR12 rackmount chassis, perform
the following steps:
1. Attach the unit to one of the sliders that will hold the unit in the
chassis, as shown in Figure 13.
LINK
ERR
PSTN
LINE
MGMT
VDSL EXTENDED ETHERNET
AT-MC601
PWR
ACT
LINK
10BaseT/
100BaseTX
Figure 13 Rack Mount - Set on Slider
30
Page 31

AT-MC601 and AT-MC602 Installation and User’s Guide
2. Then, set the slider in the chassis, as shown in Figure 14.
R
E
W
O
P
MCR12
LINK
ERR
PSTN
LINE
MGMT
VDSL EXTENDED ETHERNET
AT-MC601
PWR
ACT
LINK
10BaseT/
100BaseTX
Figure 14 Rack Mount - Set in Rack
31
Page 32

AT-MC601 and AT-MC602 Installation and User’s Guide
MCR12
LINE
10BaseT/
100BaseTX
LINK
ACT
PWR
ERR
LINK
MGMT
AT-MC603
VDSL EXTENDED ETHERNET
PSTN
MCR12
LINE
10BaseT/
100BaseTX
LINK
ACT
PWR
ERR
LINK
MGMT
AT-MC603
VDSL EXTENDED ETHERNET
PSTN
Cabling the
Provider Unit
To cable the Provider unit, perform the following steps:
1. First, connect the Ethernet cable from the Ethernet port to the Service
Provider box in your wiring closet, as shown in Figure 15.
Internet
Service
Provider
Figure 15 Ethernet to Internet Service Provider
2. Then, connect a telephone line cable from the PSTN port to the
outside telco box, as shown in Figure 16.
Telco
PBX
Line
Figure 16 PSTN to Telco PBX Line
32
Page 33

AT-MC601 and AT-MC602 Installation and User’s Guide
MCR12
LINE
10BaseT/
100BaseTX
LINK
ACT
PWR
ERR
LINK
MGMT
AT-MC602
VDSL EXTENDED ETHERNET
PSTN
3. Next, connect a telephone line cable from the VDSL Line port to the
wall/interior telephone line, as shown in Figure 17, so that the
Provider unit can communicate with the Subscriber unit.
1
0
B
a
s
e
T
/
1
0
0
B
a
s
e
T
X
LINK
AC
T
P
W
R
AT-MC601
MGM
T
VDSL EXTENDED ETHERNET
L
INE
ER
R
PS
TN
LIN
K
Wall/Interior Phone Line
Figure 17 VDSL Line to Wall/Interior Phone Line
Note
The procedure for connecting the management cable is described
in ”Cabling Preparations” on page 36.
Powering On
the Provider
Unit
Powering on the AT-MC602 Provider Unit requires that the host
equipment, AT-MCR12 rackmount chassis, is powered on as well. For
detailed information on how to power on the AT-MCR12 unit, refer to
the AT-MCR12 Media Converter Rackmount Chassis Installation Manual.
33
Page 34

Warranty Registration
When you have finished installing the network extender, register your
product by completing the enclosed warranty card and mailing it to
Allied Telesyn.
AT-MC601 and AT-MC602 Installation and User’s Guide
34
Page 35

Chapter 3
Configuration
The configuration software allows you to adjust and monitor the
operating parameters of the media converter. Some of the functions
that you can perform with the software include:
❑ Determine the VDSL link status
❑ Set the upstream and downstream data transfer rates
❑ Monitor the status of the VDSL parameters on both the local and
remote units
❑ Monitor the status of the Ethernet parameters on both the local
and remote units
❑ Link recovery
The AT-S57 configuration software is included on the Documentation
CD included with the network extender. The default settings may be
adequate for some networks and may not need to be changed. If this is
true for your network, then you can use the network extenders by simply
connecting the units to your network, as explained in ”Installation” on
page 20.
Note
The default settings for the configuration software can be found in
Appendix A”” on page 51.
To actively configure a network extender by changing or adjusting its
operating parameters, you must access the AT-S57 software while
connected to the AT-MC602 Provider unit. The AT-S57 software has a
menu interface that makes it very easy to use.
35
Page 36

Starting a Configuration Session
AT-MC601 and AT-MC602 Installation and User’s Guide
Downloading
Software
Updates
Cabling
Preparations
In order to configure and manage your AT-MC601 and AT-MC602 VDSL
network extenders, you need to download a copy of the configuration
software onto the computers you will use to manage the units. The ATS57 configuration software is included on the Documentation CD
provided with the units.
New releases of the AT-S57 configuration software are available from the
Allied Telesyn Web site at www.alliedtelesyn.com or from our FTP
server at ftp.alliedtelesyn.com. To log on to the FTP server, enter
“anonymous” for the user name and your email address for the
password. Management software for the AT-MC601 and AT-MC602 VDSL
network extenders will have “S57” as part of the file name.
Once you have a copy of the software on your computer, connect the
Provider unit to your computer using the management cable provided,
as shown in Figure 18. Attach the 9-pin RS-232 end of the cable to the
COM 1 or COM 2 port on your computer. Attach the 8-pin DIN end of the
cable to the management port on the unit.
10BaseT/
100BaseTX
LINK
ACT
PWR
AT-MC602
VDSL EXTENDED ETHERNET
MGMT
LINE
PSTN
ERR
LINK
Figure 18 Connecting the Management Cable
If the network extender is not already on, power on the unit using the
power cable provided. Refer to ”Powering On the Subscriber Unit” on
page 29 for further instructions on how to power on the unit.
36
Page 37

AT-MC601 and AT-MC602 Installation and User’s Guide
Opening the
Configuration
Software
Open the configuration software by double-clicking the “ATS57”
application icon, as you would with any other software program. The ATMC60x Configurator pop-up will appear, as shown in Figure 19.
Figure 19 AT-MC60x Configurator
If you would like to verify that you are using the latest version of the
configuration and management software, click the About button on the
bottom right of the AT-MC60x Configurator pop-up. The About ATMC60x Configurator pop-up will appear, as shown in Figure 20.
Figure 20 About AT-MC60x Configurator
Select the computer port you are using from the pull-down menu on the
AT-MC60x Configurator pop-up and click OK.
If you are connected to the AT-MC602 Provider unit and want to
configure the network extenders, continue with the next section,
”Configuring the Provider Unit” on page 38. If you are connected to the
AT-MC601 Subscriber unit to attempt link recovery, continue with
”Configuring the Subscriber Unit” on page 45.
37
Page 38

AT-MC601 and AT-MC602 Installation and User’s Guide
Configuring the Provider Unit
After performing the procedure described in the previous section,
”Starting a Configuration Session” on page 36, if you are connected to
the Provider unit, the AT- MC60x Configurator menu will appear. The
Configurator bar at the top of the menu indicates whether or not the
Provider unit has established an Ethernet link by displaying [link DOWN]
or [link UP] in brackets.
The AT-MC60x Configurator menu has three screens: Configuration,
VDSL Status, and Ethernet Status. The parameters on these screens are
described below. Use the tabs at the top of the menu to toggle between
these screens. When you have finished viewing or adjusting the
parameters on the menu screens, click the Close button on the bottom
right of the menu to exit from the configuration software.
Configuration The Configuration screen displayed in Figure 21 is shown first by default.
Figure 21 Configuration
The parameters on the Configuration screen are described below.
Upstream/Downstream
The upstream and downstream data transfer rate.
38
Page 39

AT-MC601 and AT-MC602 Installation and User’s Guide
❑ Actual (Mbps)
Displays the actual data transfer rate on the line. The software
automatically detects this speed.
❑ Min (Mbps)
Allows you to adapt the data transfer rate by setting a minimum
speed.
❑ Max (Mbps)
Allows you to adapt the data transfer rate by setting a maximum
speed.
The maximum and minimum speeds in Mbps available in the pull-down
menus are:
0.94
1.06
1.41
1.88
2.11
2.81
3.75
4.22
5.63
7.50
8.44
11.26
15.01
16.88 (upstream only)
Status
This field will display “Select speed to set” until you have selected data
rates from the upstream and downstream pull-down menus and set the
rates by clicking the Apply button. Then reports on the status of the
attempt to configure the speeds selected from the upstream and
downstream pull-down menus will appear in this field. A successful
configuration attempt will cycle though the following status reports:
Looking for link status...
Checking signal/noise ratio
Loading a Configuration DS=1.41 US=2.81
(This report will keep repeating with progressively higher
upstream and downstream values until the set rate or the
highest possible rate has been achieved.)
Saving config on EEPROM - S Side
Saving config on EEPROM - P Side
Done
39
Page 40

AT-MC601 and AT-MC602 Installation and User’s Guide
The Configuration Saved pop-up shown in Figure 22 will appear when
the set rate or the highest possible rate has been achieved.
Figure 22 Configuration Saved
An unsuccessful configuration attempt may include the following status
reports:
Loading defaults
Can’t read link status
Done
These negative status reports may also be accompanied by error
message pop-ups. Error messages are explained in ”Troubleshooting” on
page 47.
HIGH -> LOW/LOW -> HIGH
Allows you to choose the negotiation direction for the modem speed.
The default and preferred direction is Low -> High. Choosing a
negotiation direction determines how the modem searches for speeds.
When set to Low -> High, the modem will start at minimum speeds and
keeps negotiating progressively higher speeds until it has achieved its
maximum speed for the connection.
Apply
Press the Apply button to set your data transfer rates and negotiation
direction selections.
About
Use the About button to display the version number of the AT-S57
configuration software.
VDSL Status To view the VDSL Status screen, click on the VDSL Status tab at the top of
the menu.
40
Page 41

AT-MC601 and AT-MC602 Installation and User’s Guide
The VDSL Status screen is displayed in Figure 23.
Figure 23 VDSL Status
The parameters on the VDSL Status screen are described below. These
parameters are for viewing and monitoring purposes only. They cannot
be changed manually.
SNR of Received Signal
The Signal-to-Noise Ratio on the VDSL line, measured in decibels. The
SNR is a parameter of the constellation of the receive signal.
Corrected RS errors /s
Number of corrected Reed-Solomon errors per second.
Mean Square Error
An indication of the symbol error rate, measured in decibels.
Full Constellation Link
The highest possible QAM (Quadrature Amplitude Modulation)
constellation, which enables the highest line rates.
41
Page 42

AT-MC601 and AT-MC602 Installation and User’s Guide
Reduced Constellation Link
A lesser QAM constellation, causing reduced line rates. If the full
constellation rate cannot be achieved because the received SNR is too
low, then a reduced constellation link can be established and the
software can automatically configure the Subscriber unit parameters.
TC Synchronized
Transmission convergence is synchronized.
Ethernet Encapsulation Sync
The process of encapsulating packets into frames at the VDSL link level is
synchronized.
Remote I/F Synchronized
Remote interface is synchronized.
Signal Detected
The VDSL signal is being detected by the software.
Link Fail Counter
Number of unsuccessful link attempts.
Micro Interruption Occurred
A micro-interruption occurred.
AGC Converged
Automatic gain control has converged on the VDSL link.
Timing Converged
The timing acquisition function is converged. This only occurs on the
Subscriber (remote) unit
ADC Saturation
Analog-to-digital converter has been overloaded with interference.
Local/Remote
Select Local to view the parameters for the Provider unit. Select Remote
to view the parameters for the Subscriber unit. The Remote option will
only be available when an active link has been established.
Ethernet Status To view the Ethernet Status screen, click on the Ethernet Status tab at
the top of the menu.
42
Page 43

AT-MC601 and AT-MC602 Installation and User’s Guide
The Ethernet Status screen is displayed in Figure 24.
Figure 24 Ethernet Status
The parameters on the Ethernet Status screen are described below.
TxRx Counters
The data fields in this section indicate the number and type of frames
that have been transmitted and received via the Ethernet link.
Collision Counters
The data fields in this section indicate the number and type of collisions
that have occurred on the Ethernet link.
Error Counters
The data fields in this section indicate the number and type of errors that
have occurred on the Ethernet link.
Clear
This button allows you to reset the counters, clearing the values
previously recorded by the software.
43
Page 44

AT-MC601 and AT-MC602 Installation and User’s Guide
Stop/Start
This button allows you to pause counting. When you press Stop, the
counters remain at their present values. When you press Start, the
counters continue adding to the values already recorded by the
software.
Local/Remote
Select Local to view the parameters for the Provider unit. Select Remote
to view the parameters for the Subscriber unit. The Remote option will
only be available when an active link has been established.
44
Page 45

Configuring the Subscriber Unit
In rare instances, you may need to use the configuration software on the
Subscriber unit to attempt link recovery. If the configuration software
detects a problem with the Subscriber unit while you are connected to
the Provider unit, it will prompt you to use the software on the
Subscriber unit by displaying a pop-up error message. On these
occasions, follow the procedure described in ”Starting a Configuration
Session” on page 36 and then continue with the instructions in this
section.
After you have selected the correct port and clicked the OK button, the
AT-MC60x Configurator Select Mode screen will appear, as displayed in
Figure 25.
AT-MC601 and AT-MC602 Installation and User’s Guide
Figure 25 Select Mode
There are two options on the Select Mode screen: Normal and Install.
These options are described below:
Normal
The Normal mode sets the units to operate under normal parameters.
The units will attempt to establish a link using the parameters you set on
the Configuration screen while connected to the Provider unit. See
”Configuration” on page 38 for a description of the Configuration screen.
Using the Normal mode will only allow the units to establish links that
meet the criteria you have set. The disadvantage to using the Normal
mode is that if either of the upstream or downstream speeds you have
set are unattainable, the link attempt will fail because the units are not
set to use the default parameters as back-ups.
Install
The Install mode enables a watchdog timer to monitor the link attempt
process. If the network extenders are not able to establish a link using
the parameters you set on the Provider unit within a reasonable amount
45
Page 46

AT-MC601 and AT-MC602 Installation and User’s Guide
of time, a timeout will occur. After a timeout, the default configuration
parameters will be used to establish a link with the highest possible
speed. The default configuration parameters start at 0.94 Mbps
upstream and downstream with negotiation set from Low -> High.
Select the option that corresponds to your mode choice and click the
Apply button.
When the mode has been set, the AT-MC60x Configurator Done
message will appear, as displayed in Figure 26.
Figure 26 Done Message
When you have finished setting the mode on the Subscriber unit, click
the Close button on the bottom right of the AT-MC60x Configurator
menu to exit from the configuration software.
46
Page 47

Chapter 4
Troubleshooting
This chapter contains information on how to troubleshoot the
AT-MC601 and AT-MC602 network extenders in the event a problem
occurs.
Note
If after following the instructions in this chapter you are unable to
resolve the problem, contact Allied Telesyn Technical Support for
assistance. Refer to ”Contacting Allied Telesyn Technical Support”
on page 9 for information on how to contact our Technical Support
Department.
LEDs Check the PWR LED on the front of the network extender. If the LED is
OFF, indicating that the network extender is not receiving power, do the
following:
❑ If the network extender is inserted in the AT-MCR12 chassis, make
sure that the power cord is securely connected to the power
source and to the power connector on the back panel of the
AT-MCR12 chassis.
❑ If the network extender stands alone, make sure that the provided
adapter is securely connected to the power source and to the
power connector on the back panel of the network extender.
❑ Verify that the power outlet has power by connecting another
device to it.
❑ Try connecting the network extender to another power source.
❑ Try using a different power cord or a different power adapter.
❑ Check that the voltage from the power source is within the
required levels for your region.
47
Page 48

AT-MC601 and AT-MC602 Installation and User’s Guide
Verify that the ACT LED for each twisted pair port is ON. If a ACT LED is
OFF, do the following:
❑ Verify that the end node connected to the port is powered ON and
is operating properly.
❑ Check that the twisted pair cable is securely connected to the port
on the network extender and to the port on the end node.
❑ Make sure that the twisted pair cable does not exceed 100 meters
(328 feet).
❑ Verify that you are using the appropriate category of twisted pair
cable: Category 3 or better for 10 Mbps operation, Category 5 and
Category 5E for 100 Mbps operation.
❑ Make sure that the operating parameters of the port on the
network extender are compatible with the end node to which the
port is connected.
Error Messages When using the configuration software, you may encounter the
following error messages:
❑ “No answer from device,” as shown in Figure 27
Figure 27 No Answer Error Message
This error message may occur when your computer is not
responding, in which case you should re-start your computer and
try again.
❑ “Communication error: the program will be closed. Verify serial
connection and restart the program
,” as shown in Figure 28
Figure 28 Communication Error Message
48
Page 49

AT-MC601 and AT-MC602 Installation and User’s Guide
If you are unable to establish a configuration session with the
network extender and receive this error message, check to be sure
that the management cable is securely connected to the
management port on the network extender and to the RS-232
port on the computer. Then make sure you are selecting the
correct COM1 or COM2 port at the software prompt.
❑ “Max speed cannot be lower than min speed: select different
values
”
This error message occurs when you select a maximum speed that
is lower than the set minimum speed during the selection of
speed ranges on the rate adaptation section on the Configuration
menu screen. Select a higher maximum value to correct the
problem.
❑ “P side must be connected to start this procedure” or “S side must
be connected to start this procedure
”
These error messages occur when the management cable is
connected to the wrong unit for the procedure you are trying to
perform.This could happen if you switch the management cable
between the units without closing the software window. Simply
switch the management cable to the other unit to correct the
problem.
❑ “Can't read link status”
This message occurs when the software cannot read the link
status from the Provider side. Perform the procedure described in
”Configuring the Subscriber Unit” on page 45 to see if link
recovery on the Subscriber unit solves the problem.
Please run this program on S side to set it in Install mode. If S side
❑ “
is already in install mode then configuration can not be
achieved,”
as shown in Figure 29.
Figure 29 Run on S Side Error Message
49
Page 50

AT-MC601 and AT-MC602 Installation and User’s Guide
This error message occurs when the Provider unit cannot achieve
the link with the S or Subscriber side unit using the default speeds
value. Set the Subscriber to Install Mode, as described in
”Configuring the Subscriber Unit” on page 45.
❑ “Configuration file was not found”
❑ “Syntax error in configuration file”
❑ “Configuration cannot be achieved”
These last three error messages indicate a problem with the
configuration software. Try re-loading the software onto your
computer.
50
Page 51

Appendix A
Default Configuration Settings
This appendix lists the AT-MC601 and AT-MC602 default settings.
Setting Default
Provider Parameters Monitored Local (Provider)
Speeds
Upstream Max .94 Mbps
Upstream Min .94 Mbps
Downstream Max .94 Mbps
Downstream Min .94 Mbps
Flow
Low to High Selected
Ethernet Port
Duplex Mode Auto-Negotiate
Speed Auto-Negotiate
MDI/MDI-X Auto
Link Recovery
Subscriber Unit Mode Normal
51
Page 52

Appendix B
Technical Specifications
Physical Specifications
Dimensions: (W x D x H)
109 mm x 95 mm x 25 mm
(4.29 in. x 3.74 in. x 0.98 in.)
Weight: .27 kg (0.6 lbs)
Recommended Minimum
Clearance on All Sides: 5.08 cm (2.0 in.)
Environmental Specifications
Operating Temperature: 0° C to 40° C (32° F to 104° F)
Storage Temperature: -25° C to 70° C (-13° F to 158° F)
Operating Humidity: 5% to 90% (noncondensing)
Storage Humidity: 5% to 95% (noncondensing)
Operating Altitude: 3,000 m (approx. 10,000 ft)
Non-operating Altitude: 4,000 m (approx.13,100 ft)
Power Specifications
Power Consumption: 6 Watts
Input Supply Current: 500 mA
Input Supply Voltage: 12V DC
52
Page 53

AT-MC601 and AT-MC602 Installation and User’s Guide
Safety and Electromagnetic Compatibility Certifications
Emission: EN55022 Class A, FCC Part 15Class A, C-TICK
Immunity: EN55024
Safety: EN60950, UL60950, FCC Part 68
53
Page 54

Appendix C
Translated Electrical Safety and Emission Information
Important: This appendix contains multiple-language translations for
the safety statements in this guide.
Wichtig: Dieser Anhang enthält Übersetzungen der in diesem
Handbuch enthaltenen Sicherheitshinweise in mehreren Sprachen.
Vigtigt: Dette tillæg indeholder oversættelser i flere sprog af
sikkerhedsadvarslerne i denne håndbog.
Belangrijk: Deze appendix bevat vertalingen in meerdere talen van de
veiligheidsopmerkingen in deze gids.
Important: Cette annexe contient la traduction en plusieurs langues des
instructions de sécurité figurant dans ce guide.
Tärkeää: Tämä liite sisältää tässä oppaassa esiintyvät turvaohjeet usealla
kielellä.
Importante: questa appendice contiene traduzioni in più lingue degli
avvisi di sicurezza di questa guida.
Viktig: Dette tillegget inneholder oversettelser til flere språk av
sikkerhetsinformasjonen i denne veiledningen.
Importante: Este anexo contém traduções em vários idiomas das
advertências de segurança neste guia.
Importante: Este apéndice contiene traducciones en múltiples idiomas
de los mensajes de seguridad incluidos en esta guía.
Obs! Denna bilaga innehåller flerspråkiga översättningar av
säkerhetsmeddelandena i denna handledning.
54
Page 55

AT-MC601 and AT-MC602 Installation and User’s Guide
Standards: This product meets the following safety standards.
U.S. Federal Communications Commission
Radiated Energy
Note: This equipment has been tested and found to comply with the limits for a Class A
digital device pursuant to Part 15 of FCC Rules. These limits are designed to provide
reasonable protection against harmful interference when the equipment is operated in a
commercial environment. This equipment generates, uses, and can radiate radio frequency
energy and, if not installed and used in accordance with this instruction manual, may cause
harmful interference to radio communications. Operation of this equipment in a residential
area is likely to cause harmful interference in which case the user will be required to correct
the interference at his own expense.
Note: Modifications or changes not expressly approved of by the manufacturer or the FCC,
can void your right to operate this equipment.
FCC Part 68 Product Identifier
This equipment complies with Part 68 if the FCC rules and the requirements adopted by the
ACTA. On the bottom of the equipment is a label that contains, among other information, a
product identifier in the following format:
• US: A5TOT00BMC60X
If requested, this number must be provided to the telephone company.
Industry Canada
This equipment complies with Industry Canada CS03 Standard, Certificate Number:
- IC:336A-MC60X.
This Class A digital apparatus meets all requirements of the Canadian Interference-Causing
Equipment Regulations.
Cet appareil numérique de la classe A respecte toutes les exigences du Règlement sur le
matériel brouilleur du Canada.
1 RFI Emission EN55022 Class A, FCC Part 15 Class A, C-TICK
2 Immunity EN55024
3 Electrical Safety EN60950, UL60950, FCC Part 68
Safety
4 Power to the hub must be sourced only from the adapter.
Europe—EC
Use TÜV licensed AC adapter of 12 V DC, min 500 mA.
Other Countries
Use a Safety Agency Approved AC adapter of 12 V DC, min 500 mA.
5 Caution: Power cord is used as a disconnection device. To de-energize equipment
disconnect the power cord.
6 Lightning Danger
Danger: Do not work on equipment or cables during periods of lightning activity.
7 Do not block air vents.
8 Do not connect a telephone line into the signal connector.
9 Operating Temperature: This product is designed for a maximum ambient
temperature of 40 degrees C.
10 All Countries: Install product in accordance with local and National Electrical Codes.
55
Page 56

AT-MC601 and AT-MC602 Installation and User’s Guide
Normen: Dieses Produkt erfüllt die Anforderungen der nachfolgenden Normen.
1 Hochfrequenzstörung EN55022 Klasse A, FCC Part 15 Klasse A,
C-TICK
2 Störsicherheit EN55024
3 Elektrische Sicherheit EN60950, UL60950, FCC Part 68
Sicherheit
4 Der Buchse darf nur aus dem Adpater Strom zugeführt werden.
Europe—EC
Gebrauchen Sie einen von TÜV zugelassenen Wechselstromadapter für Gleichstrom
12 Vdc, 500 mA.
5 Vorsicht: Das netzkabel dient zum trennen der stromversorgung. Zur trennung vom
netz, kabel aus der steckdose ziehen.
6 Gefahr Durch Blitzschlag
Gefahr: Keine Arbeiten am Gerät oder an den Kabeln während eines Gewitters
ausführen.
7 Entlüftungsöffnungen nicht versperren.
8 Verbinden Sie nicht das Telefonkabel mit dem Signalverbindungsstecker.
9 Betriebstemperatur: Dieses Produkt wurde für den Betrieb in einer
Umgebungstemperatur von nicht mehr als 40° C entworfen.
10 Alle Länder: Installation muß örtlichen und nationalen elektrischen Vorschriften
entsprechen.
56
Page 57

AT-MC601 and AT-MC602 Installation and User’s Guide
Standarder: Dette produkt tilfredsstiller de følgende standarder.
1 Radiofrekvens forstyrrelsesemissionEN55022 Klasse A, FCC Part 15 Klasse A,
C-TICK
2 Immunitet EN55024
3 Elektrisk sikkerhed EN60950, UL60950, FCC Part 68
Sikkerhed
4 Strømforsyningen til apparatet må udelukkende tages fra
tilpasningstransformatoren.
Europe - EC
Brug kun TÜV godkendt vekselstrømstransformator på 12 Vdc, 500 mA.
5 Advarsel: Den strømførende ledning bruges til at afbryde strømmen. Skal
strømmen til apparatet afbrydes, tages ledningen ud af stikket.
6 Fare Under Uvejr
Fare: UNDLAD at arbejde på udstyr eller KABLER i perioder med
LYNAKTIVITET.
7 Ventilationsåbningerne må ikke blokeres.
8 Tilslut ikke telefonledninger til signalstikforbindelsen.
9 Betjeningstemperatur: Dette apparat er konstrueret til en omgivende temperatur
på maksimum 40 grader C.
10 Alle Lande: Installation af produktet skal ske i overensstemmelse med lokal og
national lovgivning for elektriske installationer.
57
Page 58

AT-MC601 and AT-MC602 Installation and User’s Guide
Eisen: Dit product voldoet aan de volgende eisen.
1 RFI Emissie EN55022 Klasse A, FCC Part 15 Klasse A,
C-TICK
2 Immuniteit EN55024
3 Electrische Veiligheid EN60950, UL60950, FCC Part 68
Veiligheid
4 Stroom mag alleen via de adapter naar het apparaat toegevoerd worden.
Europe - EC
Gebruik een door TÜV gekeurde wisselstroomadapter van 12 Vdc, 500 mA.
5 Waarschuwing: Het toestel wordt uitgeschakeld door de stroomkabel te
ontkoppelen. Om het toestel stroomloos te maken: de stroomkabel ontkoppelen.
6 Gevaar Voor Blikseminslag
Gevaar: NIET aan toestellen of KABELS WERKEN bij BLIKSEM.
7 Ventilatiegaten niet blokkeren.
8 Sluit geen telefoonlijn aan op de signaalverbinding.
9 Bedrijfstemperatuur: De omgevingstemperatuur voor dit produkt mag niet meer
bedragen dan 40 graden Celsius.
10 Alle Landen: het toestel installeren overeenkomstig de lokale en nationale
elektrische voorschriften.
58
Page 59

AT-MC601 and AT-MC602 Installation and User’s Guide
Normes: ce produit est conforme aux normes de suivantes.
1 Eemission d’interférences
radioélectriques EN55022 Classe A, FCC Part 15 Classe A,
C-TICK
2 Immunité EN55024
3 Sécurité électrique EN60950, UL60950, FCC Part 68
Sécurité
4 L’alimentation du concentrateur doit être uniquement fournie par l’adaptateur.
Europe - EC
Utiliser un adaptateur secteur conforme TÜV de 12 V dc, 500 mA en courant continu.
5 Attention: Le cordon d’alimentation sert de mise hors circuit. Pour couper
l’alimentation du matériel, débrancher le cordon.
6 Danger De Foudre
Danger: NE PAS MANIER le matériel ou les CÂBLES lors d’activité orageuse.
7 Ne pas bloquer les fentes d’aération.
8 Ne pas connecter une ligne téléphonique au connecteur de signaux.
9 Température De Fonctionnement: Ce matériel est capable de tolérer une
température ambiante maximum de 40 degrés Celsius.
10 Pour Tous Pays: Installer le matériel conformément aux normes électriques
nationales et locales.
59
Page 60

AT-MC601 and AT-MC602 Installation and User’s Guide
Standardit: Tämä tuote on seuraavien standardien mukainen.
1 Radioaaltojen häirintä EN55022 Luokka A, FCC Part 15 Luokka A,
C-TICK
2 Kestävyys EN55024
3 Sähköturvallisuus EN60950, UL60950, FCC Part 68
Turvallisuus
4 Tähtipisteeseen (hub) syötettävän virran pitää tulla ainoastaan sovittimesta.
Europe - EC
Käytä TÜV-lisenssillä valmistettua verkkosovitinta, jonka tasajännitteen
nimellisarvot ovat 12 Vdc, 500 mA (milliampeeria).
5 Huomautus: Virtajohtoa käytetään virrankatkaisulaitteena. Virta katkaistaan
irrottamalla virtajohto.
6 Salamaniskuvaara
Hengenvaara: ÄLÄ TYÖSKENTELE laitteiden tai KAAPELEIDEN KANSSA
SALAMOINNIN AIKANA.
7 Älä tuki ilmareikiä
8 Älä liitä puhelinlinjaa signaalin liittimeen.
9 Käyttölämpötila: Tämä tuote on suunniteltu ympäröivän ilman
maksimilämpötilalle 40° C.
10 Kaikki Maat: Asenna tuote paikallisten ja kansallisten
sähköturvallisuusmääräysten mukaisesti.
60
Page 61

AT-MC601 and AT-MC602 Installation and User’s Guide
Standard: Questo prodotto è conforme ai seguenti standard.
1 Emissione RFI (interferenza di
radiofrequenza) EN55022 Classe A, FCC Part 15 Classe A,
C-TICK
2 Immunità EN55024
3 Sicurezza elettrica EN60950, UL60950, FCC Part 68
Norme Di Sicurezza
4 Questo dispositivo deve essere alimentato solo mediante l’adattatore.
Europe - EC
Utilizzare l’adattatore per c.a. da 12 Vdc, 500 mA conforme alla normativa TÜV.
5 Attenzione: Il cavo di alimentazione è usato come dispositivo di disattivazione. Per
togliere la corrente al dispositivo staccare il cavo di alimentazione.
6 Pericolo Di Fulmini
Pericolo: NON LAVORARE sul dispositivo o sui CAVI durante PRECIPITAZIONI
TEMPORALESCHE.
7 Non ostruire le prese d’aria.
8 Non collegare una linea telefonica al connettore del segnale.
9 Temperatura Di Funzionamento: Questo prodotto è concepito per una
temperatura ambientale massima di 40 gradi centigradi.
10 Tutti I Paesi: installare il prodotto in conformità delle vigenti normative elettriche
nazionali.
61
Page 62

AT-MC601 and AT-MC602 Installation and User’s Guide
Sikkerhetsnormer: Dette produktet tilfredsstiller følgende sikkerhetsnormer.
1 RFI stråling EN55022 Klasse A, FCC Part 15 Klasse A,
C-TICK
2 Immunittet EN55024
3 Elektrisk sikkerhet EN60950, UL60950, FCC Part 68
Sikkerhet
4 All strømtilførsel må komme fra adapteren.
Europe - EC
Benytt TÜV-godkjent AC-adapter på 12 Vdc, 500 mA (milliampere).
5 Forsiktig: Strømledningen brukes til å frakoble utstyret. For å deaktivisere
utstyret, må strømforsyningen kobles fra.
6 Fare For Lynnedslag
Fare: ARBEID IKKE på utstyr eller KABLER i TORDENVÆR.
7 Blokker ikke luftventilene.
8 Telefonlinje må ikke koples til signalkontakten.
9 Driftstemperatur: Dette produktet er konstruert for bruk i maksimum
romtemperatur på 40 grader celsius.
10 Alle Land: Produktet må installeres i samsvar med de lokale og nasjonale elektriske
koder.
62
Page 63

AT-MC601 and AT-MC602 Installation and User’s Guide
Padrões: Este produto atende aos seguintes padrões.
1 Emissão de interferência de
radiofrequência EN55022 Classe A, FCC Part 15 Classe A,
C-TICK
2 Imunidade EN55024
3 Segurança eléctrica EN60950, UL60950, FCC Part 68
Segurança
4 Use somente o adaptador fornecido para alimentação elétrica do hub.
Europe - EC
Use um adaptador de corrente alternada com saída DC de 12 Vdc, 500 mA em
conformidade com as especificações da TÜV.
5 Cuidado: O cabo de alimentação é utilizado como um dispositivo de desconexão.
Para deseletrificar o equipamento, desconecte o cabo de ALIMENTAÇÃO.
6 Perigo De Choque Causado Por Raio
Perigo: NÃO TRABALHE no equipamento ou nos CABOS durante períodos
suscetíveis a QUEDAS DE RAIO.
7 Não bloqueie as aberturas de ventilação.
8 Não conecte uma linha telefônica ao conector de sinal.
9 Temperatura De Funcionamento: Este produto foi projetado para uma
temperatura ambiente máxima de 40 graus centígrados.
10 Todos Os Países: Instale o produto de acordo com as normas nacionais e locais para
instalações elétricas.
63
Page 64

AT-MC601 and AT-MC602 Installation and User’s Guide
Estándares: Este producto cumple con los siguientes estándares.
1 Emisión RFI EN55022 Clase A, FCC Part 15 Clase A,
C-TICK
2 Inmunidad EN55024
3 Seguridad eléctrica EN60950, UL60950, FCC Part 68
Seguridad
4 La energía para el dispositivo central o “hub” debe provenir únicamente del
adaptador.
Europe - EC
Utilizar un adaptador de corriente alterna autorizado TÜV de 12 Vdc, 500 mA.
5 Atencion: El cable de alimentacion se usa como un dispositivo de desconexion. Para
desactivar el equipo, desconecte el cable de alimentación.
6 Peligro De Rayos
Peligro: NO REALICE NINGUN TIPO DE TRABAJO O CONEXION en los equipos
o en LOS CABLES durante TORMENTAS ELECTRICAS.
7 No bloquee las aberturas para ventilacion.
8 No conectar ninguna línea telefónica al conector de señales.
9 Temperatura Requerida Para La Operación: Este producto está diseñado para
una temperatura ambiental máxima de 40 grados C.
10 Para Todos Los Países: Monte el producto de acuerdo con los Códigos Eléctricos
locales y nacionales.
64
Page 65

AT-MC601 and AT-MC602 Installation and User’s Guide
Standarder: Denna produkt uppfyller följande standarder.
1 Radiostörning EN55022 Klass A, FCC Part 15 Klass A,
C-TICK
2 Immunitet EN55024
3 Elsäkerhet EN60950, UL60950, FCC Part 68
Säkerhet
4 Endast anslutningsenheten får vara kraftkälla till centralen.
Europe - EC
Använd en växelströmsanslutningsenhet licensierad av TÜV. Likström 12 Vdc, 500
mA.
5 Varning: Nätkabeln används som strömbrytare för att koppla från strömmen, dra
ur nätkabeln.
6 Fara För Blixtnedslag
Fara: ARBETA EJ på utrustningen eller kablarna vid ÅSKVÄDER.
7 Blockera inte luftventilerna.
8 Koppla inte telefonledning till signalkontakten.
9 Driftstemperatur: Denna produkt är konstruerad för rumstemperatur ej
överstigande 40 grader Celsius.
10 Alla Länder: Installera produkten i enlighet med lokala och statliga bestämmelser
för elektrisk utrustning.
65
 Loading...