


 Loading...
For firmware V1.6
Check www.allen-heath.com for the latest firmware available
Publication AP9372

Limited One Year Manufacturer’s Warranty
Allen & Heath warrants the Allen &Heath -branded hardware product and accessories contained in the original packaging ("Allen & Heath Product”) against defects in materials and workmanship when used in accordance with Allen & Heath's user manuals, technical specifications and other Allen & Heath product published guidelines for a period of ONE (1) YEAR from the date of original purchase by the end-user purchaser ("Warranty Period").
This warranty does not apply to any non-Allen & Heath branded hardware products or any software, even if packaged or sold with Allen & Heath hardware.
Please refer to the licensing agreement accompanying the software for details of your rights with respect to the use of software/firmware (“EULA”).
Details of the EULA, warranty policy and other useful information can be found on the Allen & Heath website: www.allen-heath.com/legal.
Repair or replacement under the terms of the warranty does not provide right to extension or renewal of the warranty period. Repair or direct replacement of the product under the terms of this warranty may be fulfilled with functionally equivalent service exchange units.
This warranty is not transferable. This warranty will be the purchaser’s sole and exclusive remedy and neither Allen & Heath nor its approved service centres shall be liable for any incidental or consequential damages or breach of any express or implied warranty of this product.
Conditions Of Warranty
The equipment has not been subject to misuse either intended or accidental, neglect, or alteration other than as described in the User Guide or Service Manual, or approved by Allen & Heath.
Any necessary adjustment, alteration or repair has been carried out by an authorised Allen & Heath distributor or agent.
The defective unit is to be returned carriage prepaid to the place of purchase, an authorised Allen & Heath distributor or agent with proof of purchase. Please discuss this with the distributor or the agent before shipping. If the unit is to be repaired in a different country to that of its purchase the repair may take longer than normal, whilst the warranty is confirmed and parts are sourced. Units returned should be packed in the original carton to avoid transit damage.
DISCLAIMER: Allen & Heath shall not be liable for the loss of any saved/stored data in products that are either repaired or replaced.
Check with your Allen & Heath distributor or agent for any additional warranty information which may apply. If further assistance is required please contact Allen & Heath Ltd.
Qu Series products comply with the European Electromagnetic Compatibility directive 2004/108/EC and the European Low Voltage directive 2006/95/EC.
Any changes or modifications to the product not approved by Allen & Heath could void the compliance of the product and therefore the users authority to operate it.
Qu Mixer User Guide AP9372 Issue 5
Copyright © 2014 Allen & Heath. All rights reserved
ALLEN&HEATH
Allen & Heath Limited, Kernick Industrial Estate, Penryn, Cornwall, TR10 9LU, UK http://www.allen-heath.com
Qu Mixer User Guide |
2 |
AP9372 iss.5 |
IMPORTANT - Read these instructions before starting:
Safety instructions
Before starting, read the Important Safety Instructions printed on the sheets supplied with the equipment. For your own safety and that of the operator, technical crew and performers, follow all instructions and heed all warnings printed on the sheet and on the equipment panels.
System operating firmware
The function of the Qu mixer is determined by the firmware (operating software) that runs it. Firmware is updated regularly as new features are added and improvements made. The firmware version current when this guide was released is noted in the Contents section.
The latest firmware can be downloaded from the Allen & Heath website, transferred to USB key and then loaded into the Qu mixer using the Firmware Update utility.
Check the Allen & Heath website for the latest version of Qu firmware.
Software licence agreement
By using this Allen & Heath product and the software within it you agree to be bound by the terms of the relevant End User Licence Agreement (EULA), a copy of which can be found on the Allen & Heath website ( www.allen-heath.com/legal ). You agree to be bound by the terms of the EULA by installing, copying, or using the software.
Further information
Please refer to the Allen & Heath website for further information, knowledgebase and technical support. You can join our Allen & Heath Digital Community to share knowledge and information with other Qu users.
General precautions
To prevent damage to the controls and cosmetics, avoid placing heavy objects on the control surface, obstructing movement of the motorised faders, scratching the surface or touch screen with sharp objects, or rough handling and vibration.
Protect the equipment from damage through liquid or dust contamination. Avoid dust or small objects getting into the fader slots. Cover the mixer when it is not being used for a long period.
Computer and touch screen technology can be affected by extreme cold. If the equipment has been stored in sub-zero temperatures allow time for it to reach normal operating temperature before use at the venue. Recommended operating temperature for Qu is 5 to 35 degrees Celsius.
Avoid using the equipment in extreme heat and direct sunlight. Make sure the mixer ventilation slots are not obstructed and that there is adequate air movement around the equipment.
Transport the Qu using a touring grade, purpose designed flightcase with adequate foam lining and internal support for protection.
Clean the control surface with a soft brush and dry lint-free cloth. Do not use chemicals, abrasives or solvents.
It is recommended that servicing is carried out only by an authorised Allen & Heath agent. Contact details for your local distributor can be found on the Allen & Heath website. Allen & Heath do not accept liability for damage caused by maintenance, repair or modification by unauthorised personnel.
Qu Mixer User Guide |
3 |
AP9372 iss.5 |
1. Packed contents
Qu Mixer
User Guide AP9372
|
Safety Sheets |
|
AP3345 – English |
Mains lead • Check this |
AP7287 – French |
AP8513 – Chinese |
|
is correct for your territory |
• Read this before starting |
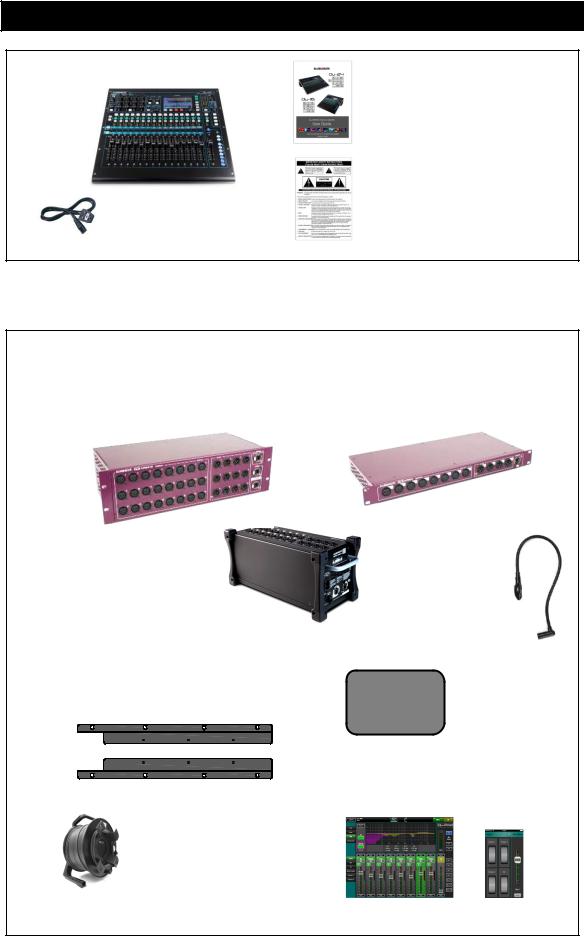
Options and Accessories available
Remote Audio Racks
Provides remote audio over dSNAKE Cat5 cable digital snake.
AR2412 24 Mic/Line in, 12 Line out |
AR84 8 Mic/Line in, 4 Line out |
Part: GLD-AR2412 |
Part: GLD-AR0804 |
AB168 16 Mic/Line in, 8 Line out Remote AudioRack.
Part: AB1608
19” Rack Ear Kit for Qu-16
To mount the Qu-16 in a standard 19” rack or flightcase. These fit over the plastic trims.
Part: QU-16-RK19
Cat5 cables
For use with dSNAKE remote audio
AH8822 2m (6.6’) short patch AH9651 20m (66’) coil AH9650 100m (330’) drum
LEDlamp
Right angled 4-pin XLR LED lamp with built-in dimmer
Part: LEDlampX
|
Soft cover |
Qu |
AP9262 Qu-16 |
|
AP9458 Qu-24 |
|
AP9639 Qu-32 |
Qu-Pad app for iPad Qu-You app for iOS devices
Available from the Apple Store
Full mix control |
Personal monitoring |
REGISTER YOUR PRODUCT online at: www.allen-heath.com/register
Qu Mixer User Guide |
4 |
AP9372 iss.5 |

2. Contents
1. |
Packed contents ................................................................................................................................. |
|
4 |
|
2. |
Contents.............................................................................................................................................. |
|
5 |
|
3. |
Introduction......................................................................................................................................... |
|
7 |
|
3.1 |
|
Overview and Features .............................................................................................................. |
|
7 |
3.2 |
|
System Architecture and Processing ........................................................................................ |
|
8 |
3.3 |
|
Differences between the Qu models ......................................................................................... |
|
9 |
4. |
Connection Overview........................................................................................................................ |
|
11 |
|
4.1 |
|
Local Input Connections.......................................................................................................... |
|
11 |
4.2 |
|
Local Output Connections....................................................................................................... |
|
12 |
4.3 |
|
Other Connections................................................................................................................... |
|
12 |
4.4 |
|
Powering up the mixer............................................................................................................. |
|
13 |
5. |
Connecting dSNAKE Remote Audio ................................................................................................ |
|
14 |
|
5.1 |
|
Connecting to a remote AudioRack ........................................................................................ |
|
14 |
5.2 |
|
Qu Systems.............................................................................................................................. |
|
16 |
5.3 |
|
The ME Personal Mixing System............................................................................................. |
|
18 |
6. |
Operational Overview ....................................................................................................................... |
|
19 |
|
6.1 |
|
Fader Strips.............................................................................................................................. |
|
19 |
6.2 |
|
Channel Naming ...................................................................................................................... |
|
21 |
6.3 |
|
Channel Processing................................................................................................................. |
|
22 |
6.4 |
|
Working with the Processing:.................................................................................................. |
|
22 |
6.5 |
|
Working with Processing Libraries: ......................................................................................... |
|
22 |
6.6 |
|
Processing Libraries ................................................................................................................ |
|
27 |
6.7 |
|
List of Factory Libraries............................................................................................................ |
|
28 |
6.8 |
|
Channel Routing ...................................................................................................................... |
|
29 |
6.9 |
|
Working with the Routing screens........................................................................................... |
|
29 |
6.10 |
Working with the Groups (not Qu-16) ..................................................................................... |
|
30 |
|
6.11 |
Working with the Matrix (not Qu-16)........................................................................................ |
|
31 |
|
6.12 |
Mute and DCA Groups ............................................................................................................ |
|
32 |
|
6.13 |
Using Mute Groups.................................................................................................................. |
|
33 |
|
6.14 |
Using DCA Groups .................................................................................................................. |
|
34 |
|
6.15 |
The Master Strip....................................................................................................................... |
|
35 |
|
6.16 |
Working with the sends on faders:.......................................................................................... |
|
36 |
|
7. |
Touch Screen Mixing Functions....................................................................................................... |
|
37 |
|
7.1 |
|
Copy, Paste, Reset keys.......................................................................................................... |
|
38 |
7.2 |
|
The Sel screens – Processing and Routing |
............................................................................39 |
|
7.3 |
|
Home Screen ........................................................................................................................... |
|
39 |
7.4 |
|
Home Screen – User................................................................................................................ |
|
40 |
7.5 |
|
Home Screen – Meters ............................................................................................................ |
|
41 |
7.6 |
|
Home Screen – RTA ................................................................................................................ |
|
41 |
7.7 |
|
Home Screen – Qu-Drive (USB audio).................................................................................... |
41 |
|
7.8 |
|
The FX ...................................................................................................................................... |
|
44 |
7.9 |
|
Working with FX – Adding vocal reverb: ................................................................................. |
46 |
|
7.10 |
Scene Memories ...................................................................................................................... |
|
47 |
|
8. |
Touch Screen Setup Functions........................................................................................................ |
|
50 |
|
8.1 |
|
Audio Setup -PAFL................................................................................................................... |
|
50 |
8.2 |
|
Audio Setup - Talkback ........................................................................................................... |
|
51 |
8.3 |
|
Audio Setup –Signal Generator............................................................................................... |
|
51 |
|
|
|
||
Qu Mixer User Guide |
5 |
AP9372 iss.5 |
||

|
8.4 |
Control Setup – Custom Layer ................................................................................................ |
52 |
|
8.5 |
Control Setup - SoftKeys ......................................................................................................... |
53 |
|
8.6 |
Control Setup - Network .......................................................................................................... |
54 |
|
8.7 |
Control Setup - MIDI ................................................................................................................ |
54 |
|
8.8 |
USB Data – Scene Transfer ..................................................................................................... |
55 |
|
8.9 |
USB Data – Library transfer ..................................................................................................... |
55 |
|
8.10 |
USB Data – Show transfer ....................................................................................................... |
56 |
|
8.11 |
Output Patch Setup – Surface ................................................................................................. |
57 |
|
8.12 |
Output Patch Setup – dSNAKE ............................................................................................... |
57 |
|
8.13 |
Output Patch Setup - Monitor.................................................................................................. |
58 |
|
8.14 |
Output Patch Setup – USB Audio............................................................................................ |
59 |
|
8.15 |
Utility - Calibration.................................................................................................................... |
60 |
|
8.16 |
Utility – Qu-Drive ...................................................................................................................... |
60 |
|
8.17 |
Utility – Firmware Update......................................................................................................... |
61 |
9. |
Working with Audio Streaming and a DAW...................................................................................... |
62 |
|
10. |
iOS Apps for Wireless Control.......................................................................................................... |
64 |
|
11. |
Resetting the Mixer ........................................................................................................................... |
67 |
|
|
11.1 |
Reset Mix Settings – A starting point for mixing...................................................................... |
67 |
|
11.2 |
System Hard Reset .................................................................................................................. |
68 |
12. |
Specifications.................................................................................................................................... |
69 |
|
|
12.1 |
Mechanical Details................................................................................................................... |
69 |
|
12.2 |
Qu-16 System Block Diagram ................................................................................................. |
70 |
|
12.3 |
Qu-24 and Qu-32 System Block Diagram............................................................................... |
71 |
|
12.4 |
System Specifications.............................................................................................................. |
72 |
About this guide
This is the User Guide for the Allen & Heath Qu-16, Qu-24 and Qu-32 digital mixers.
Please Note
This guide refers to Qu firmware V1.6. Please refer to the Allen & Heath website for the latest version of firmware and this user guide. For more details read the Release Notes available with the firmware.
For information on the AR2412, AR84 and AB168 remote AudioRacks please refer to their user guides.
Qu Mixer User Guide |
6 |
AP9372 iss.5 |

3. Introduction
3.1 Overview and Features
Building on the heritage of the GLD and flagship iLive digital consoles, the Qu presents exceptional performance together with an intuitive analogue style user interface with a motorised fader per channel, knobs and touch screen, total recall of all settings, full input, output and FX processing, USB streaming and hard drive multitrack recording, digital snake capability and remote wireless control using an iPad. There are three models in the Qu Digital Audio Mixer Series:
Qu-16 – Compact, rack mountable mixer with 16 mic and 3 stereo line input channels.
Qu-24 – Larger model with 24 mic and 3 stereo inputs. Adds stereo Groups, Matrix and more SoftKeys. Qu-24 – Largest model with 32 mic and 3 stereo inputs. Adds 2 more stereo Groups.
|
Qu-16 |
|
Qu-24 |
|
Qu-32 |
|
16 Mic/Line channels |
|
24 Mic/Line channels |
|
32 Mic/Line channels |
|
3 stereo Line channels |
|
3 stereo Line channels |
|
3 stereo Line channels |
|
24 sources to the mix |
|
32 sources to the mix |
|
40 sources to the mix |
|
12 mixes (4 mono, 3 stereo, LR) |
|
12 mixes (4m, 3st, LR) |
|
12 mixes (4m, 3st, LR) |
|
4 FX (2 send buses) |
|
4 FX (4 send buses) |
|
4 FX (4 send buses) |
|
4 SoftKeys |
|
10 SoftKeys |
|
10 SoftKeys |
|
24 out, 22 in USB streaming |
|
32 out, 30 in USB |
|
32 out, 32 in USB |
|
|
|
2 stereo Groups |
|
4 stereo Groups |
|
|
|
2 stereo Matrix |
|
2 stereo Matrix |
All models
Extra stereo outputs – AES digital, Alt Out, 2TRK out
Talkback mic input
dSNAKE Cat5 snake for remote audio using AR2412, AR84 or AB168
4 Mute Groups
4 DCA Groups
AnaLOGIQ™ total recall analogue preamps
Effects ported from the flagship iLive console
Dedicated stereo FX return channels
Master strip for quick access to mix levels and processing
Input channel linking for stereo sources
Input processing – Preamp, HPF, Gate, PEQ, Compressor, Delay
Output processing – PEQ, Graphic EQ, Compressor, Delay
800x480 pixel colour touch screen for quick control
Motorised faders for sends on faders, GEQ fader flip and mix recall
Quick copy and reset of processing, mixes and scenes
100 Scene memories
Channel Safes, Global and per Scene Recall Filters
FX, processing and channel User Libraries
Qu-Drive for stereo and 18-track recording/playback to USB hard drive
USB streaming to/from an Apple® Mac or Windows™ PC computer
MIDI DAW Control driver for Mac (converts to HUI or Mackie Control)
USB transfer of Scenes, Libraries, Shows
User assignable Custom Layer
Qu-Pad engineer’s mixing wireless remote app for iPad
Qu-You personal monitoring app for iPhone, iPad, iPod Touch
Compatible with the Allen & Heath ME personal mixing system
User Permissions to restrict operator access
Qu Mixer User Guide |
7 |
AP9372 iss.5 |
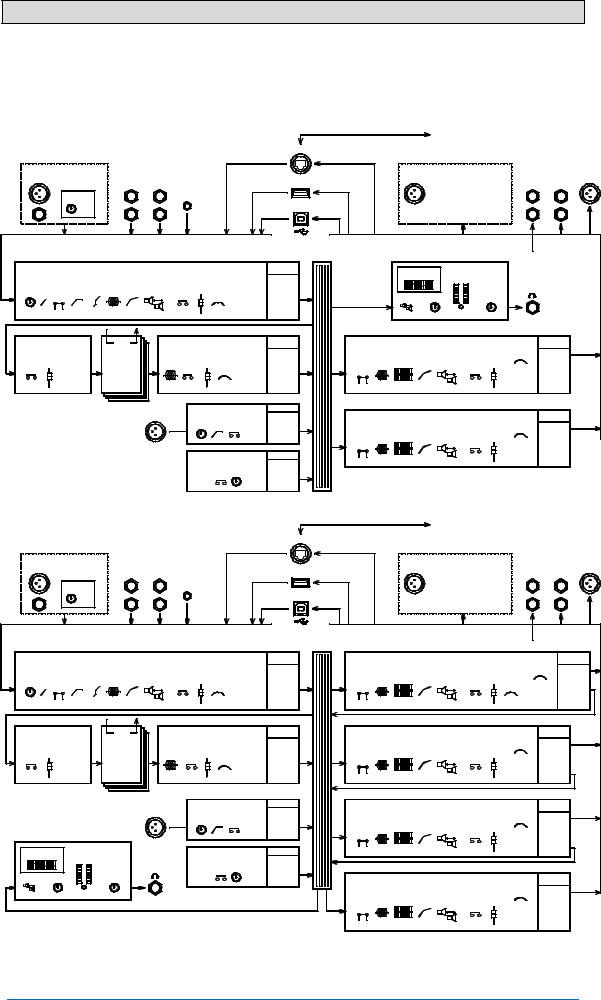
3.2 System Architecture and Processing
The following diagrams show the Qu-16, Qu-24 and Qu-32 I/O (inputs and outputs), audio architecture and processing available. The differences between the models and the routing capability of each processing section is illustrated. Refer also to the more detailed System Block Diagrams at the rear of this guide.
Qu-16 SIGNAL FLOW
Cat5 Digital Snake to AudioRack
dSNAKE
Mic/Line Inputs |
|
|
Line Inputs |
|
|
|
|
|
|
Qu-Drive |
|
|
|
|
|
Line Outputs |
|
|
AES Out |
|||||
|
1 ---------- 16 |
|
ST1 |
ST2 |
|
|
|
|
|
|
Playback |
Record |
|
|
|
Mix 1-----------10 |
2Trk |
|
Alt Out |
|||||
|
|
|
|
|
|
|
ST3 |
|
|
|
|
|
|
|
|
|
|
|
||||||
|
Mic |
PREAMP |
L/M |
|
L/M |
|
|
|
|
|
LR, 18 trk |
|
LR, 18 trk |
|
|
|
L |
|
L |
|||||
|
GAIN |
|
|
L/R |
|
|
|
|
|
|
USB B |
|
|
|
|
Main LR |
|
|
|
|
||||
|
Line |
|
|
|
|
|
|
|
|
|
|
|
|
|
|
|
|
|||||||
|
48V |
R |
|
R |
|
|
|
|
|
|
|
Stream |
|
Stream |
|
|
|
|
|
|
R |
|
R |
|
|
|
|
|
|
|
|
|
|
|
|
|
|
22 ch |
|
24 ch |
|
|
|
|
|
|
|
|
|
|
|
Local Inputs |
|
|
|
|
dSNAKE |
USB |
|
|
USB |
dSNAKE |
|
|
|
Local Outputs |
|
|
||||||
Channel SOURCE |
|
|
|
|
Inputs |
|
|
|
|
|
|
|
|
|
Mix |
|
|
|
|
|
|
LR post |
Output PATCH |
|
|
|
|
Input Channels 1-16, ST1-3 |
|
|
|
PAFL |
Route to: |
|
|
|
RTA |
PAFL MONITOR |
|
|
|
||||||||
|
|
|
|
|
|
|
|
|
|
|
|
|
|
|
|
|
|
|
|
|
|
|
||
TRIM POL |
Insert HPF GATE |
PEQ |
COMP |
DELAY |
MUTE FADER |
PAN |
|
ASSIGN |
LR |
|
|
|
|
|
|
|
|
|
|
|||||
|
MIX Sends |
|
|
|
|
PFL TRIM |
PHONES |
|
|
|
||||||||||||||
0 |
FX |
|
|
|
|
|
L |
R |
PRE/POST |
FX Sends |
PAFL |
|
|
DELAY |
|
|
|
|||||||
|
|
|
|
|
|
|
|
|
|
|
SENDS |
DIR OUT |
|
|
|
|
|
|
PAFL |
|
|
|
||
|
|
|
|
|
|
|
|
|
|
|
|
|
|
|
|
|
|
|
|
|
|
|
||
|
|
|
FX |
|
|
|
|
|
|
|
|
|
|
|
|
|
|
|
|
|
|
|
|
|
FX Send 1-2 |
Insert |
|
|
FX Return 1-4 |
|
PAFL |
Route to: |
|
Mono 1-4, Stereo 5-6, 7-8, 9-10 Mix |
PAFL |
Route to: |
|||||||||||||
|
|
|
|
|
|
|
|
|
|
|
|
|
|
|
|
|
|
|
|
|
Output BAL |
|
Outputs |
|
|
|
|
|
|
PEQ |
|
|
|
|
|
|
LR |
|
Insert |
PEQ |
GEQ |
COMP |
|
L |
R |
|
|
||
MUTE FADER |
ASSIGN |
FX 1-4 |
MUTE |
FADER PAN |
ASSIGN |
|
DELAY |
MUTE FADER |
|
|
|
|||||||||||||
MIX Sends |
|
|
|
|
||||||||||||||||||||
|
|
PRE/POST |
|
|
|
|
|
|
L |
R |
PRE/POST |
FX Sends |
|
FX |
|
|
|
|
|
|
|
|
||
|
|
SENDS |
|
|
|
|
|
|
SENDS |
|
|
|
|
|
|
|
|
|
|
|||||
|
|
|
|
Talkback |
|
|
|
TALKBACK |
Route to: |
|
|
|
|
|
Main LR |
|
|
|
|
|||||
|
|
|
|
|
|
|
|
|
|
|
|
|
|
|
PAFL |
Route to: |
||||||||
|
|
|
|
|
Mic |
|
|
GAIN |
HPF |
|
|
|
LR |
|
|
|
|
|
|
|||||
|
|
|
|
|
|
|
TALK |
ASSIGN |
|
|
|
|
|
|
Output BAL |
|
Outputs |
|||||||
|
|
|
|
|
|
|
|
|
MIX |
|
|
|
|
|
|
|
||||||||
|
|
|
|
|
|
|
|
|
|
|
|
|
|
|
|
Insert |
PEQ |
GEQ |
COMP |
DELAY |
L |
R |
|
|
|
|
|
|
|
|
|
|
|
|
|
|
|
|
|
|
MUTE FADER |
|
|
|
|||||
|
|
|
|
|
|
|
|
|
|
|
|
|
|
|
|
FX |
|
|
|
|
|
|
|
|
|
SIG GEN |
Route to: |
|
Sine |
|
||
|
LEV |
|
|
Pink |
MUTE |
LR |
|
White |
|
ASSIGN |
MIX |
Bandpass |
|
|
|
Qu-24(32) SIGNAL FLOW
Cat5 Digital Snake to AudioRack
dSNAKE
Mic/Line Inputs |
|
Line Inputs |
|
|
|
|
|
Qu-Drive |
|
|
|
|
|
Line Outputs |
|
|
|
|
AES Out |
|||||||
|
|
1 ------ 24(32) |
ST1 |
ST2 |
|
|
|
|
|
Playback |
Record |
|
|
|
Grp 1---4(8) |
|
2Trk |
Alt Out |
||||||||
|
|
|
|
|
|
|
|
ST3 |
|
|
|
|
|
|
|
Mix 1---------------10 |
|
|
|
|
|
|||||
|
|
Mic |
PREAMP |
L/M |
L/M |
|
|
|
|
LR, 18 trk |
|
LR, 18 trk |
|
|
|
L |
|
|
L |
|
||||||
|
|
|
GAIN |
|
L/R |
|
|
|
|
|
USB B |
|
|
|
|
Main LR |
|
|
|
|
|
|
||||
|
|
Line |
|
|
|
|
|
|
|
|
|
|
|
|
|
|
|
|
|
|||||||
|
|
|
48V |
R |
R |
|
|
|
|
|
|
Stream |
|
Stream |
|
|
|
MTX 1---4 |
|
R |
|
|
R |
|
||
|
|
|
|
|
|
|
|
|
|
|
|
|
30 ch |
|
32 ch |
|
|
|
|
|
|
|
|
|
|
|
|
|
|
|
Local Inputs |
|
|
dSNAKE |
USB |
|
|
USB |
dSNAKE |
|
|
|
Local Outputs |
|
|
|
|||||||
Channel SOURCE |
|
|
|
|
Inputs |
|
|
|
|
|
|
|
|
Mix |
|
|
|
|
Masters |
|
LR post |
Output PATCH |
||||
|
|
|
|
|
Input Channels 1-24, ST1-3 |
|
|
|
PAFL |
Route to: |
|
|
|
|
Group 1-2, 3-4, (5-6, 7-8) |
|
PAFL |
Route to: |
||||||||
|
|
|
|
|
|
|
|
|
|
|
|
|
GRP |
|
|
|
|
|
|
|
|
Output BAL |
Outputs |
|||
TRIM POL |
Insert |
HPF GATE |
PEQ COMP |
DELAY |
MUTE FADER PAN |
|
ASSIGN |
LR |
|
Insert |
PEQ |
GEQ |
COMP |
DELAY |
MUTE FADER |
|
L |
|
R |
LR |
||||||
|
MIX Sends |
|
PAN |
ASSIGN |
MIX Sends |
|||||||||||||||||||||
|
0 |
FX |
|
|
|
|
L |
|
R |
PRE/POST |
FX Sends |
|
FX |
|
|
|
|
L |
R |
PRE/POST |
FX Sends |
|||||
|
|
|
|
|
|
|
|
SENDS |
|
|
|
|
|
|
||||||||||||
|
|
|
|
|
|
|
|
|
|
|
DIR OUT |
|
|
|
|
|
|
|
|
SENDS |
MTX Sends |
|||||
|
|
|
|
|
|
|
|
|
|
|
|
|
|
|
|
|
|
|
|
|
||||||
|
|
|
|
|
FX |
|
|
|
|
|
|
|
|
|
|
|
|
|
|
|
|
|
|
|
|
|
FX Send 1-4 |
Insert |
|
|
FX Return 1-4 |
|
PAFL |
Route to: |
|
Mono 1-4, Stereo 5-6, 7-8, 9-10 Mix |
PAFL |
|
Route to: |
||||||||||||||
|
|
|
|
|
|
|
|
|
|
|
|
|
GRP |
|
|
|
|
|
|
|
Output BAL |
|
Outputs |
|||
|
FADER |
ASSIGN |
FX 1-4 |
PEQ |
MUTE FADER PAN |
|
ASSIGN |
LR |
|
Insert |
PEQ |
GEQ |
COMP |
DELAY |
MUTE FADER |
L |
R |
|
|
|
||||||
MUTE |
|
|
|
|
|
|
|
|||||||||||||||||||
|
MIX Sends |
|
ASSIGN |
|
|
|
||||||||||||||||||||
|
|
|
PRE/POST |
|
|
|
|
L |
R |
PRE/POST |
FX Sends |
|
FX |
|
|
|
|
|
PRE/POST |
|
|
|
||||
|
|
|
SENDS |
|
|
|
|
|
|
|
SENDS |
|
|
|
|
|
|
|
|
|
SENDS |
|
MTX Sends |
|||
|
|
|
|
|
|
|
|
|
|
|
|
|
|
|
|
|
|
|
|
|
|
|
||||
|
|
|
|
|
Talkback |
|
|
TALKBACK |
Route to: |
|
|
|
|
|
Main LR |
|
PAFL |
|
Route to: |
|||||||
|
|
|
|
|
|
|
GRP |
|
|
|
|
|
|
|
||||||||||||
|
|
|
|
|
|
Mic |
|
GAIN |
HPF |
TALK |
|
LR |
|
|
|
|
|
|
|
Output BAL |
|
Outputs |
||||
|
|
|
|
|
|
|
ASSIGN |
|
|
|
|
|
|
|
L |
R |
|
|||||||||
|
|
|
|
|
|
|
|
|
|
|
|
MIX |
|
Insert |
PEQ |
GEQ |
COMP |
DELAY |
MUTE FADER |
ASSIGN |
|
|
|
|||
|
|
|
|
|
|
|
|
|
|
|
|
|
MTX |
|
|
|
|
|||||||||
|
|
|
|
|
|
|
|
|
|
|
|
|
|
|
|
FX |
|
|
|
|
|
PRE/POST |
|
|
|
|
|
|
|
|
|
|
|
|
|
|
|
|
|
|
|
|
|
|
|
|
|
|
|
|
|
||
RTA |
|
PAFL MONITOR |
|
|
|
SIG GEN |
Route to: |
|
|
|
|
|
|
|
SENDS |
|
MTX Sends |
|||||||||
|
|
|
|
|
|
|
|
|
|
|
|
|
|
|
|
|||||||||||
|
|
|
|
|
Sine |
GRP |
|
|
|
|
|
|
|
|
|
|
|
|
||||||||
|
|
|
|
|
|
|
|
MUTE LEV |
|
|
|
|
|
|
|
|
|
|
|
|
|
|||||
|
|
|
|
|
|
|
|
Pink |
ASSIGN |
LR |
|
|
|
|
|
|
|
|
|
|
|
|
||||
DELAY |
PFL TRIM |
PHONES |
|
|
White |
|
|
|
MIX |
|
|
|
|
Matrix 1-2, 3-4 |
|
|
|
Route to: |
||||||||
|
|
Bandpass |
|
|
|
|
MTX |
|
|
|
|
PAFL |
|
|||||||||||||
|
|
|
|
PAFL |
|
|
|
|
|
|
|
|
|
|
|
|
|
|
|
|
|
Output BAL |
|
Outputs |
||
|
|
|
|
|
|
|
|
|
|
|
|
|
|
|
|
|
|
|
|
|
|
|
||||
|
|
|
|
|
|
|
|
|
|
|
|
|
|
|
|
Insert |
PEQ |
GEQ |
COMP |
DELAY |
MUTE FADER |
L |
R |
|
|
|
|
|
|
|
|
|
|
|
|
|
|
|
|
|
PAFL |
|
ASSIGN |
|
|
|
|||||||
|
|
|
|
|
|
|
|
|
|
|
|
|
|
|
|
FX |
|
|
|
|
|
PRE/POST |
|
|
|
|
|
|
|
|
|
|
|
|
|
|
|
|
|
|
|
|
|
|
|
|
|
|
|
|
|
||
|
|
|
|
|
|
|
|
|
|
|
|
|
|
|
|
|
|
|
|
|
|
SENDS |
|
|
|
|
Qu Mixer User Guide |
|
|
|
|
|
|
|
|
8 |
|
|
|
|
|
|
|
AP9372 iss.5 |
|||||||||

3.3 Differences between the Qu models
All three models operate in the same way and have a similar touch screen menu structure. The larger models add Groups and Matrix. Other differences are shown here:
4 SoftKeys |
Shelf for iPad |
2 Group masters |
2 Matrix masters 10 SoftKeys |
|||||||||
|
|
|
|
|
|
|
|
|
|
|
|
|
|
|
|
|
|
|
|
|
|
|
|
|
|
|
|
|
|
|
|
|
|
|
|
|
|
|
|
|
|
|
|
|
|
|
|
|
|
|
|
|
|
|
|
|
|
|
|
|
|
|
|
|
16 fader strips |
24 fader strips |
Extra FX Send and Group Mix selects |
||
|
LED colour strips to identify layer |
|
||
4 Group masters |
Larger Touch Screen |
2 Matrix masters |
4 DCA Group masters |
|
32 fader strips |
Extra 2 Group Mix selects |
Qu Mixer User Guide |
9 |
AP9372 iss.5 |
16 Mic/Line in |
24 Mic/Line in |
|
|||
|
|
|
|
|
|
|
|
|
|
|
|
|
|
|
|
|
|
24 out, 22 in USB audio streaming |
32 out, 30 in USB audio streaming |
4 Group out Matrix out |
32 Mic/Line in
32 out, 32 in USB audio streaming |
8 Group out |
Matrix out |
Scene, Library and Show memories - Qu-16, Qu-24 and Qu-32 memories are compatible. Files created on one model can be transferred via USB key and loaded on the other. The extra features of the bigger models will be ignored when their file is loaded on a Qu-16. The extra features of the bigger models will be reset to factory default when a Qu-16 file is loaded.
Note To be compatible, ensure all your Qu mixers are loaded with the same version of firmware later. Check the Allen & Heath web site for the latest firmware available.
USB Audio - A USB hard drive formatted on one model can be used on the other. Stereo and multitrack Qu-Drive recordings are compatible. USB B audio streaming is compatible, but note that the Qu-16 is 24 out / 22 in, the Qu-24 is 32 out / 30 in, and the Qu-32 is 32 out / 32 in.
Firmware - Different firmware is needed for each model. Choose either the Qu-16, Qu-24 or Qu-32 file when downloading firmware from the Allen & Heath web site. The firmware version number will be the same for each update that is made available. The procedure for updating firmware is the same for all models.
Qu-Pad and Qu-You apps - These iOS apps are compatible with all Qu mixers. They identify the model and load the appropriate controls when you log in.
Qu Mixer User Guide |
10 |
AP9372 iss.5 |
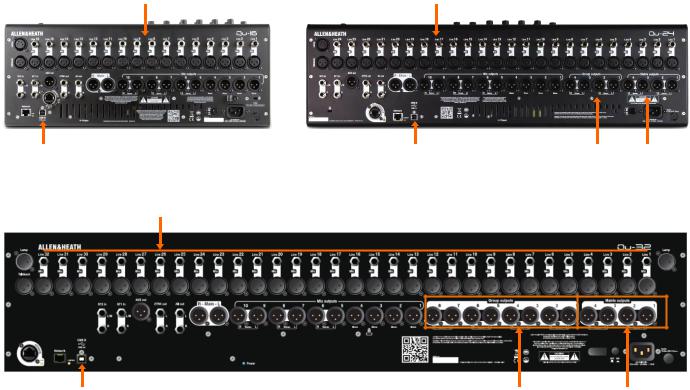
4. Connection Overview
The following connections are available on the rear panel of the Qu mixer. The Qu-16 is shown here.
AES digital out Alt out |
|
|
||
Lamp |
2Trk out |
LR main out |
Analogue Mix outputs |
Mic and Line inputs |
Talkback
Mic in
ST1 and ST2 |
|
Kensington |
stereo line in |
|
Lock |
|
|
Cable |
|
|
clamp |
dSNAKE remote audio |
|
|
Network |
Power On/Off |
Mains fuse |
|
||
USB B streaming |
Mains power input |
|
4.1 Local Input Connections
Mono Line Input – Balanced ¼” TRS (Tip, Ring, Sleeve) jack input for plugging in line level signals such as multitrack players and radio mic receivers. To work with unbalanced sources use a mono jack or link ring to sleeve within the TRS stereo jack.
Use DI boxes plugged into the Mic input for high impedance, low level sources such as acoustic instrument pickups.
Microphone Input – Balanced XLR input for plugging
in a low level source such as a microphone or DI box. 48V Pin2 = hot can be switched to the socket for condenser mics and active
DI boxes that require phantom power.
Note - To avoid loud thumps, mute the channel before plugging in cables or equipment while 48V is turned on.
Stereo Line Input – ST1 and ST2 balanced ¼” TRS (Tip, Ring, Sleeve) jack inputs for plugging in line level stereo sources such as CD players. The L input normals (switches) through the R input so that you can work with a mono source by plugging into just the L/M input.
To work with RCA phono connections use jack to RCA converter plugs.
Talkback Input – Dedicated balanced XLR input for plugging in a microphone to route to the mixes for the engineer to talk to the performers on stage. Phantom power can be switched to the socket for condenser microphones.
Qu Mixer User Guide |
11 |
AP9372 iss.5 |
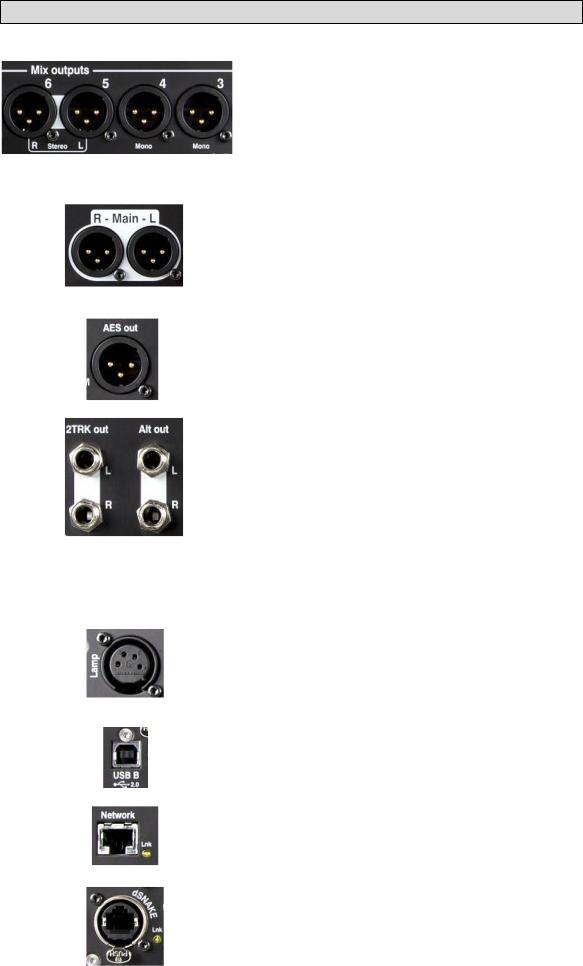
4.2 Local Output Connections
|
Group, Mix, Matrix outputs – Balanced XLR line |
|
|
level outputs for the mono and stereo mixes, for example to |
|
|
feed monitor amplifiers, external processing devices, delay |
|
|
fill speaker systems and recording devices. These use low |
|
|
impedance, high quality differential driver circuits for |
|
|
connection to +4 or 0dBu equipment. Maximum output is |
|
|
+22dBu. |
|
Pin2 = hot |
Professional equipment provides ‘balanced’ connections for |
|
maximum interference rejection over long cable runs. If you |
||
|
||
|
are connecting to ‘unbalanced’ equipment then make sure |
|
|
the XLR pin 3 (signal cold) is linked to pin 1 (signal ground). |
|
|
Main LR output – Balanced XLR line level outputs for |
|
|
the main Left and Right stereo mix. These typically plug into |
|
|
the FOH speaker processor, amplifier or powered speakers. |
|
|
AES out – 2-channel digital output using a single XLR |
|
|
connection and standard mic (2-core screened) audio cable. |
|
|
It follows the AES (Audio Engineering Society) digital audio |
|
|
standard and can connect to any equipment fitted with an |
|
|
AES input socket. The source to this output is patched using |
|
|
the Setup / Output Patch / Surface screen. Applications |
|
|
include the feed to a PA speaker processor, amplifier, stereo |
|
|
broadcast or recording device equipped with AES input. |
|
|
Alt out – Stereo ‘alternative’ output on balanced TRS |
|
|
jacks for connection to +4 or 0dBu equipment such as zone |
|
|
feeds, fill speakers, broadcast or local monitor. The source |
|
|
to this output is patched using the Setup / Output Patch / |
|
|
Surface screen. |
|
|
2TRK out – Stereo output on balanced TRS jacks for |
|
|
connection to +4 or 0dBu equipment such as stereo |
|
|
recorders. It follows the post master fader main LR mix. |
|
|
|
|
4.3 Other Connections |
|
|
|
Lamp – Plug in a 4-pin gooseneck lamp to illuminate the |
|
|
mixer surface. You can use any industry standard 12V, 5W |
|
|
or lower power lamp. We recommend the Allen & Heath |
|
|
LEDLamp with built-in thumbwheel dimmer. |
|
|
USB B – Type B USB connection for multi-channel |
|
|
bi-directional audio streaming between the mixer and a |
|
|
computer. Follows the high speed USB 2.0 standard. |
|
|
Refer to the Allen & Heath web site for information on |
|
|
Windows® and Apple® Mac drivers available for Qu. |
|
|
Network – Fast Ethernet (100 Mbit/s) port for Cat5 cable |
|
|
connection to a computer for MIDI over TCP/IP control of |
|
|
mixer parameters, or to a wireless router (access point) for |
|
|
live mixing control using the Allen & Heath Qu-Pad app |
|
|
running on an iPad. The Lnk indicator flashes to indicate |
|
|
network activity. |
|
|
dSNAKE – The proprietary Allen & Heath ‘digital snake’ |
|
|
connection for remote audio using an AR2412, AR84 or |
|
|
AB168 AudioRacks, and for personal monitoring using the |
|
|
ME Personal Mixing System. |
Qu Mixer User Guide |
12 |
AP9372 iss.5 |
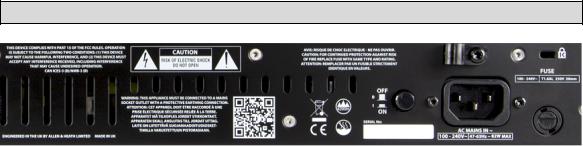
4.4 Powering up the mixer
The Qu mixer has an internal universal voltage power supply unit. This means you can use your mixer in most parts of the world without the need to modify the unit as long the local mains supply is within the range:
Mains Voltage = |
100 to 240 V.AC |
Mains Frequency = |
47 to 63Hz |
Important - Before starting, read the Safety Instructions Sheet packed with the mixer. These can also be downloaded from the Allen & Heath website.
Also read the safety notes printed on the rear of the mixer.
AC MAINS IN – Standard IEC socket for connecting the mixer to the local mains supply. Plug in a mains lead with moulded plug suitable for your territory. A suitable mains lead is shipped with the mixer.
Note – Do not replace the mains plug or modify the lead in any way. For your own safety and that of the operator and performers do not remove or defeat the ground connection.
A cable clamp is provided. You can slot the cable into this or lock it in place. To lock the cable use a star head Torx T20 screwdriver to refit the clamp around the cable.
Fuse – Mains input fuse to protect the mixer circuits in the unlikely event of a failure or excessive power surge. If you need to replace the fuse always use one of the same type and rating as printed on the rear panel. If the replacement fuse blows then refer to your authorised Allen & Heath service agent for advice.
Power ON/OFF switch – Press to switch the mixer on. Press again to switch it off.
Switching the mixer on – Press the ON/OFF switch. The rear panel blue Power indicator lights. The mixer takes just a few seconds to boot up. It restores its previous settings. LR mix is selected and its processing shown on the screen.
Note – To avoid loud thumps, do not switch the mixer on or off while the PA speakers are powered. Always switch the amplifiers on last, and switch them off first.
Switching the mixer off – First select the Home
screen. Touch Shut Down to safely complete processes such as parameter storing and USB data transfer or recording. Once complete, press the ON/OFF switch to turn the mixer off.
Qu Mixer User Guide |
13 |
AP9372 iss.5 |
5. Connecting dSNAKE Remote Audio
The Qu mixer provides local sockets on its rear panel for all audio inputs and outputs. It can also work with remote audio by connecting over a single cable ‘digital snake’ to an Allen & Heath AudioRack, or to the Allen & Heath ME Personal Mixing System.
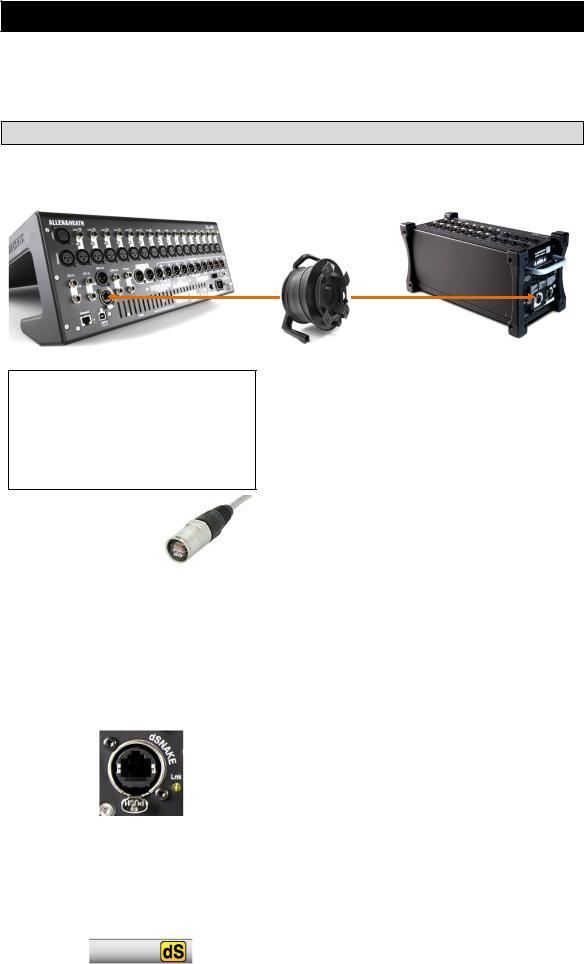
5.1 Connecting to a remote AudioRack
The Qu can connect to an Allen & Heath AudioRack so that the audio can be plugged into a rack on stage and routed to the mixer over a single Cat5 cable ‘digital snake’ plugged into its dSNAKE port.
dSNAKE carries:
Up to 38 remote input signals
Up to 16 remote output signals
40 personal mixing sends
Preamp control – Gain, Pad, 48V
The Qu mixer provides a locking Neutrik EtherCon socket to protect the connections and ensure suitability for touring. Use a touring grade cable fitted with locking EtherCon plugs.
Maximum cable length = 120m (396’) depending on cable type. Recommended maximum length = 100m (330’).
The ‘digital snake’ – dSNAKE provides a convenient, single Cat5 cable alternative to the typical heavy analogue copper multicore to connect many inputs and outputs on stage. One cable carries multiple channels of audio in both directions together with remote control of the preamps.
Cat5 cable – Use STP (shielded twisted pair) Cat5e or higher cables. Those with both foil and braided screens provide shielding from interference and are generally more rugged. Stranded core cables are less prone to damage when kinked or repeatedly coiled.
Remote Inputs - dSNAKE inputs are mapped one-to- one to the Qu input channels. They are not patchable.
Note - dSNAKE does not add channels to the mixer. Choose either Local (rear panel) or dSNK (remote) input for each channel.
Remote Outputs - Qu outputs can be patched to the output sockets on the remote racks. These duplicate the outputs on the Qu rear panel.
Connecting Qu to the AudioRack – Plug one end of
your Cat5 ‘digital snake’ into the Qu mixer dSNAKE port. Plug the other end into the dSNAKE port of the AudioRack.
Connecting a second AudioRack – The AR2412 and
AB168 AudioRacks include an EXPANDER port. You can use this to connect to an AR84 or AB168 AudioRack.
Note – The AR2412 AudioRack cannot be used as an expander in a Qu system.
Note – You can connect up to two AudioRacks in a Qu system. This includes the main rack and one expander rack.
Once connected and powered up, the Qu touch screen should display the ‘dS’ icon in its toolbar to show that one or more dSNAKE devices are recognised by the system.
Qu Mixer User Guide |
14 |
AP9372 iss.5 |
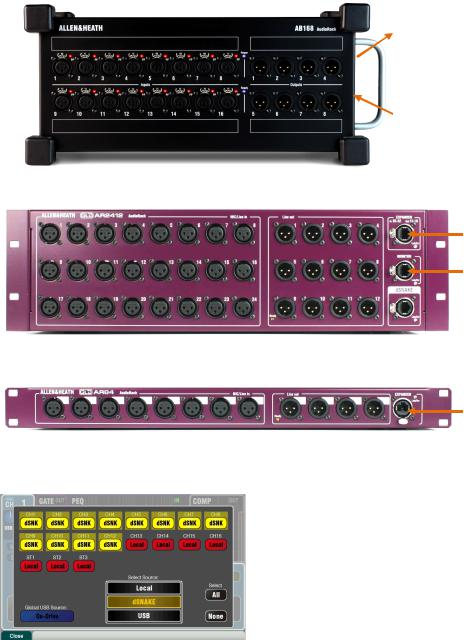
Available AudioRacks:
AB168 16 Mic/Line in, 8 Line out - Floor, shelf or rack mount
The AB168 AudioRack can be used as a stage box on the floor or a surface, or mounted in a 19” rack using the optional rack ears.
EXPANDER – To connect to a second AB168 to add more input and output sockets. Also compatible with the Allen & Heath ME personal mixing system.
dSNAKE – To connect to the Qu mixer using a Cat5 digital snake.
AR2412 24 Mic/Line in, 12 Line out - Rack mount
EXPANDER – To connect to an AR84 or AB168 to add more
input and output sockets.
MONITOR – To connect to the Allen & Heath ME personal
mixing system.
 dSNAKE – To connect to the Qu mixer using a Cat5 digital snake.
AR84 8 Mic/Line in, 4 Line out - Rack mount
EXPANDER – To connect to the Expander port of the AR2412, or connect directly to the Qu mixer via its dSNAKE port.
Inputs – Use the Preamp screen Fn key Source page to choose either ‘Local’ or ‘dSNK’ (remote) for each channel source. AudioRack Input sockets are not patchable. They are mapped one-to-one to each Qu channel.
Note – Adding an AudioRack does not expand the number of Qu channels available.
Outputs – The Qu mixer outputs will appear simultaneously at its rear panel sockets and also at the sockets on the remote rack. AudioRack output sockets are patchable. Qu outputs can be patched to the rack sockets using the Setup / Output Patch / dSNAKE screen.
Qu Mixer User Guide |
15 |
AP9372 iss.5 |
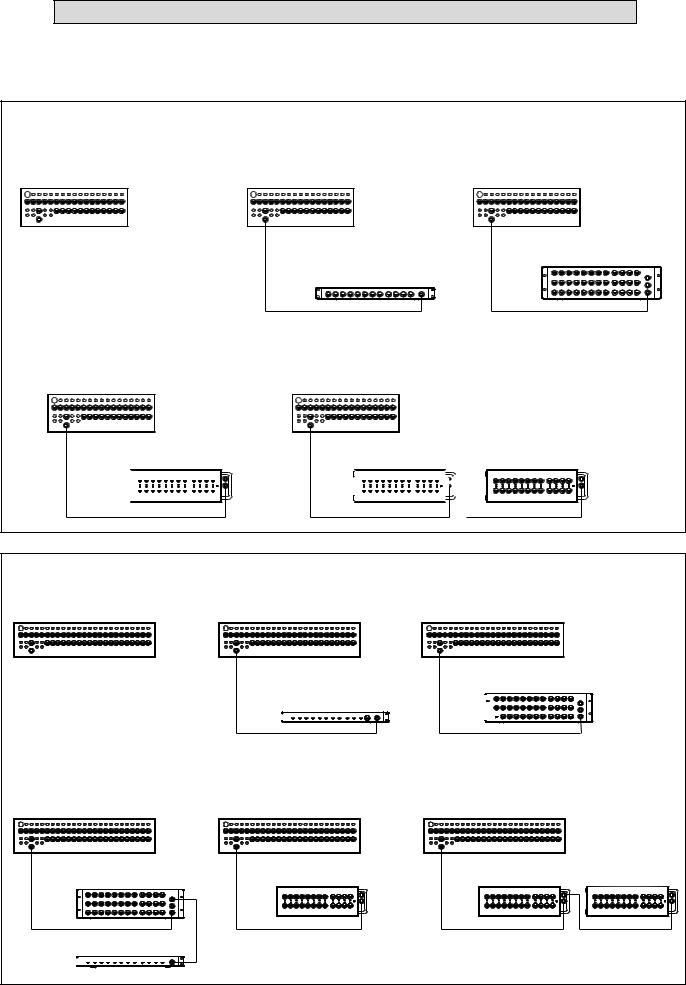
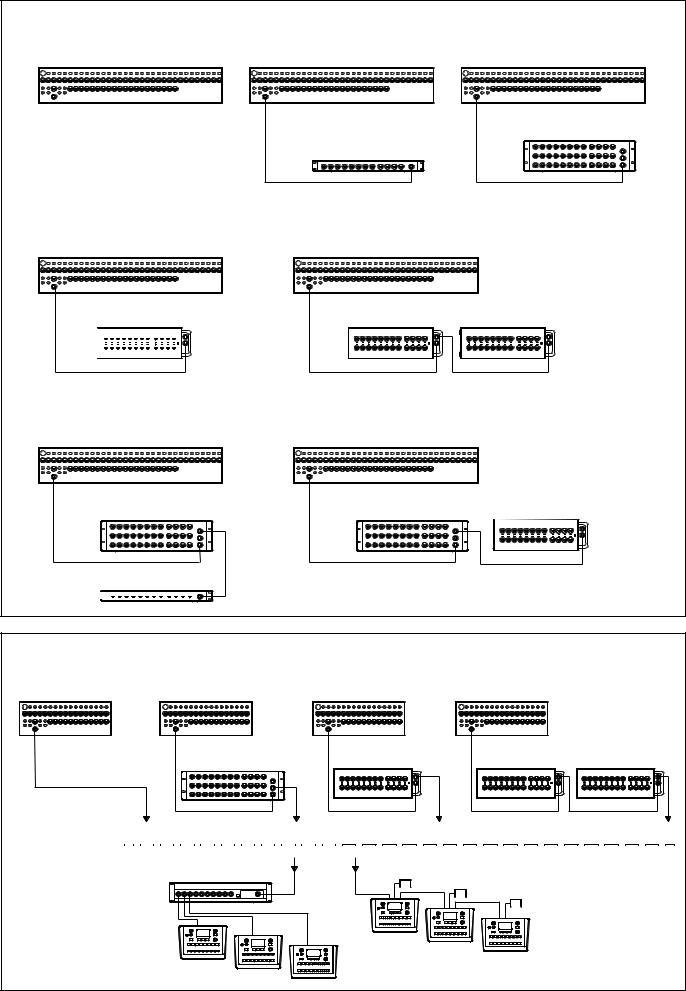
5.2 Qu Systems
The Qu mixer has sockets for all its inputs and outputs on its rear panel and can therefore be used without any additional rack. However, if you wish to use a digital snake to connect remote stage audio to the mixer using a single Cat5 cable then there are several rack options available. The following diagrams show suggested combinations:
Qu-16 – All inputs and outputs are available locally. Use on stage or with an analogue snake.
Qu-16
Qu-16+AR84 – 8 remote inputs. Provides 4 outputs, ideal for feeding a stereo PA and two
monitors.
Qu-16
Qu-16+AR2412 – Access all inputs and outputs near the stage. ST1-3 provide stereo mic
inputs.
Qu-16
Qu-16+AB168 – Provides a rugged digital snake and stage box for all 16 mic inputs and up to 8 returns.
Qu-16
dSNAKE
CH1-16 Out1-8
AB168 


dSNAKE |
dSNAKE |
1-16 = CH1-16 |
|
|
|
17-22 |
= ST1-3 |
|
|
23-24 |
= unused Out1-12 |
CH1-8 |
Out1-4 |
|
|
AR84 |
AR2412 |
|
|
|
Qu-16+2x AB168 – A second |
|
Qu-16 |
stage box expands the first to |
|
|
access ST1-3 on its first 6 inputs |
|
|
and provides more outputs. |
|
|
Inputs 7-16 are not used. |
|
dSNAKE |
|
1-6 = ST1-3 |
|
|
|
CH1-16 |
Out1-8 |
7-16 = unused Out9-16 |
AB168 


EXPANDER
Qu-24 – All inputs and outputs are available locally.
Qu-24
Qu-24+AR84 – 8 remote inputs. Provides 4 outputs
Qu-24
Qu-24+AR2412 – Access all 24 mic inputs near the stage.
Qu-24
Qu-24+AR2412+AR84 – Adds the ST1-3 stereo mic inputs near the stage.
Qu-24
dSNAKE
CH1-8 Out1-4
AR84 


Qu-24+AB168 – Digital snake for 16 mic inputs on stage.
Qu-24
dSNAKE |
|
|
dSNAKE |
CH1-24 |
Out1-12 |
|
CH1-16 Out1-8 |
EXPANDER |
|
||
|
|
AB168 |
|
AR2412 |
|
|
|
|
|
|
1-6 = ST1-3
7-8 = unused Out13-16
AR84 


dSNAKE
CH1-24 Out1-12
AR2412 


Qu-24+2x AB168 – Expands with a second stage box to access all inputs.
Qu-24
dSNAKE |
1-8 = CH17-24 |
|
9-14 = ST1-3 |
CH1-16 Out1-8 |
15-16 = unused Out9-16 |
AB168 |
|
|
EXPANDER |
Qu Mixer User Guide |
16 |
AP9372 iss.5 |
Qu-32 – All inputs and outputs are available locally.
Qu-32
Qu-32+AR84 – 8 remote inputs. Provides 4 outputs
Qu-32
Qu-32+AR2412 – Access to 24 mic inputs near the stage.
Qu-32
|
dSNAKE |
dSNAKE |
|
|
CH1-24 Out1-12 |
|
|
CH1-8 Out1-4 |
|
AR84 |
AR2412 |
Qu-32+AB168 – Digital snake |
Qu-32+2x AB168 – Add a |
|
for 16 mics on stage. |
second AB168 for 32 mics on |
|
Qu-32 |
stage. |
Qu-32 |
dSNAKE
CH1-16 Out1-8
AB168 


dSNAKE |
|
|
CH1-16 Out1-8 |
CH17-32 |
Out9-16 |
AB168 |
|
|
|
EXPANDER |
|
Qu-32+AR2412+AR84 –
Provides all 32 mic inputs near the stage.
Qu-32+AR2412+AB168 –
Access to all inputs including stereos.
dSNAKE |
|
dSNAKE |
|
1-8 = CH25-32 |
|
|
|
|
9-14 = ST1-3 |
CH1-24 |
Out1-12 |
CH1-24 |
Out1-12 |
15-16 = unused Out9-16 |
|
EXPANDER |
AR2412 |
AR2412 |
|
EXPANDER |
CH25-32 Out13-16
AR84 


ME Personal Mixing System – The Qu system can interface directly or via the ME-U hub to ME-1 personal mixers using any available dSNAKE, EXPANDER or MONITOR port.
Qu Mixer |
Qu Mixer |
Qu Mixer |
Qu Mixer |
dSNAKE |
dSNAKE |
AR2412
MONITOR |
dSNAKE |
AB168 |
EXPANDER |
dSNAKE |
|
|
AB168 |
EXPANDER |
EXPANDER |
ME System |
|
|
|
|
|
|
|
|
|
ME System |
||||||||||
|
|
|
|
|
|
|
|
|
|
|
|
|
|
|
|
|
|
|
|
|
Parallel connection
Use the ME-U hub or a standard PoE hub to power and connect to several ME-1 mixers using individual Cat5 cables.
ME-U hub |
ME-D |
|
PoE |
|
ME-1 |
ME System ME System
Daisy chain connection
ME-1 |
PSU |
|
Connect to Link In of the |
|
PSU |
|
|
|
|
|
|
|
|
PSU |
first ME-1 mixer. Connect |
|
|
|
|
|
|
|
its Link Out to daisy chain |
|
|
|
to the next. Use the power |
|
|
|
units provided with each |
|
|
|
ME-1 mixer. |
Qu Mixer User Guide |
17 |
AP9372 iss.5 |
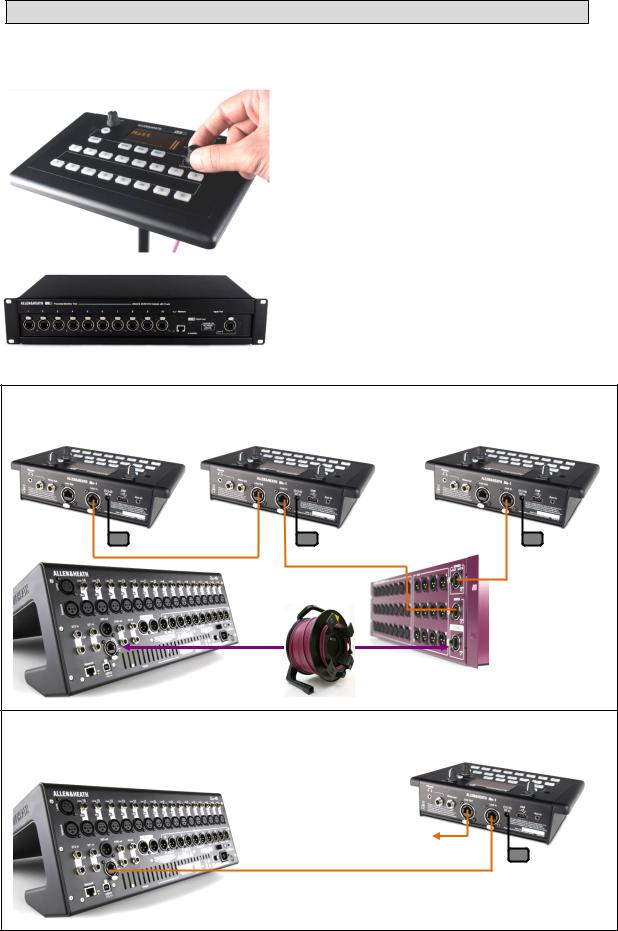
5.3 The ME Personal Mixing System
The Allen & Heath ME Personal Mixing System can be used with the Qu mixer. This provides customisable personal monitor control for individual musicians and performers on stage.
ME-1 personal mixer – A compact personal mixer able to work with up to 40 channels. Features built-in headphones and monitor output. Intuitive and easy to operate, its 16 select keys can be configured to provide as much or as little control as the musician needs.
The 40 ME channels are mapped from the Qu input channel direct outputs, FX and mixes to dSNAKE. Qu sends audio and stereo status information. Channels can be chosen and grouped to ME-1 keys using the setup function available on the ME-1 mixer.
Multiple ME-1 mixers can be connected in series (daisy chained) by linking the output of one to the input of the next. Alternatively, they can be connected in parallel and powered over their Cat5 cables using a standard PoE Ethernet switch or the Allen & Heath ME-U hub. The ME connects directly to a dSNAKE compatible port using a Cat5 cable.
Connecting ME to the AR2412 AudioRack - ME-1 mixers, a standard Ethernet switch or the ME-U hub can be plugged into either or both the AR2412 MONITOR and EXPANDER ports.
Daisy chain |
Power unit |
|
MONITOR port |
||
|
||
|
EXPANDER port |
dSNAKE
Connecting ME to the Qu mixer - ME-1 mixers, a standard Ethernet switch or the ME-U hub can be plugged directly into the Qu dSNAKE port if you are not using this to connect to an AudioRack. Power can be provided over the Cat5 by the ME-U or a PoE switch.
Daisy chain other ME-1
dSNAKE
Find out more about the ME Personal Mixing System at www.allen-heath.com
Qu Mixer User Guide |
18 |
AP9372 iss.5 |
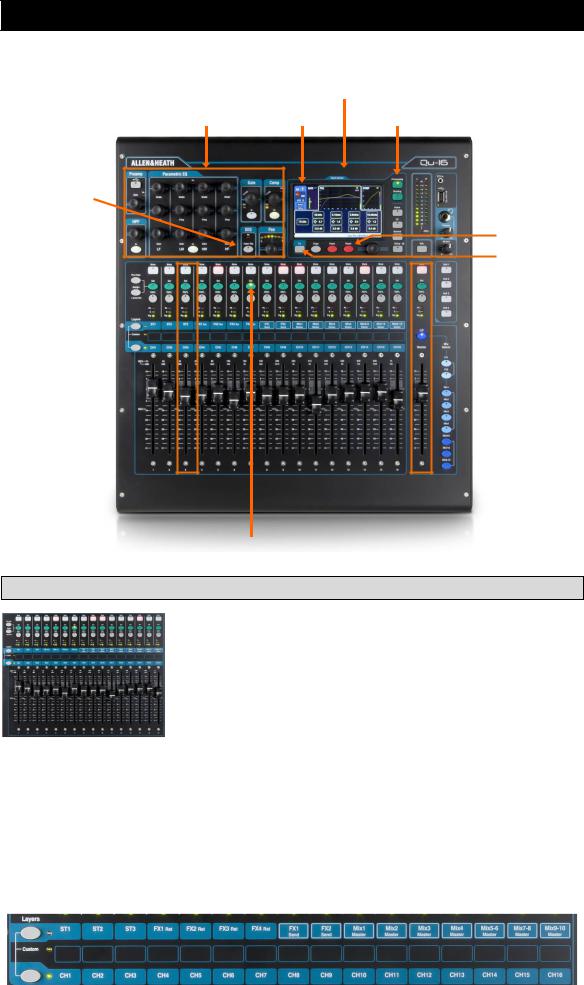
6. Operational Overview
This section provides an overview of the Qu layout and operation to help you get started quickly. The Qu16 mixer is shown here.
Touch Screen
SuperStrip TouchChannel |
Screen select |
Fader Flip
Mix assign 
Layer select 
Fader Strips 
 Qu-Drive
 Engineer’s monitor
Copy/Paste/reset Function key ( Fn )
 SoftKeys
 Master Strip
 Mix select Mix keys
Channel select Sel key
6.1 Fader Strips
The Qu mixer has a group of fader strips, one per channel. These provide access to the input and master channel levels and processing.
The main channel levels, master levels and all sends to the FX and mixes can be easily viewed and adjusted using the faders. The faders can also be used to adjust the Graphic EQ while in Fader Flip mode.
The faders are motorised and instantly move to show the current settings when the layer or function is changed.
Layers – There are three Layers. These provide access to inputs and masters as identified by the labels alongside the layer select keys. Indicators next to the keys show which layer is active.
Press the lower key to access the mono channels.
Press the upper key to access the 3 stereo channels, FX returns, FX sends and Mix masters. Press both keys together to access the user assignable Custom layer.
Note – There is an option in the Setup / Control / Custom Layer screen to enable ‘Custom Layer only’. This lets you choose which channels the user should have access to.
Qu Mixer User Guide |
19 |
AP9372 iss.5 |

Mute key – Press to turn off the channel audio signal. This affects the send to all mixes including LR, groups, effects and stage monitors. The key lights red when muted. It flashes when muted by a Mute or DCA Group master.
Sel key (select) – Press to access the Channel Processing. Parameters can be adjusted using the SuperStrip controls. The touch screen will display the settings and provide additional controls if either the Processing or Routing screen is active. The Sel key is also used for:
Assign mix routing – Hold down the ‘Assign’ key and press Sel keys to assign channels to the mix currently selected in the Master Strip. The Sel keys light green to show channels assigned to the selected mix.
Assign Pre/Post fade sends – Hold down the ‘Pre Fade’ key and press Sel keys to toggle channel sends pre or post fader for the mix currently selected in the Master Strip. The Sel keys light green to show channels set pre-fade.
Copy channel processing – Hold down the Copy key and press a channel Sel key to copy its processing settings. Then hold down the Paste key and press one or more Sel keys to instantly paste those settings to other channels.
Reset channel processing – Hold down the Reset key and press a channel Sel key to instantly reset all its processing to factory default.
Reset Graphic EQ band – Press Sel to reset the associated GEQ frequency band to 0dB while in GEQ Flip mode.
PAFL key – Press to listen to a channel using headphones and check its level on the main meters. The meter PAFL indicator lights. Press PAFL again to turn it off. A SoftKey can be assigned to clear all active PAFL selections. Options are available in the Setup / Audio / PAFL screen to choose how you want PAFL to work:
Additive mode – Pressing a PAFL key automatically cancels any previous selection. Turn Additive on to PAFL more than one channel at a time.
Sel follow PAFL – Link the Sel switch so that pressing PAFL automatically selects the processing for that channel.
LR to PAFL – Routes the main LR mix to the monitor when there is no PAFL selected.
Output AFL – This option sets the mix strip PAFL keys to monitor AFL (afterfade listen). With this option turned off these keys monitor PFL (pre-fade listen). The default is AFL so that you can check mixes after the master fader.
Input AFL – This option sets the input strip PAFL keys to monitor AFL (afterfade listen). With this option turned off these keys monitor PFL (pre-fade listen). PFL is the usual setting for inputs so that you can check and set their gain before you bring up the faders.
Channel meter – The strip meters let you keep an eye on signal levels while you are mixing. These display channel level before the fader and mute control:
Pk – Lights red to warn that the signal is too hot and gain or trim should be reduced. It turns on 3dB before clipping to warn you before audible distortion. Pk senses the signal at several points within the channel.
0 – Lights when the signal reaches nominal 0dBu allowing a healthy 18dB headroom. This is the normal level for mixing.
Sig – Lights to show signal presence. It turns on at -26dBu.
Fader – Controls the level of the input channel, FX or mix master assigned to it. This can be the main channel fader or a send to an effect or mix depending on which Mix Select key is active in the Master Strip.
The faders can also control the Graphic EQ frequency bands while in GEQ Flip mode. The range of frequencies accessed by the faders is highlighted in the touch screen and labelled at the top of the faders. The centre 0dB flat position is marked on the fader scale.
Qu Mixer User Guide |
20 |
AP9372 iss.5 |
6.2 Channel Naming
Qu channels, FX, mixes and groups can be named using the screen keypad. The following can be named:
Mono input channels Stereo input channels FX Returns
FX Sends Mix
LR Groups Matrix
Mute Groups
DCA Groups
|
Channel names |
|
The name is displayed at the top left of the |
|
Processing and Routing screens. The name can be |
|
edited from the Processing screen. |
|
The pencil icon appears when the name is blank. All |
|
names are cleared when the Qu mixer is reset or the |
|
‘Reset Mix Settings’ scene is recalled. |
|
Touch the name box to open the screen keypad and |
|
edit the name. |
|
Names can have up to 6 characters. |
Shift |
Touch the Shift button to type in an uppercase |
|
character. Touch the button twice for Caps Lock. |
Mute and DCA Group names
Open the Routing screen Fn key Mute/DCA page to view the Mute and DCA Group masters. Their names are displayed.
Touch a name box to open the screen keypad and edit the name.
Qu-Pad iPad app names
Names stored in the Qu mixer are sent to the iPad.
These are displayed and can be edited using the iPad.
Names and Scene memories
Names are stored as part of the Qu mixer Scene memories.
You can block or allow names in Scene recall using the Global and per scene Filters. Three filter items affect names:
Input/FX Names – CH, ST, Groups and FX ReturnsOutput Names – FX Sends, Mix, LR, Matrix
Mute/DCA Grp Masters – Mute and DCA names
Qu Mixer User Guide |
21 |
AP9372 iss.5 |
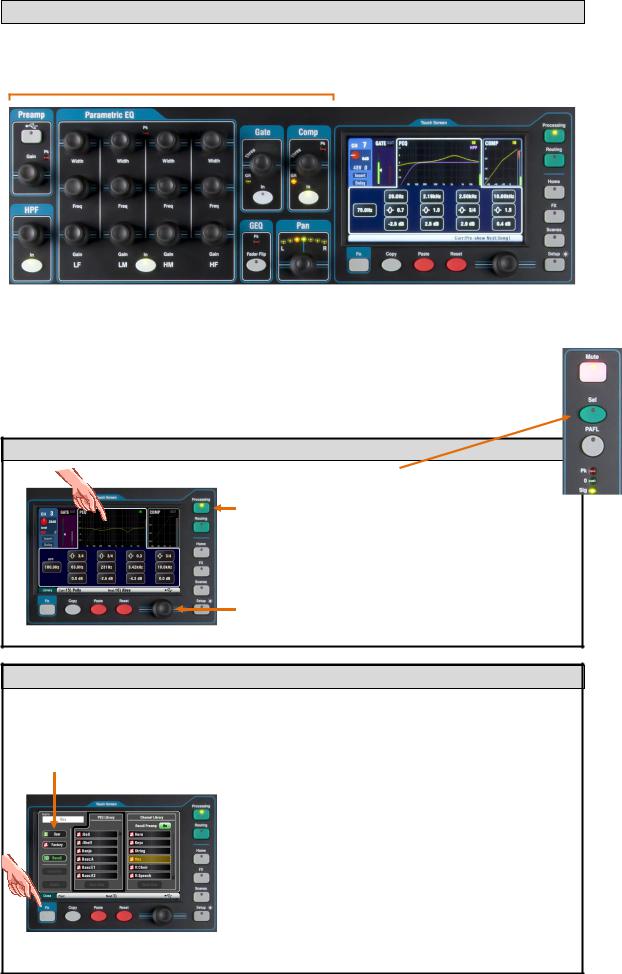
6.3 Channel Processing
The SuperStrip provides familiar, analogue feel, one function per knob control of channel and mix master processing such as equalisers and dynamics. The Touch Screen displays the parameter values and provides additional related controls while in the Processing screen. This processing is accessed using the fader strip Sel keys.
The following processing is available:
Mono input CH = Source, Preamp, HPF, Gate, PEQ, Compressor, Delay, Stereo Linking Stereo input ST1-3 = Source, Preamp, HPF, Gate, PEQ, Compressor, Delay
FX Return 1-4 = FX parameters, PEQ
Groups (not Qu-16) = Parametric EQ, Graphic EQ, Compressor, Delay
Mix1-10, LR = Parametric EQ, Graphic EQ, Compressor, Delay
Matrix (not Qu-16) = Parametric EQ, Graphic EQ, Compressor, Delay
6.4 Working with the Processing:
Press a fader strip Sel key. The Processing Block controls become active for that channel.
Press the Processing key to work with the parameters on the Touch Screen.
Touch the top part of the Touch Screen to open the tabs for the available processing blocks.
View values in the lower part of the screen. Touch screen buttons and use the screen rotary to adjust parameter values.
6.5Working with Processing Libraries:
Press the ‘Library’ Fn key to open and close the related
User Library – Store your own settings.
Factory Library – Provides a starting point for mixing.
Library page.
Use the left hand list for individual processing libraries or the right hand list for complete input channel processing libraries including the preamp.
Store - Touch ‘Store New’. Enter a name using the screen keypad to store a new User Library. You can store up to 128 Libraries.
Recall - Highlight a library item and touch ‘Recall’ to instantly recall its settings. Turn on ‘Recall Preamp’ if you want to recall the preamp settings.
Edit – Highlight a library item and touch ‘Overwrite’ to overwrite an existing library with the current settings, or ‘Delete’ to delete it from the list. Touch the ‘Name’ box to edit its name.
Qu Mixer User Guide |
22 |
AP9372 iss.5 |
Loading...