

Alcatel POP3 User Manual
For more information on how to use the phone, please go to ConsumerCellular.com/Pop3LTE and download
the complete user manual. On the website, you can also find answers to frequently asked questions, and so
much more.Consumer Cellular and the Consumer Cellular logo are trademarks of Consumer Cellular, Inc.
CJA37B0ALAAA
ConsumerCellular.com

Introduction ................................
Thank you for purchasing the Pop 3 5.5 LTE. Pop 3 5.5 LTE comes equipped
with many of the features and functions you want and need.
Home screen
• Convenient at-a-glance view of shortcut applications
• Menu shortcuts for quick access to features and apps
Powerful media applications
• Music & Radio
• Video & Streaming
Bluetooth
With Bluetooth 4.1 supporting HFP 1.6 profiles, you can enjoy hands-free
conversations.
General information ....................
Your Pop 3 5.5 LTE is a transceiver that operates on GSM/GPRS/EDGE
in quad-band with 850/900/1800/1900 MHz or UMTS in tri-band with
850/1700/1900 MHz and LTE FDD (B2/4/5/12/17).
Protection against theft
Your cell phone is identified by an IMEI (cell phone serial number) shown
on the packaging label and in the product’s memory. We recommend that
you note the number the first time you use your cell phone by entering
*#06# and keep it in a safe place. It may be requested by the police or your
network operator if your cell phone is stolen.

Table of Contents
1 Your mobile ..........................................................................1
1.1 Keys and connectors ..................................................1
1.2 Getting started ........................................................... 2
1.3 Home screen ............................................................. 4
1.4 Applications and widgets menu ................................... 9
2 Text input ...........................................................................10
2.1 Using the On-Screen Keyboard .................................. 10
2.2 Text messaging ........................................................ 11
3 Phone calls, Call history log and Contacts .......................12
3.1 Call ......................................................................... 12
3.2 Wi-Fi calling ............................................................ 15
3.3 Call log ................................................................... 15
3.4 Contacts ........................................................................16
4 Messaging, Gmail/Email, Google Hangouts ...................... 19
4.1 Messaging ............................................................... 19
4.2 Gmail/Email ............................................................. 23
4.3 Google Hangouts ...................................................... 26
5 Calendar, Alarm clock & Calculator ..................................27
5.1 Calendar ................................................................. 27
5.2 Clock ...................................................................... 28
5.3 Calculator ................................................................ 30
6 Getting connected..............................................................30
6.1 Connecting to the Internet ......................................... 30
6.2 Chrome ................................................................... 31
6.3 Connecting to Bluetooth devices ................................ 32
6.4 Connecting to a computer ......................................... 33
6.5 Sharing your phone's mobile data connection .............. 33
6.6 Connecting to virtual private networks ........................ 33
7 Google Play Store ..............................................................34
7.1 Locate the item you want to download and install ........ 34
7.2 Download and install ................................................ 35
7.3 Manage your downloads ........................................... 36
8 Multimedia applications ....................................................37
8.1 Camera/Camcorder .................................................. 37
8.2 Gallery .................................................................... 38
8.3 YouTube ..................................................................39
8.4 Mix ......................................................................... 40
9 Google Maps ......................................................................40
9.1 Get My Location ....................................................... 40
9.2 Search for a location................................................. 41
9.3 Get driving, public transport or walking directions ........ 41
9.4 Share a location ....................................................... 42

10 Others ................................................................................. 42
10.1 File Manager ............................................................ 42
10.2 Sound Recorder ....................................................... 42
10.3 Radio ...................................................................... 43
10.4 Notes ...................................................................... 43
10.5 Other applications .................................................... 43
11 Settings ..............................................................................44
11.1 Wireless & network .................................................. 44
11.2 Device .................................................................... 45
11.3 Personal .................................................................. 47
11.4 System ................................................................... 49
12 Keeping your phone up-to-date ....................................... 50
12.1 Update .................................................................... 50
Safety and use ............................................................................. 51
Warranty and Support .................................................................59
www.sar-tick.com
This product meets applicable national SAR
limits of 1.6 W/kg. The specific maximum SAR
values can be found in the SAR INFORMATION
section of this user guide.
When carrying the product or using it while worn
on your body, either use an approved accessory
such as a holster or otherwise maintain a
distance of 15 mm from the body to ensure
compliance with RF exposure requirements.
Note that the product may be transmitting even
if you are not making a phone call.
1
1
Your mobile .......................
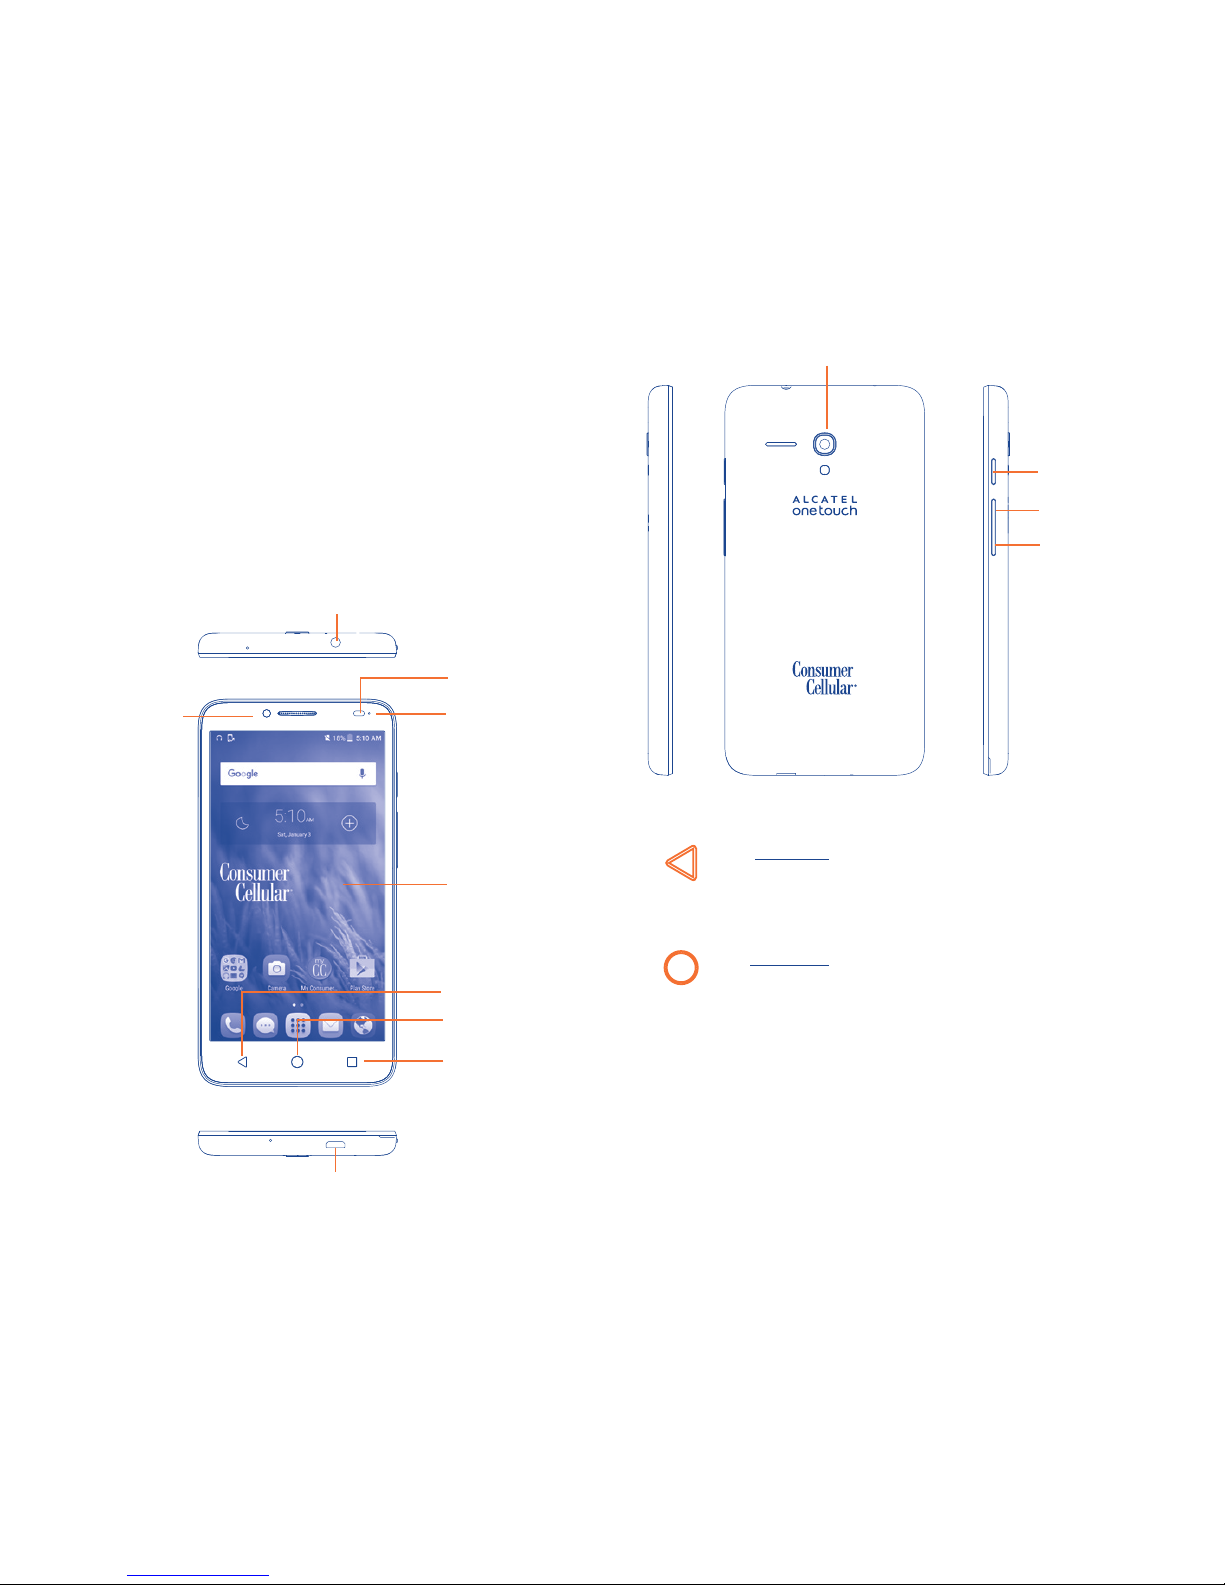
1.1 Keys and connectors
Micro-USB Connector
Front Camera
Headset Connector
Proximity &
Light Sensor
Home Key
Touch Screen
Back Key
Menu Key
LED Indicator
Volume up Button
Volume down
Button
Camera Flash/ Flashlight
Back Key
• Touch to go back to the previous screen, or to close a
dialog box, options menu, the notification panel, etc.
Home Key
• From any application or screen, touch to return to the
Home screen.
• Touch and hold to open Google Now.
Power Button
2
Menu Key
• Touch to view recently used applications.
• Touch to close any application.
• Touch the brush icon on the bottom of the screen to
close all applications.
Power Key
• Press: Lock the screen/Light up the screen.
• Press and hold: Show the pop-up menu to select from
Power off/Restart/Airplane mode.
• Press and hold the Power key and Volume down key to
capture a screenshot.
• Press and hold the Power key for 8 seconds to power
off or hold it for 10 seconds or more to force reboot.
Volume Keys
• In call mode, adjusts the earpiece or headset volume.
• In Music/Video/Streaming mode, adjusts the media
volume.
• In general mode, adjusts the ringtone volume.
• Mutes the ringtone of an incoming call.
• In camera mode, press Volume up or down key to
take a photo.
1.2 Getting started
1.2.1 Set-up
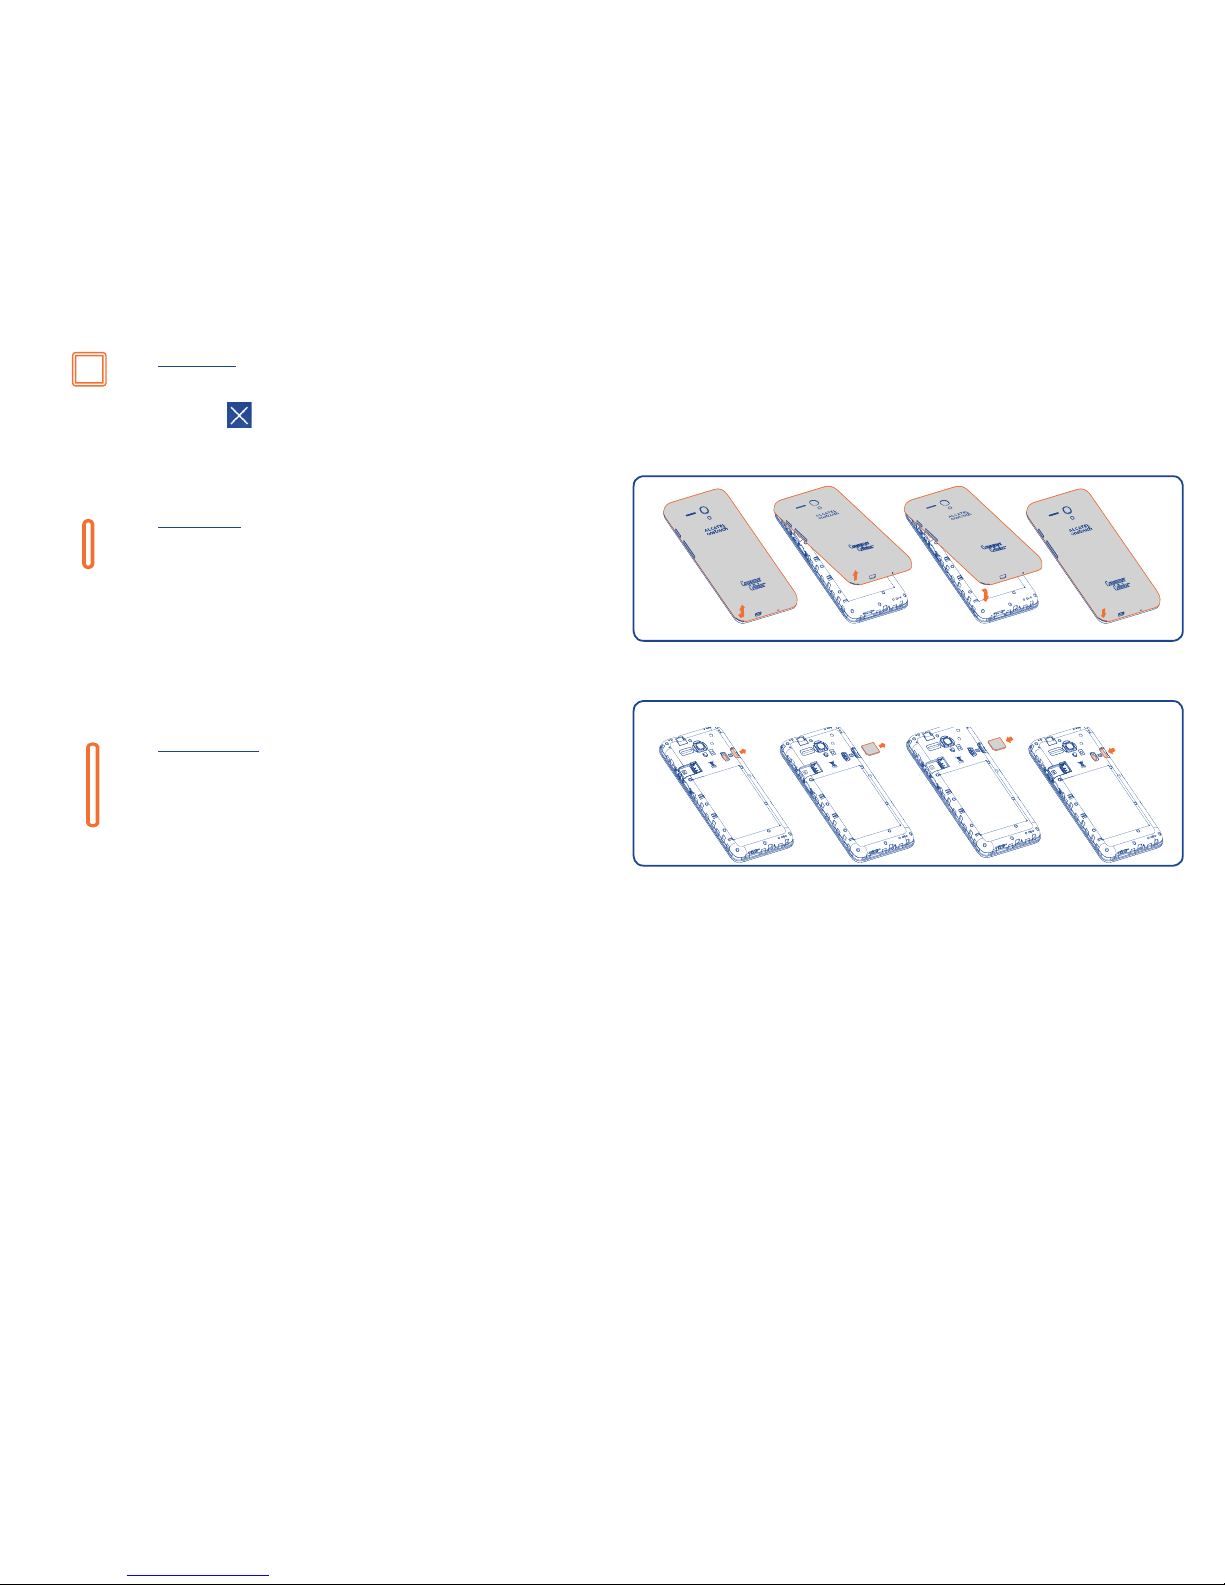
Attaching or removing back phone cover
(1)
Inserting or removing the SIM card
The SIM card and battery are normally pre-installed for you. Follow these
instructions should you ever need to access them yourself. To remove the
card, please take it out directly from the slot.
Inserting memory card
1. Locate the microSD card slot on the left side of phone, opposite to
SIM card slot.
2. Insert the microSD card upward into slot with the gold contacts facing
downward and gently push in microSD card until it locks into the slot.
(1)
Don't forget to detach USB and headset cables before attaching or
removing the back cover to prevent damages.
3
Removing memory card
1. Locate the microSD card slot on the left side of phone, opposite to
SIM card slot.
2. Pull microSD card and remove.
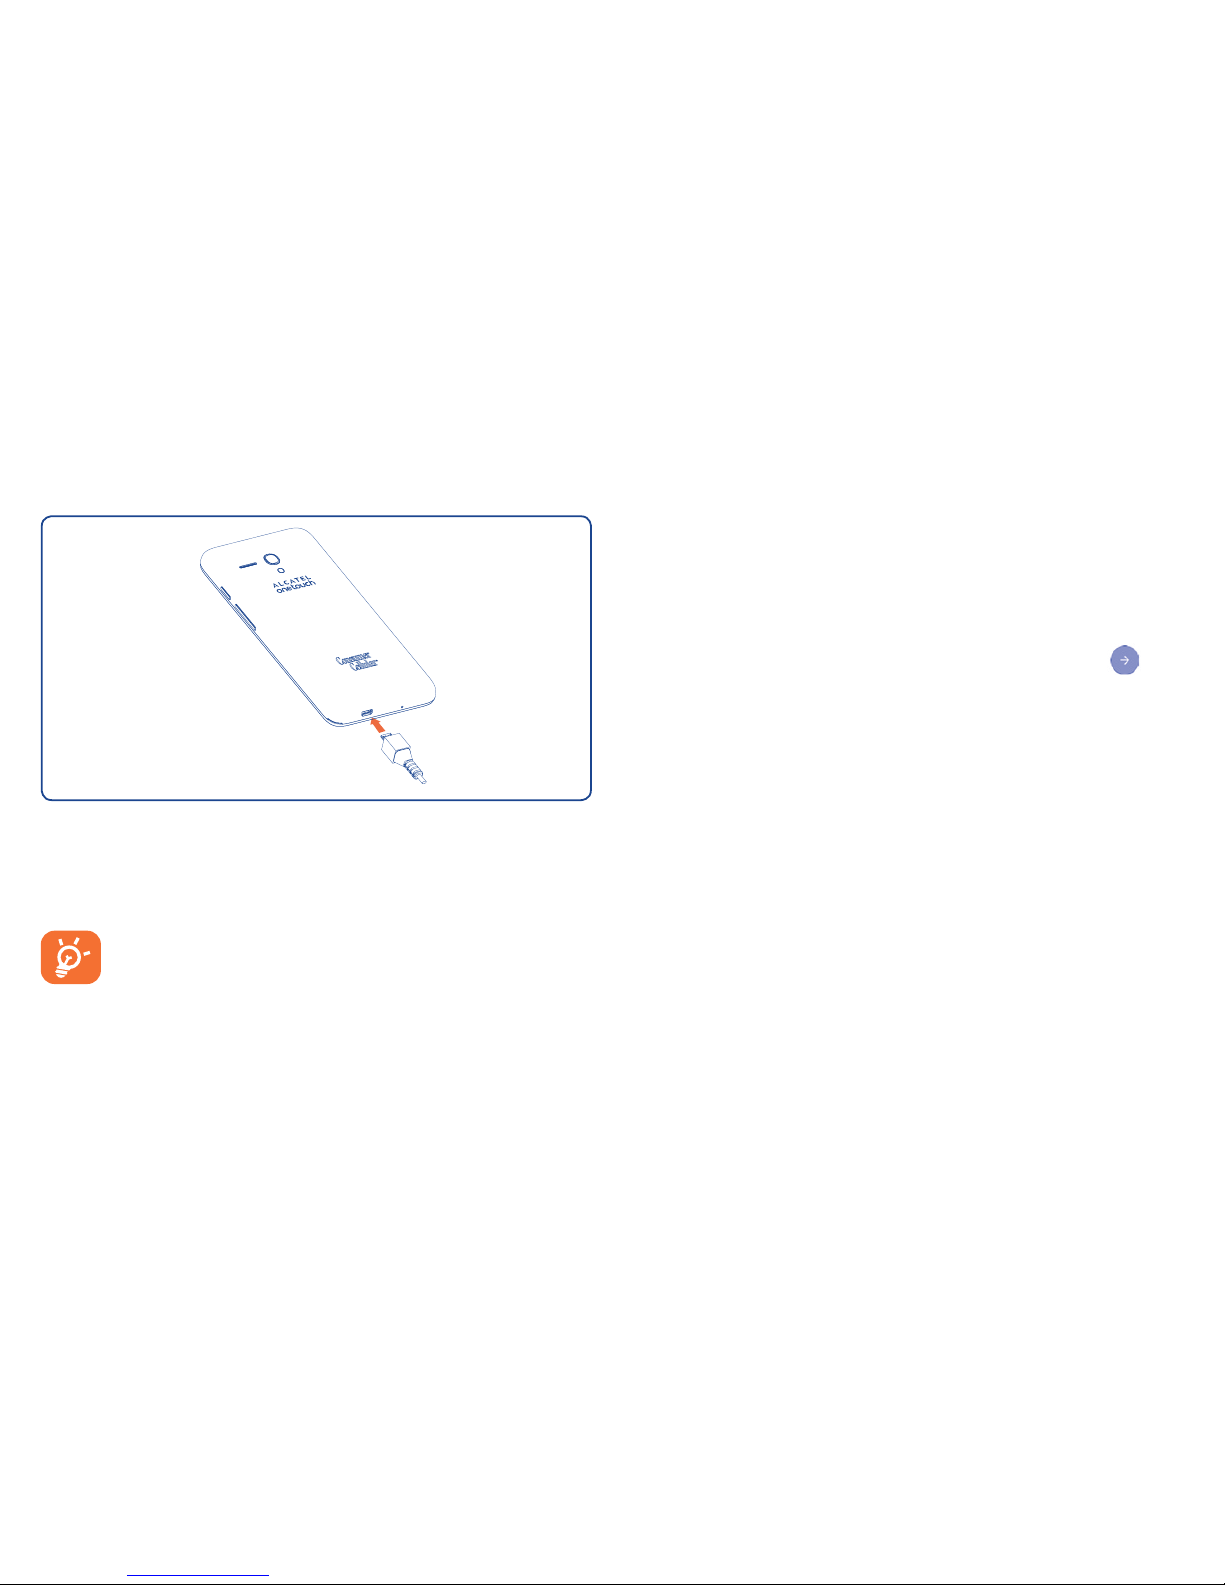
Charging battery
Connect the USB Cable provided to your phone and charger, connect the
charger to an electric outlet. You will be able to confirm the battery is
charging when the phone charging icon is displayed on the status bar.
The charging icon will not display if your battery is completely
consumed. To reduce power consumption and energy waste,
when battery is fully charged disconnect your charger from the
plug; switch off GPS, Bluetooth or background-running
applications when not in use.
1.2.2 Power on your phone
Hold down the Power key until the phone powers on, then unlock your
phone if you set up a screen lock (Swipe, PIN, password, or pattern). The
Home screen is displayed once the phone is unlocked.
If you do not know your PIN code or if you have forgotten it, contact your
network operator. Do not store the PIN code within your phone; be sure
to store the PIN in a location that is secure, but accessible without using
your phone.
Setting up your phone for the first time
The first time you power on the phone, you should set the following options:
• Scroll up or down to select the phone's language, then touch .
• Select an available Wi-Fi network, then touch NEXT, otherwise touch
SKIP.
• Login to an existing Google account or create a new account.
• Set up the screen lock by touching SET SCREEN LOCK NOW to make
your phone more secure, otherwise touch SKIP.
• Set up Google Services by marking the corresponding checkboxes, touch
Learn more to learn more about Google Services, then touch NEXT.
1.2.3 Power off your phone
Hold down the Power key from the Home screen until the Phone options
appear, then select Power off.
4
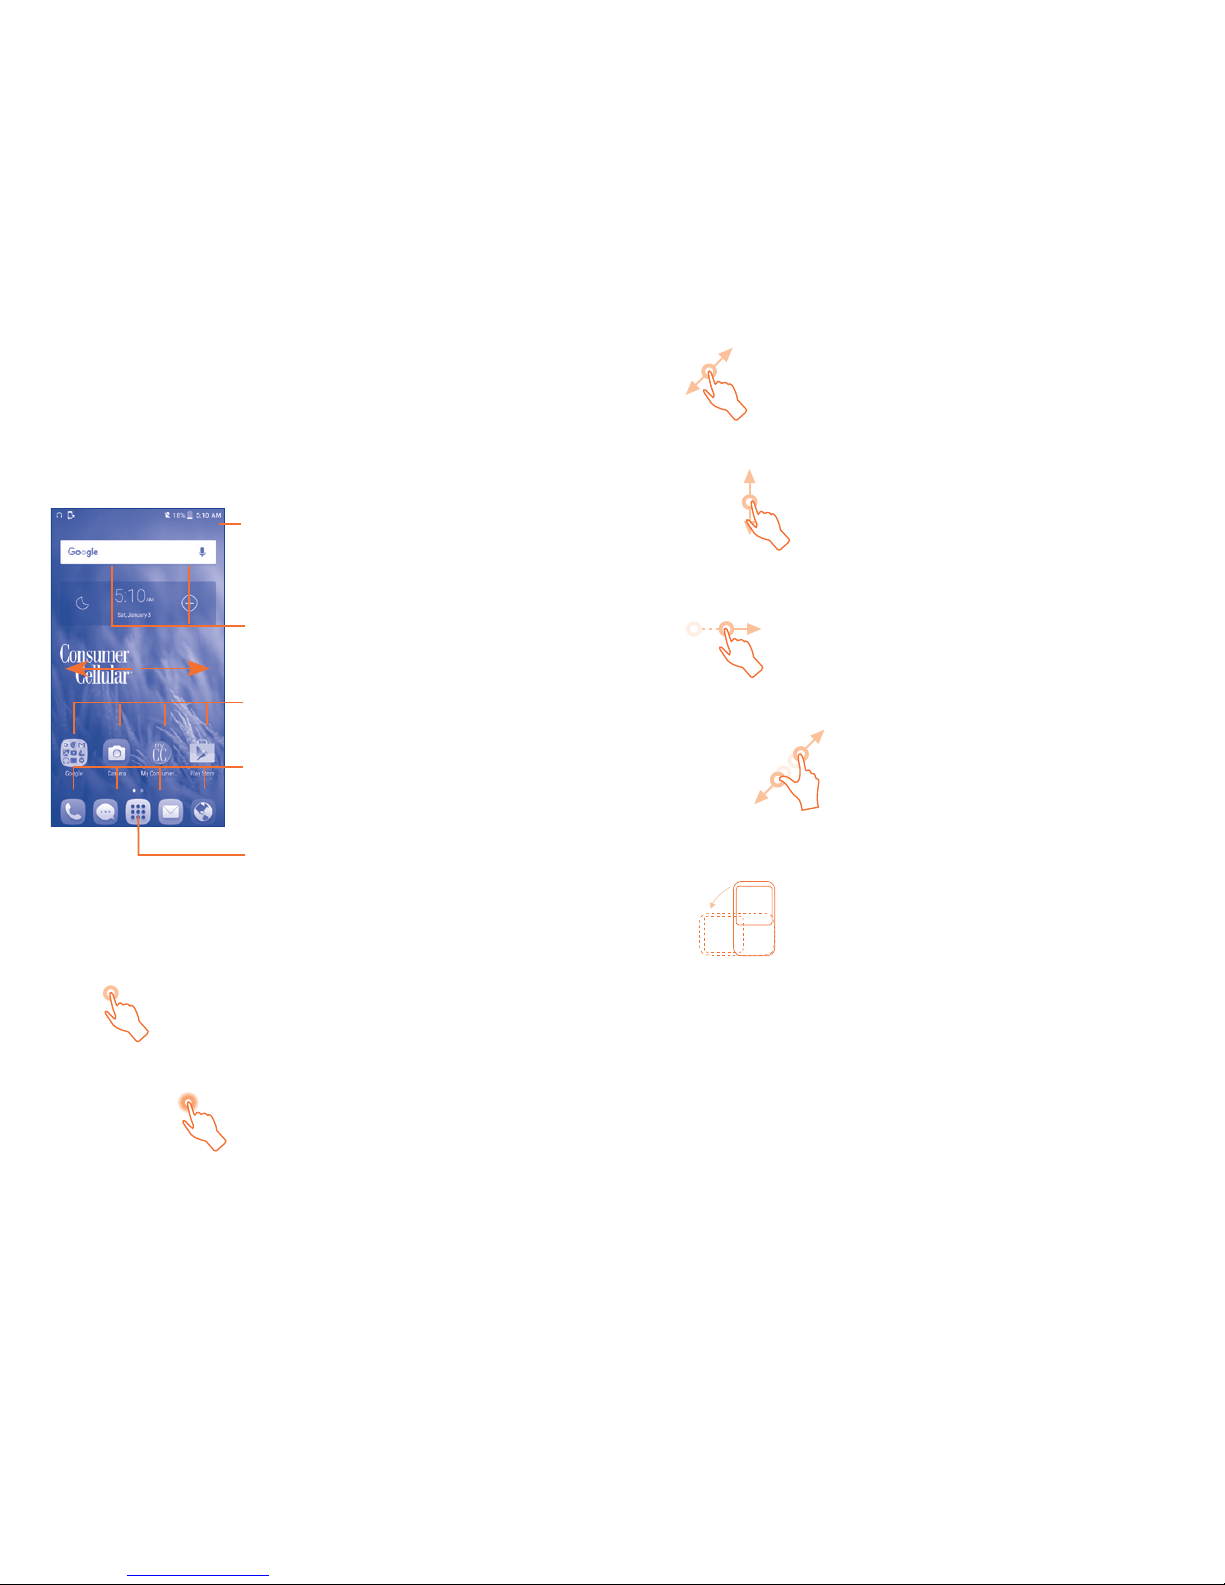
1.3 Home screen
The Home screen is provided in an extended format to allow more space for
adding applications, shortcuts etc. Slide the Home screen horizontally left
and right to get a complete view of the Home screens. The white dots at the
lower part of the screen indicates which screen you are viewing.
Status bar
• Status/Notification indicators
• Touch and drag down to open
the Notifications panel.
Application icon
• Touch to open applications menu.
Search bar
• Touch to enter text search screen.
• Touch to enter voice search screen.
Favorite applications tray
• Touch to enter the application.
• Touch and hold to move or change
applications.
Touch an icon to open an application,
folder, etc.
1.3.1 Using the touchscreen
Touch
To access an application, touch it with your finger.
Touch and Hold
Touch and hold the Home screen to access widgets.
Drag
Place your finger on any item to drag it to another location.
Slide/Swipe
Slide/swipe your finger up and down and left to right to scroll through
screens, applications, web pages, etc.
Flick
Flick your finger across screen to move through screens faster.
Pinch/Spread
Place your index finger and thumb on the screen surface and draw them
apart or together to scale an element on the screen.
Rotate
Automatically change the screen orientation from portrait to landscape by
turning the phone sideways to have a better view.
1.3.2 Status bar
From the status bar, you can view both the phone status (to the right side)
and notification information (to the left side).
5
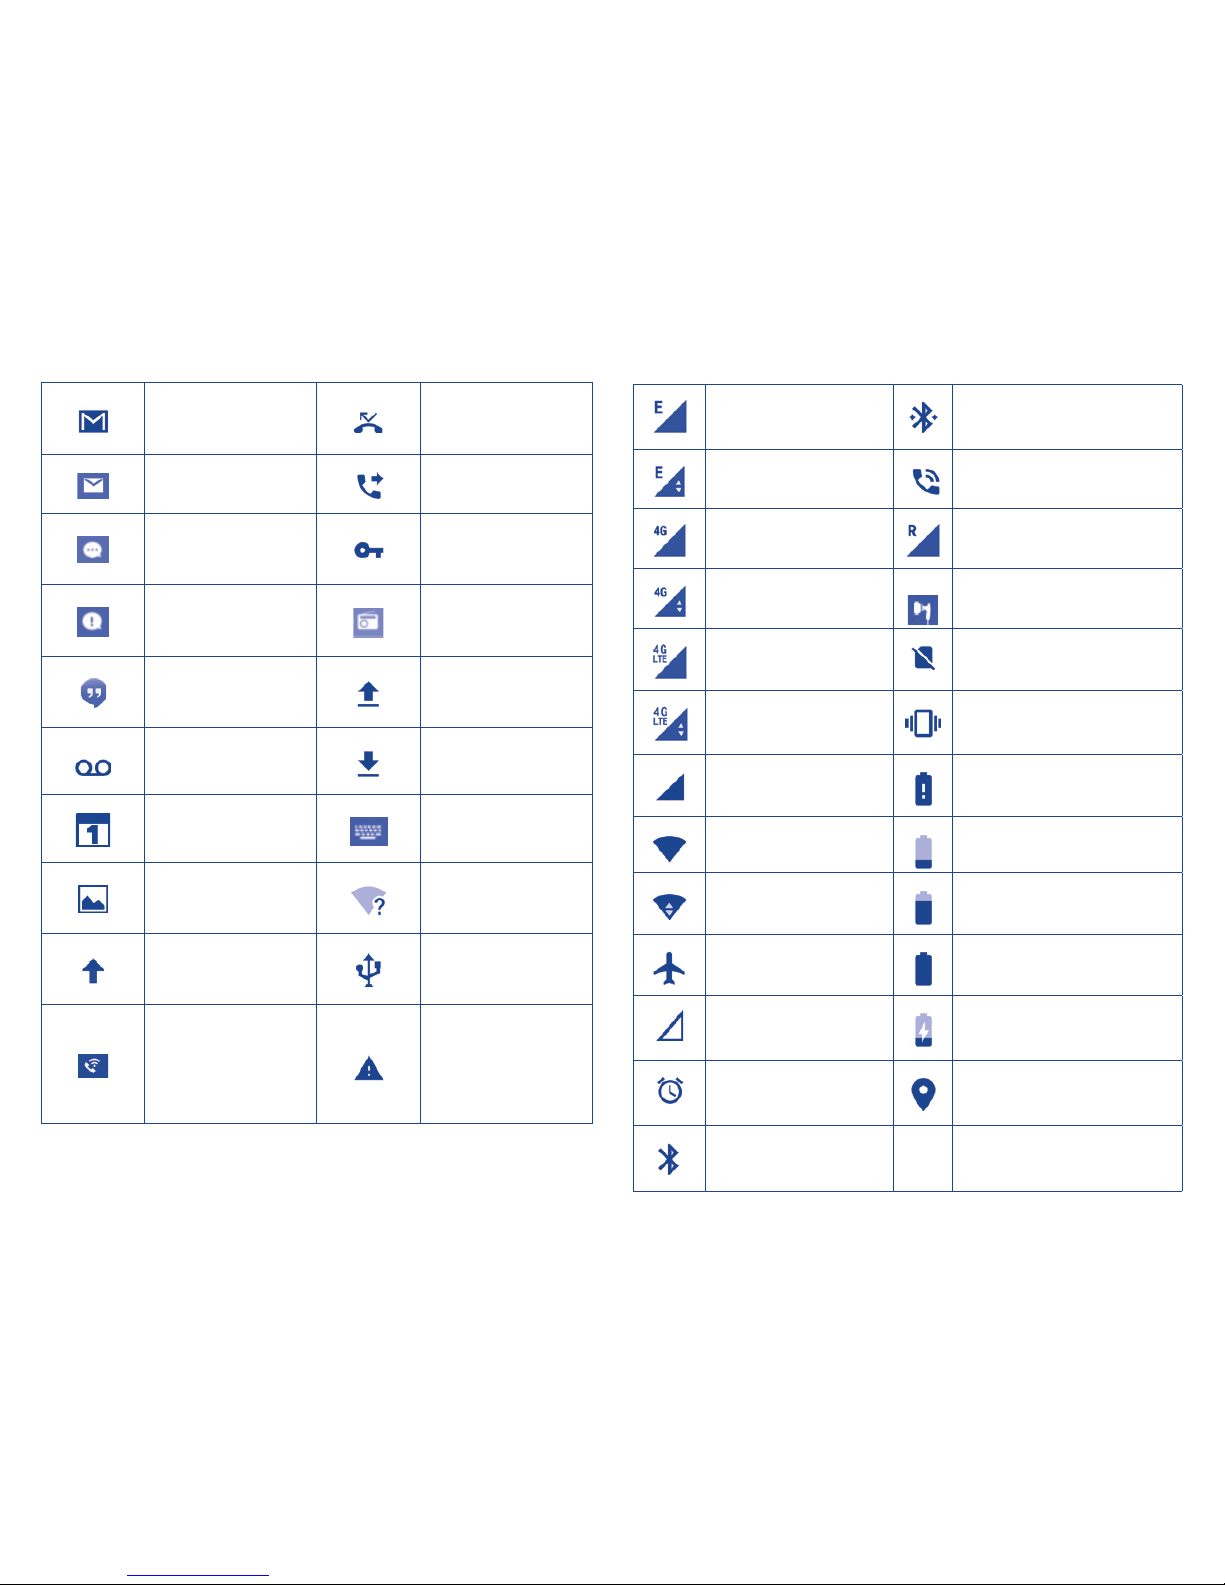
Notification icons
New Gmail message Missed call
New Email message Call forwarding is on
New text or
multimedia message
Connected to VPN
Problem with SMS or
MMS delivery
Radio is on
New Google
Hangouts message
Uploading data
New voicemail Download finished
Upcoming event Select input method
Screenshot captured
An open Wi-Fi
network is available
Software update
available
Phone is connected
via USB cable
Wi-Fi Calling
Carrier data
use threshold
approaching or
exceeded
Status icons
EDGE connected
Connected to a Bluetooth
device
EDGE in use
Speakerphone is on
4G connected Roaming
4G in use Headset connected
4G LTE connected No SIM card installed
4G LTE in use Vibrate mode
Signal strength Battery is very low
Wi-Fi is on Battery is low
Connected to a Wi-Fi
network
Battery is partially drained
Airplane mode Battery is full
No signal Battery is charging
Alarm is set GPS is on
Bluetooth is on
6
1.3.3 Search bar
The search bar can be used to find information located on the phone or
the web.
Search by text
• Touch Search bar from the Home screen.
• Enter the text/phrase you want to search for.
• Touch the Enter/Search key on the keyboard to begin search.
• Use the bottom menu bar with filters to view search results from Web,
Images, News, Maps, Shopping, Videos, Books, Apps, or Phone.
Search by voice
• Touch from Search bar to display a dialog screen.
• Speak the word/phrase you want to search for. A list of search results
will display for you to select from.
• Use bottom menu bar with filters to view search results from Web,
Images, News, Maps, Shopping, Videos, Books, Apps, or Phone.
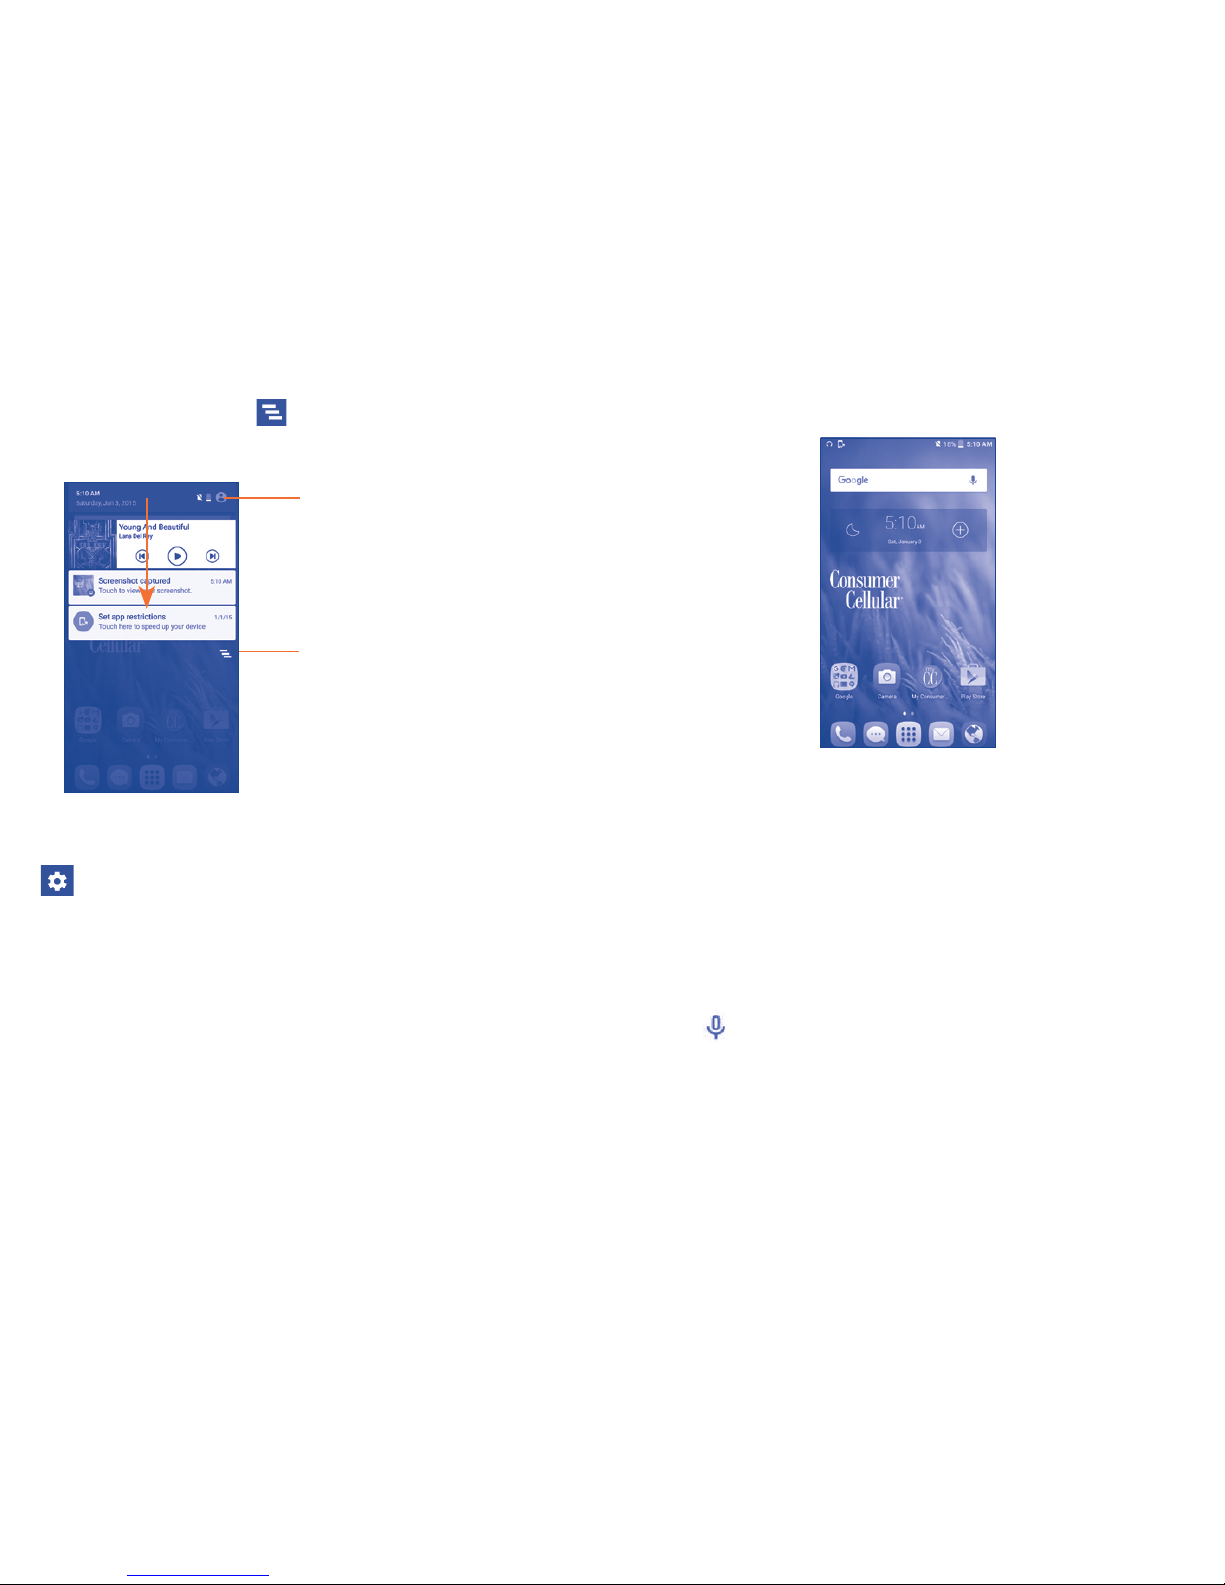
Notifications panel
Touch and drag down the Status bar to open the Notifications panel.
Touch and drag up or touch to close it. From the Notifications panel,
you can view wireless service information, access reminders/notifications
and open apps.
Touch to clear all event–based
notifications (other ongoing
notifications will remain).
Settings shortcut panel
• Touch to get quick access to
various phone setting options.
Touch a notification and swipe to the left or right side to delete.
Touch and drag the status bar further down, then touch the Settings icon
to access all Settings.
The Notifications panel is also available for viewing even if the screen
is locked.
7
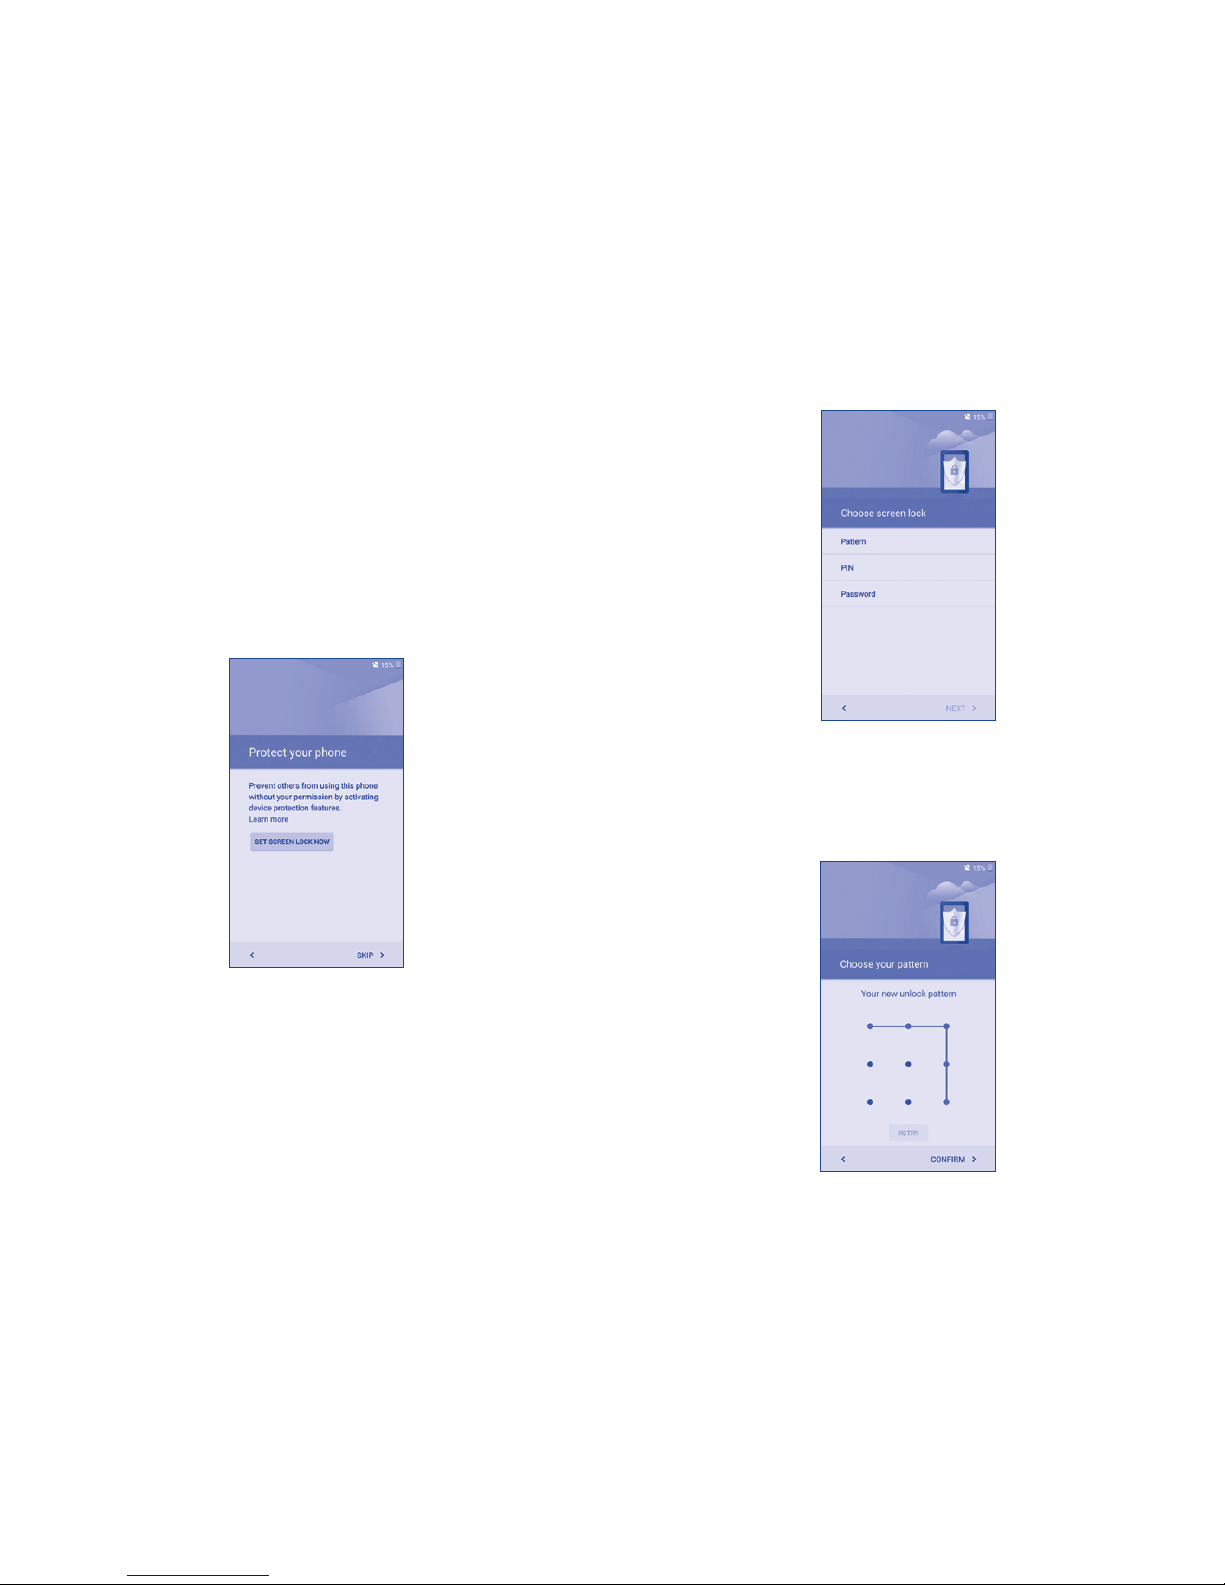
1.3.4 Protect your phone
Prevent others from using your phone without your permission. Device
protection is automatically activated when you add a Google Account and
set a screen lock. Together with the Android Device Manager, you can locate
and erase the contents of your phone, and protect it from reuse if it’s lost or
stolen. Even if your phone gets wiped, your Google Account password will
be required to access your phone.
To activate
1. Touch SET SCREEN LOCK NOW when prompted during phone set up.
Note: If you decide you want to skip this option, select Cancel. If you have
already set up your phone, activate this option by going to Settings/Lock
screen/Screen security.
2. Set Pattern, Password or PIN.
3. Draw an unlock pattern twice and touch CONFIRM to activate the
screen lock .
8
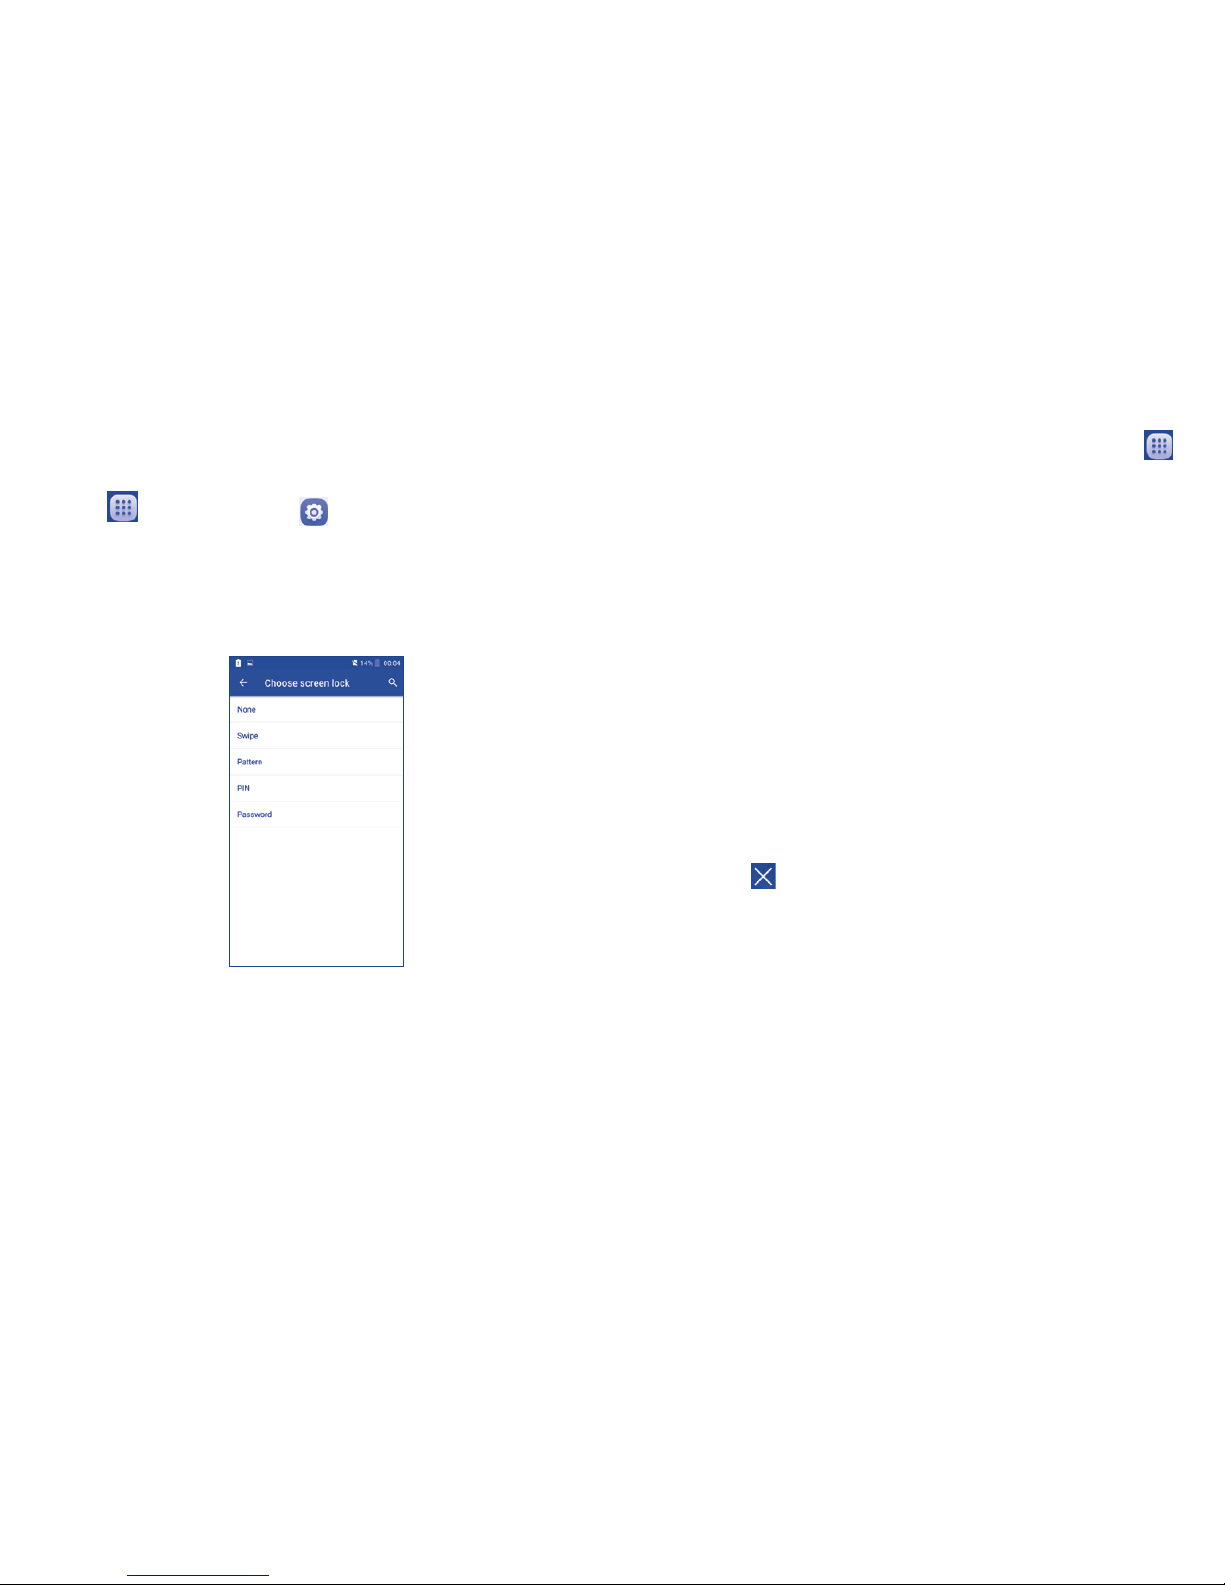
To deactivate
Note: You can directly deactivate the screen lock by removing your Google
Account.
Be sure to deactivate this option before returning or exchanging the phone
to avoid the PIN/password from being required in order to access it.
1. Touch , then touch Settings and select Lock screen.
2. Touch Screen lock, and you will be prompt to draw the preset unlock
pattern to confirm.
3. Select None to deactivate.
1.3.5 Personalize your Home screen
Adding Apps and Widgets
To add an App shortcut to Home screen touch the Applications icon ,
touch and hold an application to activate the Move mode, and drag the item
to the preferred Home screen.
Touch and hold a blank space on the Home screen, then touch WIDGETS,
touch and hold the desired widgets and move it to the desired Home screen.
While adding an application to a Home screen, drag it to the top App info to
view detailed information. If the application is downloaded, drag it to the top
Uninstall to remove it from the phone completely.
Repositioning Apps and Widgets
Touch and hold the item to be repositioned to activate the Move mode, drag
the item to the desired position and then release. You can move items both
on the Home screens and in the Favorite applications tray. Hold the icon
on the right edge of the screen to drag the item to another Home screen.
Removing Apps and Widgets
Touch and hold the item to be removed to activate the Move mode, drag the
item up to icon , and release after the item turns red.
Creating folders
To improve the organization of items (shortcuts or applications) on the Home
screens and the Favorite applications tray, you can add them to a folder by
stacking one item on top of another. To rename a folder, open folder, touch
the folder’s title bar and input new name.
Wallpaper customization
Touch and hold a blank space on the Home screen, then touch
WALLPAPERS, select the desired image in the wallpaper library or touch
Pick image to select an image from Gallery, Photos, Files Manager,
Downloads or other places. Touch Set wallpaper to set the image as
wallpaper.
9
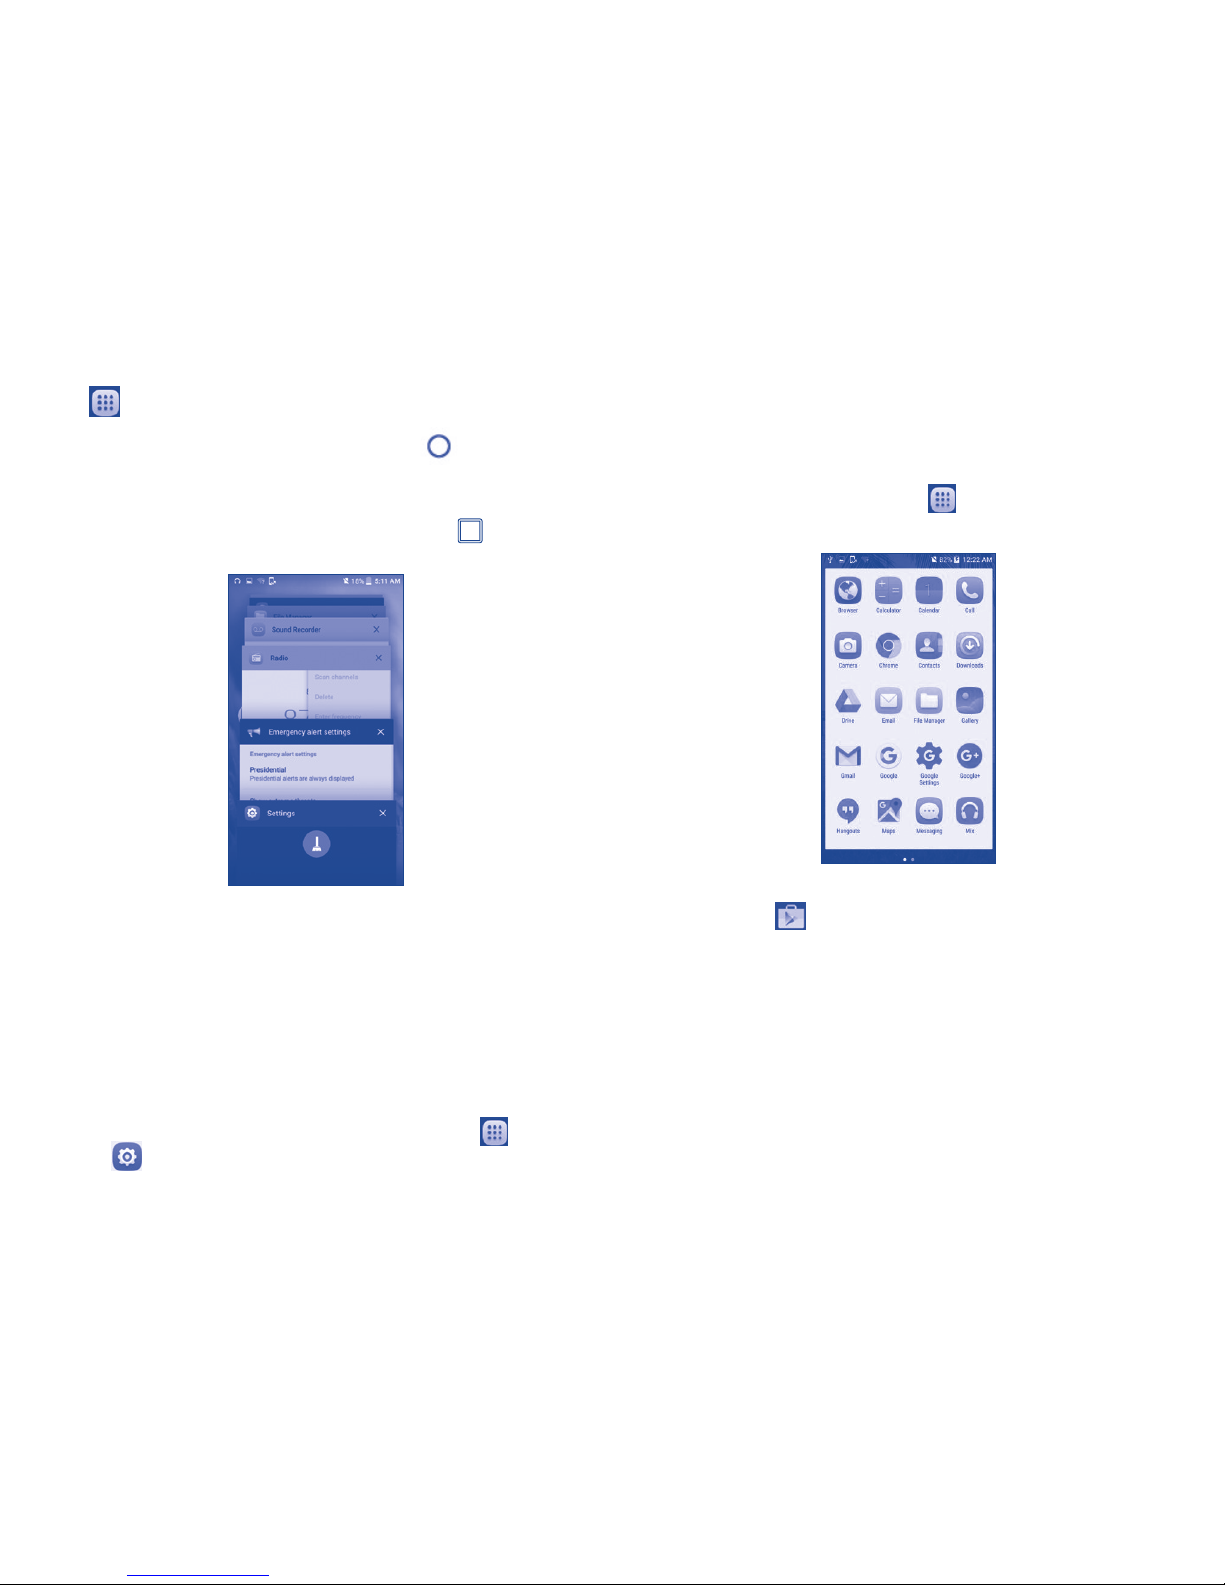
1.3.6 Applications menu
Touch on the Home screen to enter applications menu.
To return to the Home screen, touch the Home key .
1.3.7 Recently-used applications
To view recently-used applications touch the Menu key . To remove an
app from the list, swipe the app to the left or right side.
1.3.8 Volume adjustment
Using volume key
You can set the ringer, media and phone ringtone volumes to your
preference by pressing the Volume up/down key, or touching Settings\
Sound & notification\Media volume to set the volume.
Using volume settings menu
To access Volume settings menu from home screen touch then touch
Settings , select Sound & notification to display volume controls for
Media, Alarm, Notification.
1.4 Applications and widgets menu
The applications and widgets menus contain and provide access to all preinstalled and newly downloaded applications or widgets.
Accessing applications menu
To access the applications menu, touch from the Home screen.
Slide left and right to view all applications.
To download new applications from the applications menu or Home screen
touch Play Store and search for preferred applications by name,
subject or category.
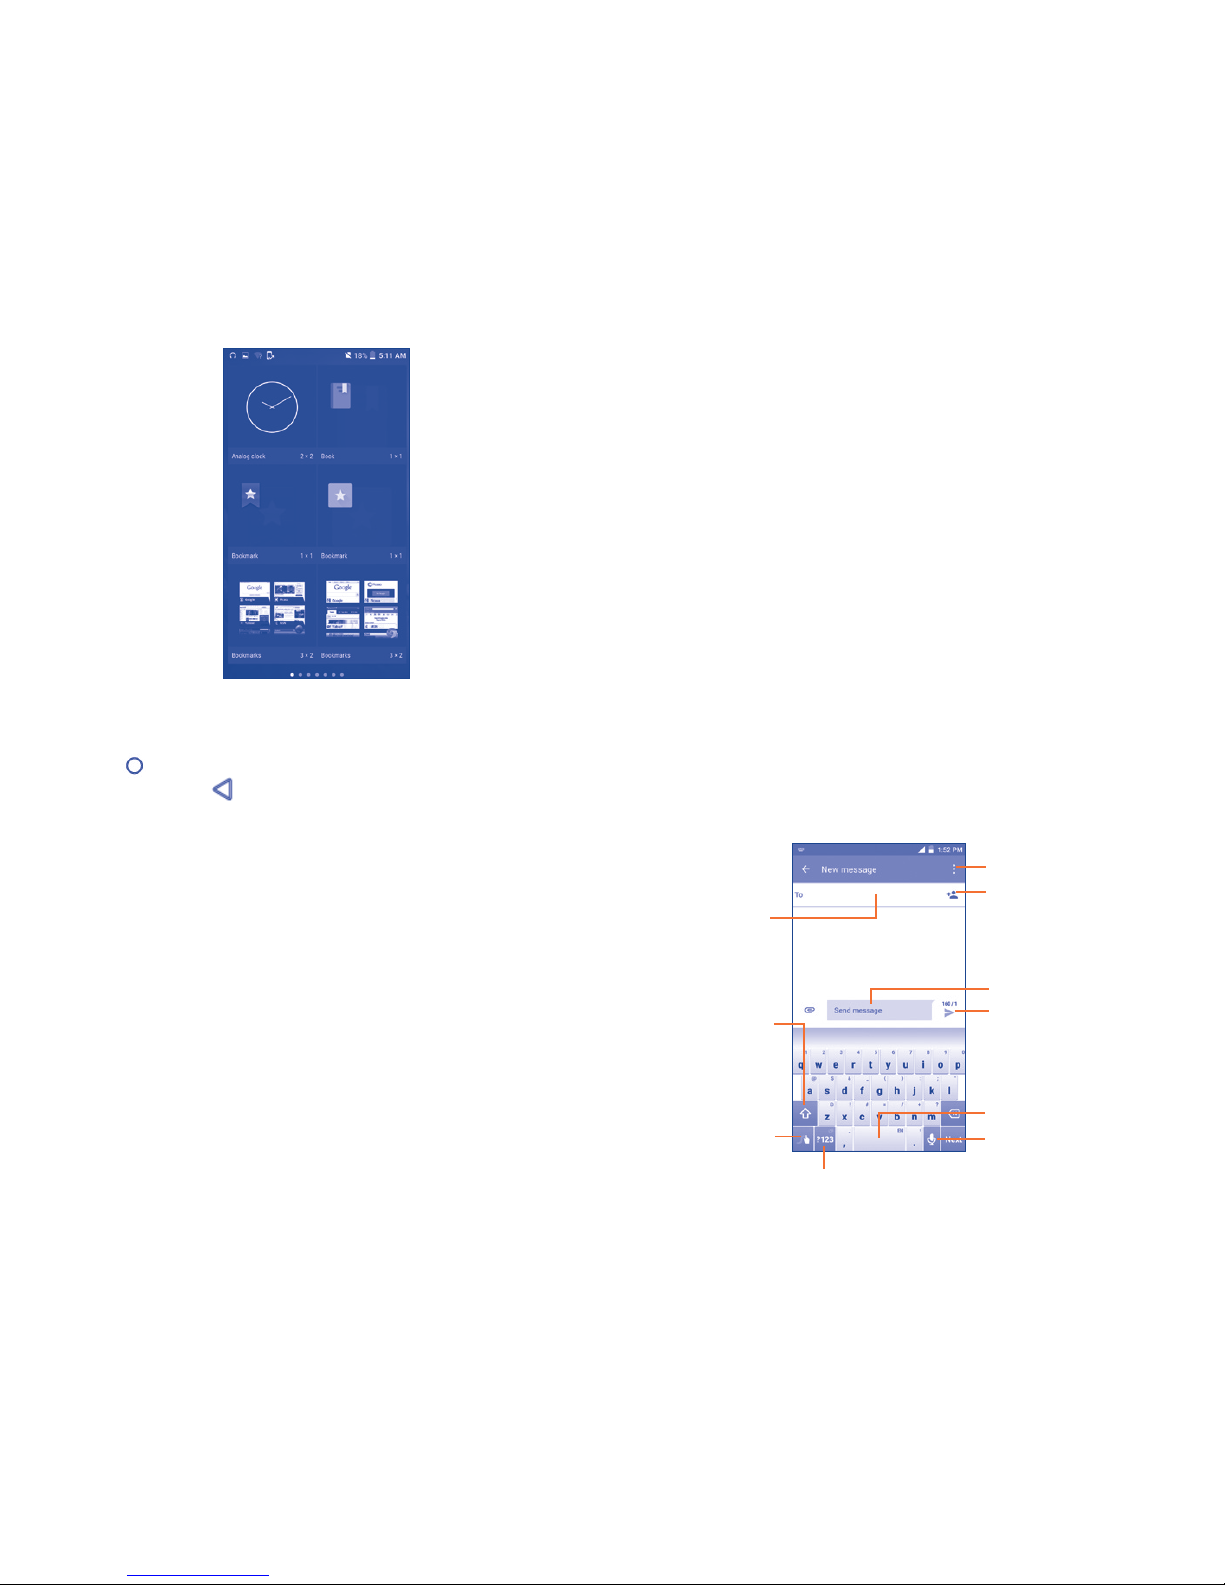
Accessing widgets menu
In the widgets menu you will view all available widgets that can be added
to your home screens.
To access the widgets menu, touch and hold a blank space on the Home
screen, then touch WIDGETS, touch and hold the desired widgets and
move it to the desired Home screen. The selected widget will be placed
on the selected home screen (if space is not available on the preferred
home screen a new home screen with available space for widget must
be selected).
10
To return to Home screen from applications or widgets menu touch the
Home key or to return to previous screen from applications or widgets
menu touch Back key .
2
Text input
2.1 Using the On-Screen Keyboard
Onscreen Keyboard settings
Touch Settings\Language & input, touch the keyboard you want to set up
and a series of settings will become available for your selection.
Adjust the Onscreen Keyboard orientation
Turn the phone sideways or upright to adjust the Onscreen Keyboard
orientation. You can adjust it by changing the settings (Touch Settings\
Display\When device is rotated\Rotate screen contents).
2.1.1 Swype keyboard
Touch to add a
contact from saved
Groups, Contacts or
Call history log.
Touch to switch
between 《abc/
Abc/ABC》.
Press and hold to
open settings.
Speech-to-text option
(microphone)
Touch to input space.
Touch to switch between symbol
and numeric keyboard.
Touch to enter text.
Touch to enter
phone number
or contact.
Touch to view
messaging options.
Touch to to send message.
11
Switching keyboards from new message screen
When in the new message screen, drag down the Status bar to open the
Notifications panel.
In the Notifications panel, touch Change keyboard, from this input method
shortcut menu you can choose between: Android keyboard (ASOP),
Google voice typing or Swype.
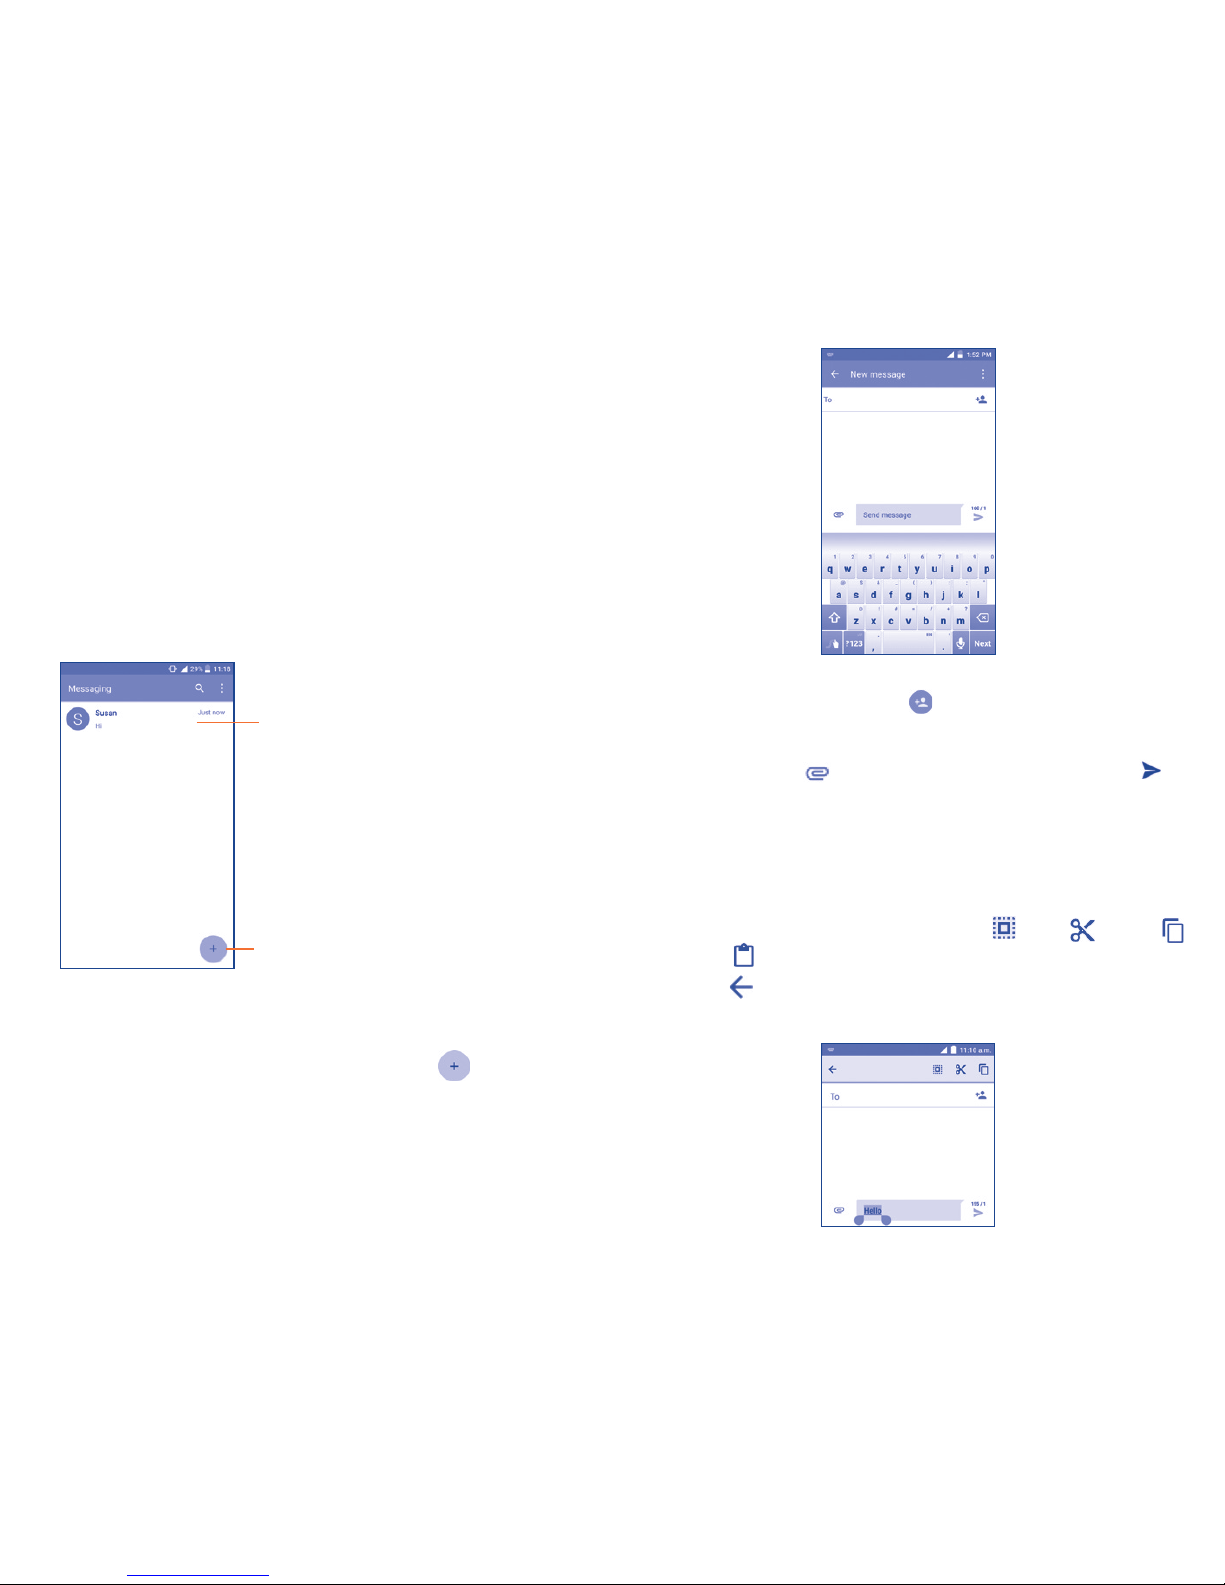
2.2 Text messaging
Use the text messaging feature to send and receive text (SMS) and
multimedia (MMS) messages.
• Touch to view the whole message
thread.
• Touch & hold to activate delete mode.
Touch to create a new message.
Creating a text message
In the message screen, touch the new message icon to create a new
text/multimedia message.
While in the new message screen, touch To line and insert a contact name
or phone number. You can also touch to insert a contact from Contacts
list. Next touch the Send message line and insert text message; to add a
picture, video, audio file, contact or calendar item to your text message,
touch the attach icon . Once the message is complete, touch to
send text message to contact.
You can edit the text you have entered before sending the message.
• Touch and hold or double-tap within the text you would like to edit.
• Drag the tabs to change the highlighted selection.
• The following options will show: Select all , Cut , Copy
and Paste .
• Touch the icon to go back without any action.
12
3
Phone calls, Call history
log and Contacts
3.1 Call...................................................
3.1.1 Placing a call
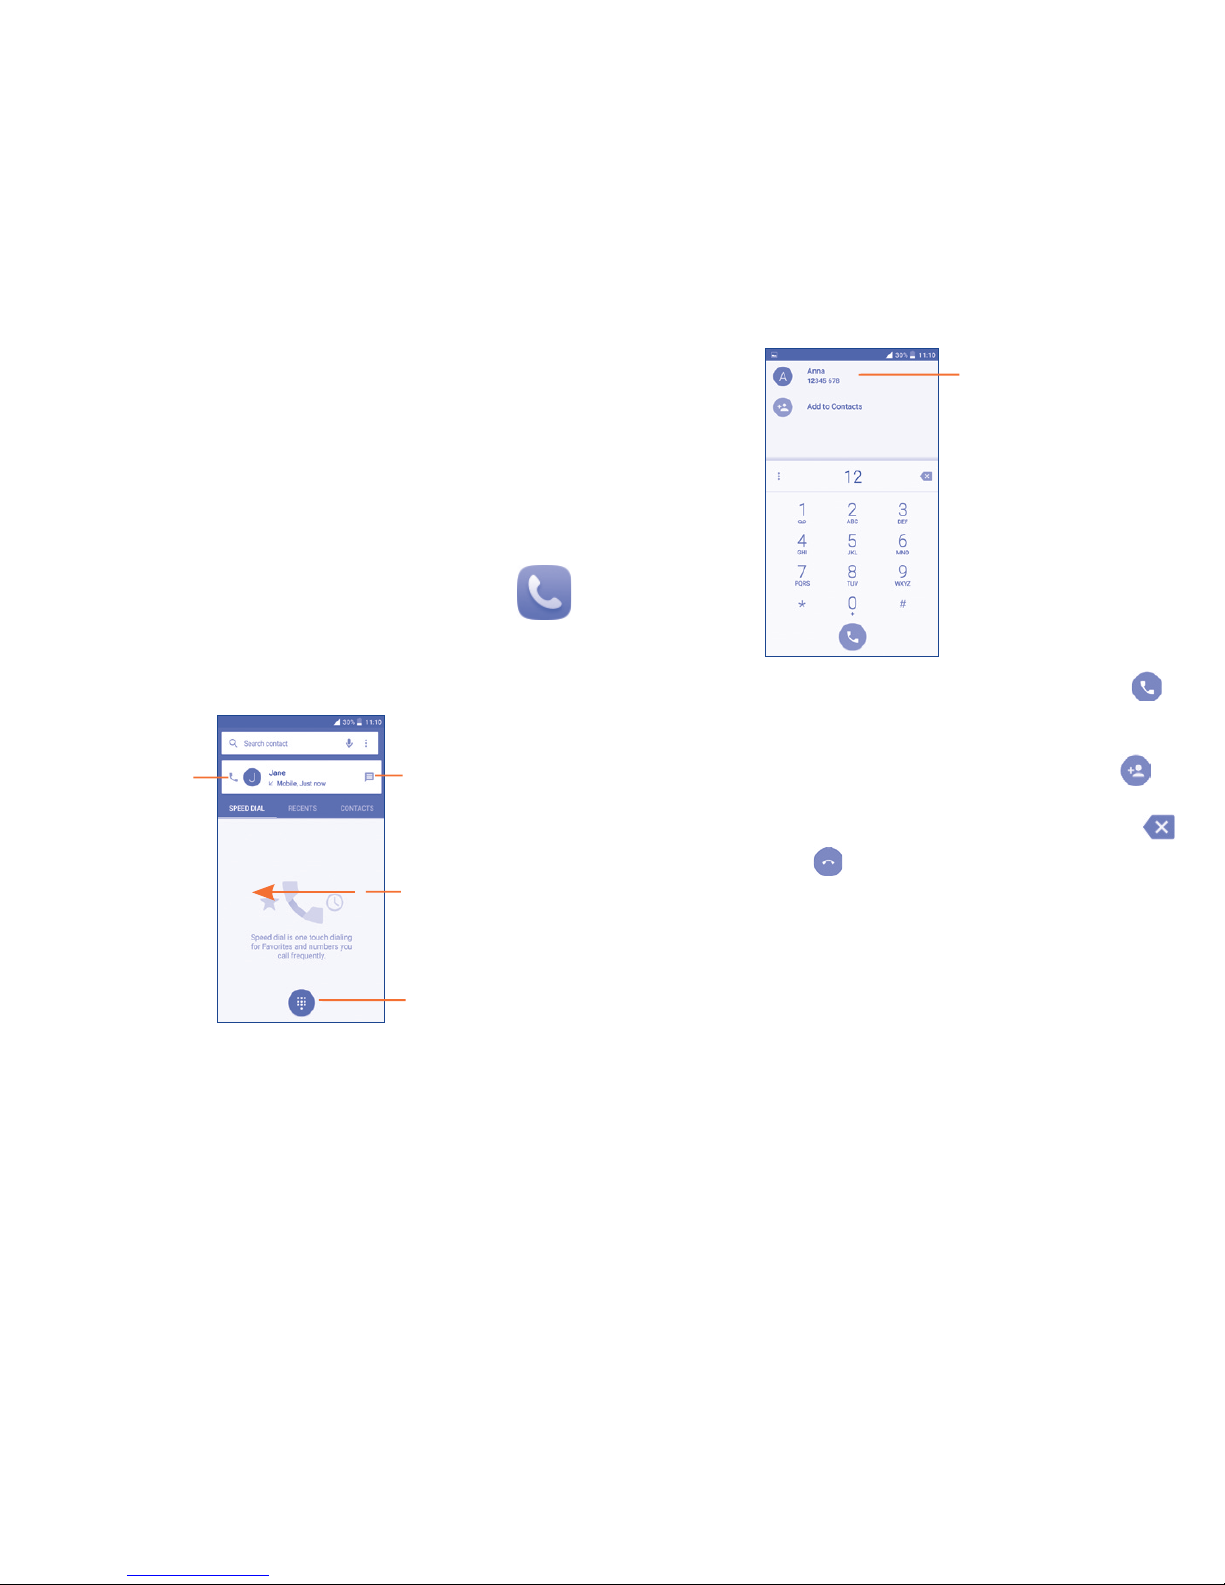
You can easily place a call using Call. Touch the Application tab from the
Home screen and select Call.
Touch to send
message to the
previewed number.
Touch to call
the previewed
number.
Touch to hide/
display keyboard.
Slide to access
the Recent and
CONTACTS.
Display the
suggested
number(s).
Enter the desired number from the keyboard directly and touch to
place the call or select a contact from CONTACTS or RECENT by sliding or
touching tabs, then choose your target contact to make the call.
The number you entered can be saved to Contacts by touching and
then touching Create new contact.
If you make a mistake, you can delete the incorrect digits by touching .
To hang up a call, touch .
International Calls
To learn more about how to make international calls, please visit:
ConsumerCellular.com/Int
13
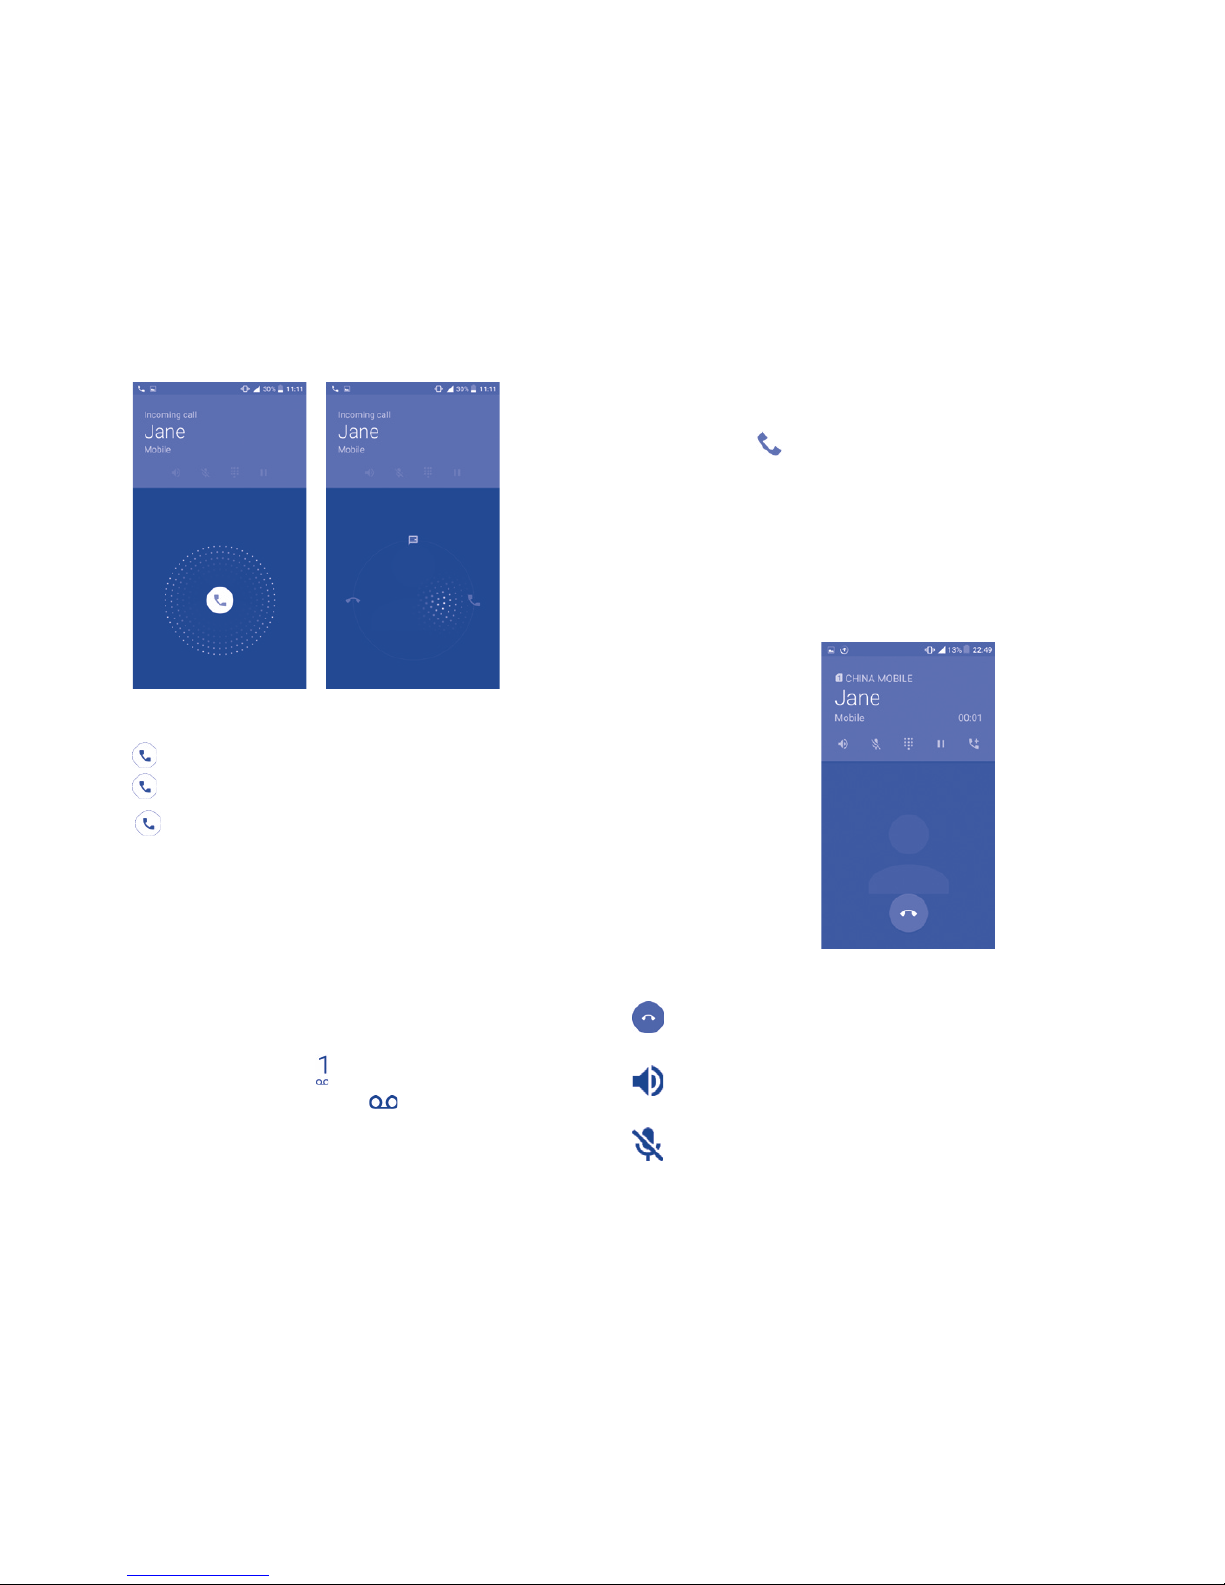
3.1.2 Answering or rejecting a call
When you receive a call:
• Slide the icon to the right to answer;
• Slide the icon to the left to reject;
• Slide the icon upwards to reject the call by sending a preset text
message.
To mute the ringtone volume of an incoming call, press the Volume up/
down key, or turn the phone over (when the Settings\Gestures\Turn over
to mute option is activated).
3.1.3 Accessing your voicemail
Your voicemail is provided by your network to avoid missing calls. It works
like an answering machine that you can consult at any time.
To access your voicemail, long press .
If you receive a voicemail, a voicemail icon will appear on the Status
bar. Open the Notification panel and touch New voicemail.
3.1.4 Resetting your voicemail password
If you forget your voicemail password, you can reset it to the last four
digits of your phone number. To start the reset, enter #793# on the dial
pad, then touch to dial. When looking at your screen, a message will
display confirming the reset of your voicemail password to the last four
digits of your phone number. Select OK and the reset will be completed.
If you need assistance with this process, please call Consumer Cellular
at (800) 686-4460.
3.1.5 During a call
To adjust the volume during a call, press the Volume up/down key.
Touch to end the current call.
Touch to activate the speaker during the current call. Touch this
icon again to deactivate the speaker.
Touch to mute the current call. Touch this icon again to unmute
the call.
14
Call settings
Voicemail
• Service: Opens a dialog box where you can select your operator’s
voicemail service or another service.
• Sound: Touch to set the sound when a new voicemail arrives.
• Vibrate: Mark the checkbox to enable vibration when a new voicemail
arrives.
Call barring: Touch to configure Call barring settings. Mark the check
box to activate the call barring for outgoing and incoming calls.
Service Dialing Numbers: You can place a call from the SDN list.
Call forwarding: Touch to configure how your calls are forwarded when
you are busy, unanswered or unreachable.
Additional settings
• Caller ID: Touch to use default operator settings to display your number
in outgoing calls.
• Call waiting: Mark the check box to notify you of new incoming calls
during a call.
Other call settings
TTY mode: TTY mode can be used by people who are deaf, have poor
hearing or speech impairments.
Hearing aids: Hearing aid mode can be used by people who are deaf,
have poor hearing or speech impairments. After connecting the phone
and hearing aid device, calls are linked to a relay service, which converts
incoming speech to text for the person using the hearing aid and converts
outgoing text from the hearing aid device to a spoken voice for the person
on the other end of the conversation.
DTMF Tones: Dual Tone Multi-Frequency, or DTMF is a method for
instructing a telephone switching system of the telephone number to be
dialed, or to issue commands to switching systems or related telephony
equipment. Touch to enable DTMF tones.
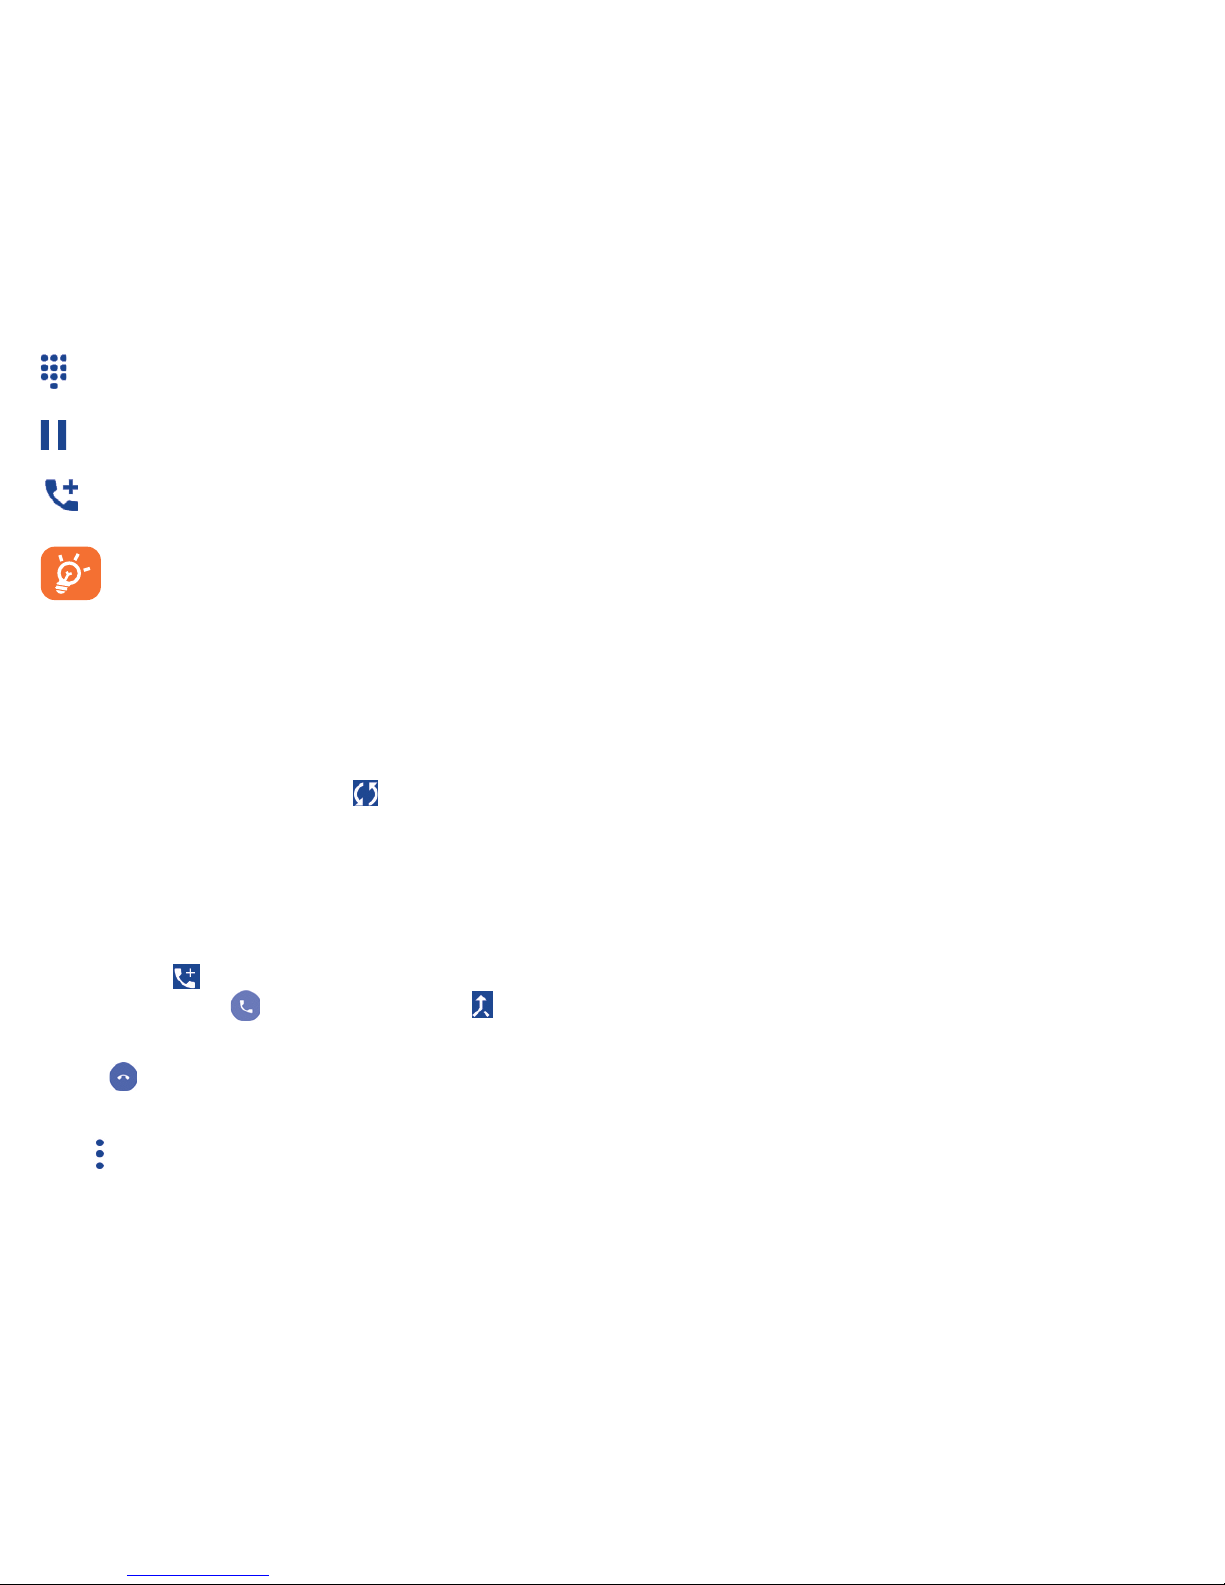
Touch to display the Dial pad.
Touch to hold the current call. Touch this icon again to retrieve
the call.
Touch to add a call.
To avoid accidental operation of the touchscreen during a call,
the screen will darken automatically when you put the
cellphone close to your ear; and the screen will light up when
the cellphone is taken away from your ear.
3.1.6 Managing multiple calls
With this phone you can handle multiple calls at the same time.
Swap calls
When you accept two calls, touch the icon, you can now switch
between two lines. The current call will be put on hold and you are able
to join the other call.
Conference calls
You can set up a conference call as follows.
• Place a call to the first participant of the conference call.
• Touch the icon .
• Then touch the icon and then touch the icon to start the
conference.
• Touch to end the conference call and disconnect all callers.
3.1.7 Call settings
Touch from the Call screen, then touch Settings. The following options
are available:
15
3.2 Wi-Fi calling
Wi-Fi Calling lets you make and receive voice calls and text /multimedia
messages over your Wi-Fi network when your phone is connected to a
Wi-Fi network and registered with your wireless carrier's network for
Wi-Fi Calling.
Wi-Fi Calling can improve your coverage and allows you to make phone
calls and send messages over a Wi-Fi network (when a Wi-Fi network is
available). Please check your rate plan to determine if Wi-Fi Calling minutes
count towards your cellular calling minutes or not.
To use Wi-Fi Calling please use the SIM card shipped with your device. A
different SIM card may not work with the Wi-Fi Calling feature. You must
have a 911 emergency address registered with your account.
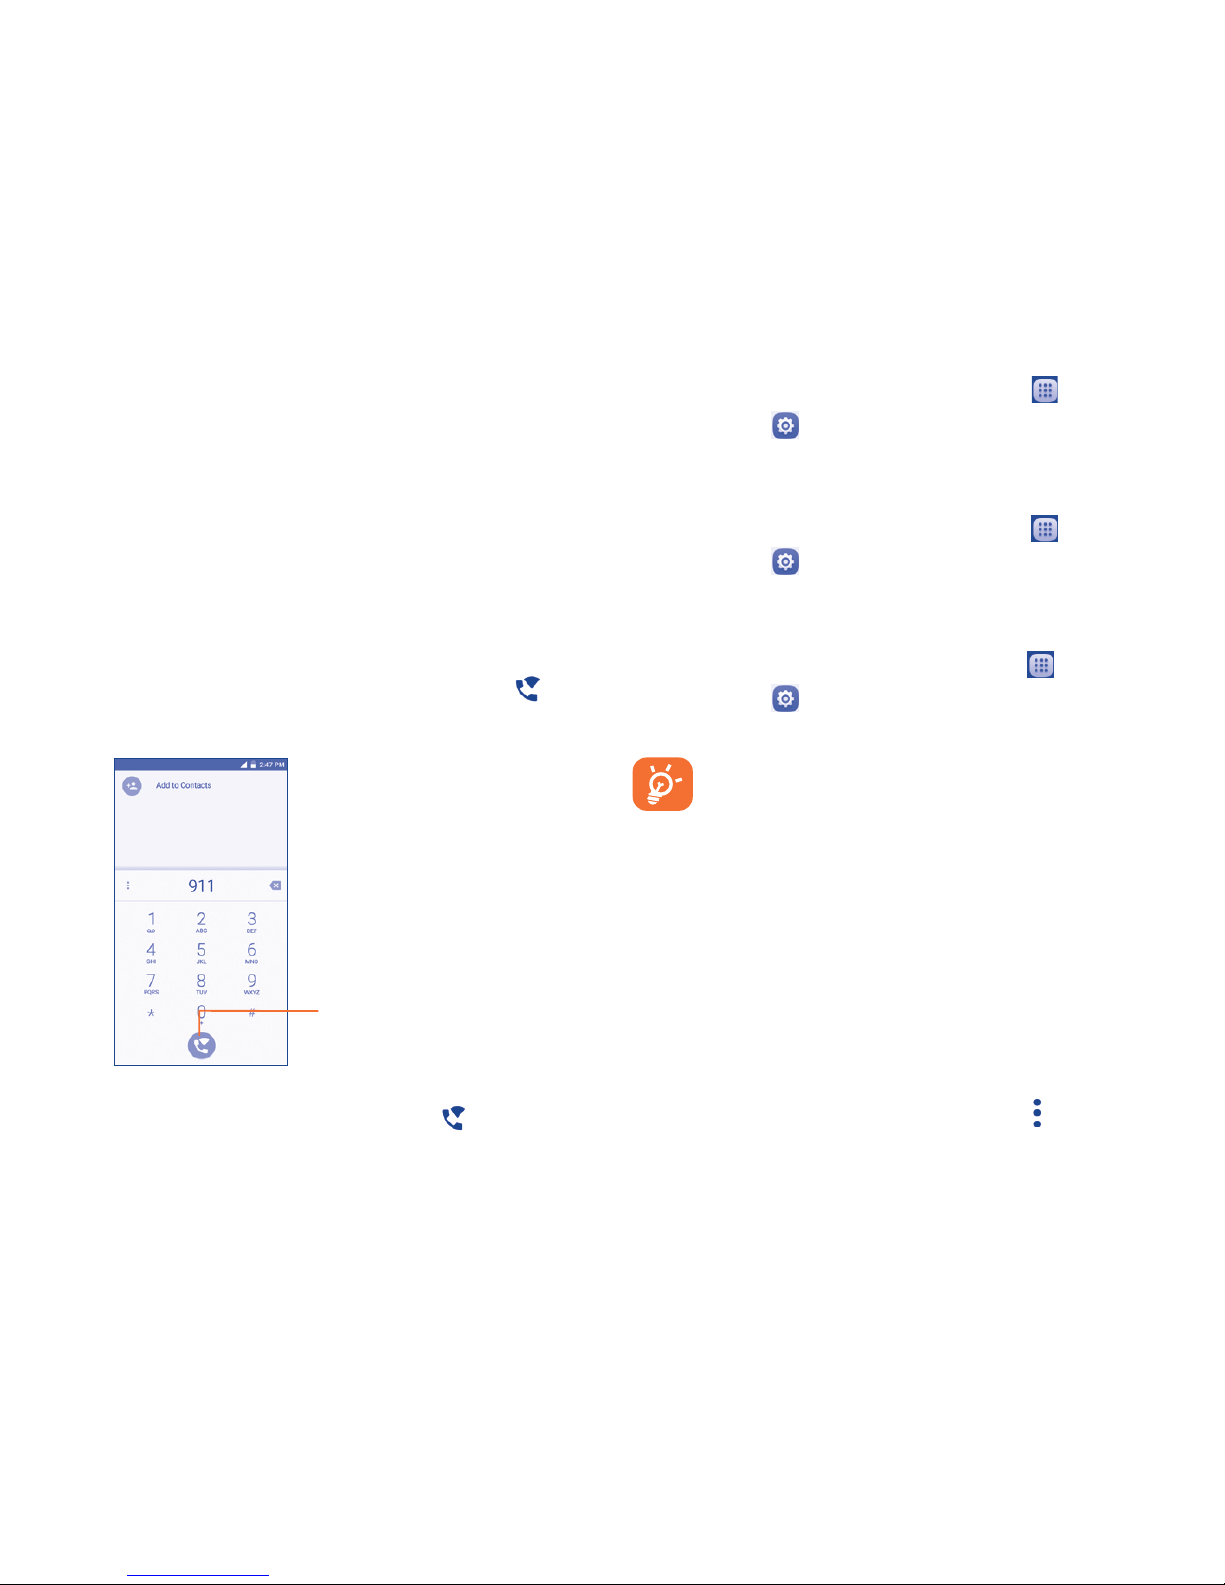
When your phone is connected to Wi-Fi network, you will see at the
top of your screen. Now you are able to use your device for calling and
messaging even if you have no cellular coverage.
Touch to make calls over
Wi-Fi when connected
to Wi-Fi network.
Enter the desired number into dial pad or select a contact from Contacts
or Call history by sliding or touching tabs, then touch to place the call.
When the handset loses Wi-Fi coverage, any active call will drop and the
phone will connect to the cellular network if available.
To enable Wi-Fi Calling
1. From the Home screen, touch the Applications icon .
2. Select Settings , then More….
3. Toggle Wi-Fi Calling button to right On position, bar will light up in green.
To disable Wi-Fi Calling
1. From the Home screen, touch the Applications icon .
2. Select Settings , then More….
3. Toggle Wi-Fi Calling button to left Off position, bar will display in gray.
To change the connection preference for Wi-Fi Calling
1 From the Home screen, touch the Applications icon .
2. Select Settings , then More….
3 Select Wi-Fi Calling, then select Connection Preferences.
Calls and messages made over Wi-Fi will be charged like
cellular calls.
3.3 Call log
You can access your call memory by touching RECENT tab from the Call
screen to view Missed calls, Outgoing calls and Incoming calls.
In the call log, you can touch a contact or number to view information,
or do a variety of other actions. You can launch a new call, send an SMS
message to the contact or number, view detailed information of the call, or
clear the call from the log.
You can also add the number to Contacts by touching Add to Contacts
(only available for unsaved phone numbers).
Touch View full call history to view All call log, touch and Clear call log
to clear the entire call memory.
16
3.4 Contacts..............................................
Contacts enables quick and easy access to the contact you want to reach.
You can view and create contacts on your phone and synchronize these
with your Gmail contacts or other applications on the web or on your phone.
To open Contacts, touch the Application tab from the Home screen,
then touch the Contacts icon. To create a new contact, touch
in the contacts list.
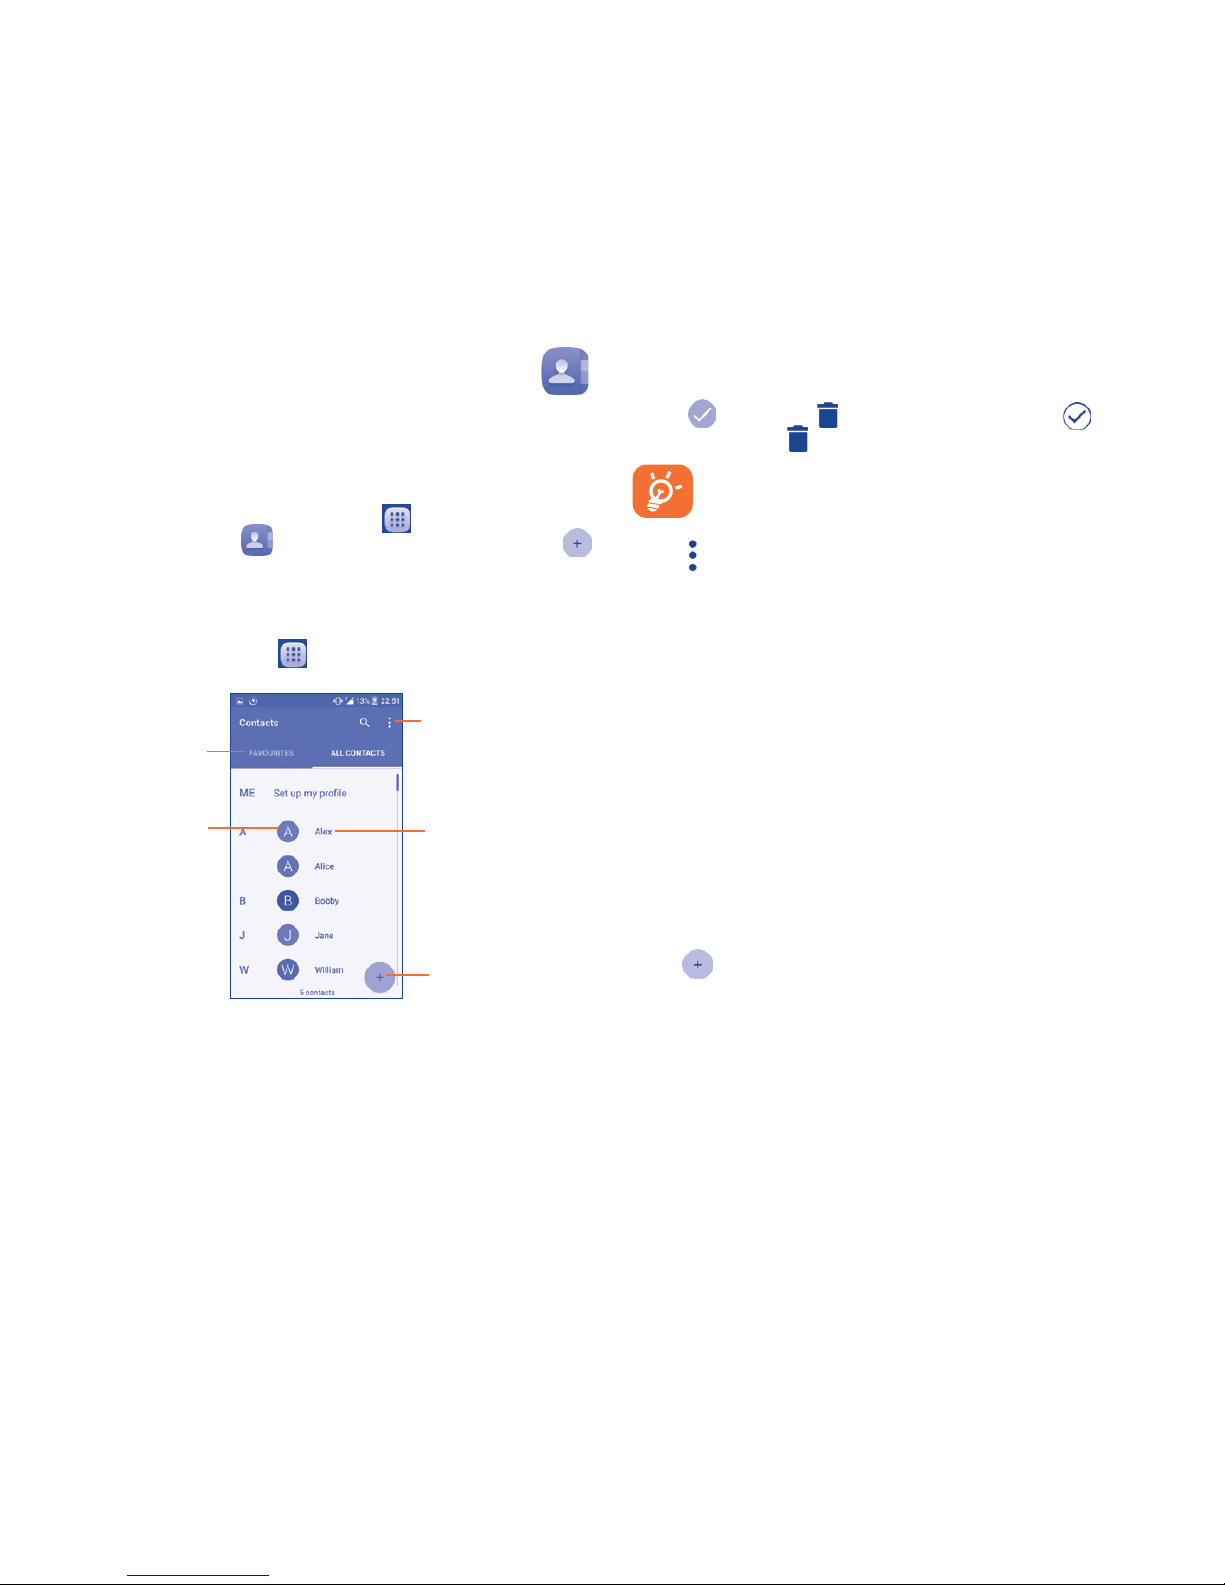
3.4.1 Consult your Contacts
To access this feature, touch from the Home screen, then select
Contacts.
Touch name to open
Quick Contact panel.
Touch to select the
current contact or all
contacts to delete.
Touch to view your
favorite contacts.
Touch to search
in Contacts
Touch to add
new contact.
Delete a contact
To delete a contact, touch the contact you want to delete, the icon will
turn to , then touch and confirm to delete. Touch to select all
contacts, then touch and confirm to delete all contacts.
The contact you have deleted will also be removed from other
applications on the phone or web the next time you synchronize
your phone.
Touch to display the contacts list options menu. The following actions
are available:
• Contacts to
display
Choose contacts to display.
• Import/export Import or export contacts between phone, SIM card,
microSD card
(1)
and phone storage.
• Accounts Manage the synchronization settings for different
accounts.
• Settings Touch to change the display of the sort list and
contact names.
3.4.2 Adding a contact
Touch in the contact list to create a new contact.
You are required to enter the contact's name and other contact information.
By scrolling up and down the screen, you can move from one field to
another easily.
 Loading...