

Alcatel-Lucent 8232 User Manual
First
Alcatel-Lucent 8232 DECT Handset
OmniPCX Enterprise
User manual
8AL 90862 USAA ed01
06/2012


Toc

Contents
4
Precautions for use . . . . . . . . . . . . . . . . . . . . . . . . . . . . . . . . . . . . . . . . . . . . . . . . . . . . . . p. 6
1.
Getting to know your telephone p. 8
1.1 Phone description . . . . . . . . . . . . . . . . . . . . . . . . . . . . . . . . . . . . . . . . . . . . . . . . . p. 8
1.2 Status icons . . . . . . . . . . . . . . . . . . . . . . . . . . . . . . . . . . . . . . . . . . . . . . . . . . . . . . p. 9
1.3 MENU icons. . . . . . . . . . . . . . . . . . . . . . . . . . . . . . . . . . . . . . . . . . . . . . . . . . . . . . p. 9
1.4 Call icons . . . . . . . . . . . . . . . . . . . . . . . . . . . . . . . . . . . . . . . . . . . . . . . . . . . . . . . . p. 10
1.5 Accessing the MENU and navigating . . . . . . . . . . . . . . . . . . . . . . . . . . . . . . . . . . p. 10
2.
Getting started p. 11
2.1 Installing the battery in the telephone . . . . . . . . . . . . . . . . . . . . . . . . . . . . . . . . . . p. 11
2.2 Charging your telephone battery . . . . . . . . . . . . . . . . . . . . . . . . . . . . . . . . . . . . . . p. 11
2.3 Switching on your telephone . . . . . . . . . . . . . . . . . . . . . . . . . . . . . . . . . . . . . . . . . p. 12
3.
Using your telephone p. 13
3.1 Making a call . . . . . . . . . . . . . . . . . . . . . . . . . . . . . . . . . . . . . . . . . . . . . . . . . . . . . p. 13
3.2 Calling from your personal directory . . . . . . . . . . . . . . . . . . . . . . . . . . . . . . . . . . . p. 13
3.3 Calling your correspondent by name (company directory) . . . . . . . . . . . . . . . . . . p. 13
3.4 Receiving a call . . . . . . . . . . . . . . . . . . . . . . . . . . . . . . . . . . . . . . . . . . . . . . . . . . . p. 14
3.5 Redialing . . . . . . . . . . . . . . . . . . . . . . . . . . . . . . . . . . . . . . . . . . . . . . . . . . . . . . . . p. 14
3.6 Requesting automatic callback if internal number is busy. . . . . . . . . . . . . . . . . . . p. 14
3.7 During a call. . . . . . . . . . . . . . . . . . . . . . . . . . . . . . . . . . . . . . . . . . . . . . . . . . . . . . p. 15
4.
During a conversation p. 16
4.1 Make a second call . . . . . . . . . . . . . . . . . . . . . . . . . . . . . . . . . . . . . . . . . . . . . . . . p. 16
4.2 Receiving a second call . . . . . . . . . . . . . . . . . . . . . . . . . . . . . . . . . . . . . . . . . . . . . p. 16
4.3 Switching between two calls (Broker call) . . . . . . . . . . . . . . . . . . . . . . . . . . . . . . . p. 16
4.4 Transferring a call . . . . . . . . . . . . . . . . . . . . . . . . . . . . . . . . . . . . . . . . . . . . . . . . . p. 17
4.5 Three-way conference with internal and/or external correspondents (conference) p. 17
4.6 Placing an outside call on hold (parking) . . . . . . . . . . . . . . . . . . . . . . . . . . . . . . . . p. 17
4.7 Activate / Deactivate voice frequency . . . . . . . . . . . . . . . . . . . . . . . . . . . . . . . . . . p. 18
5.
Sharing p. 19
5.1 Answering the general bell . . . . . . . . . . . . . . . . . . . . . . . . . . . . . . . . . . . . . . . . . . p. 19
5.2 Call pick-up . . . . . . . . . . . . . . . . . . . . . . . . . . . . . . . . . . . . . . . . . . . . . . . . . . . . . . p. 19
5.3 Hunting groups . . . . . . . . . . . . . . . . . . . . . . . . . . . . . . . . . . . . . . . . . . . . . . . . . . . p. 19
5.4 Sending a written message to an internal correspondent . . . . . . . . . . . . . . . . . . . p. 20
5.5 Send a voice message copy . . . . . . . . . . . . . . . . . . . . . . . . . . . . . . . . . . . . . . . . . p. 20
5.6 Sending a recorded message to a number a distribution list. . . . . . . . . . . . . . . . . p. 21
6.
Keep in touch p. 22
6.1 Diverting calls to your voice mailbox . . . . . . . . . . . . . . . . . . . . . . . . . . . . . . . . . . . p. 22
6.2 Consulting your voice mailbox . . . . . . . . . . . . . . . . . . . . . . . . . . . . . . . . . . . . . . . . p. 22
6.3 Program your associate number . . . . . . . . . . . . . . . . . . . . . . . . . . . . . . . . . . . . . . p. 22
6.4 Define an overflow number . . . . . . . . . . . . . . . . . . . . . . . . . . . . . . . . . . . . . . . . . . p. 23
6.5 Diverting calls to another number (immediate diversion). . . . . . . . . . . . . . . . . . . . p. 23
6.6 Different types of diversions Example of diversion on busy . . . . . . . . . . . . . . . . . p. 23
6.7 Cancelling all diversions . . . . . . . . . . . . . . . . . . . . . . . . . . . . . . . . . . . . . . . . . . . . p. 24
6.8 Consulting text messages . . . . . . . . . . . . . . . . . . . . . . . . . . . . . . . . . . . . . . . . . . . p. 24
7.
Programming your telephone p. 25
7.1 Initializing your voice mailbox . . . . . . . . . . . . . . . . . . . . . . . . . . . . . . . . . . . . . . . . p. 25
7.2 Modifying your personal code . . . . . . . . . . . . . . . . . . . . . . . . . . . . . . . . . . . . . . . . p. 25
7.3 Adjusting the audio functions. . . . . . . . . . . . . . . . . . . . . . . . . . . . . . . . . . . . . . . . . p. 25
7.4 Activating headset mode . . . . . . . . . . . . . . . . . . . . . . . . . . . . . . . . . . . . . . . . . . . . p. 26
7.5 Adjusting your telephone functions . . . . . . . . . . . . . . . . . . . . . . . . . . . . . . . . . . . . p. 26
7.6 Selecting language . . . . . . . . . . . . . . . . . . . . . . . . . . . . . . . . . . . . . . . . . . . . . . . . p. 27
7.7 Programming your personal directory . . . . . . . . . . . . . . . . . . . . . . . . . . . . . . . . . . p. 27
7.8 Modifying a card in the personal directory . . . . . . . . . . . . . . . . . . . . . . . . . . . . . . . p. 28
7.9 Erase a record from the personal directory . . . . . . . . . . . . . . . . . . . . . . . . . . . . . . p. 28
7.10 Programming an appointment reminder . . . . . . . . . . . . . . . . . . . . . . . . . . . . . . . . p. 28
7.11 Identify the terminal you are on . . . . . . . . . . . . . . . . . . . . . . . . . . . . . . . . . . . . . . . p. 29
7.12 Locking your telephone . . . . . . . . . . . . . . . . . . . . . . . . . . . . . . . . . . . . . . . . . . . . . p. 29
8.
Registering the telephone p. 30
8.1 Registering the telephone on a system for the first time . . . . . . . . . . . . . . . . . . . . p. 30
8.2 Registering the telephone on other systems . . . . . . . . . . . . . . . . . . . . . . . . . . . . . p. 30

Contents
5
9.
Using the telephone in GAP mode p. 32
9.1 Making a call . . . . . . . . . . . . . . . . . . . . . . . . . . . . . . . . . . . . . . . . . . . . . . . . . . . . . p. 32
9.2 Receiving a call . . . . . . . . . . . . . . . . . . . . . . . . . . . . . . . . . . . . . . . . . . . . . . . . . . . p. 32
9.3 Calling from your personal directory . . . . . . . . . . . . . . . . . . . . . . . . . . . . . . . . . . . p. 32
9.4 Redialling the last number dialed (redial) . . . . . . . . . . . . . . . . . . . . . . . . . . . . . . . p. 33
9.5 Sending DTMF signals . . . . . . . . . . . . . . . . . . . . . . . . . . . . . . . . . . . . . . . . . . . . . p. 33
9.6 Sending a calibrated cut-off . . . . . . . . . . . . . . . . . . . . . . . . . . . . . . . . . . . . . . . . . . p. 33
9.7 Programming your personal directory . . . . . . . . . . . . . . . . . . . . . . . . . . . . . . . . . . p. 33
9.8 Deleting a card. . . . . . . . . . . . . . . . . . . . . . . . . . . . . . . . . . . . . . . . . . . . . . . . . . . . p. 34
9.9 Customizing and adjusting your telephone . . . . . . . . . . . . . . . . . . . . . . . . . . . . . . p. 34
10.
Accessories p. 36
10.1 Phone package . . . . . . . . . . . . . . . . . . . . . . . . . . . . . . . . . . . . . . . . . . . . . . . . . . . p. 36
10.2 Chargers . . . . . . . . . . . . . . . . . . . . . . . . . . . . . . . . . . . . . . . . . . . . . . . . . . . . . . . . p. 36
10.3 Characteristics of the mains power adapter . . . . . . . . . . . . . . . . . . . . . . . . . . . . . p. 37
10.4 Presentation of the battery pack . . . . . . . . . . . . . . . . . . . . . . . . . . . . . . . . . . . . . . p. 37
10.5 Headphone / external microphone. . . . . . . . . . . . . . . . . . . . . . . . . . . . . . . . . . . . . p. 37
10.6 Cleaning your telephone . . . . . . . . . . . . . . . . . . . . . . . . . . . . . . . . . . . . . . . . . . . . p. 37
10.7 Transporting and protecting your telephone . . . . . . . . . . . . . . . . . . . . . . . . . . . . . p. 37
11.
Glossary p. 38
Declaration of compliance . . . . . . . . . . . . . . . . . . . . . . . . . . . . . . . . . . . . . . . . . . . . . . . . . p. 39

Precautions for use
6
howtoc
Coverage area
The DECT functions provided by your Alcatel-Lucent system allow user mobility management via DECT cordless
telephones.
Radio coverage of the Alcatel-Lucent system is ensured by a network of radio terminals. The coverage area of a
radio terminal is called a cell.
• Mobility:
A user can make or receive calls in any cell.
• Radio transfer:
This function enables the user to move during a conversation and go from one cell to another. The transfer takes
place automatically and has no effect on the conversation. In some cases, slight crackling may be audible at the
moment of transition.
Use of approved DECT equipment
This DECT telephone is designed to be used with a private automatic branch exchange (PABX) without an AlcatelLucent wire. The CE symbol means that this product is compliant with current Community directives, more
especially the following directives:
Pursuant to directive 1999/5/CE (R&TTE) published in the Official Journal of the European Community of April 7,
1999, these items of equipment use the DECT harmonized frequency spectrum and can be used in all the countries
of the European Community, in Switzerland and Norway.
89/336/
CEE
Electromagnetic Compatibility
73/23/CEE (low voltage)
1999/5/CE (R&TTE)
No guarantee is given concerning possible interference affecting DECT equipment, due to other
authorised utilisation of the radio frequencies concerned.

Precautions for use
7
Operating conditions
This approved DECT telephone is intended to be used with an Alcatel-Lucent cordless PBX. The following
conditions must be respected, notably concerning the use of radioelectric frequencies:
Changes or modifications to the equipment not expressly approved by the party responsible for compliance could
void the user’s authority to operate the equipment.
To limit the risk of interference, people with pacemakers must keep the wireless telephone away from their
equipment (minimum distance of 15 cm/6 inches)
It is recommended to follow the standard acceptance procedures before using this equipment in human safety
critical areas (hospitals...).
DECT equipment can only be used to establish links between fixed points if these links are temporary and the
equivalent isotropically radiated power at the antenna is less than 250 mW.
The conditions of access to a DECT equipment telepoint network shall be stipulated by contract with the operator
of the authorized telepoint network concerned.
Do not expose your telephone to severe conditions (rain, sea air, dust, etc.).
Switch off the telephone before changing the battery.
You must not switch on or use your telephone near gas or inflammable liquids.
The handset includes magnetic elements that may attract sharp metallic objects. To prevent injury, before each
use ensure sharp metallic objects are not stuck to the earpiece.
There is a danger of explosion if the battery is replaced incorrectly. Use only recommended battery : Alcatel-
Lucent 3BN67332AA (China Shenzhen DRN Battery Co. Ltd. RTR001FXX / China Effort Limited CE-MB206-5CXX - Li-ion 3.7V 1100mAh 4.1Wh).
The mains power socket used must be close to the charger/holder and easily accessible, so that it can be used
as an "on/off" facility.
Battery charge : Charge the battery for about 16 hours before initial use.
Use only 8232 DECT Handset charging units: : 8232 DECT Handset Desktop charger (3BN67331AA), 8232
DECT Handset Desktop charger PSU (SALOM SSW-2374, Friwo FW7712-/FW7713/XX, Ten Pao
S005SV0500100 / S005SB0500100). You can charge the device by connecting it to a USB 2.0 port (type A). Use
only the cable provided with the 8232 DECT Handset Desktop Charger (USB "A" plug).
The labels and icons presented in this document are not contractually binding and may be modified without prior
warning.The labels and icons displayed on your phone depend on the system to which you are connected and may
differ from those specified in this document.
Getting to know your telephone
1
8
Other
1.1
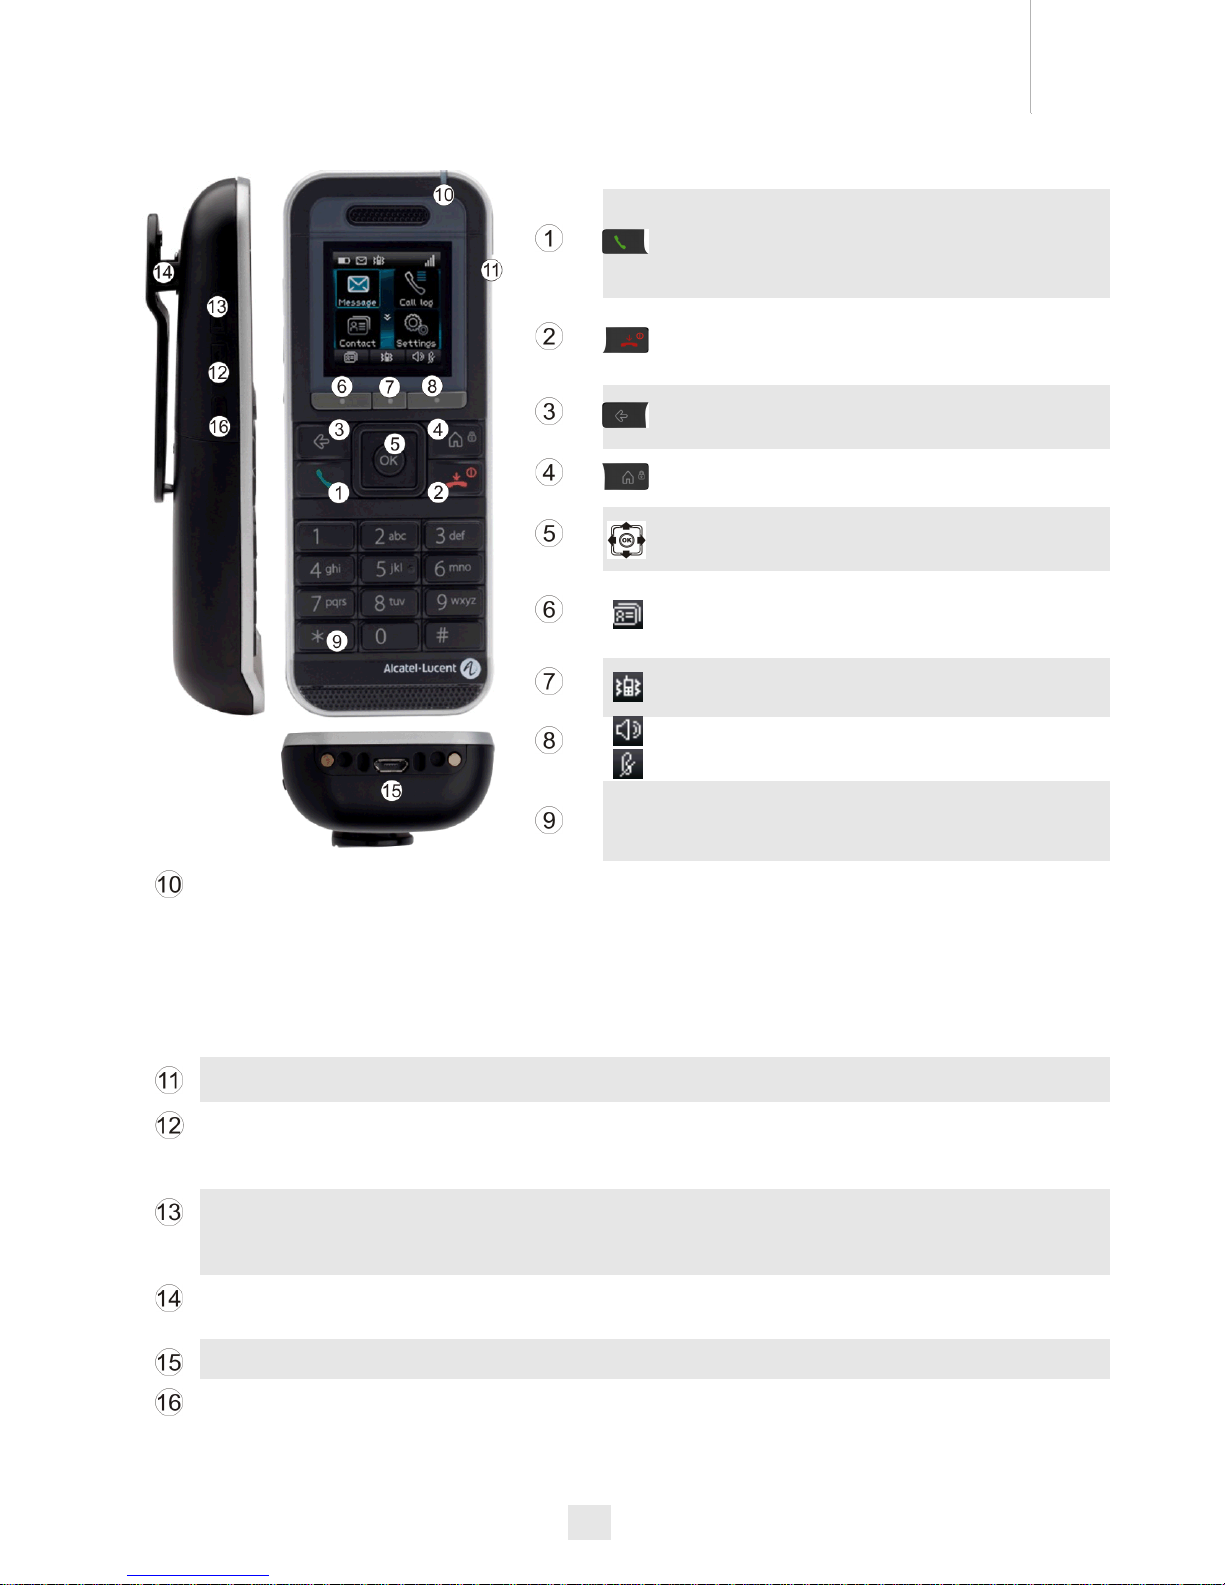
Phone description
• Answer the call
• Long press (feature depending on the system):
redial last number or access the redial list
• Switching between two calls (Broker call)
• Switch off ringer
• Hang up
• Long press : Switch on the phone / Switch off the
phone
• Return to previous menu
• Erase a character
• Delete an entire field
• Back to homepage
• Lock/unlock keypad
• Access MENU
• Confirm
• Navigate
• Short press : access the company directory
• Long press : Customizing your telephone ;
Telephone ID (Features depending on the
system)
• Access the ringer and vibrate adjustment feature
• Short press : Activate/deactivate the loudspeaker
• Long press : Activate/deactivate the mute feature
• Long press (Features depending on the system ) :
Access to personal speed dial / Access the DTMF
feature during a conversation
LED
• Green steady: the phone is on the charger and the battery is fully charged
• Red steady: the phone is on the charger and the battery is charging
• Slow yellow flashing: telephonic event such as unread message, missed call, etc.
• Rapid yellow flashing: incoming call
• Red flashing: out of coverage
• Flashing when the phone is plugged into the charger means the same as when the phone is not plugged
into the charger; however, the LED will display red or green in between the yellow flash depending on the
charging status.
• 3.5 mm jack plug for headset and maintenance
• Short press : Decrease the volume of ring tone during an incoming call (4 steps) or decrease volume of
loudspeaker during a conversation (8 steps).
• Long press : activate/deactivate the mute feature.
• Short press : increase the volume of ring tone during an incoming call (4 steps) or increase volume of
loudspeaker during a conversation (8 steps).
• Long press : activate/deactivate the loudspeaker.
• Clip to hook your phone on your belt. You can remove the clip and instead use the cover that is provided
in the phone package.
• USB plug for charging the battery
• press on this key to light up the screen when the phone is in idle state

9
1.2
Status icons
The status icons are displayed on the welcome screen and indicate the status of the telephone.
1.3
MENU icons
The MENU is accessible from the welcome screen by pressing the OK key. (OK:)
It provides access to all the functions available on your system.
Battery charge level
Received messages voice mail and callback request texts and unanswered calls
Appointment programmed
Call diversion activated
Vibrator active
Ringer active
Ringer disabled
Radio reception quality
Loudspeaker on (in conversation)
Mute on (in conversation)
Economy mode activated and used (green)
Economy mode activated (gray)
You can obtain details on the status icons from the tooltips that appear on the
welcome screen when you use the navigator:
Directories:
manage your personal directory and access the company directory.
Redial
call back the last number dialed.
Divert
divert your calls to another number.
Mailbox:
consult and send voice and text messages.
Call pick-up:
answer a call intended for another telephone.
Appointment:
program a call-back time.
System lock:
prohibit outgoing calls and modification of the programming.
Guide: programming, list of functions,...
Adjustment: ;
adjust contrast, activate or deactivate the beeps, lighting, etc.
System selection
Installation
Manager/Assistant
Choice of language
Ringing setting
10
1.4
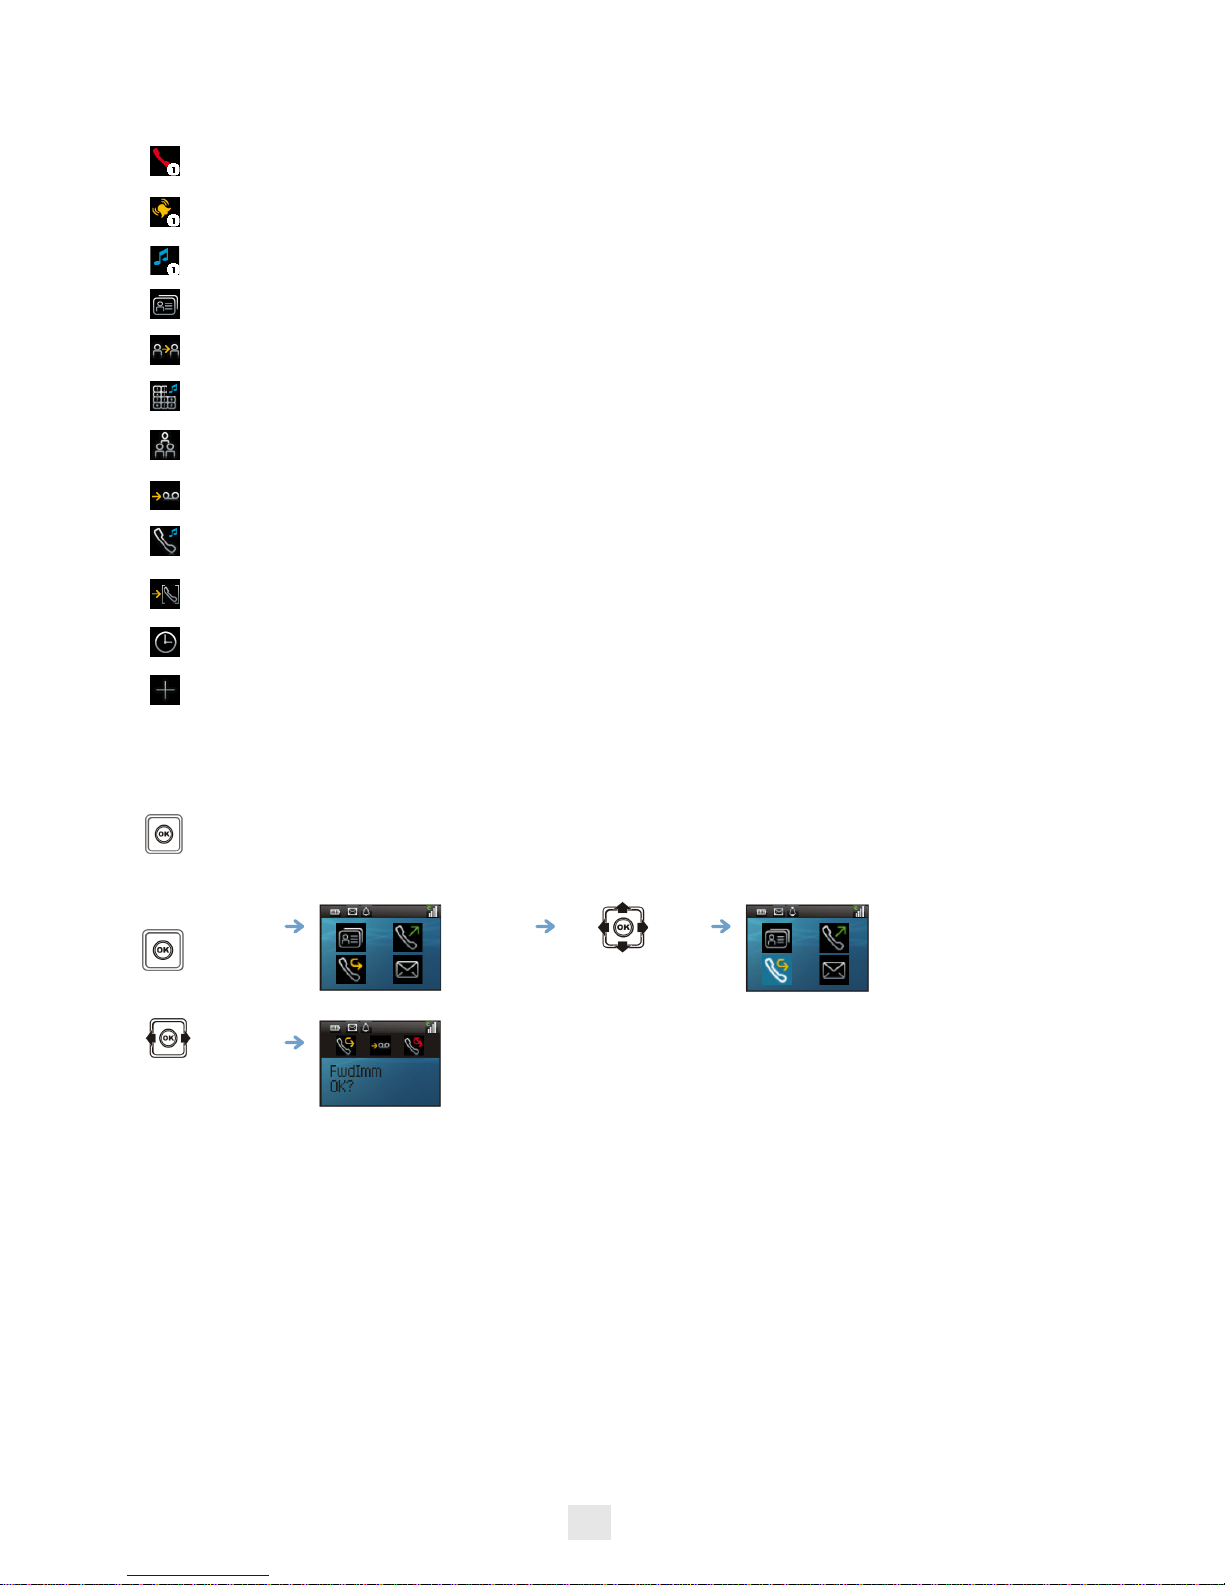
Call icons
In the event of a multiple call, the icons are given indices to represent the different correspondents
1.5
Accessing the MENU and navigating
The MENU is accessible from the welcome screen by pressing the OK key.
Making a call
Receiving a call
Call on hold
Accessing the directories
Transferring a call
Switching to DTMF signals
Setting up a conference
Diverting your calls to your voice message service
Putting on common hold
Parking an external communication
Call duration and cost
Additional options (Features depending on the system )
Access MENU Select a function in the MENU
You can move horizontally along the various icons within the function
Getting started
2
11
Other
2.1
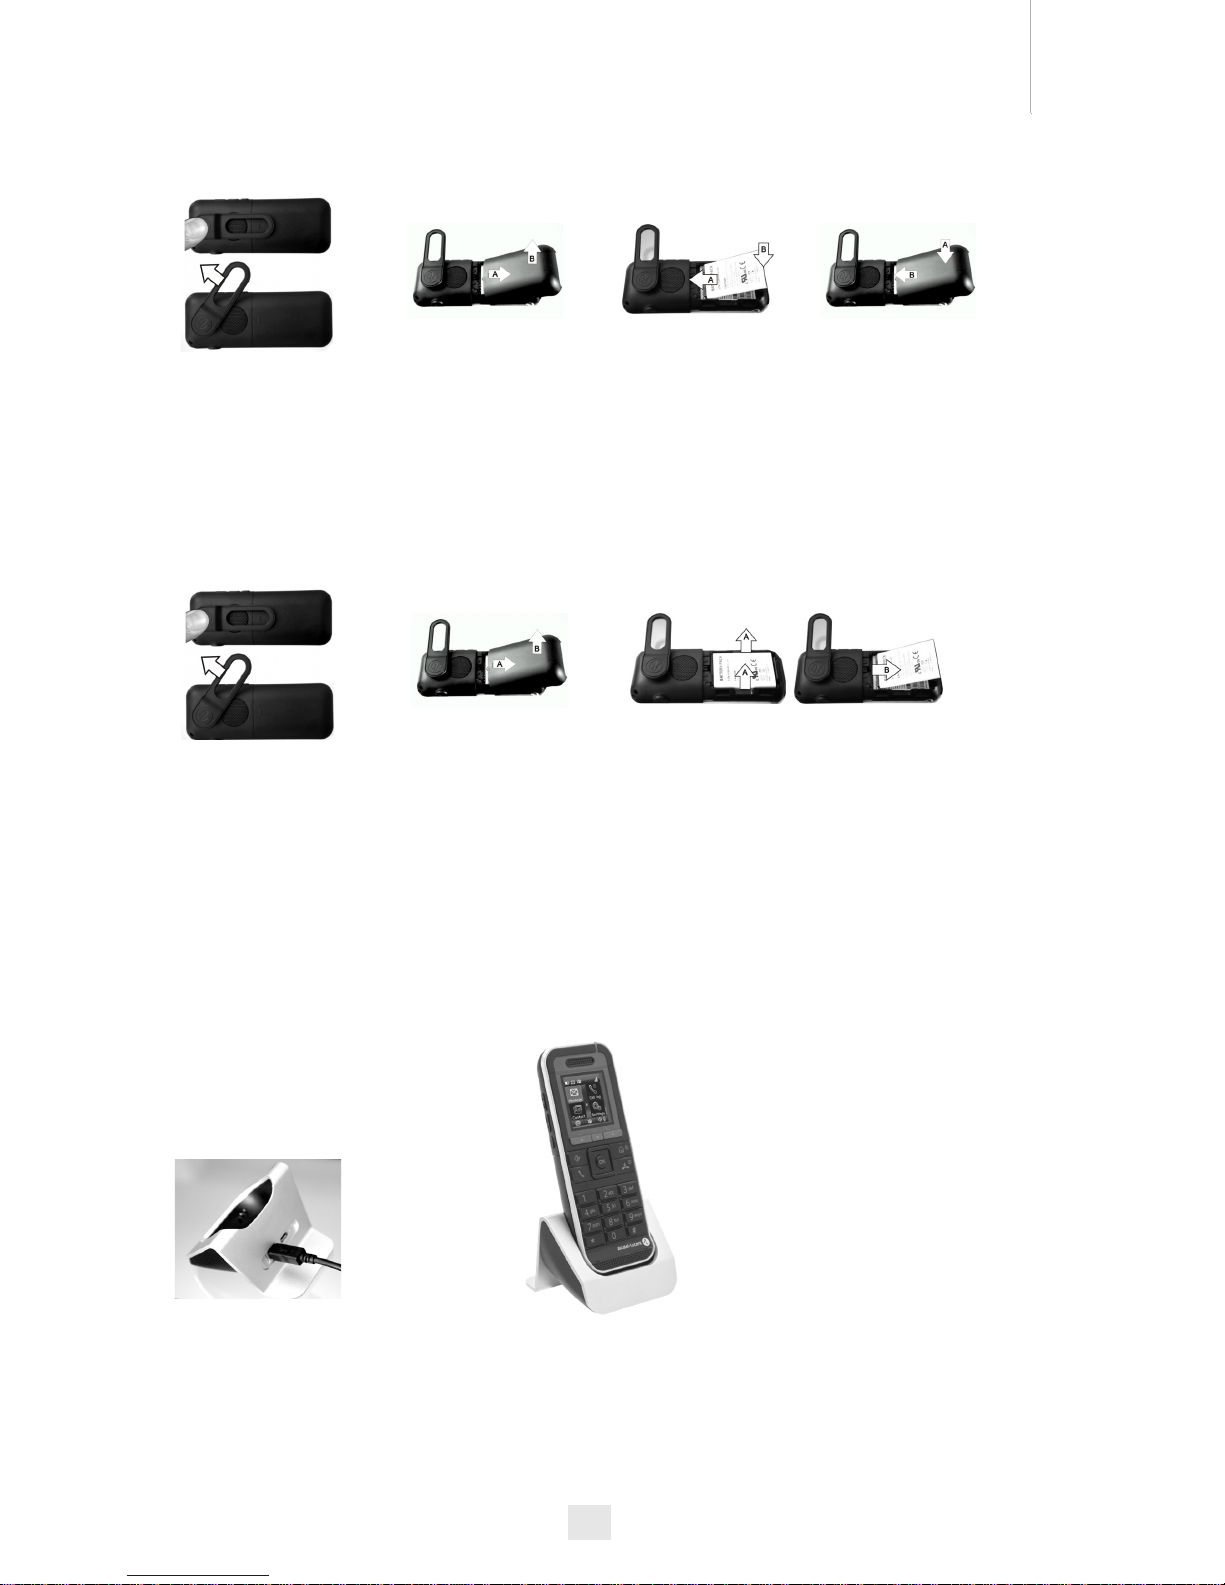
Installing the battery in the telephone
• Installing the battery in the telephone
• To remove it
2.2
Charging your telephone battery
• How to dock your phone on the desk support
If the belt clip is installed,
you must lift it up and
maintain it in this position
during the battery
installation or
replacement.
You can also turn the belt
clip counterclockwise.
Lift up the cover. Position the battery
connectors side as
shown in the drawing
(A). Terminate the
installation of the
battery in its
compartment by
pressing as shown in
the drawing (B).
Replace the cover.
If the belt clip is installed,
you must lift it up and
maintain it in this position
during the battery
installation or
replacement.
You can also turn the belt
clip counterclockwise.
Lift up the cover. Remove the battery from its compartment as
shown in the drawing.
Put your phone on its support. Plug the USB cable into the 5V socket of the desk support. Plug the
other end of the USB cable into the AC/DC adapter. Plug the adapor into the mains power supply.

12
• How to dock your phone with the USB cable
LED
• Green steady: the phone is on the charger and the battery is fully charged
• Red steady: the phone is on the charger and the battery is charging
Recharge your telephone battery regularly. The telephone can be on or off when recharging the battery. If the
telephone is to remain unused or out of its charger for several weeks, remove the battery and store it separately.
2.3
Switching on your telephone
If the display fails to light up or the battery icon is flashing, recharge the battery. ;
If the radio reception icon doesn’t appear on the telephone display :
• Check that you’re in an area covered (if you’re not, move close to a radio terminal).
• Check that the telephone is properly installed in the system (consult the PABX manager).
Switching off your telephone:
Press the switch on/off key (long press).
Plug the USB cable into the USB port of your phone. The other end of the
USB cable can be plugged into the AC/DC adapter or into a computer USB
port.
You can also charge your phone from any USB plug, such as a computer USB plug. However, the
charging time is longer than charging with the AC/DC adapter.
The battery charging time is less than 3 hours. The charging time is longer if charging through the
USB plug from a device other than the AC/DC adapter.
Autonomy of your telephone
On standby in the radio coverage zone: up to 200 hours
In continuous conversation: up to 20 hours
Switch off the telephone before changing the battery.
Your telephone is switched on
Press the switch on/off key
(long press)
If the display indicates: "System 1 Auto install ?", see paragraph "Registering the telephone" or
contact your installation technician.
 Loading...