

Page 1

Alaris® PC Unit, Model 8015
Upgrade to v9.12
Software Upgrade Instructions
Table of Contents
Explanation . . . . . . . . . . . . . . . . . . . . . . . . . . . . . . . . . . . . . . . . . . . . . . . . . . . . . 1
References . . . . . . . . . . . . . . . . . . . . . . . . . . . . . . . . . . . . . . . . . . . . . . . . . . . . . . 1
Kit Contents . . . . . . . . . . . . . . . . . . . . . . . . . . . . . . . . . . . . . . . . . . . . . . . . . . . . . 1
Parts and Tools Required . . . . . . . . . . . . . . . . . . . . . . . . . . . . . . . . . . . . . . . . . . . . 2
Identify Software Version. . . . . . . . . . . . . . . . . . . . . . . . . . . . . . . . . . . . . . . . . . . . 2
RF Card and RF Card Cover Compatibility. . . . . . . . . . . . . . . . . . . . . . . . . . . . . . . . . 3
Software Upgrade . . . . . . . . . . . . . . . . . . . . . . . . . . . . . . . . . . . . . . . . . . . . . . . . . 3
Task 1: Flash Alaris PC Unit Using CF Card (takes approximately 5 minutes) . . . . . . . . 3
Task 2a: Wireless Network Configuration — Transfer Network Configuration/Data Set to
Alaris PC Unit . . . . . . . . . . . . . . . . . . . . . . . . . . . . . . . . . . . . . . . . . . . . . . . . . . . . 6
Task 2b: Non-Wireless Configuration — Transfer Data Set to Alaris PC Unit . . . . . . . . . 8
Troubleshooting . . . . . . . . . . . . . . . . . . . . . . . . . . . . . . . . . . . . . . . . . . . . . . . . . . 8
Explanation
®
IMPORTANT: If the Alaris
center at 1.888.562.6018 to arrange for a software upgrade. Do not use these instructions and the
accompanying software to upgrade software that is prior to v9.1.14.
This document provides instructions to:
• Upgrade Model 8015 software from v9.1.14 to v9.12.
• Upgrade Model 8015 software from v9.5 to v9.12.
• Upgrade Model 8015 software from v9.7 to v9.12
• Upgrade Model 8015 software from v9.9 to v9.12.
PC unit software version is prior to v9.1.14, call the CareFusion support
References
The instructions in this document are to be used in conjunction with the v9.7.x or v9.8 Alaris
System Maintenance Software User Guide.
Kit Contents
Before proceeding, verify that the following items are enclosed in the applicable kit:
• 8990 v9.12 Guardrails
• Serial Cable (Alaris PC unit to computer connection)
P/N 12280525 Rev 02 Page 1 of 12
®
Point-of-Care software CD
Page 2

Alaris® PC Unit, Model 8015 Software Upgrade Instructions to v9.12
Parts and Tools Required
In addition to the parts included in the applicable upgrade kits, the following parts and tools are
required.
Software Upgrade:
• Windows-based personal computer or laptop, with v9.7.x or v9.8 Alaris System Maintenance
software installed
•Three CompactFlash
recommends SiliconDrive
Systems, Inc. It is also available from CareFusion as P/N 10012641.
•CF card reader
• #1 Phillips
Available from CareFusion:
• 8975 Alaris System Maintenance software kit, v9.7.X or v9.8
• 9981 Guardrails
Guardrails alert logs)
• Serial to USB Port Adapter kit (P/N 12273817, or equivalent) (if computer being used does not
have a DB-9 serial port)
®
head screwdriver
®
(CF) memory cards in FAT/FAT16 format, 64 MB to 2 GB . CareFusion
®
CF, SSD-C64MI-3012 (or equivalent) — available from Silicon
®
CQI Reporter software kit, v9.2.1or v9.8 (optional use for downloading
Warning and Caution Definitions
A WARNING is an alert to a potential hazard which could result in serious personal injury and/or
product damage if proper procedures are not followed.
A CAUTION is an alert to a potential hazard which could result in minor personal injury and/or
product damage if proper procedures are not followed.
Identify Software Version
1. Power on Alaris PC unit.
2. Respond to all prompts:
• Press Yes on the NEW PATIENT? screen.
• Press Yes on the profile screen (if displayed).
• On the Patient ID screen (if displayed) press Exit.
3. Press OPTIONS.
4. Press PAGE DOWN.
5. Press Software Versions.
6. Press View. The software and firmware versions are displayed.
7. Compare (and write down) software/firmware Main Processor versions displayed on Alaris PC
unit with corresponding versions listed on the label of the v9.12 Guardrails Point-of-Care
software CD.
8. Power down the Alaris PC unit.
P/N 12280525 Rev 02 Page 2 of 12
Page 3
Alaris® PC Unit, Model 8015 Software Upgrade Instructions to v9.12
RF Card and RF Card Cover Compatibility
It is important to use the correct RF card cover. If the existing RF card is being reinstalled after the
software upgrade, make sure to reinstall the existing RF card cover.
The following table provides the RF card and RF card cover identifier and compatibility information.
RF Card
Symbol IEEE
802.11b (does not
support WPA-2
security)
AmbiCom
802.11b/g
Motorola
802.11a/b/g
®
IEEE
®
IEEE
RF Card
Identifier
Blue label A foam insert
Gray card A foam insert
Green label A pre-
RF Card
Cover
might or
might not be
used.
is not used.
installed
(attached)
foam insert is
used.
Compatibility
— A cover with a foam insert: Before screwing the
cover down, place it over the RF card. If there is a
gap between the cover and the rear panel, use a
cover that has no foam insert.
—
A cover with no foam insert: If there is a
noticeable gap between the inside surface of the
cover and the end of the RF card, use a cover that
has a foam insert. Using the wrong cover can result
in a loose fit between the RF card and its cover,
creating the potential for network communication
errors if the RF card becomes loose.
Installing a cover with a foam insert results in
unacceptable pressure being applied agai nst the RF
card.
Using a cover with no foam insert can result in a
loose fit between the RF card and its cover, creating
the potential for network communication errors if
the RF card becomes loose.
Software Upgrade
NOTE: You cannot use Alaris S ystem Maintenance software to upgr ade an Alaris PC unit Model 8015
to v9.12. Flashing the firmware files must be done with a CF car d.
WARNING: Never upgrade the software while the Alaris PC unit is connected to the patient.
CAUTION:
• Upgrading the software erases CQI informatio n on the Alaris PC unit. Before starting the upgrade
process, it is highly recommended to download the Guardrails alert logs using the download tool
that is part of the Alaris System Maintenance software or Guardrails CQI Reporter software. The
software used to download the Guardrails alert logs must be compatible with the Alaris PC unit
version.
• Do not use these upgrade instructions on the Model 8000. Doing so can render the Model 8000
inoperable.
• Reinstalling v9.12 on a FIPS 140-2 compliant Alaris PC unit with v9.12 already i nstalled d isables
the FIPS 140-2 mode and zeroizes the Critical Security Parameters (CSP). For more detailed
information about FIPS 140-2 compliance, refer to the FIPS 140-2 compliance instructions, the
Alaris System Maintenance Software User Guide, and Alaris Systems Manager Software User
Guide.
Task 1: Flash Alaris PC Unit Using CF Card (takes approximately 5 minutes)
1. Label the first FAT16-formatted CF card as "8015 POLO."
2. Copy folder contents of v9.12 Guardrails Point-of-Care software CD to computer.
3. Connect CF card reader to computer.
P/N 12280525 Rev 02 Page 3 of 12
Page 4
Alaris® PC Unit, Model 8015 Software Upgrade Instructions to v9.12
4. Insert CF card labeled "8015 POLO" into CF card reader and delete any existing contents on
card.
®
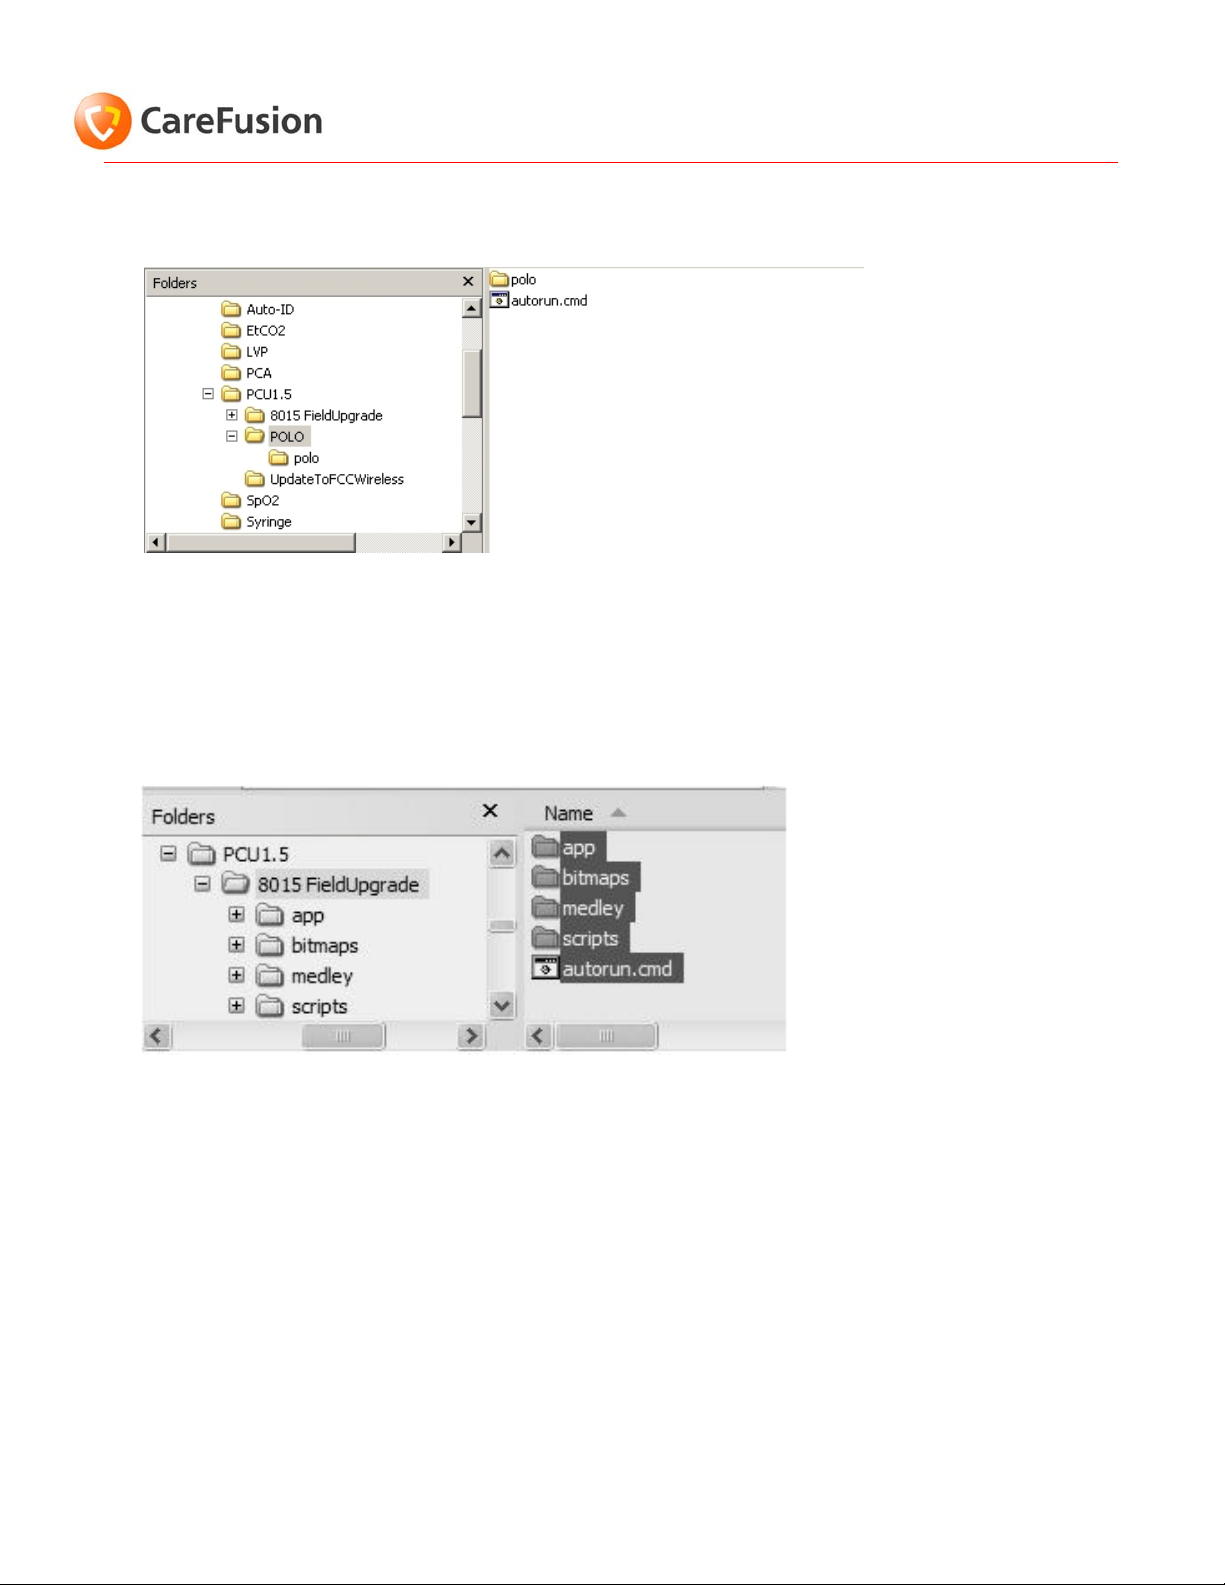
5. Using Windows Explorer
, locate POLO folder (path: \PCU1.5\POLO).
6. Copy contents of POLO folder (not folder itself) to CF card labeled "8015 POLO." When
complete, CF card should contain one folder and an autorun.cmd file.
7. Remove CF card labeled "8015 POLO" from CF card reader.
8. Label the second FAT16-formatted CF card as "8015 App."
9. Insert CF card labeled "8015 App" into CF card reader and delete any existing contents on card.
10.Using Windows Explorer
®
, locate 8015 FieldUpgrade folder (path: \PCU1.5\FieldUpgrade).
11.Copy contents of 8015 FieldUpgrade folder (not folder itself) to CF card labeled "8015 App."
When complete, CF card should contain four folders and an autorun.cmd file.
12.Remove CF card labeled "8015 App" from CF card reader.
13.Label the third FAT16-formatted CF card as “FCCwirelessconfig.”
14.Insert CF card labeled “FCCwirelessconfig”
into CF card reader and delete any existing contents
on card.
15.Using Windows Explorer
®
, locate UpdateToFCCWireless folder (path:
\PCU1.5\UpdateToFCCWireless).
P/N 12280525 Rev 02 Page 4 of 12
Page 5

Alaris® PC Unit, Model 8015 Software Upgrade Instructions to v9.12
16.Copy contents of UpdateToFCCWireless (not folder itself) to CF card labeled
“FCCwirelessconfig.” When complete, CF card should contain three files.
17.Remove CF card labeled “FCCwirelessconfig” from CF card reader.
18.Ensure that Alaris PC unit is powered off and not plugged into AC power.
19.Remove RF card cover. Retain RF card cover and screws for reinstallation later on in this
procedure.
20.Insert CF card labeled "8015 POLO" into RF card slot.
The CF card can be inserted in only one direction — with label facing away from the center of the
Alaris PC unit. To avoid damaging the pins, do not force the CF card into the connector.
21.Plug Alaris PC unit into AC power.
22. Power on Alaris PC unit. Alaris PC unit displays installation status on main screen and powers off
when complete.
23.Remove CF card labeled "8015 POLO" from Alaris PC unit.
24.Insert CF card labeled "8015 App" into RF card slot.
The CF card can be inserted in only one direction — with label facing away from the center of the
Alaris PC unit. To avoid damaging the pins, do not force the CF card into the connector.
25. Power on Alaris PC unit. Alaris PC unit displays installation status on main screen and powers off
when complete.
26.Remove CF card labeled "8015 App" from Alaris PC unit.
27.Power cycle the Alaris PC Unit with no CF card installed.
28.Insert CF card labeled "FCCwirelessconfig" into RF card slot.
P/N 12280525 Rev 02 Page 5 of 12
Page 6

Alaris® PC Unit, Model 8015 Software Upgrade Instructions to v9.12
The CF card can be inserted in only one direction — with label facing away from the center of the
Alaris PC unit. To avoid damaging the pins, do not force the CF card into the connector.
29. Power on Alaris PC unit. When the wireless configuration flash completes, the Alaris PC Unit NEW
PATIENT? screen displays.
30.Verify that Alaris PC unit is successfully upgraded (see Identify Software Version on page 2).
31.Power off Alaris PC unit and unplug from AC power.
32.Remove CF card labeled "FCCwirelessconfig" from Alaris PC unit.
33.Insert RF card into RF card slot, with card's LEDs facing away from center of Alaris PC unit.
34.Install RF card cover.
IMPORTANT: Using the wrong RF card cover can result in a loose fit between the RF card and its
cover, creating the potential for network communication errors if the RF card becomes loose.
Task 2a: Wireless Network Configuration — Transfer Network Configuration/Data
Set to Alaris PC Unit
1. Plug Alaris PC unit into AC power.
2. Remove rubber plug from RJ-45 connector on Alaris PC unit.
3. Connect serial communications cable to RJ-45 connector on Alaris PC unit.
P/N 12280525 Rev 02 Page 6 of 12
Page 7

Alaris® PC Unit, Model 8015 Software Upgrade Instructions to v9.12
4. Connect communications cable to communications port on computer. If computer has only a USB
port, connect serial cable to USB adapter cable (using kit available from CareFusion) and USB
adapter cable to computer's USB port.
5. Ensure that System Maintenance software recognizes computer's connection to Alaris PC unit
(refer to v9.7.xor v9.8 Alaris System Maintenance Software User Guide , Hardware Connections).
6. Run Transfer Network Configuration (Silent) task (refer to v9.7.X or v9.8 Alaris System
Maintenance Software User Guide
7. Power off Alaris PC unit.
8. Disconnect serial cable from Alaris PC unit and insert rubber plug in RJ-45 connector.
9. Power on Alaris PC unit.
— Configure Components, for details).
10.Respond to all prompts and press
11.Verify that Alaris PC unit connects to server (green light in lower-left corner of Alaris PC unit
keypad flashes as a data set is transferred).
NOTE: To be able to monitor the transferring data set, the Alaris PC unit must be within the
range of the network access point.
12.To display the Data Set Status menu:
•Press Option.
•Press PAGE DOWN twice.
•Press Data Set Status.
Yes on the NEW PATIENT? screen.
13.When the new data set is visible and transfer is complete, power off the Alaris PC unit.
NOTE:
• The data set is visible in the Pending field of the Data Set Status menu.
• When the status changes from Transferring ... to Not Activated, the transfer is complete.
14.Power on Alaris PC unit.
15.Respond to all prompts and press Yes on the NEW PATIENT? screen.
16.Select a profile in new data set to verify that data set has successfully transferred.
17.The Alaris PC unit is now successfully upgraded.
NOTE:
P/N 12280525 Rev 02 Page 7 of 12
Page 8

Alaris® PC Unit, Model 8015 Software Upgrade Instructions to v9.12
In order to use the Barcode/Pre-population functionality, the data set must be transferred wirelessly
from the server.
Task 2b: Non-Wireless Configuration — Transfer Data Set to Alaris PC Unit
1. Plug Alaris PC unit into AC power.
2. Remove rubber plug from RJ-45 connector on Alaris PC unit.
3. Connect serial communications cable to RJ-45 connector on Alaris PC unit.
4. Connect communications cable to communications port on computer. If computer has only a USB
port, connect serial cable to USB adapter cable (using kit available from CareFusion) and USB
adapter cable to computer's USB port.
5. Ensure that the Alaris System Maintenance software recognizes computer's connection to Alaris
PC unit (refer to v9.7.xor v9.8 Alaris System Maintenance Software User Guide, Hardware
Connections).
6. Run Transfer Data Set task (refer to v9.7.x or v9.8 Alaris System Maintenance Software User
Guide for details).
NOTE: To avoid encountering network communication errors in a non-wireless environment, run
disable task feature on Alaris PC unit (refer to v9.7.x or v9.8 Alaris System Maintenance
Software User Guide, Configure Components ch ap ter).
7. When task has completed, power off Alaris PC unit.
8. Disconnect serial cable from Alaris PC unit and insert rubber plug in RJ-45 connector.
9. Power on Alaris PC unit.
10.Respond to all prompts and press Yes on the NEW PATIENT? screen.
11.Select a profile in new data set to verify that data set has successfully transferred.
12.The Alaris PC unit is now successfully upgraded.
Troubleshooting
Contact CareFusion Technical Support if:
• A failure occurs that is not identified in the following tables.
P/N 12280525 Rev 02 Page 8 of 12
Page 9

Alaris® PC Unit, Model 8015 Software Upgrade Instructions to v9.12
• The failure cannot be corrected after performing the instructions in the following tables.
Failure Response
An error occurred
during execution of
Transfer Network
Configuration
(Silent) task.
Error 600.6835—
Invalid Network
Configuration.
(wireless
environment)
Error 600.6835—
Invalid Network
Configuration.
(non-wireless
environment)
Verify that Alaris PC unit (main processor) — and wireless main, if applicable —
were successfully upgraded (see Identify Software Version on page 2).
• If upgrade failed, repeat software upgrade.
• If upgrade was successful, refer to v9.7.x or v9.8 Alaris System
Maintenance Software User Guide for Transfer Network Configuration —
Error Handling information.
1. Connect Alaris PC unit to Alaris System Maintenance software and repeat
Transfer Network Configuration (Silent) task.
2. If Transfer Network Configuration (Sil ent) task f ails, refer to v9.7.x or v9.8
Alaris System Maintenance Software User Guide for Transfer Network
Configuration — Error Handling information.
3. If error persists, return Alaris PC unit to CareFusion for repair.
Disable wireless feature on Alaris PC unit (refer to v9.7.x or v9.8 Alaris System
Maintenance Software User Guide, Configure Components chapter for instructions).
P/N 12280525 Rev 02 Page 9 of 12
Page 10

Failure Response
Alaris® PC Unit, Model 8015 Software Upgrade Instructions to v9.12
Error 100.6130—
System
Configuration Data
Integrity.
Data set does not
transfer wirelessly.
OR
No wireless
connection is
detected.
Reset wireless feature on Alaris PC unit System Configuration settings:
1. While holding down OPTIONS, press SYSTEM ON.
2. When Alaris PC unit beeps, release OPTIONS.
3. At System Configuration screen, press Factory Default.
4. Press Yes.
5. Press Exit.
6. Power on Alaris PC unit again.
To verify network connectiv ity:
1. Press OPTIONS.
2. Press PAGE DOWN twice.
3. Press Network Status.
4. Enter Network Status Access Key (32221) and press CONFIRM.
If Status reads:
• ASSOCIATED — Ensure that the Alaris PC unit is in an area with good
wireless coverage. Link Quality and Signal Strength both need to be
above 20%.
• SCANNING or ASSOCIATING — Contact applicable hospital/facility
support group to verify that Alaris PC unit is in an area that has wireless
coverage and that the correct SSID is being used. Because the system
supports up to eight profiles, it might take as long as 16 minutes to
obtain a network connection.
• AUTHENTICATING — Contact applicable hospital/facility support group.
• INVALID CONFIG — RF card being used does not support wireless
features contained in transferred network configuration. Refer to v9.7.x
or v9.8 Alaris System Maintenance Software User Guide for Transfer
Network Configuration — Error Handling information.
• DISABLED — Ensure that RF card is properly fitted inside Alaris PC unit
and that correct RF card cover is being used.
To verify server connectivity:
1. From Network Status screen, press SERVER STATUS.
If Status reads:
• CONNECTED — Leave Alaris PC unit power on for at least 24 hours and
then recheck data set status (see Task 2a: Wireless Network
Configuration — Transfer Network Configuration/Data Set to Alaris PC
Unit on page 6).
• CONNECTING — Contact applicable hospital/facility support group to
verify network is functional. If network is n o t f unc t i onal , c ontact
applicable hospital/facility group to verify that Network Configuration
settings are correct.
P/N 12280525 Rev 02 Page 10 of 12
Page 11

NOTES:
Alaris® PC Unit, Model 8015 Software Upgrade Instructions to v9.12
P/N 12280525 Rev 02 Page 11 of 12
Page 12

Alaris® PC Unit, Model 8015 Software Upgrade Instructions to v9.12
CareFusion
San Diego, California
United States
800.367.9947
858.617.2000
Authorized EU Representative
CareFusion
The Crescent, Jays Close
Basingstoke, Hampshire RG22 4BS
United Kingdom
Technical Inquires:
Contact information is available on the
CareFusion website:
http://www.carefusion.com/customer-support/index.aspx
© 2012 CareFusion Corporation or one of its
subsidiaries. All rights reserved.
CareFusion, Alaris, Guardrails, and the
CareFusion logo are trademarks or registered
trademarks of CareFusion Corporation or one
of its subsidiaries. All other trademarks are
the property of their respective owners.
P/N 12280525 Rev 02 Page 12 of 12
 Loading...