

Akaso EK7000 User Manual

USER MANUAL
AKASO EK7000 Pro Action Camera

CONTENTS
01 - 20 21 - 40
61 - 8041 - 60
81 - 100
121 - 140
䚐ạ㛨
101 - 120
日本語
V1.1

English
YOUR EK7000 PRO
1
2
3
1412
4
145
6
7
1. Shutter / Select Button
2. Working / Wi-Fi Indicator
3. Power / Mode / Exit Button
4. MicroSD Slot
5. Micro USB Port
6. Micro HDMI Port
8
9
Note: Camera does not record sound when it is in the waterproof case.
7. Lens
8. Touch Screen
9. Up Button
10. Speaker
11. Down / Setting Button
12. Battery Door
10
11
01
02
GETTING STARTED
Welcome to your new EK7000 Pro. To capture video and photos, you need a microSD card
(sold separately).
TURNING ON / OFF Wi-Fi
To Turn On Wi-Fi
Turn on camera, press and hold Down button for three seconds to turn on Wi-Fi.
MICROSD CARDS
Use brand name memory cards that meet these requirements:
• microSD, microSDHC, or microSDXC
• Class 10 or UHS-I rating
• Capacity up to 64GB (FAT32)
Note:
1. Please format the microSD card first in this camera before using. To keep your microSD
card in good condition, reformat it on a regular basis. Reformatting erases all of your
content, so be sure to offload your photos and videos first.
2. FAT32 format microSD card stops recording when the storage of each file is over 4GB
and starts to record again on a new file.
POWERING ON AND OFF
To Power On:
Press and hold Mode button for three seconds. The camera beeps while the camera status
light is on. When information appears on the display or the camera status screen, your
camera is on.
To Power Off:
Press and hold the Mode button for three seconds. The camera beeps while the camera
status light is off.
SWITCHING MODE:
To Switch Mode:
Press the Mode button after you turn on the camera, you can switch the mode.
To Exit Mode:
Press the Mode button to exit mode.
03
To Turn Off Wi-Fi
Press Down button to turn off Wi-Fi.
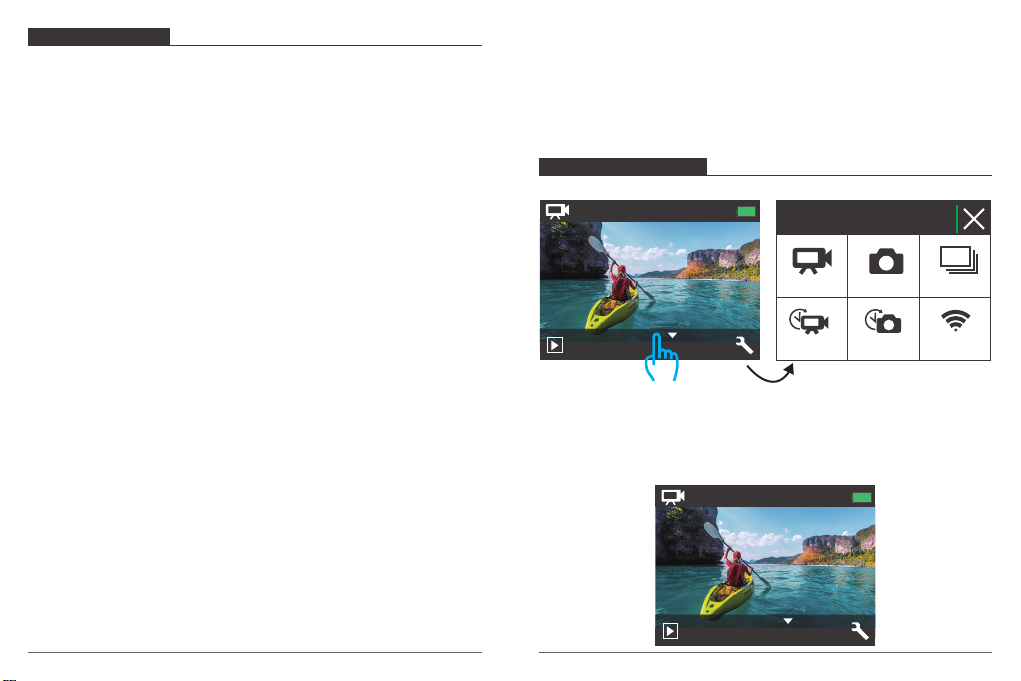
OVERVIEW OF MODES
There are 5 modes: Video, Photo, Burst Photo, Time Lapse Photo and Setting.
00:00:00 | 06:02:04
Video
1080/60
Tap here
VIDEO MODE
Video Mode is the default mode when you turn on the camera.
In Video Mode, press Shutter button, the camera starts recording video. Press Shutter
button to stop recording video.
00:00:00 | 06:02:04
Mode
Video Photo Burst Photo
Video
1080/60
Time Lapse
Video
Time Lapse
Photo
Wi-Fi
04
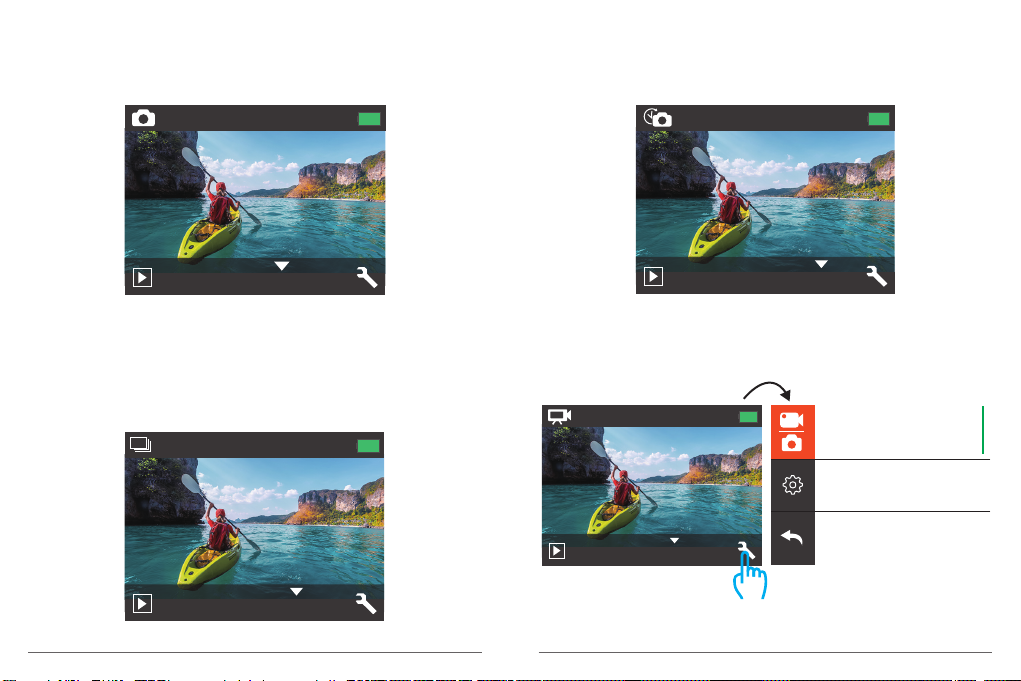
Photo Mode
Press Mode button once to switch to Photo Mode after you turn on camera.
In Photo Mode, press Shutter button, the camera takes a photo.
0 | 3206
Time Lapse Photo Mode
Press Mode button several times to switch to Time Lapse Photo Mode.
In Time Lapse Photo Mode, press Shutter button, the camera takes a serial of photos at
2s / 3s / 5s / 10s / 20s / 30s / 60s intervals.
0 | 3206
Photo
16M
Burst Photo Mode
Press Mode button twice to switch to Burst Photo Mode.
In Burst Photo Mode, press Shutter button, the camera takes 3 photos per second.
0 | 3206
Burst Photo
16M
05
Time Lapse Photo
Setting Mode
Press Down button to switch to Setting Mode.
00:00:00 | 06:02:04
Video
1080/60
Tap here
16M
Video Resolution
Image Stabilization
Angle
06

CUSTOMIZING YOUR EK7000 PRO
Video & Photo Setting
1. Video Resolution: 1080P 60fps, 1080P 30fps, 720P 120fps, 720P 60fps, 4K 25fps,
2.7K 30fps
Default setting is 1080P 60fps.
Note: If you turn on image stabilization, then select 4K 25fps or 2.7K 30fps video resolution,
image stabilization will be turned off automatically.
2. Image Stabilization: Off / On
Default setting is Off.
This setting adjusts the footage to offset for motion during capture. The result is smoother
footage, especially in activities with relatively small but fast motion including cycling,
motorcycling, and handheld uses.
Note: Image stabilization is disabled if you select 4K 25fps or 2.7K 30fps video resolution.
3. Angle: Super Wide / Wide / Medium / Narrow
Default setting is Super Wide.
The angle refers to how much of the scene can be captured through the camera lens.
Wide angle captures the largest amount of the scene, while Narrow angle captures the
least.
4. Diving Mode: Off / On
Default setting is Off.
Turn on Diving Mode, it can compensate for the lack of red light in underwater scenes.
Diving Mode is designed to be used in tropical and blue water, optimized for use between
10 and 80 feet.
5. Loop Recording: Off / 1min. / 3min. / 5min.
Default setting is off.
Loop recording allows your camera to overwrite old files with new files. Once the memory
card becomes full, the camera will delete the first video file to make room for the latest
file. For example, if the setting for loop recording is “1 Minute”, then the camera will create
video clips of 1 minute in length, and a 1-minute clip will be deleted when the camera
needs more memory.
07
Note: Loop Recording is disabled when you select 4K 25fps or 2.7K 30fps video resolution.
6. Time Lapse Video: 1S / 3S / 5S / 10S / 30S / 60S
Default setting is 5S.
Time Lapse Video creates video from frames captured at specific intervals. This option lets
you capture a time lapse event and immediately view or share it as a video. Time Lapse
Video is captured without audio.
Note: Time Lapse Video is disabled when you select 4K 25fps or 2.7K 30fps video
resolution. Image Stabilization and Loop Recording does not function when you
record time lapse video.
7. Date Stamp: Off / Date / Date&Time
Default setting is Date.
If you turn on Date Stamp, this camera adds date stamp to the photos and videos you take.
Note: This camera does not add date stamp to the videos you take if you record time
lapse video or image stabilization is on.
8. Exposure: -2.0, -1.7, -1.3, -1.0, -0.7, -0.3, 0.0, +0.3, +0.7, +1.0, +1.3, +1.7, +2.0.
Default setting is 0.0.
By default, your camera uses the entire image to determine the appropriate exposure level.
However, Exposure lets you select an area that you want the camera to prioritize when
determining exposure. This setting is particularly useful in shots where an important region
might otherwise be over- or underexposed.
When you change this setting, the display immediately shows you the effect on your
image. If you change modes, the camera returns to using the entire scene to determine
the correct level of exposure.
9. Photo Resolution: 16MP / 14MP / 12MP / 8MP / 5MP / 4MP
Default setting is 16MP.
10. Burst Photo: 3Photos
Burst captures up to 3 photos in 1 second, so it is perfect for capturing fast-moving
activities.
08

11. Time Lapse Photo: 2S / 3S / 5S / 10S / 20S / 30S / 60S
Default setting is Unlimited.
Time Lapse Photo captures a series of photos at specified intervals. Use this mode to
capture photos of any activity, then choose the best ones later.
7. Screen Saver: Off / 1min. / 3min. / 5min.
Default setting is 1 minutes.
Turns off the LCD display after a period of inactivity to save battery life. To turn on the
display again, press any button on the camera.
12. Continuous Lapse: Off / On
Default setting is off.
Turn on Continuous Lapse, this camera takes continuous lapse photo.
Camera Setting
1. Special Effect: Normal / B&W / Sepia / Negative / Warm / Cold / Red / Green / Blue
Default setting is Normal.
2. Power Frequency: 50Hz / 60Hz / Auto
Default setting is Auto.
3. Language: English / এѽИކ/ য檥Иކ/ Italiano/ Español / Português / Deutsch /
Dutch / Français / ޙߎ寉
Default setting is English.
4. Date & Time: 10 / 01 / 2018 00:23 MM / DD / YY
5. Sounds:
Shutter: Off / On
Beep: Off / On
Volume: off, 0, 1, 2, 3
Start-up: Off / On
Default setting is on.
You can turn on or off the shutter, boot-up, beep sounds.
6. Upside Down: Off / On
Default setting is off.
This setting determines the orientation of your video or photos to help you prevent upside
down footage.
09 10
8. Power Save: Off / 1min. / 3min. / 5min.
Default setting is 3 minutes.
Powers off your EK7000 Pro after a period of inactivity to save battery life.
9. Format: No / Yes
Default setting is No.
To keep your micro SD card in good condition, reformat it on a regular basis. Reformatting
erases all of your content, so be sure to offload your photos and videos first.
To reformat your card, enter Camera Setting, then scroll through the options to locate and
tap ‘Format’, then tap ‘Yes’.
10. Reset: No / Yes
Default setting is No.
This option resets all settings to their default values.
11. Version:
Brand: AKASO
Model: EK7000 Pro
Version: JFKxxxxVx
You can check the model and updated time of your EK7000 Pro.
CONNECTING TO THE ISMART DV APP
The iSmart DV app lets you control your camera remotely using a smartphone or tablet.
Features include full camera control, live preview, playback and sharing of content, and
camera software updates.
1. Download iSmart DV app to your mobile device from the Apple App Store or Google
Play.
2. Turn on the camera, hold and press Down button for three seconds to turn on Wi-Fi.
3. Turn on Wi-Fi of your mobile device, connect to the Wi-Fi SSID ‘AKASO_EK7000Pro’.
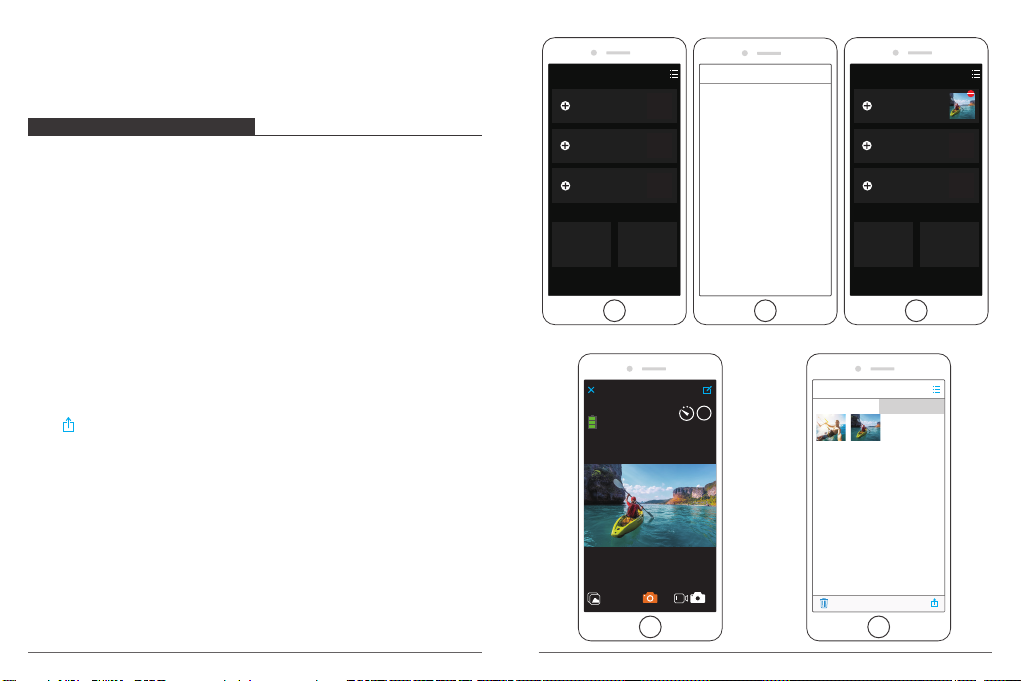
4. Enter the password: 1234567890.
Photos
Videos
Media on My iPhone
Add New Camera
Add New Camera
Add New Camera
Photos
Videos
Media on My iPhone
Add New Camera
Add New Camera
AKASO_EK7000Pro
16M
Preview
5. Open the app iSmart DV.
6. Tap ‘Add new camera’.
7. Tap ‘Wi-Fi Connect’.
OFFLOADING YOUR CONTENT
OFFLOADING YOUR CONTENT TO A COMPUTER
To play back your video and photos on a computer, you must first transfer these files to a
computer. Transferring also frees up space on your microSD card for new content.
To offload files to a computer using a card reader (sold separately) and your computer’s
file explorer, connect the card reader to
the computer, then insert the microSD card. You can then transfer files to your computer
or delete selected files on your card. Note that you must use a card reader to offload
photos or audio files.
OFFLOADING YOUR CONTENT TO SMARTPHONE OR TABLET
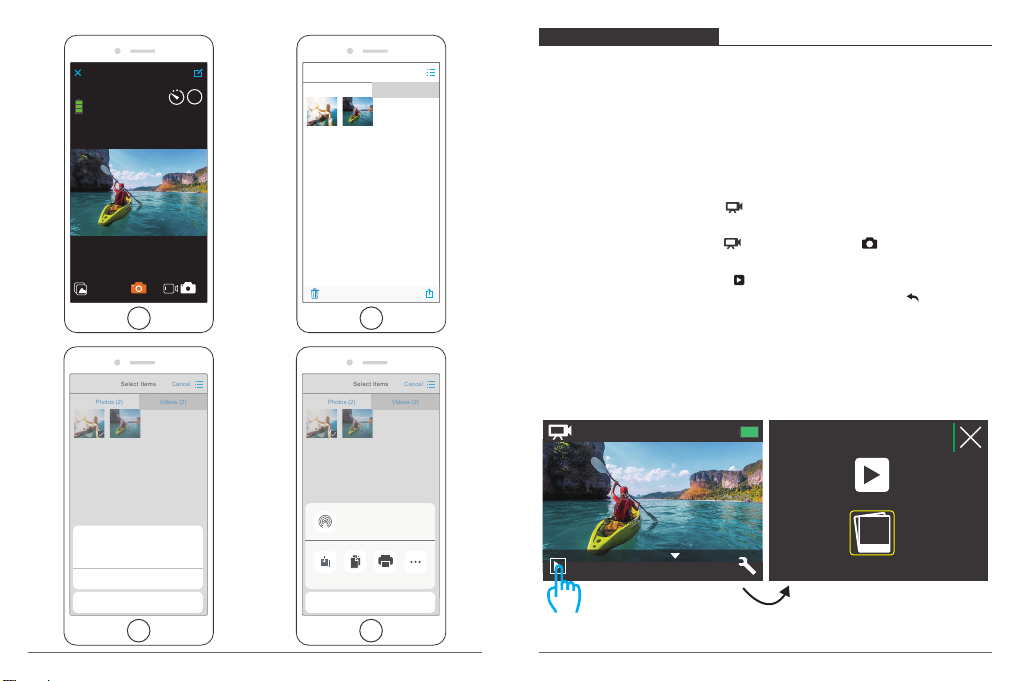
1. Connect to the iSmart DV app.
2. Open the iSmart DV app.
3. Tap ‘AKASO_EK7000Pro’ at the top of the screen.
4. Tap file icon at the left corner of the bottom screen.
5. Tap ‘Choose’
6. Tap the files you want to save.
7. Tap at the right corner of the bottom screen. The screen shows ‘Confirm Download’.
8. Tap ‘Confirm Download’.
9. Tap ‘Save Images’
Note:
1. If you cannot offload videos or photos to iPhone or iPad, please enter Setting -> Privacy
-> Photos , find "iSmart DV" and select "Read and Write".
2. You cannot download 4K or 2.7K video to iPhone and iPad via Wi-Fi app. Please offload
4K or 2.7K videos via card reader.
Cancel Add new camera
When you already connect to camera by Wi-Fi
Wi-Fi Connec t
For new camera, and the camera supports bluetooth
low energy.
Bluetooth P air
Photos (2) Videos (2)
ChooseDone Albums
11
12
Photos (2) Videos (2)
Total Files: 2
Download Time: 5 seconds
Confirm download?
5.30MB
Confirm Download
Cancel
CancelSelect Items
Photos (2) Videos (2)
AirDrop. Tap to turn on Wi-Fi and Bluetooth to
share with AirDrop.
Save 2
Images
CancelSelect Items
Copy Print More
Cancel
PLAYING BACK YOUR CONTENT
You can playback your content on the camera’s display, your computer, TV, or
smartphone / tablet.
You can also play back content by inserting the microSD card directly into a device, such
as a computer or compatible TV. With this method, playback resolution depends on the
resolution of the device and its ability to play back that resolution.
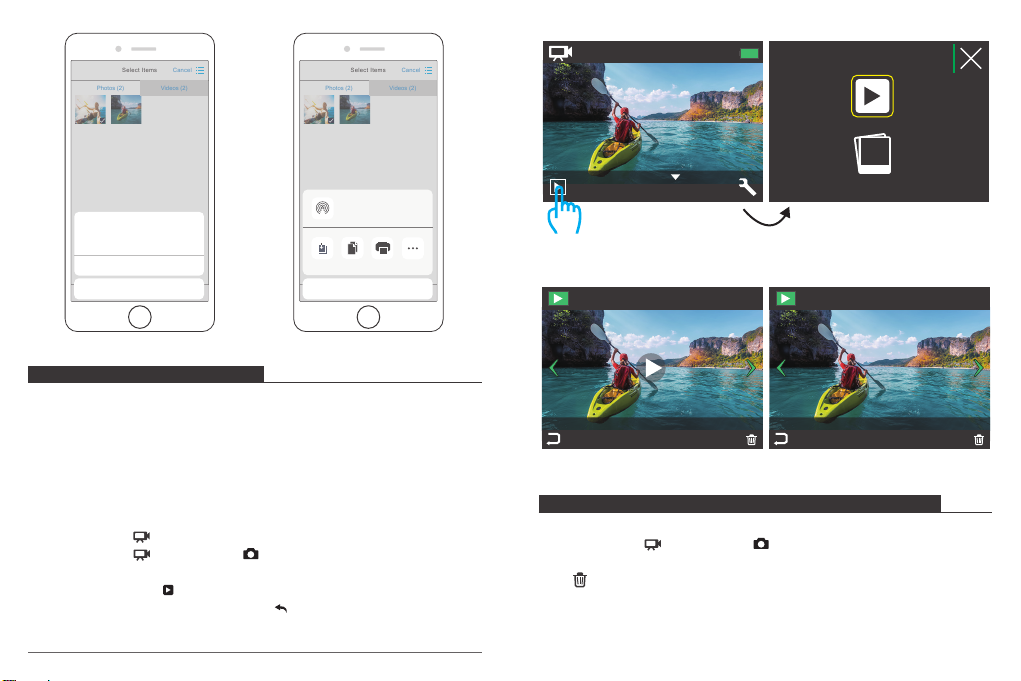
VIEWING VIDEOS AND PHOTOS ON YOUR EK7000 Pro
1. Turn on camera.
2. Tap video file icon at the left corner of the screen to enter playback mode.
3. Tap video file icon or photo file icon .
4. Tap Forward or Backward icon to playback video or photo files.
5. Tap video playback icon to playback video in full-screen view.
6. To exit the video or photo files, tap return icon .
Note: If your micro SD card contains a lot of content, it might take a minute for it to load.
00:00:00 | 06:02:04
Video
1080/60
Tap here
1/2
1080P/60
5376x3024
DELETING VIDEOS AND PHOTOS ON YOUR EK7000 PRO
1. Enter playback mode.
2. Tap video file icon or photo file icon .
3. Tap Forward or Backward icon to locate the video or photo file you want to delete.
4. Tap . The screen shows ‘Delete this file? Yes / No’.
5. Tap ‘Yes’, the selected file will be deleted.
3/6
13
14
REFORMATTING YOUR MICROSD CARD
To keep your microSD card in good condition, reformat it on a regular basis. Reformatting
erases all of your content, so be sure to offload your photos and videos first.
1. Turn on the camera.
2. Press Down button to enter Video & Camera Setting.
3. Press Down button then Shutter button to enter Camera Setting.
4. Press Down button to locate the ‘Format’ option.
5. Press Shutter button - Down button - Shutter button, the screen shows ‘Waiting and
Completed.’ Then you format your micro SD card successfully.
BATTERY STORAGE AND HANDLING
The camera contains sensitive components, including the battery. Avoid exposing your
camera to very cold or very hot temperatures. Low or high temperature conditions may
temporarily shorten the battery life or cause the camera to temporarily stop working
properly. Avoid dramatic changes in temperature or humidity when using the camera, as
condensation may form on or within the camera.
Do not dry the camera or battery with an external heat source such as a microwave oven
or hair dryer. Damage to the camera or battery caused by contact with liquid inside the
camera is not covered under the warranty.
MAINTENANCE YOUR CAMERA
Follow these guidelines to get the best performance from your camera:
1. For best audio performance, shake the camera or blow on the mic to remove debris
from the microphone holes.
2. To clean the lens, wipe it with a soft, lint-free cloth. Do not insert foreign objects around
the lens.
3. Don’t touch the lens with fingers.
4. Keep the camera away from drops and bumps, which may cause damage to the parts
inside.
5. Keep the camera away from high temperature and strong sunshine to avoid being
damaged.
Do not store your battery with metal objects, such as coins, keys or necklaces. If the
battery terminals come in contact with metal objects, this may cause a fire.
Do not make any unauthorized alterations to the camera. Doing so may compromise
safety, regulatory compliance, performance, and may void the warranty.
WARNING: Do not drop, disassemble, open, crush, bend, deform, puncture, shred,
microwave, incinerate or paint the camera or battery. Do not insert foreign objects into the
battery opening on the camera. Do not use the camera or the battery if it has been
damaged - for example, if cracked, punctured or harmed by water. Disassembling or
puncturing the battery can cause an explosion or fire.
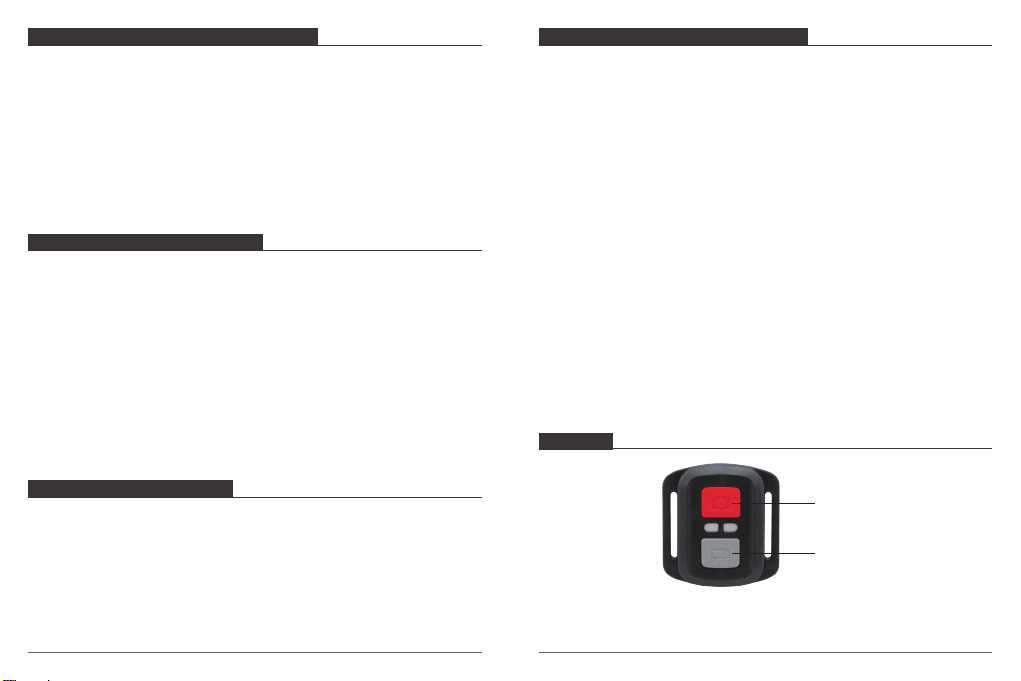
REMOTE
MAXIMIZING BATTERY LIFE
A message appears on the touch display if the battery drops below 10%. If the battery
reaches 0% while recording, the camera saves the file and powers off.
To maximize battery life, follow these guidelines when possible:
1. Turn off Wireless Connections
2. Capture video at lower frame rates and resolutions
3. Use Screen Saver setting.
VIDEO
To record Video, verify the camera in Video mode.
15 16
Photo Button
Video Button
Splashproof only, not waterproof
To start recording:
Press the Grey Video Button. The camera will emit one beep and the camera light will
flash while recording.
To stop recording:
Press the Grey Video Button again. The camera will emit one beep and the camera light
will stop flashing while recording.
PHOTO
To capture a photo, verify the camera in Photo mode.
To take a photo:
Press the Red Photo Button. The camera will emit a camera shutter sound.
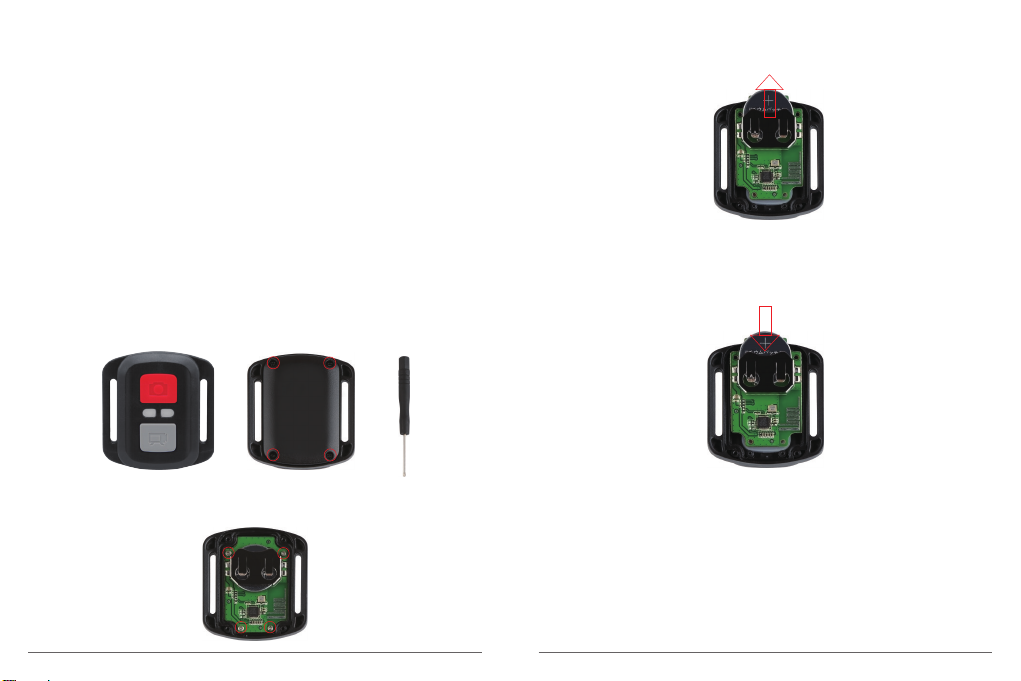
3. Lift the PCB board and slide out the battery, as shown in the picture.
Note: Do NOT rotate the PCB board to avoid reversing the camera and video button functions.
4. Install the new battery, keeping the “+” pole facing up.
CR2032 BATTERY REPLACEMENT FOR EK7000 PRO REMOTE
1. Use a 1.8mm Phillips tip screwdriver to remove the 4 screws on the back cover of the
remote, allowing you to open it.
2. Remove another 4 screws on PCB board.
17
5. Install all 4 screws back onto the PCB board.
6. Install all 4 screws back into the cover.
18

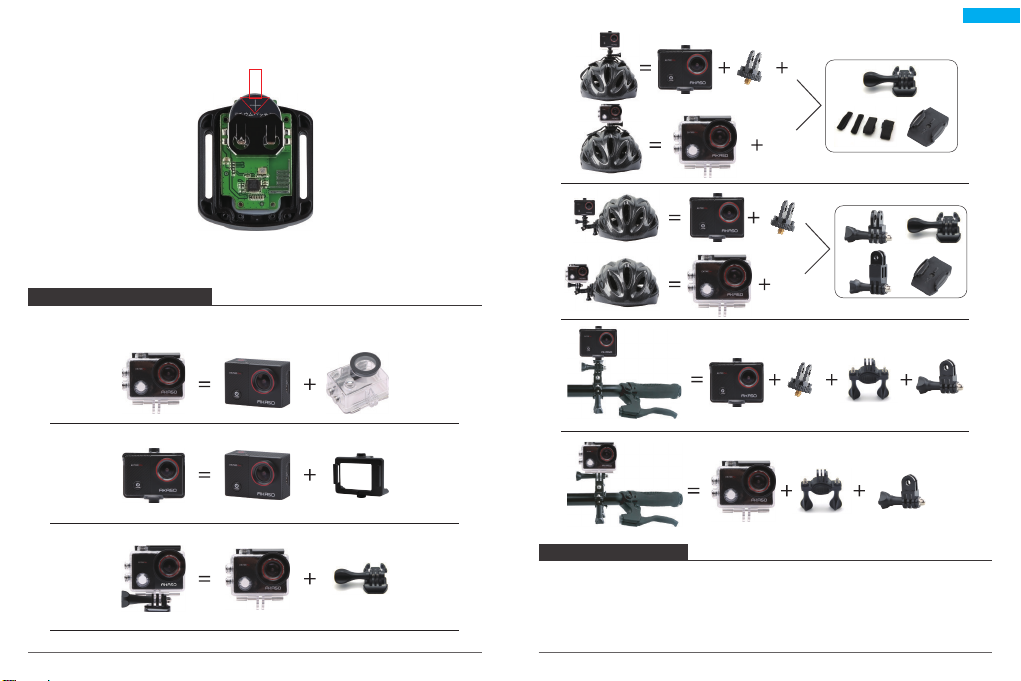
MOUNTING YOUR CAMERA
Attach your camera to helmets, gear and equipment.
English
CONTACT US
For any inquires with AKASO products, please feel free to contact us, we will respond
within 24 hours.
E-mail: cs@akasotech.com
Tel: (888) 466-9222 (US) Mon-Fri (except holiday) 9am-5pm (EST)
Ocial website: www.akasotech.com
19
20

Deutsch
IHRE EK7000 PRO
1
2
3
1412
4
145
6
7
1. Auslöser / Wi-Fi / Auswahltaste
2. Arbeitsanzeige
3. Einschalt- / Modus- / Exittaste
4. MicroSD Schlitz
5. Micro USB Anschluss
6. Micro HDMI Anschluss
8
21 22
9
10
11
Hinweis: Im wasserdichten gehäuse nimmt die kamera keinen ton auf.
7. Linse
8. Bildschirm
9. Hoch Taste
10. Lautsprecher
11. Runter Taste
12. Akkuklappe
EINFÜHRUNG
Willkommen zu Ihrer AKASO EK7000 Pro Action Kamera. Sie benötigen eine microSD
Karte (nicht enthalten), um Videos und Fotos aufnehmen zu können.
MICROSD KARTE
Benutzen Sie SD Karten, die folgende Anforderungen erfüllen:
• MicroSD, microSDHC oder microSDXC
• Klass 10 oder UHS-I Klasse
• Kapazität bis zu 64GB (FAT32)
Hinweis:
1. Bitte formatieren Sie die microSD Karte in der Kamera zuerst, bevor Sie sie benutzen.
Um den Zustand Ihrer microSD Karte aufrecht zu erhalten, formatieren Sie diese
regelmäßig. Formatieren löscht Ihre gesamten Inhalte. versichern Sie sich deshalb vor
der Formatierung von allen Inhalten ein Backup zu erstellen.
2. Bei FAT32 and exFAT Format microSD Karten stoppt die Aufnahme, wenn die Größe der
Datei 4GB übersteigt und startet eine neue Aufnahme.
EIN- UND AUSSCHALTEN
Einschalten:
Drücken und halten Sie die Modustaste für drei Sekunden. Die Kamera tutet und das
Betriebslicht geht an. Wenn eine Mitteilung auf dem Bildschirm oder dem
Betriebsbildschirm der Kamera erscheint, ist die Kamera eingeschaltet.
Ausschalten:
Drücken und halten Sie die Modustaste für drei Sekunden. Die Kamera tutet und das
Betriebslicht geht aus.
DEN MODUS WECHSELN
Modus wechseln:
Drücken Sie die Modustaste, nachdem Sie die Kamera eingeschaltet haben. Sie können
nun den Modus wechseln.
Wi-Fi EIN- UND AUSSCHALTEN
Wi-Fi einschalten
Schalten Sie die Kamera an. Drücken und halten Sie die Hoch Taste für drei Sekunden, um
Wi-Fi einzuschalten.
Wi-Fi ausschalten
Drücken und halten Sie die Runtertaste, um Wi-Fi auszuschalten.
MODI ÜBERBLICK
Es gibt 5 Modi: Video, Foto, Serien-Foto, Zeitraffer Video/Foto und Einstellungen.
00:00:00 | 06:02:04
Video
1080/60
Tippe hier an
Videomodus
Standardmodus ist der Videomodus, wenn Sie die Kamera einschalten.
Drücken Sie im Videomodus den Auslöser, um eine Videoaufnahme zu starten. Drücken
Sie den Auslöser erneut, um die Videoaufnahme zu stoppen.
00:00:00 | 06:02:04
Mode
Video Foto Serien-Foto
ZeitrafferVideo
ZeitrafferFoto
Wi-Fi
Modus verlassen:
Drücken Sie die Modustaste, um das Menü zu verlassen.
23 24
Video
1080/60

Fotomodus
Drücken Sie die Modustaste einmal nach Einschalten der Kamera, um zum Fotomodus zu
wechseln. Drücken Sie im Fotomodus den Auslöser, um Fotos aufzunehmen.
Zeitraffer Fotomodus
Drücken Sie im Zeitraffer Fotomodus den Auslöser, um eine Serie von Fotos in 2s / 3s / 5s
/ 10s / 20s / 30s / 60s Intervallen aufzunehmen.
0 | 3206
Foto
16M
Serien-Foto Modus
Drücken Sie die Modustaste zweimal, um in den Serien-Foto Modus zu wechseln.
Drücken Sie im Serien-Foto Modus den Auslöser, wird die Action Kamera 3 Fotos pro
Sekunde.
0 | 3206
Einstellungsmodus
Drücken und halten Sie die Runtertaste, um zum Einstellungsmodus zu gelangen.
00:00:00 | 06:02:04
0 | 3206
Zeitraffer Foto
16M
Videoauflösung
Bildstabilisierung
Video
1080/60
Serien-Foto
16M
25 26
Tippe hier an
Winkel

INDIVIDUELLE EINRICHTUNG
Video & Foto Einstellungen
1. Videoauflösung: 1080P 60fps, 1080P 30fps, 720P 120fps, 720P 60fps, 4K 25fps,
2.7K 30fps
Standardeinstellung ist 1080P 60fps.
Hinweis: Wenn bildstabilisierung aktive ist und 4K 25fps oder 2.7K 30fps Video-Auflösung
ausgewählt ist, wird die Bildstabilisierung automatisch deaktivert werden.
2. Bildstabilisierung: An / Aus
Standardeinstellung ist Aus.
Diese einstellung gleicht bewegungen während der aufnahme aus. Das ergebnis ist eine
geschmeidigere aufnahme, besonders bei aktivitäten mit relativ kleinen, aber schnellen
bewegungen, einschließlich radfahren, Motorradfahren und bei freihändiger nutzung.
Hinweis: Die bildstabilisierung ist nicht verfügbar, wenn sie 4K 25fps, 2.7K 30FPS als
videoauflösung ausgewählt haben.
3. Winkel: Super Weit / Weit / Medium / Schmal
Standardeinstellung ist super weit.
Der winkel bezieht sich darauf, wie viel von der szene durch die kameralinse erfasst
werden kann. Ein weiterwinkel erfasst am meisten von der szene, ein schmaler winkel am
wenigsten.
1-Minuten-Clip wird gelöscht, wenn die Kamera mehr Speicher benötigt.
Hinweis: Daueraufnahme ist nicht verfügbar, wenn 4K 25fps oder 2.7K 30fps video
auflösung ausgewählt ist.
6. Zeitraffer Video: 1S / 3S / 5S / 10S / 30S / 60S
Standardeinstellung ist 5S.
Zeitraffervideo erstellt videos von bildern, die in bestimmten intervallen aufgenommen
werden. Diese option ermöglicht Ihnen die aufnahme eines zeitrafferereignisses und sie
können es umgehend als video ansehen oder teilen. Zeitraffervideo wird ohne ton
aufgenommen.
Hinweis: Zeitraffer video ist nicht verfügbar wenn 4K 25fps or 2.7K 30fps video auslösung
ausgewählt ist. Bildstabilisierung und loop aufnahme sind nicht verfügbar wenn
zeitraffer video ausgewählt ist.
7. Datumsstempel: Aus / Datum / Datum&Zeit
Standardeinstellung ist Datum.
Wenn sie datum&zeit auswählen, wird das datum und die zeit zu ihren video-und
fotoaufnahmen hinzugefügt.
Hinweis: Datumsstempel ist nicht verfügbar, wenn bildstabilisierung oder zeitraffer video
eingeschaltet ist.
4. Tauchmodus: An / Aus
Standardeinstellung ist Aus.
Turn on diving mode, it can compensate for the lack of red light in underwater scenes.
Diving mode is designed to be used in tropical and blue water, optimized for use between
10 and 80 feet.
5. Daueraufnahme(Loop-Aufnahme): Aus / 1min. / 3min. / 5min.
Standardeinstellung ist Aus.
Mit der Loop-Aufnahme kann Ihre Kamera alte Dateien mit neuen Dateien überschreiben.
Sobald die Speicherkarte voll ist, löscht die Kamera die erste Videodatei, um Platz für die
neueste Datei zu schaffen. Zum Beispiel, wenn die Einstellung für die Loop-Aufnahme
"1 Minute" ist, erstellt die Kamera Videoclips mit einer Länge von 1 Minute, und ein
27 28
8. Belichtung: -2.0, -1.7, -1.3, -1.0, -0.7, -0.3, 0.0, +0.3, +0.7, +1.0, +1.3, +1.7, +2.0.
Standardeinstellung ist 0.0.
Standardmäßig verwendet ihre kamera das gesamte bild, um die angemessene
belichtungsstufe zu bestimmen. Jedoch lässt sie die belichtungseinstellung ein gebiet
bestimmen, welches die kamera bei der wahl der belichtung priorisieren soll. Diese
einstellung ist vor allem bei aufnahmen sinnvoll, wo wichtige teile eher unter-oder
überbelichtet sind.
Wenn sie diese einstellung verändern, wird ihnen der entsprechende effekt unverzüglich
auf dem LCD
das gesamte bild verwenden, um die angemessene belichtungsstufe zu bestimmen.
bildschirm angezeigt. Wenn sie den modus wechseln, wird die kamera erneut

9. Foto Auflösung: 16MP / 14MP / 12MP / 8MP / 5MP / 4MP
Standardeinstellung ist 16MP.
10. Serien-Foto Aufnahme: 3 Fotos
Serien-Foto aufnahme funktion nimmt bis zu 3 fotos in einer sekunde auf, sodass es sich
ideal für die aufnahme von sich schnell bewegenden aktivitäten eignet.
11. Zeitraffer Foto: Unbegrenzt / 2S / 3S / 5S / 10S / 20S / 30S / 60S
Standardeinstellung ist unbegrenzt.
Zeitrafferfoto nimmt eine serie von fotos in bestimmten intervallen auf. benutzen sie
diesen modus, um fotos bei jeglicher aktivität aufzunehmen und wählen sie im nachhinein
die besten aus.
12. Kontinuierliches Zeitraffer Foto: Aus / An
Standardeinstellung ist Aus.
Schalten Sie die Kontinuierliches Zeitraffer Foto ein. Diese Kamera nimmt Kontinuierliche
Zeitraffer Fotos auf.
Kameraeinstellungen
1. Spezialeffekt: Normal / Schwarz&Weiß / Sepia / Negative / Warm / Kalt / Rot / Green
/ Blau Default setting is Normal.
6. Kopfüber Drehung Einstellung: An / Aus
Standardeinstellung ist Aus.
Diese Einstellung legt die ausrichtung ihres videos oder ihrer fotos fest, um zu verhindern,
dass verkehrtes material auf dem kopf steht
7. Bildschirmschoner: Aus / 1min. / 3min. / 5min.
Standardeinstellung ist 1 Min.
Schaltet den Bildschirm nach einer Weile ohne Aktivität aus, um Strom zu sparen. Um den
Bildschirm wieder anzuschalten, drücken Sie eine beliebige Taste der Kamera.
8. Strom Sparen: Aus / 1min. / 3min. / 5min.
Standardeinstellung ist 3 Minuten.
Macht Ihren EK7000 Pro nach einer gewissen Zeit der Inaktivität aus, um die Lebensdauer
der Batterie zu verlängern.
9. Karte Formatieren: Nein / Ja
Standardeinstellung ist Nein.
Um ihre micro SD karte in gutem zustand zu erhalten, formatieren sie sie regelmäßig. eine
formatierung löscht alle ihre inhalte, also seien sie sicher davor erst ein backup anzulegen.
Um ihre karte zu formatieren, gehen sie bitte zu den kameraeinstellungen, blättern sie
dann durch die optionen und tippen Sie auf "Format" und Ja.
2. Stromfrequenz: 50Hz / 60Hz / Auto Standardeinstellung ist Auto.
3. Sprache: English / এѽИކ/ য檥Иކ/ Italiano/ Español / Português / Deutsch /
Dutch / Français / ޙߎ寉
Standardeinstellung ist English.
4. Datum & Zeit: 10 / 01 / 2018 00:23 MM / DD / YY
5. Töne:
Auslöser: An / Aus Piepen: An / Aus
Lautstärke: 0 / 1 / 2 / 3 Hochfahren: An / Aus
Standardeinstellung ist An.
Sie können die töne vom auslöser, hochfahren und die pieptöne einschalten.
29
10. Zurücksetzen: Nein / Ja
Standardeinstellung ist Nein.
Diese option setzt alle einstellungen auf ihre standardwerte zurück.
11. Version:
Marke: AKASO Model: EK7000 Pro Version: JFKxxxxVx
Sie können das modell und die aktualisierte uhrzeit ihres EK7000 Pro überprüfen.
MIT ISMART DV APP VERBINDEN
Die iSmart DV App lässt sie die kamera über ein smartphone oder ein tablet steuern.
Features sind die volle kontrolle über die kamera, Live Vorschau, Wiedergabe,
Herunterladen, Inhalte teilen und kameraeinstellungen.
30
1. Laden sie die iSmart DV App auf ihr mobiltelefon vom Apple App Store oder Google
Photos
Videos
Media on My iPhone
Add New Camera
Add New Camera
Add New Camera
Photos
Videos
Media on My iPhone
Add New Camera
Add New Camera
AKASO_EK7000Pro
Play Store herunte.
2. Schalten sie die kamera ein, drücken und halten sie die runtertaste für 3 minuten, um
WiFi einzuschalten.
3. Schalten sie Wi-Fi auf ihrem mobiltelefon ein und verbinden sie zur Wi-Fi SSID
‘AKASO_EK7000Pro’.
4. Geben sie folgendes passwort ein: 1234567890
5. Öffnen sie die iSmart DV APP.
6. Tippen sie ‘Eine neue Kamera hinzufügen’ an.
7. Tippen sie ‘Wi-Fi Verbinden’ an.
INHALTE ÜBERTRAGEN
IHRE INHALTE AUF EINEN COMPUTER ÜBERTRAGEN
Um videos oder fotos auf einem computer wiedergeben zu können, müssen sie erst die
dateien auf einen computer übertragen. Die Übertragung schafft außerdem freien
speicherplatz auf ihrer microSD karte für neue aufnahmen.
Um dateien auf ihren computer mittels eines kartenlesegeräts (nicht enthalten) zu
übertragen, verbinden sie das kartenlesegerät mit ihrem computer und stecken sie dann
die microSD Karte ein. Sie können im anschluss dateien auf ihren computer übertragen
oder ausgewählte dateien auf ihrer Karte löschen. Beachten sie, dass sie ein
kartenlesegerät verwenden müssen, um Foto-oder Audiodateien über tragen zu können.
INHALTE AUF EIN SMARTPHONE ODER TABLET ÜBERTRAGEN
1. Verbinden sie mit iSmart DV app.
2. Öffnen sie iSmart DV app.
3. Tippen sie auf ‘AKASO_EK7000Pro’ oben auf dem bildschirm.
4. Tippen sie das dateisymbol in der linken ecke des unteren bildschirms.
5. Tippen sie auf ‘Wählen’.
6. Tippen sie auf die datein, die sie einsparen möchten.
7. Tippen sie in der rechten ecke des unteren bildschirms. ‘Confirm Download’ wird
auf dem Bildschrim angezeigt.
8. Tippen sie auf ‘Confirm Download’.
9. Tippen sie auf ‘Bilder Sparen’.
Hinweis:
1. Wenn Sie keine Videos oder Fotos auf das iPhone oder iPad übertragen können, gehen
Sie bitte zu Einstellungen -> Datenschutz -> Fotos, suchen Sie nach "iSmart DV" und
wählen Sie "Lesen und Schreiben".
2. Sie können 4K- oder 2,7K-Videos nicht über die Wi-Fi-App auf iPhone und iPad
übertragen. Bitte benutzen Sie den Kartenleser, um diese Dateien zu übertragen.
Cancel Add new camera
When you already connect to camera by Wi-Fi
Wi-Fi Connec t
For new camera, and the camera supports bluetooth
low energy.
Bluetooth P air
31 32
16M
Preview
Photos (2) Videos (2)
ChooseDone Albums
INHALTE WIEDERGEBEN
Sie können ihre inhalte auf dem bdschirm der kamera, auf ihrem computer, dem fernseher
oder ihrem smartphone / tablet wiedergeben.
Sie können außerdem inhalte wiedergeben, indem sie die microSD karte direkt in einen
computer oder kompatiblen fernseher stecken. Auf diesem wege hängt die auflösung der
wiedergabe von der auflösung des gerätes und der fähigkeit diese auflösung abzuspielen
ab.
VIDEOS UND FOTOS AUF IHRER EK7000 PRO ANSCHAUEN
1. Schalten sie die kamera ein.
2. Tippen sie das videodateinsymbol in der linken ecke des bildschirms, um
widergabemodus zu gehen.
3. Tippen sie das videodateinsymbol oder fotodateinsymbol .
4. Tippen sie vorwärts oder rückwär ts symbol, um video oder foto datei widerzugeben.
5. Tippen sie video widergabe symbol , um video in vollbild wiederzugeben.
6. Um video oder foto datein zu verlassen, tippen sie bitte zurück symbol .
Hinweis: Falls Ihre microSD Karte zu viele Inhalte hat, dauert es etwas länger, um diese
zu laden
Photos (2) Videos (2)
CancelSelect Items
Photos (2) Videos (2)
CancelSelect Items
00:00:00 | 06:02:04
AirDrop. Tap to turn on Wi-Fi and Bluetooth to
Total Files: 2
Download Time: 5 seconds
Confirm download?
5.30MB
Confirm Download
Cancel
share with AirDrop.
Save 2
Images
Copy Print More
Cancel
Video
1080/60
Tippe hier
33 34

1/2
3/6
4. Halten sie die kamera frei von stürzen und stößen, da diese dem innenleben der
kamera schaden könnten.
5. Halten sie die kamera fern von hohen temperaturen und starkem sonnenlicht, um
schäden vorzubeugen.
LEBENSDAUER DER BATTERIE MAXIMIEREN
Wenn die batterie 0% während der aufnahme erreicht, speichert die Kamera diese und
1080P/60
5376x3024
LÖSCHEN VON VIDEO UND FOTOS AUF EK7000 PRO ACTIONKAMERA
1. Gehen sie bitte zu wiedergabemodus.
2. Tippen sie das videodateinsymbol oder Fotodateinsymbol .
3. Tippen sie vorwärts oder rückwär ts symbol, um die video oder fotodatein, die sie
löschen möchten, sicherzustellen.
4. Tippen sie . ‘Delete this file? Yes / No’ werden auf dem bildschirm angezeigt.
5. Tippen Sie ‘Yes’, dann die ausgewählte Datein werden gelöscht.
FORMATIERUNG IHRER MICRO SD KARTE
Um Ihre microSD Karte in einem guten Zustand zu erhalten, formatieren Sie sie
regelmäßig. Eine Formatierung löscht alle Ihre Inhalte. Machen Sie zuvor also
sicherheitshalber ein Backup.
1. Schalten Sie die Kamera ein und gehen Sie zu den Kameraeinstellungen.
2. Blättern Sie runter, um die Option ‘Karte formatieren’ zu finden.
INSTANDHALTUNG DER KAMERA
Folgen sie diesen anweisungen, um die beste leistung ihrer kamera zu gewährleisten:
1. Für die beste audioleistung, schütteln sie die kamera oder blasen sie in das mikrofon,
um dreck aus dem mikrofonloch zu entfernen.
2. Um die linse zu säubern, wischen sie diese mit einem weichen, fusselfreien lappen ab.
Legen sie keine fremdkörper um die linse herum.
3. Berühren sie die linse nicht mit ihren fingern.
35 36
schaltet sich aus.
Um die lebensdauer der batterie zu maximieren, beachten sie die folgenden
Anweisungen, wenn möglich:
• Schalten sie kabellose verbindungen aus.
• Nehmen sie videos bei niedrigerer bildrate und auflösung auf.
• Benutzen sie die bildschirmschonereinstellungen.
BATTERIE AUFBEWAHRUNG UND HANDHABUNG
Die kamera beinhaltet empfindliche bestandteile, die batterie mit eingeschlossen.
Vermeiden sie es, ihre kamera sehr kalten oder heißen temperaturen auszusetzen. Unter
bedingungen mit niedrigen oder hohen temperaturen kann die Lebensdauer der batterie
verkürzt werden oder die kamera dazu veranlasst werden, vorübergehend nicht richtig zu
funktionieren. Vermeiden sie drastische temperatur-oder feuchtigkeitswechsel, wenn Sie
die kamera benutzen, da sich kondenswasser innerhalb der Kamera bilden kann.
Trocknen sie die kamera oder die batterie nicht mit hitze von außen durch zum beispiel
einer mikrowelle oder einem fön. Kamera-oder batterieschäden verursacht durch kontakt
mit flüssigkeiten innerhalb der kamera sind nicht durch die garantie gedeckt.
Lagern sie die batterie nicht mit metallobjekten, wie münzen, schlüsseln oder halsketten.
wenn die batterieklemmen in kontakt mit metallobjekten kommen, kann dies zu einem
brand führen.
Machen sie keine unerlaubten modifikationen an der kamera. Dies kann ihre sicherheit
gefährden, gegen behördliche auflagen verstoßen, die leistung beeinträchtigen und zur
erlöschung der garantie führen.

WARNING: Das Fallenlassen, Auseinanderbauen, Öffnen, Zerdrücken, Verbiegen,
Deformieren, Durchlöchern, Zerfetzen, durch eine mikrowelle erhitzen, verbrennen und
bemahlen der kamera und batterie ist zu unterlassen. Stecken sie keine fremdkörper in die
batterieöffnung der kamera. Benutzen sie die kamera oder batterie nicht, wenn sie
beschädigt wurden-zum beispiel, wenn sie zerbrochen, durchlöchert oder durch wasser
beschädigt sind. Das zerlegen oder durchlöchern der batterie kann zu einer explosion
oder brand führen.
FERNBEDIENUNG
CR2032 Batterie Ersatz für EK7000 PRO Action Kamera Fernbedienung
1. Verwenden Sie einen 1,8 mm Kreuzschlitzschraubendreher, um die 4 Schrauben an der
Rückseite der Fernbedienung zu entfernen, damit Sie sie öffnen können.
Foto Taste
Video Taste
Nur spritzfest, nicht wasserfes
2. Entfernen sie weitere 4 schrauben auf der leiterplatte.
VIDEO
Um videos aufnehmen zu können, muss sich die kamera im videomodus befinden.
Um die Aufnahme zu beginnen:
Drücken sie die graue videotaste. Die kamera gibt einen signalton aus und das kameralicht
blinkt während der Aufnahme.
Um die Aufnahme zu stoppen:
Drücken sie erneut die graue videotaste. Die kamera gibt einen signalton aus und das
kameralicht hört während der Aufnahme auf zu blinken.
3. Heben sie die leiterplatte an und schieben sie die batterie heraus, wie in der abbildung
gezeigt.
Note: Drehen sie die platine NICHT, um eine umkehr der kamera und videotastenfunktionen zu
vermeiden.
FOTO
Um Fotos aufnehmen zu können, muss sich die Kamera im Fotomodus befinden.
Um Foto zu machen:
Drücken Sie die rote Fototaste. Die Kamera gibt ein Kameraauslösegeräusch aus.
37 38
4. Installieren sie die neue batterie und halten Sie dabei den pol "+" nach oben.
5. Montieren sie alle 4 schrauben wieder auf der platine.
6. Setzen sie alle 4 schrauben wieder in die abdeckung ein.
DIE KAMERA BEFESTIGEN
Befestigen Sie Ihre Kamera an Helmen, Ausrüstung und Geräten.
KONTAKTIERE UNS
Bei Problemen mit AKASO-Produkten können Sie sich gerne an uns wenden. Wir werden
Ihnen innerhalb von 24 Stunden antworten.
Adresse E-mail: cs@akasotech.com
Ofzielle Website: www.akasotech.com
Deutsch
39
40
 Loading...