


User Manual
DL2 Car Dash Camera
Please read this manual before operating your car dash camera,
and keep it for further reference.
33

01 - 10 11 - 20
31 - 4021 - 30
41 - 50 51 - 60
日本語
English
PREAUTION
AKASO Dash Cam is not intended to be modified, or calibrated while operating a
vehicle. AKASO is not responsible for any damages resulting from the user's misuse
of the camera.
Use only manufacturer-approved chargers, accessories, and supplies.
AKASO cannot be responsible for the user’s safety when using accessories or supplies
that are not approved by AKASO.
Do not store your device in excessively hot, cold, damp or dry locations.
Doing so may cause the screen to malfunction, result in damage to the device, or cause
the battery to explode. Your device is recommended for use within a temperature range
of -4º to 131º F (-10º to 55º C), and a humidity range of 10% to 80%.
If your device becomes overheated, allow it to cool down before use.
Prolonged exposure of skin to an overheated device may cause low-temperature burn
symptoms, such as red spots or areas of darker pigmentation.
Do not touch the car charger with wet hands or disconnect the charger by pulling the
cord. Doing so may result in electrocution.
Do not use damaged power cords or plugs, or loose electrical sockets.
Faulty connections can cause electric shock or fire.
Do not touch your device with wet hands.
Doing so may cause electric shock.
Do not remove the SD card from the product during data recording, which may
cause an Error.
Always keep the camera lens clean, and ensure that the lens is not blocked by any
object or placed near any reflective material.
If the car’s windshield is tinted with a dark coating, recording quality may be affected.
USE SUGGESTIONS
Please use10 high-speed MicroSD memory card.
Please buy genuine MicroSD memory card to use to avoid compatible issue.
For the first time, please format your MicroSD memory card.
Note:
a. MicroSD card maximum support 32G, FAT32 format, allocation unit size ≥ 32kb;
b. Make sure insert MicroSD card in the local MicroSD card slot. When you hear "click",
the memory card is inserted correctly.
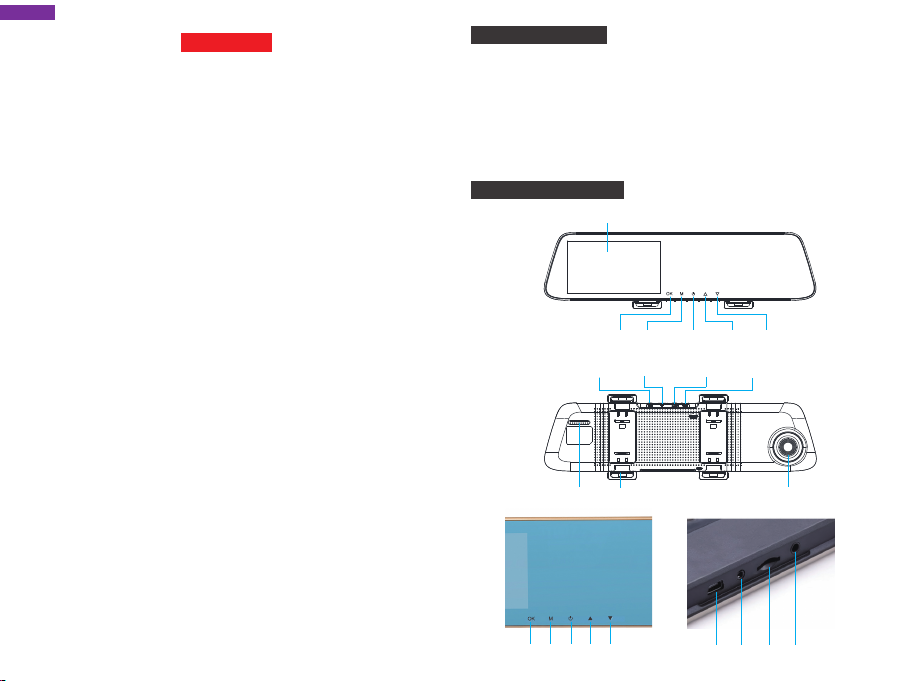
PRODUCT OVERVIEW
LCD Panel
OK
Mode Power Up Down
GPS Port
MicroSD
Card Slot
Rear
Camera Port USB Port
(Optional)
Spaker Back Clasp Lens
1
① ② ③ ④ ⑤
⑥ ⑦ ⑧ ⑨
2
① OK Button: On / Off recording function In standby mode, press【OK】to start
recording, press【OK】again to stop recording.
② Menu Button
Function 1: In the standby mode, short press【M】key to enter the setup menu
interface.
Function 2: camera key in the camera mode, short press【OK】key to take a photo.
③ Power Button
Function 1: Screen ON/OFF function, short press the【Power】button to turn on or
off the screen. (When the screen is off, click on the display area can also
light up the screen)
Function 2: ON/OFF function, long press【Power】key to turn on/off the machine.
The unit automatically saves the video file and user settings and shuts
down.
④ UP
⑤ DOWN
⑥ USB interface: the machine power supply and internal battery charge.
⑦ AV IN camera interface
⑧ MicroSD card slot
⑨ GPS module (optional)
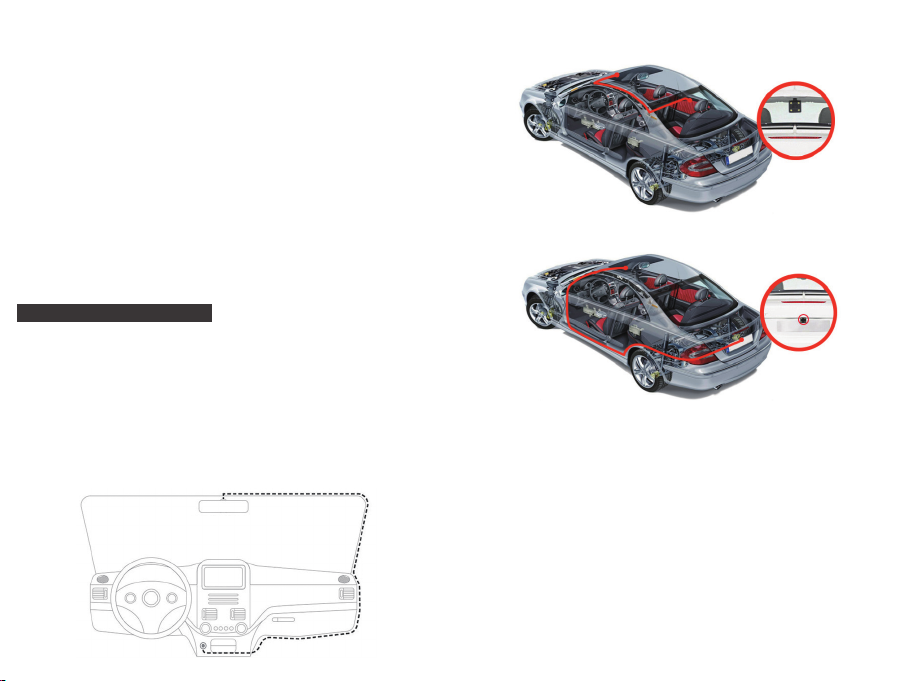
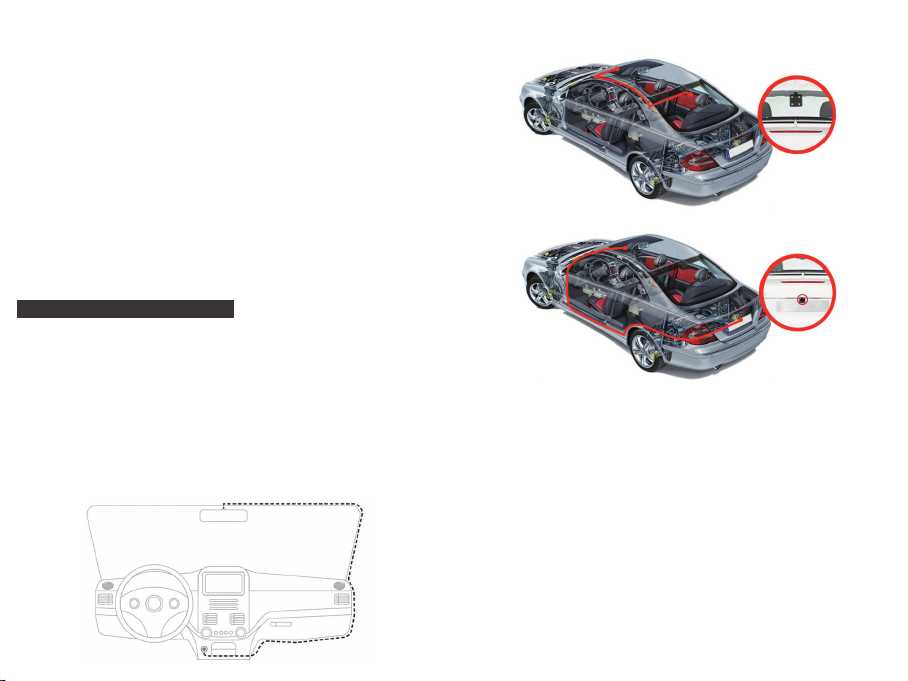
INSTALLATION AND USAGE
1. Installation
Insert MicroSD card into the recorder to store video, images and other files. Fix the
recorder in the position of rear view mirror and connect it to cigarette lighter via car
charger.
Note: You can lay out the extended charging/power supply wiring along the edge
of windshield. Optional rear camera is installed in the rear of the vehicle, and
you need to pay attention to the direction of the installation. Wiring can be
laid along the roof of a vehicle. After installation is complete, put camera plug
into the recorder’s rear camera port. Adjust the lens position to ensure that
the lens level with the ground. Start the engine to check if the device has been
installed correctly.
Optimal Installation Location
Power Supply Wining
3
How to install rearview camera, You have two ways to install it.
1. Installed on the rear windshield.
2. Installed near the license plate.
3. Black and red lines connected to the reversing lights in order to view the reversing situation.
2. Start to work
Press [POWER] button to turn on the recorder; or connect car charger and start car
engine, the recorder will be started automatically.
3. Charging Battery and USB Connection
Press [POWER] button to turn on the recorder; or connect car charger and start car
engine, the recorder will be started automatically.
(1) You can use our free car charger. Upon access to power, battery symbol on top of
the screen will be changed into the charging symbol.
(2) The device could be connected to a computer via USB cable and a successful
connection would automatically pop up the options menu. You can press [UP /
DOWN] button to select and press [OK] button to confirm.
This device could be functioned as a portable hard drive to copy and transfer files to/
from computer.
4

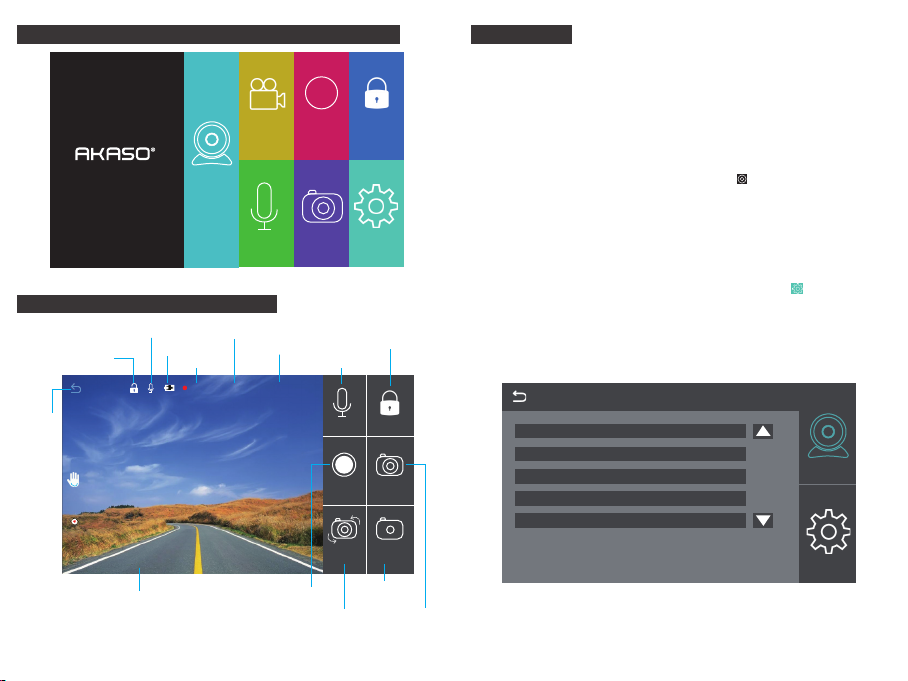
INTRODUCTION TO MAIN INTERFACE FUNCTIONS
REC
Rec Off Playback Video Lock
12:45
2017-09-13 Tuesday
VIDEO MODE (ICON INTRODUCTION)
Audio status
Date/time
Power state
Video status
Video lock/Unlock
instructions
Return to
the main
interface
Back
2016-09-20 12:23:12
Video time
REC 00:58
5
Audio Off
Camera Setup
Video resolution
Audio on / off
1080FHD
Video Switch
Video on/off
Front/rear image switching
Video lock/Unlock
Video LockAudio Off
Tale CaptuRec Off
Night Mode
Front/rear
image switching
Take pictures
FEATURES
1. Automatic recording function
Start the car engine, the recorder automatically starts and turns on the recording
function. Turn off the car engine, the recorder automatically save the contents of the
record and shut down, record the video
MicroSD card is full, the recorder will overwrite the earlier recorded images, and the
locked file will not automatically be covered.
2. Use the manual recording function
In the main interface, click the recorder icon , enter the traffic recording screen point
to the right of the icon,
the OK button to turn on/off the recording function. If you want to turn off the power,
press the [POWER] key again for 3 seconds, and the recorder will save the record
automatically and turn it off.
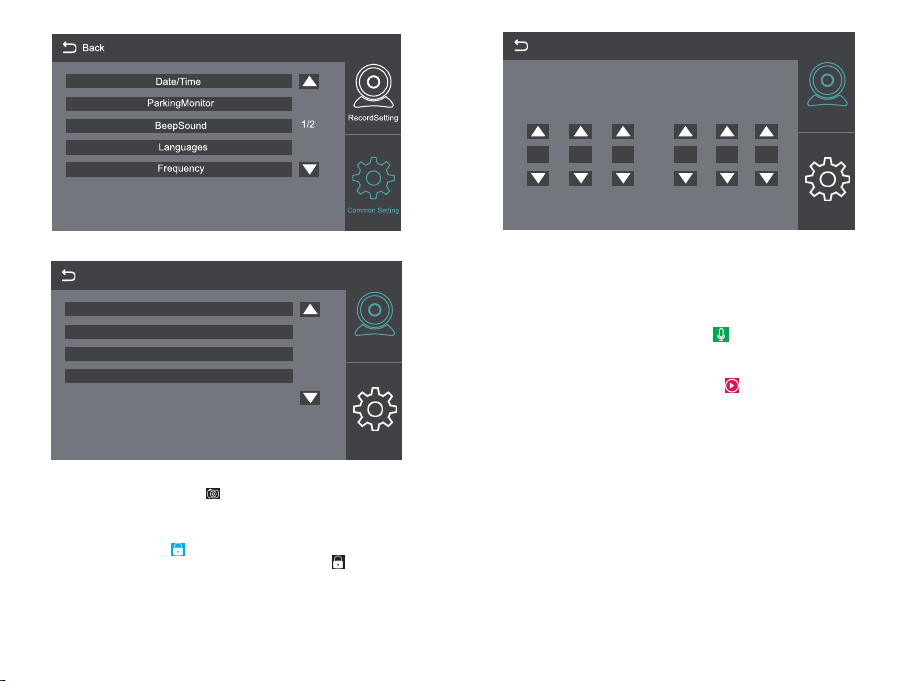
3. Set Up
In the main interface, click the [System Settings] icon , enter the system settings, the
system settings, including recorder settings / general settings, as shown below:
you can manually turn on/off video function. You can also press
【Note】 When entering the system settings, stop recording first.
Back
Boot into recorder interface
Back
segment stored in the MicroSD card. When the
Resolution
Looprecording
NightMode
MotionDetection
RecordAudio
DateStamp
G-Sensor
1/2
2/2
6
RecordSetting
Common Setting
RecordSetting
Common Setting
Back
Date/Time
Year Month Date Hour Minute Second
2017 09 22 12 00 00
RecordSetting
Common Setting
Back
ScreenSaver
Format
DefaultSetting
Version
4. Use the camera function
Back to main interface, please click the icon to enter the camera mode.
5. One key lock function
The unit has one key lock function. When the driving function is turned on, click on the
main interface [video lock] icon , the entire video image will be locked; or enter the
driving function interface, click the upper right corner of the icon . Then entire video
will be locked, and cannot be overwritten.
6. Date and time settings
In the main interface, click the [System Settings] icon, click [Common Settings] to enter
the date / time settings. As shown below:
7
RecordSetting
2/2
Common Setting
Note: In order to effectively record the date and time of forensic of traffic safety
accident, please set the correct time immediately before using the machine.
7. Mute Function
In the main interface, click the [Voice Record] icon to a key to open or close the
recording.
8. File playback
In the main interface, click the [Playback Mode] icon to enter the video / photo
playback, click on the screen [Previous] or [Next] to select the video / photo, or press
[UP] or [DOWN] to select.
9. Rear View
First of all, you must connect a rear camera to the recorder with the extension of long
lines. When the car engine starts, the recorder will work automatically.
10. Parking mode
In the main interface, click [System Settings] icon menu settings, click [General
Settings]; Open the parking mode: the recorder will start to work based on G-SENSOR
induction to automatically save 30 seconds video when the vehicle is shut down. When
the park mode is not turned on, the recorder will not be turned on by vibration.
8

PRODUCT SPECIFICATION
Display screen
Lens angle
Pull back the camera
G-SENSOR
Automatic reversing visual
Speaker
Microphone
Language
Loop video
Recording function
Picture-in-picture
Memory card
Front camera video resolution
Take pictures of quality
Video Format
Image Format
Note: This product retains the design and specifications without notice.
5inch high-definition IPS touch screen
170° Wide-angle lens
Stand by
Stand by
Stand by
Stand by
Stand by
Support multi-language
Stand by
Stand by
Stand by
Maximum support 32GB
1080P FHD(1920*1080) 720P(1080*720)
1 M
MOV
JPEG
TROUBLE SHOOTING
In the normal operation, if the product problems, please refer to the following methods
to solve:
● Cannot record
Check whether there is enough space MicroSD card, whether too many files due to
lock the MicroSD card storage space is not enough, please format the TF memory card
after use.
Check if the cycle recording in the main menu is set to OFF, set it to 3 minutes.
● When recording, it will stop automatically
Due to the large amount of high-definition video data processed at the time of
recording, please use a high-speed TF memory card of Class10 or Class10 or higher.
● A "File Error" prompt appears when you replay your pictures and videos
Please buy genuine TF memory card use.
If the TF card is storing the data,
of the recorder to reformat the TF card.
the file is incomplete. Please use the "Format" function
9
● The image is misty
Please check the lens for fingerprints, dirty, and use the lens paper / cloth to clean the
lens parts, while cleaning the front windshield.
● Crash
After the crash, use a sharp object to press the reset button to restart the machine.
English
CONTACT US
For any inquiries, issues or comments concerning our products, please send E-mail to
the address below, and we will respond as soon as possible.
E-mail: cs@akasotech.com
US customer service line: (301)670-7335
10
Deutsch
ACHTUNG
Die AKASO Armaturen-Kamera ist nicht dazu bestimmt, gerändert oder während
der Autofahrt abgestimmt zu werden. AKASO haftet für keinerlei Schäden, die durch
Missbrauch oder Fehlgebrauch der Kamera entstehen.
Verwenden Sie ausschließlich Ladegeräte, Zubehör und sonstige Zusätze, die vom
Hersteller zugelassen sind.
AKASO kann nicht für die Sicherheit des Benutzers garantieren, wenn Zubehör
verwendet wird, welches nicht von AKASO zugelassen wurde.
Lagern Sie Ihr Gerät nicht an übermäßig heißen, kalten, feuchten oder trockenen
Orten.
Andernfalls könnten Schäden am Bildschirm oder am Gerät auftreten oder der Akku
explodieren. Es wird empfohlen, dass Sie Ihr Gerät innerhalb von Temperaturen
zwischen -10° bis 55° C und einer Luftfeuchtigkeit von 10% bis 80% verwenden.
Wenn sich Ihr Gerät überhitzt, warten Sie, bis es abkühlt, bevor Sie es verwenden.
Bei längerem Hautkontakt mit einem überhitzten Gerät können Niedrig-Temperatur
Verbrennungssymptome wie rote Stellen oder dunklere Pigmentierung auftreten.
Berühren Sie das Autoladegerät nicht mit feuchten Händen und entfernen Sie das
Ladegerät nicht, indem Sie am Kabel ziehen. Andernfalls kann dies zu Stromschlägen
führen.
Verwenden Sie keine beschädigten Stromkabel, Stecker oder lose Steckdosen.
Fehlerhafte Anschlüsse können elektrische Schläge oder Feuer verursachen.
Berühren Sie das Gerät nicht mit feuchten oder gar nassen Händen.
Dies kann zu elektrischen Schlägen führen.
Entfernen Sie die SD-Karte nicht während der Aufnahme. Dies könnte Fehler
verursachen.
Halten Sie die Linse stets sauber und stellen Sie sicher, dass die Linse nicht von
Objekten verdeckt oder in der Nähe von reflektierenden Materialien platziert ist.
Wenn die Windschutzscheibe des Fahrzeugs getönt ist, könnte dies die
Aufnahmequalität beeinträchtigen.
NUTZUNGSEMPFEHLUNG
Bitte verwenden Sie eine 10 schnelle Mikro-SD-Speicherkarte.
Bitte verwenden Sie ausschließlich originale Mikro-SD-Speicherkarten um
Kompatibilitätsprobleme zu vermeiden.
Formatieren Sie bitte Ihre Mikro-SD-Speicherkarte vor der erstmaligen Verwendung.
Hinweis:
a. Mikro-SD Speicherkarte unterstützt maximal 32 GB, FAT32 Format,
Standardclustergröße ≥ 32kb;
b. Vergewissern Sie sich, dass Sie die Mikro-SD-Speicherkarte korrekt in den lokalen
Mikro-SD-Kartensteckplatz eingelegen. Wenn Sie ein Klicken hören, wurde die
Speicherkarte korrekt eingelegt.
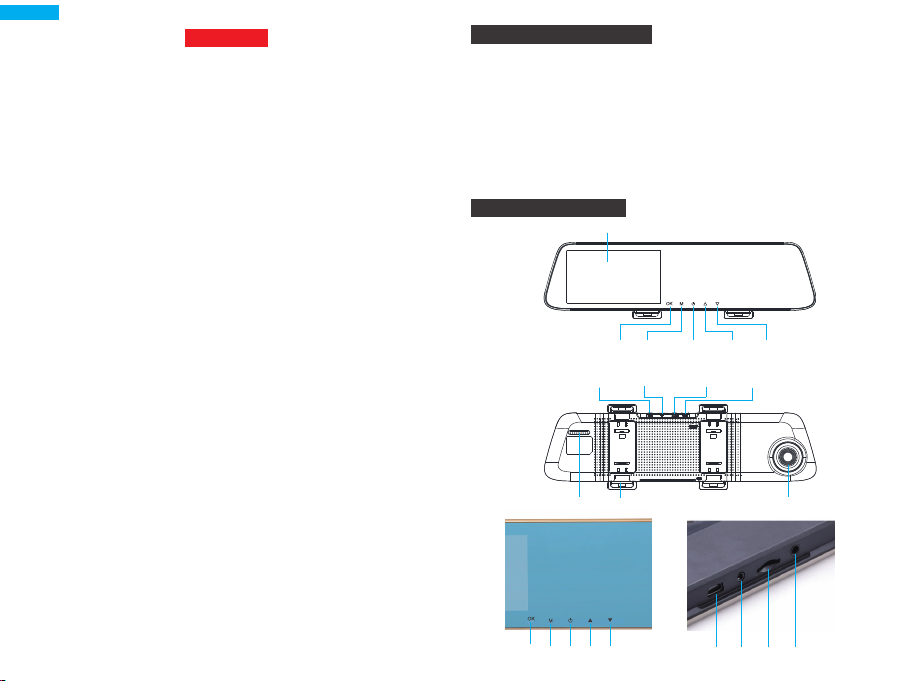
PRODUKT ÜBERSICHT
LCD Bildschirm
OK
Modus Power Auf Ab
GPS Port
Mikro-SD
Steckplatz
Rück Kamera
Anschluss USB Port
(Optional)
Lautsprecher Verschluss Linse
①
11
② ③ ④ ⑤
⑥ ⑦ ⑧ ⑨
12
① OK Taste: An / Aus Aufnahmefunktion im Standby-Modus, [OK]drücken um
Aufnahme zu starten, [OK]erneut drücken um Aufnahme zu stoppen.
② Menü Taste
Funktion 1: Im Standby-Modus kurz die [M] Taste drücken um die
Einstellungsoberfläche zu öffnen.
Funktion 2: Kamera Taste im Kamera-Modus, [OK] Taste kurz drücken um ein Foto
zu machen.
③ Power Taste
Funktion 1: Bildschirm AN/AUS Funktion, [Power] Taste kurz drücken um den
Bildschirm ein- oder auszuschalten. (Wenn der Bildschirm ausgeschaltet
ist, kann auch durch berühren des Bildschirmbereichs der Bildschirm
aktiviert werden.)
Funktion 2: AN / AUS Funktion, [Power] Taste lange gedrückt halten um das Gerät
an / auszuschalten.
Das Gerät speichert das Video und Einstellungen automatisch und schaltet sich ab.
④ AUF ⑤ AB
⑥ USB-Anschluss: Stromversorgung und interner Akkulader des Geräts.
⑦ AV IN Kamera Anschluss ⑧ Mikro-SD-Kartensteckplatz ⑨ GPS Modul (Optional)
INSTALLATION UND NUTZUNG
1. Installation
Setzen Sie die Mikro-SD-Karte in das Gerät um Videos, Fotos und andere Dateien zu
speichern. Platzieren Sie das Aufnahmegerät in der Nähe des Rückspiegels und
verbinden Sie es über das Stromkabel mit dem Zigarettenanzünder.
Hinweis: Sie können das verlängerte Strom/Ladekabel entlang des Randes der
Windschutzscheibe verlegen. Die optionale Rückkamera wird am Heck des Fahrzeugs
angebracht und sie müssen bei der Platzierung der Kameras auf die Richtung achten.
Die Verkabelung kann entlang des Dachhimmels erfolgen. Nachdem die Installation
abgeschlossen wurde, stecken Sie den Kamerastecker in den hinteren Anschluss des
Aufnahmegerätes. Passen Sie die Linsenposition so an, dass Sie am Boden ausgerichtet
ist. Starten Sie den Motor des Fahrzeugs um zu überprüfen, ob das Gerät
ordnungsgemäß angeschlossen wurde.
Stromverkabelung
Optimale Installationsposition
13
Wie Sie die Rückfahrkamera installieren, haben Sie zwei Arten von Installationsmethoden.
1. Installiert auf der Heckscheibe.
2. In der Nähe des Nummernschilds installiert.
3. Verbinden Sie die schwarzen und roten Kabel mit den Rückfahrscheinwerfern, um die
Rückwärtsfahrt zu sehen.
2. Betriebsaufnahme
Drücken Sie die [POWER] Taste um das Gerät zu einzuschalten, oder verbinden Sie es
mit dem Stromkabel um das Gerät automatisch zu starten, wenn der Motor des
Fahrzeugs gestartet wird.
3. Aufladen der Batterie und USB Verbindung
Drücken Sie die [POWER] Taste um das Gerät einzuschalten; oder verbinden Sie es mit
dem Ladekabel und starten Sie den Fahrzeugmotor um das Gerät automatisch zu
starten.
(1) Sie können unser kostenlos mitgeliefertes Autoladekabel verwenden. Sobald das
Gerät mit Strom versorgt wird, verändert sich das Batteriesymbol im oberen Bereich
des Bildschirms in das Auflade Symbol.
(2) Wenn das Gerät per USB-Kabel erfolgreich an einen Computer angeschlossen wird,
erscheint automatisch das Optionsmenü. Sie können die [AUF / AB] Tasten
verwenden um auszuwählen und die [OK] Taste drücken um zu bestätigen.
Dieses Gerät kann auch als mobile Festplatte verwendet werden, um Dateien von / zu
Ihrem Computer zu kopieren oder zu verschieben.
14
EINFÜHRUNG ZU DEN FUNKTIONEN DES HAUPTMENÜS
Aufn Aus Wiedergabe Video sperren
12:45
2017-09-13 Dienstag
VIDEOMODUS (SYMBOL ERKLÄRUNG)
Rückkehr zu
Hauptmenü
Video sperren
/entsperren
Anweisungen
Zurück
2016-09-20 12:23:12
Audio Status
Strom Status
Datum/Uhrzeit
Video Status
REC 00:58
Video Zeit
Video Auflösung
Audio Aus
Front/Heck Bild Wechsel Foto machen
1080FHD
Video on/off
Kamera Einstellungen
Video sperren
/ Entsperren
Audio An / Aus
Audio Aus
Aufnahme
Aus
Video
Wechsel
Front / Heck
Bild Wechsel
Video
Sperre
Tale Captu
Nachtmodus
FUNKTIONEN
1. Automatische Aufnahmefunktion
Wenn der Fahrzeugmotor gestartet wird schaltet sich das Gerät selbst ein und aktiviert
die Aufnahmefunktion. Wenn der Fahrzeugmotor abgestellt wird, speichert das Gerät
automatisch sämtliche Inhalte sowie alle aufgenommen Videos auf der SD-Karte und
schaltet sich ab. Wenn der Speicher der SD-Karte voll ist, wird das Gerät alle früheren
aufgenommenen Bilder überschreiben und die gesperrte Datei wird nicht automatisch
geschützt.
2. Verwendung der manuellen Aufnahmefunktion
Drücken Sie im Hauptmenü auf das Aufnahme Symbol , um den Verkehrsaufnahme
Bildschirm auf der rechten Seite des Symbols zu öffnen um manuell die Videofunktion
ein-/auszuschalten. Sie können auch die OK Taste drücken um die Aufnahmefunktion
ein-/auszuschalten. Wenn Sie das Gerät ausschalten möchten, drücken Sie die [POWER]
Taste erneut für 3 Sekunden und das Gerät wird die Aufnahme automatisch speichern
und sich danach abschalten.
3. Einstellung
Drücken Sie im Hauptmenü auf das [Systemeinstellungen] Symbol , um die
Systemeinstellungen sowie Aufnahmeeinstellungen / Allgemeine Einstellungen zu
öffnen, wie unten gezeigt:
Note: Wenn Sie die Systemeinstellungen öffnen, stoppen Sie zuerst die
Aufnahme.
Zurückt
Auflösungt
Schleifenaufnahme
Nachtmodus
In das Aufnahmemenü starten
Bewegungserkennung
Aufnahme
1/2
Einstellungen
Allgemeine
Einstellungen
15 16

Zurück
Zurück
Zurück
Tonaufnahme
Datumsstempel
G-Sensor
Datum / Uhrzeit
Parküberwachung
Piepton
Sprachen
Frequenz
Bildschirmschoner
Format
Standardeinstellungen
Version
4. Verwendung der Kamerafunktion
Zurück im Hauptmenü, drücken Sie bitte auf das Symbol um in den Kameramodus
zu wechseln.
5. Eine-Taste Sperrfunktion
Dieses Gerät verfügt über eine Eine-Taste Sperrfunktion. Wenn die Fahrt-Funktion
Aufnahme
2/2
Einstellungen
Allgemeine
Einstellungen
eingeschaltet ist, drücken Sie auf das Hauptmenü [Video Sperre] Symbol , um das
gesamte Video zu sperren, oder öffnen Sie das Menü der Fahrt Funktion und drücken
Sie auf das Symbol in der oberen rechten Ecke. Das gesamte Video wird gesperrt
und kann nicht überschrieben werden.
6. Datums - und Uhrzeiteinstellungen
Drücken Sie im Hauptmenü auf das [Systemeinstellungen] Symbol, drücken Sie auf
[Allgemeine Einstellungen] um die Datums- / Uhrzeiteinstellungen wie unten gezeigt
zu öffnen:
Zurück
Datum/Uhrzeit
Aufnahme
Einstellungen
Allgemeine
Einstellungen
Aufnahme
2/2
Einstellungen
Allgemeine
Einstellungen
17 18
Jahr Monat Ta g Stunde Minute Sekunde
2017 09 22 12 00 00
Hinweis: Um das Datum und die Uhrzeit bei Verkehrsunfällen richtig zu erfassen,
stellen Sie bitte sofort das richtige Datum und Uhrzeit ein bevor Sie das
Gerät verwenden.
7. Stummschalten Funktion
Drücken Sie im Hauptmenü auf das [Stimmaufzeichnung] Symbol ,um die Aufnahme
zu aktiveren oder zu deaktivieren.
8. Datei Wiedergabe
Drücken Sie im Hauptmenü auf das [Wiedergabemodus] Symbol um die Video/Foto
Wiedergabe zu öffnen, drücken Sie im Bildschirm auf [Vorheriges] oder [Nächstes] um
das Video / Foto auszuwählen oder drücken Sie [AUF] oder [AB] um auszuwählen.
9. Rückansicht
Zuerst muss eine Rückkamera mit dem Gerät über das Verlängerungskabel verbunden
werden. Wenn der Fahrzeugmotor gestartet wird, schaltet sich das Aufnahmegerät
automatisch ein.
Aufnahme
Einstellungen
Allgemeine
Einstellungen

10. Parkmodus
Drücken Sie im Hauptmenü auf das [Systemeinstellungen] Symbol, drücken Sie
[Allgemeine Einstellungen]; Öffnen Sie den Parkmodus: Das Gerät wird sich über den
G-SENSOR einschalten und automatisch 30 Sekunden lange Videos aufnehmen, wenn
das Fahrzeug abgestellt wird. Wenn der Parkmodus ausgeschaltet ist, wird das Gerät
bei Erschütterungen keine Videos aufzeichnen.
PRODUKT SPEZIFIKATIONEN
Bildschirm 5 Zoll Hochauflösender IPS Touchscreen
Linsenwinkel
Kamera zurückziehen
G-SENSOR
Automatische Bildumkehr
Lautsprecher
Mikrofon
Sprache
Schleifen-Video
Aufnahmefunktion
Bild-In-Bild
Speicherkarte
Frontkamera Bildauflösung
Fotoaufnahme Qualität
Videoformat
Bildformat
170° Weitwinkel Linse
Standby
Standby
Standby
Standby
Standby
Mehrsprachenunterstützung
Standby
Standby
Standby
Maximum support 32GB
1080P FHD(1920*1080) 720P(1080*720)
1 M
MOV
JPEG
Hinweis: Dieses Produkt behält Design und Spezifikationen ohne Ankündigung.
FEHLERBEHEBUNG
Sollten unter normalem Betrieb Probleme auftreten, beachten Sie bitte die folgenden
Methoden zu Fehlerbehebung:
● Das Gerät nimmt nichts auf
Überprüfen Sie ob genug Speicherplatz auf der Mikro-SD-Karte vorhanden ist, ob
durch zu viele gesperrte Dateien zu wenig Speicherplatz auf der SD-Karte vorhanden
ist, bitte formatieren Sie die TF-Speicherkarte nach Benutzung.
Überprüfen Sie ob die Schleifenaufnahme im Hauptmenü ausgeschaltet ist, stellen Sie
sie auf 3 Minuten ein.
19 20
● Die Aufnahme wird automatisch gestoppt
Verwenden Sie bitte eine ausreichend schnelle TF-Speicherkarte der Klasse10 oder
Höher, da während der Aufnahme große Mengen an Hochauflösender Videodaten
verarbeitet werden.
● Eine "Datei Fehler" Meldung erscheint bei der Wiedergabe von Videos und
Fotos
Bitte verwenden Sie eine originale TF-Speicherkarte.
Wenn die TF-Karte die Daten speichert, ist die Datei unvollständig. Bitte verwenden Sie
die “Format” Funktion des Geräts um die TF-Karte neu zu formatieren.
● Die Aufnahmen sind verschwommen/undeutlich
Bitte überprüfen Sie die Linse auf Fingerabdrücke, Schmutz und verwenden Sie Linsen
papier / ein Tuch zur Reinigung der Linse, wenn Sie die Windschutzscheibe säubern.
● Absturz
Verwenden Sie ein spitzes Objekt um die Reset-Taste nach einem Absturz zu drücken
und das Gerät neu zu starten.
Deutsch
KONTAKTIEREN SIE UNS
Bei Fragen, Problemen oder Kommentaren zu unseren Produkten senden Sie bitte ein
E-Mail an die untenstehende Adresse oder rufen Sie uns an. Wir werden so schnell wie
möglich antworten.
E-Mail: cs@akasotech.com

Español
PRECAUCIÓN
La cámara de salpicadero AKASO no está diseñada para ser modificada, o calibrada
mientras esté conduciendo un vehículo. AKASO no se hace responsable de los daños
que pueda causar un mal uso de la cámara por parte del usuario.
Utilice solamente cargadores, accesorios, y suministros aprobados por el fabricante.
AKASO no se hace responsable de la seguridad del usuario al usar accesorios o
suministros que no han sido aprobados por AKASO.
No guarde su dispositivo en lugares excesivamente cálidos, fríos, húmedos o secos.
Hacerlo puede provocar que la pantalla no funcione correctamente, causar daños al
dispositivo, o hacer que explote la batería. Se recomienda utilizar su dispositivo dentro
de un rango de temperaturas de entre -10º a 55º C, y un rango de humedad relativa
de entre el 10% y el 80%.
Si su dispositivo se recalienta, deje que se enfríe antes de usarlo.
Una exposición prolongada de la piel a un dispositivo sobrecalentado puede causar
síntomas de quemaduras de baja temperatura, tales como manchas rojas, o zonas de
pigmentación más oscura.
No toque el cargador para el coche con las manos húmedas ni lo desconecte tirando
del cable. Hacerlo puede tener como resultado una electrocución.
No utilice cables de alimentación ni enchufes o tomas de corriente flojas.
Las conexiones defectuosas pueden provocar descargas eléctricas o fuego.
No toque su dispositivo con las manos húmedas.
Hacerlo puede provocar una descarga eléctrica.
No retire la tarjeta SD del aparato mientras esté grabando datos, ya que se puede
producir un error.
Mantenga siempre limpia la lente de la cámara, y asegúrese de que no está
bloqueada por ningún objeto o situada cerca de cualquier material reflectante.
Si el parabrisas del coche está tintado con un recubrimiento oscuro, la calidad de la
grabación puede verse afectada.
SUGERENCIAS DE USO
Por favor, utilice 10 tarjetas de memoria MicroSD de alta velocidad.
Por favor, compre tarjetas de memoria MicroSD auténticas para evitar problemas de
compatibilidad. La primera vez, por favor, formatee su tarjeta de memoria MicroSD.
Nota:
a. La capacidad máxima de la tarjeta MicroSD es de 32G, formato FAT32, tamaño de la
unidad asignado ≥ 32kb.
b. Asegúrese de introducir una tarjeta MicroSD en la ranura MicroSD local. Cuando se
escuche un "click", la tarjeta de memoria se habrá insertado correctamente.
RESUMEN DEL PRODUCTO
Pantalla LCD
OK
Modo Encendido Arriba Abajo
Ranura de
tarjetas
MicroSD
Puerto de
cámara
trasera Puerto USB
Puerto GPS
(Opcional)
Altavoz Hebilla trasera Lente
21
① ② ③ ④ ⑤ ⑥ ⑦ ⑧ ⑨
22

① Botón de OK: Encender / Apagar la función de grabación en modo reposo, presione
[OK] para empezar a grabar, presione [OK] de nuevo para dejar de
grabar.
② Botón menú
Función 1: En el modo de reposo presione brevemente la tecla [M] para entrar en el
menú de configuración de la interfaz;.
Función 2: toque la tecla cámara en el modo cámara, presione brevemente la tecla
[OK] para sacar una foto.
③ Botón de encendido
Función 1: función de ENCENDIDO/APAGADO de la pantalla, presione brevemente
el botón [Encendido] para encender o apagar la pantalla (cuando la
pantalla esté apagada, haga click en la zona de visualización, también
puede iluminar la pantalla)
Función 2: Función de ENCENDIDO/APAGADO, mantenga presionada la tecla
[Encendido] para encender/apagar la máquina.
El aparato automáticamente guarda el archivo de video y los ajustes del usuario y se
apaga.
④ ARRIBA ⑤ ABAJO
⑥ Interfaz de USB: la fuente de alimentación y la carga de la batería interna.
⑦ AV IN interfaz de cámara ⑧ Puerto MicroSD ⑨ Módulo GPS (opcional)
INSTALACIÓN Y USO
1. Instalación
Introduzca la tarjeta MicroSD en el grabador para poder almacenar video, imágenes y
otros archivos. Fije el grabador en la posición de retrovisor y conéctelo al mechero a
través del cargador para el coche.
Nota: Puede colocar el cable de carga/alimentación a lo largo del borde del parabrisas.
Hay una cámara trasera opcional instalada en la parte trasera del vehículo, y debe
prestar atención a la dirección en la que ha sido instalada. El cableado se puede
colocar a lo largo del techo del vehículo. Cuando haya completado la instalación,
conecte el conector de la cámara en el puerto de cámara trasera del grabador. Ajuste
la posición de la lente y asegúrese de que está a nivel con el suelo. Arranque el motor
para comprobar si el dispositivo se ha instalado correctamente.
ordnungsgemäß angeschlossen wurde.
Ubicación para instalación óptima
Cable de alimentación
1
23
Cómo instalar la cámara de visión trasera, tiene dos tipos de métodos de instalación.
1. Instalado en el parabrisas trasero.
2. Instalado cerca de la matrícula.
3. Conecte los cables negro y rojo a las luces de marcha atrás para ver la situación de inversión.
2. Inicie el funcionamiento
Presione el botón [ENCENDIDO] para encender el grabador; o para conectar el
cargador del coche y encender el motor, el grabador se encenderá automáticamente.
3. Cargar la batería y la conexión USB
Presione el botón [ENCENDIDO] para encender el grabador; o conecte el cargador del
coche y arranque el motor, el grabador se iniciará automáticamente.
(1) Puede usar nuestro cargador para coches gratis. Al acceder a la energía, el símbolo
de batería que está en lo alto de la pantalla se cambiará por un símbolo de carga.
(2) El dispositivo se podría conectar a un ordenador por medio de un cable USB y una
conexión exitosa haría saltar un menú de opciones. Puede presionar el botón
[ARRIBA /ABAJO] para seleccionar y presione el botón [OK] para confirmar.
Este dispositivo podría funcionar como un disco duro portátil para copiar y transferir
archivos hacia / y desde un ordenador.
24

INTRODUCCIÓN A LAS PRINCIPALES FUNCIONES
Apagar
Reproducción
Grabación
12:45
2017-09-13 Martes
MODO VIDEO (INTRODUCCIÓN A LOS ICONOS)
Estatus de Audio
Estado de
Bloqueo/desbloqueo
de Video instrucciones
Atrás
Volver a
la interfaz
principal
energía
Estado de víde
Hora del Video
REC 00:58
Apagar audio
Resolución de video
Cámara Setup
Audio encendido /
1080FHD
Bloqueo
e video
Bloqueo/desbloqueo
de vídeo
apagadof
Video
Audio
bloqueado
apagado
Captura
Grabación
de cuento
apagada
CARACTERÍSTICAS
1. Función de grabación automática
Arranque el motor del coche, el grabador se enciende automáticamente y se activa la
función de grabación. Apague el coche, el grabador comenzará automáticamente a
guardar contenidos del registro y se apagará, grabando el segmento de vídeo
almacenado en la tarjeta MicroSD. Cuando la tarjeta MicroSD esté llena, el grabador
sobreescribirá las primeras imágenes grabadas, y el fichero bloqueado no se
sobreeescribirá automáticamente.
2. Utilice la función de grabación manual
En la interfaz principal, haga click en el icono del grabador , introdúzcase en la
pantalla de grabación del tráfico, apunte a la derecha del icono, podrá activar /
desactivar manualmente. También puede presionar el botón OK para encender /
apagar la función de grabación. Si desea apagar el aparato, presione la Tecla
[ENCENDIDO] otra vez durante 3 segundos, y el grabador guardará el registro
automáticamente y se apagará.
3. Configuración
En la interfaz principal, haga click en [Ajustes del sistema] el icono , introdúzcase en
los ajustes del Sistema, incluyendo los ajustes del grabador / generales, como se
muestra abajo:
Note: Para entrar en los ajustes del Sistema, primero deje de grabar.
Atrás
Resolución
Grabación en bucle
Modo nocturno
Iniciar en la interfaz del grabador
Detección del movimiento
Ajustes de
1/2
grabación
2016-09-20 12:23:12
Fecha / hora
Modo
Cambio
nocturno
de video
Video encendido / apagadof
Frontal / trasera
Cambio de imgen
Cambio de imagen frontal / trasera Sacar fotos
25 26
Ajustes
generales

Atrás
Atrás
Seguimiento del parking
Atrás
Grabar Audio
Código de tiempo
G-Sensor
Fecha / Hora
Sonido Busca
Idiomas
Frecuencia
Salvapantallas
Formato
Ajuste por derecho
Version
4. Uso de la función de cámara
Vuelva a la interfaz principal, haga click en el icono .
5. Función de bloqueo con una tecla
El aparato tiene una función de bloqueo con una tecla. Cuando la función de
Ajustes de
2/2
grabación
Ajustes
generales
conducción está encendida, haga click en la interfaz principal en el icono [bloqueo
de video], la imagen de video al completo se bloqueará; o entre en la interfaz de la
función de conducción, haga click en la esquina superior derecha del icono . Todo el
video se bloqueará, y no se podrá sobreescribir.
6. Ajuste de la fecha y la hora
En la interfaz principal, haga click en el icono [Ajustes del Sistema], luego click en
[Ajustes Comunes] para introducir los ajustes de fecha / hora. Como se muestra a
continuación:
Atrás
Fecha / Hora
Año Mes Fecha Hora Minuto Segundo
Ajustes de
grabación
Ajustes
generales
Ajustes de
2/2
grabación
Ajustes
generales
27
2017 09 22 12 00 00
Nota: Con el objeto de guardar efectivamente la fecha y la hora de un accidente de
tráfico, por favor, establezca la hora correcta inmediatamente antes de utilizar
la máquina.
7. Función de silencio
En la interfaz principal, haga click en [Grabación de Voz] en el icono y a una tecla
para abrir o cerrar la grabación.
8. Reproducción de los archivos
En la interfaz principal, haga click en el [Modo Reproducción] en el icono para entrar
en la reproducción de video/foto, haga click en la pantalla [Anterior] o [Siguiente] para
seleccionar el vídeo / foto, o presionar [ARRIBA] o [ABAJO] para seleccionar.
9. Vista trasera
Antes que nada, debe conectar una cámara trasera al grabador con los cables de
extensión. Cuando el motor del coche arranque, el grabador comenzará a funcionar
automáticamente.
28
Ajustes de
grabación
Ajustes
generales

10. Modo de estacionamiento
En la interfaz principal, haga click en el icono [Ajustes del sistema] del menú de ajustes,
luego haga click en [Ajustes Generales]; abra el modo de aparcamiento: el grabador
comenzará a funcionar utilizando un G-SENSOR de inducción para guardar
automáticamente 30 segundos de video cuando el vehículo se haya apagado. Cuando
el modo de estacionamiento no esté encendido, el grabador no se encenderá en caso
de vibración.
ESPECIFICACIONES DEL PRODUCTO
Pantalla de visualización
Ángulo de la lente
Retirar la cámara
G-SENSOR
Marcha atrás automática de las imágenes
Altavoz
Micrófono
Idioma
Vídeo en bucle
Función de grabar
Foto a foto
Tarjeta de memoria
Resolución de la cámara frontal
Toma de fotos de calidad
Formato de vídeo
Formato de imagen
Note: Este producto retiene el diseño y especificaciones sin previo aviso.
5 pulgadas, alta definición, pantalla táctil IPS
170° ancho de ángulo de la lente
Reposo
Reposo
Reposo
Reposo
Reposo
Funcionamiento multilenguaje
Reposo
Reposo
Reposo
Capacidad máxima de 32GB
1080P FHD(1920*1080) 720P(1080*720)
1 M
MOV
JPEG
RESOLUCIÓN DE PROBLEMAS
Si el producto experimenta problemas durante su uso normal, por favor recurra a los
siguientes métodos para solucionar esos problemas:
● No graba
Compruebe si hay suficiente espacio en la tarjeta MicroSD, si hay demasiados ficheros
debido al bloqueo de la tarjeta MicroSD, el espacio de almacenamiento no es
suficiente, por favor formatee la tarjeta de memoria TF después de su uso.
Compruebe si el ciclo de grabación en el menu principal está seleccionado en OFF,
seleccione 3 minutos.
29
● Cuando graba, se para automáticamente
Debido a la gran cantidad de datos de video de alta definición procesados en el
momento de la grabación, por favor, utilice tarjetas de memoria TF de alta velocidad
de clase 10 o superior.
● Aparece un mensaje de “error de archive” cuando intenta ver sus fotos y vídeos
Por favor, compre una tarjeta de memoria TF auténtica; si la tarjeta TF está guardando
los datos, el fichero está incompleto. Por favor, utilice la función “Formato” del
grabador para reformatear la tarjeta TF.
● La imagen está borrosa
Por favor, compruebe que no hay huellas o suciedad en la lente y utilice el papel /
gamuza de a lente para limpiar sus partes, mientras limpia el parabrisas frontal.
● Cuelgue
Después de un cuelgue, utilice un objeto puntiagudo para presionar el botón que
reinicia la máquina.
CONTACTE CON NOSOTROS
Para cualquier pregunta, incidencia o comentario sobre nuestros productos, por favor,
envíe un correoelectrónico a la siguiente dirección o llámenos. Responderemos lo
antes posible.
Correo electrónico: cs@akasotech.com
30
Español

Français
PRÉCAUTIONS
La caméra embarquée AKASO n’est pas destinée à être modifiée ou réglée pendant
l’utilisation du véhicule. AKASO ne peut être tenu responsable des dommages
résultant d’une mauvaise utilisation par l’utilisateur de la caméra
Utilisez uniquement les chargeurs, accessoires et du matériel approuvés par le
fabricant.
AKASO ne peut être tenu responsable de la sécurité de l’utilisateur lorsque des
accessoires ou du matériel ne sont pas approuvés par AKASO.
Ne laissez pas votre appareil à des endroits excessivement chauds, froids, humides
ou secs.
Cela pourrait entraîner un dysfonctionnement de l’écran, endommager l’appareil ou
provoquer l’explosion de la batterie. Il est recommandé d’utiliser l’appareil dans des
environnements à une température comprise entre -10°C et 55°C et une humidité
allant de 10 à 80%.
Si votre appareil chauffe excessivement, laissez-le refroidir avant de l’utiliser à
nouveau.
Le contact prolongé d’un appareil en surchauffe contre la peau peut entraîner une
apparence de brûlures (basse température) telle que des tâches rouges ou des zones
de pigmentation plus foncées.
Ne manipulez pas le chargeur pour voiture avec des mains mouillées et ne
déconnectez pas le chargeur en tirant sur le câble. Cela peut entraîner une
électrocution.
N’utilisez pas de câble d’alimentation ou de connecteur endommagés, ni de prise
électrique desserrées.
Un branchement défectueux risque de causer un choc électrique voire un incendie.
Ne manipulez pas votre appareil avec les mains mouillées.
Cela peut entraîner un choc électrique.
Pendant un enregistrement, veillez à ne pas retirer la carte SD de la caméra car cela
risque de générer une erreur.
Veuillez toujours garder propre l’objectif de la caméra et assurez-vous que la caméra
n’est pas gênée de face par un objet ou par un élément réflecteur.
Si les vitres du véhicule sont sur-teintées, la qualité de l’enregistrement vidéo s’en
trouvera diminuée.
CONSEILS D’UTILISATION
Veuillez utiliser une carte Micro SD 10 à haute vitesse (TF).
Veuillez acheter une carte micro SD authentique afin d’éviter tout problème de
compatibilité.
Lors de la première utilisation, veuillez formater la carte micro SD
Remarques:
a. Carte micro SD supportée jusqu’à 32G, format FAT32, taille unitaire d’allocation ≥
32kb.
b. Assurez-vous d’insérer correctement la carte micro SD dans la fente intégrée.
Lorsque vous entendez un « clic », la carte mémoire est alors correctement insérée.
PRÉSENTATION DU PRODUIT
Écran LCD
OK
Mode Alimentation Haut Bas
Port GPS
Fente
micro SD
Port caméra
arrière Port USB
(optionnel)
Haut-parleur Clip arrière Objectif
31 32
① ② ③ ④ ⑤ ⑥ ⑦ ⑧ ⑨

① Bouton OK: Fonction d’enregistrement On/off. En mode veille, appuyez sur [OK]
pour commencer l’enregistrement, et appuyez de nouveau sur [OK]
pour l’arrêter.
② Bouton Menu
Fonction 1: En mode veille, appuyez brièvement sur la touche [M] pour accéder à
l’interface du menu de configuration.
Fonction 2: en mode photo, touche pour prendre une photo, appuyez brièvement
sur [OK] pour prendre une photo.
③ Bouton d’alimentation
Fonction 1: Fonction ON / OFF de l’écran, appuyez brièvement sur le bouton
[ALIMENTATION] pour allumer ou éteindre l’écran (lorsque l’écran est
éteint, il suffit de toucher l’écran pour qu’il s’allume)
Fonction 2: Fonction ON / OFF, appuyez longuement sur la touche [ALIMENTATION]
pour allumer / éteindre l’appareil.
L’appareil enregistre automatiquement les fichiers vidéo et les paramètres utilisateur,
puis s’éteint.
④ HAUT ⑤ BAS
⑥ Port USB : l’alimentation de la machine et le rechargement de la.
⑦ Batterie interne ⑧ Fente carte micro SD ⑨ Port GPS (optionnel)
INSTALLATION ET UTILISATION
1. Installation
Insérez la carte micro SD dans l’enregistreur pour garder les vidéos, les images et
d’autres fichiers. Placez l’enregistreur dans le sens d’un rétroviseur et branchez-le à la
prise allume-cigare à l’aide du chargeur voiture.
Remarque: Vous pouvez étendre le câblage de chargement / d’alimentation tout le
long du bord du pare-brise. La caméra arrière optionnelle est installée à l'arrière du
véhicule, et vous devez faire attention à l’orientation du placement. Le câblage peut
être effectué le long du toit du véhicule. Une fois l'installation terminée, insérez la prise
de la caméra dans le port arrière caméra de l’enregistreur. Ajustez la position de
l'objectif pour vous assurer qu‘il est au même niveau que le sol. Démarrez le moteur
pour vérifier que le périphérique a été correctement installé.
Emplacement d’installation idéal
Câble d’alimentation
1
33
Comment installer la caméra de vue arrière, vous avez deux types de méthodes d'installation.
1. Installé sur le pare-brise arrière.
2. Installé près de la plaque d'immatriculation.
3. Connectez les fils noir et rouge aux feux de recul pour voir la situation d'inversion.
2. Lancer le fonctionnement
Appuyez sur la touche [ALIMENTATION] pour allumer l’enregistreur ; ou connectez le
chargeur voiture puis démarrez la voiture et l’enregistreur se mettra en tension
automatiquement.
3. Rechargement de la batterie et connexion USB
Appuyez sur la touche [ALIMENTATION] pour allumer l’enregistreur ; ou connectez le
chargeur voiture puis démarrez la voiture et l’enregistreur se mettra en tension
automatiquement.
(1) Vous pouvez utiliser le chargeur voiture fourni gratuitement. Sur alimentation, le
symbole batterie en haut de l’écran sera remplacé par le symbole chargement.
(2) L’appareil peut être connecté à un ordinateur par câble USB et une connexion
réussie devrait automatiquement laisser apparaître le menu des options. Vous
pouvez appuyer sur les touches [HAUT / BAS] pour sélectionner puis sur la touche
[OK] pour confirmer.
Cet appareil peut fonctionner comme un disque dur portable afin de copier et
transférer des fichiers depuis un ordinateur.
34

PRÉSENTATION DES PRINCIPALES FONCTIONS DE L’INTERFACE
Enr off lecture Vidéos verrou
12:45
2017-09-13 Mardi
MODE VIDÉO (INTRODUCTION DE L’ICÔNE)
État son
Temps d’enregistrement
Date / heure
État de
consommation
État vidéo
REC 00:58
Vidéo verrouillé /
Retourà
a page
principale
déverrouillé
Instructions
Retour
2016-09-20 12:23:12
Son off
Résolution vidéo
35
Caméra Réglages
Audio on / off
1080FHD
Enr Off
Changement
Vidéo on / off
Changement caméra
avant / arrière
Verrouiller /
déverrouiller vidéo
Verou vidéoAudio Off
Capturer
photo
Mode nuit
vidéo
Mode nocturne
Prendre photo
FEATURES
1. Fonction d’enregistrement automatique
Démarrez le moteur de la voiture, l'enregistreur s’allume automatiquement et active la
fonction d'enregistrement. Éteignez le moteur de la voiture, l'enregistreur sauvegarde
automatiquement le contenu de l'enregistrement et s’éteint, enregistre la séquence
vidéo stockée sur la carte micro SD. Lorsque la carte micro SD est pleine, l'enregistreur
écrasera les images précédemment enregistrées, sauf les fichiers verrouillés qui ne
seront pas automatiquement couverts.
2. Utiliser la fonction d’enregistrement manuel
Sur la page principale, cliquez sur l'icône de l'enregistreur , cliquez sur le point de
l'écran d'enregistrement du trafic, à droite de l'icône ; vous pouvez manuellement
activer / désactiver la fonction vidéo. Vous pouvez également appuyer sur le bouton
OK pour activer / désactiver la fonction d'enregistrement. Si vous souhaitez mettre
l'appareil hors tension, appuyez à nouveau pendant 3 secondes sur la touche
[ALIMENTATION] et l'enregistreur sauvegarde automatiquement l'enregistrement et
tout s'éteint.
3. Configuration
Sur la page principale, cliquez sur l'icône [Paramètres système] , entrez les
paramètres du système, y compris les paramètres de l'enregistreur / paramètres
généraux, comme indiqué ci-dessous :
Remarque: Avant d’entrer dans les paramètres du système, veuillez d’abord
arrêter tout enregistrement.
Retour
Résolution
Enregistrement en boucle
Mode nuit
Démarrer sur la page de l’enregistreur
Détection de mouvements
36
Rég enregistr
1/2
Param
généraux

Retour
Retour
Enregistrement audio
Horodatage
G-Sensor
Date / Heure
Surveillance parking
Bip sonor
Langues
Fréquence
4. Utiliser la fonction caméra
Retournez sur la page principale, veuillez cliquer sur l’icône pour accéder au mode
caméra.
5. Fonction verrouillage
L'appareil possède une fonction de verrouillage des touches. Lorsque la fonction de
Rég enregistr
2/2
Param
généraux
conduite est activée, cliquez sur l'icône [verrouillage vidéo] sur la page, l'image vidéo
entière sera verrouillée; ou accédez à la page de la fonction de conduite, cliquez sur en
haut à droite sur l'icône . Ensuite, la vidéo entière sera verrouillée et ne sera pas
immédiatement écrasée.
6. Configuration date et heure
Sur la page principale, cliquez sur l'icône [Paramètres système], puis cliquez sur
[Paramètres généraux] pour accéder à la configuration des date / heure. Comme
indiqué ci-dessous :
Retour
Date / Time
Rég enregistr
Année Mois Jour Heure Minute Seconde
2017 09 22 12 00 00
Rég enregistr
Retour
Économiseur d’écran
Format
Paramètres par défaut
Version
Param
généraux
Remarque: Afin de bien enregistrer la date et l'heure en cas d’accident de la route,
veuillez régler l'heure avant d'utiliser la machine.
7. Fonction silencieuse
Sur la page principale, cliquez sur l'icône [Enregistrement vocal] puis sur n’importe
quelle touche pour ouvrir ou fermer l’enregistrement.
Rég enregistr
2/2
Param
généraux
37
8. Lecture de fichier
Sur la page principale, cliquez sur l'icône [Mode Lecture] pour accéder à la lecture de
vidéo / photo, et sur l'écran cliquez sur [Précédente] ou [Suivante] pour sélectionner la
vidéo / photo, ou appuyer sur [HAUT] ou [BAS] pour sélectionner vidéo ou photo.
9. Vue arrière
D'abord, vous devez connecter une caméra branchée à l’arrière de l'enregistreur avec
les extensions des câbles. Lorsque le moteur de la voiture démarre, l'enregistreur
fonctionne automatiquement.
38
Param
généraux

10. Mode stationnement
Sur la page principale, cliquez sur l'icône [Paramètres système] pour voir la page des
paramètres, cliquez sur [Paramètres généraux] ; Ouvrez le mode parking: l'enregistreur
commencera à fonctionner en fonction de l’accéléromètre, pour enregistrer
automatiquement 30 secondes de vidéo, lorsque le véhicule est éteint. Lorsque le
mode parking (stationnement) n'est pas activé, l'enregistreur ne sera pas activé par la
survenue d’une vibration.
SPÉCIFICATIONS DUPRODUIT
Écran d’affichage Écran tactile IPS 5 pouces Haute-définition
Angle de l’objectif
Accéléromètre
G-SENSOR
Visuel de recul automatique
Haut-parleur
Microphone
Langue
Vidéo en boucle
Fonction d’enregistrement
Picture-in-Picture (PIP)
Carte mémoire
Résolution de la caméra avant
Prendre des photos de qualité
Format vidéo
Format image
Lentille 170° Grand-angle
Prêt
Prêt
Prêt
Prêt
Prêt
Support multilingue
Prêt
Prêt
Prêt
Jusqu’à 32GB
1080P FHD(1920*1080) 720P(1080*720)
1 M
MOV
JPEG
Remarque: Ce produit conserve son design et ses caractéristiques sans préavis.
RÉSOLUTIONS DES PROBLÈMES
Si ces problèmes apparaissent dans le cadre d’un fonctionnement normal, veuillezvous référer aux méthodes suivantes pour les résoudre:
● Impossibilité d’enregistrer
Assurez-yous qu’il y a assez de place sur la carte Micro SD ; un trop grand nombre de
fichiers verrouille l'espace de stockage de la carte Micro SD, et faute d’espace
disponible, veuillez formater la carte mémoire TF après utilisation.
Vérifiez à partir du menu principal que l'enregistrement par période est désactivé (Off),
réglez-le sur 3 minutes.
39 40
● Arrêt automatique d’un enregistrement
En raison de la grande quantité de données vidéo haute définition traitées au moment
de l'enregistrement, veuillez utiliser une carte mémoire TF haute vitesse de classe 10
ou plus.
● Une réponse "Erreur de fichier" s'affiche en relisant vos photos et vidéos
Veuillez acheter une carte mémoire TF authentique.
Si la carte TF stocke les données mais que le fichier est incomplet, veuillez utiliser la
fonction "Format" de l'enregistreur pour reformater la carte TF.
● L’image n’est pas nette
Assurez-vous qu’il n’y a pas de traces de doigts sur l'objectif, ou de la saleté, et utilisez
le papier / chiffon de l'objectif pour nettoyer sa surface, sans omettre de nettoyer le
pare-brise avant.
● Accident
Après un accident, utilisez un objet pointu pour appuyer sur le bouton de
réinitialisation pour redémarrer la machine.
CONTACTEZ-NOUS
Pour toute demande, problème, ou avis sur nos produits, nous vous prions d'adresser
un email ou de nous appeler aux coordonnées ci-dessous. Nous vous répondrons
aussitôt que possible.
E-mail: cs@akasotech.com
Français

Italiano
PRECAUZIONI
La Dash-Cam AKASO non è progettata per essere modificata, o calibrata mentre si
guida il veicolo. AKASO non è responsabile di qualunque danno dovuto al cattivo
uso della fotocamera.
Usare solo caricatori, accessori e ricambi approvati dal produttore.
AKASO AKASO non è responsabile della sicurezza dell’utente che usi accessori o
ricambi non appraovati da AKASO.
Non riporre il dispositivo in luoghi eccessivamente caldi, freddi, umidi o asciutti.
Potrebbe causare malfunzionamenti dello schermo, danni al dispositivo, o far
esplodere la batteria. Si raccomanda di usare il dispositivo in luoghi con temperature
che varino dai -10° ai 55°, e con un’umidità fra il 10% e l’80%.
Se il dispositivo si surriscaldasse, farlo raffreddare primo di usarlo.
Un’esposizione prolungata della pelle ad un dispositvo surriscaldato potrebbe causare
sintomi di scottatura, come macchie rosse o di pigmentazione più scura.
Non toccare il caricatore con le mani bagnate o disconettere il caricatore tirando il
filo. Potrebbe causare folgorazione.
Non usare cavi, trasformatori o prese rovinati.
Connessioni difettose possono causare folgorazione o incendi.
Non toccare il dispositivo con le mani bagnate.
Potrebbe causare folgorazione.
Non rimuovere la microSD dal prodotto durante la registrazione dei dati, potrebbe
causare una Errore.
Mantenere le lenti della telecamera sempre pulite, assicurarsi che le lenti non siano
blocate da oggetti o che non siano vicine a oggetti riflettenti.
Se il parabrezza fosse di un colore scuro, potrebbe condizionare la qualità della
registrazione.
SUGGERIMENTI PER L’USO
Si prega di usare una microSD ad alta velocità 10
Usare microSD di marca per evitare problemi di compatibilità.
Per il primo utilizzo, formattare la memory card.
Nota:
a. La microSD supportata è max 32G, formato FAT32, unità di grandezza di allocazione
≥ 32kb
b. Assicurarsi di inserire la microSD nel compartimento giusto. Quando si sentirà un
"click", la memory card sarà inserita correttamente.
PANORAMICA DEL PRODOTTO
Schermo LCD
OK
Modalità Accensione Su Giù
MicroSD
Porta GPS
Compartimento
(Opzionale)
memory card
Cassa Pinza sul retro Lenti
Porta
Fotocamera Porta USB
41 42
① ② ③ ④ ⑤
⑥ ⑦ ⑧ ⑨

① Tasto OK: Funzione di registrazione Accesa / Spenta. In modalità standby, Premere
[OK] per iniziare la registrazione, Premere [OK] di nuovo per fermare la
registrazione.
② Tasto Menù
Funzione 1: In modalità standby, premere il tasto [M] per inserire l’interfaccia del
menù impostazioni.
Funzione 2: tasto fotocamera in modalità fotocamera, premere il [OK] per scattare
una foto.
③ Tasto accensione
Funzione 1: Funzione schermo ON / OFF , premere il [tasto] di accensione per
accendere o spegnere lo schermo. (Quando lo schermo è spento,
cliccare sul display per illuminare lo schermo)
Funzione 2: Funzione ON / OFF , tenere premuto il tasto [Accensione] per accendere
/ spegnere la fotocamera.
L’unità salva automaticamente il file video e le impostazioni utente e si spegne.
④ SU ⑤ GIÙ
⑥ Interfaccia USB: fonte di energia e batteria interna.
⑦ Interfaccia della fotocamera AV
⑧ Compartimento microSD ⑨ modulo GPS (opzionale)
GUIDA ALL’INSTALLAZIONE
1. installazione
Inserire la MicroSD card nella fotocamera per salvare i video, le immagini e altri file.
Fissare la fotocamera sotto lo specchietto retrovisore e connettere all’accendisigari con
il caricatore da macchina.
Nota: Il cavo si può anche estendere in alto sul parabrezza Una fotocamera opzionale
è installata sul retro del veicolo, fare attenziona alla direzione d’Installazione. Il
cavo può essere esteso lungo il tetto del veicolo. A installazione completata,
inserire la presa della fotocamera nella porta sul retro del registratore. Regolare
la posizione delle lenti per per assicurarsi che le lenti siano a livello della strada.
Avviare il motore per controllare che il dispositivo sia installato correttamente.
Posto per installazione ideale
Alimentazione
43
Come installare la telecamera di retrovisione, hai due tipi di metodi di installazione.
1. Installato sul parabrezza posteriore.
2. Installato vicino alla targa.
3. Collegare i fili nero e rosso alle luci di retromarcia per vedere la situazione di inversione.
2. Inizia a usare la fotocamera
Premere il tasto di [accensione] per accendere il registrare, o connettere il caricatore
da macchina e accendere il motore, la registrazione inizierà automaticamente.
3. Caricare la batteria e la connessione USB
Premere il tasto di [accensione] per accendere il registrare,o connettere il caricatore da
macchina e accendere il motore, la registrazione inizierà automaticamente.
(1) Si può usare il nostro caricatore gratuito. Una volta collegato all’alimentazione, il
simbolo della batteria sullo schermo verrà sostituito dal simbolo di carica.
(2) Il dispositivo puòessere connesso a un computer con un cavo USB e una
connessione avvenuta con successo farà automaticamente apparire il menù delle
opzioni. Puoi premere i tasti [SU / giù] per selezionare ogni impostazione, e
premere [OK] per confermare.
Questo dispositivo può essere usato come hard drive portatile per copiare e trasferire
file al / dal computer.
44

INTRODUZIONE ALLE FUNZIONI DELL’INTERFACCIA
Rec off Riproduzione Video bloccato
12:45
2017-09-13 Martedì
MODALITÀ VIDEO (INTRODUZIONE ICONA)
Stato audio
Stoato
Data / Ora
della carica
Stato video
REC 00:58
Blocca / Sblocca video
istruzioni
Indietro
Torna a l’interfaccia
principale
2016-09-20 12:23:12
Audio
Fotocame Installazio
Durata video
Risoluzione video
acceso / spento
1080FHD
Switch video
Video Acceso / Spento
Cambia immagine
davanti / dietro
45 46
Blocca / Sblocca video
Audio
Blocco videoAudio spento
Tale CaptuREC spento
Modalità
notturna
Davanti / dietro
cambia immagine
Scatta foto
FEATUCARATTERISTICHE:RES
1. Funzione registrazione automatica
Accendendo il motore, il dispositivo inizierà a registrare automaticamente sulla
funzione di registrazione. Spegnendo il motore, il dispositivo salverà automaticamente
i contenuti e si spegnerà, il video registrato sarà memorizzato sulla microSD. Quando
la MicroSD sarà piena, il dispositivo sovrascriverà sulle prime immagini registrate, e i
file bloccati non saranno automaticamente cancellati.
2. Utilizzare la funzione di registrazione manuale
Nell’interfaccia principale, cliccare sull’icona del registratore avviare lo schermo di
registrazione del traffico puntandolo a destra dell’icona, ora si puà spegnere e
accendere la funzione manualmente. Si può anche premere il tasto OK per accendere /
spegnere il la funzione di registrazione. Se lo si volesse spegnere, premere il tasto
[ACCENSIONE] di nuovo per 3 secondi, e il registratore salverà automaticamente
quello che ha registrato e si spegnerà
3. Impostazioni
Nell’interfaccia principale, cliccare sull’icona [Impostazioni Di Sistema] , entrare nelle
impostazioni di sistema, le impostazioni di sistema, incluse le impostazioni del
registratore impostazioni / impostazioni generali, come mostrato sotto:
Non: Quando si entra nelle impostazioni di sistema, fermare prima la
registrazione.
Indietro
Risoluzione
Registrazione Loop
Avviare l’interfaccia del registratore
Modalità notturna
Rilevatore di movimento
Impostazioni di
1/2
registrazione
Impostazioni
comuni

Indietro
Indietro
Indietro
Registrazone audio
Data
G-Sensor
Data / Ora
Monitor di parcheggio
Suono beep
Lingua
Frequenza
Screensaver
Formato
Impostazioni di default
Versione
4. Utilizzare la funzione fotocamera
Tornare all’interfaccia principale, cliccare l’cone per inserire la modalità fotocamera.
5. Tasto di blocco
L’unità ha un tasto di blocco Quando la funzione di guida è accesa, cliccare sull’icona
dell’interfaccia principale [blocco video] , l’intera immagine video sarà bloccata, o
Impostazioni di
2/2
registrazione
Impostazioni
comuni
avvia l’interfaccia della modalità di guida, cliccare la l’icona nell’angolo in alto a
destra . Sarà bloccato tutto il video e non potrà essere sovrascritto.
6. Impostazioni data e ora
Nell’interfaccia principale, cliccare sull’icona [impostazioni di sistema], cliccare
[impostazioni comuni] per entrare nelle impostazioni di data e ora. Come mostrato
sotto:
Indietro
Data / Ora
Anno Mese Data Ora Minuto Secondo
Impostazioni di
registrazione
Impostazioni
comuni
Impostazioni di
2/2
registrazione
Impostazioni
comuni
Nota: Per registrare con successo la data e l’ora del traffico o incidente, impostare l’ora
corretta subito prima di usare il dispositivo.
7. Funzione mute
Nell’interfaccia principale, cliccare l’icona [Registrazione vocale] per avviare o
fermare la registrazione.
8. Riproduzione file
Nell’interfaccia principale, cliccare l’cona [Modalità Riproduzione] per avviare la
riproduzione di video / foto, cliccare sullo schermo [Precedente] o [Successivo] per
selezionare il video / foto, o Premere [SU] o [GIÙ] per selezionare.
9. Visione del retro
Prima di tutto, si deve connettere una fotocamera da retro al registratore con i cavi di
estensione. Quando si accende il motore, il registratore si avvierà automaticamente.
47 48
2017 09 22 12 00 00
Impostazioni di
registrazione
Impostazioni
comuni

10. Modalità parcheggio
Nell’interfaccia principale, cliccare l’icona [Impostazioni Di Sistema] menù
impostazioni, cliccare [General Impostazioni].
Aprire la modalità parcheggio: il registratore si avvierà secondo l’induzione del
SENSORE G per salvare automaticamente video di 30 secondi quando il veicolo è
spento. Quando la modalità parcheggio non è accesa, il registratore non verrà attivato
dalla vibrazione.
SPECIFICHE DEL PRODOTTO
Display Touch screen HD IPS 5“
Angolo lenti
Sposta indietro la fotocamera
G-SENSOR
Reversione automatica della visuale
Cassa
Microfono
Lingua
Video loop
Funzione di registrazione
Foto-nella-foto
Memory Card
Risoluzione video fotocamera frontale
Scatta foto di qualità
Formato video
Formato immagine
Nota: Questa prodotto memorizza design e specifiche senza avviso.
Grandangolo 170°
Standby
Standby
Standby
Standby
Standby
Supporto Multi-lingue
Standby
Standby
Standby
Supporto max. 32GB
1080P FHD(1920*1080) 720P(1080*720)
1 M
MOV
JPEG
RISOLUZIONE DEI PROBLEMI
Durante la normale attività, se il prodotto avesse problemi, fare riferimento ai seguenti
metodi per risolvere:
● Non registra
Controllare che ci sia spazio sulla microSD, se ci sono troppi file bloccati e lo spazio
non è sufficiente, formattare la memory card.
Controllare se la registrazione circolare è impostata su SPENTA nel menù principale,
e impostarla su 3 minuti.
49 50
●
Italiano
Quando registra, si ferma automaticamente
A causa della grande quantità di dati video HD processati durante la registrazione,
usare una memory card ad alta velocità, classe 10 o superiore.
● Compare il messaggio di “errore file” quando si cercano di riprodurre video o
foto. Usare memory card di marca.
Se la memoria sta ancora salvando il file, questo sarà incompleto. Usare la funzione
di formattazione del registratore per riformattare la card.
● L’immagine è sfocata
Controllare che non vi siano impronte sulle lenti, usare panni appositi per pulirle e
pulire il parabrezza.
● Crash
Dopo il crash, premere il tasto RESET per riavviare la fotocamera.
CONTATTO US
Per qualsiasi domanda, problemi o commenti riguardo i nostri prodotti, si prega di contattarci
mandando una mail all’indirizzo sottostante o telefonando al recapito indicato. Risponderemo
il prima possibile.
E-mail: cs@akasotech.com

日本語
ご注意ください
AKASO Dash Camは、自動車の運転中に変更を加えたり補正したりするために設計され
ていません。 AKASOは、ユーザーが誤った方法でカメラを使用したため発生した損害に
ついては責任を負いません。製造業社により承認されたチャージャーや付属品を使用す
るようにしてください 。
AKASOにより承認されていない付属品を使用した場合、AKASOは、ユーザーの安全を保
証しませ ん。
過度に高温または低温である場所や湿気が非常に高いまたは全くない場所に、機器を保
管しないでくだ さい。
そのような場所で使用した場合、スクリーンに不具合が生じ、機器が故障したり、バッテリ
ーが爆発したりする危険性があります。本機器は、温度が、-10º〜55ºC、湿度が10%〜
80%の環境でお使いください。
本機器が過熱状態にある場合は、使用前に冷却してください。
加熱状態にある機器に長時間皮膚をさらすと、皮膚に赤いしみができたり、皮膚が黒っぽ
く変色したりするなど、熱傷の発生につながる場合があります。
カー チャージャーを 濡れ た 手でさ わったり、 コードを 引っ張って外し たりし ない でくださ
い。このようにカーチャージャーを取り扱うと、感電が発生する恐れがあります。
破損した電源コード、コンセント、または緩くなった電気ソケットは使用しないでください。
接続に何らかの欠陥があると、電気ショックや火事の発生につながる場合があります。
本機器は濡れた手でさわらないようにしてください。
濡れた手でさわると、感電につながる恐れがあります。
データの記録中に本製品からSDカードを取り出さないでください。
これによりエラーが発生する場合があります。
カメラのレンズは常にきれいな状態に保ってください。また、レンズの近くに障害物や反
射物質がないようにしてください。
車のウィンドシールドが黒くコーティングされている場合、録画の質に影響が出る場合が
ありま す。
使用上のヒント
クラス10の高速MicroSDメモリカードを使用してください。
互換性の問題が発生しないように、MicroSDメモリカードは、本機器に対応した純正製品
をご購入ください。MicroSDカードは、初めて使用するときにフォーマットしてください。
注:
a.MicroSDカードの最大サポートサイズは、32Gで、フォーマットはFAT32です。また、分配
ユニットサイズは、≥32kbになります。
b.MicroSDカードがMicroSDカードスロットに入っていることをご確認ください。カチッと
音が聞こえたら、メモリカードは正しく挿入されています。
製品概要
LCDパネル
OK
モード 電源 アップ ダウン
GPSポート
(オプションl)
スピーカー 背面留め具 レンズ
MicroSD
カ ード ス ロ ット背面カメ ラポ ート USBポート
51 52
① ② ③ ④ ⑤
⑥ ⑦ ⑧ ⑨

① OKボタン: オン/オフ録画機能(スタンドバイモード)[OK] を押して録画を開始します。
[OK]を再度押して録画を停止します。
② メニューボ タン
機能1:スタンドバイモードで、[M] キー を短 押しして、セットアップメニュー に移 動しま
す。
機能2:カメラモード・カメラキー[OK]キーを短押しして、写真を撮影します。
③ 電源ボタン
機能1:スクリーンオン/オフ機能。[電源]ボタンを短押しして、スクリーンをオン/オフ
します。(スクリーンがオフのとき、表示エリアをクリックすると、スクリーンが点
灯します。)
機能2:オン/オフ機能。[電源]ボタンを長押しして、機器の電源をオン/オフします。
ユニットにより、ビデオファイルとユーザー設定が自動保存され、シャットダウンします。
④ アップ ⑤ ダウン
⑥ USBインターフェース機器への電力供給および内部バッテリー充電
⑦ AV IN カメラインターフェース
⑧ MicroSD カ ード ス ロ ット
⑨ GPS モジュ ール ( オプ ション)
設置と使 用
1. 設置
MicroSDカードをレコーダーに挿入して、ビデオ、写真、その他のファイルを保存します。レ
コーダーを、バックミラー の位置 に固定して、カーチャージャー経由で シガーライターソケ
ット に 接 続 し ま す。
: ウィンドシールドの縁にそって充電ケーブル/電源ケーブルを配線できます。オプシ
注意
ョンの背面カメラを車両の後方に設置できます。設置の方向に注意してください。
配線は車両の屋根にそって行えます。設置が完了した後、カメラのプラグをレコーダ
ーの背面カメラのポートにつなぎます。レンズの位置を調整して、レンズが地面と平
行になるようにします。エンジンをかけて、機器が正常に設置されていることを確認
してください。
最適な設置場所
電力供給配線
53 54
リアビューカメラをインストールするには、2種類のインストール方法があります。
1.後で挡风玻璃上に安装。
2. ナンバープレ ートの近くに設置してください。
3. 黒と赤のワイヤーを反転ライトに接続して、反転状況を確認します。
2. 開始方法
[電源] ボタンを押して、レコーダーをオンにします。また は、カーチャージャー を接続し、
自動車のエンジンをかけると、レコーダーは自動的に起動します。
3. バッテリー の充 電とUSB接続
[電源]ボタンを押して、レコーダーをオンにします。または、カーチャージャーを接続し、
自動車のエンジンをかけると、レコーダーは自動的に起動します。
(1)弊社の無料カーチャージャーを使用できます。電源にアクセスすると、画面上方のバッ
テリーマークは、充電マークに変わります。
(2)機器は、USBケーブルでPCに接続できます。接続が成功すると、ポップアップメニュー
が自動的に表示されます。[アップ/ダウン]ボタンを押して選択し、[OK]ボタンを押して
確定できます。
機器はポータブルハードドライブとして機能し、ファイルをPCとの間でコピー/転送しま
す。

イン画面の機能の紹介
12:45
2017-09-13 (火曜日)
ビデオモード(アイコンの紹介)
オーディオステータス
ビデ オ ロック/ ロック解 除
インストラクション
戻る
電力状態
ビデオス
テータス
ビデオ時間
REC 00:58
レコ ード
オフオフ
オーデ
ィオオフ
ビデオ解像度
1080FHD
再生 ビデ オロ ック
カメラ 設定
ビデ オ ロック/ ロック解 除
オーディオオン/オフ
オー ディ
オオフ
REC オフ
ビデ オロ ック
テェルキ
ャプチャ
機能
1. 自動録画機能
自動車のエンジンをかけると、自動的にレコーダーが始動し、録画機能がオンになります。
また、自動車のエンジンが切られると、レコーダーは、自動的に録画した内容を保存し、シ
ャットダ ウンし、MicroSDカードにビデオを格納します。MicroSDカードに空き容量がない
場合は、以前のファイルが上書きされます。ロックされているファイルは自動録画の対象
外で す。
2. 手動録画機能の使用
メイン画面で、レコーダーアイコンをクリックして、ビデオ機能を手動でオン/オフにす
ることができます。また、OKボタンを押して、録画機能をオン/オフにすることも可能です。
電源をオフにする場合は、[電源]ボタンを再度3秒間押しててください。これで、録画は自
動的に保存され、電源オフになります。
3. 設定
メイン画面で、[システム設定]アイコンをクリックし、システム設定に移動します。システ
ム設定には、次の図のように、レコーダーの設定、一般設定があります。
注意
:システム設定に移動後は、まず、録画を停止してください。
戻る
解像度
ループレコ ーディング
ナイトモード
レコーダー画面をブート
モーション検知
録画設定
1/2
一般設定
メイン画面に 戻る
2016-09-20 12:23:12
日時
55
ナイトモードビデオ切替
ビデオオン/オフ
前面/背面画像切替 写真撮影
ナイトモード
56

戻る
戻る
戻る
オーディオ録音
日付スタンプ
Gセンサー
日時
パーキングモニター
ビー プサ ウンド
言語
周波数
スクリーンセーバー
フォ ー マ ット
デフォ ルト設 定
バ ージョン
4. カメラ機能の使用
メイン画面に戻るには、アイコンをクリックして、カメラモードにします。
5. ワンキー/ロック機能
ユニットには、キーロック機能があります。運転機能がオンのときに、メイン画面の[ビデオ
ロック]アイコンをクリックすると、ビデオイメージ全体がロックされます。また、運転機
録画設定
2/2
一般設定
録画設定
一般設定
録画設定
2/2
能画面の右上にあるをクリックすると、ビデオ全体がロックされ、上書きできなくなりま
す。
6. 日時設定
メイン画面で、[システム設定]アイコンをクリックし、次に[一般設定]をクリックし、日時設定
に移動します。以下の画面が表示されます。
戻る
日時
日 时间 分 秒
月
年
2017 09 22 12 00 00
注意: 何か事件が発生した場合、法的に使用できる日時を効率良く記録できるように、正
しい時間を設定してからお使いください。
7. ミュートボタン
メイン画面で[音声録音]アイコンをクリックし、録音を開始/終了します。
8. ファイル 再 生
メイン画面で[再生モード]アイコンをクリックし、ビデオ/写真再生に移動します。画面
で[前へ]または[次へ]をクリックしビデオ/写真を選択するか、[アップ]または[ダウン]で選
択します。
9. 背 面ビュ ー
まずはじめに背面カメラをレコーダーに接続する必要があります。車のエンジンが始動する
と、レコーダーは自動で起動します。
一般設定
57 58
録画設定
一般設定

10. パーキングモード
メイン画面で、[システム設定]アイコンのメニュー設定をクリックし、[一般設定]をクリック
します。パーキングモードを起動すると、車両が停止されたときに、レコーダーがGセンサ
ーの起動をトリガに起動し、自動的に30秒のビデオが録画されます。パークモードがオン
でない場合は、レコーダーは振動があってもオンになりません。
製品使用
ディスプレ イ
レンズ角度
カメラの 引き 戻し
G-SENSOR
自動ビジュアル反転
スピーカー
マイク
対応言語
ループ ビデオ
録画機能
ピクチャ-イン-ピクチャ
メモリカ ード
前面カメラ解像度
画質
ビデオ形式
画像形式
注意: 本製品では、通知がない限り現状の設計と仕様が保持されます。
5 インチ HD IPSタッチスクリーン
17 0°ワイド アングルレンズ
スタンドバイ
スタンドバイ
スタンドバイ
スタンドバイ
スタンドバイ
複数言語サポート
スタンドバイ
スタンドバイ
スタンドバイ
最大32GB
1080P FHD(1920*1080) 720P(1080*720)
1 M
MOV
JPEG
トラブ ルシュー ティン グ
通常の操作で問題が発生した場合は、次の方法をお試しください。
● 録画できない
MicroSD カードに十分なスペースがあることをご確認ください。ファイル数が多すぎる
かカード内のスペースが十分にない場合は、TFメモリをフォーマットしてください。
メインメニューで繰り返し録画がオフになっている場合は、3分に設定してください。
● 録画中、自動停止する
録画時大量のHDビデオデータが処理されるため、クラス10以降の高速TEメモリカードを
ご使用ください。
59 60
● 画像や動画の再生時に「ファイルエラー」というプロンプトが表示される
TEメモリの純正品をご購入し使用してください。
カードにデータがある場合は、そのファイルは不完全なものです。「フォーマット」機能
TF
を 使って、T Fカードを再フォーマットしてください。
● 画像がぼやける
レンズに、指紋または汚れがないか確認してください。レンズクリーニング用のペーパー
または布を使用してレンズの各パーツから汚れを除去してください。前面のウィンドシー
ルドもクリーニングします。
● クラッシュ
クラッシュが発生した場合、先の尖った物を使用して、リセットボタンを押しマシンを再
起動してください。
日本語
お問い合わせ
当社の製品に関するお問い合わせ、問題、コメントについては、下記アドレスまでEメールをお送り
いただくか、当社までお電話ください。私たちは可能な限り早く対応いたします。
E-mail: cs.jp@akasotech.com
 Loading...