

Page 1
User Guide
English
Manual Version 1.0
Page 2

Table of Contents
Introduction ............................................................. 6
Support .............................................................. 6
About This User Guide ..................................... 6
Important Notes ............................................... 6
Setup ........................................................................ 7
Features ................................................................... 8
Top Panel .......................................................... 8
Display ....................................................... 11
Rear Panel ....................................................... 12
Front Panel ...................................................... 13
2
Tutorial ................................................................... 14
Starting Up ...................................................... 14
Launching Clips .............................................. 14
Editing Clips & Tracks .................................... 17
Clip Edit Mode ........................................... 18
Region View ................................................... 20
Event View ...................................................... 22
List View ......................................................... 23
Track Edit Mode ........................................ 24
Renaming & Saving ........................................ 27
Using the Browser ..................................... 29
Mixing Tracks ................................................. 30
Cueing Tracks ............................................ 32
Recording Clips .............................................. 33
Recording with Note Mode ........................ 33
Recording with the Step Sequencer ......... 35
Page 3

Operation ............................................................... 37
General Features ............................................ 37
Control Types ............................................ 37
Knobs ............................................................. 37
Parameter Values ............................................ 38
Drop-Down Menus / Lists ............................... 38
Selectors ......................................................... 39
Buttons ........................................................... 39
Checkboxes .................................................... 39
Tabs ............................................................... 39
Sliders ............................................................. 40
Envelopes ....................................................... 40
Event View Tools ............................................. 41
Audio Region Edit Tools .................................. 42
Pad Modes ................................................ 43
Launch Mode .................................................. 43
Note Mode ...................................................... 44
Drum Note Mode ........................................ 44
Melodic Note Mode .................................... 45
Launch & Note Mode ...................................... 47
Step Sequencer .............................................. 48
Drum .......................................................... 48
Melodic ....................................................... 49
Lanes ......................................................... 49
Tracks ........................................................ 50
About Tracks .................................................. 50
Audio Tracks ................................................... 51
Drum Tracks ................................................... 52
Keygroup Tracks ............................................. 54
Plugin Tracks .................................................. 56
MIDI Tracks ..................................................... 58
CV Tracks ....................................................... 59
Menu .......................................................... 60
Save ............................................................... 61
Preferences .................................................... 62
Info............................................................. 62
Wi-Fi .......................................................... 62
Bluetooth ................................................... 63
Sequencer ................................................. 63
Sync .......................................................... 64
Hardware ................................................... 64
Project Defaults .......................................... 65
Project Load/Save ...................................... 65
Record/Export ............................................ 65
General ...................................................... 65
Sync ............................................................... 66
Mode .............................................................. 66
System Resources.......................................... 67
Timing Correct (TC).................................... 68
Metronome (Click/Metro) ........................... 70
Automation ................................................ 71
Arpeggiator ................................................ 72
Effects ........................................................ 74
Overview ........................................................ 74
Insert Effects................................................... 76
Pads .......................................................... 76
Keygroups .................................................. 77
Tracks ........................................................ 78
Masters ...................................................... 79
Send/Return Effects ....................................... 80
Pads .......................................................... 81
Keygroups .................................................. 82
Audio and Plugin Tracks ............................. 83
Plugins ....................................................... 84
Bassline .......................................................... 84
Electric ........................................................... 87
Hype .............................................................. 91
TubeSynth ...................................................... 96
Standalone vs. Computer Mode .............. 103
3
Page 4

Modes ............................................................ 104
Matrix Mode ............................................. 105
Step Sequencer ....................................... 107
XYFX Mode .............................................. 111
Navigate Mode ........................................ 114
Browser .................................................... 115
Clip Edit Mode ......................................... 118
Clip View ....................................................... 118
Event View .................................................... 120
Editing Events ........................................... 123
Region View .................................................. 128
List View ....................................................... 131
Track Edit Mode ...................................... 135
Drum Tracks ................................................. 135
Master ...................................................... 138
Samples ................................................... 139
Pan Velocity .............................................. 146
Filter/Envelope .......................................... 147
LFO Modulation ........................................ 148
Effects ...................................................... 150
Keygroup Tracks ........................................... 152
Master ...................................................... 153
Samples ................................................... 156
Pan Velocity .............................................. 162
Filter/Envelope .......................................... 163
LFO Modulation ........................................ 164
Effects ...................................................... 166
Plugin Tracks ................................................ 168
MIDI Tracks ................................................... 169
CV Tracks ..................................................... 170
Anatomy of an Envelope ............................... 171
Sample Edit Mode ................................... 172
Settings ........................................................ 174
Trim Mode .................................................... 175
Assigning Samples ................................... 178
Processing Slices & Samples .................... 180
Chop Mode .................................................. 184
Converting or Assigning Slices .................. 187
Processing Slices ..................................... 190
Sampler .................................................... 193
Auto Sampler ............................................... 197
Looper ...................................................... 199
Knobs ....................................................... 203
Screen .......................................................... 204
Project .......................................................... 205
Track ............................................................ 208
Volume ......................................................... 210
Pan .............................................................. 210
Sends ........................................................... 210
Mixer ........................................................ 211
Volume ......................................................... 212
Pan & Volume ............................................... 212
Sends ........................................................... 213
Inserts & I/O ................................................. 214
Pad Mixer ................................................. 215
Volume ......................................................... 216
Pan & Volume ............................................... 216
Sends ........................................................... 217
Inserts & I/O ................................................. 218
Pad Color Mode ....................................... 219
4
Page 5

Appendix .............................................................. 221
Effects & Parameters ................................... 221
Reverbs .................................................... 221
Delays ...................................................... 225
Flangers ................................................... 229
Chorus ..................................................... 230
Autopans .................................................. 231
Tremolos .................................................. 231
Phasers .................................................... 232
HP (High-Pass) Filters .............................. 233
LP (Low-Pass) Filters ............................... 234
Filters (Other) ........................................... 235
Parametric EQs ........................................ 236
Distortions ................................................ 238
Compressors ........................................... 240
Bit Reducers ............................................ 241
Other ........................................................ 242
Glossary ........................................................ 249
SATA Drive Installation ................................ 254
MIDI Machine Control (MMC) ..................... 255
Technical Specifications ............................. 256
Trademarks & Licenses ............................... 257
5
Page 6

Introduction
Thank you for purchasing the Force. At Akai Professional, we know how serious music is to you. That’s why we design
our equipment with only one thing in mind—to make your performance the best it can be.
Support
For the latest information about this product (documentation, technical specifications, system requirements,
compatibility information, etc.) and product registration, visit akaipro.com.
For additional product support, visit akaipro.com/support.
About This User Guide
This manual should help you get familiar with using the Force. For consistency, the terminology throughout is based on
the Force parameter names. We also used specific formatting to indicate particular topics of significance:
Important/Note/Tip: Important or helpful information on a given topic.
Names of buttons, controls, parameters, settings, and other options are written in bold characters throughout the manual.
Examples: Press the Play button.
Turn Knob 4.
Tap the Mute icon.
The Velocity ranges from 0 to 127.
Set the Sample Play selector to One Shot.
Tap BPM, and then use the numeric keypad to enter a 120 as the tempo.
Some parts of this manual refer to other relevant chapters or sections, which are cited in bold, italic blue characters.
Click the text to skip immediately to that section.
Examples: Read the Important Notes section before proceeding.
For more information about launching clips, see Tutorial > Launching Clips.
To learn more about using send effects, see General Features > Effects > Send/Return Effects.
Important Notes
Read the included safety & warranty manual before using Force.
Before getting started and connecting devices to Force or turning the hardware on/off, make sure all devices are
switched off.
6
Page 7
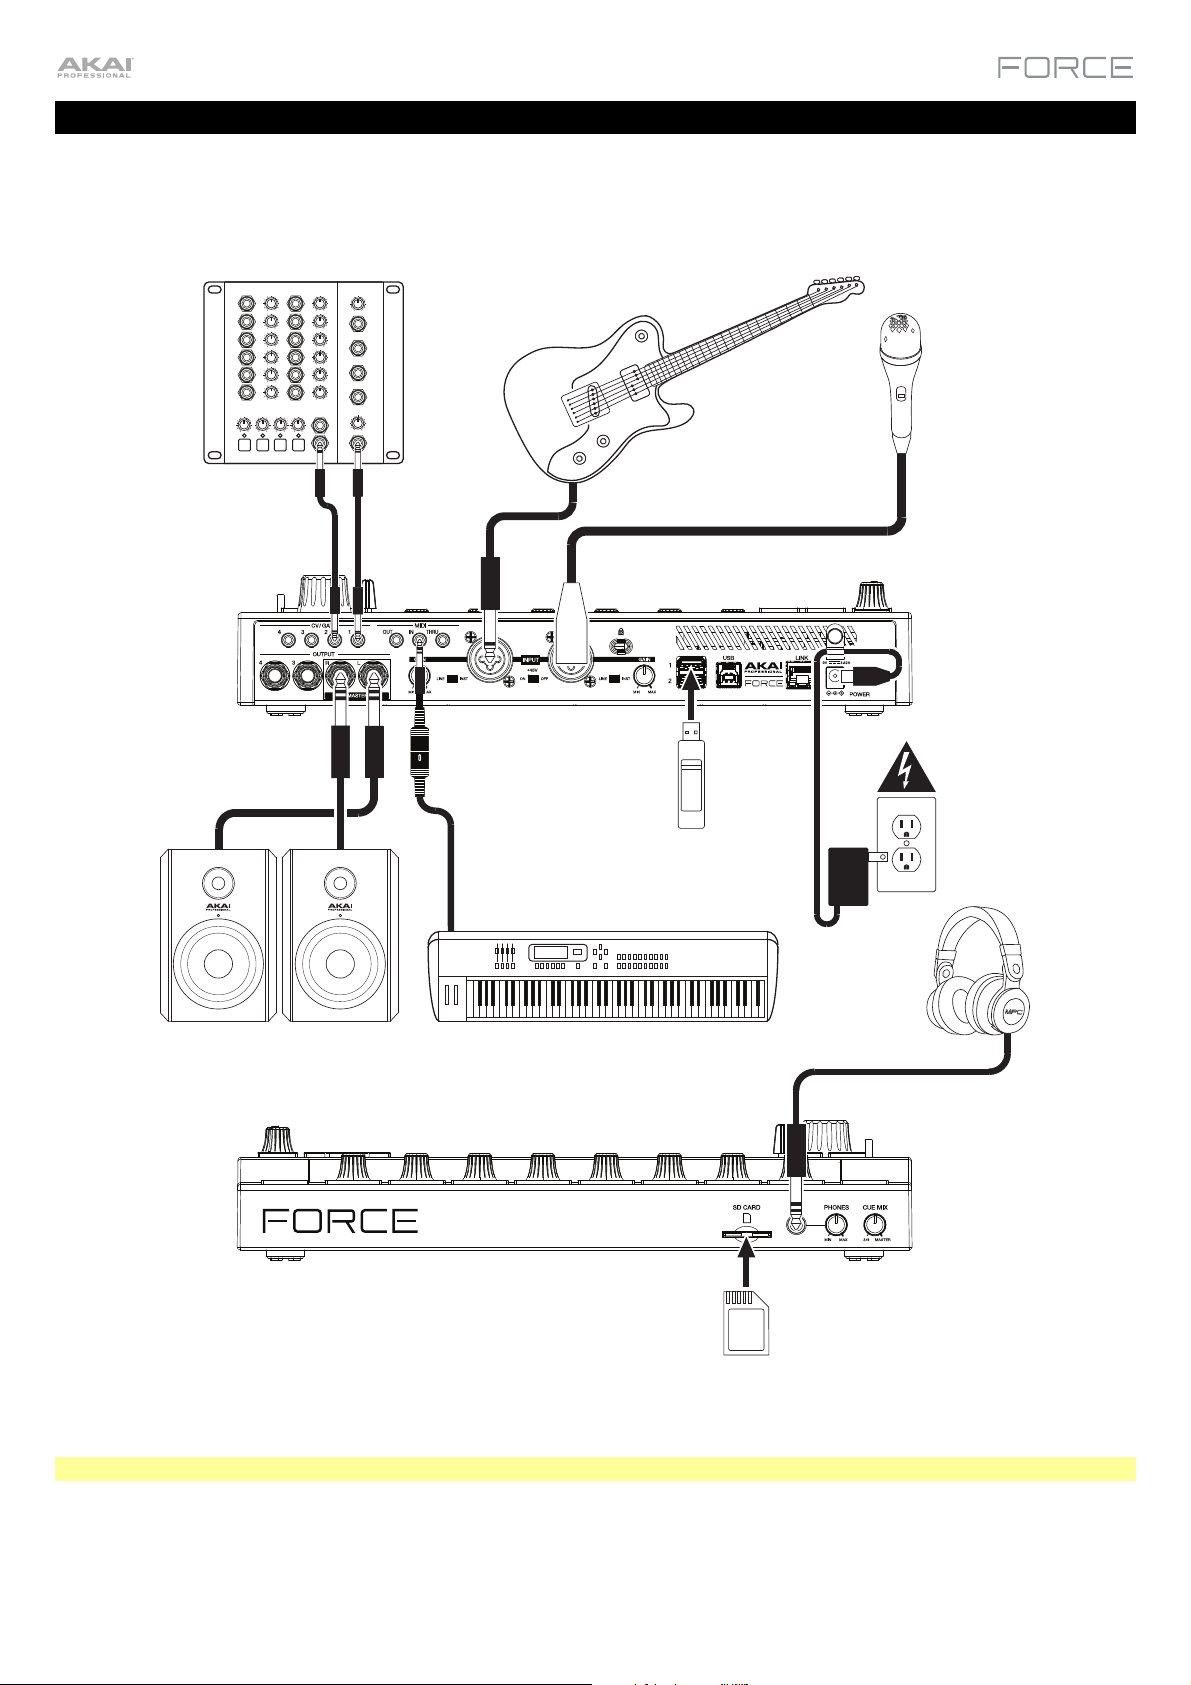
Setup
Here is just an example of how to use Force in your setup. Items not listed under Introduction > Box Contents of your
included Quickstart Guide are sold separately.
Remember to remove the protective film from the Force touchscreen!
Synthesizer
Powered Monitors
Guitar
USB
Flash
Drive
MIDI Keyboard
SD
Card
Headphones
Microphone
Power
Note: We highly recommend checking akaipro.com for any available updates to the Force firmware and/or drivers.
7
Page 8
Features
This chapter explains the features and functions of your Force.
Top Panel
4
7
10
13
15
21
24
3
5
8
11
14
2
6
9
12
1
16
17
18
19
20
25
26
27
28
29
32
22
33
30
23
31
34
8
Page 9

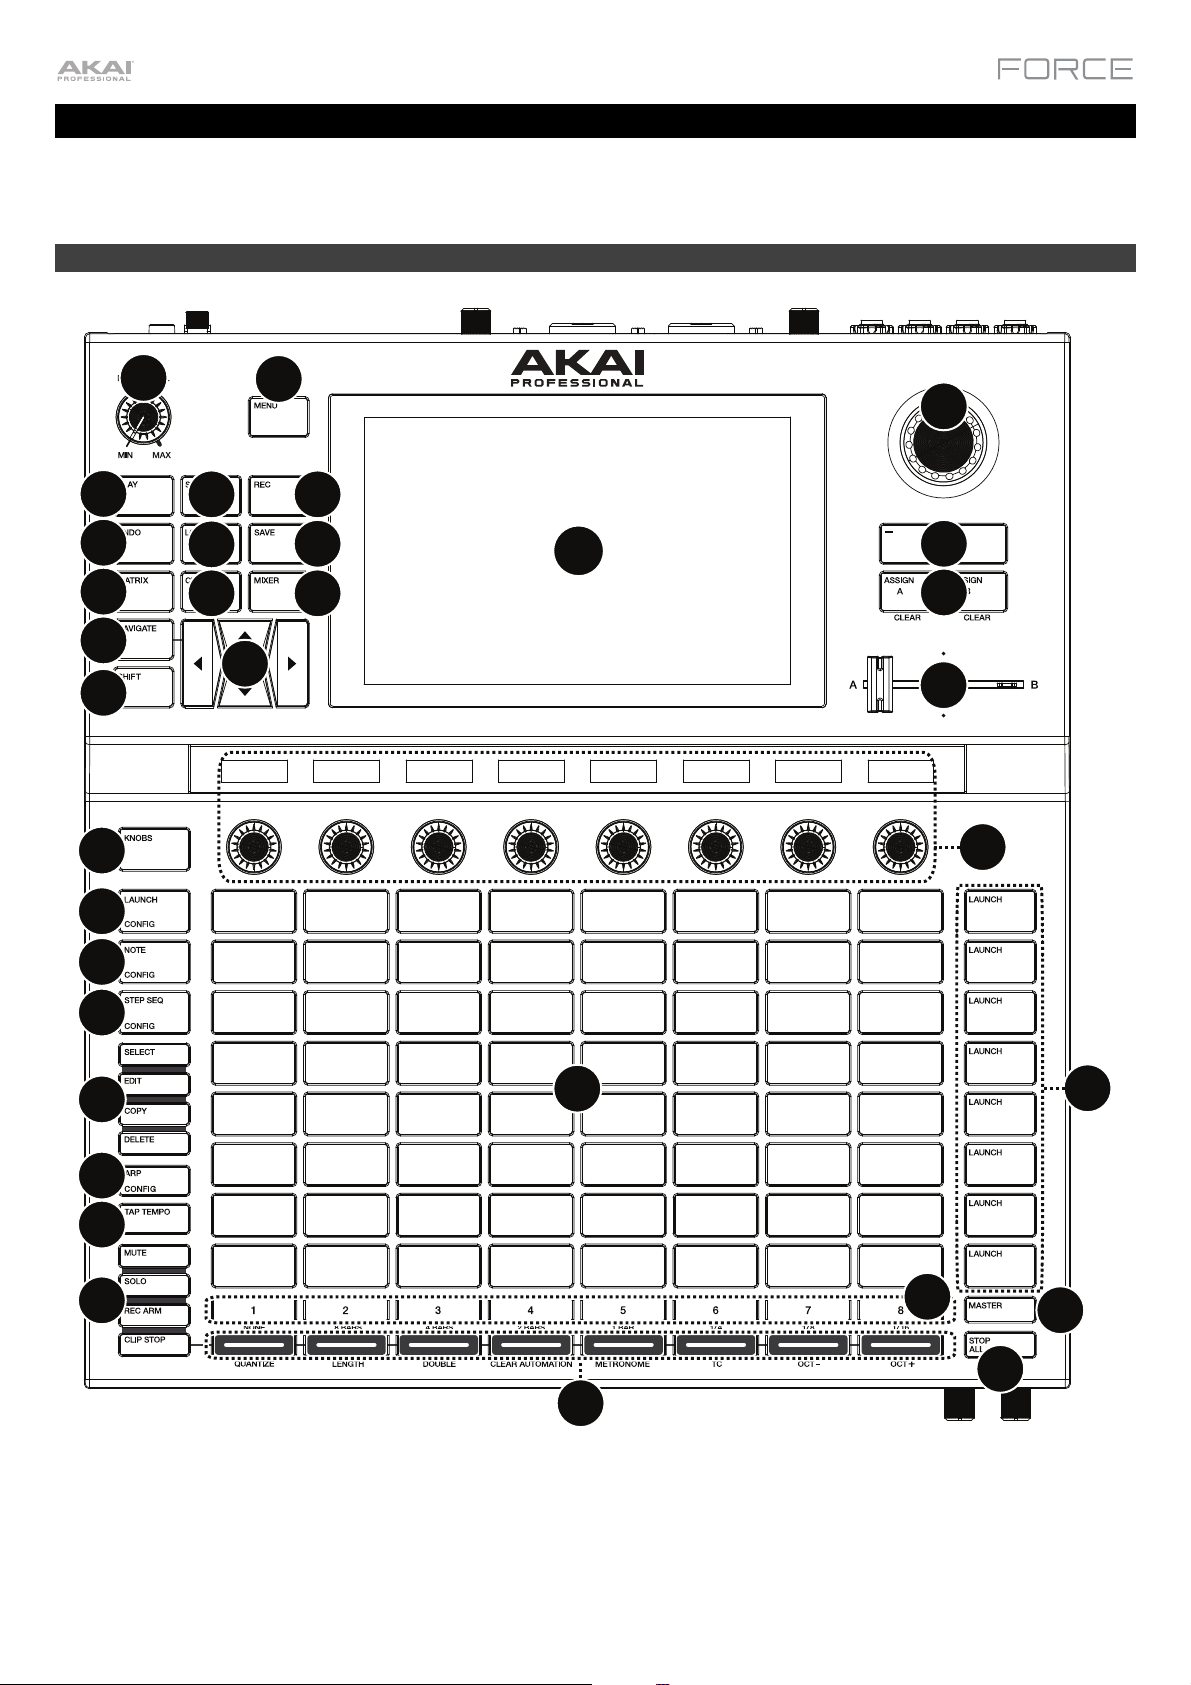
1. Display: This full-color multi-touch display shows information relevant to Force’s current operation. Touch the
display (and use the hardware controls) to control the Force interface. See Display to learn how to use some basic
functions.
2. Menu: Press this button to open the menu. You can tap an option on the menu screen to enter that mode, view, etc.
3. Master Volume: Turn this knob to adjust the volume level of the Master L/R outputs.
4. Play: Press this button to start transport playback.
5. Stop: Press this button to stop transport playback. Double-press this button to immediately stop all sound.
6. Record: Press this button to start or stop transport recording.
Press Shift and this button to view the Record Configuration window.
7. Undo: Press this button to undo your last action.
Press Shift and this button to redo the last action you undid.
8. Load: Press this button to open the Browser, where you can load projects, clips, and more.
9. Save: Press this button to save your project, sample or track, or to start a new project from scratch.
10. Matrix: Press this button to open Matrix View, an overview of your project with an 8x8 view of your clips.
11. Clip: Press this button to open Clip View, which gives you finer detail of a single clip.
Press Shift and this button to open Track Edit View, where you can edit
parameters of your drum kit, plugin, MIDI or CV tracks.
12. Mixer: Press this button to open Mixer View, where you can control each track's
volume, pan and send controls, as well as add plugin insert effects.
When using a drum track, press Shift and this button to open Pad Mixer View,
where you can control each pad's volume, pan and send controls, as well as add
Tip: While in any of the pad
modes, you can press and
hold the button for another
mode to momentarily switch
to that mode. You will return
to the previous mode when
you release the button.
plugin insert effects.
13. Navigate: Press this button to open the Navigate view, which gives you an overview of the entire project. Tap a
section to jump the Matrix view directly to that section, or use the cursors to move the Matrix View.
Press Shift and this button to open the XYFX View.
14. Cursors: Press these buttons to move the Matrix View and the pads by one row or column at a time.
Press Shift and press these buttons to move by eight rows or columns at a time.
15. Shift: Pre
ss and hold this button to access secondary functions on some buttons and display modes.
16. Data Dial: Turn this dial to scroll through the available menu options or adjust the parameter values of the selected
field in the display. Pressing the dial also functions as an Enter button.
Press Shift and turn this dial to adjust parameters in finer detail.
17. –/+: Press these buttons to increase or decrease the value of the selected field in the display.
18. Assign A/Assign B: Press one of these buttons and a Track Assign button to assign the corresponding track to
the crossfader A or B grouping.
Press Shift and press one of these buttons to clear all crossfader A or B assignments.
19. Crossfader: Use this crossfader to mix between clips assigned to the A or B grouping.
20. Assignable Knobs: Use these knobs controls track panning, track send levels, or other user-assignable
parameters. Use the Knobs button to change the active knob bank or mode (described below). The display strip
above each knob indicates the parameter it is controlling and its current value or setting.
21. Knobs Button: Press this button to cycle between up to two banks of knobs for the currently active mode. The
display strip above the knobs will indicate the currently active parameters.
Press and hold this button to quickly select one of several preset knob control modes.
Press Shift and this button to open Knobs Mode, where you can edit knob assignments.
22. Clip Launch Pads: Use the velocity-sensitive pads in this 8x8 to launch clips, play notes, and more, depending on
the active mode.
23. Scene Launch Buttons: Press one of these buttons to launch the corresponding scene, represented by the row of
clips to its left.
Press the Edit button and one of these buttons to quickly insert a new row, capture the currently playing clip(s) as a
new scene or clear a row.
9
Page 10

24. Launch/Config: Press this button to set the Clip Launch Pads to Launch mode. In Launch mode, each pad
represents a single clip slot. The eight columns represent eight tracks while the eight rows represent eight scenes.
You can launch the entire scene by pressing the Scene Launch buttons to the right of the row of clips.
Press Shift and press this button to configure the Launch mode settings.
25. Note/Config: Press this button to set the Clip Launch Pads to Note mode. In Note mode, you can use the pads to
play a configurable scale of MIDI notes.
When in Note mode and using a Keygroup, Plugin, MIDI or CV track, press and hold this button to select different
play modes, such as scales, chords, progressions and more. When in Note mode and using a Drum track, press
and hold this button to select a time division for note repeat.
Press Shift and press this button to configure the Note mode settings, such as scale and root note. You can also
press and hold this button to quickly select a mode.
26. Step Seq/Config: Press this button repeatedly to cycle through three different pad views for using the Step
Sequencer.
When in Step Sequencer mode, press and hold this button to quickly select a step sequencer view, select a Step
Sequence page, or change the step size.
Press Shift and press this button to configure the Step Sequencer's settings.
27. Edit Buttons: Press and hold one of these buttons to edit a clip or track according to the following:
• Select: Press and hold this button to view the currently select clip. While holding, tap another Clip Launch Pad
to select another clip. This button can also be used to select a drum pad in a drum kit or select a note in the
Step Sequencer without sounding the note.
• Edit: Press and hold this button then tap a Clip Launch Pad or Track Selector button to edit a clip or track,
respectively.
Hold this button and press any Scene Launch button to open the Edit Row window, where you can quickly add
or clear rows in the Matrix.
• Copy: Press and hold this button to copy a clip or track. While holding, tap the Clip Launch Pad or Track
Selector button of the clip or track you would like to copy, then tap a new pad or button to copy it.
• Delete: Press and hold this button then tap a Clip Launch Pad or Track Selector button to delete it.
28. Arp/Config: Press this button to enable or disable the internal Arpeggiator, whose rate is based on the current
Tempo and Time Division settings.
Press Shift and this button to configure the Arpeggiator's settings.
29. Tap Tempo:
Tap this button at the desired rate to enter a new tempo.
Press Shift and this button to open the Tempo window, where you can enter a new tempo.
30. Track Selectors: Press one of these buttons to select a track, represented by the column of clips just above it. The
right-most button (labeled Master) selects the Master track.
Press and hold Shift and then press one of these buttons to select a Global Quantization setting: None, 8 Bars, 4
Bars, 2 Bars, 1 Bar, 1/4, 1/8, or 1/16.
31. Master: Press this button to view the Master and Return channels.
32. Assign Mode Buttons: Press one of these buttons to set the function of the
Track Assign buttons when pressed:
• Mute: Press this button to mute the track.
• Solo: Press this button to solo the track.
• Rec Arm: Press this button to record-arm the track.
Tip: Hold Shift and press Mute or
Solo to open the Mixer Config
window, where you can set the solo
button and crossfader behaviors.
• Clip Stop: Press this button to stop the clip that is playing in the track.
33. Track Assign: Press one of these buttons to apply an assignment to a track, represented by the column of clips just
above it. Use the Assign Mode buttons to set the assign function.
Press and hold Shift and then press one of these buttons to access secondary functions, printed below the buttons.
34. Stop All Clips: Press this button to stop all clips when they reach the end.
10
Page 11
Display
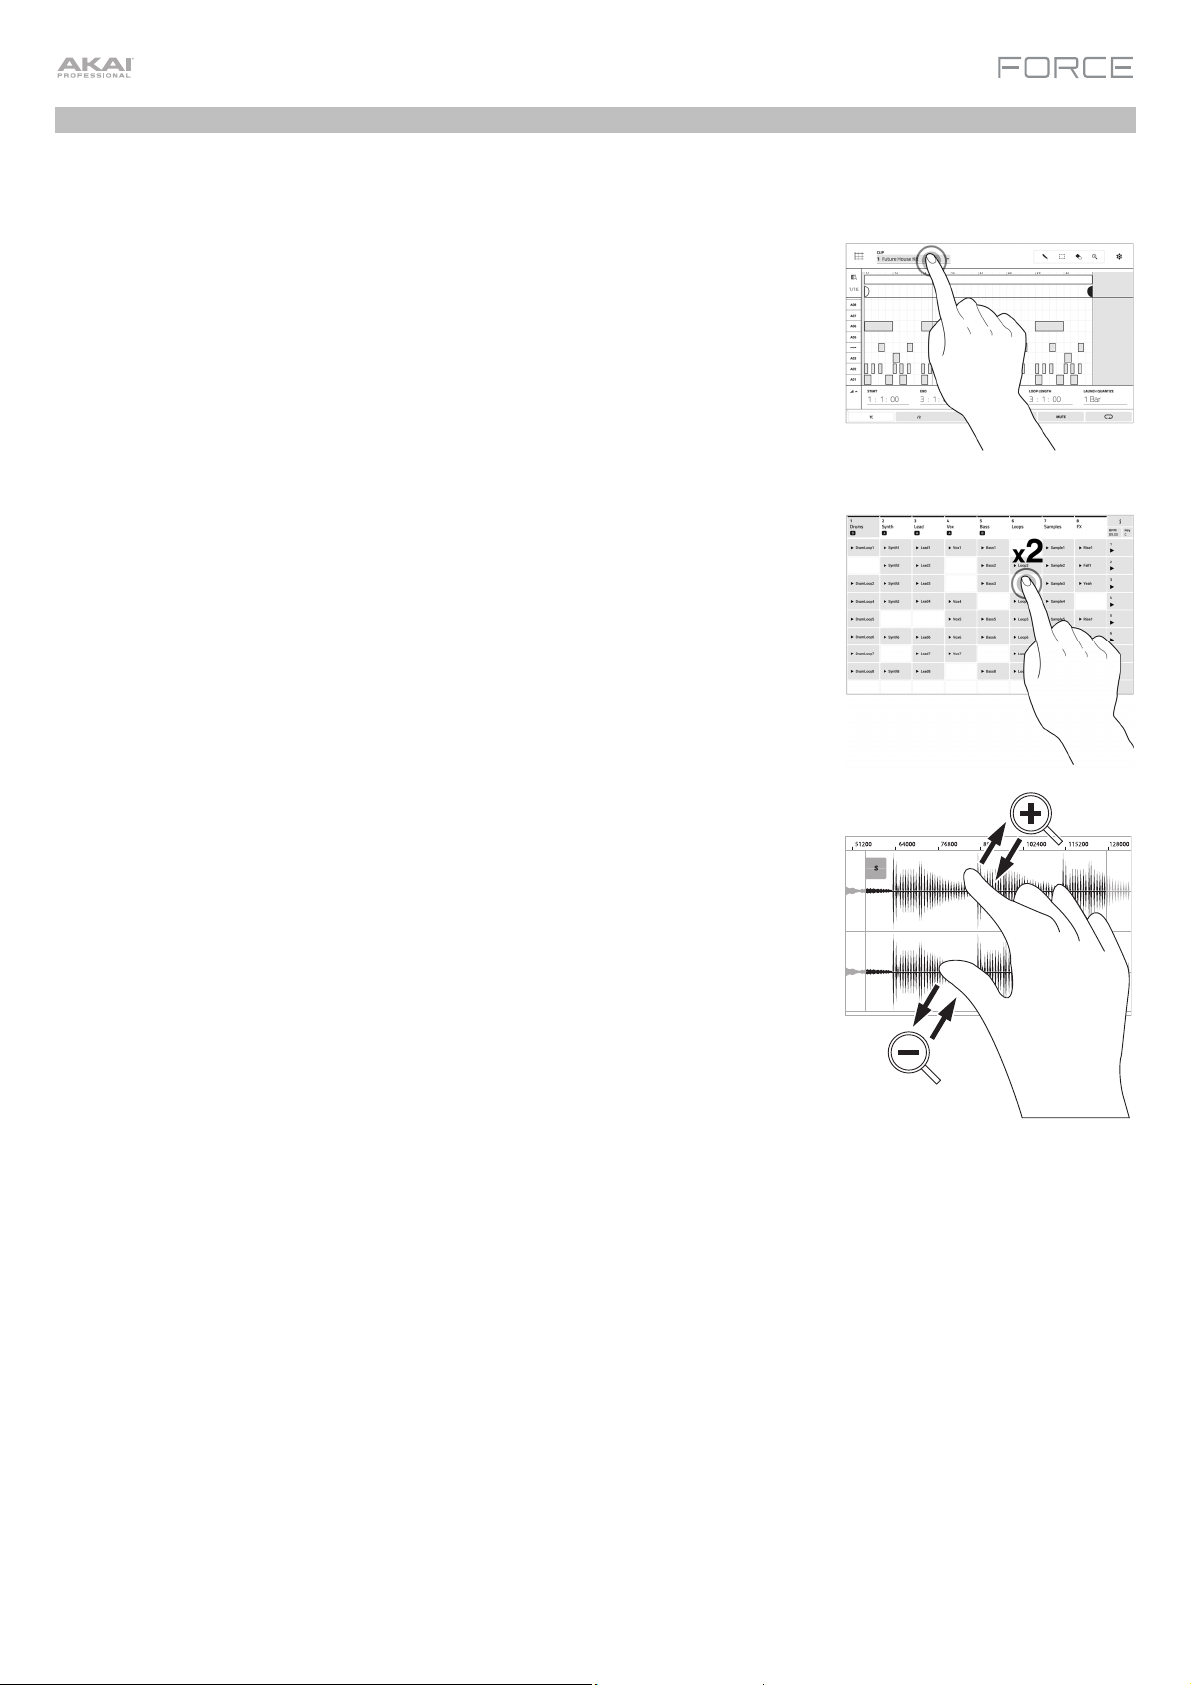
Here is some general information about how to use the Force display:
Tap a button or option to select it. Use the data dial or –/+ buttons to change its
setting or value.
In Matrix View, tap a filled clip slot to launch the clip.
Double-tap a control to access advanced editing options. In some cases, this will
show a numeric keypad that you can use to enter a value (an alternative to the data
dial or –/+ buttons). Tap the upper-left part of the display to return to the previous
view.
In Matrix View, double-tap an empty clip slot in your track to create a new clip.
Spread two fingers to zoom in (into a section of a waveform, for example). Pinch two
fingers to zoom out.
11
Page 12
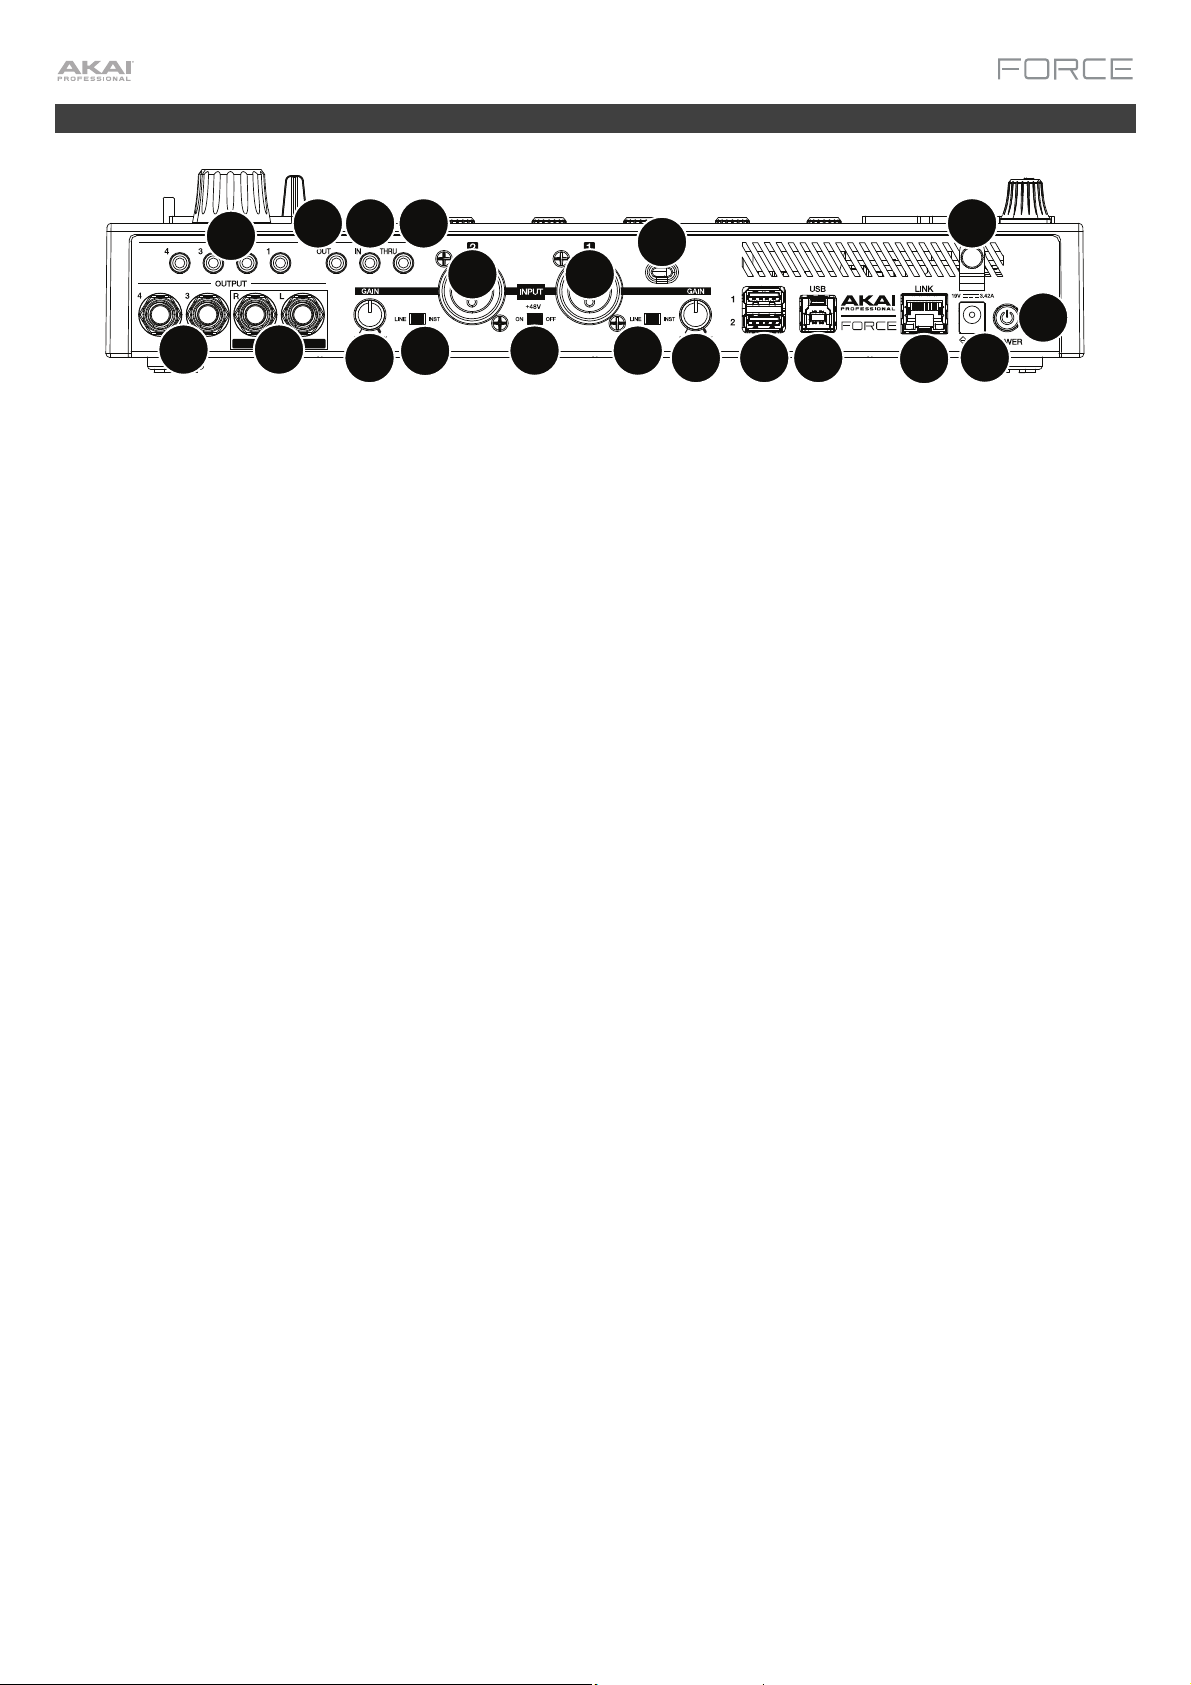
Rear Panel
15
12 13
14
7
16
7
2
3
11
1. Power Input: Connect the included power adapter (19 V, 3.42 A, center-positive) to this jack then into an electrical
outlet.
2. Power Adapter Restraint: Secure the power adapter cable to this restraint to prevent it from accidentally
unplugging.
3. Power Switch: Press this button to turn Force’s power on or off.
4. Link: Connect a standard Ethernet cable to this port to use Ableton Link and other compatible devices with Force.
See Operation > General Features > Menu > Preferences > Sync for more information.
5. USB-B Port: Use the included USB cable to connect this high-retention-force USB port to an available USB port on
your computer.
6. USB-A Ports: Connect USB flash drives to these USB ports to access their files directly using Force.
7. Input 1/2 (XLR or 1/4” / 6.35 mm): Use standard XLR or 1/4” (6.35 mm) TRS cables to connect these inputs to audio
sources (microphone, mixer, synthesizer, etc.). When using a 1/4" cable, the Mic preamp is removed from the
circuit, and the Line/Inst switch can be used to set the impedance.
11
8
9
10
9
8
6
5
4
1
Turn the Gain knobs to set the input level of each one.
8. Gain: Use these knobs to adjust the gain of the incoming signal from Input 1/2 on the rear panel. Be careful when
setting this knob at higher levels, which can cause the signal to distort.
9. Line/Inst: Use these switches to set Input 1/2 to accept either a Line-level or Instrument-level sound source when
using a 1/4" (6.35 mm) connection.
10. Phantom Power (+48V): This switch activates and deactivates phantom power for Inputs 1/2 when using an XLR
connection. When activated, +48V of phantom power will be supplied to both inputs. Note that most dynamic
microphones do not require phantom power, while most condenser microphones do. Refer to your microphone’s
documentation to check if it needs phantom power.
11. Outputs (1/4” / 6.35 mm): Use standard 1/4” (6.35 mm) TRS cables to connect these outputs to your monitors,
mixer, etc. The Master L/R outpu
12. MIDI Out: Connect compatible 1/8" (3.5 mm) MIDI devices to this output, or use the included 1/8"-to-MIDI adapter
to connect a standard 5-pin MIDI cable from this output to the MIDI input of an external MIDI device (synthesizer,
drum machine, etc.).
13. MIDI In: Connect compatible 1/8" (3.5 mm) MIDI devices to this input, or use the included 1/8"-to-MIDI adapter to
connect a standard 5-pin MIDI cable from this input to the MIDI output of an external MIDI device (synthesizer, drum
machine, etc.).
14. MIDI Thru: Connect compatible 1/8" (3.5 mm) MIDI devices to this thru-port, or use the included 1/8"-to-MIDI
adapter to connect a standard 5-pin MIDI cable from this input to the MIDI output of an external MIDI device
(synthesizer, drum machine, etc.). Incoming MIDI from the MIDI In port will be passed along to this output.
15. CV/Gate Out: Use standard 1/8” (3.5 mm) TS cables to connect these outputs to optional modular devices. Force
will send control voltage (CV) and/or Gate data over this connection.
®
16. Kensington
Lock Slot: You can use this slot to secure your Force to a table or other surface.
ts are the same as Outputs 1,2.
12
Page 13
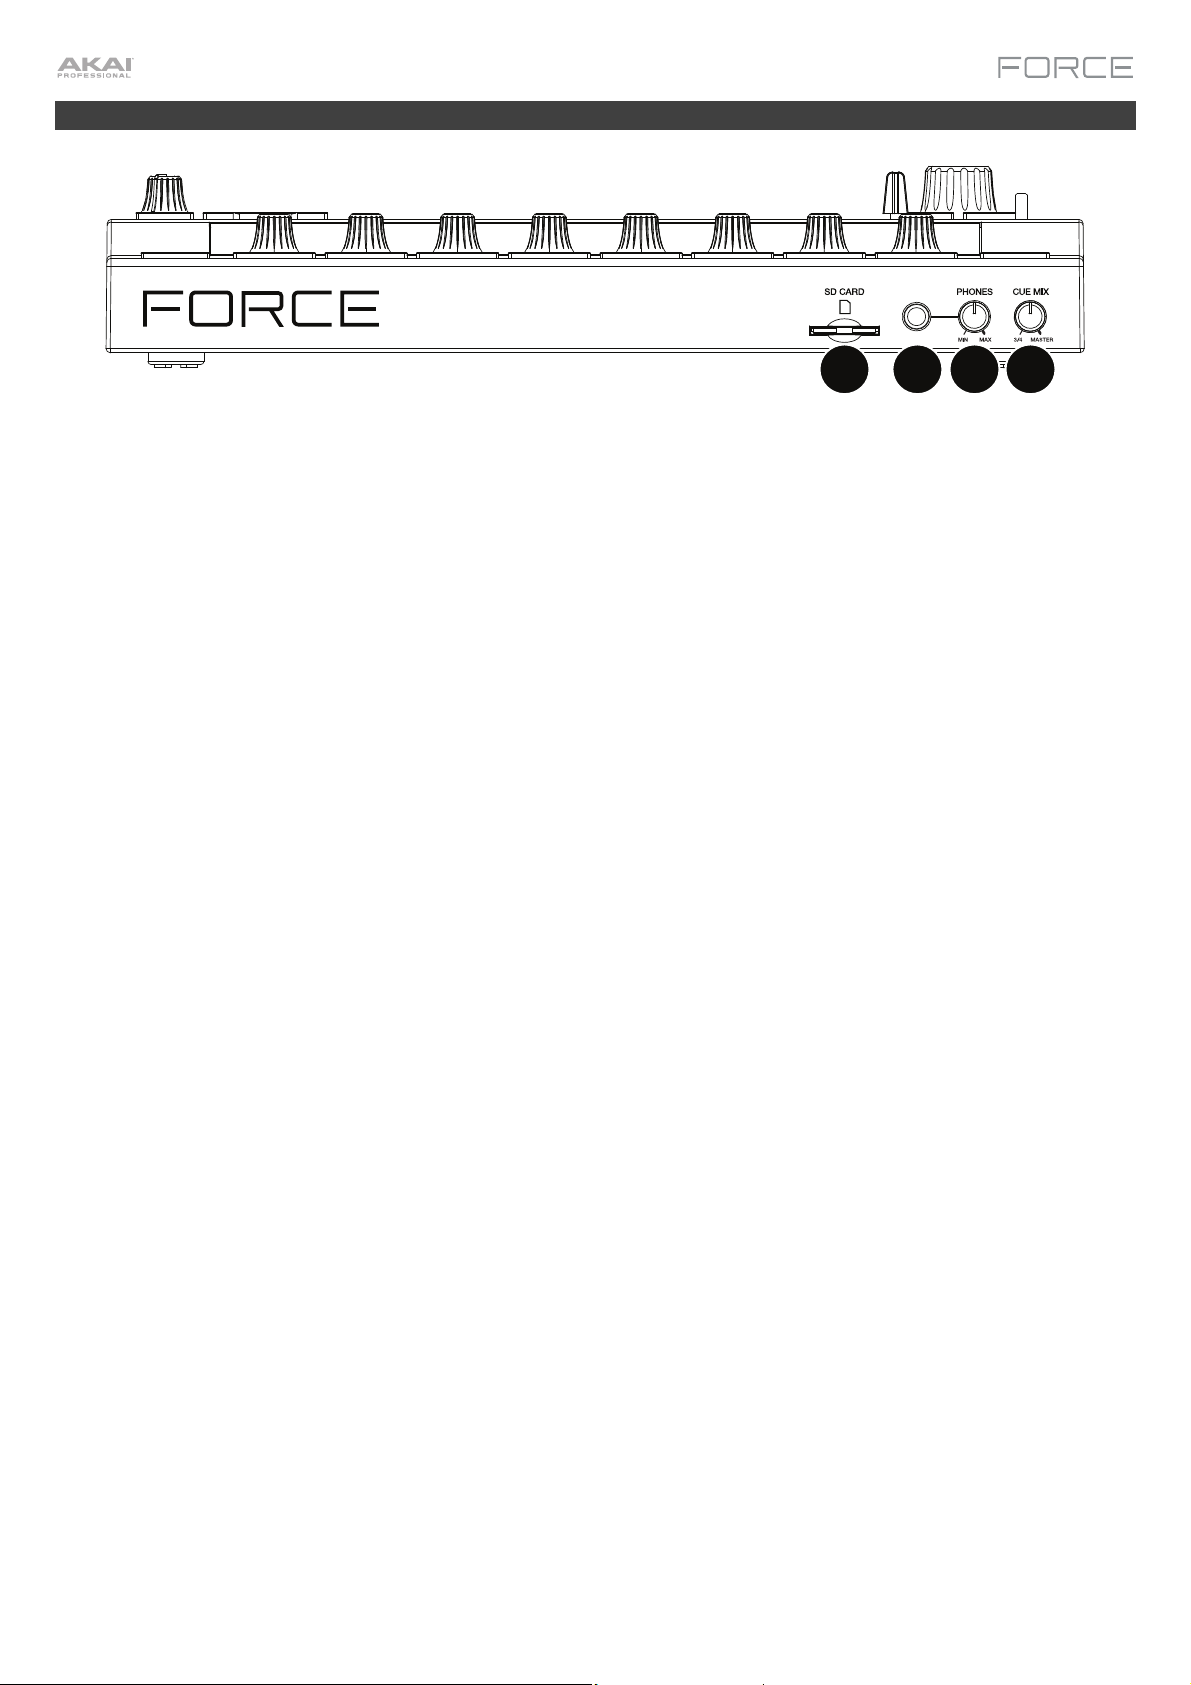
Front Panel
1
1. SD Card Slot: Insert a standard SD/SDHC card into this slot to access its files directly using Force.
2. Phones (1/4” / 6.35 mm): Connect standard 1/4” (6.35 mm) stereo headphones to this output.
3. Phones Volume: Turn this knob to adjust the volume of the phones output.
4. Cue Mix: Turn this knob to adjust the balance between the Master and 3/4 signals in your headphones. Master is
the signal sent from the Master outputs. 3/4 is the signal sent from the Outputs 3/4.
23
4
13
Page 14
Tutorial
This chapter describes how to get started doing basic tasks using your Force. We'll use one of Force's included Demo
projects to illustrate some of the most important concepts and features. To get the most out of this chapter, we
recommend reproducing each of the described steps.
Starting Up
Make sure you have connected your Force hardware to a power source using the included power adapter and powered
it on.
When you first power on your Force, you can select a demo project to help get you started, select Empty Project at the
bottom of the screen to load a blank template, or select User Template to load a saved custom template.
For this tutorial, tap the Deep House - Colors Demo project to load it.
Launching Clips
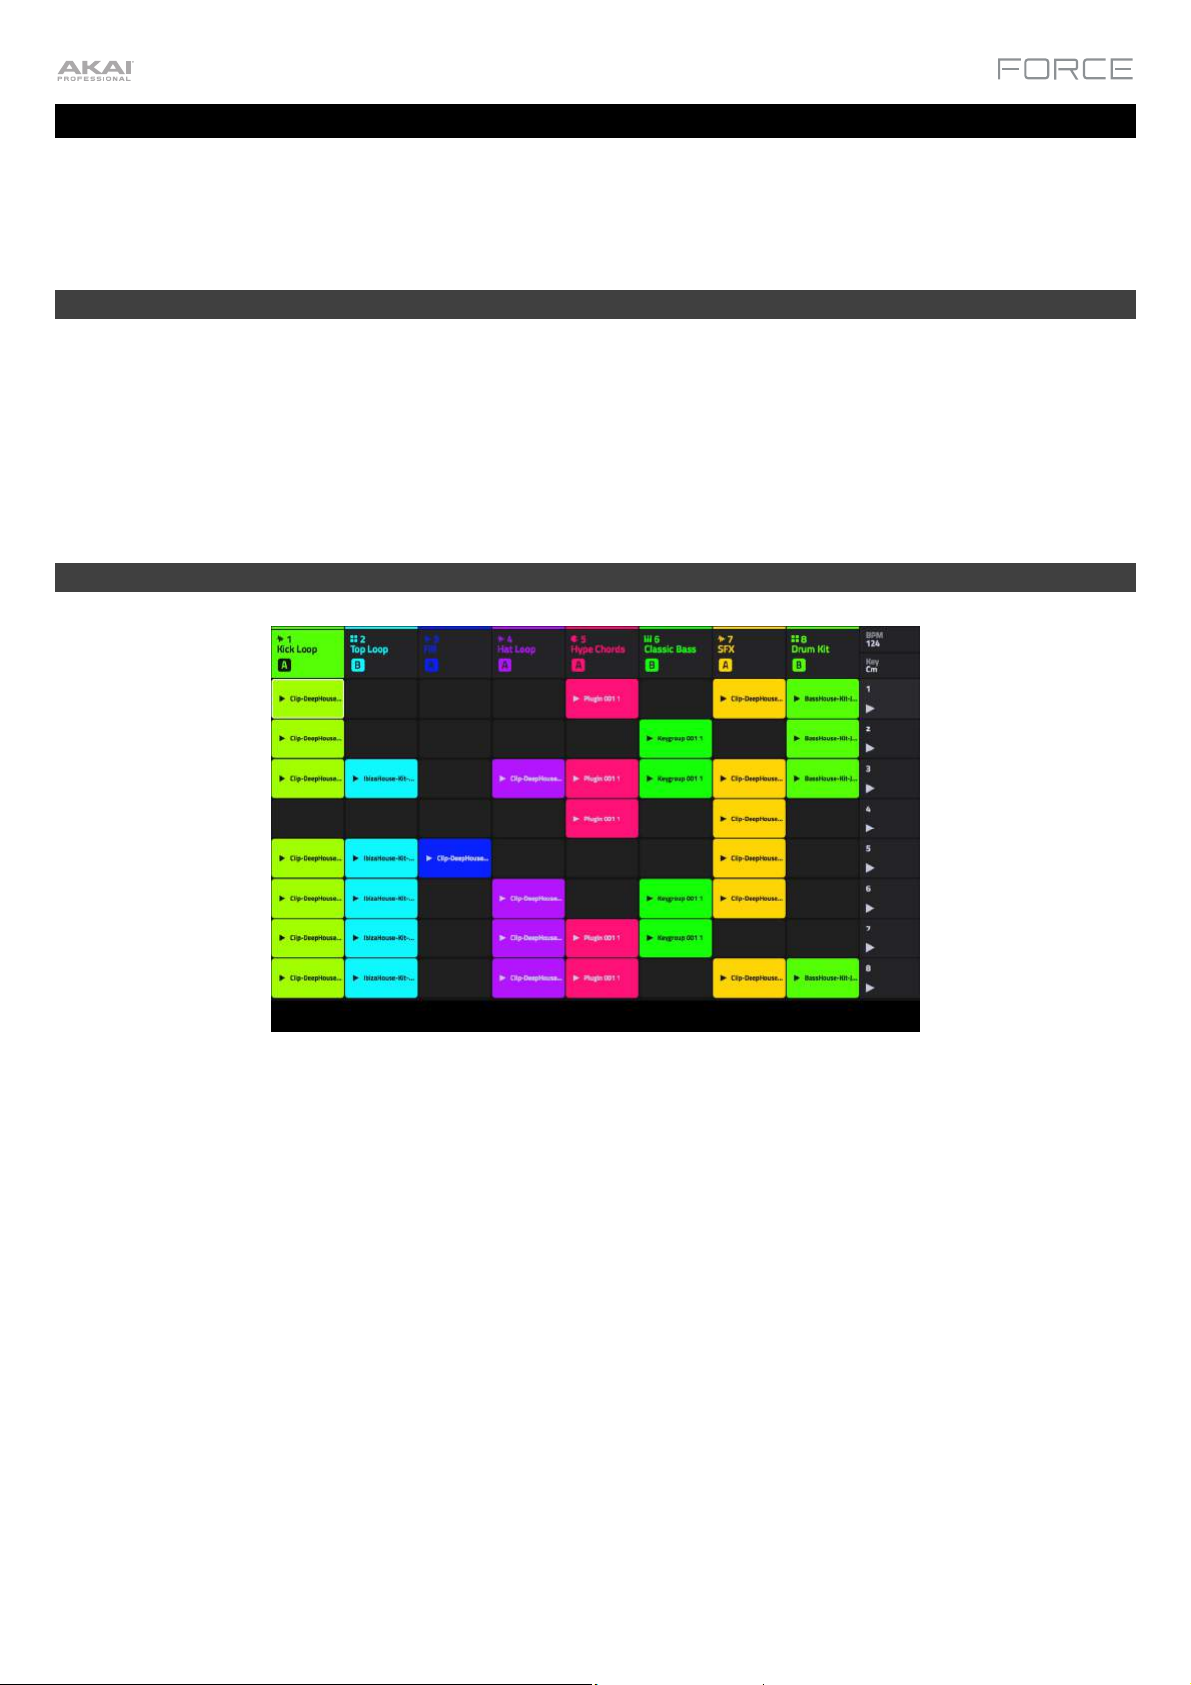
After loading the demo, Force will automatically open Matrix Mode. This display mode gives you an overview of your
project and mirrors the 8x8 layout of the clip launch pads. Use the cursor buttons to move the current view of the
matrix by one row or column at a time.
Each column in Matrix Mode represents a track. Tracks can be used to hold audio samples, drum kits, instrument
plugins and more. On the display, you will see tracks labeled Kick Loop, Top Loop, Fill and more.
Each track is made up of clips, which are short sequences of audio or MIDI. Only one clip in a track can play at a time.
Let's try playing with a few clips to see how they work.
14
Page 15

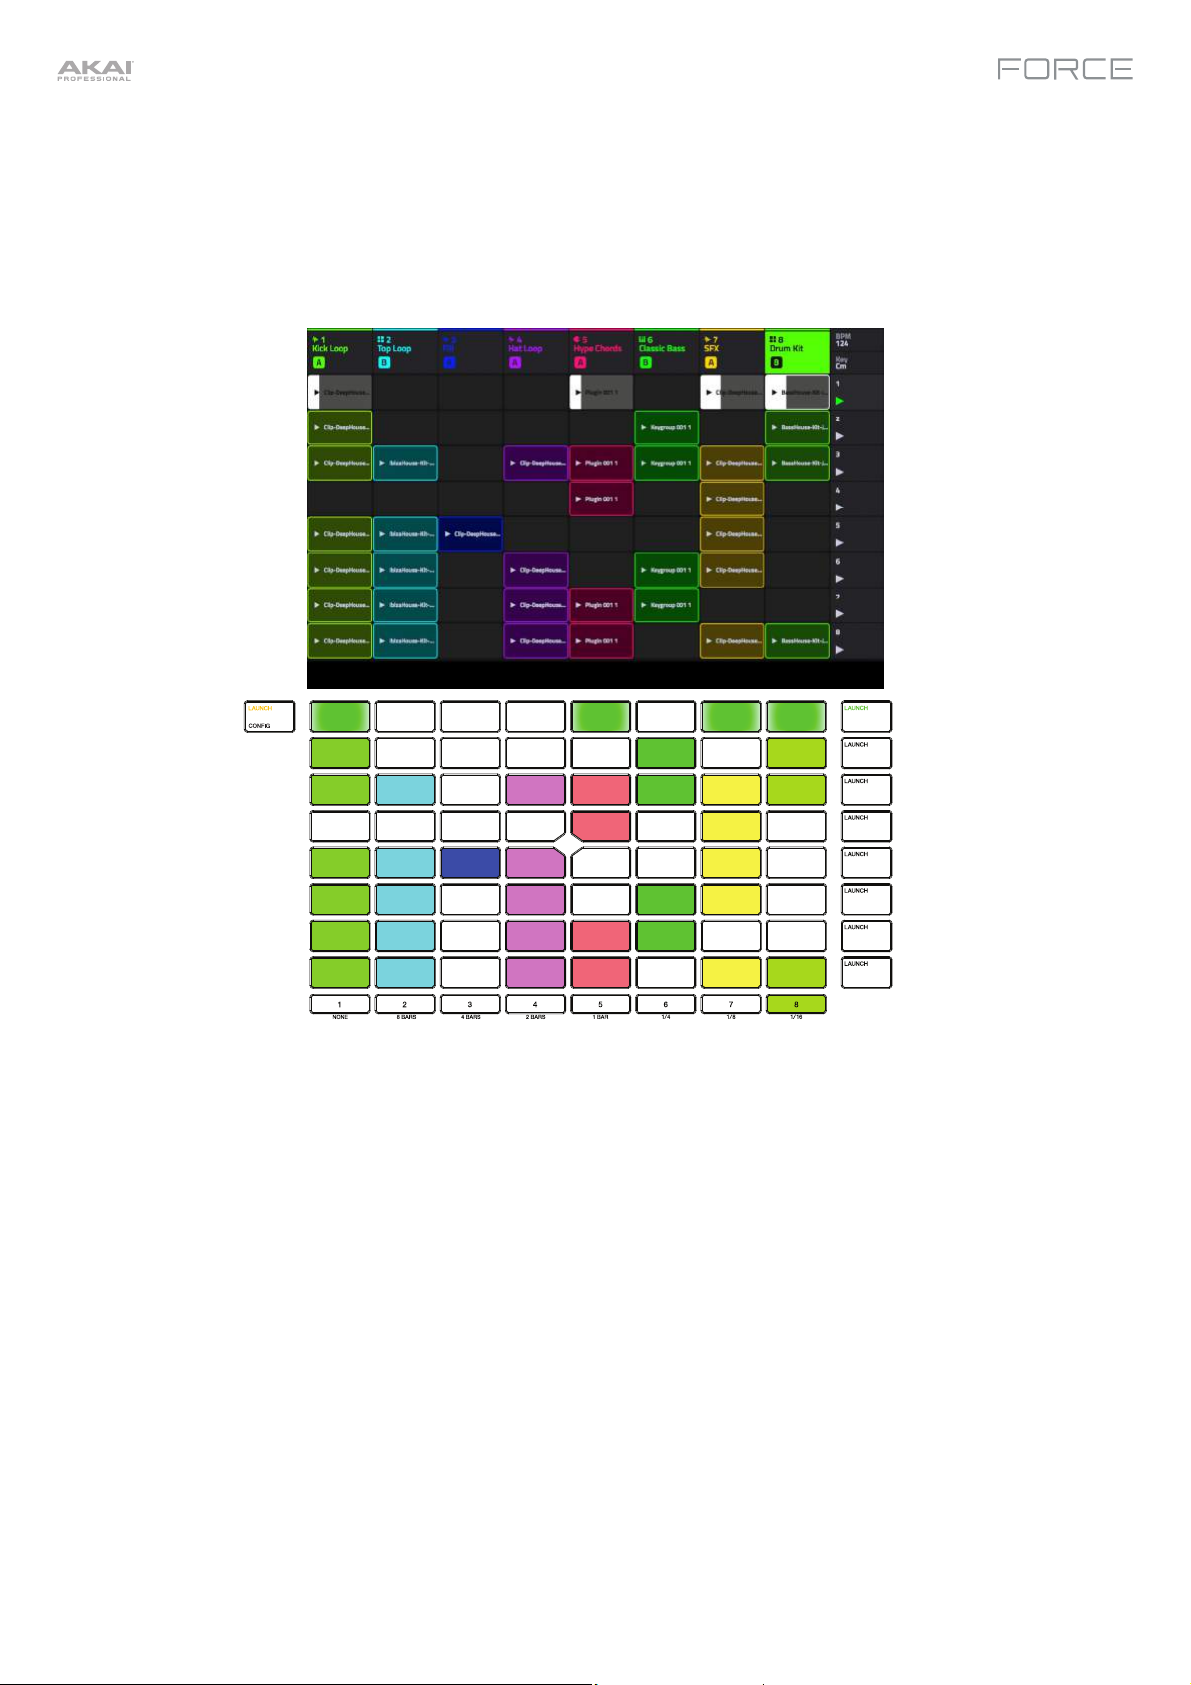
Press the Launch button to make sure the clip launch pads are in Launch Mode. In this pad mode, each pad
represents a single clip in a track. The lighted pads represent the clips shown on the display, and the dim pads are
empty clips.
Tap the first clip in Track 8 – Drum Kit to begin playing it. The clip launch pad will slowly blink green to indicate it is
active, and the clip on the display will show the position of the playhead in the clip.
Now, while in Launch mode, press the clip launch pad below the pad that is currently playing. The second clip will start
playing after the next bar.
See Operation > General Features > Pad Modes > Launch Mode to learn more.
Clips will continue to play until another clip in the same track is launched, until playback is stopped or until the clip is
stopped while playback continues.
To stop playback, press the Stop button.
To stop the clip, first press the Clip Stop button to assign the Track Assign buttons to stop mode. Then, press the
Track Assign button for the track with the clip playing. You can also press the Stop All Clips button to stop clips in
all tracks.
15
Page 16
In addition to launching clips in a track, you can launch multiple clips across tracks in the same row. Each row of clips is
called a scene, and these can be used to arrange different parts of a song.
Press the top-most Scene Launch button to launch the first row of clips, and then continue launching other scenes in
order.
While one scene is playing, try launching clips from other rows to experiment with different variations.
You can also assign Tracks to Force's crossfader. This allows you to seamlessly transition between clips from multiple
tracks.
1. Press and hold the Assign A button and press the Track Assign button for Track 1 – Kick Loop. The track name at
the top of the display will now show an A icon.
2. Next, press and hold the Assign B button and press the Track Assign button for Track 4 – Hat Fill. The track name
at the top of the display will show a B icon.
3. Launch the third scene and then use the crossfader to blend from one clip to the other by moving it from the A side
to the B side and back.
To clear crossfader assignments, hold Shift and press the Assign A or Assign B button.
To edit the slope profile of the crossfader, open the Mixer Config window by tapping Settings when viewing the
Mixer, or by holding Shift and pressing Mute or Solo. Select Linear, Exponential or Logarithmic.
16
Page 17
Editing Clips & Tracks
Now that you are familiar with the basics of launching clips, let's explore some of the modes and menus that let you edit
clips and tracks for even more customization of your project.
Force's Clip Edit Mode is used to edit the parameters of individual clips. Clip Edit Mode features three additional
pages, the appearance and function of which change based on what kind of clip you have selected.
In Clip View, you can view and edit the parameters of the clip container itself, such as its length,
launch mode and quantization. When using an audio clip, this view will show the waveform of the
sample. When using a MIDI clip, such as a drum kit clip or a plugin clip, this view will show either
all available pads in a vertical view with their corresponding data or a vertical “piano roll”
keyboard.
For audio clips, the second page in Clip Edit Mode is Region View, which is used to edit the
audio sample in the clip and its parameters, such as length, volume and tuning. Use the toolbar
at the top of the display to select, move, erase, cut and mute parts of the waveform below. This
page also contains Force's powerful Warp tool, which can be used to adjust the tempo of any
sample to match your project's tempo without changing the pitch.
For MIDI clips such as those in drum, keygroup or plugin tracks, Event View in Clip Edit Mode is
used to edit note events and their parameters, such as length, velocity and transposition. Use the
toolbar at the top of the display to add, erase, or select notes and move around the grid, and use
the Edit menu to further edit the MIDI note events.
Additionally, MIDI clips can be edited using List View in Clip Edit Mode. This view gives you
many of the same features as Event Mode, but in a list workflow. You can use this view to filter
your MIDI events by a particular type, for instance, Aftertouch messages or Track Automation.
Force's Track Edit Mode is used to edit the parameters of the track itself. This mode is not available for audio tracks.
For drum tracks, you can edit the parameters of the four layers as well as all synthesis parameters and insert effect
settings.
For keygroup tracks, you can set the keygroup note ranges and edit the parameters of each keygroup and set their
note ranges. You can also edit all synthesis parameters and insert effect settings.
For plugin tracks, you can parameters of the plugin using the graphic interface for built-in plugins, or an overview of
all plugin parameters with a slider for each for other plugins.
Each of these sections is explained in further detail below and in the Operation > Modes chapter.
17
Page 18
Clip Edit Mode
First, let's look at Clip Edit Mode, where you can view and edit clip information and parameters.
To enter Clip Edit Mode, do either of the following:
• Press Clip.
• Press Menu and then tap Clip Edit.
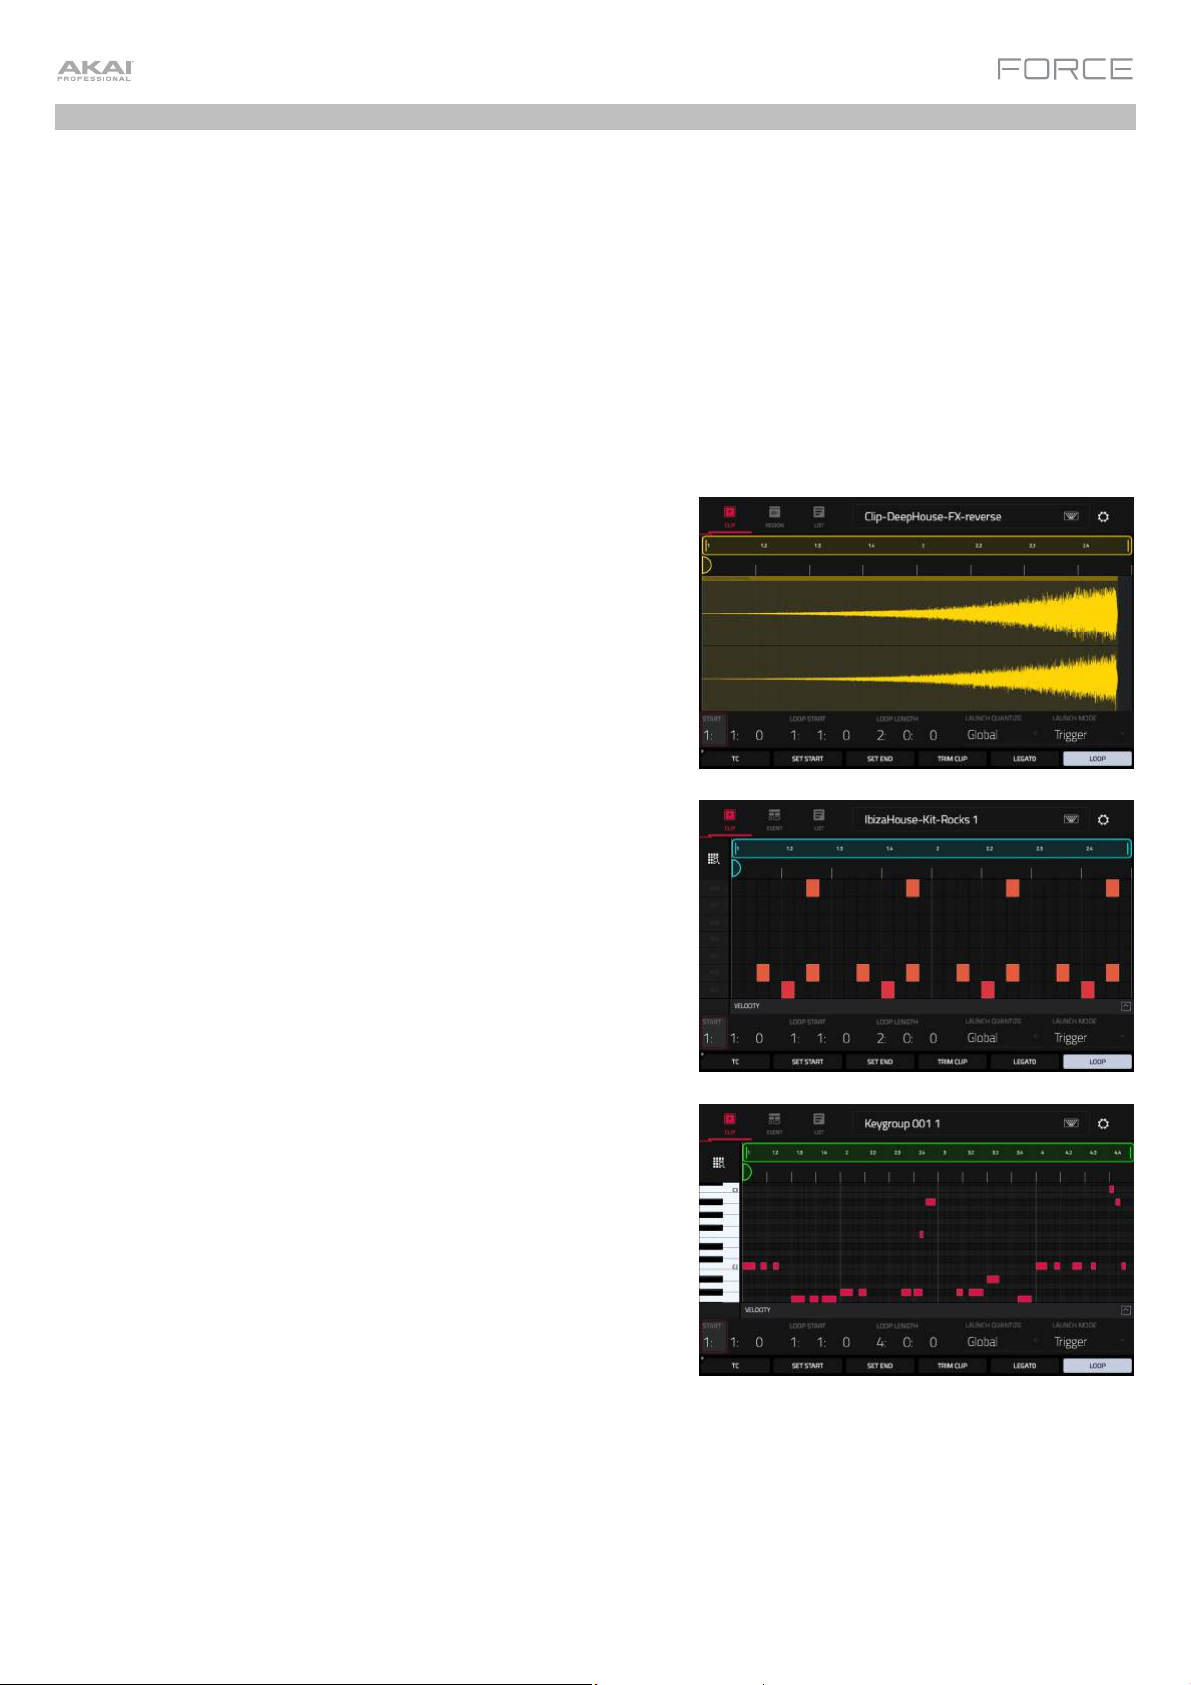
When you first enter Clip Edit Mode, you will see the Clip View page. In Clip View, you can view and edit the parameters
of the clip container itself, such as length, launch mode, and quantization. The appearance of Clip View depends on
what kind of track the clip belongs to:
For audio tracks, the waveform of the audio clip is shown:
For drum tracks, the left column shows you all available pads in a
vertical view with their corresponding events in the grid to the right:
For keygroup, plugin, MIDI and CV tracks, the left column shows a
vertical “piano roll” keyboard with the corresponding events in the
grid to the right:
18
Page 19
Let's edit one of the clips in our demo project:
1. Make sure the clip launch pads are in Launch Mode by pressing the Launch button.
2. Press and hold the Select button, then press the first clip launch pad for Track 7 – SFX.
3. Now, try making some of the edits to the clip described below. At any time, press Undo to revert to the previous
state.
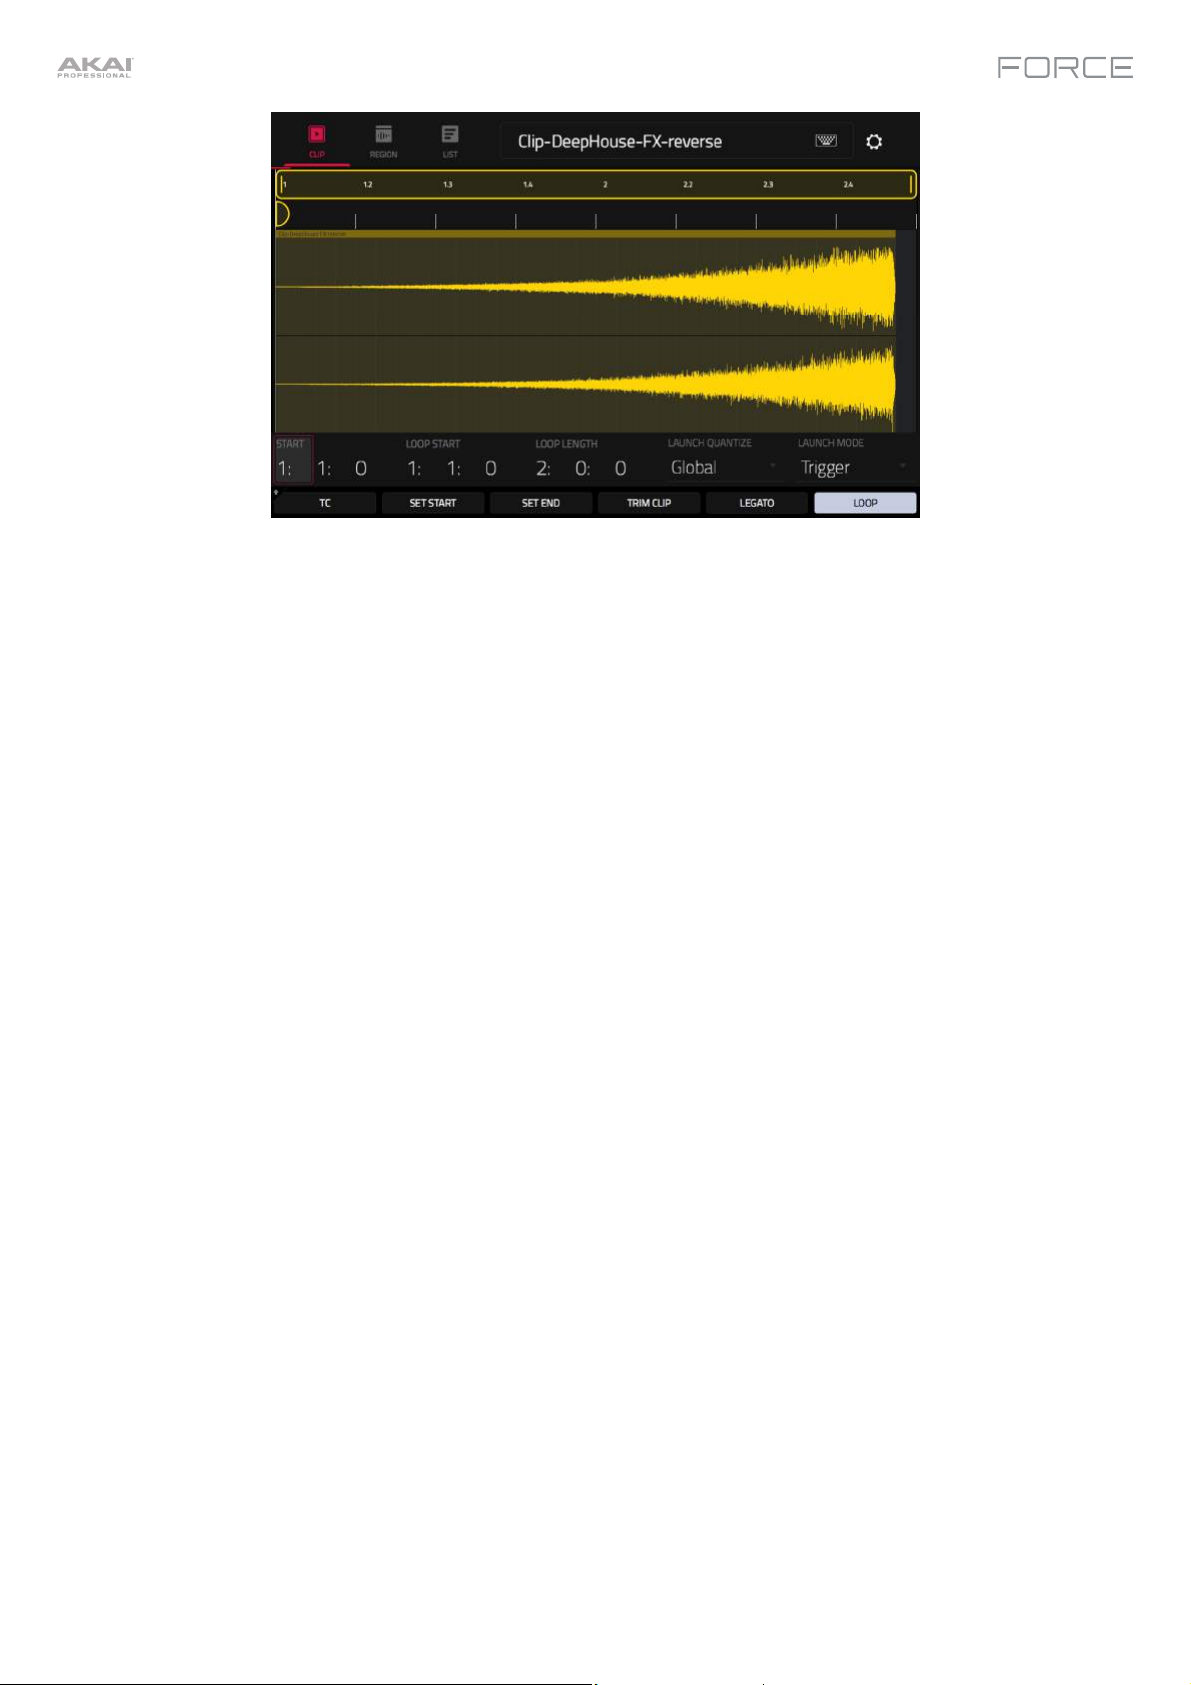
To adjust the length of the clip, use the Start, Loop Start and Loop Length fields. Alternatively, use the Set
Start and Set End buttons during playback. The start or end point will be placed at the position of the playhead
when the button was pressed.
To adjust the launch quantization setting, tap the Launch Quantization field, and then use the data dial or
–/+ buttons to set the timing of how the clip is launched. This can be set separately from the global launch
quantization. For instance, you may keep the global launch quantization at 1 Bar to keep longer clips in sync,
but set sound effects or other "one shots" to a smaller launch quantization, such as 1/8 Bar.
To change the clip launch behavior, tap the Launch Mode field, and then use the data dial or –/+ buttons to
change the mode. Select Toggle for the clip to start or stop with each successive press. Select Trigger for the
clip to start at the beginning with each press. Toggle is useful for clips of full phrases, whereas Trigger is useful
for one shot sound effects.
To adjust the timing correction, tap the TC button to open the Timing Correct window. This window contains
various settings to help quantize the events in your clip (learn about this feature in Operation > General
Features > Timing Correct (TC)).
To trim an audio clip, use the Loop Length field to set the preferred length, then tap Trim Clip to trim the
whole clip to this size.
To carry the playhead position from one clip to another in the same track, tap the Legato button. When
active, the playhead will continue from the
same position as it was in the previous clip of the same track when
switching between clips. This is useful for creating seamless fills in drum breaks, working with an acapella track
or other scenarios where you would like a clip to play across multiple scenes.
To enable or disable clip looping, tap the Looping button. Clips like sound effects, drum hits and other "one
shots" should usually have Loop set to Off. For longer melodic or rhythmic phrases, set Loop to On.
To adjust the loop, hold Shift and tap the <<Loop or Loop>> buttons to shift the loop left or right, or hold Shift
and tap the /2 or 2X buttons to halve or double the loop size.
19
Page 20
In Clip Edit Mode, depending on the type of clip selected, you can also edit an audio clip using Region View or edit
MIDI note events using Event View.
Region View
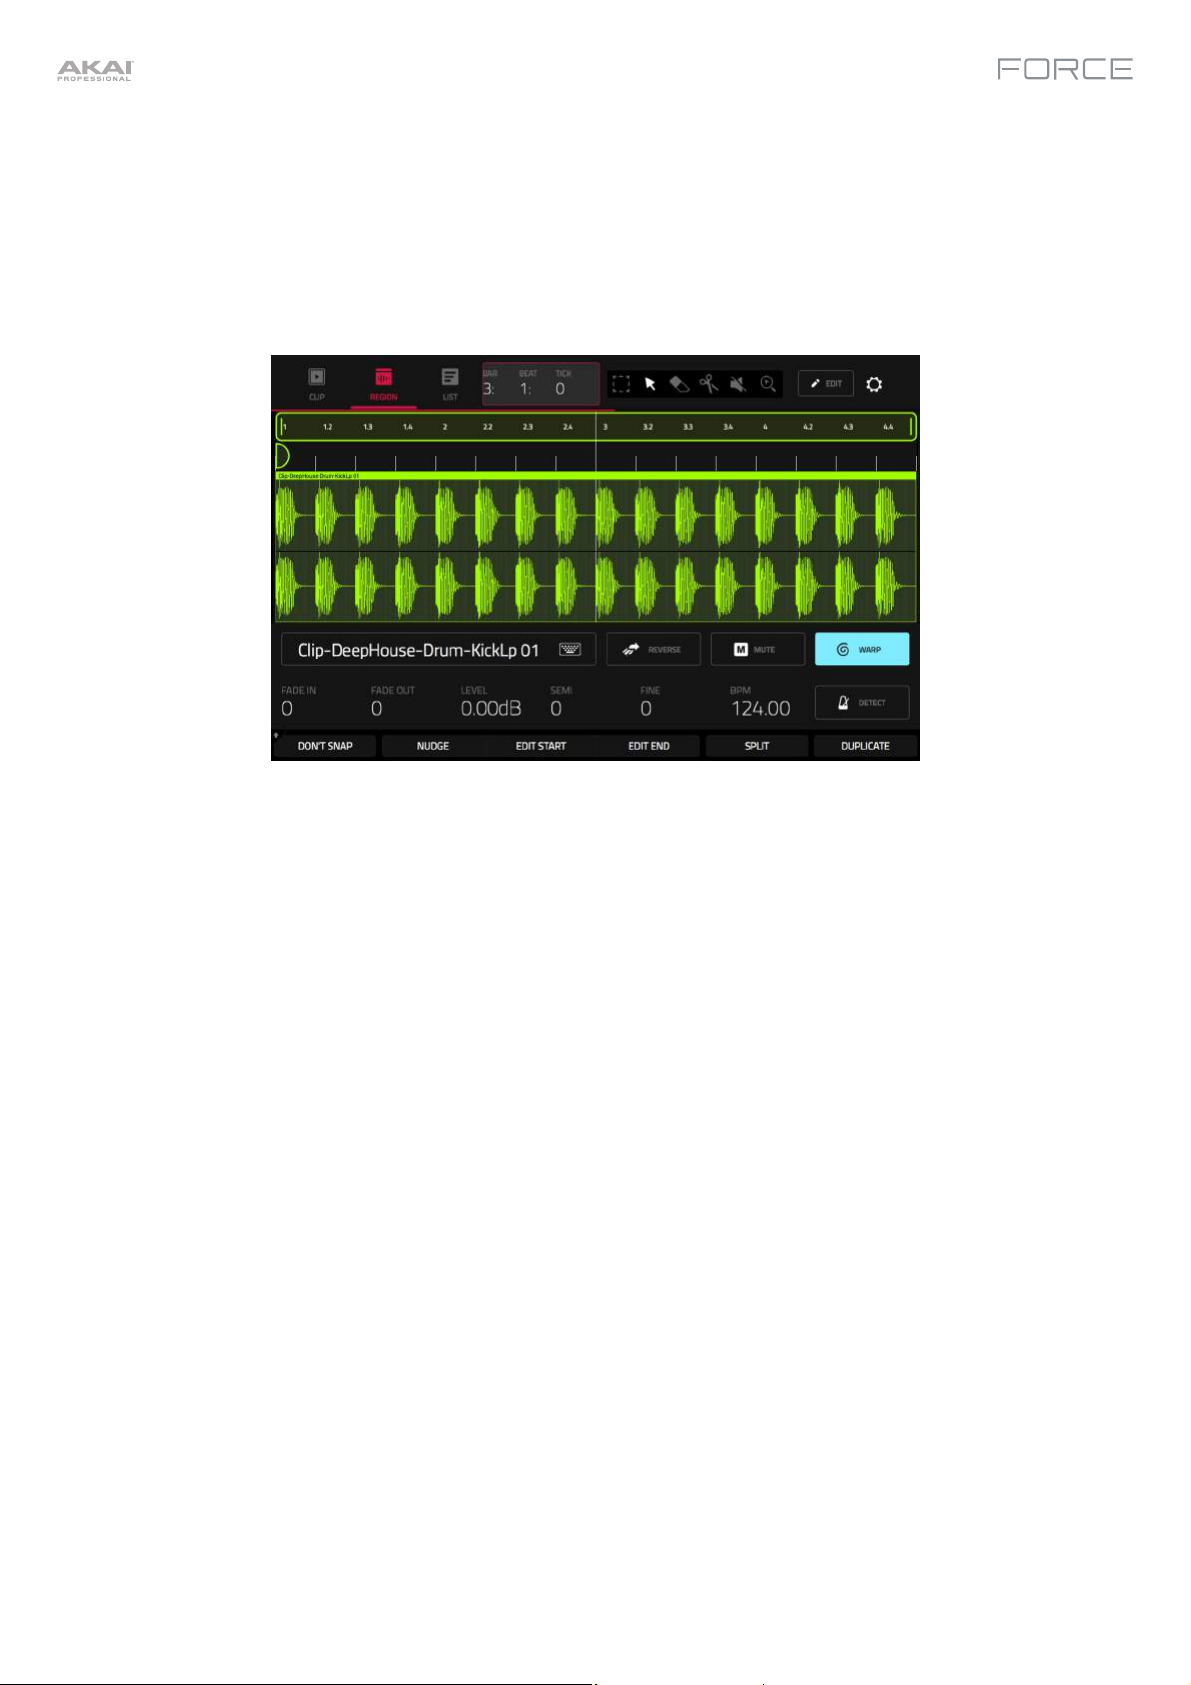
In Region View, you can edit parameters of the audio clip itself, such as length, levels, tuning and BPM.
Let's start by making some edits to an audio clip using Region View.
1. Launch the first clip in Track 1 – Kick Loop.
2. Press the Clip button to open Clip Edit Mode, or press Menu and tap Clip Edit.
3. In Clip Edit mode, tap the Region icon at the top of the display.
4. Now, try making some of the edits to the audio clip described below. At any time, press Undo to revert to the
previous state.
To select part of the clip, tap the select box icon in the upper-right corner, then tap and drag in the lower-half
of the waveform.
To move all or part of the clip, tap the pointer icon in the upper-right corner, and then tap and drag at the top
part of the waveform.
To shorten or lengthen a clip region (or multiple selected clip regions), tap the select box or pointer icons in
the upper-right corner, and then tap and drag the lower third of it left or right.
To split the clip into multiple parts, tap the scissors icon in the upper-right corner, and then tap anywhere in
the waveform.
To mute all or part of a clip, tap the speaker icon in the upper-right corner, and then tap in the waveform.
Alternatively, select the part of the waveform you want to mute, and then press the Mute button.
To scroll through or change the zoom level of the waveform, tap the magnifying glass icon. Then, tap and
drag to scroll through the waveform, pinch with two fingers to zoom out, or spread with two fingers to zoom in.
20
To change the level of the clip, tap the Level field, and then use the data dial or –/+ buttons.
To change the tuning of the clip, tap Semi or Fine, and then use the data dial or –/+ buttons.
To reverse the clip (or a section of it), tap the Reverse button.
To rename the clip, tap the keyboard icon under the waveform, then use the keyboard on the display to enter
a new name.
Page 21
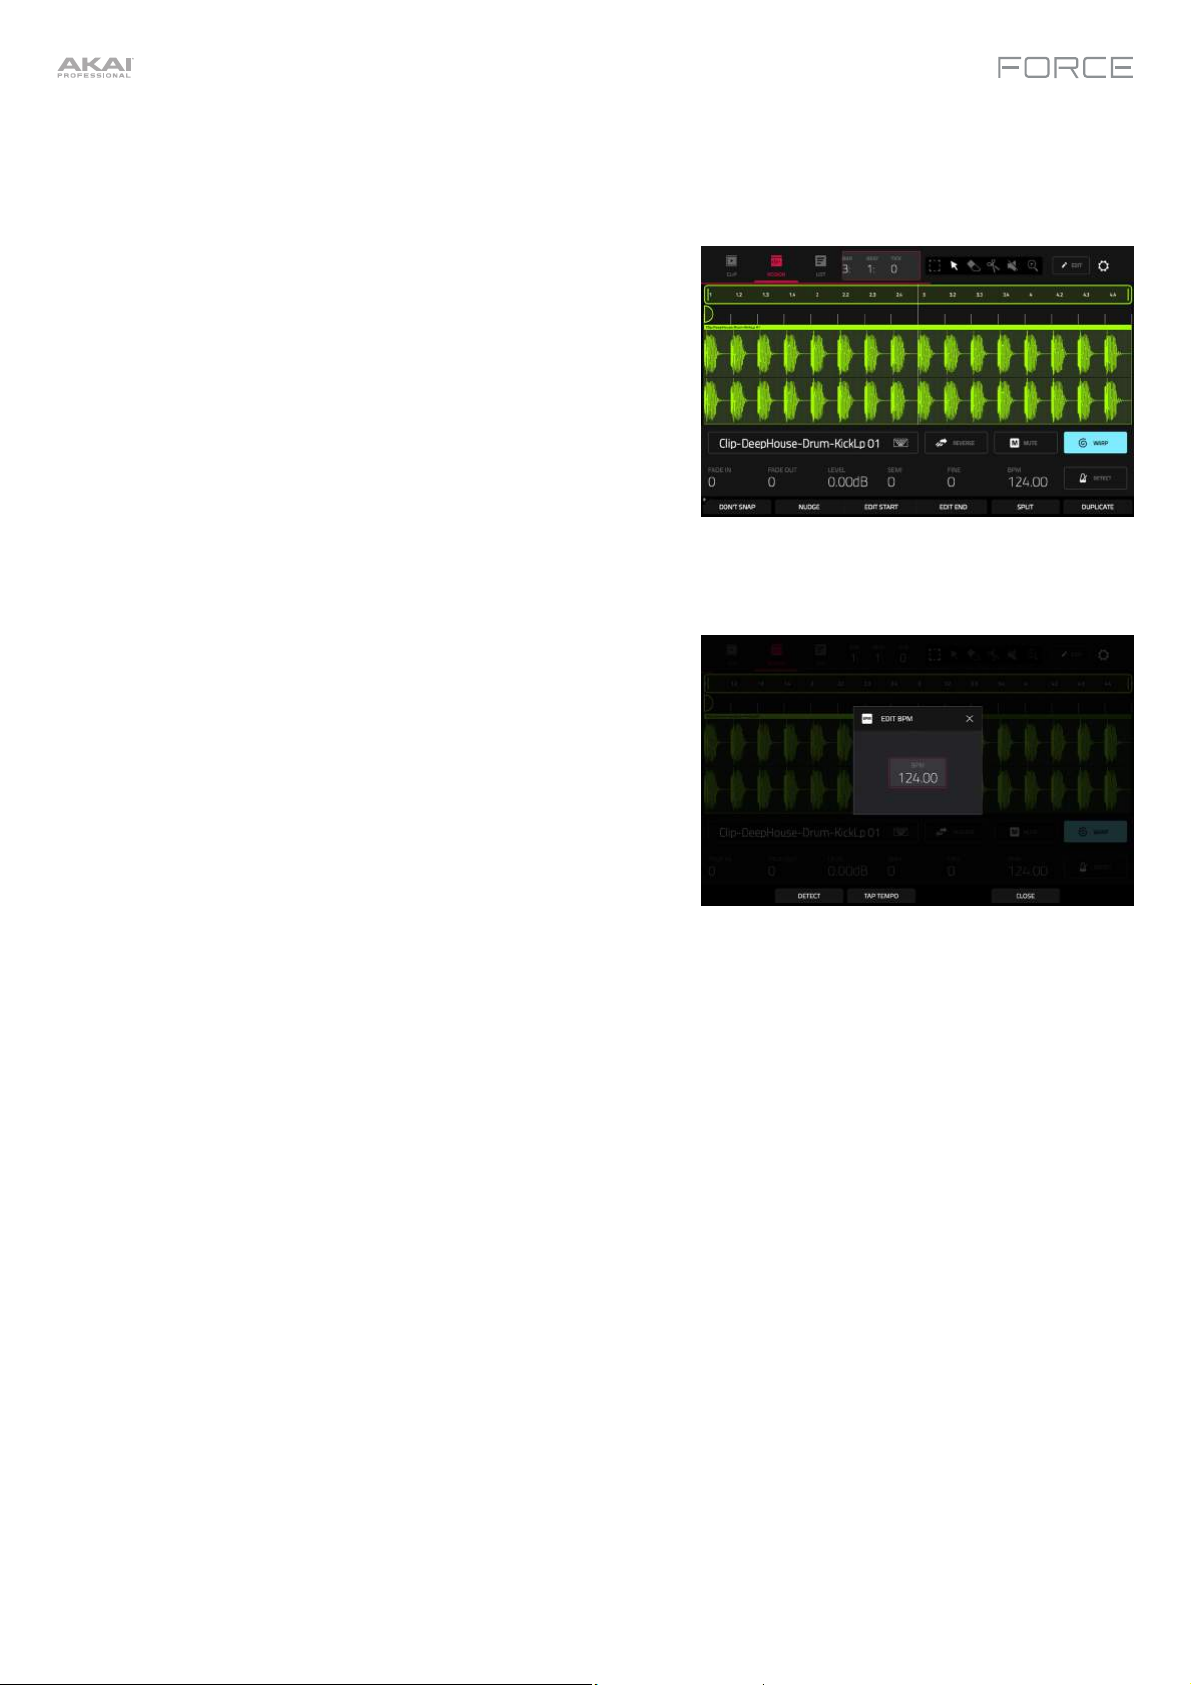
In Region View, you can also use Force's powerful tool to adjust the tempo of any sample to match your project's
tempo without changing the pitch.
To sync an audio clip to the project tempo:
1. Load the desired sample to an empty clip launch pad using the
Browser.
2. With the clip launch pad selected, open Clip View by pressing
Clip or by pressing Menu and tapping Clip Edit.
3. Tap Region to open Region View.
4. If your sample is already cut to a set number of bars and beats,
you can continue to the next step.
If your sample is not already evenly cut, you can use the Edit
Start and Edit End tools to isolate the section of the sample you
would like to use. Alternatively, use the scissors icon to cut the
audio.
5. Tap the Warp button to enable warping of the sample. This will
allow you to lengthen or shorten the selected clip region to the
desired loop length without changing the sample pitch.
6. To adjust the BPM of the sample, tap the Detect button to open
the Edit BPM window. From here, you can set the BPM in one of
three ways:
i. Press Detect to have Force analyze the BPM for you.
ii. Play the clip and use the Tap Tempo button to input the
BPM.
iii. Enter the BPM manually if you know it.
7. As the BPM of the sample is changed, the number of bars and
beats it covers will also change.
See Operation > Modes > Clip Edit Mode > Region View to learn more about this feature.
21
Page 22
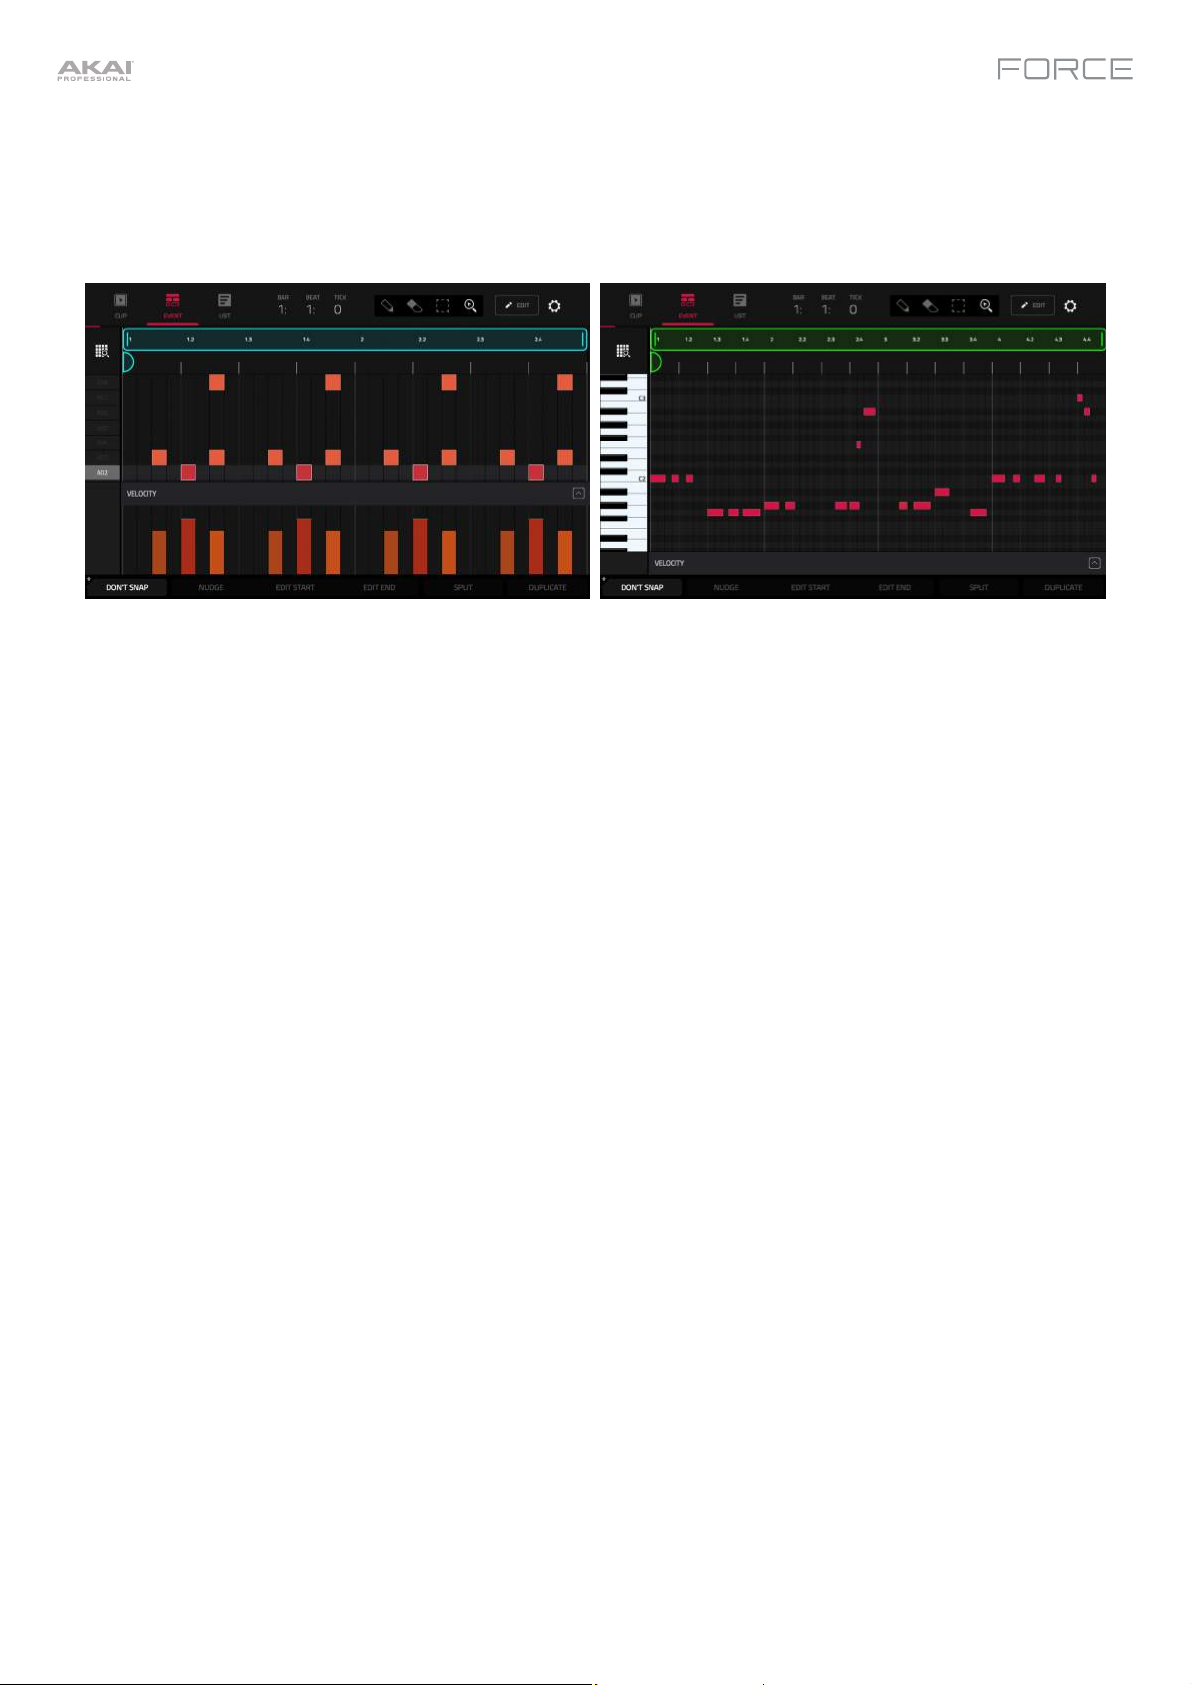
Clip Edit Mode will appear differently when using a clip with MIDI data. Drum, Keygroup, Plugin, MIDI and CV tracks all
use Event View instead of Region View, which allows you to edit MIDI data.
Event View
Event View for a drum track
Event View for a keygroup, plugin, MIDI or CV track
Now let's make some edits to a MIDI clip using Event View.
1. Launch the first clip in Track 2 – Top Loop.
2. Press the Clip button to open Clip Edit Mode, or press Menu and tap Clip Edit.
3. In Clip Edit mode, tap the Event icon at the top of the display.
4. Now, try making some of the edits to note events described below. At any time, press Undo to revert to the
previous state.
To add a note, tap the Pencil icon in the upper-right corner of the display. Then, in the grid, tap a square.
To erase a note, tap the Eraser icon in the upper-right corner. Then, in the grid, tap a note.
To select a note, tap the select box in the upper-right corner. Then, in the grid, tap a note. You can also drag
your finger to select multiple notes.
To move the selected notes, tap Nudge at the bottom of the screen, and then use the data dial or –/+ buttons
to shift the notes left or right. By default, you can position notes only by quantization values defined by the Time
Correct value (learn about this feature in Operation > General Features > Timing Correct (TC)).
To adjust the start point or end point of the selected notes (without changing their position), tap Edit Start
or Edit End at the bottom of the screen, and then use the data dial or –/+ buttons.
To transpose the selected notes up or down, tap Transpose at the bottom of the screen, and then use the
data dial or –/+ buttons.
To adjust the velocity of the selected notes, tap Velocity at the bottom of the screen, and then use the data
dial or –/+ buttons. The numeric
value will appear on the screen.
To show or hide the velocity lane, tap the up arrow (∧) button in the lower-right corner of the screen to show
the velocity lane below the grid. Each note’s velocity is represented by a vertical bar. The higher and more red
the bar is, the higher the velocity is.
Tap the up arrow (∧) button once more to show a taller version of the velocity lane, after which it will turn into a
down arrow (∨) button, which you can then tap to hide the velocity lane.
See Operation > Modes > Clip Edit Mode > Event View to learn more about this feature.
22
Page 23
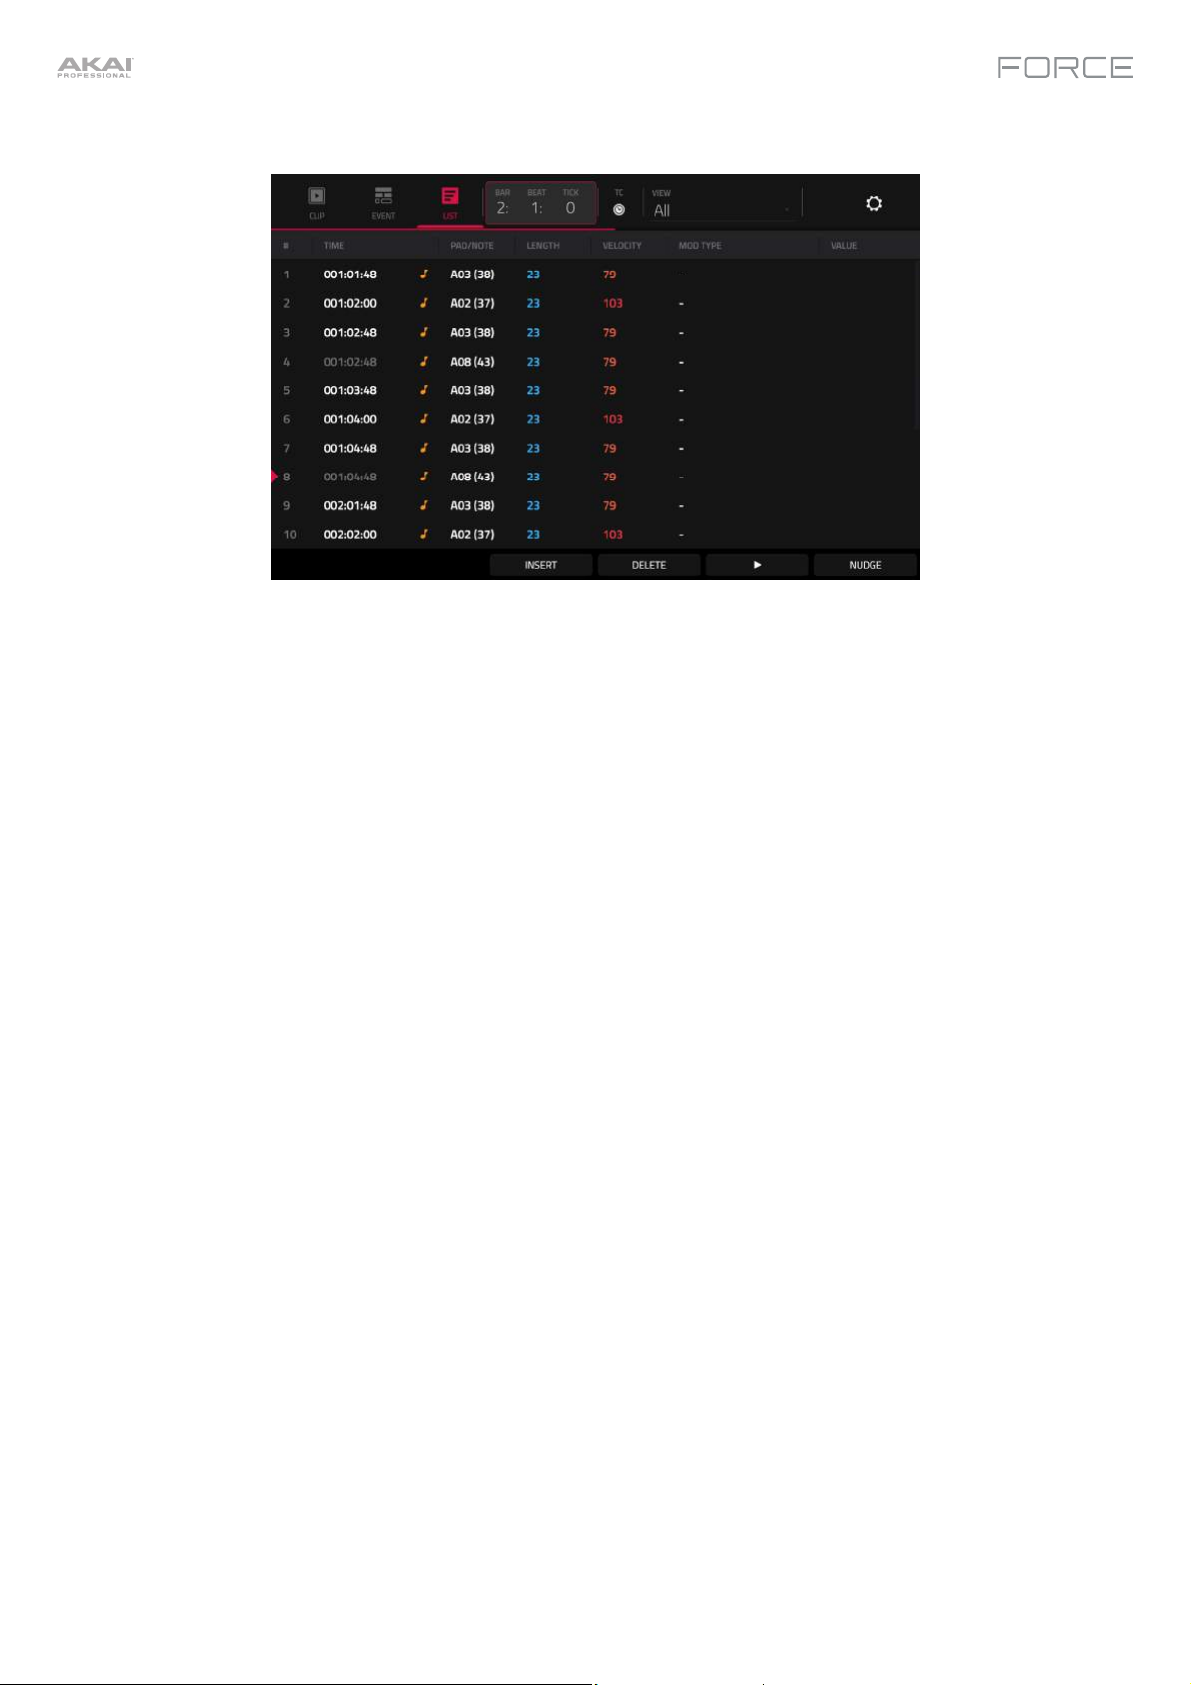
List View
List View in Clip Edit Mode is similar to Event View, but uses a scrolling list workflow to display MIDI note event
parameters. This allows you to quickly filter your MIDI events by a particular type using the View menu or by the current
playhead position using the time counter at the top of the display. You can also insert, delete, play and nudge note
events using the buttons at the bottom of the display.
See Operation > Modes > Clip Edit Mode > List View to learn more about this feature.
23
Page 24
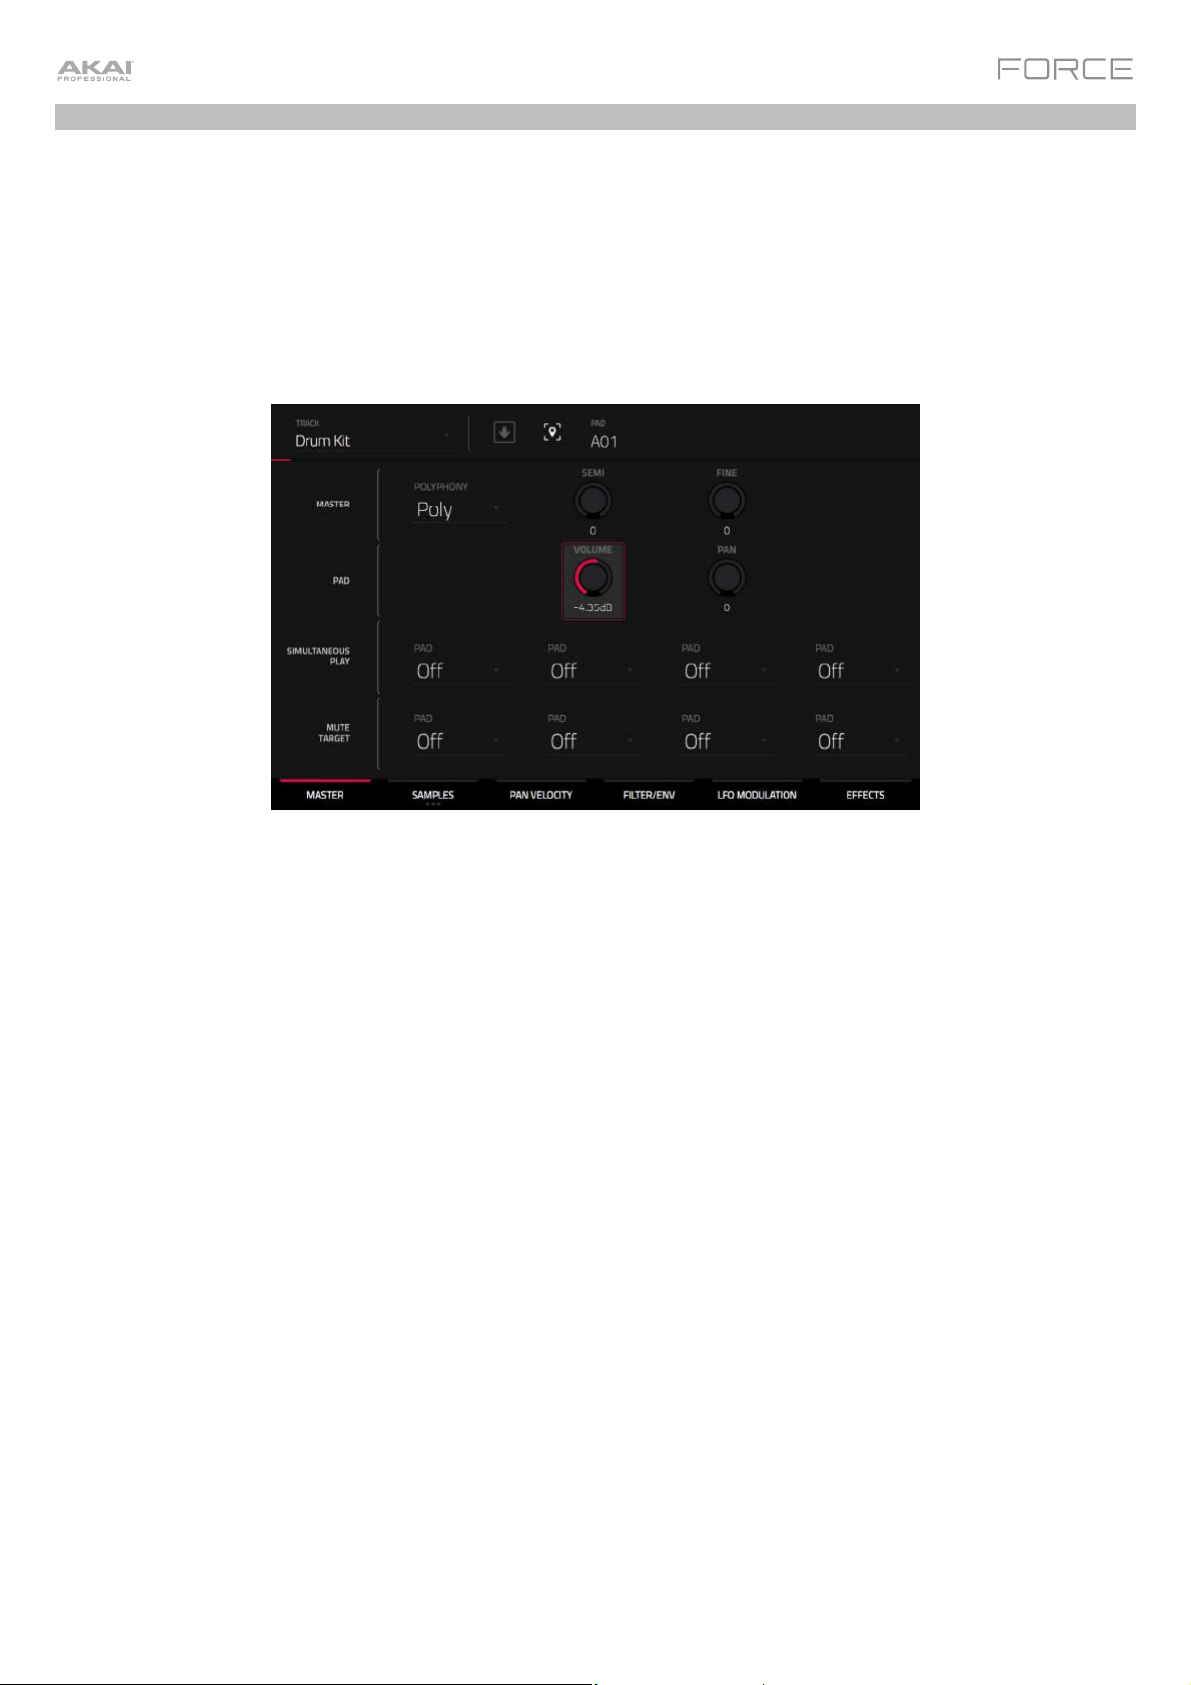
Track Edit Mode
In addition to editing MIDI note events using Clip Edit Mode, you can edit the parameters of a track using Track Edit
Mode. This mode is not available for audio tracks.
To enter the Track Edit Mode, do either of the following:
• Press Menu and then tap Track Edit.
• Hold Shift and press Clip.
Now, let's make some simple edits to the sounds in a drum track. Try making these edits while a clip is playing to hear
the difference.
1. In Matrix Mode, press and hold the Track Select button for Track 8 – Drum Kit to select the track.
2. Press the Note button to set the clip launch pads to Note mode. The lower left quadrant will now show a typical
16-pad drum kit.
3. Press the kick drum pad (A01) to select it.
4. In the Master tab of Track Edit Mode, adjust the Volume knob up or down.
5. Press the snare drum pad (A02) to select it.
6. Tap and drag the Pan knob up or down to adjust the stereo panning. We recommend spreading the panning of the
bright sounds (e.g., cymbals, snare drum) a little.
7. Press the hi-hat pad (A03) to select it.
8. Tap the Samples tab so the first square under it is lit.
9. Use the Semi and Fine fields to adjust the tuning of the sample.
24
Page 25
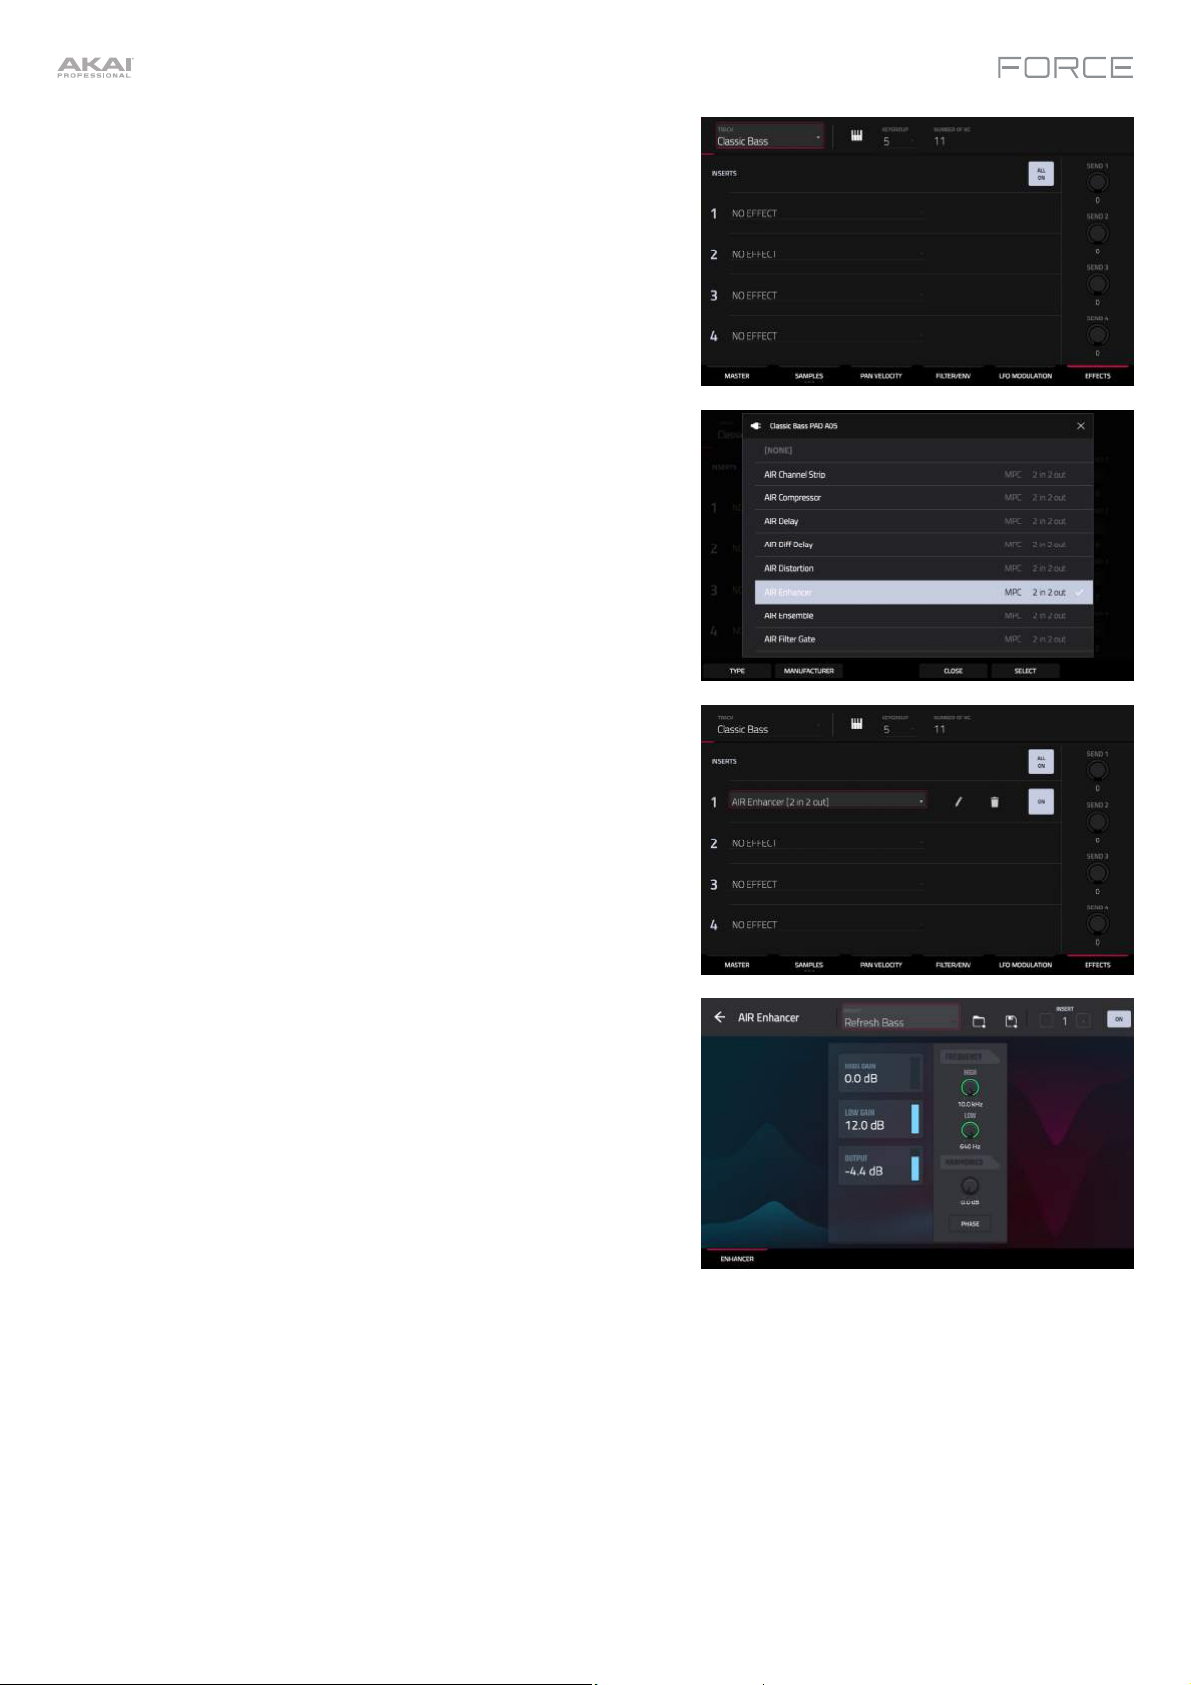
You can also apply effects to a track with Track Edit mode. Let's try
adding an effect to the bass track.
1. While in Track Edit Mode, press and hold the Track Select
button for Track 6 – Classic Bass to select the track.
2. Tap the Effects tab at the bottom of the screen to view the Insert
Effects tab.
3. Double-tap the first effect slot. A list of effects will appear.
4. Swipe up or down to move through the list.
5. To load an effect, double-tap it. Alternatively, tap it once and
then tap Select or push the data dial. Let’s try adding the AIR
Enhancer.
6. To close the list, tap Close.
7. Now that the effect has been added to the bass track, you can
adjust its parameters to your liking.
To adjust the effect's parameters, tap the pencil icon.
To adjust a parameter's value, tap and drag your finger on
a slider. Alternatively, tap the parameter and use the data
dial or –/+ buttons.
To empty the effect slot, tap the trash can icon. Switch the
effect on or off by tapping the On/Off button for the slot.
25
Page 26
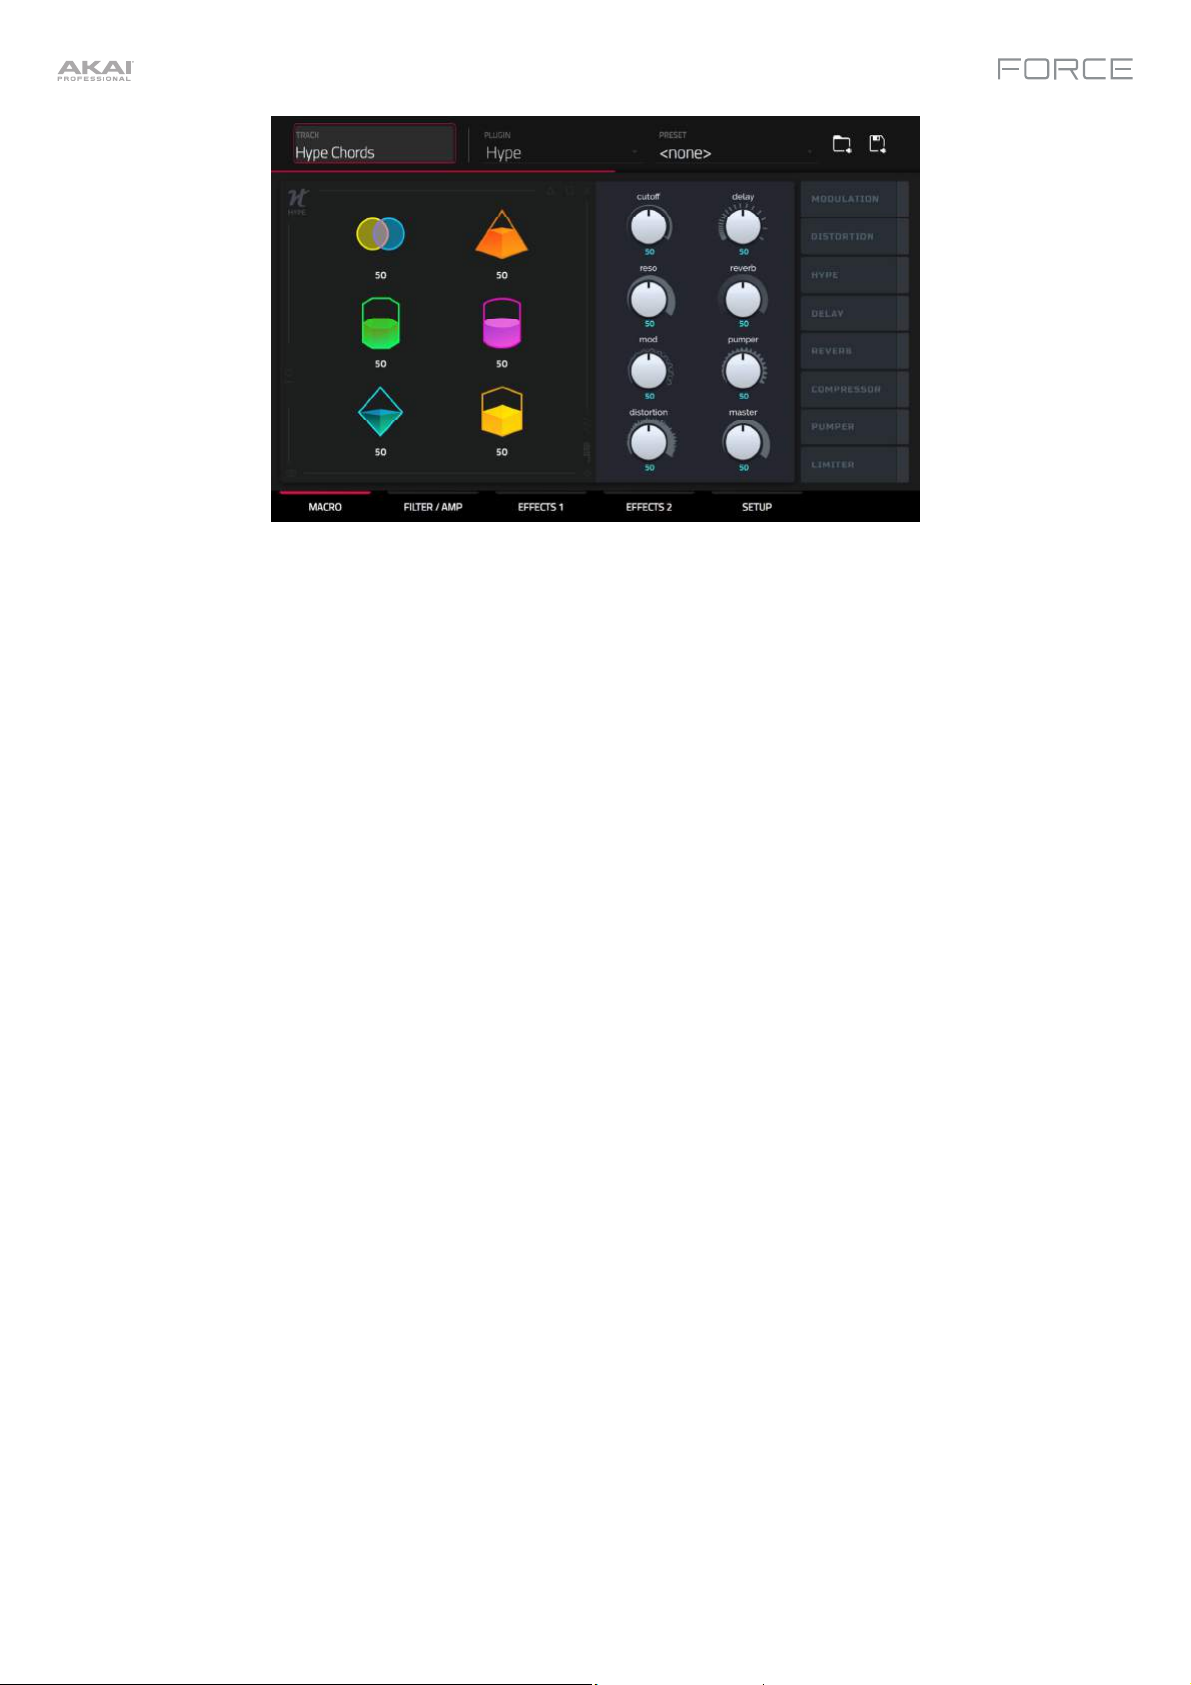
When a Plugin track is selected, Track Edit Mode shows the parameters of the loaded plugin.
1. Press Matrix to enter Matrix Mode.
2. Press and hold the track selector button for Track 5 – Hype Chords.
3. Launch the first clip in Track 5 – Hype Chords.
4. Enter Track Edit Mode.
5. While the clip is playing, try making edits to the various plugin parameters. Use the tabs at the bottom of the page to
view different sets of parameters.
26
Page 27
Renaming & Saving
After making changes to clips and tracks, you may want to do some renaming and save your project before going
further.
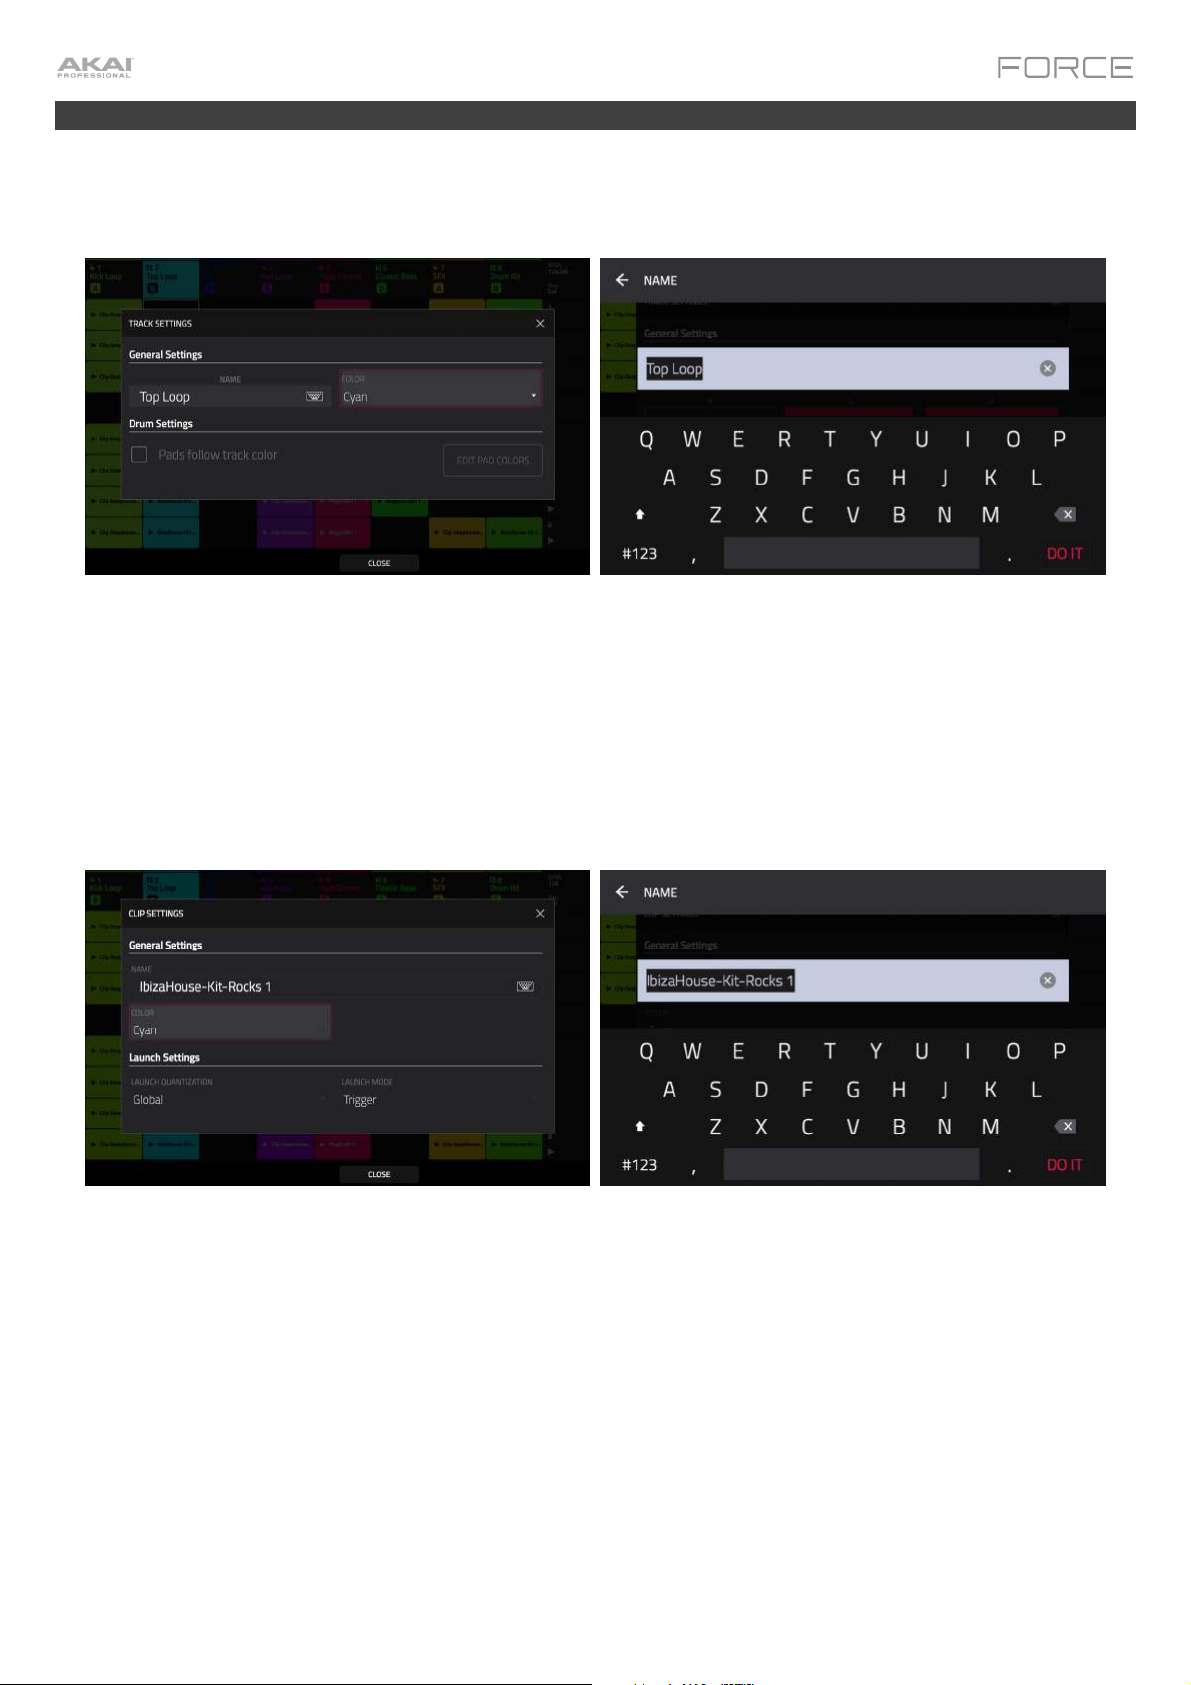
To rename a track:
1. Press Matrix to enter Matrix mode.
2. Double-tap the track name at the top of the display.
3. Under Name, tap the keyboard icon.
4. Use the virtual keyboard that appears to enter a new name (e.g., Synth Lead), and then tap Do It.
To rename a clip:
1. Press Matrix to enter Matrix mode.
2. Hold Edit press a clip launch pad.
3. In the window that appears, tap the keyboard icon next to Name.
4. Use the virtual keyboard that appears to enter a new name (e.g., Drum Fill), and then tap Do It.
27
Page 28
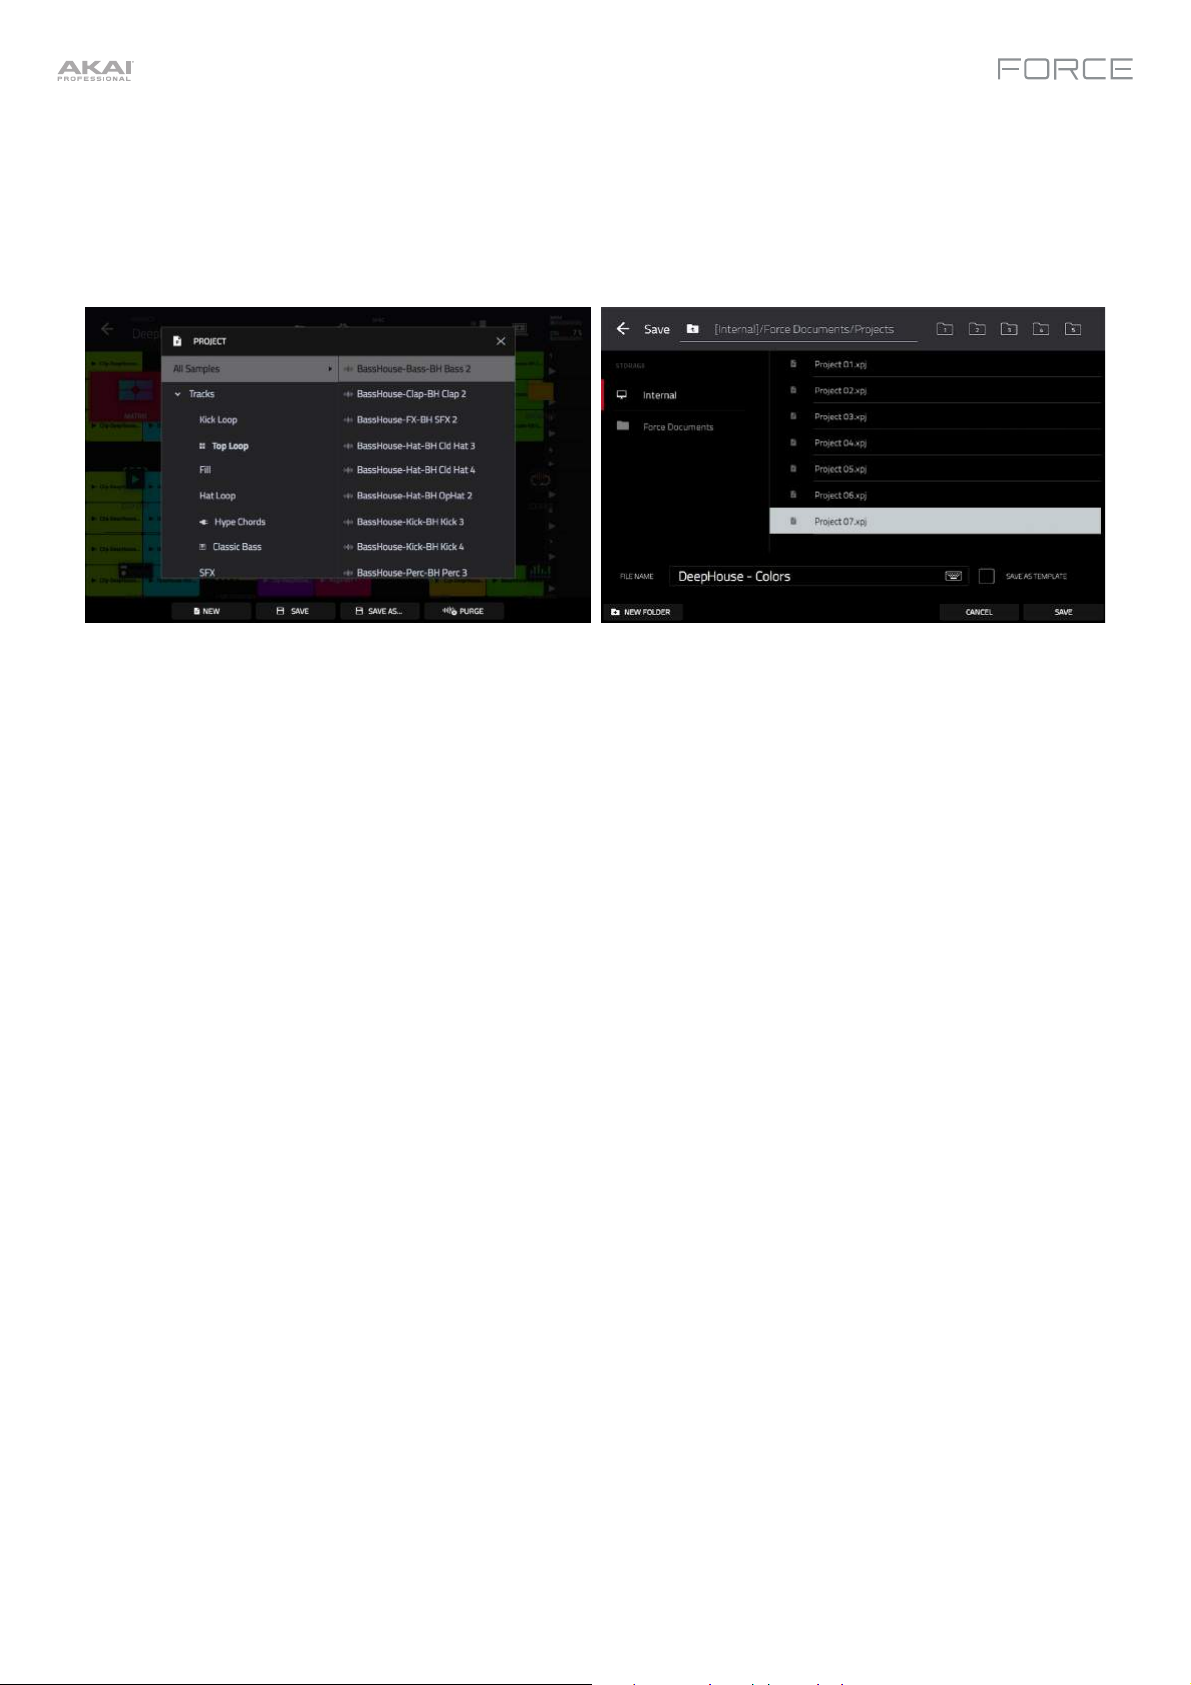
Now that we've made changes to our demo, this would be a good time to save as a new project. You can save your
project by doing either of the following:
• Press Menu to show the Menu, and tap the folder icon at the top of the screen to open the Project window. Then,
select Save As.
• Press Save to open the Save window. Then, select Save As.
In the Save screen, do any of the following:
To select the storage device you want to view, tap it in the Storage column on the left.
Internal is the internal drive of Force.
Force Documents is a shortcut to the Force Documents folder on the internal drive of Force.
If you have storage devices connected to the USB ports or SD card slot of Force, they will appear in this
column, as well.
To enter a folder, double-tap it. Alternatively, turn the data dial or use the –/+ buttons to move through the list, and
press the data dial to enter a folder. You can also tap one of the five folder buttons in the upper-right to jump
immediately to those pre-assigned file paths (see Operation > Modes > Browser to learn how to do this).
To create a new folder, tap New Folder, use the virtual keyboard that appears to enter a name, and then tap Do It.
You will immediately enter the new folder.
To move up one folder level, tap the folder/ icon in the upper-left corner.
To name the file, tap the File Name field at the bottom of the screen, and use the virtual keyboard that appears.
To save the file, tap Save.
To cancel and return to the Menu, tap Cancel. Alternatively, tap the icon in the upper-left corner.
28
Page 29
Using the Browser
Force's Browser is where you can browse and load clips, samples, instruments and more from Force's internal library,
as well as the library of any connected devices.
To open the Browser, do either of the following:
• Press Menu to show the Menu, and tap Browser.
• Press Load.
Let's try creating a new drum track and loading samples to it.
1. Press Matrix to open Matrix view.
2. Use the right cursor to scroll the Matrix view all the way to the right, until the last column shows a + sign above the
clips.
3. Tap the + symbol to open the Add Track window. Alternatively, you can press and hold the Track Selector button
under an unused track to open the Add Track window.
4. Select Drum to create a new drum track.
5. Set the pads to Note mode by pressing the Note button.
6. Tap a pad to select it. While in the Browser, the selected pad will be lit bright white. Since we are creating a drum
kit, start by tapping the bottom-left pad.
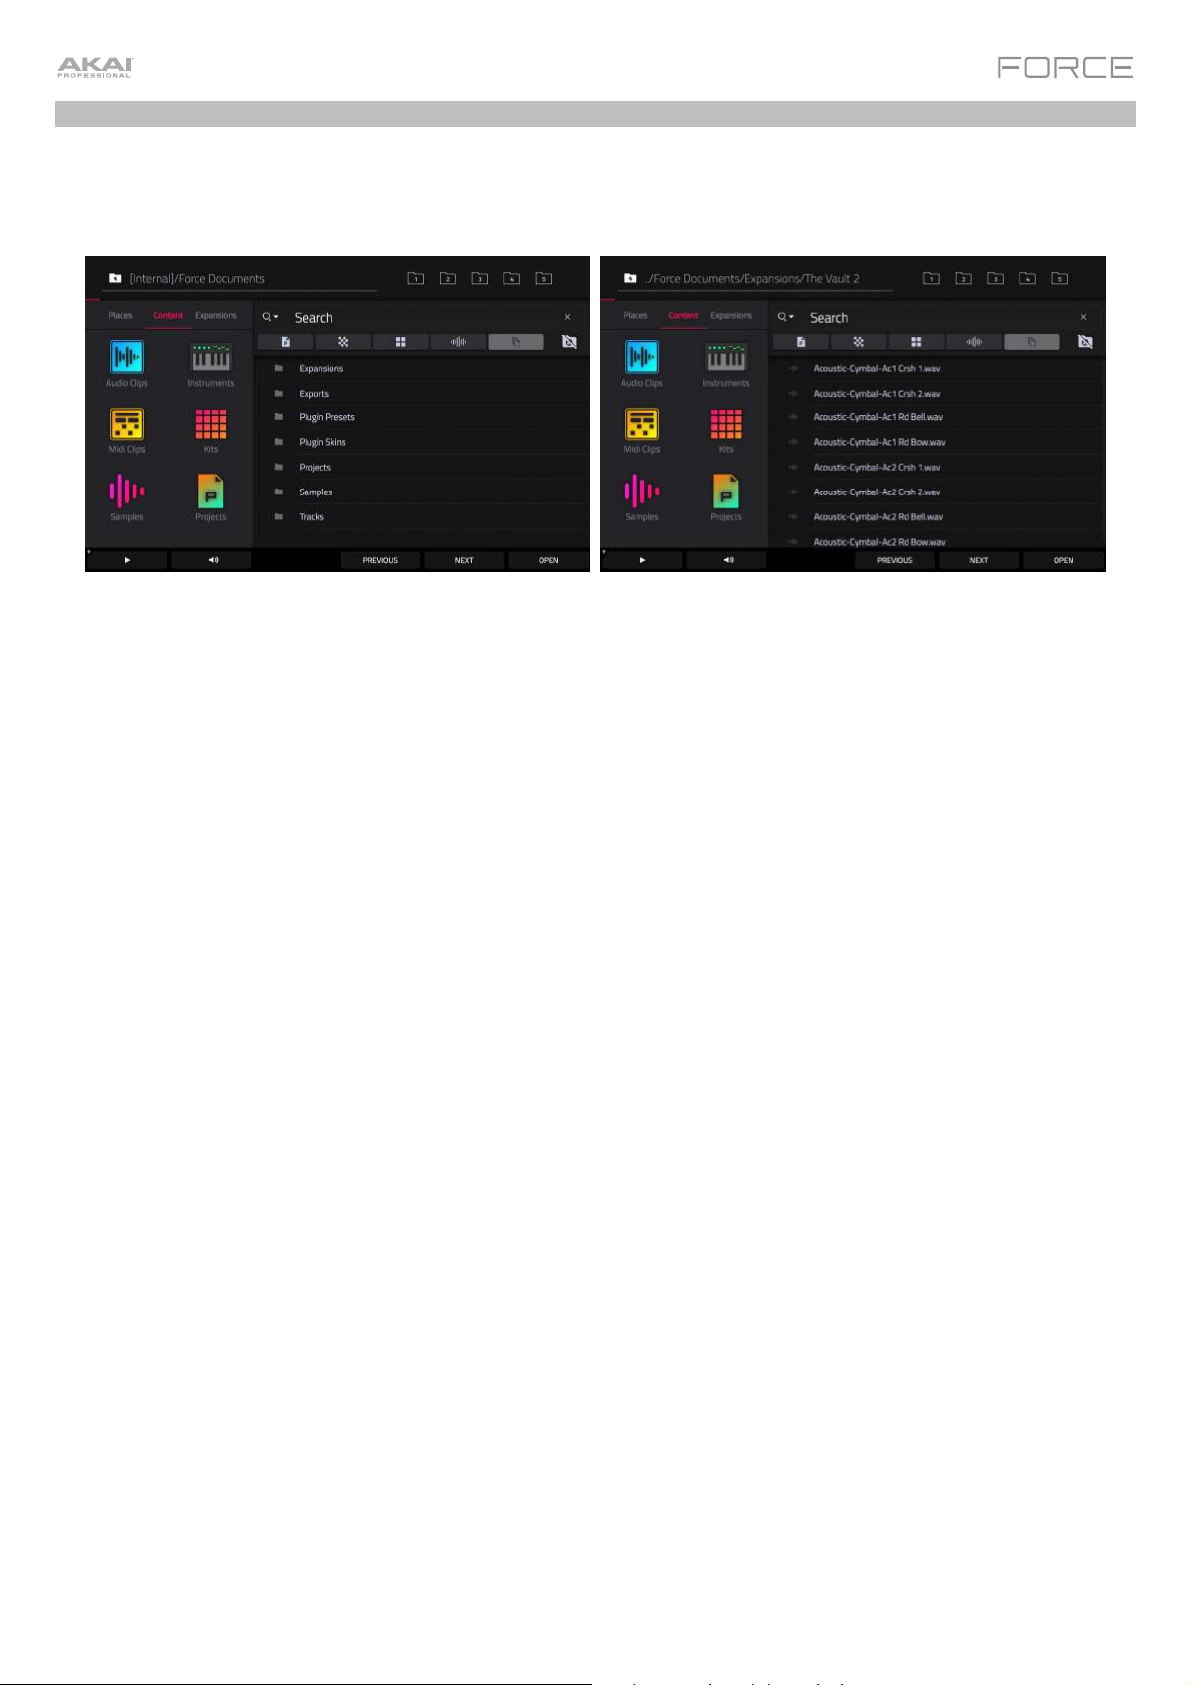
7. To search for drum samples, first open the Content tab, then select Samples.
8. Start by searching for a kick drum sound. Tap in the Search bar, then use the keyboard that appears to type "kick"
and tap Do It to perform the search. A list of all kick drum samples will now appear.
9. To load a sample, tap the Load button.
10. You can browse and preview samples in two ways:
Turn the data dial to scroll through the list, and tap the Play button to preview the sample. You can enable autopreview by tapping the Speaker icon and tapping the Auto button so it is highlighted.
You can also quickly audition samples by using the Previous and Next buttons on the display, or the – and +
buttons on Force. When you move to a new sample, it will automatically be loaded to the selected pad. If you
decide to not use the sample, the old sample will automatically be deleted when a new one is loaded to the same
pad.
11. Repe
at this process to add a snare, hi-hat or anything else you can think of to your drum kit.
You can use this same general process for browsing and loading other files such as audio or MIDI clips, instruments,
kits and projects.
29
Page 30

Mixing Tracks
Force's mixer allows you to adjust parameters such as level, stereo panning and routing the same way you would with a
traditional mixer or digital audio workstation.
To open the Mixer, press Mixer. Alternatively, press Menu and tap Mixer.
The Mixer contains four tabs of pages that let you control different settings for the tracks and master. Tap and drag your
finger to scroll through available tracks, or use the cursor buttons.
Let's start with the Pan & Volume tab. Tap the tab at the bottom of
the display to select it. Launch a scene in your project and try making
a few of the following adjustments to the tracks:
To adjust the track volume, tap and drag your finger on the
volume slider, or tap it and then use the data dial or
-/+ buttons.
To adjust the track panning, tap and drag your finger on the
Pan slider, or tap it and then use the data dial or -/+ buttons.
To mute or solo the track, tap the M or S buttons, respectively.
To give a track a crossfader assignment, tap the A or B
buttons at the bottom of the display.
30
Page 31

Next, tap the Inserts & I/O tab. On this page, you can add insert
effects to tracks, as well as control input and output routing. Let's try
adding an effect to a track:
1. Tap an insert slot in Track 4 – Hat Loop to open the Inserts
window. The insert slots are marked with a + sign.
2. Double-tap the first effect slot. A list of effects will appear.
3. Swipe up or down to move through the list, or turn the data dial.
4. To load an effect, double-tap it. Alternatively, tap it once and
then tap Select or push the data dial. Let’s add the Reverb
Small effect.
5. To close the list, tap Close.
6. Now that the effect has been added to the track, you can adjust
the settings to your preference.
To adjust the effect’s parameters, tap the pencil icon.
To empty the effect slot, tap the trash can icon. Switch the
effect on or off by tapping the On/Off button for the slot.
See Operation > Modes > Mixer to learn more about this feature.
31
Page 32

Cueing Tracks
In addition to using the Solo button to isolate a track, you can use it to cue tracks. This allows you to preview the sound
of a track using the Phones output or Outputs 3/4 before sending it to the main mix for your audience to hear.
To cue tracks:
1. Connect headphones to the Phones output, or connect Outputs
3/4 to your monitors, mixer, etc.
2. Open the Mixer Config window, either by pressing Settings while
viewing the Mixer, or by holding Shift and pressing Solo or Mute.
3. Set the Solo Button Behavior to Cue Tracks.
4. Adjust the Cue Mix knob so that it is between 3/4 and Master.
You can adjust the exact mix to your preference. Turn the Cue
Mix knob toward 3/4 for more of the cued track audio, or more
toward Master for more of the master mix audio.
5. Press the Solo button.
6. Press the Track Assign button for the track you would like to
assign to the cue mix.
When viewing certain pages of the Mixer, the S icon in the
channel strip will become a Headphones icon that is highlighted
when enabled.
When viewing the Matrix, a Headphones icon will be added to the
track heading.
7. Launch a clip in the track you have cued. You should hear both
the master mix and the audio of the cued track.
8. Using headphones attached to the Phones Output on Force's
front panel, and/or speakers connected to Outputs 3/4, listen to
the cued audio to make sure it is in sync with your main mix.
9. When you are ready to send the track audio to the main mix,
press the Solo butt
on and the Track Assign button for the track
to disable cueing.
32
Page 33

Recording Clips
Now that you're more familiar with the basics of clip launching and editing, let's try recording new clips to add to the
project.
Before recording, let's create a new scene and an empty clip to
record into:
1. Press Matrix to open Matrix Mode on the display.
2. Hold Edit and press the top Scene Launch button to open the
Edit Row window.
3. Tap the Insert icon. A new row will be created at the top of the
Matrix.
4. On the display, double-tap an empty clip slot in your new scene to
create a new clip. New clips are always created at the default
length, which can be set by holding Shift and pressing the second
Track Assign button.
Alternatively, you can create an empty clip using the clip launch
pads. First, press the Launch button to enter Launch mode.
Then, hold the Select button and double-tap an empty pad.
Recording with Note Mode
In addition to using the clip launch pads for launching clips, you can use them to record notes chromatically as you
would use a MIDI keyboard. This is enabled by pressing the Note button to enter Note Mode.
In the Deep House – Colors project, select Track 6 – Classic Bass and press Note to view Note Mode in action. In
Note Mode, the appearance of the pads will change. The root note or chord will be lit in one color, and the notes or
chords in between will be lit white.
33
Page 34

To configure the pads in Note Mode, hold Shift and press Note to
open the Note Config window. In this window, you can set the
function of the pads, from playing notes in a scale to playing full chord
progressions. For now, let's leave Type set to Scales and set Pad
Rows to Start on root.
See Operation > General Features > Pad Modes > Note Mode to
learn more.
Now, let's prepare the clip and track for recording:
1. Create an empty clip in Track 6 – Classic Bass following the
directions above.
2. Launch the clip to make sure it is playing.
3. Press the Rec Arm button, then press the sixth Track Select
button to record enable the track. A record symbol will appear
under the track name.
4. Finally, when you are ready to record, press the Rec button. On
the display, the selected clip will turn red and show Overdub.
5. Try recording a simple bassline using the clip launch pads in
Note mode. Press Undo at any time to undo any recorded note
events.
6. You have finished recording, press the Rec button again to stop
recording.
You can also change the recording configurations to suit your
preferences.
1. Press Matrix to open Matrix Mode on the display.
2. Hold Shift and press Record to open the Record Configuration
window.
3. Check the Write automation when recording box to capture
automation while recording.
Use t
he Record Mode field to set how recording is initiated.
When set to Pad, tap any pad while the track is armed to begin
recording. When set to REC Button or Pad, tap any pad while the
track is armed to begin recording, or press the Record button to
begin recording on the highlighted clip slot. When set to REC
Button then Pad, first press the record button, then tap any pad
to begin recording. This is the default mode when Force is
powered on.
Check the Fixed Length Recording box to stop recording after
the clip length set in the Fixed Length (Bars) field. Leave
unchecked to record for any desired clip length.
Use the Record To field to set the behavior when recording is
completed, entering either Overdub or Play.
4. When you are finished, tap Close to close the Record
Configuration window.
34
Page 35

Recording with the Step Sequencer
When sequencing drums, you can use Force's built-in Step Sequencer to quickly enter note events by using the clip
launch pads as "step buttons," simulating the experience of a traditional step-sequencer-style drum machine.
When using the Step Sequencer, you can assign the clip launch pads to three different modes:
Drum: In this mode, the top four rows of pads represent each
step in the clip. The bottom four rows of pads are split into two
4x4 quadrants: the left quadrant is used for selecting and
triggering drum sounds, while the right quadrant is used to select
the velocity of the note events. This mode is most useful for
recording drum parts with the step sequencer.
Melodic: In this mode, the top four rows of pads represent each
step in the clip. The bottom four rows of pads are notes in the set
scale, which can be adjusted by holding Shift and pressing Step
Seq. This mode is most useful for recording melodic parts such as
a bassline with the step sequencer.
Lanes: In this mode, each column of clip launch pads represents
a step in the clip. The eight rows represent eight different pads.
You can set the base pad by holding Shift and pressing Step
Seq.
To cycle between these modes, press the Step Seq button. You can also press and hold the Step Seq button while in
any Step Sequence mode to quickly select another mode.
35
Page 36

Let's use the Drum mode to sequence a drum pattern using the Step Sequencer.
1. Select Track 2 – Top Loop and add a new empty clip as described above.
2. Make sure the clip you are recording into is playing, otherwise you won't hear the pattern you are creating.
3. Press Menu and then tap Step Sequencer on the display.
4. Press the Step Seq button until Drum is shown on the display. The pads will now be in Drum mode.
5. Select the bass drum sound by pressing its pad (A01).
Tip: Press and hold the Clip Select button and then press a pad to select it without sounding the sample.
6. Use the top four rows of clip launch pads to sequence a simple bass drum pattern.
You can also change portion of the clip you are viewing and editing by pressing and holding the Step Seq button
and using the top row(s) of clip launch pads. The number of pages available depends on the selected step size and
the number of bars in the clip.
7. Next, select a snare drum sound (A02) and sequence a pattern.
8. Finally, select a hi-hat sound (A03) and sequence a pattern. Try using the velocity pads to vary the velocity of the hihat sounds to make the clip sound more realistic.
See Operation > General Features > Pad Modes > Step Sequencer Mode and Operation > Modes > Step
Sequencer to learn more about this feature.
36
Page 37

Operation
This chapter explains the complete features and functions of your Force hardware.
Important:
• When the left-most button at the bottom of the screen shows an upward arrow (), it means there are
additional buttons you can use when you press and hold Shift. Press and hold Shift to show the
secondary buttons, and any of them, if desired. Release Shift to return to the previous buttons.
• Many modes shown on the screen have 1–6 buttons at the bottom. Each of these buttons select a
different tab in that mode or perform a specific function in that mode.
• As an alternative to double-tapping an item on the screen to “enter” it, you can press the data dial.
• When a parameter is highlighted and has a red outline, this means that it is selected. You can then
change it by turning the hardware’s data dial or using the –/+ buttons. If the parameter is a number,
double-tap it to show a numeric keypad on the screen to enter a specific value.
General Features
Control Types
The Force touchscreen uses the following types of control elements:
Knobs
To set the value for a knob, do any of the following:
• Tap and drag the knob up or down.
• Tap the knob to select it, and then use the data dial or –/+ buttons to
adjust the value.
• Double-tap the knob to show it in a larger screen. Alternatively, press
data dial when the knob is selected.
Tap and drag the larger version that appears, or use the data dial or
–/+ buttons to adjust the value.
If the knob is bipolar (has positive and negative values with the center
as the default position), double-tap the larger version to reset it to the
center/0 position.
Tap anywhere else to return to the previous screen.
• Press and hold Shift while turning the data dial to adjust a value by
smaller increments.
37
Page 38

Parameter Values
To set the value for a parameter, do either of the following:
• Tap the field to select it, and then use the data dial or –/+ buttons to
adjust the value.
When the value has decimal places, you can sometimes press and
hold Shift and then use the data dial or –/+ buttons to adjust the value
by smaller increments.
• Double-tap the field or hold your finger on it for a second. In the
screen that appears, type in a value using the number pad, or use the
data dial or the –/+ buttons to adjust the value. Alternatively, tap and
drag the value up or down.
You can also tap /2 to halve the value or x2 to double it.
To confirm the value and remain on this screen, tap Apply.
To confirm the value and return to the previous screen, tap Do It.
To return to the previous screen, tap the gray area in the upper-
left corner of the screen. Unsaved changes made using the number
pad will not be applied. All other changes will be saved.
Drop-Down Menus / Lists
To select an option for a drop-down menu, do any of the following:
• Tap the field to select it, and then use the data dial or –/+ buttons to select an option.
• Double-tap the field. In the list that appears (examples below), tap the desired option. Alternatively, use the data
dial or the –/+ buttons to select an option.
In some windows, tap the relevant button at the bottom of the screen to confirm your selection or to cancel
without changing anything.
38
Page 39

Selectors
Selectors show all available options. One of them is always selected. The
selected option is highlighted while the others are dark.
To select an option, tap it.
Buttons
Buttons usually have two states: selected and deselected (active or inactive,
respectively). Some may have more than two states.
To switch between or cycle through a button’s states, do either of the
following:
• Tap it.
• If it is outlined in red (and is not a mute button), use the data dial or
–/+ buttons.
Checkboxes
Checkboxes have two states: checked and unchecked (enabled or disabled,
respectively).
To check or uncheck a checkbox, tap it.
Tabs
Some modes have buttons at the bottom of the screen that let you cycle
through several similar tabs. For instance, you could view the send level that
is routed to each of four returns—each level is shown on a separate tab. With
each tap, you will move to the next tab, indicated by the squares below it.
To select a tab, tap it. Each time you tap it, it will select the next tab.
39
Page 40

Sliders
To adjust the position of a slider, do any of the following:
• Tap and drag the slider to the desired position.
• Tap the desired position (this works only on some sliders).
• Tap the slider to select it, and then use the data dial or –/+ buttons
to adjust the position (this works only on some sliders).
• Double-tap the slider, and then tap and drag the larger version that
appears, or use the data dial or –/+ buttons to adjust the value. Tap
anywhere else to return to the previous screen.
Envelopes
To set the stages of an envelope, do either of the following:
Tip: Tap the expand-rectangle icon above the envelope to show a close-up view.
• Tap and drag a “handle” of an envelope stage in the desired direction.
• Set the numeric value of an envelope stage by adjusting or entering it as a parameter value (described
earlier).
The Filter/Envelope tab in Track Edit Mode.
40
Close-up of an AD-type filter envelope. Close-up of an AHDS-type amp envelope.
Page 41

Event View Tools
In the Event View in Clip Mode, these four icons enable you to use different functions in the grid.
Tap one to select its mode:
Pencil: Draw Mode:
To enter a note in an empty grid square, tap the grid square.
To select a note, tap it.
To move a note, tap and drag it to another grid square.
To erase a note, double-tap it.
Eraser: Erase Mode:
To erase a note, tap it. You can also tag and drag to erase multiple notes in the same row.
Select Box: Select Mode:
Note: Notes will remain selected if you switch to another mode. The selection will change, however, if you
press a pad while Hitting Pad Selects All Events is set to On.
To select a note, tap it.
To select multiple notes, tap and drag across the grid to create a box around them.
To move a note, tap and drag it to another grid square.
To move multiple notes, select them as described above, and tap and drag them.
To erase multiple notes, select them as described above, and then select the eraser tool and tap any of
the selected notes.
Magnifying Glass: Navigation Mode:
To move to another part of the grid, tap and drag it.
To zoom in or out, spread or pinch your fingers (respectively) on the grid. You can do this vertically,
horizontally, or both at the same time.
41
Page 42

Audio Region Edit Tools
In Audio Region Edit Mode in Clip Mode, these six tool icons enable you to use different functions in the waveform.
Tap one to select its mode:
Marquee: Marquee Mode:
To select a track region, tap the upper third of it.
To select multiple track regions, tap and drag across the grid to create a box that highlights them.
To move a track region (or multiple selected track regions), tap and drag the upper third of it left or right.
To split the track at two specific points (creating a track region on either side and between them), tap and
drag across the middle third of it to create a translucent white box, and then tap the upper third of that box.
To shorten or lengthen a track region (or multiple selected track regions), tap and drag the lower third of it
left or right.
Arrow: Selection Mode:
To select a track region, tap it.
To move a track region (or multiple selected track regions), tap and drag the upper third of it left or right.
To shorten or lengthen a track region (or multiple selected track regions), tap and drag the lower third of it
left or right.
Eraser: Erase Mode:
To erase a track region (or multiple selected track regions), tap it.
Scissors: Split Mode:
To split the track at a specific point (creating a track region on either side), tap that point in the track.
To select a track region, tap its left-most edge.
Mute: Mute Mode:
42
To mute or unmute a track region (or multiple selected track regions), tap it.
Magnifying Glass: Navigation Mode:
To move to another part of the track, tap and drag it.
To zoom in or out, spread or pinch your fingers (respectively) on the grid. You can do this vertically,
horizontally, or both at the same time.
Page 43

Pad Modes
In addition to the various control functions used in the display, Force features three different control modes for the 8x8
grid of clip launch pads: Launch Mode, Note Mode, and Step Sequencer Mode. You can also control Launch and
Note Modes at the same time using Launch & Note Mode.
These modes are accessed by pressing their respective Launch/Config, Note/Config, and Step Seq/Config buttons
on the Force hardware. At any time, you can also temporarily view any of the pad modes by pressing and holding the
Launch, Note, or Step Seq buttons. This allows you to quickly make changes such as launching a different clip or
editing the step sequencer.
Launch Mode
Launch Mode is used for launching and working with clips. The image
to the right shows the pads in Launch Mode. The brightly lit pads each
represent clips in the respective track columns.
To enter Launch Mode, press the Launch button. In Launch Mode,
you can do any of the following:
To launch a clip, press the clip launch pad.
To select a clip, hold Select and press a pad.
To create a new clip, hold Select and double-press an empty pad.
To copy a clip, hold Copy and press the pad you want to copy. Keep holding Copy and press the pad where you
want to copy the clip.
To delete a clip, hold Delete and press the pad you want to delete.
To set the quantization of launching clips, hold Shift and press one of the Track Select buttons. The time
division values are printed beneath them.
Launch Configuration
Press and hold Shift and press the Launch/Config button to open the
Launch Configuration window.
Use the Default Length (Bars) field to set the default length of
new clips in bars.
Use the Empty Slots field to set the appearance of the clip
launch pads that do not have a clip loaded.
Check Tapping a clip selects it to automatically select a clip for
editing when tapped. When unchecked, tapping a clip will only
launch it.
43
Page 44

Note Mode
Note Mode is used for playing drum kits or melodic tracks like keygroups or plugins.
To enter Note Mode, press the Note button while a drum, keygroup, plugin, MIDI or CV track is selected. The
appearance of the clip launch pads will change depending on the type of track selected. When a drum track is selected,
the clip launch pads will appear in Drum Note Mode; when a keygroup, plugin, MIDI or CV track is selected, the clip
launch pads will appear in Melodic Note Mode.
Drum Note Mode
In Drum Note Mode, each quadrant of clip launch pads can be used
like a traditional 4x4 drum pad layout to play samples. The image to
the right shows a traditional layout when using Drum Note Mode.
In Drum Note Mode, you can do the following:
To play a sample, press any of the lit clip launch pads.
To change pad banks, hold Shift and press the Track Assign
buttons labeled Oct- and Oct+.
To select a pad, hold Select and press it.
To edit a sample in Track Edit Mode, hold Edit and press a pad.
To copy a sample, hold Copy and press the pad you want to
copy. Keep holding Copy and press the pad where you want to
copy the sample.
To delete a pad, hold Delete and press the pad you want to
delete.
To mute a pad, hold Mute and press the pad you want to mute.
To solo a pad, hold Solo and press the pad you want to solo.
To set the quantization of launching clips, hold Shift and press
one of the Track Select buttons. The time division values are
printed beneath them.
Drum Note Configuration
Press and hold Shift and press the Note/Config button to open the
Drum Note Configuration window, where you can adjust the settings
of the drum pads.
Use the Velocity field to set the velocity level of the drum pads.
Select As Played for responsive velocities, or select Half level or
Full level for fixed level velocities.
Use the Bank field to select the drum bank currently in view in the
bottom left quadrant.
44
Page 45

Melodic Note Mode
In Melodic Note Mode, the clip launch pads can be used like a
traditional keyboard controller to play melodic notes and chords. For
instance, the image to the right shows the clip launch pads set to play
a scale in Melodic Note Mode. The pads with bright colors are the
root notes of the scale, and the white pads in between are the other
degrees of the scale.
To play a note, press a clip launch pad.
To change the starting octave, hold Shift and press the Track
Assign buttons marked Oct-/Oct+.
Melodic Note Configuration
Press and hold Shift and press the Note/Config button to open the
Melodic Note Configuration window, where you can adjust the
settings of how the notes or chords are laid out on the clip launch
pads.
Use the Type selector to determine what will be mapped over the
pads:
• Chromatic: Each pad is assigned a note, ascending by one
semitone with each pad.
• Scales: Each pad is assigned a note, ascending by one scale
degree with each pad.
• Harmonize: Each pad is assigned a chord, with the root note ascending by one scale degree with each pad. All
available chords will play in the key determined by the Scale.
• Chords: Each pad is assigned a chord, with the root note ascending by one scale degree with each pad. You
can play any chord type regardless of the key determined by the Scale. Essentially, this is like the Harmonize
setting but with more options to play chords out of the set key.
• Progressions: Each pad is assigned a chord in a chord progression. You can play the pads in (or out of) order
to construct songs quickly. The available chords are determined by the Progression field.
• Tonnetz: Each pad is assigned a note, ascending by a perfect fifth (7 semitones) going left to right along each
row of pads, and ascending by a minor third (3 semitones) going from bottom to top along each column of
pads.
• Guitar: The bottom six rows of pads are organized like a six-
string guitar, with notes ascending E-A-D-G-B-E from bottom
to top in the first column of pads, and ascending by one
semitone with each pad in each row.
• Bass: The bottom six rows of pads are organized like a six-
Note: For Guitar, Bass and Piano types,
changing the Root Note or Scale will not
affect the layout of notes on the pads, but
will change the highlighted root and scale
notes according to the selection.
string bass, with notes ascending B-E-A-D-G-B from bottom
to top in the first column of pads, and ascending by one
semitone with each in pad in each row.
• Piano
: Every two rows of clip-laun
ch pads are organized like
the traditional white-and-black keys layout of a piano, with
the lower row representing the white keys and the upper row
representing the black keys.
Note: You can also press and hold the Note button while in Note
Mode to quickly select a Type on the display.
45
Page 46

r
r
r
A
r
r
A
r
r
Use the Pad Rows field to determine how the notes are laid out on Force's 8x8 pad grid:
Continuous Start on 5th Start on 3rd
Start on root Start on 4th Start on 2nd
Use the Base Note and Octave fields to set the starting point of the scale (pitch and register). The available notes are all
chromatic notes across the range of the pads. The pad that’s assigned the root note will be lit differently to indicate
where the scale starts in each octave.
Use the Scale field to set the scale or mode based on the root note (this is disabled when Type is set to Progressions).
The available scales are:
Majo
Blues Major Bebop Lydian
Natural Mino
Harmonic Mino
Pentatonic Majo
Pentatonic Mino
Flamenco Whole Tone Mixolydian
Gypsy Chromatic
eolian
Hungarian Gypsy Dorian Locrian
Persian Phrygian
Use the Velocity field to set the velocity of the pads when played:
s played 26% 53% 80%
6% 33% 60% 86%
13% 40% 66% 93%
20% Half 73% Full
Use the Scale Chord and Chromatic Chord fields to determine what chord type will play when pressing a pad. The chord
will use those scale degrees based off of the pad’s root note. You can use this only when the Type is set to Harmonize or
Chords.
When set to Harmonize, the available Scale Chords are:
1-3-5 (major/minor) 1-3-5-7 (major7/minor7)
1-4-5 (sus4) 1-3-5-7b (dominant)
1-2-5 (sus2)
When set to Chords, the available Chromatic Chords are:
Majo
Major7 Augmented
Mino
Minor7 Diminished
Sus2 Major9
Sus4 Minor9
46
Page 47

Launch & Note Mode
In addition to using the entire 8x8 pad matrix for Launch Mode or Note Mode, you can split the rows of clip launch pads
into half Launch Mode and half Note Mode.
To enter Launch & Note Mode, press the Launch and Note buttons
at the same time.
The top four rows of pads can be used for launching clips, and the
bottom four rows of pads can be used for melodic or drum note
playing, depending on the track selected.
In this mode, you can perform any of the same actions that you would
in either Launch Mode or Note Mode.
Launch & Note Mode
(Melodic Note Mode)
Launch & Note Mode
(Drum Note Mode)
47
Page 48

Step Sequencer
The Step Sequencer pad mode is used to create or edit clips by using the pads as "step buttons," simulating the
experience of a traditional step-sequencer-style drum machine. This pad mode is often used in conjunction with the
Step Sequencer mode on the display, but can be used while any mode is on the display.
To enable Step Sequencer pad mode, press the Step Seq button. Each time you press this button, the pads will cycle
through three different appearances: Drum Mode, Melodic Mode, and Lanes Mode. See below for more details.
Press and hold the Step Seq button to do any of the following:
Quickly select a Step Sequencer Mode using the Step Seq Mode window that appears.
Use the top row(s) of pads to select the active page of the step sequencer. The number of pages available depends
on the selected step size and the number of bars in the clip.
Use the bottom row of pads to select the beat division for the Step Size. The right-most pad can be used to enable
or disable Triplet beat divisions.
Hold Shift and press Step Seq/Config button to open the Step
Sequence Configuration window. In addition to these common
settings, some Step Sequencer modes have additional settings
available in this window, described below.
Use the Mode field to set the Step Sequencer pad mode: Drum,
Melodic or Lanes.
Use the Velocity field to set the velocity of new steps being
entered. Select As Played for responsive velocity, or select one of
the preset levels for fixed velocity of all steps.
Use the Step Size field to set the beat division for each step.
Drum
In Drum Step Sequencer Mode, the lower left quadrant of pads is
used like a traditional 4x4 drum pad layout to play samples.
Press a clip launch pad to select it. Doing so will also play back
the pad's sample. If you would like to select a pad without
sounding the sample, hold Select and press the pad.
Hold Shift and press the Track Assign buttons marked Oct-/
Oct+ to change the active pad bank.
The lower right quadrant of pads is used to quickly set the velocity of
new steps.
Press the lower-left pad to select As Played for responsive
velocity, or press the other pads to set a fixed velocity from low
(6%) to high (Full), going left-to-
right.
The top four rows of pads represent the steps in the clip. The number of pads available depends on the Step Size
setting.
Press a pad to insert a step at that beat for the selected drum sample. The top four rows will be lit dimly with the
color of the selected drum sample.
Hold Shift and press Step Seq while in Drum Step Sequencer Mode to configure its settings. These are the same as
mentioned above.
48
Page 49

Melodic
In Melodic Step Sequencer Mode, the bottom four rows of the pads
are used like Melodic Note Mode, with the pads representing notes
in a scale.
Press a clip launch pad to select a note. The currently selected
note will be lit bright white.
Hold Shift and press the Track Assign buttons marked Oct-/
Oct+ to change the octave.
The top four rows of pads represent the steps in the clip. The number
of pads available depends on the Step Size setting.
Press a pad to insert a step at that beat for the selected note.
Hold Shift and press Step Seq to open the Configuration window. In
addition to the fields mentioned above:
Use the Note Settings fields to set configure the Root Note,
Scale and starting Octave.
Lanes
In Lanes Step Sequencer Mode, each column of pads represents one
beat division, and each row of pads represents one drum sample in a
drum bank or one note in a scale, depending on the type of track
selected.
Press a clip launch pad to insert a step at that beat division for
the respective drum sample or note.
Hold Shift and press the Track Assign buttons marked Oct-/
Oct+ to change the octave or starting pad.
Hold Shift and press Step Seq to open the Configuration window. In
addition to the fields mentioned above:
• When a drum track is selected:
Use the Base Pad field to set the starting pad for the 8
rows of clip launch pads.
• When a keygroup, plugin, MIDI or CV track is selected:
Use the Base Note field to set the starting note for the 8
rows of clip launch pads.
Use the Note Settings fields to set configure the Root
Note and Scale.
49
Page 50

Tracks
About Tracks
Each clip you create within a project is routed through a track. There are six
types of tracks, each of which determines how the clip sounds or what it is used
for. A single project can hold up to 128 tracks.
This chapter covers how to create each track type.
To learn about editing your tracks to your preference, see the Modes > Track
Edit Mode chapter.
An Audio track lets you record audio from an external source or by resampling another track to create a clip.
See Audio Tracks for more information.
A drum track uses one or more samples as its sound source. It contains (1) a list of samples and (2) the
settings for each sample (i.e., pad assignments, loop points, pitch tuning, effects, etc.). Drum tracks are used
mostly for creating drum parts and quickly and easily assigning samples to pads. See Drum Tracks for more
information.
A plugin track contains an instance of a plugin through which you can send your track’s MIDI data. See
Plugin Tracks for more information.
A keygroup track uses one or more samples as its sound source. It contains (1) a list of samples and (2) the
settings for each sample (i.e., pitch tuning, effects, etc.). Keygroup tracks are used to play samples
chromatically with a MIDI keyboard or the Force pads. See Keygroup Tracks for more information.
A MIDI track lets you send your track’s MIDI data to an external MIDI device like a synth or drum machine.
See MIDI Tracks for more information.
A CV track lets you send your track’s MIDI data to an external device that uses control voltage (CV), like a
synth. See CV Tracks for more information.
50
Page 51

Audio Tracks
An audio track uses recorded or imported samples as its sound source.
To create an audio track:
1. Press Matrix to enter Matrix Mode.
2. At the top of the screen, press the + icon to add a new track.
If you cannot see the + icon, press the right cursor to move the matrix
view until it is shown.
3. In the window that appears, turn the data dial to select Audio as the track
type.
Use the Input field to select which inputs the audio track will use.
Check the Ascending box to determine if the channel numbers of the
input sources will ascend across the new audio tracks you create. When
checked, the first new audio track will use the input source you set above
(e.g., Input 1), the second new audio track will use the next input source
(e.g., Input 2), etc. When unchecked, all of the new audio tracks you
create in this instance will use the same input source. This feature is
relevant only if you are creating more than one new audio track
(determined by Number of Tracks below).
Check the Record Enable box to set the new track to be automatically
record enabled.
Use the Input Monitoring field to set the monitoring behavior: Off, On, or
Auto.
If you would like to create more than one drum track at once, use the
Number of Tracks field to select how many tracks you would like to
create.
4. Tap Do It to confirm, or tap Close, the X or outside the window to go
back. A new drum track will be created and appended with a number
(e.g., Audio 002).
Alternatively, press and hold the track select button of an unused track, then tap Audio.
To edit the track settings, double-tap the track name at the top of the screen to open the Track Settings window.
To rename the track, tap the track name field and use the virtual keyboard that appears to enter a new name, and
then tap Do It to confirm or the gray bar at the top of the screen to cancel.
To change the track color, tap the color field and use the data dial or -/+ buttons to scroll through the options. You
can also double-tap the color field and then swipe up or down, or use the data dial or -/+ buttons to scroll through the
options.
51
Page 52

Drum Tracks
A drum track uses one or more samples as its sound source. It contains (1) a list of samples and (2) the settings for each
sample (i.e., pad assignments, loop points, pitch tuning, effects, etc.). Drum tracks are used mostly for creating drum
parts and quickly and easily assigning samples to pads.
To create a drum track:
1. Press Matrix to enter Matrix Mode.
2. At the top of the screen, press the + icon to add a new track.
If you cannot see the + icon, press the right cursor to move the matrix
view until it is shown.
3. In the window that appears, select Drum as the track type.
If you would like to create more than one drum track at once, use the
Number of tracks field to select how many tracks you would like to
create.
4. Tap Do It to confirm, or tap Close, the X or outside the window to go
back. A new drum track will be created and appended with a number
(e.g., Drum 002).
Alternatively, press and hold the track select button of an unused track, then tap Drum.
To edit the track settings, double-tap the track name at the top of the screen
to open the Track Settings window.
To rename the track, tap the track name field and use the virtual keyboard
that appears to enter a new name, and then tap Do It to confirm or the gray
bar at the top of the screen to cancel.
To change the track color, tap the color field and use the data dial or -/+
buttons to scroll through the options. You can also double-tap the color
field and then swipe up or down, or use the data dial or -/+ buttons to
scroll through the options.
To edit the pad colors, uncheck the Pads follow track color field, then
tap the Edit Pad Colors button. (See Modes > Pad
Color Mode to learn
more about editing pad colors).
To load a kit into a drum track:
1. Press Load or press Menu and tap Browser to show the Browser.
2. Find and select a kit, and then tap Load to load it to the track. Repeat this for any other kits or samples you want to
load into the project. (See Modes > Browser to learn more about using the Browser specifically.)
Tip: Remember that a drum kit has 128 pads total—16 pads across eight banks.
52
Page 53

Alternatively, assign samples in a drum track in Track Edit Mode in one of these two ways:
1. Press Menu, and then tap Track Edit to enter Track Edit Mode. Alternatively, press and hold Shift and press Clip.
2. Tap the Samples tab. This lets you view the samples assigned to all four layers of the current pad as well as tuning
and level parameters for each layer.
3. Tap a pad to select it (and play its assigned samples, if any).
4. Tap one of the Layer fields under the sample waveform to select a layer. Tap the Sample field, and then use the
data dial or –/+ buttons to select a sample. Alternatively, double-tap the field for a layer, and then tap a sample to
select it.
1. Press Menu, and then tap Track Edit to enter Track Edit Mode. Alternatively, press and hold Shift and press Clip.
2. Tap the Pan Velocity tab. This lets you view the samples assigned to all four layers of the current pad as well as
panning and velocity ranges of each layer.
3. Tap a pad to select it (and play its assigned samples, if any).
4. Tap one of the Layer fields to select a layer, and then use the data dial or –/+ buttons to select a sample.
Alternatively, double-tap the field for a layer, and then tap a sample to select it.
53
Page 54

Keygroup Tracks
A keygroup track uses one or more samples as its sound source. It contains (1) a list of samples and (2) the settings for
each sample (i.e., pitch tuning, effects, etc.). Keygroup tracks are used to play samples chromatically with a MIDI
keyboard or the Force pads.
To create a keygroup track:
1. Press Matrix to enter Matrix Mode.
2. At the top of the screen, press the + icon to add a new track.
If you cannot see the + icon, press the right cursor to move the matrix
view until it is shown.
3. In the window that appears, turn the data dial to select Keygroup as the
track type.
If you would like to create more than one keygroup track at once, use the
Number of tracks field to select how many tracks you would like to
create.
4. Tap Do It to confirm, or tap Close, the X or outside the window to go
back. A new keygroup track will be created and appended with a number
(e.g., Keygroup 002).
Alternatively, press and hold the track select button of an unused track, then tap Keygroup.
To edit the track settings, double-tap the track name at the top of the screen to open the Track Settings window.
To rename the track, tap the track name field and use the virtual keyboard that appears to enter a new name, and then
tap Do It to confirm or the gray bar at the top of the screen to cancel.
To change the track color, tap the color field and use the data dial or -/+ buttons to scroll through the options. You
can also double-tap the color field and then swipe up or down, or use the data dial or -/+ buttons to scroll through the
options.
To transpose the keygroup track, tap the transpose field and use the data dial or -/+ buttons to set the transposition
amount.
54
Page 55

To assign samples in a keygroup track:
1. Press Menu, and then tap Track Edit to enter Track Edit Mode. Alternatively, press and hold Shift and press Clip.
2. Tap Samples. This lets you view the samples assigned to all four layers of the current keygroup as well as tuning
and level parameters for each layer.
3. Tap the Number of KG field, and then use the data dial or –/+ buttons to set the number of keygroups in the track (1–
128). Alternatively, double-tap the Number of KG field, and then use the numeric keypad on the screen.
4. Tap the Keygroup field, and then use the data dial or –/+ buttons to select a keygroup. Alternatively, double-tap the
Keygroup field, and then tap a keygroup to select it.
5. Tap the field for a layer, and then use the data dial or –/+ buttons to select a sample. Alternatively, double-tap the
field for a layer, and then tap a sample to select it.
To create complex keygroup track, you can add more keygroups (up to 128). This is useful when working with multisamples (e.g., when programming a real piano).
Tip: Remember that a keygroup track offers up to 128 keygroups, and each keygroup can hold up to four samples
(Layers 1–4). This is a total of 512 samples.
55
Page 56

Plugin Tracks
A plugin track contains an instance of a plugin through which you can send your track’s MIDI data.
To create a plugin track:
1. Press Matrix to enter Matrix Mode.
2. At the top of the screen, press the + icon to add a new track.
If you cannot see the + icon, press the right cursor to move the
matrix view until it is shown.
3. In the window that appears, turn the data dial to select Plugin as
the track type.
If you would like to create more than one plugin track at once, use
the Number of tracks field to select how many tracks you would
like to create.
4. Tap Do It to confirm, or tap Close, the X or outside the window to
go back. A new drum track will be created and appended with a
number (e.g., Plugin 002).
Alternatively, press and hold the track select button of an unused track, then tap Plugin.
To edit the track settings, double-tap the track name at the top of the screen to open the Track Settings window.
To rename the track, tap the track name field and use the virtual keyboard that appears to enter a new name, and then
tap Do It to confirm or the gray bar at the top of the screen to cancel.
To change the track color, tap the color field and use the data dial or -/+ buttons to scroll through the options. You
can also double-tap the color field and then swipe up or down, use the data dial or -/+ buttons to scroll through the
options.
To transpose the plugin track, tap the transpose field and use the data dial or -/+ buttons to set the transposition
amount.
56
Page 57

To load a plugin to the track:
1. Double-tap the track name at the top of the screen to open the Track
Settings window.
2. Double-tap the Plugin field. In the list that appears, tap the desired
plugin. Alternatively, use the data dial or the –/+ buttons to select a
plugin.
To sort your plugins by type or maker, tap Type or Manufacturer.
3. Tap Select to select the plugin, or tap Close to cancel.
To select the MIDI channel the track will use, double-tap the MIDI Ch
field. In the list that appears, tap the desired channel. Alternatively, use
the data dial or the –/+ buttons to select a channel. Use this setting
when you are working with a virtual instrument plugin that supports multimode, or when an external device is controlling the track from a certain
MIDI channel.
To select a preset in your plugin (if any), double-tap the Preset field. In
the list that appears, tap the desired preset. Alternatively, use the data
dial or the –/+ buttons to select a preset.
Alternatively, use the Browser to load a plugin:
1. Press Load or press Menu and tap Browser to show the Browser.
2. Find and select a plugin preset, and then tap Load. A new plugin track will be created if no other tracks exist,
otherwise the currently selected track will be converted into a plugin track. Repeat this for any other plugins you
want to load into the project. (See Modes > Browser to learn more about using the Browser specifically.)
57
Page 58

MIDI Tracks
A MIDI track lets you send your track’s MIDI data to an external MIDI device like a synth or drum machine.
To create a MIDI track:
1. Press Matrix to enter Matrix Mode.
2. At the top of the screen, press the + icon to add a new track.
If you cannot see the + icon, press the right cursor to move the matrix
view until it is shown.
3. In the window that appears, turn the data dial to select Midi as the track
type.
If you would like to create more than one MIDI track at once, use the
Number of tracks field to select how many tracks you would like to
create.
4. Tap Do It to confirm, or tap Close, the X or outside the window to go
back. A new MIDI track will be created and appended with a number (e.g.,
Midi 002).
Alternatively, press and hold the track select button of an unused track, then tap MIDI.
To edit the track settings, double-tap the track name at the top of the screen to open the Track Settings window.
To rename the track, tap the track name field and use the virtual keyboard that appears to enter a new name, and then
tap Do It to confirm or the gray bar at the top of the screen to cancel.
To change the track color, tap the color field and use the data dial or -/+ buttons to scroll through the options. You
can also double-tap the color field and then swipe up or down, use the data dial or -/+ buttons to scroll through the
options.
To transpose the MIDI track, tap the transpose field and use the data dial or -/+ buttons to set the transposition
amount.
To select the MIDI channel the track will use, double-tap the MIDI Ch field. Use the number pad that appears to
enter a value from 1–16, then tap Do It. Alternatively, use the data dial or the –/+ buttons to select a channel.
To select a MIDI program change value for the track to send, double-tap the MIDI Program Change field. Use
the number pad that appears to enter a value from 1–127, then tap Do It. Alternatively, use the data dial or the –/+
buttons to select a value. Clips will send this value when launched.
58
Page 59

CV Tracks
A CV track lets you send your control voltage (CV) signals to an external device like a synth or drum machine that uses CV.
To create a CV track:
1. Press Matrix to enter Matrix Mode.
2. At the top of the screen, press the + icon to add a new track.
If you cannot see the + icon, press the right cursor to move the matrix
view until it is shown.
3. In the window that appears, turn the data dial to select CV as the track
type.
If you would like to create more than one CV track at once, use the
Number of tracks field to select how many tracks you would like to
create.
4. Tap Do It to confirm, or tap Close, the X or outside the window to go
back. A new CV track will be created and appended with a number (e.g.,
CV 002).
Alternatively, press and hold the track select button of an unused track, then tap CV.
To edit the track settings, double-tap the track name at the top of the screen to open the Track Settings window.
To rename the track, tap the track name field and use the virtual keyboard that appears to enter a new name, and
then tap Do It to confirm or the gray bar at the top of the screen to cancel.
To change the track color, tap the color field and use the data dial or -/+ buttons to scroll through the options. You
can also double-tap the color field and then swipe up or down, use the data dial or -/+ buttons to scroll through the
options.
To transpose the CV track, tap the transpose field and use the data dial or -/+ buttons to set the transposition
amount.
There are five additional settings to configure for a CV track: the CV Port, the Gate Port, the modulation wheel port
(Mod Wheel Port), Velocity Port and Note Priority. Tap each field and use the data dial or -/+ buttons to edit the
setting.
59
Page 60

Menu
The Menu lets you select any of the 14 modes or save your project. You can also use it to set your preferences, save
your project, set sync behavior or view your system resources.
To open the Menu, press Menu, or tap the icon in the upper-left corner of the screen while on the normal page of your
current mode.
When viewing the Menu, do any of the following:
To enter a mode, tap it.
To return to the previous mode, tap the gray area in the upper-left corner, or press Menu again.
Click a part of the screen above to skip directly to that part of this user guide.
60
Page 61

Save
To save the project, tap the folder icon at the top of the screen to open the Project window. The Project window
shows an overview of all samples and tracks in the current project.
To open a new project, tap New.
To save a project, tap Save or Save As. If a project has not been saved before, both options will open the Save
window, described below. If a project has been saved before, tapping Save will automatically overwrite the most
recently saved version.
To delete samples from the project (to create more free RAM space for sampling time, audio recording, etc.), tap
Purge. In the screen that appears, tap Unused Samples to delete all unused samples from the project, tap All
Samples to delete all samples from the project (from all kits and audio or MIDI tracks), or tap Cancel to return to the
previous screen.
To select the storage device you want to view, tap it in the Storage column on the left.
Internal is the internal drive of Force.
Force Documents is a shortcut to the Force Documents folder on the internal drive of Force.
If you have storage devices connected to USB ports or SD card slot of Force, they will appear in this column, as
well.
To enter a folder, double-tap it. Alternatively, turn the data dial or use the –/+ buttons to move through the list, and
press the data dial to enter a folder. You can also tap one of the five folder buttons in the upper-right to jump
immediately to those pre-assigned file paths (see Modes > Browser to learn how to do this).
To create a new folder, tap New Folder, use the virtual keyboard that appears to enter a name, and then tap Do It.
You will immediately enter the new folder.
To move up one folder level, tap the folder/ icon in the upper-left corner.
To name the file, tap the File Name field at the bottom of the screen, and use the virtual keyboard that appears.
To save the file, tap Save.
To save the file as a project template file, tap the Save as Template checkbox to check it before tapping Save.
(This file will be shown in the Template File field in the Preferences’ Project Load/Save tab.)
To cancel and return to the Menu, tap Cancel. Alternatively, tap the icon in the upper-left corner.
Alternatively, press Save to quickly save the Project, save the Project As a new save, create a New Project, or save
the Track.
61
Page 62

Preferences
To open the Preferences, tap the gear icon at the
top of the screen.
To return to the Menu, tap the icon in the upperleft corner. Changes to the Preferences are saved
automatically.
To restore your Force hardware’s default settings,
tap Reset. In the screen that appears, tap OK to
continue or Cancel to return to the Preferences. In the
next window, tap Save to save your current project
before restoring the default settings; tap Cancel to
return to the Preferences; or tap Don’t Save to
restore the default settings without saving your
current project.
Info
This screen shows current information about your Force hardware: its current firmware version, which includes its
standalone operating system (Force Firmware); its hardware Serial Number; and its current firmware for the Control
Surface.
To view legal information relevant to Force, tap Legal Info. For complete legal information, visit
akaipro.com/product-legal.
To enter Update Mode, press and hold Shift and tap Update. In the screen that appears, tap Save to save your
current project before entering Update Mode; tap Cancel to return to the Preferences; or tap Don’t Save to enter
Update Mode without saving your current project.
Wi-Fi
The settings on this screen will determine how your Force hardware’s wireless connection works, so you can use
Ableton Link, a new technology that synchronizes beat, phase and tempo of Ableton Live and Ableton Link-enabled
applications over a wireless or wired network. These settings are available only for Force when used in Standalone
Mode.
To activate or deactivate wireless connectivity on your Force hardware, tap the On/Off selector. The available
wireless networks will appear in the panel below it.
To select a wireless network, tap it.
To connect to a selected wireless network, tap Connect. If the Wi-Fi network is password-protected, use the
virtual keyboard that appears to enter the correct password to connect to it.
To view the information of a selected wireless network, press and hold Shift and tap Info. The Netwo
rk
Information window that appears will show the network name, IPv4/IPv6 address (including the subnet mask and
gateway), type of security, and signal strength (as a percentage).
To disconnect from a connected wireless network, tap Disconnect.
To clear the connection information (e.g., the password) from a selected wireless network, tap Forget.
62
Page 63

Bluetooth
The settings on this screen will determine how your Force hardware’s Bluetooth connection works, so you can use
Bluetooth MIDI controllers (e.g., LPD8 Wireless or LPK25 Wireless) or a Bluetooth computer keyboard with it. These
settings are available only when used in Standalone Mode.
To activate or deactivate Bluetooth connectivity on your Force hardware, tap the On/Off selector. The available
Bluetooth devices will appear in the panel below it under Available Devices. The Bluetooth devices that have
already paired to your Force hardware will appear under Paired Devices.
To select a Bluetooth device, tap it.
To pair a selected Bluetooth device (in the Available Devices section), tap Pair.
To connect to a selected Bluetooth device (in the Paired Devices section), tap Connect.
To disconnect from a connected Bluetooth device (in the Paired Devices section), tap Disconnect.
To return an available Bluetooth device to its original state, tap Remove.
Sequencer
The settings on this screen determine how sequencing works in the Event View and in the Step Sequencer.
Display Resolution: This is the display resolution (in PPQN—pulses per quarter note) of pulse values in certain areas
of the operating system. Please note that this setting affects the display resolution, not the timing.
Record Pad Aftertouch Events: When enabled, pad aftertouch data (from the Force hardware’s pressure-sensitive
pads) will be recorded. When disabled, pad aftertouch data will be ignored.
Place Events Recorded During Count-In at Start Point: When enabled, pressing a pad during the recording’s
pre-count will record that note event at the start of the recording (this is how the MPC3000 worked). When disabled,
no notes will be recorded until the pre-count is finished and recording has begun.
Note: This setting is ignored when recording with the Arpeggiator active.
Recording Note Length: This determines if/how events are cropped if they exceed the length of the current Clip when
recording:
Truncate to Clip Length: If the length of an event exceeds the length of the clip, it will be truncated. This
ensures that the event will not overlap itself when the clip loops.
Truncate to Clip End: If an event exceeds the length of the clip, it will be truncated to the end of the current
clip. In other words, the event will stop playing when the clip ends or loops.
As Played: Events will play back exactly as they were recorded, even if they overlap themselves when the clip
loops.
For example, if you record a note starting on the second bar of a 4-bar loop and
hold it for 5 bars, the note would end: at bar 7 (As Played), at bar 6 (To Clip
Length), or bar 4 (To Clip End). See image for details.
Bar 1 2 3 4 5 6 7 8
As played
To Clip Length
To Clip End
Playback Note Length: This determines if/how events are cropped if they exceed the length of the current Clip during
playback:
As Recorded: Events will play back exactly as they were recorded, even if they overlap themselves when the clip
loops.
Truncate to Clip Length: If the length of an event exceeds the length of the clip, it will be truncated. This
ensures that the event will not overlap itself when the clip loops.
Knob Swing Control Applies TC Settings on Release: When enabled, turning the knob assigned to Swing and
then releasing it will immediately apply that Swing setting. When disabled, you must use the Timing Correct window
to apply the Swing setting.
63
Page 64

A
Sync
The settings on this screen determine how your Force hardware synchronizes with connected USB and MIDI devices.
Receive: This determines whether your Force hardware receives MIDI Clock information (MIDI Clock), MIDI Time Code
information (MIDI Time Code (MTC)), communication from Ableton Link (Ableton Link), or none of these (Off).
Receive MMC: When enabled, your Force hardware will be able to receive MIDI Machine Control (MMC) information.
When disabled, your Force hardware will not receive this information. See Appendix > MIDI Machine Control
(MMC) to learn about this.
Send: This determines whether your Force hardware sends MIDI Clock information (MIDI Clock), MIDI Time Code
information (MIDI Time Code (MTC)), or neither (Off).
Send MMC: When enabled, your Force hardware will be able to send MIDI Machine Control (MMC) information. When
disabled, your Force hardware will not send this information. See Appendix > MIDI Machine Control (MMC) to learn
about this.
MTC Frame Rate: This determines the frame rate used by MIDI Time Code (MTC), which is important for correct
timing, especially when working on film scoring projects. In most cases, you should select 25.
Start Time: This is the starting time that will be sent when Send MIDI is set to anything other than Off. The time is
formatted in hours : minutes : seconds : frames.
Send Port 1: These are the MIDI ports over which MIDI Clock or MTC information will be sent.
Hardware
The settings on this screen determine the behavior of your Force hardware’s pads and touchscreen.
Empty Slots: This determines how the clip launch pads appear when no clip is loaded.
Track Select Buttons: This determines the behavior of the Track Select buttons
Pad Threshold: This determines how much force is required to strike the pads for them to trigger.
Pad Sensitivity: This determines how the pads respond to touch. At lower values, you
need to use more force to generate a high-velocity note. At higher values, it is easier to
generate high-velocity notes, even if you do not use much force while pressing a pad.
MIDI
Velocity
Pad Curve: This determines how striking the pads translates into velocity values. The A
curve is essentially linear, while the B, C, and
D curves are exponential (see graphic here).
Velocity & Aftertouch: View these meters when striking and pressing the pads to help
gauge the force and pressure you are applying to them. These meters are useful when
adjusting the Pad Threshold and Pad Sensitivity parameters (above).
Screen Dimming: This determines how much time must pass before your Force hardware
automatically dims its touchscreen.
Screen Brightness: This determines the brightness of the screen during normal operation: normal brightness (Day)
or dimmed (Night).
Date: This is the current date, formatted as Month / Day / Year. When saving files on Force in Standalone Mode,
the file will include the current date in its metadata.
Time: This is the current time, formatted as Hour : Minute. When saving files on Force in Standalone Mode, the file
will include the current time in its metadata.
pplied
Force
Time Zone: This is the current time zone, formatted as Continent / City, which you can change here.
Ethernet: This is the settings for connecting to the internet using the Link port:
Tap the Enabled box to establish to a wired internet connection.
Address Method: This determines how Force will connect using Ethernet. Select Automatic to have Force set
the Ethernet connection, or Manual to set it yourself. When setting the Ethernet connection manually, tap the IP
Address, Subnet Mask, Gateway, and DNS fields to input the values.
64
Page 65

Project Defaults
The settings on this screen determine various default values for any new project that you create.
New Project Dialog: This determines what options you see when you start a new project. When set to Off, a new
project will be empty with no preconfigured settings except for the project defaults shown here. When set to Demo,
you can choose to load a demo project (from several different genres) as a starting point or an empty project. When
set to Demo/Template/Recent, you can choose to load a demo project, a project template file, or an empty
project. You must have a project in the Template File field of the Project Load/Save tab to select a template in this
window.
Default Tempo: This is the default tempo in BPM.
Default Pad Slice: This determines how new samples will play when you load them or record them into a project.
When set to Pad, the Slice menu in Track Edit Mode will be set to Pad, which lets you set the start point, end point,
etc. for the layer. When set to All, the Slice menu in Track Edit Mode will be set to All, in which the entire sample
plays.
Default Drum/Keygroup Filter: This determines the default type of filter that drum and keygroup tracks will use.
See Appendix > Glossary > Filter to learn about this.
Default Plugin Synth: This determines the default instrument plugin that a new plugin track will use. Use the
window that appears to select it.
Project Load/Save
The settings on this screen determine if (and how) projects are automatically saved.
Auto Save Enabled: When enabled, your project will automatically save after each Timeout interval. When
disabled, your project will not be automatically saved; you may save only manually.
Timeout: Use this field to select how often your project will automatically save.
Template File: Use this field to select a project template that will load automatically when you select User
Template in the New Project Dialog window. (If you select the Save as Template box when saving a file, it will be
shown in this field.) In order for the User Template option to be available, New Project Dialog (in the Project
Def
aults tab) must be set to Demo or Demo/Template/Recent.
Record/Export
The settings on this screen determine the settings for recording and exporting audio.
Recording Bit Depth: This determines the bit depth of recorded audio.
General
The settings on this screen determine how other features work in the hardware and operating system.
Tap Tempo: This determines how many times you have to press the Tap button before the new tempo is
recognized.
Flash Tap Tempo Light: When enabled, the Tap button’s light will flash in time with the tempo. When disabled, the
Tap button’s light will be off.
Filter ‘All Notes Off’ CC: When enabled, “All Notes Off” (“MIDI panic”) messages will be ignored. This is useful if
you are using an external MIDI device that can send these types of messages but you want to filter them out. When
disabled, “All Notes Off” messages will be received normally.
Vintage Mode: This determines the type of emulation applied to the audio output. You can apply the particular
sonic qualities of, for example, the MPC3000 or MPC60, or of course no emulation (None).
Audition Auto Play: This determines how long a sample will sound when auto-previewing it.
65
Page 66

Audition Outputs: This determines which pair of outputs will play any auditioned sounds. These sounds include:
samples, tracks, and projects in the Browser; sample playback, Cue Preview, and Slice Preview in Sample Edit
Mode; and sample playback in the Keep or Discard Sample window in the Sampler.
Cue Preview: This determines if/how audio is played as you move the cue playhead. As you move the cue playhead
through a sample waveform, you can set it to play the small part of the sample before the cue playhead (Before),
play the small part of the sample after the cue playhead (After), or not play at all (Off). You can also set this in
Sample Edit Mode (see Modes > Sample Edit Mode > Settings).
Slice Preview: This determines if/how audio is played as you move a slice marker. As you move the slice marker
through a sample waveform, you can set it to play the small part of the sample before the slice marker (Before), play
the small part of the sample after the slice marker (After), or not play at all (Off). You can also set this in Sample Edit
Mode (see Modes > Sample Edit Mode > Settings).
Audio Warp Algorithm: This determines how a sample is “warped” when you adjust the length of a sample without
changing its pitch (e.g., the Warp function in Audio Region Edit Mode for audio tracks or in Track Edit Mode for clip
tracks).
Note: The Warp algorithms are very CPU-intensive and can result in audio drop-outs during playback if used too
freely. Be mindful of how (and how often) you use the warp function. You can reduce the CPU resources required by
using the Basic warp algorithm, which is less CPU-intensive.
Audio Track Auto Warp: This determines how recorded audio track regions are warped. When set to On, any audio
track region that you record will be warped automatically to match the current project tempo. You can then adjust
the project tempo while the audio track region remains in time.
Note: When you record an audio file, the current project tempo will be embedded with it. This information is stored
within the sample file when you save the project. When you warp an audio track region, the warping algorithm uses
this project tempo and the current value in the BPM field to generate the “stretch factor.”
BPM Auto Detection: This enables automatic detection of BPM from loaded samples.
BPM Detection Range: This defines the range of detectable BPM values when you use any automatic BPM
detection function in the software or when you press the Tap button to enter a new tempo.
Sync
Tap the Sync field (in the center of the top of the screen) and then turn the data dial or use the –/+
buttons to set whether your Force hardware receives MIDI Clock information (MIDI Clock), MIDI Time
Code information (MTC), communication from Ableton Link, or none of these (Off). Alternatively,
double-tap Sync and tap the desired option to select it.
This is the same setting as the Receive menu in Sync tab of your Preferences. See Preferences >
Sync for more information.
Note: Ableton Link is a new technology that synchronizes beat, phase and tempo of Ableton Live
and Ableton Link-enabled applications over a wireless or wired network. See Preferences > Wi-Fi or
Preferences > Hardware > Ethernet to learn how to connect to a network.
Mode
Tap this icon to switch Force to Computer Mode. In the screen that appears, select whether you want to
continue to Computer Mode or Cancel and return to your current mode and project. It is recommended
to save your project before switching to Computer Mode since you cannot freely switch between
Standalone and Computer Modes without also closing your current project.
See Standalone vs. Computer Mode to learn more.
66
Page 67

System Resources
Tap one of these icons to show the System Resources window for Force.
The indicators in this window show current usage statistics:
CPU: The CPU indicator shows the current CPU as a percentage.
RAM Usage: The Mem indicator shows your Force hardware’s current RAM usage.
Important: If you encounter a warning that there is not enough memory to complete an action while using your
Force hardware, do the following to make more memory available:
Make sure all audio tracks in your project are not record-armed.
Delete samples from your project’s sample pool that were there before the warning appeared.
If you are still seeing the warning, do the following:
1. Manually undo the last action you performed before seeing the warning (you may not be able to use the Undo
button for this due to how the undo history is stored in RAM).
2. Save your project.
3. Do one of the following, and then load your saved project again.
• In Main Mode, tap the folder icon at the top of the screen, and then tap New at the bottom of the screen.
• Power your Force hardware off and then on again.
• Press Menu and then tap the gear icon to open the Preferences. In the Preferences, tap Reset at the
bottom of the screen, tap OK, and then tap Restart to reset the Preferences.
• Enter Computer Mode and then reenter Standalone Mode.
Important: Although you can load multiple files at once, any samples you load into a project will be automatically
converted to full-quality uncompressed audio files, so they may use more storage space than they do on your
external storage device. If you are unable to load multiple files at once due to this, select fewer files and try again.
Drives: The Drives indicator shows the available storage space on any detected external storage devices or the internal
drive of Force.
To delete samples from the project (to create more free RAM space for sampling time, audio recording, etc.), tap
Purge. In the screen that appears, tap Unused Samples to delete all unused samples from the project, tap All Samples
to delete all samples from the project (from all kits, audio or MIDI tracks), or tap Cancel to return to the previous screen.
To close the System Resources window, tap OK, the X in the upper-right corner, or anywhere outside the window.
67
Page 68

Timing Correct (TC)
The Timing Correct window contains various settings to help quantize the events in your project. You can quantize
note events on MIDI tracks or track regions on audio tracks (though you cannot apply all types of quantization to audio
tracks).
To open the Timing Correct settings:
Press and hold Shift and press the track 6 Track Assign button.
In Step Sequencer Mode or Clip Edit Mode, tap TC at the bottom of the screen.
In Event Edit Mode or Audio Region Edit Mode, press and hold Shift and tap TC at the bottom of the screen.
In List Edit Mode, tap TC at the top of the screen.
To apply the settings you selected, tap Do It.
To cancel and return to the previous screen, tap Close.
Use the Type selector to set how timing corrections are applied.
• Start: The start points of note events or audio track regions will be extended or shortened to align with the
closest time division marker in the grid. The end points will remain untouched. You can apply this to MIDI tracks
or audio tracks.
• End: The end points of note events will be extended or shortened to align with the closest time division marker
in the grid. The start points will remain untouched. You can apply this to MIDI tracks only.
• Length: The end points of note events will be extended or shortened so that each event’s length is a multiple of
the time division, regardless of where it is in the grid. The start points will remain untouched. You can apply this
to MIDI tracks only.
• Legato: The end points of note events will be extended or shortened to create a long, unbroken phrase from the
first note event’s start point to the last note event’s end point. Each note event will sustain until another note event
starts. If multiple note events start at the same time (and are not the last note events), their lengths will become
identical. Selecting Legato disables all other options in this window. You can apply this to MIDI tracks only.
68
Without legato applied. With legato applied.
Page 69

Use the Time Division selector to set the quantization value. Events will “snap” to these time divisions on the grid. The
T indicates a triplet-based value.
Use the Swing field to set the amount of swing from 50% to 75%. Swing lets you “shuffle” your beats—from subtle to
extreme.
Use the Shift Timing field to shift all events by clock ticks.
Use the Window field to set how many events around a quantize value will be quantized. Any events outside this range
will not be quantized; events inside will.
Use the Strength field to set how strictly events will be quantized (i.e., shifted toward the quantize value). Lower values
move events a little bit towards the closest quantize value, resulting in a less mechanical feel than a strict quantization (a
higher value).
Use the Events selector to set the target range for the time correction.
You can apply the time correction to All note events or to just the
Selected ones.
To select note events to which to apply time correction, either use the
various tools in Event View or Region View or press the pad with the
desired events (while Hitting Pad Selects All Events is set to On).
You must do this before opening the Timing Correct window.
When Range is selected, you can define the locations (From and To)
as well as the pads or keys that will be quantized.
69
Page 70

Metronome (Click/Metro)
The Click/Metro window contains all settings regarding the metronome (click track).
To open the metronome settings, press and hold Shift and press the track 5 Track Assign button.
Use the Count-In field to set if/when the metronome counts before recording.
• Off disables the metronome pre-count.
• Record enables the pre-count during recording only.
• Record + Play enables pre-count in both Record and Playback Modes.
Use the Enable field to set if/when the metronome is enabled.
• Off disables the metronome.
• Play enables the metronome sound during playback only.
• Record enables the metronome sound during recording only.
• Record + Play enables the metronome to happen in both Record and Playback Modes.
Use the Rate field to select the metronome click’s time division: 1/4, 1/4T, 1/8, 1/8T, 1/16, 1/16T, 1/32 or 1/32T.
T indicates a triplet-based time division.
Use the Sound field to select the sound that you want to hear for the metronome: Sidestick 1, Sidestick 2, Clap,
Metroclick, Shake, Tambourine, or Force Click.
Use the Volume knob to set the volume of your metronome click.
Tap the On/Off butt
on to enable or disable the metronome.
Use the Output field to set which pair of outputs will play the metronome click: Out 1,2, Out 3,4 or an individual Out
1–4.
70
Page 71

Automation
You can set the automation for individual tracks to be “written,” “read,” or disabled entirely by using the track
automation button in the channel strip in the Mixer.
Tap the track automation button to cycle through its three states:
When off, the track will ignore automation data. If you have already recorded or entered automation,
tapping this will switch between Read (R) and Write (W) only, but you can override this and turn it off
by pressing and holding Shift while pressing or tapping the button.
Important: If you have already recorded automation and turn it off, the track will still use the effect
and its parameter values at the point where you turned it off.
When set to Read (R), the track will read automation data but will not record any additional
automation over it. (Think of this as a protective feature to prevent accidental changes to your
automation while recording.)
When set to Write (W), the track can record automation. (If you have any knobs assigned to
automatable parameters, make sure not to touch any accidentally while you are recording.)
To quickly clear automation from a track:
1. Make sure the track is selected by pressing and holding its Track Select button.
2. Hold Shift and press the Track 4 Track Assign button, with Clear Automation written underneath.
3. All automation on the track will be immediately removed.
Alternatively, you can delete individual automation events using List View in Clip Edit Mode.
71
Page 72

Arpeggiator
Force includes a full-featured arpeggiator and phrase player for melodic track types, as well as traditional note repeat
functionality.
To enable the arpeggiator, press the Arp button.
To configure the arpeggiator setting, hold Shift and press the Arp button to open the Arpeggiator window.
The Setup section of the Arpeggiator window sets what kind of arpeggiator will be used and its basic functions.
Use the Action field to set the type: Arp, Note Repeat, Rhythm and Pattern. See below for more details about
these types and their additional parameters.
Use the Time Division selector to set the note value of each arpeggiator step from 1/1–1/64 beats, including T
(triplet) variations. This parameter is not available when Action is set to Pattern.
Note: This setting is tied to the project's Time Division setting, and will not function if Time Division has been set to
Off.
Use the Note Length slider to set the length of the played note in each step, from 1–100%.
Use the Velocity field to set the velocity of the arpeggiator notes. Choose As played, From first note, Accented,
Full, 3/4, Half or 1/4.
Use the Swing field to set the amount of swing in the arpeggiator from 50% to 75%. Swing lets you "shuffle" your
beats—from subtle to extreme.
72
Page 73

The Arp mode section of the Arpeggiator window is available when
the Action is set to Arp. When this action is selected, hold down a
chord and the arpeggiator will play a pattern based on the notes held.
Use the Pattern field to set how the arpeggiator triggers the held
notes.
Use the Octaves field to set how many octaves of the held notes
the arpeggiator will cycle through.
Use the Variation field to apply rhythmic variation to the set
pattern.
The Rhythm section of the Arpeggiator window is available when
Action is set to Note Repeat or Rhythm. The Note Repeat action
provides traditional MPC Note Repeat behavior. When the Rhythm
arpeggiator action is selected, hold down a chord and the arpeggiator
will play the held notes in a rhythmic pattern.
Use the Spread field to spread the timing of the held notes,
creating a glissando effect.
Use the Rhythm Pattern field to choose the pattern played when
notes are held. This is only available for the Rhythm action.
The Pattern section of the Arpeggiator window is available when the
Action is set to Pattern. When this arpeggiator action is selected,
hold down a single note to trigger a melodic phrase. As you change
what note is held, the melodic phrase will be transposed.
Use the Pattern field to choose the pattern.
The Settings section of the Arpeggiator window offers additional
options to control the arpeggiator.
If you have a sustain pedal connected, you can enable Sustain
Pedal Latches to use it to control latching.
Use the Latch Mode setting to set the action of the sustain pedal,
either Reset or Add.
73
Page 74

Effects
You can apply various effects to the pads, keygroups, tracks and master outputs, using insert and send/return effects.
This chapter can help you get a good overall understanding of how the effects work.
See Appendix > Effects & Parameters for a list of all available effects (with a brief description of each) and their
editable parameters.
Overview
In a track, each pad or keygroup can have up to four insert effects applied to it. See Insert Effects > Pads or
Keygroups to learn more about this.
An entire track can also have up to four insert effects applied to it, as well. See Insert Effects > Tracks to learn more
about this.
Additionally, each pad, keygroup, and track can each be sent to (up to) four return channels, each of which can have
up to four insert effects of their own. Their audio will be routed through the insert effects on those returns, and the
processed audio will be sent to a master output. See Send/Return Effects to learn more about this.
Finally, you can apply up to four insert effects to each master output (a stereo pair of channels: Outputs 1/2 or
Outputs 3/4). See Insert Effects > Masters to learn more about this.
There are three other modes that handle effects differently:
• The Sampler can use up to four insert effects, which are applied to the audio as you record it. This means that
the effects cannot be “removed” from the sound later. Learn more about the Sampler in the Modes > Sampler
chapter.
• Similarly, the Looper can use up to four insert effects, which are applied to the audio as you record it. This
means that the effects cannot be “removed” from the sound later. Learn more about the Looper in the Modes >
Looper chapter.
• In XYFX Mode, the effects act like a single insert effect on that track. In fact, XYFX is the name of the insert
effect you have to load to the track before you can use this mode. Learn more about XYFX Mode in the Modes
> XYFX Mod
e chapter.
74
Page 75

To view, load, edit, or clear effects, tap the area under the Inserts
field. This usually appears in a channel strip (next to a level slider and
pan knob).
When viewing loaded effects, you will see this window:
To select an effect, use the field for each insert slot. A window
(described below) will appear.
To edit the parameters of a loaded effect, tap the pencil icon
next to the insert slot.
To clear the insert slot, tap the trash can icon next to it.
To enable or disable an effect slot, tap the On/Off button next
to it.
To disable all four effect slots, tap the All On/All Off button in the
upper-right corner. Tap it again to reactivate the previously active
effects.
When selecting an effect, you will see this window:
To move through the list, swipe up or down. Alternatively, use the
data dial or –/+ buttons.
To sort or unsort the effects by type or manufacturer, tap Type
or Manufacturer in the lower-left corner.
To load an effect, double-tap it. Alternatively, tap Select or the
data dial.
To cancel, tap Close or anywhere outside the list.
When you edit an effect, you will see this window:
To adjust a parameter, tap and drag its slider. Alternatively, use
the data dial or –/+ buttons. To make finer adjustments, doubletap the pad and adjust the larger version of the slider that
appears.
Tip: Set the Knobs to screen mode to quickly adjust the
corresponding parameters.
To select another page of parameters, tap tabs at the bottom of
the screen.
To enable or disable the effect, tap the On/Off button in the
upper-right corner.
To edit parameters for another insert effect on the same pad,
track, etc., tap the Insert -/+ buttons at the top of the screen.
To close the window, tap Close or the upper part of the screen.
75
Page 76

Insert Effects
Pads
You can load up to four insert effects to each pad. You can do this in the Pad Mixer or Track Edit Mode.
Tip: When using pad insert effects, they will be applied to the selected pad only. This means that you could apply
unique combinations of effects to each pad within a kit. If you want to apply the same effect to all pads, do this with a
track insert effect (see Insert Effects > Tracks).
To load a pad insert effect in the Pad Mixer:
1. Tap the Inserts & I/O tab at the bottom of the screen.
2. Press the desired pad to select it, or tap it on the screen. Swipe your finger to the left to scroll through the banks of
pads.
3. Tap an insert slot to open the effects window and use it to load or edit effects.
To load a pad insert effect in Track Edit Mode:
1. While using the desired track, press the desired pad to select it.
2. Tap the Effects tab in the lower-right corner, and use it to load or edit effects.
76
Page 77

Keygroups
You can load up to four insert effects to each keygroup. You can do this in the Pad Mixer or Track Edit Mode.
Important: When using keygroup insert effects, they will be applied to that keygroup only. Keep this in mind if you load
insert effects to multiple keygroups with overlapping note ranges—the effects will overlap in that range as well.
To load a keygroup insert effect in the Pad Mixer:
1. Tap the Inserts & I/O tab at the bottom of the screen.
2. Tap an insert slot to open the effects window and use it to load or edit effects.
To load a keygroup insert effect in Track Edit Mode, tap the Effects tab at the bottom of the screen and then use the
screen that appears to load or edit effects.
Important: Remember that the effect will be applied to that keygroup only.
77
Page 78

Tracks
You can load up to four insert effects to each track. You can do this in the Mixer or XYFX Mode.
Note: In XYFX Mode, the effects act like a single insert effect on that track. In fact, XYFX is the name of the insert effect
that is loaded when use this mode.
To load a track insert effect in the Mixer:
1. Tap the Inserts & I/O tab at the bottom of the screen.
2. Tap an insert slot to open the effects window and use it to load or edit effects.
To load XYFX for a track in XYFX Mode:
1. Select the desired track in another mode, and then enter XYFX Mode.
2. If you have not yet used XYFX Mode for this track, tap Insert XYFX on the screen to load it and show the XY pad.
Note: If you already have four insert effects loaded, you will need to clear one of the insert effect slots before doing
this.
If you have already used XYFX Mode for this track, the XY pad will appear.
3. Tap XYFX Location in the upper-left corner, and select Track.
4. If the Setup panel is not shown, tap Setup in the lower-right corner to show it.
5. Use the Preset field to load an effect. Use the controls below the Preset field to edit the effect.
78
Page 79

Masters
You can load up to four insert effects to each master output (a stereo pair of channels: Outputs 1/2 or Outputs 3/4).
You can do this in the Mixer.
To load a master insert effect in the Mixer:
1. Press the Master button to show the Returns and Master Outputs in the Mixer.
2. Tap the Inserts & I/O tab at the bottom of the screen.
3. Tap an insert slot to open the effects window and use it to load or edit effects.
79
Page 80

Send/Return Effects
Send/return effects work in the following way:
1. A pad or drum, keygroup, plugin or audio track sends its audio to a return at a designated send level.
2. That audio is processed by the effects on the return. Each return can have up to four insert effects loaded and
activated.
3. The processed audio is sent to a pair of master outputs (stereo) or a single master output (mono).
You can load send/return effects and set return levels only in the Track Mixer, described below. The rest of this section
describes the different ways to set the desired send levels for pads or tracks.
To load a send/return effect to a return:
1. In the Mixer, press the Master button on the hardware to show the Returns and Master.
2. Tap the Inserts & I/O tab at the bottom of the screen.
3. Tap an insert slot to open the effects window and use it to load or edit effects.
To set the return level:
1. In the Mixer, press the Master button on the hardware to show the Returns and Master.
2. Tap the Volume or Volume & Pan tab in the lower-left corner.
3. In the touchscreen, tap the track that corresponds to the desired return.
4. To adjust the level of the currently selected return, use the data dial or –/+ buttons. Alternatively, use the level
slider in the channel strip. To make finer adjustments, double-tap the track on the screen and adjust the larger
version of the slider that appears.
80
Page 81

Pads
You can set the send levels for individual pads in Track Edit Mode or the Pad Mixer.
To set the send levels for a pad in Track Edit Mode:
1. While editing the desired clip in Track Edit Mode, press the desired clip launch pad to select it.
2. Tap the Effects tab in the lower-right corner.
3. Use the Send knobs to set the send level for each return.
To set the send levels for a pad in the Pad Mixer:
1. Tap the Sends tab at the bottom of the screen.
2. Press the desired pad to select it, or tap it on the screen.
3. To set the send level, use the data dial or –/+ buttons. To make finer adjustments, double-tap the knob on the
screen and adjust the larger version of the knob that appears.
81
Page 82

Keygroups
You can set the send levels for keygroups in Track Edit Mode or the Pad Mixer.
To set the send levels for a keygroup in Track Edit Mode:
1. While using the desired track, press the desired pad to select its keygroup. Alternatively, use the Keygroup field at
the top of the screen.
2. Tap the Effects tab in the lower-right corner.
3. Use the Send knobs to set the send level for each return.
To set the send levels for a keygroup in the Pad Mixer:
1. Tap the Send tab at the bottom of the screen.
2. Press the desired pad to select its corresponding keygroup, or tap it on the screen.
3. To set the send level, use the data dial or –/+ buttons. To make finer adjustments, double-tap the pad on the
screen and adjust the larger version of the knob that appears.
82
Page 83

Audio and Plugin Tracks
You can set the send levels for audio and plugin tracks in the Mixer only.
To set the send levels for an audio or plugin track:
1. Tap the Send tab at the bottom of the screen.
2. In the touchscreen, tap the send knob in the desired track.
3. To set the send level, use the data dial or –/+ buttons. To make finer adjustments, double-tap the pad on the
screen and adjust the larger version of the knob that appears.
83
Page 84

V
r
A
A
A
A
A
Plugins
Force includes four new plugins from AIR Music Technology to help you get started making music right out of the box.
To learn more about plugin tracks, see Operation > General Features > Tracks > Plugin Tracks.
Bassline
The AIR Bassline plugin emulates the sound of classic mono synths,
with a contemporary twist.
Osc / Filter / Envelope
Use this tab to adjust the settings for the oscillators, as well as their
filter and envelope settings.
Parameter Description
alue Range
Oscillato
Sub-Octave
Waveform Continuously variable waveshape for the oscillator. Saw Octave, Saw, Square, Sine
mount of sub-octave oscillator. 0–100%
Fifth Amount of fifth-oscillator. 0–100%
Start Phase Position of the waveform when a note is triggered. Free, 0 degr., 180 degr.
Glide Time
mount of time to slide from the pitch of one note
10.0 ms – 2.00 s
to the next note played.
Boost Boosts the signal of the oscillator. 0.0 dB – 48.0 dB
Boost Freq. Center frequency of the boost. * 1.0 – * 240.0
Boost EnvelopeAmount of effect of the envelope on the Boost
section.
Gain 100–0%, Off, Frequency
0–100%
Adjust Gain to control the amount of boost.
Adjust Frequency to control the width of the
boosted frequency.
Filter LP Cutoff Cutoff frequency for the low-pass filter. 20.0 Hz – 20.0 kHz
Reso Resonance of the filter. 0–100%
Filter Env Envelope of the filter.
-100% – 0 – 100%
At negative values, decreases the cutoff value
based on the filter decay value.
At positive values, increases the cutoff value
based on the filter decay value.
HP Cutoff Cutoff frequency for the high-pass filter. 10.0 Hz – 500 Hz
Envelope
mp Attack Length of time for the note to reach full volume. 100–0% Soft to 0–100% Hard
mp Decay Length of time for the note to reach the sustained
0–100%
volume.
Filter Decay Length of time for the filter to reset after being
0–100%
released.
Pitch Mod
mount of pitch modulation applied to the
0–100%
envelope.
84
Page 85

V
V
A
A
V
A
A
Velocity / Master / Chorus
Use this tab to adjust the Velocity Control settings, Master volume. You can also apply and adjust the settings for the
built-in Chorus effect.
Parameter Description
alue Range
elocity
mp Control The amount of effect velocity has on amplitude
0–100%
control.
Filter Control The amount of effect velocity has on filter control. 0–100%
Boost Control The amount of effect velocity has on boost control. 0–100%
Env Retrigger Sets whether the envelope will retrigger when a note is
Off, On
played while another note is being held.
Master Master Volume Sets the volume level. -inf dB – +6.0 dB
Drive Type Choose one of two drive algorithms. Overdrive, Clip
Drive Amount
Bend Range Number of semitones up or down controlled by MIDI
mount of drive applied. 0–100%
0–12
pitch bend messages
Chorus Rate Modulation speed of the chorus effect. 0.40 Hz – 3.20 kHz
Depth Modulation depth of the chorus effect. 0–100%
Mix Wet/dry amount of the chorus effect. 0–100%
On/Off Enables or disables the effect. Off, On
Delay
Use this tab to apply and adjust the settings for the built-in delay effect.
Parameter Description
alue Range
Time Length of time of the delayed signal.
Sync
When Sync is set to Free:
When Sync is set to Sync:
Set to Free to adjust Time by milliseconds, or set to Sync to match the
1 ms – 2.00 s
1/32 – 8/4
Free, Sync
Delay Time to the Global Tempo.
Mix Wet/dry amount of the delay effect. 0–100%
Feedback
mount of signal fed back into the delay line. 0–100%
Damp Center frequency of where the delay signal will be dampened. 1.00 – 20.0 kHz
Reso
mount of resonance of the feedback signal. 0–100%
Reso Freq Center frequency for feedback resonance. 100 Hz – 10.0 kHz
Ratio
Reduces the delay Time in either the Left or Right stereo field. This is
L 50:100, R 50:100
useful for creating offset, panned delays.
HPF Center frequency for delay signal high-pass filter. 20.0 Hz – 1.0 kHz
Width Stereo width of delay signal. Higher values give wider stereo separation. 0–100%
On/Off Enables or disables the effect. Off, On
85
Page 86

V
r
A
Compressor / Hype
Use this tab to apply and adjust the settings for the built-in Compressor and Hype effects.
Parameter Description
alue Range
Compresso
Threshold Signal level after which the compressor will be applied. 0.0 – -60. dB
Ratio Amount of compression applied. 1.0:1 – 100.0:1
Output Amount of additional output gain for the compressed
0.0 – +30.0 dB
signal.
Mix Wet/dry mix of the compressor effect. 0–100%
Knee How gradually the compressor reacts as the threshold
0–100%
is reached.
Lower values apply a "soft" knee (compression is
applied more slowly as signal approaches the
threshold), and higher values apply a "hard" knee
(compression is immediately applied when the
threshold is reached).
Release Length of time for compressed signal to return to
ttack Length of time to apply the compression. 100 us – 300 ms
10 ms – 4.00 s
original level.
On/Off Enables or disables the effect. Off, On
Hype High Dampens or maximizes high end frequencies. -100 – 0 – +100%
Low Dampens or maximizes low end frequencies. -100 – 0 – +100%
On/Off Enables or disables the effect. Off, On
86
Page 87

V
A
Electric
The AIR Electric plugin emulates the sound of classic electric pianos.
While viewing any of the tabs listed below, you can quickly enable or
disable the Bell and Noise sounds, as well as the built-in effects
(Tremolo, Tube, Chorus, Delay and Spring Reverb).
When viewing a specific tab, you can enable or disable the sound or
effect by pressing the circle in the upper-right corner of each section.
Pickup / Env
Use this tab to edit the settings for the emulated pickup and the
sound envelope.
Parameter Description
Pickup Type Type of pickup emulated. Pickup, 0–100% Electro-
alue Range
Static, 0–100% ElectroMagnetic
Height Height of the pickup to the tines. 0.0 – 5.0 mm
Distance Distance of the pickup to the tines. 0.1 – 10.0 mm
Clip Amount of clipping applied to the signal. 0–100%
Keytrack Ties the pickup parameters to the pitch being played.
0–100%
At higher values, the Distance is increased as the
pitch is increased.
Envelope
ttack Length of time for the note to reach full volume. 100–0% Hard,
0–100% Soft
Decay Length of time for the note to reach the sustained
100 ms – 20.0 s
volume.
Release Length of time for the note to become silent after
100 ms – 5.0 s
being released.
Peak Length Length of time full volume is held before decaying. 3 – 50 ms
Keytrack Ties the envelope parameters to the pitch being
0–100%
played.
At higher values, the envelope time is decreased as
the pitch is increased.
87
Page 88

V
V
–
A
V
V
A
V
V
Bell / Noise
Use this tab to apply and adjust the settings for the Bell and Noise sounds.
Parameter Description
alue Range
Bell Tune Pitch of the bell sound, in semitones above the root
0– 60 semitones
pitch.
Dry/PU Mix of Dry versus Pickup signal for the bell sound. -100% – 0% –+100%
olume Level of the bell sound. -inf dB – +6.0 dB
Tune Keytrack Ties the tuning of the bell sound to the pitches played. 0–100%
Decay How long it takes for the bell sound to dissipate 100 ms – 7.0 s
Keytrack Ties the amount of bell sound to the pitch being
-100% – 0%
+100%
played.
At negative values, the bell sound is increased as the
pitch increases.
At positive values, the bell sound is increased as the
pitch decreases.
Noise Freq Center frequency of the noise effect 200 Hz – 16.0 kHz
Random Amount of randomization applied to the noise effect 0–100%
Mix Level of noise effect present -inf dB – +6.0 dB
ttack Length of time for the noise effect to reach full level 1–50 ms
Decay Length of time for the noise effect to dissipate 100 ms – 3.00 s
Keytrack
Ties the Freq to the pitch being played.
0–100%
Setup
Use this tab to adjust general settings for the plugin.
Parameter Description
alue Range
Polyphony Number of voices available. 1–16 Voices
Master Volume Overall level of the plugin. -inf dB – +6.0 dB
elo Level
elo Tone Ties the incoming velocity to tone.
djusts how much incoming velocity is applied. 0–100%
0–100%
At higher values, increased velocity increases tone brightness.
elo Attack Ties the incoming velocity to the attack envelope.
0–100%
At higher values, low velocities feature longer attack times.
88
Page 89

V
A
A
A
V
A
A
A
Trem / Tube / Chorus
Use this tab to apply and adjust the settings for the built-in Tremolo, Tube (Over Drive), and Chorus effects.
Parameter Description
alue Range
Tremolo Rate Modulation speed of the effect.
Sync
When Sync is set to Free:
When Sync is set to Sync:
Sync the Tremolo Rate to the Global Tempo or let it
0.25 – 13.00 Hz
8/4 – 1/16
Free, Sync
run Free.
Mode
Select Pan for stereo field modulation, or Tremolo for
Pan, Tremolo
amplitude modulation.
Depth Amount of modulation applied. 0–100%
Tube Drive
Headroom
mount of drive applied. 0–100%
mount of gain reduction between the clean signal
-30.0 – 0.0 dB
and the driven signal.
Saturation
mount of saturation applied. 0–100%
Output Output level of the tube driven signal. -20.0 – 0.0 –+20.0 dB
Chorus Rate Modulation speed of the effect. 0.40 – 3.20 Hz
Depth Amount of pitch modulation of the effect. 0–100%
Mix Wet/dry amount of the chorus effect. 0–100%
Delay
Use this tab to apply and adjust the settings for the built-in Delay effect.
Parameter Description
Time
mount of time between the dry signal and the delayed signal.
Sync
Sync the Delay Time to the Global Tempo or set to Free to adjust Time
When Sync is set to Free:
When Sync is set to Sync:
alue Range
1 ms – 2.00 s
1/32 – 8/4
Free, Sync
by milliseconds.
Mix Wet/dry amount of the delay effect. 0–100%
Feedback
mount of signal fed back into the delay line. 0–100%
Damp Center frequency of where the delay signal will be dampened. 1.00 – 20.0 kHz
Reso
mount of resonance of the feedback signal. 0–100%
Reso Freq Center frequency for feedback resonance. 100 Hz – 10.0 kHz
Ratio
Reduces the delay Time in either the Left or Right stereo field. This is
L 50:100, R 50:100
useful for creating offset, panned delays.
HPF Center frequency for delay signal high-pass filter. 20.0 Hz – 1.0 kHz
Width Stereo width of delay signal. Higher values give wider stereo separation. 0–100%
89
Page 90

V
Spring Reverb
Use this tab to apply and adjust the settings for the built-in Spring Reverb effect.
Parameter Description
alue Range
Pre-Delay Length of time between dry signal and reverberated signal. 0 ms – 250 ms
Time Length of reverb tail. 1.0 – 10.0 s
Mix Wet/dry amount of the reverb effect. 0–100%
Diffusion Rate of increasing density of reverb reflections.
0–100%
At lower settings, the sound of individual reflections is more present.
At higher settings, reflections are more uniform.
Width Stereo width of reverb signal. Higher values give wider stereo separation. 0–100%
Low Cut Center frequency for reverb signal low-cut filter. 20.0 Hz – 1.00 kHz
90
Page 91

V
V
A
A
A
A
A
A
A
Hype
The AIR Hype plugin is a modern style dual-oscillator synthesizer that
includes a wide variety of built-in effects for endless combinations of
sound, as well as convenient macro controls for lightning-fast
adjustments.
Macro
Use this tab to adjust the macro settings for the plugin. You can
access the Effect on/off switches in all tabs.
Parameter Description
alue Range
Macros These six macro controls are unique to each preset.
Cutoff
Reso
Mod
Distortion
Delay
Reverb
Pumper
mount of filter cutoff applied. 0–100%
mount of filter resonance applied. 0–100%
mount of modulation effect applied. 0–100%
mount of distortion effect applied. 0–100%
mount of delay effect applied. 0–100%
mount of reverb effect applied. 0–100%
mount of pumper effect applied. 0–100%
aries
Master Master output volume. -inf – +6.0 dB
91
Page 92

V
r
A
A
A
A
V
A
Filter / Amp
Use this tab to adjust the filter and amplitude envelope settings.
Parameter Description
Cutoff Cutoff frequency for the filter. 0–100%
Filte
Reso Amount of resonance of the filter. 0–100%
Filter Envelope Attack Length of time for the filter to reach full level. 0–100%
Decay Length of time for the filter to reach sustain level. 0–100%
Sustain Length of time for the filter to hold sustain level. 0–100%
Release Length of time for the filter to dissipate when released. 0–100%
alue Range
Envelope
mount of Filter Envelope added to the filter cutoff. 0–100%
Depth
Envelope
Velocity
mount of effect the note velocity has on the filter
envelope.
mp Spike Applies additional velocity to the amplitude attack. 0–100%
Spike Decay Length of time for the Spike to decay. 0–100%
mp Envelope Attack Length of time for the note to reach full level. 0–100%
Decay Length of time for the note to reach sustain level. 0–100%
Sustain Length of time for the note to hold sustain level. 0–100%
Release Length of time for the note to dissipate when released. 0–100%
Fade Amount added to the envelope sustain level. 0–100%
elocity
mount of effect the note velocity has on the
amplitude envelope.
0–100%
0–100%
92
Page 93

V
A
A
Effects 1
Use this tab to adjust the settings for the Low-Frequency Oscillator and Modulation, Distortion and Hype effects.
Parameter Description
alue Range
LFO Rate Speed of the low frequency oscillator.
When Sync is set to 1st Note or Each Note:
When Sync is set to Temp+Note or Tempo+Beat:
Sync Enables or disables LFO sync, and sets how it is
synced when enabled.
0.03 – 30.00 Hz
8/4 – 1/64
Off, 1st Note, Each Note,
Tempo+Note,
Tempo+Beat
Depth Amount of LFO modulation applied. 0–100%
Mod Rate Speed of modulation. 0.05 – 20.00 Hz
djust Length of time the wet signal is offset from the dry
0.0 – 24.0 ms
signal.
Depth Amount of modulation applied. 0–100%
Mix Wet/dry mix of the modulation effect. 0–100%
Distortion Drive
mount of drive applied. 0–100%
Bias Emulates amount of voltage sent to a tube power-amp. -100 – 0 – 100%
Output Output level of the distorted signal. 0–100%
Mix Wet/dry mix of the distortion effect. 0–100%
Hype Low Dampens or maximizes low end frequencies. -12.0 – +12.0 dB
Lo-Mid Dampens or maximizes low-mid frequencies. -20.0 – +20.0 dB
Hi-Mid Dampens or maximizes high-mid frequencies. -20.0 – +20.0 dB
High Dampens or maximizes high end frequencies. -12.0 – +12.0 dB
93
Page 94

V
A
A
A
A
A
Effects 2
Use this tab to adjust the settings for the Delay, Reverb, Compressor, Pumper and Limiter effects.
Parameter Description
alue Range
Delay Time
mount of time between the dry signal and the
1/32 – 8/4
delayed signal.
Feedback
Freq Adjusts the filter cutoff frequency of the delayed
mount of signal fed back into the delay line. 0–100%
0–100%
signal.
Mix Wet/dry amount of the delay effect. 0–100%
L/R
Reduces the delay Time in either the Left or Right
L 50:100 – R 100:50
stereo field. This is useful for creating offset, panned
delays.
Reverb Pre-Delay Length of time between dry signal and reverberated
0.0 – 250.0 ms
signal.
Time Length of reverb tail. 0.0 – 30.0 s
Mix Wet/dry amount of the reverb effect. 0–100%
Compressor Threshold Signal level after which the compressor will be
-30.0 – +10.0 dB
applied.
Ratio Amount of compression applied. 1.0:1 – 20.0:1
ttack Length of time to apply the compression. 0–100%
Output
mount of additional output gain for the compressed
-20.0 – +20.0 dB
signal.
Pumper Rate Speed of the pumper effect. Bar, 1/2 – 1/32T
Depth Amount of signal attenuation by the effect. 0–100%
Release
mount of time to release the effect. 0–100%
Limiter Drive Amount of drive added after the limiter effect. 0.0 – 32.0 dB
94
Page 95

V
A
A
A
A
Setup
Use this tab to adjust the plugin setup parameters.
Parameter Description
alue Range
Setup Transpose Transposition of the plugin, in semitones. -36 – +36
Tune Fine tuning of the plugin, in cents. -100 – +100
Glide Time
mount of time to slide from the pitch of one note to
0 ms – 32 s
the next note played.
Glide Mode Enables or disables pitch gliding for all triggered notes
Off, Legato, On
or legato notes.
Mode Sets the plugin to polyphonic or monophonic Poly, Mono
Del-Rev Level of the delay and reverb signals. -inf – +6.0 dB
Master Overall level of the plugin. -inf – +6.0 dB
MIDI Control
Mod Wheel Destination Send Mod Wheel data to one of the following control
destinations.
Pitch, Cutoff, Reso, Amp,
Pan
Depth Amount of modulation applied.
When Destination is set to Pitch:
When Destination is set to Cutoff, Reso,
mp or Pan:
-12.0 – +12.0
-100 – 0 – 100%
LFO Ties the modulation to the Control LFO. Off, On
ftertouch Destination Send Aftertouch data to one of the following control
destinations.
Pitch, Cutoff, Reso, Amp,
Pan
Depth Amount of modulation applied. 0–100%
When Destination is set to Pitch:
When Destination is set to Cutoff, Reso,
mp or Pan:
-12.0 – +12.0
-100 – 0 – 100%
LFO Ties the modulation to the Control LFO. Off, On
Control LFO Sync Enables or disables Control LFO sync, and sets how
the Control LFO is synced when enabled.
Off, First Note, Each
Note, BPM & Note, BPM
& Beat
Rate Speed of modulation of the Control LFO.
When Sync is set to First Note or Each Note:
When Sync is set to BPM & Note or BPM & Beat:
0.03 – 30.00 Hz
8/4 – 1/64
Shape Waveshape of the Control LFO. Sine, Triangle, Sawtooth,
Square, S&H Random,
S&H Alternate, Random
Drift, Slow Drift
95
Page 96

V
A
TubeSynth
The AIR TubeSynth plugin emulates the sound of classic vintage
analog polysynths. TubeSynth is based on the highly acclaimed AIR
Vacuum Pro desktop synth plugin and also includes 5 integrated AIR
effects.
Oscillator
Use this tab to adjust the settings for the two variable Oscillators and
the Sub Oscillator.
Parameter Description
alue Range
Oscillator 1 Octave Coarse tuning of the oscillator by octaves.
Wide, 32', 16', 8', 4', 2'
The Wide setting provides additional Fine tuning
controls.
Fine Fine tuning of the oscillatorby semitones.
When Octave is set to Wide:
When Octave is set to 32'–2':
-70.00 – 0.00 –+70.00
-12.00 – 0.00 –+12.00
Shape Waveshape of Oscillator 1 (continuously variable) Triangle, Saw, Square, Pulse
F-EnvShape Amount of Filter Envelope output subtracted from
-100 – 0 – +100%
or added to the value defined by the Osc 1 Shape
parameter.
Quad Enables or disables four-voice emulation for the
Off, On
oscillator.
Detune
Adjusts tuning of the additional Quad voices.
Oscillator 2 Octave Coarse tuning of the oscillator by octaves, all the
0–100%
LFO, 32', 16', 8', 4', 2'
way down to LFO speed.
Fine Fine tuning of the oscillator.
When Octave is set to LFO:
0.01 – 20.00 Hz
When Octave is set to 32'–2':
-12.00 – 0.00 –+12.00
semitones
Shape Waveshape of Oscillator 2 (continuously variable) Noise, Saw, Square, Pulse
F-EnvShape Amount of Filter Envelope output subtracted from
-100 – 0 – +100%
or added to the value defined by the Osc 2 Shape
parameter.
Sync Enables of disables syncing of Oscillator 2 to
Off, On
Oscillator 1.
Micro Detune
Phase Position of the waveshape when the sound is
dditional detuning of Oscillator 2. 0–100%
0 – 360 degrees
triggered.
Sub Oscillator Shape Waveshape of the sub oscillator (continuously
Triangle, Saw, Square, Pulse
variable).
96
Page 97

V
A
Mixer / Filter
Use this tab to control EQ for Oscillator 2, set the levels of the oscillators and effects, and edit the low-pass filter.
Parameter Description
alue Range
Osc 2 EQ Gain
Amount of gain applied to the selected Frequency.
-48 – 0 – +48 dB
Frequency Center frequency for the equalization band. 25 – 10,000 Hz
Drive Amount of drive added to the EQ signal. 0–100%
Keytrack Ties the EQ settings to the pitch being played 0–100%
Mixer Osc 1 Level of Oscillator 1. 0–100%
Osc 2 Level of Oscillator 2. 0–100%
Sub Osc Level of the Sub Oscillator. 0–100%
Ring Mod Level of Ring Modulation effect. 0–100%
Drive Level of Drive effect. 0–100%
LP Filter Cutoff Center frequency of the low-pass filter cutoff. 0–100%
Reso Amount of resonance of the low-pass filter. 0–100%
Slope Amount of attenuation applied above the cutoff
0 – 24 dB/oct
frequency.
Saturation
Env Percentage of the envelope output subtracted from or
mount of saturation applied to the low-pass filter. 0–100%
-100 – 0 – +100%
added to the LP Filter Cutoff.
Keytrack
Ties the LP Filter Cutoff to the pitch being played.
0–100%
97
Page 98

V
A
A
A
A
Envelope
Use this tab to adjust the various envelope settings.
Parameter Description
alue Range
Filter Envelope
ttack Length of time for the filter to reach full level. 1.00 ms – 100 s
Decay Length of time for the filter to reach sustain level. 1.00 ms – 100 s
Sustain Level that a sustained note is held at, as a percentage
0–100%
of the maximum level.
Release Length of time for the filter to dissipate when released. 1.00 ms – 100 s
mp Envelope Attack Length of time for the note to reach full level. 1.00 ms – 100 s
Decay Length of time for the note to reach sustain level. 1.00 ms – 100 s
Sustain Level that a sustained note is held at, as a percentage
0–100%
of the maximum level.
Release Length of time for the note to dissipate when released. 1.00 ms – 100 s
Envelope 3 Start Level Initial velocity level of the envelope. 0–100%
Start Time Length of time for the envelope to start. 0–5000 ms
Slope Hold
mount of Envelope subtracted from or added to the
-100 – 0 – +100%
Destination when a note is held.
Slope Rel
mount of Envelope subtracted from or added to the
-100 – 0 – +100%
Destination when a note is released.
Destination Where the envelope will be applied to. Off, Pitch, Osc 2 Pitch,
LFO 1/2 Rate, Osc1 Quad
Det., Osc 1/2 Shape, Osc
1/2 Level, Ring Level
98
Page 99

V
/
LFO
Use this tab to adjust the settings for the low-frequency oscillators.
Parameter Description
alue Range
LFO 1
LFO 2 Shape Waveshape of the low-frequency oscillator. Sine, Square. Saw Up,
Saw Down, Pump, S&H,
Drift
Destination Where the low-frequency oscillator is sent.
LFO1:
Off, Pitch, Filter, Level,
Pan
LFO2:
Pitch, Osc 1/2 Shape,
Osc 1/2 Pitch, LPF, Quad
Detune, Osc 2 EQ Freq,
Osc 2 EQ Gain, Ring
Level
Rate Speed of modulation.
When Sync is Off:
When Sync is On:
0.01 – 20.00 Hz
8/4 – 1/32
Depth Amount of modulation applied. 0–100%
Fade Apply a fade-in or fade-out of the LFO signal. 0.00 – 20.00 s out,
No fade,
0.00 – 20.00 s in
Sync
Sync the LFO Rate to the Global Tempo or turn Off to
Off, On
adjust Rate by Hertz.
Modulation Source Where the modulation signal is sent from. Filter Env, Amp Env, Osc
1, Osc 2
Destination Where the modulated signal is received. Pitch, Osc 1/2 Shape,
Osc 1/2 Pitch, LPF, Quad
Detune, Osc EQ 2 Freq,
Osc 2 EQ Gain, Ring
Level
Depth Amount of modulation applied. -100 – 0 – 100%
99
Page 100

V
V
A
V
A
A
A
A
A
Setup
Use this tab to adjust plugin setup parameters.
Parameter Description
Controller Destinations
alue Range
elocity 1 Send Velocity data to one of the following control
destinations.
mp, Cutoff, Osc1
Shape, Osc2 Shape,
Osc1&2 Shape
Depth Amount of modulation applied. 0–100%
elocity 2 Send Velocity data to one of the following control
destinations.
mp, Cutoff, Osc1
Shape, Osc2 Shape,
Osc1&2 Shape
Depth Amount of modulation applied. 0–100%
Modwheel Send Modwheel data to one of the following control
destinations.
mp, Cutoff, Osc1
Shape, Osc2 Shape,
Osc1&2 Shape
Depth Amount of modulation applied. -100 – 0 – 100%
ftertouch Send Aftertouch data to one of the following control
destinations.
LFO 1 Depth, Cutoff,
Osc1 Shape, Osc2
Shape, Osc1&2 Shape
Depth Amount of modulation applied. -100 – 0 – 100%
Setup Polyphony Number of allowable voices, and how voices are
Legato, Retrigger, 2, 3, 4
triggered.
Bend Range Number of semitones up or down controlled by MIDI
2–12 (semitones)
pitch bend messages
Glide Time
mount of time to slide from the pitch of one note to
1.00 ms – 100 s
the next note played.
Glide All Enables or disables pitch gliding for all triggered
Off, On
notes, not just legato notes.
Detune
mount of detuning applied. This setting is only
0–100%
applied when Doubling is enabled.
Doubling Enables or disables voice doubling. Off, On
Output Shape Amount of signal sent to a Tube Drive. 0–100%
Width Stereo width of the audio signal. Higher values give
0–100%
wider stereo separation.
Level Overall output volume of the plugin. -inf dB – +12.0 dB
100
 Loading...